

Page 1
AUTOMATIC DRUM WASHING MACHINE
USER MANUAL
HW70-1401 HW70-1201
HW70-1001 HW60-1401
HW60-1201 HW60-1001
Page 2
10 - 1
5
0
6- 2
TABLE OF CONTENTS
BEFORE USE USING THE APPLIANCE MAINTENANCE
COMPONENTS> ............................... 03
PREPARATION> ................................ 04
SAFETY INSTRUCTIONS> ................... 05
INSTALLATION> ................................ 06
CONTROL PANEL> ............................ 08
LEGEND
Yes
No
Optional
For your safety, any instructions in this manual with this "Warning" sign must be followed strictly.
IMPORTANT DISPOSAL INSTRUCTIONS
As a responsible retailer we care about the environment. As such we urge you to follow the
correct disposal procedure for your product and packaging materials.
PROGRAM SELECTION> ..................... 10
CONSUMPTION AND TECHNICAL DATA> ..
WASHING METHODS> ...................... 12
CLEANING & CARE> .......................... 16
DISPLAY CODES> ............................. 18
11
TROUBLESHOOTING> ........................ 19
WIRING CIRCUIT> ............................ 20
This will help conserve natural recourses and ensure that it is recycled in a manner that protects
Because this product contains electronic components, the product and its accessories must be disposed of separately
from household waste when the product reaches its end of life.
Contact your local authority to learn about disposal and recycling. The product and packaging should be taken to your
local collection point for recycling. Some collection points accept products free of charge.
We apologise for any inconvenience caused by minor inconsistencies in these instructions, which may occur as a
resultof product improvement and development.
health and the environment.
You must dispose of this product and its packaging according to local laws and regulations.
Page 3
BEFORE US
E
COMPONENTS
Please read these instructions carefully before using this appliance. The instructions contain important information which will help you
get the best out of the appliance and ensure safe and proper installation, use and maintenance.
Keep this manual in a convenient place so you can always refer to it for the safe and proper use of the appliance.
If you sell the appliance, give it away, or leave it behind when you move house, make sure you also pass on this manual so that the
new owner can become familiar with the appliance and safety warnings.
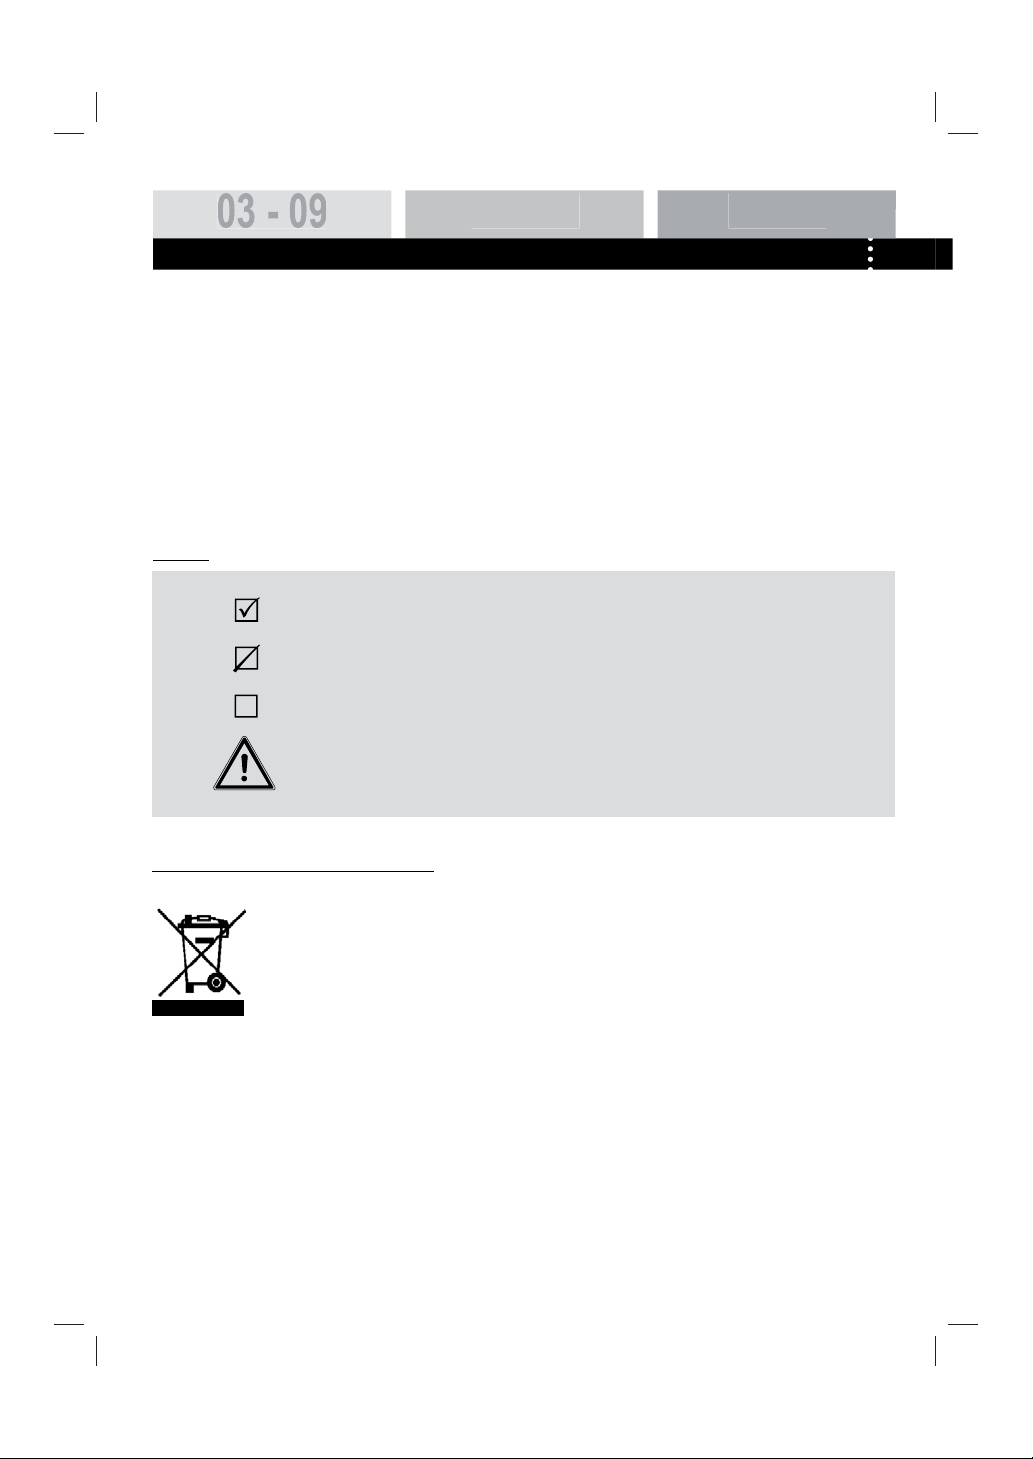
ACCESSORIES
Check the accessories and literature
in accordance with this list:
1x Inlet hose assembly
1x User manual
1x Warranty card(optional)
1x Drain hose bracket
HW60-1401-E
HW60-1201-E
Delay
4x Blanking plugs
Page 4
BEFORE USE
PREPARATION
PREPARING THE MACHINE
Remove all the packing materials to prevent unsteadiness, including the polystyrene base. Upon
opening the package, water drops may be seen on the plastic bag and the porthole. This is normal
phenomenon resulting from water tests in the factory.
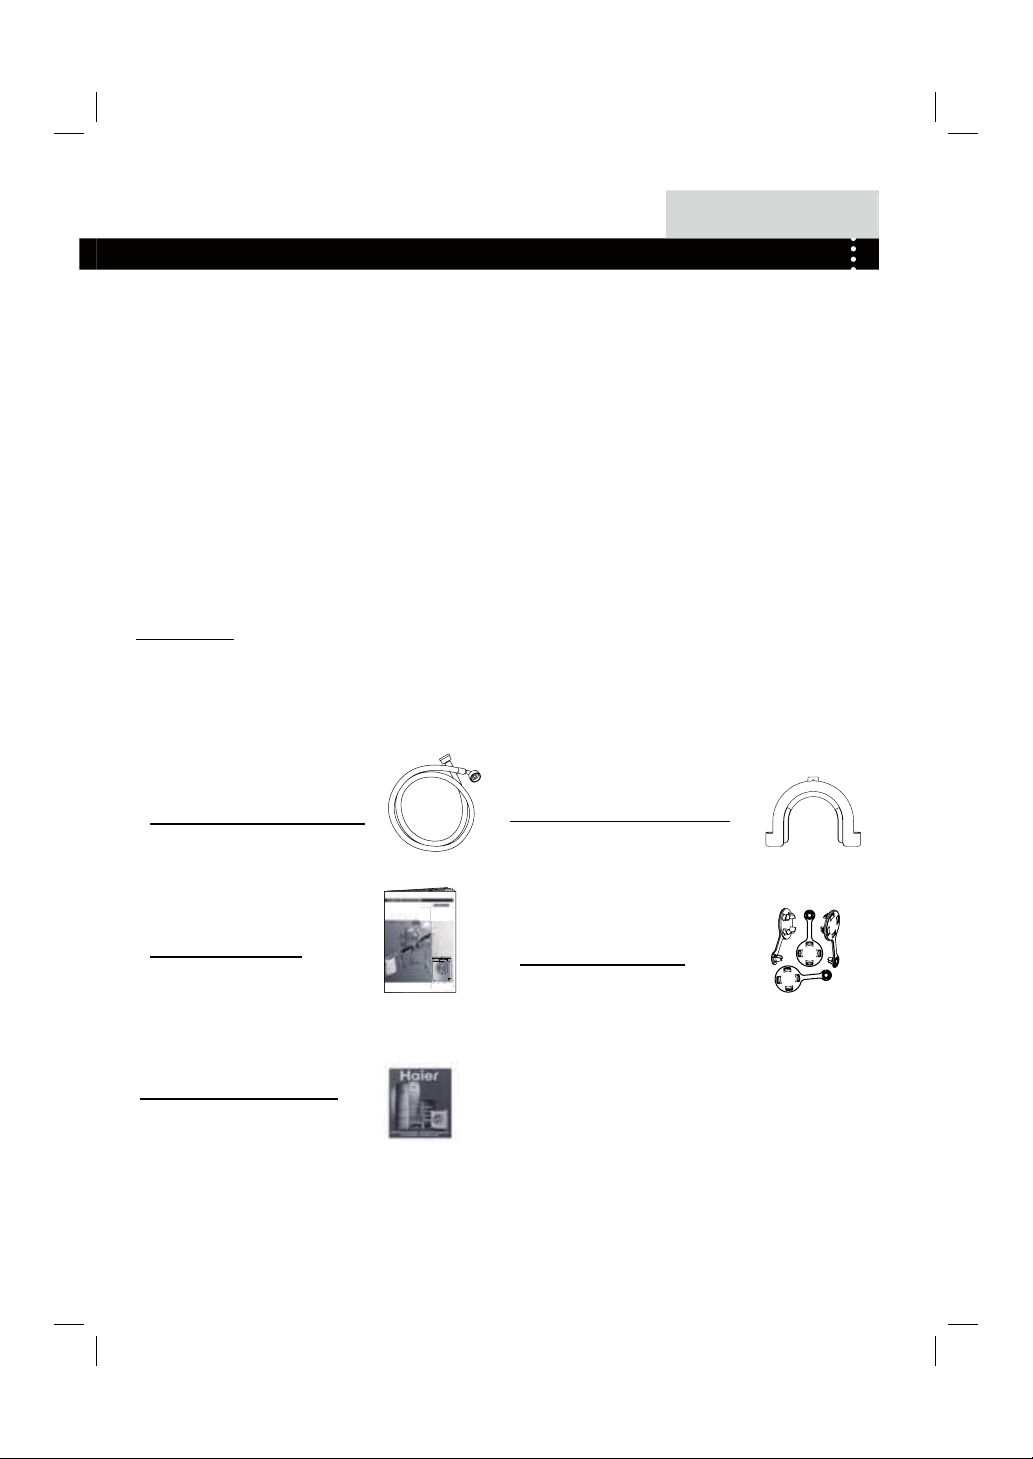
DESCRIPTION
This diagram may be slightly different from the layout of the washing machine you have just
purchased due to technical improvements.
Control panel
Door handle
Work top
Washer door
Start/Pause
Detergent distribution drawer
Filter cover
Drain hose
Water inlet valve
Power cord
Back cover screws
Back cover
Transportation bolts
T3
T1
S2
S3
S1
T4
S4
T2
Page 5
BEFORE US
E
SAFETY INSTRUCTIONS
BEFORE SWITCHING THE APPLIANCE ON FOR THE FIRST TIME
DO ...
... Make sure that the transport bolt are removed.
... Use a separate earthed socket for the power supply.
... Make sure that the plug is accessible.
... Hold the plug and not the electric cable when
unplugging the power supply.
... Make sure that the fuses in the power circuit are rated
for 15A.
... Keep away from heat sources and direct sun light to
prevent plastic and rubber components from aging.
... Make sure that the power cord is not caught under or
in the appliance and avoid damage to the power cable.
... Check that hose joints and connections are fi rm and no
water can leak. If joints are loose or there is leakage, turn off the
water supply and refi x. Do not use the washing machine until the
hoses are properly fi xed.
DURING DAILY USE OF THE APPLIANCE
DO ...
... Pull up zips and fi x loose threads to prevent the items
from being entangled. If necessary, put small items into a net bag
or pillow.
... Turn off the machine after each wash program and
switch it off at the mains to save electricity and for safety. Wipe
clean the lower part of the porthole.
... Keep the door slightly open when the washing machine
is not in use to prevent formation of odours.
... Let the power cord be replaced by the manufacturer, his
service agent or other accordingly qualifi ed persons, in case it is
damaged.
... Ensure that the appliance is not used by persons
with reduced physical, sensory or mental capabilities, lack of
experience and knowledge without supervision or instruction by a
person responsible for their safety.
... Supervise children to ensure that they do not play with
the appliance.
DO NOT ...
... Touch or use the appliance when barefoot or with wet
or damp hands or feet.
... Use fl ammable detergent or dry cleaning agent.
... Use any fl ammable sprays in close vicinity to the
appliance.
... Remove or insert the plug in the presence of fl ammable
gas.
... Allow children or infi rm persons to play with the appliance
or packing materials.
... Install the appliance outdoors in a damp place, or in an
area which may be prone to water leaks such as under or near a
sink unit. In the event of a water leak allow the machine to dry
naturally.
... Place the washing machine directly on a carpet, or close
to a wall or furniture.
DO NOT ...
... Touch the washer door during the washing process - it
gets hot!
...Place heavy objects or sources of heat or damp on top
of the appliance.
... Hot wash foam rubber or sponge-like materials.
... Open the detergent distribution drawer during the wash
cycle.
... Force the washer door open. The door is fi tted with a
self-lock device and will open shortly after the washing procedure
is ended.
... Open the washer door if the water level is visibly
over the porthole.
... Cover the washing machine with plastic cover so that
inside dampness cannot be kept in.
Page 6
BEFORE USE
INSTALLATION
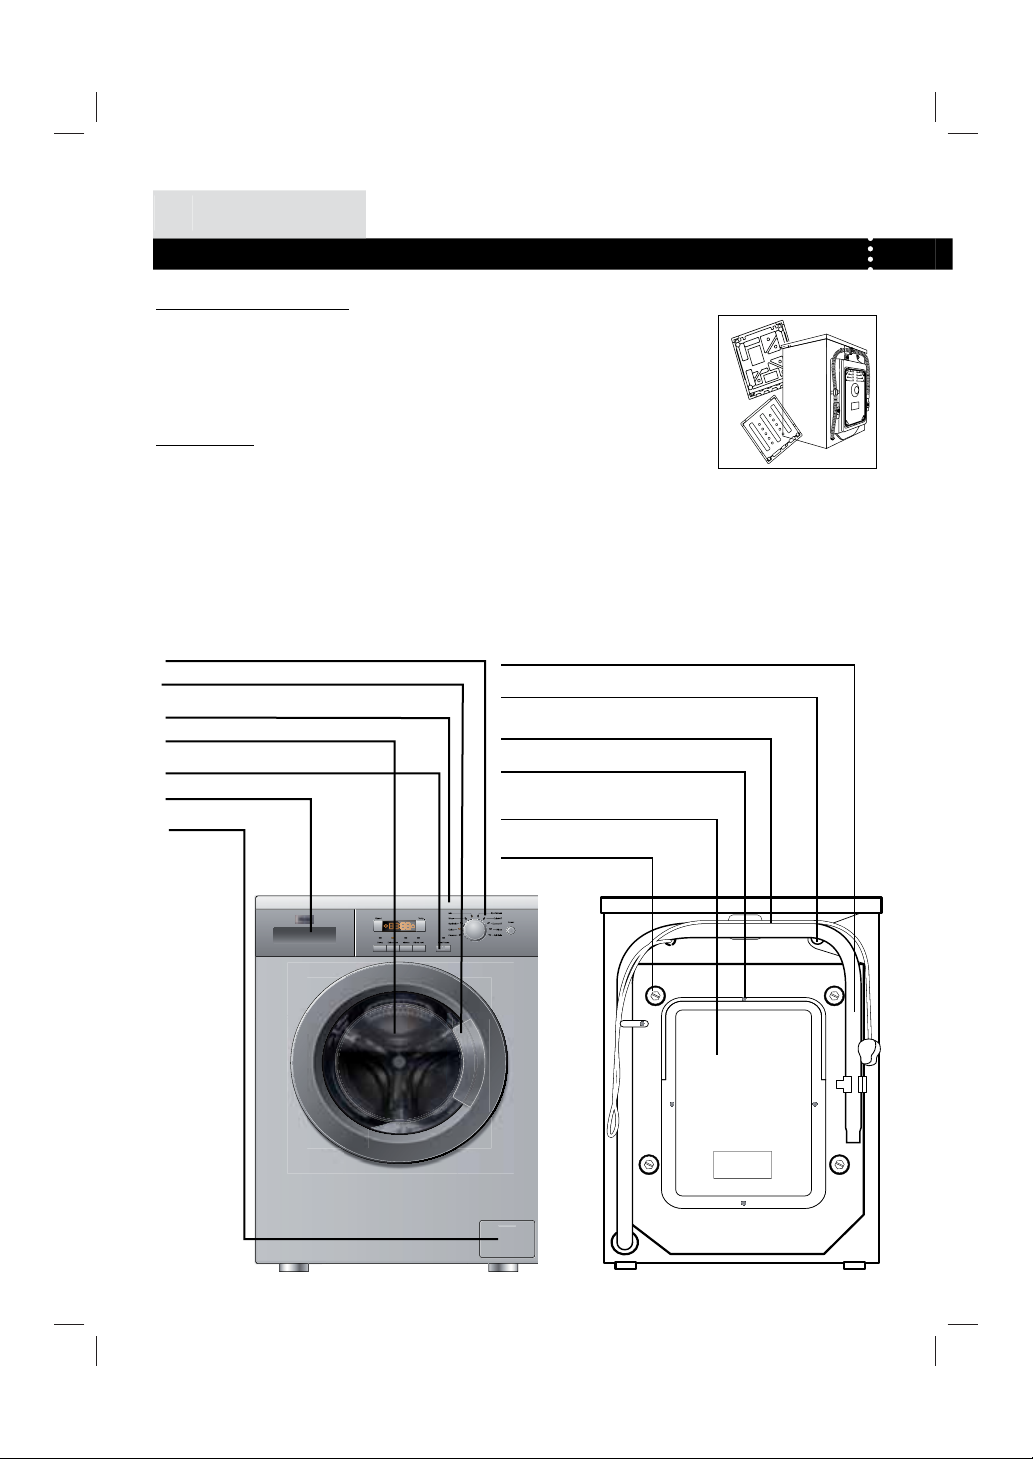
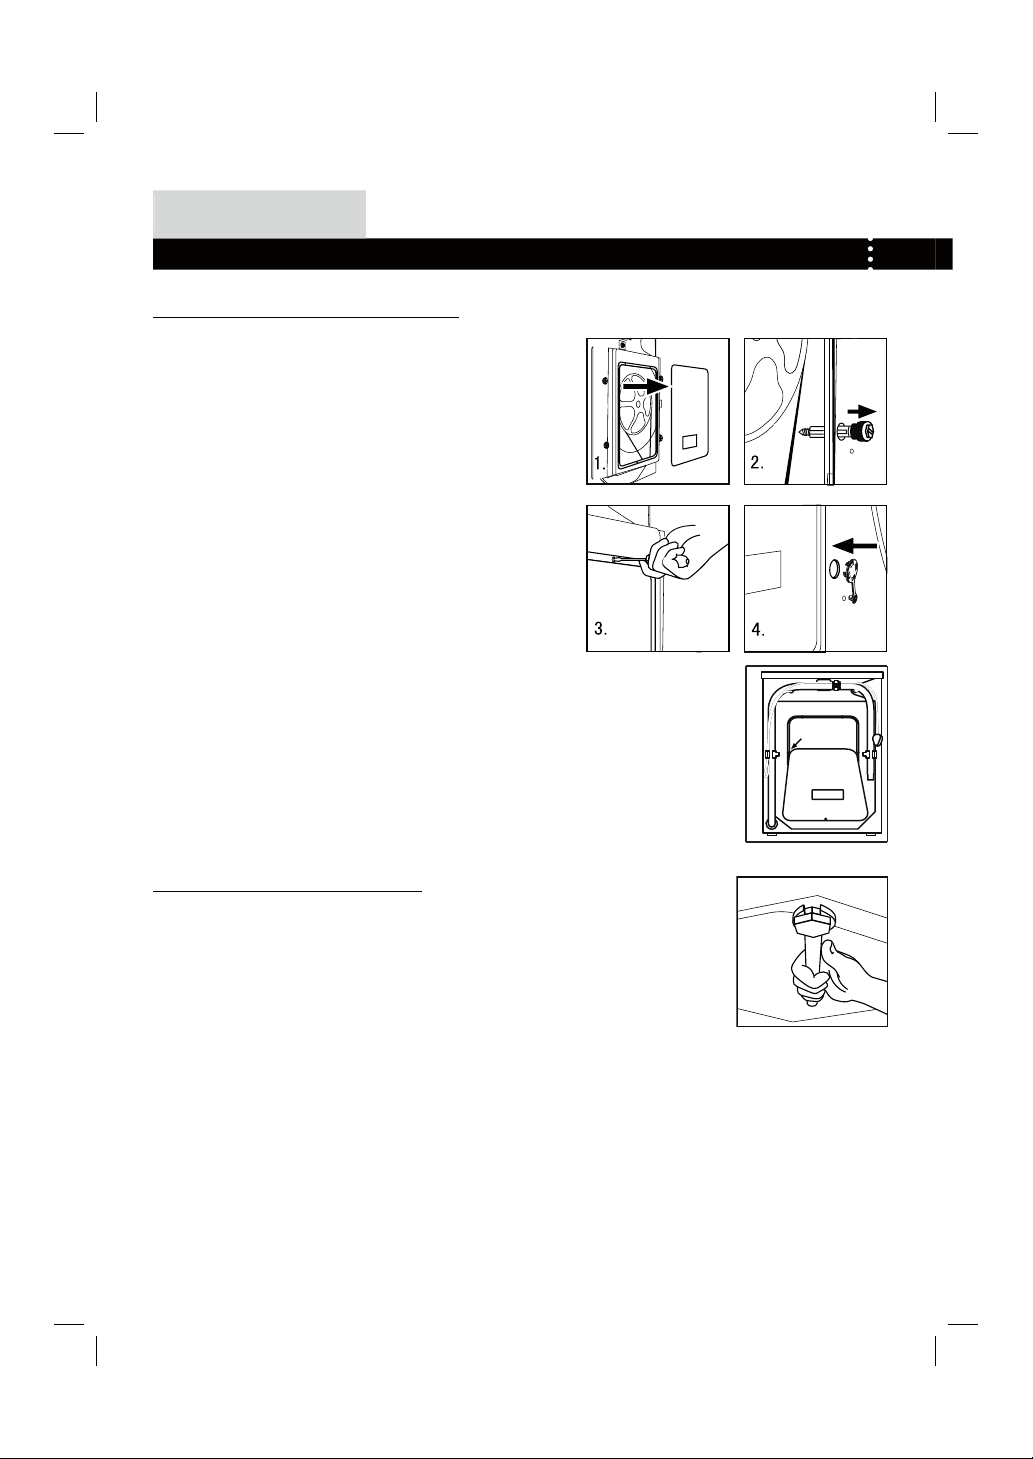
DISMANTLE THE TRANSPORTATION BOLTS
The transportation bolts are designed for clamping anti-vibration components
inside of the washing machine during the transportation process.
Remove the back cover.1.
Remove the four bolts on the rear side and take out the synthetic 2.
stabilisers from within the machine.
Replace the back cover.3.
Fill the holes left by the bolts with blanking plugs.4.
Note:
1.Please pull out the power plug before removing the
transportion bolts.
2.When you replace the back cover,the convexity must face
to outside, and you have to insert the back cover from the
two gaps as shown in fi g.5.
3.Keep the transportation bolts and synthetic stabilisers
in a safe place for later use.
ADJUSTING THE WASHING MACHINE
There are adjustable feet under the bottom of the washing machine. Before use, they should be
adjusted so that the machine is level. This will minimise vibrations and thus noise during use. It will
also reduce wear and tear. We recommend using a spirit level to level the appliance.The fl oor should
be as stable and fl at as possible.
fi g.5.
Page 7
BEFORE US
E
1.
2.
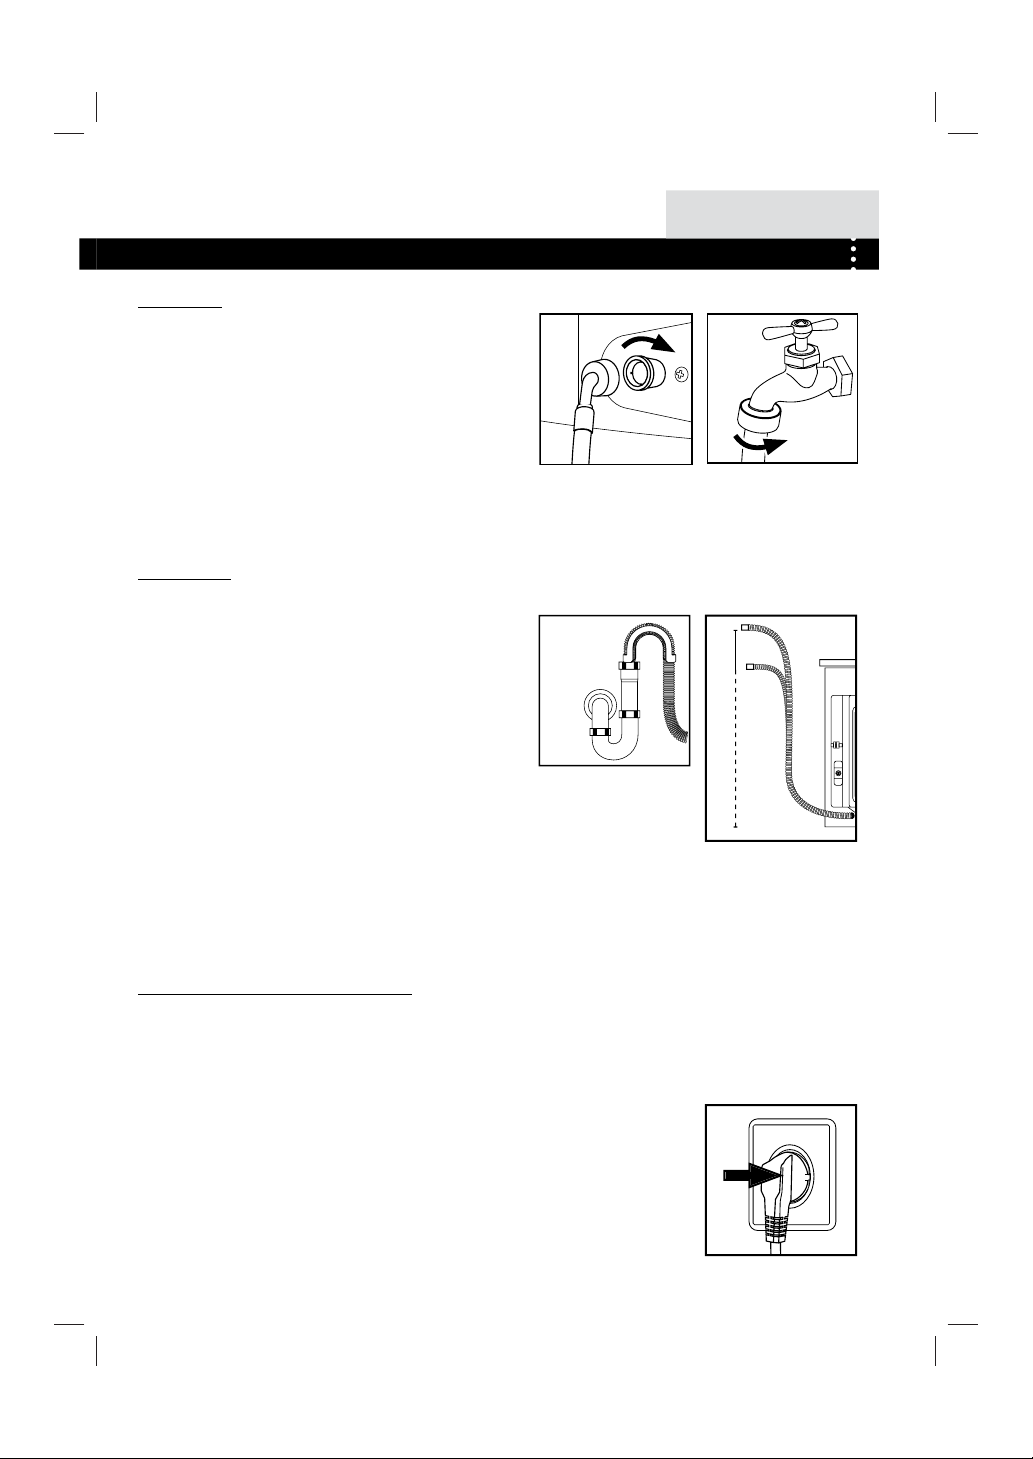
INLET HOSE
1. Connect the nut on the inlet hose to the connector on the water
valve.
2. Apply inlet hose to a water tap with cold, fresh water.
7
Note: Use the hose-set supplied with the appliance.
Old hose-sets should not be reused.
DRAIN HOSE
1. Use the drain hose bracket to keep the end of the drain hose
retained and prevent the outfl ow of water. Don't extend the length
of the drain hose; if an extended hose is required, please consult a
serviceman.
2. The height of the drainage outlet must be 80-100 cm. Fix the
drain hose to the clip at the back of the washing machine to prevent
it from dropping off.
Note: The drain hose should not be submerged in water and should be securely
fixed and leak-free. If the drain hose is placed on the ground or if the pipe is at
a height of less than 80cm, the washing machine will continuously drain while
being filled (self-siphoning).
CONNECTING TO THE POWER SUPPLY
1.
1.
2.
80 - 100 cm
2.
Before connecting to the power supply, check:
¬ The socket is adequate for the maximum power of the washing machine
(For safety, fuses in the power circuit should be rated for no less than 15A).
¬ The voltage should meet the requirement.
¬ The power outlet should be capable of accepting the washing machine plug.
¬ Connect the machine to an earthed socket outlet.
Page 8
CONTROL PANEL
BEFORE USE
G
D
F
K
E
I
H
J
C
A
B
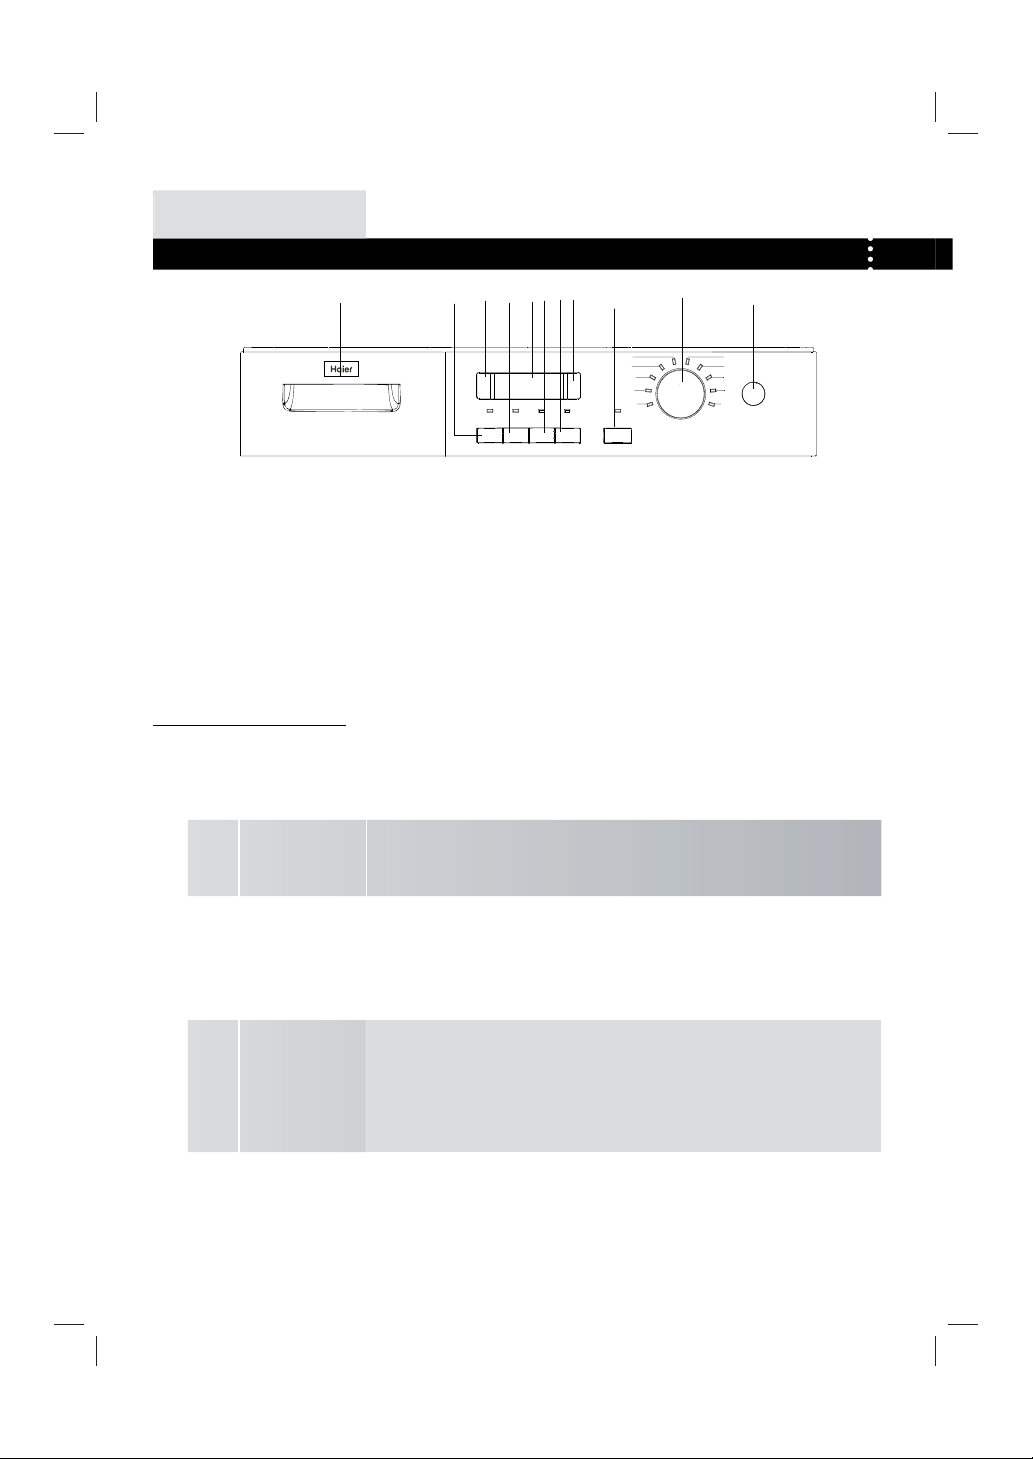
A Program knob
B Power Switch
C Start/Pause button
D Spinning Speed Setting button
E Washing temperature button
Velocidad
Mixto
Inicio/Pausa
Lana
Sintético
Algodón
Prelavado
Temperatura
Inicio
Aclarado
Parada
Intensivo
Diferido
Extra
cuba llena
G Detergent distribution drawer
H Display
I
Intense button
J Extra rinse button
K Rinse hold
Deportivo
Rápido 40’
Express 15’
Aclarado
Centrifugado/
Vaciado
Inicio
F Delay Button
OPERATIONAL FUNCTIONS
A ¬ Program knob _By turning the knob clockwise/counterclockwise, the required program can be selected.
There are 10 programs available. After a program is selected, the corresponding light will
go on.
B ¬ Power Switch _ Press this button to switch on the washing machine. Press it again to switch it off.
Press this button gently for 2 seconds to switch off the machine as buttons are soft touch
sensitive.
C ¬ Start/Pause
Button
_ When the washing machine is connected to the power socket and a program is selected,
lightly touch this button to start operation. During a wash cycle, touch it lightly ,operation
will stop and the digits on the screen start blinking. Touch it again to resume operation. To
cancel a wash program during a wash cycle, touch this button, when the digits on the screen
start blinking, press the Power switch, the program will be cancelled.
D ¬ Spinning Speed
Setting Button
_ Touch this button lightly to select the desired speed. When a speed is set, it will be
displayed on the display screen.
E ¬ Washing
temperature button
Note: Different water temperatures and spinning speeds can be set for
different laundries. Wash using the default settings if there is no special
requirement.
_ Touch this button lightly, the washing temperature will be displayed on the display screen.
Select a temperature according to the type of laundry.
Page 9

BEFORE US
E
F ¬ Delay Button Touch this button lightly, the washing machine will start operation after a period of time
and the corresponding indicator will go on. The range is 0.5-24 hours; each touch of this
button increases a half hour. After the button is set, press the Start/Pause button to start
countdown of the set time (the time is displayed on the screen until the program ends).
Note:The delay time must be longer than the program time;otherwise,the
washing machine will start the wash program directly.
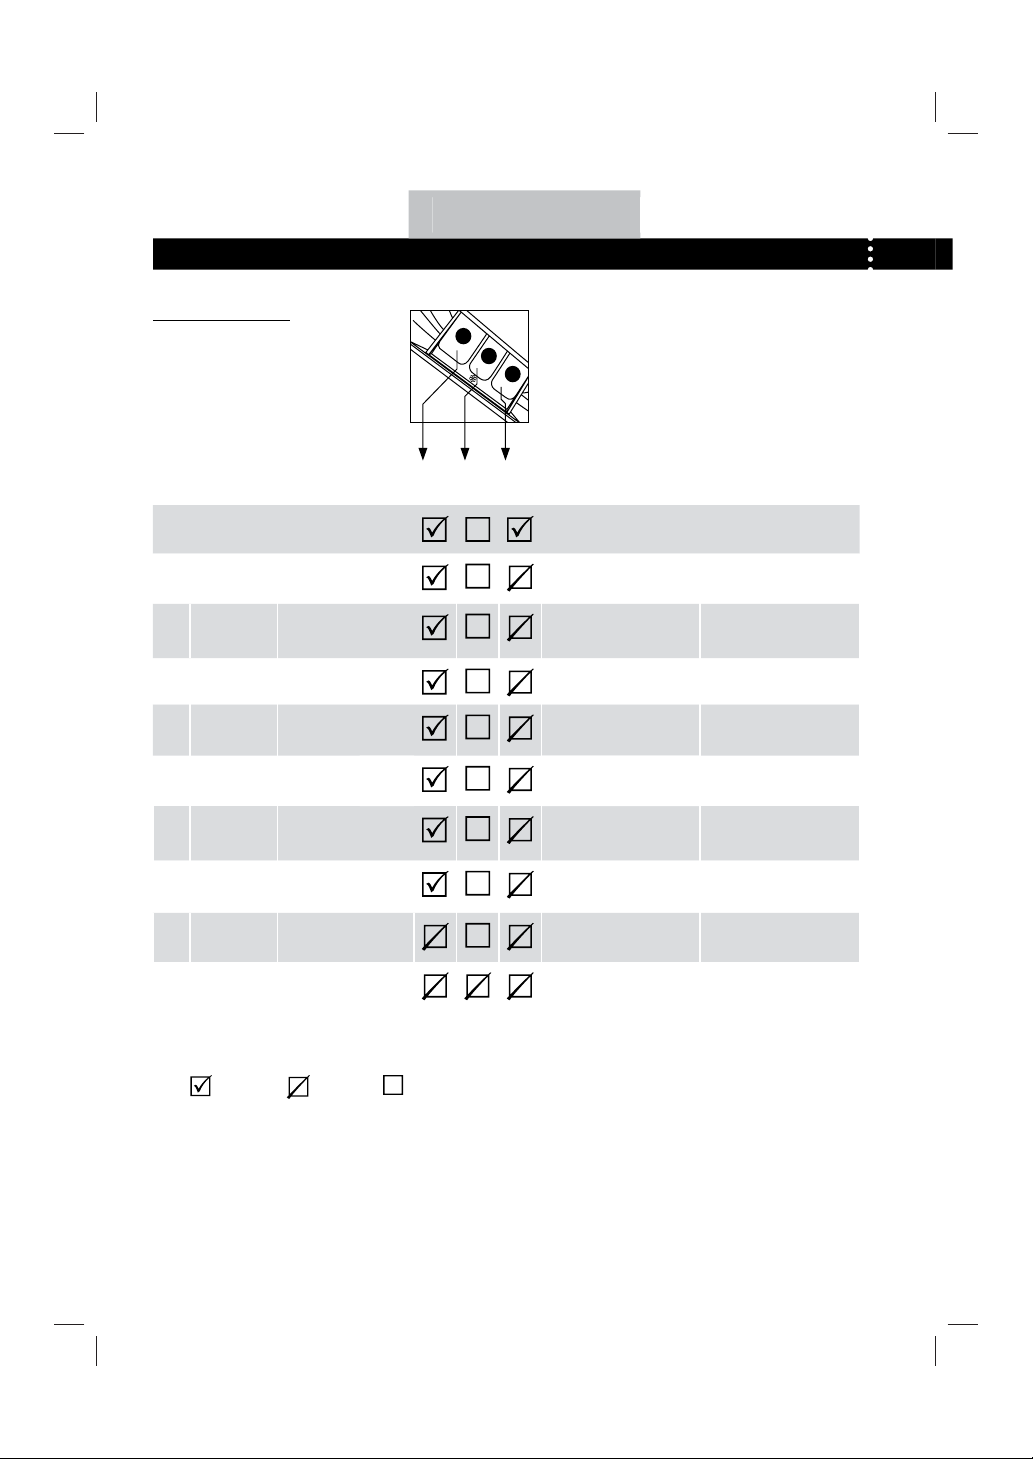
G ¬ Detergent
distribution drawer
H ¬ Display _Information as remaining wash time and error messages will be shown here.
I ¬ Intense button If the laundry is heavily soiled, press this button before starting the program. When the
_Open the drawer, three compartments can be
seen:
Compartment 1: Prewash detergent
Compartment 2: Detergent for programs 1 to 8.
Compartment 3: Softener, conditioning agent, perfume, etc.
Note: After power is switched on, the display will go on and the
remaining wash time decreases. As the water pressure and temperature
may differ, the remaining time maybe adjusted accordingly. When the
laundry is not balanced during spinning, the time may be automatically
prolonged. These are normal phenomena.
button is pressed, the washing time increases.
2
2
3
1
1
9
J ¬ Extra rinse button Press this button, the washing machine will perform additional rinses. Press the
K ¬ Rinse hold
button once to select one additional rinse. The display will show"P-1". Press the button
repeatedly and the screen will display "P-2''or "P-3'', indicating two or three additional
selected rinses. The "extra rinse light" is activated and fl ashes during the performance.
"P-1/2/3" is displayed alternating with the remaining time. The light turns off and the
display disappears when the extra rinse ends.
Note:Select this function when programe 1-9 is selected.
Touch this button lightly,the indicator will go on.When the washing machine is at the
last rinsing operation,it will not drain but to start a soaking cycle.If you want to spin the
laundry,press this button or the “start/pause”button again,the indicator will go off and
operation will resume.Note:Select this function when “Prewash,Cotton,Synthetic,Mix,Sp
ort”Programmes are selected.
Page 10
0
E
SING THE
APPLIANC
PROGRAM SELECTION
PROGRAM MODES
2
2
3
1
Temperature
Program Maximum Preset 2 3 1 Recommended Laundry
1 ¬ Prewash - - to 90 °C
40°C
1 Detergent compartment for prewash mode
1
2 Detergent compartment
3 Compartment for softener and
other additives
Heavy soiling 1000 rpm
Preset spin speed
2 ¬ Cotton - - to 90 °C
3 ¬ Synthetic - - to 60 °C
4 ¬ Wool - - to 40 °C
5 ¬ Mix - - to 60 °C
6 ¬ Sport - - to 40 °C
7 ¬ Quick - - to 40 °C
8 ¬ Express 15 - - to 30 °C
9 ¬ Rinse - - - -°C
10 ¬ Spin/Drain - - - -°C
Yes No Optional
40°C
40°C
- -°C
30°C
30°C
- -°C
- -°C
Cotton fabrics 1000 rpm
Cotton or synthetic 1000 rpm
Woolen fabrics 600 rpm
Different materials 1000 rpm
Sports wear 1000 rpm
Slight-soil cotton, linen
and synthetic fabrics
Fast colour synthetic 800 rpm
/ 1000 rpm
/ 1000 rpm
1000 rpm
Page 11

1
SING THE APPLIANC
E
CONSUMPTION AND TECHNICAL DATA
CONSUMPTION TABLE
The wash cycle times are intended as a guide only. The actual time used may vary due to different water pressure, initial water
temperature, etc.
1
MAX.
PROGRAM
¬ Prewash
Cotton
¬
Synthetic
¬
¬ Wool
¬ Mix
¬ Sport
¬ Quick
¬ Express15
)
*
EN 60456 test program / Energy label program with Standard 60°C and max. spin speed and
function
TECHNICAL DATA
Power source
Max. working current (A) 10 10
Water pressure (MPa) 0.03≤P ≤1 0.03≤P ≤1
Nominal load (kg) 7 6
Spinning speed (r/min) 1400/1200/1000 1400/1200/1000
Washing programs 10 10
Max power (W) 2000 2000
Dimensions (HxDxW mm)
Net weight (kg) 70 65
LOAD
6kg/7kg 1.0kwh/0.945kwh 74L/75L 40°C 1:46
6kg/7kg 0.75kwh/0.75kwh 60L/56L 40°C 1:28
3kg/3.5kg 0.54kwh/0.485kwh 38L/41L 40°C 1:10
1kg/1kg 0.035kwh/0.034kwh 44L/46L - -°C 0:50
3kg/3.5kg 0.29kwh/0.251kwh 44L/41L 30°C 1:10
3kg/3kg 0.31kwh/0.282kwh 35L/36.5L 30°C 1:25
1kg/2kg 0.06kwh/0.065kwh 33L/37.5L - -°C 0:40
1kg/2kg 0.02kwh/0.02kwh 20L/22L - -°C 0:15
.
ENERGY
CONSUMPTION
HW70-1401
HW70-1201
HW70-1001
220 - 240V~/50Hz 220 - 240V~/50Hz
850 x 600x 595 850 x 520 x 595
WATER
CONSUMPTION
HW60-1401
HW60-1201
HW60-1001
TEMPERATURE
WASHING
TIME
Intense
Page 12
2
E
SING THE
APPLIANC
WASHING METHODS
PLEASE NOTE
This washing machine is for domestic use only. If the machine is use for commercial purpose the guarantee
will not be valid anymore.Do not use it for purposes other than that for which it was designed. Follow the
instructions given on the label of each garment and wash only machine-washable garments.
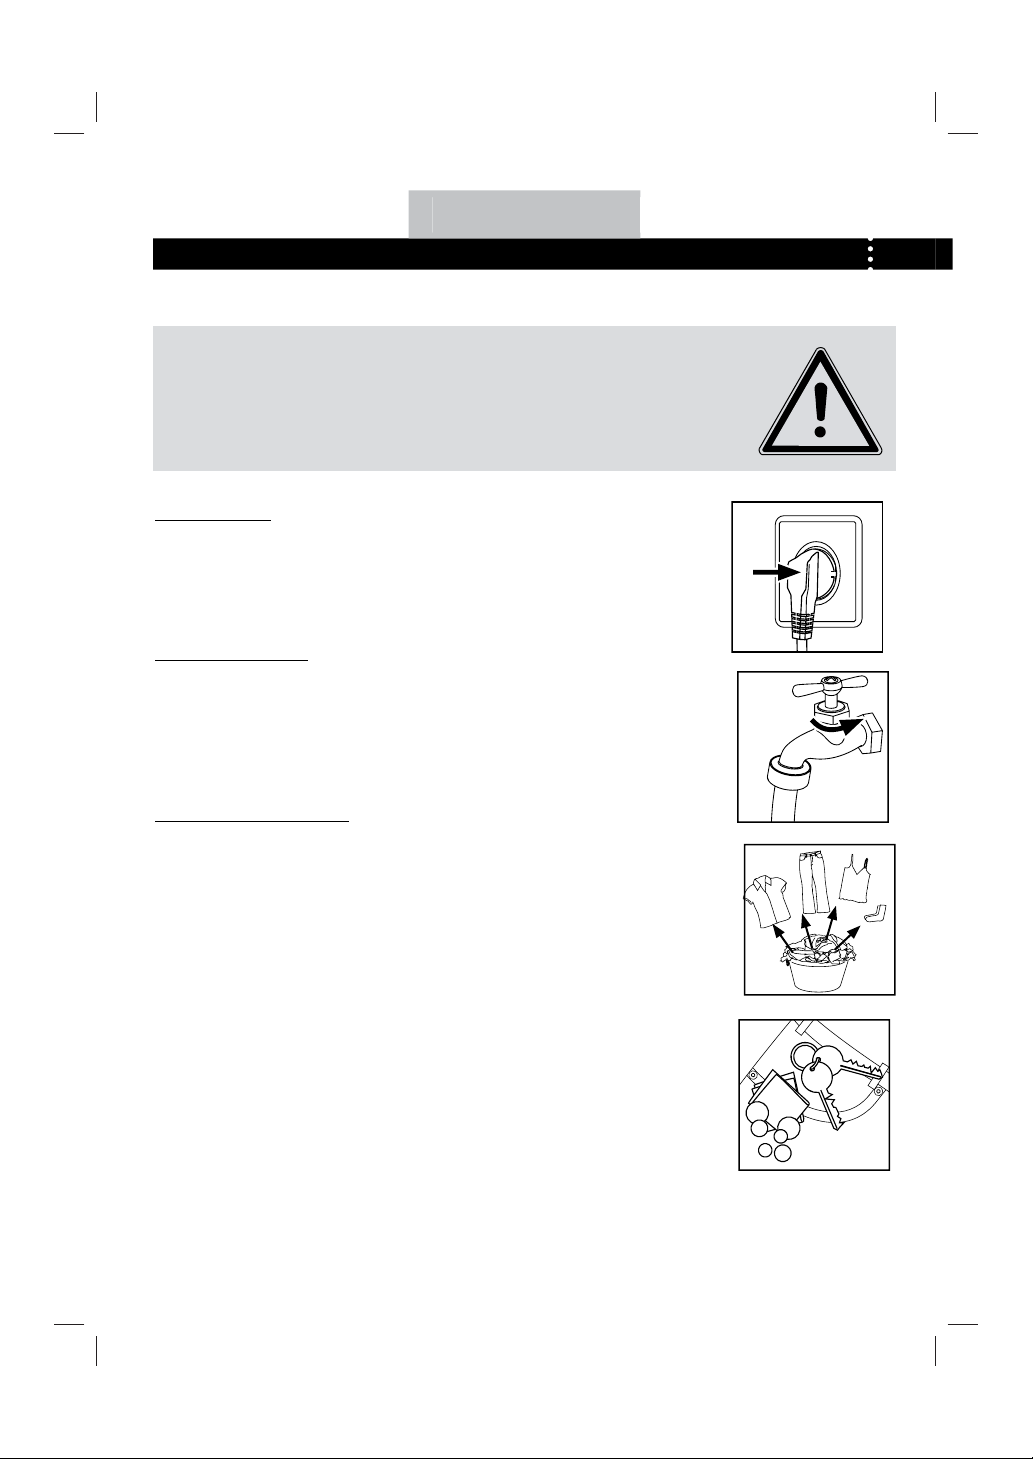
POWER SUPPLY
Connect the washing machine to the power supply (220V to 240V~/50Hz).
WATER CONNECTION
Turn on the tap. The water must be clean and clear.
Note: Before use, check for leakage in the joints between the tap and the inlet
hose by turning on the tap.
PREPARING THE LAUNDRY
¬ Sort out clothes according to fabric (cotton, synthetics, wool or silk) and to how dirty they are.
¬ Separate white clothes from coloured ones. Wash them fi rst by hand to check if they fade or run.
¬ Empty pockets (keys, coins, etc.) and remove the harder decorative objects (e.g. brooches).
Attention: Small parts (like buttons, etc) may lead to repair work which user
has to pay by themselves and can cause damage in the machine.
¬ Garments without hems, underwear, fi nely woven textile such as fi ne curtains are to be put into
wash bag (it is better not to wash them in a washing machine).
¬ Close zippers and hooks, make sure the buttons are sewn on tightly and place small items such
as socks, belts, bras, etc. in the wash bag.
Unfold large pieces of fabric such as bed sheets, bedspreads, etc.
¬
¬ Turn shirts inside out.
Page 13

3
SING THE APPLIANC
E
LOADING THE MACHINE
Open the washer door, put in the laundry piece by piece. Close the door tightly.
¬ When fi rst using the washing machine, let it run unloaded for one program to prevent the laundry from
being tainted by oil or dirty water from the washing machine. Before washing you should run the machine
without laundry, but with detergent, with 60°C programm.
¬ Do not overload the washing machine.
SELECTING DETERGENT
The washing effi ciency and the performance is determined by the quality of detergent used. Special nonfoaming detergent produces good washing results. Use specifi c detergents for synthetic and woollen goods.
Do not use dry cleaning agents such as trichloroethylene and similar products.
Note: Do not add more detergent than needed. Please follow the dosage
recommendation on the detergent package.
ADDING DETERGENT
1
Slide out the detergent drawer and put the required detergent and softening agent into the corresponding
compartments. Push back the drawer gently. (Refer to the instructions on the drawer)
2
2
Caution:
¬ For prewashing program, detergent should be added to both compartments 1 and 2.
For other programs, do not add detergent to compartment 1.
¬ Use liquid detergent according to the instructions on its package. Do not use liquid detergent if the
prewash mode or "Delay" is selected.
¬ Do not overuse softener; otherwise, it will damage the artifi cial fi bers.
SELECTING PROGRAM
Inicio/Pausa
Mixto
Lana
Sintético
Algodón
Prelavado
To get the best washing results, an appropriate washing program should be selected according to the
laundry type. Please turn the program knob to select the right program.
SELECTING FUNCTIONAL
Select the required options. (Refer to the "Control panel" pages 08 and 09)
3
1
1
Deportivo
Rápido 40’
Express 15’
Inicio
Aclarado
Centrifugado/
Vaciado
Page 14

E
SING THE
APPLIANC
SETTING WASHING TEMPERATURE
Press and hold down the temperature button until the desired
temperature is selected .
Velocidad
Inicio
Diferido
Aclarado
Extra
Intensivo
Temperatura
Parada
cuba llena
SETTING SPIN SPEED
Press and hold down the speed button until the desired speed is selected.
Velocidad
Temperatura
See "Operational functions" on the "Control panel" pages (08 and 09)
for selecting temperature and spin speed. It is advisable to select the
recommended value.
Inicio
Aclarado
Parada
Intensivo
Diferido
Extra
cuba llena
WASHING
Press the Start/Pause button. The washing machine will operate
Velocidad
Temperatura
according to the preset programs. The washing machine will stop
operation automatically when a washing cycle ends. The "End" sign will
appear on the display. Open the washer door and take out the laundry.
Inicio
Aclarado
Parada
Intensivo
Diferido
Extra
cuba llena
AFTER WASHING
Turn off the water supply and unplug the power cord. Open the washer door to prevent formation of
moisture and odours. Let the door open while not used.
Inicio/Pausa
Inicio/Pausa
Inicio/Pausa
Mixto
Lana
Sintético
Algodón
Prelavado
Mixto
Lana
Sintético
Algodón
Prelavado
Mixto
Lana
Sintético
Algodón
Prelavado
Deportivo
Rápido 40’
Express 15’
Aclarado
Centrifugado/
Vaciado
Aclarado
Centrifugado/
Vaciado
Deportivo
Rápido 40’
Express 15’
Deportivo
Rápido 40’
Express 15’
Aclarado
Centrifugado/
Vaciado
Inicio
Inicio
Inicio
TIPS FOR SAVING ENERGY
Collect clothes for one full wash load.1.
Avoid overloading the washing machine.2.
Prewash only heavily soiled clothes.3.
Reduce the amount of detergent or choose4.
Express 15 or Quick wash programs for slightly soiled clothes.
Choose a proper washing temperature. Modern detergents can wash with very good result already in lower 5.
temperature than 60°C. Only use higher temperature than 60°C for heavily soiled laundry.
Follow the dosage recommendation on the detergent package to avoid using too much detergent.6.
Page 15

5
SING THE APPLIANC
E
CARE CHART
1
Resistant material
Delicate fabric
Washable at 95 °C
Washable at 60 °C
Washable at 40 °C
Washable at 30 °C
Hand wash
Dry clean only
Wool Seal
LOAD REFERENCE
Bed sheet (single) Cotton Approximately 800g
Blanket Wool Approximately 3000g
Blended fabric clothes / Approximately 800g
Jackets Cotton Approximately 800g
Bleachable in cold water
Do not bleach
Iron at 200 °C
Iron at 150 °C
Iron at 100 °C
Don't iron
Dry cleaning with any solvent
Dry cleaning with pericloride
Dry cleaning with aviation fuel
Don't dry clean
Dry fl at
Hung to dry
Dry on clothes hanger
Tumble dry, normal heat
Tumble dry, reduced heat
Don't tumble dry
Jeans / Approximately 800g
Overalls Cotton Approximately 950g
Ladies Pyjamas / Approximately 200g
Shirts / Approximately 300g
Socks Blended fabrics Approximately 50g
T-Shirts Cotton Approximately 300g
Underwear Blended fabrics Approximately 70g
Page 16

1.
2.
AINTENAN
CE
3.
2.
4.
CLEANING & CARE
AFTER WASHING
Turn off the water supply and pull out electricity plug after each wash.
Open the washer door to prevent formation of moisture and odours. If
the washing machine is left idle for a long period, drain the water in
the machine and replace the drain hose.
CLEANING THE DETERGENT DRAWER
Clean the detergent distribution drawer regularly.
1.
2.
.
1
Swing out the drawer, fl ush it clean with water and then replace it.
CLEANING THE MACHINE
Unplug the machine during cleaning and maintenance. Use a soft cloth
dampened with soap liquid to clean the machine case and rubber components. Do not use organic chemicals or corrosive solvents.
CLEANING THE FILTER
Clean the fi lter once a month:
1. Open the bottom cover.
2.Remove the fi lter by turning counterclockwise.
3.Flush the fi lter clean with running water.
4.Replace the fi lter by turning clockwise and
remount the cover.
Caution:
1.The filter must be in place, or it may lead to leakage.
1.
2.
2.
2.Place a container under the drain pump filter, to collect
any excess water that may come out of the drain pump
when the filter is removed.
3.
4.
Page 17

AINTENAN
CE
WATER INLET VALVE AND INLET VALVE FILTER
To prevent blockage to the water supply by ingress of foreign substances, clean the water inlet valve and
inlet valve fi lter regularly.
MOVING THE MACHINE
If the machine is to be moved to a distant location, replace the transportation bolts removed before
installation to prevent damage as shown below.
Remove the back cover.1.
Remove the blanking plugs.2.
Insert the synthetic stabilisers and the transportation bolts. 3.
Tighten the bolts with a spanner.
Replace the back cover.4.
1.
17
2.
3.
LONG PERIODS OF DISUSE
If the washing machine is left idle for a long period, pull out the electrical plug and turn off the water
supply. Open the washer door to prevent formation of moisture and odours. Let the door open while not
used.
4.
Page 18

AINTENAN
CE
DISPLAY CODES
DISPLAY CODES AND SPECIAL FUNCTIONS
CODES
Err1 ¬ Door is not properly shut. _ Shut the door properly.
Err2 ¬ Drainage error, water not emptied within 6
Err3 ¬ Temperature sensor not properly connected or
Err4
Err5 ¬ The drain hose is in water. _ Make sure the drain hose is not in water.
Err6 ¬ Motor error. _ Contact the maintenance personnel.
Err7 ¬ Motor error. _ Contact the maintenance personnel.
Err8 ¬ Water exceeds protective level. _ Contact the maintenance personnel.
End ¬ End of wash cycle.
1:25 ¬The remaining time is 1 hour 25 minutes.
19:25 ¬Status information:Preset time for delayed operation.
Unb
CAUSES SOLUTIONS
_ Clean the fi lter and check the drain hose for blockage. If error
minutes.
damaged.
¬ Heater error (Appears at the end of a cycle).
¬ After the last rinsing cycle fi nishes,spinning fails completely due to unbalance of the laundry.
still exists, please contact the maintenance personnel.
_ Contact the maintenance personnel.
_ Reduce load and then start washing again. If problem still
exists, please contact the maintenance personnel.
¬ Control panel lock function: Press the "Delay" and the "Start/Pause" buttons simultaneously for 3 seconds after starting a program.
It can no longer be changed by operating buttons or knobs. To unlock press the "Delay" and "Start/Pause" buttons again for 3
seconds.
¬ Power-off memory function: In case of abrupt power failure or the need to cut off the power during a program cycle, the present
settings will be saved and the preset operation will resume when the power is on again.
¬ To cancel a program : Press the "Start/Pause" button, then switch off the power and the program is automatically cancelled. Turn
the program selector again to choose another program.
Alarm sound can be cancelled if it is needed.Please follow the instruction as below:
Switch on the washing machine and turn the program knob to spin cycle, then press the "Delay" and "Extra rinse" button, hold on for
3 seconds.The "bEEP OFF" will be displayed on the screen which indicates that alarm sound has been canceled. To operate the above
steps again so the alarm sound can be recovered and the display will show "bEEP ON".
Page 19

AINTENAN
CE
TROUBLESHOOTING
TROUBLESHOOTING
The following circumstances do not constitute problems. Do not contact the Service Center until the problem has been confi rmed.
PROBLEM CAUSES SOLUTIONS
Washing machine fails to
operate.
Washing machine cannot be
fi lled with water.
Machine is draining while
being fi lled.
Drainage failure. ¬ Drain hose is blocked.
Strong vibration while
spinning.
Operation stops before
completing wash cycle.
Operation stops for a period
of time.
Excessive foam in the
drum, which is spilled to the
distribution drawer.
Automatic adjustment of the
washing time.
Spinning fails ¬ Unbalance of the laundry _ Add clothes or run a spinning program again.
¬ Poor connection to the power supply.
¬ Power failure.
¬ The washer door is not properly closed.
¬ Machine has not been switched on.
¬ The "Start/Pause" button is not pressed.
¬ Water tap is not turned on.
¬ Water pressure is less than 0,03 MPa.
¬ The inlet hose is kinked.
¬ Water supply failure.
¬ The program knob is not properly set.
¬ The washer door is not properly closed.
¬ The inlet hose fi lter is blocked.
¬ The height of the drain hose is below 80 cm.
¬ The drain hose is in water.
¬ Drain hose end is higher than 100 cm above
the fl oor level.
¬ The fi lter is blocked.
¬ Not all transportation bolts have been removed.
¬ Washing machine is located on an uneven
surface or is not level.
¬ Machine load is over 7/6kg.
¬ Water or electricity failure. _ Check the power supply or water supply.
¬ Washing machine gives an error message.
¬ Washing machine is in soaking cycle?
¬ The detergent is not a low-foaming type or for
manual wash.
¬ Excessive use of detergent.
¬ The washing program duration will be adjusted _ This is normal and doesn't affect the
_ Check connection to the power supply.
_ Check the power supply.
_ Close the washer door properly.
_ Make sure the machine is switched on.
_ press the "Start/Pause" button.
_ Turn on the water tap.
_ Check water pressure.
_ Check the inlet hose.
_ Ensure the water supply.
_ Set the program knob properly.
_ Close the washer door properly.
_ Unblock the inlet hose fi lter.
_ Install drain hose within 80-100 cm of height.
_ Make sure the drain hose is not in water.
_ Unblock the drain hose.
_ Make sure the drain hose end is lower than
100 cm above fl oor level.
_ Unblock the fi lter.
_ Remove all transportation bolts.
_ Make sure the washing machine is on
an even surface and levelled.
_ Reduce amount of laundry in the drum.
_ Check display codes.
_ Press the rinse hood button or the Start/pause
button again to cancel it.
_ Check if your detergent is appropriate.
_ Reduce amount of detergent in the distribution
drawer.
functionality.
19
Page 20

ON
0
IMPORTANT SAFETY INFORMATI
WIRING CIRCUIT
WIRING CIRCUIT
X3-1
P
2
1
X3-2
X2-1
X2-2
X7-1
X7-2
X7-3
X2-3
X2-4
X4-1
MOTOR
M9
R
M8
M10
M1
M5
M3
T
M4
M7
M6
FUSE
R
2
1
X5-1
MRN
MRL
MRC
N
X4-2
L
X5-3
X1-3
X1-1
EVF
X6-5
X6-2
2
1
EVP
X6-6
2
2
1
1
PS
N
G
FA
L
FA1
FA3
MR
FUSE
PCB
X6-1
NTC
2
1
X6-3
Motor--------------Motor
PCB----------------Printed Circuit Board
MR------------------Door lock
R---------------------Heating Element
PS-------------------Drainage Pump
EVF,EVP-----------Water Inlet Magnetic Valve
P----------------------Pressure Switch
FA---------------------Interference Suppresser
NTC------------------Temperature Sensor
Page 21

LAVADORA AUTOMÁTICA DE CARGA FRONTAL
MANUAL DE USUARIO
HW70-1401 HW70-1201
HW70-1001 HW60-1401
HW60-1201 HW60-1001
Page 22

03 – 09
5
0 – 1
16 – 20
ÍNDICE
ANTES DE UTILIZAR LA LAVADORA CÓMO UTILIZAR LA LAVADORA MANTENIMIENTO
COMPONENTES> .............................................03
PREPARACIÓN> ................................................ 04
INSTRUCCIONES DE SEGURIDAD> .......................05
INSTALACIÓN> ................................................. 06
PANEL DE CONTROL> ........................................ 08
LEYENDA
SÍ
NO
OPCIONAL
SELECCIÓN DE UN PROGRAMA> ......................... 10
DE CONSUMO> ............................................... 11
MÉTODOS DE LAVADO> .....................................12
LIMPIEZA Y CUIDADO> ......................................16
MENSAJES DE LA PANTALLA>
RESOLUCIÓN DE PROBLEMAS> .......................... 19
DIAGRAMA ELÉCTRICO> ..................................... 20
................18
Por su seguridad, todas las instrucciones contenidas en el presente manual con el símbolo de
“Advertencia” deben aplicarse en sentido estricto.!
ENTSORGUNG
No tire los aparatos eléctricos en los contenedores de basura municipales, utilice los sistemas de recogida
selectiva. Póngase en contacto con las autoridades municipales para conocer los sistemas de recogida
disponibles. Si se tiran los aparatos eléctricos en basuras o vertederos, las sustancias peligrosas pueden fi ltrarse
hacia las aguas subterráneas e introducirse en la cadena alimentaria, dañando su salud y bienestar.
Cuando cambie de electrodoméstico, el comerciante está legalmente obligado a retirar su electrodoméstico
antiguo para su eliminación sin ningún cargo adicional.
Page 23

ANTES DE UTILIZAR LA LAVADOR
A
COMPONENTES
Por favor, lea las instrucciones detenidamente antes de utilizar este electrodoméstico. Las instrucciones contienen información
importante que puede ayudarle a obtener un resultado óptimo de su electrodoméstico y asegurar una instalación, uso y
mantenimiento correcto y seguro.
Guarde este manual en un lugar accesible para un uso correcto y seguro de su electrodoméstico.
Si vende el electrodoméstico, lo cede o lo abandona cuando cambie de vivienda, asegúrese de incluir este manual para que el
nuevo propietario pueda conocer las funciones del electrodoméstico y las advertencias de seguridad.
ACCESORIOS
Compruebe los accesorios y la documentación de conformidad con esta lista:
1x Manguera de entrada
1 x Manual de usuario
1x Certifi cado de Garantía
(opcional)
1x Soporte manguera de drenaje
4x Tapones obturadores
Page 24

ANTES DE UTILIZAR LA LAVADOR
A
PREPARACIÓN
PREPARAR LA LAVADORA
Retire todos los materiales de embalaje para evitar la inestabilidad, incluida la base de
poliestireno. Al abrir la caja, pueden aparecer gotas de agua en el envoltorio de plástico y
en la ventanilla de la puerta. Es un fenómeno habitual debido a las pruebas de agua que se
llevan a cabo en la fábrica.
DESCRIPCIÓN
El diagrama que aparece a continuación puede diferir ligeramente del modelo que ha adquirido por mejoras técnicas.
Panel de control
Tirador de la puerta
Encimera
Puerta
Inicio/Pausa
Compartimento para el detergente
Tapa del fi ltro
Manguera de drenaje
Válvula de entrada del agua
Cable de alimentación
Cubierta trasera
Tornillos de la cubierta trasera
Tornillos de transporte
T3
S2
T1
S3
S1
T4
S4
T2
Page 25

ANTES DE UTILIZAR LA LAVADOR
A
INSTRUCCIONES DE SEGURIDAD
ANTES DE UTILIZAR LA LAVADORA POR PRIMERA VEZ
DEBE...
... Asegurarse de que ha retirado los tornillos de transporte.
... Utilizar un enchufe con toma de tierra para el suministro
eléctrico.
... Asegurarse de que el enchufe sea accesible.
... Sujetar el enchufe y no el cable eléctrico cuando lo
desconecte del suministro eléctrico.
... Asegurarse de que los fusibles en el cuadro eléctrico sean
de 15A.
... Mantener la lavadora alejada de las fuentes de calor y de la
luz del sol directa para prevenir que se deterioren los componentes
de plástico y goma.
... Asegurarse de que el cable de alimentación no queda
atrapado debajo de la lavadora y evite dañarlo.
... Comprobar que las juntas y conexiones del cable son
sólidas y no puede fi ltrarse agua. Si las juntas están fl ojas o hay
fi ltraciones de agua, cierre el suministro de agua y repárelas. No
utilice la lavadora hasta que los cables estén fi jados correctamente.
NO DEBE…
... Tocar o utilice la lavadora cuando vaya descalzo o con las
manos o los pies húmedos o mojados.
... Utilizar detergente infl amable o productos para la limpieza
en seco.
... Utilizar ningún spray infl amable cerca de la lavadora.
... Retirar o introducir el enchufe en presencia de gas
infl amable.
... Dejar que niños o personas con problemas de salud jueguen
con la lavadora o los materiales de embalaje.
... Colocar la lavadora en el exterior, en un lugar húmedo o en
una zona propensa a fi ltraciones de agua, como debajo o cerca
de un fregadero. En caso de que se produzcan fi ltraciones de
agua, deje que la máquina se seque de forma natural.
... Poner la lavadora directamente encima de una alfombra o
cerca de una pared o mueble.
EN EL USO DIARIO DE LA LAVADORA
DEBE ...
... Cerrar las cremalleras y tener cuidado con los cordones
y demás piezas suelas que pueden mezclarse. Si es necesario,
ponga las prendas pequeñas en una bolsa o funda.
... Apagar la máquina después de cada programa de lavado
y desconectarla de la red eléctrica para ahorrar electricidad y por
seguridad. Limpie con un paño húmedo la parte inferior de la
puerta.
... Dejar la puerta un poco abierta cuando la lavadora no esté
en funcionamiento para evitar la formación de olores.
... Dejar que el fabricante, su agente de servicio o cualquier
otra persona debidamente cualifi cada cambie el cable eléctrico en
caso de que esté dañado.
... Asegurarse de que no utilicen la lavadora personas
con capacidades físicas, sensoriales o mentales reducidas,
inexperiencia o desconocimiento sin la supervisión o instrucción de
una persona responsable de su seguridad.
... Asegurarse de que los niños no jueguen con la lavadora.
NO DEBE ...
... Tocar la puerta durante el proceso de lavado ya que está
caliente.
... Depositar objetos pesados o fuentes de calor o humedad
en la superfi cie del aparato.
... Lavar en caliente goma esponjosa o materiales
esponjosos.
... Abrir el compartimento para el detergente durante el
ciclo de lavado.
... Forzar la puerta, ya que está bloqueada con un
dispositivo de autobloqueo y se abrirá poco después de que
acabe el proceso de lavado.
... Abrir la puerta si el nivel de agua está visiblemente por
encima de la ventanilla de la puerta.
... Cubrir la lavadora con una capa de plástico para que no
coja humedad.
Page 26

ANTES DE UTILIZAR LA LAVADOR
A
INSTALACIÓN
DESMONTAJE DE LOS TORNILLOS DE TRANSPORTE
Los tornillos de transporte están diseñados para sujetar el tambor de
la lavadora durante el transporte.
1. Retire la cubierta trasera.
2. Extraiga los tres tornillos situados en la parte trasera y retire los
estabilizadores sintéticos de la máquina.
3. Vuelva a poner la cubierta trasera.
4. Cubra los huecos que han dejado los tornillos con los tapones
obturadores.
Aviso:
1. Por favor, libere el cable de alimentación antes de
sacar los tornillos de transporte.
2. Cuando vuelva a poner la cubierta trasera, la parte
convexa debe encararse hacia fuera y debe introducir
la cubierta trasera en los dos huecos, tal como muestra
la fi gura 5.
3. Guarde los tornillos de transporte y los
estabilizadores sintéticos en un lugar seguro para su
uso futuro!
fi g.5.
AJUSTE DE LA LAVADORA
Antes de utilizar la lavadora, debe ajustar los pies ajustables para que la lavadora quede nivelada y,
de este modo, se reducirán las vibraciones y el ruido durante su uso, y se minimizará el desgaste.
Page 27

ANTES DE UTILIZAR LA LAVADOR
A
1.
2.
MANGUERA DE ENTRADA
1.Enrosque la manguera de entrada en la llave de agua.
2. Enrosque la manguera de entrada en grifo de su red hidráulica.
Aviso: Utilice el conjunto de piezas de la manguera
proporcionado con el aparato. El conjunto de piezas
de mangueras antiguas no deben volverse a utilizar.
MANGUERA DE DRENAJE
1. Utilice el soporte de la manguera de drenaje para mantener fi jo el fi nal de la manguera y evitar el
derrame de agua. No alargue la manguera de drenaje. Si necesita un
alargador de manguera, consúltelo con un técnico.
2. El desagüe debe estar de 80 a 100 cm de altura. Ajuste la
manguera de drenaje a la abrazadera situada en la parte trasera de la
lavadora para evitar que caiga.
1.
1.
7
2.
Aviso: La manguera de drenaje no debe sumergirse
en agua, debe estar bien sujeta y no debe tener fi ltraciones de agua. Si la
manguera de drenaje está colocada en el suelo o si el desagüe está a menos de
80 cm, la lavadora drenará de forma continua cuando esté llena (autodrenaje).
CONEXIÓN A LA CORRIENTE
Antes de conectar la lavadora a la corriente, compruebe que:
¬ El enchufe sea compatible con la potencia máxima de la lavadora.(Para su seguridad, los fusibles del cuadro eléctrico no
deben ser menores de 15A).
¬ El voltaje cumpla con los requisitos establecidos.
¬ La toma de corriente sea compatible con el enchufe de la lavadora.
¬ El enchufe tiene toma de tierra.
80 - 100 cm
2.
Page 28

ANTES DE UTILIZAR LA LAVADOR
A
PANEL DE CONTROL
G
D
F
K
E
I
H
J
C
A
B
A Funciones
B Botón de encendido
C Botón de inicio/pausa
D Botón de selección de velocidad de centrifugado
E Botón de temperatura de lavado
F Incio Diferido
FUNCIONES
A
Funciones
¬
_Gire el botón hacia la derecha o izquierda para seleccionar el programa que necesite.
Encontrará 10 programas disponibles. Después de seleccionar el programa, se encenderá la luz
correspondiente.
B
Botón de encendido
¬
_ Presione este botón para poner en funcionamiento la lavadora. Púlselo de nuevo para apagarlo.
Presione el botón ON/OFF suavemente durante 2 segundos para apagar la lavadora. Los botones
son de pulsación suave.
C
Botón de inicio/
¬
pausa
_Cuando la lavadora esté conectada a la toma de corriente y haya seleccionado el programa,
presione ligeramente este botón para iniciar el proceso de lavado. Durante el ciclo de lavado,
presiónelo ligeramente, el proceso de lavado se detendrá y los dígitos de la pantalla empezarán a
parpadear. Púlselo de nuevo para reanudar el proceso. Si desea cancelar un programa durante el
ciclo de lavado, pulse este botón y, cuando los dígitos en la pantalla empiecen a parpadear, pulse
el botón de encendido y se cancelará el programa.
D
Botón de selección
¬
velocidad de
centrifugado
_ Presione este botón para seleccionar la velocidad que desee. Cuando se establezca la velocidad,
aparecerá en la pantalla.
Aviso: Las diferentes temperaturas del agua y las velocidades de centrifugado
pueden ajustarse dependiendo de la ropa para el lavado. Lave utilizando los
ajustes predeterminados si no necesita ningún requisito adicional.
E ¬ Botón de
temperatura de lavado
_ Al pulsar este botón, la temperatura de lavado aparecerá en la pantalla. Seleccione una
temperatura según el tipo de prenda.
Velocidad
Mixto
Inicio/Pausa
Lana
Sintético
Algodón
Prelavado
Temperatura
Inicio
Aclarado
Parada
Intensivo
Diferido
Extra
cuba llena
Deportivo
Rápido 40’
Express 15’
Aclarado
Centrifugado/
Vaciado
Inicio
G Compartimento para el detergente
H Display
I Intensivo
J Aclarado Extra
K Parada cuba llena
Page 29

ANTES DE UTILIZAR LA LAVADOR
A
F¬ Incio Diferido _Al presionar este botón, la lavadora empezará el proceso de lavado después de un periodo de
tiempo y se encenderá el indicador correspondiente. El periodo de tiempo puede oscilar entre 0,5
y 24 horas; cada vez que presione este botón, aumenta media hora. Después de establecer el
tiempo, pulse el botón Inicio/Pausa para iniciar la cuenta atrás del tiempo establecido (el tiempo
se muestra en la pantalla hasta que fi naliza el programa).
Aviso: El tiempo de demora debe ser superior al tiempo del programa, por el
contrario, la lavadora iniciará directamente el programa de lavado.
G¬
Compartimento para el
detergente
_Cuando abra el depósito, verá tres compartimentos:
Compartimento 1: Detergente de prelavado
Compartimento 2: Detergente para los programas del 1 a 8
Compartimento 3: Suavizante, productos acondicionadores,
perfume, etc.
2
2
3
1
1
9
H¬
I¬
J¬
K¬
Display _Muestra información como el tiempo de lavado restante, los ajustes de temperatura y velocidad
Botón Intensivo _Pulse este botón antes de iniciar el programa para un lavado intensivo en caso de ropa muy
Botón Aclarado Extra _Pulse este botón para incrementar el tiempo de aclarado.Puede incrementar 3 veces
Parada cuba llena _Al pulsar el botón se iluminará el piloto. Cuando el programa llegue al último ciclo de aclarado,
y mensajes de error.
Aviso: Tras pulsar el botón de encendido, el display se encenderá y mostrará
como el tiempo de lavado disminuye. Ya que la presión y temperatura del
agua pueden diferir, el tiempo restante se ajustará de acuerdo con estos
parámetros. Si la colada no está equilibrada durante el centrifugado,
el tiempo se prolongará automáticamente. Todos ellos son fenómenos
habituales.
sucia
o con manchas. Cuando se selecciona este botón, el tiempo de lavado se incrementa.
como máximo el tiempo total de aclarado.Cada vez que pulse el botón se incrementará
proporcionalmente el tiempo de aclarado.La pantalla mostrará “P-1” o “P-2” o “P-3” cada vez
que la máquina registre un incremento del tiempo de aclarado.El modo de visualización es “P-x”
y alternativamente el tiempo del programa.Antes del inicio del programa. Aclarado Extra se
enciende un piloto.El piloto se apaga una vez terminado el aclarado extra.
no realizará la evacuación del agua, evitando así la formación de arrugas. Para centrifugar la
ropa, pulsar el botón de Nuevo o el botón “Inicio/Pausa”, el piloto se apagará y se iniciará el
centrifugado. Nota: Selección esta opción en los programas: Prelavado, Algodón, Sintético, Mixto
y Sport.
Page 30

0
SELECCIÓN DE UN
PROGRAMA
TIPO DE PROGRAMAS
2
2
3
1
Temperatura
Programa Máxima Prefi jada 2 3 1 Recomendado para
1 ¬ Prelavado - - to 90 °C
2 ¬ Algodón - - to 90 °C
3 ¬ Sintético - - to 60 °C
4 ¬ Lana - - to 40 °C
5 ¬ Mixto - - to 60 °C
6 ¬ Deportivo - - to 40 °C
7 ¬ Rápido 40’ - - to 40 °C
8 ¬ Express 15’ - - to 30 °C
9 ¬ Aclarado - - - -°C
40°C
40°C
40°C
- -°C
30°C
30°C
- -°C
- -°C
1 Compartimento de detergente para la modalidad de
prelavado
1
2 Compartimento de detergente
3 Compartimento para el suavizante y otros productos
Ropa muy sucia 1000 rpm
Algodón mixto 1000 rpm
Algodón o Sintético 1000 rpm
Lana mixta 600 rpm
Diferentes tejidos 1000 rpm
Ropa deportiva 1000 rpm
Algodón poco sucio,
lino y ropa sintética
Rápido sintético de
color
/ 1000 rpm
Velocidad centrifugado
prefi jada
1000 rpm
800 rpm
10 ¬ Centrifugado/
Vaciado
Sí No Opcional
- - - -°C
/ 1000 rpm
Page 31

1
CÓMO UTILIZAR LA LAVADOR
A
1
DE CONSUMO
TABLA DE CONSUMO
Los valores que fi guran a continuación son únicamente una estimación de la duración del ciclo de lavado. El tiempo real puede
variar debido a la presión del agua, la temperatura inicial del agua, etc
PROGRAMA CARGA MÁX CONSUMO DE ENERGÍA
¬ Prelavado
¬ Algodón
¬ Sintético
¬ Lana
¬ Mixto
¬ Deportivo
¬ Rápido 40’
¬ Express 15’
)
*
Programa de pruebas EN 60456 / Programa de etiquetas de efi ciencia energética con Algodón 60 ºC y
velocidad de centrifugado de Máx.
DATOS TÉCNICOS
Fuente de energía
Corriente activa máx. (A) 10 10
Presión del agua (MPa) 0.03≤P ≤1 0.03≤P ≤1
Carga nominal (kg) 7 6
Velocidad de centrifugado
(r/min)
Programas de lavado
Potencia máx. (W) 2000 2000
Tamaño
Peso neto (kg) 70 65
6kg/7kg 1.0kwh/0.945kwh 74L/75L 40°C 1:46
6kg/7kg 0.75kwh/0.75kwh 60L/56L 40°C 1:28
3kg/3.5kg 0.54kwh/0.485kwh 38L/41L 40°C 1:10
1kg/1kg 0.035kwh/0.034kwh 44L/46L - -°C 0:50
3kg/3.5kg 0.29kwh/0.251kwh 44L/41L 30°C 1:10
3kg/3kg 0.31kwh/0.282kwh 35L/36.5L 30°C 1:25
1kg/2kg 0.06kwh/0.065kwh 33L/37.5L - -°C 0:40
1kg/2kg 0.02kwh/0.02kwh 20L/22L - -°C 0:15
HW70-1401
HW70-1201
HW70-1001
220 - 240V~/50Hz 220 - 240V~/50Hz
1400/1200/1000 1400/1200/1000
10 10
850 x 600x 595 850 x 520 x 595
CONSUMO DE AGUA
HW60-1401
HW60-1201
HW60-1001
TEMPERATURA
DURACIÓN DEL
LAVADO
Page 32

2
MÉTODOS DE LAVADO
AVISO
La lavadora únicamente debe emplearse para uso doméstico. Si el electrodoméstico se utiliza con
fi nes comerciales, la garantía no tendrá validez. No lo utilice con fi nes distintos de aquel para el que
se diseñó. Siga las instrucciones que fi guran en la etiqueta de cada prenda y lave únicamente prendas
lavables a máquina.
SUMINISTRO ELÉCTRICO
Conecte la lavadora al suministro eléctrico (de 220 V a 240 V~/50 Hz).
SUMINISTRO DE AGUA
Gire la llave de agua. El agua de ser limpia y clara.
Aviso: Antes de utilizar la lavadora, busque posibles fi ltraciones en las juntas entre el grifo y la
manguera de entrada girando la llave de agua.
PREPARAR LA ROPA PARA EL LAVADO
¬ Separe las prendas según el tipo de tejido (algodón, sintético, lana o seda) y el nivel de
suciedad.
¬ Separe las prendas blancas de las de colores. Lávelas primero a mano para comprobar si
destiñen.
¬ Vacíe los bolsillos (llaves, monedas, etc.) y extraiga los objetos decorativos más duros (por
ejemplo, los broches).
¬ Las prendas sin dobladillos, la ropa interior y las prendas delicadas como las cortinas deben
ponerse en una bolsa de lavado (es mejor no lavarlas en una lavadora).
¬ Cierre las cremalleras y los corchetes. Asegúrese de que los botones están bien cosidos y ponga
las prendas pequeñas, tales como los calcetines, cinturones, sujetadores, etc. en la bolsa de
lavado.
¬ Despliegue las prendas grandes, como sábanas, colchas, etc
¬ Deles la vuelta a las camisas.
Page 33

3
CÓMO UTILIZAR LA LAVADOR
A
CARGAR LA LAVADORA
Abra la puerta de la lavadora, introduzca las prendas pieza por pieza. Cierre la puerta con fuerza.
¬ Cuando utilice la lavadora por primera vez, déjela en funcionamiento sin carga durante la duración de
un programa para evitar que las prendas se manchen de aceite o de agua sucia de la misma lavadora.
¬ No sobrecargue la lavadora.
SELECCIONAR EL DETERGENTE
La efi cacia y el rendimiento del lavado dependen de la calidad del detergente que utilice. Los
detergentes especiales que no producen espuma proporcionan buenos resultados de lavado. Utilice
detergentes específi cos para prendas sintéticas y de lana. No utilice productos de lavado en seco,
como tricloroetileno o similares.
Aviso: No añada más detergente del necesario. Se recomienda aplicar la dosis indicada en el envase de detergente.
1
AÑADIR EL DETERGENTE
2
Abra el compartimento para el detergente y añada el detergente y suavizante necesario en los
2
3
compartimentos correspondientes. A continuación, ciérrelo con cuidado. (Véanse las instrucciones relativas
al compartimento).
1
Aviso:
¬ Para el programa de prelavado, debe añadir el detergente y suavizante en los compartimentos 1 y 2. Para otros programas, no
añada detergente en el compartimento 1.
¬ Utilice detergente líquido de acuerdo con las instrucciones del envase. No utilice detergente líquido si selecciona el programa de
prelavado o “Iniciar temporizador”:
¬ No utilice demasiado suavizante ya que podría dañar las fi bras artifi ciales.
SELECCIONAR EL PROGRAMA
Mixto
Inicio/Pausa
Lana
Sintético
Algodón
Prelavado
Centrifugado/
Vaciado
Para obtener unos resultados de lavado óptimos, debe seleccionar el programa de lavado adecuado
para el tipo de prenda. Para seleccionar el programa correcto, gire el botón en el sentido de las agujas
del reloj.
SELECCIONAR LA FUNCIÓN
Seleccione las opciones que necesite. (Véase “Panel de control” en las páginas 08 y 09).
Deportivo
Rápido 40’
Express 15’
Aclarado
1
Inicio
Page 34

SELECCIONAR LA TEMPERATURA DE LAVADO
Pulse y mantenga presionado el botón de temperatura hasta que se
muestre la temperatura deseada o aparezca el símbolo “--“ para no
calentar el agua.
SELECCIONAR LA VELOCIDAD DE CENTRIFUGADO
Velocidad
Mixto
Inicio/Pausa
Lana
Sintético
Algodón
Prelavado
Temperatura
Inicio
Aclarado
Parada
Intensivo
Diferido
Extra
cuba llena
Deportivo
Rápido 40’
Express 15’
Aclarado
Centrifugado/
Vaciado
Inicio
Inicio/Pausa
Mixto
Lana
Sintético
Algodón
Prelavado
Pulse y mantenga presionado el botón de velocidad hasta que se
muestre la velocidad que desee o aparezca el símbolo “0” para
indicar que no desea centrifugar. Véase “Funciones operativas” en
“Panel de control” (páginas 08 y 09) para seleccionar la temperatura
Velocidad
Temperatura
Inicio
Aclarado
Parada
Intensivo
Diferido
Extra
cuba llena
y la velocidad del centrifugado. Se aconseja seleccionar los valores
recomendados.
LAVADO
Mixto
Inicio/Pausa
Lana
Sintético
Algodón
Prelavado
Al pulsar el botón Inicio/Pausa, la lavadora empezará a funcionar de
acuerdo con los programas preestablecidos y se detendrá cuando acabe
el ciclo de lavado. En este momento, aparecerá el símbolo “Fin” en la
Velocidad
Temperatura
Inicio
Aclarado
Parada
Intensivo
Diferido
Extra
cuba llena
pantalla. Abra la puerta y extraiga la ropa.
DESPUÉS DEL LAVADO
Cierre el suministro de agua y desenchufe el cable eléctrico. Abra la puerta de la lavadora
para prevenir la formación de humedad y olores. Deje la puerta abierta cuando no esté en
funcionamiento.
CONSEJOS PARA AHORRAR ENERGÍA
1. Acumule ropa para una carga completa.
2. Evite sobrecargar la lavadora.
3. Utilice la opción de prelavado únicamente en prendas muy sucias.
4. Con prendas poco sucias, reduzca la cantidad de detergente o seleccione los programas de lavado normales o delicados.
5. Seleccione una temperatura adecuada. Los detergentes modernos pueden lavar con muy buenos resultados en temperaturas
menores de 60 ºC. Seleccione una temperatura más alta con prendas muy sucias.
6. Siga las cantidades recomendadas en el envase del detergente para no utilizar demasiado.
Deportivo
Rápido 40’
Express 15’
Aclarado
Centrifugado/
Vaciado
Aclarado
Centrifugado/
Vaciado
Deportivo
Rápido 40’
Express 15’
Inicio
Inicio
Page 35

5
CÓMO UTILIZAR LA LAVADOR
A
CUADRO DE CUIDADOS
1
Material resistente
Tejidos delicados
Lavable a 95 ºC
Lavable a 60 ºC
Lavable a 40 ºC
Lavable a 30 ºC
Lavar a mano
Sólo lavar en seco
Lana
REFERENCIAS PARA LA CARGA
Sábanas (individual) Algodón Aproximadamente 800 g
Mantas Lana Aproximadamente 3000 g
Mezcla de tejidos / Aproximadamente 800 g
Chaquetas Algodón Aproximadamente 800 g
Blanquear con agua fría
No blanquear
Planchar a 200 ºC
Planchar a 150 ºC
Planchar a 100 ºC
No planchar
Limpiar en seco con cualquier disolvente
Limpiar en seco con percloruro
Limpiar en seco con combustible para aviones.
No limpiar en seco
Secar sobre una superfi cie
Colgar para secar
Secar en una percha
Secar a máquina, a temperatura normal
Secar a máquina, a baja temperatura
No secar a máquina.
Tejanos / Aproximadamente 800 g
Monos Algodón Aproximadamente 950 g
Pijamas mujer / Aproximadamente 200 g
Camisas / Aproximadamente 300 g
Calcetines Mezcla de tejidos Aproximadamente 50 g
Camisetas Algodón Aproximadamente 300 g
Ropa interior Mezcla de tejidos Aproximadamente 70 g
Page 36

3.
2.
4.
1.
2.
ANTENIMIENTO
LIMPIEZA Y CUIDADO
DESPUÉS DEL LAVADO
Cierre el suministro de agua y desconéctela de la electricidad después
de cada lavado. Abra la puerta de la lavadora para prevenir la
humedad y olores. Si el aparato está sin funcionar durante un largo
periodo de tiempo, retire el agua y cambie la manguera de drenaje.
LIMPIAR EL COMPARTIMENTO DEL DETERGENTE
Limpie el compartimento del detergente de forma habitual.
Extraiga el compartimento, lávelo con agua y vuélvalo a poner.
LIMPIAR LA LAVADORA
Desconecte el aparto durante las tareas de lavado y mantenimiento. Utilice un paño húmedo y suave con jabón líquido y limpie
la caja de la lavadora y las piezas de goma. No utilice productos químicos orgánicos ni disolventes corrosivos.
1.
2.
1
2.
.
LIMPIAR EL FILTRO
Limpie el fi ltro una vez al mes:
1. Abra la cubierta superior.
2. Retire el fi ltro girándolo en el sentido de las agujas del reloj.
3. Lave el fi ltro con agua corriente.
4. Vuelva a poner el fi ltro girándolo en el sentido de las agujas del
reloj y vuelva a poner la cubierta.
Aviso:
1. El fi ltro debe estar bien puesto o, de lo contrario, puede ocasionar escapes.
2. Ponga un recipiente bajo el fi ltro de la bomba de drenaje para recoger cualquier exceso de agua que
pueda salir de la bomba de drenaje cuando retire el fi ltro.
1.
3.
2.
4.
Page 37

ANTENIMIENTO
VÁLVULA DE ENTRADA DE AGUA Y FILTRO DE LA VÁLVULA DE
ENTRADA
Para evitar el bloqueo en el suministro de agua a causa de sustancias externas, limpie
la entrada de agua y el fi ltro de la válvula de entrada con frecuencia.
MOVER LA MÁQUINA
Si debe mover la máquina para ubicarla en otro lugar, vuelva
a poner los tornillos de transporte que retiró antes de la
instalación para evitar dañar el aparato, tal como se muestra a
continuación:
1. Reitre la cubierta trasera.
17
2. Retire los tapones obturadores.
3. Introduzca los estabilizadores sintéticos y los tornillos de
transporte.Apriete los tornillos con una llave inglesa.
4. Vuelva a poner la cubierta trasera.
LARGOS PERIODOS DE DESUSO
Si no va a utilizar la lavadora durante un largo periodo de tiempo, desconéctela del
suministro eléctrico y cierre el suministro de agua. Abra la puerta para prevenir la
formación de humedades y olores y déjela abierta cuando no la esté utilizando.
1.
3.
2.
4.
Page 38

MENSAJES DE LA PANTALLA
CÓDIGOS DE CONFIGURACIÓN Y FUNCIONES ESPECIALES
SENOICULOSSASUACSOGIDÓC
Err1 ¬ La puerta no está cerrada correctamente. _ Cierre la puerta correctamente.
Err2 ¬ Error de drenaje: no se ha vaciado el agua en 6
minutos.
Err3 ¬ El sensor de temperatura no está bien conectado o está
dañado.
Err4 ¬ Error en el calentador (aparece cuando termina el ciclo
de lavado)
Err5 ¬ No se ha alcanzado el nivel de agua en 8 minutos.
¬ La manguera de drenaje está situada a una altura
inferior de 80 cm.
¬ La manguera de drenaje está inundada.
Err6 _Póngase en contacto con el personal de mantenimiento.
Err7 _Póngase en contacto con el personal de mantenimiento. _Póngase en contacto con el servicio técnico.
Err8 ¬ El agua sobrepasa el nivel de protección _Póngase en contacto con el servicio técnico.
End ¬ Fin del ciclo de lavado.
1:25 ¬ El tiempo restante es de1 hora y 25 minutos.
_Póngase en contacto con el servicio técnico.
_ Si el mensaje de error persiste, póngase en contacto
con el servicio técnico.
_ Póngase en contacto con el servicio técnico.
_ Reduzca la carga de ropa y vuelva a iniciar el lavado. Si
el problema persiste, contacte con el Servicio Técnico.
_presión es normal. Si el problema persiste, póngase en
contacto con el personal de mantenimiento.
_Instale la manguera de drenaje a una altura de 80 –
100 cm.
_Asegúrese de que la manguera de drenaje no está
inundada.
19:25 ¬ Información de estado:Tiempo de funcián retraso.
Unb ¬ Después de senalar que se ha terminado la utima vez de banquear,comoropas no están puestas rugulares,no se
realiza deshidratar por girar.
¬ Función de bloqueo del panel de control. Pulse los botones “Inicio Diferido” y “Inicio/Pausa” a la vez durante 3 segundos
antes de iniciar cualquier programa. De este modo, el programa no puede cambiarse mediante los demás botones operativos. Para
desbloquearlo, presione de nuevo “Incio Diferido” e “Inicio/Pausa” durante 3 segundos.
¬ Función de memoria de apagado. En caso de se produzca un apagón repentino o sea necesario cortar la electricidad durante un ciclo
de lavado, se guardará la confi guración actual y la preconfi guración se reanudará cuando esté conectado de nuevo a la electricidad.
¬ Cancelar un programa. Pulse “Inicio/Pausa”, apague la máquina y el programa se cancelará de forma automática. Gire el botón de
selección de programa de nuevo para seleccionar un nuevo.
Alarma Sonora opcional:
Para cancelar la alarma sonora por favor siga las siguientes instrucciones:
Conecte la lavadora y gire la rueda de control hasta el ciclo de centrifugado, luego presione los botones “Inicio Diferido” y “Aclarado
Extra ” durante 3 segundos. La leyenda “bEEP OFF” se mostrará en el display que indica que la el sonido de la alarma ha sido
desconectado.
Page 39

ANTENIMIENTO
RESOLUCIÓN DE PROBLEMAS
RESOLUCIÓN DE PROBLEMAS
No se ponga en contacto con el Servicio Técnico hasta que no se haya confi rmado que se trata de una incidencia real.
NÓICULOSOVITOMAMELBORP
La lavadora no funciona. ¬ Mala conexión con el suministro eléctrico.
¬ Apagón.
¬ La puerta no está bien cerrada.
¬ La máquina no se ha encendido.
La lavadora no puede
llenarse de agua.
La máquina se está
vaciando mientras se llena.
Error de drenaje. ¬ La manguera de drenaje está bloqueada.
Fuertes vibraciones en el
centrifugado.
El funcionamiento se
detiene antes de completar
el ciclo de lavado.
El funcionamiento se
detiene durante un periodo
de tiempo.
Exceso de jabón en el
tambor, que se derrama
por el compartimento de
detergente.
Ajuste automático del
tiempo de lavado.
¬ No ha pulsado “Inicio/Pausa”.
¬ La llave de agua no está abierta.
¬ La presión de agua es inferior a 0,03 MPa.
¬ La manguera de entrada está doblada.
¬ Fallo en el suministro de agua.
¬ No se ha confi gurado correctamente el
programa.
¬ La puerta no está bien cerrada.
¬ El fi ltro de la manguera de entrada está
bloqueado.
¬ La manguera de drenaje tiene una altura
inferior a 80 cm.
¬ La manguera de drenaje está inundada.
¬ El fi nal de la manguera de drenaje está
situado a más de 100 cm por encima del nivel
del suelo.
¬ El fi ltro está bloqueado.
¬ No se han retirado todos los tornillos de
transporte.
¬ La lavadora está situada en una superfi cie
irregular o desnivelada.
¬ La carga es superior a 6/7 kg.
¬ Error en el suministro de agua o electricidad. _ Compruebe el suministro eléctrico.
¬ La lavadora muestra un mensaje de error. _ Compruebe los códigos de confi guración.
¬ El detergente no es poco espumoso o para
lavados a mano.
¬ Uso excesivo de detergente.
La duración del programa de lavado se
¬
ajustará de acuerdo con la temperatura inicial
de agua.
El ciclo de centrifugado no
funciona
¬ La colada en el interior del tambor no está
equilibrada (poca ropa, por ejemplo).
_ Compruebe la conexión del suministro eléctrico.
_ Compruebe el suministro eléctrico.
_ Cierre la puerta correctamente.
_ Asegúrese de que la máquina está encendida.
_ Presione “Inicio/Pausa”.
_ Abra la llave de agua.
_ Compruebe la presión de agua.
_ Revise la manguera de entrada.
_ Asegúrese de que tiene suministro de agua.
_ Confi gure el programa correctamente.
_ Cierre la puerta correctamente.
_ Desbloquee el fi ltro de la manguera de entrada.
_ Instale la manguera de drenaje a 80 – 100 cm
de altura.
- Asegúrese de que la manguera de drenaje no esté
inundada.
_ Desbloquee la manguera de drenaje.
_ Asegúrese de que el fi nal de la manguera de
drenaje está situado a menos de 100 cm por
encima del nivel del suelo.
_ Desbloquee el fi ltro.
_ Retire todos los tornillos de transporte.
_ Asegúrese de que la lavadora está en una
superfi cie regular y nivelada.
_ Reduzca la cantidad de ropa del tambor.
_ Compruebe si su detergente es el adecuado.
_ Reduzca la cantidad de detergente en el
compartimento.
_ Es una circunstancia normal y no afecta al
funcionamiento.
_ Introduzca más ropa dentro del tambor y
arranque el ciclo de centrifugado de nuevo.
19
Page 40

Información importante de seguridad
0
DIAGRAMA ELÉCTRICO
DIAGRAMA ELÉCTRICO
R
2
1
MRL
MRN
MRC
N
L
2
1
EVF
EVP
PC B
2
2
1
1
PS
N
G
FA
L
FA1
FA3
MR
FUS E
NTC
2
1
P
2
1
MOTOR
R
T
FUS E
Motor--------------Motor
PCB----------------Placa de circuito impreso
MR------------------Cerradura
R---------------------Calentador
PS-------------------Bomba de desagÜe
EVF,EVP-----------Válvula de suministro magnética
P----------------------Interruptor de presion
FA---------------------Supresor de interferencia
NTC------------------Sensor de temperatura
 Loading...