

Page 1

Automatic Drum Washer
Operating Instructions
Models:
HW60-B12866NZP
Please read this manual carefully before use.
Please keep this manual in a safe place for future
reference.
Specifications
Power supply
Water inlet pressure
Rated washing capacity
Rated spinning capacity
Spinning speed
Washing noise
Spinning noise
This product is classified as
Class I appliance. Please pay
attention to electrical safety
during use.
The diagrams in this manual are
for illustrative purpose only. In
consideration of continuous
product improvement, please
see the actual product for the
appearance, color and
accessories which may be
inconsistent with those
described in this manual. We
hereby apologize for this.
220-240V/50H z
6.0kg
6.0kg
1200r/m
50dB (A weighted)
68dB (A weighted)
510mm
445mm
940mm
1. Notice before Use
2. Safety Precautions
3. Precautions for Use
4. Preparations before Washing
5. Operational Procedure
6. Control Panel and Program Description
7. Display Screen Description
8. Other Functions
9. Fault Clearance
10. Cleaning/Maintenance
Technology of
variable frequency drive
Contents
Technology of
power-down memory
Technology of
automatic selection
1. Notice before Use
To connect the water inlet pipe
1. Select a proper water tap
The length of front end must be more than 10mm. If the
end face of water tap outlet is unsmooth, please file it
smooth to avoid water leakage.
2. Remove the water inlet pipe joint
① Press the lower end of locking lever;
② Hold the water inlet pipe, press
down the slider and remove the water
inlet pipe joint;
Wall
If the water tap is
placed against the wall,
you may turn this screw
to a proper position in
advance.
Bushing
Tally
Nut
3-4 turns
4. Connect the water inlet pipe
① Press down the slider and insert the
water pipe into the water inlet pipe joint;
② Hook the water inlet pipe joint with
the locking lever, then loosen the slider
until a “poop” is heard.
5. Connect to the washer
① Ring the nut at the other end of water
inlet pipe onto the water inlet valve joint;
② Tighten and confirm the nut of water
inlet pipe in place.
6. Check the water inlet pipe for good connection
① Check for firm connection;
② After installation, turn on the water tap and
check for water leakage;
③ Before every use of the washer, please check
for firm connection between the water inlet pipe
and the water tap;
④ Never forcibly bend the water inlet pipe.
Installation of the rat guard
1. Remove the adhesive from the back side of the felt and paste
the felt onto the back side of the protection board in a
symmetrical position to the board’s corners;
2. Incline the washer backwards and remove fourfeet(Fig.1);
3. Place the side with dimpled grain of rat guard inwards, then
pass foot bolts through four holesand tighten them to fix the rat
guard to the shell(Fig. 2) and finally level the washer.
fig. 1 fig. 2
Locking lever
Slider
Water inlet pipe
3. Install the water inlet pipe joint
① Loosen the nut to the extent that
approximate 3-4 turns of screw thread are
exposed;
② Loosen four screws of the water inlet pipe
joint to the extent that the joint can be ringed
onto the water tap;
③ If the water inlet pipe joint cannot be ringed
onto the water tap, please remove the bushing
and install again;
④ Turn one of screws to an approximately
proper position in advance, ring the water inlet
pipe joint onto the water tap, then evenly
tighten the remaining three screws in place,
and finally tighten the nut.
Locking lever
Drain pipe
The outlet end of drain pipe must be
higher than 80cm and the highest point
must be less than 100cm. To prevent the
drain pipe from coming off, you may
secure it to its clamp at the back of washer
or to the firm holder as shown in the
figure.
It is not recommended to extend the drain
pipe. If the extension pipe exceeds 2.5m
in length, simultaneous water feeding and
drainage is likely to occur. Please contact
our After-sales Service Department for the
extension of drain pipe.
Please install and adjust the washer according to the instructions in this
manual so that you can use it in a correct and safer manner.
Water inlet pipe joint
Drain pipe holder
Distributor boxes
(Add a proper amount of
detergent required by washing)
Pre-wash detergent box
Main wash detergent box
Softener and bleach box
When selecting the pre-wash function or the pre-wash
program, add detergent into the pre-wash box to pre-wash
the clothes;
As for the dosage of detergent, please refer to the
instructions for detergent. Excessive detergent may result
in too many bubbles and spill as well as affect its
dissolution. Special low foaming detergent for drum
washers shall be used. When washing synthetic or wool
fabrics, be sure to use special detergent;
The level of softener or liquid detergent should not be
higher than the “MAX” mark of a distributor box.
Concentrated softener or liquid detergent should be diluted
before being added into a distributor box.
Adjustment of the feet
Be sure to adjust four feet
to level the washer before
use.
Sight glass
Door
Table top
Water inlet valve
Power cord
Screw (4 pcs)
Power plug
Back cover plate
Drain pipe clamp
Drain pipe
Splash-proof plastic
plug (4 pcs)
Shell
Note:
After finishing the adjustment of
four feet, turn the foot support
nuts to cling to the shell in order
to support the washer.
Foot
Table top
Main control
panel
Front panel
Inner drum
Window pad
Filter door
Lower trim
Packaging bolts and accessories
Packaging bolts and accessories are used to
fix internal components of the washer during
transport and should be removed before using
the washer.
Unscrew packaging bolts and take
out the back-up block.
Block the bolt hole with a
splash-proof plastic plug.
Please keep such disassembled components
as packaging bolt and back-up block in a safe
place for future handling of the washer.
Accessories
Water inlet pipe assy
Rat guard
Felt
Drain pipe holder
Operating
instructions
Automatic Drum Washer
Operating Instructions
2. Safety Precautions 3. Precautions for Use 4. Preparations
before Washing
Electrical safety
prompt:
Please pay attention to
electrical safety when
using the washer.
Warning sign: The
contents with this
sign involve the
safety of both the
product and user. Be
sure to strictly follow
these instructions,
otherwise the washer
may be damaged or
the user may be
injured.
Prohibitory sign: The
contents with this
sign indicate the
behaviors to be
absolutely prohibited.
Failure to follow these
instructions may
result in damage to
the washer or
personal injury.
1. The plug should be accessible after the washer is
installed in place. Do not disconnect the plug from the
socket by pulling the power cord. If the power cord needs to
be replaced, ask a qualified person or contact our
After-sales Service Department for replacement. Prevent
the power cord from being pressed by any foot and from
such problems as break-off, flattening, etc.
2. Power supply must use a separate socket, the grounding
terminal of which must be reliably grounded.
3. Such overload protective devices as proper fuse must be available at the user’s home.
And, the ammeter, wires and socket must be able to withstand the current of 10A.
1. Keep the washer away from any heat source and direct sunlight to prevent aging of plastic/rubber
parts.
1. Do not use such chemicals as flammable detergent and dry-cleaning
solvent to wash the clothes. Do not use any organic solvent or corrosive
liquid to wipe the exterior and rubber parts of the washer. Do not use any
flammable spray near the washer. In case of flammable gas leakage, do
not plug in or unplug the washer. Do not use the washer near the
environment with flammable and explosive gas or liquid such as biomass
pool, etc.
2. The washer’s door is relatively hot during heating. For the purpose of safety, keep
children away from the washer. In addition, when draining hot water, be careful to avoid
scald.
3. After unpacking the washer, do not allow children to play with the disassembled
packaging materials such as carton, plastic packaging bag and foam, etc.
4. Do not install the washer outdoors and in excessively humid environment, otherwise
the moisture on electrical components may easily cause damage to the ignition system
or other accidents. In case of inadvertent water spray onto or into the washer, only after
the washer thoroughly dries can you use it.
5. Neither place the washer directly on airproof carpet to prevent its bottom vent from
being blocked nor close up to a wall or furniture to avoid accidents. Do not use the
washer on any platform higher than the floor
, otherwise it may fall off onto the floor and
be damaged.
1. Due to fluctuation of water pressure, please check all the joints of water inlet pipe, water tap and
drain pipe for firm connection before washing every time. In case of loose water pipe connection or
water leakage, please turn off the water tap and take proper measures or contact our After-sales
Service Department for reconnection. Only after such faults are cleared can you use it again.
2. Using the washer at 0 ℃ and below may damage the water inlet valve and drainage system. If the
washer is stored at 0 ℃ and below, be sure to move and leave it in the environment at room
temperature for 2-4 hours before use.
3. It is recommended that the washer be installed in a location with floor drainer.
4. Do not place any heavy object, heat-producing appliance and item liable to water/liquid leakage to
avoid the deformation of table top and plastic parts.
5. Do not wash such waterproof articles as raincoat, bicycle cover and down products as well as
carpet to avoid abnormal vibration or the damage to articles.
6. If a brassiere with steel wire is washed in the washer, the steel wire may bounce out. Therefore, do
not wash any brassiere with steel wire in order to protect the washer.
7. Do not put the clothes tainted with chemicals into the washer.
8. Do not open any detergent distributor box during the program operation to avoid some detergent
leaving in the box.
9. The washer’s door is equipped with self-lock safety device. Only when the washer is in safe state
(the water level is below the lower edge of sight glass, the temperature inside the drum is below 50 ℃ ,
the inner drum is not rotating) can you unlock the door. Never forcibly open the door before the washer
reaches the safe state to avoid damage to the door or scald. “Click” will be heard when opening the
door. It is normal and arises from the working principle of electromagnetic lock’s internal structure.
10. Cut off the water supply and power supply after finishing washing every time. Moreover, clean the
sight glass window pad interlining to prevent contaminants from tainting the clothes again or the
surface of window pad from going moldy.
11. When the washer is not in use, please keep the door slightly open to avoid unpleasant smell. Do
not cover the washer with a plastic bag to avoid moisture staying in the washer.
12. If the washer is feed water from a water tank and the difference
between the lowest height of water level in the water tank and the highest height of washer (table top)
is 0.1~0.5m, put a proper amount of detergent along with the clothes into the washer’s inner drum or
dilute the detergent and add it in the washer through corresponding detergent before washing to
prevent it from staying in the washer and affecting the washing and rinsing effect. It is not
recommended to select the prewash function and add softener in the washer in the above-mentioned
situations.
13. Washing capacity
Fadeless
cotton fabric
Terylen fabric/blend
fabric/chemical fiber fabric
6 kg
3kg
Wool fabric
1kg
Check the clothes for special washing
requirements and make sure that the clothes are
suitable for washing with a washing machine and
water in order to avoid the deformation and
damage of the clothes.
For the clothes tainted with much mud
and dust, please remove them before
washing.
Wash those clothes liable to color fading
separately from other clothes.
Check pockets and remove coins,
sand, hairpin and other things
from them.
Tie the ties, buckle the buttons, zip the zippers
and sew the openings.
To avoid the sound from buttons,
please turn those clothes with
buttons inside out before putting
them into the washer.
Please unfold and fluff out the clothes before
putting them into the washer. Furthermore, do
not overload the washer.
When washing small articles (e.g. handkerchief,
gloves and socks, etc.) and those clothes liable
to intertwist and wear, please put them into net
bags for washing, rinsing and spinning to prevent
them from falling between the inner drum and
window pad and further avoid incomplete
washing or damage to top-grade clothes. The
weight of articles in each net bag should not
exceed 300g and the net bags should not be
washed together with those clothes not in a net
bag, otherwise the washer will not be balanced,
resulting in abnormal vibration.
5. Operational Procedure
Insert the power
plug into a power
socket.
Connect the water
inlet pipe and turn
on the water tap
Put down the
drain pipe.
Select the washing temperature, spinning speed,
“Delay” function, times of extra rinse and
“Intense” function, etc. as required.
Night Wash
Speed Up
After finishing washing, the washer will automatically switch off.
Open the door, put the clothes into the washer and
close the door. Then add a proper amount of detergent
into corresponding distributor box and close it (refer to
the section of “Distributor Boxes” under “Notice before
Use” for details).
Select the desired
program.
Sport Wash
Quick
Wool
Synthetic
Cotton
Start
Prewash
Pause
Press and hold 2 seconds
to set door unlocked
time
time
Delay Strong
Extra Rinse Anti-crease
Speed
Temp.
The “Delay” program is off by default.
To activate this program, press the
“Delay” button to make settings.
Hand Wash
S-D Inverter
Heavy
Underwear
Rinse
Spin
Drain
HW60-B12866NZP
Power
6.0kg
Start the selected
program.
Turn on the
power
switch.
Power
Page 2
Close the door; if the problem
remains, please ask for repair
Please ask for repair
Please ask for repair
Please ask for repair
Take out and fluff out the
clothes; if the problem
remains, please ask for repair
The washer automatically
removes this problem; if the
problem remains, please
ask for repair
Shut down the washer and
remove the problem.• • Check
whether the water tap is turned on,
whether the water pressure is too
low, whether water supply cut-off
occurs;• • Check whether the
water inlet valve is clogged
(please clean it); if the problem
remains, please ask for repair
Clean the draining pump filter
and check whether the drain
pipe is clogged; if the problem
remains, please ask for repair
The washer is in automatic
weighing state
The remaining washing time is
one hour and sixteen minutes
The spinning speed is set
at 800 rpm
The whole program ends
Abnormal door locking or
unclosed door
Drainage fault
Temperature sensor fault
Heating fault
Abnormal water inflow
The motor stops running
The water level exceeds
alarm level
Water level sensor fault
Uneven clothes distribution
while spinning
Poor washing effect
Check whether the type and dosage of
detergent are suitable
Check whether the selected program is
correct
Check whether the clothes weight
exceeds the washer’s rated washing
capacity
Check whether the washer is washing
a single piece of clothing, e.g. woolen
sweater. If so, it is normal
The spinning effect varies with the
type of clothes
Check whether it is for eccentric
protection with few clothes
It is normal that electronic
components are slightly hot
The clothes distribution becomes
imbalanced during washing
Poor water feeding/drainage
conditions result in a longer time
Check whether the drain pipe is bent,
clogged or frozen
Check whether the drain pipe orifice is
100cm higher than the floor
Check whether the filter is clogged
Check whether all the fixing bolts for
transport are removed
Check whether the washer is level (the
washer can be leveled by adjusting the feet)
Check whether the clothes intertwist
Check whether the washer collides with
other objects
Check whether there are foreign bodies in
the washer
Check whether sudden power failure
or water supply cut-off occurs
Check whether the “Start/Pause”
button is pressed
The washer’s program is set with
water discharge time and the
spinning starts after a period of time
Check whether the clothes intertwist
Check whether too much washing
powder was added
Forceless washing
Stop operation
during washing
No spinning
Excessively long
spinning time
Loud noise when spinning
Vibration and
displacement
The clothes are not
spun dry after finishing
the “Spin” program
No water discharge or
slow water discharge
The control panel is
partially hot
The washing does not
end after the preset
delay time
Check whether the washer inclines or shakes
Check whether there are foreign bodies such
as coins and zippers in the washer
Check whether the noise is from the buttons
and zippers of washing
Check whether the noise is from the draining
pump or motor in normal operation
The washer does
not operate
Buttons cannot be
operated
Water leakage occurs
at the water tap
No water inflow or
slow water inflow
Water feeding and water
drainage occurs at the
same time
Abnormal noise
8. Other functions
Function
Function
Function
Function
Power-down memory
With the power-down memory function, the washer can
memorize the program’s running state in case of power
failure or loose plug during washing and continue the
formerly selected program after the power supply resumes.
Eccentric protection
When spinning, if the clothes are not evenly distributed, the washer will fluff out
and redistribute the clothes and continue spinning after the clothes distribution
becomes even. If the clothes distribution does not become even within the
specified time, the washer will not spin to avoid abnormal vibration. In this case,
please check the clothes for intertwist and rearrange them, then select “Spin”
program to spin the clothes. When there are few clothes, the washer may not spin
due to eccentric protection. In this case, you can put more clothes into the washer
and make them evenly distributed, then continue spinning. In addition, it is normal
that the program time will prolong because the washer rearranges and fluffs out
the clothes.
Silencing function
Select the “Spin” program, simultaneously press the “Delay” and “Extra rinse”
buttons and hold them for 3 seconds, the beep of all the programs (excluding the
alarm sound) will be silenced and the display screen will show “ ”.
Simultaneously press the two buttons and hold them for 3 seconds again, the
beep of all the programs will resume and the display screen will show “ ”.
Cancel or reselect a program during washing
(1) To cancel the running program, just turn off the washer;
to reselect a program, turn it on again.
(2) To select any additional function when a program is
running, just press the “Start/Pause” button, then select your
desired additional function and finally press the
“Start/Pause” again.
The above operations should be made when the child lock is
not activated.
The method (2) is only available for several function buttons.
Note:
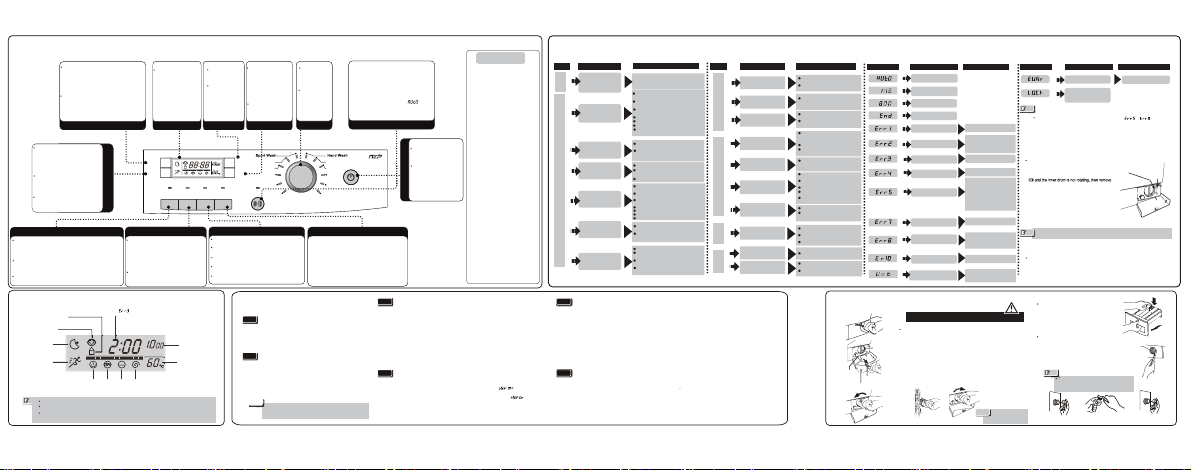
9. Fault Clearance
The following phenomena are not necessarily faults of the washer. Please check against the following table before calling for repair.
If any fault actually exists, please contact our After-sales Service Department and do not repair by yourself. Please pull out the power plug before check.
noituloS gninaem edoC edoc deyalpsiD noituloS gninaem edoC edoc deyalpsiD noituloS nonemonehP etatS noituloS nonemonehP etatS
erofeB
noitarepo
hsawnehW
There is a little water in
the drain pipe and
washer when using the
washer for the first time
It is normal; the water is the remaining
water of factory inspection
Check whether the “Child lock” function is
selected
After starting, to select other programs,
please press the “Start/Pause” button and
then operate
Check whether the height of drain pipe
orifice is within the range of 80cm~100cm
Check whether the drain pipe orifice is
immersed in the water
Check whether the water tap is in proper shape
Check whether the water inlet pipe joint is
installed in place
Check whether the water tap is damaged
Check whether the water tap is turned on and
whether water supply cut-off occurs
Check whether the water inlet valve is clogged (if
necessary, clean the valve)
Check whether the water tap and water inlet pipe
are frozen
Check whether the “Delay” program is selected
Check whether the “Start/Pause” button is pressed
Check whether the water inlet pipe is bent
Check whether the water pressure is too low
Check whether power failure or abnormal
power supply occurs
Check whether the power plug is firmly
inserted into the socket
Check whether the fuse of power supply or the
current breaker is in good condition
Check whether the “Power” switch is turned on
Check whether the water tap is turned on
Check whether the “Delay” function is selected
Check whether the “Start/Pause” button is
pressed
nips
n
ehWhsawne
hW
ne
hW
egr
a
h
csid
r
e
t
aw
rehtO
Communication fault
Being inconsistent with the
conditions for door opening,
it is not allowed to unlock
the door
It is normal that the washer discharges water when or occurs.
Please ask for repair
Note:
Warm tips
To add clothes during washing or to take out clothes
after extended power failure, make sure that the
water level in the drum is properly below the lower
edge of sight glass, the water temperature is below
the drain pipe from its holder and put it down until no
water is drained from the drain pipe, afterwards put
back the drain pipe. Open the filter door at the bottom
of washer, and you will see a pull wire. Take out the
pull wire and gently pull it downwards until you hear a
low sound, the door will open, now you can add or
take out the clothes. Afterwards, reset the pull wire
and filter door.
Pull wire
Note:
Never perform the above operations when the washer is running.
The washer contains recyclable materials. Please properly dispose of them to protect
the environment.
Adding a proper amount of softener may make the clothes soft, eliminate sticking arising
from static electricity and make the clothes easier to be ironed. Excessive soften may
damage synthetic fiber. Please refer to its instructions for correct dosage of softener.
10.Cleaning/Maintenance
Fig. 1
Fig. 2
Fig. 3 Fig. 4 Fig. 5
Filter
Waste pipe
Waste pipe plug
Water container
Please pull out the power plug from the socket before
cleaning and maintenance.
Filter cleaning (once a month as recommended)
(1) After draining the water in the washer, open the filter door by pressing it
down with a flat head screwdriver or a similar tool through the square hole
above the filter door (as shown in Fig. 1).
(2) Hold the plastic pipe plug to pull out the waste pipe, prepare a water
container, remove the plastic plug of waste pipe to drain the remaining
water into the container (as shown in Fig. 2), replace the plastic plug onto
the waste pipe, and finally clamp the waste pipe in original position.
(3) Anticlockwise screw out the filter. It is normal that a little water flows out
at this time (as shown in Fig. 3).
(4) Rinse with clean water (as shown in Fig. 4).
(5) Insert the filter after aligning its convex with the groove of draining pipe,
then clockwise tighten it (as shown in Fig. 5), and finally close the filter door.
Note:
Note:
The filter must be
tightened to avoid
water leakage.
Cleaning of a distributor box
To clean a distributor box, pull it out, gently
press it down and continue to pull it out (as
shown in the figure on the right), remove it,
rinse it with water and reinstall it in place.
Cleaning of the filter screen of water inlet valve
Frequently clean the water inlet pipe joint and
the filter screen of water inlet valve to prevent
them from being clogged by impurities (as
shown in the figure on the right)
Please clean the filter screen of water
inlet valve as shown in the figures below.
• • Take out the filter screen • • Wash the filter screen
• • Reinstall the filter
screen in place
water inlet
valve joint
Function
Function
Memory Backup
The washer can memory the program you slected last time and your washing
custom,just need to press the “Start/Pause” button to start the washing,
no need to set the program again.Of course, you can adjust the program
before start.
Child Lock
After start, press the “Delay”and the “Start/Pause” button for about 3 seconds to
activate the child lock, after the child lock was activated, all buttons are useless.
After the child lock was activated, press the “Delay” and “Start/Pause” button
for about 3 seconds to cancel it.
After the child lock was activated,Power button is effective.
Please ask for repair
6. Control Panel and Program Description
Press the “Night Wash” button, the icon will light
up,indicating this function is selected.
After started,all buzzer sound is canceled(except
error alarm sound),the maximum spin speed is
800 rum.
If “Night Wash” function was selected and the
maximum spin speed higher than 800 rpm, the
machine will adjust it to 600 rpm automatically.
All progarm can select “Night Wash”function.
neercs yalpsiDnottub I
“Night Wash”
“Speed” selection button
It displays washing time,
remaining washing time,
set speed, set
temperature, child lock
state, times of extra rinse,
door lock state, washing
progress and alarm
message, etc.
Press the “Speed”
button to select
spinning speed.
The maximum
allowable spinning
speed varies with
programs.
“Temp.” selection button Program knob
Press the “Temp.” button
to select heating
temperature (--, 30, 40,
50, 60, 90). The
maximum allowable
heating temperature
varies with programs.
“- -” in the temperature
display area indicates
non-heated washing.
Select the
desired program
by turning this
knob.
After turning on
the washer, it
automatically
selects the
program of last
washing.
Press the “Speed up” button, the icon
will light up, indicating this function is
selected; this function may reduce the
water and power consumption of
washing.
This function is available before a
washing program starts and may reduce
the main wash time or a time of rinse for
some programs.
This function is not available for the
“Spin”, “Dry”, “Iron”, “Air-wash”,
“Self-clean” and “Quick” programs.
“Speed up” button
Press the “Power” button to
switch on the washer. Press
this button again and hold it
for 2s to switch it off.
After switching on the
washer, if any button is not
pressed within 5min, it will
automatically turn off.
“Power” button
Press the “Delay” button, its indicator will light up, indicating this
function is selected. The delay time (0.5-24h) increases by 30min
each press of “Delay” button. The time will change continuously if
you press and hold this button until you release it.
The delay time is the end time of washing. For example, 6:00
means the washing ends after 6 hours (the delay time must be
longer than the program’s running time).
This function is not available for the “Spin”, “Drain” programs.
“Anti-crease” and “Delay” are not available to select together.
Press the “Extra rinse” button, its indicator will
light up, indicating this function is selected.
You may increase the times of rinse (at most
three times) before softening. “P--1” shown on
the display screen means the washer will carry
out one more time of rinse.
This function is not available for the “Spin”,
“Drain”
programs.
nottub ”esnir artxE“nottub ”yaleD“
Press the “Strong” button to select or cancel the function of
intensive washing
When the“Strong”indicator lights up,it means this function is
seclected.
This function is not available for the “Rinse”, “Spin” and “drain”
programs.
“Strong” and “Speed Up” are not available to select together.
“Strong” button
“Anti-crease” button
Programs Guide
Prewash
Cotton
Synthetic
Wool
Hand wash
Underwear
Rinse
Spin
Drain
For prewashing
relatively dirty
cotton/linen fabrics
For washing cotton
fabrics
For washing
chemical fiber
fabrics
For washing wool
fabrics
For washing the not too
dirty cotton abrics or
chemical fiber fabrics
For washing contton
underwear or children`s
clothes
For washing the clothes
only
For spinning the clothes
only
For drainning the water
only
7. Display Screen
“Door lock” icon
Numerical display area (after power-on, the time of last washing
program is displayed in this area; it displays various preset codes,
e.g. is displayed at the time of trouble alarm)
“Child lock” icon
“Night wash” icon
“Speed up” icon
“Prewash” icon
“Main wash”
icon
“Rinse”
icon
“Spin” icon
Spinning speed
Program progress bar
Heating temperature
Note:
The time shown on the display screen is only for reference and may be slightly different from actual time;
When the “Prewash” program is selected, its icon will light up;
When the selected program runs to the main wash, rinse or spin stage, the corresponding icon on the
display screen will flash.
Speed
Temp.
Delay Strong
Extra Rinse Anti-crease
Press and hold 2 seconds
to set door unlocked
Speed Up
Night Wash
HW60-B12866NZP
Cotton
Prewash
Synthetic
Wool
Quick
Heavy
Underwear
Rinse
Spin
Drain
Start
Pause
S-D Inverter
Power
6.0kg
• Press "Anti-crease" button to start up/shut down the
crease-resistant and soak function.
•When the process runs to the last rinse, the washing
machine is not going to drain, clothes will be soaked in
water, and the soak icon flashes, the remain time not
decreasing. If you need to dry the clothes, you can
press "Anti-crease" button or “start /pause” button,then
the icon will be off to cancel this function,and the
washing machine continue to work.
• This feature and the "delay"button can not be chose at
the same time. Also this feature is ineffective in the
"Spin,Drain”process.
Sport Wash For washing sport
wear
Heavy
For washing Jean clothes
and big fabrics
This function is to increase wanshing time,times of rinse and
spinning time of the main wash stage of the selected program.
nottub I
“Start/Pause”
• Press the"Strat/Pause" button,the washer will start and
the indicators will keeps on,if this button is pressed when
the washer is in operation,the washer will pause and the
indicator will flash.
If not press the"Strat/Pause"button after switch on power
and satisfy the door open condition,press this button
about 2 seconds can open the door.
This machine with auto-weight function,perss "Power "
button and the door will open automatically,put in laundry
•
and close the door.The screen display
"Strat/Pause" button,the washer will finish the weight
automatically about 2 minutes later and select proper
,press
program,this function save water,power and time
effectively.
Quick
For washing slightly dirty
cotton and chemical
fiber fabrics
 Loading...