

Page 1
HTF-540DGG7
Refrigerator
User Guide
Kühlschrank
Bedienungsanleitung
Réfrigérateur
Mode d‘emploi
Frigorifero
Guida per l‘utente
Frigoríco
Manual del usuario
Koelvriescombinatie
Handleiding
Lodówka
Podręcznik użytkownika
Congelator
Manual de utilizare
Chladnička
Uživatelská příručka
Hűtőszekrény
Felhasználói útmutató
ΨΥΓΕΙΟ
ΟΔΗΓΙΕΣ ΧΡΗΣΗΣ
EN
DE
FR
IT
ES
NL
PL
RO
CZ
HU
GR
Page 2
EN
WARNING:Risk of fire/flammable ma-
terial. The symbol indicates there is a risk of
re since ammable materials are used. Take
care to avoid causing a re by ingiting ammable material. DE WARNUNG:Brandgefahr/
brennbares Material. Das Symbol weist auf
Brandgefahr hin, da brennbare Materialien verwendet werden. Verhindern Sie die Entste-
hung von Bränden, die durch entammbare
Materialien verursacht werden. FR ATTENTION: Risque d’incendie
ou de mati ères inammables. Le symbole montre qu’il y’a le risque
de maté riaux inammables sont utilisés. Prendre soin d’éviter de
provoquer un incendie en ingérant des matières inammables.
IT
ATTENZIONE: Rischio di incendio/materiale inammabile. Il
simbolo indica il rischio di incendio nel caso di utilizzo di materiali inammabili. Fare attenzione ed evitare l‘insorgere di incendi a causa
della caombustione di materiali inammabili.
ES
ADVERTENCIA:
Riesgo de incendio o mate rial inamable. El símbolo indica que
existe riesgo de incen dio, dado que se utilizan materiales inamables. Se debe procurar evitar incendios medi ante la combustión de
materiales inamables. NLWAARSCHUWING: Brandrisico / brand-
baar materiaal. Het systeem geeft aan dat er een brandrisico bestaat aangezien brandbaar materiaal wordt gebruikt. Zorg ervoor
dat er geen brand wordt veroozaakt door brandbaat materiaal te ont
steken.
PL
OSTRZEŻENIE:Ryzyko pożaru/materiał łatwopalny.
Symbol wskazuje, że istnieje ryzyko pożaru, ponieważ używane są
materiały łatwopalne. Dbaj o to, aby uniknąć pożaru poprzez zapale
nie łatwopalnego materiału.
RO
AVERTISMENT: Risc de incendiu/
material inamabil. Simbolul indică că există risc de incendiu deoa-
rece sunt folosite materiale inamabile. Aveți grijă și evitați incendiile
aprinzând mate riale inamabile. CS VAROVÁNÍ: Nebezpečí Požáru/
Hořlavého Materiálu. Symbol označuje riziko požáru, protože byly
použity hořlavé materiály. Dbejte na to, aby nedošlo ke vzniku požáru
HU
zapálením hořlavého materiálu.
FIGYELEM: Tűz / gyúlékony
anyag veszélye. A szimbólum azt jelzi, hogy tűzveszély áll fenn, mi-
vel gyúlékony anyagokat használnak. Ügyel jen arra, hogy ne tegyen
rá tűzveszélyes gyú lékony anyagot. EL ΠΡΟΣΟΧΗ: Κίνδυνος φωτιάς/
εύφλεκτο υλικό. Το σύμβολο υποδεικνύει ότι υπάρχει κίνδυνος φωτιάς επειδή
χρησιμοποιούνται εύφλεκτα υλικά. Προσέχετε να αποφεύγετε την πρόκληση
φωτιάς από ανάφλεξη εύφλεκτου υλικού.
Page 3
User Manual
Refrigerator-Freezer
HTF-540DGG7
EN
Page 4
Thank You
EN
Thank you for purchasing a Haier Product.
Please read these instructions carefully before using this appliance. The instructions contain important information which will help you get the best out of the appliance and ensure
safe and proper installation, use and maintenance.
Keep this manual in a convenient place so you can always refer to it for the safe and proper
use of the appliance.
If you sell the appliance, give it away, or leave it behind when you move house, make sure
you also pass this manual so that the new owner can become familiar with the appliance
and safety warnings.
Legend
Warning – Important Safety information
General information and tips
Environmental information
Disposal
Help protect the environment and human health. Put
the packaging in applicable containers to recycle it.
Help to recycle waste of electrical and electronic ap-
pliances. Do not dispose appliances marked with this
symbol with the household waste. Return the product
to your local recycling facility or contact your municipal
oce.
WARNING!
Risk of injury or suocation!
Refrigerants and gases must be disposed of professionally. Ensure that the tubing of
the refrigerant circuit is not damaged before being properly disposed of. Disconnect
the appliance from the mains supply. Cut o the mains cable and dispose of it. Remove
the trays and drawers as well as the door catch and seals, to prevent children and pets
to get closed in the appliance.
Old appliances still have some residual value. An environmentally friendly method of disposal will ensure that valuable raw materials can be recovered and used again.
Cyclopentane, a ammable substance not harmful to ozone, is used as an expander for
the insulationg foam.
By ensuring this product is disposed of corectly, you will help prevent potential negative
consequences for the environment and human health, which could otherwise be caused.
For more detailed information about recycling of this product, please contact your local
council, your household waste disposal service or the shop where you purchased the product, handled by the professionals.
2
Page 5
EN
Safety information ...........................................................................................................................4
Intended use ...................................................................................................................................... 9
Product description .......................................................................................................................11
Control panel ...................................................................................................................................12
Use .....................................................................................................................................................13
Equipment .......................................................................................................................................20
Care and cleaning ...........................................................................................................................23
Troubleshooting .............................................................................................................................25
Installation ........................................................................................................................................28
Technical data .................................................................................................................................31
Customer service ...........................................................................................................................33
Content
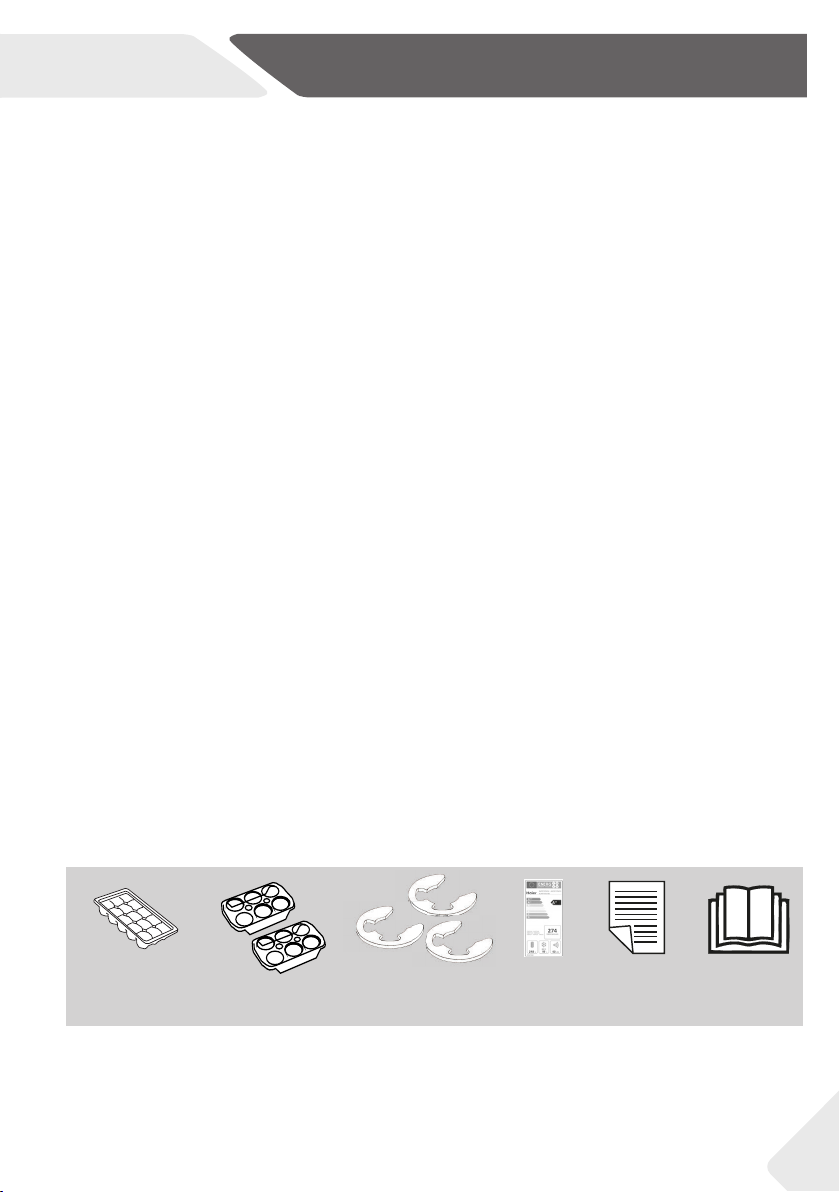
Accessories
Check the accessories and literature in accordance with this list:
Ice cube tray
2 Egg trays
3 spacers
Energy-
label
Warranty
card
User
manual
3
Page 6

Safety information
Before switching on the appliance for the rst time read the following safety hints!:
WARNING!
Before rst use
▶ Make sure there is no transport damage.
▶ Remove all packaging and keep out of children´s reach.
▶ Wait at least two hours before installing the appliance in order to
ensure the refrigerant circuit is fully ecient.
▶ Handle the appliance always with at least two persons because it
is heavy.
Installation
▶ The appliance should be placed in a well-ventilated place. Ensure a
space of at least 10 cm above and around the appliance.
▶ Never place the appliance in a damp area or location where it
might be splashed with water. Clean and dry water splashes and
stains with a soft clean cloth.
▶ Do not install the appliance in direct sunlight or in the near of heat
sources(e.g. stoves, heaters).
▶ Install and level the appliance in an area suitable for its size and use.
▶ Keep ventilation openings in the appliance or in the in-built struc-
ture clear of obstruction.
▶ Make sure that the electrical information on the rating plate agrees
with the power supply. If it does not, contact an electrician.
▶ The appliance is operated by a 220-240 VAC/50 Hz power sup-
ply. Abnormal voltage uctuation may cause the appliance to fail
to start, or damage to the temperature control or compressor, or
there may be an abnormal noise when operating. In such case, an
automatic regulator shall be mounted.
▶ Do not use multi-plug adapters and extension cables.
▶ Do not locate multiple portable socket-outlets or portable power
supplies at the rear of the appliance.
▶ Ensure that the power cable is not trapped by the refrigerator. Do
not step on the power cable.
EN
4
Page 7
EN
WARNING!
▶ Use a separate earthed socket for the power supply which is easy
accessible. The appliance must be earthed.
Only for UK: The appliance’s power cable is tted with 3-cord
(grounding) plug that ts a standard 3-cord (grounded) socket.
Never cut o or dismount the third pin (grounding). After the appliance is installed, the plug should be accessible.
▶ Do not damage the refrigerant circuit.
Daily use
▶ This appliance can be used by children aged from 8 years and
above and persons with reduced physical, sensory or mental capabilities or lack of experience and knowledge if they have been
given supervision or instruction concerning use of the appliance
in a safe way and understand the hazards involved.
▶ Children aged from 3 to 8 years are allowed to load and unload, but
not allowed to clean or install the refrigerating appliances.
▶ Keep away children under 3 years of age from the appliance unless
they are constantly supervised.
▶ Children shall not play with the appliance.
▶ If cool gas or other inammable gas is leaking in the vicinity of the
appliance, turn o the valve of the leaking gas, open the doors and
windows and do not unplug a plug in the power cable of the refrigerator or any other appliance.
▶ Notice that the appliance is set for operation at a specic ambient
range between 10 and 43°C. The appliance may not work properly
if it is left for a long period at a temperature above or below the
indicated range.
▶ Do not place unstable articles (heavy objects, containers lled with
water) on top of the refrigerator, to ovoid personal injury caused
by falling or electric shock caused by contact with water.
▶ Do not pull on the door shelves. The door may be pulled slant, the
bottle rack, may be pulled away, or the appliance may topple.
▶ Open and close the doors only with the handles. The gap between
the doors and between the doors and the cabinet is very narrow.
Do not extend your hands in these areas to avoid pinching your
ngers. Open or close the refrigerator doors only when there are
no children standing within the range of door movement.
Safety information
5
Page 8

Safety information
WARNING!
▶ Do not store or use inammable, explosive or corrosive materials
in the appliance or in the vicinity.
▶ Do not store medicines, bacteria or chemical agents in the ap-
pliance. This appliance is a household appliance. It is not recommended to store materials that require strict temperatures.
▶ Never store liquids in bottles or cans (besides high percentage
spirits) especially carbonated beverages in the freezer, as these
will burst during freezing.
▶ Check the condition of food if a warming in the freezer has taken
place.
▶ Do not set unnecessarily low temperature in the refrigerator com-
partment. Minus temperatures may occur at high settings. Attention: Bottles can burst
▶ Do not touch frozen goods with wet hands (wear gloves). Espe-
cially do not eat ice lollies immediately after removal from the
freezer compartment. There is the risk to freeze or the formation
of frost blisters. FIRST aid: keep immediately under running cold
water. Do not pull away!
▶ Do not touch the inside surface of the freezer storage compart-
ment when in operation, especially with wet hands, as your hands
may freeze onto the surface.
▶ Unplug the appliance in the event of a power interruption or be-
fore cleaning. Allow at least 7 minutes before restarting the appliance, as frequent starting may damage the compressor.
▶ Do not use electrical devices inside the food storage compart-
ments of the appliance, unless they are of the type recommended by the manufacturer.
Maintenance / cleaning
▶ Make sure children are supervised if they carry out cleaning and
maintenance.
▶ Disconnect the appliance from the electrical supply before un-
dertaking any routine maintenance. Allow at least 7 minutes before restarting the appliance, as frequent starting may damage
the compressor.
EN
6
Page 9
EN
WARNING!
▶ Hold the plug, not the cable, when unplugging the appliance.
▶ Do not clean the appliance with hard brushes, wire brushes, de-
tergent powder, petrol, amyl acetate, acetone and similar organic
solutions, acid or alkaline solutions. Please clean with special refrigerator detergent to avoid damage.
▶ Do not scrape o frost and ice with sharp objects. Do not use
sprays, electric heaters like heater, hair dryer, steam cleaners or
other sources of heat in order to avoid damage to the plastic parts.
▶ Do not use mechanical devices or other means to accelerate the
defrosting process, other than those recommended by the manufacturer.
▶ If the supply cord is damaged, it must be replaced by the manu-
facturer, its service agent or similarly qualied persons in order to
avoid a hazard.
▶ Do not try to repair, disassemble or modify the appliance by your-
self. In case of repair please contact our customer service.
▶ Eliminate the dust on the back of the unit at least once in the year
to avoid hazard by re, as well as increased energy consumption.
▶ Do not spray or ush the appliance during cleaning.
▶ Do not use water spray or steam to clean the appliance.
▶ Do not clean the cold glass shelves with hot water. Sudden tem-
perature change may cause the glass to break.
Safety information
7
Page 10

Safety information
Refrigerant gas information
WARNING!
The appliance contains the ammable refrigerant ISOBUTANE
(R600a). Make sure the refrigerant circuit is not damaged during
transportation or installation. Leaking refrigerant may cause eye
injuries or ignite. If a damage has occurred, keep away open re
sources, thoroughly ventilate the room, do not plug or unplug the
power cords of the appliance or any other appliance. Inform the
customer service.
In case of eyes get into contact with the refrigerant, rinse immediately it under running water and call immediately the eye specialist.
EN
8
Page 11
EN
Intended use
This appliance is intended for cooling and freezing food. It has been designed exclusively
for use in household and similar applications such as sta kitchen areas in shops, oces
and other working environments; farm houses and by clients in hotels, motels and other
residential type environments as well as in bed-and-breakfast and catering business. It is
not intended for commercial or industrial use.
Changes or modications to the device are not allowed. Unintended use may cause hazards and loss of warranty claims.
Standards and directives
This product meets the requirements of all applicable EC directives with the corresponding harmonised standards, which provide for CE marking.
Intended use
9
Page 12
Intended use
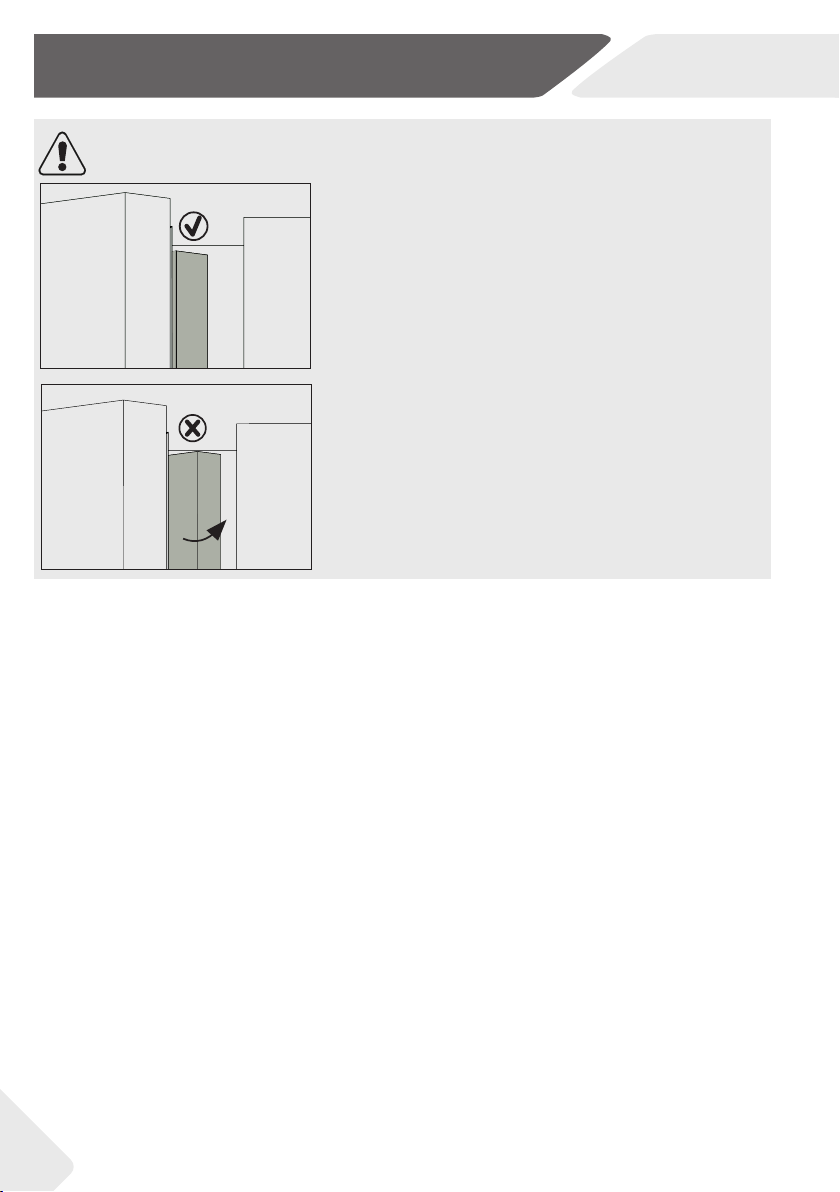
CAUTION!
When you close the door, the vertical door strip on
1.
the left door should be bent inside (1).
If you try to close the left door and the vertical door
2.
strip is unbent (2), you should bend it rstly, otherwise the door strip will hit the xing shaft or right
door. Thus a damage to the door slip or a leak will
occur.
There is a heating thread inside the frame. The temperature of the surface will rise a little, which is normal and won´t aect the function of appliance.
EN
10
Page 13
EN
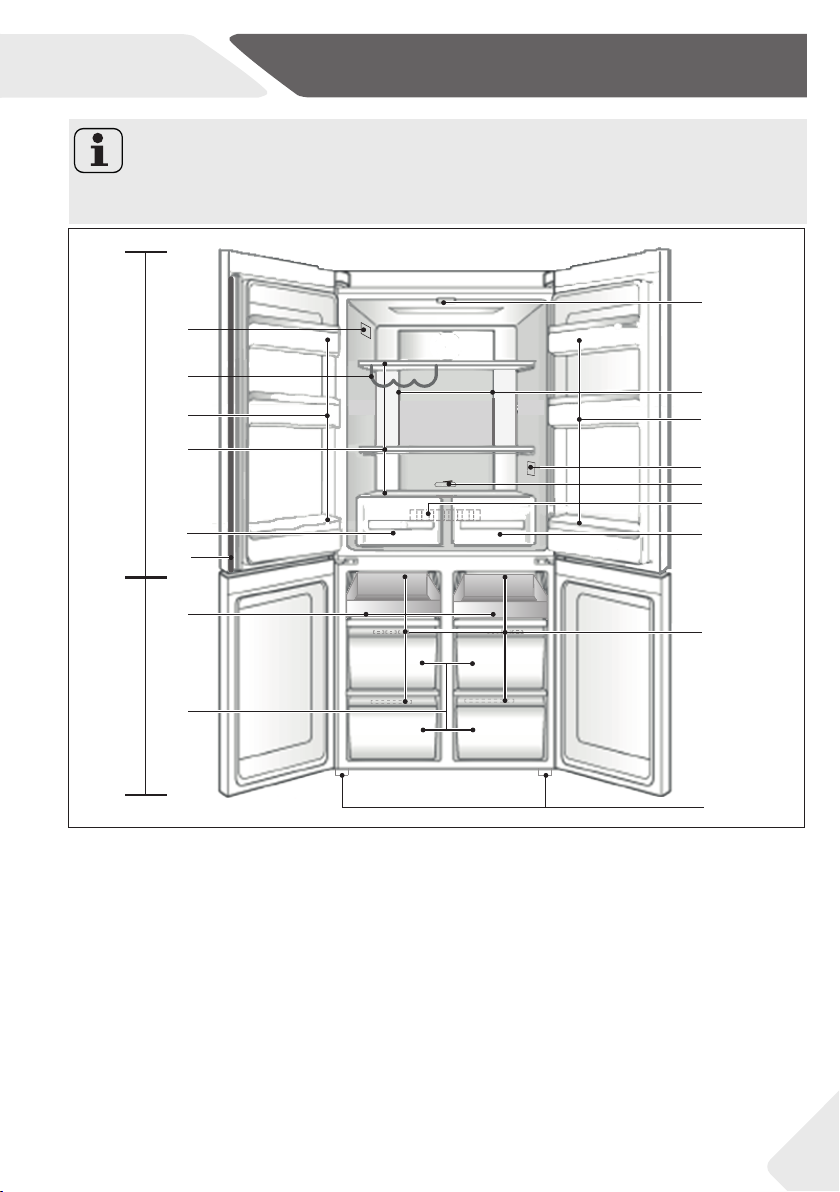
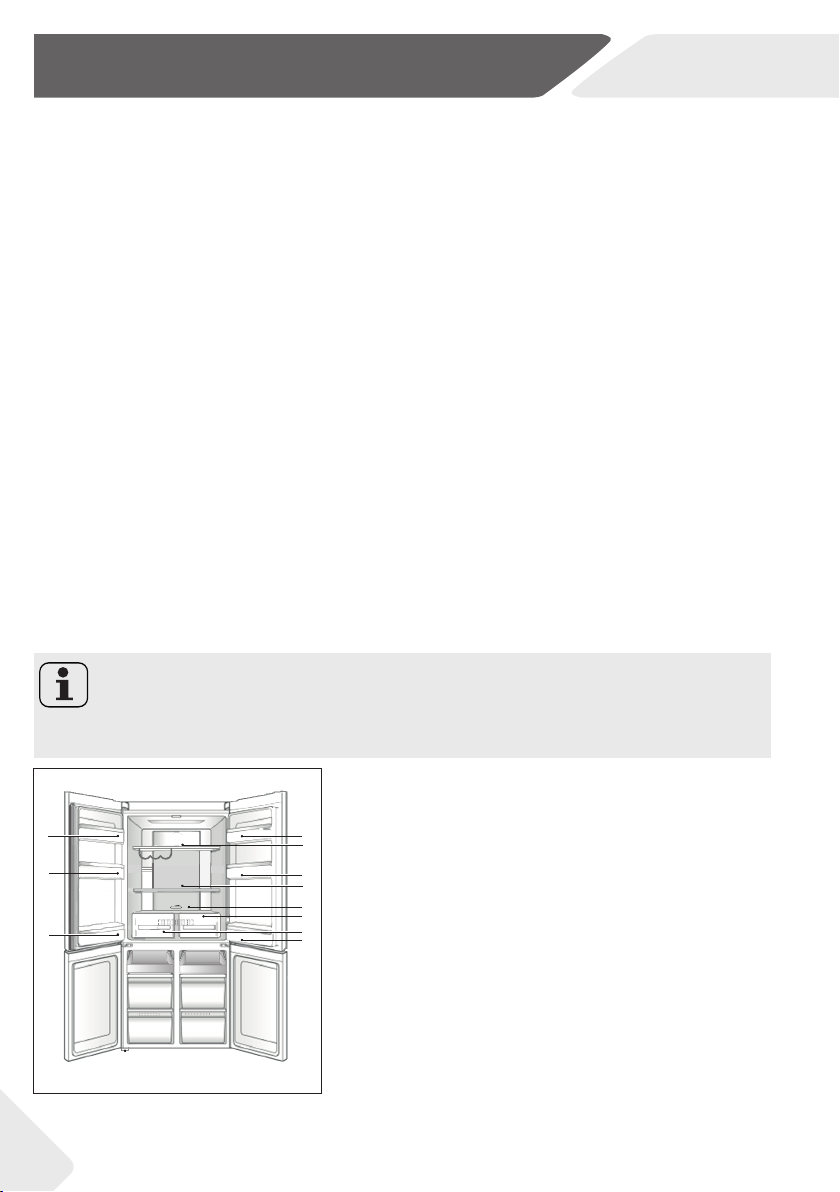
Product description
Notice
Due to technical changes and dierent models, some of the illustrations in this manual
may dier from your model.
7
3
4
A
1
2
will be
modied
5
6
13
B
14
A: Refrigerator compartment
1 Bottle holder/Door rack
2 Glass shelves
3 Rating plate
4 Wine rack
5 Humidity box
6 Vertical beam
7 Ceiling lamp
8 Air duct and sensor (behind panel)
9 O.K.-temperature indicator (optional)
10 MyZone slider
11 Air duct (behind drawers)
12 MyZone box
Chiller
Fruit&Vegetable
B: Freezer compartment
13 Sliding shelf
14 Freeze box
15 Air duct
16 Adjustable feet
8
1
9
10
11
12
15
16
11
Page 14
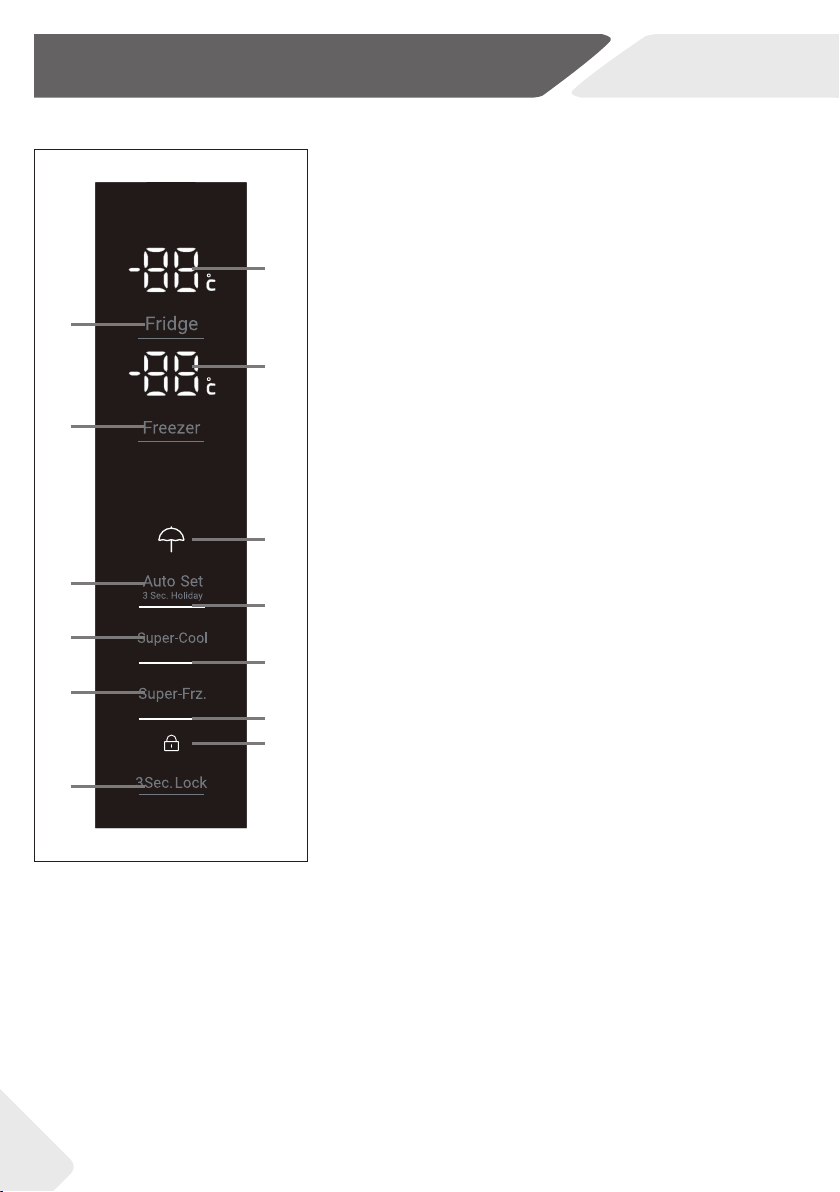
Control panel
Control panel
a
A
b
EN
Buttons:
A Fridge selector
B Freezer selector
C Auto Set mode and holiday function selector
D Super-Cool selector
E Super-Freeze selector
F Panel lock selector
B
C
D
E
F
Indicators:
a Temperature fridge
b Temperature freezer
c1 holiday mode
c2 Auto Set mode
c1
d Super-Cool function
e Super-Freeze function
c2
f Panel lock
d
e
f
Before rst use
▶ Remove all packaging materials, keep them out of children`s reach and dispose
them in an environmentally friendly manner.
▶ Clean the inside and outside of the appliance with water and a mild detergent before
putting any food in it.
▶ After the appliance has been levelled and cleaned, wait for at least 2-5 hours before
connecting it to the power supply. See Section INSTALLATION.
▶ Precool the compartments at high settings before loading with food. The function
Power- Freeze helps to cool down the freezer compartment quickly.
▶ The refrigerator temperature and freezer temperature are automatically set to 5° C
and -18° C respectively. These are the recommended settings. If desired, you can
change these temperatures manually. Please see ADJUST THE TEMPERATURE.
12
Page 15
EN
Use
Sensor keys
The buttons on the control panel are sensor keys, which already respond when lightly
touched with the nger.
Switch on /o the appliance
The appliance is in operation as soon as it is connected to the power supply.
When the appliance is powered on for the rst time, the actual refrigerator and freezer
temperatures are displayed. The display will ash. If the doors are closed it will switch o
after 30 seconds.
Maybe the panel lock is active.
Notice
▶ The appliance is preset to the recommended temperature of 5°C (refrigerator) and
- 18°C (freezer). Under normal ambient condition you need not to set a temperature.
▶ When the appliance is switched on after disconnection from the main power supply, it
may take up to 12 hours for the correct temperatures to be reached.
Empty the appliance before switching o. To switch o the appliance, pull the power cord
out of the power socket.
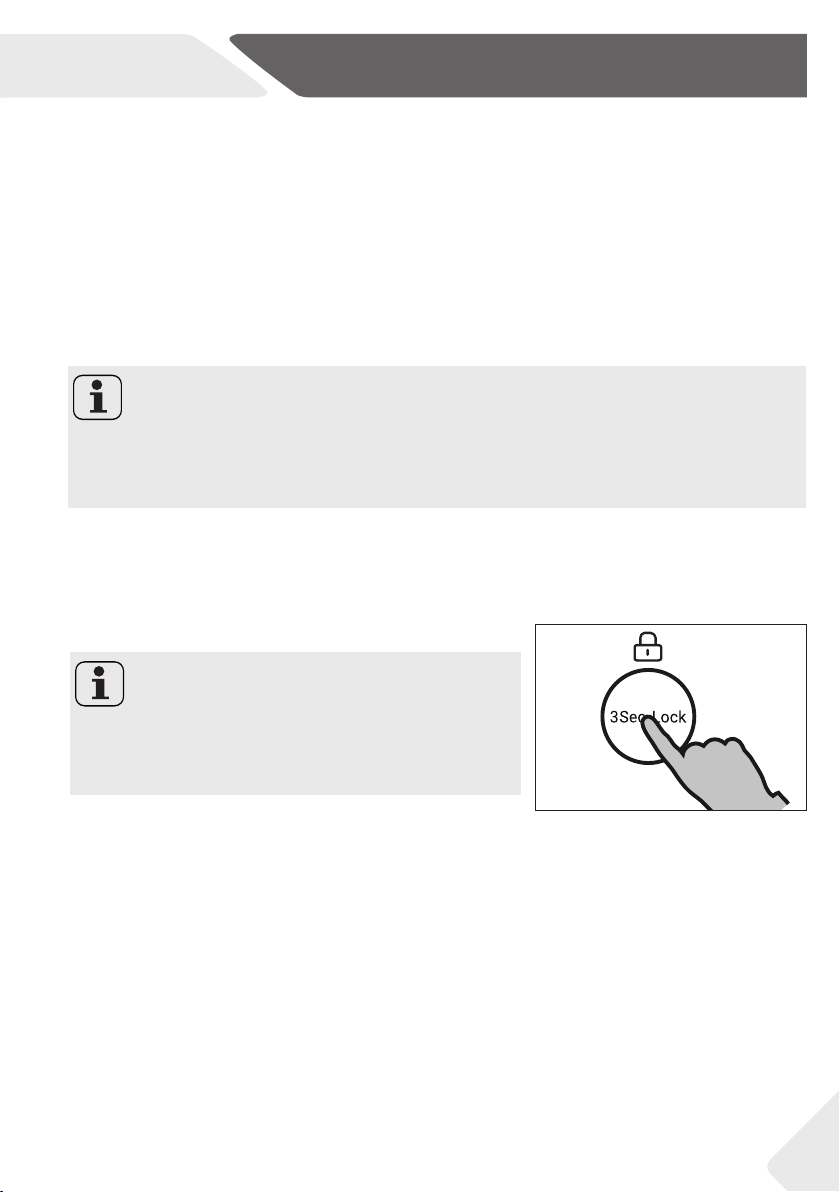
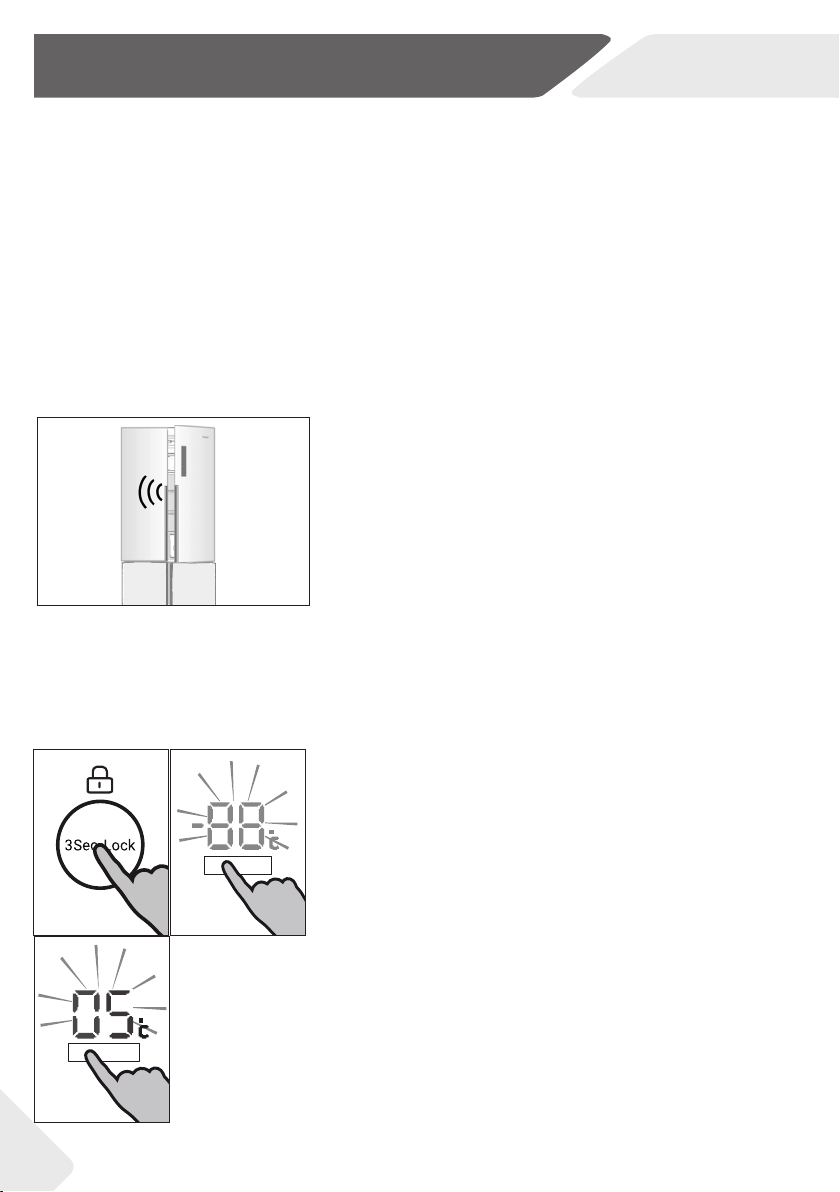
Lock/unlock panel
Notice
The control panel is automatically blocked against
activation if the doors are closed and 30 seconds no
button is pressed. For any settings the control panel
must be unlocked.
▶ Touch button “F” for 3 seconds to block all panel el-
ements against activation. The buzzer alarms and
the related indicator “f” is now displayed; the light-
ening of the panel is switched o. The icon ashes
if a button will be pressed, when the panel lock is
activated. The change is not running.
▶ For unlocking press again the button.
Standby-mode
The display screen turns o automatically 30 seconds after pressing a key. The display will
be automatically locked. It lights up automatically when pressing any key or opening any
door (Alarm does not light up the display screen).
13
Page 16
Use
EN
Select the working mode
You may need to select one of the following two ways to set the appliance:
1) Auto Set mode
Under Auto Set mode, the appliance can automatically adjust the temperature setting according to the ambient temperature and temperature change in the appliance. If you do
not have any special requirements, we recommend that you use Auto Set mode (refer to
Auto Set mode later on).
2) Manual adjusting mode:
If you want to manually adjust the temperature of the appliance in order to store a particular food, you can set the temperature via a temperature adjusting button (refer to
ADJUST THE TEMPERATURE).
Door opening alarm
When the refrigerator door is opened for more than 1
minute, the door opening alarm will sound. The alarm
can be silenced by either closing the door or touching
the control panel. If the door is left open for more than
7 minutes, the light inside the compartment and control panel illumination will automatically switch o.
Adjust the temperature
The indoor temperatures are inuenced by the following factors:
▶ Ambient temperature
▶ Frequency of door opening
▶ Amount of stored foods
1. 2.
▶ Installation of the appliance
Adjust the temperature for fridge
1. Unlock the panel by pressing button “F” if it is
locked.
Fridge
3.
Fridge
2. Press button „A“ (Fridge) for select the fridge compartment. An alarm sounds. The actual temperature in the refrigerator compartment is displayed.
3. Press button “A” to set the fridge temperature. A signal will sound at each key press.
The temperature increases in sequences of 1°C
from a minimum of 1°C (OF) to a maximum of
9°C, switching to 1°C again when pressing further.
The optimum temperature in the refrigerator is
5 °C. Colder temperatures mean unnecessary
energy consumption.
If no key is operated in 5 sec., the setting conrms automatically.
14
Page 17
EN
Use
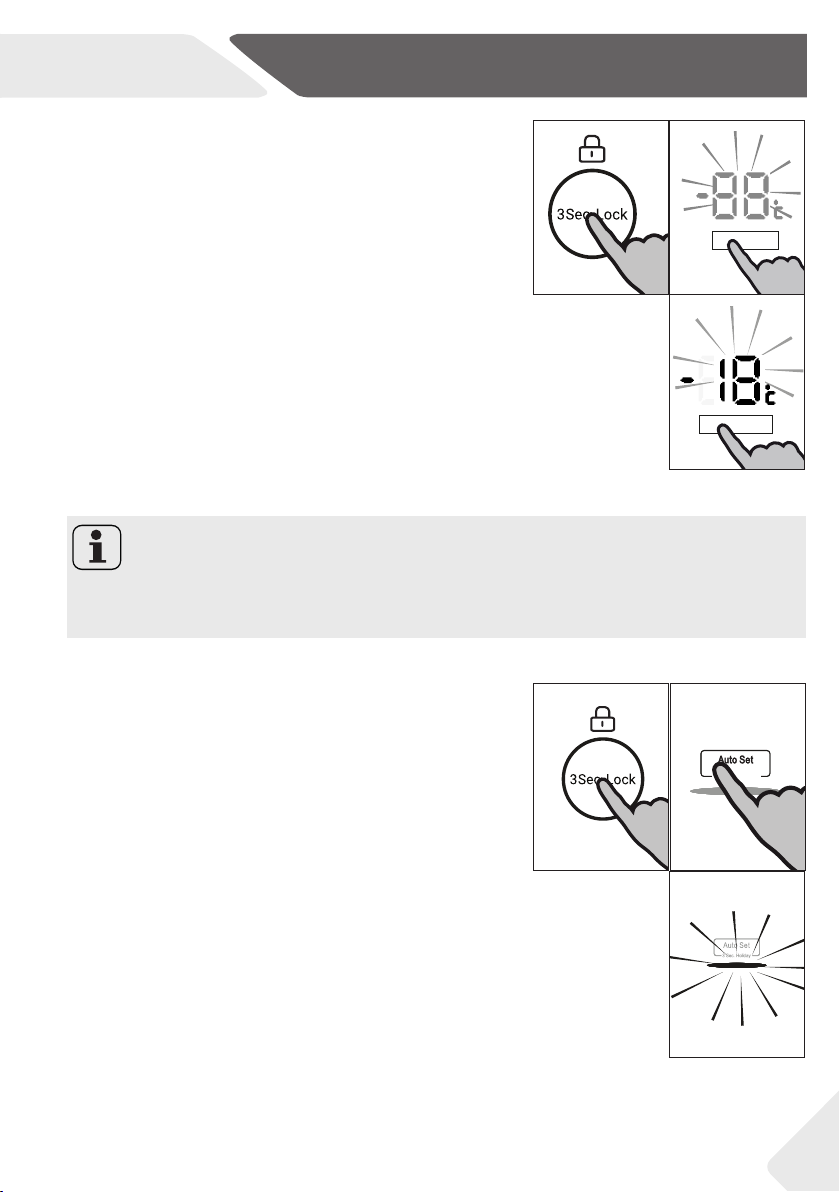
Adjust the temperature for freezer
1. Unlock the panel by pressing button “F” if it is
locked.
2. Press button “B” (Freezer) for select the freezer
compartment. An alarm sounds. The actual temperature in the freezer compartment is displayed.
3. Press button “B” (Freezer) to set the freezer temperature. A signal will sound at each key press.
The temperature increases in sequences of
1°C from a minimum of -14°C to a maximum of
-24°C, switching to -14°C again when pressing
further.
The optimum temperature in the freezer is -18°C.
Colder temperatures mean unnecessary energy
consumption.
If no key is operated in 5 sec., the setting conrms automatically.
1.
2.
Freezer
3.
Freezer
Notice
The temperature in the corresponding compartment cannot be adjusted if any other
function (Power-Freeze, Super-Cool, Holiday or Auto Set mode) is activated or the display is locked. The corresponding indicator will ash accompanying with a buzzer.
Auto Set mode
In the Auto Set mode, the appliance can automatically
adjust the temperature setting according to the ambient temperature and temperature change in the appliance. This function is totally hand free.
1. Unlock the panel by pressing button “F” if it is
locked.
2. Press button “C” (Auto Set). An alarm sounds.
3. Indicator “c2” illuminates and the function is activated.
By repeating the above steps or selecting an other
function this function can be switched o again.
1. 2.
sec. holiday
3.
15
Page 18
Use
EN
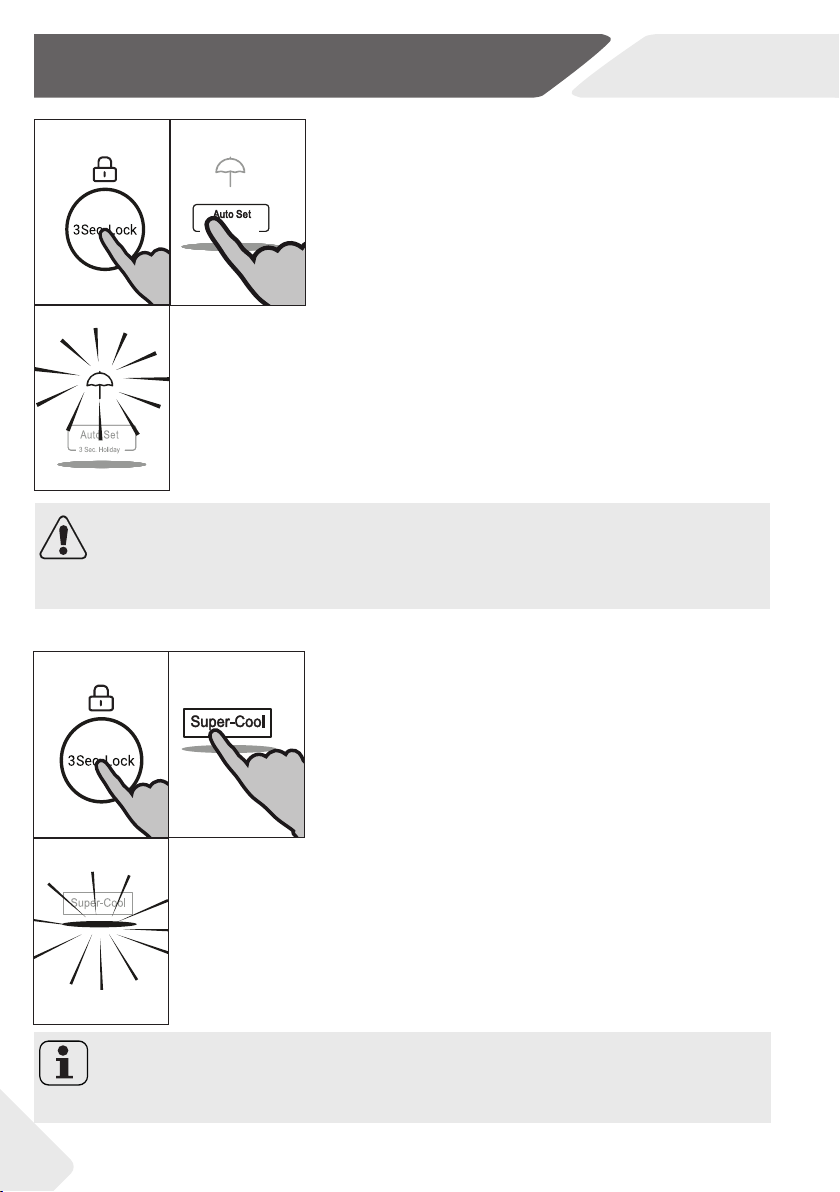
1.
3.
2.
3 sec. holiday
Holiday function
This function sets the refrigerator temperature permanently to 17°C.
This allows to keep the door of the empty refrigerator closed without causing an odour or mold - during
a long absence (e.g. during holiday). The freezer compartment is free for your setting.
1. Unlock the panel by pressing button “F” if it is
locked.
2. Press button “C” (Auto Set) for 3 seconds.
3. Indicator “c1” illuminates .and the function is activated.
By repeating the above steps or selecting an other
function this function can be switched o again.
WARNING!
During the holiday function no goods must be stored in the refrigerator compartment.
The temperature of + 17 ° C is too high for storing food.
1. 2.
3.
Super-Cool function
Switch on the Super-Cool function if larger quantity
of food should be stored (for example after the purchase). The Power-Cool function accelerates the
cooling of fresh food and protects the goods already
stored from undesirable warming. The factory setting
temperature is 0 to +1°C.
1. Unlock the panel by pressing button “F” if it is
locked.
2. Press button “D” (Super-Cool).
3. Indicator “d” illuminates and the function is activated.
By repeating the above steps or selecting an other
function this function can be switched o again.
Notice
This function will be automatically disabled after 3 hours.
16
Page 19
EN
Use
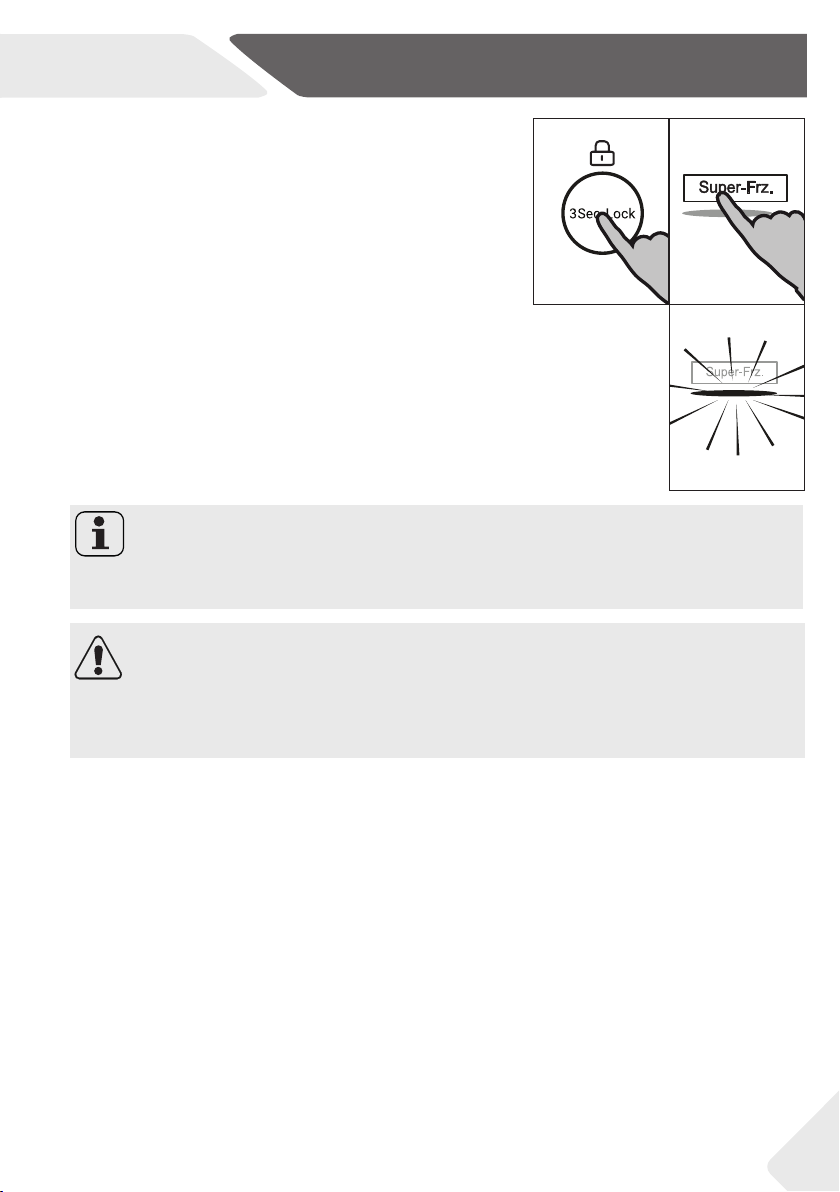
Super-Freeze function
Fresh food should be frozen as quickly as possible to
the core. This preserved the best nutritional value, appearance and taste. The Super-Freeze function accelerates the freezing of fresh food and protects the
goods already stored from undesirable warming. If
you need to freeze a large amount of food once, it is
recommended to set the Super-Freeze function on
ahead for 24 h before the usage of frozen room. The
function setting temperature is below -24 °C.
1. Unlock the panel by pressing button “F” if it is
locked.
2. Press button “E” (Super-Freeze).
3. Indicator “e” illuminates and the function is activated.
By repeating the above steps or selecting an other
function this function can be switched o again.
1. 2.
3.
Notice
The Super-Freeze function will automatically switch o after 50 hours. The appliance is
then operated at the previously set temperature.
WARNING!
▶ Empty the appliance before switching o.
▶ Keep the door of the refrigerating compartment open, when Refrigerator o func-
tion is activated, in order to avoid odour or mold..
17
Page 20
Use
Tips on storing fresh food
Storing into the refrigerator compartment
▶ Keep your fridge temperature below 5°C.
▶ Hot food must be cooled to room temperature before storing in the appliance.
▶ Foods stored in the refrigerator should be washed and dried before storing
▶ Food to be stored should be properly sealed to avoid odour or taste alterations.
▶ Do not store excessive quantities of food. Leave spaces between foods to allow cold
air owing around them, for a better and more homogeneous cooling.
▶ Foods eaten daily should be stored at the front of the shelf.
▶ Leave a gap between foods and the inner walls, allowing air owing. In special way
don’t store foods against the rear wall: foods could freeze against rear wall. Avoid direct contact of food (especially oily or acidic food) with the inner liner, as oil/acid can
erode the inner liner. Clean away oily/acid dirt whenever it is found.
▶ Defreeze frozen food in the fridge storage compartment. This way, you can use the
frozen food to decrease the temperature in the compartment and save energy.
▶ The ageing process of fruit and vegetables such as courgettes, melons, papaya, ba-
nana, pineapple, etc. can be accelerated in the refrigerator. Therefore, it is not advisable to store them in the refrigerator. However, the ripening of strongly green fruits
can be promoted for a certain period. Onions, garlic, ginger and other root vegetables should also be stored at room temperature.
▶ Unpleasant odours inside the fridge are a sign that something has spilled and clean-
ing is required. See CARE AND CLEANING.
▶ Dierent foods should be placed in dierent areas according to their properties:
EN
Notice
▶ Please keep the distance more than 10 mm between the food placed and air duct or
sensors to ensure the cooling eect.
1 Butter, cheese, etc.
2 Eggs, cans, canned food, spices, etc.
3 Drinks and bottled foods.
4 Pickled foods, canned food, etc.
5 Meat products, snack foods, pasta, canned
food, milk, tofu, dairy etc.
6 Cooked meat, sausages, etc.
7 My Zone drawer : dry fruits, butter oils, choco-
late
8 Humidity box drawer: Fruit, vegetables, salad,
etc.
18
1
2
Chiller
Fruit&Vegetable
3
1
4
2
5
6
7
8
3
Page 21
EN
Storage into the freezer compartment
▶ Keep the freezer temperature at- 18°C.
▶ 24 hours before freezing switch on the Power-freeze function; -for small quantities
of food 4-6 hours are sucient.
▶ Hot food must be cooled to room temperature before storing in the freezer com-
partment.
▶ Food cut into small portions will freeze faster and be easier to defrost and cook. The
recommended weight for each portion is less than 2.5 kg
▶ It is better to pack food before putting it into the freezer. The outside of the pack-
aging must be dry to avoid bags sticking together. Packaging materials should be
odour-free, airtight, non-poisonous and nontoxic.
▶ In order to avoid expiration of storage periods, please note the freezing date, time
limit and name of the food on the packaging according to the storage periods of different foods.
▶ WARNING!: Acid, alkali and salt etc. could erode the internal surface of the freezer.
Do not place the food having these substances (e.g. sea sh) directly on the internal
surface. Salt water in the freezer should be cleaned up immediately.
▶ Do not exceed the food storage times recommended by the manufacturers. Only
take the required amount of food out of the freezer.
▶ Consume defrosted food quickly. Defrosted food cannot be re-frozen unless it is
rst cooked, otherwise it may bless edible.
▶ Do not load excessive quantities of fresh food in the freezer compartment. Refer
to the freezing capacity of the freezer – See TECHNICAL DATA or data at the type
plate.
▶ Food can be stored in the freezer at a temperature of at least -18°C for 2 to 12
months, depending on its properties (e.g., meat: 3-12 months, vegetables: 6-12
months)
▶ When freezing fresh food, avoid bringing it in contact with already frozen food. Risk
of thawing!
Use
When storing commercially frozen foods, please follow these guidelines:
▶ Always follow manufacturers’ guidelines for the length of time you should store food
for. Do not exceed these guidelines!
▶ Try to keep the length of time between purchase and storage as short as possible to
preserve food quality.
▶ Buy frozen foods, which have been stored at a temperature of –18 °C or below.
▶ Avoid buying food which has ice or frost on the packaging – This indicates that the
products might have been partially defrosted and refrozen at some point – temperature rises aect the quality of food.
Notice
▶ Please keep the distance more than 10 mm between the food placed and air duct to
ensure the cooling eect.
19
Page 22
Equipment
EN
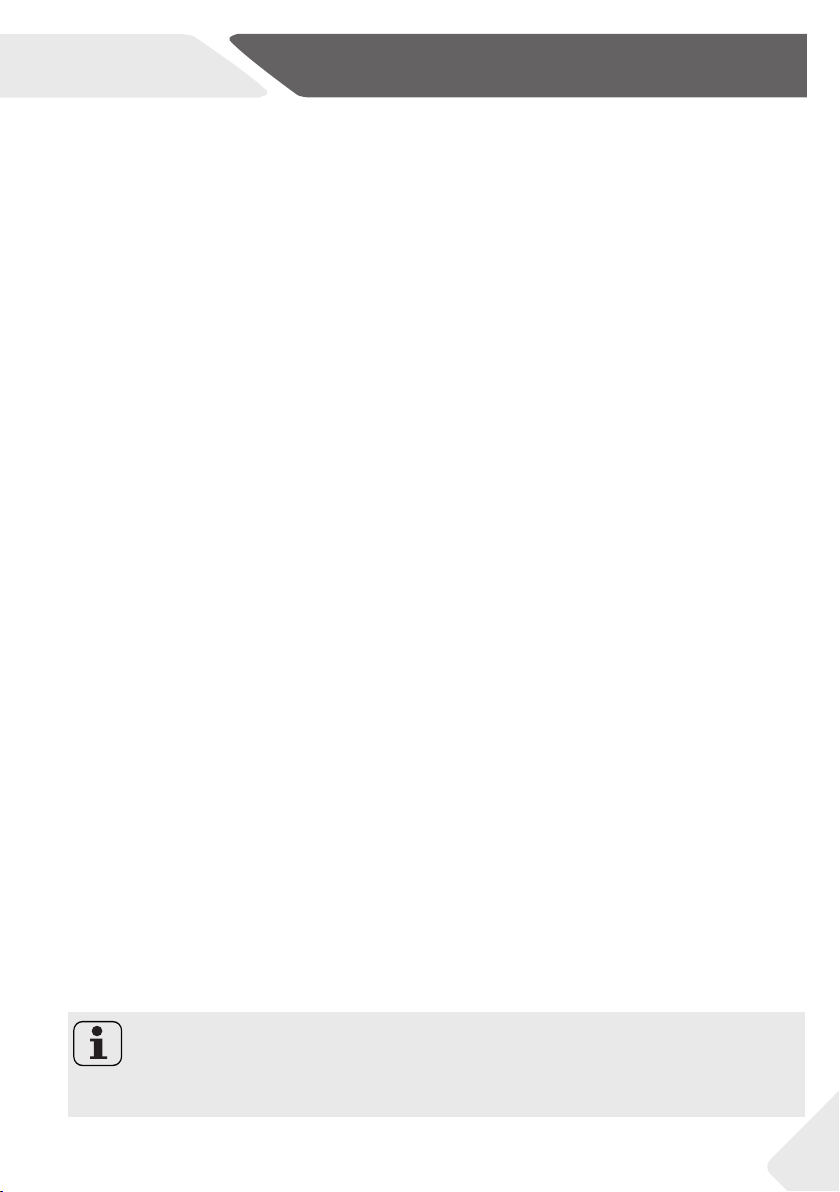
Multi-air-ow
The refrigerator is equipped with a multi-air-ow system, with which cool air ows are located on every shelf
level. This helps to maintain a uniform temperature to
ensure that your food is kept fresher for longer.
Adjustable shelves
The height of the shelves can be adjusted to t your
storage needs.
1. To relocate a shelf, remove it rst by uplifting its
hind edge (1) and pulling it out (2).
2. To reinstall it, put it on the lugs on both sides and
push it to the most rearward position until the rear
of the shelf is xed inside the slots in the sides
Notice:
Ensure that all ends of a shelf are level.
My Zone drawer
In this compartment the humidity level is around 45% This drawer is suitable to store dry
fruit and other dry food with low water content like like butter, fats and oils or chocolate.
Humidity box drawer
In this compartment the humidity level is around 85%. It is controlled automatically by the
system and is suitable to store fruits,vegetables, salads etc.
Notice:
▶ Do not remove the plastic cover inside the two zones.
They maintain the humidity.
▶ Cold-sensitive fruits like pineapple, avocado, bananas,
grapefruits and vegetables such as potatoes, aubergines, beans, cucumbers, zucchini and tomatoes and cheese should not be stored in these two drawers.
20
Page 23
EN
Equipment
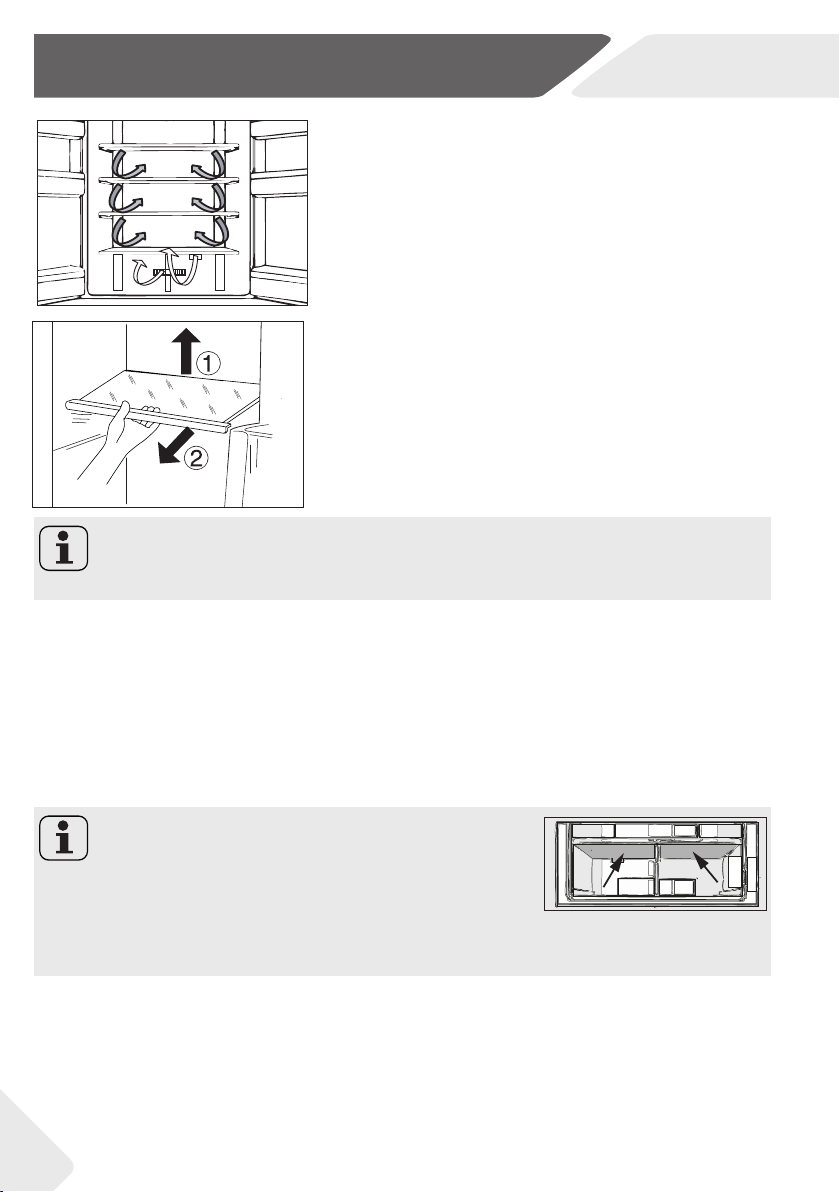
Removable door racks
The door racks can be removed for cleaning:
Place hands on each side of the rack, lift it upwards (1)
and pull it out (2).
In order to insert the door rack, the above steps are
carried out in reverse order.
1
1
2
OPTIONAL: OK-temperature indicator
The OK-temperature indicator can be used to determine temperatures below +4°C. Gradually reduce the
temperature if the sign does not indicate “OK”.
Notice:
When the appliance is switched on, it may take up to 12 hours for the correct temperatures to be reached.
Removable freezer drawer
To remove the drawer out, pull out to the maximum extent (1), lift and remove (2).
In order to insert the drawer, the above steps are carried out in reverse order.
2 2
1
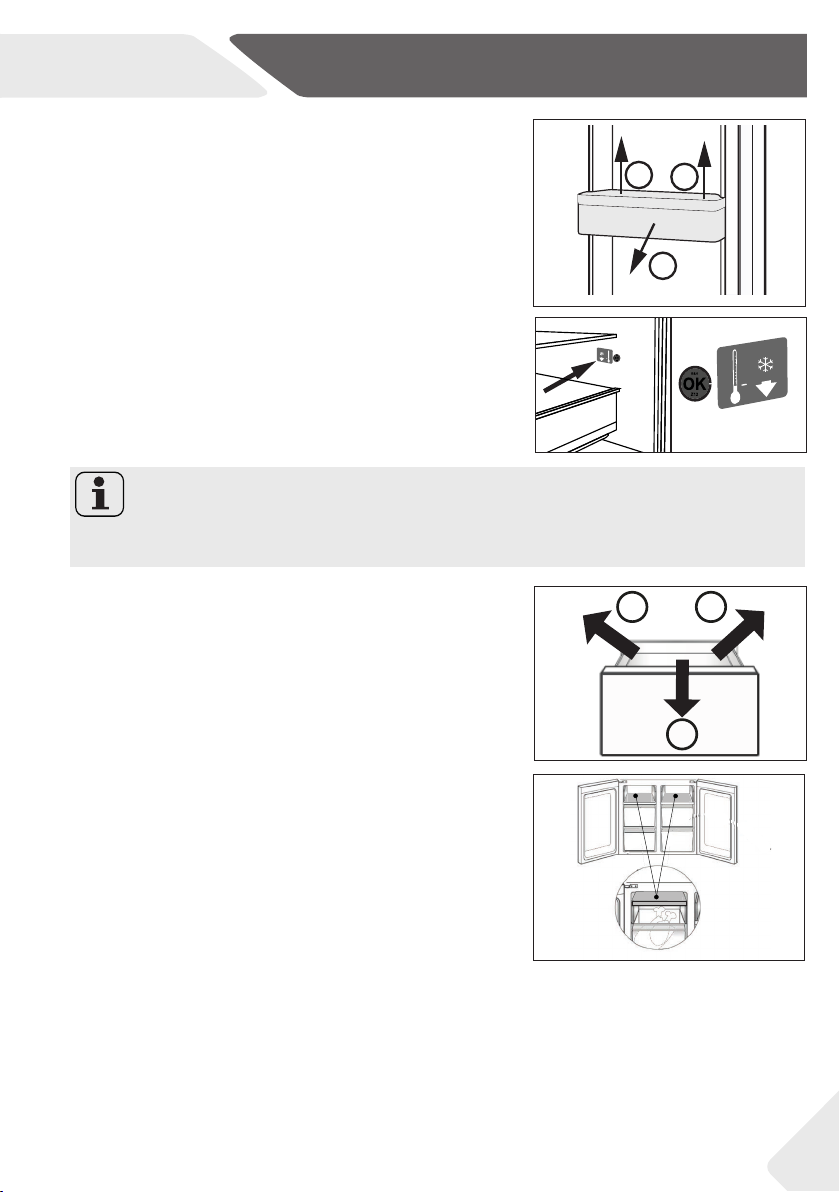
Storing large items
Large items of e.g. frozen food can be stored after:
▶ removing and overturning by 180° the upper freez-
ing tray, or
▶ after removing both upper freezing trays as well as
the middle freezer drawer and storing the food directly on the shelf.
The Light
The LED interior light comes on when the door is opened. The performance of the lights
is not aected by any of the appliances other settings.
21
Page 24

Equipment
Energy saving tips
▶ Make sure the appliance is properly ventilated (see INSTALLATION).
▶ Do not install the appliance in direct sunlight or in the near of heat sources(e.g. sto-
ves, heaters).
▶ Avoid unnecessarily low temperature in the appliance. The energy consumption in-
creases the lower the temperature in the appliance is set.
▶ Functions like POWER- FREEZE consume more energy.
▶ Allow warm food to cool down before placing it in the appliance.
▶ Open the appliance door as little and as briey as possible.
▶ Do not overll the appliance to avoid obstructing the air ow.
▶ Avoid air within the food packaging.
▶ Keep door seals clean so that the door always closes correctly.
▶ Defreeze frozen food in the fridge storage compartment.
EN
22
Page 25

EN
Care and cleaning
WARNING!
Disconnect the appliance from the power supply before cleaning.
Cleaning
Clean the appliance when only little or no food is stored.
The appliance should be cleaned every four weeks for good maintenance and to prevent
bad stored food odors.
WARNING!
▶ Do not clean the appliance with hard brushes, wire brushes, detergent powder, petrol,
amyl acetate, acetone and similar organic solutions, acid or alkaline solutions. Please
clean with special refrigerator detergent to avoid damage.
▶ Do not spray or ush the appliance during cleaning.
▶ Do not use water spray or steam to clean the appliance.
▶ Do not clean the cold glass shelves with hot water. Sudden temperature change may
cause the glass to break .
▶ Do not touch the inside surface of the freezer storage compartment, especially with
wet hands, as your hands may freeze onto the surface.
▶ In case of heating check the condition of frozen goods.
▶ Always keep the door gasket clean.
▶ Clean the inside and housing of the appliance with
a sponge dampened in warm water and neutral detergent.
1. Please scrub the interior and exterior of the refrigerator, including door sealing, door rack, glass
shelves, boxes and so on, with a soft towel or
sponge dipped in warm water (you may add neutral detergent into the warm water).
2. If there is liquid spilled, remove all the contaminated parts, directly rinse with the ow
water, dry and place it back into the fridge.
3. If there is spilled cream (such as the cream, melting ice cream), please remove all the
contaminated parts, put into the warm water with about 40 °C for some time, then
rinse with the ow water, dry and place it back into the fridge.
4. In case some small part or component gets stucked inside of the fridge (between
shelves or drawers), use small soft brush to release it. If you could not reach the part,
please contact Haier service.
▶ Rinse and dry with soft cloth.
▶ Do not clean any of the parts of the appliance in a dishwasher.
▶ Allow at least 7 minutes before restarting the appliance as frequent starting may dam-
age the compressor.
Defrosting
The defrosting of the refrigerator and the freezer compartment are done automatically;
no manual operation is needed.
23
Page 26
Care and cleaning
EN
Replacing the LED-lamps
WARNING!
Do not replace the LED lamp yourself, it must only be replaced by either the manufacturer or the authorised service agent.
The lamp adopts LED as its light source, featuring low energy consumption and long service life. If there is any abnormality, please contact the customer service . See CUSTOMER
SERVICE.
Parameters of the lamp:
Refrigerator compartment:12 V max 2 W
Freezer compartment:12 V max 0,5 W
Non-use for a longer period
If the appliance is not used for an extended period of time, and you will not
use only the Holiday-function or the fridge o function for the refrigerator:
▶ Take out the food.
▶ Unplug the power cord.
▶ Empty and clean the watertank
▶ Clean the appliance as described above.
▶ Keep the doors open to prevent the creation of bad odours inside.
Notice
Turn the appliance o only if strictly necessary.
Moving the appliance
1. Remove all food and unplug the appliance.
2. Secure shelves and other moveable parts in the fridge and the freezer with adhesive
tape.
3. Do not tilt the refrigerator more than 45° to avoid damaging the refrigerating system.
WARNING!
▶ Do not lift the appliance by its handles.
▶ Never place the appliance horizontally on the ground.
24
Page 27
EN
Troubleshooting
Many occuring problems could be solved by yourself without specic expertise. In case
of a problem please check all shown possibilities and follow below instructions before you
contact an after sales service. See CUSTOMER SERVICE.
WARNING!
▶ Before maintenance, deactivate the appliance and disconnect the mains plug from
the mains socket.
▶ Electrical equipment should be serviced only by qualied electrical experts, because
improper repairs can cause considerable consequential damages.
▶ A damaged supply should only be replaced by the manufacturer, its service agent or
similarly qualied persons in order to avoid a hazard.
Problem Possible Cause Possible Solution
The compressor
does not work.
The appliance runs
frequently or runs
for a too long period
of time.
The inside of the re-
frigerator is dirty and/
or smells.
• Mains plug is not connected in the
mains socket.
• The appliance is in the defrosting
cycle
• The indoor or outdoor tempera-
ture is too high.
• The appliance has been o power
for a period of time.
• A door/drawer of the appliance is
not tightly closed.
• The door/drawer has been opened
too frequently or for too long.
• The temperature setting for the
freezer compartment is too low.
• The door/drawer gasket is dirty,
worn, cracked or mismatched.
• The required air circulation is not
guaranteed.
• The inside of the refrigerator
needs cleaning.
• Food of strong odour is stored in
the refrigerator.
• Connect the mains plug.
• This is normal for an automatic
defrosting
• In this case, it is normal for the
appliance to run longer.
• Normally, it takes 8 to 12 hours
for the appliance to cool down
completely.
• Close the door/drawer and
ensure the appliance is located
on a level ground and there is
no food or container jarring the
door.
• Do not open the door/drawer
too frequently.
• Set the temperature higher
until a satisfactory refrigerator temperature is obtained. It
takes 24 hours for the refrigerator temperature to become
stable.
• Clean the door/drawer gasket
or replace them by the customer service.
• Ensure adequate ventilation.
• Clean the inside of the refrig-
erator.
• Wrap the food thoroughly..
25
Page 28

Troubleshooting
Problem Possible Cause Possible Solution
EN
It is not cold enough
i
nside the appli-
ance.
It is too cold inside
the appliance.
Moisture formation
on the inside of the
refrigerator compartment.
Moisture accumulates on the refrigerators outside
surface or between
the doors/door and
drawer.
Strong ice and frost
in the freezer compartment.
The sides of the
cabinet and door
strip get warm.
• The temperature is set too high.
• Too warm goods has been stored.
• Too much food has been stored at
one time.
• The goods are too close to each
other.
• A door/drawer of the appliance is
not tightly closed.
• The door/drawer has been opened
too frequently or for too long.
• The temperature is set too low.
• The Power- freeze function is acti-
vated or is running too long.
• The climate is too warm and too-
damp.
• A door/drawer of the appliance is
not tightly closed.
• The door/drawer has been opened
too frequently or for too long.
• Food containers or liquids are left
open.
• The climate is too warm and too
damp.
• The door/drawer is not closed
tightly. The cold air in the appliance
and the warm air outside it condensates.
• The goods were not adequately
packaged .
• A door/drawer of the appliance is
not tightly closed.
• The door/drawer has been opened
too frequently or for too long.
• The door/drawer gasket is dirty,
worn, cracked or mismatched.
• Something on the inside prevents
the door/drawer to close properly.
• - • This is normal.
• Reset the temperature.
• Always cool down goods be-
fore storing them.
• Always store small quantities of
food.
• Leave a gap between several
foods allowing air owing.
• Close the door/drawer.
• Do not open the door/drawer
too frequently.
• Reset the temperature.
• Switch o the Power- freeze
function
• Increase the temperature.
• Close the door/drawer.
• Do not open the door/drawer
too frequently.
• Let hot foods cool to room
temperature and cover foods
and liquids.
• This is normal in damp climate
and will change when the humidity decreases.
• Ensure that he door/drawer is
tightly shut.
• Always pack the goods well.
• Close the door/drawer.
• Do not open the door/drawer
too frequently.
• Clean the door/drawer gasket
or replace them by new ones.
• Reposition the shelves, door
racks, or internal containers to
allow the door/drawer to close.
26
Page 29

EN
Problem Possible Cause Possible Solution
Troubleshooting
The appliance
makes abnormal
sounds.
A slight sound is
to be heard si
• The appliance is not located on
level ground.
• The appliance touches some ob-
ject around it.
• - • This is normal.
• Adjust the feet to level the ap-
• Remove objects around the
milar
pliance.
appliance.
to that of owing
water.
You will hear an
alarm beep.
You will hear a faint
hum.
The interior lighting
or cooling system
does not work
• The fridge storage compartment
door is open.
• The anti-condensation system is
working
• Mains plug is not connected in the
mains socket.
• The power supply is not intact.
.
• The LED-lamp is out of order.
• Close the door or silence the
alarm manually.
• This prevents condensation
and is normal
• Connect the mains plug.
• Check the electrical supply to
the room. Call the local electricity company!
• Please call the service for
changing the lamp.
Power interruption
In the event of a power cut, food should remain safely cold for about 12 hours. Follow these
tips during a prolonged power interruption, especially in summer:
▶ Open the door/drawer as few times as possible.
▶ Do not put additional food into the appliance during a power interruption.
▶ If prior notice of a power interruption is given and the interruption duration is longer
than 12 hours, make some ice and put it in a container in the top of the refrigerator
compartment.
▶ An inspection of the goods is required immediately after the interruption.
▶ As temperature in the refrigerator will rise during a power interruption or other fail-
ure, the storage period and edible quality of food will be reduced. Any food that defrosts should be either consumed, or cooked and refrozen (where suitable) soon
afterwards in order to prevent health risks.
Memory function during power interruption
After restoration of power the appliance continues with the settings that were set before
the power failure.
27
Page 30
Installation
EN
Unpacking
WARNING!
▶ The appliance is heavy. Always handle with at least two persons.
▶ Keep all packaging materials out of children´s reach and dispose them in an environ-
mentally friendly manner.
▶ Take the appliance out of the packaging.
▶ Remove all packaging materials.
Environmental conditions
The room temperature should always be between 10° C and 43° C, since it can inuence
the temperature inside the appliance and its energy consumption. Do not install the appliance near other heat-emitting appliances (ovens, refrigerators) without isolation.
Space requirement
D1
W1
W2
Required space when door is opened:
W1=1221 mm
D2
W2=1534 mm
D1=560 mm
D2=1040 mm
28
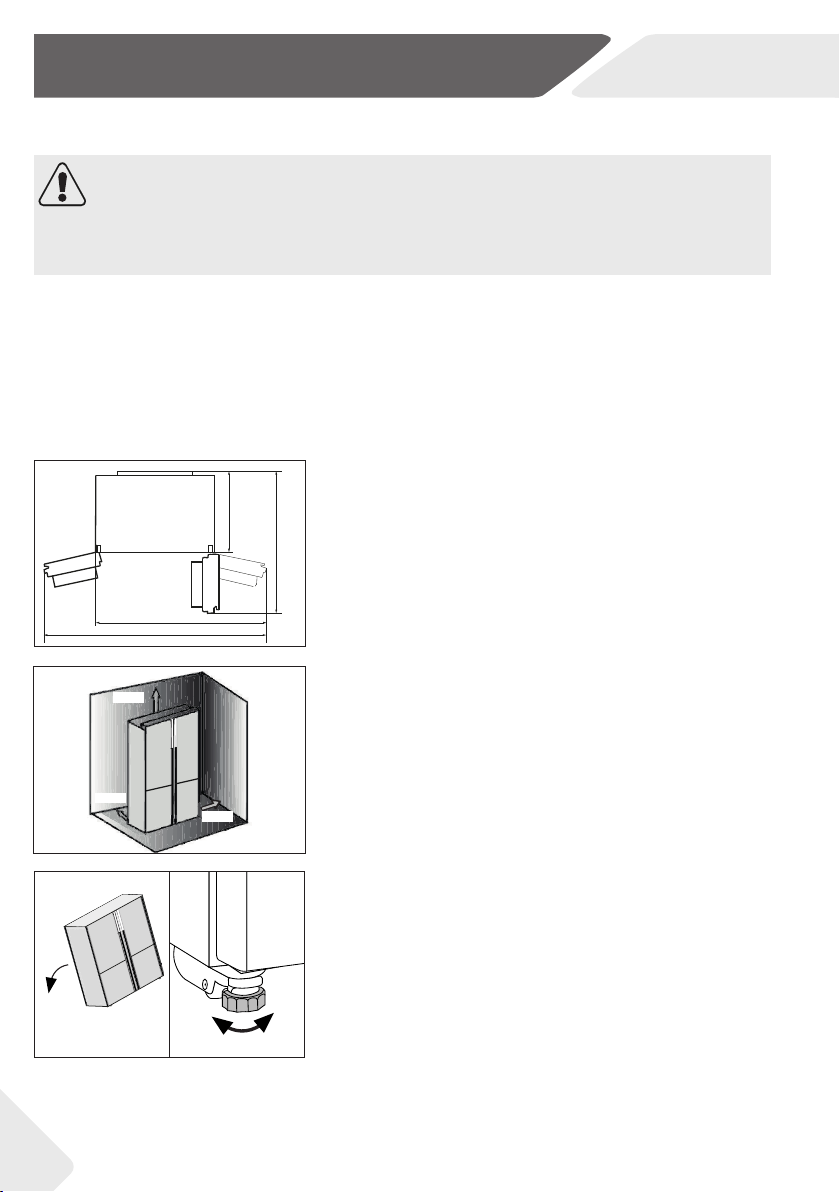
1.
max 45°
10 cm
10 cm
Ventilaton cross-section
To achieve sucient ventilation of the appliance for
safety reasons, the information of the required ventilation cross sections must be observed.
10 cm
10 cm
2.
Aligning the appliance
The appliance should be placed on a at and solid surface.
1. Tilt the appliance slightly backwards.
2. Set the feet to the desired level.
Make sure the distance to the wall on the hinge side is
at least 100 mm for the door to open properly.
Page 31

EN
Installation
3. The stability can be checked by alternately bumping on the diagonals. The slightly swaying should
be the same in both directions. Otherwise the
frame can warp; possible leaking door seals are
the result. A low tendency to the rear facilitates
the closing of the door.
Fine tuning of the doors
If the doors are not in one level, this mismatch can be
remedied by following:
A) Using adjustable foot
Rotate the adjustable foot according to the direction of
arrow to turn up or down the foot.
3.
A
B) Using spacers
▶ Open the upper door and lift it.
▶ Carefully clip the spacer (enclosed in the accessory
bag) in the white plastic ring of the middle hinge
by hand or using tools like pliers. Do not scratch or
bruise the door.
Notice
In the future use of refrigerator, doors uneven phenomenon may occur to the weight of
stored food. Then please adjust according to the above methods.
B
29
Page 32

Installation
Waiting time
To the maintenance-free lubrication oil is located in the
capsule of the compressor. This oil can get through
the closed pipe system during slanting transport. Before connecting the appliance to the power supply you
2 h
Electrical connection
Before each connection check if:
▶ power supply, socket and fusing are appropriate to the rating plate.
▶ the power socket is earthed and no multi-plug or extension.
▶ the power plug and socket are strictly according.
Connect the plug to a properly installed household socket.
WARNING!
To avoid risks a damaged power cord must be replaced by the customer service (see
warranty card).
have to wait 2-5 hours so that the oil runs back into the
capsule.
EN
30
Page 33

EN
Technical data
Product che according to regulation EU No. 1060/2010
Brand Haier
Model name / identier HTF-540DGG7
Category of the household refrigerating appliance
(1)
Energy eciency class
A+++ (most ecient) to D (least ecient)
Energy consumption
(2)
Total net capacity of whole refrigerator compartment 500 L
of which chill compartment 26 L
of which wine storage compartment of which cellar-temperature compartment of which fresh food storage compartment
Total number of wine bottles
(3)
Total net capacity of freezer compartment
Star coding
Design temperature of "other compartments"
(4)
(5)
Lowest storage temperature of wine compartment
Frost-free
Storage time during malfunctions
Freezing capacity
Climate rating
(6)
(7)
Airborne noise emitted 39 dB(A) re 1 pW
Type of appliance
Explanations:
• Yes, featured
(1) Household refrigeration categories:
Category=Designation
1=Refrigerator with one or more storage compartments for fresh food, 2=Refrigerator with cellar-temperature zone, cellartemperature compartment refrigerator and wine cabinet, 3=Refrigerator with cold storage zone and refrigerator with a zero star
compartment, 4=Refrigerator with a one-star compartment, 5=Refrigerator with a two-star compartment, 6=Refrigerator with a
three-star compartment, 7=Fridge-freezer, 8=Freezer, 9=Chest freezer, 10=Multi-purpose refrigerators and other refrigerators
(2) Based on the results of the standards conformance test over 24 hours. The actual consumption depends on the use and the
location of the appliance.
(3) The rated capacity is quoted as the number of standard 0.75 l bottles that can be stored in the appliance in accordance with the
manufacturer’s instructions.
(4) * = compartment -6°C or less; *** = frozen-food compartment -18°C or less; **** = food freezer compartment -18°C or less
with a minimum freezing capacity.
(5) ‘Other compartment’ means a compartment, other than a wine storage compartment, intended for the storage of particular
foodstus at a temperature warmer than + 14 °C.
(6) The freezing capacity is achievable for the quantity given according to type of appLiance only after switching to permanent
operation and cannot be repeated within 24 hours. Please observe the operating instructions.
(7) Climate rating SN: This appliance is intended for use in an ambient temperature of between + 10°C and +32°C
Climate rating N: This appliance is intended for use in an ambient temperature of between + 16°C and +32°C
Climate rating ST: This appliance is intended for use in an ambient temperature of between + 16°C and +38°C
Climate rating T: This appliance is intended for use in an ambient temperature of between + 16°C and +43°C
7
A++
360
324 L
-
150 L
****
-
-
•
12 h
12 kg
SN-N-ST-T
freestanding
31
Page 34

Technical data
Additional technical data
Voltage / Frequency 220-240V ~/ 50Hz
Input current (A)
Main fuse (A)
Coolant
Dimensions (H/W/D in mm)
1905 / 908 / 648
2
16
R600a
EN
32
Page 35

EN
Customer service
Customer Service
We recommend our Haier Customer Service and the use of original spare parts.
If you have a problem with your appliance, please rst check section TROUBLESHOOT-
ING.
If you cannot nd a solution there, please contact
▶ your local dealer or
▶ our European Call Service-Center (see listed phone numbers below) or
▶ the Service & Support area at www.haier.com where you can activate the service
claim and also nd FAQs.
To contact our Service, ensure that you have the following data available.
The information can be found on the rating plate.
Model _____________
Serial No. _____________
Also check the Warranty Card supplied with the product in case of warranty.
European Call Service-Center
Country* Phone number Costs
Haier Italy (IT)
Haier Spain (ES)
Haier Germany (DE)
Haier Austria (AT)
Haier United Kingdom (UK)
Haier France (FR)
* For other countries please refer to www.haier.com
Haier Europe Trading S.r.l
Branch UK
Westgate House, Westgate, Ealing
London, W5 1YY
199 100 912
902 509 123
0180 5 39 39 99
0820 001 205
0333 003 8122
0980 406 409
• 14 Ct/Min Landline
• max 42 Ct/Min Mobile
• 14,53 Ct/Min Landline
• max 20 Ct/Min all others
33
Page 36

HTF-540_EN_V08_190415
Page 37

Návod k použití
Lednička-Mraznička
HTF-540DGG7
CZ
Page 38

Děkujeme
CZ
Děkujeme Vám, že jste si zakoupili spotřebič Haier.
Před použitím spotřebiče si prosím pečlivě pročtěte tento návod. V návodu najdete důležité informace, díky nimž budete svůj spotřebič využívat naplno, zajistíte bezpečnou a
správnou instalaci, použití a údržbu.
Uchovávejte tento návod na vhodném místě, abyste ho měli vždy po ruce a mohli tak spotřebič používat bezpečně a správně.
Pokud spotřebič prodáte, darujete nebo necháte v domě/bytě např. po stěhování, zajistěte předání návodu, aby se nový majitel spotřebiče mohl seznámit s pokyny pro jeho bezpečné používání.
Popis
Upozornění - Důležité poučení o bezpečnosti
Obecné informace a tipy
Sdělení týkající se životního prostředí
Likvidace
Pomozte chránit životní prostředí a lidské zdraví. Obal
spotřebiče vyhoďte do příslušného kontejneru, aby
mohl být recyklován. Pomozte recyklovat odpad z
elektrických a elektronických přístrojů. Nevyhazujte
přístroje označené tímto symbolem do běžného odpadu z domácnosti. Vraťte výrobek do místního zařízení
pro recyklaci nebo se obraťte na svůj městský úřad.
UPOZORNĚNÍ!
Nebezpečí zranění nebo udušení!
Chladivo a plyny se musí zlikvidovat profesionálně. Před řádnou likvidací se ujistěte, že
potrubí chladicího okruhu není poškozeno. Odpojte spotřebič od elektrické sítě. Odřízněte kabel pro připojení do elektrické sítě a zlikvidujte ho. Aby nedošlo k zavření dětí
nebo domácích mazlíčků do spotřebiče, odstraňte zásobníky a zásuvky a odmontujte
západku dveří a těsnění.
Staré spotřebiče stále mají svou zbytkovou hodnotu. Ekologická metoda likvidace zajistí
opětovné získání a opětovné využití cenných surovin.
Jako expandér pro izolační pěnu se používá cyklopentan, hořlavá látka, která není škodlivá
pro ozon.
Tím, že zajistíte správné zneškodnění tohoto produktu, pomůžete předejít možným negativním důsledkům pro životní prostředí a lidské zdraví, které by jinak mohly být způsobeny.
Podrobnější informace o recyklaci tohoto produktu získáte na vašem místním úřadě, ve
společnosti zajišťující likvidaci odpadu nebo v obchodě, ve kterém jste produkt zakoupili,
obsluhované odborníky.
2
Page 39

CZ
Bezpečnostní informace ................................................................................................................ 4
Doporučené použití ......................................................................................................................... 9
Popis spotřebiče .............................................................................................................................11
Ovládací panel .................................................................................................................................12
Použití ...............................................................................................................................................13
Příslušenství ....................................................................................................................................20
Péče a čištění...................................................................................................................................23
Řešení problémů ............................................................................................................................25
Instalace ...........................................................................................................................................28
Technické údaje ..............................................................................................................................31
Zákaznický servis............................................................................................................................33
Obsah
Příslušenství
Zkontrolujte příslušenství a textovou dokumentaci podle tohoto seznamu:
Zásobník na
ledové kostky
2 Tácky pro
vajíčka
3 distanční
vložky
Energetický štítek
Záruční list
Návod k
použití
3
Page 40

Bezpečnostní informace
Před zapnutím spotřebiče si nejprve přečtěte následující
bezpečnostní rady!:
UPOZORNĚNÍ!
Před prvním použitím
▶ zkontrolujte, že nedošlo k poškození spotřebiče během přepravy.
▶ Odstraňte všechny obaly a držte mimo dosah dětí.
▶ Před instalací spotřebiče vyčkejte alespoň 2 hodiny, aby byla zajiš-
těna plná funkce chladicího okruhu.
▶ S přístrojem manipulujte vždy minimálně ve 2 osobách, protože je
těžký.
Instalace
▶ Spotřebič umístěte na dobře větraném místě. Zajistěte, aby nad a
kolem spotřebiče byla mezera minimálně 10 cm.
▶ Nikdy neumísťujte spotřebič ve vlhkém prostředí nebo na místě,
kde by na něj mohla stříkat voda. Kapky vody a skvrny osušte a
očistěte s měkkým čistým hadříkem.
▶ Neinstalujte spotřebič na přímé sluneční světlo nebo do blízkosti
tepelných zdrojů (např. sporák, radiátory).
▶ Instalujte a vyrovnejte spotřebič na místě, které odpovídá jeho ve-
likosti a způsobu využití.
▶ Udržujte větrací otvory v přístroji nebo ve vestavěné konstrukci
čisté a bez překážek.
▶ Ujistěte se, že elektrické údaje na výkonnostním štítku souhlasí se
síťovým napájením. Pokud tomu tak není, obraťte se na elektrikáře.
▶ Spotřebič je provozován na 220-240 VAC / 50 Hz napájení. Ab-
normální kolísání napětí může způsobit, že se spotřebič nepodaří
spustit, nebo se poškodí regulace teploty nebo kompresor, nebo
při provozu může vznikat abnormální hluk. V takovém případě
musí být namontován automatický regulátor napětí.
▶ Nepoužívejte adaptér s více zásuvkami a prodlužovacími kabely.
▶ Neumísťujte více přenosných zásuvek nebo přenosných napáje-
cích zdrojů na zadní stranu spotřebiče.
▶ Zkontrolujte, že lednička nestojí na napájecím kabelu. Nestoupej-
te na napájecí kabel.
CZ
4
Page 41

CZ
UPOZORNĚNÍ!
▶ Použijte samostatnou zásuvku pro uzemnění napájení, jež je
snadno přístupná. Spotřebič musí být uzemněný.
Pouze pro Spojené království: Napájecí kabel spotřebiče je vybaven
3drátovou (zemnicí) zástrčkou, která je vhodná pro standardní
3drátovou (zemnicí) zásuvku. Nikdy neodstraňujte ani nedemontujte třetí kolík (uzemnění). Po instalaci spotřebiče by zásuvka měla
zůstat přístupná.
▶ Nepoškozujte chladicí okruh.
Každodenní používání
▶ Spotřebič mohou používat děti od 8 let a osoby se sníženými fy-
zickými, smyslovými nebo mentálními schopnostmi, nebo osoby
s nedostatečnými zkušenostmi a znalostmi, pokud mají nad sebou dohled nebo pokud byly vyškoleny ohledně bezpečného používání spotřebiče a pokud chápou možná rizika.
▶ Děti ve věku od 3 do 8 let jejich smí nakládat a vykládat, ale nesmí
je čistit ani instalovat.
▶ Děti do 3 let udržujte v bezpečné vzdálenosti od spotřebiče, po-
kud nejsou pod neustálým dohledem.
▶ Se spotřebičem si nesmí hrát děti.
▶ Pokud v blízkosti spotřebiče uniká svítiplyn nebo jiný hořlavý plyn,
vypněte ventil unikajícího plynu, otevřete dveře a okna a neodpojujte nebo nepřipojujte síťový kabel chladničky nebo jiného spotřebiče.
▶ Věnujte pozornost tomu, že spotřebič je nastavený pro provoz při
rozsahu okolní teploty mezi 10 a 43 °C. Pokud bude ponechán delší dobu v prostředí, kde je teplota vyšší nebo nižší než je uvedený
rozsah, nemusí správně fungovat.
▶ Nepokládejte nestabilní předměty (těžké předměty, nádoby s vo-
dou) nahoru na spotřebič, abyste zabránili zranění osob způsobené pádem nebo elektrickému šoku způsobenému kontaktem s
vodou.
▶ Netahejte za police ve dveřích. Dveře by se mohly zkřivit, polička
na láhve odtáhnout nebo by se spotřebič mohl převrátit.
▶ Dveře spotřebiče otvírejte a zavírejte pouze klikou. Mezera mezi
dveřmi a mezi dveřmi a skříní je velmi úzká. Nedávejte ruce do
těchto míst, abyste se vyhnuli skřípnutí prstů. Dveře otvírejte a zavírejte, pouze pokud v dosahu dveří nestojí děti.
Bezpečnostní informace
5
Page 42

Bezpečnostní informace
UPOZORNĚNÍ!
▶ Neskladujte nebo nepoužívejte hořlaviny, výbušniny nebo žíravé
materiály ve spotřebiči nebo v jeho okolí.
▶ V spotřebiči neskladujte léky, bakterie nebo chemické látky. Tento
spotřebič určený pro domácnost. Nedoporučuje se pro skladování materiálů s požadavkem na přesné teploty.
▶ Nikdy neskladujte tekutiny v lahvích nebo plechovkách (kromě li-
hovin s vysokým obsahem alkoholu), zejména perlivých nápojů, v
mrazničce, protože by během zmrazování praskly.
▶ Pokud v mrazničce došlo k zahřátí, zkontrolujte stav potravin.
▶ Nenastavujte příliš nízké teploty v prostoru ledničky. Při vysokém
nastavení může teplota klesnout pod nulu. Pozor: Může dojít k
roztržení lahví.
▶ Nedotýkejte se zmrazených potravin mokrýma rukama (noste
rukavice). Zejména se vyvarujte jedení nanuků ihned po vyjmutí z
mrazničky. Je zde nebezpečí omrzlin nebo tvorby puchýřů z mrazu. První pomoc: okamžitě dejte pod tekoucí studenou vodu. V
žádném případě se neodtrhujte!
▶ Nedotýkejte se vnitřního povrchu mrazničky, když je zapnutá, ze-
jména mokrýma rukama, protože by vám ruce mohly přimrznout
k povrchu.
▶ V případě výpadku napájení nebo před čištěním spotřebič odpojte
z napájení. Před tím, než spotřebič znovu zapnete, vyčkejte alespoň 7 minut, protože časté zapínání může poškodit kompresor.
▶ Nepoužívejte elektrická zařízení uvnitř potravinové skříně, pokud
se nejedná o přístroje doporučené výrobcem.
Údržba / čištění
▶ Zajistěte, aby při provádění čištění a údržby byly děti pod dozorem.
▶ Před prováděním jakékoli běžné údržby spotřebič odpojte od elek-
trické sítě. Před tím, než spotřebič znovu zapnete, vyčkejte alespoň 7 minut, protože časté zapínání může poškodit kompresor.
CZ
6
Page 43

CZ
UPOZORNĚNÍ!
▶ Při odpojování spotřebiče od el. napájení táhněte za zástrčku, ne
za kabel.
▶ Spotřebič nečistěte tvrdými kartáči, drátěnými kartáči, čisticími
prášky, benzínem, amyloacetáty, acetony a podobnými organickými prostředky, kyselinami nebo alkalickými čistidly. Abyste se
vyhnuli poškození spotřebiče, používejte prosím k čištění speciální čisticí prostředky určené pro ledničky.
▶ Ne seškrabávejte námrazy a led ostrými předměty. Nepoužívejte
spreje, elektrické ohřívače jako radiátory, fény, parní čističe nebo
jiné zdroje tepla, abyste zabránili poškození plastových částí.
▶ Pro urychlení rozmrazení nepoužívejte mechanická zařízení nebo
jiné prostředky jinak, než je doporučeno výrobcem.
▶ Pokud je síťový kabel poškozený, musí ho vyměnit výrobce, auto-
rizovaný servis nebo podobně kvalikovaná osoba, aby se zabránilo možným rizikům.
▶ Nepokoušejte se o opravení spotřebiče vlastními silami. V případě
nutnosti opravy spotřebiče kontaktujte náš zákaznický servis.
▶ Alespoň jednou ročně odstraňte prach ze zadní části spotřebi-
če, abyste omezili riziko vzniku požáru a také zvýšenou spotřebu
energie.
▶ Během čištění na spotřebič nestříkejte ani ho neoplachujte.
▶ Nepoužívejte při čištění kropicí ani parní spotřebiče.
▶ Studené skleněné police neomývejte horkou vodou. Náhlá změ-
na teploty by mohla způsobit prasknutí skla.
Bezpečnostní informace
7
Page 44

Bezpečnostní informace
Informace o chladicím plynu
UPOZORNĚNÍ!
Spotřebič obsahuje hořlavé chladivo ISOBUTAN (R600a). Zkontrolujte, že během přepravy a instalace nedošlo k poškození chladicího okruhu. Prosakující chladivo může způsobit poranění očí nebo
se vznítit. Pokud se objeví závada, držte všechny zdroje otevřeného
ohně stranou, důkladně vyvětrejte místnost, nezapojujte ani ne-
vypojujte síťové kabely žádného spotřebiče v místnosti. Informujte
zákaznický servis.
V případě, že chladivo přijde do kontaktu s očima, okamžitě je propláchněte pod tekoucí vodou a zavolejte neprodleně očního lékaře.
CZ
8
Page 45

CZ
Doporučené použití
Tento spotřebič je určený k chlazení a mrazení potravin. Je určen výhradně pro použití v
domácnosti a podobných podmínkách, jako jsou oblasti kuchyně pro personál v obchodech, kancelářích a dalším pracovním prostředí; farmových domech a pro klienty v hotelech, motelech a jiných prostředích obytného typu, stejně jako v ubytovacích a stravovacích zařízeních. Není určený pro komerční nebo průmyslové využití.
Není dovoleno spotřebič jakkoli měnit nebo upravovat. Nedovolené zacházení může způsobit poruchy a ztrátu záruky.
Normy a směrnice
Tento výrobek vyhovuje požadavkům všech odpovídajících směrnic ES včetně souvisejících harmonizovaných norem, které jsou nutné pro to, aby výrobek mohl nést označení
CE.
Doporučené použití
9
Page 46

Doporučené použití
VÝSTRAHA!
Když zavřete dveře, svislý pás dveří na levých dveřích
1.
se ohne dovnitř (1).
Pokud se pokusíte zavřít levé dveře a vertikální pás
2.
na dveřích není zahnutý (2), nejprve ho zahněte, jinak pás na dveřích zasáhne upevňovací hřídel nebo
pravé dveře. Tak může dojít k skluzu nebo netěsnosti
dveří.
Uvnitř rámu je dispozici ohřívací spirála. Teplota povrchu trochu vzroste, což je normální a nemá žádný
vliv na funkce spotřebiče.
CZ
10
Page 47

CZ
Popis spotřebiče
Poznámka
Některé ilustrace v tomto manuálu se mohou v důsledku technických změn a rozdílnosti
modelů lišit od Vašeho spotřebiče.
7
3
4
A
1
2
bude mo-
dikován
5
6
13
B
14
A: Prostor chladničky
1 Držák na lahve / Stojan ve dveřích
2 Skleněné police
3 Výkonnostní štítek
4 Stojan na víno
5 Vlhký box
6 Vertikální pás
7 Stropní svítidlo
8 Vzduchový kanál a snímač (za panelem)
9 Indikátor správné teploty (volitelně)
10 MyZone posuvník
11 Vzduchový kanál (za zásuvkami)
12 MyZone box
Chiller
Fruit&Vegetable
B: Mrazicí prostor
13 Posuvná police
14 Mrazicí box
15 Vzduchové potrubí
16 Nastavitelné nožičky
8
1
9
10
11
12
15
16
11
Page 48

Ovládací panel
Ovládací panel
A
Tlačítka:
A Ovladač ledničky
B Volič Mrazničky
C Volič režimu "Auto Set" a funkce "Dovolená"
D Volič "Super Cool"
a
E Volič "Super Freeze"
F Ovladač uzamčení panelu
b
CZ
B
C
D
E
F
Kontrolky:
a Teplota ledničky
b Teplota Mrazničky
c1 Režim Dovolená
c2 Režim Auto Set
c1
d Funkce Extra Cool
e Funkce Extra Freeze
c2
f Uzamčení panelu
d
e
f
Před prvním použitím
▶ Odstraňte všechny obalové materiály, udržujte je mimo dosah dětí a zlikvidujte je v
souladu s ochranou životního prostředí.
▶ Než vložíte do spotřebiče potraviny, očistěte ho uvnitř i zvenku vodou a jemným či-
sticím prostředkem.
▶ Po vyrovnání a očištění spotřebiče vyčkejte alespoň 2-5 hodiny, než ho zapojíte do
elektrické sítě. Viz oddíl INSTALACE.
▶ Nechte přihrádky vychladit na požadovanou teplotu dříve, než do nich vložíte potra-
viny. Funkce Silné mrazení pomáhá rychlému ochlazení mrazničky.
▶ Teplota ledničky je automaticky nastavená na 5° C a teplota mrazničky na - 18° C. To
je doporučené nastavení. Nastavené teploty můžete ručně změnit podle vlastních
požadavků. Viz NASTAVENÍ TEPLOTY.
12
Page 49

CZ
Použití
Doteková tlačítka
Tlačítka na ovládacím panelu jsou doteková tlačítka, která reagují na lehký dotek prstem.
Zapnutí/Vypnutí spotřebiče
Spotřebič je funkční, jakmile ho zapojíte do elektrické sítě.
Při prvním zapnutí přístroje se zobrazí aktuální teplota chladničky a mrazničky. Displej za-
čne blikat. Pokud jsou dveře zavřené, vypne se po 30 sekundách.
Zámek panelu může být aktivní.
Poznámka
▶ Spotřebič je nastavený na doporučenou teplotu 5°C (lednička) a -18°C (mraznička).
Za normálních podmínek okolního prostředí není nutné teplotu nastavovat.
▶ Když zapnete spotřebič po předchozím odpojení od elektrické sítě, může trvat až 12
hodin, než dosáhne správných teplot.
Před vypnutím spotřebič vyprázdněte. Chcete-li spotřebič vypnout, vytáhněte napájecí
kabel ze zásuvky.
Zamknout/Odemknout panel
Poznámka
Ovládací panel se automaticky zablokuje proti aktivaci, dveře jsou zavřené a není-li po dobu 30 sekund
stisknuto žádné tlačítko. Chcete-li provést jakékoli
nastavení, ovládací panel musí být odemčený.
▶ Chcete-li zablokovat všechny prvky na panelu proti
aktivaci, držte po dobu 3 sekund tlačítko „F“. Bzu-
čák spustí alarm a zobrazí se související kontrolka
"f" světlení panelu se vypne. Pokud bude stisknu-
to tlačítko, když je aktivován zámek panelu, ikona
bude blikat. Změna není spuštěna.
▶ Chcete-li panel odemknout, přidržte znovu tlačítko
„G“.
Pohotovostní režim (Stand-by)
Displej se automaticky vypne 30 sekund po stisknutí tlačítka. Displej se automaticky zamkne. Automaticky se rozsvítí po stisknutí libovolného tlačítka nebo po otevření dveří (spuštěním alarmu se displej nerozsvítí).
13
Page 50

Použití
CZ
Volba pracovního režimu
Pro nastavení spotřebiče můžete zvolit jednu z následujících možností:
1) Režim Auto Set
Ve Auto Set režimu může spotřebič automaticky upravovat teplotu podle okolní teploty a
podle změn teploty uvnitř spotřebiče. Pokud nemáte žádné zvláštní požadavky, doporučujeme použít Auto Set režim (viz režim Auto Set níže).
2) Ruční nastavení:
Chcete-li nastavit teplotu spotřebiče ručně s ohledem na uchovávání specických potravin, můžete ji nastavit přes tlačítko pro nastavení teploty (viz NASTAVENÍ TEPLOTY).
Alarm při otevřených dveřích
Jsou-li dveře ledničky otevřené více než 1 minuty, ozve
se alarm dveří. Alarm lze vypnout buď zavřením dveří nebo dotykem ovládacího panelu. Pokud jsou dveře
otevřené déle než 7 minut, světlo uvnitř prostoru a
osvětlení ovládacího panelu se automaticky vypnou.
Nastavení teploty
Vnitřní teploty ovlivňují níže uvedené faktory:
▶ Okolní teplota
▶ Četnost otevírání dveří
▶ Množství uchovávaných potravin
▶ Instalace spotřebiče
1. 2.
Nastavení teploty pro ledničku
1. Je li zamčený, odemkněte panel stiskem tlačítka
"F".
Fridge
3.
Fridge
2. Abyste zvolili oddíl ledničky, stiskněte tlačítko „A“
(lednička). Zazní alarm. Zobrazí se aktuální teplota
chladicího oddílu.
3. Pro nastavení teploty chladničky stiskněte tlačítko
„A“. Při každém stisknutí tlačítka zazní signál.
Teplota se zvyšuje v sekvencích po 1°C od minima 1°C (OF) do maxima 9°C, po dosažení maxima se po dalším stisknutí opět přepne na 1°C.
Optimální teplota v chladničce je 5 °C. Nižší teplota
představuje nadbytečnou spotřebu energie.
Pokud po dobu 5 sekund není stisknuto žádné tlačítko,
nastavení se automaticky potvrdí.
14
Page 51

CZ
Použití
Nastavení teploty pro mrazničku
1. Je li zamčený, odemkněte panel stiskem tlačítka
"F".
2. Abyste zvolili oddíl mrazničky, stiskněte tlačítko „B“
(Mraznička). Zazní alarm. Zobrazí se aktuální teplota mrazícího oddílu.
3. Pro nastavení teploty mrazničky stiskněte tlačítko
„B“ (Mraznička). Při každém stisknutí tlačítka zazní
signál.
Teplota se zvyšuje v sekvencích po 1°C od minima -14°C (OF) do maxima -24°C, po dosažení
maxima se po dalším stisknutí opět přepne na
-14°C.
Optimální teplota v mrazničce je -18°C. Nižší teplota představuje nadbytečnou spotřebu energie.
Pokud po dobu 5 sekund není stisknuto žádné tlačítko,
nastavení se automaticky potvrdí.
1.
2.
Freezer
3.
Freezer
Poznámka
Teplotu v odpovídajícím prostoru nelze upravit v případě, pokud je aktivována jakákoli
jiná funkce (Silné mrazení, Super chlazení, Dovolená nebo Auto Set režim) nebo je displej
uzamčen. Odpovídající indikátor bude blikat a bude doprovázen bzučákem.
Režim Auto Set
Ve Auto Set režimu si spotřebič automaticky nastavuje teplotu v závislosti na okolní teplotě a na změnách
vnitřní teploty. Tato funkce je zcela automatická.
1. Je li zamčený, odemkněte panel stiskem tlačítka
"F".
2. Ctiskněte tlačítko “C” (Auto Set). Zazní alarm.
3. Rozsvítí se kontrolka „c2“ a funkce se aktivuje.
Opakováním výše uvedených kroků, nebo výběrem
další funkce, může být tato funkce opět vypnuta.
1. 2.
sec. holiday
3.
15
Page 52

Použití
CZ
1.
3.
2.
3 sec. holiday
Funkce Dovolená
Touto funkcí nastavíte teplotu spotřebiče na stálých
17°C.
Díky tomu je možné nechat dveře prázdné lednice zavřené, aniž by vznikl zápach nebo plíseň – a to po dobu
dlouhé nepřítomnosti (např. během dovolené). Oddíl
mrazničky můžete nastavit podle libosti.
1. Je li zamčený, odemkněte panel stiskem tlačítka
"F".
2. Stiskněte tlačítko “C” (Auto Set) po dobu 3 sekund.
3. Rozsvítí se kontrolka „c1“ a funkce se aktivuje.
Opakováním výše uvedených kroků, nebo výběrem
další funkce, může být tato funkce opět vypnuta.
UPOZORNĚNÍ!
Je-li zapnutá funkce Dovolená, nesmí být v ledničce uloženy žádné potraviny. Teplota
17°C je pro uchovávání potravin příliš vysoká.
1. 2.
3.
Funkce Super chlazení (Super Cool)
Chcete-li uložit větší množství potravin (např. po nákupu), zapněte funkci Extra chlazení. Funkce Power
Cool urychlí chlazení čerstvých potravin a potraviny již
uložené ochrání před nežádoucím ztepláním. Továrně
nastavená teplota je od 0 do +1°C.
1. Je li zamčený, odemkněte panel stiskem tlačítka
"F".
2. Stiskněte tlačítko “D” (Super Cool).
3. Rozsvítí se kontrolka „d“ a funkce je aktivní.
Opakováním výše uvedených kroků, nebo výběrem
další funkce, může být tato funkce opět vypnuta.
Poznámka
Po 3 hodinách se funkce automaticky vypne.
16
Page 53

CZ
Použití
Super mrazení (Super freeze)
Čerstvé potraviny by měly být zcela zmrazeny co nejrychleji. Zachovají se tak nejlepší nutriční hodnoty,
vzhled a chuť. Funkce Extra mrazení zrychluje zmražení
čerstvých potravin a chrání již uložené potraviny před
nežádoucím ztepláním. Pokud potřebujete jednorázově zmrazit velké množství potravin, doporučujeme
zapnout funkci Super Freeze 24 hodin před použitím
mrazicího prostoru. Teplota pro nastavení funkce je
nižší než -24 ° C.
1. Je li zamčený, odemkněte panel stiskem tlačítka
"F".
2. Stiskněte tlačítko “E” (Super Freeze).
3. Rozsvítí se kontrolka „e“ a funkce je aktivní.
Opakováním výše uvedených kroků, nebo výběrem
další funkce, může být tato funkce opět vypnuta.
1. 2.
3.
Poznámka
Po 50 hodinách se funkce Extra mrazení automaticky vypne. Spotřebič pak bude pracovat při teplotě, která byla nastavena před použitím funkce Extra mrazení.
UPOZORNĚNÍ!
▶ Před vypnutím spotřebič vyprázdněte.
▶ Když je aktivována funkce Vypnutí chladničky, pro zabránění vzniku zápachu nebo
plísní, nechte dvířka chladicího prostoru otevřené.
17
Page 54

Použití
Tipy pro uchování čerstvých potravin
Ukládání do prostoru ledničky
▶ Udržujte teplotu v ledničce pod 5°C.
▶ Horká jídla se musí před uložením do ledničky zchladit na pokojovou teplotu.
▶ Potraviny by se před uložením do ledničky měly omýt a osušit
▶ Potraviny určené pro uložení do ledničky by měly být řádně utěsněny, aby se zabráni-
lo změnám vůně nebo chuti.
▶ Neuchovávejte nadměrné množství potravin. Pro lepší a homogenní chlazení ne-
chávejte mezi potravinami mezery, aby kolem nich mohl proudit chladný vzduch.
▶ Denně používané potraviny by se měly ukládat do přední části polic.
▶ Nechcete mezeru mezi potravinami a vnitřními stěnami ledničky, aby mohl vzduch
volně proudit. Zejména ohlídejte, aby se potraviny nedotýkali zadní stěny: mohly by k
ní přimrznout. Zabraňte přímému kontaktu potravin (zejména mastných nebo kyselých) s vnitřním povrchem, protože mastnota a kyseliny ho mohou rozrušit. Kdykoli
narazíte na mastnou/kyselou špínu, hned ji vyčistěte.
▶ Zmražené potraviny rozmrazujte v prostoru ledničky. Zmrzlé potraviny sníží teplotu
v ledničce a tím ušetříte energii.
▶ Proces stárnutí ovoce a zeleniny, např. některé druhy zeleniny, melounů, papáji, ba-
nánů, ananasu atd., se může v ledničce urychlit. Proto není vhodné uchovávat je v
ledničce. Zrání velmi nezralého ovoce se ale může o určitou dobu urychlit. Cibuli,
česnek, zázvor a další kořenovou zeleninu je možné uchovávat při pokojové teplotě.
▶ Nepříjemné pachy uvnitř ledničky značí, že se něco vylilo a je nezbytné ledničku vy-
čistit. Viz PÉČE A ÚDRŽBA.
▶ Různé potraviny je třeba umístit na různá místa podle toho, jaké mají vlastnosti:
CZ
Poznámka
▶ Prosím, dodržujte vzdálenost více než 10 mm mezi umístěnými potravinami a vzdu-
chovým kanálem nebo senzory z důvodu zajištění chladicího účinku.
1 Máslo a sýr, atd.
2 Vejce, plechovky, konzervované potraviny, ko-
ření, atd.
3 Nápoje a zavařené potraviny.
4 Nakládané potraviny, konzervované potraviny,
atd.
5 Masné výrobky, snack, těstoviny, konzervova-
né potraviny, mléko, tofu, mléčné výrobky atd.
6 Vařené maso, klobásy, atd.
7 Zásuvka My Zone: Sušené ovoce, máslový
olej, čokoláda
8 Zásuvka pro vlhkou zónu: Ovoce, zelenina, sa-
lát, atd.
18
1
2
Chiller
Fruit&Vegetable
3
1
4
2
5
6
7
8
3
Page 55

CZ
Ukládání do prostoru mrazničky
▶ Udržujte teplotu v mrazničce na -18°C.
▶ 24 hodin před mražením zapněte funkci Silné mrazení; -pro malé množství potravin
stačí 4-6 hodin.
▶ Horké potraviny je nutné před uložením do mrazničky zchladit na pokojovou teplotu.
▶ Potraviny nakrájené na malé porce zmrznou rychleji a bude snadnější je rozmrazit a
uvařit. Doporučená váha každá porce je do 2,5 kg
▶ Je lepší potraviny před vložením do mrazničky zabalit. Vnější stana obalu musí být
suchá, aby se balíčky k sobě nepřilepily. Obalové materiály musí být bez zápachu,
neprodyšné, nesmí být toxické ani škodlivé.
▶ Abyste nepřekročili dobu uchovávání potravin, zapište prosím datum zmrazení, ča-
sový limit a název potraviny na obal. Řiďte se doporučenou dobou uchovávání u různých potravin.
▶ UPOZORNĚNÍ! Kyseliny, žíraviny a sůl atd. mohou narušit vnitřní povrch mrazničky.
Neumísťujte přímo na vnitřní povrch potraviny, které obsahují tyto látky (např. mořské ryby). Slanou vodu je třeba z mrazničky ihned vyčistit.
▶ Nepřekračujte dobu skladování potravin které jsou doporučovány výrobci. Z
mrazničky vyndávejte pouze požadované množství potravin.
▶ Rozmrazené potraviny rychle zkonzumujte. Rozmrazené jídlo znovu nezmrazujte,
pokud ho nejdřív neuvaříte, protože by to negativně ovlivnilo jeho poživatelnost.
▶ Neukládejte do mrazničky nadměrné množství čerstvých potravin. Podívejte se na
mrazicí kapacitu mrazničky – viz TECHNICKÁ DATA nebo údaje na výkonnostním
štítku.
▶ Potraviny lze uchovávat v mrazničce při teplotě nejméně -18°C po dobu 2 až 12 mě-
síců podle vlastností potravin (např. maso: 3-12 měsíců, zelenina: 6-12 měsíců)
▶ Chcete-li zmrazit čerstvé potraviny, zabraňte jejich kontaktu s již zmrazenými potra-
vinami. Nebezpečí tání!
Použití
Při zmrazování komerčně mražených potravin postupujte prosím podle těchto pokynů:
▶ Vždy věnujte pozornost pokynům výrobce o délce uchování potravin. Neporušujte
tyto pokyny!
▶ Kvůli zachování kvality potravin se snažte, aby doba mezi nákupem a uložením po-
travin byla co nejkratší.
▶ Kupujte potraviny, které byly uchovávány při teplotě -18°C nebo nižší.
▶ Vyhněte se nákupu potravin, které mají na obale sníh nebo námrazu – může to zna-
čit, že výrobek byl částečně rozmrazen a znovu zmrazen – nárůst teploty ovlivňuje
kvalitu potravin.
Poznámka
▶ Prosím, pro zajištění chladícího účinku udržujte vzdálenost více než 10 mm mezi
umístěnými potravinami a vzduchovým potrubím.
19
Page 56

Příslušenství
CZ
Více-proudové chlazení
Lednička je vybavena systémem více-proudového
chlazení, díky němuž je proud studeného vzduchu
umístěný do každé police. Pomáhá to udržet rovnoměrnou teplotu a zajistit tak, že potraviny zůstanou
déle čerstvé.
Nastavitelné police
Výšku polic lze nastavit podle vašich požadavků.
1. Chcete-li přemístit polici, nejprve nadzvedněte její
zadní okraj (1) a poté ji vytáhněte (2).
2. Chcete polici znovu vložit do ledničky, položte ji na
výstupky po obou stranách a zatlačte ji do krajní
zadní polohy, dokud nezapadne do žlábků po stranách
Poznámka:
Zkontrolujte, že všechny strany police jsou ve stejné úrovni.
Zásuvka My Zone
V tomto prostoru je hladina vlhkosti okolo 45%. Tato zásuvka je vhodná pro skladování
suchého ovoce a jiných suchých potravin s nízkým obsahem vody, jako je jsou máslo, tuky
a oleje nebo čokolády.
Zásuvka pro vlhkou zónu
V tomto prostoru je hladina vlhkosti asi 85%. Je automaticky řízena systémem a je vhodná
pro skladování ovoce, zelenina, salátů atd.
Poznámka:
▶ Neodstraňujte plastový kryt uvnitř dvou zón. Udržování
vlhkosti.
▶ Ovoce citlivé na chlad, jako jsou ananas, avokádo, banány,
grapefruit a zelenina, jako jsou brambory, lilek, fazole, okurky, cukety a rajčata a sýr by
neměly být skladovány v těchto zásuvkách. Příslušenství
20
Page 57

CZ
Příslušenství
Snímatelné poličky na dveře
Poličky na dveře lze vyjmout kvůli čištění:
Položte ruce na obě strany poličky, zvedněte ji nahoru
(1) a vytáhněte (2).
Chcete-li vrátit poličku zpět na dveře, výše zmíněný
postup obraťte.
1
1
2
DOPLNĚK: Kontrolka správné teploty
Kontrolku správné teploty lze využít k udržování teploty
pod +4°C. Pokud znaménko neukazuje „OK“, snižujte
postupně teplotu.
Poznámka:
Po zapnutí spotřebiče může trvat až 12 hodin než se dosáhne správných teplot.
Vyjímatelná zásuvka mrazničky
Chcete-li odstranit zásuvku, vytáhněte ji v maximální
míře (1), zvedněte a odstraňte ji (2).
Chcete-li vrátit zásuvku, proveďte výše uvedené kroky
v opačném pořadí.
2 2
1
Skladování velkých položek
Velké předměty, např mražené potraviny lze skladovat
po:
▶ odstranění a pootočení o 180 ° horního mrazícího
zásobníku, nebo
▶ po odstranění obou horních mrazících zásobníků,
jakož i prostřední mrazicí zásuvky a skladováním
potravin přímo na polici.
Světlo
Při otevření dveří. se rozsvítí LED vnitřní osvětlení. Výkon světel není ovlivněn dalšími nastaveními ostatních zařízení.
21
Page 58

Příslušenství
Tipy na ušetření energie
▶ Zkontrolujte, zda spotřebič správně větrá (viz INSTALACE).
▶ Neinstalujte spotřebič na přímé sluneční světlo nebo do blízkosti tepelných zdrojů
(např. sporák, radiátory).
▶ Nenastavujte na spotřebiči zbytečně nízké teploty. Čím nižší teplota je na spotřebiči
nastavená, tím vyšší je spotřeba energie.
▶ Funkce SILNÉ MRAZENÍ spotřebovává více energie.
▶ Teplé potraviny nechce před uložením do spotřebiče ochladit.
▶ Dveře spotřebiče otvírejte co nejméně a na co nejkratší dobu.
▶ Spotřebič nenaplňujte přes míru, aby nedošlo ke ztížení cirkulace vzduchu.
▶ Uvnitř potravinového balení by neměl být vzduch.
▶ Udržujte těsnění dveří čisté, aby se dveře vždy správně zavřely.
▶ Zmražené potraviny rozmrazujte v prostoru ledničky.
CZ
22
Page 59

CZ
Péče a čištění
UPOZORNĚNÍ!
Než začnete s čištěním spotřebiče, odpojte ho od elektrické sítě.
Čištění
Spotřebič čistěte, pouze když je prázdný nebo když je v něm jen malé množství uskladněných potravin.
Spotřebič by se měl čistit každé 4 týdny jednak kvůli správné údržbě a jednak aby se zabránilo pachům ze špatně uchovávaných potravin.
UPOZORNĚNÍ!
▶ Spotřebič nečistěte tvrdými kartáči, drátěnými kartáči, čisticími prášky, benzínem,
amyloacetáty, acetony a podobnými organickými prostředky, kyselinami nebo alkalickými čistidly. Abyste se vyhnuli poškození spotřebiče, používejte prosím k čištění
speciální čisticí prostředky určené pro ledničky.
▶ Během čištění na spotřebič nestříkejte ani ho neoplachujte.
▶ Nepoužívejte při čištění kropicí ani parní spotřebiče.
▶ Studené skleněné police neomývejte horkou vodou. Náhlá změna teploty by mohla
způsobit prasknutí skla.
▶ Nedotýkejte se vnitřního povrchu prostoru mrazničky, zejména mokrýma rukama,
protože by vám mohly k povrchu přimrznout.
▶ Dojde-li k zahřátí, zkontrolujte stav zmrazených potravin.
▶ Těsnění na dveřích musí být vždy čisté.
▶ Vnitřek a plášť spotřebiče čistěte houbičkou navlh-
čenou teplou vodou a neutrálním čisticím prostředkem.
1. Otřete vnitřní a vnější stranu chladničky, včetně
těsnění dvířek, dveřního stojanu, skleněných polic, krabic apod., měkkou utěrkou nebo houbou
namočenou v teplé vodě (do teplé vody můžete
přidat neutrální čisticí prostředek).
2. Pokud dojde k rozlití kapaliny, odstraňte všechny znečištěné části, opláchněte je
proudem vody, osušte a vložte zpět do chladničky.
3. Pokud je rozlitá smetana (např. smetana, roztavená zmrzlina), odstraňte všechny
kontaminované části, na určitý čas je vložte do teplé vody s teplotou přibližně 40°C,
poté opláchněte proudem vody, osušte a vložte je zpět na místo v chladničce.
4. V případě, že se v chladničce (mezi policemi nebo zásuvkami) zasekne nějaká malá
část nebo součást, použijte malou měkký kartáček na její uvolnění. Pokud jste se nedostali k dílu, kontaktujte servis Haier.
▶ Spotřebič omyjte a vysušte jemnou utěrkou.
▶ Žádné součásti spotřebiče nemyjte v myčce nádobí.
▶ Před opakovaným spuštěním spotřebiče vyčkejte alespoň 7 minut, protože časté zapí-
nání může poškodit kompresor.
Odmrazování
Odmrazování ledničky a mrazničky probíhá automaticky, není potřeba provádět ho ručně.
23
Page 60

Péče a čištění
CZ
Výměna LED osvětlení
UPOZORNĚNÍ!
Nevyměňujte LED lampu sami, smí být vyměněna pouze výrobcem nebo autorizovaným servisním technikem.
Ve spotřebiči je jako světelný zdroj LED osvětlení, protože spotřebovává malé množství
energie a má dlouhou životnost. Vyskytne-li se nějaká závada, kontaktujte prosím zákaznický servis. Viz ZÁKAZNICKÝ SERVIS.
Parametry osvětlení:
Prostor chladničky:12 V max 2 W
Prostor chladničky:12 V max 0,5 W
Nepoužívání spotřebiče po delší dobu
Nepoužíváte-li spotřebič delší dobu a nevyužili jste pro ledničku funkci Dovolená, nebo funkci Vypnutí chladničky pro mrazničku:
▶ Vyjměte potraviny.
▶ Odpojte síťový kabel.
▶ Vyprázdněte a vyčistěte vodní nádrž
▶ Očistěte spotřebič podle výše uvedeného návodu.
▶ Nechte otevřené dveře, abyste zabránili vzniku nežádoucích pachů
uvnitř spotřebiče.
Poznámka
Spotřebič zapněte pouze pokud je to nezbytně nutné.
Stěhování spotřebiče
1. Vyjměte všechny potraviny a odpojte spotřebič od elektrické sítě.
2. Police a všechny pohyblivé části v ledničce a mrazničce zajistěte lepicí páskou.
3. Nenaklánějte spotřebič pod větším úhlem než 45°, aby nedošlo k poškození chladicího systému.
UPOZORNĚNÍ!
▶ Spotřebič nezvedejte za kliky.
▶ Nikdy nepokládejte spotřebič na podlahu v horizontální poloze.
24
Page 61

CZ
Řešení problémů
Hodně vzniklých problémů můžete vyřešit sami bez zvláštní kvalikace. Vyskytne-li se nějaký problém, dříve než se obrátíte na prodejce, zkontrolujte všechny uvedené možnosti a
postupujte podle níže uvedených pokynů. Viz ZÁKAZNICKÝ SERVIS.
UPOZORNĚNÍ!
▶ Před prováděním údržby spotřebič vypněte a odpojte ho od elektrické sítě.
▶ Elektrické součásti smí opravovat pouze kvalikovaný odborník, protože neodborné
zásahy by mohly způsobit rozsáhlá následná poškození.
▶ Poškozený síťový kabel musí vyměnit výrobce, autorizovaný servis nebo podobně
kvalikovaná osoba, aby se zabránilo možným rizikům.
Problém Možná příčina Možné řešení
Nefunguje kompresor.
Spotřebič pracuje
často nebo pracuje
příliš dlouho.
Vnitřek ledničky je špinavý a/nebo zapáchá.
• Zástrčka není zapojená do elek-
trické zásuvky.
• Spotřebič je ve fázi odtávání
• Vnitřní nebo vnější teplota je příliš
vysoká.
• Spotřebič byl nějakou dobu bez
přívodu elektrické energie.
• Dveře/zásuvky spotřebiče nejsou
těsně uzavřeny.
• Dveře/zásuvky spotřebiče se ote-
víraly příliš často nebo na dlouhou
dobu.
• Nastavená teplo-
ta mrazničky je příliš nízká.
• Těsnění dveří/zásuvek je špinavé, opotřebované, prasklé nebo
nevhodné.
• Není zajištěna požadovaná cirkula-
ce vzduchu.
• Je potřeba vyčistit vnitřek lednič-
ky.
• V ledničce jsou uložené potraviny
s výraznou vůní.
• Zapojte spotřebič do elektrické
sítě.
• Při automatickém odmrazování
je to normální
• V tomto případě je běžné, že
spotřebič pracuje delší dobu.
• Běžně trvá 8 až 12 hodin než se
spotřebič zcela ochladí.
• Zavřete dveře/zásuvky a zkon-
trolujte, že spotřebič stojí na
rovném podkladu a že se dveří
nedotýkají žádné potraviny ani
jiné překážky.
• Neotvírejte dveře/zásuvky příliš
často.
• Nastavte vyšší teplotu, dokud
se spotřebič nedostane na
uspokojivou teplotu. Ustálení
teploty ledničky trvá 24 hodin.
• Očistěte těsnění dveří/zásuvek
nebo je nechte vyměnit v zákaznickém servisu.
• Zajistěte dostatečnou ventilaci.
• Umyjte vnitřek ledničky.
• Potraviny důkladně zabalte.
25
Page 62

Řešení problémů
Problém Možná příčina Možné řešení
CZ
Uvnitř spotřebiče
není
dostatečně
chladno.
Uvnitř spotřebiče
je příliš chladno.
Na vnitřní straně
ledničky kondenzuje vlhkost.
Na vnějším povrchu
nebo mezi dveřmi/
dveřmi a zásuvkami
se hromadí vlhkost.
V mrazničce je silná vrstva ledu a
námrazy.
• Je nastavena příliš vysoká teplota.
• Byly vloženy teplé potraviny.
• Bylo vloženo příliš mnoho potravin
najednou.
• Potraviny jsou příliš blízko u sebe.
• Dveře/zásuvky spotřebiče nejsou
těsně uzavřeny.
• Dveře/zásuvky spotřebiče se ote-
víraly příliš často nebo na dlouhou
dobu.
• Nastavená teplota je příliš nízká.
• Funkce Super chlazení/Super mra-
zení je aktivní nebo pracuje příliš
dlouho.
• Ovzduší je příliš teplé a příliš vlhké.
• Dveře/zásuvky spotřebiče nejsou
těsně uzavřeny.
• Dveře/zásuvky spotřebiče se ote-
víraly příliš často nebo na dlouhou
dobu.
• Nádoby na potraviny nebo tekuti-
ny jsou otevřené.
• Ovzduší je příliš teplé a příliš vlhké.
• Dveře/zásuvky nejsou těsně uza-
vřeny. Kondenzaci způsobuje studený vzduch ve spotřebiči a teplý
vzduch venku.
• Potraviny nebyly správně zabalené.
• Dveře/zásuvky spotřebiče nejsou
těsně uzavřeny.
• Dveře/zásuvky spotřebiče se ote-
víraly příliš často nebo na dlouhou
dobu.
• Těsnění dveří/zásuvek je špina-
vé, opotřebované, prasklé nebo
nevhodné.
• Uvnitř je překážka, která brání
správnému zavření dveří/zásuvky.
• Nastavte teplotu znovu.
• Před uložením potraviny vždy
ochlaďte.
• Ukládejte vždy malé množství
potravin.
• Mezi potravinami nechávejte
mezery, aby mohl vzduch volně
proudit.
• Zavřete dveře/zásuvku.
• Neotvírejte dveře/zásuvky příliš
často.
• Nastavte teplotu znovu.
• Vypněte funkci Silné mrazení
• Zvyšte teplotu.
• Zavřete dveře/zásuvku.
• Neotvírejte dveře/zásuvky příliš
často.
• Nechte horké jídlo zchladnout
na pokojovou teplotu a zakryjte
potraviny a tekutiny.
• To je ve vlhkém prostředí normální. Změna nastane, až klesne vlhkost.
• Ujistěte se, že dveře/zásuvka
jsou těsně zavřené.
• Potraviny vždyc-
ky správně zabalte.
• Zavřete dveře/zásuvku.
• Neotvírejte dveře/zásuvky příliš
často.
• Těsnění dveří/zásuvky očistěte
nebo vyměňte za nové.
• Přemístěte police, dveřní polič-
ky nebo vnitřní zásobníky tak,
aby bylo možné zavřít dveře/
zásuvku.
26
Page 63

CZ
Problém Možná příčina Možné řešení
Řešení problémů
Boky skříně a pásy
dveří se mohou zahřát.
Spotřebič dělá
neobvyklý hluk.
Měl by být slyšet
tenký zvuk
podob-
• - • To je normální.
• Spotřebič nestojí na rovné ploše.
• Spotřebič je v kontaktu s nějakým
předmětem.
• - • To je normální.
• Vyrovnejte spotřebič nastave-
ním nožiček.
• Odstraňte předměty z okolí
spotřebiče.
ný zvuku tekoucí
vody.
Uslyšíte pípnutí
alarmu.
Uslyšíte slabé hučení.
Nefunguje vnitřní osvětlení nebo
chladicí systém
• Jsou otevřené dveře úložného
prostoru ledničky.
• Pracuje anti-kondenzační systém • Zabraňuje to kondenzaci a je to
• Zástrčka není zapojená do elek-
trické zásuvky.
• Zdroj napájení není v pořádku.
.
• LED osvětlení nefunguje.
• Zavřete dveře nebo alarm vy-
pněte ručně.
v pořádku
• Zapojte spotřebič do elektrické
sítě.
• Zkontrolujte, jestli přívod elektrické energie v místnosti. Kontaktujte místního dodavatele
elektrického proudu!
• Kvůli výměně světla prosím
kontaktujte servis.
Přerušení elektrické energie
• V případě výpadku elektrického proudu by měly potraviny zůstat bezpečně vychlazené
po dobu asi 12 hodin. V případě delšího výpadku proudu, zejména v létě, postupujte podle
těchto pokynů:
▶ Otevírejte dveře/zásuvky co možná nejméně.
▶ Během výpadku proudu nepřidávejte do spotřebiče další potraviny.
▶ Pokud je výpadek proudu předem ohlášený a předpokládaná doba výpadku přesahu-
je 12 hodin, vyrobte led a vložte ho do zásobníku v horní části ledničky.
▶ Jakmile je dodávka energie obnovena, je nutné zkontrolovat stav potravin.
▶ V důsledku zvýšení teploty v ledničce během výpadku elektrického proudu nebo jiné
poruchy dojde ke zkrácení doby uložení potravin a také se sníží jejich kvalita. Potraviny, které se rozmrazily, by se měly buď brzy zkonzumovat, nebo uvařit a znovu zmrazit (pokud je to vhodné), aby se předešlo zdravotním rizikům.
Funkce paměti při přerušení napájení
Po obnovení napájení přístroj pokračuje v nastaveních, které byly nastaveny před výpadkem proudu.
27
Page 64

Instalace
CZ
Vybalení
UPOZORNĚNÍ!
▶ Spotřebič je těžký. Se spotřebičem manipulujte vždy nejméně ve dvou.
▶ Všechny obalové materiály udržujte mimo dosah dětí a zlikvidujte ho způsobem, kte-
rý je šetrný k životnímu prostředí.
▶ Vyjměte spotřebič z obalu.
▶ Odstraňte všechny obalové materiály.
Podmínky okolního prostředí
Teplota v místnosti by se měla pohybovat v rozmezí 10°C až 43°C, protože může ovlivňovat teplotu uvnitř spotřebiče a spotřebu energie. Neinstalujte spotřebič do blízkosti spotřebičů, které vydávají teplo (sporáky, ledničky), aniž by byl odizolován.
Prostorové požadavky
D1
W1
W2
Prostor nutný při otevřených dveřích:
W1=1221 mm
D2
W2=1534 mm
D1=560 mm
D2=1040 mm
28
1.
max 45°
10 cm
10 cm
Ventilační systém
Pro dosažení dostatečné ventilace spotřeby z důvodu
bezpečnosti, je nutné dodržet požadavky pro správné
větrání.
10 cm
10 cm
2.
Umístění spotřebiče
Spotřebič umístěte na rovný a pevný povrch.
1. Nakloňte spotřebič lehce dozadu.
2. Nastavte nožičky na požadovanou úroveň.
Zkontrolujte, že vzdálenost od zdi ke straně spotřebi-
če, na které je závěs dveří, je alespoň 100 mm, aby se
dveře daly řádně otvírat.
Page 65

CZ
Instalace
3. Stabilitu spotřebiče zkontrolujete tak, že střídavě
udeříte do protilehlých stran. Mírné vychýlení by
mělo být stejné v obou směrech. V opačném případě by mohlo dojít k deformaci rámu; důsledkem
může být netěsnící zavírání dveří. Mírný náklon na
zadní stranu usnadňuje zavírání dveří.
Jemné doladění dveří
Pokud dveře nejsou v jedné rovině, tento nesoulad lze
napravit následujícím způsobem:
A) Použitím nastavovacích nožiček
Otočte patku ve směru šipky pro snížení nebo zvýšení
nožiček.
3.
A
B) Použití distanční vložky
▶ Otevřete horní dveře a zvedněte je.
▶ Opatrně cvakněte distanční vložku (najdete ji v sáč-
ku s příslušenstvím) na bílý plastový kruh na středním závěsu ručně nebo pomocí nástrojů jako jsou
např. kleště. Dveře nepoškrábejte nebo na nich neudělejte prolákliny.
Poznámka
Při používání chladničky v budoucnu, jev nerovnoměrných dveří může vést k zkažení
uložených potravin. Pak upravte výše uvedeným způsobem.
B
29
Page 66

Instalace
Čekací doba
V kapsli kompresoru je umístěný bezúdržbový olej. Při
naklánění spotřebiče během převozu se olej mohl dostat přes zavřené potrubí. Vyčkejte 2-5 hodin před zapojením spotřebiče do elektrické sítě, aby se olej mohl
2 h
Elektrické připojení
Před každým zapojením zkontrolujte, zda:
▶ zdroj energie, zásuvka a pojistka odpovídají výkonnostnímu štítku.
▶ je zásuvka uzemněná a nepoužíváte prodlužovací kabel ani vícenásobné zásuvky.
▶ se zástrčka a zásuvka přesně shodují.
Zástrčku zapojte do řádně instalované domácí zásuvky.
UPOZORNĚNÍ!
Poškozený napájecí kabel musí být vyměněn v zákaznickém servisu, aby nedošlo ke
vzniku nebezpečí (viz Záruční list).
vrátit do pouzdra.
CZ
30
Page 67

CZ
Technické údaje
List výrobku podle nařízení EU č. 1060/2010
Značka Haier
Název modelu / identikátor HTF-540DGG7
Kategorie chladicího spotřebiče pro domácnost
(1)
Energetická třída A +++
(nejvyšší účinnost) do D (nejnižší účinnost)
Spotřeba energie
(2)
Celková čistá kapacita celé chladicí části 500 L
z toho chladicí prostor 26 L
z toho prostor pro skladování vína z toho prostor se sklepní teplotou z toho prostor pro skladování čerstvých potravin
Celkový počet lahví na víno
(3)
Celková čistá kapacita celé mrazící části
Kódování hvězdičkami
Návrhová teplota "ostatních oddělení"
(4)
(5)
Nejnižší skladovací teplota prostoru pro víno
Bez mrazová
Doba skladování během poruch
Mrazicí kapacita
Hodnocení klimatu
(6)
(7)
Vysílaný hluk 39 dB(A) re 1 pW
Typ spotřebiče
Vysvětlení:
• Ano, v nabídce
(1) Chladící kategorie pro domácnost:
Kategorie = Označení
1 = Chladnička s jedním nebo více odkládacími prostory pro čerstvé potraviny, 2 = Chladnička se zónou s sklepní teplotou,
sklepní komora s lednicí a vinotéka, 3 = Chladnička s chladící zónou a chladnička s oddělením nula hvězd. 4 = Chladnička s
oddělením s jednou hvězdou, 5 = Chladnička s oddělením se dvěma hvězdami, 6 = Chladnička s oddělením se třemi hvězdami,
7 = Chladnička s mrazničkou, 8 = Mrazák, 9 = Mrazicí box, 10 = víceúčelové chladničky a jiné chladničky
(2) Na základě výsledků zkoušky shody s normami v průběhu 24 hodin. Skutečná spotřeba závisí na způsobu používání a umístění
spotřebiče.
(3) Jmenovitá kapacita je udávána jako počet standardních 0,75 l lahví, které mohou být uloženy v přístroji podle pokynů výrobce.
(4) * = Oddělení -6°C nebo nižší; *** = oddělení mražených potravin -18°C nebo nižší; **** = přihrádka na mražené potraviny
-18°C nebo méně s minimální kapacitou mrazení.
(5) "Jiné oddělení" je oddělení jiné než přihrádka na víno určené ke skladování určitých potravin při teplotě vyšší než + 14°C.
(6) Kapacita mražení je dosažitelná pro množství dané podle typu aplikace jen po přechodu na trvalý provoz a nemůže se opako-
vat do 24 hodin. Dodržujte speciální pokyny pro provoz.
(7) Klimatické hodnocení SN: Spotřebič je určen pro použití při teplotě okolního prostředí mezi + 10°C a +32°C
Klimatické hodnocení N: Spotřebič je určen pro použití při teplotě okolního prostředí mezi + 16°C a +32°C
Klimatické hodnocení ST: Spotřebič je určen pro použití při teplotě okolního prostředí mezi + 16°C a +38°C
Klimatické hodnocení T: Spotřebič je určen pro použití při teplotě okolního prostředí mezi + 16°C a +43°C
7
A++
360
324 L
-
150 L
****
-
-
•
12 h
12 kg
SN-N-ST-T
volně stojící
31
Page 68

Technické údaje
Doplňkové technické údaje
Napětí / Frekvence 220-240V ~/ 50Hz
Vstupní proud (A)
Hlavní pojistka (A)
Chladicí kapalina
Rozměry (v/š/h v mm)
1905 / 908 / 648
2
16
R600a
CZ
32
Page 69

CZ
Zákaznický servis
Zákaznický servis
Doporučujeme používat originální náhradní díly a služby zákaznického servisu Haier.
Máte-li se spotřebičem nějaký problém, podívejte se prosím nejprve do sekce ŘEŠENÍ
PROBLÉMŮ.
Pokud tam nenajdete řešení, kontaktujte prosím
▶ místního prodejce nebo
▶ naše evropské Servisní centrum (viz seznam telefonních čísel níže) nebo
▶ sekce Service & Support na stránkách www.haier.com, kde můžete aktivovat váš
servisní požadavek a také najít často kladené dotazy.
Ještě, než budete kontaktovat naše Servisní centrum, zkontrolujte, zda máte níže uvedené informace.
Informace najdete na výkonnostním štítku.
Typ _____________
Výrobní číslo _____________
Zkontrolujte také Záruční list, který je dodáván spolu se spotřebičem pro případ reklamace.
Servisní centrum pro Evropu
Země* Telefonní číslo Ceny
Haier Itálie (IT)
Haier Španělsko (ES)
Haier Německo (DE)
Haier Rakousko (AT)
Haier Spojené království
(UK)
Heier, Francie (FR)
* Pro další země prosím jděte na www.haier.com
Haier Europe Trading S.r.l
Pobočka: SK
Westgate House, Westgate, Ealing
London, W5 1YY
199 100 912
902 509 123
0180 5 39 39 99
0820 001 205
0333 003 8122
0980 406 409
• 14 Ct/Min místní linka
• max. 42 Ct/Min všichni
ostatní
• 14,53 Ct/Min místní linka
• max. 20 Ct/Min všichni
ostatní
33
Page 70

HTF-540_CZ_V08_190415
Page 71

Bedienungsanleitung
Kühl-Gefriergerät
HTF-540DGG7
DE
Page 72

Vielen Dank
DE
Vielen Dank, dass Sie ein Haier-Gerät gekauft haben.
Machen Sie sich gründlich mit dieser Anleitung vertraut, bevor Sie mit der Maschine arbei-
ten. In der Anleitung nden Sie wichtige Hinweise, die Ihnen helfen, von Anfang an perfekt
saubere Wäsche zu genießen. Zusätzlich zeigt Ihnen die Anleitung, wie Sie die Maschine
richtig und sicher aufstellen, in Betrieb nehmen, damit waschen und das Gerät richtig pegen.
Bewahren Sie die Anleitung gut auf, damit Sie später darin nachlesen können.
Geben Sie die Anleitung auch mit, wenn Sie die Maschine verkaufen oder verschenken
möchten. So kann sich der neue Besitzer auch gleich mit allem Wichtigem zur Maschine
vertraut machen.
Legende
Warnung - Wichtige Sicherheitsinformationen
Allgemeine Informationen und Tipps
Umweltinformationen
Entsorgung
Leisten Sie einen Beitrag zum Schutz von Mensch und
Umwelt. Entsorgen Sie das Verpackungsmaterial richtig, damit es dem Recycling zugeführt werden kann.
Helfen Sie auch beim Recycling von elektrischen und
elektronischen Altgeräten mit. Entsorgen Sie die mit
diesem Symbol markierten Geräte nicht mit dem regulären Hausmüll. Bringen Sie die Maschine zu einer
Sammelstelle in Ihrer Nähe. Ihre Stadtverwaltung informiert Sie gerne über passende Sammelstellen.
WARNUNG!
Verletzungs- und Erstickungsgefahr!
Kühlmittel und Gase müssen fachgerecht entsorgt werden. Achten Sie darauf, dass
die Leitungen des Kühlkreislaufs nicht beschädigt werden, bevor das Gerät der Entsorgung zugeführt wird. Ziehen Sie den Netzstecker aus der Steckdose. Schneiden Sie das
Netzkabel ab, entsorgen Sie das Kabel. Entfernen Sie die Einschübe und Schubladen
sowie den Türverschluss und die Dichtungen, um zu verhindern, dass Kinder und Haustiere im Gerät eingeschlossen werden.
Altgeräte haben immer noch einen Restwert. Eine umweltfreundliche Entsorgungsme-
thode trägt dazu bei, dass wertvolle Rohstoe zurückgewonnen und wieder verwendet
werden.
Cyclopentan, eine entzündbare, nicht ozonschädliche Substanz, wird als Dehner für den
Isolierschaum verwendet.
Durch die Gewährleistung einer ordnungsgemäßen Entsorgung dieses Produkts helfen
Sie, potenzielle Umwelt- und Gesundheitsschäden zu verhindern, die sonst durch eine
unsachgemäße Entsorgung dieses Geräts verursacht werden könnten.
Für detaillierte Informationen zum Recycling dieses Produkts wenden Sie sich bitte an Ihre
Gemeindeverwaltung, Ihren Entsorgungsdienst für Hausmüll oder an das Geschäft, in
dem Sie das Produkt erworben haben und die von Fachleuten geführt wird.
2
Page 73

DE
Sicherheitsinformationen .............................................................................................................. 4
Bestimmungsgemäße Verwendung .......................................................................................... 9
Produktbeschreibung ...................................................................................................................11
Bedienfeld ........................................................................................................................................12
Verwendung ....................................................................................................................................13
Ausstattung .....................................................................................................................................20
Pege und Reinigung ....................................................................................................................23
Fehlerbehebung .............................................................................................................................25
Aufstellung .......................................................................................................................................28
Technische Daten ..........................................................................................................................31
Kundendienst ..................................................................................................................................33
Inhalt
Zubehör
Überprüfen Sie das Zubehör und die Dokumentation gemäß dieser Liste:
Eiswürfelschale
2 Eiereinsätze
3 Zwischenstücke
EnergieLabel
Garantiekarte
Bedienungsanleitung
3
Page 74

Sicherheitsinformationen
Lesen Sie die folgenden Sicherheitstipps, vor dem ersten Einschalten des Gerätes!:
WARNUNG!
Vor dem ersten Gebrauch
▶ Vergewissern Sie sich zunächst, dass die Maschine nicht beim
Transport beschädigt wurde.
▶ Entfernen Sie die gesamte Verpackung und halten Sie sie außer
Reichweite von Kindern.
▶ Warten Sie mindestens zwei Stunden, bevor Sie das Gerät auf-
stellen, um sicherzustellen, dass der Kältekreislauf voll leistungsfähig ist.
▶ Handhaben Sie das Gerät immer mit mindestens zwei Personen,
da es schwer ist.
Aufstellung
▶ Das Gerät muss an einem gut gelüfteten Ort aufgestellt werden.
Stellen Sie sicher, dass über dem Gerät und um das Gerät herum
mindestens 10 cm Platz sind.
▶ Stellen Sie das Gerät niemals in einem feuchten Bereich oder
Ort auf, an dem es Wasserspritzern ausgesetzt ist. Reinigen und
trocknen Sie Wasserspritzer und Flecken mit einem weichen Tuch.
▶ Stellen Sie das Gerät nicht in direktem Sonnenlicht oder in der
Nähe von Wärmequellen (z. B. Öfen, Heizungen) auf.
▶ Stellen Sie das Gerät in einem für seine Größe und Verwendung
passenden Bereich auf und nivellieren Sie es.
▶ Halten Sie Lüftungsönungen am Gerät oder in der Einbaustruk-
tur frei von Blockaden..
▶ Stellen Sie sicher, dass die elektrischen Angaben auf dem
Typenschild mit der Stromversorgung übereinstimmen. Falls dies
nicht der Fall ist, kontaktieren Sie einen Elektriker.
▶ Das Gerät wird durch eine 220-240 VAC/50 Hz Stromversorgung
betrieben. Abnormale Spannungsuktuationen können verursachen, dass das Gerät sich nicht einschaltet, oder Schaden an der
Temperaturkontrolle oder dem Kompressor entsteht, oder beim
Betrieb ein abnormales Geräusch entsteht. In einem solchen Fall
muss ein automatischer Regler montiert werden.
▶ Verwenden Sie keine Mehrfachsteckdosen und
Verlängerungskabel.
▶ Stellen Sie keine Steckdosenleisten oder tragbare Netzteile hinter
der Rückseite des Geräts auf.
▶ Stellen Sie sicher, dass das Netzkabel nicht durch den Kühl-/Ge-
friergerät gequetscht wird. Treten Sie nicht auf das Netzkabel.
4
DE
Page 75

DE
WARNUNG!
▶ Verwenden Sie eine separat geerdete Steckdose für die Strom-
versorgung, die einfach zugänglich ist. Das Gerät muss geerdet
sein.
Nur für DE: Das Netzkabel des Geräts ist mit 3-poligem (geerdet)
Stecker ausgestattet, der in einen 3-poligen Standardstecker (geerdet) passt. Trennen Sie den dritten Kontakt (Erdungskontakte)
niemals ab. Achten Sie darauf, dass Sie auch nach dem Aufstellen
der Maschine ohne Weiteres an den Stecker herankommen.
▶ Beschädigen Sie nicht das Kühlaggregat.
Täglicher Gebrauch
▶ Das Gerät darf nur dann von Kindern ab 8 Jahren und Personen
mit körperlichen oder geistigen Einschränkungen genutzt werden, wenn diese beaufsichtigt oder gründlich über den richtigen
und sicheren Umgang mit dem Gerät aufgeklärt wurden, sich
sämtlicher möglicher Gefahren bewusst sind.
▶ Kinder im Alter von 3 bis 8 Jahren dürfen das Kühlgerät be- und
entladen, aber jedoch nicht reinigen oder installieren.
▶ Halten Sie Kinder unter 3 Jahren von dem Gerät fern, es sei denn,
sie sind unter ständiger Aufsicht.
▶ Kinder dürfen nicht mit dem Gerät spielen.
▶ Wenn kühles oder anderes brennbares Gas in der Nähe des Ge-
rätes ausläuft, drehen Sie das Ventil des auslaufenden Gases zu,
önen Sie die Türen und Fenster und ziehen Sie nicht den Stecker
aus dem Netzkabel des Kühl- und Gefriergeräts oder anderer Ge-
räte heraus.
▶ Bitte beachten Sie, dass das Gerät für den Einsatz bei besonderen
Umgebungstemperaturen zwischen 10 und 43 °C voreingestellt
ist. Das Gerät funktioniert möglicherweise nicht richtig, wenn es
über einen längeren Zeitraum hinweg über oder unter der ange-
gebenen Temperatur betrieben wird.
▶ Stellen Sie keine instabilen Gegenstände (schwere Objekte, mit
Wasser gefüllte Behälter) auf den Kühlschrank, um Verletzungen
durch Herunterfallen oder Stromschlag durch Kontakt mit Wasser
zu vermeiden.
▶ Ziehen Sie nicht an den Türablagen. Die Tür kann in Schräglage
geraten, das Flaschengestell kann abgerissen werden, oder das
Gerät kann umfallen.
▶ Önen und schließen Sie die Türen nur mit den Handgrien. Die
Lücke zwischen den Türen und zwischen den Türen und dem Ge-
häuse ist sehr schmal. Stecken Sie Ihre Hände nicht in diese Be-
reiche, um das Quetschen der Finger zu vermeiden. Önen oder
schließen Sie die Türen des Kühlschranks nur, wenn sich keine Kin-
der im Bereich der Türbewegung benden.
Sicherheitsinformationen
5
Page 76

Sicherheitsinformationen
WARNUNG!
▶ Lagern Sie keine brennbaren, explosive oder korrodierende Mate-
rialien in dem Gerät oder in der Nähe.
▶ Lagern Sie keine Medikamente, Bakterien oder chemische Mit-
tel in dem Gerät. Das Gerät ist ein Haushaltsgerät. Es wird nicht
empfohlen, Materialien zu lagern, die eine genaue Temperatur
benötigen.
▶ Lagern Sie niemals Flüssigkeiten in Flaschen oder Dosen (außer
hochprozentigen Spirituosen), insbesondere Getränke mit Kohlensäure im Gefriergerät, da diese während des Einfrierens platzen.
▶ Überprüfen Sie den Zustand von Lebensmitteln, falls eine Erwär-
mung im Gefriergerät stattgefunden hat.
▶ Stellen Sie die Temperatur im Kühlfach nicht unnötigerweise nied-
rig. Bei hohen Einstellwerten kann es zu Minustemperaturen führen. Achtung: Flaschen können platzen
▶ Berühren Sie Tiefkühlwaren nicht mit nassen Händen (tragen Sie
Handschuhe). Essen Sie insbesondere kein Eis am Stiel direkt
nach Entnahme aus dem Gefrierfach. Es besteht das Risiko, dass
das Eis fest friert oder die Frost bildet. ERSTE HILFE: Halten Sie
die Stelle sofort unter ießendes kaltes Wasser. Reißen Sie den
gefrorenen Gegenstand nicht ab!
▶ Berühren Sie nicht die Oberäche der Innenseite des Gefrier-
fachs, wenn es in Betrieb ist, besonders nicht mit nassen Händen,
da Ihre Hände an der Oberäche anfrieren können.
▶ Ziehen Sie den Gerätenetzstecker im Falle eines Stromausfalls
oder vor dem Reinigen. Warten Sie mindestens 7 Minuten, bevor
Sie das Gerät erneut einschalten, da häuges Einschalten den
Kompressor beschädigen kann.
▶ Verwenden Sie keine elektrischen Geräte im Inneren der Lebens-
mittelfächer des Gerätes, sofern dies nicht ausdrücklich durch
den Hersteller empfohlen wird.
Wartung / Reinigung
▶ Stellen Sie sicher, dass Kinder unter Aufsicht sind, wenn diese Rei-
nigung und Wartung durchführen.
▶ Trennen Sie das Gerät vom Netzstrom vor dem Ausführen von
Routine-Wartungsarbeiten. Warten Sie mindestens 7 Minuten,
bevor Sie das Gerät erneut einschalten, da häuges Einschalten
den Kompressor beschädigen kann.
6
DE
Page 77

DE
WARNUNG!
▶ Halten Sie beim Herausziehen des Steckers den Stecker und nicht
das Kabel fest.
▶ Reinigen Sie das Gerät nicht mit harten Bürsten, Drahtbürsten,
Waschpulver, Benzin, Amyl Azetat, Aceton oder ähnlichen organischen Lösungen, Säure oder Laugen. Bitte reinigen Sie mit einem speziellen Reinigungsmittel für Kühlschränke, um Schaden
zu vermeiden.
▶ Kratzen Sie Frost und Eis nicht mit scharfen Gegenständen ab.
Verwenden Sie keine Sprays, elektrischen Heizkörper, Haartrockner, Dampfreiniger oder andere Wärmequellen, um Schaden an
den Plastikteilen zu vermeiden.
▶ Verwenden Sie keine mechanischen Vorrichtungen oder andere
als die vom Hersteller empfohlenen Mittel, um den Abtauvorgang
zu beschleunigen.
▶ Sollte das Netzkabel beschädigt sein, muss es durch den Herstel-
ler, dessen Kundendienst oder eine Person mit gleicher techni-
scher Qualikation ausgetauscht werden.
▶ Versuchen Sie nicht, das Gerät selbst zu reparieren, zu demon-
tieren oder zu ändern. Im Falle einer Reparatur kontaktieren Sie
bitte unseren Kundendienst.
▶ Entfernen Sie mindestens einmal im Jahr den Staub an der Rück-
seite des Geräts, um Brandgefahr sowie erhöhten Energieverbrauch zu vermeiden.
▶ Sprayen Sie das Gerät während dem Reinigen nicht mit Wasser
ein und setzen Sie es nicht unter Wasser.
▶ Sprayen Sie das Gerät nicht mit Wasser ein und reinigen Sie es
nicht mit Dampf.
▶ Reinigen Sie die kalten Regale nicht mit heißem Wasser. Plötzli-
che Temperaturänderung kann dazu führen, dass das Glas bricht.
Sicherheitsinformationen
7
Page 78

Sicherheitsinformationen
Informationen bezüglich Kältemittelgas
WARNUNG!
Das Gerät enthält das brennbares Kältemittel ISOBUTANE (R600a).
Stellen Sie sicher, dass der Kältekreislauf während dem Transport
und der Aufstellung nicht beschädigt wird. Auslaufendes Kältemittel kann Augenverletzungen oder Augenentzündungen verursachen. Wenn ein Schaden entstanden ist, halten Sie sich fern von
allen oenen Feuerquellen, lüften Sie den Raum gründlich, stecken
Sie die Netzkabel des Geräts oder anderer Geräte nicht hinein oder
ziehen Sie sie heraus. Informieren Sie den Kundendienst
Sollten die Augen in Kontakt mit dem Kältemittel geraten, spülen
Sie diese sofort unter ießendem Wasser aus und rufen Sie sofort
einen Augenarzt an.
DE
8
Page 79

DE
Bestimmungsgemäße Verwendung
Bestimmungsgemäße Verwendung
Dieses Gerät ist zum Kühlen und Einfrieren von Lebensmitteln vorgesehen. Es wurde ausschließlich für den Gebrauch im Haushalt und ähnlichen Einrichtungen, wie Küchenpersonalbereiche in Geschäften, Büros und andere Arbeitsumgebungen produziert; Gutshöfe,
Hotels, Motels und andere Wohnumgebungen sowie Bed-und-Breakfast-Einrichtungen
und Catering-Unternehmen. Das Gerät ist nicht für gewerblichen oder industriellen Gebrauch vorgesehen.
Änderungen oder Modizierungen am Gerät sind nicht erlaubt. Nicht vorgesehener Gebrauch kann zu Risiken und dem Verlust von Gewährleistungsansprüchen führen.
Standards und Richtlinien
Dieses Produkt ist konform mit den Anforderungen aller geltenden EU-Richtlinien der zugehörigen harmonisierten Standards, die CE-Kennzeichnung vorsehen.
9
Page 80

Bestimmungsgemäße Verwendung
VORSICHT!
Wenn Sie die Tür schließen, muss die vertikale Tür-
1.
strebe an der linken Tür nach innen eingeklappt sein
(1).
2.
Wenn Sie versuchen, die linke Tür zu schließen, und
die Türstrebe nicht eingeklappt ist (2), müssen Sie
diese zuerst einklappen, da andernfalls die Türstrebe gegen die Fixierung der rechten Tür schlägt. Das
könnte zur Beschädigung der Türstrebe oder zu
Leckstellen führen.
Im Inneren des Rahmens bendet sich ein Heizdraht.
Die Temperatur auf der Oberäche wird dadurch
leicht erhöht. Das ist normal und hat keinerlei Auswirkungen auf die Funktionsweise des Geräts.
DE
10
Page 81

DE
Produktbeschreibung
Anmerkung
Wegen der technischen Änderungen und verschiedenen Modellen, können einige der
Abbildungen von Ihrem Modell abweichen.
7
3
4
A
1
2
wird mo-
diziert
5
6
13
B
14
A: Kühlschrankfach
1 Flaschenhalter/Türablage
2 Glaseinschübe
3 Typenschild
4 Weinablage
5 Obst- und Gemüsefach
6 Vertikaler Träger
7 Beleuchtung
8 Lüftungskanal und Sensor (hinter der
Leiste)
9 OK-Temperaturanzeige (optional)
10 MyZone-Schieber
11 Lüftungskanal (hinter den Schubla-
den)
12 MyZone-Fach
Chiller
Fruit&Vegetable
B: Gefrierfach
13 Ausziehbare Ablage
14 Gefrierfach
15 Lüftungskanal
16 Justierbare Füße
8
1
9
10
11
12
15
16
11
Page 82

Bedienfeld
Bedienfeld
A
Tasten:
A Kühlschrank-Wahlschalter
B Gefrierfach-Wahlschalter
C Automatischer Einstellungsmodus und Holiday-
a
b
Funktion-Wahlschalter
D Super-Cool-Wahltaste
E Super-Freeze-Wahltaste
F Bedienfeldsperre
DE
B
C
D
E
F
Anzeigen:
a Kühlschranktemperatur
b Gefrierfachtemperatur
c1 Urlaubsmodus
c1
c2 Automatischer Einstel-
lungsmodus
c2
d Super-Cool-Funktion
e Super-Gefrierfunktion
f Bedienfeldsperre
d
e
f
Vor dem ersten Gebrauch
▶ Entfernen Sie alle Verpackungsmaterialien, halten Sie sie außer Reichweite von Kin-
dern und entsorgen Sie sie umweltgerecht.
▶ Reinigen Sie das Gerät innen und außen mit Wasser und einem milden Reinigungs-
mittel bevor Sie es mit Lebensmitteln füllen.
▶ Warten Sie mindestens 2-5 Stunden bevor Sie das Gerät an die Stromversorgung
anschließen, nachdem das Gerät nivelliert und gereinigt wurde. Siehe Abschnitt
AUFSTELLUNG
▶ Kühlen Sie die Fächer auf hohen Einstellungen vor, bevor Sie sie mit Lebensmitteln
füllen. Die Funktion Super-Freeze hilft, das Gefrierfach schnell herunter zu kühlen.
▶ Die Kühltemperatur und die Gefriertemperatur werden jeweils automatisch auf 5 °C
und --18 °C eingestellt. Diese sind die empfohlenen Einstellungen. Wenn Sie möchten, können Sie diese Temperaturen manuell ändern. Siehe TEMPERATUR ANPASSEN.
12
Page 83

DE
Verwendung
Sensortasten
Die Tasten auf dem Bedienfeld sind Sensortasten, die bereits reagieren, wenn Sie nur
leicht berührt werden.
Gerät ein-/ausschalten
Das Gerät ist betriebsbereit, sobald es an die Stromversorgung angeschlossen wird.
Wenn das Gerät zum ersten Mal eingeschaltet wird, werden die tatsächlichen Tempera-
turen im Kühlschrank und Gefrierfach angezeigt. Das Display wird blinken. Wenn die Türen
geschlossen werden, schaltet sich das Display nach 30 Sekunden aus.
Möglicherweise wurde die Bedienfeldsperre aktiviert.
Anmerkung
▶ Das Gerät ist auf die empfohlene Temperatur von 5 °C (Kühlgerät) und - 18 °C (Ge-
friergerät) eingestellt. Bei normalen Umgebungstemperaturen müssen Sie die Temperatur nicht einstellen.
▶ Wenn das Gerät nach Ausschaltung von der Stromversorgung eingeschaltet wird,
kann es bis zu 12 Stunden dauern bis die richtige Temperatur erreicht wird.
Leeren Sie das Gerät, bevor Sie es ausschalten. Ziehen Sie das Netzkabel aus der Steckdose, um das Gerät auszuschalten.
Bedienfeldsperren/entsperren
Anmerkung
Das Bedienfeld wird automatisch gegen Aktivierung
gesperrt, wenn 30 Sekunden keine Taste berührt
wurde. Für jegliche Einstellungen muss das Bedienfeld entsperrt werden.
▶ Berühren Sie die Taste „G” für 3 Sekunden, um alle
Elemente des Bedienfelds gegen Aktivierung zu
sperren. Der Alarmpiepser und die dazugehörige Anzeige „f“ wird nun angezeigt; das Leuchten
des Bedienfelds wird ausgeschaltet. Das Symbol
leuchtet auf, wenn eine Taste gedrückt wird, wenn
die Bedienfeldsperre aktiviert wird. Änderungen
werden nicht angenommen.
▶ Zum Entsperren drücken Sie die Taste erneut.
Standby-Modus
Die Anzeige schaltet sich automatisch 30 Sekunden nach dem Drücken der Taste ab. Die
Anzeige wird automatisch gesperrt. Sie leuchtet automatisch auf, wenn eine Taste ge-
drückt oder eine Tür geönet wird (ein Alarm läßt die Display-Anzeige nicht aueuchten).
13
Page 84

Verwendung
DE
Auswählen des Arbeitsmodus
Sie können das Gerät mithilfe eines der folgenden zwei Verfahren einstellen:
1) Auto Set Modus
Im Auto Set Modus kann das Gerät die Temperatureinstellung automatisch gemäß der
Umgebungstemperatur und den Temperaturänderungen im Gerät anpassen. Sofern Sie
keine besonderen Anforderungen haben, empfehlen wir Ihnen, den automatischen Einstellungsmodus (siehe Automatischer Einstellungsmodus) zu verwenden.
2) Manueller Einstellungsmodus:
Wenn Sie die Temperatur des Geräts manuell einstellen möchten, um bestimmte Lebensmittel zu lagern, können Sie die Temperatur mithilfe der Temperatureinstellungstaste anpassen (ANPASSEN DER TEMPERATUR).
Türönungsalarm
Wenn die Kühlschranktür länger als 1 Minute geönet
ist, ertönt der Türönungsalarm. Der Alarm kann durch
Schließen der Tür oder Berühren des Bedienfelds gestoppt werden. Wenn die Tür länger als 7 Minuten ge-
önet ist, geht das Licht im Inneren des Kühlschranks
aus und die Beleuchtung des Bedienfelds schaltet sich
automatisch ab.
Anpassen der Temperatur
Die Innenraumtemperaturen werden durch die folgen-
den Faktoren beeinusst:
▶ Umgebungstemperatur
▶ Häugkeit des Türönens
▶ Menge der gelagerten Lebensmittel
1. 2.
▶ Aufstellungsort des Geräts
Anpassen der Kühlschranktemperatur
1. Entsperren Sie das Bedienfeld durch Drücken auf
der Taste „F” , wenn es gesperrt ist.
Fridge
3.
Fridge
2. Drücken Sie Taste „A“ (Kühlschrank), um den Kühlschrankinnenraum auszuwählen. Ein Alarm ertönt.
Die tatsächliche Temperatur im Kühlschrankfach
wird angezeigt .
3. Drücken Sie Taste „A“, um die Kühlschranktemperatur einzustellen. Ein Signalton erklingt mit jedem
Drücken der Taste. Die Temperatur erhöht sich
jeweils um 1 °C von einem Minimum von 1 °C bis
zu einem Maximum von 9 °C und geht zurück auf
1°C, wenn man weiter drückt. Die optimale Tem-
peratur im Kühlschrank beträgt 5 °C. Kältere Temperaturen bedeuten unnötigen Stromverbrauch.
14
Page 85

DE
Verwendung
Wenn innerhalb von 5 Sekunden keine Taste bedient
wird, wird die Einstellung automatisch bestätigt.
Anpassen der Gefrierfachtemperatur
1.
2.
1. Entsperren Sie das Bedienfeld durch Drücken auf
der Taste „F” , wenn es gesperrt ist.
2. Drücken Sie Taste „B“ (Gefrierfach), um das Gefrierfach auszuwählen. Ein Alarm ertönt. Die tatsächliche Temperatur im Gefrierfach wird ange-
Freezer
zeigt.
3. Drücken Sie Taste „B” (Gefrierfach), um die
Temperatur des Gefrierfachs einzustellen. Ein
Signalton erklingt mit jedem Drücken der Taste.
Die Temperatur erhöht sich jeweils um 1 °C von
einem Minimum von -14 °C bis zu einem Maximum von -24°C und geht zurück auf 14 °C, wenn
man weiter drückt.
Die optimale Temperatur des Gefrierfachs ist -18
Freezer
°C. Kältere Temperaturen bedeuten unnötigen
Stromverbrauch.
Wenn innerhalb von 5 Sekunden keine Taste bedient
wird, wird die Einstellung automatisch bestätigt.
Anmerkung
Die Temperatur des entsprechenden Fachs kann nicht angepasst werden, wenn eine
andere Funktion (Power-Freeze, Super-Cool, Holiday oder Auto-Set Modus) aktiviert
ist oder die Anzeige gesperrt ist. Die entsprechende Anzeige blinkt begleitet von einem
Piepton.
3.
Auto Set Modus
Im Auto Set Modus kann das Gerät die
Temperatureinstellung automatisch gemäß der Umgebungstemperatur und den
Temperaturänderungen im Gerät anpassen. Diese
Funktion wird vollkommen automatisch ausgeführt.
1. Entsperren Sie das Bedienfeld durch Drücken auf
der Taste „F” , wenn es gesperrt ist.
2. Drücken Sie Taste „C” (Auto Set). Ein Alarm ertönt.
3. Die Anzeige „c2“ leuchtet auf und die Funktion ist
aktiviert.
Durch die Wiederholung der vorherigen Schritte bzw.
durch Auswahl einer anderen Funktion kann diese
Funktion wieder ausgeschaltet werden.
1. 2.
sec. holiday
3.
15
Page 86

Verwendung
DE
1.
3.
2.
3 sec. holiday
Holiday-Funktion
Diese Funktion stellt die Kühlschranktemperatur permanent auf 17 °C ein.
Dies ermöglicht, die Tür des leeren Kühlschranks geschlossen zu halten, ohne dass Geruch oder Schimmel
entsteht - während einer langen Abwesenheit (z. B. Urlaub). Das Gefrierfach ist bereit für Ihre Einstellung.
1. Entsperren Sie das Bedienfeld durch Drücken auf
der Taste „F” , wenn es gesperrt ist.
2. Drücken Sie Taste „C” (Auto Set) für 3 Sekunden.
3. Die Anzeige „c1“ leuchtet auf und die Funktion ist
aktiviert.
Durch die Wiederholung der vorherigen Schritte bzw.
durch Auswahl einer anderen Funktion kann diese
Funktion wieder ausgeschaltet werden.
WARNUNG!
Wenn die Holiday-Funktion in Betrieb ist, dürfen keine Lebensmittel im Kühlschrankfach
gelagert werden. Die Temperatur von + 17 °C ist zu hoch, um Lebensmittel zu lagern.
1. 2.
3.
Super-Cool-Funktion
Schalten Sie die Super-Cool-Funktion ein, wenn größere Mengen an Lebensmitteln gelagert werden sollen (zum Beispiel nach dem Einkaufen). Die SuperCool-Funktion beschleunigt das Kühlen von frischen
Lebensmitteln und schützt die bereits gelagerten vor
unerwünschter Erwärmung. Werksseitig ist die Temperatur auf 0 bis +1°C voreingestellt.
1. Entsperren Sie das Bedienfeld durch Drücken auf
der Taste „F”, wenn es gesperrt ist.
2. Drücken Sie Taste „D” (Super-Cool).
3. Anzeige „d“ leuchtet auf und die Funktion ist aktiviert.
Durch die Wiederholung der vorherigen Schritte bzw.
durch Auswahl einer anderen Funktion kann diese
Funktion wieder ausgeschaltet werden.
Anmerkung
Diese Funktion wird automatisch nach 3 Stunden deaktiviert.
16
Page 87

DE
Verwendung
Super-Freeze Funktion
Frische Lebensmittel müssen so schnell wie möglich tiefgefroren werden. Dies konserviert am besten
Nährwert, Zustand und Geschmack. Die Super Freeze-Funktion beschleunigt das Gefrieren von frischen
Lebensmitteln und schützt die bereits gelagerten
vor unerwünschter Erwärmung. Wenn Sie eine große
Menge an Lebensmitteln auf einmal einfrieren müssen, wird empfohlen, die Super Freeze-Funktion 24
Stunden vor dem Gebrauch des Gefrierfachs einzustellen. Werkseitig ist die Temperatur auf unter -24 °C
voreingestellt.
1. Entsperren Sie das Bedienfeld durch Drücken auf
der Taste „F” , wenn es gesperrt ist.
2. Drücken Sie Taste „E” (Super-Freeze).
3. Die Anzeige „e“ leuchtet auf und die Funktion ist
aktiviert.
Durch die Wiederholung der vorherigen Schritte bzw.
durch Auswahl einer anderen Funktion kann diese
Funktion wieder ausgeschaltet werden.
1. 2.
Anmerkung
Die Super Freeze-Funktion wird automatisch nach 50 Stunden ausgeschaltet. Das Gerät wird dann bei der vorher eingestellten Temperatur betrieben.
3.
WARNUNG!
▶ Leeren Sie das Gerät, bevor Sie es ausschalten.
▶ Lassen Sie die Kühlschranktür oen, wenn die Kühlschrank AUS-Funktion aktiviert
ist, um Geruch oder Schimmel zu vermeiden.
17
Page 88

Verwendung
Tipps zum Lagern von frischen Lebensmitteln
Lagern im Kühlschrankfach
▶ Halten Sie Ihre Kühlschranktemperatur 5 °C.
▶ Heiße Speisen müssen auf Raumtemperatur abgekühlt werden, bevor Sie im Gerät
gelagert werden.
▶ Lebensmittel, die im Kühlschrank aufbewahrt werden müssen vor dem Lagern ge-
waschen und getrockknet werden.
▶ Lebensmittel zum Lagern müssen sachgemäß versiegelt sein, um Geruch oder Ge-
schmacksveränderungen zu vermeiden.
▶ Frieren Sie keine zu großen Mengen ein. Lassen Sie Platz zwischen den Lebensmit-
teln, damit kalte Luft um sie herum ießen kann, was für ein besseres und gleichmäßigeres Kühlen sorgt.
▶ Lebensmittel, die jeden Tag gegessen werden, sollten vorne in der Ablage gelagert
werden.
▶ Lassen Sie Platz zwischen den Lebensmitteln und den Innenwänden, damit die Luft
ießen kann. Lagern Sie insbesondere keine Lebensmittel an der Rückwand: die Lebensmittel könnten an der Rückwand festfrieren. Vermeiden Sie (insbesondere) direkten Kontakt von öligen oder säurehaltigen Lebensmitteln mit dem Inneren des
Gerätes, da Öl/Säure das Innere des Gerätes erodieren kann. Reinigen Sie das Gerät
von Öl- und Säureverschmutzungen, wann immer sie diese vornden.
▶ Tauen Sie gefrorene Lebensmittel im Kühlschrankfach auf. Auf diesem Weg können
Sie die gefrorenen Lebensmittel verwenden, um die Temperatur im Kühlschrank zu
reduzieren und sparen Energie.
▶ Die Verderblichkeit von Obst und Gemüse, wie Zucchini, Melonen, Papaya, Bana-
nen, Ananas, etc. kann im Kühlschrank beschleunigt werden. Deshalb ist es nicht
empfehlenswert, sie im Kühlschrank aufzubewahren. Jedoch kann der Reifungsprozess von sehr grünem Obst für einen bestimmten Zeitraum gesteigert werden. Zwiebeln, Knoblauch, Ingwer und andere Wurzelgemüse müssen ebenfalls bei
Raumtemperatur gelagert werden.
▶ Unangenehme Gerüche im Inneren des Kühlschranks sind ein Zeichen dafür, dass
etwas ausgelaufen und Reinigung erforderlich ist. Siehe WARTUNG UND REINIGUNG.
▶ Unterschiedliche Lebensmittel müssen gemäß ihren Eigenschaften in verschiede-
nen Bereichen gelagert werden:
DE
Anmerkung
▶ Bitte halten Sie mehr als 10 mm Abstand zwischen den gelagerten Lebensmitteln
und dem Luftkanal oder den Sensoren, um die Kühlung sicherzustellen.
1 Butter, Käse, etc.
2 Eier, Konserven, Lebensmittel in Dosen, Ge-
würze, etc.
3 Getränke und Lebensmittel in Flaschen.
4 Eingelegte Lebensmittel und Lebensmittel in
Dosen, etc.
5 Fleischprodukte, Snacks, Nudeln, Lebensmit-
tel in Dosen, Milch, Tofu, Milchprodukte, usw.
6 Gekochtes Fleisch, Wurst, etc.
7 MyZone-Fach: Trockenfrüchte, Butter, Öle,
Schokolade
8 Frischhalteschublade Obst, Gemüse, Salate,
etc.
18
1
2
Chiller
Fruit&Vegetable
3
1
4
2
5
6
7
8
3
Page 89

DE
Lagerung im Gefrierfach
▶ Halten Sie die Temperatur des Gefriergeräts auf -18 °C.
▶ Schalten Sie die Power-Freeze-Funktion 24 Stunden vor dem Einfrieren ein; -für
kleine Mengen an Lebensmitteln sind 4-6 Stunden genug.
▶ Heiße Speisen müssen auf Raumtemperatur herunter gekühlt werden, bevor im Ge-
frierfach gelagert werden.
▶ Nahrungsmittel, die in klein geschnitten sind, gefrieren schneller und sind einfacher
aufzutauen und zu kochen. Das empfohlene Gewicht für jede Portion beträgt weniger als 2,5 kg.
▶ Es ist besser, die Lebensmittel einzupacken, bevor man sie in den Gefrierschrank
gibt. Die Außenseite der Verpackung muss trocken sein, damit die Verpackungen
nicht aneinander kleben. Verpackungsmaterialien müssen geruchsfrei, luftdicht,
nicht giftig und frei von Schadstoen sein.
▶ Schreiben Sie bitte das Gefrierdatum, das Ablaufdatum und den Namen des Le-
bensmittels gemäß des Lagerzeitraums der verschiedenen Lebensmittel auf die
Verpackung, um den Lagerzeitraum nicht zu überschreiten.
▶ WARNUNG!: Säure, Lauge und Salz, etc. können dazu führen, dass die Oberäche
dem Innern des Gefrierschranks erodiert. Stellen Sie die Lebensmittel, die diese
Substanzen enthalten (z. B. Seesch) nicht unmittelbar auf die Oberäche der Innenseite. Salzwasser im Gefrierschrank muss sofort beseitigt werden.
▶ Überschreiten Sie nicht die vom Hersteller empfohlenen Lagerzeiten für Lebens-
mittel. Nehmen Sie stets nur die benötigte Menge aus dem Gefriergerät.
▶ Verzehren Sie aufgetaute Lebensmittel schnell. Aufgetaute Lebensmittel und nicht
wieder eingefroren werden, es sei denn, sie wurden vorher gekocht, andernfalls werden sie ungenießbar.
▶ Lagern Sie keine übermäßigen Mengen von frischen Lebensmitteln im Gefrierfach.
Siehe TECHNISCHE DATEN oder Daten auf dem Typenschild bezüglich der Gefrierkapazität des Gefrierschranks.
▶ Lebensmittel können bei einer Temperatur von mindestens -18 °C für 2 bis 12 Mo-
nate gelagert werden, abhängig von den Eigenschaften (z. B. Fleisch: 3-12 Monate,
Gemüse: 6-12 Monate)
▶ Wenn Sie frische Lebensmittel einfrieren, vermeiden Sie es, sie mit bereits gefrore-
nen Lebensmitteln in Kontakt zu bringen. Risiko des Auftauens!
Wenn Sie kommerziell eingefrorene Lebensmittel lagern, befolgen Sie bitte nachstehende Anweisungen:
▶ Folgen Sie immer den Anweisungen der Hersteller in Bezug auf den Zeitraum, für
den Sie Lebensmittel einfrieren sollten. Überschreiten Sie diese Anweisungen nicht!
▶ Versuchen Sie den Zeitraum zwischen dem Einkauf und der Lagerung so kurz wie
möglich zu halten, um die Qualität der Lebensmittel zu erhalten.
▶ Kaufen Sie gefrorene Lebensmittel, die bei einer Temperatur von –18 °C oder dar-
unter gelagert wurden.
▶ Vermeiden Sie Lebensmittel zu kaufen, die Eis oder Frost an der Verpackung haben
- dies deutet darauf hin, dass die Produkte teilweise aufgetaut wurden und an einem
Punkt wieder eingefroren wurden. Temperaturanstieg wirkt sich auf die Qualität der
Lebensmittel aus.
Verwendung
Anmerkung
▶ Bitte halten Sie mehr als 10 mm Abstand zwischen den gelagerten Lebensmitteln
und dem Luftkanal oder den Sensoren, um die Kühlung sicherzustellen.
19
Page 90

Ausstattung
Multi-Luftzirkulation
Der Kühlschrank ist mit einer Multi-Luftzirkulation
ausgestattet, durch die jede Ablage mit kühler Luft
versorgt wird. Dies hilft, eine einheitliche Temperatur
zu halten, um sicherzustellen, dass Ihre Lebensmittel
länger frisch gehalten werden.
Justierbare Einschübe
Die Höhe der Einschübe kann angepasst werden, um
Ihren Lagerbedürfnissen gerecht zu werden.
1. Um einen Einschub zu entnehmen, heben Sie erst
seine hintere Ecke an (1) und ziehen sie ihn dann
heraus (2).
2. Um ihn wieder einzubauen, legen Sie den Einschub auf beiden Seiten auf die Haltevorrichtungen und drücken Sie ihn an die hinterste Stelle, bis
die Rückseite des Einschubs in den Spalten an den
Seiten xiert ist.
Anmerkung:
Stellen Sie sicher, dass alle Enden des Einschubs nivelliert sind.
DE
My-Zone-Schublade
In diesem Fach ist der Feuchtigkeitsgrad ungefähr 45 %. Diese Schublade ist geeignet,
um Trockenfrüchte und andere trockene Lebensmittel mit wenig Wassergehalt, wie z. B.
Butter, Fette und Öle oder Schokolade zu lagern.
Frischhalteschublade
In diesem Fach ist der Feuchtigkeitsgrad ungefähr 85 %. Es wird automatisch durch das
System reguliert und ist geeignet, um Früchte, Gemüse, Salate etc. zu lagern.
Anmerkung:
▶ Entfernen Sie nicht die Plastikabdeckung im Inneren der
zwei Zonen. Sie bewahrt die Feuchtigkeit.
▶ Kälteempndliche Früchte, wie Ananas, Avocado, Bana-
nen, Grapefruits und Gemüse, wie Kartoeln, Auberginen, Bohnen, Gurken, Zucchini
und Tomaten, sowie Käse sollten nicht in diesen zwei Schubladen gelagert werden.
20
Page 91

DE
Ausstattung
Herausnehmbare Türablagen
Die Türablagen können zum Reinigen entfernt werden:
Legen Sie Ihre Hände auf jede Seite der Ablage, heben
Sie sie hoch (1) und ziehen sie heraus (2).
Um die Türablage wieder einzubauen, sind oben ge-
nannte Schritte in umgekehrter Reihenfolge auszuführen.
1
1
2
OPTIONAL: OK-Temperaturanzeige
Die OK-Temperaturanzeige kann benutzt werden, um
Temperaturen unter +4 °C festzulegen. Reduzieren Sie
die Temperatur schrittweise, wenn die Anzeige „OK“
nicht anzeigt.
Anmerkung:
Wenn das Gerät eingeschaltet ist, kann es bis zu 12 Stunden dauern bis die richtigen
Temperaturen erreicht worden sind.
Herausnehmbare Gefrierfachschublade
Zum Herausnehmen der Schublade ziehen Sie diese
bis zum Anschlag heraus (1), heben Sie diese an und
nehmen Sie sie heraus (2).
Um die Schublade wieder einzusetzen sind die obigen
Schritte in umgekehrter Reihenfolge auszuführen.
2 2
1
Lagern von großen Gegenständen
Große Gegenstände, wie z. B. gefrorene Lebensmittel
können gelagert werden nachdem:
▶ die obere Gefrierablage herausgenommen und um
180° gekippt wird, oder
▶ nach dem Herausnehmen beider oberen Gefrier-
ablagen sowie der mittleren Gefrierschublade und
des Lagerns von Lebensmittel direkt auf dem Einschub.
Licht
Das LED-Licht im Inneren leuchtet auf, wenn die Tür geönet wird. Die Lichtleistung wird
nicht durch keine anderen Geräteeinstellungen beeinträchtigt.
21
Page 92

Ausstattung
Tipps zum Strom sparen
▶ Stellen Sie sicher, dass das Gerät sachgemäß belüftet wird (siehe AUFSTELLUNG).
▶ Stellen Sie das Gerät nicht in direktem Sonnenlicht oder in der Nähe von Wärmequel-
len (z. B. Öfen, Heizungen) auf.
▶ Vermeiden Sie unnötigerweise niedrige Temperaturen im Gerät. Der Stromver-
brauch steigt, je niedriger die Temperatur im Gerät eingestellt ist.
▶ Funktionen wie POWER-FREEZE verbrauchen mehr Strom.
▶ Lassen Sie warme Speisen erst abkühlen, bevor Sie diese in das Gerät legen.
▶ Önen Sie die Gerätetür so wenig und kurz wie möglich.
▶ Überfüllen Sie das Gerät nicht, um die Luftzirkulation nicht zu behindern.
▶ Vermeiden Sie Luft in der Lebensmittelverpackung.
▶ Halten Sie Dichtungen sauber, damit die Tür immer richtig schließt.
▶ Tauen Sie gefrorene Lebensmittel im Kühlschrankfach auf.
DE
22
Page 93

DE
Pege und Reinigung
WARNUNG!
Trennen Sie das Gerät vom Netzgerät vor dem Reinigen.
Reinigung
Reinigen Sie das Gerät, wenn nur wenig oder gar keine Lebensmittel darin sind.
Zur guten Wartung und um schlechten Lebensmittelgeruch zu vermeiden, sollte das Ge-
rät alle vier Wochen gereinigt werden.
WARNUNG!
▶ Reinigen Sie das Gerät nicht mit harten Bürsten, Drahtbürsten, Waschpulver, Benzin,
Amyl Azetat, Aceton oder ähnlichen organischen Lösungen, Säure oder Laugen. Bitte reinigen Sie mit einem speziellen Reinigungsmittel für Kühlschränke, um Schaden
zu vermeiden.
▶ Sprayen Sie das Gerät während dem Reinigen nicht mit Wasser ein und setzen Sie es
nicht unter Wasser.
▶ Sprayen Sie das Gerät nicht mit Wasser ein und reinigen Sie es nicht mit Dampf.
▶ Reinigen Sie die kalten Regale nicht mit heißem Wasser. Plötzliche Temperaturände-
rung kann verursachen, dass das Glas bricht.
▶ Berühren Sie die Oberäche der Innenseiten der Gefrierfächer nicht, insbesondere
nicht mit nassen Händen, da Ihre Hände an der Oberäche festfrieren könnten.
▶ Überprüfen Sie den Zustand von gefrorenen Lebensmitteln Im Falle von Aufwär-
mung.
▶ Halten Sie die Türdichtung immer sauber.
▶ Reinigen Sie das Innere und das Gehäuse des Ge-
räts mit einem mit warmem Wasser befeuchteten
Schwamm und neutralem Reinigungsmittel.
1. Schrubben Sie das Innere und Äußere des Kühl-
schranks, einschließlich der Türabdichtung, des
Türregals, der Glasregale, der Kästen usw., mit
einem weichen Tuch oder Schwamm, der in warmes Wasser eingetaucht ist (Sie können neutrales Reinigungsmittel in das warme Wasser geben).
2. Wenn Flüssigkeit verschüttet ist, entfernen Sie alle kontaminierten Teile, spülen Sie
sie direkt mit Wasser aus, trocknen Sie sie ab und setzen Sie sie wieder in den Kühlschrank ein.
3. Wenn verschüttete Sahne (z. B. Sahne, schmelzendes Eis) vorhanden ist, entfernen
Sie bitte alle kontaminierten Teile, legen Sie sie für einige Zeit in warmes Wasser mit
einer Temperatur von etwa 40 °C, spülen Sie sie anschließend mit Fließwasser ab,
trocknen Sie es und setzen Sie es wieder in den Kühlschrank ein.
4. Wenn ein kleines Teil oder eine Komponente im Kühlschrank (zwischen Regalen oder
Schubladen) stecken bleibt, verwenden Sie eine kleine, weiche Bürste, um sie zu lösen. Wenn Sie das Teil nicht erreichen können, wenden Sie sich bitte an den Haier-
Kundendienst.
▶ Spülen und trocknen Sie mit einem weichen Tuch.
▶ Reinigen Sie keine der Geräteteile in einer Geschirrspülmaschine.
▶ Warten Sie mindestens 7 Minuten, bevor Sie das Gerät neu einschalten, da häuges
Einschalten den Kompressor beschädigen kann.
23
Page 94

Pege und Reinigung
DE
Abtauen
Das Abtauen des Kühl- und Gefrierfachs ndet automatisch statt, manuelles Abtauen ist
nicht notwendig.
Ersetzen der LED-Lampen
WARNUNG!
Ersetzen Sie die LED-Lampe nicht selbst, sie muss entweder durch den Hersteller oder
den autorisierten Dienstleister ersetzt werden.
Die Lampe verwendet LED als Lichtquelle, was einen niedrigen Stromverbrauch und eine
lange Lebensdauer zum Resultat hat. Wenn eine Abweichung vorliegt, kontaktieren Sie
bitte den Kundendienst. Siehe KUNDENDIENST.
Parameter der Lampe:
Kühlschrankfach: 12 V max. 2 W
Gefrierfach: 12 V max. 0,5 W
Nicht-Gebrauch für einen längeren Zeitraum
Wenn das Gerät für einen längeren Zeitraum nicht benutzt wird, und Sie
die Holiday-Funktion für das Kühlfach nicht benutzen:
▶ Nehmen Sie die Lebensmittel heraus.
▶ Ziehen Sie das Netzkabel heraus.
▶ Leeren und reinigen Sie den Wassertank.
▶ Reinigen Sie das Gerät wie oben beschrieben.
▶ Halten Sie die Türen oen, um die Entstehung von schlechten Gerü-
chen im Innern zu vermeiden.
Anmerkung
Schalten Sie das Gerät nur aus, wenn es unbedingt notwendig ist.
Transport des Geräts
1. Nehmen Sie alle Lebensmittel heraus und ziehen Sie den Stecker heraus.
2. Sichern Sie Einschübe und andere bewegliche Teile im Kühl- und Gefrierfach mit Klebeband.
3. Kippen Sie den Kühlschrank nicht mehr als 45 °, um zu vermeiden, dass das Kühlsystem
beschädigt wird.
WARNUNG!
▶ Heben Sie das Gerät nicht an seinen Grien hoch.
▶ Stellen Sie das Gerät niemals waagrecht auf den Boden.
24
Page 95

DE
Fehlerbehebung
Viele auftretende Probleme können Sie selbst ohne spezielles Fachwissen lösen. Falls
einmal ein Problem auftreten sollte, prüfen Sie sämtliche erwähnten Ursachen und probieren die nachstehenden Abhilfemaßnahmen, bevor Sie sich an den Kundendienst wenden. Siehe KUNDENDIENST.
WARNUNG!
▶ Schalten Sie die Maschine aus und ziehen Sie den Netzstecker aus der Steckdose,
bevor Sie das Gerät warten.
▶ Da elektrische Arbeiten zu schweren Folgeschäden führen können, sollten solche
Tätigkeiten nur von Elektrofachleuten ausgeführt werden.
▶ Ein geschädigtes Netzkabel darf nur vom Hersteller, seinem Dienstleister oder einer
ähnlich qualizierten Person durchgeführt werden, um Risiken zu vermeiden.
Problem Mögliche Ursache Mögliche Lösung
Der Kompressor
funktioniert nicht.
Das Gerät läuft häug oder läuft für einen zu langen Zeitraum.
Der Innenraum des
Kühlschranks ist
schmutzig und/oder
riecht.
• Netzstecker ist nicht mit der Steck-
dose verbunden.
• Das Gerät bendet sich im Abtau-
vorgang
• Die Innen- und Außentemperatur
ist zu hoch.
• Das Gerät war für einen Zeitraum
nicht an den Strom angeschlossen.
• Eine Tür/Schublade des Geräts ist
nicht fest verschlossen.
• Die Tür/Schublade wurde zu häug
und zu lange geönet.
• Die Temperatureinstellungen für
das Gefrierfach sind zu niedrig.
• Die Tür-/Schubladendichtung ist
schmutzig, verschlissen, gerissen
oder falsch angepasst.
• Die erforderliche Luftzirkulation ist
nicht sichergestellt.
• Der Innenraum des Kühlschranks
muss gereinigt werden.
• Lebensmittel mit strengem
Geruch werden im Kühlschrank
gelagert.
• Verbinden Sie den Netzstecker.
• Dies ist normal für ein automati-
sches Abtauen.
• In diesem Fall ist es normal, dass
das Gerät länger läuft.
• Es dauert normalerweise 8 bis
12 Stunden, bis das Gerät vollständig herunter gekühlt ist.
• Schließen Sie die Tür/Schublade
und stellen Sie sicher, dass
das Gerät auf geradem Boden
steht und keine Lebensmittel
oder Behälter gegen die Tür
schlagen.
• Önen Sie die Tür/Schublade
nicht zu häug.
• Stellen Sie die Temperatur höher ein, bis eine zufriedenstellende Kühlschranktemperatur
erreicht wird. Es dauert 24 Stunden bis die Kühlschranktemperatur stabil ist.
• Reinigen Sie die Tür-/Schubladendichtung oder lassen Sie sie
durch den Kundendienst ersetzen.
• Sorgen Sie für angemessene
Belüftung.
• Reinigen Sie den Innenraum des
Kühlschranks.
• Verpacken Sie die Lebensmittel
sorgfältig.
25
Page 96

Fehlerbehebung
Problem Mögliche Ursache Mögliche Lösung
DE
Es ist nicht kalt genug im Inneren des
Geräts.
Es ist zu kalt im I
n-
neren des Geräts.
Feuchtigkeitsbildung im Innenraum
des Kühlschrankfachs.
Auf der Oberäche
der Kühlschrankaußenseite oder zwischen den Türen/
Tür und Schublade
bildet sich Feuchtigkeit.
Zu viel Eis und Frost
im Gefrierfach.
• Die Temperatur ist zu hoch einge-
stellt.
• Es wurden zu war-
me Speisen gelagert.
• Es wurden zu viele Lebensmittel
auf einmal gelagert.
• Die Lebensmittel liegen zu dicht
beieinander.
• Eine Tür/Schublade des Geräts ist
nicht fest verschlossen.
• Die Tür/Schublade wurde zu häug
und zu lange geönet.
• Die Temperatur ist zu niedrig eingestellt.
• Die Power-Freeze-Funktion ist aktiviert oder läuft zu lange.
• Das Klima ist zu warm und zu
feucht.
• Eine Tür/Schublade des Geräts ist
nicht fest verschlossen.
• Die Tür/Schublade wurde zu häug
und zu lange geönet.
• Lebensmittelbehälter oder Flüs-
sigkeiten wurden oen gelassen.
• Das Klima ist zu warm und zu
feucht.
• Die Tür/Schublade ist nicht fest
geschlossen. Durch die kalte Luft
im Gerät und die warme Außenluft
bildet sich Kondensat.
• Die Lebensmittel waren nicht richtig verpackt.
• Eine Tür/Schublade des Geräts ist
nicht fest verschlossen.
• Die Tür/Schublade wurde zu häug
und zu lange geönet.
• Die Tür-/Schubladendichtung ist
schmutzig, verschlissen, gerissen
oder falsch angepasst.
• Etwas im Innenraum lässt die Tür/
Schublade nicht richtig schließen.
• Stellen Sie die Temperatur neu
ein.
• Kühlen Sie Speisen vor dem
Lagern immer herunter.
• Lagern Sie immer kleine Men-
gen an Lebensmitteln.
• Lassen Sie eine Lücke zwischen
den Lebensmitteln, damit die
Luft zirkulieren kann.
• Schließen Sie die Tür/
Schublade.
• Önen Sie die Tür/Schublade
nicht zu häug.
• Stellen Sie die Temperatur neu
ein.
• Schalten Sie die Power-FreezeFunktion aus.
• Erhöhen Sie die Temperatur.
• Schließen Sie die Tür/
Schublade.
• Önen Sie die Tür/Schublade
nicht zu häug.
• Lassen Sie heiße Speisen auf
Raumtemperatur abkühlen und
decken Sie Lebensmittel und
Getränke ab.
• Bei feuchtem Klima ist das normal und es ändert sich, wenn die
Luftfeuchtigkeit sinkt.
• Stellen Sie sicher, dass die Tür/
Schublade fest geschlossen.
• Packen Sie die Lebensmittel immer gut ein.
• Schließen Sie die Tür/
Schublade.
• Önen Sie die Tür/Schublade
nicht zu häug.
• Reinigen Sie die Tür-/Schubladendichtung oder ersetzen Sie
sie durch neue.
• Positionieren Sie die Einschübe,
Türablagen, oder Behälter im
Innenraum neu, damit die Tür/
Schublade schließt.
26
Page 97

DE
Problem Mögliche Ursache Mögliche Lösung
Fehlerbehebung
Die Schrankseiten
und die Türverkleidung werden warm.
Das Gerät macht
abnormale Geräusche.
Ein leiser Ton ist
• - • Das ist normal.
• Das Gerät steht nicht auf ebenem
Boden.
• Das Gerät berührt einen Gegen-
stand in seiner Umgebung.
• - • Das ist normal.
• Passen Sie die Füße an, um das
Gerät zu nivellieren.
• Entfernen Sie Gegenstände um
das Gerät herum.
zu hören, ähnlich
dem von ießendem Wasser.
Sie hören einen
Alarm-Piepston.
Sie hören ein leises
Brummen.
Das Licht im Innenrau oder das
Kühlsystem funktioniert nicht.
.
• Die Tür des Kühlschrankfachs ist
oen.
• Das Anti-Kondenswassersystem
ist in Betrieb.
• Netzstecker ist nicht mit der Steck-
dose verbunden.
• Die Stromversorgung ist nicht in-
takt.
• Die LED-Lampe funktioniert nicht.
• Schließen Sie die Tür oder stel-
len Sie den Alarm manuell ab.
• Dies verhindert Kondensation
und ist normal.
• Verbinden Sie den Netzstecker.
• Überprüfen Sie die Stromzufuhr
zum Raum. Rufen Sie den örtlichen Stromversorger an.
• Bitte rufen Sie den Kunden-
dienst an, um die Lampe zu
wechseln.
Stromausfall
Bei einem Stromausfall, bleiben die Lebensmittel in der Regel ca. 12 Stunden lang sicher
gekühlt. Beachten Sie bei einem Stromausfall insbesondere im Sommer die folgenden
Hinweise:
▶ Önen Sie die Türen und Schubladen so wenig wie möglich.
▶ Legen Sie während eines Stromausfalls keine weiteren Lebensmittel in das Gerät.
▶ Stellen Sie Eis her und tun Sie es in ein Gefäß und stellen dieses in den obersten Ein-
schub im Kühlschrankfach, wenn es sich um einen angekündigten Stromausfall han-
delt und die Dauer des Ausfalls mehr als 12 Stunden beträgt,
▶ Überprüfen Sie die Lebensmittel unmittelbar nach dem Ende des Stromausfalls.
▶ Da die Temperaturen im Kühlschrank während eines Stromausfalls oder einer ande-
ren Störung steigen, kann die Lagerdauer und die Qualität einzelner Lebensmittel
beeinträchtigt werden. Um gesundheitliche Schäden zu vermeiden, sind sämtliche
aufgetauten Lebensmittel entweder sofort zu verbrauchen oder müssen einmal er-
hitzt (sofern zulässig) werden, bevor diese wieder eingefroren werden können.
Speicherfunktion während Stromunterbrechung
Sobald die Stromzufuhr wieder hergestellt ist, fährt das Gerät mit den Einstellung fort, die
vor dem Stromausfall eingestellt wurden.
27
Page 98

Aufstellung
DE
Auspacken
WARNUNG!
▶ Das Gerät ist schwer. Hantieren Sie immer mit mindestens zwei Personen.
▶ Halten Sie sämtliches Verpackungsmaterial von Kindern fern, entsorgen Sie alles auf
umweltfreundliche Weise.
▶ Nehmen Sie das Gerät aus der Verpackung.
▶ Entfernen Sie sämtliche Verpackungsmaterialien.
Umweltbedingungen
Die Raumtemperatur muss immer zwischen 10 °C und 43 °C betragen, da sie die Tempe-
ratur im Innenraum des Gerätes und seinen Stromverbrauch beeinussen kann. Stellen
Sie das Gerät nicht ohne Isolation in der Nähe von anderen Geräten (Herde, Kühlschränke)
auf, die Hitze abgeben.
W1
W2
D1
Platzerfordernis
Erforderlicher Platz, wenn die Tür geönet ist:
W1=1221 mm
D2
W2=1534 mm
D1=560 mm
D2=1040 mm
28
1.
max 45°
10 cm
10 cm
Lüftungsquerschnitt
um aus Sicherheitsgründen genügend Lüftung des
Gerätes zu erreichen, müssen die Informationen des
erforderlichen Lüftungsquerschnitts beachtet werden.
10 cm
10 cm
2.
Ausrichten des Geräts
Das Gerät muss auf eine ache und stabile Oberäche
gestellt werden.
1. Kippen Sie das Gerät leicht nach hinten.
2. Setzen Sie die Füße auf die gewünschte Höhe.
Stellen Sie sicher, dass der Abstand zur Wand an der
Scharnierseite mindestens 100 mm beträgt, damit die
Page 99

DE
Aufstellung
Tür richtig önet.
3. Alternativ kann die Stabilität durch Anstoßen an
die Diagonalen überprüft werden. Das leichte
Schaukeln muss in beiden Richtungen das gleiche
sein. Ansonsten kann der Rahmen sich verziehen;
mögliche undichte Türönungen sind das Resultat. Eine leichte Tendenz nach hinten macht es
einfacher die Tür zu schließen.
Feineinstellung der Türen
Wenn die Türen nicht gerade ausgerichtet sind, kann
diese Fehlausrichtung folgendermaßen behoben werden:
Verwendung des justierbaren Fußes
Rotieren Sie den justierbaren Fuß in Pfeilrichtung, um
ihn nach oben oder unten zu drehen.
3.
A
B) Benutzen von Abstandhalter
▶ Önen Sie die obere Tür und heben Sie diese nach
oben.
▶ Stecken Sie die Abstandhalter (in der Tüte mit den
Zubehörteilen enthalten) mit der Hand oder mithilfe von Werkzeugen, wie einer Zange ab, vorsichtig
in den weißen Kunststoring des mittleren Scharniers. Achten Sie darauf, die Tür nicht zu zerkratzen.
Anmerkung
Im Laufe der Zeit können sich die Türen des Kühlschranks aufgrund des Gewichts der
gelagerten Lebensmittel verschieben. In diesem Fall sind die Türen mithilfe der oben
genannten Methoden auszurichten.
B
29
Page 100

Aufstellung
Wartezeit
Für die Wartung ist Schmieröl in der Kapsel des Kompressors enthalten. Dieses Öl kann während dem geneigten Transport durch das geschlossene Leitungssystem gelangen. Vor dem Anschließen des Gerätes
2 h
Elektrischer Anschluss
Überprüfen Sie vor jedem Anschluss, ob:
▶ Stromversorgung, Steckdose und Sicherung mit dem Typenschild übereinstimmen,
▶ die Steckdose geerdet ist und kein Mehrfach-Stecker oder eine Verlängerung ist,
▶ Stromversorgung und Steckdose den Anforderungen genau entsprechen.
Verbinden Sie den Stecker mit einer sachgemäß montierten Haushaltssteckdose.
WARNUNG!
Ein beschädigtes Stromkabel muss durch den Kundendienst ersetzt werden (siehe
Garantiekarte), um Risiken zu vermeiden.
an die Stromversorgung müssen Sie 2-5 Stunden war-
ten, so dass das Öl zurück in die Kapsel ießt.
DE
30
 Loading...