

Haier HT18TS45SW, HT18TS45SB Owner’s Manual
Frost-Free Top Mount
JANUARY 2012
HT18TS45SW
Refrigerator / Freezer
Réfrigérateur/congélateur sans
givre à compartiments superposés
Refrigerador/congelador sin
escarcha, de puertas horizontales
User Manual
Guide de l’Utilisateur
Manual del Usuario
Model HT SERIES
Design may vary by model number.
La conguration peut varier selon le numéro de modèle.
El diseño puede variar conforme al número de modelo.

TABLE OF CONTENTS
JANUARY 2012
HT18TS45SW
SAFETY INFORMATION
ENGLISH
Important Safety Instructions
SET UP & USE
Parts & Features
Electrical Requirements
Installation Guide
...............................................................................................................................
...............................................................................................................................
......................................................................................................................
...............................................................................................................................
5-6
2
3
4
Instructions for Unpacking
Installing Your Refrigerator
Parts Included
Accessories
Reversing the Door
Door Handle Installation
Features and Use
CLEANING & CARE
Proper Care and Maintenance
TROUBESHOOTING & WARRANTY
Normal Operating Sounds
Troubleshooting
Customer Service
Limited Warranty
...............................................................................................................................
...............................................................................................................................
...............................................................................................................................
...............................................................................................................................
...............................................................................................................................
...............................................................................................................................
...............................................................................................................................
............................................................................................................................
............................................................................................................................
............................................................................................................................
..........................................................................................................................
..............................................................................................................
12
10-11
12
13-14
14
15
5
5
6
7
7
8
Thank you for purchasing our Haier
product. This easy-to-use manual will guide you in
getting the best use of your product .
Remember to record the model and serial numbers.
They are on a label i nside of the Product .
Staple your receipt to your manual. You will need it to obtain warranty service.
PRODUCT REGISTRATION
Model number
Serial number
Date of purchase
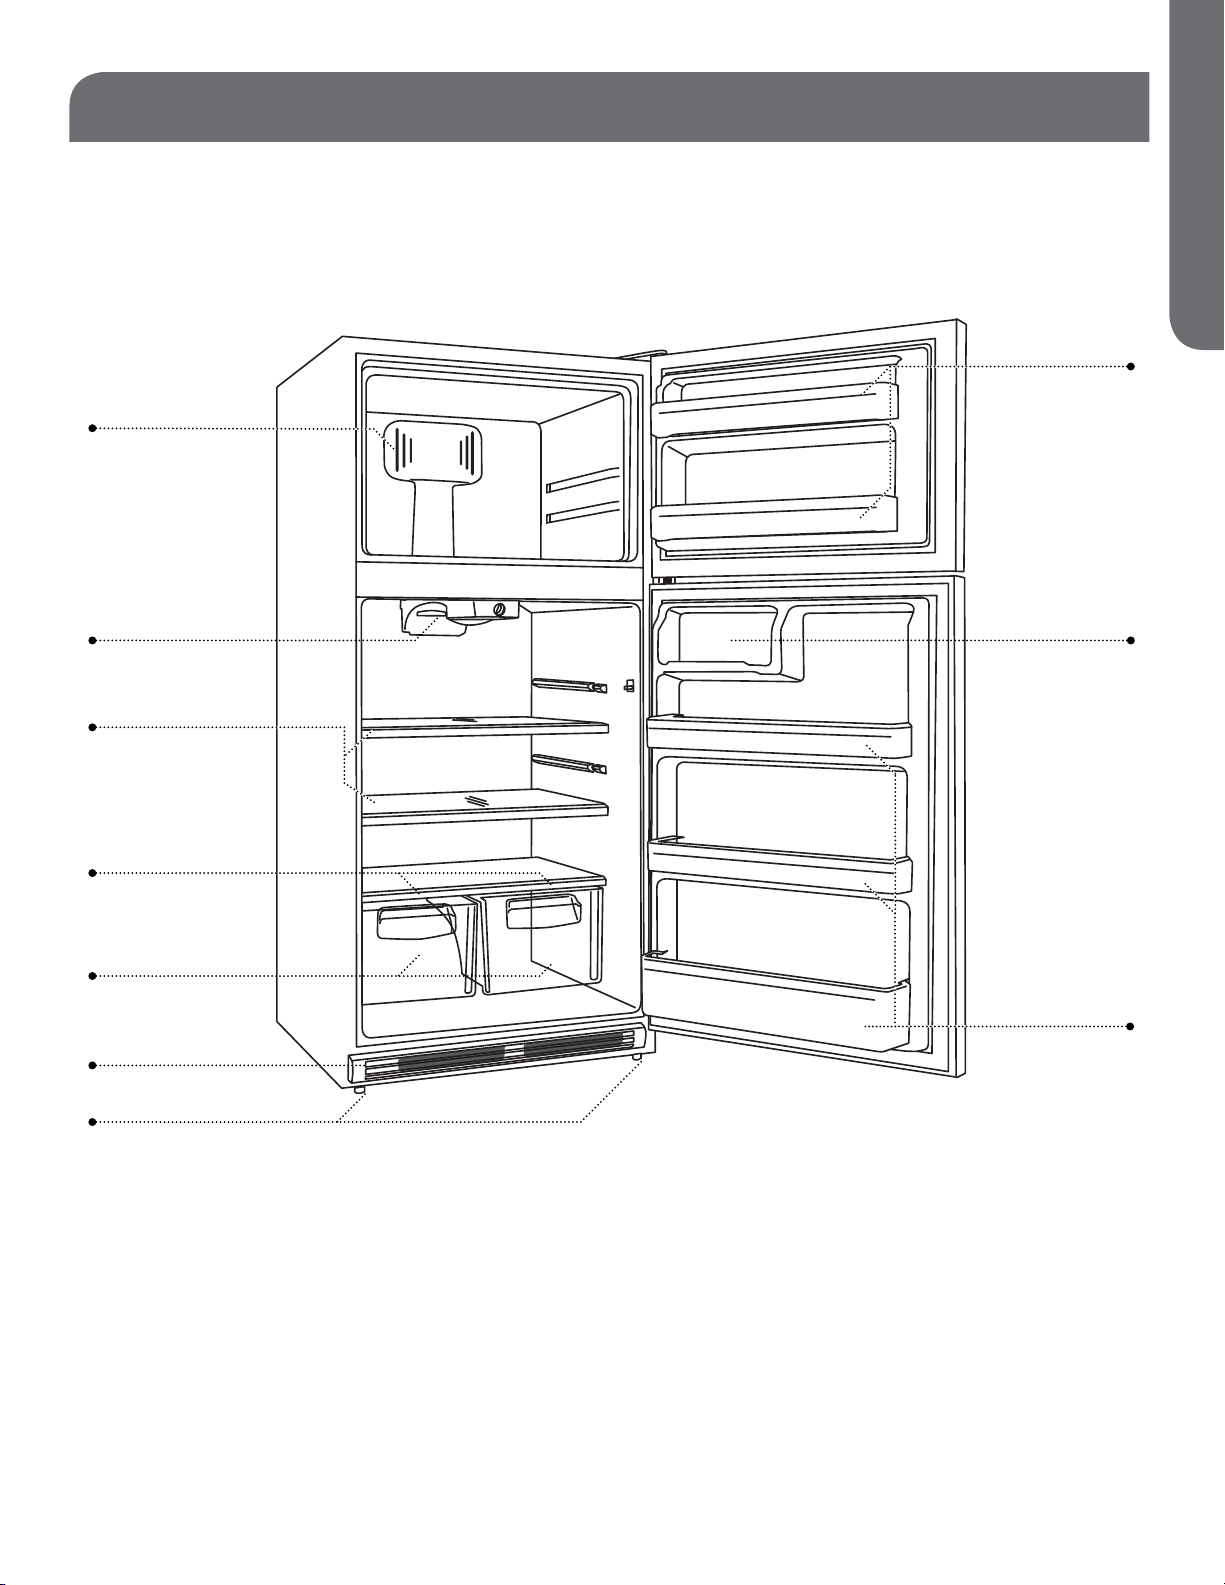
PARTS & FEATURES
JANUARY 2012
HT18TS45SW
Air Flow
Control
Temperature
Control with
Interior Light
Full-Width
Shelves
ENGLISH
Freezer
Door Shelves
Dairy
Compartment
Crisper
Humidity
Controls
Crisper Bins
Front Grille
Leveling Legs
Full-Width
Door Shelves
Diagram for instructional purposes only.
Design may vary by model number.
PAGE 3 • PARTS & FEATURES

IMPORTANT SAFETY INSTRUCTIONS
JANUARY 2012
HT18TS45SW
ENGLISH
WARNING
READ ALL INSTRUCTIONS BEFORE USING THIS APPLIANCE:
WHEN USING THIS APPLIANCE, ALWAYS EXERCISE BASIC SAFETY
PRECAUTIONS, INCLUDING THE FOLLOWING:
NO TE : If the refrigerator has been placed in a horizontal or tilted position for any period of time, wait 4
hours before plugging the unit in.
1) Use this appliance only for its intended purpose as described in this use and care guide.
2) This refrigerator must be properly installed in accordance with the installation instructions before it is
used. See Electrical Requirements in the Set Up & Use section.
3) This refrigerator should not be recessed or built-in an enclosed cabinet. It is designed for freestanding
installation only.
4) Never unplug your refrigerator by pulli
straight out from the outlet.
5) Repair or replace immediately, all electric service cords that have become frayed or otherwise
damaged. Do not use a cord that shows cracks or abrasion damage along its length, the plug or the
connector end.
6) If your old refrigerator is not being used, we recommend that you remove the doors. This will reduce
the possibility of danger to children.
mly and pull
WARNING
AFTER YOUR REFRIGERATOR IS IN OPERATION, DO NOT TOUCH THE COLD
SURFACES IN THE FREEZER COMPARTMENT, PARTICULARLY WHEN HANDS ARE
DAMP OR WET. SKIN MAY ADHERE TO THESE EXTREMELY COLD SURFACES.
7) Do not use any electrical device or any sharp instrument in defrosting your refrigerator.
.sriaper yna gnikam erofeb ro gninaelc erofeb rotaregirfer ruoy gulpnU )8
NOTE: deifitrec a taht dnemmocer ylgnorts ew ,ecivres seriuqer tcudorp siht nosaer yna rof fI
technician perform service.
9) Do not operate your refrigerator in the presence of explosive fumes.
SAVE THESE INSTRUCTIONS
DANGER
RISK OF CHILD ENTRAPMENT. BEFORE YOU THROW AWAY YOUR OLD
REFRIGERATOR OR FREEZER, TAKE OFF THE DOORS. LEAVE THE SHELVES IN
PLACE SO THAT CHILDREN MAY NOT EASILY CLIMB INSIDE.
PAGE 4 SAFETY INFORMATION•

ELECTRICAL REQUIREMENTS
JANUARY 2012
HT18TS45SW
GROUNDING INSTRUCTIONS
WARNING
ELECTRICAL REQUIREMENT - SHOCK HAZARD
• Make sure there is a suitable power outlet. 115 Volts, 15 Amps, 3 Prong (Grounded) power outlet with
proper grounding to power the refrigerator.
• Avoid the use of three prong adapters or cutting o the third grounding prong in order to
accommodate a two prong outlet. This is a dangerous practice since it provides no eective grounding
for the refrigerator and may result in shock hazard.
USE OF EXTENSION CORDS
WARNING
USE OF EXTENSION CORD - POTENTIAL SAFETY HAZARD
• Avoid the use of an extension cord because of potential safety hazards under certa in conditions.
If it is necessary to use an extension cord, use only a 3-wire extension cord that has a 3-blade
grounding plug and a 3-slot outlet that will accept the plug. The marked rating of the extension cord
must be equal to or greater than t he electrical rating of the appliance.
ENGLISH
DO NOT USE EXTENSION CORD LONGER THAN 12 FT.
INSTALLATION GUIDE
INSTALLATION LIMITATIONS
• Select a suitable location for the refrigerator on a hard even surface away from direct sunlight or heat
source, e.g. radiators, baseboard heaters, cooking appliances, etc. Any oor unevenness should be
corrected with the leveling legs located on the front bottom corners of the refrigerator.
UNPACKING YOUR REFRIGERATOR
1. Remove all packaging material. This includes the corrugated base and all adhesive ta pe holding the
refrigerator accessories inside and outside.
2. Inspect and remove any remains of packing, tape or pr
refrigerator.
NOTE: If your refrigerator comes with a snack pan, remove the blue adhesive tape from the rear of the
pan. The pan will not slide in and out without removing the tape.
inted materials before powering on the
PAGE 5 • SET UP & USE
 Loading...