

Page 1
User Manual
Free Standing Cooker
HOR54B5MCW1
Cod:0040304158
Page 2

DEAR CUSTOMER
TABLE OF CONTENTS
This appliance has been designed to be efficient and easy to use. The following
instructions will show you how to best operate your appliance to enjoy years of
hassle-free use.
It is important to keep this instruction manual and store it in a safe place so that it can
be consulted at any time.
For your peace of mind, this appliance has been thoroughly tested with regard to safety
and functionality before leaving the factory.
Caution!
Do not use this appliance until you have read this instruction manual.
This appliance is intended for household use only.
Safety instructions..................................................................................................................................3
....
How to save energy......................................................................................................
Unpacking..........................................................................................................................5
Disposal of the appliance...................................................................................................5
Description of the appliance.....................................................................................
Installation ......................................................................................................................7
Operation ...................................................................................................................
Before first use .............................................................................................................
How to use the heating plate
Operating the grill/top oven .......................................................................................... ....10
Operating the fan oven ................................................................................................. ....12
Oven functions and operatiom ...................................................................................... ....13
Mechanical timer ...................................................................................... ....13
Cleaning and maintenance.................................................................................................16
Operation in case of emergency..................................................................................................20
Technical information..........................................................................................................21
Electrical connection..........
..........
..........
.............................
................................
....................
...................................................................22
.........................................9
..
...........6
..
..8
....
..8
4
1
2
Page 3
SAFETY INSTRUCTIONS
l The appliance becomes hot during operation. Take care not to touch the hot parts
inside the oven.
l Always keep children away from the cooker.
the cooker may cause burns!
l Ensure that small items of household equipment, including connection leads, do not
touch the hot oven or the hob as the insulation material of this equipment is usually
not resistant to high temperatures.
l Do not leave the cooker unattended when frying. Oils and fats may catch fire due to
overheating.
l Do not allow the cooktop to get soiled and prevent liquids from boiling over onto the
surface of the cooktop, Any spillages should be cleaned up as they happen.
l Do not place pans with a wet bottom on the warmed up heating zones as this can
cause irreversible changes to the cooktop(irremovable stains).
l Do not switch on the cooktop until a pan has been placed on it.
l Do not put pans weighing over 15kg on the opened door of the oven and pans over
25kg on the cooktop.
l Do not use harsh cleaning agents or sharp metal objects to clean the doors as they
can scratch the surface, which could then result in the glass cracking.
l Do not use the cooker in the event of a technical fault. Any faults must be fixed by an
appropriately qualified and authorized person.
l In the event of any incident caused by a technical fault, disconnect the power and
report the fault to the service centre to be repaired.
l The rules and provisions contained in this instruction manual should be strictly
observed. Do not allow anybody who is not familiar with the contents of this instruction
manual to operate the cooker.
l The cooker should not be cleaned using steam equipment.
WARNING:In order to prevent accidental tipping of the appliance ,for example by a
child climbing onto the open door,the stabilizing means must be installed.
The oven must be switched off before removing the guard and that,after cleaning,the
guard must be replaced in accordance with the instrctions.
Ensure that the appliance is switched off before replacing the lamp to avoid the possibility
of electric shock.
WARNING:Accessible parts will become hot when the grill is in use .Children should be
kept away.
The appliance is not intended to be operated by means of an external timer or separate
remote-control system.
This appliance is not intended for use by persons (including children) with reduced
physical, sensory or mental capabilities, or lack of experience and knowledge,unless
they have been given supervision or instruction concerning use of the appliance by a
person responsible for their safety.
Children should be supervised to ensure that they do not play with the appliance.
If the supply cord is damaged, it must be replaced by the manufacturer or its service
agent or a similarly qualified person in order to avoid a hazard.
Use pans that are specified by the manufacturer as designed for use with a ceramic hob.
If the surface is cracked,switch off the appliance to avoid the possibility of electric shock.
While in operation direct contact with
SAFETY INSTRUCTIONS
Do not use pans with sharp edges that may
cause damage to the ceramic hob.
Do not look directly at the halogen heating
zone (not covered with a pan)when they are
warming up.
HOW TO SAVE ENERGY
Using energy in a responsible
way not only saves money
but also helps the environment
So let’s save energy!
● Use proper pans for cooking.
Pans with thick, flat bases can save up to
1/3 on electric energy. Remember to cover
pans if possible otherwise you will use four
times as much energy!
● Match the size of the saucepan to the
surface of the heating plates.
A saucepan should never be smaller than
a heating plate.
● Ensure heating plates and pan bases
are clean.
Soils can prevent heat transfer-and
repeatedly burnt-on spillages can often
be removed by products which cause
damage to the environment.
● Do not uncover the pan too often(a
watched pot never boils!).
Do not open the oven door unnecessarily
often.
● Switch off the oven in good time and
make use of residual heat.
For long cooking times,switch off heating
zones 5 to 10 minutes before finishing
cooking.This saves up to 20% on energy.
● Only use the oven when cooking larger
dishes.
Meat of up to 1 kg can be prepared more
economically in a pan on the cooker burner.
● Make use of residual heat from the
oven.
If the cooking time is greater than 40minutes
it is recommended to switch off the oven
10 minutes before the end time.
Caution!
When using the timer set appropriately
shorter cooking times according to the dish
being prepared.
● Never operate the oven with the door
ajar, including when grilling.
● Make sure the oven door is properly
closed.
Heat can leak through spillages on the door
seals.Clean up any spillages immediately.
● Do not install the cooker in the direct
vicinity of refrigerators/freezers.
Otherwise energy consumption increases
unnecessarily.
3
4
Page 4
UNPACKING
DISPOSAL OF THE APPLIANCE
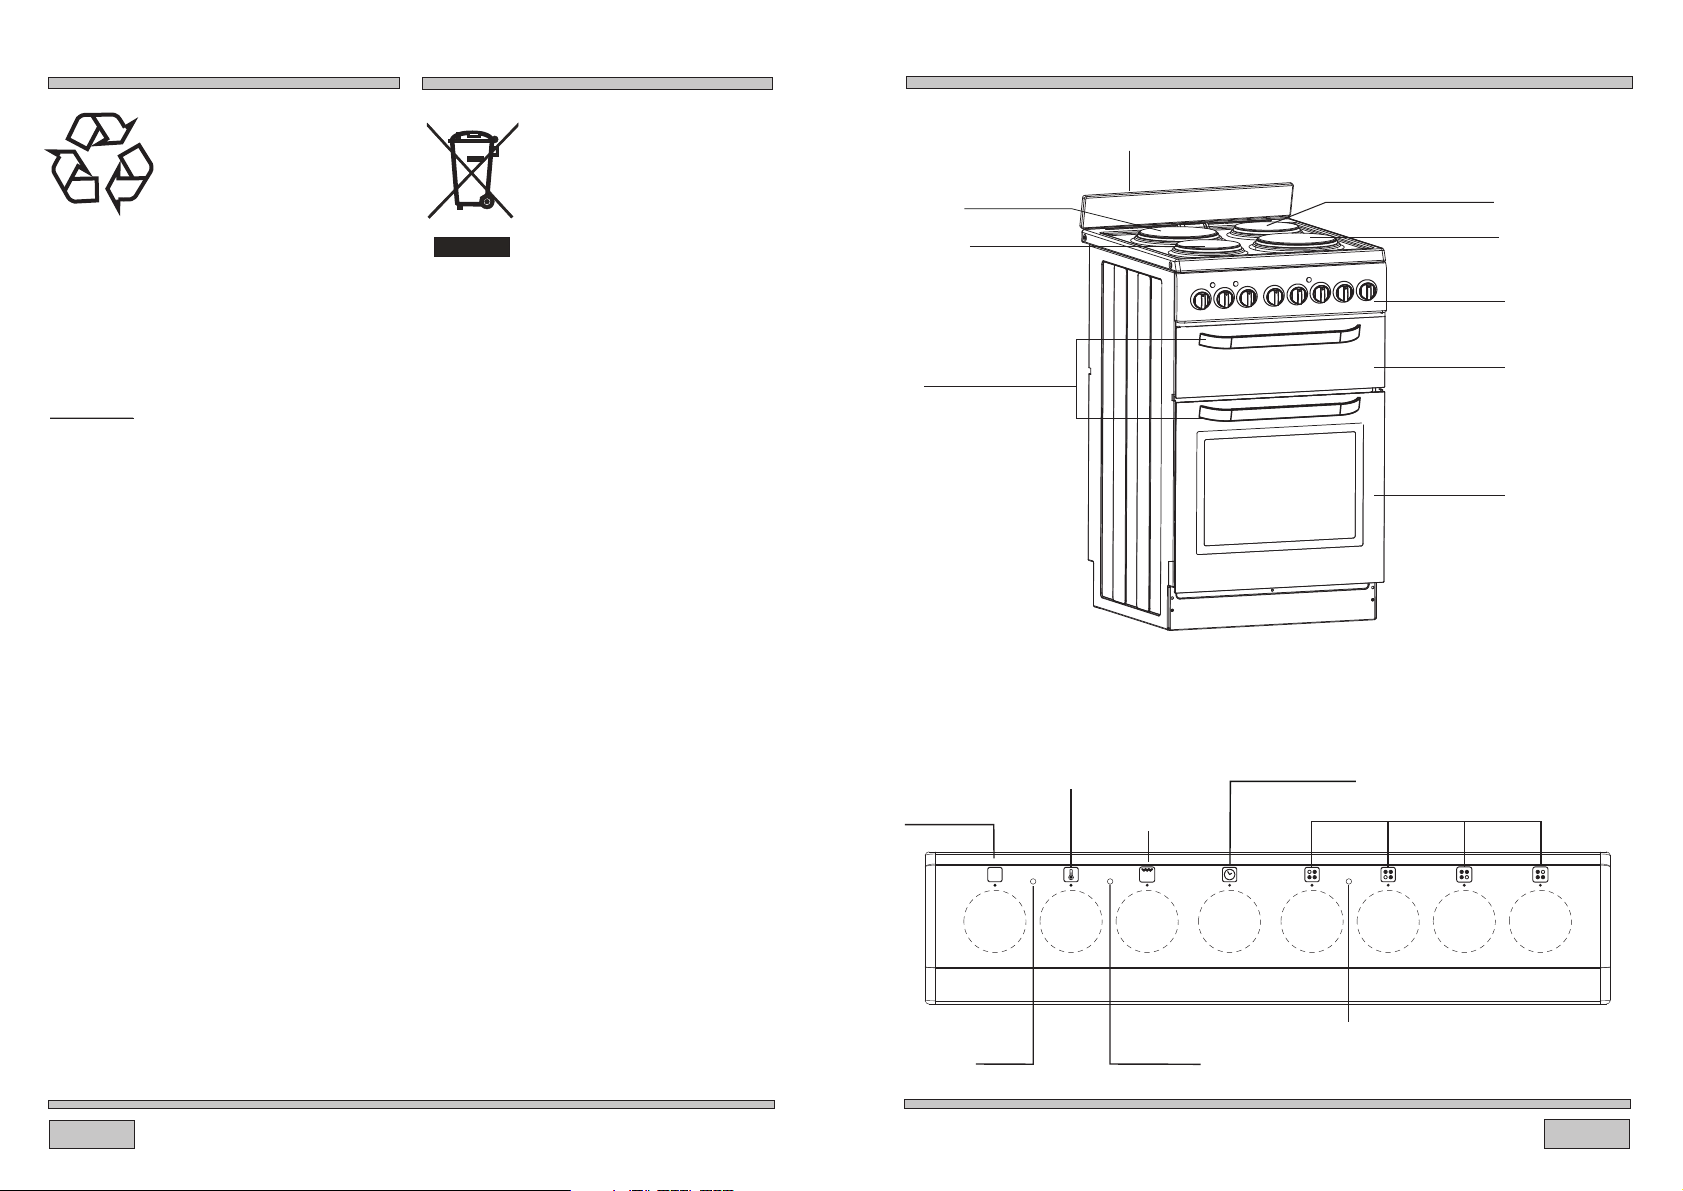
DESCRIPTION OF THE APPLIANCE
During transportation,
protective packaging was
used to protect the appliance
against any damage.
After unpacking, please dispose of all
elements of packaging in a way that will
not cause damage to the environment.
All materials used for packaging the
appliance are environmentally friendly;
they are 100% recyclable and are marked
with the appropriate symbol.
Caution!
During unpacking, the packaging materials
(polythene bags, polystyrene pieces, etc.)
should be kept out of reach of children.
Old appliances should not
simply be disposed of with
normal household waste,
but should be delivered to a
collection and recycling centre
for electric and electronic
equipment.
A symbol shown on the product,the
instruction manual or the packaging shows
if it is suitable for recycling.
Materials used inside the appliance are
recyclable and are labelled with information
concerning this. By recycling materials or
other parts from used devices you are
making a significant contribution to the
protection of our environment.
Information on appropriate disposal centers
for used devices can be provided by your
local authority.
1.5kw Hotplate
1kw Hotplate
oven door handle
Splashback
1kw Hotplate
2.0kw Rapid Hotplate
Control panel
Top oven/grill door
Main oven door
Temperature
Main oven
control knob
Main oven
indicator light
5
control knob
Top oven/grill
control knob
Top oven
indicator light
Mechanical timer
control knob
Top burners control knob
hob indicator light
6
Page 5

INSTALLATION
Installing the cooker
The kitchen where the appliance is to
be installed must be dry and well
ventilated.
The room should be equipped with a
ventilation system that pipes away
exhaust fumes created during
combustion. This system should
consist of a ventilation grid or hood.
Hoods should be installed according
to the manufacturer’s instructions.
The cooker should be placed so as
to ensure free access to all control
elements.
Coating or veneer used on fitted
furniture must be applied with a heat
resistant adhesive (100℃). This
prevents surface deformation or
detachment of the coating. If you
are unsure of your furniture’s heat
resistance, you should leave
approximately 2 cm of free a space
around the cooker. The wall behind
the cooker should be resistant to
high temperatures.During operation,
its back side can warm up to around
Fix the cooker to the back wall
with 2 chains
The cooker should stand on a hard,
even floor (do not put it on a base.)
Before you start using the cooker it should
be leveled,which is particularly Important for
distribution in a frying fat pan. To this
purpose,adjustable feet are accessible after
removal of the drawer. The adjustment range is +/-5mm.
2cm
INSTALLATION
To fit the rear panel/splashback, slide the lugs on the bottom of the panel into
●
the matching slots on rear of stove and fix with screws provided.
650mm(min)
2cm
OPERATION
Before first use
Remove packaging and empty the drawer. Clean the interior of the oven with
l
warm soapy water and wipe clean with oistened cloth or sponge. Wipe clean the
cooktop.
l
Take out and wash the oven fittings with warm water and a little washing-up liquid.
l
Switch on the ventilation in the room or open a window.
l
Heat the oven (to a temperature of 250°C, for approx. 30 min.), remove any stains and
wash carefully. The hotplates should be heated for around 4 minutes without
a pan or pot on them.
l
When heating the oven for the first time it is normal for the stove to give
off smoke and manufacturing odours.These will disappear after about 30
Minutes.
7
8
Page 6

OPERATION
Use
Do not use pots and pans that are unsteady and likely to rock or overbalance.
Do not operate the cooktop for an extended time without utensil on the hotplate.
Good Bad Bad Bad Bad Bad Bad
(recessed base)
Caution!
(convex base)
Ensure the plate is clean – a soiled zone does not transfer all of the heat.
Protect the plate against corrosion.
Switch off the plate before a pan is removed.
Do not leave pans with prepared dishes based on fats and oils unattended on the switched
– on plate; hot fat can spontaneously catch fire.
(undersize) (oversize)
(moisture on hotplate)
(no utensil)
OPERATION
Operating the grill/top oven
Caution!
Do not touch the heating elements or other parts that may become hot when the grill/
top oven is in use-children must be kept away.
A switch operated by the knob. Turn the knob to the temperture position you want,
the grill element is actived.
How to use the heating plate
When any hotplate is activated the RED signal light will remain on.
The level of heat can be adjusted gradually by turning the appropriate knob to the right
or left.
Switching on the plate results in a RED signal light on the control panel turning on.
Switching off
MAX
Fast heating up,
fast cooking and frying
MIN.
Warming up
Stewing vegetables
Grilling meat, fish
slow cooking
Cooking soups,larger
dishes
Slow frying
An appropriately selected pan saves energy.
A pan should have a thick, flat base with a diameter equal to the plate diameter, as in that
case heat is transferred most efficiently.
Caution!
Ensure the plate is clean – a soiled zone does not transfer all of the heat.
Protect the plate against corrosion.
Switch off the plate before a pan is removed.
Do not leave pans with prepared dishes based on fats and oils unattended on the switched
– on plate; hot fat can spontaneously catch fire.
9
Using as a grill
When the door is full open, it remains titled slightly, so that any spillage will be directly
away from you.
1.Opened the drawer.
2.Turn the grill on by turning the control knob to maximum tempreture position and
allow to preheat for around 5 minutes.
3.The indicator light will glow to show that the grill has been switched on .
4.Then choose the desired setting.
l
Plates and dishes placed on the floor of the grill compartment will be heated when
the main oven in use.
l
Do not switch on the grill when using the compartment for storage.
l
Do not line the grill pan with aluminium foil.
10
Page 7

OPERATION
OPERATION
Using as an oven
1.Turn on the oven by rotating the top oven control knob clockwise.
2.Select the temperature in the oven by selecting the temperature (in degrees Celsius)
printed on the knob.
3.The amber temperature indicator light on the control panel will glow until the pre-set
temperature is reached.
4.Once the temperature has been reached, the amber light will go off and cycle on and off.
to maintain the pre-set temperature.
Take care when opening the door. let steam and hot air escape before removing the food.
Top oven temperature chart
This chart is for guidance only. follow food manufactures recommendations whenever
available.
There is a temperature conversion chart in the oven section.
Food
Beef 170-180
Lamb
Pork
Poultry
Fruit cake
Small cakes 160-180 20-25mins
Victoria sandwich
11
Cooking
temperature °
180-190
170-190
170-190
140-160
160-180
C
Time
30 mins per 450g+30 mins
30 mins per 450g+30 mins
30 mins per 450g+30 mins
25-30 mins per 450g+25 mins
Time dependent on size
20-25mins
Operating the oven
Caution!
Do not touch the heating elements or other
parts that may become hot when the grill/top
oven is in use, children must be kept away.
1.Turn on the oven by
rotating the oven control
clockwise. knob
2.Select the temperature
in the oven by selecting
the temperature (in
degrees Celsius) printed
on the knob.
3.The amber temperature indicator light on
the control panel will glow until the pre-set
temperature is reached.
4.Once the temperature has been reached,
the amber light will go off and cycle on and off.
Ensure you stand back from the appliance when
opening the oven door to allow any build up
of steam or heat to escape.
Caution!
l
Check food is thoroughly cooked and piping hot.
Food
Beef 160-180
Lamb
Pork
Poultry up to 4Kg(81bs)
Poultry up to5.5Kg(121bs)
Casseroles 140-150
Fruit cake
Small cakes 160-180 20-25mins
Victoria sandwich
Cooking
temperature °
160-180
160-180
160-180
150-160
130-140
160-180
C
20-25 mins per 450g+20 mins
25 mins per 450g+25 mins
25 mins per 450g+25 mins
18-20 mins per 450g+20 mins
14-16 mins per 450g+20 mins
1.5-2 hours dependent on quantity
Time dependent on size
Temperature conversion
The oven temperature control knob is
marked in degrees Celsius(sometimes
called centigrade). This chart will help
when recipes show °F or use descriptive
terms (as ecommende by the Association
of Manufacturers of Domestic Electrical
Appliances).
Description
Cool
Slow
Fairly hot
Hot
Very hot
Time
20-25mins
Celsius°
70 150
80 175
100 200
110 225
120 250
140 275
150 300
160 325
180 350
190 375
200 400
220
230 450
250 480
Fahremheit°F
425
Shelf position
2
2
1-2
1-2
1-2
1-2
2-3
4
1
12
Page 8

OPERATION
OPERATION
Oven functions and operation
(only for main oven)
The oven is controlled by the function
knob, timer knob and the temperature
selection knob.
Temperature selection knob
5 Function knob
Mechanical timer
(Only for main oven)
When using the oven, you must set
food cooking time.
1.Turn mechanical timer to the time
position you want.
2.Turn function knob to the function
position you want.
3.Turn temperature knob to the
temperature position
you want.
4.After above operation, oven knob
runs normally.
5.When oven works till pre-set time,
timer will have sound which means
the cooking is finished.
If you don’t want the oven work
controlled by the mechanical timer,
you can turn the mechanical timer
to the position.
Possible settings of the oven
function knob
Caution!
At this oven function knob position.
The oven is not being warmed up.
Classic convection
(Bottom Heat + Top Heat)
Setting the knob to this position allows the
oven to be heated conventionally.
Base Heat
(Bottom heater)
At this oven function knob position, the
oven activates the bottom heater.
Top element
top element.
Mechanical timer knob
Caution!
When selecting any heating function
(switching a heater on etc.) the oven will
only be switched on after the temperature
has been set by the temperature regulator
knob.
13
Caution!
When selecting any oven function, the
oven will only be switched on after the
temperature has been set by the
temperature selection knob.
Static Grill
(Double Grill)
When the “combined grill” is active it
enables grilling with the grill and with the
top heater switched on at the same time.
This function allows a higher temperature
at the top of the cooking area, which
causes more intense browning of the dish
and permits larger portions to be grilled.
14
Page 9

OPERATION
CLEANING AND MAINTENANCE
Use of the grill
In order to switch on the grill you need to:
● Set the oven knob to the position marked grill.
● Heat the oven for approx. 5 minutes(with the oven door shut).
● Insert a tray with a dish onto the appropriate cooking level; and if you are grilling on
the grate insert a tray for dripping on the level immediately below (under the grate).
● Close the oven door.
For grilling with the function grill and combined grill the temperature must be set to
250℃.
Warning!
When using function it is recommended that the oven door is closed. grill
When the grill is in use accessible parts can become hot.
It is best to keep children away from the oven.
Bottom main Oven guide levels
Baking pans and accessories (oven grid, baking tray, etc) may be inserted into the
oven in 5 guiding levels. Appropriate levels are indicated in the tables that follow.
Always count levels from the bottom upwards!
By ensuring proper cleaning and maintenance
of your oven you can have a significant
influence on the continuing fault-free operation
of your appliance.
Before you start cleaning, the oven must be
switched off and you should ensure that all
knobs are set to the “0”position. Do not start
cleaning until the oven has completely cooled.
Oven
The oven should be cleaned after each
.
use
Cool the oven completely before cleaning.
Never clean the appliance with pressurised
hot steam cleaner!
The oven chamber should only be washed
with warm water and a small amount
of washing-up liquid.
Steam cleaning
-pour 250mL of water (1 cup) into a
bowl placed in the oven on the first level
from the bottom.
-Close the oven door,
-Set the temperature knob to , and50℃
the function knob to the bottom heater
position,
-heat the oven chamber for approximately
30 minutes,
-Open the oven door, wipe the chamber
inside with a cloth or sponge and wash
using warm water with washing-up liquid.
After cleaning the oven chamber wipe it
dry.
15
Caution!
Do not use cleaning products containing
abrasive materials for the cleaning and
maintenance of the glass front panel.
16
Page 10

CLEANING AND MAINTENANCE
CLEANING AND MAINTENANCE
Turn off at the mains before cleaning.
Before switching on again ensure that
all controls are in the off position.
Make sure that the oven grill and hobs
are sufficiently cool before you start
cleaning.
Never mix different cleaning products as
different active ingredients may react with
unforseen results.
Exterior
Use a damp cloth to clean the outside.Never
use any sharp instruments, abrasive household
cleaner, or detergents for cleaning.For hard
stains use suitable washing liquid.
Control panel
Wipe over the control panel with a damp cloth
and polish with a dry cloth. Do not use oven
cleaners or aerosols,scouring pads or abrasive
powder for cleaning the plastic knobs or end
caps as damage will occur. Do not attempt to
remove any of the control knobs from the
panel as this may cause damage and is a
safety hazard.
Grill interior
Wipe the grill elements with a damp cloth
(ensuring they are sufficiently cool first)
to remove any fat spashes. This will prevent
fumes from any fat being burned off when
the cooker is next used.
Oven interior
Remove the rod shelves for washing in the
sink. Use a fine steel wool soap pad for
removing stubborn stains from the rod shelves
and floor of the oven. Take care during
cleaning not to damage, bend or dislodge
from the surrounding clips the thermostat
sensor which is located at the top right hand
side of the oven
Before any maintenance is started
involving electrical parts, the
appliance must be disconnected
from the power supply.
If the oven has been in use, let the
oven cavity and the heating elements
cool down before attempting any
maintenance.
Changing the bulb
Unscrew the protective cover. We
l
recommend that you wash and dry the
glass cover at this point.
Carefully remove the old bulb and
insert the new bulb suitable for high
temperatures (300℃) having the
following specifications: 220-240V,
50Hz, 25W, G9 fitting.
l
Refit the protective cover.
IMPORTANT
Never use screwdrivers or other
utensils to remove the light cover.
This could damage the enamel of the
oven or the lampholder. Remove only
by hand.
IMPORTANT
Never replace the bulb with bare
hands as contamination from your
fingers can cause premature failure.
Always use a clean cloth or gloves.
Please note:
The bulb replacement is not covered
by your guarantee
Door removal
In order to obtain easier access to the oven
chamber for cleaning , it is possible to
remove the door.
To do this, tilt the safety catch part of the
hinge upwards. Close the door lightly, lift
and pull it out towards you. In order to fit the
door back on to the cooker, do the reverse.
When fitting, ensure that the notch of the
hinge is correctly placed on the protrusion
of the hinge holder. After the door is fitted
to the oven, the safety catch should be
carefully lowered down again. If the safety
catch is not set it may cause damage to the
hinge when closing the door.
Tilting the hinge safety catches
Door removal
17
18
Page 11

CLEANING AND MAINTENANCE
OPERATION IN CASE OF EMERGENCY
Removal of the internal glass
panel
Unscrew and unfasten the plastic latch that
is in the corner at the top of the door. Next
take out the glass from the second blocking
mechanism and remove. After cleaning,
sert and block the glass panel, and screw in
the blocking mechanism.
Removal of the internal glass panel
Install door
Regular inspections
Besides keeping the cooker clean, you
should:
● Carry out periodic inspections of the
control elements and cooking units of the
cooker. After the guarantee has expired you
should have a technical inspection of the
cooker carried out at a service centre
at least once every two years.
● Fix any operational faults.
● Carry out periodical maintenance of the
cooking units of the cooker.
Caution!
All repairs and regulatory activities should
be carried out by the appropriate service
centre or by an appropriately authorized
fitter.
If the cooker does not work
If the appliance does not operate check whether:
●
The power supply is on.
●
The fuse has blown/circuit breaker has tripped/main distribution switch has been turned off.
●
The temperture control has been set correct.
●
The main oven will not light has the clock been set.
●
Check your electric power supply earthing system.
This cooker must be earthed in doubt consult a qualified electrician.
●
If the appliance is still not operating after the above checks, please refer to section on how
to obtain sevice.
Performance characteristic when in use
●
When using your appliance for the first few times, the odour and/or smoke may be
emitted which is normal.
●
It is normal for the metal parts to produce noise when in use, this is due to expansion
and contraction .
●
When in use, steam may be produced which is normal and not a fault of the cooker.
●
At the end of cooking session,it is normal to have a momentary puff of steam when
the oven door is opened. This should disperse in a few seconds.
●
If,whilst cooking, steam produced comes in to contact with cool surface’s on the outside
of the appliance, it will condense and produce water droplets. This is quite normal and is
not a fault.
In the event of an emergency, you should:
switch off all working units of the oven
Disconnect the mains plug
Call the service centre
Some minor faults can be fixed by referring to the instructions given in the table below.
Before calling the customer support centre or the service centre check the following
points that are presented in the table.
19
PROBLEM REASON ACTION
1.
The appliance does not work.
2. The oven lighting does not
work.
Break in power supply. Check the household fuse box; if
there is a blown fuse replace it
The bulb is loose or damaged.
with a new one
Tighten up or replace the blown
bulb ( see Cleaning and
Maintenance )
20
Page 12

TECHNICAL INFORMATION
ELECTRICAL CONNECTION
TYPE
Dimensions
(height/width/depth) cm
Oven
Guide levels
Top heater(kW)
Bottom heater(kW)
Grill heater(kW)
Oven illumination(W)
Function modes
Oven light(W)
Top+bottom heater(kW)
Top heater(kW)
Bottom heater(kW)
Top+bottom heater+fan(kW)
Top/grill(kW)
Fan(W)
Fan+Rear heater(kW)
Fan+Half grill(kW)
Fan+Bottom heater(kW)
Temperature
Frequency(Hz)
Electrical Input(V)
Top Oven Power(kW)
Main Oven Power(kW)
Hotplate power(kW)
Total connected power(kW)
Complies with AS/NZS regulations EN 50304, AS/NZS60335-1,AS/NZS60335-2-6
HOR54B5MCW1
90/54/60
5
0.85
1.15
1.1
25
25
2.0
0.85
1.15
1.95
50-250℃
50
220-240V/380-415V
3N~50Hz
2.0
2.0
5.5
9.5
standards.
Caution!
All electrical work should be carried out by a suitably qualified and authorized electrician.
No alterations or willful changes in the electricity supply should be carried out.
The fixing line connected must be equipped with the all-pole disconnection device
provided by breakaway the contact under overvoltage category III according to
the wiring rules.
Fitting guidelines
The cooker is manufactured to work with three-phase alternating current (380-415V 3N~50
Hz). The voltage rating of the cooker heating elements is 220-240V. Adapting the cooker
to operate with one phase current is possible by appropriate bridging in the connection
box according to the connection diagram below. The connection diagram is also found on
the cover of the connection box. Remember that the connection wire should match the
connection type and the power rating of the cooker.
CONNECTION DIAGRAM
Caution! Voltage of heating elements 220-240V
Caution! In the event of any connection the safety
Wire must be connected to the E terminal.
For 220-240V earthed one-phase connecti-
1
bridges connect 1-2-3 on, terminals and
4-5 terminals, safety wire to
For 380-415/220-240V earthed three-phase
2
connection, bridges connect 4-5 terminals,
phases in succession 1,2 and 3, earth to
4-5, the safety wire to
L1=R, L2=s, L3=T, N=null terminal, E=safety wire terminal
.
.
L1
L1L1
E
E
1
N
L2 L3
NN
2 3
4
Recommended
type of
connection
lead
H05VV-F3G4
H05VV-F5G1,5
The connection cable must be secured in a strain-relief clamp.For the connection leads,
the grounding wire must be longer than the other wires.
Caution!
Remember to connect the safety circuit to the connection box terminal marked with
.
Before connecting the cooker to the power supply it is important to read the informatIion
on the data plate and the connection diagram.
21
22
 Loading...