

Page 1
User manual
HHS1A-2G
it is imp or tant to read this instruction bo ok p rior to using you r new product for t he first time.
1
Page 2

Contents
Safety information...................................3
Before you begin....................................6
Copyright warning...................................6
Back up your data....................................6
Unpacking your player................................6
Computer system requirements.........................6
Secure music transfer requirements......................6
Using the armband...................................6
Connecting to the computer............................7
Charging the player...................................7
Managing files on your Haier Player.......................8
Using Windows Explorer..............................9
Deleting files from the player...........................9
Disconnecting the player from the PC.....................10
General controls....................................10
Turning the player on and off..........................10
Locking the player controls............................10
Resetting the player.................................10
Using the menus....................................11
Menu types........................................11
Menu navigation....................................11
The Home menu....................................12
Music............................................13
Playing music files..................................13
Music playback controls..............................13
Option menu (music playback).........................13
Music playback display...............................13
Pictures..........................................14
Playing picture files.................................14
Picture viewing controls..............................14
Option menu (picture viewing).........................14
Videos...........................................15
Playing video files..................................15
Video playback controls..............................15
Option menu (video playback).........................15
Radio.................................................16
Playing FM radio.......................................16
Storing and recalling preset stations.....................16
Improving FM radio sound..............................17
Recording FM radio....................................17
Playing back FM radio recordings.......................17
Copying recordings to your PC..........................17
Favorites.............................................18
Creating a "Favorites" playlist...........................18
Removing files from "Favorites" playlist..................18
Sports................................................19
Stopwatch............................................19
Sports mode..........................................20
Pedometer...........................................20
Personal info..........................................21
BMI (Body Mass Index).................................21
Settings..............................................22
Changing the player’s settings..........................22
Shuffle...............................................22
Equalizer.............................................22
Customize............................................22
Brightness............................................22
Screensaver...........................................22
Power saver...........................................22
FreqStep (Frequency Step)..............................22
RecDur (Record duration)...............................22
Language............................................22
Unit..................................................23
Protocol..............................................23
MTP (Media Transfer Protocol) modes when..............23
Flip display............................................23
System info...........................................23
Date and time.........................................23
Theme...............................................23
Restore defaults......................................23
Additional information................................24
Tips and troubleshooting...............................24
Specifications.........................................25
Sport MP3 Player warranty.................................26
2
Page 3

Safety information
Imp ortant Safety Information Pr oduct Gui de
Rea d this gu ide carefully and keep it i n a safe place.
Following all guidelines is important for your h ealth
and s afety w hen usi ng the Sp ort MP3 Player.
Imp ortant Safety Information
• Rea d and kee p these g uidel ines.
• Follow all warn ings an d instr uctions c arefully.
• Do no t use the S port MP3 Player in or near water.
• To clean, w ipe wit h a soft dry cloth only.
• Use only in accorda nce with this manual and the
Spo rt MP3 Player User Guide.
• Do no t use nea r heat so urces such as ovens,
radiator s, etc.
• Use only accessorie s and attachme nts provided o r
recommen ded by the manuf acturer.
• Unp lug thi s product during l ightn ing storms.
• Unp lug thi s product when it is n ot used for a long
per iod of ti me.
• This product m ust onl y be serviced by a quali fied
professional. S ervice is required when the p roduc t
is da maged o r altered in any way. This inclu des
dam age to the adapter, expo sure to water, rain,
and m oistu re, and hard impact (dropping or
cru shing t he Spor t MP3 Player). When t he Spor t
MP3 P layer does n ot work normally, it must be
brought in for service.
Cau tion: D o not expose this product to water, rain,
or mo isture. This will re duce the risk of fire or elec tric
sho ck.
Ear phone s and Volume Control
Dam age to He aring : The Sport MP3 P layer can
ope rate at vo lumes l oud eno ugh to ca use dam age
to your hear ing. To avoid thi s and protec t your
hea ring, foll ow these guide lines :
Kee p the volume low. S et the volume at a level
whe re you can hea r noise s around you cle arly.
You should be able to hear some one nea rby
spe aking in a no rmal tone of voice. I f you can not
hea r peopl e around you s peaking, eve n with
noi se-c ancel ing hea dphon es, the volu me is too
lou d. You could d amage your hea ring.
Do not increas e the volume whi le listening. After
lis tening to the Sp ort MP3 Player for some time,
you will bec ome accustom ed to the volume and
may want to turn it lou der. However, thi s can sti ll
cau se dama ge to your heari ng. Do not chang e the
volume whi le usin g the Spo rt MP3 Player.
Minim ize the amount o f time sp ent listenin g to
lou d sound s. The more exposure to loud soun ds,
the m ore likely you are to d amage your hea ring.
Your hearing can be da maged i n as litt le as
15 mi nutes when exp osed to ver y loud mu sic or
sou nds.
Even when volume is l ower, your hearing can still
be da maged a fter a lo ng peri od of tim e.
Batterie s: The Spor t MP3 Player h as a buil t-in
battery. If used incorre ctly, this b atter y could
exp lode an d cause p hysical harm. Do not open
or al ter the batter y, or expose i t to heat. Pun cturing
or mu tilating the battery is dange rous. Do not throw
the b atter y or Sport MP3 Player de vice into fire.
Sun light : Do not leave the S port MP3 Player in
direct sunli ght for extended periods of t ime. This
may cause it to melt, or cause damag e to the batte ry.
The louder the sound, t he less t ime it ta kes to
dam age your heari ng.
Hea ring lo ud soun ds or mus ic duri ng a day is
cum ulative: it ad ds up. If yo u are exposed to
oth er loud s ounds d uring t he day, it will tak e less
tim e for the Sport MP3 Player to d amage your
hea ring.
As a ge neral guideline, ke ep the Sp ort MP3 Player
volume at a le vel where you can conver se
nor mally w ith peo ple nea rby.
If yo u replace the earphones on your Sp ort MP3
Player, you mu st reset the vol ume sta rting at a low
level. D ifferent kinds of earphon es may produ ce
dif ferent volumes, even if th e volume setti ng on
the S port MP3 Player is t he same.
3
Page 4

Safety information
Imp roper S urrounding s for Using th e Sport
MP3 P layer
Do not use the Sport MP3 Player w hile dr iving,
rid ing a bik e, or walking on t he side walk or n ear
traffic. A lways keep t he volume low en ough
to hear people speaking around you, and make
sure that you can hea r any warning so unds li ke
fire alarm s, while wearing the head phone s.
We strongly adv ise that you do not use
hea dphon es with your Spo rt MP3 Player
whi le driv ing. Use of he adpho nes whi le driv ing is
ill egal in s ome states. Stop us ing the S port MP3
Player i f it dist racts you or is disr uptive while you
are operating any t ype of vehicle, or per forming
any task tha t requires your con centrati on and
ful l attention.
Hea ring Loss Sy mptom s
If yo u experience a ny of these hear ing los s
sym ptoms, sto p using t he Spor t MP3 Player and
have you r heari ng chec ked by an audiol ogist:
• Hea ring lo ss
• Ringing in the ears
• Your spe ech sou nds qui et or muf fled to you
• Sounds seem flatter or du ller th an usua l
Getting your h earin g checked regularly by an
aud iologist is a good way to p revent and d etect
hea ring lo ss.
Prevent Inf ections f rom Sport M P3 Playe r
Hea dphon es
Using earphones for your Spo rt MP3 Player that
are dir ty can lead to ear infec tions. Clean your
ear phone s regularly with isopro pyl alcohol or
ano ther an tisep tic. If you find t hat the earpho nes
are irrita ting your ears o r the skin around th em,
stop use immediatel y. This mig ht indicate a
developi ng or fut ure infection.
Protec ting the Sp ort MP3 Player D evice
• When c arrying the S port MP3 Player, make sure
you do not drop, bend, or crush the dev ice. A
protective carrying cas e, included wi th the
dev ice, may hel p to protect the s urface from
scratche s and dam age.
• Kee p the Spo rt MP3 Player devi ce at a
temperat ure between -2 0° and
45° C (-4° to 113°F). Parked cars can ge t extremely
hot i n the sum mer, so be sure to take your Sport
MP3 P layer devi ce out of t he car wh en you leave
it. R ecommended t emperature for using the
Spo rt MP3 Player is bet ween 0° a nd
35° C (32° - 95 °F). At this tem perature you will g et
the m aximu m playing time. Extreme ly cold
temperat ures will shor ten playing time
temporar ily.
Note: When in use or being charged, the Spor t MP3
Player w ill bec ome warm. This is n ormal, and wil l
not h urt the device.
Prevent Seizu res, Blackouts, and Eye Str ain
If yo u have eve r had a sei zure or blacko ut, or if t hese
sym ptoms exist in your family's medic al histor y,
ple ase spe ak with a d octor before u sing th e video
fun ctions on t he Spor t MP3 Player devic e
(if availa ble). S top using the Sp ort MP3 Player
imm ediately if you exper ience eye twitches, m uscle
twitches, convu lsion , disor ientation, o r
uncontrollable movem ents. When usin g the vid eo
fun ction on th e Sport MP3 Player d evice
(if availa ble), t ake frequent breaks a nd avoid
prolonge d use to prote ct your eyes fro m damag e or
strain.
4
Page 5

Safety information
Gui delin es for All Sport MP3 P layer Pr oducts
Warn ing! Fai lure to foll ow the guidelines for set up
and u se for this product can lead to seriou s injur y or
death, or harm to the dev ice. Make sure you read this
gui de carefully a nd follow all in struc tions. Keep this
gui de in a safe place. If you ne ed to replac e this gu ide,
contact Haier custome r service or visit
ww w.haie ramerica.c om/su pport.
Rep airs: D o not repair or alter this product on your
own! Attempts to fi x this product may result in
ele ctric sho ck or oth er haza rds. If we determine that
you have t ried to repa ir the product by yoursel f,
evi denced by peel ing, puncturin g, or removal of
lab els, your wa rrant y will be voided.
Qua lifie d service profes siona ls must d o all ser vicing
on th is devi ce. Ser vice is required when the p roduc t
is da maged i n any way or doe s not ope rate normall y.
This includes expos ure to water, extreme heat, and
bei ng dropped.
Mak e sure you und ersta nd all wa rning s and
ins tructio ns before using this devi ce.
Keep Away From Wat er
Do not use or store this product near water, includ ing
any moistu re or rain. Thi s will reduce th e risk of f ire
or sh ock.
Care of Ca ble and Cord
All c ables a nd cords for t his product and it s
accessor ies sho uld be ar range d out of th e way, so
that people an d pets ca nnot trip over them. Do not
leave cables and co rds in a place whe re childre n can
reach them a nd play with them.
Use and Clea ning of S port MP3 Pl ayer
Follow all direct ions in t his man ual and t he Spor t
MP3 P layer User G uide for pro per use o f the Spo rt
MP3 P layer.
Using a Co nnector and a Port
Do not force a connec tor int o a port. If they d on't
connect easily, c heck for any b lockage o r
obs tructio ns. If you can't fin d anything wrong,
the n the connector an d port prob ably do n't
match and ca n't be used t ogeth er.
Spo rt MP3 Player Ra dio Feature
In co mpilation with t he FCC RF expo sure
compliance requirements, this device m ust not b e
loc ated or operating in co njunc tion with a ny other
transmitter or antenna.
Spo rt MP3 Player He adpho nes
The Sport MP3 Player headphones have lo w
intensit y magnets in them. This magnet ic charge
may disrupt pacemak ers, or erase magneti c
storage da ta in cer tain devi ces, includi ng credit
cards and ATM cards. Keep the head phone s several
inc hes away from these items, a nd anything th at
is se nsiti ve or could be affected by a magneti c
fie ld.
Dis posin g of the Sp ort MP3 Player D evice
Dis posal o f the Spo rt MP3 Player devi ce may be
regulated by ce rtain rec ycling laws re garding
ele ctron ic and el ectrica l waste. You may no t be
abl e to throw out t he Spor t MP3 Player with your
hou sehol d garba ge. It is your responsibi lity to
dis pose of t he Spor t MP3 Player devic e in a proper
way that follow s all rec yclin g laws and
regulati ons. Improper disposa l could lead to
dam aging the envi ronment or put ting hu man
hea lth in da nger. To lear n more about the p roper
ways to di spose o f electronic and electrical
dev ices, cont act you r local c ity office, yo ur waste
dis posal s ervice, or the sto re where you
purchase d your Spor t MP3 Player.
Do not use near any source of heat, such as fire or
ovens.
Use only acc essories and attachme nts provided o r
recommen ded by Haier.
Cle an gent ly with a s oft, dr y cloth.
5
Page 6
Before you begin
Dea r Haier C ustome r,
Thank you for purchasing t he Player.
This product w ill play mp3 and Windows Media™
aud io (WMA) content a s well as content purchased
from most on line mu sic dow nload s ervices.
Spo rt MP3
Copyright warning
This player is fo r your persona l use onl y.
Una uthor ized recording or d uplic ation o f
copyrigh ted materi al may infringe up on the ri ghts
of th ird par ties and may be cont rary to copyright
laws.
Back up your data
As wi th any port able pl ayer, you must bac k up the
dri ve regular ly. The man ufacturer is not
responsi ble for lost dat a.
Unpacking your player
All o f the items list ed below shoul d have been
pac ked in th e box with you r player.
• Hai er player
• Qui ck Star t Guide
• USB c able
• Ear phone s
• Arm band
Computer system requirements
• Pentiu m III 500 MHz or higher recommended
• Windows ® XP (ser vice pack 1 or higher) or
Window s Vist a™
• Int ernet E xplorer 6.0 or h igher w ith Internet access
• Windows M edia Pl ayer 10 or higher
• 250 MB or more fre e hard disk space for
the s oftware
• 128 MB RAM (2 56MB recomme nded)
• CD-RO M drive capabl e of digi tal aud io extrac tion
• USB p ort (2.0 re commended)
• Sound card
Secure music transfer requirements
The default setting of this player is in MS C (Mass
Storage Cl ass) mo de when connecte d to your PC.
To enable f unction o f transferri ng subs cript ion
mus ic content to the player, select MTP (Me dia
Transfe r Protocol) mode under Pro tocol in the
player's S ettin gs menu ( refer to pag e 23).
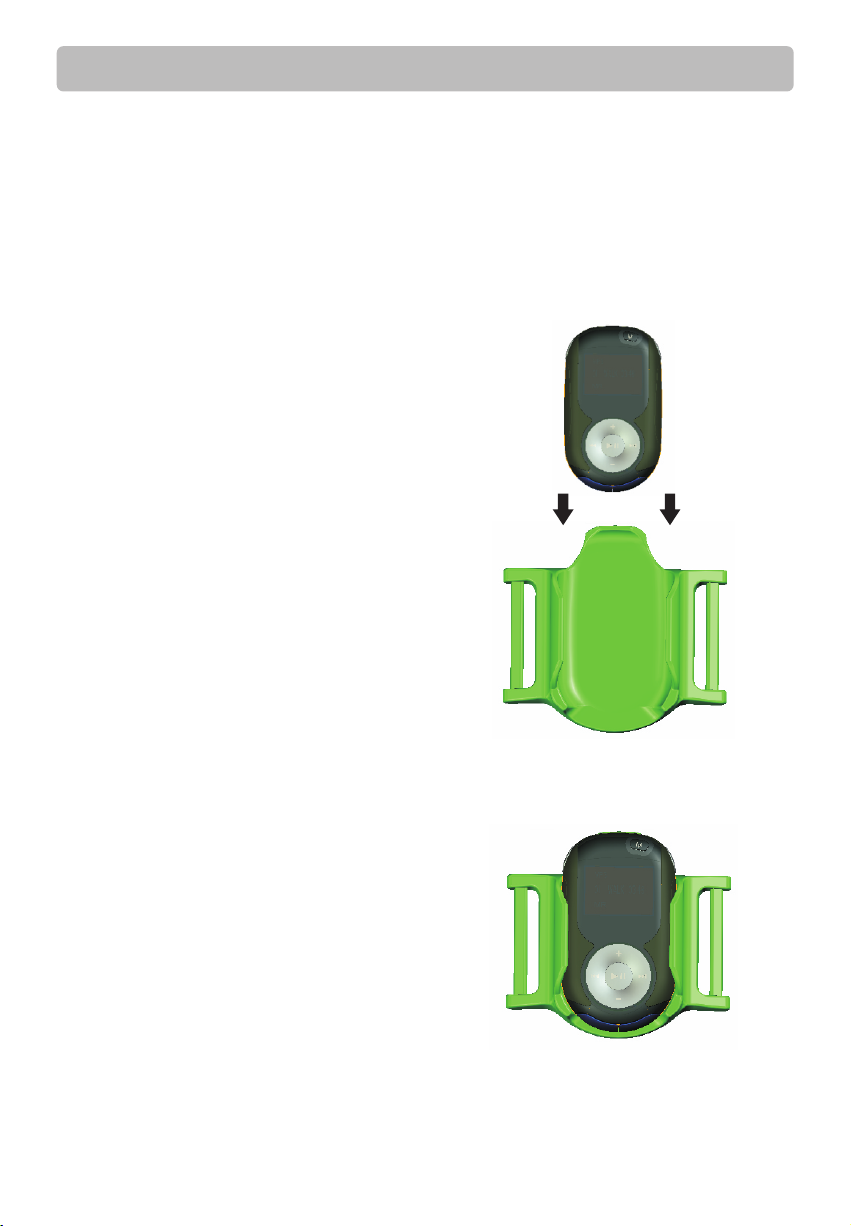
Using the armband
1. Sl ide the p layer into t he holder of the arm band
by alignin g with th e arrow on the hol der.
2. Sl ide the e nd of the a rmban d through the ri ng
and s ecure with the velcro tape.
6
Page 7
Before you begin
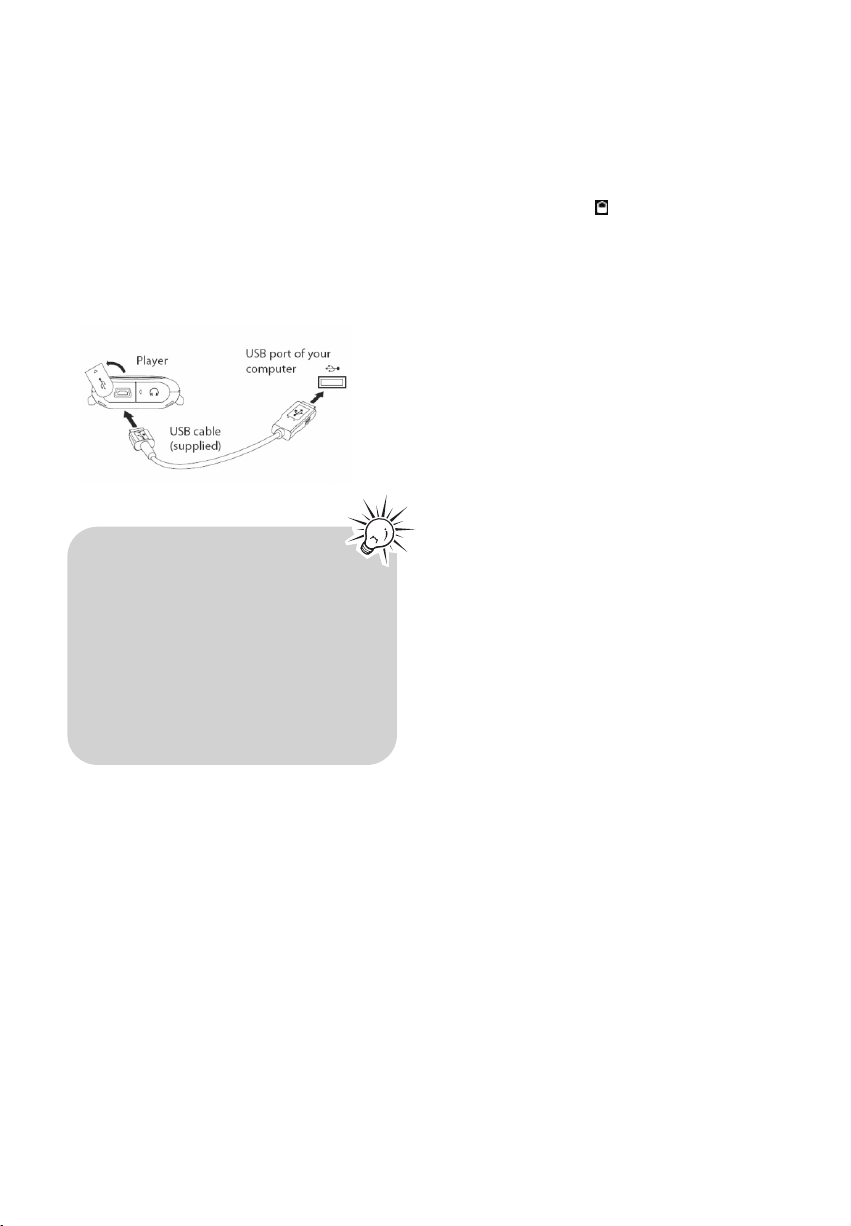
Connecting to the computer
• Connect the pl ayer to yo ur comp uter with the US B
cab le provided. The player wil l turn
on au tomaticall y.
• The playe r will be connecte d in MSC
(Ma ss Storage Cla ss) mod e. It wil l appea r as a drive
let ter on your co mpute r and behave a s a detac hable
dri ve for file transfe r in one or b oth directions.
• The soft ware installer can be del eted from th e
player aft er inst allation to free up more storage
spa ces.
• It might take se veral second s for the
player to be detected. Cli ck Refr esh in My
Computer or Wind ows Explorer to make su re
the p layer has been detected.
• The playe r is capa ble of transfe rring f iles at
USB 2 .0. If USB 2.0 port is available on your
computer, use it to connect to your player.
The player is still b ackwa rd compatible with
the o lder US B 1.1 por ts. However, you wil l not
be ab le to take full ad vantage of the potentia l
spe ed increase.
Charging the player
The player charges autom atically every time you
connect it to your comp uter. To fully charge the
player, make sure your compute r is on and t he
dev ice is connected for at least 3 hours. Refe r to
the b atter y level i con on the display to check
the b atter y level. Recharge the player w hen the
icon is empty.
7
Page 8

Managing files on your Haier Player
Acrsoft Softwa re Installation I nstru ctions
Inser t your CD into you r CD-ROM dr ive. The CD w ill
automati cally r un and la unch th e on-sc reen setup
prompt. Follow the ins tructio ns to complete t he
ins tallation.
If yo ur system does n ot automatic ally ru n the CD,
ope n the My Compute r icon on your desktop th en
dou ble- click o n your CD ROM drive. Lo cate and
dou ble- click t he 'Setup' or 'Set up.exe' file to s tart
the i nstal lation process.
Conver ting Files for your Hai er Devi ce:
1. La unch 'M ediaConver ter' by double -click ing the
app lication ico n on your deskto p or from the Star t
Men u.
2. Pl ug-in your Hai er MP3 Sp orts Player.
The player ’s dev ice icon will appear on the
app lication screen.
3. Dr ag & drop media fi les directly to th e
player’s icon. Files wi ll be automati cally conver ted
and t ransferred to the device.
For full u sage de tails, pleas e reference
the ' Help' includ ed in the a pplic ation.
8
Page 9
Managing files on your Haier Player
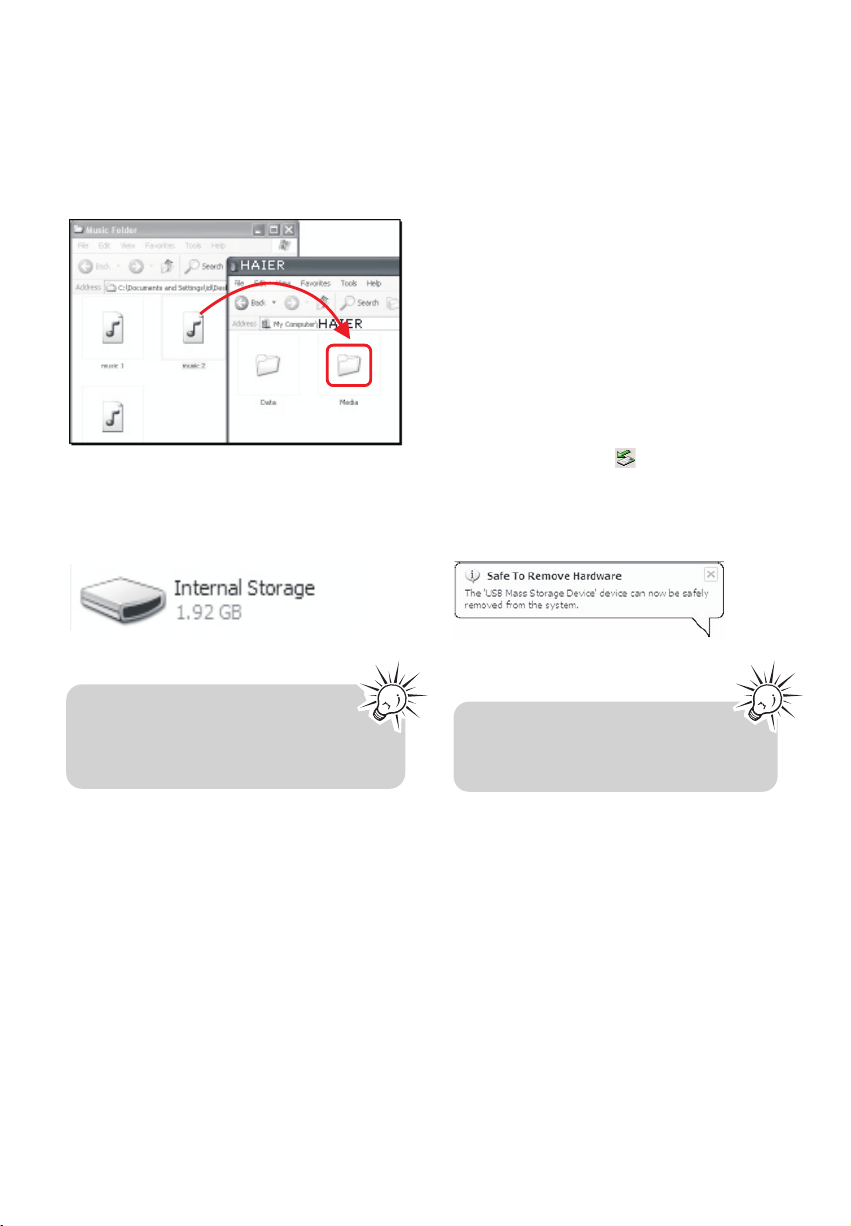
Using Windows Explorer
To copy files in Windo ws XP with Wind ows Media
Player 1 0 insta lled:
1. Op en the pl ayer in Windows Expl orer.
2. Dr ag and drop musi c files o nto the M edia folder.
To copy files in Windo ws Vis ta or Window XP w ith
Windows Med ia Player 11 i nstal led:
1. Op en the pl ayer in Windows Expl orer
2. Op en Internal Stora ge.
3. Dr ag and drop musi c files.
• Dra g-and -drop pic ture fi les onto the root
level or a spe cific folder of the player for
vie wing.
• Video files m ust be conve rted to SMV format
by Acrsoft Sof tware.
Deleting files from the player
For any files you have t ransferred to the p layer,
you may delete them w hile you have conne cted
the p layer with your com puter.
1. Op en the pl ayer in Windows Expl orer and then
navigate to the folder containing the files.
2. Select the files you want to remove and th en
press the Dele te key on the keyboard of your PC.
• It is bes t to remove subscri ption f iles from the
player by using Windows M edia Pl ayer.
Disconnecting the player from the PC
If Windows sees th e player as an MTP de vice:
• Unp lug the p layer from t he PC whe n no file
transfer i s in progres s.
If Windows sees the player as a removable disk:
1. In the Windows syst em tray, click th e Safely
Rem ove Hard ware icon and th en sele ct the
player from the lis t of devi ces.
2. Whe n the Safe to remove ha rdware message
app ears, unplug t he player from the PC.
Do not disconn ect the USB
•
connection dur ing fil e download.
• Doing so may corrupt system file s or
the f iles be ing downloaded.
9
Page 10

General controls
Turning the player on and off
To turn the p layer on, press and hold MENU. Press
and h old MEN U again t o turn th e player off.
1
2
Follow the
dia gram to open
the U SB or ear phone
jac k cover.
Locking the player controls
To lock the p layer controls to prevent them from
bei ng activated accident ally, press and h old .
To unlock t he control s, press again. When the
controls are locked, the l ock icon appea rs on
the d isplay.
Resetting the player
If the playe r stops operat ing properly, you can
reset it by pressin g and hol ding ME NU for more
tha n 10 seconds.
10
Page 11

Using the menus
Menu types
The player has two types of menu:
Player m enu
The player menu app ears wh en you turn on the
player or if you press /MENU w hile li stening to the
player. It lets you:
• Browse for and play music, video and pict ure files
• Lis ten to the radio
• Access t he Spor ts functions – st opwatch,
ped ometer, calorie coun ter, body mas s index
(BM I)cal culator, etc.
• Cha nge the p layer's settings – language, d isplay
bri ghtne ss, etc.
Men u Titles
Men u Items
Opt ion men u
The option menu appears if you press whil e
lis tening to the pl ayer. It provides di fferent op tions
dep endin g on what you are listening to whe n
you pres s .
Menu navigation
When a menu is dis played:
• Press + an d – to scroll up and d own the list of
men u items. (The Home men u shows one item
at a time; other m enus sh ow four at a tim e.)
• Press to g o to the next menu level. Press to
return to th e previous men u level.
• If the highlighted item is playable (fo r example,
an au dio fil e), press or to st art playb ack.
“Now Playing”
screen
Opt ion men u
• If the h ighli ght ed item i ndica tes t he
curr ent set tin g (for ex ample , the rep eat
mode s ettin g), p ress to c hange t he
sett ing.
11
Page 12

Using the menus
The Home menu
The top-level or “Home” menu is al ways displayed when you press /MENU . The menu o ption s are:
Now Play ing
Availa ble onl y durin g playback.
Press or t o return to
the c urrently playing fi le.
Mus ic
Press or t o enter the
Mus ic menu a nd choo se an
artist, album, genre, year,
or in divid ual tit le.
Pic tures
Press or t o enter the
Pic tures menu and c hoose a
par ticular folder or im age.
Videos
Press or t o enter the
Videos menu and choos e a
par ticular vid eo.
Rad io
Press or to either
lis ten to the radio or play
record ings of p revious radi o
shows.
Favorit es
As you listen to musi c, you can
add i ndivi dual ti tles to a
“favor ites” playlist.
Press or t o enter the
Favorit es menu a nd choo se a
par ticular tit le or edi t the
playlist .
Spo rts
Press or t o
Spo rts menu, w hich le ts you:
• Rec ord your run ning de tails
• Cha nge the s topwatch
set tings
• Che ck your resu lts
• Use the pedometer
• Use the calorie counter
• Enter pers onal da ta, suc h
as se x, heig ht and weight,
for the BMI ca lcula tor and
ped ometer
• Calculate your bo dy mass
ind ex (BMI )
Set tings
Press to e nter the Setti ngs
men u, which lets you:
• Cho ose the s huffl e
playback mode
• Cho ose an eq ualizer
set ting
• Customize the mus ic menu
• Cha nge the s creen
bri ghtne ss
• Cha nge the s creensaver
set ting
• Turn on/off the automatic
shu tdown feat ure
• Switch bet ween US a nd
European radio frequency
steps
• Cho ose a record d uration
set ting
• Cha nge the l angua ge of
the p layer's menus
• Switch bet ween En glish
(Imperial) and m etric u nits
• Switch bet ween MTP and
MSC m odes
• Flip the dis play 180°
• Dis play the firmware
version, s pace us ed, and
spa ce available
• Set date and time
• Cha nge the t heme of
player
• Res et the pl ayer's setti ngs
to the factory defau lts
enter the
12
Page 13

Music
Playing music files
The player sor ts your music fi les by ar tist, alb um,
track name (ti tle), g enre and yea r.
1. Press M ENU to di splay the Home m enu, then
press + or – to se lect Musi c.
2.To star t playbac k at a particular artist, al bum,
tit le, genre or year, press to e nter the Music
men u. Use + or – and or to navigate
through th e menus a nd sele ct the desi red item,
the n press .
The item that you can s elect for
playback i s not lim ited to a single f ile,
you may select a n artist, a n album a nd
the n press to start playback of al l
fil es with in your selected i tem.
Music playback controls
Skips to the previous fil e*, press and
hol d to scan backward within a f ile
Skips to the nex t file, p ress and hold to
sca n forward within a f ile
Sta rts/pauses playb ack and s hows/
hid es the Op tion me nu
+ or -
Increases or d ecreases the volume
dur ing playback
Opt ion men u (musi c playb ack)
Press to s how or hide the Option menu during
playback. Press + or – to highli ght an op tion an d
the n press to con firm th e selec tion or cha nge
the s ettin g.
The following opt ions are ava ilabl e:
• Res ume – to resume pl ayback
• Rep eat – press re peatedly to select repe at
cur rent or all file s (corresp ondin g icon
shows on the d isplay)
• Del ete File – to remove current file f rom the
player
• Add to Favorit es – to add the current file in
the Favor ites pl aylist. If the f ile is al ready in
the p laylist, thi s optio n chang es to Clear from
Favorit es to remove the current fil e from the
playlist
Music playback display
1. Curre nt file n umber /total number of files
2. Song name
3. Ar tist name
4. Al bum nam e
5. El apsed p layback time
6. File to tal tim e
7. Pl ayback pro gress bar
8. Sh uffle i con (display only when it i s not off )
9. Re peat icon (dis play only when i t is not of f)
The information p rovided in the p layback screen
dep ends up on the ID 3 tags th at have been s et up
for the musi c file.
* Press wi thin th e begin ning 5 se conds of the current
mus ic file to skip to previous f ile. Ot herwise, you
wil l return to the be ginning of the c urrent file.
13
Page 14

Pictures
Playing picture files
1.Pres s MENU to display the Home me nu, then
press + or – to se lect Pi cture s.
2.Pres s or to enter the Picture s menu an d
cho ose a par ticular ima ge.
Pic ture viewing controls
Goe s back, skips b ackward
Advances, skips for ward
Sta rts/pauses slidesh ow if it is
activ ated, shows/hid es the
Opt ion men u
Option menu (picture viewing)
Press to s how or hide the Option menu
dur ing playback . Press + or – to high light a n
opt ion and t hen press to confirm th e
sel ection or c hange t he sett ing.
The following opt ions are ava ilabl e:
• Res ume – to resume pl ayback
• Sli deshow – to sele ct the slid eshow image
duration . Press repeatedl y to select among
off, 3 , 5, 10 and 15 seconds
• Delete File – to re move curre nt file from the
player
14
Page 15

Videos
Playing video files
1. Press M ENU to di splay the Home m enu, then
press + or – to se lect Videos.
2.Pres s or to enter the Videos men u and
cho ose a par ticular vid eo.
Video playback controls
Skips to the previous fil e*, press and
hol d to scan backward within a f ile
Skips to the nex t file, p ress and hold to
sca n forward within a f ile
Sta rts/pauses playb ack and
shows/hi des the O ption menu
+ or –
Increases or d ecreases the volume
dur ing playback
Opt ion men u (vide o playb ack)
The option menu appears if you press whil e
lis tening to the pl ayer. It provides di fferent
opt ions de pendi ng on what you are listening to
whe n you press .
• Res ume – to resume pl ayback
• Rep eat – press re peatedly to se lect re peat
cur rent or all file s (corresp ondin g icon sh ows
on th e displ ay)
• Delete File – to re move curre nt file from the
player
Video file s must be conver ted to
opt imal format by the included Arcsoft
sof tware for play back on t his player.
* Press wi thin th e begin ning 5 se conds of the current
mus ic file to skip to previous f ile. Ot herwise,
you will return to th e beginning of the c urrent file.
15
Page 16

Playing FM radio
To turn the radio on:
1. Press / MENU to d isplay the player men u.
2. Press + o r – to sele ct Radio and press or
to enter the radio menu.
3. Whi le Listen is highlighte d, press to
sta rt listen ing. The frequency screen appea rs.
To tune t he radi o:
Press an d hold or u ntil "S earching" sh ows
and t hen release th e butto n to star t scannin g
through th e frequency range. The player stops
sca nning w hen it de tects the next stati on.
Press or t o step throu gh the frequency ran ge.
To turn t he radi o off:
Eit her tur n the player off or press M ENU and
cho ose a dif ferent opt ion.
Storing and recalling preset stations
You can store up t o 20 preset stations in the player.
To store the cur rently playing station a s a prese t:
1. Press t o displ ay the Option me nu.
2. Press + o r – to high light S ave to Pre set and t hen
press .
• If all 20 preset s tation numbers are occupied,
the o ption c hange s to Replace P reset.
3. The first available preset n umber i s displ ayed.
Press + or – t o selec t a diffe rent prese t numbe r if
des ired.
• If yo u choos e a preset numbe r that already
contains a n FM station, you will replace t he
exi sting s tation with th e new sta tion.
4. Press t o highl ight Yes and then press .
To list en to a preset statio n:
1. Whe n the radio is playing, press to display
the O ption m enu.
16
2. Press + o r – to high light Tunin g and pre ss
to switch from Manu al to Preset .
3. Press + o r – to high light Back and press to
return to th e frequency screen.
Page 17

Playing FM radio
4. Press o r to choo se the de sired station
preset num ber. The prese t numbe r shows at the
top left of the sc reen.
Preset n umber
Improving FM radio sound
If stereo recepti on is noi sy, you can often reduce
the n oise by switch ing to mono.
To swit ch between stereo a nd mono :
1. Whi le the radio is playing, press to display the
Opt ion men u.
2. Press + o r – to high light M ode and then pre ss
to switch be tween S tereo and Mono .
3. Press + o r – to high light Back and press to
return to th e frequency screen.
Recording FM radio
You can record the radi o and play back re cordings
as well as copy the record ings ( WAV files) to yo ur PC.
To record th e curre ntly pl aying radi o station:
1. Press t o displ ay the Option me nu.
2. Press + o r – to high light S tart Recordi ng and
the n press to to st art recording.
Playing back FM radio recordings
To play b ack a record ing:
1. Press / MENU to d isplay the player men u.
2. Press + o r – to sele ct Radio and press
to enter the radio menu.
3. Press + o r – to high light Play back an d press
to see the list of reco rdings.
4. Press + o r – to sele ct a recording a nd press
to star t playb ack.
Opt ion men u (recordi ng play back)
Press to s how or hide the Option menu
dur ing playback . Press + or – to high light a n
opt ion and t hen press to confirm th e
sel ection or c hange t he sett ing.
The following opt ions are ava ilabl e:
• Res ume – to resume pl ayback
• Rep eat – press re peatedly to select repe at
cur rent or all file s (corresp ondin g icon sh ows
on th e displ ay)
• Del ete File – to remove current file f rom the
player
Copying recordings to your PC
Rec ordings are store d as WAV fil es in the “FMRecord”
folder on th e player.
To copy reco rdings to th e PC:
1. Pl ug the pl ayer into the PC.
Press to p ause or resume recording.
3. Press / MENU to s top recording.
• The playe r names e ach record ing FMRecXXX.wav
whe re XXX is a un ique nu mber.
To record fo r a speci fic duration
Refer to Rec Dur on page 22
2. Op en the pl ayer's Record fol der.
3. Select the files you want to copy a nd drag and
drop them on to a folder on the P C.
• Alm ost all a udio ap plications c an play WAV files.
17
Page 18

Favorites
Creating a "Favorites" playlist
You can create a p laylist of your favorite music,
add ing new f iles to the play list as you listen to the m.
This function is not available for other me dia
formats su ch as vid eos, picture s and record ings.
To add th e curre ntly pl aying musi c file in t he
playlist :
1. Press t o pause p layback and di splay the
Opt ion men u.
2. Press + o r – to high light Add to Favor ites an d
the n press .
• Added Success fully s hows on the display.
• Rep eat the a bove steps for addi ng more music files.
To list en to the Favorites pl aylist:
1. Press / MENU to d isplay the Hom e menu.
2. Press + o r – to sele ct Favorite s.
Removing files from "Favorites" playlist
To remove a mu sic fil e from the playlist :
1. Whi le the mu sic fil e is playing, press to
pau se playback an d displ ay the Op tion me nu.
2. Press + o r – to high light C lear from Favorites
and p ress .
3. Press t o highl ight Yes and then press to
remove t he file f rom the play list.
To remove al l music f iles from the pl aylist:
1. Press M ENU to di splay the Home m enu.
2. Press + o r – to sele ct Favorite s and press to
enter the Favorites menu.
3. Press + o r – to high light C lear Favori tes and
press .
• To play back a p art icula r file, p ress or
to ent er the Fa vor ites me nu and th en
pres s to list t he fi les. Pr ess + or – to
sele ct the de sir ed file a nd pres s .
18
4. Press t o highl ight Yes and then press to
remove a ll file s from the playlist.
Page 19

Sports
Stopwatch
For sing le lap ti ming:
1. Press S TART/S TOP to sho w the stopwatch.
2. Press S TART/S TOP again to start the stopwatch.
3. Press S TART/S TOP to pau se the st opwatch an d
aga in to resume tim ing.
4. Press L AP/RESE T to reset the stopwatch when it is
stopped.
For mult iple la p timin g:
1. Press S TART/S TOP to sho w the stopwatch.
2. Press S TART/S TOP again to start the stopwatch.
3. Press L AP/RESE T at the st art of the second, t hird
lap a nd so on (m aximu m 99 laps ).
Total ela psed ti me
Latest lap t ime
Lap counte r
4. Press S TART/S TOP to sto p the stopwatch when
all l aps are finish ed.
5. Press + o r – to review all th e lap tim es.
3. Press + o r – to high light S topwat ch Setu p
and t hen press .
4. Press t o selec t Act. Count D own and t hen
press .
5. Press + o r – to high light Coun t Down Se t up
and t hen press .
6. Press o r to shif t betwe en minu te and
second setti ngs and p ress + or – to adj ust the
values.
7. Whe n finis hed, press .
8. Press S TART/S TOP to sta rt the count down time r.
To activate voice p rompt s to remind yo u the
tim e passe d or rema ins:
1. Press / MENU to d isplay the Hom e menu.
6. Press L AP/RESE T to clear all lap tim es and reset
the s topwatch.
To use th e count down t imer:
1. Press M ENU to di splay the Home m enu.
2. Press + o r – to sele ct Sports and p ress or
to enter the s ports menu.
2. Press + o r – to sele ct Sports and p ress to
enter the Sp orts menu.
3. Press + o r – to high light S topwat ch Setu p and
the n press .
4. Press + o r – to high light Vo ice Prompt s and
the n press .
19
Page 20

Sports
5. Press + o r – to high light Peri od or Voice and then
press to cha nge the s ettin gs.
• Period : Every 1, 5, 10, 20 or 30 min utes (count up),
las t 1, 5, 10, 2 0 or 30 min utes (count down) or Off
• Voic e: Male, fem ale
Sports mode
To record your run de tails :
To record yo ur run de tails (calorie burnt an d
dis tance comple ted).
1. Press M ENU to di splay the Home m enu.
2. Press + o r – to sele ct Sports and p ress to enter
the S ports menu.
3. Press + o r – to high light M ode and then
press to Stop Watch Screen
Pedometer
To activate th e pedom eter:
1. Press M ENU to di splay the Home m enu.
2. Press + o r – to sele ct Sports and p ress to
enter the Sp orts menu.
3. Press + o r – to high light Pedo meter and then
press .
4. Press + o r – to high light M ode and press to
cha nge the s ettin g:
• Off = ped ometer is off
• Steps = numb er of ste ps to be displayed
• Dis tance = e stimated dis tance to be disp layed
• Calories = estimated calorie -burnt to b e
dis played
• Onc e Sports mode i s turne d on, the s topwatch
and p edome ter will be activa ted. Start you r
run ning now!
• Press ME NU to dis play the Home me nu and
per form other operati ons (e.g. Se lecting m usic) .
It will n ot affect the record of your run details.
4. Whe n you have finished run ning, repeat steps 1-3
and s elect Mod e as Off.
To track yo ur re co rds :
1. Pre ss MENU t o dis play th e Home me nu.
2. Pre ss + or – to se lec t Sport s and pre ss
to ent er the Sp ort s menu.
3. Pre ss + or – to hi ghl ight Re sults Tr ack er
and th en pres s .
4. Pre ss + or – to hi ghl ight a re cord an d the n
pres s to chec k the d etail s.
20
• On the d ispla y, th e sel ected
mode i s indic ate d by St (fo r Steps
mode ), mi or km ( for D istan ce mode )
or kca l (for Ca lor ies mod e).
• Esti mated d ist ance = nu mber of
step s x strid e len gth
• Esti mated c alo rie-b urnt = we igh t x
esti mated d ist ance (x 0 .73 for E nglis h
unit )
• For ac curat e mea surem ent, us e the
play er on you r arm w ith the a rmban d
prov ided.
To chan ge the se nsiti vity of ped ometer:
1. Press M ENU to di splay the Home m enu.
2. Press + o r – to sele ct Sports.
3. Press + o r – to high light Pedo meter and then
press .
4. Press + o r – to high light S ensit ivity a nd
press to cha nge the s ettin g (low, medium
or hi gh).
Page 21

Sports
To rese t the ped ometer:
1. Press M ENU to di splay the Home m enu.
2. Press + o r – to sele ct Sports.
3. Press + o r – to high light Pedo meter and then
press .
4. Press + o r – to high light R eset and press to
reset the pe domet er.
Personal info
For accurate use of the pe domet er, calculation of
the B MI (Bod y Mass Inde x) ,per sonal i nformation
are requ ired.
To ente r perso nal inform ation :
1. Press M ENU to di splay the Home m enu.
2. Press + o r – to sele ct Sports and p ress to enter
the S ports menu.
3. Press + o r – to high light Pers onal In fo and then
press .
4. Press + o r – to high light S ex, Weight, Height or
Str ide and t hen press to confirm se lection.
BMI (Body Mass Index)
What's B MI?
BMI i s a measu re which takes i nto accoun t a
per son's weight and height to estim ate total
bod y fat in adults. I t may var y dependi ng on your
bod y type and composi tion. B MI is cal culated by
the follow ing formula:
BMI = B ody weight (kg ) / [Body h eight ( m)]²
= 703 x B ody weight (lb ) / [Body hei ght (inch)]²
You should have entered your p erson al
informat ion before c hecking t his ind ex
(refer to Per sonal i nfo).
To chec k your BMI:
1. Press M ENU to di splay the Home m enu.
2. Press + o r – to sele ct Sports and p ress to
enter the Sp orts menu.
3. Press + o r – to high light BMI and then press
Mea nings o f BMI:
Dif ferent BMI r anges corres pond to different
hea lth condition. .
5. Press + o r – to adju st the value whi le it is bl inking
(excep t for sex, pre ss for selection ).
6. Whe n finis hed, press . R epeat s tep 4-5 for othe r
adj ustme nts.
• To switc h betwe en Engl ish (Impe rial) a nd metr ic
uni ts when e ntering pers onal in formation, refer to
Settings on page 28.
• To measure your s tride l ength , measu re the
dis tance traveled by w alking 20 s teps and divid e
the d istan ce by 20.
BMI i s a general indicator of your heal th.
The information a bove is a roug h estim ation
onl y. To have a full
und ersta nding o f your health co nditi on,
consult with your doc tor.
21
Page 22

Settings
Changing the player's settings
To chan ge the pl ayer setti ngs:
1. Press M ENU to di splay the Home m enu.
2. Press + o r – to sele ct Settin gs and press to
enter the se tting s menu.
3. Press + o r – to sele ct a settin g and the n press
to change it.
Shuffle
• Press repeatedly to se lect shuf fle on or o ff.
Mus ic file s (mp3/ wma/wav) wil l be played
randomly whe n shuff le is activated.
• The shuffle icon shows on displ ay when
shu ffle is o n.
Equalizer
• Press repeatedly to ch oose an e quali zer
set ting (Flat, Bass, G raphi c, Pop, Rock and Jazz).
Set ting Graphic mod e:
• Press repeatedly unt il Grap hic app ears an d
the n press . I n graphic mode, you c an
cus tomize the five band eq ualizer. Press
or to select a band an d then press + or
– to adjust the band leve l. When fi nishe d,
press MENU to exit.
Customize
To select what you wis h to display in the submenu
of th e Music m enu: Ar tists, Album, Tit les, Genre s,
and Year s.
22
Brightness
To adjust t he disp lay light brig htness.
Screensaver
To set the du ration (10s, 20s, 3 0s and 1m ) before
the s creensaver activates.
Power saver
To set the ti me interval (Off, 1m, 2 m, 5m and 1 0m)
before the player turns of f if no key i s pressed.
FreqStep (Frequency Step)
To change s the way that t he player scan s through
the radio frequenci es. Switch to EU if you b ring
the p layer to Europe; switch ba ck to US when you
return to No rth Ameri ca.
RecDur (Record duration)
To change t he duration (M ax, 5 min utes,
30 mi nutes, 1 hour) for radio recording.
Language
To change t he lang uage of t he player me nus.
Page 23

Settings
Unit
To switch betwee n Engli sh (Imper ial) an d metri c
uni ts when e ntering pers onal in formation. R efer
to page 26 for d etail s.
Protocol
To switch betwee n MSC (Mass Storage Class) and
MTP (Media Transfer Protocol) m odes wh en
connected to your PC. To enabl e functio n of
transfer ring su bscri ption m usic content, selec t
MTP mode.
Flip display
To flip the d isplay 180°.
System info
To show t he amou nt of free space availa ble and t he
fir mware ve rsion .
Date and time
To set the date and ti me (for Sports mode) .
Theme
Cha nge the t heme of t he player. We have two
the mes(m ale and female ).
Restore defaults
To rese t all men us to fac tory defaul ts.
23
Page 24

Additional information
Tips and troubleshooting
Can not del ete files on the p layer.
• For any files you have t ransferred to the p layer,
you may delete them w hile you have conne cted
the p layer with your com puter. Highli ght the
unwanted file in th e player's file direc tory on your
computer a nd press the del ete key on your
computer to delete the file. Subscr ibed fi les are
bes t to be removed through Win dows Me dia
Player.
• For dele ting fi les from the player, refe r to Opti on
men u from page 16-2 2 for details.
Player repeats same tracks or a ll tracks.
• Rep eat play is turn ed on. Press t he PLAY button to
show the option menu and ch ange th e play mode.
Audio distor ted at high volume.
• Cha nge the Equalizer mode to Flat.
• Turn down the volume.
Player t urns it self of f.
• Your player tu rns its elf off i f you leave it i n pause
mod e or navigatio n mode for the dur ation
spe cifie d in Power Save setting.
The player cann ot be tur ned on.
• Bat tery is emp ty.
• Ens ure the keys lock is not activated.
• Res et the pl ayer by pressing and holding MENU
for more than 10 seco nds.
• If the playe r still c annot b e turne d on afte r
resettin g, perform a firmware upgrade to restore
it.
Player d oes not respon d to key pre sses.
• If yo ur player st ops respondi ng to key pres ses,
you can re set it by p ressing and ho lding M ENU
for more than 10 seco nds. Most of you r setti ngs
wil l be preser ved; only the se tting s that you have
cha nged af ter your last po wer off will be lo st.
• This player may te mporarily ce ase to function if
sub jected to electrostatic d istur bance. To resume
nor mal ope ration, it may be neces sary to cycle t he
power off an d back on o r you can rese t it by
pressing a nd hold ing MEN U for more than
10 se conds.
Player c annot p lay WMA so ngs.
• Secure music d ownload file s must be
transfer red to your pl ayer through the Windows
Med ia Player or the application recommen ded
by your onli ne musi c download ser vice
(No te: Ser vices and applicat ions mu st be
Windows M edia au dio- compliant an d suppo rt
Dig ital Rights Manage ment.) (Ap ple iTunes
mus ic content is not supported ). The player
tak es a long t ime to read fi les in a folder.
• File reading may take long er if too many f iles
are put in a sin gle folder. Re-organize yo ur file s
into a numbe r of folders.
Son g infor mation is not sh owing corr ectly.
• Song information may not match your c urrent
player's language s ettin g. Change the language
set ting.
Can not view picture files.
• The playe r only su pports .jpg extensio n file, and
do no t suppo rt other fo rmats l ike .bmp, .tiff, .
jpe g.
Can not play vid eo file s.
• All v ideo contents must be c onver ted by
vid eo2smv . Other format of vi deo fil e will no t
be su pported.
Can not play aud ible fi les.
• Mak e sure the file format is c orrec t. The player
sup ports Format 4 Audible fi le. The player
repor ts that it is full.
• You have filled t he capa city of the intern al
mem ory of the player.
• You have exceeded th e maxim um numb er of
items that t his player supports. Your player can
onl y suppo rt up to 2000 m edia fi les wit hin eig ht
hie rarchy of folder in m aximu m.
24
Page 25

Additional information
Can not playba ck trac ks on the p layer.
• Mak e sure audio tra cks are encode d in the mp3
or Window s Media format s at supp orted
bit rates.
• Bit rates suppor t by the player:
mp3 – 3 2 to 320 kb ps
wma – 4 8 to 192 kb ps
• WMA files may b e DRM protecte d and you don't
have the proper rig hts (license ) to play the file s.
• Che ck the website a nd/or a pplic ation help
sys tem of the music d ownlo ad service provi der
from where the content was purcha sed from for
license acquisiti on deta ils. For m ore information
on how licen se acquisition works, go to
www.microsoft.com/windowsme dia/d rm.
Can not playba ck song s downl oaded f rom my
pai d Music S erver Provid er subs cript ion ser vice.
• The internal clock in your portable p layer may
not b e up to date. Downloading a new
sub scrip tion so ng from your M usic Server
Provid er shou ld update yo ur player' s clock a nd
all ow it to playb ack all your songs again.
• The license for your subscription song s may
have exp ired. Sync hronize your device with your
PC ag ain to obtain an update to your li cense. If
the p roblem persi sts, please co ntact your Music
Service Prov ider for addit ional s uppor t.
Can not transfer subs cript ion mus ic content t o
the p layer.
• To enable fu nction of t ransferrin g subsc ripti on
mus ic content, select MT P mode un der Protocol
in th e Settings menu. R efer to page 23 for more
informat ion.
Specifications
Har dware
• Dim ensio ns: 71. 11 mm H, 40 .51 mm W, 15.00 mm D
• Uni t We ight: 3 4.3g, 1.225oz
• Stereo H eadph ones ja ck
• USB Connec tion Jack
• Bat tery Operated: R echargeable li thium b atter y.
USB D rive
• External USB Dri ve: When connec ted to a
computer v ia USB, the player is cap able of
storing any file type allowing t he user a f ast,
conven ient method of storing, retr ievin g, and
transfer ring fi les. This inc ludes word processing
fil es, presen tations, spreadsh eets an d any other
computer f iles.
Cap acity : 2GB
Connec tion: USB 2.0 , Hi-sp eed cap able
What is MT P mode?
• MTP (Media Transfer Protocol) m ode is es sential
if you want to transfer DRM content to you r
player. In MTP mod e your playe r will no l onger
show up as a drive letter. So pro grams that were
des igned to wor k with a player th at shows up as
a dri ve letter will n ot be abl e to work dire ctly
wit h the player.
25
Page 26

Sport MP3 Player Warranty
Hai er guarantees that this Haie r brand prod uct,
whe n shipp ed and re ceived i n its ori ginal
pac kagin g, is free fro m any defects in
workmans hip and m aterials d uring t he time
per iods st ated below. I f the product is defective,
Hai er will, at it s optio n,
(1) repair t he product using new or refur bishe d
replacem ent par ts.
(2) replac e the product with a n ew or
re-ma nufac tured e quiva lent product at no
cha rge to the purchasing consumer.
(3) refund t o the purchase r up to the price of t he
product. (This refund may t ake into acc ount a
ded uction for depreciati on of val ue base d on the
consumer's a ctual use.)
This war ranty d oes not a pply for the follow ing:
(1) d amage c aused by use with non-Haier p roduc ts
and a ccessories.
(2) d amage c aused by accid ent, misuse, abuse,
flo od, fire, eart hquak e, or other exte rnal ca uses.
(3) d amage c aused by using this produ ct outsid e of
the i ntended uses a s descr ibed by H aier in t he user
man ual.
(4) d amage c aused by service, includi ng expa nsion
and u pgrade, th at was performed by anyon e who is
not a representat ive for Haie r.
(5) to the appearance o f the product or the e xteri or
of th e product, which h as been d amage d or defa ced,
altered or m odifi ed in des ign or constru ction.
(6) to any and all of the add ition al exclude d items
set for th below:
The warranty commen ces on the date the item was
purchase d and the o rigin al purchase receipt m ust
be presented to the a uthor ized serv ice center before
warranty repairs are ren dered.
The limite d warranty described herein is in ad ditio n
to whatever impli ed warrantie s may be granted to
purchase rs by law.
ALL I MPLIE D WARRANT IES INC LUDING THE
WARRANTIES OF MERCHANTABILIT Y AND FITNESS
FOR U SE ARE LI MITED TO THE PER IOD(S ) FROM THE
DATE OF PURCHA SE SET FORTH BELOW.
Some states do not allow limitat ions on h ow long an
imp lied warrant y lasts, so the above limitation m ay
not a pply to you.
Nei ther th e sales p erson nel of th e selle r nor any
oth er pers on is aut horized to make any warranti es
oth er than t hose de scrib ed herein, or to extend
the d uration of any warranties beyond the ti me
per iod des cribe d herein on beha lf of Hai er.
26
The warranties described herein sha ll be the s ole
and e xclusive warran ties granted by Haier a nd
sha ll be the s ole and e xclusive remedy availa ble
to the purch aser. Correction of de fects i n the
man ner and for the pe riod of t ime des cribe d
herein, sh all con stitu te complete fulfill ment of a ll
abi litie s and responsi bilit y of Haier to the
purchase r with respect to th e product, and sha ll
constitute full sat isfac tion of all c laims, wheth er
bas ed on contract, negligence, st rict dualit y or
oth erwise. I n no event shall Haier be liabl e, or in
any way respons ible for any dam ages or d efect s
in th e product which were caus ed by repairs or
attempted repai rs perfor med by anyon e other
tha n an auth orized service center or de aler; n or
sha ll Haie r be liab le, or in any way res ponsi ble for
inc ident al or conseque ntial e conomic or pro perty
dam age. Some states do not all ow the exclu sion
of in ciden tal or consequ entia l damag es, so that
above exclusi on may not apply to you.
THI S WARR ANTY GIVE S YOU SP ECIFI C LEGAL
RIG HTS. YOU MAY AL SO HAVE OTH ER RIGH TS,
WHI CH VARY FROM STATE TO STATE.
Warr anty pe riod for this product is: One Year for
Lab or and pa rts.
Any defe cts discovered after th e Wa rrant y Period
end s are not covered by this warranty or any
conditions.
Where to o btain s ervice: For the lo cation of the
nea rest Haier aut horized service ce nter or to obt a
in product lit erature, acce ssori es, supplies or
cus tomer assistance, p lease c all 1-8 77-33 7-363 9
How to obtai n service from you r warranty:
Shi p or carr y in your product to a Hai er auth orized
ser vice center. You must have th e proof of
purchase w ith you. If you ship this product to a
ser vice center, ma ke sure that it is c arefully
pac kaged. Remove or delete a ny private or
per sonal f iles an d data before you sen d the
Spo rt MP3 Player devi ce to Haier or bri ng it in for
ser vice.
Fail ure to follo w the ins tructio ns stated
above may affec t your warra nty by causing
del ays, add ition al char ges, or a vo ided
warran ty.
Page 27

Sport MP3 Player Warranty
BY SHIPP ING OR CARRYIN G IN YOUR SPO RT MP3
PLAYE R TO A HAI ER AUTHORI ZED SER VICE
CEN TER, YOU AGREE THAT HAI ER IS NOT LIAB LE
FOR A NY LOSS OF DATA OR CONTENT AS A RE SULT
OF RE PAIR OR RE PLACING PARTS ON YOUR SP ORT
MP3 P LAYER PRO DUCT.
After the Warranty Pe riod is o ver, Haier may charge
you for any work in d iagnosing problem on an d/or
ser vicing an Spo rt MP3 Player product.
Hai er will u se all reasona ble effor ts to dia gnose and
attempt to fix, or sugg est pos sible s oluti ons for, an
Spo rt MP3 Player product defec t that is c overed by
the l imited warra nty sta ted above.
HAI ER DOES N OT HAVE ANY WAR RANTY
REG ARDIN G ITS WARRA NTY SERVI CE(S) . HAIER
DIS CLAIM S ALL DUT IES (IF A PPLIC ABLE) OF
WOR KMANLIKE EFF ORT OR LACK OF N EGLIG ENCE,
EXCEPT F OR THE SEN TENCE A BOVE.
The Limite d Wa rrant y detai led above does n ot cover
your data on t he Spor t MP3 Player, or any separate
content or software ( wheth er or not i t is pack aged
and i nclud ed with t he Spor t MP3 Player pro duct).
The warranty also doe s not cover any Sport MP3
Player a ccessories o r devic es that are not
man ufactured by or for Haier.
ADD ITION AL CONDITI ONS
The software that com es incl uded wi th this S port
MP3 P layer product is lice nsed to you only, a nd is
not s old to you. You are licens ed to use this
sof tware i n your Spor t MP3 Player p roduc t only.
You are n ot perm itted to reverse en ginee r it,
except a s is spec ifica lly per mitted by appl icabl e
law notwiths tandi ng this l imita tion.
You are e ntirely re spons ible to comply w ith any
copyrigh t laws that ap ply to you in yo ur use of
mus ic, video and ot her content wi th this S port
MP3 P layer product.
Your Spor t MP3 Player pro duct and al l of its
internal p arts and comp onents are new pursuant
to industry standards, unless it i s other wise
ind icated on the Sp ort MP3 Player product's
ori ginal retail p ackaging as “Refurbi shed.”
You agree to follow all export laws and regulation s
that apply to you if you choose to export the
Spo rt MP3 Player product outside of the United
States.
The Limite d Wa rrant y stated above applie s only to
the o riginal cons umer wh o purchased the product.
The warranty may not be assign ed or tra nsferred
to anyon e else. However, some juris diction s that
extend the protection o f impli ed warrantie s for
sub seque nt consumers m ay exist, so the a bove
lim itation may no t apply to you.
GOV ERNIN G LAW
This Limited Warranty is valid in th e Unite d States
of Am erica o nly. The laws of t he State of New York,
U.S.A. , will ap ply to this Limited Warrant y.
Dig ital Righ ts Mana gement
Conten t owners use Windows Med ia digital rights
man ageme nt technolog y (WMD RM) for
protection o f intellectual p roper ty, includin g all
copyrigh ts. This devi ce uses t he WMDRM s oftware
for acce ss to WMDR M protected co ntent. If the
WMD RM softwa re fails to protect cer tain content,
content owners may ask Microsoft to revoke t he
sof tware 's abil ity to us e W MDRM to play or copy
protecte d content. This revocation will not af fect
unp rotec ted content. When you downl oad licenses
for protec ted conten t, you agree that Microsoft
may include a revoc ation list with the licen ses.
You may b e required b y content owners to u pgrade
WMD RM to access their content. If you decline an
upgrade, you will not be able to acce ss any
content that re quires the upgrade.
27
Page 28

Sport MP3 Player Warranty
Pate nt Info rmation
Uni ted States a nd/or i nternation al patents pen ding.
Custom er Service and Suppo rt
For informati on abou t Sport MP3 Player, read a ll
doc ument ation includ ed with t he product. If you
sti ll have a question, go to
ww w.haie ramerica.c om/su pport to search th e
informat ion bas e, and to get suppor t using c hat or
-ma il.
In th e Unite d States, ca ll:
Hai er Amer ica, Ne w York, NY
1-8 77-33 7-363 9
For Cu stome rs in the U nited Stat es
This equipment has be en tested and found to
comply with th e limit s for a Class B digital device,
pur suant to part 15 of the FCC Rules. Thes e limit s are
des igned to pro vide reasona ble protection a gains t
har mful in terference i n a residentia l insta llati on.
This equipment gene rates, use s and can radiate
radio freq uency ene rgy and, if not in stall ed and us ed
in accordance wit h the ins tructio ns, may cause
har mful in terference t o radio commun ications.
Howeve r, there is no guar antee that inter ference
wil l not occur in a particular install ation. If this
equ ipmen t does ca use har mful interference to
radio or tel evisi on reception , which c an be
determined by turni ng the eq uipme nt off an d on,
the u ser is en couraged to tr y to correc t the
inter ference by o ne or more of the followi ng
mea sures:
• Reo rient o r relocate t he receiving a ntenna.
• Increase the s eparation be tween t he equi pment
and receiver.
• Connect the eq uipme nt into an outle t on a circuit
dif ferent from that to which the recei ver is
connected.
• Consult th e deale r or an exp erien ced radio/TV
technician to help.
Dec laration o f Conformi ty
Mod el Name : Sport MP3 Player
Trade Name: H aier
Res ponsi ble Par ty: Haier Ame rica Trading LLC
Addres s: 1356 B roadway, New York, NY 10018 USA
Telepho ne No.: 877- 339-3 639
Warn ing: Ch anges o r modif ications to th is devi ce
that are not expres sly app roved by H aier Am erica
may void your autho rity to o perate this
equ ipmen t.
This device complies with Part 15 of the FCC Rules.
Ope ration is subjec t to the followi ng two conditi ons:
(1) This device may no t cause h armfu l inter feren ce.
(2) This device must accept any interference received,
inc ludin g inter feren ce that may ca use und esired
ope ration.
28
 Loading...