

Haier HB21FWRSS Service Manual
CAUTION
READ THIS MANUAL CAREFULLY TO
DIAGNOSE TROUBLE CORRECTLY
BEFORE OFFERING SERVICE .
Refrigerator
SERVICE MANUAL
Features:
1.Chill drawer for delicatessen
2.Slide-out shelf for easy food access
3.Optimized condensing system
4.Pre-cooling for defrosting for freshness storage
5.Automatic problem detecting and warning system, door cooling warning system
MODEL: HB21FWRSS
Haier Grou
p
6.Vitamin C technology for fresh food storage
7.Ice making
8.Intelligent operation for automatic operation
9.Dispenser for cold drinks
EDITION:2008-03-24

SAFETY PRECAUTIONS----------------------------------------------------------------1-2
SPECIFICATIONS--------------------------------------------------------------------------3-4
PARTS IDENTIFICATIONS--------------------------------------------------------------5
DISASSEMBLY------------------------------------------------------------------------------6-12
CONTROL AND DISPLAY SYSTEM--------------------------------------------------13-18
Control and Display Panel---------------------------------------------------------13
Function Adjustment and Control Principle------------------------------------14-18
REFRIGERATION PRINCIPLE----------------------------------------------------------19
System Flow Chart-------------------------------------------------------------------19
System Flow Scenograph ---------------------------------------------------------19
CIRCUIT DIAGRAM ------------------------------------------------------------------------20
Brief Principle Diagram-------------------------------------------------------------20
Connect Diagram---------------------------------------------------------------------20
SENSOR AND MALFUNCTION CODE------------------------------------------------21
Introduce of Sensor Parts----------------------------------------------------------22
Malfunction Codes Problems------------------------------------------------------22
ELECTRICAL CONTROL PRINCIPLE-------------------------------------------------23
Overview--------------------------------------------------------------------------------23
Main Control Board of HB21T-----------------------------------------------------23
Air Escaper Controlling Pinciple--------------------------------------------------25
Ice Maker Control Principle--------------------------------------------------------25
Refrigerator Test Model-------------------------------------------------------------26
Fan motor Control---------------------------------------------------------------------27
Defrosting Control--------------------------------------------------------------------28
TROUBLE SHOOTING--------------------------------------------------------------------30-43
Normal Phenomena-not troubles for refrigerators---------------------------30
Troubles in Refrigerators and Their Remedies------------------------------30-32
Analysis of Troubles and Troubleshooting------------------------------------33-44
CONTENTS
Water Way Operation Instruction------------------------------------------------45-46

SAFTY RECAUTIONS
DǃPower supply: 220V/50HZ
This refrigerator use Alternating Current of 220V/50Hz.If the range of the voltage fluctuates
too significantly, it is possibly will make the refrigerator not start, and will burn down the master
board and the compressor, or will make the sound of the compressor be out of the way. When
this does happen, an automatic manostat must be installed.
EǃThe appliance must be plugged into a dedicated outlet that is securely grounded.
An independent special electrical outlet must be used and reliable earthing must be done on
the electrical outlet. This refrigerator is equipped with three electrical source lines (earthing lines)
and the connector plugs are in accordance with the normal three-lined earthing electrical outlet.
WARNING! The plug should be securely connected to the socket or otherwise
fire hazard may arise.
FǃBe careful not to damage the power cord.
1. Don't let the refrigerator body press the power line or let the man-caused stamping of the
power line happen.
2. When moving the refrigerator from the wall, please be careful not to press or roll or damage
the power line.
3.Don't pull out the connector plugs of the refrigerator in the way of pulling out the power line.
GǃWhen the power cord is damaged
When the power line is damaged or frayed, you must go to the servicing station specified by
the manufacturer to ask for a new one.
HǃWhen there is a gas leakage
1. Shut off the gas valve.
2. Open the doors and windows for ventilation.
3. Do not plug or unplug the refrigerator or other electric appliances.
IǃAlways remember to unplug the appliance in the following cases:
1. Unplug the appliance before cleaning and reparation.
2. Unplug the appliance before replacing the old light bulb to prevent electric shock.
JǃNever store inflammable or explosive items and strong corrosive acids or
alkalis in the appliance.
KǃThis appliance is a household refrigerator, which is produced in accordance
with the specification of national standard. It is intended for food storage only,
not for storage of blood, medicine and biological products.
LǃTo prevent risk of fire, keep the appliance away from gasoline or any other
inflammables.

SAFTY RECAUTIONS
MǃTo prevent risk of electromagnetic interference or other accidents, do not
place any patch panel, voltage stabilizer and microwave oven on top of the
refrigerator or use any electric appliance (unless recommended by the
manufacturer) inside the refrigerator.
NǃChildren are not allowed to play with the door or the bottle racks. Serious
injury may occur.
OǃThe internal surface of freezer compartment is very cold when the
appliance is running. Do not touch the surface especially when hands are wet.
PǃThe gap between the doors and the gap between the doors and the
cabinet are very small. Make sure figures do not get stuck. Always keep
children away when a door is opened or closed.
QǃDo not splash water onto the refrigerator. Keep off places of high humidity
that may have adverse effect on the electric insulation performance.
RǃNo dismantlement or modification can be made without authorization.
Damage to refrigeration system is strictly prohibited. Reparation must be
carried out by authorized personnel.
SǃBottled beer or beverage should not be stored in the freezer
compartment - risk of explosion.
TǃUnplug the appliance in the event of power interruption or cleaning.
The appliance can be plugged again only after an interval of at least 5 minutes
to prevent damage to the compressor caused by frequent startups.
UǃPlease remove the door, door seal and shelves before disposal of the
old appliance and put them away in a safe place to prevent children from
being entrapped.
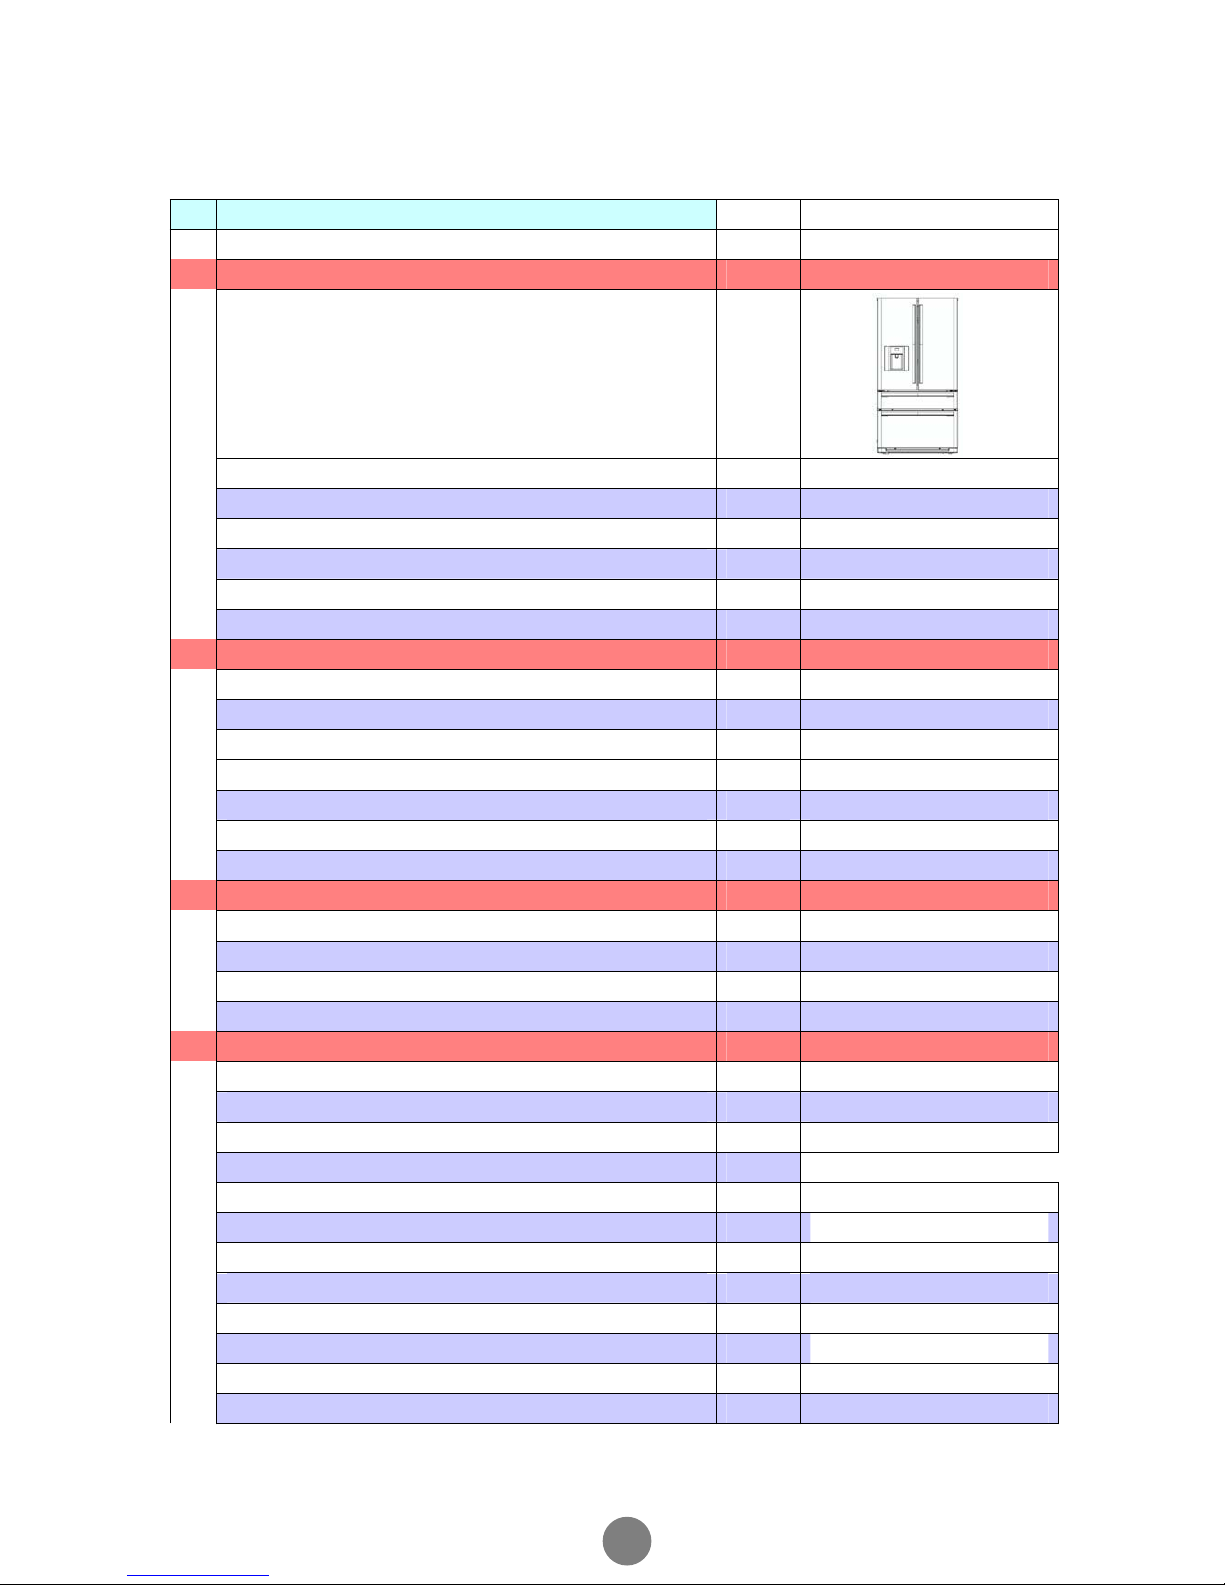
SPECIFICATIONS
Refrigerator
1.
Model HB21FWRSS
Photo
Commercial brand Haier
Product description
REFRIGERATOR-FREEZER
Type of Applianc e (FS= freestanding BI= built-i n) FS
Energy efficiency class A
Climate class (N= + 18-32 °C T=+ 18-43 °C) SN/N
Freezer c ompartment / Star rating
2.
Key features
Gross capacity 586
Total net capacity 557
Defrosting (H=manual A=automatic) Fridge/Freez A
Defrost water outlet Ye s
Air circulating ventil ator Yes
Kind of coolant (R134a/R600a)
R600a
Foaming c omponents HFC-245fa
3.
Technical data
Voltage / frequency V/Hz 220-240 V~/ 50Hz
Input power W 120
Length of cable / incl. plug
cm 350
Temperature range (f rom>to) Fridge / Freez °C -21~-7
4.
Aesthetics
Colours (see L):
Top cover Black
Cabinet
Black
Door
Door Frame Black
Fascia panel / Handle
Inside door/-drawers (w=white t=tr anspar.) - / -
Door:
F= Flat / R= Rounded / S= Streamline S
Hinged (r =right l =left) / reversible)
Lock
Shelves:
Black
Black
-both side -
- no -
****
L
L
3

Number
Type (gr=grill/g=glass/p=plastic) g
Colour of shelves
Adjustable S
Drawers:
Number n°. 2
Crisper:
Salad crisper(s) transparent / white
transparent
5.
Equipment & Accessories
Control Panel:
Control panel interior / exterior
Exterior
Thermometer interior / exterior
Ex terior
Control lamps green / yellow / red
Over temp erature A LARM LED / acoustic
acoustic
Adjustable thermostat NO
Fast freeze switch YES
Interior light W 25
Adjustable f eet front / rear
n°
Castors front / rear
rear
6.
Product dimensions
Unit dimensions H / W / D mm 1771*908*759
Depth with open door mm mm 600000
Net weight kg 145
7.
Packing dimensions & loadability
Packing dimensions H / W / D mm 1 1960*974*863
Gross weight kg 160
8.
Recycling symbols
Carton weight in g
kg
9.
Service
Users instruction (languages)
10.
Others
YE
4
English
2
fron t
4
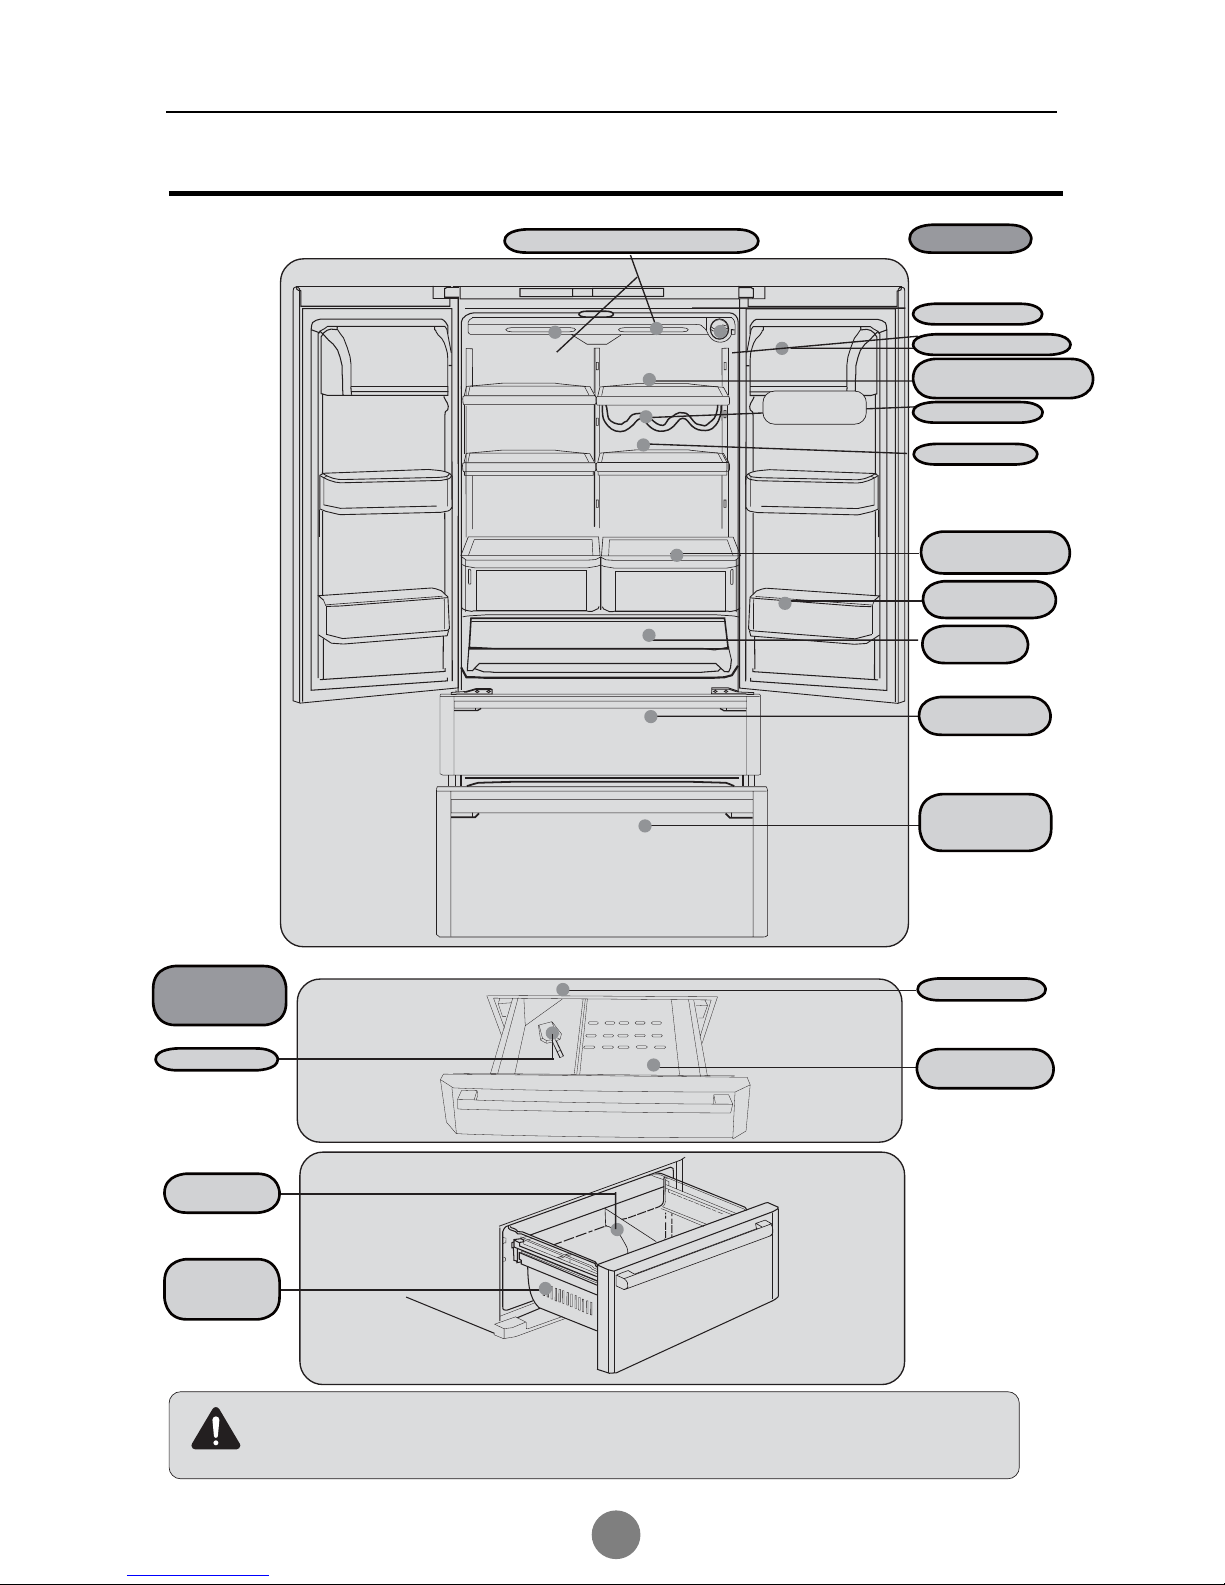
PARTS IDENTIFICATIONS
Freezer
&KLOOFROGVWRUDJHÀRRGOLJKW
:DWHU¿OWHU
'LDU\IRRGER[
Diary foChill-cold
storageUDFNRGER[
Liquid rack
Slide rack
Fruits and
VHJHWDEOHVER[
Gallon
bottled seat
Cooked-
IRRGER[
Ice-making
drawer
Deepfreeze
refrigeration big
drawer
Deepfreeze
fridge
Ice spoon
Ice-maker
Ice-meeting
drawer
Drawer
clapboard
Deepfreeze
fridge big
drawer
For the application of this brochure to different models, the characteristics of the refrigerator you are
using may be different from the descriptions in this brochure.
Note
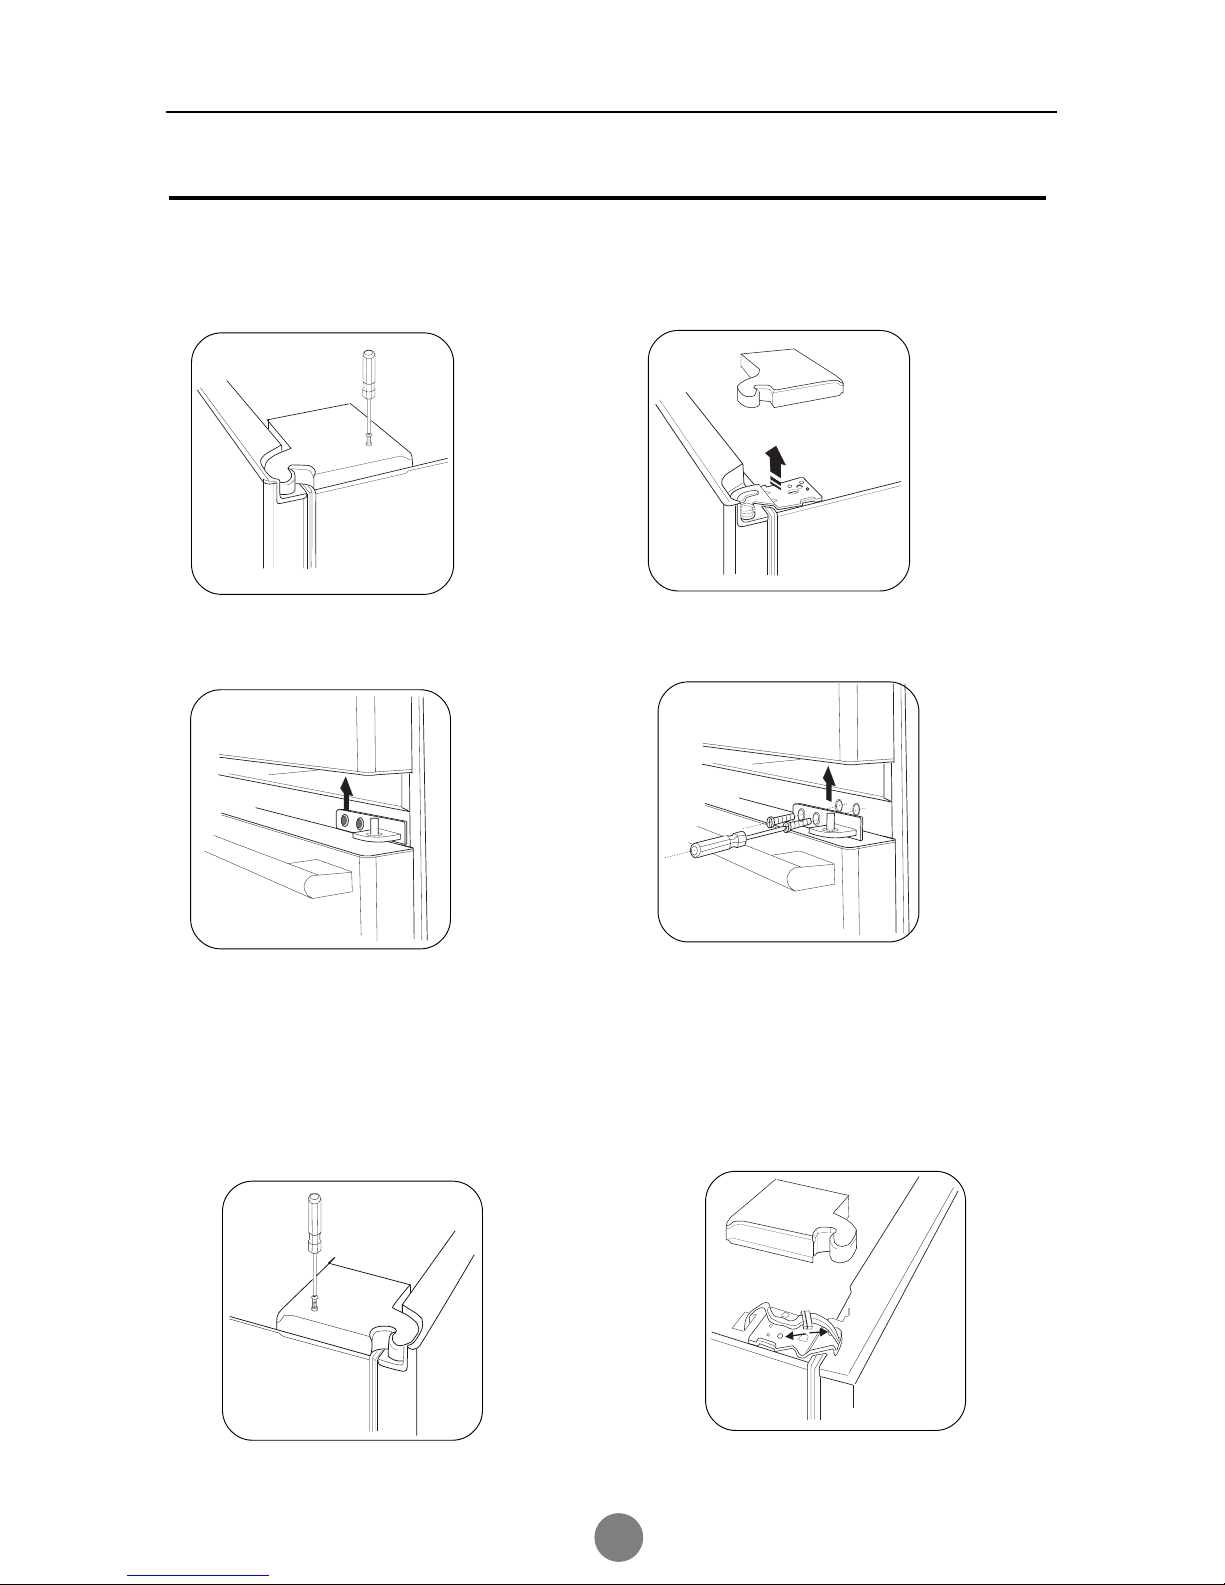
DISASSEMBLY
1. Removing and replacing the right door of refrigerator compartment
ķUnscrew the upper right hinge cover by
means of screwdriver and then remove
the hinge cover.
ĸ Unscrew the upper right hinge by means of
hexagonal screwdriver and then remove the hinge.
ĹRemove the door and place it in a proper
position.
ĺ Remove the middle hinge if necessary.
2. Removing and replacing the left door of refrigerator compartment
ķUnscrew the upper left hinge cover by
means of screwdriver and then remove the
hinge cover.
ĸUnscrew the upper left hinge by means of
hexagonal screwdriver and then remove the
hinge.
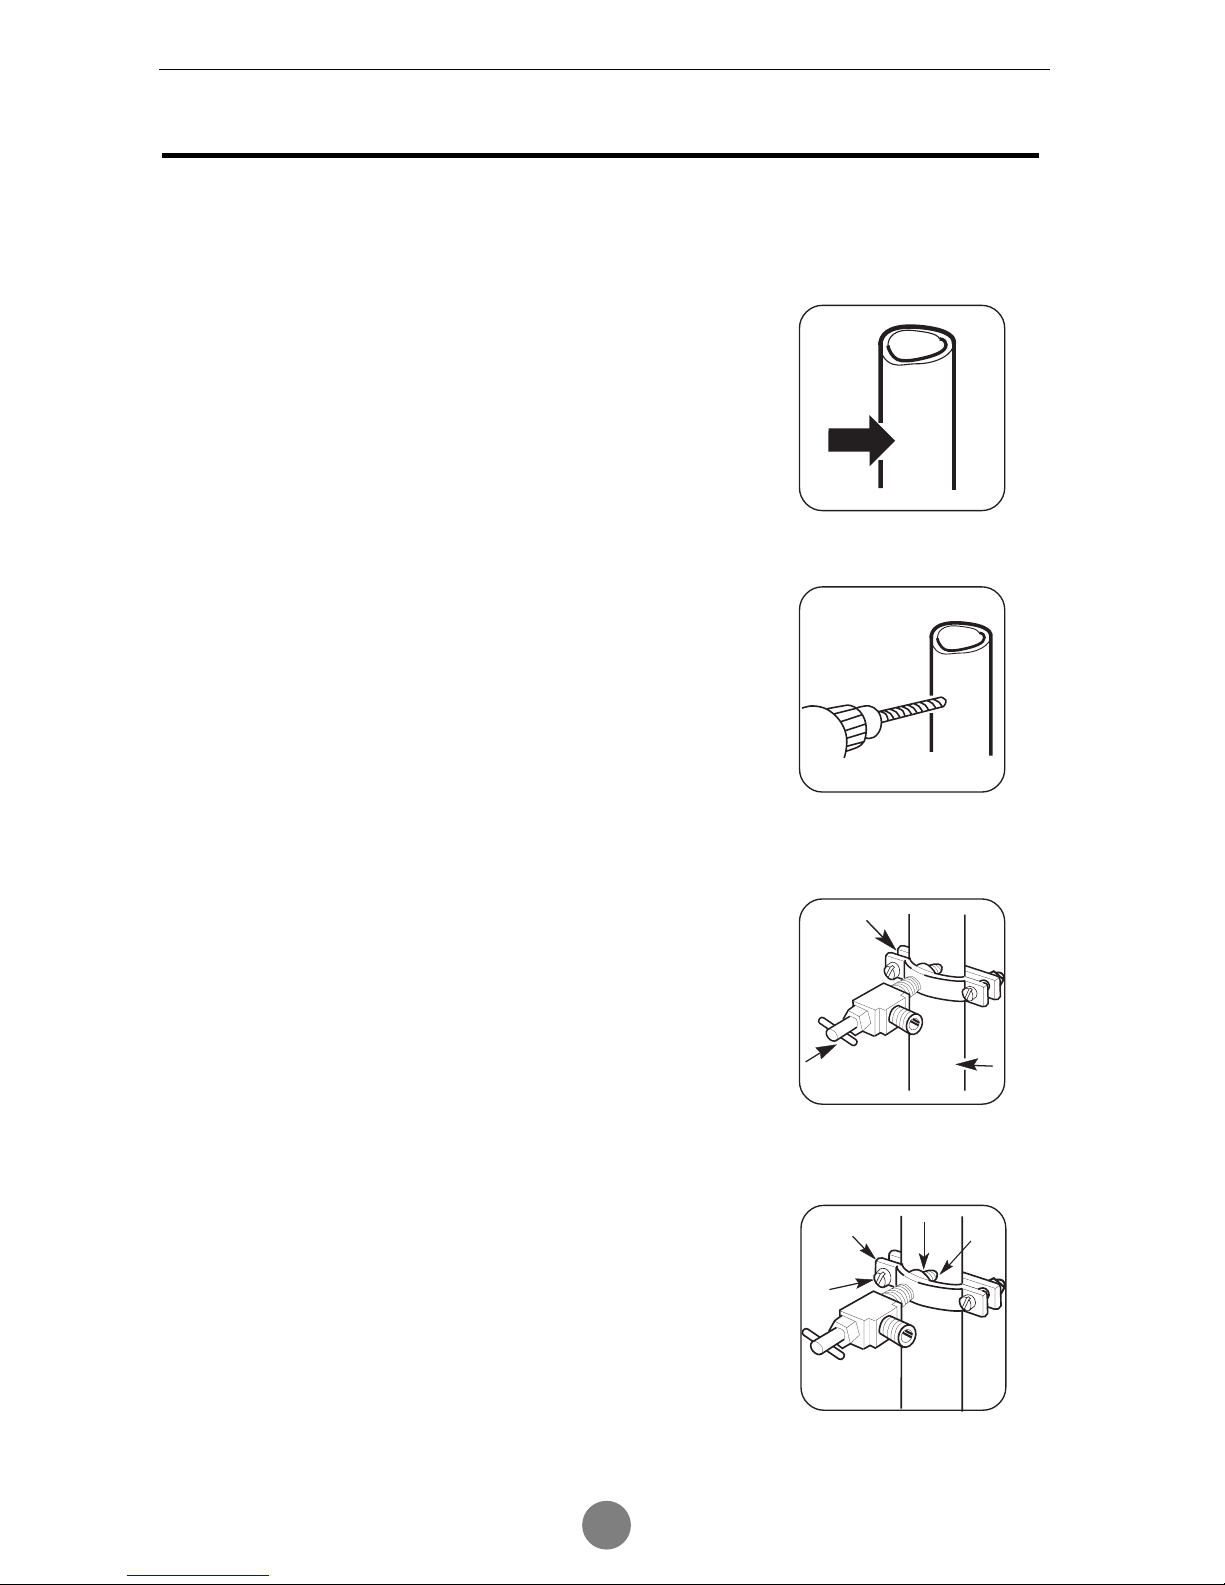
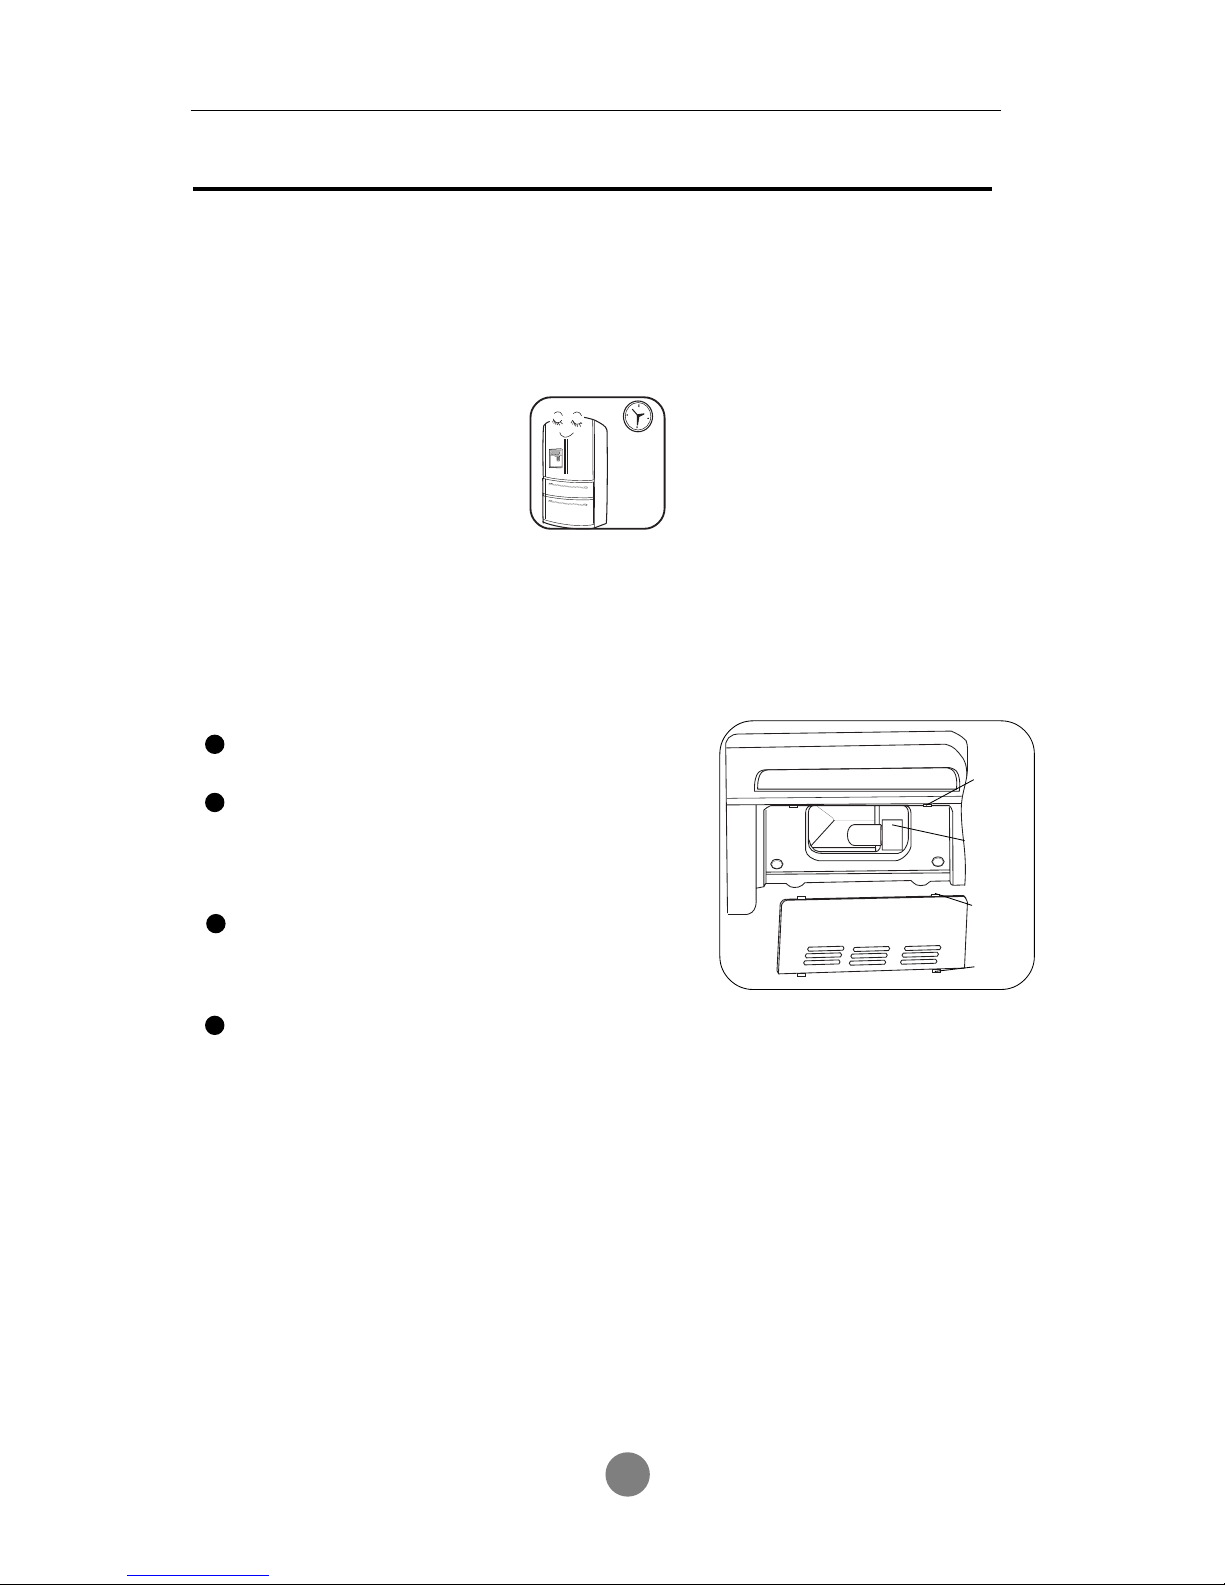
Install the stopping valve on the drinking pipe that is frequently
used recently.
1. Turn off the main water supplying pipe routine
Turn on the nearest tap till the water pipe is cleaned completely.
2. Choose the position of the valve.
Choose a position for the valve that is easy to be approached. It is recommended
that the valve is connected to the side of a vertical water pipe, and if it is really
needed to connect the valve to a level water pipe, connect it to the upside of the
water pipe not the downside, in case the sediment may flow out from the water
pipe.
3. The hole of the drill valve
Drill a hole of 1/4 inches on the water pipe using a sharp drill (even using an
automatic valve). Clean the burr left on the water pipe by the drill.
1RWOHWWKHZDWHUÀRZLQWRWKHGULOO
4.Tighten the stopping valve.
Tighten the stopping valve on the cold water pipe using a pipe nip. Follow the
UXOHVVSHFL¿HGLQWKH&05RI0DVVDFKXVHWWV)HGHUDO3LSLQJ6WDQGDUG6DGGOH
backed is unlawful in Massachusetts and is forbidden. Please consult the plumber's
mate with working license.
5. Tighten the pipe tip.
7LJKWHQWKHEROWVRIWKHSLSHWLSWLOOWKHFORVLQJFLUFOHEHJLQVWRH[SDQG
Don’t let the bolts of the pipe tip be too tight, otherwise the water pipe is pressed
ÀDW
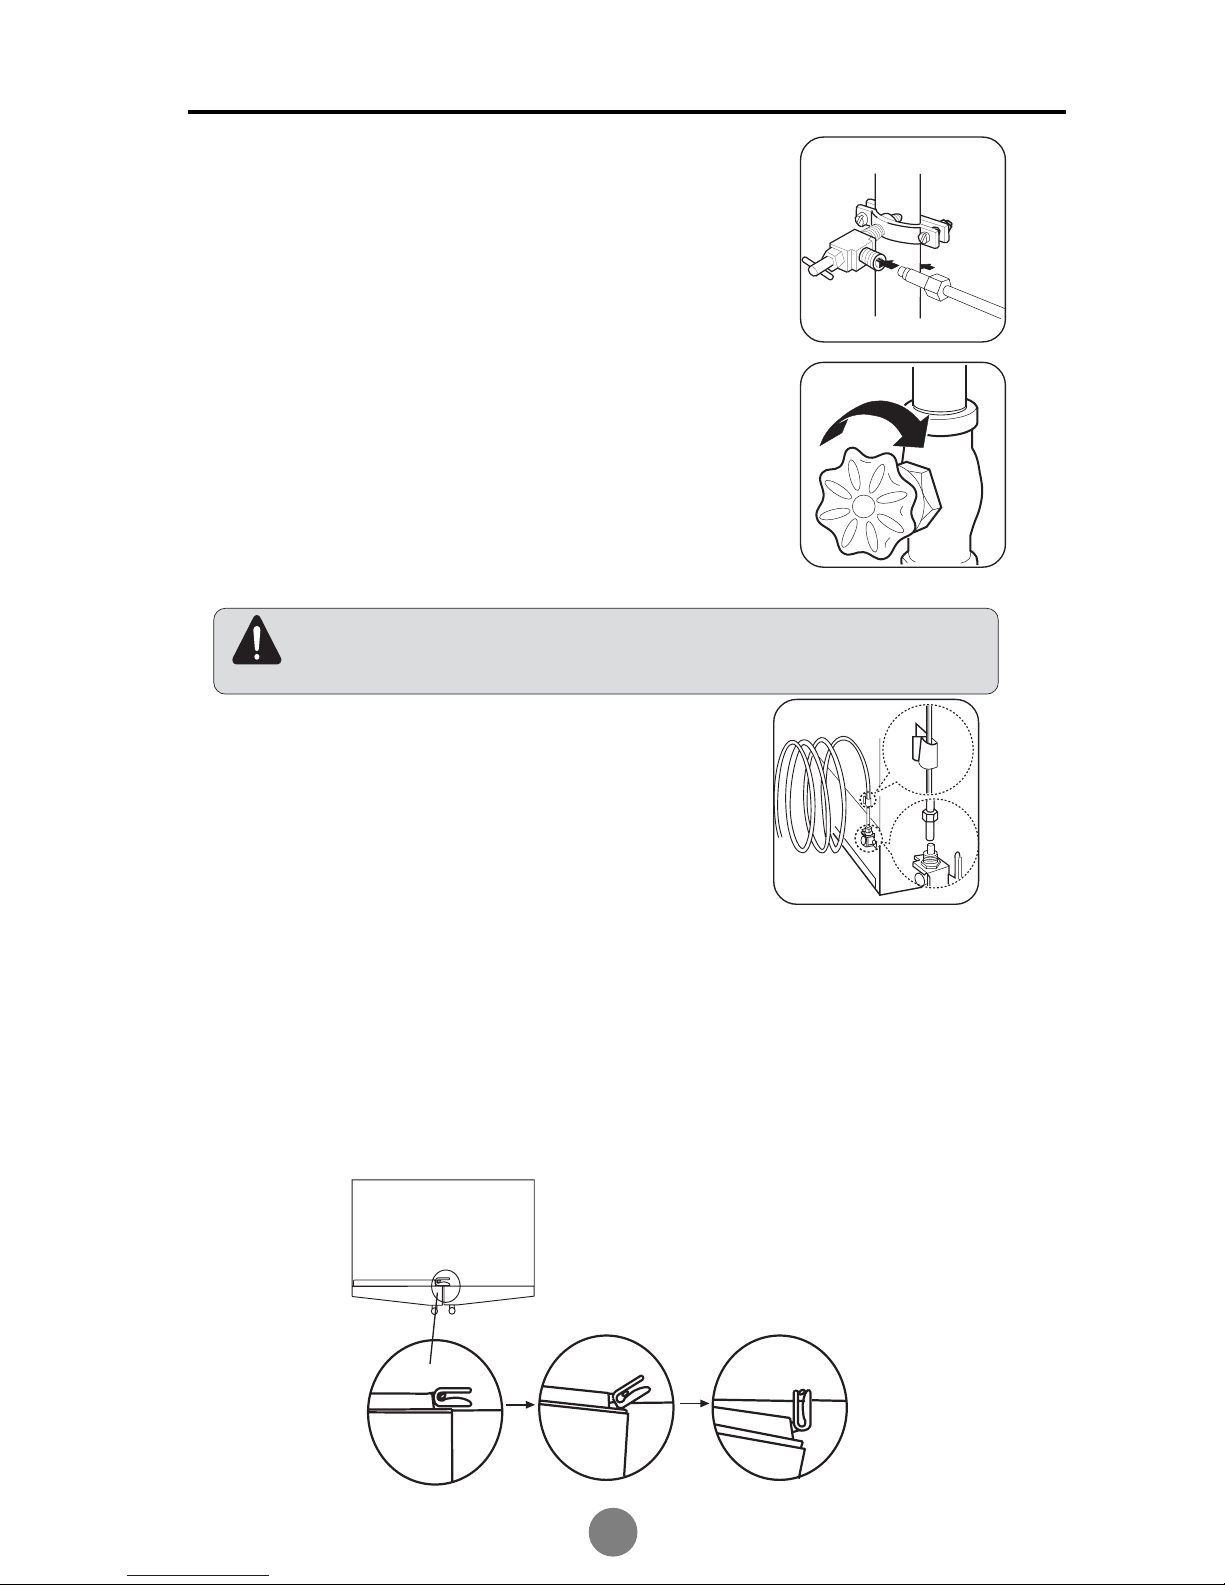
6. The deposing line of the pipe
The deposing line between the cold water pipe and the refrigerator
'ULOODKROHRQWKHZDOORURQWKHÀRRUWKDWLVQHDUWKHZDOOWRDJUHDWGHJUHHDQGOHW
the pipe line go through the hole.
Assure the pipe has an enough margin area( about 8 inches [2.4 meters] and make
it be three circles with the diameter of each circle about 10inches[25 centimeters],
and after this installment is done, the refrigerator can be moved away from the wall.
DISASSEMBLY
3. Pipes connecting
The chill-cold storage vertical girder goes around the vertical girder orientation shaft when the chill-cold
storage left door body is opened. After the chill-cold storage left door body is opened, don't circle the
chill-cold storage vertical girder with your hands, in case the door may not be closed.
7. Connect the pipe to the valve
Put the Tightened nuts and the copper shaft on the end side of the pipe and
connect the pipe to the stopping valve. Make sure that the pipe is cut into the
valve completely. Tighten and press the nut.
)ROORZWKHGHVFULSWLRQV VSHFL¿HG LQ &05 RI 0DVVDFKXVHWWV )HGHUDO 3LSLQJ
Standard. Saddle-backed is unlawful in Massachusetts and is forbidden. Please
consult the plumber's mate with working license.
8. Clean the Pipe
Power the main water supply till the water in the pipe becomes clean. Turn off the
water valve after having used water of about 1v.
9. Connect the pipe to the refrigerator.
Before connecting the pipe to the refrigerator, make sure that the power line is not cut into
the electric plug on the wall.
Note
(1) Tighten the water pipe on the water valve and take the nut off the water
pipe.
$QGWKHQDVVKRZQLQWKH¿JXUHFRQQHFWWKHHQGVLGHRIWKHZDWHUSLSHWR
the water valve; tighten the water pipe using tightening nuts.
Pipes connecting
4. Operation of the Chill-cold storage Vertical Girder
DISASSEMBLY
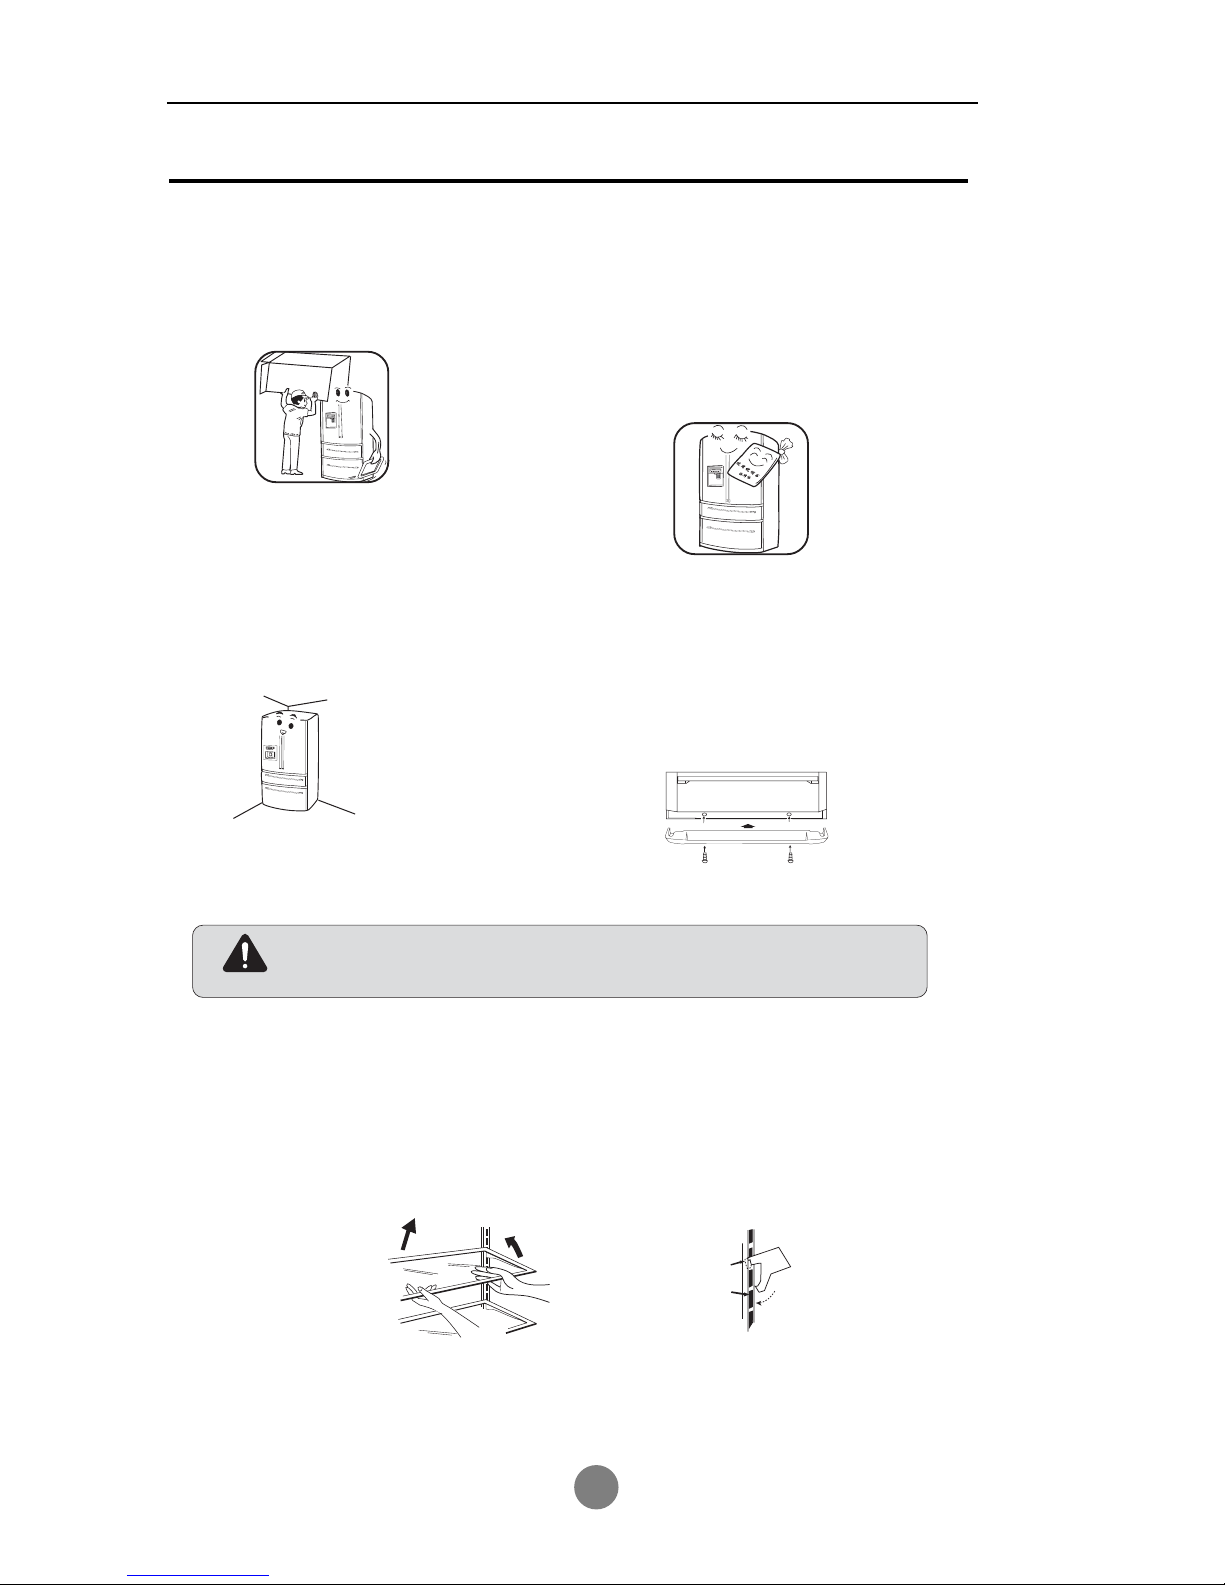
5. Dismantle all subassemblies
The foam base seat as well as the
adhesive ape as a fixed additional
part must bealso dismantled.
See the previous ¡°Position Environment¡±
7. Place the refrigerator at
a proper position
9. Height-adjustable Shelf
The height of shelf can be adjusted to meet your storage
needs.
To adjust the shelf height, remove the shelf first. The steps are
as follows:
tilt the shelf up at front, and lift it up and out of
tracks. To replace the shelf,
with shelf front
raised slightly,
engage the lugs in tracks. Then lower shelf front until it locks
into position.
Lift and remove
Tilt up
To remove
Engaged the lugs
To replace
6. Check all the additional parts and
materials with the machine.
The articles in the box must be checked according
to the descriptions on the incasement list, and if
there is any difference between the description on
the incasement list and the actual case, please
consult the seller shop for information.
8.The installment of the decorating
articles at the base.
Open the door of the refrigerant room and from the
refrigerant room take out the decorating articles and
install them at the proper positions, and drill the bolts
For the convenience of searching information, the number of the refrigerator and the
number of manufacturing should be copied on the guarantee issue.
Note
DISASSEMBLY
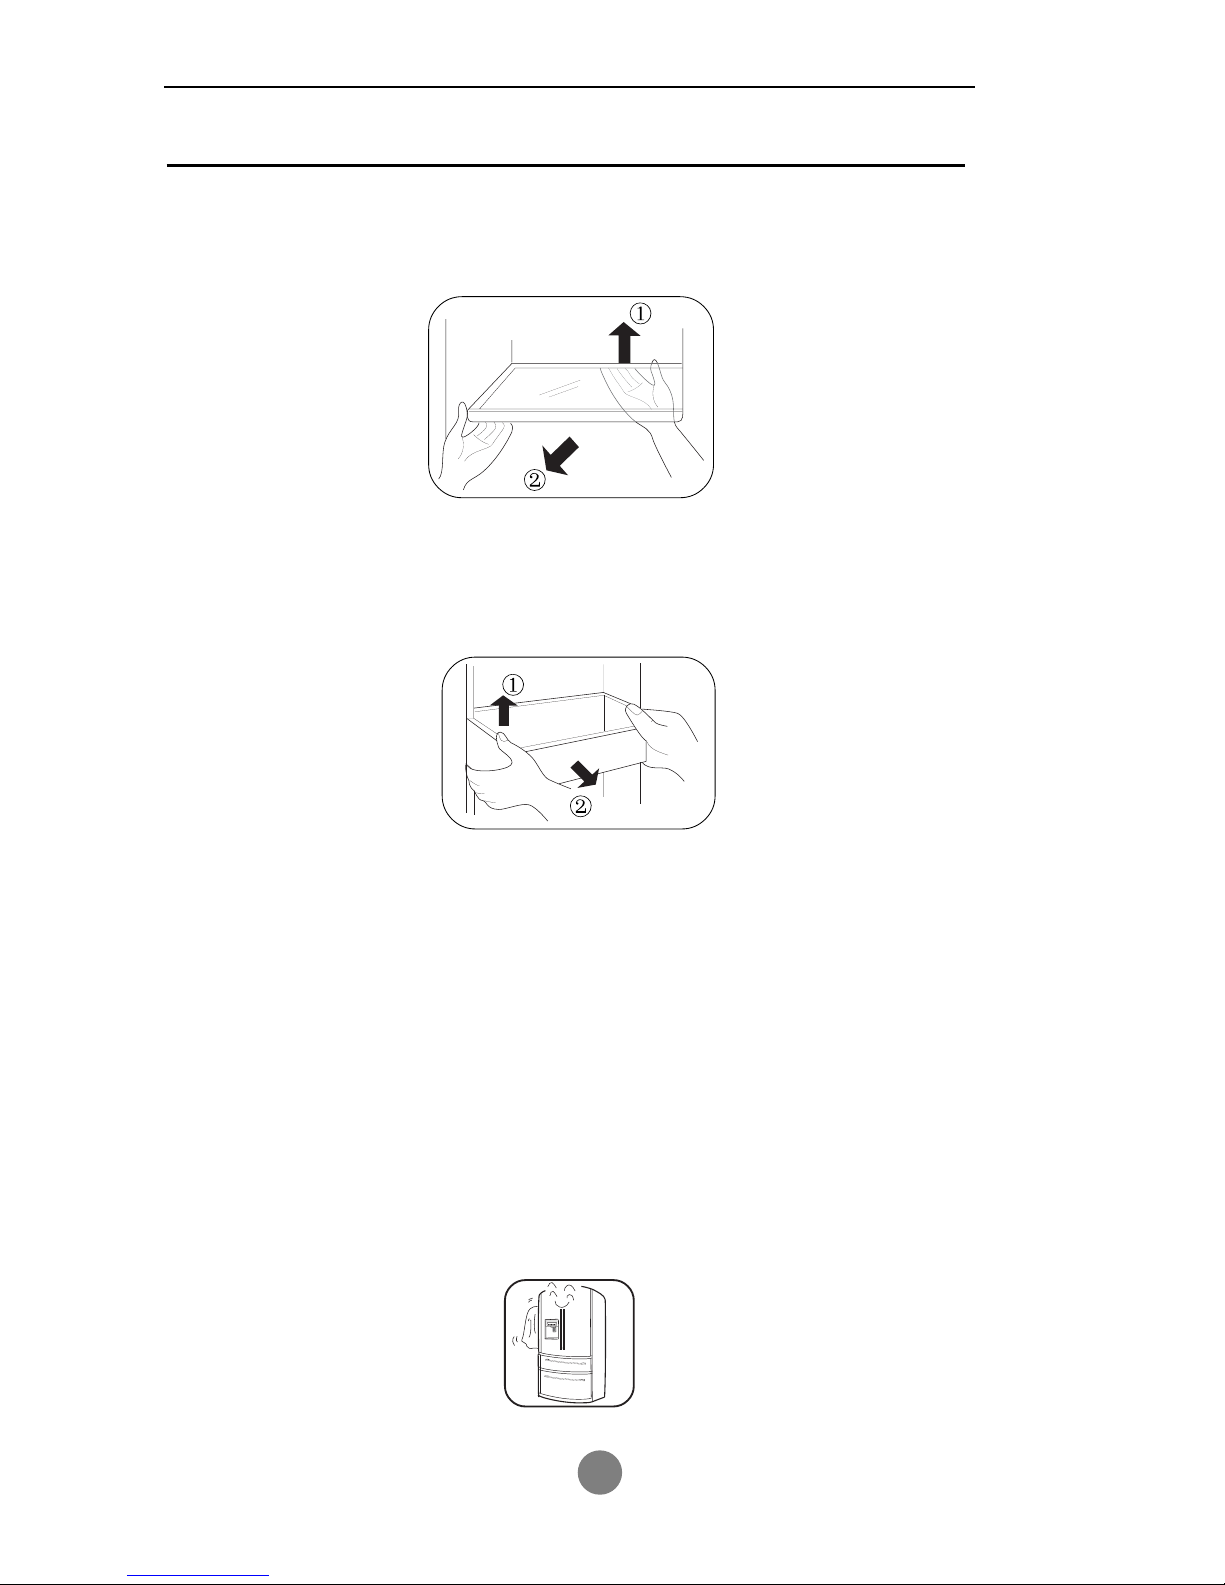
10. Removing Crisper Cover
Take out the crisper and put it away. Lift up the cover end (1)
and remove it (2).
11. Cleaning door bin
Lift the bin up (1) and pull it towards you (2). Replace the bin in the
reverse sequence of
removal after cleaning.
12. The Installment of the Cover in Front of the Cooked-food Box.
Take out the front cover of the cooked-food box, put the circling shaft on both sides of
the front cover of the cooked-food box into the supporting blocking tank of the cooked-food
box, and circle down the front cover of the cooked-food box. Note: the angle between
the front cover of the cooked-food box and the slide-way support must be about 90 degrees.
13. It is recommended that before being used the refrigerator
should be cleaned first.
Before putting food into the refrigerator, please clean the inside and outside of the
refrigerator completely using the baking soda diluted by water (by the ratio of 4L water
to a spoon of baking soda).
DISASSEMBLY
14. Place the refrigerator without turning on the power.
After the refrigerator is placed at a flat position and cleaned, don¡¯t turn on the
power immediately, rather you should place the refrigerator for about 6 hours
without turning on the power. After at least 6 hours, turn on the power so that the
refrigerator can operate well.
15. Replacing the Light Bulb(refrigerator)
Bulb specifications: 220V~, 25W
Socket: E14 (DO NOT use a bulb over 25W)
Unplug the appliance.
ķTo remove the light shield, press the stopper
at rear out of the square hole.
ĸ Pull the shield backward until the retainer is
separated from the square hole.
Turn the bulb anticlockwise and out. Replace a
bulb of the same specifications in the reverse
sequence of removal.
To replace the light shield: Engaged the retainer
into the square hole and then press the shield
rear forward until the stopper is locked in the
square hole.
Square
hole
Refrigerator
light socket
Retainer
Stopper
Light bulb

DISASSEMBLY
16. Replacing the Light Bulb
Bulb specifications: 220V~, 25W
Socket: E14 (DO NOT use a bulb over 25W)
To replace the light bulb:
1. Unplug the appliance.
ķRemove the front screw with a screwdriver.
ĸTo remove the light shield, press the stopper at front
ǂout of the square hole.
ĹPull the shield forward until the retainer is separated ǂ
from the square hole.
2. Turn the bulb anticlockwise and out. Replace a bulb of
the same specifications in the reverse sequence of
removal.
3. To replace the light shield: Engaged the retainer into the
square hole and then press the shield front backward
until the stopper is locked in the square hole. Replace
and tighten the screw.
Screw hole
Square
hole
Freezer light socket
Stopper
Retainer
Freezer light bulb
17. How to User the Crisper
The appliance is equipped with a crisper for vegetable and fruit
storage. You can set the humidity to meet your storage needs.
1. Turn the humidity regulator (located at the upper right
corner of the crisper) up to get a higher humidity suitable for
storage of cucumber, grape, kiwifruit and persimmon etc.
2. Turn the humidity regulator (located at the upper right
corner of the crisper) down to get a lower humidity suitable
for storage of strawberry, orange, bean, garlic, watermelon,
plum and tomato etc.
Up
Down
Humidity regulator
18. How to Use the Delicatessen Drawer
The appliance is equipped with a delicatessen drawer with a
temperature range from -2°C~+3°C. The temperature can be
adjusted by the air control knob to meet your storage needs.
1. Turn the air control knob leftwards (weak) to reduce the cooled
air moving in the delicatessen drawer and maintain a higher
temperature;
2. Turn the air control knob rightwards (strong) to increase the
cooled air moving in the delicatessen drawer and maintain a
lower temperature.
Air control knob
cold
colder
cold
colder
Humidity
High
Low
Humidity
High
Low
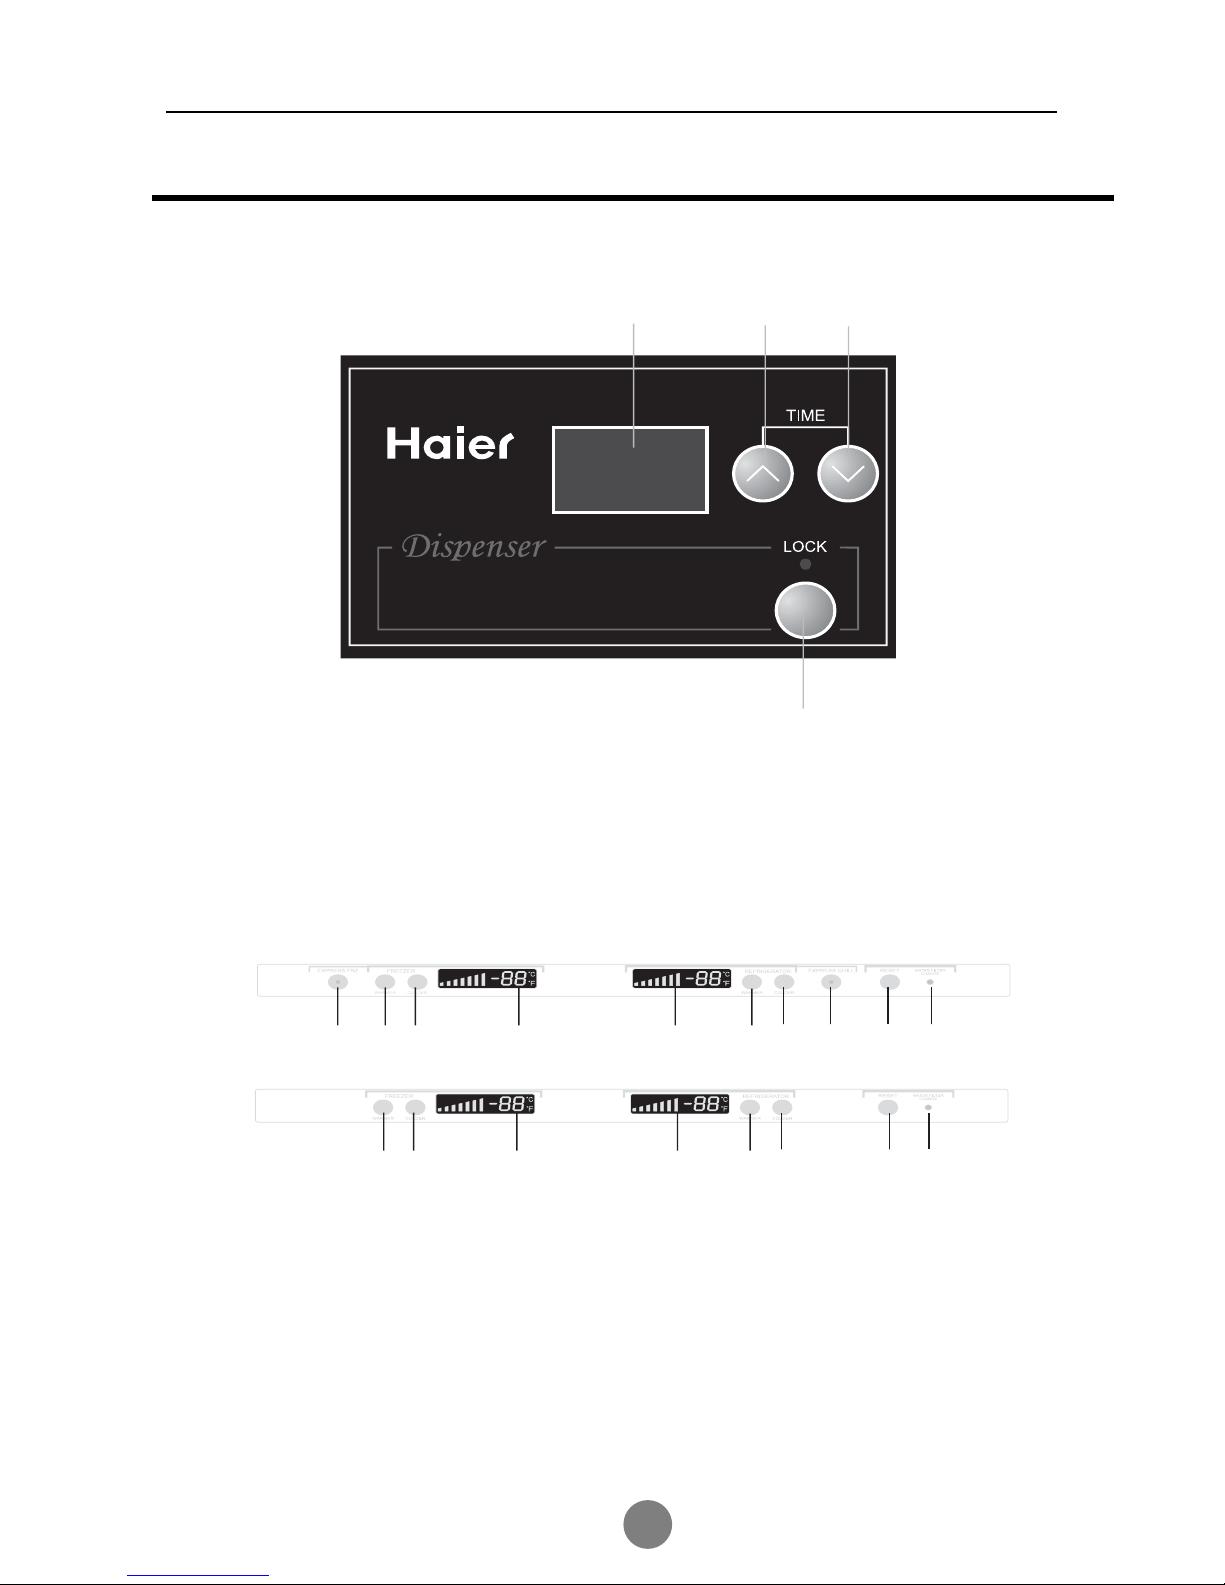
CONTROL AND DISPLAY SYSTEM
The door body vision controlling screen
Function adjustment and control principle
D A B
C
A …………Hour Button B …………Minute Button
C………… Lock Button D……………Time Area
E
K
L
M N
K
M N
E …………Quick-refrigerant button F, G………Deepfreeze fridge temperature adjusting button
H ………deepfreeze fridge temperature indicating area I……..………Chill-cold storage temperature indicating area
J.K…...…chill-cold storage temperature adjusting button L…….…...………Chill-cold storage quick-deepfreeze fridge
0«««««««««««««:DWHU¿OWHUUHVHWEXWWRQ1««««««««««««:DWHU¿OWHULQGLFDWLQJODPS
FG
H I J
F
G
H
I
J
 Loading...