

Haier HB21FSSAA, HB21FGRAA, HB21FGBAA, HB21FGWAA Service Manual
Order No. Ref1012S008V0
© 2010 (HAIER ELECTRICAL APPLIANCES COR. LTD)
All rights reserved. Unauthorized copying and distribution is a violation of law.
Refrigerator
SERV ICE MANUAL
MODEL: HB21FSSAA
HB21FGRAA
HB21FGBAA
HB21FGWAA
Haier Group
This service information is designed for experienced repair technicians only and is not designed for use by the general public. It
does not contain warnings and cautions to advice non-technical individuals of potential dangers in attempting to service a product.
Product powered by electricity should by serviced or repaired only by experienced professional technicians. Any attempt to service
or repair the product or products dealt with in this service information by anyone else could result in serious injury or death.
WARNING

SERVICE MANUAL
Model: HB21FSSAA, HB21FG*
2
Issue 2010-12
Rev.
Ref1012S008V0
Contents
Table of Contents ·········································································································· 2
1. General Information ·································································································· 4
1-1. General guideline 4
1-2. important notice 4
1-3. How to read this service manual 5
2. Product Feature ········································································································ 6
2-1. Specifications 6
2-2. Main features 8
2-3. External views 9
3.
Disassembly and Installation
·············································································· 10
3-1. Disassemble the lamp of fridge chamber 10
3-2. Disassemble the air duct of fridge chamber 11
3-3. Disassemble the fridge door 12
3-3-1. Disassemble the fridge door 12
3-3-2. Disassemble the automatic door closers of fridge door 13
3-4. Disassemble the freezing door 13
3-5. Disassemble the display panel of left fridge door 17
3-6. Assemble the handle 18
3-7. Defrosting system disassembly and inspection 18
4. Control and Display System ···················································································· 22
4-1. Control and display board 22
4-2. Holiday function 22
4-3. Fuzzy function 22
4-4. Super cooling function 23
4-5. Super freezing function 23
4-6. Lock / Unlock 23
4-7. Freezing temperature setting 24

SERVICE MANUAL
Model: HB21FSSAA, HB21FG*
3
Issue 2010-12
Rev.
Ref1012S008V0
4-8. Fridge temperature setting 24
4-9. Open-door alarm function 24
4-10. Energy-saving display control function 24
4-11. Power outage memory function 25
4-12. Power outage memory function 25
5. Electrical Control Principle ······················································································ 26
5-1. Overview 26
5-2. Fridge electric air damper control 26
5-3. Fan control 26
5-4. Vertical girder hater control 27
5-5. Defrost control 27
6. Cooling System Principle························································································· 28
6-1. Cooling system flow scenograph 28
6-2. Cooling system flow chart 28
7. Circuit Diagram ········································································································· 29
7-1. Main control PCB diagram diagram 29
7-2. Brief principle diagram 30
8. Sensor, Error Code and Self-test Function ···························································· 31
8-1. Sensor position 31
8-2. Error codes list 31
8-3. How to display error code 32
8-4. Self-test function 32
9. Trouble shooting ······································································································· 43
SERVICE MANUAL
Model: HB21FSSAA, HB21FG*
4
Issue 2010-12
Rev.
Ref1012S008V0
Chapter 1 General Information
1-1. General Guidelines
When servicing, observe the original lead dress. If a short circuit is found, replace all parts which have
been overheated or damaged by the short circuit. After servicing, see to it that all the protective devices
such as insulation barriers, insulation papers shields are properly installed. After servicing, make the
following leakage current checks to prevent the customer from being exposed to shock hazards.
1) Leakage Current Cold Check
2) Leakage Current Hot Check
3) Prevention of Electro Static Discharge (ESD) to Electrostatic Sensitive
1-2. Insurance test
1. Check if there is any leak of current.
2. Cut out the power supply before the repair to avoid an electrical shock hazard.
3. In the case of a live-line test, insulating gloves should be worn to avoid potential electrical shock.
4. Confirm the rated current, voltage and capacity before testing with any kinds of instruments.
5. Watch if the upper door is open when you check something at a lower position.
6. Take out every part in the cabinet before moving the machine, especially things like panels (e.g. glass
shelf).
7. Please wear intact cotton gloves when repair any parts of the evaporator, so that scratches by the
sharp fins can be avoided.
8. If there is a breakdown with the refrigeration system, please surrender the machine to the service
center, else the leaked refrigerant may pollute the atmosphere.
9. The refrigerator use AC of 220V with a frequency of 50~60Hz.
10. A big fluctuation of voltage (exceed the range 187~242V) may cause a start failure of the refrigerator,
a burn-out of the control panel and compressor, or an abnormal sound from the compressor in
operation. In this condition an automatic voltage regulator over 750W should be added.
11. Take care not to damage the supply line. Don’t yank at the line; pull the plug out gently from the
receptacle. Don’t press the line under the cabinet or step on it. Take care not to roll on or damage the
supply line when moves the machine from the wall.
12. In the case of leakage of inflammable gases like carbon monoxide, open the door and windows. Don’t
pull out or insert the plugs of the appliance.
13. Don’t touch the refrigeration surface of the freezing compartment when the refrigerator is in operation,
especially when your hand is wet, else you may be glued to the surface.
14. Pull out the plug of power supply during clearance or power outage. Wait at least five minutes to
resume the power supply in order to prevent damage to the compressor caused by continuous restart.
SERVICE MANUAL
Model: HB21FSSAA, HB21FG*
5
Issue 2010-12
Rev.
Ref1012S008V0
Photo used in this manual
The illustration and photos used in this Manual may not base on the final design of products, which may
differ from your products in some way.
1-3. How to read this Service Manual
1-3-1. Using Icons
The meaning of each icon is described in the table below:
Note:
A “note” provides information that is not indispensable.
Caution:
A “caution” is used when there is danger, through incorrect manipulation, may damage equipment, loose
data, get an unexpected result or has to restart (part of) a procedure.
Warning:
A “warning” is used when there is danger of personal injury.
Reference:
A “reference” guides to find additional information on a specific topic.
SERVICE MANUAL
Model: HB21FSSAA, HB21FG*
6
Issue 2010-12
Rev.
Ref1012S008V0
Chapter 2 Product Feature
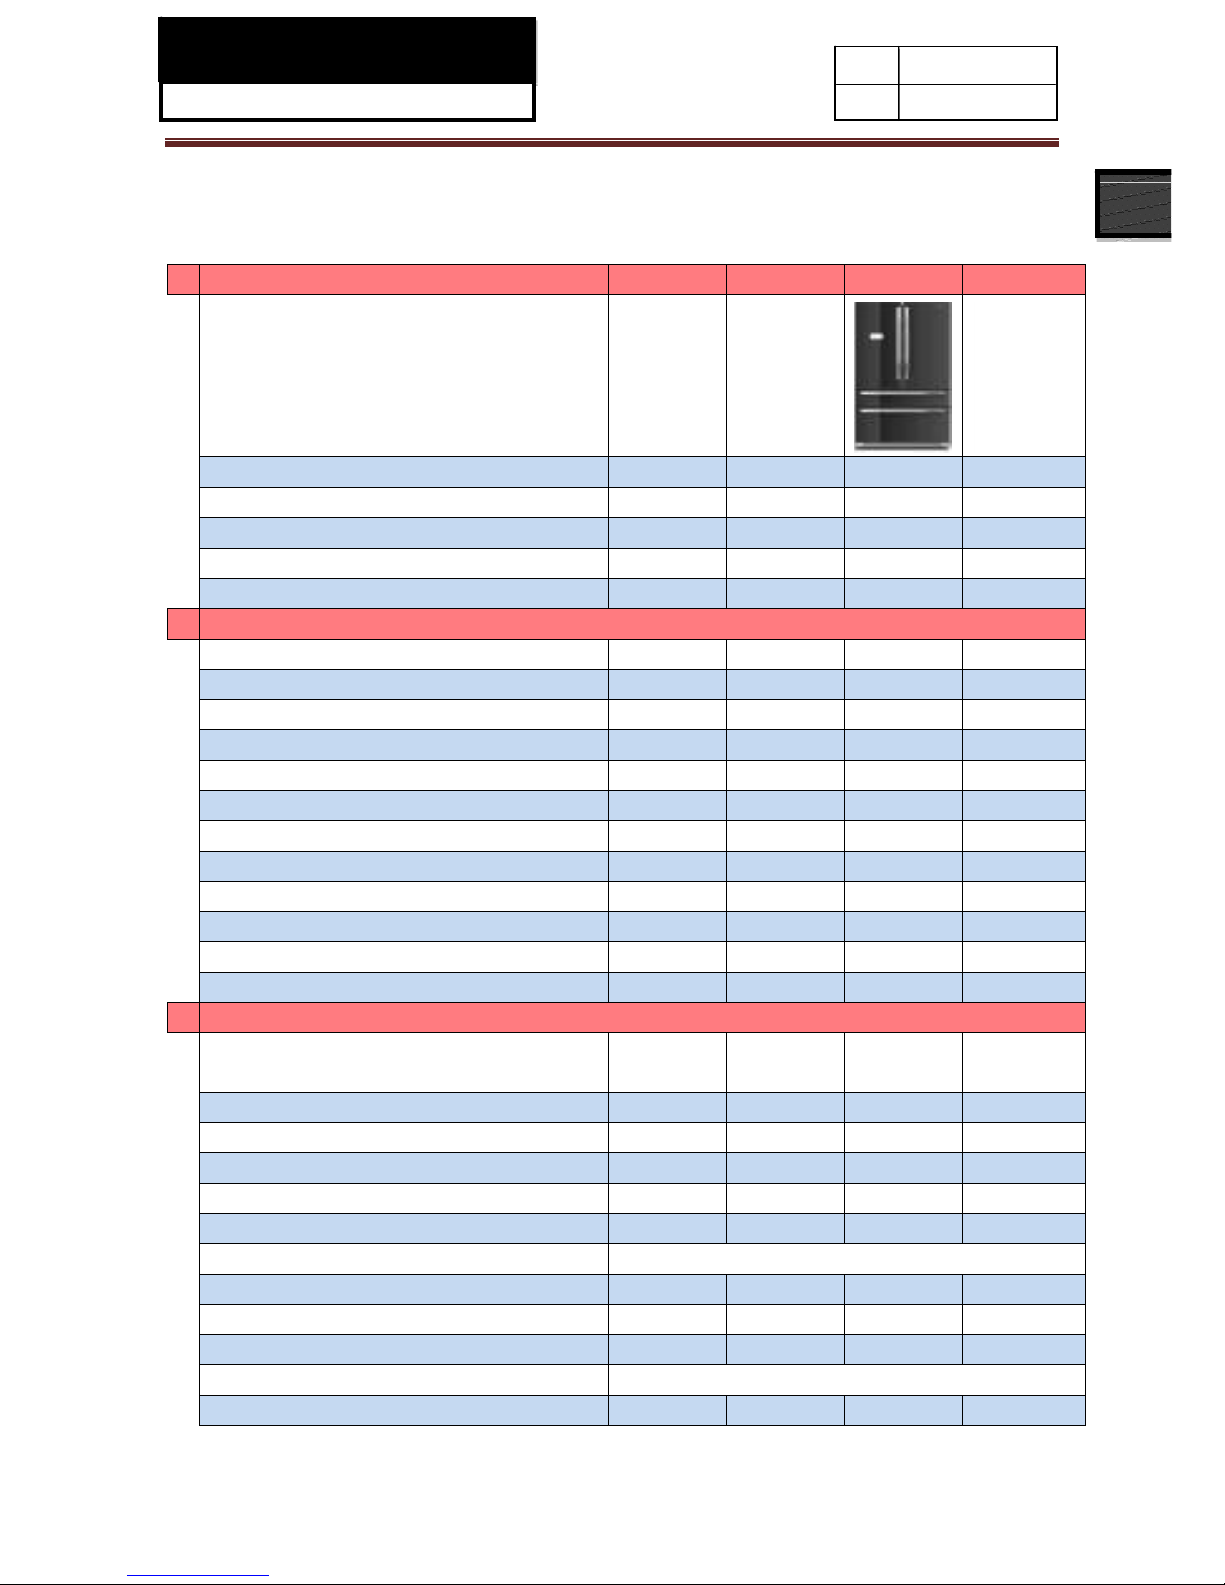
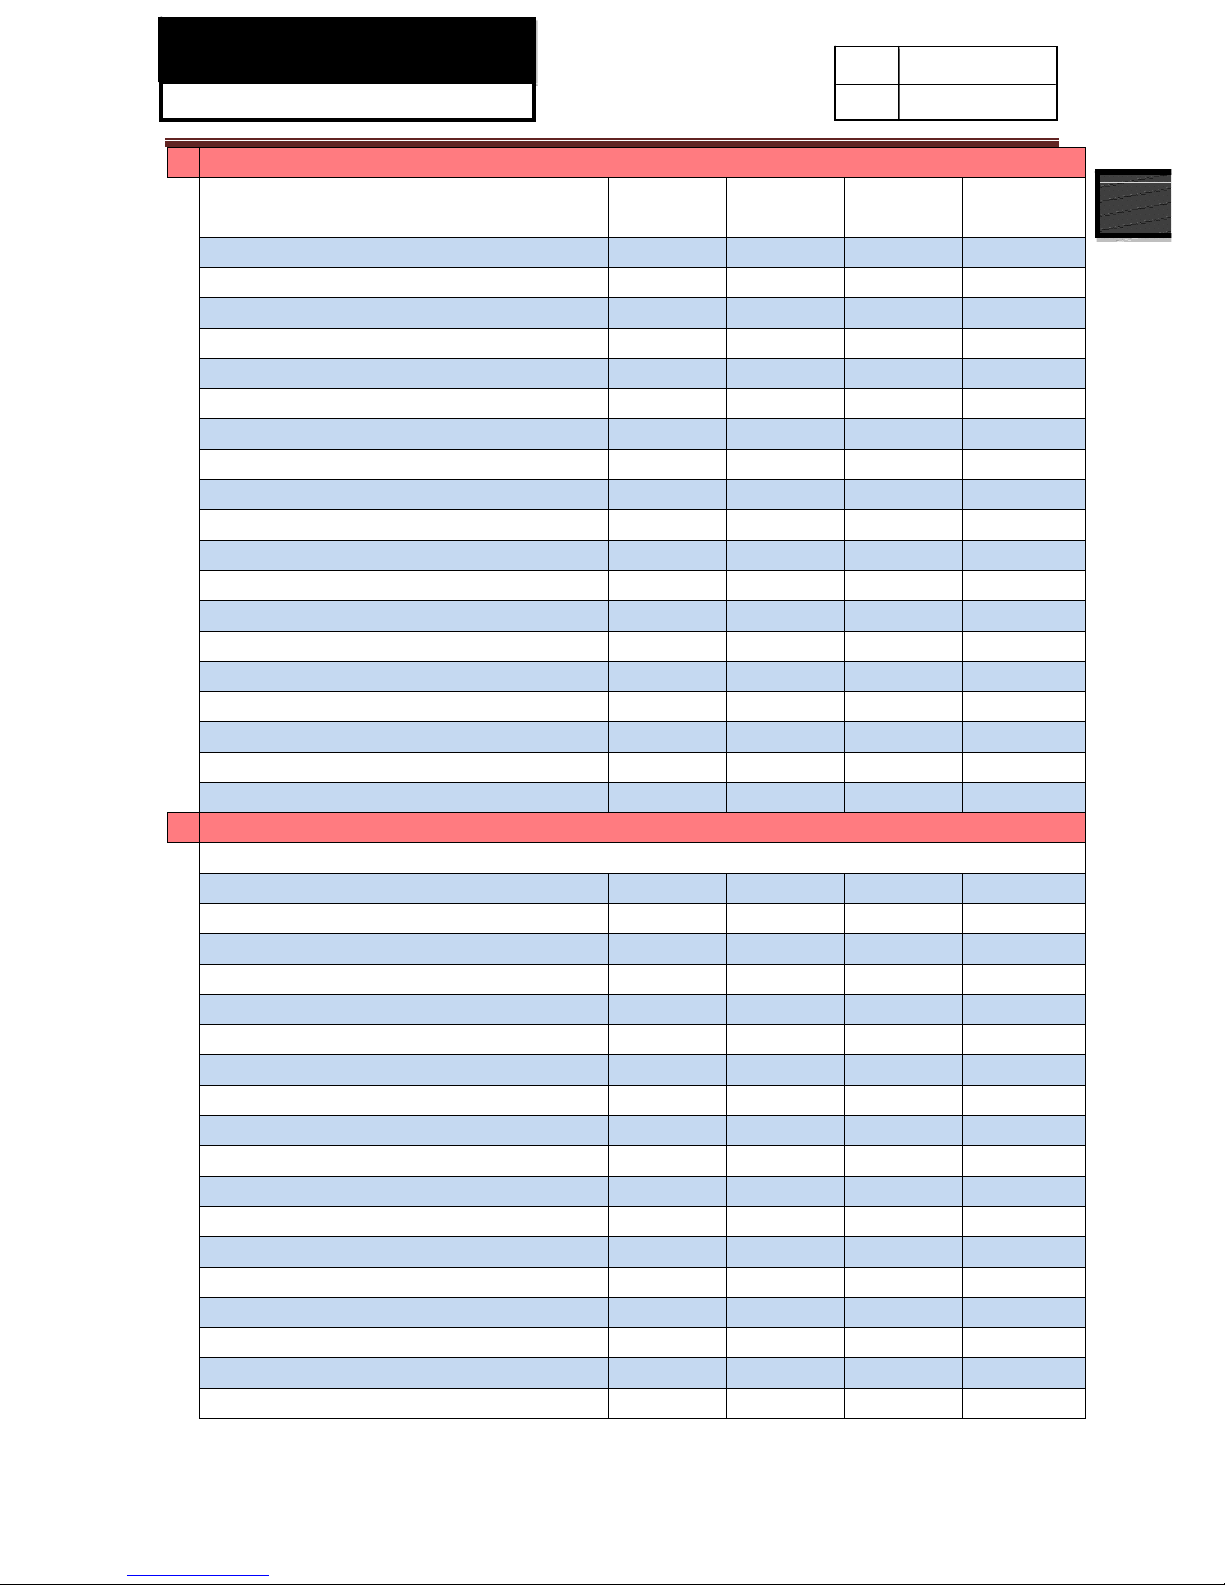
2-1. Specifications
1
Model
HB21FSSAA HB21FGRAA HB21FGBAA HB21FGWAA
Sketch
Product description (Refrigerator/Freezer) Refrigerator Refrigerator Refrigerator Refrigerator
Type of appliance (FS= freestanding/BI= built-in) FS FS FS FS
Type of cooling system(NF=no frost/ S=static) NF NF NF NF
Climate class* SN N ST T SN N ST T SN N ST T SN N ST T
Freezer compartment / Star rating 4* 4* 4* 4*
2
Key features
Gross capacity 635L 635L 635L 635L
Total net capacity 543L 543L 543L 543L
Net capacity refrigerator compartment 394L 394L 394L 394L
Net capacity freezer compartment /ice compartment 149L 149L 149L 149L
Freezing capacity 10kg 10kg 10kg 10kg
Energy consumption / year 432kWh 432kWh 432kWh 432kWh
Max storage time at breakdown Freezer 720Min 720Min 720Min 720Min
Defrosting (M=manual A=automatic) A A A A
Frost free system yes yes yes yes
Defrost water outlet yes yes yes yes
Air circulating ventilator yes yes yes yes
Kind of coolant (R134a/R600a) R600a/ 75g R600a/ 75g R600a/ 75g R600a/ 75g
3
Technical data
Voltage / frequency
220-240~V/
50Hz
220-240~V/
50Hz
220-240~V/
50Hz
220-240~V/
50Hz
Protection calss I I I I
Input power 150 W 150 W 150 W 150 W
Rated current 1.5 A 1.5 A 1.5 A 1.5 A
Defrost watt 180 W 180 W 180 W 180 W
Max power of lamp 8 W 8 W 8 W 8 W
Temperature range (from>to)
Refrigerator 2-10°C 2-10°C 2-10°C 2-10°C
Freezer -16 ~-26°C -16 ~-26°C -16 ~-26°C -16 ~-26°C
Refrigerating capacity 10kg/24h 10kg/24h 10kg/24h 10kg/24h
Features:
Cooling system: K=Compressor / A=Absorption K K K K
SERVICE MANUAL
Model: HB21FSSAA, HB21FG*
7
Issue 2010-12
Rev.
Ref1012S008V0
4
Aesthetics
Colors: W=white G=silver gray
B=Obsidian SS=stainless steel
Stainless
Steel
RED BLACK WHITE
Fascia panel / Handle (w / c) G/G G/G G/G G/G
F= flat / R= rounded / S= streamline R R R R
Inside colour W w w w
Compartments number 2n° 2n° 2n° 2n°
Bottle compartment 6n° 6n° 6n° 6n°
Hinged (r =right l =left) / reversible r / X r / X r / X r / X
Shelves:
Number Fridge / Freezer 3 / - 3 / - 3 / - 3 / -
Type (gr=grill / g=glass / p=plastic) g g g g
Color w-white / b=blue / t=transparent. t t t t
Adjustable (Y=yes / N=not) y y y y
Foldable Shelf yes yes yes yes
Bottle Rack yes yes yes yes
Drawers:
Plastic drawers (fully freezing comp.) 3n°. 3n°. 3n°. 3n°.
Colour of drawer (w=white/t=transp./g=green) t t t t
Crisper:
Chiller / Meat (salad crisper) transparent / white Chiller (t) Chiller (t) Chiller (t) Chiller (t)
Vegetable crisper(s) transparent / white t t t t
5
Equipment & accessories
Control panel
Interior / exterior Exterior Exterior Exterior Exterior
Thermometer interior / exterior Interior Interior Interior Interior
Display type LCD LCD LCD LCD
Control lamps green / yellow /white W W W W
Over temperature alarm LED / acoustic acoustic acoustic acoustic acoustic
Adjustable thermostat yes yes yes yes
Fast freeze switch /-function yes yes yes yes
Deodorizing yes yes yes yes
Interior light yes yes yes yes
LED light Full Full Full Full
Freeze pack(s) 2n° 2n° 2n° 2n°
ice maker Manual/ Automatic M M M M
Ice cube tray(s) 1n° 1n° 1n° 1n°
Butter holder yes yes yes yes
Egg trays 2 2 2 2
Adjustable feet front / rear 2n° 2n° 2n° 2n°
Length of cable/incl. plug 200cm 200cm 200cm 200cm
Condenser Back wall / Integrated I I I I

SERVICE MANUAL
Model: HB21FSSAA, HB21FG*
8
Issue 2010-12
Rev.
Ref1012S008V0
6
Product dimensions
Unit dimensions ( H / W / D mm) 1780*910*770 1780*910*770 1780*910*770 1780*910*770
Depth Without handle 700mm 700mm 700mm 700mm
Depth with open door 1080mm 1080mm 1080mm 1080mm
Door open angle <135 <135 <135 <135
Net weight 141kg 152KG 152KG 152KG
7
Packing dimensions & load ability
Packing dimensions (H / W / D mm) 1860*980*760 1860*980*760 1860*980*760 1860*980*760
Gross weight 161kg 164KG 164KG 164KG
2-2. Main features
(1) Ice-making function
Manual ice maker can satisfy user’s different need for ice.
(2) Full width shelf design, more convenience for storing and taking food.
(3) Fuzzy Function
The refrigerator can be automatically adjusted to the best refrigerating condition according to the
chamber temperature and ambient temperature without human intervention.
(4) Super large and super luxurious design
The refrigerator has super large capacity, super large refrigerating and freezing chamber, as well as
super luxurious inter design.
(5) Fluoride-free, frostless, complete air cooling refrigeration, deep cooling, and rapid freezing.
(6) Defrost and pre-refrigeration
The refrigerator will make judgment on the temperature in the refrigerator before defrosting, and the
compressor will automatically and rapidly refrigerate after defrosting.
(7) Equipped with condensing unit, heat dissipation by blower, better refrigeration effect, and long service
life of compressor.
(8) Open door alarm, touch-sensitive button, large-screen LCD display.
(9) Drawers have track way. It can be pushed and pulled smoothly.

SERVICE MANUAL
Model: HB21FSSAA, HB21FG*
9
Issue 2010-12
Rev.
Ref1012S008V0
2-3. External views
SERVICE MANUAL
Model: HB21FSSAA, HB21FG*
10
Issue 2010-12
Rev.
Ref1012S008V0
Chapter 3 Disassembly and Installation
3-1. Disassemble the lamp of fridge chamber
The fridge lamp is LED type with low energy consumption and long op eration life. The replacement step s are as
follows:
(A
) Replace the top lamp panel of fridge chamber:
(1) Remove two fixing screws of top lamp cover. (2) Remove the top lamp cover.
(3) Disconnect the connecting terminal, then
remove the four fixing crews of lamp panel.
(4) During installation, carry out the operation in
the reverse order
(B) Replace the back lamp of fridge chamber:
(1) Remove the top lamp cover firstly. then remove
the back lamp cover (back light cover is mounted
on the back by clip hook structure)
(2) Remove the lamp panels. There are two back
lamp panel. Each lamp panel is fixed by fixing
screw and clip hook structure.
(3) During installation, carry out the operation in the reverse order
SERVICE MANUAL
Model: HB21FSSAA, HB21FG*
11
Issue 2010-12
Rev.
Ref1012S008V0
3-2. Disassemble the air duct of fridge chamber
(1) Remove the top lamp cover and top lamp panel firstly according to above steps.
(2) Remove the four fixing screws of lamp panel
support, then remove the lamp panel support.
(3) After the top lamp pane l support is removed,
Detach two screws fixing back air duct of fridge
chamber.
(4) Pull out the air duct assembly of fridge
chamber.
(5) Disconnect the lower wire terminals of the
air duct , then detach the fridge air duct.
(6) During installation, carry out the operation in the reverse order
 Loading...