

Haier HB21FSSAA, HB21FGBAA, HB21FGWAA, HB21FGRAA Instructions For Use Manual
1
HB21FSSAA
HB21FGRAA
HB21FGBAA
HB21FGWAA
(This picture is HB21FSSAA)
(The appearance, color, design of the
refrigerator may vary from the actual product)
Instruction for Use
Contents
Product Features ................................................. 1
Name of Components ....................................... 2-3
Safety Notice ..................................................... 4-7
Disassembly and Assembly of Door ............... 8-10
Preparation ................................................... 10-12
Getting Started ................................................... 13
Product Function ........................................... 14-32
About Refrigerating Chamber ....................... 33-36
About Freezing Chamber .............................. 36-38
Usage of Ice Maker and Water Chiller.......... 39-41
Cleaning and Disuse ..................................... 42-50
FAQ ............................................................... 51-52
After Service ................................................. 53-54
Technical Data & Packing List ...................... 55-56
Warranty Information .................................... 57-58
Product Features
Refrigerator-freezer
Please carefully read the instructions before use.
Please retain it for future reference.

2
Product Features
Ice-making function
Equipped with automatic ice maker, it can make ice for you according to your preferences, (depends
on the model).
Manual ice maker can satisfy user’s different need for ice.
Full width shelf design, more convenience for storing and taking food.
Fuzzy Function
The refrigerator can be automatically adjusted to the best refrigerating condition according to the
chamber temperature and ambient temperature without human intervenes.
Super large and super luxurious design
The refrigerator has super large capacity, super large refrigerating and freezing chamber, as well as
super luxurious inter design.
Fluoride-free, frostless, complete air cooling refrigeration, deep cooling, and
rapid freezing.
Defrost and pre-refrigeration
The refrigerator will make judgment on the temperature in the refrigerator before defrosting, and the
compressor will automatically and rapidly refrigerate after defrosting.
Equipped with condensing unit, heat dissipation by blower, better refrigeration
effect, and long service life of compressor.
Open door alarm, touch-sensitive button, large-screen LCD display.
Fresh-keeping by light wave
The application of light wave fresh can effectively extend the fresh-keeping duration for fruit and
vegetables, and effectively eliminate odor.
Drawers have track way. It can be pushed and pulled smoothly.
Deodorant Brick
It separates the refrigerating chamber and freezing chamber, avoiding tainting.
3
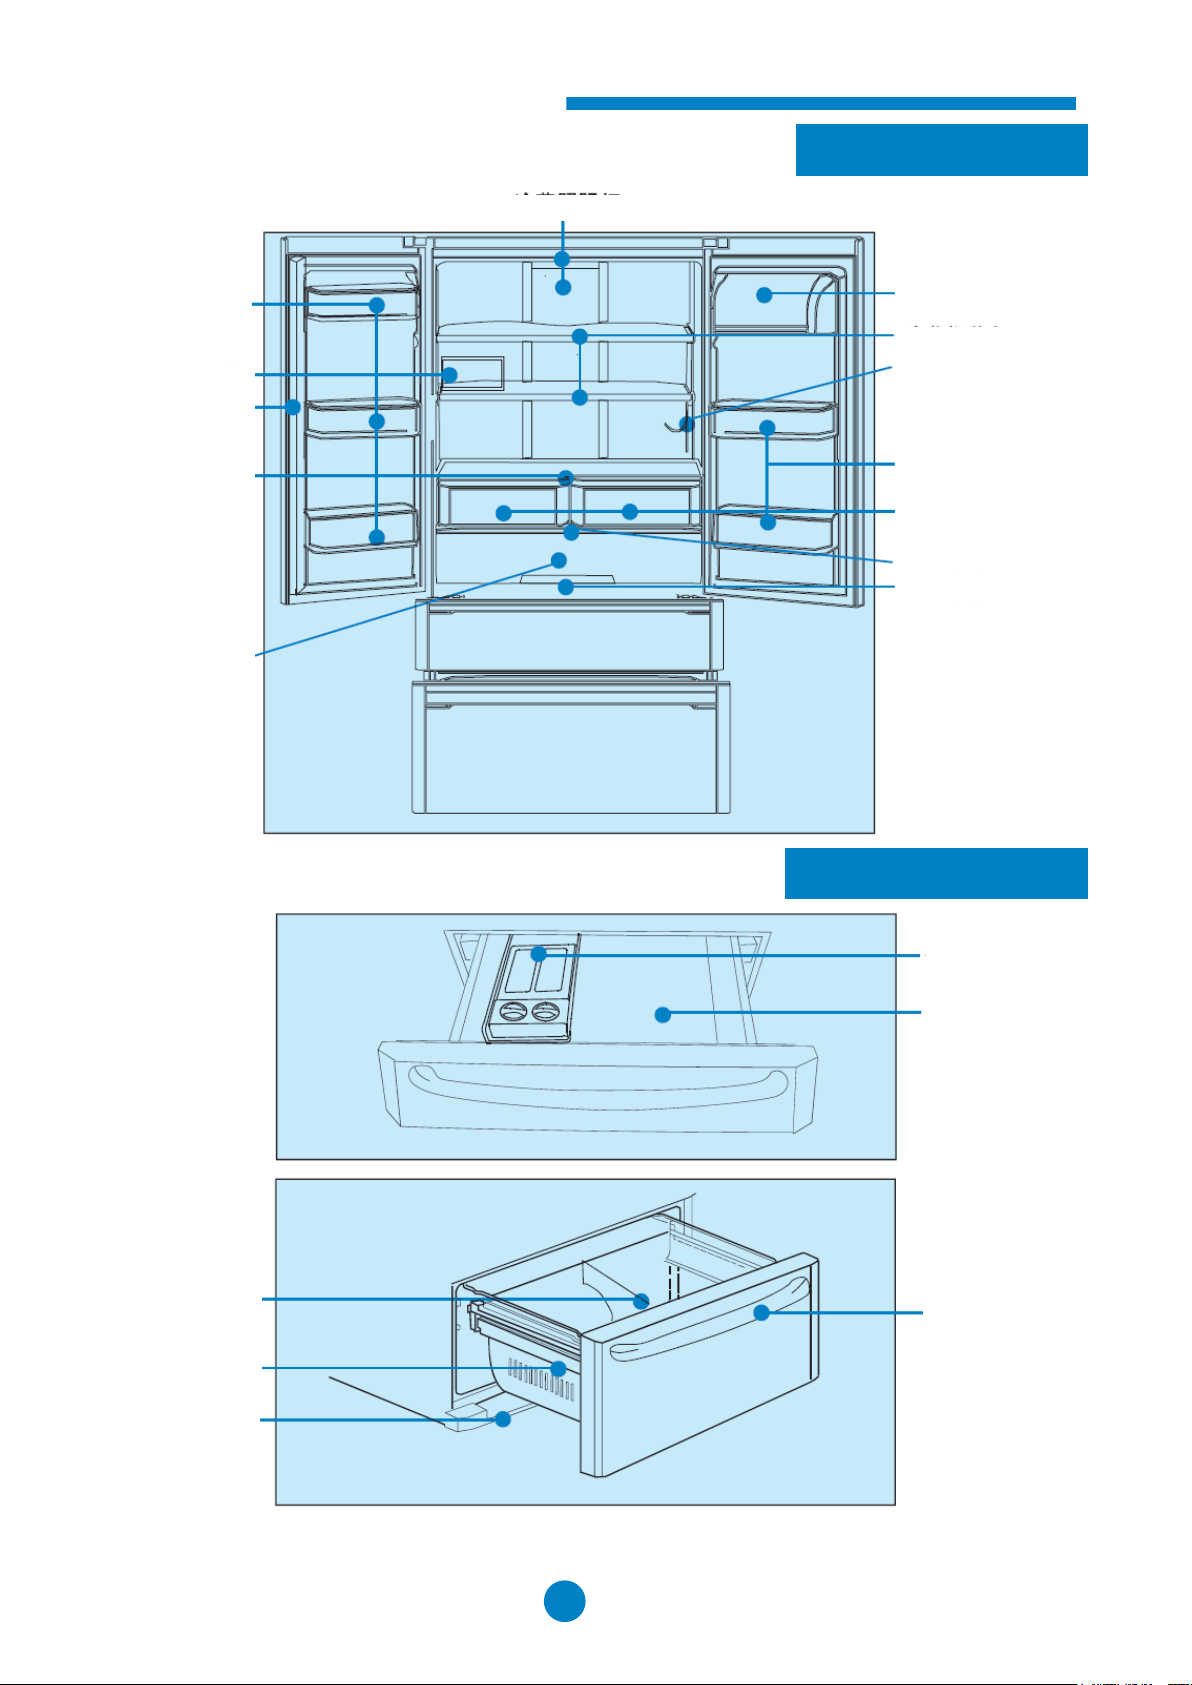
Refrigerating Chamber
Freezing Chamber
Egg Box
Vertical Beam
Crisper Cover
Light for
Fresh-keeping
Refr. Light
Diary Box
Refr. Shelf
Wine Rack
Gallon Bottle
Seat
Crisper
Full Wid. Drawer Cover
Full Wid. Drawer
Manual Ice
Maker
Freezer Small
Drawer
Handle
Drawer Shelf
Board
Freezer Large
Drawer
Decoration Strip
Gallon Bottle
Seat
Name of Components
(This picture is HB21FSSAA)
4
Prohibit
All action with this sign is prohibited; it may cause product damages or endanger
the personal safety of users.
Warning
All action with this sign is related to the safe use of products and the personal
safety of users. Operation must follow the requirement strictly; otherwise it may
cause product damages or endanger the personal safety of users.
Caution
Any action with this sign shall be paid more attention. Otherwise it will cause
product damages and other damages due to improper operation.
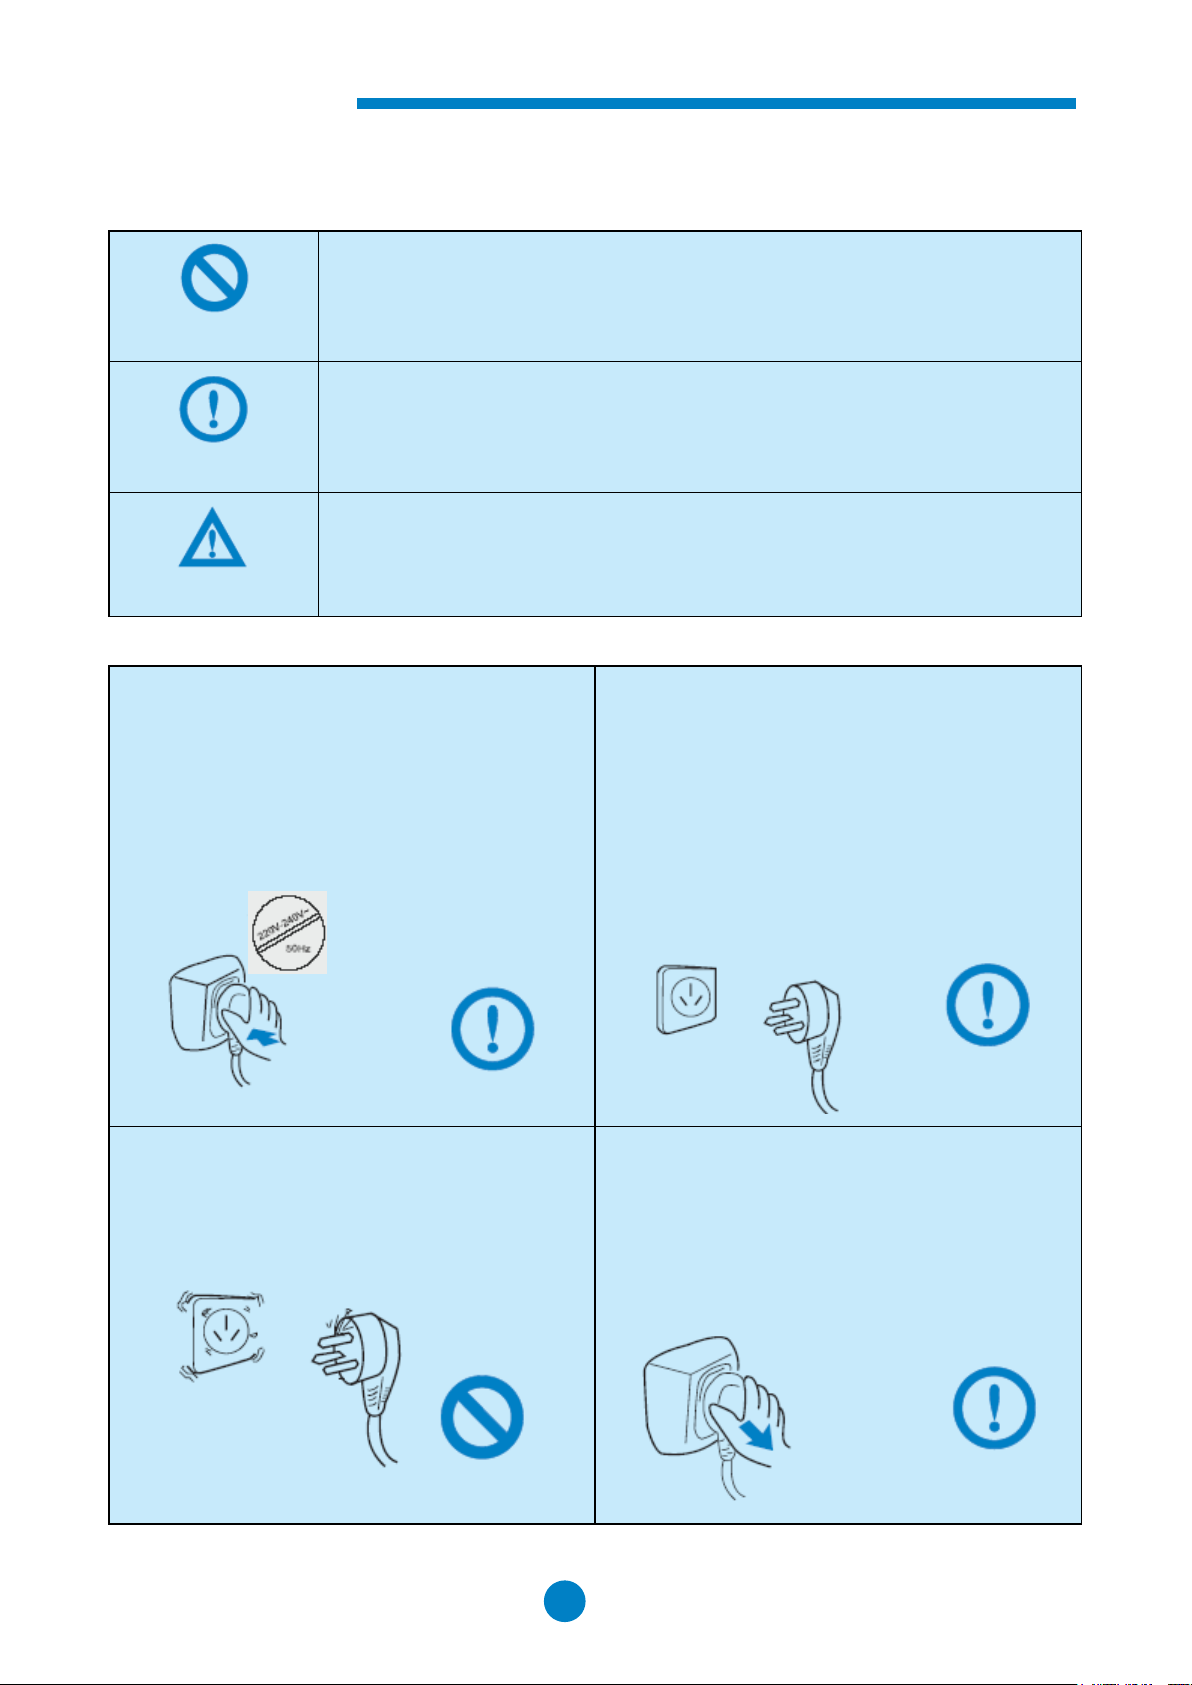
The refrigerator use 220-240V/50Hz AC power
supply.
If the voltage variation is large (greater than
187-242V), it may cause the refrigerator fail to start,
and the master control board and compressor will
burn out, or compressor has abnormal noise. At this
time, auto stabilizer of 750W or above must be
added.
Independent dedicated socket must be used and
reliably grounded.
The power cord of the refrigerator has three-pin
plug (for grounding) which complies with standard.
In no circumstances the third pin of the power cord
for grounding shall be cut or dismantled. After the
refrigerator is installed, the plug shall be accessible
to facilitate plug in and out.
Warning! The plug of power cord shall be attached
firmly with the socket; otherwise it may cause a fire.
When the power cord is damaged
When the power cord is damaged or the plug is
worn, do not use. The worn or damaged power cord
must be replaced at the specified maintenance
provider by the manufacturer.
Detach the power plug when:
Before cleaning and maintenance, please
detach the power plug of the refrigerator.
When replacing damaged lighting devices, the
power plug of the refrigerator shall be detached
to prevent electric shock.
Safety Notice
Dear user,
Thank you for using haier Refrigerator! For your better understanding of the instruction and better use of
the product, we explain the signs appeared in the instruction as follow:

5
DO NOT damage the power cord
Do not pull the power cord to disconnect the
plug of refrigerator. The plug shall be hold
tightly and directly detached from the socket.
The body of refrigerator shall not press on the
power cord and do NOT stamp on the power
cord.
Please be careful when moving the refrigerator
from the wall, do not press or damage the
power cord.
It is recommended not to place appliance such as
power socket, regulated power supply, microwave
oven on the refrigerator, and do not use electrical
appliances inside the refrigerator to avoid
electromagnetic interference or other accident.
DO NOT store or use gasoline or other combustibles
around the pump to avoid fire.
When flammable gas such as natural gas leaks
Close the valve which leaks the gas,
Open house door and window,
DO NOT unplug/plug the power plug of
refrigerator or other electrical appliance.
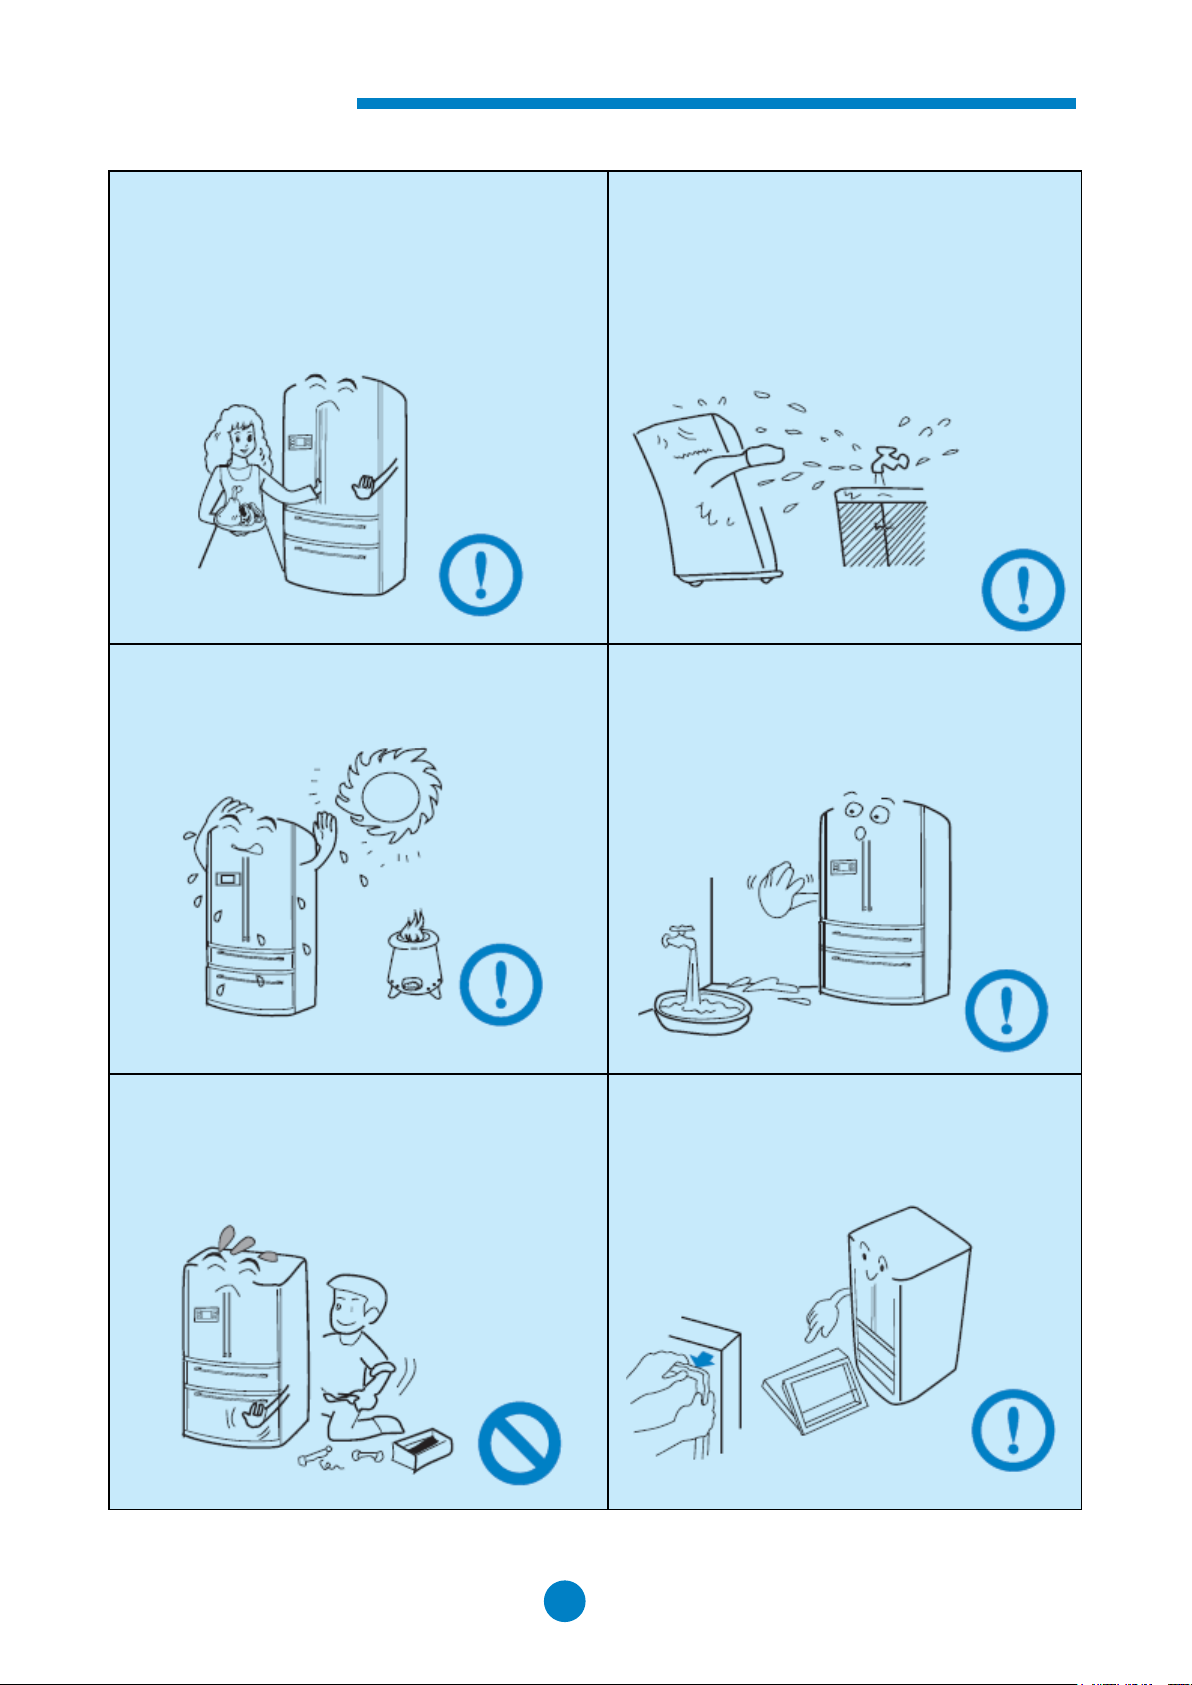
Never sit on the bottle seat inside the refrigerator
door to avoid the door tiles or the bottle seat
damages, and the refrigerator falls to hurt people;
when take in and out the food, please do not stamp
on the door of freezing chamber and body of
refrigerator. Do not sit on the drawers to avoid the
refrigerator falling down to hurt people.
After the refrigerator is in operation, do not touch
the cold surface in the freezing chamber,
particularly when hands are damp or wet. Skin
may adhere to these extremely cold surfaces.
Safety Notice
6
When open and close the door, the handle shall be
hold to open and close. The space between the
doors and between the doors and the body is small.
Cautions shall be made not to put your hands in
these spaces to avoid jam your fingers. When open
and close the doors, do not let children approach to
avoid hurt the children.
Do not use water to spray on or flush the
refrigerator, and do not place the refrigerator at
wet place or the place which is easy to be
splashed with water to avoid the impact to the
electric insulation performance of the refrigerator.
The refrigerator shall be placed far from heat source
and avoid direct sunshine to prevent from impact to
performance.
Do not place the refrigerator at damp or wet place
and the place which is easy to be splashed with
water. The splashed water and dirt shall be wiped
out with soft cloth in a timely manner to avoid
rustiness and impact to electric insulation.
Dismantle and alter the refrigerator is prohibited, and
the refrigerating pipeline shall not be damaged. The
maintenance of the refrigerator must be carry out by
professional personnel.
When the refrigerator falls into disuse, please
remove the door, door seal, and shelves, and
place them in proper location to avoid children
entering into the refrigerator and causing accident.
Safety Notice
7
Leveling Your Refrigerator
The Refrigerator shall be place on flat and solid
ground. If it's necessary to block up the refrigerator,
flat, sold, and nonflammable cushion block shall be
used. Do not use the package foam to block up.
Adjustable leveling legs can be adjusted by turning
them clockwise (as shown by the arrow) to raise
your refrigerator or by turning them
counterclockwise to lower your refrigerator if your
refrigerator is not leveled.
Door Alignment
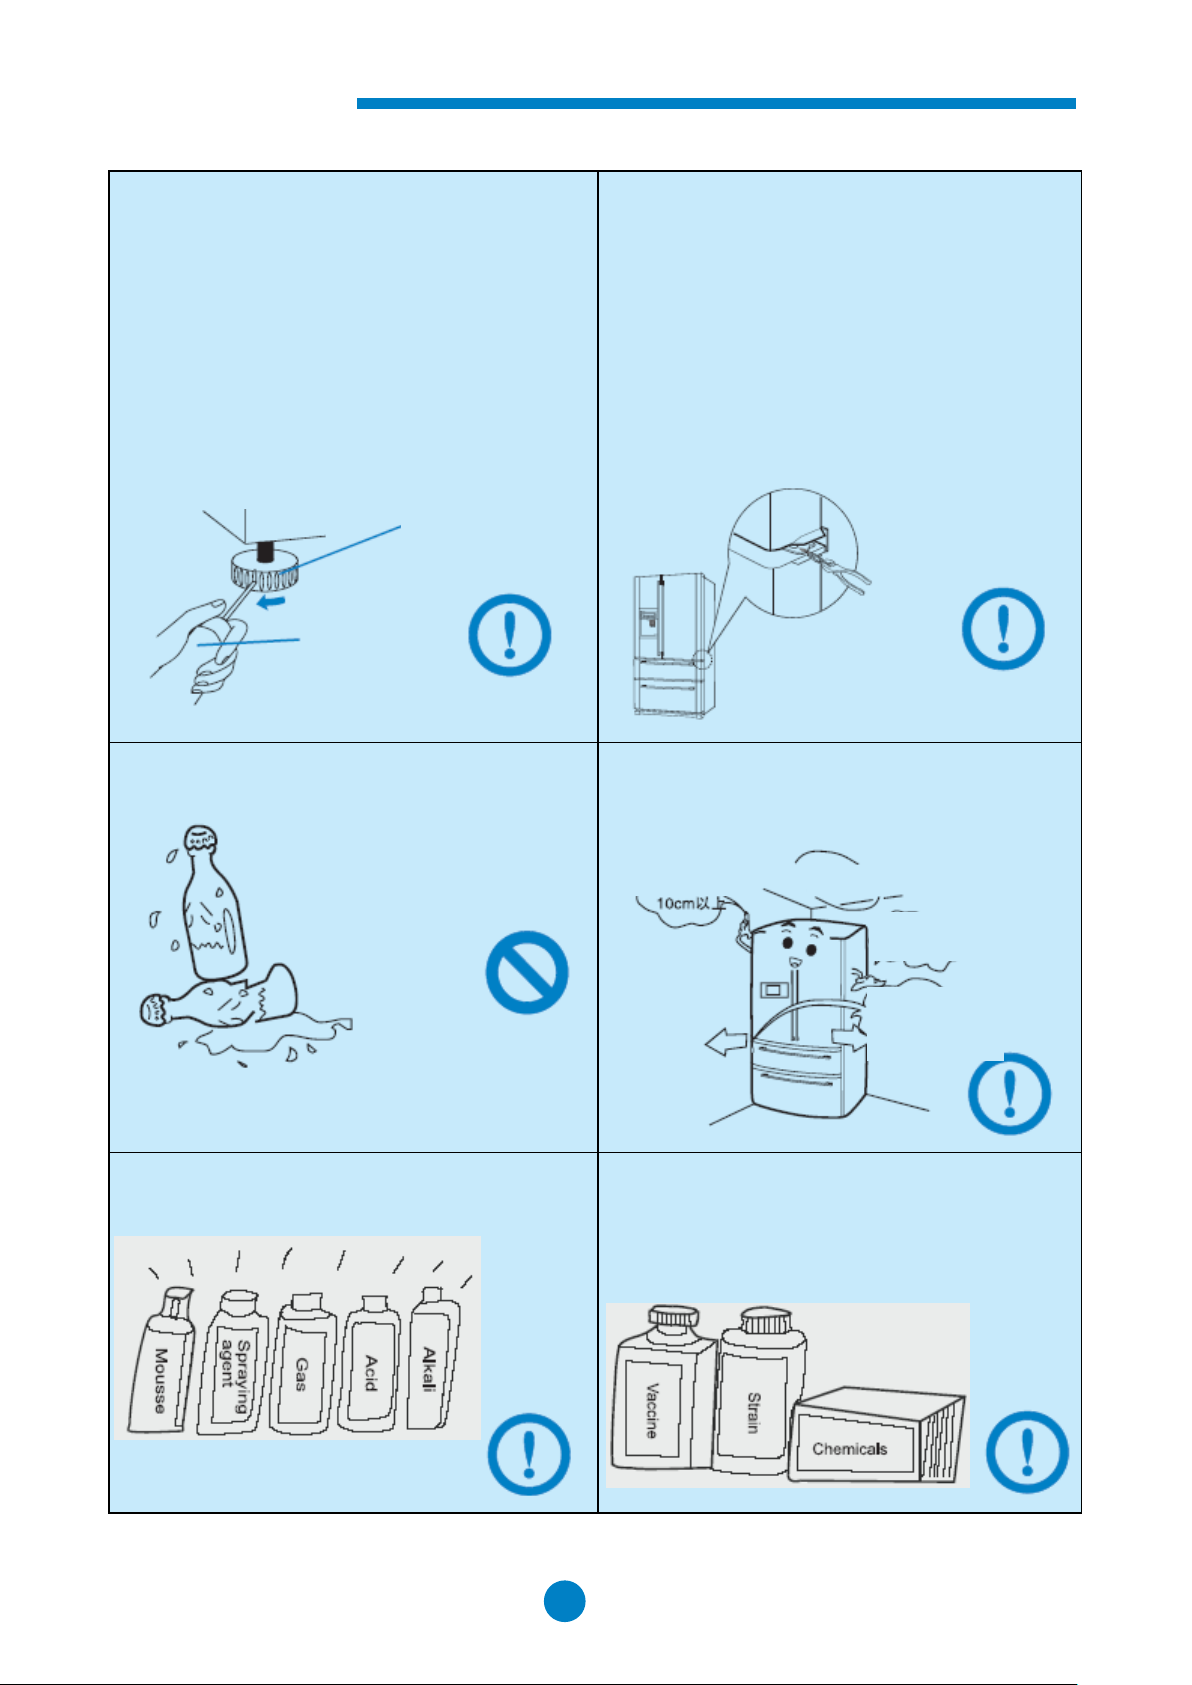
If the two doors of refrigerating chamber is not
aligned, please align the doors as following:
1. Use one hand to raise the door at the hinge in
the middle.
2. The other hand insert a spacer with pliers, as
shown.
3. Insert remained spacers till the doors is
aligned. (3 cramp rings are provided with the
product)
Do not put bottled beer or drinks into the freezing
chamber to avoid frost cracking.
The refrigerator shall be placed in well-ventilated
place. Clearance of 10cm or above shall be left
around the refrigerator including the back.
Never place combustibles, explosives, highly
corrosive acid/alkali in the refrigerator.
The product is household refrigerator. According to
the national standard, household refrigerator is
only suitable for food, cannot be used for other
purpose, such as storing blood, chemicals,
cosmetics, medicine, and biological products.
Distance
Adjustable
Leveling
Leg
Flat
Screwdriver
10cm or
above to top
10cm or
above to back
10cm or
above to left
and right
Safety Notice
Note: The refrigerator shall not be started if the ambient temperature is higher than 75℃.
8
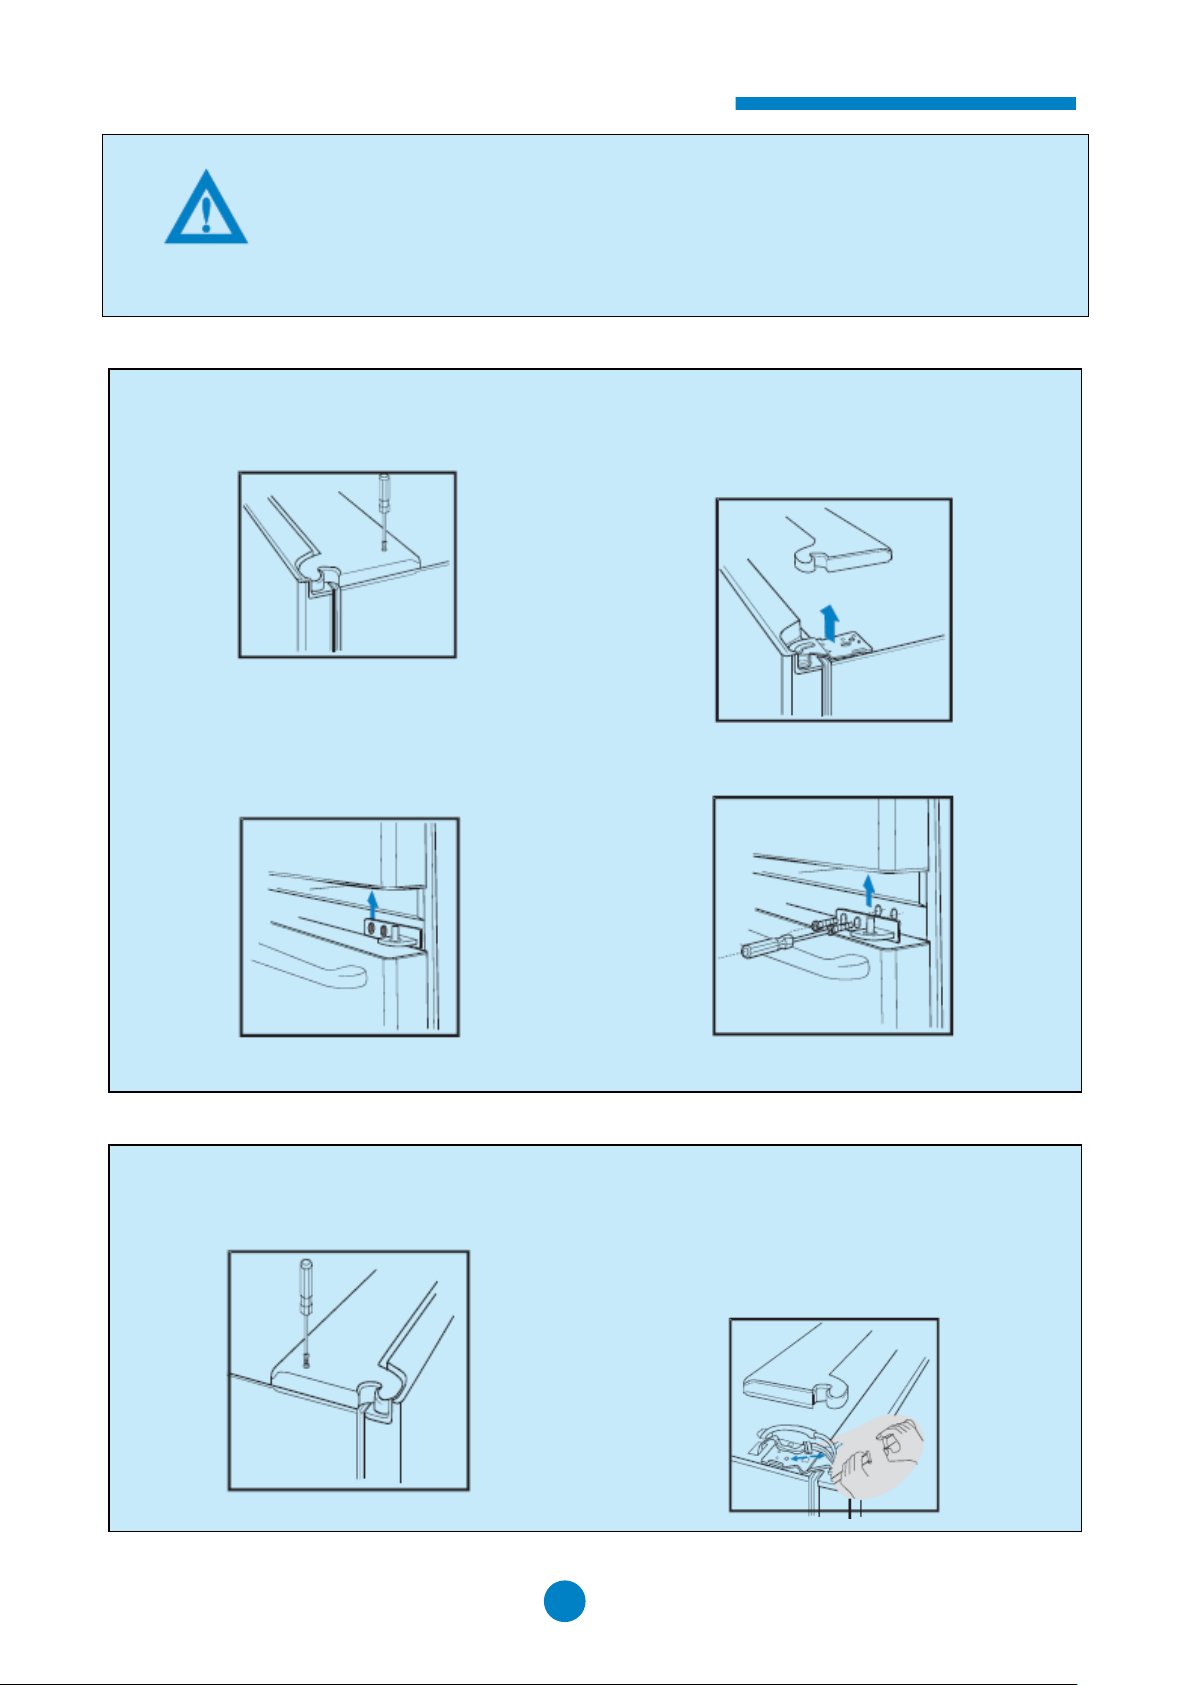
Caution
Before disassembling and assembling the doors, please remove food on the
bottle seat, and remove the bottle seat, and then cut the power, shutdown the
water source to avoid personal injury, product or property loss. When install and
dismantle the doors, please contact the servicer centre of Haier.
Prevent children or pets from asphyxia due to trap in the refrigerator. Do not let
them play in the drawer.
① Remove the screw which fixes the upper hinge
cover with screwdriver, and then remove the
upper hinge cover.
② Remove the screw which fixes the upper right
hinge with hex driver, and move forward the
upper right hinge and the door, and then
remove right upper hinge.
③ Raise the right door and remove to proper
location.
⑤ The door can be installed by reverse steps.
④ Middle hinge may be removed if necessary.
① Remove the screw which fixes the upper hinge
cover with screwdriver, and then remove the
upper hinge cover.
② Disconnect the wire terminal, and separate the
connectors on the upper right corner at the
back. Remove humidity sensor, and then
remove the screw with hex driver. Move
forward the hinge, water pipe, and door, and
then remove the upper left hinge.
Disassembly and Assembly of Door
Refr. Right Door Disassembly and Assembly
Refr. Left Door Disassembly and Assembly
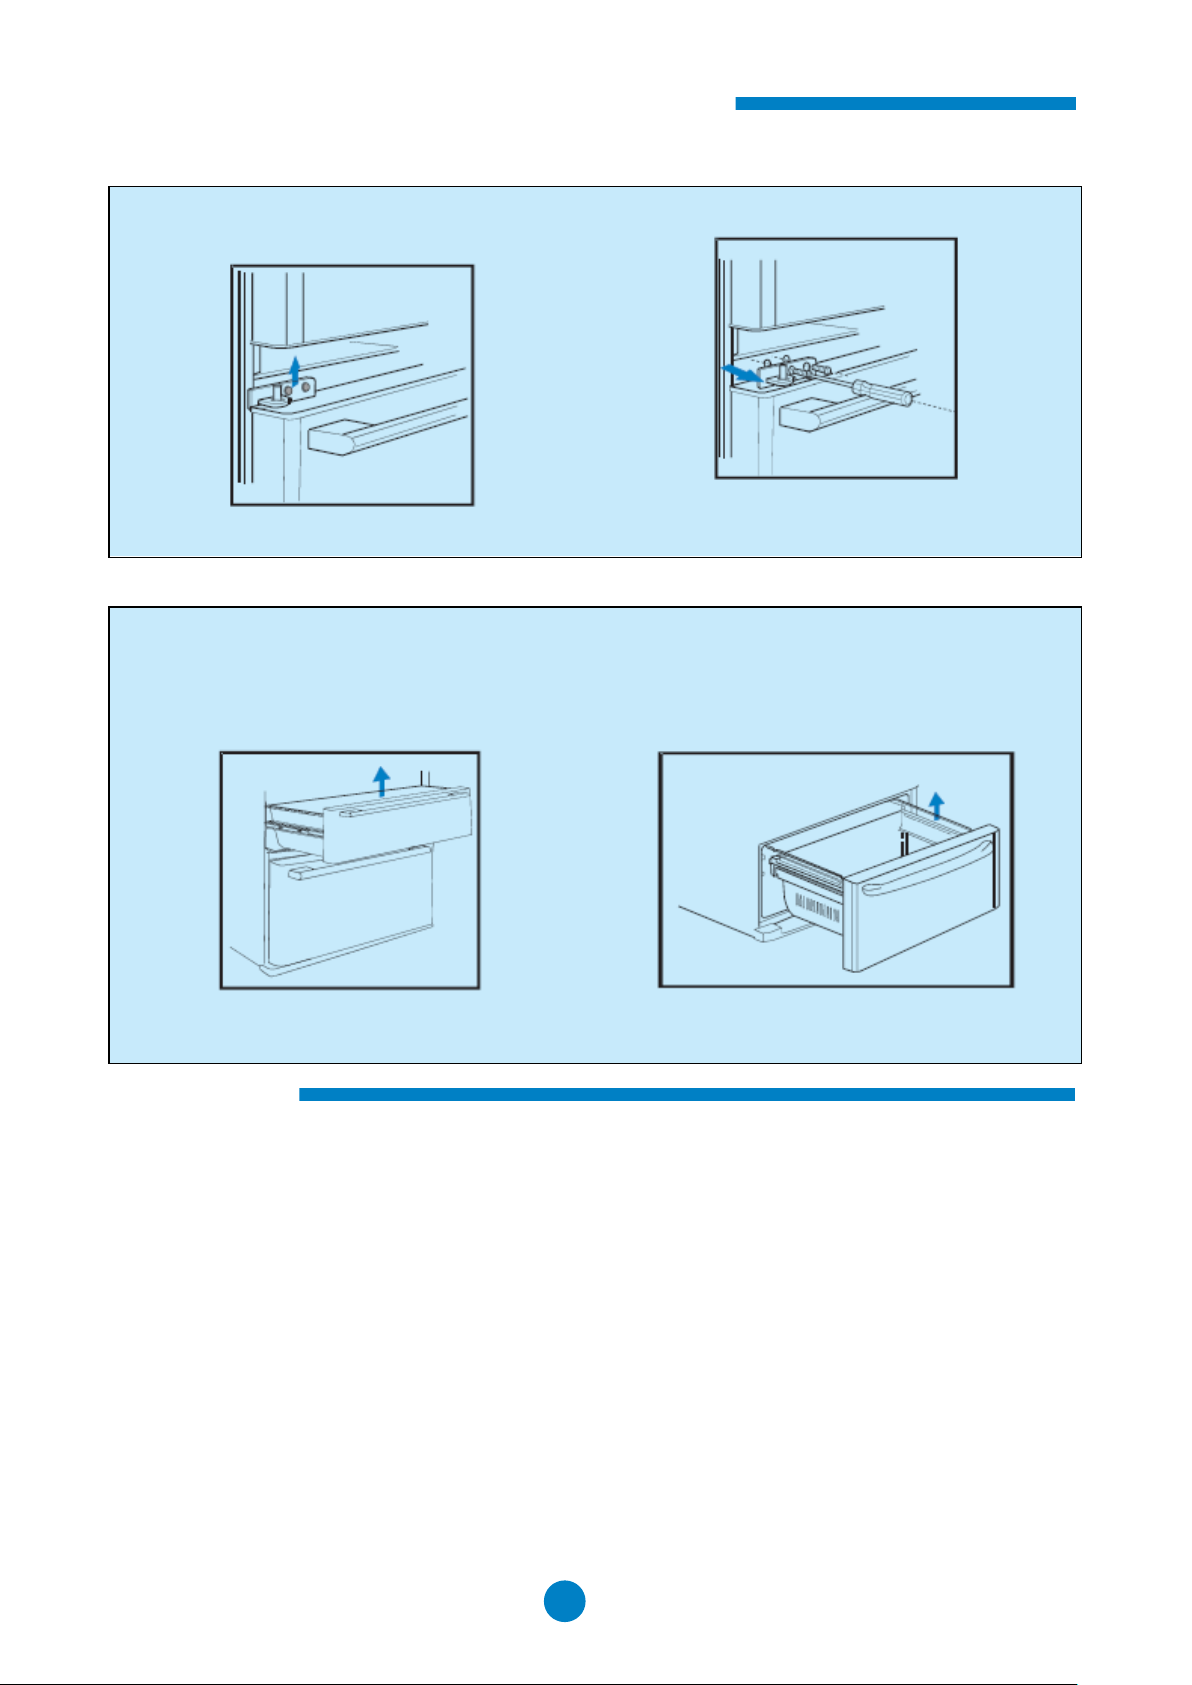
9
③ Remove the left door and place it to proper
location.
⑤ The door can be installed by reverse steps.
④ Middle hinge may be removed if necessary.
Disassembly and Assembly of Ice
Receiving Drawer
① Pull the drawer to the maximum length at first,
and then remove the drawer.
② The Ice Receiving Drawer can be install by
reverse steps.
Disassembly and Assembly of Freezer
Drawer
① Pull the freezer door to the maximum length at
first, and then remove the drawer.
② The freezer larger drawer can be installed by
reverse steps.
Disassembly and Assembly of Door
Refr. Left Door Disassembly and Assembly
Preparation
① Remove all package
Packing base and tapes that fix accessories also must be removed.
② Check out the accessories and materials
Check out the items in the box according to the packing list. If varies, please make query to the seller.
③ Place your refrigerator into proper location
④ It is better to clean your refrigerator before use (see section “Cleaning” for details)
⑤ Standing
After leveling and cleaning, the refrigerator shall keep standing more than 6 hours before
connecting to power supply to ensure the normal running of the refrigerator.
10
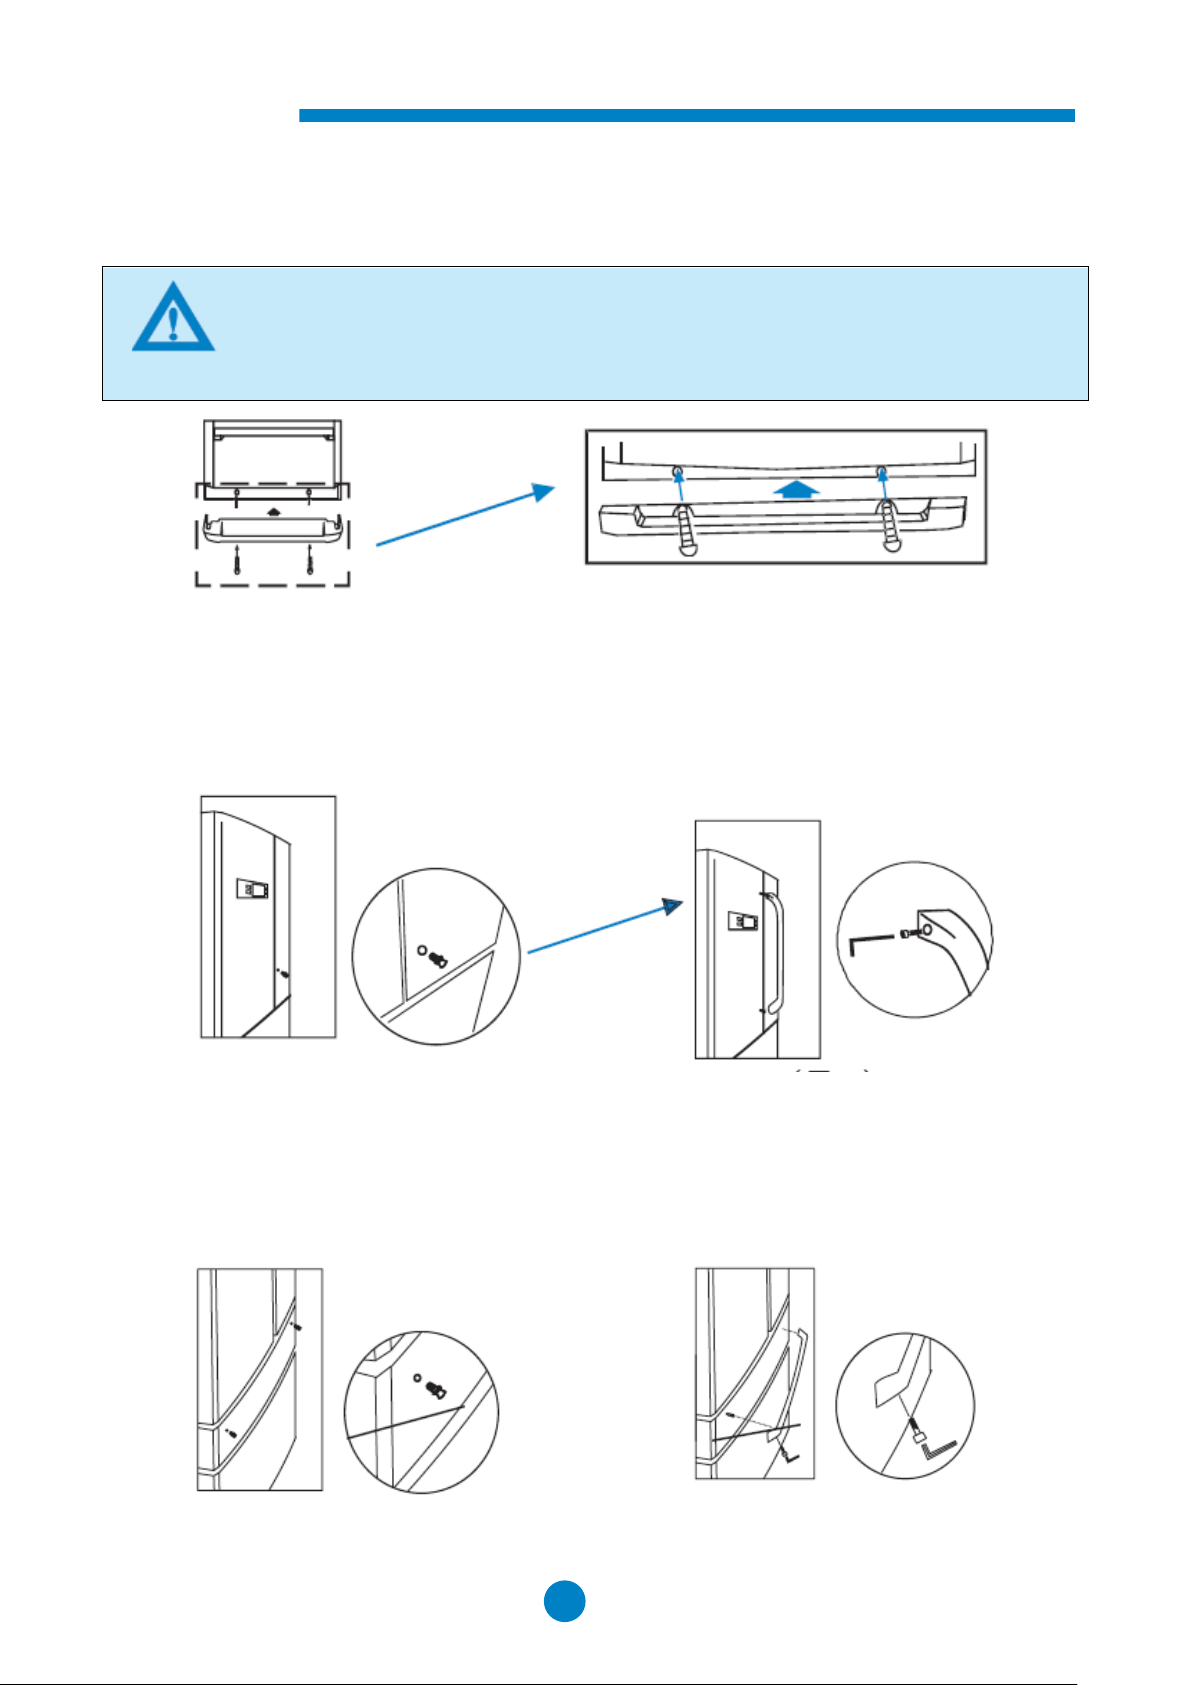
Caution
Please wear gloves when dismantle the bottom decorative strip and adjustable leveling
legs to avoid injury to your hands.
(Fig. 3)
(Fig. 4)
(Fig. 1)
(Fig. 2)
Preparation
⑥ Install the bottom decorative strip
Open the door of refrigerating chamber, take out the decorative strip from the chamber, and install it
to the shown location, and fix it with screw.
(2 screws are provided with the product)
⑦ Disassembly and Assembly of the Handle of Refr. Door
At the first, remove the handle connector, and pinch the connector to the hole on the door shell (Fig.
1). Take out one refr. handle, align the hole on the handle head to the connector and install the
handle to the connector. Take out inside-hexagonal spanner, and use it to pinch the cap screw tight
on the handle head (Fig. 2).
The handle can be dismantled by reverse steps.
⑧ Disassembly and Assembly of the Handle of Freezer Door
At the first, remove the handle connector, and pinch the connector to the hole on the door shell (Fig.
3). Take out one freezer handle, align the hole on the handle head to the connector and install the
handle to the connector. Take out inside-hexagonal spanner, and use it to pinch the cap screw tight
on the handle head (Fig. 4). The handle can be dismantled by reverse steps.
 Loading...