

Page 1

User Manual
Refrigerator-Freezer
HB18FGSAAA
GB
Page 2

Thank You
GB
Thank you for purchasing a Haier Product.
Please read these instructions carefully before using this appliance. The instructions contain important information which will help you get the best out of the appliance and ensure
safe and proper installation, use and maintenance.
Keep this manual in a convenient place so you can always refer to it for the safe and proper
use of the appliance.
If you sell the appliance, give it away, or leave it behind when you move house, make sure
you also pass this manual so that the new owner can become familiar with the appliance
and safety warnings.
Legend
Warning – Important Safety information
General information and tips
Environmental information
Disposal
Help protect the environment and human health. Put
the packaging in applicable containers to recycle it.
Help to recycle waste of electrical and electronic appliances. Do not dispose appliances marked with this
symbol with the household waste. Return the product
to your local recycling facility or contact your municipal
oce.
WARNING!
Risk of injury or suocation!
Refrigerants and gases must be disposed of professionally. Ensure that the tubing of
the refrigerant circuit is not damaged before being properly disposed of. Disconnect
the appliance from the mains supply. Cut o the mains cable and dispose of it. Remove
the trays and drawers as well as the door catch and seals, to prevent children and pets
to get closed in the appliance.
2
Page 3

GB
1- Safety information ..................................................................................................................... .4
2- Intended use ............................................................................................................................... .8
3- Product description ...................................................................................................................9
4- Control panel ..............................................................................................................................10
5- Use ................................................................................................................................................11
6- Energy saving tips .....................................................................................................................20
7- Equipment ..................................................................................................................................21
8- Care and Cleaning.....................................................................................................................25
9- Troubleshooting ........................................................................................................................28
10- Installation ................................................................................................................................31
11- Technical Data ........................................................................................................................ .34
Content
12- Customer Service ..................................................................................................................35
3
Page 4

1- Safety information
Before switching on the appliance for the rst time read the following safety hints!:
WARNING!
Before rst use
▶ Make sure there is no transport damage.
▶ Remove all packaging and keep out of children´s reach.
▶ Wait at least two hours before installing the appliance in order to
ensure the refrigerant circuit is fully ecient.
▶ Handle the appliance always with at least two persons because it
is heavy.
Installation
▶ The appliance should be placed in a well-ventilated place. Ensure
a space of at least 10 cm above and around the appliance.
▶ Never place the appliance in a damp area or location where it
might be splashed with water. Clean and dry water splashes and
stains with a soft clean cloth.
▶ Do not install the appliance in direct sunlight or in the near of heat
sources(e.g. stoves, heaters).
▶ Install and level the appliance in an area suitable for its size and use.
▶ Keep ventilation openings in the appliance or in the in-built struc-
ture clear of obstruction.
▶ Make sure that the electrical information on the rating plate agrees
with the power supply. If it does not, contact an electrician.
▶ The appliance is operated by a 220-240 VAC/50 Hz power sup-
ply. Abnormal voltage uctuation may cause the appliance to fail
to start, or damage to the temperature control or compressor, or
there may be an abnormal noise when operating. In such case, an
automatic regulator shall be mounted.
▶ Use a separate earthed socket for the power supply which is easy
accessible. The appliance must be earthed.
▶ Only for UK: The appliance’s power cable is tted with 3-cord
(grounding) plug that ts a standard 3-cord (grounded) socket.
Never cut o or dismount the third pin (grounding). After the ap-
pliance is installed, the plug should be accessible.
▶ Do not use multi-plug adapters and extension cables.
▶ Ensure that the power cable is not trapped by the refrigerator. Do
not step on the power cable.
▶ Do not damage the refrigerant circuit.
4
GB
Page 5

GB
WARNING!
Daily use
▶ This appliance can be used by children aged from 8 years and
above and persons with reduced physical, sensory or mental capabilities or lack of experience and knowledge if they have been
given supervision or instruction concerning use of the appliance
in a safe way and understand the hazards involved.
▶ Keep away children under 3 years of age from the appliance un-
less they are constantly supervised.
▶ Children shall not play with the appliance.
▶ If cool gas or other inammable gas is leaking in the vicinity of the
appliance, turn o the valve of the leaking gas, open the doors
and windows and do not unplug a plug in the power cable of the
refrigerator or any other appliance.
▶ Notice that the appliance is set for operation at a specic am-
bient range between 10 and 43°C. The appliance may not work
properly if it is left for a long period at a temperature above or below the indicated range.
▶ Do not place unstable articles (heavy objects, containers lled
with water) on top of the refrigerator, to ovoid personal injury
caused by falling or electric shock caused by contact with water.
▶ Do not pull on the door shelves. The door may be pulled slant, the
bottle rack, may be pulled away, or the appliance may topple.
▶ Open and close the doors only with the handles. The gap between
the doors and between the doors and the cabinet is very narrow.
Do not extend your hands in these areas to avoid pinching your
ngers. Open or close the refrigerator doors only when there are
no children standing within the range of door movement.
▶ Do not store or use inammable, explosive or corrosive materials
in the appliance or in the vicinity.
▶ Do not store medicines, bacteria or chemical agents in the ap-
pliance. This appliance is a household appliance. It is not recommended to store materials that require strict temperatures.
▶ Never store liquids in bottles or cans (besides high percentage
spirits) especially carbonated beverages in the freezer, as these
will burst during freezing.
▶ Check the condition of food if a warming in the freezer has taken place.
1- Safety information
5
Page 6

1- Safety information
WARNING!
Daily use
▶ Do not set unnecessarily low temperature in the refrigerator
compartment. Minus temperatures may occur at high settings.
Attention: Bottles can burst.
▶ Do not touch frozen goods with wet hands (wear gloves). Espe-
cially do not eat ice lollies immediately after removal from the
freezer compartment. There is the risk to freeze or the formation
of frost blisters. FIRST aid: keep immediately under running cold
water. Do not pull away!
▶ Do not touch the inside surface of the freezer storage compart-
ment when in operation, especially with wet hands, as your hands
may freeze onto the surface.
▶ Unplug the appliance in the event of a power interruption or be-
fore cleaning. Allow at least 5 minutes before restarting the appliance, as frequent starting may damage the compressor.
▶ Do not use electrical devices inside the food storage compart-
ments of the appliance, unless they are of the type recommended by the manufacturer.
GB
Maintenance / cleaning
▶ Make sure children are supervised if they carry out cleaning and
maintenance.
▶ Disconnect the appliance from the electrical supply before un-
dertaking any routine maintenance. Allow at least 5 minutes before restarting the appliance, as frequent starting may damage
the compressor.
▶ Hold the plug, not the cable, when unplugging the appliance.
▶ Do not scrape o frost and ice with sharp objects. Do not use
sprays, electric heaters like heater, hair dryer, steam cleaners or
other sources of heat in order to avoid damage to the plastic parts.
▶ Do not use mechanical devices or other means to accelerate the
defrosting process, other than those recommended by the manufacturer.
▶ If the supply cord is damaged, it must be replaced by the manu-
facturer, its service agent or similarly qualied persons in order to
avoid a hazard.
▶ Do not try to repair, disassemble or modify the appliance by your-
self. In case of repair please contact our customer service.
6
Page 7

GB
1- Safety information
WARNING!
Maintenance / cleaning
▶ Eliminate the dust on the back of the unit at least once in the year
to avoid hazard by re, as well as increased energy consumption.
▶ Do not spray or ush the appliance during cleaning.
▶ Do not use water spray or steam to clean the appliance.
▶ Do not clean the cold glass shelves with hot water. Sudden tem-
perature change may cause the glass to break.
Refrigerant gas information
WARNING!
The appliance contains the ammable refrigerant ISOBUTANE
(R600a). Make sure the refrigerant circuit is not damaged during
transportation or installation. Leaking refrigerant may cause eye
injuries or ignite. If a damage has occurred, keep away open re
sources, thoroughly ventilate the room, do not plug or unplug the
power cords of the appliance or any other appliance. Inform the
customer service.
In case of eyes get into contact with the refrigerant, rinse immediately it under running water and call immediately the eye specialist.
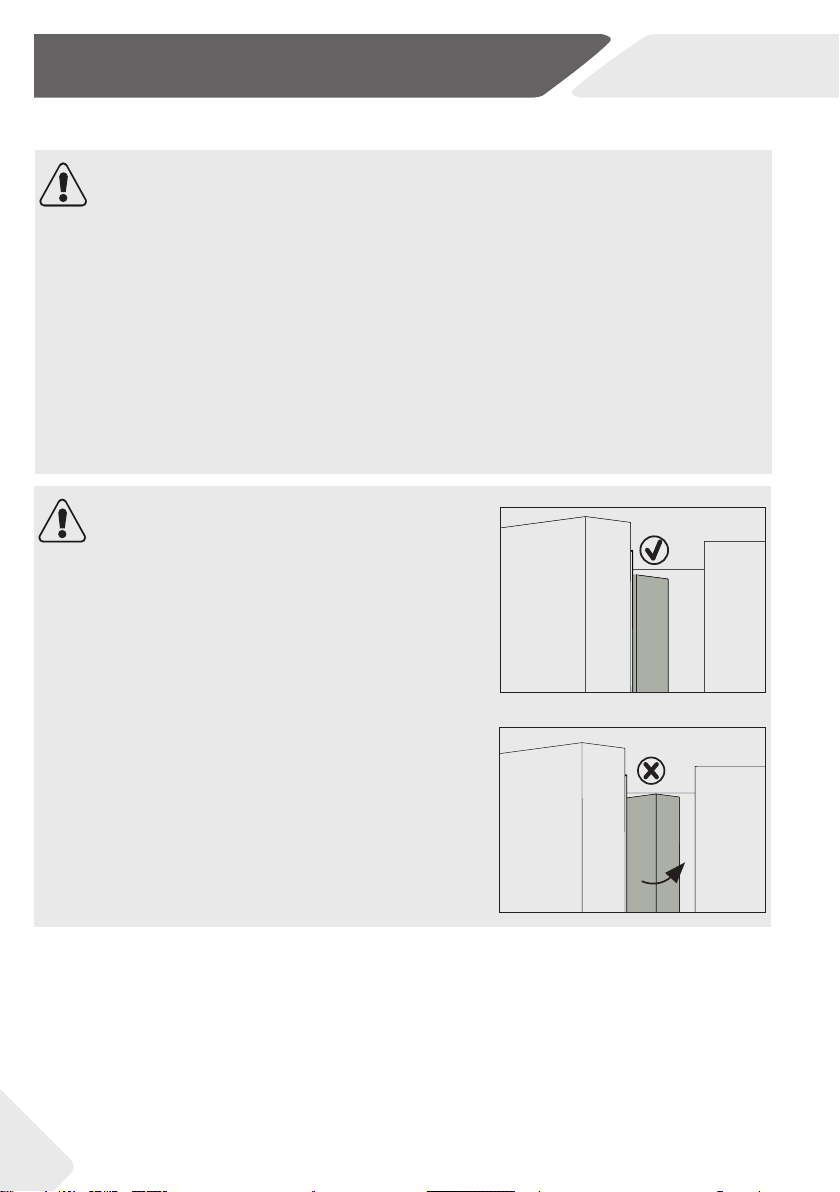
CAUTION!
When you close the door, the vertical door beam on
the left door should be bent inside (1).
If you try to close the left door and the vertical door
beam is unbent (2), you should bend it rstly, otherwise the door beam will hit the xing shaft or right
door. Thus a damage to the door beam or a leak will
occur.
There is a heating thread inside the vertical door
beam. The temperature of the surface will rise a lit-
tle, which is normal and won´t aect the function of
refrigerator.
1
2
7
Page 8

2- Intended use
GB
2.1 Intended use
This appliance is intended for cooling and freezing food. It has been designed exclusively
for use in dry-interior house-holds. It is not intended for commercial or industrial use.
Changes or modications to the device are not allowed. Unintended use may cause hazards and loss of warranty claims.
2.2 Accessories
Check the accessories and literature in accordance with this list (Fig.:2.2):
2.2
Ice maker with
ice scoop
Fresher Pad
2 Egg trays
Energy lable
2 freezer packs
3 spacers
User manualWarranty card
8
Page 9

B
8
10
11
13
9
12
14
15
23
3
4
7
19
18
20
16
A
21
1 2
5
6
22
17
GB
3- Product description
Notice: Dierences
Due to technical changes and dierent models, some of the illustrations in this manual
may dier from your model.
Picture of appliance (Fig. 3)
3
A: Refrigerator compartment
1 Rating plate
2 Refrigerator LED lamp
3 ABT sterilisation module
4 Glass shelf
5 O.K.-temperature indicator (optional)
6 Door rack
7 Panel of DryZone drawer
8 Door beam
9 Air duct
10 Door rack
11 Turning cover of Fruit and vegetable drawer
12 Fruit and vegetable drawer
13 Panel of MoistZone drawer
14 MoistZone drawer
15 DryZone drawer
B: Freezer compartment
16 Freezer box
17 Upper freezer storage drawer
18 Pre-Freezing tray
19 Fresher Pad
20 Lower freezer storage drawer
21 Adjustable feet
22 Ice maker
23 Freezer drawer handle
9
Page 10

4- Control panel
Control panel (Fig. 4)
4
graphic.
a
A
b
B
c1
C
D
E
3 Sec. Holiday
c2
Super-Cool
d
Super-Frz.
e
GB
Keys:
A Fridge temperature setting
B Freezer temperature setting
C Fuzzy mode and Holiday function on/o
D Super-Cool function on/o
E Super-Freeze function on/o
F Panel lock/unlock
Indicators:
a Temperature fridge compartment
b Temperature freezer compartment
c1 Holiday function
c2 Fuzzy mode
d Super-Cool function
e Super-Freeze function
f Panel lock
10
f
F
Page 11

GB
5- Use
5.1 Before rst use
▶ Remove all packaging materials, keep them out of children`s reach and dispose
them in an environmentally friendly manner.
▶ Clean the inside and outside of the appliance with water and a mild detergent before
putting any food in it.
▶ After the appliance has been levelled and cleaned, wait for at least 2 hours before
connecting it to the power supply. See Section INSTALLATION.
▶ Precool the compartments at high settings before loading with food. The functions
Super-Freeze and Super-Cool help to cool down the compartments quickly.
▶ The refrigerator temperature and freezer temperature are automatically set to 5° C
and -18° C respectively. These are the recommended settings. If desired, you can
change these temperatures manually. Please see MANUAL ADJUSTING MODE.
5.2 Sensor keys
The buttons on the control panel are sensor keys, which already respond when lightly
touched with the nger.
5.3 Switch on /o the appliance
The appliance is in operation as soon as it is connected to the power supply.
When the appliance is powered on for the rst time, the actual refrigerator and freezer
temperatures (“a” and “b”) are displayed. The display will ash. If the doors are closed it will
switch o after 30 seconds. Maybe the panel lock is active.
Notice: Presettings
▶ The appliance is preset to the recommended temperature of 5°C (refrigerator) and
- 18°C (freezer). Under normal ambient condition you need not to set a temperature.
▶ The presetting function for the DryZone drawer is “Fruits and Vegetables”. for the
MoistZone drawer “High humidity”
▶ When the appliance is switched on after disconnection from the main power supply, it
may take up to 12 hours for the correct temperatures to be reached.
Empty the appliance before switching o. To switch o the appliance,pull the power cord
out o the power socket.
5.4 Standby-mode
The display screen turns o automatically 30 seconds after pressing a key. The display will
be automatically locked. It lights up automatically by touching any key or opening the door/
drawer.
11
Page 12

Fuzzy
5- Use
5.5
5.5 Lock/unlock panel
GB
Notice: Panel lock
The control panel is automatically blocked against
activation if 30 seconds no key is touched. For any
settings the control panel must be unlocked.
▶ Touch key “F” for 3 seconds to block all panel ele-
ments against activation (Fig. 5.5). The related indicator “f” is now displayed.
▶ For unlocking touch again the key.
5.6 Door/drawer opening alarm
When one of the refrigerator doors or one of the freezer drawers is opened for more than
1 minute, the door/drawer opening alarm will sound. The alarm can be silenced by closing
the door/drawer. If the door/drawer is left open for more than 7 minutes, the light inside
the refrigerator and control panel illumination will automatically switch o.
5.7 Select the working mode
You may need to select one of the following two ways to set the appliance:
5.7.1-1 5.7.1-2
3 Sec. Holiday
Fuzzy
3 Sec. Holiday
5.7.1 Fuzzy mode
If you do not have any special requirements, we recommend that you use fuzzy mode :
In the Fuzzy mode, the appliance can automatically adjust the temperature setting according to the ambient
temperature and temperature change in the appliance.
This function is totally hand free.
1. Unlock the panel by touching key “F” if it is locked
(Fig. 5.5).
2. Touch key “C” (Fuzzy) (Fig. 5.7.1-1).
3. Indicator “c2” illuminates and the function is activated (Fig. 5.7.1-2).
By repeating the above steps or selecting an other
function this function can be switched o again.
5.7.2 Manual adjusting mode
If you want to manually adjust the temperature of the appliance in order to store a particular food, you can set the temperature via a temperature adjusting key:
Notice: Conict with other functions
The temperature cannot be adjusted, if any other function (Super-Cool, Super-Freeze,
Hoilday or Fuzzy) is activated or the display is locked. The corresponding indicator will
ash accompanying with a buzzer.
12
Page 13

GB
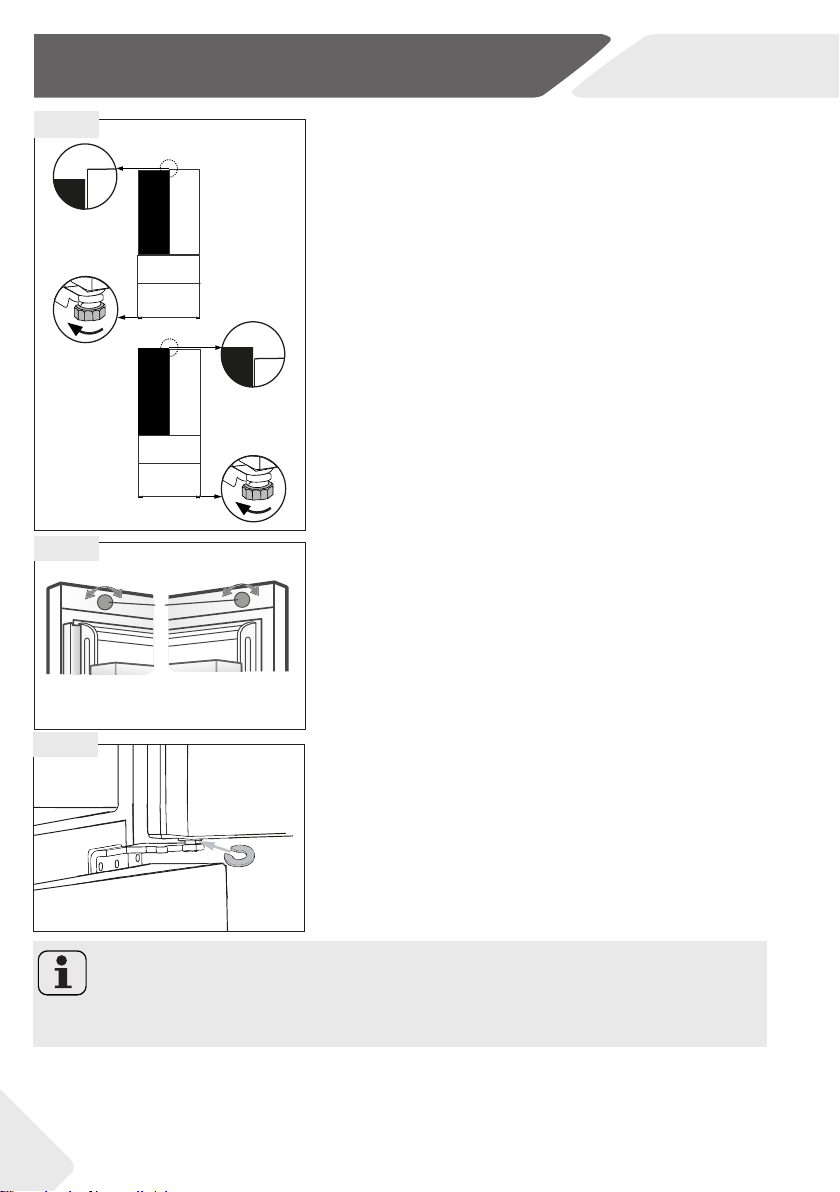
5.7.2.1 Adjust the temperature for fridge
1. Unlock the panel by touching key “F” if it is locked
(Fig. 5.5).
2. Touch key “A” (Fridge) to select the fridge compartment. The actual temperature in the fridge compartment is displayed (Fig. 5.7.2-1).
3. Touch sequentially key “A” (Fridge) until the desired value of temperature is ashing (Fig. 5.7.2-2).
A signal will sound at each key touch. The temperature increases in sequences of 1°C from a minimum
of 1°C to a maximum of 9°C. The optimum temperature in the fridge is 5 °C. Colder temperatures
mean unnecessary energy consumption.
4. Touch any key except „A“ (Fridge) to conrm, or the
setting conrms automatically after 5 seconds. Displayed temperature stops ashing.
5.7.2.2 Adjust the temperature for freezer
1. Unlock the panel by touching key “F” if it is locked
(Fig. 5.5).
2. Touch key “B” (Freezer) to select the freezer compartment. The actual temperature in the freezer
compartment is displayed (Fig. 5.7.2-3).
3. Touch sequentially key“B” (Freezer) until the desired
value of temperature is ashing (Fig. 5.7.2-4).
A signal will sound at each key press. The temperature increases in sequences of 1°C from -15°C to
-23°C. The optimum temperature in the freezer is
-18°C. Colder temperatures mean unnecessary energy consumption.
4. Touch any key except „B“ (Freezer) to conrm, or
the setting conrms automatically after 5 seconds.
Displayed temperature stops ashing.
Fridge
5.7.2-4
Freezer
5- Use
5.7.2-2
5.7.2-1
Fridge
5.7.2-3
Freezer
Notice: Inuences on temperatures
The indoor temperatures are inuenced by the following factors:
▶ Ambient temperature
▶ Frequency of door opening
▶ Amount of stored foods
▶ Installation of the appliance
13
Page 14

5- Use
5.8-1 5.8-2
Super-Cool
Super-Cool
This function will be automatically disabled when the function has lasted for more than
3 hours.
5.9-1
Super-Frz.
5.9-2
Super-Frz.
5.8 Super-Cool function
Switch on the Super-Cool function if larger quantity of food should be stored (for example after the
purchase). The Super-Cool function accelerates the
cooling of fresh food and protects the goods already
stored from undesirable warming. When the function
start, The fridge temperature is nearly +1°C.
1. Unlock the panel by touching key “F” if it is locked
(Fig. 5.5).
2. Touch key “D” (Super-Cool) (Fig. 5.8.-1).
3. Indicator “d” illuminates and the function is activated (Fig. 5.8.-2).
By repeating the above steps or selecting an other
5.9 Super-Freeze function
Fresh food should be frozen as quickly as possible to
the core. This preserved the best nutritional value, appearance and taste. The Super-Freeze function accelerates the freezing of fresh food and protects the
goods already stored from undesirable warming. If
you need to freeze a large amount of food once, it is
recommended to set the Super-Freeze function on
ahead for 24h before the usage of frozen room. The
freezer temperature is nearly -24 °C to -30°C when the
function start.
1.
Unlock the panel by touching key ““F” if it is locked
(Fig. 5.5).
2.
Touch key “E” (Super-Freeze) (Fig. 5.9.-1).
3. Indicator “e” illuminates and the function is activated (Fig. 5.9.-2).
By repeating the above steps or selecting an other
GB
then operated at the previously set temperature.
14
Page 15

GB
5.10 Holiday function
This function sets the fridge temperature permanently
to 17°C. When the ambient temperature is below 17°C,
the refrigerator temperature is close to the ambient
temperature.
This allows to keep the door of the empty fridge closed
without causing an odour or mold - during a long absence (e.g. during holiday). The freezer compartment
is free for your setting.
1. Unlock the panel by touching key “F” if it is locked
(Fig. 5.5).
2. Touch key “C” (Fuzzy) for 3 seconds Fig. 5.10). Indicator “c1” illuminates .and the function is activated.
By repeating the above steps or selecting an other
function this function can be switched o again.
5- Use
5.10
Fuzzy
3 Sec. Holiday
WARNING!
During the Holiday function no goods must be stored in the refrigerator compartment.
The temperature of + 17 ° C is too high for storing food.
5.11 DryZone drawer
The fridge compartment is equipped with a DryZone drawer. In accordance with the food’s
storage demands, the most suitable function can be selected to get the optimal nutritional value of the foods Following functions are available:
5.11.1 Function Precious
The appliance provides the chamber for precious food with mild and dry fresh air via intel-
ligent control, avoiding the damp and mustiness to eectively preserve the nutrition of
the food for a long time. This function is suitable to store dry food with low water content
like tea, coee, dried fruit etc.
5.11.2 Function Fruits & Veg
This function is suitable to store fruits and vegetables like apples and carrots.
Notice: Fruits & Veg function
Cold-sensitive fruits like pineapple, avocado, bananas, grapefruits and vegetables such
as potatoes, aubergines, beans, cucumbers, zucchini and tomatoes and cheese should
not be stored in the DryZone drawer .
5.11.3 Function 0°C Fresh
This function sets the temperature in the DryZone drawer to 0 °C. Suitable to store of fresh food
such as meat, sh, mussels or instant products. Most foods stay fresh at 0 ° C, but not frozen.
Notice: 0°C Fresh
Due to dierent water contents of meat, some meat with more moisture will be frozen
at temperatures lower than 0 °C. So “immediately cut” meat should be stored in DryZone drawer, with temperatures min. 0°C.
15
Page 16

Precious Fruits & Veg 0°C Fresh 3Sec. Lock
K NML
k l m n
3Sec. Lock
High Hum.Low Hum. Mid Hum. 3Sec. Lock
G JIH
g
j i h
5- Use
GB
Notice: DryZone drawer
▶ One of the three functions of the DryZone compartment must always be activated
▶ When you chose “0°C Fresh“ or “Precious” set the temperature of the refrigerating
compartment in the middle level (5°C), in order to preserve your food in the optimal
storage environment.
5.11.4-1
5.11.4-2 5.11.4-3
3Sec. Lock
5.11.4 Select function for DryZone drawer
The function can be selected by using the separate panel (Fig. 5.11.4-1) which is located at the drawer cover.
1. If indicator “n” illuminates the panel is locked and
must be unlocked by touching key “N” (3 Sec. Lock)
for 3 seconds (Fig. 5.11.4-2). A buzzer sounds and
indicator “n” turns o (Fig. 5.11.4-2).
2. Touch corresponding key “K/L/M” of desired function. After a few seconds corresponding indicator
“k/l/m” illuminates .and the function is activated.
3. Lock the panel by touching key “N” (3Sec. Lock) for
3 seconds. A buzzer sounds and indicator “n” turns
on (Fig. 5.11.4-3).
5.12 MoistZone drawer
The fridge compartment is equipped with a MoistZone drawer. Appropriate de-polythene
module enhance the freshness preservation by removing the ripener. Following functions
are available:
Function Recommended food
Low Hum.
Mid Hum. Pears, grapes cherries etc.
High Hum.
5.12.1
Notice: Panel lock
The control panel of DryZone and MoistZone drawer is automatically blocked against
activation if door is open. For any settings the control panel must be unlocked.
16
Dry fruit and other dry food with low water content like like butter, fats
and oils, bread or chocolate.
Cabbage, mushrooms etc.
5.12.1 Select function for MoistZone drawer
The humidity in this drawer can be adjusted by using
the separate humidity control panel (Fig. 5.12.1) which
is located at the drawer cover.
The steps are the same as describe in chapter 5.11.4
but only by using the panel for MoistZone.
Page 17

GB
5- Use
5.13 Fridge o function
This function shuts down the refrigerator. This has no
eect on the freezer compartment.
1. Panel must be locked.
2. Press simultaneously key “A” (Fridge) and “B”
(Freezer) for 3 seconds (Fig. 5.13).
3. Fridge temperature indicator “a” shows “OF” and
the function is activated.
The same operation can exit Fridge o function manually.
A
B
WARNING!
▶ Empty the appliance before switching o.
▶ Keep the door of the refrigerating compartment open, when Fridge o function is
activated, in order to avoid odour or mold..
5.13
17
Page 18

5- Use
5.14 Tips on storing fresh food
5.14.1 Storing into the refrigerator compartment
▶ Keep your fridge temperature below 5°C.
▶ Hot food must be cooled to room temperature before storing in the appliance.
▶ Foods stored in the refrigerator should be washed and dried before storing
▶ Food to be stored should be properly sealed to avoid odour or taste alterations.
▶ Do not store excessive quantities of food. Leave spaces between foods to allow cold
air owing around them, for a better and more homogeneous cooling.
▶ Foods eaten daily should be stored at the front of the shelf.
▶ Leave a gap between foods and the inner walls, allowing air owing. In special way
don’t store foods against the rear wall: foods could freeze against rear wall. Avoid direct contact of food (especially oily or acidic food) with the inner liner, as oil/acid can
erode the inner liner. Clean away oily/acid dirt whenever it is found.
▶ Frozen food can be gently thawed in the refrigerator compartment. This saves en-
ergy.
▶ The ageing process of fruit and vegetables such as courgettes, melons, papaya, ba-
nana, pineapple, etc. can be accelerated in the refrigerator. Therefore, it is not advisable to store them in the refrigerator. However, the ripening of strongly green fruits
can be promoted for a certain period. Onions, garlic, ginger and other root vegetables should also be stored at room temperature.
▶ Unpleasant odours inside the fridge are a sign that something has spilled and clean-
ing is required. See CARE AND CLEANING.
▶ Dierent foods should be placed in dierent areas according to their properties (Fig.:
5.14.1).
5.14.1
1
Fine-controlled
micro air-channel
2
3
8 9
NAVI-FORCE
1 Butter, cheese, eggs, spices, etc.
2 Eggs, canned food, spices, etc
3 Drinks and bottled foods.
1
4
4 Pickled foods, canned food, etc.
5
5 Meat products, snack foods, etc.
2
6
6 Pasta, milk, tofu, dairy, etc.
7
7 Fruit, vegetables, salad, etc.
3
8 DryZone drawer
▶
: Butter, fats, oils, chocolate etc.
▶
: Pears, grapes cherries etc.
▶
: Cabbage, mushrooms etc.
9 MoistZone drawer:
▶
: tea, coee, dried fruit etc.
▶
: Apples, carrots etc.
▶
: Rraw fresh food
GB
18
Page 19

GB
5- Use
5.14.2 Storage into the freezer compartment
▶ Keep the freezer temperature at- 18°C.
▶ 24 hours before freezing switch on the Super-Freeze function; -for small quantities
of food 4-6 hours are sucient.
▶ Hot food must be cooled to room temperature before storing in the freezer compartment.
▶ Food cut into small portions will freeze faster and be easier to defrost and cook. The
recommended weight for each portion is less than 2.5 kg
▶ It is better to pack food before putting it into the freezer. The outside of the pack-
aging must be dry to avoid bags sticking together. Packaging materials should be
odour-free, airtight, non-poisonous and nontoxic.
▶ In order to avoid expiration of storage periods, please note the freezing date, time limit
and name of the food on the packaging according to the storage periods of dierent
foods.
▶ WARNING!: Acid, alkali and salt etc. could erode the internal surface of the freezer.
Do not place the food having these substances (e.g. sea sh) directly on the internal
surface. Salt water in the freezer should be cleaned up immediately.
▶ Do not exceed the food storage times recommended by the manufacturers. Only
take the required amount of food out of the freezer.
▶ Consume defrosted food quickly. Defrosted food cannot be re-frozen unless it is
rst cooked, otherwise it may bless edible.
▶ Do not load excessive quantities of fresh food in the freezer compartment. Refer to
the freezing capacity of the freezer – See TECHNICAL DATA or data at the type plate.
▶ Food can be stored in the freezer at a temperature of at least -18°C for 2 to 12 months,
depending on its properties (e.g., meat: 3-12 months, vegetables: 6-12 months)
▶ When freezing fresh food, avoid bringing it in contact with already frozen food. Risk
of thawing!
▶ Dierent foods should be placed in dierent areas according to their properties (Fig.:
5.14.2).
1 Freezer box:
Small frozen food like meat or small pizza
2 Upper freezer storage drawer:
Ice maker, freezer packs, Fresher Pad, less weighty items, such as ice cream, vegetables, bread etc.
3 Preefreezing tray:
Bigger size pizza, small parts such as herbals,
ice cream etc.
4 Lower freezer storage drawer:
Large/heavier portions of food, such as meats
joints for roasting etc.
1
2
3
4
5.14.2
5.14.3 When storing commercially frozen foods, please follow these guidelines:
▶ Always follow manufacturers’ guidelines for the length of time you should store food
for. Do not exceed these guidelines!
▶ Try to keep the length of time between purchase and storage as short as possible to
preserve food quality.
▶ Buy frozen foods, which have been stored at a temperature of –18 °C or below.
▶ Avoid buying food which has ice or frost on the packaging – This indicates that the
products might have been partially defrosted and refrozen at some point – temper-
ature rises aect the quality of food.
19
Page 20

6- Energy saving tips
Energy saving tips
▶ Make sure the appliance is properly ventilated (see INSTALLATION).
▶ Do not install the appliance in direct sunlight or in the near of heat sources(e.g. stoves,
heaters).
▶ Avoid unnecessarily low temperature in the appliance. The energy consumption in-
creases the lower the temperature in the appliance is set.
▶ Functions like SUPER-FREEZE or SUPER-COOL consume more energy.
▶ Allow warm food to cool down before placing it in the appliance.
▶ Open the appliance door as little and as briey as possible.
▶ Do not overll the appliance to avoid obstructing the air ow.
▶ Avoid air within the food packaging.
▶ Keep door seals clean so that the door always closes correctly.
▶ Defreeze frozen food in the fridge storage compartment.
GB
20
Page 21

GB
7.1 Multi-air-ow
The refrigerator is equipped with a multi-air-ow system, with which cool air ows are located on every
shelf level (Fig. 7.1). This helps to maintain a uniform
temperature to ensure that your food is kept fresher
for longer.
7.2 Adjustable shelves
The height of the shelves can be adjusted to t your
storage needs.
1. To relocate a shelf, remove it rst by uplifting its
hind edge (1) and pulling it out (2) (Fig. 7.2).
2. To reinstall it, put it on the lugs on both sides and
push it to the most rearward position until the rear
of the shelf is xed inside the slots in the sides
Notice: Shelves
Ensure that all ends of a shelf are level.
7.3 Removable door racks
The door racks can be removed for cleaning:
Place hands on each side of the rack, lift it upwards (1)
and pull it out (2) (Fig. 7.3).
In order to insert the door rack, the above steps are
carried out in reverse order.
7- Equipment
7.1
Fine-controlled
micro air-channel
NAVI-FORCE
7.2
7.3
1
1
2
7.4 Fruit and vegetable drawer
Storage zone for fruit and vegetables (Fig. 7.4) to keep
them fresh and healthy.
Notice: Fruits and vegetable drawer
Cold-sensitive fruits like pineapple, avocado, bananas, grapefruits and vegetables such
as potatoes, aubergines, beans, cucumbers, zucchini and tomatoes and cheese should
not be stored in the fruits and vegetable drawer .
7.4
21
Page 22

A
B
7- Equipment
7.5
7.6
Notice: OK-sticker
When the appliance is switched on, it may take up to 12 hours for the correct temperatures to be reached.
7.7
7.5 MoistZone and DryZone drawer
For use and setting of the MoistZone and DryZone
drawer please check section USE.
To remove the drawer out:
1. Pull out (1) to the maximum extent (Fig. 7.5).
2. Lift (2) to separate the drawer from the rail and remove (3).
It can be mounted in reverse order.
7.6 OPTIONAL: OK-temperature indicator
The OK-temperature (Fig. 7.6) indicator can be used to
determine temperatures below +4°C. Gradually reduce
the temperature if the sign does not indicate “OK”.
7.7 3D-freezer drawer
The freezer drawers (Fig. 7.7) can be extended straightly and completely. They are mounted on easy-roll telescopic runners, so that you can store and remove the
freezing good comfortable. Because of the automatic
door closing mechanism the handling is easy and you
save energy.
GB
WARNING!
Do not overload the drawers: Max. load of each drawer: 35 kg!.
22
7.8-1
7.8 Removable freezer drawer
The freezer drawers are removeable:
7.8.1 Upper freezer drawer
1. Pull out the upper freezer drawer to the maximum
extent (Fig. 7.8.1).
2. Lift the drawer(A) and remove.
3. Pull out the freezer boxes (B) to maximum extent, lift
to separate the boxes from the rails and remove.
In order to insert the boxes and drawer, the above steps
are carried out in reverse order.
Page 23

A
B
B
GB
7.8.2 Lower freezer drawer
1. Pull out to the lower freezer drawer to maximum
extent (Fig. 7.8.2).
2. Pull out the freezing tray(A) to stop position, lift
and remove.
3. Lift the drawer (B) until it is separated from the
support block, push it into the freezer and tilt it to
take out.
In order to insert the freezing tray and drawer, the
above steps are carried out in reverse order.
7.9 Pre-freezing tray
The lower freezer drawer is equipped with a pre-freezing rack (Fig. 7.9). Fresh frozen food can be separated
from already frozen, so that a smooth freezing process
can take place and freezing food will not defrosted.
After rearrangement of frozen food these compartments can be used for easy storage of small parts such
as herbals, ice cream.
7.10 Fresher Pad
The Fresher Pad (Fig. 7.10) can be used for:
1. Quick freezing
By using the Fresher Pad in the freezer compartment,
food put on this pad will be frozen three times faster
than in ordinary freezer. The zone of maximum ice
crystal formation will be minimized; the quality of food
will be saved:
▶ Put the Fresher Pad in the upper freezer drawer in
the respective hole and place the food on the side
printed with “Fresher Pad“.
7- Equipment
7.8-2
7.9
7.10
2. Quick thrawing
By using the Fresher Pad outside the appliance food will be thrawn ve times faster than
without pad because:
▶ allow the Fresher Pad to cool down at ambient temperature and put it on a at surface
outside the appliance. Place the food on the side printed with “Fresher Pad“.
Notice: Fresher Pad
▶ Do not touch the aluminium part of the Fresher Pad when using it in the freezer com-
partment. Your hands may freeze onto the surface. Wear gloves.
▶ Please keep the fresher pad dry when you put it into the freezer.
23
Page 24

7- Equipment
7.11-1
7.11 Ice cube maker
1. Pour fresh drinking water into each ice-making box
as per the scale mark inside the measuring cup, do
not exceed the scale mark (Fig. 7.11-1).
GB
Notice:
Do not bring water between the 2 buttons, otherwi-
7.11-2
se the buttons maybe frozen and the ice cubes cannot drop into the storage box.
2. Put the box into the upper freezing compartment.
3. After water becomes ice, take o the ice maker out
of the appliance and rotate the button by hand (Fig.
7.11-2). Then, ice blocks will fall into the ice box automatically. Remove the cover and fetch the ice cubs.
7.12 Freezer pack
There are two frezzer packs in the the kit, which prolong the storage time of the frozen
food in case of power failure. The freezer packs are optimally used when they are placed in
the upper freezer drawer directly on the frozen food
7.13 The Light
The LED interior light comes on when one of the doors is opened. The performance of
the lights is not aected by any of the appliances other settings.
7.14 ABT sterilisation module
This feature sterilizes the refrigerator compartment with a rate of 99.9%; the compartment will be cleaned and deodorized.
24
Page 25
GB
8- Care and Cleaning
WARNING!
Disconnect the appliance from the power supply before cleaning.
8.1 General
Clean the appliance when only little or no food is stored.
The appliance should be cleaned every four weeks for good maintenance and to prevent
bad stored food odours.
WARNING!
▶ Do not clean the appliance with hard brushes, wire brushes, detergent powder, petrol,
amyl acetate, acetone and similar organic solutions, acid or alkaline solutions. Please
clean with special refrigerator detergent to avoid damage.
▶ Do not spray or ush the appliance during cleaning.
▶ Do not use water spray or steam to clean the appliance.
▶ Do not clean the cold glass shelves with hot water. Sudden temperature change may
cause the glass to break .
▶ Do not touch the inside surface of the freezer storage compartment, especially with
wet hands, as your hands may freeze onto the surface.
▶ In case of heating check the condition of frozen goods.
▶ Always keep the door gasket clean.
▶ Clean the inside and housing of the appliance
with a sponge dampened in warm water and
neutral detergent (Fig. 8.1).
▶ Rinse and dry with soft cloth.
▶ Do not clean any of the parts of the appliance in a
dishwasher.
▶ Clean the accessory only with warm water and mild
neutral detergent.
▶ Allow at least 5 minutes before restarting the
appliance as frequent starting may damage the
compressor.
8.2 Cleaning the ice cube maker
1. Take o the ice cube maker out of the appliance.
2. Remove cover (A) and (B) (Fig. 8.2).
3. Clean the ice cube maker with warm water and
liquid dishwashing detergent. Make sure all soap is
rinsed o.
4. Close the covers, rell with drinking water and replace the ice cube maker inside the appliance.
8.1
8.2
B
A
25
Page 26

8- Care and Cleaning
GB
8.3 Defrosting
The defrosting of the refrigerator and the freezer compartment are done automatically;
no manual operation is needed.
8.4 Replacing the LED-lamp
The lamp adopts LED as its light source, featuring low energy consumption and long service life. If there is any abnormality, please contact the customer service . See CUSTOMER
SERVICE.
WARNING!
Do not replace the LED lamp yourself, it must only be replaced by either the manufacturer or the authorised service agent.
The lamp adopts LED as its light source, featuring low energy consumption and long service life. If there is any abnormality, please contact the customer service . See CUSTOMER
SERVICE.
Parameters of the lamp:
Voltage 12V; Max Power: 9.5 W
8.5
1. 2.
3.
4.
8.5 Removable auxiliary door gaskets
There are six auxiliary door gaskets on the upper and
lower freezer drawer.
1. Locate the ve indicated door gaskets on the up-
per and lower freezer drawer (Fig. 8.5-1.).
2. Make sure the bent slices of the gaskets point inwards when attaching (Fig. 8.5-2.).
3. Locate the lower gasket of the upper drawer as
indicated (Fig. 8.5-3.).
4. Make sure the bent slice of this gasket points
downwards when attaching (Fig. 8.5-4.).
You get these gaskets as well as the revolving door /
drawer gaskets via the customer service (see warranty
card).
8.6 Non-use for a longer period
If the appliance is not used for an extended period of time, and you will not use the Holiday-function for the refrigerator:
▶ Take out the food.
▶ Unplug the power cord.
▶ Clean the appliance as described above.
▶ Keep the door and freezer drawers/door open to prevent the creation of bad odours inside.
Notice: Switch o
Turn the appliance o only if strictly necessary.
26
Page 27

GB
8- Care and Cleaning
8.7 Moving the appliance
1. Remove all food and unplug the appliance.
2. Secure shelves and other moveable parts in the fridge and the freezer with adhesive tape.
3. Do not tilt the refrigerator more than 45° to avoid damaging the refrigerating system.
WARNING!
▶ Do not lift the appliance by its handles.
▶ Never place the appliance horizontally on the ground.
27
Page 28

9- Troubleshooting
GB
Many occuring problems could be solved by yourself without specic expertise. In case
of a problem please check all shown possibilities and follow below instructions before you
contact an after sales service. See CUSTOMER SERVICE.
WARNING!
▶ Before maintenance, deactivate the appliance and disconnect the mains plug from
the mains socket.
▶ Electrical equipment should be serviced only by qualied electrical experts, because
improper repairs can cause considerable consequential damages.
▶ A damaged supply should only be replaced by the manufacturer, its service agent or
similarly qualied persons in order to avoid a hazard.
9.1 Troubleshooting table
Problem Possible Cause Possible Solution
The compressor
does not work.
The appliance runs
frequently or runs
for a too long period of time.
The inside of the
refrigerator is dirty
and/or smells.
• Mains plug is not connected in the
mains socket.
• The appliance is in the defrosting
cycle.
• The indoor or outdoor tempera-
ture is too high.
• The appliance has been o power
for a period of time.
• A door/drawer of the appliance is
not tightly closed.
• The door/drawer has been opened
too frequently or for too long.
• The temperature setting for the
freezer compartment is too low.
• The door/drawer gasket is dirty,
worn, cracked or mismatched.
• The required air circulation is not
guaranteed.
• The inside of the refrigerator
needs cleaning.
• Food of strong odour is stored in
the refrigerator.
• Connect the mains plug.
• This is normal for an automatic
defrosting.
• In this case, it is normal for the ap-
pliance to run longer.
• Normally, it takes 8 to 12 hours for
the appliance to cool down completely.
• Close the door/drawer and ensure
the appliance is located on a level
ground and there is no food or
container jarring the door.
• Do not open the door/drawer too
frequently.
• Set the temperature higher until a
satisfactory refrigerator temperature is obtained. It takes 24 hours
for the refrigerator temperature
to become stable.
• Clean the door/drawer gasket or
replace them by the customer
service.
• Ensure adequate ventilation.
• Clean the inside of the refrigera-
tor.
• Wrap the food thoroughly.
28
Page 29

GB
Problem Possible Cause Possible Solution
It is not cold enough
inside the appliance.
It is too cold inside the appli-
.
ance
Moisture formation on the inside
of the refrigerator
compartment.
Moisture accumulates on the
refrigerators outside surface or between the doors/
door and drawer.
Strong ice and
frost in the freezer compartment.
The appliance
makes abnormal
sounds.
• The temperature is set too high. • Reset the temperature.
• Too warm goods has been stored. • Always cool down goods before
• Too much food has been stored at
one time.
• The goods are too close to each
other.
• A door/drawer of the appliance is
not tightly closed.
• The door/drawer has been opened
too frequently or for too long.
• The temperature is set too low. • Reset the temperature.
• The Power-Freezer function is ac-
tivated or is running too long.
• The climate is too warm and too
damp.
• A door/drawer of the appliance is
not tightly closed.
• The door/drawer has been opened
too frequently or for too long.
• Food containers or liquids are left
open.
• The climate is too warm and too
damp.
• The door/drawer is not closed
tightly. The cold air in the appliance
and the warm air outside it condensates.
• The goods were not adequately
packaged.
• A door/drawer of the appliance is
not tightly closed.
• The door/drawer has been opened
too frequently or for too long.
• The door/drawer gasket is dirty,
worn, cracked or mismatched.
• Something on the inside prevents
the door/drawer to close properly.
• The appliance is not located on
level ground.
• The appliance touches some ob-
ject around it.
9- Troubleshooting
storing them.
• Always store small quantities of
food.
• Leave a gap between several
foods allowing air owing.
• Close the door/drawer.
• Do not open the door/drawer too
frequently.
• Switch o the Power-Freezer
function.
• Increase the temperature.
• Close the door/drawer.
• Do not open the door/drawer too
frequently.
• Let hot foods cool to room temperature and cover foods and liquids.
• This is normal in damp climate and
will change when the humidity decreases.
• Ensure that he door/drawer is
tightly shut.
• Always pack the goods well.
• Close the door/drawer.
• Do not open the door/drawer too
frequently.
• Clean the door/drawer gasket or
replace them by new ones.
• Reposition the shelves, door
racks, or internal containers to allow the door/drawer to close.
• Adjust the feet to level the appliance.
• Remove objects around the appliance.
29
Page 30

9- Troubleshooting
Problem Possible Cause Possible Solution
A slight sound is
to be heard similar to that of owing water.
You will hear an
alarm beep.
You will hear a
faint hum
The interior lighting
or cooling system
does not work.
The sides of the
cabinet and door
strip get warm.
.
• This is normal. • -
• The fridge storage compartment
door or a freezer drawer is open.
• The anti-condensation system is
working.
• Mains plug is not connected in the
mains socket.
• The power supply is not intact. • Check the electrical supply to
• The LED-lamp is out of order. • Please call the service for chang-
• This is normal. • -
• Close the door/drawer.
• This prevents condensation and is
normal.
• Connect the mains plug.
the room. Call the local electricity
company!
ing the lamp.
GB
9.2 Power interruption
In the event of a power cut, food should remain safely cold for about 18 hours. Follow these
tips during a prolonged power interruption, especially in summer:
▶ Open the door/drawer as few times as possible.
▶ Do not put additional food into the appliance during a power interruption.
▶ If prior notice of a power interruption is given and the interruption duration is longer
than 18 hours, make some ice and put it in a container in the top of the refrigerator
compartment.
▶ An inspection of the goods is required immediately after the interruption.
▶ As temperature in the refrigerator will rise during a power interruption or other fail-
ure, the storage period and edible quality of food will be reduced. Any food that de-
frosts should be either consumed, or cooked and refrozen (where suitable) soon
afterwards in order to prevent health risks.
Notice: Memory function during power interruption
After restoration of power the appliance continues with the settings that were set before the power failure.
30
Page 31

GB
10- Installation
10.1 Unpacking
WARNING!
▶ The appliance is heavy. Always handle with at least two persons.
▶ Keep all packaging materials out of children´s reach and dispose them in an environ-
mentally friendly manner.
▶ Take the appliance out of the packaging.
▶ Remove all packaging materials.
10.2 Environmental conditions
the temperature inside the appliance and its energy consumption. Do not install the appliance near other heat-emitting appliances (ovens, refrigerators) without isolation.
10.3 Space requirement
Required space when door is opened (Fig. 10.3):
Width
in mm
W1 W2 D1 D2 D5
830 869
W3
1424
Depth
in mm
600 885
D3 D4
1034 1130
Distance to wall
in mm
50
D5
D1 D2
W1
W2
W3
>10 cm
mc 01>
D3D4
10.3
10.3
10.4
10.4 Ventilaton cross-section
safety reasons, the information of the required ventilation cross sections must be observed (Fig. 10.4).
10.5 Aligning the appliance
The appliance should be placed on a at and solid surface.
1. Tilt the appliance slightly backwards (Fig. 10.5).
2. Set the feet to the desired level.
3. The stability can be checked by alternately bump-
ing on the diagonals. The slightly swaying should
be the same in both directions. Otherwise the
frame can warp; possible leaking door seals are
the result. A low tendency to the rear facilitates
the closing of the door.
1.
max 45°
3.
mc 091
>10 cm
83 cm
10.5
2.
31
Page 32
10- Installation
10.6-1
10.6-2
A
10.6 Fine tuning of the doors
If the doors are not in one level, this mismatch can be
remedied by following:
10.6.1 Using adjustable foot
Rotate the adjustable foot according to the direction of
arrow (Fig. 10.6-1) to turn up or down the foot.
10.6.2 Using adjustment button
Rotate the adjustment button on top of the door (Fig.
10.6-1).
GB
10.6-3
10.6.3 Using spacers
▶ Open the upper door and lift it.
▶ Carefully clip the spacer (enclosed in the accessory
bag) in the white plastic ring of the middle hinge by
hand or using tools like pliers (Fig. 10.6-3). Do not
scratch or bruise the door.
Notice: Levelling
In the future use of refrigerator, doors uneven phenomenon may occur to the weight of
stored food. Then please adjust according to the above methods.
32
Page 33

2 h
GB
10- Installation
10.7 Waiting time
To the maintenance-free lubrication oil is located in the
capsule of the compressor. This oil can get through
the closed pipe system during slanting transport. Before connecting the appliance to the power supply you
have to wait 2 hours (Fig. 10.7) so that the oil runs back
into the capsule.
10.8 Electrical connection
Before each connection check if:
▶ power supply, socket and fusing are appropriate to the rating plate.
▶ the power socket is earthed and no multi-plug or extension.
▶ the power plug and socket are strictly according.
Connect the plug to a properly installed household socket.
WARNING!
To avoid risks a damaged power cord must be replaced by the customer service (see
warranty card).
10.7
33
Page 34

11- Technical data
11.1 Product che according to regulation EU No. 1060/2010
Trade mark Haier
Model identier HB18FGSAAA
Category of the model
Energy eciency class A++
Annual energy consumption (kWh/year)
Storage volume cooling (L) 351
Storage volume freezing (L) **** 157
Star rating
Temperature of other compartments > 14°C
Frostfree system
Power cut safe (h) 18
Freezing capacity (kg/24h) 14
Climate class
This appliance is intended to be used at an
ambient temperature between
10 °C and 43°C.
Airborne acoustical noise emissions
(db(A) re 1pW)
Construction type
1)
based on standard test results for 24 hours. Actual energy consumption will depend on
how the appliance is used and where it is located.
1)
Refrigerator-freezer
298
Non applicable
Yes
SN/N/ST/T
38
Freestanding
GB
11.2 Additional technical data
Total gross volume (L) 592
Net volume (L) 508
Voltage / Frequency 220-240V ~/ 50Hz
Input power (W)
Input current (A)
Main fuse (A)
Coolant/amount
Dimensions (D/W/H in mm)
120
1.5
16
R600a/69g
669x830x1900
11.3 Standards and directives
This product meets the requirements of all applicable EC directives with the corresponding harmonised standards, which provide for CE marking.
34
Page 35

GB
We recommend our Haier Customer Service and the use of original spare parts.
If you have a problem with your appliance, please rst check section TROUBLESHOOTING.
If you cannot nd a solution there, please contact
▶ your local dealer or
▶ the Service & Support area at www.haier.com where you can nd telephone numbers
and FAQs and where you can activate the service claim.
To contact our Service, ensure that you have the following data available.
The information can be found on the rating plate.
Model ____________________ Serial No. _____________________
Also check the Warranty Card supplied with the product in case of warranty.
For general business enquiries please nd below our addresses in Europe:
12- Customer Service
European Haier addresses
Country* Postal address Country* Postal address
Haier Europe Trading SRL
Italy
Spain
Portugal
Germany
Austria
United
Kingdom
*For more information please refer to www.haier.com
Via De Cristoforis, 12
21100 Verese
ITALY
Haier Iberia SL
Pg. Garcia Faria, 49-51
08019 Barcelona
SPAIN
Haier Deutschland GmbH
Hewlett-Packard-Str. 4
D-61352 Bad Homburg
GERMANY
Haier Appliances UK Co.Ltd.
One Crown Square
Church Street East
Woking, Surrey, GU21 6HR
UK
France
Belgium-FR
Belgium-NL
Netherlands
Luxembourg
Poland
Czechia
Hungary
Greece
Romania
Russia
Haier France SAS
3-5 rue des Graviers
92200 Neuilly sur Seine
FRANCE
Haier Benelux SA
Anderlecht
Route de Lennik 451
BELGIUM
Haier Poland Sp. zo.o.
Al. Jerozolimskie 181B
02-222 Warszawa
POLAND
35
Page 36

HB18_GB-V02_032017
Page 37

Manuel d’utilisation
Réfrigérateur-congélateur
HB18FGSAAA
FR
Page 38

Nous vous remercions
FR
Nous vous remercions d'avoir acheté un produit Haier.
Veuillez lire attentivement ces instructions avant d'utiliser l'appareil. Ces instructions sont
des informations utiles vous permettant de mieux exploiter cet appareil, et vous assurer
une installation, une utilisation et un entretien sécurisés et adéquats.
Veuillez bien garder ce manuel et toujours vous y référer pour une utilisation sécurisée et
adéquate de l’appareil.
Si vous devez vendre, donner ou abandonner l'appareil pour cause de déménagement,
assurez-vous également de laisser ce manuel an que le prochain utilisateur puisse maîtriser l'appareil, notamment les règles de sécurité.
Légende
Avertissement - Consignes importantes de
sécurité
Renseignements généraux et conseils
Informations sur l'environnement
Mise au rebut
Contribuez à la protection de l’environnement et de
la santé humaine. Veuillez mettre les emballages au
rebut dans les espaces prévus pour leur recyclage.
Contribuez à recycler les déchets d’appareils électriques et électroniques. Ne mettez pas au rebut les
appareils marqués de ce symbole avec les déchets
ménagers. Veuillez déposer l’appareil à votre usine de
recyclage locale, ou prendre contact avec votre bureau
municipal.
AVERTISSEMENT!
Risque de blessure ou d'asphyxie!
Les réfrigérants et les gaz doivent être mis au rebut par des professionnels. Avant
toute mise au rebut, assurez-vous que la tuyauterie du système de réfrigération n'est
pas endommagée. Débranchez l'appareil du secteur. Coupez les câbles de réseau et
mettez-les au rebut. Retirez les plateaux et corets ainsi que le verrou de porte et les
joints, pour éviter qu'un enfant ou un animal domestique ne reste coincé dans l'appareil.
2
Page 39

FR
1- Consignes de sécurité ..................................................................................................................... 4
2- Utilisation prévue .............................................................................................................................. 9
3- Description du produit ...................................................................................................................10
4- Panneau de commande ................................................................................................................11
5- Utilisation ..........................................................................................................................................12
6- Conseils pour économiser de I‘énergie ....................................................................................20
7- Équipement ......................................................................................................................................21
8- Entretien et nettoyage ..................................................................................................................24
9- Dépannage .......................................................................................................................................26
11- Informations techniques ............................................................................................................32
Sommaire
12- Service client .................................................................................................................................33
3
Page 40

1- Consignes de sécurité
Avant de mettre l’appareil en marche pour la première fois, veuillez
lire les consignes de sécurité ci-après:
AVERTISSEMENT!
Avant la première utilisation
▶ Vériez que l’appareil n’a subi aucun dommage lié au transport.
▶ Retirez tous les emballages et tenez-les hors de portée des en-
fants.
▶ Attendez au moins deux heures avant d'installer l'appareil pour
une meilleure ecacité du système de réfrigération.
▶ Il faut toujours au moins deux personnes pour la manipulation de
l'appareil car il est lourd.
Installation
▶ Placez l'appareil dans un endroit bien ventilé. Laissez un espace
d’au moins 20cm de haut et 10cm autour de l'appareil.
▶ Ne placez jamais l'appareil dans une zone ou à un endroit humide
où il pourrait être éclaboussé par de l'eau. Nettoyez et séchez les
éclaboussures d'eau et les tâches à l'aide d'un chion doux et
propre.
▶ N'installez pas l'appareil en direction des rayons solaires ou à
proximité des sources de chaleur (par exemple, les cuisinières,
chaue-eau).
▶ Installez et positionnez l'appareil dans un espace adéquat tenant
compte de sa taille et son utilisation.
▶ Tenez les ouvertures d’aération de l'appareil ou dans les struc-
tures encastrées libres de toute obstruction.
▶ Vériez que les informations électriques sur la plaque signalé-
tique sont conformes à l'alimentation électrique. Si ce n'est pas
le cas, veuillez contacter un électricien.
▶ L’appareil fonctionne avec une alimentation de 220~-
240VCA/50Hz. Des uctuations anormales de tension peuvent
entraîner un échec de démarrage ou endommager le régulateur
de température ou le compresseur, ou l'appareil peut émettre un
bruit anormal pendant le fonctionnement. Dans de tels cas, installez un régulateur automatique.
▶ Pour l'alimentation électrique, utilisez une prise avec terre dié-
rente facilement accessible. Mettez à la terre cet appareil.
FR
4
Page 41

FR
AVERTISSEMENT!
Installation
▶ Uniquement pour le Royaume-Uni: Cet appareil est équipé d’un
cordon d’alimentation avec che à 3ls (mise à la terre), répondant aux normes de la prise à 3ls (mise à la terre). Ne coupez
jamais ou ne démontez jamais le troisième l (mise à la terre). Une
fois l’appareil installé, la che doit être accessible.
▶ N’utilisez pas des adaptateurs multiprises ou des rallonges.
▶ Assurez-vous que le câble d’alimentation n’est pas sous le réfri-
gérateur. Évitez de marcher sur le câble d’alimentation.
▶ N’endommagez pas le circuit réfrigérant.
Utilisation quotidienne
▶ Cet appareil peut être utilisé par des enfants âgés d'au minimum
8ans, ainsi que par des personnes avec des capacités physiques,
sensorielles ou mentales réduites ou sans expérience et connaissances, si elles sont supervisées ou ont été formées à l'utilisation
sécurisée de l'appareil et comprennent les risques y relatifs.
▶ Tenez les enfants de moins de 3ans hors de portée de l'appareil,
sauf s'ils sont en permanence surveillés.
▶ Les enfants ne doivent pas jouer avec l'appareil.
▶ En cas de fuite de gaz froid ou de tout autre gaz inammable aux
alentours du réfrigérateur, arrêtez la vanne d'alimentation du gaz
qui s'échappe, ouvrez les portes et fenêtres et ne débranchez
pas ni ne branchez le câble d'alimentation de l'appareil ou de tout
autre appareil.
▶ Rassurez-vous que l'appareil est programmé pour fonctionner à
une plage de température entre 10 et 43°C. L'appareil pourrait ne
pas bien fonctionner si vous le faites fonctionner pendant longtemps à une température en dessous ou au-dessus de la plage
indiquée.
▶ Ne placez pas des objets instables (objets lourds, récipients rem-
plis d'eau) au-dessus du réfrigérateur pour éviter tout dommage
corporel suite à une chute de l'objet ou un choc électrique causé
par le contact avec l'eau.
▶ Ne tirez pas sur les étagères de la porte. La porte pourrait se pen-
cher, le rayon des bouteilles pourrait sauter ou l'appareil pourrait
basculer.
1- Consignes de sécurité
5
Page 42

1- Consignes de sécurité
AVERTISSEMENT!
Utilisation quotidienne
▶ Ouvrez et fermez les portes uniquement à l’aide des poignées.
L’espace entre les portes et le placard est très réduit. N’en-
voyez pas vos mains dans ces endroits pour éviter de coincer vos
doigts. Ouvrez ou fermez les portes du réfrigérateur uniquement
lorsque les enfants ne se trouvent pas près du réfrigérateur.
▶ Évitez de ranger ou utiliser des produits inammables, des explo-
sifs ou des matières corrosives à l’intérieur ou autour de l’appareil.
▶ Ne conservez pas des médicaments, des bactéries ou des agents
chimiques dans le réfrigérateur. Le présent réfrigérateur est un
appareil électroménager. Il n’est pas recommandé de conserver
des matériaux qui requièrent des températures strictes.
▶ Évitez de conserver des liquides dans des bouteilles ou des
cannettes (à l’exception de vins et spiritueux fortement alcooli-
sés), notamment des boissons gazeuses car elles peuvent ex-
ploser pendant la congélation.
▶ Vériez le conditionnement des aliments si le congélateur devient
plus chaud.
▶ Ne programmez pas inutilement le compartiment réfrigérateur à
une température basse. Les températures basses peuvent sur-
venir lorsque les températures hautes sont programmées. At-
tention: Les bouteilles peuvent se casser.
▶ Ne touchez pas les aliments congelés avec des mains mouillées
(portez des gants). Surtout, ne mangez pas les sucettes glacées
immédiatement après les avoir sorties du congélateur. Vous
risquez une congélation de la langue ou la formation d'ampoules
suite à la congélation. PREMIERS soins: placez votre langue sous
le robinet avec la sucette. Ne la tirez pas de force!
▶ Ne touchez pas la surface intérieure du compartiment congé-
lateur pendant qu'il est en marche, notamment avec les mains
mouillées; vos mains pourraient se congeler sur la surface.
▶ Débranchez l'appareil en cas de coupure de courant ou avant de
le nettoyer. Attendez au moins 5minutes avant de redémarrer
l'appareil car plusieurs redémarrages endommagent le compres-
seur.
▶ N’utilisez pas d'appareils électriques de type autre que ceux re-
commandés par le fabricant, à l’intérieur des compartiments de
stockage d’aliments de l'appareil.
FR
6
Page 43

FR
AVERTISSEMENT!
Entretien et nettoyage
▶ Assurez-vous que les enfants sont sous surveillance lors du net-
toyage et de l’entretien.
▶ Débranchez l’appareil de l’alimentation électrique avant d’entre-
prendre tout entretien. Attendez au moins 5minutes avant de redémarrer l’appareil car plusieurs redémarrages endommagent le
compresseur.
▶ Tenez la che et non le cordon pour débrancher l’appareil.
▶ Ne raclez pas le givre ou la glace à l’aide d’objets tranchants. N’u-
tilisez pas de vaporisateurs, d’appareils de chauage électriques,
de sèche-cheveux, de nettoyants à vapeur ou toute autre source
de chaleur an d’éviter des dommages sur les parties en plastique.
▶ N’utilisez pas d’appareils mécaniques ou des moyens autres que
ceux recommandés par le fabricant pour accélérer le processus
de dégivrage.
▶ Si le cordon d’alimentation est endommagé, faites-le remplacer
par le fabricant, son agent de service ou par des personnes quali-
ées similaires an d’éviter tout risque.
▶ N’essayez pas de réparer, de démonter ou de changer vous-
même l’appareil. En cas de réparation, veuillez contacter notre
service clientèle.
▶ Dépoussiérez l'arrière de l'appareil au moins une fois par an an
d'éviter tout risque d'incendie, et pour réduire votre consommation énergétique.
▶ N'utilisez pas de vaporisateur ou ne rincez pas l'appareil pendant
le nettoyage.
▶ N'utilisez pas un pulvérisateur d'eau ou nettoyant à vapeur pour
nettoyer l'appareil.
▶ Ne nettoyez pas les rayons de congélation en verre avec de l'eau
chaude. Le changement soudain de température pourrait briser
le verre.
1- Consignes de sécurité
7
Page 44
1- Consignes de sécurité
Informations sur le gaz frigorigène
AVERTISSEMENT!
Cet appareil contient du réfrigérant inammable ISOBUTANE
(R600a). Assurez-vous que le système de réfrigération n'est pas
endommagé pendant le transport et l'installation. Une fuite de
gaz frigorigène pourrait causer des dommages oculaires ou un incendie. Si un dommage est survenu, tenez-vous hors de sources
d'incendie visibles, aérez correctement l'espace, ne branchez ou
ne débranchez pas la prise d'alimentation de l'appareil ou de tout
autre appareil. Informez le service clientèle.
En cas de contact avec les yeux, rincez abondamment les yeux
avec de l'eau et consultez immédiatement un ophtalmologue.
ATTENTION!
Lorsque vous fermez la porte, le renfort vertical de la
porte gauche doit être rabattu vers l’intérieur (1).
FR
1
Si vous essayez de fermer la porte gauche et la bande
verticale de porte n'est pas rabattue (2), Rabattez-la
d'abord, sinon elle frappera l'axe de xation ou la
porte droite. Vous constaterez alors des dommages
lors du glissement de la porte ou des fuites.
Le renfort vertical de porte dispose d'un l chauant.
La surface s'échauera un peu, ce qui est tout à fait
normal et n’aecte nullement le fonctionnement du
réfrigérateur.
8
2
Page 45

FR
2- Utilisation prévue
2.1 Utilisation prévue
Cet appareil a été conçu pour la réfrigération et la congélation des aliments. Il est destiné
exclusivement pour des intérieurs chauds. Il n'est pas destiné à un usage commercial ou
industriel.
Aucune modication ou altération de cet appareil n'est autorisée. Toute utilisation inadéquate vous expose à des risques et la perte des droits de garantie.
2.2 Accessoires
Vériez les accessoires et la documentation suivant cette liste (Fig.2.2):
2.2
Bac à glaçon
Plateau à
œufs
3entretoises
Étiquette
énergétique
Carte de
garantie
Manuel
de l’utilisateur
9
Page 46

1
2
4
5
6
4
7
8
9
10
11
3
A
B
3- Description du produit
Remarque: Diérences
En raison des modications techniques et des divers modèles, certaines illustrations de
ce manuel peuvent être diérentes de votre modèle.
Images des appareils (Fig. 3)
3
FR
A: Compartiment réfrigérateur
1 Lampe d'éclairage du réfrigérateur en LED
2 Poutre de porte
3 Plaque signalétique
4 Casier de porte
5 Couvercle en verre de My Zone
6 Tiroir My Zone
7 Étagère en verre
8 Indicateur de température O.K. (en option)
10
B: Compartiment congélateur
9 Tiroir de stockage de la partie supérieure du congélateur
10 Tiroir de stockage de la partie inférieure du congélateur
11 Pieds ajustables
Page 47

d1
d2
FR
4- Panneau de commande
Panneau de commande (Fig.4)
Touches:
A Réglage de la température du réfrigéra-
teur
B Réglage de la température du congéla-
teur
C Réglage MyZone
D Sélecteur du mode Multifonction et ac-
tivation/désactivation de la fonction Va-
cances
E Activation/désactivation de la fonction
Super réfrigération
F Activation/désactivation de la fonction
Super congélation
G Verrouillage/déverrouillage du panneau
Indicateurs:
a Température du compartiment réfrigé-
rateur
b Température du compartiment congéla-
teur
c Fonction My Zone
d1 Fonction Vacances
d2 Mode Multifonction
e Fonction Super réfrigération
f Fonction Super congélation
g Verrouillage panneau de commande
B
C
D
E
F
4
a
A
b
c
3 Sec. Holiday
Super-Cool
e
Super-Frz.
f
g
11
Page 48

5- Utilisation
FR
5.1 Avant la première utilisation
▶ Retirez tous les emballages et tenez-les hors de portée des enfants, puis mettez-les
au rebut dans le respect de l'environnement.
▶ Nettoyez l'intérieur et l'extérieur de l'appareil avec de l'eau et un détergent doux
avant de garder les aliments à l'intérieur.
▶ Une fois l'appareil bien positionné et nettoyé, attendez au minimum 2heures avant
de le brancher à une source d'alimentation. Voir la Section INSTALLATION.
▶ Pré-réfrigérez les compartiments à fortes températures avant de charger les ali-
ments. La fonction Super congélation permet de refroidir rapidement le compartiment congélateur.
▶ Les températures du réfrigérateur et du congélateur sont automatiquement réglées
à 5°C et -18°C respectivement. Ces derniers sont les réglages recommandés. Au
besoin, vous pouvez modier les températures manuellement. Reportez-vous au
MODE RÉGLAGE MANUEL
5.2 Touches sensitives
Les boutons sur le panneau de commande sont des touches de détection qui répondent
une fois que vous les eeurez avec le doigt.
5.3 Mise en marche / arrêt de l’appareil
L'appareil se met en marche une fois qu'on le branche à l'alimentation électrique.
Lorsque vous mettez l’appareil en marche pour la première fois, les températures ac-
tuelles du réfrigérateur et du congélateur («a» et «b») s'achent à l'écran. L'achage
clignote. Il s'éteint 30secondes après la fermeture des portes. Le panneau de verrouillage
est peut-être actif.
Remarque: Préréglages
▶ L’appareil et réglé à la température recommandée de 5°C (réfrigérateur) et -18°C
(congélateur). Sous une température ambiante normale, nul besoin de régler la tem-
pérature.
▶ Le mode de préréglage du compartiment My Zone est 0°C.
▶ Une fois que l'appareil est mis en marche et débranché de l'alimentation électrique
principale, il faut 12heures pour que les bonnes températures soient atteintes.
Videz l'appareil avant de l'arrêter. Pour arrêter l'appareil, débranchez sa prise de l'alimentation électrique.
5.4 Mode Veille
L’écran d’achage s’éteint automatiquement 30 secondes après la pression d’une
touche. L'écran se verrouille automatiquement. Il se rallume automatiquement lorsque
vous appuyez sur une touche ou lorsque vous ouvrez la porte/le tiroir.
12
Page 49

Fuzzy
FR
5- Utilisation
5.5 Verrouillage/Déverrouillage du
panneau
Remarque : Verrouillage du
panneau
Pour éviter toute activation, le panneau de
commande se verrouille automatiquement si au-
cune touche n’est appuyée pendant 30 secondes.
Pour tout réglage, le panneau de commande doit
être déverrouillé.
▶ Appuyez sur la touche «G» pendant 3 secondes
pour verrouiller toutes les touches du panneau et
éviter toute activation (Fig. 5.5). L’indicateur correspondant «d» s'ache à l'écran.
▶ Pour déverrouiller le panneau de commande, ap-
puyez une seconde fois sur cette touche.
5.6 Alarme d'ouverture de la porte
Lorsqu’une des portes du réfrigérateur reste ouverte pendant plus de 1minute, l’alarme
d’ouverture de la porte résonne. Vous pouvez arrêter l'alarme en fermant la porte. Si la
porte reste ouverte pendant plus de 7minutes, la lumière à l'intérieur du compartiment et
du panneau de commande s'éteint automatiquement.
5.7 Sélection du mode de fonction
Vous pourrez avoir besoin de programmer une des deux fonctions suivantes sur l'appareil:
5.7.1 Mode Multifonction
Si vous n’avez pas de besoin précis, nous vous re-
commandons d’utiliser le mode Multifonction:
Sous le mode Multifonction l'appareil peut automatiquement régler la température selon la température
ambiante et le changement de température à l'intérieur de l'appareil. Cette fonction est totalement libre.
1. Déverrouillez le panneau en appuyant sur la touche
«F» s’il est verrouillé (Fig.5.5).
2. Appuyez sur la touche « D » (Multifonction)
(Fig.5.7.1-1).
3. L’indicateur «d2» s’allume et la fonction est activée (Fig.5.7.1-2).
En répétant les étapes précédentes ou en sélectionnant une autre fonction, la fonction susmentionnée peut être désactivée à nouveau.
5.7.2 Mode réglage manuel
Si vous voulez régler la température de l’appareil manuellement pour garder un aliment en
particulier, vous pouvez régler la température à l’aide de la touche de réglage de tempé-
rature:
5.7.1-1 5.7.1-2
3 Sec. Holiday
Fuzzy
3 Sec. Holiday
5.5
13
Page 50

5- Utilisation
FR
Remarque: Conit avec d’autres fonctions
La température ne peut être réglée si une autre fonction (Super réfrigération, Super
congélation, Vacances ou Multifonction) est activée ou si l'achage est verrouillé. L'indicateur correspondant clignote en émettant un son.
5.7.2-1
Fridge
5.7.2-3
Freezer
5.7.2-2
Fridge
5.7.2-4
Freezer
5.7.2.1 Réglage de la température du réfrigérateur
1. Déverrouillez le panneau en appuyant sur la touche
«F» s’il est verrouillé (Fig.5.5).
2. Appuyez sur la touche «A» (Réfrigérateur) pour sé-
lectionner le compartiment réfrigérateur. La température réelle du compartiment congélateur s’af-
che (Fig.5.7.2-1).
3. Appuyez successivement sur la touche « A »
(réfrigérateur) jusqu’à ce que la valeur de température souhaitée clignote (Fig. 5.7.2-2).
Un signal retentira à chaque fois que vous appuyez
sur une touche. La température augmente par sé-
quences de 1°C d’un minimum de 1°C à un niveau
maximum de 9°C. La température maximale dans
le réfrigérateur est de 5 °C. Les températures les
plus froides signalent une consommation d'énergie
inutile.
4. Appuyez sur n’importe quelle touche à l’exception
de la touche « A » (réfrigérateur) pour conrmer,
sinon le réglage se conrme automatiquement
après 5 secondes. La température achée cesse
de clignoter.
5.7.2.2 Réglage de la température du congélateur
1. Déverrouillez le panneau en appuyant sur la touche
«F» s’il est verrouillé (Fig.5.5).
2. Appuyez sur la touche «B» (congélateur) pour sé-
lectionner le compartiment congélateur. La tempé-
rature réelle du compartiment congélateur s’ache
(Fig.5.7.2-3).
3. Appuyez successivement sur la touche « B» (congélateur) jusqu’à ce que la valeur de température
souhaitée clignote (Fig.5.7.2-4).
Un signal sera émis à chaque fois que vous appuyez
sur une touche. La température augmente par sé-
quences de 1°C de -15°C à -24°C. La température maximale dans le congélateur est de -18 °C.
Les températures les plus froides signalent une
consommation d'énergie inutile.
4. Appuyez sur n’importe quelle touche à l’exception
de la touche «B » (congélateur) pour conrmer, sinon le réglage se conrme automatiquement après
5 secondes. La température achée cesse de
clignoter.
14
Page 51

FR
5- Utilisation
Remarque: Inuence sur les températures
Les températures intérieures sont inuencées par les facteurs suivants:
▶ La température ambiante
▶ La fréquence d'ouverture de la porte
5.8 Fonction Super réfrigération
Activez la fonction Super réfrigération si vous voulez
conserver une plus grande quantité d'aliments (par
exemple après les achats). La fonction Super réfrigération accélère la réfrigération des aliments frais et
aide à protéger les aliments déjà conservés de la cha-
leur. La température de fabrication varie de 0 à +1°C.
1. Déverrouillez le panneau en appuyant sur la touche
«F» s’il est verrouillé (Fig.5.5).
2. Appuyez sur la touche «E» (Super réfrigération)
(Fig.5.8.-1).
3. L’indicateur «e» s’allume et la fonction est activée
(Fig.5.8.-2).
En répétant les étapes précédentes ou en sélectionnant une autre fonction, la fonction susmentionnée
peut être désactivée à nouveau.
▶ La quantité d'aliments conservés
▶ L'installation de l'appareil
5.8-2
Super-Cool
5.8-1
Super-Cool
Remarque: Désactivation automatique
Ladite fonction se désactivera automatiquement lorsque la température atteindra +
2°C ou lorsque vous aurez utilisé cette fonction pendant plus de 3heures.
5.9 Fonction Super congélation
Les aliments frais doivent se congeler à fond le plus
rapidement possible. Ceci permet de préserver au
mieux les valeurs nutritives, l'apparence et le goût
des aliments. La fonction Super congélation accélère
la congélation d’aliments frais et aide à protéger les
aliments déjà conservés de la chaleur. Si vous voulez
congeler une grande quantité d’aliments en une fois,
il est recommandé de régler la fonction Super congé-
lation 24h à l’avance avant d’utiliser le compartiment
congélation. La température par défaut est de -24°C.
1. Déverrouillez le panneau en appuyant sur la touche
«F» s’il est verrouillé (Fig.5.5).
2. Appuyez sur la touche « F» (Super congélation)
(Fig.5.9.-1).
3. L’indicateur «f» s’allume et la fonction est activée
(Fig.5.9.-2).
En répétant les étapes précédentes ou en sélectionnant une autre fonction, la fonction susmentionnée
peut être désactivée à nouveau.
Super-Frz.
5.9-2
Super-Frz.
5.9-1
15
Page 52

5- Utilisation
Remarque: Désactivation automatique
La fonction Super congélation se désactive automatiquement après 50 heures. L'appareil fonctionne ensuite à la température préalablement réglée.
5.10
Fuzzy
3 Sec. Holiday
AVERTISSEMENT!
Sous la fonction Vacances, aucun aliment ne doit être conservé dans le réfrigérateur.
La température de +17°C est trop élevée pour conserver des aliments.
5.10 Fonction Vacances
Cette fonction permet de régler la température du ré-
frigérateur de manière permanente à 17°C.
Cela vous permet de garder la porte du réfrigérateur
vide fermée sans odeur ni moisissure pendant votre
longue absence (par exemple pendant les vacances).
Vous êtes libre de régler la température du congélateur.
1. Déverrouillez le panneau en appuyant sur la touche
«F» s’il est verrouillé (Fig.5.5).
2. Appuyez sur la touche «D» (Multifonction) pendant 3secondes Fig.5.10). L'indicateur «d1» s'al-
lume et la fonction est activée.
En répétant les étapes précédentes ou en sélectionnant une autre fonction, la fonction susmentionnée
peut être désactivée à nouveau.
FR
5.11
5.11 Tiroir My Zone
Le compartiment de congélation est équipé d’un tiroir
My Zone (Fig. 5.11). Les fonctions ci-après sont disponibles:
5.11.1 Fonction Fruits et légumes.
Cette fonction est adaptée pour la conservation de fruits et de légumes frais.
Remarque: Fonction Fruits et légumes
Les fruits sensibles comme l'ananas, l'avocat, la banane et les raisins, ainsi que les légumes comme la pomme, l'aubergine, le haricot, le concombre, la courgette et les tomates, ou encore le formage ne doivent pas être conservés dans le tiroir My Zone.
16
Page 53

My Zone
FR
5.11.2 Fonction 0°C Fresh
Cette fonction permet de régler la température dans le tiroir MyZone à 0°C. Cette fonction est appropriée pour la conservation de produits frais tels que la viande ou les denrées
instantanées. . La plupart des aliments conservent leur fraîcheur à 0 °C, sans être pour
autant congelés.
5- Utilisation
Remarque: Fonction 0°C Fresh
▶ En raison de la variation de teneur en eau des viandes, les viandes qui moisissent ra-
pidement sont congelées à une température inférieure à 0°C. Ainsi, coupez immédiatement la viande à conserver et gardez là dans le rayon My Zone à une tempéra-
ture inférieure à 0°C.
5.11.3 Q-Cool (Réfrigération rapide)
Cette fonction permet de refroidir rapidement des boissons en cannette. La température
dans le compartiment MyZone est réglée à+2°C.
Remarque: Tiroir MyZone
▶ L’une des trois fonctions du compartiment MyZone doit toujours être activée.
▶ Pour réduire la température du compartiment réfrigérateur, utilisez la fonction
Q-Cool. Pour l’augmenter, utilisez la fonction Fruits et légumes.
5.11.4 Sélection d’une fonction pour le compartiment MyZone
1. Déverrouillez le panneau en appuyant sur la
touche «G» s’il est verrouillé (Fig.5.5).
2. Appuyez successivement sur la touche « C »
(MyZone) jusqu’à ce que la fonction «c» souhaitée
clignote (Fig.5.11.4).
3. Au bout de quelques secondes, l’indicateur « c»
brille de manière permanente et le réglage est
conrmé.
5.11.4
17
Page 54

5- Utilisation
5.12 Conseils sur la conservation des aliments frais
5.12.1 Conservation dans le compartiment réfrigérateur
▶ Maintenez votre réfrigérateur à une température inférieure à 5°C.
▶ Les aliments chauds doivent être refroidis à la température ambiante avant de les
conserver dans l'appareil.
▶ Les aliments à conserver dans le réfrigérateur doivent être lavés et séchés avant de
les conserver.
▶ Les aliments à conserver doivent être bien couverts pour éviter les odeurs ou une
altération du goût.
▶ Ne conservez pas de grandes quantités d'aliments. Laissez de l'espace entre les ali-
ments pour permettre à l'air froid de circuler entre eux, pour une meilleure réfrigéra-
tion et homogène.
▶ Les aliments consommés tous les jours peuvent être conservés à l'avant du rayon.
▶ Laissez un espace entre les aliments et les parois internes, pour que l'air y circule.
Surtout, ne conservez pas d'aliments près des parois arrière: les aliments peuvent
congeler et s'y coller. Évitez un contact direct entre les aliments (notamment les ali-
ments huileux et acides) et la paroi interne, car les aliments huileux/acides peuvent
l'éroder. Nettoyez l'huile/les acides qui sont sur les aliments.
▶ Les aliments congelés peuvent se décongeler doucement dans le compartiment
réfrigérateur. Ceci permet d’économiser l’énergie.
▶ Le processus de vieillissement des fruits et des légumes tels que la courgette, le
melon, la papaye, la banane, l'ananas, etc.; peut accélérer dans le réfrigérateur. Par
conséquent, il est recommandé de les conserver dans le réfrigérateur. Cependant,
le mûrissement des aliments complètement verts peut être retardé pendant un
certain temps. Les oignons, l'ail, le gingembre, et autres légumes à racine se conser-
vent à une température ambiante.
▶ Les odeurs désagréables à l'intérieur du réfrigérateur signalent que quelque chose
s'est versé et qu'il faut nettoyer. Voir ENTRETIEN ET NETTOYAGE.
▶ Les aliments diérents doivent se conserver dans des rayons diérents en fonction
de leurs caractéristiques Fig. 5.12.1).
FR
18
5.12.1
1
2
3
8
1 Beurre, fromage, œufs, épices, etc.
4
1
5
2
6
7
3
2 Œufs, conserves, épices, etc.
3 Boissons, aliments en conserve.
4 Aliments marinés, conserves, etc.
5 Produits à base de viande, en-cas, etc.
6/7 Pâtes alimentaires, lait, tofu, produits lai-
tiers, etc.
8 Tiroir My Zone:
Fruits, légumes, salade (Fruits et légu-
mes), boissons en cannettes (Q-Cool),
aliments crus et frais (0°C Fresh)
Page 55

FR
5.12.2 Conservation dans le compartiment congélateur
▶ Réglez la température de congélation à -18°C.
▶ 24heures avant la congélation, réglez la fonction Super congélation; pour de petites
quantités d’aliments 4 à 6heures sont susantes.
▶ Les aliments chauds doivent être refroidis à la température ambiante avant de les
conserver dans le congélateur.
▶ Les aliments découpés en petits morceaux se congèlent plus rapidement et se dé-
givrent aussi facilement pour la cuisson. Le poids recommandé pour chaque portion
est moins de 2,5kg.
▶ Il vaut mieux conditionner les aliments avant de les conserver dans le congélateur.
L'extérieur du conditionnement doit être sec pour éviter que les sacs ne se collent
les uns contre les autres. Le matériel de conditionnement doit être sans odeur, hermétique, et non toxique.
▶ Pour éviter de dépasser le temps de conservation, veuillez inscrire la date de congé-
lation, l'heure et le nom de l'aliment sur l'emballage en fonction des temps de
conservation des diérents aliments.
▶ AVERTISSEMENT! Les acides, les alcalis, le sel, etc. peuvent éroder la surface in-
térieure du congélateur. Ne placez pas les aliments contenant ces substances (par
exemple les poissons d'eau profonde) directement sur les surfaces intérieures.
L'eau salée dans le congélateur doit immédiatement être nettoyée.
▶ Évitez de dépasser la durée recommandée par le fabricant pour la conservation des
aliments. Ne sortez que la quantité d'aliments nécessaire du congélateur.
▶ Consommez rapidement les aliments décongelés. Les aliments décongelés ne
peuvent être recongelés sauf s’ils sont préalablement cuits, auquel cas ils ne sont
pas comestibles.
▶ Ne gardez pas une trop grande quantité d'aliments dans le congélateur. Veuillez
vous référer à la capacité de congélation du congélateur - Voir les DONNÉES TECHNIQUES ou les informations sur la plaque signalétique.
▶ Les aliments peuvent se conserver dans le congélateur à une température d’au
moins -18 °C pendant 2 à 12 mois, selon ses caractéristiques (par exemple, la
viande: 3-12mois, les légumes: 6-12mois)
▶ Lorsque vous congelez des aliments frais, évitez de les mettre contre des aliments
déjà congelés. Risque de décongélation!
5.12.3 Lorsque vous conservez les aliments surgelés, veuillez suivre les instructions
suivantes:
▶ Suivez toujours les instructions des fabricants concernant le temps de conservation
de ces aliments. Ne dépassez pas ces délais!
▶ Faites en sorte que le temps entre l'achat et la conservation soit le plus court pos-
sible pour préserver la qualité de l'aliment.
▶ Achetez les aliments surgelés qui peuvent se conserver à une température de
-18°C ou moins.
▶ Évitez d'acheter des aliments qui ont du givre ou de la glace sur l'emballage - cela in-
dique que ces aliments ont été partiellement décongelés puis recongelés à un mo-
ment donné - la montée de température aecte la qualité des aliments.
5- Utilisation
19
Page 56

6- Conseils pour
économiser de I‘énergie
Conseils pour économiser de l’énergie
▶ Assurez-vous que l'appareil est susamment ventilé (Voir INSTALLATION).
▶ N'installez pas l'appareil en direction des rayons solaires ou à proximité des sources
de chaleur (par exemple, les cuisinières, chaue-eau).
▶ Évitez de faire fonctionner l'appareil à une température inutilement basse. La
consommation énergétique augmente lorsque l'appareil fonctionne à des tempéra-
tures basses.
▶ Les fonctions telles que SUPER CONGÉLATION consomment plus d'énergie.
▶ Laissez les aliments refroidir avant de les mettre dans l'appareil.
▶ Ouvrez la porte de l'appareil le moins possible et le plus brièvement possible.
▶ Ne remplissez pas l'appareil pour ne pas obstruer le ux d'air.
▶ Évitez que l'air n'entre dans les aliments emballés.
▶ Maintenez toujours les joints de porte propres pour que la porte se ferme correcte-
ment.
▶ Dégivrez les aliments congelés dans le compartiment de congélation.
FR
20
Page 57

FR
7- Équipement
Remarque: Diérences en fonction des modèles
Selon le modèle, votre produit pourrait ne pas posséder les fonctionnalités suivantes.
Reportez-vous au chapitre DESCRIPTION DU PRODUIT.
7.1 Ventilation multiple
Le réfrigérateur est équipé d’un système de ventilation multiple, qui permet à l’air froid de circuler dans
tous les rayons (Fig.7.1). Ce système permet de maintenir une température homogène et de conserver les
aliments pendant plus longtemps.
7.2 Étagères réglables
Réglez la hauteur des étagères selon vos besoins de
conservation.
1. Pour réaménager une étagère, retirez-la d’abord
en soulevant ses bords arrière (1) puis sortez-la (2)
(Fig.7.2).
2. Pour le réinstaller, placez-le sur les anses des deux
côtés puis poussez-le en profondeur vers l'arrière
jusqu'à ce que l'arrière se xe dans les anses sur
les côtés.
7.1
7.2
Remarque: Grilles
Assurez-vous que tous les bouts du rayon sont uniformes.
7.3 Balconnets réfrigérateur
Les casiers de porte peuvent être démontés pour les
nettoyer.
Placez les mains sur chaque côté du casier, soulevez-le
(1) puis retirez-le (2) (Fig.7.3).
Pour remettre le casier, répétez ces procédures dans
le sens inverse.
7.4 Tiroir My Zone
Pour utiliser et régler la température du compartiment
My Zone (Fig. 7.4), veuillez vous référer à la partie UTILISATION (Tiroir My Zone).
7.3
1
1
2
7.4
21
Page 58

7- Équipement
7.5
Remarque: Autocollant OK
Une fois que l'appareil est mis en marche, il faut 12heures pour atteindre les bonnes
températures.
7.6
7.7
2 2
1
7.5 EN OPTION: Indicateur de température OK
L’indicateur de température OK (Fig.7.5) sert à déterminer les températures en dessous de +4°C. Diminuez
progressivement la température si le signe «OK » ne
s'ache pas.
7.6 Tiroir de congélateur démontable
Pour retirer le tiroir, tirez-le au maximum (1) puis soulevez et sortez-le (2) (Fig.7.6).
Pour remettre le tiroir, répétez ces étapes dans le sens
inverse.
7.7 Tige de liaison amovible
La tige de liaison peut être retirée après avoir retiré le
tiroir de congélation supérieur (Fig. 7.7):
1. Appuyez sur le support (A) du seau en plastique (1)
et retirez-le (2).
2. Répétez l’étape 1 de l’autre côté.
3. Retirez (3) la tige de liaison (B).
Pour remettre la tige de liaison, répétez ces étapes
dans le sens inverse.
FR
7.8
7.8 Tiroir de congélation 3D
Les tiroirs du congélateur (Fig. 7.8) sont complètement extensibles. Ils sont équipés de glissières télescopiques à roulement facile pour vous permettre de
mieux sortir et de remettre les tiroirs dans le congélateur. Grâce à son système de fermeture automatique
de porte, il est facile de manœuvrer et d'économiser
ainsi l'énergie.
AVERTISSEMENT!
Ne surchargez pas les tiroirs. Charge maximale pour chaque tiroir: 35kg!
22
Page 59

FR
7.9 Bac à glaçons
1. Remplissez les bacs à glaçons au 3/4 et laissez-les
dans le tiroir du compartiment de congélation (Fig.
7.9-1).
2. Tordez légèrement le bac ou tenez-le sous le robi-
net pour décoller les glaçons (Fig.7.9-2).
7- Équipement
7.9-2
7.9-1
7.10 Éclairage
Le voyant DEL intérieur s’allume à l’ouverture de la porte. La qualité des lumières n’est
aectée par aucun appareil ou réglage.
23
Page 60

8- Entretien et nettoyage
FR
AVERTISSEMENT!
Débranchez l'appareil de la prise d'alimentation avant de le nettoyer.
8.1Généralités
Nettoyez l'appareil uniquement lorsqu'il y a moins d'aliments ou pas d'aliments.
Pour un bon entretien et an de prévenir les mauvaises odeurs, veuillez nettoyer l’appareil
toutes les quatre semaines.
AVERTISSEMENT!
▶ Évitez de nettoyer l'appareil à l'aide de brosses dures, métalliques, de détergent en
poudre, d'essence, d'acétate d'amyle, d'acétone et toute autre solution similaire organique, acide ou alcaline. Veuillez nettoyer avec du détergent spécial réfrigérateur
pour éviter tout dommage.
▶ N'utilisez pas de vaporisateur ou ne rincez pas l'appareil pendant le nettoyage.
▶ N'utilisez pas un pulvérisateur d'eau ou nettoyant à vapeur pour nettoyer l'appareil.
▶ Ne nettoyez pas les rayons de congélation en verre avec de l'eau chaude. Le change-
ment soudain de température pourrait briser le verre.
▶ Évitez de toucher la surface intérieure du tiroir de rangement du congélateur, surtout
avec les mains mouillées, elles pourraient se congeler au contact de ladite surface.
▶ En cas de chauage, vériez l'état des aliments congelés.
8.1
8.2 Dégivrage
Le réfrigérateur et le congélateur se dégivrent automatiquement, aucune opération manuelle n'est nécessaire.
▶ Gardez toujours le joint de la porte propre.
▶ Nettoyez l’intérieur et l’extérieur de l’appareil
avec une éponge humide humidiée dans de
l’eau tiède et un détergent doux (Fig.8.1).
▶ Rincez avec un torchon doux.
▶ Ne lavez aucune pièce de l’appareil dans le lave-
vaisselle.
▶ Nettoyez les accessoires uniquement à l’eau tiède
et avec un détergent doux et neutre.
▶ Attendez au moins 5 minutes avant de redé-
marrer l'appareil car plusieurs redémarrages endommageraient le compresseur.
8.3 Remplacement des lampes LED
Les lampes sont des lampes LED; elles consomment moins d'énergie et ont une longue
durée de vie. En cas de problème, veuillez contacter le service clientèle. Voir SERVICE
AVERTISSEMENT!
CLIENTÈLE.
Ne remplacez pas la lampe DEL vous-même, elle doit être remplacée uniquement par
le fabricant ou l'agent de maintenance agréé.
24
Page 61

FR
Les lampes sont des lampes LED; elles consomment moins d'énergie et ont une longue
durée de vie. En cas de problème, veuillez contacter le service clientèle. Voir SERVICE
CLIENTÈLE.
Caractéristiques des lampes:
Tension 12V; Puissance maximale: 2W
8.4 Joints de porte secondaires démon-
tables
L'appareil dispose de six joints de porte sur les tiroirs
inférieur et supérieur du congélateur.
1. Localisez les cinq joints de porte en haut et en bas
du tiroir du congélateur (Fig.8.4-1.).
2. Assurez-vous que les côtés pliés des joints poin-
tent vers l’intérieur lors de la xation (Fig.8.4-2.).
3. Localisez le joint inférieur du tiroir supérieur tel
qu’indiqué (Fig.8.4-3.).
4. Assurez-vous que son côté plié pointe vers l’inté-
rieur lors de la xation (Fig.8.4-4.).
Vous pouvez avoir ces joints ainsi que les joints de la
porte / tiroir pivotant auprès du service clientèle. (voir
la carte de garantie).
8- Entretien et nettoyage
8.4
1. 2.
3.
4.
8.5 Non-utilisation pendant une longue période
Si l’appareil n’est pas utilisé pendant une longue période, et si vous n’allez pas utiliser la
fonction Vacances pour le réfrigérateur:
▶ Retirez les aliments.
▶ Débranchez la prise d'alimentation.
▶ Nettoyez l'appareil tel qu'indiqué ci-dessus.
▶ Laissez la porte et les tiroirs/porte du congélateur ouverts pour éviter les mauvaises
odeurs à l'intérieur.
Remarque: Hors tension
N'éteignez l'appareil que si c'est absolument nécessaire.
8.6 Déplacement de l'appareil
1. Retirez tous les aliments et débranchez l'appareil.
2. Sécurisez les rayons et autres pièces amovibles à l'intérieur du réfrigérateur et du
congélateur à l'aide d'un ruban adhésif.
3. Ne penchez pas le réfrigérateur à plus de 45° pour éviter d'endommager le système
de réfrigération.
AVERTISSEMENT!
▶ Ne soulevez pas l'appareil par les poignées.
▶ Ne placez jamais l'appareil horizontalement au sol.
25
Page 62
9- Dépannage
FR
Vous pouvez résoudre la plupart des problèmes qui pourraient survenir sans expertise
précise. En cas de problème, veuillez vérier toutes les solutions possibles en suivant les
instructions ci-dessous avant de contacter un service après-vente. Voir SERVICE CLIENTÈLE.
AVERTISSEMENT!
▶ Avant tout entretien, veuillez arrêter l’appareil et débranchez-le du secteur.
▶ Les appareils électriques doivent être entretenus uniquement par des experts en
électricité, parce qu'une mauvaise intervention pourrait causer des dommages
considérables.
▶ Faites remplacer le cordon d'alimentation endommagé par le fabricant, son repré-
sentant ou par des personnes qualiées an d'éviter tout risque.
9.1 Tableau de dépannage
Problème Causes probables Solutions possibles
Le compresseur
ne fonctionne
pas.
L'appareil tourne
continuellement
ou tourne pendant
trop longtemps.
L'intérieur du réfrigérateur est sale
et/ou dégage des
odeurs.
• La che principale n'est pas bran-
chée à la prise.
• L’appareil est en cycle de dé-
givrage.
• La température intérieure et exté-
rieure est trop élevée.
• L'appareil a été en arrêt pendant
trop longtemps.
• Une porte / un tiroir de l'appareil ne
se ferme pas correctement.
• La porte / le tiroir a été ouvert(e)
trop souvent ou pendant trop
longtemps.
• La température du congélateur est
trop basse.
• Le joint de porte / tiroir est sale,
usé, ssuré ou pas compatible.
• Le ux d'air nécessaire n'est pas
garanti.
• L'intérieur du réfrigérateur a besoin de nettoyage.
• Les aliments aux odeurs fortes
sont conservés dans le réfrigérateur.
• Branchez la che.
• Ce processus est normal pour un
dégivrage automatique.
• Dans ce cas, il est normal que l'ap-
pareil tourne plus longtemps.
• Normalement, il faut 8 à 12heures
pour que l'appareil se dégivre
complètement.
• Fermez la porte / le tiroir et assu-
rez-vous que l'appareil est placé
sur une surface plane et qu'on ne
retrouve pas d'aliments ou de récipient qui cognent sur la porte.
• N'ouvrez pas la porte / le tiroir trop
fréquemment.
• Réglez la température le plus haut
possible jusqu'à obtenir une température du réfrigérateur satisfai-
sante. Il faut 24 heures pour que
la température du réfrigérateur se
stabilise.
• Nettoyez le joint de la porte / du
tiroir ou faites-le remplacer par le
service client.
• Assurez une ventilation adéquate.
• Nettoyez l'intérieur du réfrigéra-
teur.
• Emballez les aliments correcte-
ment.
26
Page 63

FR
Problème Causes probables Solutions possibles
L’appareil n’est pas
susamment froid.
L’appareil
n’est pas susamment froid
Formation de
moisissure à l'intérieur du réfrigérateur.
La moisissure
s'accumule sur
les surfaces extérieures du réfrigérateur ou entre la
porte et le tiroir.
Du givre dur dans
le congélateur.
• La température est trop élevée. • Réglez à nouveau la température
• Des aliments trop chauds sont
placés dans le congélateur.
• Trop d'aliments ont été conservés
à la fois.
• Les aliments sont trop près les uns
des autres.
• Une porte / un tiroir de l'appareil ne
se ferme pas correctement.
• La porte / le tiroir a été ouvert(e)
trop souvent ou pendant trop
longtemps.
• La température est trop basse. • Réglez à nouveau la température
• La fonction Super congélation est
.
activée ou a fonctionné pendant
longtemps.
• Le climat est trop chaud et trop
humide.
• Une porte / un tiroir de l'appareil ne
se ferme pas correctement.
• La porte / le tiroir a été ouvert(e)
trop souvent ou pendant trop
longtemps.
• Les récipients contenant les aliments ou les liquides sont laissés
ouverts.
• Le climat est trop chaud et trop
humide.
• La porte / le tiroir n’est pas hermétiquement fermé(e). L'air froid
dans l'appareil et l'air chaud à l'extérieur est en condensation.
• Les aliments ne sont pas bien emballés.
• Une porte / un tiroir de l'appareil ne
se ferme pas correctement.
• La porte / le tiroir a été ouvert(e)
trop souvent ou pendant trop
longtemps.
• Le joint de porte / tiroir est sale,
usé, ssuré ou pas compatible.
• Quelque chose à l'intérieur em-
pêche la porte de se fermer correctement.
9- Dépannage
• Laissez toujours les aliments re-
froidir avant de les conserver.
• Conservez toujours de petites
quantités d'aliments.
• Laissez de l'espace entre les dif-
férents aliments pour permettre à
l'air de circuler.
• Fermez la porte / le tiroir.
• N'ouvrez pas la porte / le tiroir trop
fréquemment.
• Désactivez la fonction Super
congélation.
• Augmentez la température
• Fermez la porte / le tiroir.
• N'ouvrez pas la porte / le tiroir trop
fréquemment.
• Laissez les aliments chauds re-
froidir à la température ambiante
avant de les couvrir et de les placer
dans l'appareil.
• Ceci est normal en zone humide
et cela change lorsque l'humidité
diminue.
• Assurez-vous que la porte / le tiroir est bien fermé(e).
• Emballez toujours bien les ali-
ments.
• Fermez la porte / le tiroir.
• N'ouvrez pas la porte / le tiroir trop
fréquemment.
• Nettoyez les joints de la porte /
du tiroir ou remplacez-les par de
nouveaux.
• Repositionnez les rayons, les
casiers de porte, ou les récipients
à l'intérieur pour permettre à la
porte/tiroir de se fermer.
27
Page 64

9- Dépannage
Problème Causes probables Solutions possibles
L’appareil produit
des sons bizarres.
Un son léger
comparable à
celui de l’eau qui
coule retentit.
Vous entendrez
un bip.
Vous entendrez
un léger ronronnement
Le voyant intérieur
ou le système de
refroidissement ne
fonctionne pas.
Les côtés de l'armoire et la bande
de porte deviennent chauds.
.
• L’appareil n’est pas placé sur une
surface plane.
• L’appareil est en contact avec cer-
tains objets.
• C’est normal. • -
• La porte du réfrigérateur est ou-
verte.
• Le système anti-condensation
fonctionne.
• La che principale n'est pas bran-
chée à la prise.
• L'alimentation électrique est anor-
male.
• La lampe LED ne fonctionne pas. • Veuillez contacter le service client
• C’est normal. • -
• Réglez les supports an d’équi-
librer l’appareil.
• Retirez les objets autour de l’appareil.
• Fermez la porte ou arrêtez l'alarme
manuellement.
• Ceci prévient la condensation et
c’est normal.
• Branchez la che.
• Vériez l'alimentation électrique
de la pièce. Contactez la compagnie d'électricité.
pour changer la lampe.
FR
9.2 Coupure de courant
En cas de coupure d'électricité, les aliments sont en sécurité au froid pendant près de
20heures. Suivez les conseils suivants pour une interruption de courant prolongée, notamment en été:
▶ Ouvrez la porte / le tiroir à des fréquences très réduites.
▶ Ne conservez pas plus d'aliments dans l'appareil pendant l'interruption de courant.
▶ Si vous êtes informé à l'avance de la coupure et de ce que l'interruption durera plus
de 20heures, faites des boules de glace, mettez-les dans un récipient et placez le
récipient au-dessus du réfrigérateur.
▶ Il est conseillé d'inspecter les aliments une fois le courant rétabli.
▶ Étant donné que la température à l'intérieur du réfrigérateur va augmenter pendant
l'interruption ou autre panne, la période de conservation et la qualité des aliments
seront réduites. Tout aliment décongelé doit être consommé, cuisiné ou recongelé
(si possible), immédiatement après, pour éviter tout risque sur la santé.
Remarque: Fonction Mémoire pendant la coupure d'électri-
cité
Après le retour de l'électricité, l'appareil continue de fonctionner avec les réglages dénis au préalable avant l'interruption du courant.
28
Page 65

W2
D1
D3
D2
W1
D4
FR
10- Installation
10.1 Déballage
AVERTISSEMENT!
▶ L'appareil est lourd. Il faut toujours être au moins à deux pour le manœuvrer.
▶ Tenez tous les emballages hors de portée des enfants et mettez-les au rebut dans le
respect de l'environnement.
▶ Sortez l'appareil de l'emballage.
▶ Retirez tous les emballages.
10.2 Conditions environnementales
La température de la pièce doit toujours varier entre 10°C et 43 °C, parce qu'elle peut
inuencer la température à l'intérieur de l'appareil et la consommation énergétique. N'ins-
tallez pas l'appareil près des appareils qui produisent de la chaleur (cuisinières, réfrigéra-
teurs) sans isolation.
10.3 Exigences en matière d’espace
Espace nécessaire lorsque la porte est ouverte
(Fig.10.3):
Gerätebreite
en mm
W1 W2 D1 D2 D3 D4
700 1188 600 887 966 100
Gerätetiefe
en mm
Wandabstand
en mm
10.3
10.4 Ventilation croisée
Pour une meilleure ventilation de l’appareil pour des
raisons de sécurité, les instructions sur la ventilation
croisée doivent être respectées (Fig.10.5).
>10 cm
190 cm
>10 cm
70 cm
10.4
>10 cm
29
Page 66
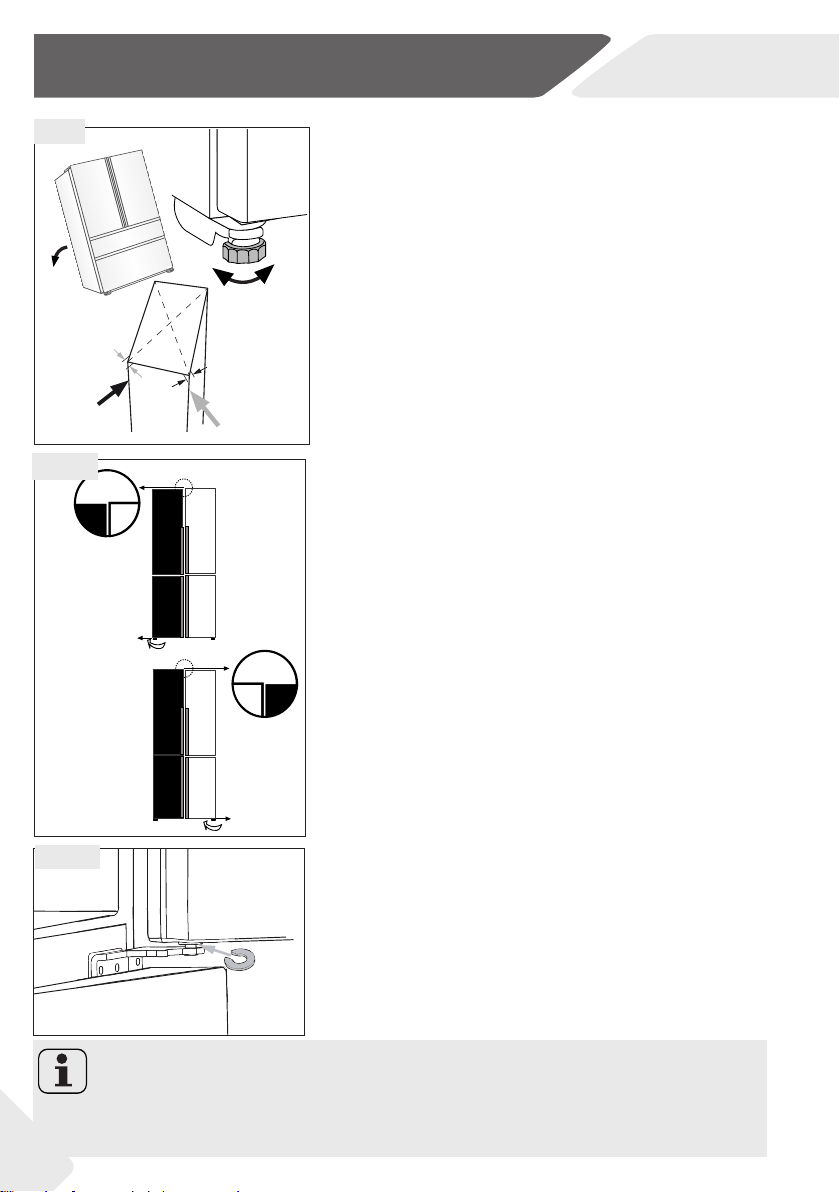
10- Installation
10.5
1.
max 45°
2.
3.
10.6-1
FR
10.5 Alignement de l’appareil
L'appareil doit être placé sur une surface plane et solide.
1. Penchez légèrement l’appareil vers l’arrière
(Fig.10.5).
2. Réglez les supports de xation au niveau souhaité.
3. Vériez la stabilité en basculant entre les diago-
nales. Faites basculer légèrement dans les deux
directions. Sinon le cadre peut se déformer causant ainsi une fuite au niveau des joints de porte.
Une légère inclinaison vers l'arrière facilite la fermeture de la porte.
10.6 Réglage minutieux des portes
Si les portes ne sont pas au même niveau, vous pouvez
y remédier en suivant la procédure suivante:
10.6.1 Utilisation des pieds ajustables
Tournez les pieds ajustables en suivant la direction de
la èche (Fig. 10.6-1) pour les tourner vers le haut ou
vers le bas.
10.6-2
10.6.2 Utilisation des entretoises
▶ Ouvrez la porte supérieure et soulevez-la.
▶ Attachez soigneusement l’entretoise (fournie
dans le sac d’accessoires) dans l’anneau en plastique blanc de la charnière centrale à la main ou en
utilisant des outils comme une pince (Fig. 10.6-2).
N'égratignez pas la porte.
Remarque: Positionnement
Lors de l'utilisation ultérieure du réfrigérateur, un phénomène irrégulier au niveau des
portes peut se produire suite au poids des aliments conservés. Veuillez les ajuster selon les méthodes susmentionnées.
30
Page 67

2 h
FR
10.7 Temps d’attente
L'huile d'entretien du compresseur se trouve dans la
capsule du compresseur. Cette huile peut se déverser
dans le circuit fermé du système pendant le transport.
Avant de brancher l’appareil à l’alimentation électrique,
vous devez attendre 2 heures (Fig. 10.7) pour permettre à l’huile de retourner dans la capsule.
10- Installation
10.7
10.8. Raccordement électrique
Avant chaque branchement, vériez si:
▶ l’alimentation électrique, la prise et le fusible correspondent à la plaque signalétique.
▶ la prise d’alimentation est mise à la terre sans aucune che multiple ou rallonge;
▶ la prise d'alimentation et la che correspondent parfaitement.
Connectez la che à une prise correctement installée.
AVERTISSEMENT!
Pour éviter tout risque, remplacez tout câble endommagé auprès du service clients
(voir carte de garantie).
31
Page 68

11- Informations techniques
FR
11.1 Fiche du produit conforme à la réglementation UE N°1060/2010
Marque de fabrique Haier
Numéro d'identication du modèle
Catégorie du modèle
Classe d'ecacité énergétique A+ A++
Consommation énergétique annuelle (kWh/
1)
an)
Volume de conservation réfrigération (L) 303 303
Volume de conservation congélation (L) **** 121 121
Classement en étoile
Température des autres compartiments >
14°C
Système de givre
Protection anti-interruption électrique (h) 20
Capacité de congélation (kg/24h) 14
Classe climatique
Cet appareil doit être utilisé à une tempéra-
ture ambiante variant entre 10°C et 43°C.
Émission de bruits aériens (db(A) re 1pW) 40 38
Type de fabrication
1)
basé sur des résultats d'essais standards pendant 24heures. La consommation réelle
d'énergie dépendra de l'utilisation de l'appareil et de sa position.
HB16FMAA
HB16FBAA
Réfrigérateur-congélateur
387 305
Non applicable
SN/N/ST/T
Position libre
HB16FMAAA
HB16FBAAA
Oui
11.2 Autres données techniques
Volume total (en L) 485
Volume net (en L) 424
Tension/Fréquence 220-240V ~/ 50Hz
Puissance d'entrée (W)
Courant d'entrée (A)
Fusible principal (A)
Réfrigérant/quantité
Dimensions (P/L/H en mm)
HB16FMAA/ HB16FBAA: R600a /65g
HB16FMAAA/HB16FBAAA: R600a /62g
120
1,5
16
675x700x1900
11.3 Normes et directives
Ce produit répond aux exigences de toutes les directives CE applicables ainsi que les normes harmonisées correspondantes, qui prévoient le marquage CE.
32
Page 69

FR
Nous vous recommandons notre service clients Haier et l’utilisation de pièces de rechange d’origine.
Si vous avez un problème avec l’appareil, veuillez vous référer à la section DÉPANNAGE.
Si vous ne trouvez pas de solution, veuillez contacter
▶ votre vendeur local ou
▶ rendez-vous sur le site www.haier.com, dans la zone Service et support, vous trou-
verez des numéros de téléphone et une FAQ. Vous pourrez également contacter le
service de réclamation.
Pour contacter notre Service, rassurez-vous que les informations ci-après sont disponibles.
Ces informations sont disponibles sur la plaque signalétique.
Modèle ____________________ N° de série _____________________
Vériez également la Carte de garantie fournie avec le produit en cas de garantie.
Pour des renseignements généraux concernant les entreprises, vous trouverez ci-join-
tes nos adresses en Europe:
Adresses de Haier en Europe
12- Service client
Pays* Adresse postale Pays* Adresse postale
Haier Europe Trading S.R.L.
Italie
Espagne
Portugal
Allemagne
Autriche
Royaume-Uni
*Pour de plus amples informations, veuillez consulter le site www.haier.com
Via De Cristoforis, 12
21100 Verese
ITALIE
Haier Iberie SL
Pg. Garcia Faria, 49-51
08019 Barcelone
ESPAGNE
Haier Allemagne GmbH
Hewlett-Packard-Str. 4
D-61352 Bad Homburg
ALLEMAGNE
Haier Appliances UK Co.Ltd.
One Crown Square
Church Street East
Woking, Surrey, GU21 6HR
Royaume-Uni
France
Belgique-FR
Belgique-NL
Pays-Bas
Luxembourg
Pologne
République
Tchèque
Hongrie
Grèce
Roumanie
Russie
Haier France SAS
3-5 rue des Graviers
92200 Neuilly sur
Seine
FRANCE
Haier Bénélux SA
Anderlecht
Route de Lennik 451
BELGIQUE
Haier Pologne Sp.
zo.o.
Al. Jerozolimskie
181B
02-222 Warszawa
POLOGNE
33
Page 70

FR
34
Page 71

HB16_FR-V01_012017
Page 72

Gebrauchsanleitung
Kühl-Gefrierkombination
HB16FMAA
HB16FBAA
HB16FMAAA
HB16FBAAA
DE
Page 73

Danke
DE
Danke, dass Sie sich für ein Haier Produkt entschieden haben.
Bitte lesen Sie diese Gebrauchsanleitung sehr sorgfältig bevor Sie das Gerät in Betrieb
nehmen. Sie enthält wichtige Informationen, damit Sie viel Freude an Ihrem Gerät haben
und ein sicherer und sauberer Betrieb gewährleistet ist.
Bewahren Sie dieses Handbuch gut auf, damit Sie bei Bedarf immer wieder darauf
zurückgreifen können.
Wenn Sie die Maschine verkaufen, abgeben oder bei einem Umzug zurücklassen,
geben Sie bitte die Gebrauchsanleitung dazu, damit der neue Besitzer sich mit den
Anweisungen zur Benutzung und zum sicheren Betrieb vertraut machen kann.
Legende
Achtung! Unbedingt lesen!
Wichtige Sicherheitshinweise.
Allgemeine Hinweise und Tipps
Umwelt-Tipps
Entsorgung
Produkte mit diesem Symbol dürfen am Ende ihrer
Lebensdauer nicht in den Hausmüll gegeben werden,
sondern müssen an einem Sammelpunkt für das Recycling von elektrischen und elektronischen Geräten
abgegeben werden.
WARNUNG!
Verletzungs- und Erstickungsrisiko!
Das Altgerät ist vor der Verschrottung funktionsuntüchtig zu machen, damit Kinder
sich nicht selbst einschließen können.
Achten Sie vor der fachgerechten Entsorgung darauf, dass die Kühlmittelleitungen
nicht beschädigt sind.
Trennen Sie das Gerät vom Stromnetz, entfernen Sie das Netzanschlusskabel, entnehmen Sie die Ablagen und Behälter und demontieren Sie die Tür/en und Dichtungen oder
machen Sie den Türverschluss unbrauchbar, damit spielende Kinder sich oder andere
nicht einsperren und somit in Lebensgefahr kommen.
2
Page 74

DE
1- Sicherheitshinweise ......................................................................................................................4
2- Vorgesehener Gebrauch .............................................................................................................9
3- Gerätebeschreibung .................................................................................................................. 10
4- Bedienblende ............................................................................................................................... 11
5- Bedienung ..................................................................................................................................... 12
6- Energiespartipps ......................................................................................................................... 20
7- Ausstattung ................................................................................................................................. 21
8- Reinigung und Pege ................................................................................................................. 24
9- Fehlerbehebung .......................................................................................................................... 26
10- Installation .................................................................................................................................. 29
11- Technische Daten .................................................................................................................... 32
Inhalt
12- Kundendienst ............................................................................................................................ 33
3
Page 75

1- Sicherheitshinweise
Diese Hinweise dienen der Sicherheit und sollten daher vor der Installation und Inbetriebnahme aufmerksam gelesen werden.
WARNUNG!
Vor dem ersten Einschalten
▶ Vergewissern Sie sich, dass das Gerät keinen Transportschaden
aufweist.
▶ Entfernen Sie alle Verpackungsmaterialien und bewahren Sie
diese außerhalb der Reichweite von Kindern auf.
▶ Lassen Sie das Gerät vor der Installation mindestens zwei Stun-
den stehen. Dadurch kann sich das Kühlsystem nach dem Transport erholen.
▶ Das Gerät ist schwer! Immer mit mindestens zwei Personen
handhaben!
Installation
▶ Das Gerät sollte an einem gut belüfteten Ort stehen. Mindestens
einen Abstand von 10 cm über und um das Gerät freihalten.
▶ Stellen Sie das Gerät niemals in einen feuchten Bereich oder an einen
Ort, wo er mit Wasser bespritzt werden kann. Entfernen und trocknen Sie Spritzer und Flecken mit einem weichen, sauberen Tuch.
▶ Das Gerät nicht im direkten Sonnenlicht oder in der Nähe einer
Wärmequelle (z. B. Heizkörper, Herd und andere Wärme abgebende Geräte) aufstellen.
▶ Der Aufstellort muss so beschaen sein, dass sich die Gerätetü-
ren vollständig önen lassen.
▶ Die Lüftungsönungen am Gerät oder im Einbaugehäuse müs-
sen freigehalten werden.
▶ Die Angaben auf dem Typenschild müssen mit den elektrischen
Anschlussbedingungen übereinstimmen. Falls nicht, kontaktieren Sie bitte einen Elektriker.
▶ Das Gerät muss an eine separat geerdete, stets zugängliche
Steckdose angeschlossen werden.
▶ Mehrfachsteckdosen oder Verlängerungskabel dürfen nicht be-
nutzt werden.
DE
4
Page 76

DE
WARNUNG!
▶ Das Gerät wird mit 220-240 V/50 Hz betrieben. Abnorma-
le Spannungsschwankungen können bewirken, dass das Gerät
nicht startet, dass der Temperaturregler oder der Kompressor
beschädigt werden oder dass während des Betriebes unnormale
Geräusche auftreten. In einem solchen Fall muss ein automatischer Spannungsregler eingebaut werden.
▶ Das Gerät darf nicht auf der Netzanschlussleitung steht. Nicht
auf das Netzkabel treten.
▶ Der Kühlmittelkreislauf darf nicht beschädigt werden.
Täglicher Gebrauch
▶ Dieses Gerät kann von Kindern ab 8 Jahren und darüber und von
Personen mit reduzierten physischen, sensorischen oder mentalen Fähigkeiten oder Mangel an Erfahrung und/oder Wissen
benutzt werden, wenn sie beaufsichtigt oder bezüglich des sicheren Gebrauchs des Gerätes unterwiesen wurden und die daraus resultierenden Gefahren verstanden haben.
▶ Halten Sie Kinder unter 3 Jahren vom Gerät fern, es sei denn, sie
sind unter kontinuierlicher Aufsicht.
▶ Kinder dürfen nicht mit dem Gerät spielen.
▶ Wenn in der Nähe des Geräts Kohlegas oder anderes entzünd-
liches Gas entweicht, drehen Sie das Ventil des ausströmen-
den Gases zu, önen Sie Türen und Fenster und ziehen Sie das
Netzkabel dieses Geräts oder anderer Geräte nicht aus der
Stromquelle.
▶ Das Gerät ist für einen Betrieb bei Umgebungstemperaturen
zwischen 10 und 43°C ausgelegt. Das Gerät arbeitet möglicher-
weise nicht ordnungsgemäß, wenn es für eine längere Zeit einer
Temperatur oberhalb oder unterhalb des angegebenen Bereichs
ausgesetzt ist.
▶ Stellen Sie keine instabilen Gegenstände (schwere Gegenstän-
de, mit Wasser gefüllte Behälter) auf das Gerät, um Verletzun-
gen durch herabfallende Gegenstände oder einen elektrischen
Schlag bei Wasserkontakt zu verhindern.
▶ Ziehen Sie nicht an den Türablagen. Die Tür könnte verzogen, die
Türablage abgerissen oder das Gerät ins Wanken gebracht werden.
1- Sicherheitshinweise
5
Page 77

1- Sicherheitshinweise
WARNUNG!
▶ Önen und schließen Sie die Tür(en) nur an den Grien. Der
Spalt zwischen den Abteilen sowie zwischen Tür und Schrank
ist sehr schmal. Nicht hineingreifen; es besteht Quetschgefahr.
Die Gerätetür(en) nur önen und schließen, wenn sich im Bewe-
gungsbereich der Tür keine Kinder aufhalten.
▶ Lagern und benutzen Sie keine brennbaren, explosiven oder kor-
rosiven Stoe im Gerät oder in dessen Nähe.
▶ Bewahren Sie keine Medikamente, Bakterien oder chemische
Substanzen im Gerät auf. Dieses Gerät ist ein Haushaltsgerät. Es
wird nicht empfohlen, Materialien darin aufzubewahren, die genaue Temperatureinhaltung erfordern.
▶ Lagern Sie niemals Flüssigkeiten (insbesondere kohlensäu-
rehaltige Getränke) - außer hochprozentige Spirituosen - im
Gefrierabteil ein, da diese platzen könnten.
▶ Bei Erwärmung im Gefrierabteil muss der Zustand des
Gefriergutes überprüft werden. Angetautes muss gegebenenfalls verarbeitet (kochen, braten) und in gegartem Zustand wieder eingefroren werden.
▶ Vermeiden Sie unnötig tiefe Temperaturen im Kühlabteil einzu-
stellen. Es könnten Minustemperaturen auftreten! Achtung: Flaschen können platzen.
▶ Berühren Sie Tiefkühlgut nicht mit nassen Händen (Handschuhe
tragen)! Ebenso Eis am Stiel nicht sofort nach der Entnahme aus
dem Gefrierabteil verzehren. Es besteht die Gefahr festzufrieren
bzw. die Entstehung von Frostblasen. ERSTE HILFE: Sofort unter
ießendes, kaltes Wasser halten! Nicht wegreißen!
▶ Berühren Sie nicht die Innenächen des Gefrierabteils während
des Betriebes, insbesondere nicht mit nassen Händen. Es besteht die Gefahr festzufrieren.
▶ Trennen Sie das Gerät bei Stromausfall oder vor dem Reinigen vom
Netz. Warten Sie mindestens 5 Minuten, bevor Sie das Gerät wieder
anlassen, da häuges Starten den Kompressor beschädigen kann.
▶ Benutzen Sie keine elektrischen Geräte im Kühl- und Gefrierabteil
benutzen, sofern diese nicht vom Hersteller empfohlen wurden.
DE
6
Page 78

DE
WARNUNG!
Wartung / Reparatur
▶ Die Reinigung und Wartung darf nur dann von Kindern durchge-
führt werden, wenn sie beaufsichtigt werden.
▶ Trennen Sie das Gerät vor der Durchführung von Wartungsarbeiten
von der Stromzufuhr. Vor dem Wiedereinschalten mindestens 5
Minuten warten, da häuges Einschalten den Kompressor be-
schädigen kann.
▶ Ziehen Sie nur am Stecker und nicht am Anschlusskabel, um das
Gerät vom Stromnetz zu trennen.
▶ Reinigen Sie das Gerät nicht mit hartborstigen Bürsten, Draht-
bürsten, Scheuerpulver, Benzin, Amylacetat, Aceton und ähnli-
chen organischen Lösungen, Säure oder alkalischen Lösungen.
▶ Entfernen Sie Reif- und Eisansätze nicht mit scharfkantigen
Gegenständen. Zum Abtauen keine Sprays, keine elektrischen
Heizgeräte wie Heizlüfter, Haartrockner, Dampfreiniger oder
andere Wärmequellen verwenden! Kunststoteile könnten sich
verformen.
▶ Setzen Sie außer den vom Hersteller empfohlenen keine sons-
tigen mechanischen Geräte oder andere Mittel ein, um den Ab-
tauprozess zu verkürzen.
▶ Wird das Netzkabel beschädigt, so muss es durch den Hersteller,
seinen Kundendienst oder ähnlich qualizierte Personen ersetzt
werden, um Gefahren zu vermeiden.
▶ Versuchen Sie nicht, das Gerät selbst zu reparieren, zu demon-
tieren oder technisch zu verändern. Im Reparaturfall wenden Sie
sich bitte an den Kundendienst.
▶ Beseitigen Sie mindestens einmal im Jahr die Staubablagerungen
von den Teilen an der Rückseite des Gerätes gründlich mit einer
weichen Bürste oder dem Staubsauger, um Brandgefahr sowie
erhöhten Energieaufwand zu vermeiden.
▶ Sprühen oder spülen Sie das Gerät beim Reinigen nicht ab. Reini-
gen Sie das Gerät weder mit Dampf- noch mit Wasserstrahl.
▶ Reinigen Sie die kalten Glasablagen nicht mit heißem Wasser.
Plötzliche Temperaturänderungen könnten zu Glasbruch führen.
1- Sicherheitshinweise
7
Page 79

1- Sicherheitshinweise
DE
Informationen zum Kühlmittel
WARNUNG!
Dieses Gerät ist mit dem brennbaren Kühlmittel ISOBUTAN
(R600a) befüllt. Achten Sie darauf, dass die Kühlmittelrohre bei
Transport oder Installation nicht beschädigt werden. Austretendes
Kühlmittel kann Augenschäden verursachen oder sich entzünden.
Im Schadensfall sind oenen Feuerquellen fernzuhalten und der
Raum gründlich zu lüften. Weder die Netzanschlussleitung dieses
Gerätes noch eines anderen darf gezogen oder an das Stromnetz
angeschlossen werden. Benachrichtigen Sie den Kundendienst.
Sollten Spritzer des Kältemittels ins Auge gelangt sein, spülen Sie
das Auge unter ießendem Wasser aus und kontaktieren Sie sofort
den Augenarzt.
ACHTUNG!
Schließen Sie die linke Tür nur mit eingeklappter Tür-
1.
leiste (1).
Anderenfalls (2) kann die Türleiste verbiegen und deren
2.
Aufhängung oder die rechte Tür beschädigt werden,
sodass die Dichtung und Kühlleistung nicht mehr gewährleistet ist.
Innerhalb des Geräterahmens bendet sich ein Heizungs-Element, wodurch die Oberächentemperatur
ansteigen kann. Dies ist normal und beeinusst die
Funktion des Gerätes nicht.
8
Page 80

DE
2-Vorgesehener Gebrauch
2-Vorgesehener Gebrauch
2.1 Vorgesehener Gebrauch
Das Gerät ist zum Kühlen und Gefrieren von Lebensmitteln geeignet. Dieses Gerät wurde ausschließlich für den Gebrauch in trockenen Innenräumen im Haushalt konzipiert. Bei
gewerblicher Nutzung entfällt die Haier Garantie. Verwenden Sie es nicht für andere Zwecke als die, für die es ausgelegt ist.
Veränderungen oder Modikationen an dem Gerät sind nicht zulässig. Solche Eingrie
führen zum Verlust von Gewährleistungsansprüchen.
2.2 Zubehör
Zubehör entsprechend der nachfolgenden Liste überprüfen (Abb. 2.2):
2.2
Eiswürfelbereiter
Eierbehälter
Abstands-
halter
Energie-
Label
Garantie-
Karte
Bedienungs-
anleitung
9
Page 81

1
3- Gerätebeschreibung
DE
Hinweis
Aufgrund technischer Änderungen und Modellvarianten können manche Abbildungen
in dieser Bedienungsanleitung ev. von dem von Ihnen erworbenen Modell abweichen.
Geräteabbildungen (Abb.3)
3
2
3
4
A
5
6
4
7
8
9
10
B
A: Kühlabteil
1 LED Lampe
2 Türleiste
3 Typenschild
4 Türablage
5 Glasabdeckung MyZone Schublade
6 MyZone Schublade
7 Glasablage
8 O.K.-Sticker (optional)
10
11
B: Gefrierabteil
9 Obere Gefrierfachschublade
10 Untere Gefrierfachschublade
11 Verstellbare Füße
Page 82

d1
d2
DE
Bedienblende (Abb. 4)
Tasten:
A Anwahl Kühlabteil (engl.: „Fridge“)
B Anwahl Gefrierabteil (engl.: „Freezer“)
C Anwahl My Zone Schublade
D Anwahl Fuzzy Modus und Urlaubsfunktion
( engl.: „Holiday“)
E Anwahl „Super-Cool“ Funktion
F Anwahl „Super-Freeze“ Funktion
G Verriegelung Bedienblende
Anzeigen:
a Temperatur Kühlabteil
b Temperatur Gefrierabteil
c My Zone Funktion
d1 Holiday Funktion
d2 Fuzzy Modus
e Super-Cool Funktion
f Super-Freeze Funktion („Super-Frz.“)
g Verriegelung Bedienblende
4- Bedienblende
A
B
c
C
D
3 Sec. Holiday
Super-Cool
e
4
a
b
F
Super-Frz.
f
g
11
Page 83

5- Bedienung
DE
5.1 Vor dem ersten Gebrauch
▶ Alle Verpackungsmaterialien sind zu entfernen. Diese müssen unzugänglich für Kin-
der aufbewahrt und auf umweltfreundliche Weise entsorgt werden.
▶ Vor dem Einlegen von Nahrungsmitteln sollte das Gerät innen und außen mit war-
men Wasser und einem milden Geschirrspülmittel gereinigt werden.
▶ Nach dem Ausrichten und Reinigen des Gerätes mindestens 2 Stunden warten, be-
vor es an das Netz angeschlossen wird. Siehe hierzu Kapitel INSTALLATION.
▶ Vor dem ersten Einlagern die Abteile bei hoher Reglerstellung vorkühlen. Mit Hilfe der
Funktion Super-Freeze wird die Lagertemperatur im Gefrierabteil schnell erreicht.
▶ Die Temperatur im Kühl- und im Gefrierabteil werden automatisch auf 5 ° C bzw.-18 ° C
geregelt. Dies sind die empfohlenen Einstellungen. Falls gewünscht, können diese
Temperaturen manuell geändert werden. Siehe MANUELLER MODUS .
5.2 Sensortasten
Bei den Tasten handelt es sich um Sensortasten, die bereits bei leichter Berührung mit
dem Finger reagieren.
5.3 Ein- und Ausschalten des Geräts
Das Gerät ist in Betrieb, sobald es an die Stromversorgung angeschlossen ist.
Wenn das Gerät zum ersten Mal eingeschaltet ist, werden die momentan in den Abteilen
vorhandene Temperatur angezeigt („a“ und „„b“). Das Display blinkt; es erlischt 30 Sekunden, nachdem die Türen geschlossen wurden. Die Tastensperre ist aktiv.
Hinweis: Voreinstellungen
▶ Das Gerät ist ab Werk auf die empfohlenen Temperaturen von 5 ° C (Kühlabteil) und
-18 ° C (Gefrierabteil) eingestellt. Unter normalen Umgebungsbedingungen müssen
keine Temperatureinstellungen vorgenommen werden.
▶ Die voreingestellte Funktion für die My Zone Schublade ist 0°C Fresh.
▶ Nach dem Einschalten des Gerätes kann es bis zu 12 Stunden dauern, bis die einge-
stellte Temperatur erreicht ist.
Das Gerät vor dem Ausschalten leeren. Zum Ausschalten des Geräts Gerätestecker aus
der Steckdose ziehen.
5.4 Standby-Modus
Das Display schaltet automatisch 30 Sekunden nach dem Betätigen einer Taste ab. Danach wird die Bedienblende automatisch verriegelt. Es leuchtet auf, wenn eine Taste ge-
drückt oder die Tür/Gefrierfachschublade geönet wird.
12
Page 84
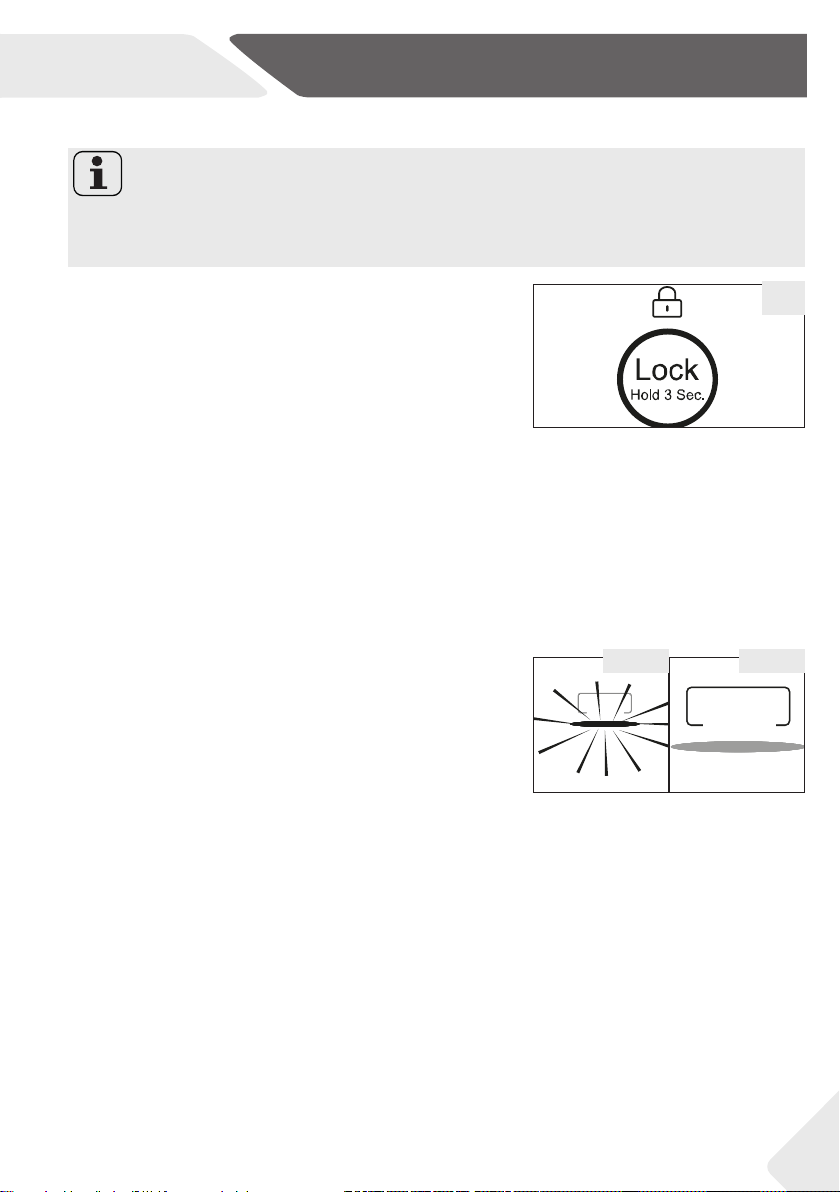
Fuzzy
DE
5- Bedienung
5.5 Sperren/entsperren der Bedienblende
Hinweis: Verriegelung der Bende
Die Bedienblende wird automatisch gegen ungewolltes Betätigen gesperrt, wenn 30
Sekunden lang keine Taste gedrückt wird. Für jede Einstellung muss die Bedienblende
erst entriegelt werden.
▶ Zum Sperren der Bedienblende Taste „G“ für 3 Se-
kunden drücken (Abb. 5.5).Das zugehörige Symbol
„g“ leuchtet auf (Abb. 4.5.2).
▶ Zum Entsperren erneut die Taste 3 Sekunden lang
drücken.
5.5
5.6 Türalarm
Wenn eine der Kühlabteiltüren für mehr als 3 Minuten geönet ist, ertönt ein Türalarm. Der
Alarm kann durch Schließen der Tür ausgeschaltet werden. Wenn die Tür für mehr als 7
Minuten oen gelassen wird, werden das Licht im Kühlabteil und die Displaybeleuchtung
automatisch abgeschaltet.
5.7. Betriebsart wählen
Zwischen folgenden zwei Betriebsarten kann gewählt
werden:
5.7.1 Fuzzy Modus
Falls keine speziellen Anforderungen an die Kühlung
bestehen, empfehlen wir die Verwendung des Betriebsmodus Fuzzy.
Im Fuzzy Modus regelt das Kühlgerät die AbteilTemperaturen automatisch entsprechend der
Umgebungstemperatur und der Temperaturänderung
im Kühlraum.
1. Bedienblende durch Drücken der Taste „G“
(Abb.5.5) entsperren, falls diese gesperrt ist.
2. Taste „D“ (Fuzzy) berühren (Abb. 5.7.1-1).
3. Die Anzeige „d2“ leuchtet auf und die Funktion ist
aktiviert (Abb. 5.7.1-2).
Die Funktion kann durch Wiederholen der obigen
Schritte oder durch Einstellen einer anderen Funktion
wieder ausgeschaltet werden.
5.7.1-2 5.7.1-1
Fuzzy
3 Sec. Holiday
3 Sec. Holiday
13
Page 85

5- Bedienung
5.7.2 Manueller Modus
Bestehen spezielle Anforderungen an die Lagertemperaturen, können diese mit Hilfe der
Tasten der Bedienblende eingestellt werden:
Hinweis: Konikt mit anderen Funktionen
Eine Temperatureinstellung kann nicht vorgenommen werden, wenn die Bedienblende
gesperrt ist oder eine andere Funktion (Super-Cool, Super-Freeze, Holiday oder Fuzzy)
aktiviert ist. Die entsprechende Anzeige blinkt und es ertönt ein Signal.
Fridge
5.7.2-3 5.7.2-4
Freezer Freezer
14
5.7.2-25.7.2-1
Fridge
5.7.2.1 Temperatureinstellung im Kühlabteil
1. Bedienblende durch Berühren der Taste „G“ entsperren, falls diese gesperrt ist (Abb. 5.5).
2. Taste „A“ (Fridge) zur Anwahl des Kühlabteils drücken. Die aktuelle Temperatur im Kühlabteil wird
angezeigt (Abb. 5.7.2-1).
3. Taste „A“ (Fridge) sooft drücken, bis der gewünschte Wert blinkend angezeigt wird (Abb.
5.7.2-2). Bei jedem Tastendruck ertönt ein Signal.
Die Temperatur kann in 1°C Schritten von minimal 1°C bis maximal 9°C eingestellt werden.
Die optimale Temperatur im Kühlabteil ist 5°C.
Kältere Temperaturen benötigen unnötigen
Stromverbrauch.
4. Die Einstellung wird automatisch nach 5 Sekunden gespeichert; zum sofortigen Bestätigen kann
irgendeine Taste außer der Taste „A“ (Fridge) gedrückt werden. Die Temperaturanzeige leuchtet
nun konstant.
5.7.2.3 Temperatureinstellung im Gefrierabteil
1. Bedienblende durch Berühren der Taste „G“ entsperren, falls diese gesperrt ist (Abb. 5.5).
2. Taste „B“ (Freezer) zur Anwahl des Gefrierabteils
drücken. Die aktuelle Temperatur im Gefrierabteil
wird angezeigt (Abb. 5.7.2-3).
3. Taste „B“ (Freezer) sooft drücken bis der gewünschte Wert blinkend angezeigt wird (Abb.
5.7.2-4). Bei jedem Tastendruck ertönt ein
Signal. Die Temperatur kann in 1°C Schritten von -15°C bis -24°C eingestellt werden.
Die optimale Temperatur im Gefrierabteil ist
-18°C. Kältere Temperaturen benötigen unnötigen Stromverbrauch.
4. Die Einstellung wird automatisch nach 5 Sekunden gespeichert; zum sofortigen Bestätigen kann
irgendeine Taste außer der Taste „B“ (Freezer) gedrückt werden. Die Temperaturanzeige leuchtet
nun konstant.
DE
Page 86

DE
5- Bedienung
Hinweis: Einussfaktoren Innentemperatur
Die Innentemperaturen werden durch folgende Faktoren beeinusst:
▶ Raumtemperatur
▶ Häugkeit des Tür önen
▶ Menge der eingelagerten Lebensmitteln
▶ Aufstellung des Gerätes
5.8 Super-Cool Funktion
Wenn eine größere Menge von Lebensmitteln eingelagert werden soll, zum Beispiel nach dem Einkauf,
sollte die Super-Cool Funktion eingeschaltet werden.
Die Super-Cool Funktion beschleunigt das Abkühlen frischer Lebensmittel und schützt gleichzeitig die
bereits eingelagerte Ware vor unerwünschter Erwärmung. Dabei wird automatisch eine Soll-Temperatur
von 0 bis 1°C vorgegeben.
1. Bedienblende durch Berühren der Taste „G“ entsperren, falls diese gesperrt ist (Abb. 5.5).
2. Taste E („Super-Cool“) berühren (Abb. 5.8.-1).
3. Die Anzeige „e“ leuchtet auf und die Funktion ist
aktiviert (Abb. 5.8.-2).
Zum Ausschalten der Funktion obige Schritte wiederholen oder eine andere Funktion einstellen.
Super-Cool
Super-Cool
Hinweis: Automatische Abschaltung
Diese Funktion wird automatisch deaktiviert, wenn die Temperatur von +2°C erreicht ist
bzw. wenn die Funktion 3 Stunden lang aktiviert war.
5.9 Super-Freeze Funktion
Frische Lebensmittel sollten möglichst schnell bis auf
den Kern durchgefroren werden. Dadurch bleiben Nährwerte, Aussehen und Geschmack am besten erhalten.
Die Super-Freeze Funktion beschleunigt das Einfrieren
frischer Lebensmittel und schützt gleichzeitig die bereits eingelagerte Ware vor unerwünschter Erwärmung.
Die Funktion 24 Stunden vor dem Einlegen der Lebensmittel in das unterste Gefrierfach einschalten.
1. Bedienblende durch Berühren der Taste „G“ entsperren, falls diese gesperrt ist (Abb. 5.5.).
2. Taste „F“ (Super-Frz.) berühren (Abb. 5.9.-1).
3. Die Anzeige „f“ leuchtet auf und die Funktion ist
aktiviert (Abb. 5.9.-2).
Zum Ausschalten der Funktion obige Schritte wiederholen oder eine andere Funktion einstellen.
Super-Frz.
Super-Frz.
5.8-15.8-2
5.9-15.9-2
Hinweis: Automatische Abschaltung
Die Super-Freeze Funktion wird automatisch nach 50 Stunden ausgeschaltet. Das Gerät wird danach mit der zuvor eingestellten Temperatur betrieben.
15
Page 87

5- Bedienung
5.10
Fuzzy
3 Sec. Holiday
WARNUNG!
Während die Holiday Funktion in Betrieb ist dürfen keine Waren im Kühlabteil gelagert
werden. Die eingestellte Temperatur von +17°C ist zu warm für Lebensmittel.
5.11
5.10 Holiday Funktion
Mit dieser Funktion wird die Kühlabteiltemperatur auf
konstant 17 °C eingestellt. Dadurch besteht die Möglichkeit - ohne dass es zu einer Geruchs- oder Schimmelbildung kommt - bei längerer Abwesenheit (z.B.
Urlaub= englisch: holiday) das leere Kühlabteil auch
geschlossen zu halten. Das Gefrierabteil setzt seinen
normalen Betrieb fort.
1. Bedienblende durch Berühren der Taste „G“ entsperren, falls diese gesperrt ist (Abb. 5.5).
2. Taste „D“ (Fuzzy) für 3 Sekunden berühren; die
Anzeige „d1“ leuchtet auf und die Funktion ist aktiviert (Abb. 5.10).
Zum Ausschalten der Funktion obige Schritte wiederholen oder eine andere Funktion einstellen.
5.11 My Zone-Schublade
Das Kühlabteil ist mit einer My Zone-Schublade ausgestattet (Abb. 5.11). Je nach Bedarf kann eine der folgenden Funktionen gewählt werden:
DE
5.11.1 Fruit & Veg.(Obst und Gemüse)
Diese Funktion ist zum Lagern von Obst und Gemüse geeignet.
Hinweis: Fruit & Veg. Funktion
Kälteempndliches Obst wie Ananas, Avocado, Bananen, Grapefruits und Gemüse wie
Kartoeln Auberginen, Bohnen, Gurken, Zucchini und Tomaten sowie Hartkäse sollten
nicht in der My Zone-Schublade gelagert werden.
5.11.2 Funktion 0°C Fresh (0°C Frisch)
Diese Funktion setzt die Temperatur in der MyZone Schublade auf 0°C. Sie ist geeignet,
um frischen Lebensmittel wie Fleisch oder Instant-Produkten zu lagern. Die Lebensmittel
bleiben bei 0 ° C frisch, ohne zu gefrieren.
Hinweis: 0°C Fresh Funktion
▶ Aufgrund des unterschiedlichen Wassergehalts von Fleisch können einige Fleischsorten
mit hohem Feuchtegehalt bei niedrigen Lagertemperaturen gefrieren. So sollte „frisch“
aufgeschnittenes“ Fleisch im My Zone-Fach bei mindestens 0°C gelagert werden.
16
Page 88

DE
5.11.3 Quick-Cool (Schnellkühlen)
Mit der Funktion können Getränke in kurzer Zeit auf eine niedrigere Temperatur abgekühlt
werden. Die Temperatur im MyZone-Fach wird auf+2 ° C eingestellt.
5- Bedienung
Hinweis: MyZone-Schublade
▶ Eine der drei Funktionen muss immer aktiviert sein.
▶ Um die Kühlabteiltemperatur zu reduzieren, verwenden Sie die Q-Cool Funktion, um
sie zu erhöhen, die Fruit & Vegetable Funktion.
5.11.4 My Zone-Schublade Funktion
5.11.4
einstell en
1. Bedienblende durch Berühren der Taste „G“ entsperren, falls diese gesperrt ist (Abb. 5.5).
2. Taste „C“ (My Zone) sooft drücken, bis die Anzeige
„c“ der gewünschten Funktion blinkt (Abb. 5.11.4).
3. Nach wenigen Sekunden leuchtet die Anzeige „c“
konstant und die Einstellung ist gespeichert.
My Zone
17
Page 89

DE
5- Bedienung
17
Page 90

5- Bedienung
5.12 Tipps für das Einlagern von Lebensmitteln
5.12 1 Einlagern in das Kühlabteil
▶ Die Temperatur des Kühlabteils sollte stets auf unter 5°C gehalten werden.
▶ Warme Lebensmittel müssen vor dem Einlegen in das Kühlabteil auf Zimmertem-
peratur abkühlen.
▶ Lebensmittel vor dem Einlegen in das Gerät reinigen und trocknen.
▶ Einzulagernde Lebensmittel sollten gut verpackt werden, um Gerüche und ge-
schmackliche Beeinträchtigungen zu vermeiden.
▶ Keine übermäßigen Mengen einlagern. Die Lebensmittel sollten mit ausreichend
Platz eingelagert werden, um einen ungehinderten Kaltluftstrom zu ermöglichen
und somit bessere Lagerergebnisse zu erzielen.
▶ Nahrungsmittel, die täglich gegessen werden, sollten im vorderen Bereich der Abla-
gen aufbewahrt werden.
▶ Die Lebensmittel nicht zu nah an den Innenwänden lagern, da sie festfrieren könn-
ten. Den direkten Kontakt von (insbesondere öligen und säurehaltigen) Lebensmit-
teln mit der Innenverkleidung vermeiden, da diese vom Öl/Säure angegrien wer-
den kann. Solche Rückstände stets entfernen.
▶ Gefriergut im Kühlabteil auftauen. Das Gefriergut senkt die Kühltemperatur, wo-
durch sich Energie sparen lässt.
▶ Die Reifung von Obst und Gemüse wie Zucchini, Melonen, Papaya, Bananen, Ananas
usw. kann im Gerät beschleunigt werden. Von einer Einlagerung dieser Lebensmittel
wird daher abgeraten. Allerdings kann die Reifung sehr unreifer Früchte für eine ge-
wisse Zeit unterstützt werden. Zwiebeln, Knoblauch, Ingwer und sonstiges Wurzel-
gemüse sollten ebenfalls bei Zimmertemperatur gelagert werden.
▶ Unangenehme Gerüche im Kühlschrank weisen darauf hin, dass etwas ausgelaufen
ist und einen Reinigung erforderlich ist. Siehe REINIGUNG UND WARTUNG.
▶ Die Lebensmittel sollten entsprechend den unterschiedlichen Lagertemperaturbe-
reichen zugeordnet werden (Abb. 5.12.1):
DE
18
5.12.1
1
2
3
8
1 Butter, Käse usw.
2 Eier, Dosen, Tuben, Gewürze usw.
4
1
3 Getränke, Flaschen, Tuben
5
4 Eingelegte Lebensmittel, Konserven usw
2
5 Fleischprodukte, Snacks,
6
6/7 Teigwaren, Milch, Tofu, Milchprodukte usw.
7
8 My Zone Schublade:
3
Dosengetränke (Quick-Cool)
Rohe frische Lebensmittel (0°C Fresh)
Obst und Gemüse (Fruit&Veg.)
Page 91

DE
5.12.2 Einlagern in das Gefrierabteil
▶ Die Temperatur des Gefrierabteils sollte stets bei -18°C gehalten werden.
▶ 24 Stunden vor dem Einfrieren den Temperaturregler auf MAX Position stellen- bei
kleinen Mengen genügen 4-6 Stunden.
▶ Warme Lebensmittel müssen vor dem Einlegen in das Gefrierabteil auf Zimmer-
temperatur abkühlen.
▶ Portionierte Lebensmittel gefrieren schneller und lassen sich besser auftauen und
verarbeiten. Das empfohlene Portionsgewicht beträgt höchstens 2,5 kg.
▶ Lebensmittel sollten vor dem Einlegen in das Gefrierabteil verpackt werden. Die
Verpackung muss außen trocken sein, damit sie nicht festfriert. Das Verpackungsmaterial sollte geruchsneutral, luftdicht und ungiftig sein.
▶ Um ein Ablaufen der Lagerzeit zu verhindern, das Einlagerungsdatum, die zulässige
Lagerdauer und die Bezeichnung des Lebensmittels auf der Verpackung vermerken.
▶ WARNUNG!: Säure, Lauge, Salz usw. können die Oberäche des Gerätes angreifen.
Lebensmittel mit diesen Substanzen (z.B. Meeressch) nicht direkt auf den Boden
oder in Kontakt mit den Wänden ablegen. Salzwasser im Gerät sollte umgehend
entfernt werden.
▶ Die von den Lebensmittelherstellern empfohlene Lagerzeiten für die jeweiligen
Lebensmittel, insbesondere die für gewerblich tiefgefrorene Lebensmittel, sollten
nicht überschritten werden.
▶ Jeweils nur die benötigte Menge an Lebensmitteln entnehmen.
▶ Aufgetaute Lebensmittel rasch verbrauchen. Sie dürfen erst wieder eingefroren
werden, nachdem sie gekocht wurden.
▶ Keine übermäßigen Mengen an frischen Lebensmitteln einlagern. Das Gefrier-
vermögen beachten (siehe Kapitel TECHNISCHE DATEN und Angaben auf dem
Typenschild). Wenn an mehreren Tagen hintereinander eingefroren wird, sind höchs-
tens ca. 2/3 der maximalen Einfriermenge zu nehmen.
▶ Lebensmittel können bei einer Temperatur von mindestens -18 °C je nach Art 2 bis
12 Monate eingelagert werden (z. B. Fleisch 3 bis 12 Monate, Gemüse 6 bis 12 Mo-
nate).
▶ Frische Lebensmittel beim Einlagern nicht mit dem übrigen Gefriergut in Kontakt
bringen. Antaugefahr!
5- Bedienung
5.12.3 Beim Aufbewahren von eingekauften Tiefkühlwaren sind folgende Punkte zu
beachten:
▶ Immer die Angaben des Herstellers in Bezug auf die zulässige Aufbewahrungsdauer
der Nahrungsmittel beachten. Diese Dauer nicht überschreiten!
▶ Zwischen dem Kauf und der Einlagerung sollte so wenig Zeit wie möglich vergehen,
um die Qualität der Nahrungsmittel zu erhalten.
▶ Nur tiefgekühlte Produkte kaufen, die bei einer Temperatur von –18 °C oder weniger
aufbewahrt wurden.
▶ Nahrungsmittel, auf deren Verpackung sich Eis oder Frost bendet sollten nicht ge-
kauft werden. – Dies ist ein Hinweis darauf, dass das Produkt möglicherweise stellenweise aufgetaut und wieder gefroren ist – Temperaturanstiege beeinträchtigen die
Qualität der Nahrungsmittel.
19
Page 92

6- Energiespartipps
Tipps zum Energiesparen
▶ Darauf achten, dass das Gerät ausreichend belüftet ist (siehe INSTALLATION).
▶ Das Gerät nicht im direkten Sonnenlicht oder in der Nähe einer Wärmequelle (z.B.
Heizkörper, Herd und andere Wärme abgebende Geräte) aufstellen.
▶ Unnötige tiefe Temperatureinstellungen sollten vermieden werden. Je niedriger die
Temperatur eingestellt ist, desto höher ist der Energieverbrauch.
▶ Funktionen wie SUPER-FREEZE verbrauchen mehr Energie.
▶ Warme Lebensmittel vor dem Einlagern auf Raumtemperatur abkühlen lassen.
▶ Die Tür so wenig und so kurz wie möglich önen.
▶ Nicht zu viele Lebensmittel einlagern, damit die kalte Luft zirkulieren kann.
▶ Einen Lufteinschluss in der Lebensmittelverpackung vermeiden.
▶ Türdichtungen sauber halten, damit die Türen immer richtig schließen.
▶ Gefriergut im Kühlabteil auftauen.
DE
20
Page 93

DE
7- Ausstattung
Hinweis: Abweichungen je nach Modell
Aufgrund unterschiedlicher Modellvarianten verfügt Ihr Produkt möglicherweise nicht
über alle der folgenden Ausstattungen. Siehe auch Kapitel GERÄTEBESCHREIBUNG.
7.1 Multi-air-ow
Das Kühlabteil ist mit einem ventilatorgestützten Mul-
ti- Air-Flow-System ausgestattet, welches für eine
gleichmäßige Verteilung der Kühlluft auf unterschied-
lichen Ebenen sorgt (Abb. 7.1). So können warme
Lebensmittel schneller heruntergekühlt werden, die
Ausgangsfrische und Qualität der eingelagerten Le-
bensmittel bleibt erhalten.
7.2 Verstellbare Ablagenhöhe
Die Ablagen können je nach Lagerungsbedarf in ihrer
Höhe verstellt werden.
1. Ablage auf beiden Seiten fassen, in Richtung (1)
nach oben anheben und in Richtung (2) herausziehen (Abb. 7.2).
2. Die Ablage zum Wiedereinlegen auf die Führungsschienen legen und ganz nach hinten schieben,
bis die Ablage in die hinteren seitlichen Schlitze
einrastet.
7.1
7.2
Hinweis:
Darauf achten, dass alle Kanten der Ablage auf gleicher Höhe liegen.
7.3 Abnehmbare Türablagen
Zur Reinigung lassen sich die Türablagen entfernen.
Türablage auf beiden Seiten fassen, in Richtung (1)
nach oben anheben und in Richtung (2) herausziehen
(Abb. 7.3).
Die Schritte in umgekehrter Reihenfolge ausführen,
um die Türablage wieder einzusetzen.
7.4 My Zone-Schublade
Gebrauch und Einstellung der My Zone-Schublade
(Abb. 7.4) siehe BEDIENUNG (My Zone-Schublade).
7.3
1
1
2
7.4
21
Page 94

7- Ausstattung
7.5
Hinweis: OK-Sticker
Nach dem Einschalten des Gerätes kann es bis zu 12 Stunden dauern, bis die eingestellte Temperatur erreicht ist.
7.6
7.7
2 2
1
7.5 OPTIONAL: OK-Sticker
Anhand der „OK“-Temperaturanzeige (Abb. 7.5) an der
inneren Seitenwand des Kühlabteils kann festgestellt
werden, ob die Temperatur unter +4 °C liegt. Temperatur stufenweise verringern, wenn der Sticker nicht „OK“
anzeigt.
7.6 Herausnehmbare Schubladen
Zum Herausnehmen die Schubladen bis zum Anschlag
vorziehen (1), anheben und herausnehmen (2) (Abb.
7.6).
Die Schritte in umgekehrter Reihenfolge ausführen,
um die Schubladen wieder einzusetzen.
7.7 Pleuelstange entfernen
Nach Herausnahme der oberen Gefrierschublade kann
die Pleuelstange entfernt werden (Abb. 7.7):
1. Haltenase (1) der Kunststohalterung (A) drücken
und aus Halterung herausschieben (2).
2. Auf anderer Seite ebenso verfahren.
3. Pleuelstange (B) entnehmen (3).
Die Schritte in umgekehrter Reihenfolge ausführen,
um die Pleuelstange wieder einzusetzen.
DE
7.8
7.8 3D-Gefrierschublade
Die Gefrierschubladen (Abb. 7.8) lassen sich gerade
und komplett ausziehen. Sie sind auf Leichtlauf-Teleskopschienen gelagert, sodass das Gefriergut einfach
und komfortabel eingelagert und entnommen werden
kann. Der automatische Türschließmechanismus erleichtert die Handhabung und spart zudem Energie.
WARNUNG!
Schubladen nicht überladen! Maximale Beladung je Schublade: 35 kg!
22
Page 95
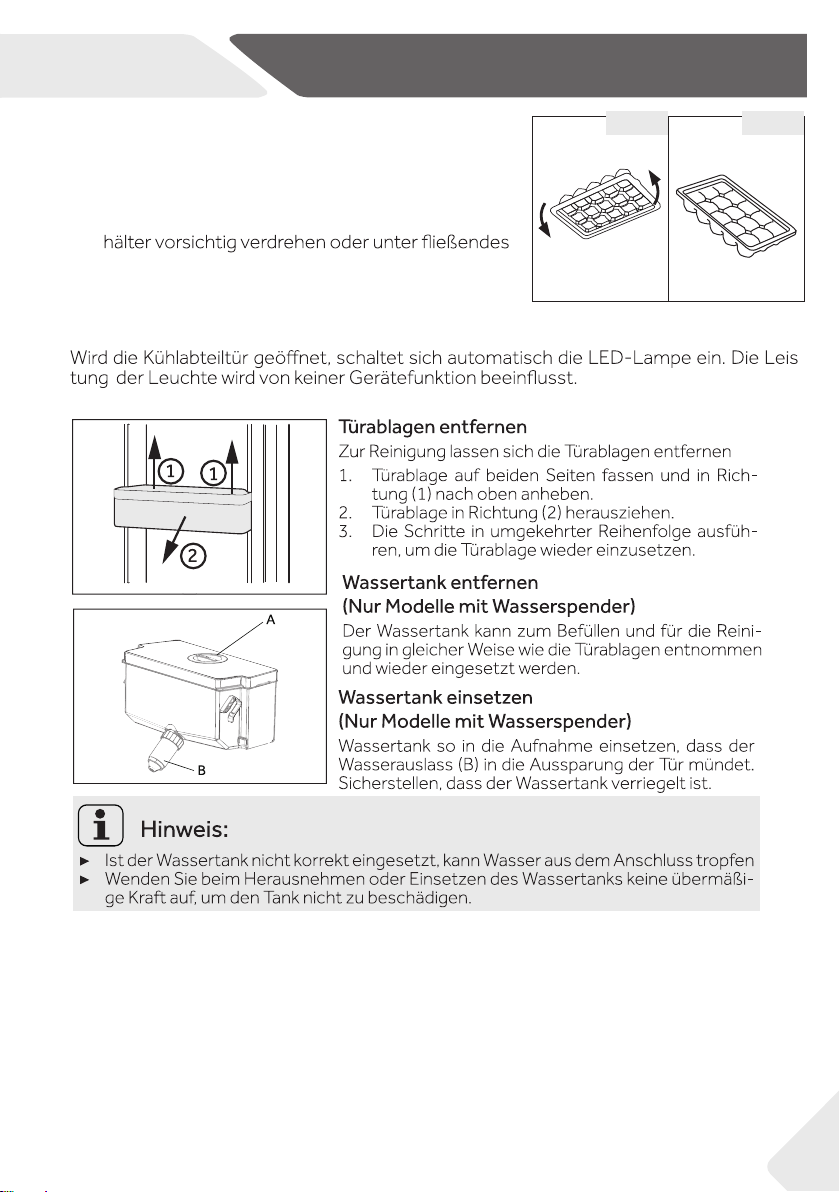
DE
7- Ausstattung
7.9 Eiswürfelbehälter
1. Den Eiswürfelbehlter zu 3/4 mit Wasser füllen
und in eines der beiden Gefrierfachschubladen
geben (Abb. 7.9-1).
2. Um die Eiswürfel herauszulsen den Eiswürfelbe-
-
Wasser halten (Abb. 7.9-2).
7.10 Innenbeleuchtung
7.9-2 7.9-1
-
23
Page 96

8- Reinigung und Pege
DE
WARNUNG!
Schalten Sie vor jeder Wartung das Gerät aus und ziehen Sie den Netzstecker.
8.1 Allgemeines
Gerät am besten dann reinigen, wenn nur wenig oder kein Kühl- bzw. Gefriergut eingelagert ist. Um unangenehme Gerüche im Gerät zu vermeiden, wird empfohlen, das
Kühlabteil alle vier Wochen zu reinigen.
WARNUNG!
▶ Führen Sie die Reinigung nicht mit hartborstigen Bürsten, Drahtbürsten, Scheuerpulver,
Benzin, Amylacetat, Aceton und ähnlichen organischen Lösungen, Säure oder alkali-
schen Lösungen durch sondern verwenden Sie spezielle Kühlschrankreiniger.
▶ Besprühen oder spülen Sie das Gerät nicht mit Wasser ab.
▶ Reinigen Sie das Gerät nicht mit Dampf- oder Wasserstrahl.
▶ Reinigen Sie die kalten Glasablagen nicht mit heißem Wasser. Plötzliche Temperatur-
änderungen können zu Glasbruch führen.
▶ Berühren Sie kalte Eisenteile nicht mit feuchten Händen. Es besteht die Gefahr
festzufrieren.
▶ Überprüfen Sie bei Erwärmung im Gefrierabteil den Zustand des Gefriergutes .
8.1
▶ Die Türdichtung stets sauber halten.
▶ Das Gerät einschließlich Innenausstattung mit
einem weichen Reinigungstuch oder Schwamm
und lauwarmem Wasser reinigen. Eventuell etwas mildes Handgeschirrspülmittel beigeben
(Abb. 7.1).
▶ Wassertropfen an den Innenächen mit einem
trockenen, weichen Reinigungstuch entfernen.
▶ Geräteteile nicht in der Geschirrspülmaschine reinigen.
▶ Zubehörteile nur mit warmem Wasser und mildem
Handspülmittel reinigen.
▶ Vor dem Wiedereinschalten mindestens 5 Minuten
warten, da häuges Einschalten den Kompressor
beschädigen kann.
8.2 Abtauen
Das Kühl- und Gefrierabteil tauen automatisch ab, so dass kein manueller Eingri erforderlich ist.
8.3 Austauschen der LED-Lampe
WARNUNG!
Tauschen Sie die LED Lampe nicht selbst aus sondern wenden Sie sich an der Kundendienst.
24
Page 97

DE
Die LED-Beleuchtung ermöglicht einen geringen Energieverbrauch und eine lange Lebensdauer. Bei Störungen wenden Sie sich bitte an den Kundendienst (siehe KUNDEN
Technische Daten LED Lampe:
Spannung 12V, max. Leistung 2W
8.4 Austauschbare Schubladendichtung
Es gibt sechs Dichtungen für die obere und die
untere Gefrierschublade, die bei Bedarf wie folgt
ausgtauscht werden können.
1. Die fünf Dichtungen an der oberen und unteren
Schublade an den dargestellten Positionen anbringen (Abb. 8.4-1.).
2. Darauf achten, dass die gebogene Lippe beim Anbringen jeweils in den Gefrierraum zeigt (Abb. 8. 4-2.).
3. Die untere Dichtung der oberen Schublade anbringen (Abb. 8.4-3.).
4. Darauf achten, dass die gebogene Lippe beim Anbringen nach unten zeigt (Abb. 8.4-4.).
Diese Dichtungen sowie die umlaufenden Tür-/ Schubladen Dichtungen erhalten Sie über den Kundendienst
(siehe Garantie-Karte).
8- Reinigung und Pege
8.4
1. 2.
3.
4.
8.5 Bei längerer Nichtbenutzung
Wenn das Gerät über einen längeren Zeitraum außer Betrieb gesetzt werden soll, und
nicht die Holiday Funktion verwendet werden soll:
▶ Eingelagerte Lebensmittel entnehmen.
▶ Netzstecker ziehen.
▶ Gerät wie oben beschrieben reinigen.
▶ Gerätetüren/Schubladen oen stehen lassen, damit im Gerät keine üblen Gerüche
entstehen.
Hinweis: Gerät ausschalten
Das Gerät nur dann ausschalten, wenn es unbedingt notwendig ist.
8.6 Bewegen den Gerätes
1. Netzstecker ziehen und alle Lebensmittel aus dem Gerät entnehmen.
2. Die Ablagen und sonstigen beweglichen Teile im Kühl- und Gefrierabteil mit Klebeband sichern.
3. Das Gerät nicht um mehr als 45 ° kippen, um Beschädigungen des Kühlsystems zu
vermeiden.
WARNUNG!
▶ Das Gerät nicht an den Grien anheben.
▶ Das Gerät niemals horizontal auf den Boden legen.
25
Page 98

9- Fehlerbehebung
DE
Die im Folgenden aufgezählten Probleme können meist selbst behoben werden. Wenden
Sie sich erst dann an den Kundendienst (siehe Garantiekarte), wenn Sie alles geprüft haben und den Fehler nicht beseitigen können.
WARNUNG!
▶ Schalten Sie vor jeder Wartung das Gerät aus und ziehen Sie den Netzstecker.
▶ Elektrogeräte dürfen nur durch Elektrofachkräfte repariert werden, da durch unsach-
gemäße Reparaturen erhebliche Folgeschäden entstehen können.
▶ Wenn das Netzkabel beschädigt ist, muss es durch den Kundendienst (siehe
Garantiekarte) ersetzt werden, um eine Gefahr auszuschließen.
9.1 Liste möglicher Probleme
Problem Mögliche Ursachen Lösungen
Der Kompressor
läuft nicht.
Das Gerät springt
häug an oder
läuft zu lange.
Der Innenraum
des Kühlabteils
ist verschmutzt
und/oder riecht
unangenehm.
• Der Netzstecker ist nicht mit
der Steckdose verbunden.
• Das Gerät taut ab. • Das ist bei einem automatisch ab-
• Die Innen- oder Außentempe-
ratur ist zu hoch.
• Das Gerät war über einen län-
geren Zeitraum ausgeschaltet.
• Eine Gerätetür/Schublade ist
nicht richtig geschlossen.
• Die Tür/Schublade wurde zu
häug oder zu lange geönet.
• Die Temperatur für das
Gefrierabteil ist zu niedrig eingestellt.
• Die Dichtung der Tür/
Schublade ist verschmutzt,
abgenutzt, gerissen oder verrutscht.
• Die erforderliche Luftzirkulation
ist nicht gewährleistet.
• Der Innenraum des Gerätes
muss gereinigt werden.
• Im Kühlabteil werden streng
riechende Lebensmittel gelagert.
• Verbindung herstellen.
tauenden Gerät normal.
• In diesem Fall ist es normal, dass das
Gerät länger läuft.
• In der Regel dauert es 8 bis 12 Stun-
den, bis das Gerät seine Betriebstemperatur erreicht hat.
• Tür/Schublade schließen. Darauf
achten, dass das Gerät auf einem
ebenen Untergrund steht und keine
Nahrungsmittel oder Behälter an die
Tür stoßen.
• Tür/Schublade so wenig wie möglich
önen.
• Die Temperatur auf einen höheren
Wert einstellen, bis eine zufriedenstellende Gefriertemperatur erreicht
ist. Die Gefriertemperatur hat sich
nach 24 Stunden stabilisiert.
• Dichtung reinigen und ggf. vom Kundendienst ersetzen lassen.
• Eine ausreichende Belüftung sicherstellen.
• Den Innenraum des Gerätes reinigen.
• Lebensmittel stets gut verpackt einlagern.
26
Page 99

DE
Problem Mögliche Ursachen Lösungen
Im Gerät wird es
nicht kalt genug.
Im Gerät ist es zu
kalt.
I
m Kühlabteil hat
sich Feuchtigkeit
gebildet.
Feuchtigkeit sammelt sich auf den
Außenächen des
Gerätes oder zwischen den Abteilen.
Starke Eis- und
Reifbildung im
Gefrierabteil.
• Der Temperaturregler ist auf
„schwach“ eingestellt.
• Es wurde zu warmes Gut ein-
gelagert.
• Es wurde zu viel auf einmal ein-
gelagert.
• Die Waren liegen zu dicht anei-
nander.
• Die Tür/Schublade ist nicht
richtig geschlossen.
• Die Tür/Schublade wurde zu
häug oder zu lange geönet.
• Die Temperatur ist auf einen zu
niedrigen Wert eingestellt.
• Die Super-Freeze Funktion ist
aktiviert und läuft zu lange.
• Das Gerät bendet sich in einer
zu warmen und zu feuchten
Umgebung.
• Die Tür/Schublade ist nicht
richtig geschlossen.
• Die Tür/Schublade wurde zu
häug oder zu lange geönet.
• Eingestellte Behältnisse wur-
den oen gelassen.
• Die Luftfeuchtigkeit ist zu
hoch.
• Die Tür/Schublade ist nicht
richtig geschlossen.
• Es wurden nicht ausreichend
verpackte Waren eingelagert.
• Die Tür/Schublade wurde oen
gelassen.
• Die Tür/Schublade wurde zu
häug oder zu lange geönet.
• Die Dichtung ist defekt. • Dichtung reinigen und ggf. ersetzen.
• Etwas im Innenraum verhin-
dert, dass die Tür/Schublade
richtig schließt.
9- Fehlerbehebung
• Temperatur neu einstellen.
• Gut erst abkühlen lassen.
• Stets kleinere Mengen einlagern.
• Zwischen den einzelnen Produkten
einen Luftspalt lassen.
• Tür/Schublade schließen.
• Tür/Schublade so wenig wie möglich
önen.
• Temperatur neu einstellen.
• Super-Freeze Funktion ausschalten.
• Temperatur mittels Temperaturreg-
ler leicht erhöhen.
• Tür/Schublade schließen.
• Tür/Schublade so wenig wie möglich
önen.
• Warme Speisen stets auf Raum-
temperatur abkühlen und Nahrungsmittel und Flüssigkeiten abdecken.
• Das ist bei feuchtem Klima normal
und ändert sich mit abnehmender
Luftfeuchtigkeit.
• Darauf achten, dass die Tür/
Schublade richtig geschlossen ist.
• Waren stets gut verpackt einlagern .
• Tür/Schublade schließen.
• Tür/Schublade so wenig wie möglich
önen.
• Sicherstellen, dass weder Ware, de-
ren Verpackung oder Geräteteile das
Schließen der Tür/Schublade behindern.
27
Page 100

9- Fehlerbehebung
Problem Mögliche Ursachen Lösungen
Die Seiten
des Gehäuses
werden und
die Türleiste
werden warm.
Das Gerät gibt
ungewöhnliche
Geräusche von
sich.
Ein leises Geräusch
wie von ießendem
Wasser ist zu hören.
Es ertönt ein
Alarmton.
Ein leises Brum-
men ist zu hören.
Die Innenbeleuchtung und/oder
das Kühlsystem
funktionieren nicht.
• Dies ist normal. • -
• Das Gerät steht nicht auf ebe-
nem Untergrund.
• Das Gerät stößt an einen Ge-
genstand.
• Dies ist normal. • -
• Die Kühlabteiltür steht oen. • Die Kühlabteiltür schließen.
• Das Kondenswasser-Schutz-
system läuft.
• Der Netzstecker ist nicht mit
der Steckdose verbunden.
• Die Stromversorgung ist nicht
intakt.
• Die LED-Lampe ist defekt. • LED Lampe durch Kundendienst
• Das Gerät so ausrichten, dass es ge-
rade steht.
• Um das Gerät stehende Gegenstän-
de entfernen.
• Das System verhindert die Bildung
von Kondenswasser und erzeugt
dieses Geräusch.
• Verbindung herstellen.
• Stromversorgung überprüfen. Bei jegli-
chem Defekt ist ein Elektrofachmann zu
verständigen!
austauschen.
DE
9.2 Stromausfall
Bei einem Stromausfall bleiben die Nahrungsmittel etwa 20 Stunden lang sicher gekühlt.
Bei einem länger andauernden Stromausfall, insbesondere im Sommer sind folgende Hinweise zu befolgen:
▶ Tür/Schublade so wenig wie möglich önen.
▶ Während des Stromausfalls keine weiteren Lebensmittel in das Gerät geben.
▶ Wenn der Stromausfall angekündigt wird und mehr als 20 Stunden andauert, etwas
Eis zubereiten und in einem Behälter auf die oberste Ablage des Kühlabteils stellen.
▶ Eine Überprüfung des Lagergutes unmittelbar nach der Unterbrechung ist erforderlich.
▶ Da die Temperatur im Gerät bei einem Stromausfall oder sonstigen Störung an-
steigt, verkürzt sich die Lagerzeit der Lebensmittel und verringert sich deren Quali-
tät. Gegebenenfalls ist Angetautes zu verarbeiten (kochen, braten) und in gegartem
Zustand wieder einzufrieren.
Hinweis: Speicherfunktion bei Stromausfall
Nach Wiederherstellung des Stromanschlusses läuft das Gerät mit den Einstellungen
weiter, die vor dem Stromausfall festgelegt waren.
28
 Loading...