

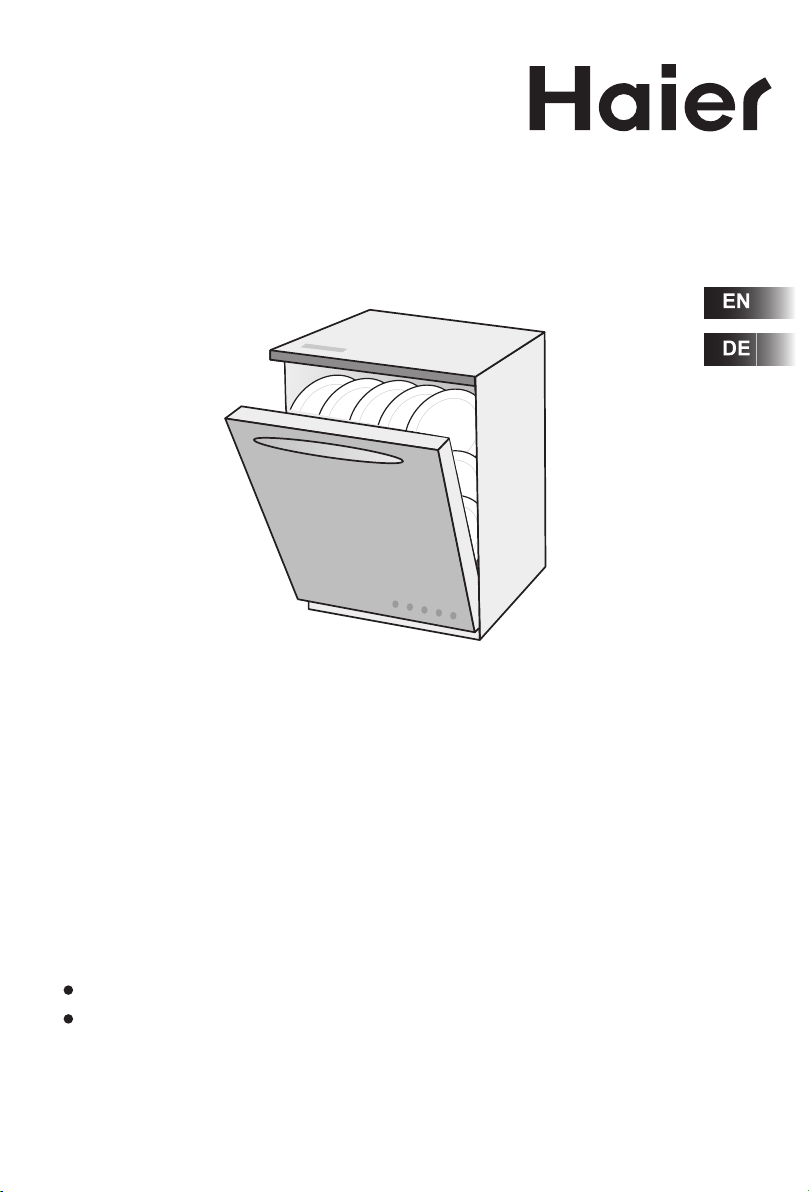
DISHWASHER OPERATION MANUAL
BEDIENUNGSANLEITUNG GESCHIRRSPÜLER
DW9-TFE1 Series
PLEASE READ THIS OPERATION MANUAL BEFORE USING THE DISHWASHER.
LESEN SIE SICH DIESE BEDIENUNGSANLEITUNG BITTE DURCH, BEVOR SIE DEN
GESCHIRRSPÜLER VERWENDEN.
0120506061
Index
en
Safety information
Installation
Getting to know your dishwasher
How to fill the salt
How to fill rinse aid
How to fill the detergent dispenser
Not suitable for the dishwasher
Arranging crockery, glasses, etc. in the dishwasher
Programme overview
Washing dishes
How to keep your dishwasher in shape
Care and maintenance
Trouble Shooting
Technical data
Important information
2
4
6
7
8
9
10
11
13
15
17
18
19
23
24
1
Safety information
en
At time of delivery
Check packaging and dishwasher immediately for signs of transport damage. If the appliance is
damaged, do not put it into use but contact your supplier or customer service without delay.
Please dispose of packaging materials properly.
During installation
Site the dishwasher and connect it up in accordance with the installation instructions.
The dishwasher must not be connected to the electricity supply while installation is being carried out.
Ensure that the domestic wiring is properly earthed.
The mains electricity supply must conform to the details shown on the dishwasher nameplate.
Do not connect the dishwasher to the electricity supply via an extension cable.
After the appliance has been installed,the mains plug should still be easily accessible.
During installation, the power supply cord must not be excessively or dangerously bent or flattened.
This appliance cannot be installed outdoor, not even if the area in which it is installed is covered by a
roof; it is also very dangerous to leave it exposed to the rain and elements.
During normal use
The dishwasher must only be used by adults for the washing of household dishes and cooking utensils.
Do not place any heavy objects or stand on the door when it is open. The appliance could tip forward.
The water inside the dishwasher is not suitable for drinking.
Do not use solvents of any kind inside your dishwasher. They could cause an explosion danger.
Open the door very carefully if the dishwasher is operating. There is a risk of water squirting out.
Do not touch the heating element during or after a wash cycle.
Fundamental rules to follow when using the appliance:
- Never touch the dishwasher when barefoot or with wet hands or feet;
- We discourage the use of extension cords and multiple sockets;
- If the appliance is not operating properly or maintenance must be performed, disconnect the
appliance from the power supply.
2
en
If your family includes children
The appliance is not intended for use by young children or infirm persons without supervision.
Young children should be supervised to ensure that they do not play with the appliance.
Keep detergents out of the reach of children, who must also be kept away from the dishwasher when
it is open.
If a fault occurs
If the appliance malfunctions, turn off water supply to the appliance and disconnect the power supply
turn off and the plug from the wall socket. Then, consult the section entitled, "Fault finding" .If you
cannot solve the problem, contact a service center.
Only specialised personnel are authorised to make repairs.
If the supply cord is damaged, it must be replaced by the manufacture, its service agent of similarly
qualified persons in order to avoid a hazard.
To maintain the EFFICIENCY and SAFETY of this appliance,we recommend:
- call only the Service Centers authorized by the manufacturer, or the approved Service agents.
- always use original Spare Parts.
When disposing of old appliances
Appliances which are no longer being used must be made inoperable by cutting the power supply
cord and removing the door lock.
Take the appliance to a designated waste disposal center.
Dangerous voltage
Warning
Children could get locked in the appliance (risk of suffocation)
or get stuck in other positions. Therefore: Remove the mains
plug, cut the mains wire and set aside. Damage the door lock so
that the door can no longer be closed.
3
Installation
en
Positioning the appliance
Positioning the appliance in the desired location. The back of the appliance should rest against the wall,
and the sides, along the adjacent cabinets or wall. The dishwasher is equipped with water supply and
drain hoses that can be positioned to the right or the left to facilitate proper installation.
Levelling the appliance
Once the appliance is positioned, adjust the feet (screwing them in or out) to adjust the dishwasher,
making it level. The appliance should not be inclined more than 2˚. If the appliance is level, it will help
ensure proper performance.
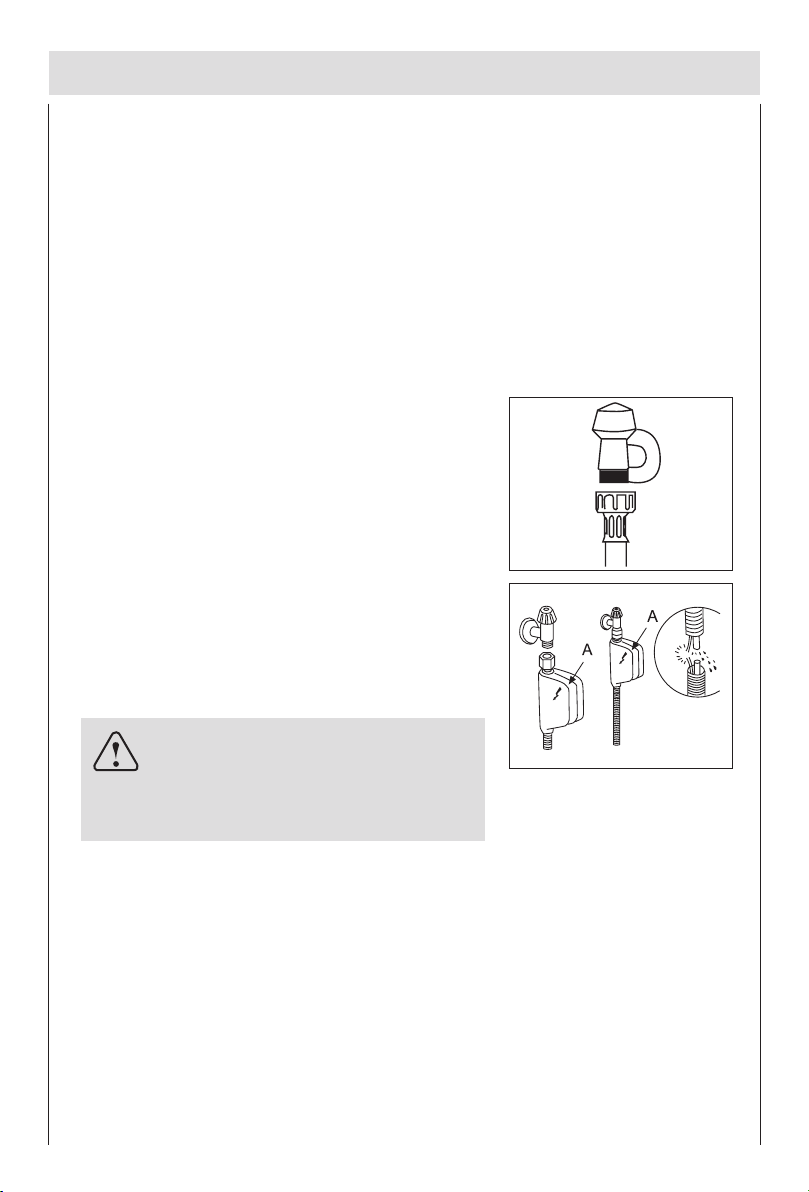
Cold water connection
Connect the water supply hose to a threaded 3/4 (gas) connector,
making sure that it is fastened tightly in place (see fig.A).
Some models are fitted with an "Aquastop" water supply hose
(see fig.B) in which the small filter is already housed in the
threaded end.
If the water pipes are new or have not been used for an extended
period of time, let the water run to make sure that the water is
clear and free of impurities. If this precaution is not taken, there
is a risk that the water inlet can get blocked and damage the
appliance.
fig.A
Warning
The appliance is to be connected to the
water mains using new hose-sets and
that old hose-sets should not be reused.
fig.B
Anti-Flooding protection
The dishwasher is equipped with a system that stops the supply of water in the event of a problem with the water
supply hose, or leaks within the unit, in order to prevent damage to your home. If for any reason the box
containing the electrical components happens to get damaged,
for the appliance from the socket immediately. In order to guarantee that the anti-flooding feature operates
properly, the "A" box with water supply hose must be attached to the water supply tap as shown in fig.B. No other
type of connection is acceptable.The water supply hose must not, under any circumstances, be cut, as it contains electrical parts which are live. If the length of the hose is not adequate to make a proper connection, the
hose must be replaced with one which is long enough. This hose is available upon request from specialised
retailers and
approved
service center.
turn off the power supply and
remove the plug
4
en
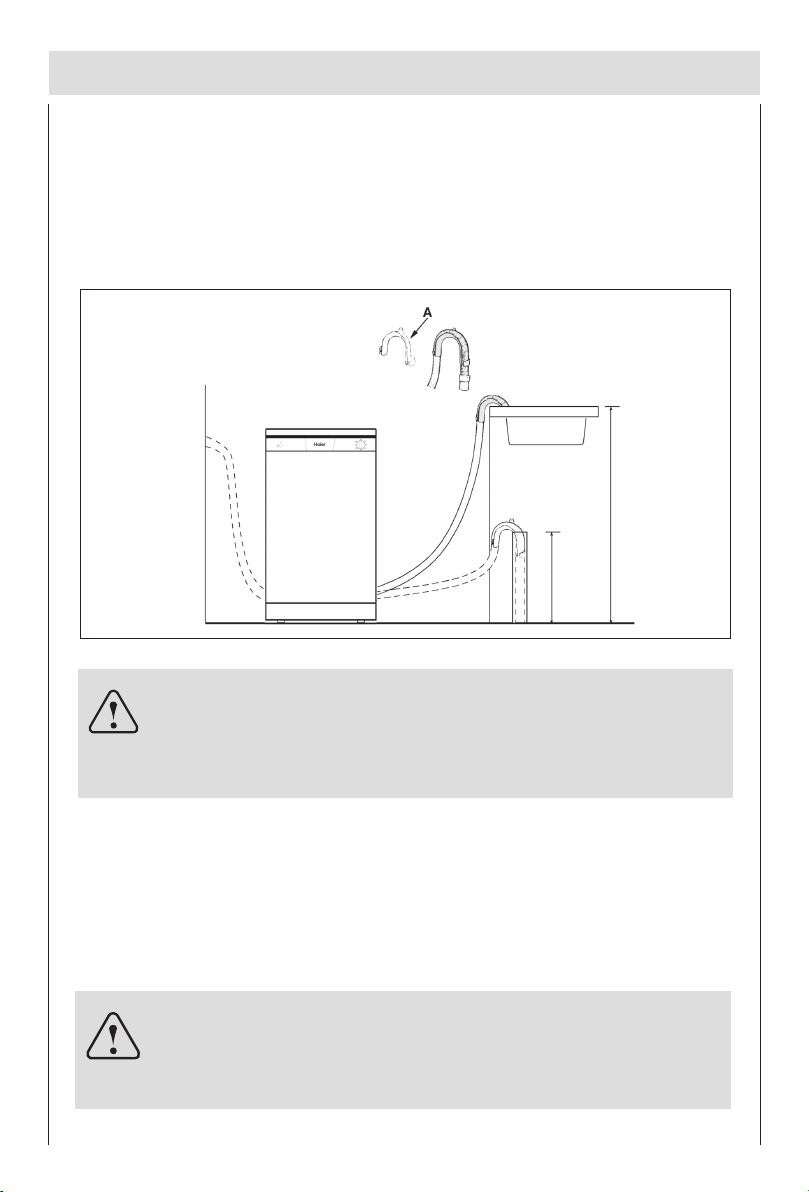
Drain hose connection
Insert the drain hose into a drain pipe with a minimum diameter of 4cm, or let it run into the sink, making
sure to avoid bending or crimping it. If necessary, fit a syphon trap (U-bend) with a connecting piece for
the electrical drain hose (fig.C). The free end of the hose must be at a height between 40 and 100 cm
and must not be immersed in water.
MAX 100 cm
MIN 40 cm
fig.C
Attention:
The connecting piece for syphon trap (U-bend) must be securely
fastened to the wall to prevent the drain hose from moving and
allowing water to spill outside the drain.
Electrical Connection
After making sure that the voltage and frequency values for the current in the home correspond to those
on the rating plate (located on the stainless steel inner door of the appliance) and that the electrical
system is correct for the maximum voltage on the rating plate, insert the plug into an electrical socket
which is earthed properly (the earthing of the appliance is a safety requirement mandated by law).
Caution:
The dishwasher plug must be accessible even when the appliance
is installed as a built-in unit so that maintenance can be done safely.
5
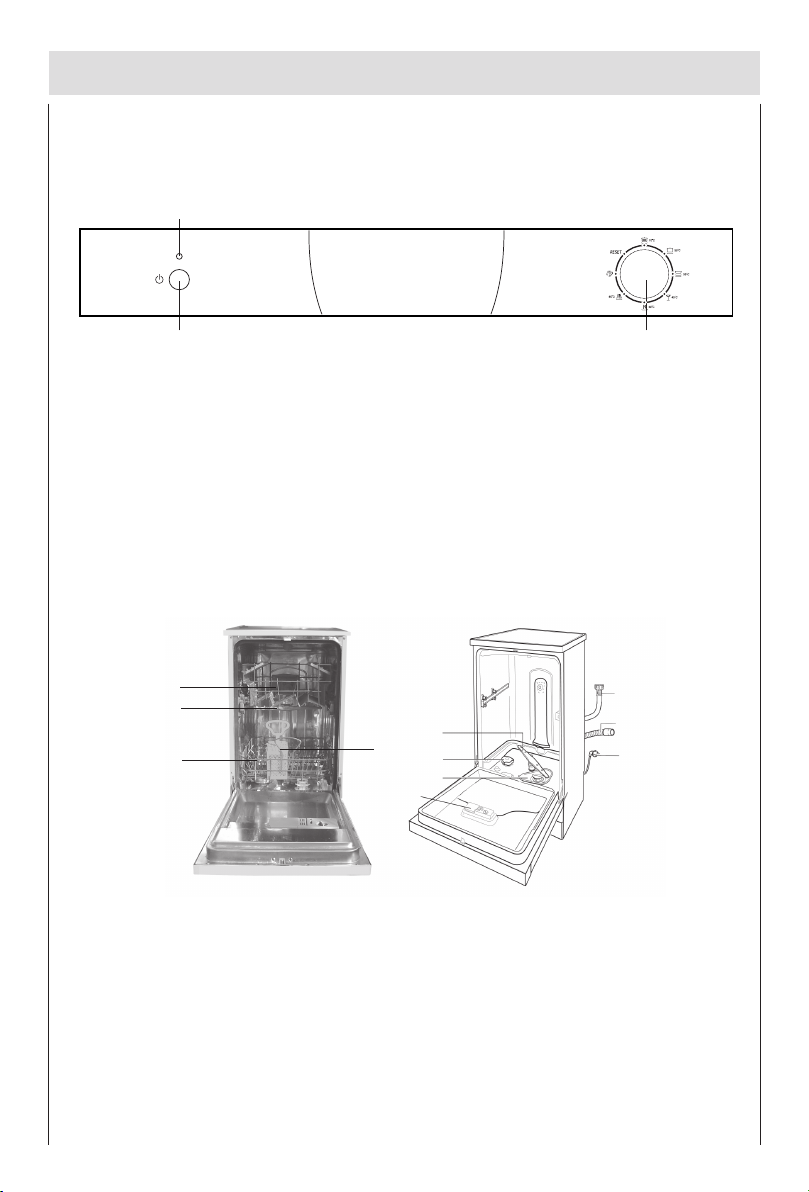
Getting to know your dishwasher
Close-up view (control panel)
A
en
B
ON-OFF Indicator
B
ON-OFF Button
Dishwasher interior
a
c
b
a
Upper Rack
b
Lower Rack
c
Top Spray Arm
d
Silverware Basket
e
Bottom Spray Arm
f
Salt Container Cap
Knob For Selecting Cycle
CA
e
d
f
g
h
g
Washing Filter
h
Detergent and Rinse Aid Dispenser
i
Water Inlet Hose
j
Drain Hose
k
Power Supply Cord
C
i
j
k
6
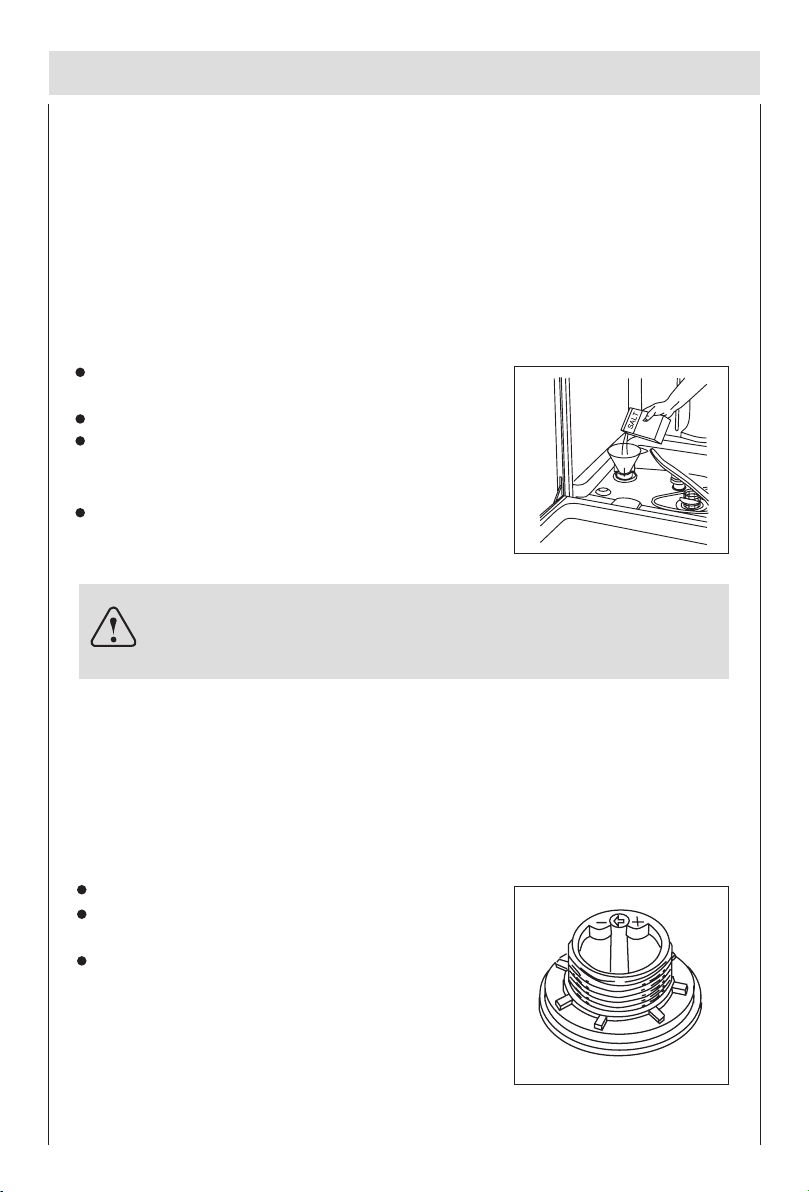
How to fill the salt
en
Salt
The hardness of the water varies from place to place. If hard water is used in the dishwasher, deposits
will form on the dishes and utensils.
The appliance is equipped with a special softener that uses a salt specifically designed to eliminate lime
and minerals from the water.
Loading the salt into the container
Always use salt intended for use with dishwashers.
The salt container is located beneath the lower rack and should be filled as follows:
Remove the lower rack and then unscrew and remove the cap
from the salt container;
If you are filling the container for the first time, fill it with water;
Place the end of the funnel (supplied) into the hole and introduce about 2 kg of salt. It is normal for a small amount of water
to come out of the salt container.
Carefully screw the cap back on.
Important
To prevent the formation of rust, load the salt just before beginning a wash cycle.
Adjusting salt consumption
The dishwasher is designed to allow for adjusting the amount of salt consumed based on the hardness of
the water used. This is intended to optimize and customize the level of salt consumption so that it remains at a minimum.
To adjust salt consumption, proceed as follows:
Unscrew the cap from the salt container;
There is a ring on the container with an arrow on it (see figure
to the side).
If necessary, rotate the ring in an anticlockwise direction from
the "-" setting towards the "+" sign, based on the hardness of
the water being used.
7
en
It is recommended that adjustments be made in accordance with the following table:
Hardness of the water
ºdH ºmmol/l
0J10 MJNT
ORJRM QRJUV QIRJUIV
ºfH
MJNIT
NIUJQIQNUJQQNMJOR
[UV[RM [UIV
Selector
knob
position
=?J?
L
jba
Salt
consumption
(Grams/cycle)
OM
QM
SM?H?
Autonomy
(cycles/2kg)
LM
SM
QM
OR
The default setting of the water softening system is -.
- If using multi-functional tablets fill the salt dispenser and set the adjuster to -; if the hardness of the
water is greater than 60ºfH, set it to +.
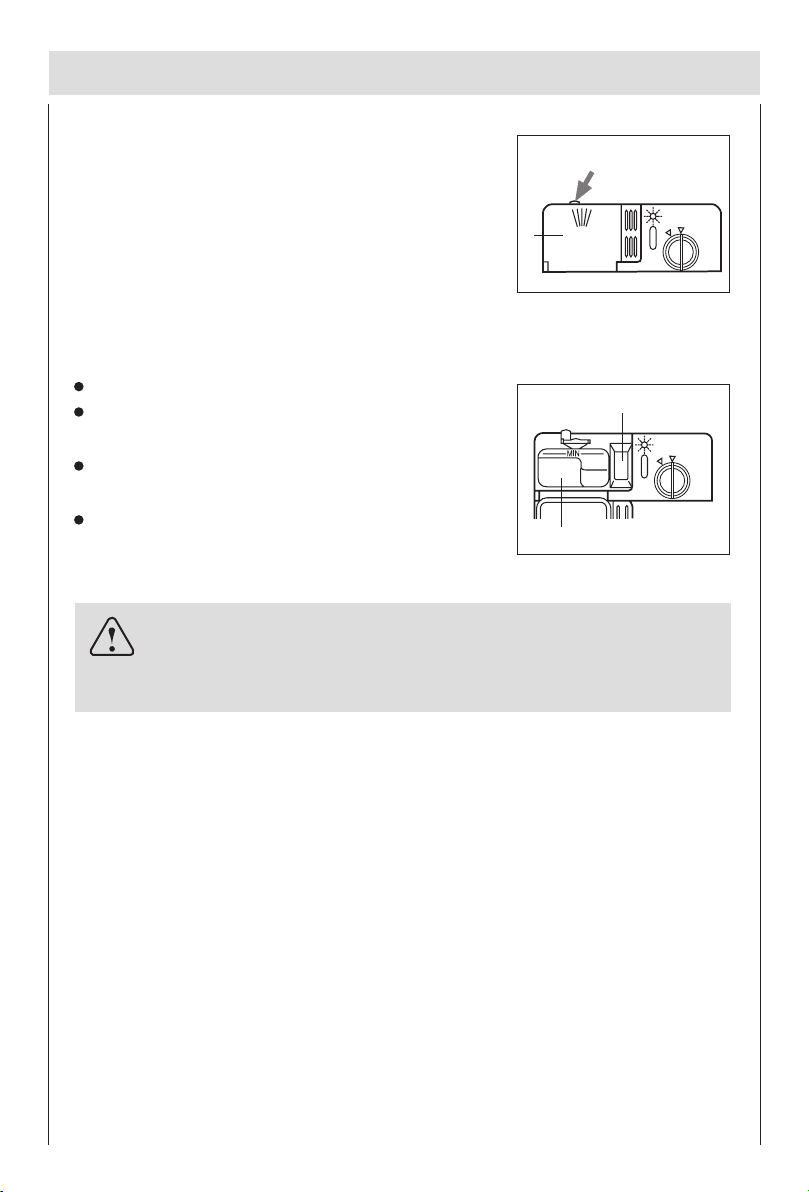
How to fill rinse aid
Rinse aid
This product makes dishes sparkle and helps them to dry without
spotting. The dispenser is located on the inside panel of the door.
When the low rinse aid indicator “ 1 ” is bright ,it means the rinse
aid is low,you must load rinse aid .
Low
Full
1
Loading the rinse aid
Regardless of the type of detergent dispenser installed on your
appliance, you must proceed as indicated below when loading the
rinse aid.
To open the dispenser, turn the "2" cap in an anti-clockwise direction
and then pour in the rinse aid, making sure not to overfill. The amount
of rinse aid used for each cycle can be regulated by turning the "3"
dose adjustor, located beneath the "2" cap, with a screwdriver. There
are 6 different settings; the normal dosage setting is 3.
Important
Proper dosage of the rinse aid improves drying. If drops of water remain on the dishes or spotting occurs, the dosage adjustor should be turned to a higher setting. If the dishes have white
streaks, turn the dosage adjustor to a lower setting.
2
3
8
How to fill the detergent dispenser
en
Detergent
Detergent specifically intended for use with dishwashers must be
used. The dispenser must be refilled before the start of each wash
cycle following the instructions provided in the "Programme overview".
The detergent dispenser is located on the inside panel of the door.
4
Loading the detergent
To open the " 4 " cover on the dispenser, press the "5" button.
The detergent for the wash cycle should be poured into the " 6"
compartment.
The detergent for the pre-wash cycle should be poured into
the “ 7 ” compartment.
After the detergent has been placed in the dispenser, close the
cover and press down until it clicks in place.
Notice:
To facilitate closing the cover, remove any excess detergent on the edges
of the dispenser.
6
5
7
9
Not suitable for the dishwasher
en
What you should not put into the dishwasher
Cutlery and tableware manufactured in whole or part from wood.They become faded and unsightly in
appearance.Furthermore,the adhesives that are used are not suitable for the temperature that occur
inside the dishwasher.Delicate decorative glassware and vases,special antique or irreplaceable china.
The decorative patterns on such items will not be dishwasher-proof.
Plastic objects that are not resistant to hot water, copper and pewter utensils are also not suitable.
Decorative patterns printed or painted onto the surface of crockery, glasses, etc.,aluminium and silver
items tend to become discoloured or faded if washed in the diswasher. Some types of glass can become
opaque in appearance after they have been washed many times in a dishwasher. Highly absorbent
materials, such as sponges and towels,should never be placed in the dishwasher.
Our recommendation
In future, only purchase table or kitchenware that has been confirmed as being dishwasher-proof.
Important
Dishes or cutlery that have been soiled by tobacco ash, wax,
Iubricating grease or paint, should not be put in the dishwasher.
Damage to glassware and other dishes
Possible causes
type of glass or manufacturing process
chemical composition of detergent
water temperature and duration of dishwasher programme.
Suggested remedy
Use glassware or porcelain dishes that have been marked ‘dishwasher-proof’ by the manufacture.
Use a mild detergent that is described as ‘kind to dishes’. If necessary, seek further information from
detergent manufacturers.
Select a programme with a low temperature and a short duration as possible.
To prevent damage, take glass and cutlery out of the dishwasher as soon as possible after the
programme has ended.
10
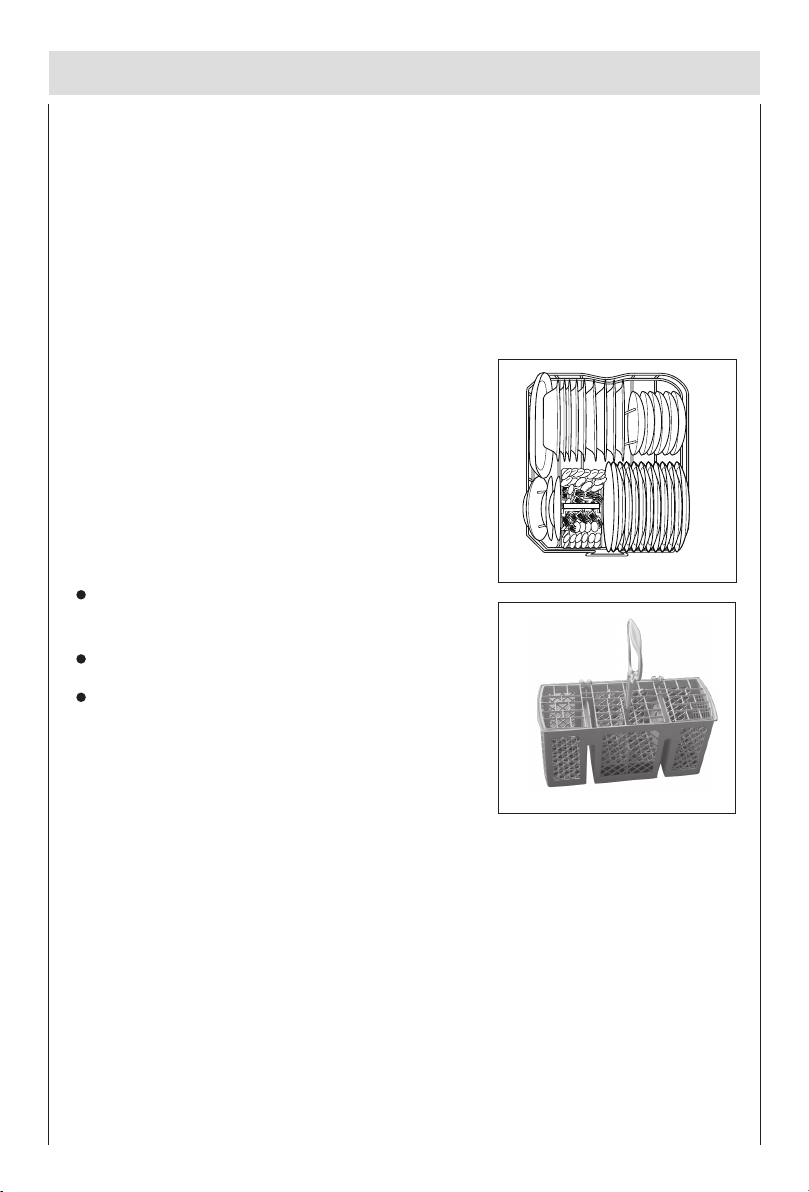
Arranging crockery, glasses, etc. in the dishwasher
ArtNo.800-0319 - RDW459
- Lower rack
Before placing the dishes in the dishwasher, remove larger food particles to prevent the filter from becoming clogged, which results in reduced performance.
If the pots and pans have baked-on food that is extremely hard to remove, we recommend that they are
soaked before washed. This will eliminate the need for extra wash cycles.
Pull out the rack to load the dishwasher.
en
How to use the lower rack
We recommend that you place the most difficult to clean items
on the bottom rack: pots, pans, lids, serving dishes and bowls,
as shown in the figure to the right.
It is preferable to place serving dishes and lids on the sides of
the racks in order to avoid blocking the rotation of the top spray
arm.
Pots, serving bowls, etc. must always be placed face down
(see fig.D) .
Deep pots should be slanted to allow the water to flow out.
The silverware basket can not be doubled (see fig.E).
Normal daily load
fig.D
fig.E
11
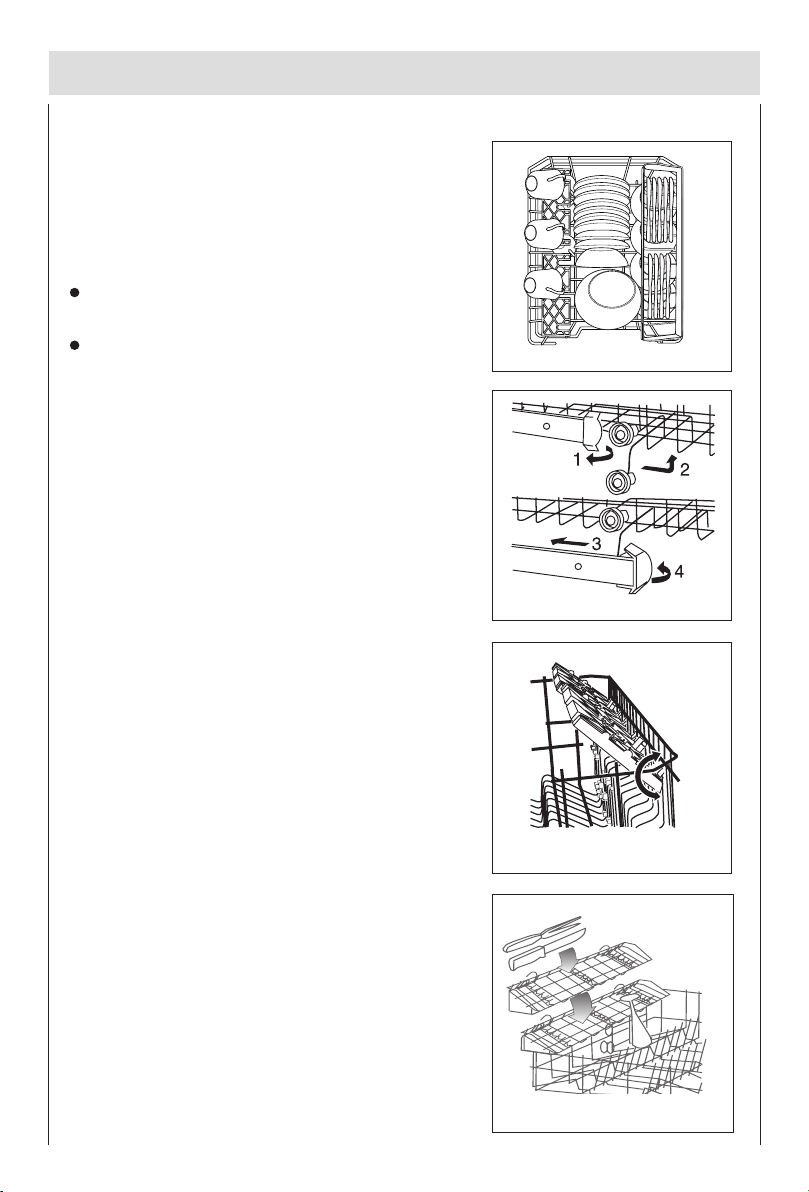
How to use the upper rack
ArtNo.800-0320 - RDW459 - Upper rack
The upper rack is designed to hold more delicate and lighter
dishware, such as glasses, cups and saucers, plates, small
bowls and shallow pans (as long as they are not too dirty).(see
fig.F)
Position the dishes and cookware so that they do not get
moved by the spray of water.
The upper rack can be adjusted for height by using the knobs
located on both sides of the rack itself (see fig.G).
Adjust the upper basket to the higher level and you have
more space to accommodate those taller pans and trays in
the bottom basket.
en
fig.F
fig.G
Shelf
Lean tall glasses and those with long stems against the shelfnot against other items to be washed.
Place glasses, cups and small bowls on the additional cup rack.
The additional cup rack can be swivelled in or out as required
(see fig.H).
Knife rack
The knife rack clips onto the side of the top basket, giving you
the freedom to wash your large sharp knives separately and
out of harm’s way (see fig.I).
fig.H
fig.I
12
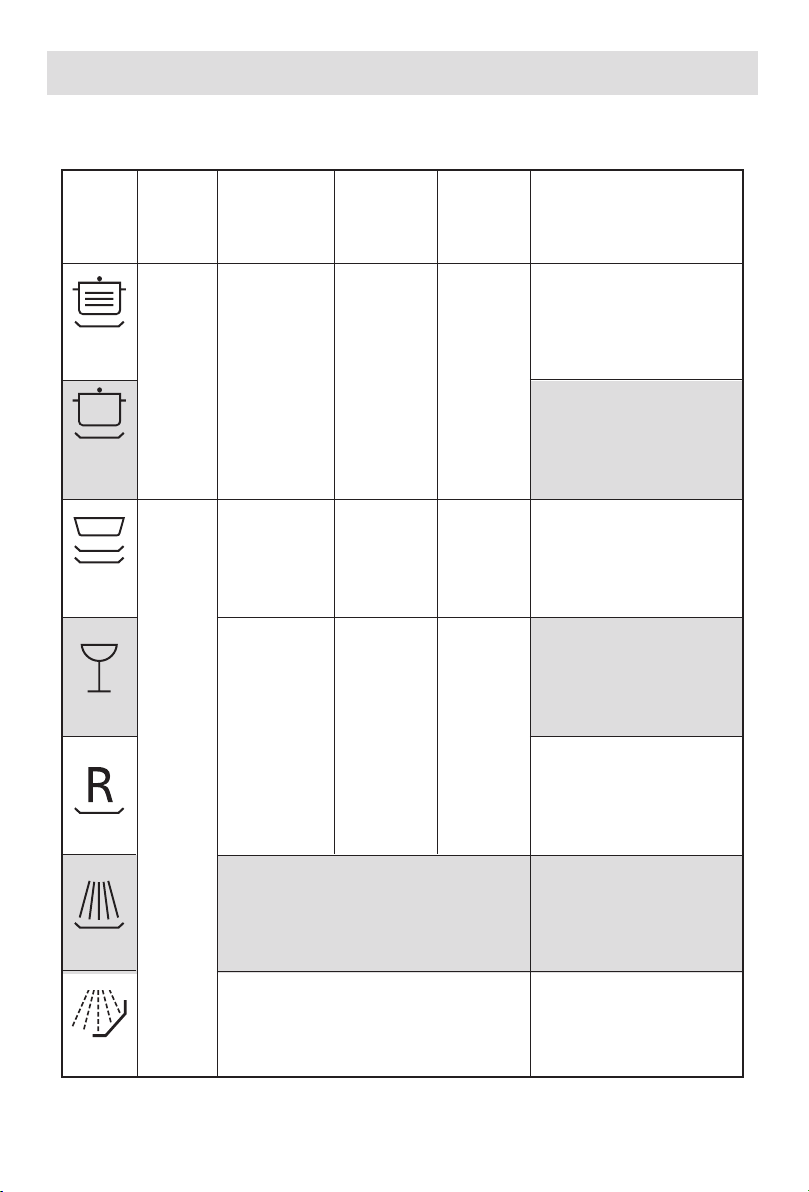
Programme overview
en
Wash
programme
Intensive
Wash
Normal
Wash
Light Wash
(EN 50242)
Glass ware
Type of
crokery e.g.
china, pots/
pans,
cutlery,
glasses, etc
Nondelicate
Mixed
Type of
food
remains
Soups,
casseroles,
sauces,
potatoes,
pasts, rice,
eggs, roast or
fried food.
Soups,
potatoes,
pasta, rice,
eggs, roast or
fried food.
Coffee,cakes,
milk, sausage,
cold drinks,
salads
Amount of
food
remains
a lot
a little
Very little
Condi-
tion of
food
remains
stuck
on hard
loosely
attached
loosely
attached
Description of cycle
Pre-wash with warm water.
Extended wash at 70°C.
Rinses with cold water.
Rinse with hot water.
Drying.
Pre-wash use cold water.
Extended wash at 55°C.
Rinse with cold water.
Rinse with hot water.
Drying.
Pre-wash use cold water.
Pre-wash use cold water.
Extended wash at 50°C.
Rinse with hot water.
Drying.
Wash at 45°C.
Rinse with warm water.
Hot rinse.
Drying.
Short wash at 40°C.
Cold rinse.
Rapid wash
13
Heat
Soak
For dishes that need to be rinsed
and dried only.
Rinse off if the dishes have been
stacked for several days in the dishwasher prior to washing.
Hot rinse at 65°C.
Drying.
Short cold wash to prevent food residue from
drying on the dishes .

en
Detergent
Prewash
5g
5g
5g
Extended
Wash
22g
22g
22g
15g
Rinse Aid
Duration in
minutes
112
102
162
92
Energy
consump-
tion in kWh
1.44
1.11
0.80
1.01
Water
consump-
tion in litres
18
15
14
12
15g
15g
*EN50242 test with rinse aid setting 5
32
54
0.40
0.90
9
5.5
Laboratory measured valve in accordance with European Standard EN50242
12
0.02
3
14

Washing dishes
en
Programme selection
The most appropriate programme can be identified by comparing the type of crockery, cutlery, etc., as
well as the amount and condition of food remains, with the details contained in the wash cycle table.The
corresponding programme sequence, duration and consumption details are shown in the right half of the
overview. For example:
Use the« normal» programme for dishes and utensils which have plenty of food remains stuck on
hard.
Earn savings
If only a small number of dishes have been loaded into the dishwasher,selecting a programme that
operates at the next lowest temperature which should be sufficient.
Programme data
The stated programme data are based on standard operating conditions. The values can vary considerably according to:
different amounts of dishes
temperature of mains water supply
pressure of mains water supply
ambient temperature
fluctuations in mains voltage
machine-related factors (e.g. temperature, water volume,...)
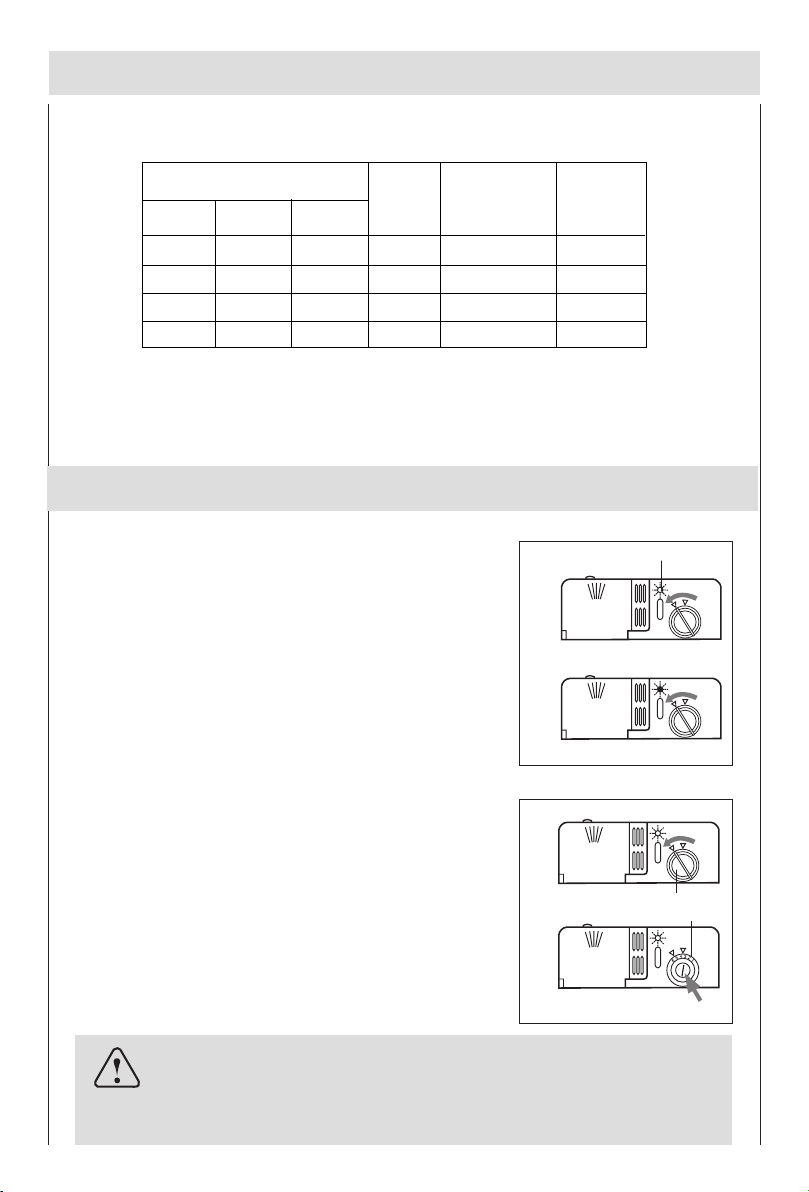
Switching the dishwasher ON
Close the door after loading the appliance.
Set On-Off button “B” to On. The state indicator "A" light.
Rotate the knob to select programme you wish. After 3 seconds the appliance emits a short warning signal, and start
the programme, the state indicator "A" blinks.
Warning
After a washing program ends, the knob indicates the same position as the last washing
program. To start another washing program, turn the knob to the reset position, then
choose the next washing program.
15
A
B

en
End of programme
Six beeps will indicate that the wash cycle has finished and the state indicators "A" light.
Switching the dishwasher OFF
Several minutes after the programme has ended:
Set On-Off button to Off
Open the door .
Remove dishes, etc. when they have cooled down.
Notice:
When the appliance is already underway press the button "B" for 3 seconds, all of the
settings will be cancelled.
Interrupping the programme
Open the door. Caution! There is a risk of water squirting out from inside the appliance. Do not open
the door fully until spray arm has stopped rotating.
When you open the door, the dishwasher will beep 10 times every 30 seconds.
If the appliance has already heated up or the hot water was switched ON and then the appliance door
opened, leave the door ajar for several minutes and then close. Otherwise, the appliance door may
open due to expansion.
Cancelling or modifying a cycle
A cycle that is underway can be modified if it has only been running for a short time. Otherwise, the
detergent may have already been used, and the appliance may have already drained the wash water.
If this is the case, the detergent dispenser must be refilled ( see the paragraph entitled, “ Loading the
detergent ”).
To cancel and restart the already ongoing program, follow the instruction on the page: 16 in the
section “Reset Drain Function”. Then select the desired program (see also page 15 in the section
"Switching the dishwasher ON"
Reset drain function
You can use Reset drain function to stop the washing cycle under
running by Rotating the knob to "Reset ", and the appliance will stop
after a few minutes drain phase.
16

How to keep your dishwasher in shape
en
After Every Wash
After every wash, turn off the water supply the appliance and leave the door slightly ajar so that moisture
and odors are not trapped inside.
Remove the plug
Before cleaning or performing maintenance, always switch off the remove the plug from the socket. Do
not run risks.
No solvents or Abrasive Cleaning Products
To clean the exterior and rubber parts of the dishwasher, do not use solvents or abrasive cleaning
products. Rather, it is recommended that you use only a cloth and warm soapy water.
To remove spots or stains from the surface of the interior, use a cloth dampened with water and a little
white vinegar, or cleaning product made specifically for dishwashers.
Moving the Appliance
If the appliance must be moved, try to keep it in a vertical position. If absolutely necessary, it can be
positioned on its back.
Seals
One of the factors that cause odors to form in the dishwasher is food that remains trapped in the seals.
Periodic cleaning with a damp sponge will prevent this from occurring.
The door should not be left in the open position since this could present a tripping hazard.
When You Go on Holiday
When you go on holiday, it is recommended that you run a wash cycle with the dishwasher empty and
then remove the plug from the socket, turn off the water supply and leave the door of the appliance
slightly ajar. This will help the seals last longer and prevent odors from forming within the appliance.
17

Care and maintenance
Regular inspection and maintenance of your appliance helps to prevent problems from occurring.This
saves time and aggravation.You should therefore carefully inspect the inside of your dishwasher from
time to time.
en
Overall condition of appliance
Check that no grease or scale has accumulated on the inside of the dishwasher.
If you discover any deposits:
Clean the interior of the dishwasher thorughly with a dishwasher detergent solution.
Filters
The filters “ 8”,“ 9” prevent larger particles of food in the water from reaching the pump.These particles may occasionally
block the filters.
When the appliance has finished washing, check the filters
for particles of food and, if required, clean.
After undoing the coarse micro-filter “8”, the filter unit “9”
can be removed. Remove any particles of food and rinse
the filters under running water.
Insert the filter unit “ 9 ” and tighten the coarse micro-filter.
8
9
Spray arms
Lime and remnants of food in the washing water can block the
nozzles in the spray arms “ 10 ” and “ 11 ” and the arm
mountings.
Inspect the nozzles in the spray arms for blocked holes
due to remnants of food.
If necessary, pull the lower arm “ 11 ” upwards and lift it off.
Unscrew the upper spray arm “ 10 ”.
Clean both spray arms under running water.
Refit the spray arms. Ensure that the lower arm has locked
into place and the upper one is screwed tight.
Ensure that the power supply is turned off prior to removal
and cleaning of any internal pars.
10
11
18

Trouble Shooting
en
Resolving minor problems yourself
Experience has shown that you can resolve most problems that rise during normal daily usage yourself,
without having to call out a service engineer.Not only does this save costs,but it also means that the
appliance is available for use again that much sooner. The following list of common occurrences and
their remedies should help you identify the causes of most problems.
...when the appliance is switched on
Appliance does not start up
Fault with fuse in mains electricity supply.
Plug not inserted in wall socket.
Appliance door not closed properly.
Programme button has not been pressed.
Water tap not turned on.
Blocked strainer in water intake hose.
- The strainer is situated in the Aquastop or supply-hose connection.
Caution
Do not forget that repairs should only be carried out by a qualified
specialist. Improper repairs can lead to considerable equipment damage as well as danger to the user.
...with the appliance itself
Error displays on the Stop light “ A ”with it blinking
all the time.
When the buzzer emits 1 short warning signal every
30 seconds.
Have you checked whether:
the door is closed properly.
When the buzzer emits 3 short warning signal every 30 seconds.
Have you checked whether:
the drain hose is too low.
19
A

en
When the buzzer emits 4 short warning signal every 30 seconds.
Have you checked whether:
the drain hose is crimped or bent.
the drain hose is too high.
When the buzzer emits 5 short warning signal every 30 seconds.
Have you checked whether:
the water is turned on and the hose is connected properly;
the water supply to the house is on and has sufficient pressure;
the water supply hose is crimped or bent;
the filter for the water supply hose is clogged.
the drain hose is too low.
When the buzzer emits 2 or 6 short warning signals every 30 seconds,Contact the nearest authorized service center.
If you take all these checks and the dishwasher still does not function or your dishwasher have any other error display, you can power the dishwasher OFF, and wait a few
minutes. You can power the dishwasher on, try it again, if the dishwasher still does not
function and/or the problem persists, contact the nearest authorised service center and
provide them with the following information:
the nature of the problem.
the model type number (Mod...) And the serial number (S/N...), which are indicated on the plate
located on the side of the inner part of the door.
Lower spray arm rotates with difficulty
Spray arm is blocked by small items or food remains.
Lid in detergent compartment cannot be closed
Detergent compartment has been overfilled.
Mechanism is clogged with remnants of detergent.
Remnants of detergent stuck inside dispenser
Compartment was damp when it was filled up with detergent. Compartment must be dry before
detergent is added.
20

en
Water remains inside appliance after programme has ended
Blockage or kind in drainage hose.
Pump is jammed.
Filters are blocked.
The programme is still running. Wait for the programme to end .
...during washing
Unusual amount of foam is creased
Normal washing up liquid has been poured into the rinse-aid container.
Remove any spilled rinse aid with a cloth as it could otherwise lead to excessive foaming during the
next washing cycle.
Appliance stops suddenly while washing is taking place
Cut off electricity supply to appliance.
Water supply has been interrupted.
Knocking sound can be heared while washing is taking place
A spray arm is knocking against the dishes inside the appliance.
Rattling sound can be heared while washing is taking place
Crockery has not been stacked properly inside the appliance.
Knocking sound coming from inlet valves
This is caused by the way the water pipes have been laid and it has no effect upon the way the
appliance functions. There is no remedy for this.
...with the dishes,cutlery, etc.
Remnants of food are stuck to the dishes, cutlery,etc.
Dishwasher was not loaded properly. Jets of water could not reach all parts of the dishes, ect.
Too many items in the rack.
Items in the rack were touching each other.
Not enough detergent was added to dispenser.
Selected wash programme was not intensive enough.
Rotation of spray arm was obstructed by dishes, etc.
N ozzles in spray arm are blokcked by remnants of food.
Filters are blocked.
Filters have been incorrectly fitted.
Waste-water pump is jammed.
21

en
Plastic items are discoloured
Not enough detergent was added to dispenser.
Detergent has insuffcient bleaching properties. Use a detergent containing a chemical bleaching agent.
White stains are left on crockery, glasses have a milky appearance
Not enough detergent was added to dispenser compartment.
Amount of rinse-aid was set too low.
Although water is quite hard, no salt has been put in appliance.
Water softener was set too low.
Lid on salt container is not screwed tight.
If you used a phosphate-free detergent , try a detergent containing phosphates and compare results.
Dishes,cultlery,etc.have not been dried
Selected programme did not include drying function.
Amount of rinse-aid was set too low.
Items were removed from dishwasher too soon.
Glasses have a dull appearance
Amount of rinse-aid was set too low.
Tea stains or traces of lipstick have not been completely removed
Detergent does not have a sufficient bleaching effect.
Washing temperature was set too low.
Traces of rust on cutlery
Cutlery is not sufficiently rustproof.
Salt content in washing water is too high.
- Lid on salt container is not screwed tight.
- Too much salt was spilt while filling container.
Glasses become clouded and discoloured; coating cannot be wiped off
Unsuitable detergent was used.
Glasses are not dishwasher-proof.
Smears left behind on glasses and cutlery; glasses have acquired a metallic appearance
Amount of rinse-aid set too high.
22

Technical data
en
Width
Depth
Height
Capacity
Mains water pressure
Power voltage
Fuse
Total absorbed power
45 cm
60 cm
85 cm
9 standard place settings
0.03-1.0MPa
220-240V~ 50Hz
13A
1950W
23

Important information
en
Notes on waste disposal
Old appliances still have some residual value. An environment-friendly method of disposal will ensure
that valuable raw materials can be recovered and used again.
When an appliance has reached the end of its working life,unplug it from the mains.Cut through the
mains cable and dispose of it together with the plug.
Destroy the door locking mechanism. This will ensure that children at play cannot become locked inside
and are not exposed to the risk of suffocation.
Your new appliance was protected by suitable packaging while it was on its way to you. All materials
used for this purpose are environment-friendly and can be recycled. Please make a contribution to
protecting the environment by disposing of the packaging appropriately.
Do not allow children to play with any parts of the packaging. There is a risk of suffocation by the
cardboard boxes and the plastic wrapping.
Up-to -date information concerning options for disposal can obtained from your retailer or local municipal administration.
General information
Measures must be taken to ensure that built-under and built-in units that are subsequently re-sited
as free-standing appliances cannot topple over. This can be achieved by bolting the dishwasher to
the wall or fitting it under a continuous work surface which is screwed to the adjacent cupboards.
24

en
Information on comparability tests implemented in compliance with
EN 50242
Appliance loaded in accordance with standard specifications.
Example of loaded dishwasher: See Fig 1 and 2
Capacity: 9 place settings
Comparability programme: Light wash
Rinse-aid setting: 5
Detergent: 5g+22g
ArtNo.800-0319 - RDW459
- Lower rack
Fig.1 Fig.2
ArtNo.800-0320 - RDW459 - Upper rack
Height-adjustable top-basket must be inserted in the uppermost position.
If the comparability tests do not comply fully with EN 50242, e.g., degree of soiling, type of dishes and
cutlery, etc., contact the appliance manufacturer before starting the test.
25

en
A: Wiring box
B: Door switch
C: Water level switch
D: Drain pump motor
E: Dispenser
Disposal
F: Softener valve
G: Overflow switch
H: Inlet valve
I: Washing pump motor
J: Temperature limiter
The symbol on the product or on its packaging indicates that this product
may not be treated as household waste. Instead it shall be handed over to the
applicable collection point for the recycling of electrical and electronic equipment.
By ensuring this product is disposed of correctly, you will help prevent potential negative consequences for the environment and human health, which could
otherwise be caused by inappropriate waste handling of this product.
For more detailed information about recycling of this product, please contact
your local city office, your household waste disposal service or the shop where
you purchased the product.
K: Heater
L: Relay
M: Temperature sensor
26

Inhaltsverzeichnis
de
Sicherheitshinweise
Installation
Geschirrspüler kennen lernen
Wie wird der Salzbehälter gefüllt ?
Wie wird der Klarspüler gefüllt?
Reiniger
Nicht geeignetes Geschirr
Geschirr einordnen
Programmübersicht
Geschirrspülen
So halte ich das Gerät in Topform
Wartung und Pflege
Fehlersuche
Technische Daten
Hinweise
2
4
6
7
8
9
10
11
13
15
17
18
19
23
23
1

Sicherheitshinweise
de
Bei der Anlieferung
Überprüfen Sie Verpackung und Geschirrspüler sofort auf Transportschäden. Nehmen Sie ein
beschädigtes Gerät nicht in Betrieb, sondem nehmen Sie Rücksprache mit Ihrem Lieferanten oder
Ihrem Kundendienst.
Entsorgen Sie das Verpackungsmaterial bitte ordnungsgemäß.
Bei der lnstallation
Nehmen Sie Aufstellung und Anschluss nach der Installations-und Montageanweisung vor.
Bei der Installation muss der Geschirrspüler vom Netz getrennt sein.
Stellen Sie sicher, dass das Schutzleitersystem der elektrischen Hausinstallation vorschriftsmäßig
installiert ist.
Elektrische Anschlussbedingungen und Angaben auf dem Typenschild des Geschirrspülers müssen
übereinstimmen.
Benutzen Sie zum Anschluss niemals Verlängerungskabel.
Nach dem Aufstellen des Gerätes muss der Stecker frei zugänglich sein.
Das Netzkabel darf bei der Installation niemals zu stark oder in gefährlicher Weise verbogen oder
gequetscht werden.
Das Gerät darf nicht im Freien aufgestellt werden, selbst wenn es unter einem Dach steht; es ist
außerdem gefährlich, den Geschirrspüler Witterungseinflüssen einschließlich Regen auszusetzen.
Im täglichen Betrieb
Der Geschirrspüler ist nur zum Spülen von Haushalts- und Kochgeschirr gedacht und sollte nur von
Erwachsenen benutzt werden.
Setzen oder stellen Sie sich nicht aut die geöffnete Tür. Das Gerät könnte kippen.
Das Wasser im Spülraum ist kein Trinkwasser.
Geben Sie kein Lösungsmittel in den Spülraum. Es besteht Explosionsgefahr.
Die Tür während des Programmablaufs nur vorsichtig öffnen. Es besteht die Gefahr, dass Wasser aus
dem Gerät spritzt.
Berühren Sie niemals die Heizelemente während oder nach einem Spülzyklus.
Bitte beachten Sie die folgenden Vorschriften für den Einsatz dieses Gerätes:
- Berühren Sie den Geschirrspüler niemals mit feuchten Händen oder Füßen.
- Verwenden Sie niemals Verlängerungskabel oder Vielfachstecker.
- Trennen Sie das Gerät stets von der Stromversorgung, wenn es nicht vorschriftsmäßig funktioniert
oder gewartet werden muss.
2

de
Bei Kindern im Haushalt
Kinder oder behinderte Personen sollten dieses Gerät nicht ohne Beaufsichtigung benutzen.
Eine Beaufsichtung von Kindern bei der Benutzung des Gerätes ist erforderlich, damit sie nicht mit
dem Geschirrspüler spielen.
Halten Sie Kinder von Spülmitteln und dem offenen Geschirrspüler fern.
Bei auftretenden Schäden
Bei Störungen am Gerät müssen Sie immer sofort die Wasserversorgung abstellen und den Stecker
aus der Steckdose ziehen. Ziehen Sie dann den Abschnitt "Fehlersuche" zu Rate. Wenn Sie das Problem nicht selbst lösen können, wenden Sie sich bitte an Ihre Kundendienststelle.
Der Geschirrspüler darf nur von geschultem Fachpersonal repariert werden.
Wenn die Anschlussleitung dieses Gerätes beschädigt wird, muss sie durch den Hersteller oder seinen
Kundendienst oder eine ähnlich qualifizierte Person ersetzt werden, um Gefährdungen zu vermeiden.
Zur Erhaltung der alten LEISTUNGSFÄHIGKEIT und SICHERHEIT des Gerätes empfehlen wir
folgendes:
- Wenden Sie sich immer nur an die vom Hersteller empfohlenen Kundendienststellen.
- Verwenden Sie immer nur Originalersatzteile.
Bei der Entsorgung
Geräte, die entsorgt werden sollen, müssen vorher unbrauchbar gemacht werden, indem das Stromkabel
abgeschnitten und das Türschloss entfernt wird.
Führen Sie das Gerät einer ordnungsgemäßen Entsorgung zu.
Gefährliche Spannung
Warnung:
Kinder könnten sich im Gerät einsperren (Erstickungsgefahr) oder in
andere Gefahrensituationen geraten.
Deshalb: Netzstecker ziehen, Netzkabel durchtrennen und beseitigen.
Türschloss so weit zerstören, dass die Tür nicht mehr schließt.
3

Installation
de
Aufstellen
Stellen Sie das Gerät an der gewünschten Stelle auf. Das Gerät kann mit den Seitenteilen, oder mit der
Rückseite an angrenzende Möbelteile oder an der Wand angelehnt werden. Der Geschirrspüler ist mit
Zulauf-und Ablaufschläuchen ausgestattet, die je nach den Installationsgegebenheiten, sowohl nach
rechts als auch nach links geleitet werden können.
Waagerechte Aufstellung
Richten Sie das Gerät mittels der Stellfüße eben waagerecht aus.
An den Stellfüßen befinden sich Schrauben. Durch Anziehen oder
Lösen dieser Schrauben können Sie die Höhe des Gerätes
einstellen.Das Gerät darf auf keinen Fall eine Neigung von mehr
als 2° aufweisen. Eine richtige Aufstellung gewährleistet eine
korrekte Betriebsweise des Gerätes.
Anschluß an die Kaltwasserleitung
Schließen Sie den Zulaufschlauch mittels einer 3/4Gewindeverbindung an die Kaltwasserleitung an und ziehen Sie
die Mutter fest an (siehe Abb.A).
Einige Modelle sind mit einem “Aquastop” -Wasserschlauch
ausgestattet(siehe Abb.B), in dem bereits schon ein Sieb im
Gewindeteil untergebracht ist.
Sollte es sich um neue Leitungen handeln,oder um Leitungen,
die für längere Zeit nicht benutzt wurden,dann lassen Sie das
Wasser so lange laufen, bis es ganz klar ist. Eventuelle
Schmutzreste könnten zu Verstopfung der Zulaufleitung und zu
Schäden am Gerät führen.
Abb.A
Abb.B
ACHTUNG:
Das Gerät ist an die Wasserversorgung unter Verwendung neuer
Schlauchsätze anzuschließen und alte Schlauchsätze werden nicht
wiederverwendet.
Überlaufschutz
Der Geschirrspüler ist mit einem System ausgestattet,dank dessen bei einem eventuellen Schaden am
Wasserzulaufschlauch oder bei Leckstellen im lnnern des Gerätes sofort die Wasserzufuhr unterbrochen wird.
Dadurch werden Schäden in lhrer Wohnung vermieden.Sollte das Gehäuse “A” (das stromführende Teile enthält)
aus irgendwelchen Gründen beschädigt werden,ist der Netzstecker sofort aus der Steckdose zu ziehen. Um eine
ordnungsgemäße Funktionsweise des Überlaufschutzes zu garantieren,muß das Gehäuse"A"mit dem
Wasserzulaufschlauch ausschließlich in der Stellung wie in Abb.B veranschaulicht,angeschlossen werden.
Der Zulaufschlauch darf auf keinen Fall durchgeschnitten werden,da er stromführende Teile enthält.Sollte der
Schlauch zu kurz sein muß er durch einen anderen Schlauch von geeigneter Länge ersetzt werden. Einen
solchen Schlauch können Sie bei einem Fachhändler oder Ihrer Kundendienststelle erhalten oder bestellen.
4

de
Anschluß des Abwasserschlauches
Führen Sie den Ablaufschlauch in eine Ablaufleitung mit einem Durchmesser von mindestens 4 cm oder
legen Sie ihn in das Spülbecken. Falls erforderlich, verwenden Sie das mitgelieferte Kunststoffteil für
den Syphonanschluss und um den Schlauch nicht zu knicken oder einzuklemmen(Abb.C).Das
Schlauchende muß in einer Höhe von 40 bis 100 cm auslaufen und darf nicht im Wasser eingetaucht
sein.
MAX 100 cm
MIN 40 cm
Abb.C
Achtung:
Das mitgelieferte Kunststoffteil muß fest an der Mauer befestigt
werden ,um zu vermeiden,daß der Ablaufschlauch abrutscht und so
das Wasser außerhalb des Ablaufrohres abläuft.
Elektroanschluß
Das Gerät nur an 230V Wechselstrom über eine vorschriftsmäßig installierte Steckdose mit Schutzleiter
anschliessen. Angaben über Netzspannung, Stromart und die erforderliche Absicherung sind dem
Typenschild zu entnehmen. Das Typenschild ist auf der Innenseite der Tür angebracht.
Falls die Steckdose für den am Gerät befindlichen Netzstecker nicht geeignet ist: Netzstecker auswechseln
lassen anstatt Adapterstecker verwenden. Überhitzungs- und Brandgefahr!
Warnung:
Bei unterbaufähigen oder inregrierbaren Geräten muß der
Anschlußstecker des Geschirrspülers frei zugänglich sein, so dass
die Instandhaltung gefahrlos vorgenommen werden kann.
5

Geschirrspüler kennen lernen
Aus der Nähe betrachtet (Bedienblende)
A
de
B
"Ein-Aus" Betriebsanzeige
B
Taste "Ein-Aus"
Programm-Auswahltaste
CA
Aus der Nähe betrachtet (Innenraum)
a
c
e
d
b
Oberer Korb
a
Unterer Korb
b
Oberer Sprüharm
c
Besteckkorb
d
Unterer Sprüharm
e
Salzbehälterdeckel
f
f
g
h
g
Filtereinsatz
h
Reiniger-und Klarspülbehälter
i
Wasserzulaufschlauch
j
Abwasserschlauch
k
Netzkabel
C
i
j
k
6

Wie wird der Salzbehälter gefüllt ?
de
Salz
Der Kalkgehalt des Wassers variiert von Ort zu Ort.Je höher der Kalkgehalt,desto höher die Wasserhärte.
Würde hartes Wasser in den Geschirrspüler eingelassen werden,käme es zu Ablagerungen auf dem
Geschirr.
Dank des Entkalkers,in den das Geschirrspüler-Spezialsalz eingefüllt werden muß,wird das Wasser
vom Kalk befreit.
Einfüllen des Salzes in den Entkalkerbehälter
Verwenden Sie bitte nur Spezialsalz für Geschirrspüler.
Der Salzbehälter befindet sich unter dem unteren Korb und wird wie folgt gefüllt:
Entsprechend der Tabelle “Wasserhärte” die benötigte
Salzmenge bestimmen,dann Salz einfüllen.
Nehmen Sie den unteren Korb heraus und schrauben Sie den
Deckel des Behälters ab.
Wenn der Salzbehälter zum ersten Mal gefüllt wird,muß er
zuerst mit Wasser gefüllt werden.
Füllen Sie mit Hilfe des mitgelieferten Trichters ca.2kg Salz
ein. Dabei tritt etwas Wasser aus dem Salzbehälter aus.
Schrauben Sie den Deckel des Salzbehälters wieder an.
Wichtig:
Um Rostbildung zu vermeiden,füllen Sie das Salz am besten kurz
vor einem kompletten Spülgang ein.
Einstellen des Salzverbrauchs
Der Geschirrspüler ist für das Einstellen des Salzverbrauchs je nach Härtebereich des Wassers
vorbereitet,so daß der Salzverbrauch auf ein notwendiges Minimum optimiert und individuell gestaltet
werden kann.
Zum Einstellen verfahren Sie bitte wie folgt:
Schrauben Sie den Deckel des Salzvorratbehälters ab.
Auf dem Rand des Behälters befindet sich ein Pfeil (siehe
nebenstehende Abbildung).
Drehen Sie den Pfeil entgegen dem Uhrzeigersinn von"-" nach
"+", je nach Härte des verwendeten Wassers.
7

de
Wir empfehlen,das Einstellen nach folgender Tabelle vorzunehmen:
Wasserhärte
ºdH ºmmol/l
0J10 MJNT
ORJRM QRJUV QIRJUIV
ºfH
MJNIT
NIUJQIQNUJQQNMJOR
[UV[RM [UIV
Wählereinstellung
L
=?J?
jba
Salzverbrauch
(gr/pro Zyklus)
OM
QM
SM?H?
Autonomie
(Zyklen/
pro 2 kg)
LM
SM
QM
OR
Der Entkalker wurde werkseitig auf - eingestellt.
Sollten Sie Multifunktionstabs verwenden, empfiehlt es sich,den Salzbehälter doch zu füllen und ihn auf einzustellen, oder auf +, wenn der Härtegrad Ihres Wassers 60°fHübersteigt.
Wie wird der Klarspüler gefüllt ?
Klarspüler
Die Verwendung des Klarspülers fördert das Trocknen und verleiht
lhrem Geschirr strahlenden Glanz.Der Klarspülerbehälter befindet sich
im Türinnern und muß nach ungefähr jeweils 80 Spülgängen neu
aufgefüllt werden(bei den mit einer Nachfüllanzeige bestückten
Modellen wird der Klarspüler eingefüllt wenn die entsprechende
Anzeige blinkt).
Wenn die Klarspüleranzeige “1” durchsichtig klar ist,muss
Klarspüler nachgefüllt werden.
Einfüllen des Klarspülers
Drehen Sie den Deckel " 2 " des Klarspülerbehälters ab und füllen
Sie Klarspüler ein. Achten Sie beim Einfüllen darauf, daß kein
Klarspüler überläuft. Der Klarspüler kann durch Einstellen (mittles
eines Schraubenziehers) des unter dem Deckel " 2 " sich befindenden
Reglers " 3 " dosiert werden.Es sind 6 verschiedene Einstellungen
möglich. Ab Werk ist der Regler auf Pos. 3 voreingestellt.
Wichtig:
Eine geeignete Klarspüler-Dosierung ermöglicht ein optimales Trocknen.
Sollten auf dem Geschirr nach dem Spülen Wassertropfen oder Flecken
hinterbleiben,muß der Regler höher eingestellt werden.Sollten auf dem Geschirr
weiße Streifen hinterbleiben,muß der Regler niedriger eingestellt werden.
1
2
3
8

Reiniger
Reiniger
Der Einsatz spezifischer Reiniger für Geschirrspüler
garantiert bessere Reinigungsergebnisse.Füllen Sie den
Reiniger vor Beginn des Spülgangs gemäß den
Anweisungen des Abschnitts "Programmübersicht" ein.Der
Reinigerbehälter befindet sich auf der Innenseite.
Einfüllen des Behälters
Drücken sie die Taste "5",um den Deckel "4" zu öffnen.
Füllen Sie den Reiniger für den Spülgang in die Mulde
"6"ein.
Den Reiniger für Vorspülen füllen Sie in die Mulde "7"ein.
Drücken Sie nach dem Einfüllen des Reinigers den Deckel
bitte so zu,daß er einrastet.
Achtung:
Um das Einrasten des Deckels zu erleichtern, säubern Sie bitte die
Kammerkanten vor dem Verschließen von eventuellen
Reinigerresten.
4
de
5
7
6
9

Nicht geeignetes Geschirr
de
Nicht in Ihrem Geschirrspüler reinigen sollten Sie:
Besteck-und Geschirrteile aus Holz. Sie laugen aus und werden unansehnlich; auch sind die
verwendendeten Kleber nicht für die auftretenden Temperaturen geeignet. Empfindliche Dekorgläser
und Vasen, spezielles antikes oder unwiederbringliches Geschirr. Diese Dekore waren noch nicht
spülmaschinenfest.
Nicht geeignet sind außerdem heißwasserempfindliche Kunststoffteile, Kupfer-und Zinngeschirr.
Aufglasdekore, Aluminium-und Silberteile können beim Spülen zum Verfärben und Verblassen neigen.
Auch einige Glassorten können nach vielen Spülgängen trüb werden. Weiter gehören sich voll saugende
Materialien, wie Schwämme und Tücher, nicht in den Geschirrspüler.
Empfehlung:
Kaufen Sie künftig nur Geschirr, das als spülmaschinenfest gekennzeichnet ist.
Hinweis
Geschirrteile die mit Asche, Wachs, Schmierfett oder Farbe
verureinigt sind, dürfen nicht in den Geschirrspüler.
Glas-und Geschirrschäden
Ursachen:
Glasart und Glasherstellungsverfahren.
chemische Zusammensetzung des Reinigers.
Wassertemperatur und Programmdauer der Geschirrspülmaschine.
Empfehlung:
Gläser und Porzellan verwenden, das vom Hersteller als spülmaschinenfest bezeichnet wird.
Reiniger verwenden, der als geschirrschonend gekennzeichnet ist, bei Reinigerherstellern nachfragen.
Programm mit möglichst geringer Temperatur und kurzer Programmdauer wählen.
Um Beschädigungen zu vermeiden, Glas und Besteck nach Programmende möglichst bald aus dem
Geschirrspüler entnehmen.
10

ArtNo.800-0319 - RDW459
- Lower rack
Geschirr einordnen
Bevor Sie das Geschirr einordnen, sollten Sie :
Grobe Speisereste entfernen. Damit bleibt der Filtereinsatz durchlässig und die Betriebseigenschaften
Ihres Gerätes erhalten.
Töpfe mit eingebrannten Speiseresten einweichen.
de
Verwendung des unteren Korbs
Es wird empfohlen das am schwierigsten zu reinigende Geschirr
in den unteren Korb einzuordnen: Töpfe, Pfannen und Teller
bis zu 29 cm Durchmesser (siehe Abbildung rechts). Die
grossen Geschirrteile an den Rand einordnen, so dass die
Drehung des oberen Sprüharmes nicht behindert wird.
Töpfe, Pfannen, Servierteller usw. immer mit der Öffnung
nach unten einordnen, damit sich kein Wasser ansammeln
kann(Abb.D).
Größe Töpfe sollten schräg einsortiert werden , damit das
Wasser besser ablaufen kann.
Der Besteckkorb kann zweigeteilt werden.(siehe Abb.E )
Normale Tagesbeladung
Abb.D
Abb.E
11

ArtNo.800-0320 - RDW459 - Upper rack
Was gehört in den Oberen Korb
Sortieren Sie in den oberen Korb das empfindliche und leichte
Geschirr wie Gläser,Tee-und Kaffeetassen,Untertassen und
Teller,flache Schüsseln,leicht verschmutzte flache Töpfe und
Pfannen.(siehe Abb.F)
Sortieren Sie das Geschirr so ein,daß es durch den
Wasserstrahl nicht umgeworfen wird.
Der obere Korb ist höhenverstellbar (siehe Abb.G).
Stellen Sie den Oberkorb in die höhere Position ein. Damit
haben Sie mehr Raum für das Einordnen höherer Teller
und größerem Geschirr im unteren Korb.
de
Abb.F
Abb.G
Etagere
Stellen Sie Gläser und Glaswaren mit längerem Stiel darauf,
um das Berühren mit anderem Geschirr zu vermeiden.
Setzen Sie Glas, Tassen und kleine Schüsseln auf das
zusätzliche Tassenregal, das entsprechend dem Bedarf ein-oder
ausgeschwenkt werden kann(Siehe Abb.H).
Messerablage
Die Messerablage ist speziell für lange Messer und Gabeln
konstruiert.
Bringen Sie die Messerablage in die richtige Position des
Obergestells an und legen Sie die langen Messer und Gabeln
auf die Messerablage zur Reinigung(Siehe Abb.I).
Abb.H
Abb.I
12

Programmübersicht
de
Spül-
programm
Intensiv-
programm
Normalspül-
programm
ECO-
Programm
(EN 50242)
Glas
Schnellspül-
programm
Geschirrart
z.B.Porzellan,
Töpfe,
Bestecke,
Gläser etc.
Unempfindlich
Gemischt
Art der
Speisereste
z.B.von
Suppen, Reis,
Aufläufen,
Soßen, Eier,
Kartoffeln,
Teigwaren,
gebratene
oder frittierte
Speisen
Suppen,
Kartoffeln,
Teigwaren, Reis,
Eier, gebratene
oder frittierte
Speisen
Kaffee,
Kuchen,
Milch, Wurst,
kalte
Getränke,
Salate
Menge an
Speiseresten
Sehr
schmutziges
Geschirr
Schmutziges
Geschirr
Leicht
verschmutztes
Geschirr
Zustand der
Speisereste
Stark
haftend
gering
haftend
gering
haftend
Programmbeschreibung
Vorspülgang mit warmem Wasser.
Verlängerter Spülgang bei 70°C.
Nachspülen mit kaltem Wasser.
Nachspülen mit heißem Wasser.
Trocknen.
Vorspülgang mit warmem Wasser.
Verlängerter Spülgang bei 55°C.
Nachspülen mit kaltem Wasser.
Nachspülen mit heißem Wasser.
Trocknen.
Vorspülgang mit kaltem Wasser.
Vorspülgang mit kaltem Wasser.
Verlängerter Spülgang bei 50°C.
Nachspülen mit heißem Wasser.
Trocknen.
Spülgang bei 45°C.
Nachspülen mit warmem Wasser.
Nachspülen mit heißem Wasser.
Trocknen.
Kurzes Spülen bei 40°C.
Nachspülen mit kaltem Wasser.
13
Nachspülen
Einweichen
Geschirr, das nur nachgespült und
getrocknet werden soll.
Abduschen, wenn das Geschirr über
mehrere Tage bis zum Spülen im
Geschirrspüler aufbewahrt wird.
Heißes Nachspülen 65°C.
Trocknen.
Kurzes Kaltspülprogramm,
damit Speisereste nicht auf
dem Geschirr antrocknen.

de
Geschirrspülmittel
Vorspülgang
Verlängerter
5g
5g
5g
Spülgang
22g
22g
22g
15g
Klarspüler
Dauer in
Minuten
112
102
162
92
Stromver-
brauch in kWh
1.44
1.11
0.80
1.01
Wasserver-
brauch in Litem
18
15
14
12
15g
15g
32
54
12
Labormesswert nach europäischer Norm EN 50242.
(G)EN 50242 Vergleichsprüfungen mit Klarspülereinstellung: 5
0.40
0.90
0.02
9
5.5
3
14

Geschirrspülen
de
Programmauswahl
Anhand der Geschirrart und der Menge bzw. des Zustands der Speisereste können Sie aus der
Programmübersicht eine genaue Zuordnung des notwendigen Programmes finden.
Den zugehörigen Programmablauf und die jeweiligen Programmdaten finden Sie im rechten Teil der
Programmübersicht.
Ein Beispiel:
Für gemischtes Geschirr mit vielen und stark haftenden Speiseresten benötigen Sie das Programm «
Normal» .
Spartipp
Bei wenig beladener Maschine genügt häufig das nächstschwächere Programm.
Programmdaten
Die angegebenen Programmdaten beziehen sich auf Normalbedingungen.
Durch:
unterschiedliche Geschirrmenge
Zulauftemperatur des Wassers
Wasserleitungsdruck
Umgebungstemperatur
Netzspannungstoleranzen
und den maschinenbedingten Toleranzen (z.B. Temperatur, Wassermenge,...)
Inbetriebnahme
Schließen Sie die Tür nach dem Laden des Geräte.
SetzenSie den On-Off-Taste "B" auf On. Das Kennzeichen
"A" blinkt.
Drehen Sie den Regler zu wählen Programm, was Sie
wünschen, Nach 3 Sekunden zeigt es da ein kurzes Signal
als Mahnung, und starten Sie das Programm, das
Kennzeichen "A" blinkt.
15
A
B
Wichtig:
Am Ende des Spülganges der Knopf bleibt in der Position des letzten Spülprogramms.
Um den nächsten Spülvorgang zu beginnen, drehen Sie den Drehknopf in die
Anfangposition/ Reset, dann wählen Sie das gewünschte Programm aus. Drehknopf in
die Anfangposition/ Reset, dann wählen Sie das gewünschte Programm aus.

de
Programmende
Sechs akustische Signaltöne zeigen das Ende des Spülprogramms an und alle Programmleuchten
leuchten auf.
Gerät ausschalten
Einige Minuten nach Programmende, schalten Sie die Maschine aus und lassen Sie die Tür für einige
Minuten offen.
SetzenSie den On-Off-Schalter auf Off.
Öffnen Sie die Tür.
Geschirr nach dem Abkühlen entnehmen.
Wichtig:
Um das bereits laufende Spülprogramm zu unterbrechen, drücken Sie den Knopf B drei
Sekunden lang. Somit werden alle Einstellungen abgebrochen.
Programm unterbrechen
Tür vorsichtig öffnen, es besteht die Gefahr, dass Wasser aus dem Gerät spritzt. Erst dann vollständig
öffnen, wenn sich der Sprüharm nicht mehr dreht.
Wird die Tür geöffnet, ertönt alle 30 Sekunden jeweils 10 mal ein akustischer Signalton.
Bei Warmwasseranschluss oder wenn die Maschine bereits aufgeheizt hat und die Gerätetür geöffnet
wurde, die Tür erst einige Minuten anlehnen und dann schließen. Andernfalls kann durch Expansion
die Gerätetür aufspringen.
Aufhebung oder Veränderung des Waschprogrammes
Das Waschprogramm kann kurz nach dem Starten noch geändert werden. Ansonsten könnte das
Waschmittel evtl. bereits verwendet werden und das Gerät wird das waschmittelhaltige Wasser ableiten.
Ggf. müssen Sie das Waschmittel erneut einfüllen. (siehe das Kapitel "Einfüllen des Waschmittels")
Um das Spülprogramm zu ändern, siehe die Anleitung auf der Seite 16 in dem Kapitel “15“. Danach
wählen Sie das gewünschte Programm. Siehe auch das Kapitel “Die Waschmaschine einschalten“.
Ablauf “Reset”
Drehen Sie den Drehknopf bis "RESET", dann führt das Gerät einen
Ablaufvorgang durch. Während dieses Prozesses können Sie das
richtige Programm auswählen.
16

So halte ich das Gerät in Topform
de
Nach jedem Spülgang
Drehen Sie nach jedem Spülgang den Wasserhahn zu und lassen Sie die Tür lhres Geschirrspülers
angelehnt,um die Bildung von Feuchtigkeit oder Gerüchen im Geräteinnern zu vermeiden.
Netzstecker aus der Steckdose ziehen
Ziehen Sie vor jeder Reinigung bzw.Wartungsarbeiten den Netzstecker aus der Steckdose.
Keine Lösungs-oder Scheuermittel verwenden
Reinigen Sie die äußeren Gehäuseteile des Gerätes weder mit Lösungs-noch mit Scheuermitteln,sondern
mit einer warmen,milden Seifenlauge.
Eventuelle Flecken auf den inneren Gehäuseteilen sind mit einem mit Wasser und etwas Essig
angefeuchteten Tuch,oder mit einem Spezialreiniger für Geschirrspüler zu entfernen.
Bei einem Umzug
Bei einem Umzug sollte das Gerät möglichst aufrecht transportiert werden,im Notfall kann es auf die
Rückseite gelegt werden.
Dichtungen
Eine der Ursachen für die Entstehung von Gerüchen im Innern des Gerätes sind Speisereste,die sich in
den Dichtungen festetzen. Die Dichtungen sollten demnach regelmäßig mit einem feuchten Schwamm
gereinigt werden.
Die Tür sollte nicht in der geöffneten Stellung belassen werden, da dies eine Gefahr darstellen
könnte.
Vor den Ferien
Bei längerer Abwesenheit,empfehlen wir einen Spülgang bei leerem Gerät durchlaufen zu lassen. Danach
den Netzstecker aus der Steckdose ziehen und den Wasserhahn abdrehen.Lassen Sie die Gerätetür
angelehnt.Sie schonen hierdurch nicht nur die Dichtungen,sondern vermeiden die Bildung von Gerüchen.
17

Wartung und Pflege
Regelmäßige Kontrolle und Wartung Ihrer Maschine hilft Fehler zu vermeiden, bevor sie auftreten. Dies
spart Zeit und Ärger.Deshalb sollten Sie von Zeit zu Zeit einen aufmerksamen Blick in Ihren Geschirrspüler
werfen.
de
Gesamtzustand der Maschine
Spülraum auf Ablagerungen von Fett und Kalk überprüfen.
Finden sich solche Ablagerungen, dann:
Maschine mit Reiniger gründlich durchspülen.
Siebe
Die Siebe “ 8 , 9 ” halten grobe Verunreinigungen im
Spülwasser von der Pumpe fern. Diese Verunreinigungen
können die Siebe gelegentlich verstopfen.
Nach jedem Spülen die Siebe auf Rückstände
kontrollieren und gegebenenfalls reinigen.
Nehmen Sie das Grobsieb “ 8” heraus und entnehmen
Sie das Sieb “ 9 ”. Reste entfernen und Siebe unter
fließendem Wasser reinigen.
Sieb “ 9 ” und Grobsieb “ 8” wieder einsetzen.
Sprüharme
Kalk und Verunreinigungen aus dem Spülwasser können Düsen
und Lagerungen der Sprüharme “ 10 ”und “ 11 ” blockieren.
Austrittsdüsen der Sprüharme auf Verstopfungen durch
Speisereste kontrollieren.
Gegebenenfalls den unteren Spüharm “ 11 ” nach oben
abziehen.
Oberen Sprüharm “ 10 ” abschrauben.
Sprüharme unter fließendem Wasser reinigen.
Sprüharme wieder einrasten bzw.
festschrauben.
10
8
9
11
18

Fehlersuche
de
Kleine Fehler selbst beheben
Erfahrungsgemäß lassen sich die meisten Fehler, die im täglichen Betrieb auftreten, von Ihnen selbst
beheben, ohne dass Sie den Kundendienst rufen müssen. Dies erspart natürlich Kosten und stellt sicher,
dass die Maschine schnell wieder zur Verfügung steht. Die nachfolgende Übersicht soll Ihnen dabei
helfen, die Ursachen von auftretenden Fehlern zu finden.
Störungen...
...beim Einschalten
Das Gerät läuft nicht an.
Sicherung im Haus ist nicht in Ordnung.
Gerätestecker nicht eingesteckt.
Gerätetür nicht richtig geschlossen.
Programmtaste nicht gedrückt.
Wasserhahn nicht geöffnet.
Sieb am Wasserzulaufschlauch verstopft.
Das Sieb befindet sich am Anschluss des Aquastops bzw. des Zulaufschlauches.
Achtung
Denken Sie daran: Reparaturen dürfen nur durch den Fachmann
durchgeführt werden. Durch unsachgemäße Reparaturen können
erhebliche Schäden und Gefahren für den Benutzer entstehen.
19
...am Gerät
Störungsanzeige: die Anzeige “A” blinkt ständig.
Wenn alle 30 Sekunden ein kurzes Warnsignal ertönt.
Überprüfen Sie:
ob die Tür richtig geschlossen ist.
Wenn alle 30 Sekunden 3 kurze Warnsignale ertönen.
Überprüfen Sie:
the drain hose is too low.
A

de
Wenn alle 30 Sekunden 4 kurze Warnsignale ertönen.Überprüfen Sie:
ob der Ablaufschlauch gequetscht oder verbogen ist.
ob der Ablaufschlauch zu hoch ist.
Wenn alle 30 Sekunden 5 kurze Warnsignale ertönen.Überprüfen Sie:
ob das Wasser aufgedreht und der Schlauch richtig angeschlossen ist;
ob die Wasserversorgung des Hauses gewährleistet ist und genügend Druck hat;
ob der Zulaufschlauch gequetscht oder verbogen ist;
ob der Filter für den Zulaufschlauch verstopft ist.
ob der Ablaufschlauch zu tief ist.
Wenn alle 30 Sekunden 2 oder 6 kurze Warnsignale ertönen wenden Sie sich bitte an den
nähest gelegenen Kundendienst.
Falls nach Durchführung all dieser Überprüfungen der Geschirrspüler weiterhin eine
Störung anzeigt: schalten Sie das Gerät aus, warten einige Minuten und schalten wieder
ein. Sollten Sie den Fehler nicht beheben können, dann fordern Sie bitte, unter Angabe
nachfolgender Daten, den nächstgelegenen, autorisierten Kundendienst an:
Art der Störung
Modellnummer ( Mod. ...) Seriennummer (S/N . ...), ersichtlich auf dem seitlich an der Innentür
angebrachten Typenschild.
Unterer Sprüharm dreht sich schwer.
Sprüharm durch Kleinteile oder Speisereste blockiert.
Reinigerdeckel lässt sich nicht schließen.
Dossierbehälter überfüllt.
Mechanismus durch verklebte Reinigerreste blockiert.
Kontrollanzeigen gehen nach dem Spülen nicht aus.
Hauptschalter noch eingeschaltet.
Reinigerreste kleben nach dem Spülen im Dosierbehälter.
Dosierbehälter war beim Einfüllen feucht, Reiniger nur in trockenen Behälter einfüllen.
20

de
Nach Programmende bleibt Wasser im Gerät stehen
Der Abwasserschlauch ist verstopft oder geknickt.
Die Abwasserpumpe ist blockiert.
Siebe sind verstopft.
Das Programm ist noch nicht beendet. Programmende abwarten.
...beim Spülen
Ungewöhnliche Schaumbildung
Handspülmittel in der Klarspülerzugabe.
Vershütteter Klarspüler kann beim nächsten Spülgang zu übermäßiger Schaumbildung führen, deshalb
danebengelaufenes Klarspülmittel mit einem Lappen entfernen.
Gerät bleibt während des Spülens stehen
Stromzufuhr unterbrochen.
Wasserzulauf unterbrochen.
Schlagendes Geräusch beim Spülen
Sprüharm schlägt an Geschirrteile.
Klapperndes Geräusch beim Spülen
Geschirrteile nicht richtig eingeordnet.
Schlagendes Geräusch der Füllventile
Ist durch die Verlegung der Wasserleitung verursacht und bleibt ohne Auswirkung auf die
Maschinenfunktion. Abhilfe ist nicht möglich.
...am Geschirr
Es bleiben teilweise Speisereste am Geschirr kleben
Das Geschirr war falsch eingeordnet, Wasserstrahlen konnten die Oberfläche nicht treffen.
Der Geschirrkorb war überfüllt.
Die Geschirrteile sind aneinander gelegen.
Zu wenig Reiniger eingefüllt.
Zu schwaches Spülprogramm gewählt.
Spüharmdrehung behindert, weil ein Geschirrteil im Wege stand.
Die Sprüharmdüsen sind durch Speisereste verstopft.
Siebe sind verstopft.
Siebe falsch eingesetzt.
21
Abwasserpumpe blockiert.

de
Auf Kunststoffteilen entstehen Verfärbungen
Zu wenig Reiniger eingefüllt.
Der Reiniger hat eine zu geringe Bleichwirkung. Reiniger mit Chlorbleiche verwenden.
Es bleiben teilweise weiße Flecken am Geschirr, die Gläser bleiben milchig
Zu wenig Reiniger eingefüllt.
Klarspülermenge zu gering eingestellt.
Trolz hoher Wasserhärte kein Spezialsalz eingefüllt.
Enthärtungsanlage zu niedrig eingestellt.
Der Deckel des Salzbehälters ist nicht fest zugedreht.
Wurde phosphatfreier Reiniger verwendet, zum Vergleich phosphathaltigen Reiniger ausprobieren.
Geschirr wird nicht trocken
Programm ohne Trocknung gewählt.
Klarspülermenge zu niedrig eingestellt.
Geschirr zu früh ausgeräumt.
Gläser bekommen stumpfes Aussehen
Klarspülermenge zu niedrig eingestellt.
Tee oder Lippenstiftreste sind nicht vollständig entfernt
Der Reiniger hat eine zu geringe Bleichwirkung.
Zu geringe Spültemperatur gewählt.
Rostspuren am Besteck
Besteck nicht ausreichend rostbeständig.
Salzgehalt im Spülwasser zu hoch.
- Deckel des Salzbehälters nicht fest zugedreht.
- Beim Salznachfüllen zu viel Salz verschüttet.
Gläser werden stumpf und verfärben sich, die Beläge sind nicht abzuwischen
Ungeeigneten Reiniger eingefüllt.
Gläser nicht spülmaschinenbeständig.
Auf Gläsern und Besteck verbleiben Schlieren, Gläser bekommen metallisches
Aussehen
Klarspülerzugabemenge zu hoch eingestellt.
22

Technische Daten
de
Breite
Tiefe
Höhe
Fassungsvermögen
Anschluß-Wasserdruck
Betriebsspannung
Maximale Stromstärke
Leistung
Hinweise
Hinweis zur Entsorgung
45 cm
60 cm
85 cm
9 Maßgedecke
0.03-1.0MPa
220-240V~ 50Hz
13A
1950W
Altgeräte sind kein wertloser Abfall! Durch umweltgerechte Entsorgung können wertvolle Rohstoffe
wiedergewonnen werden.
Bei ausgedienten Geräten Netzstecker ziehen. Netzkabel durchtrennen und mit dem Stecker entfernen.
Türverschluss zerstören. Sie verhindern damit, dass sich spielende Kinder einsperren und in Lebensgefahr
kommen.
Ihr neues Gerät wurde auf dem Weg zu ihnen durch die Verpackung geschützt.
Alle eingesetzten Materialien sind umweltverträglich und wieder verwertbar. Bitte helfen Sie mit und
entsorgen Sie die Verpackung umweltgerecht.
Verpackung und ihre Teile nicht spielenden Kindern überlassen.
Erstickungsgefahr durch Faltkartons und Folien.
Über aktuelle Entsorgungswege informieren Sie sich bitte bei Ihrem Fachhändler oder bei Ihrer
Gemeindeverwaltung.
23

de
Allgemeines
Unterbau-und integrierte Geräte, die nachträglich als Standgerät aufgestelt werden, müssen gegen
Umkippen gesichert werden, z.B. durch Verschraubungen an der Wand oder durch Einbau unter
einer durchgehenden Arbeitsplatte, die mit den Nachbarschränken verschraubt ist.
Hinweise für Vergleichsprüfungen nach EN 50242
Einordnung nach Normvorgabe
Einordungsbeispiel: siehe Abb. 1 und 2
Fassungsvermögen: 9 Maßgedecke
Vergleichsprogramm: ECO-Programm
Klarspülereinstellung: 5
Geschirrspülmittel: 5g+22g
ArtNo.800-0319 - RDW459
- Lower rack
ArtNo.800-0320 - RDW459 - Upper rack
Abb.1 Abb.2
Bei höhenverstellbarem Oberkorb muß der Oberkorb in die obere Stellung eingesetzt werden.
Im Falle von Abweichungen von den Vergleichsprüfungen nach EN 50242, z.B.
Anschmutzungen, Geschirr-und Besteckart usw., ist vor Testbeginn mit dem Gerätehersteller Kontakt
aufzunehmen.
24

de
25
A: Kabelbox
B: Türschalter
C: Druckschalter
D: Motor Ablaufpumpe
E: Waschmittel-und Klarspülbehälter
Das Symbol auf dem Produkt oder seiner Verpackung weist darauf hin, dass
dieses Produkt nicht als normaler Haushaltsabfall zu behandeln ist, sondern an
einem Sammelpunkt für das Recycling von elektrischen und elektronischen Geräten
abgegeben werden muss. Durch Ihren Beitrag zum korrekten Entsorgen dieses
Produkts schützen Sie die Umwelt und die Gesundheit Ihrer Mitmenschen. Umwelt
und Gesundheit werden durch falsches Entsorgen gefährdet.
Weitere Informationen über das Recycling dieses Produkts erhalten Sie von Ihrem
Rathaus, Ihrer Müllabfuhr oder dem Geschäft, in dem Sie das Produkt gekauft
haben.
F: Ventil Wasserenthärter
G: Überlaufschalter
H: Einlassventil
I: Motor Waschpumpe
J: Temperaturbegrenzer
K: Heizelement
L: Relais
M: Temperatursensor
 Loading...