

Page 1

Safety Precautions
Do not subject the devicetosevere impact or drop it from heights.
Do not use the device in extreme hot or cold, dusty or damp conditions. Do not
expose it to direct sunlight.
Avoid using the device near strong magnetic fields.
Normal functioning of the product may be disturbed by ESD. If so, simply reset
and restart the device following the instruction manual. During file transmission,
please handle with care and operate in a static-free environment.
Keep the device away from water and other liquids. In the event that water or
other liquids enter the device, power off the product immediately and clean the
device.
Do not use chemicals to clean the device in order to avoid corrosion. Clean it
with a dry cloth.
Do not install this equipment in a confined space such as a book case or similar
unit. The ventilation should not be impeded by covering the ventilation openings
with items such as newspaper,table-cloths, curtains etc.
No naked flame sources, such as lighted candles, should be placed on the
apparatus.
Attention should be drawn to environmental aspects of battery disposal.
Use the apparatus in moderate climates.
We are not responsible for damage or lost data caused by malfunction, misuse,
modification of the device or battery replacement.
Do not attempt to disassemble, repair or modify the product. This will invalidate
the warranty.
If the device will not be used for an extended period of time, please charge the
battery at least once per month to maintain battery life.
Charge the battery if:
a) The battery level icon displays (An empty battery)
b) The device powers off automatically when restarted.
c) There is no response when pressing keys with keys unlocked and battery full.
Do not interrupt the connection when the device is being formatted or
transferring files. Otherwise, data may be corrupted or lost.
When the device is used as a portable HD, please use only per the instructions.
Otherwise, permanent data loss could occur.
Please use and install data using the attachments/accessories provided and only
according to the manufacturer’s instruction.
Please refer to the information on the bottom of the device for electrical and
safety information before installing data or operating the device.
To reduce the risk of fire or electric shock, do not expose this device to rain or
moisture. The device should not be exposed to dripping or splashing. Never
place objects filled with liquids, such as vases, on the device.
There is danger of explosion if the battery is replaced incorrectly. Replace only
with the same or equivalent type.
1
Page 2

The battery (battery or batteries or battery pack) should not be exposed to
excessive heat such as sunlight, fire or the like.
Please follow responsible procedures for battery disposal.
If the power adaptor disconnected from the device, the device will remain
operable as long as the battery has sufficient charge.
The power adaptor is a CLASS II apparatus with double insulation, and no
external ground is provided.
Safety symbol explanation:
- The lightning flash with arrowhead symbol within an equilateral triangle is
intended to alert the user to the presence of non-insulated “dangerous
voltage”within the product’s enclosure that may be of sufficient magnitude
to constitute a risk of electric shock.
- To reduce the risk of electric shock, do not remove the cover (or back) as
there are no user-serviceable parts inside. Refer servicing to qualified
personnel.
- The exclamation point within an equilateral triangle is intended to alert the
user to the presence of important operating and maintenance instructions in
the literature accompanying the device.
- Correct Disposal of this product. This marking indicates that this
product should not be disposed of with other household waste in the EU. To
prevent possible harm to the environment or human health from
uncontrolled waste disposal, recycle it responsibly to promote the
sustainable reuse of material resources. To dispose of your used device,
please use the return and collection systems available in your area or
contact the retailer where the product was purchased. They can take this
product for safe environmental recycling.
This equipment should be installed and operated with minimum distance 20cm
between the radiator & your body.
CE in which countries where the product may be used freely: Germany, UK, Italy,
Spain, Belgium, Netherlands, Portugal, Greece, Ireland, Denmark, Luxembourg,
Austria, Finland, Sweden, Norway and Iceland. In France, except the channel 10
through 13, law prohibits the use of other channels.
2
Page 3

Listening Cautions
This product respects the current regulations for limiting the output volume of
consumer audio devices to a safe level. By listening to your device with
headphones or earbuds at high volumes, you run the risk of permanent damage
to your ears. Even if you get used to listening at high volumes and it seems
normal to you, you still risk the possibility of damaging your hearing. Reduce the
volume of your device to a reasonable level to avoid permanent hearing damage.
If you hear ringing in your ears, reduce the volume or shut off your device. This
device has been tested with the supplied earphones. In order to preserve your
hearing, it is advised that you use only the following headphone models: the
earphones supplied with your device, or any other headphones that respect the
current regulations. Other types of headphones may produce higher volume
levels.( At full power ,the prolonged listening of the walkmancan damage the ear
of the use)
Maximum output voltage<=150mv
Do not use while operating a motorized vehicle. It may create a traffic hazard
and is illegal in many areas.
You should use extreme caution or temporarily discontinue use in potentially
hazardous situations created by obstructed hearing.
Even if your headphones or earphones are the open-air type designed to let you
hear outside sounds, don’t turn up the volume so high that you can’t hear what’s
around you.
Sound can be deceiving. Over time your hearing “comfort level”adapts to higher
volumes of sound. What sounds “normal”can actually be loud and harmful to
your hearing. Guard against this by setting the volume of your device at a safe
level BEFORE your hearing adapts.
To establish a safe volume level:
a. Start your volume control at a low setting.
b. Slowly increase the sound until you can hear it comfortably and clearly,
and without distortion. Once you have established a comfortable sound
level, leave it there.
This manual may not reflect your actual device’s operation. All information is subject to change
without prior notification. Please follow your actual device’s operational procedures.
3
Page 4

Table of Content
Safety Precautions...................................................................................................1
Listening Cautions....................................................................................................3
Feature Summary ....................................................................................................5
Accessories .............................................................................................................5
Buttons & Ports........................................................................................................5
Charging Battery......................................................................................................6
Transferring Files .....................................................................................................6
Turning On the Unit..................................................................................................6
Home Screen...........................................................................................................7
Unlocking the Screen...............................................................................................9
Tips on touching screen ...........................................................................................9
Accessing Internet..................................................................................................10
Using the Virtual Keyboard..................................................................................... 11
Playing Music.........................................................................................................12
Playing Video.........................................................................................................13
Viewing Photos ......................................................................................................14
Using the Camcorder/Camera................................................................................16
Exploring Files .......................................................................................................16
Sending/Receiving E-mails.....................................................................................18
Managing 3rdPartyApplications.............................................................................19
Close Recent Applications......................................................................................20
Troubleshooting.....................................................................................................21
Specifications.........................................................................................................21
4
Page 5

Feature Summary
Wi-Fi Connectivity
With the latest Wi-Fi technology, this device can connect you to the Internet wherever
you are.
8.0”TouchScreen
Touch or slide your finger on the screen, the screen responds instantly.
Third-party Application Support
With the built-in AndroidTMOS, you can install a large number of third-party
applications in this device.
Built-in Camera Lens
Equipped with the built-in camera lens, this unit can function as a webcam or video
recorder.
Built-in G-sensor
The screen changes to landscape or portrait automatically when the device rotates.
Entertainment
You can enjoy music, movies, pictures and e-books with the device.
Accessories
Main Unit ● USB cable ●AC Adaptor
User Manual ●Warranty Card
Buttons & Ports
A. Micro SD card slot
B. HDMI interface –Connects to HD TV that
supports HDMI connection.
C. Micro USB Port – Connects to PC via USB
cable; connects to USB memory device,
keyboard, or mouse; connects to 3G dongle
via USB host cable.
D. DC-IN port –Connects to standard electric
source through the AC adaptor.
E. Earphone socket –Connects to stereo
earphones.
5
F. Power –Press and hold to turn on
or off the unit; briefly press to lock
or unlock the screen.
G. Charging indicator–Lights red
during charging, and lights orange
as charging completes.
H. Front camera lens
I. VOL+ –Increase the volume.
J. VOL- –decrease the volume.
K. Rear camera lens
L. Built-in Speakers
Page 6

Charging Battery
The device has a built-in rechargeable battery. No extra battery installation is required.
Just charge the device when it indicates low battery.
Tocharge the battery, connect the device to any standard wall outlet via the DC-IN
port using the power adaptor. It takes about 5 hours to fully charge the battery.When
the battery is fully charged, the charge indicator should light up in orange. During
charging, the indicator lights up in red.
Note:
a. You are strongly recommended to charge the battery immediately when the device indicates the
battery is lower than 15%!
b. You can operate the device even when it is being charged. But for extended battery life, it is suggested
NOT to use the device when it is charging.
c. It is recommended to charge the battery before you use the device for the first time.
d. For maximum performance, lithium-ion batteries need to be used often. If you don’t use the device
often, be sure to recharge the battery at least once per month.
e. Be sure to use only the dedicated power adaptor provided with the unit for charging.
Transferring Files
Before reading or playing files, you need to transfer media files from a computer to the
device.
(1) Connect the device to a computer with the supplied USB cable.
(2) Once connected, a removable disk drive which represents the device will show on
your computer. Now you can copy files from or to these disk drives just as you
would on your hard drive.
(3) As you complete file transfer, remove the device from the computer safely.
The pre-installed applications and Android OS occupy a considerable part of capacity –nearly more than
1GB, it is normal that you see huge difference between available memory space and total capacity.
Turning On the Unit
To turn on the device, press and hold the Power button on the unit until you
see the boot-up screen. It may take a few minutes to start up the system,
please wait before you proceed.
To turn off the device, press and hold the Power button until you see the
option “Power Off”, tap on “Power Off”and then tap on “OK”.
Tip: For the sake of power saving, this device may sleep with the screen display off
when there is no touch action for a while (depending on the actual setting of Screen
Timeout). You can briefly press the Power button to wake it up.
6
Page 7

Home Screen
Go to Google
Search page
Go to Home
Recently used
down
Tap the circled
area to display
Go to
application page
Return
screen
applications
Time
settings
Battery
level
The extended Home Screen
Slide your finger horizontally on the screen to go to the left or right panel of the extended
Home Screen.
Customizing Home Screen Items
To add a Home Screen item (shortcuts, widgets, folders etc.), you can tap the application
icon to display all applications and then hold your tap on an item until it is placed on
home page.
Hold
7
Page 8

To move a Home Screen item, hold your finger onto it until it is highlighted, then drag it to
the desired location, and release it.
To remove a Home Screen item, hold your finger onto it until it is highlighted, drag it to the
recycle bin “Remove”and then release your finger.
Changing the wallpaper
Hold your tap on the Home screen until a menu appear. Tap on “Wallpaper”and then
choose a picture as the desktop wallpaper.
Preset Applications
The device has many useful applications pre-installed. You can tap the Application
Tab to display them.
8
Page 9
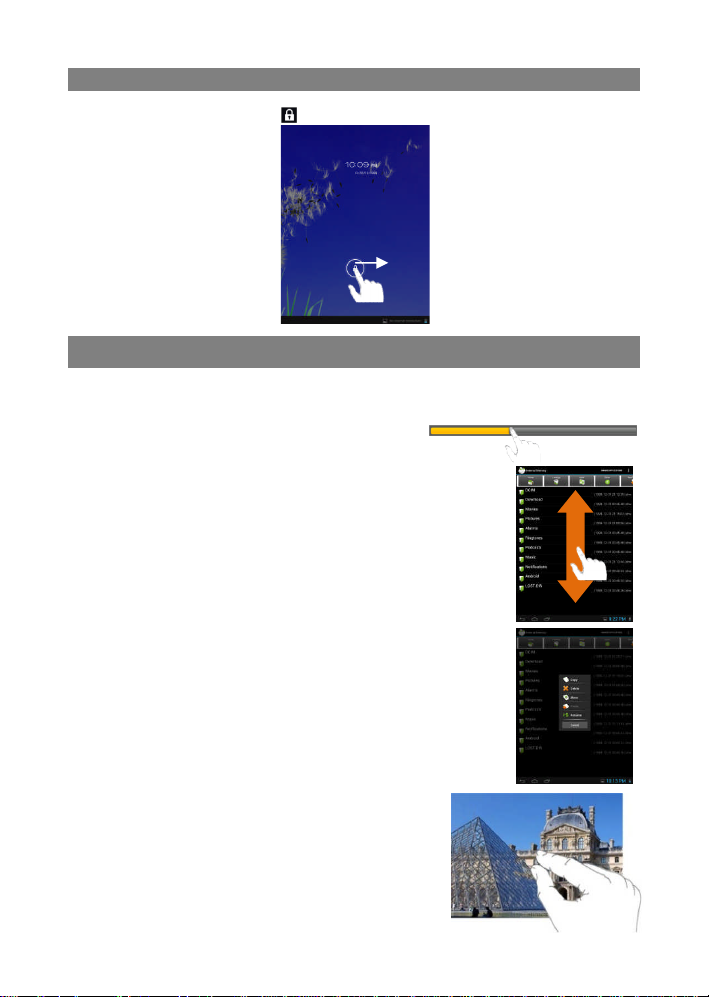
The screen will be locked after the device is idle for a few seconds. You need to unlock the
screen by dragging the lock icon rightwardsbefore you continue to use the device.
Tips on touching screen
Click: Briefly click on an item can open an application or page.
Drag: When watching a video or listening to music, you can tap on the progress
bar to playback any designated section of the
file. You can drag the cursor of the progress bar
to any other elapsed time point of the file.
Slide finger: In different browsers (File, Music, Video, Photo,
etc.), you can hold your finger on the screen and then drag
up and down to scroll the file list up and down.
Hold finger: In some browsers (File, Music, Video, Photo,
Web etc.), you may hold your finger on an item to display
options.
Unlocking the Screen
Pinch finger: You can zoom the page by pinching
your finger.
9
Page 10
Accessing Internet
This device features built-in Wi-Fi technology so that you can access the internet over
Wi-Fi network.
First of all, you need to configure a Wi-Fi network. For such purpose, you need to stay
in a Wi-Fi service zone. Whenever it is within the coverage of a WiFi network you
have configured, the device will attempt to make a connection.
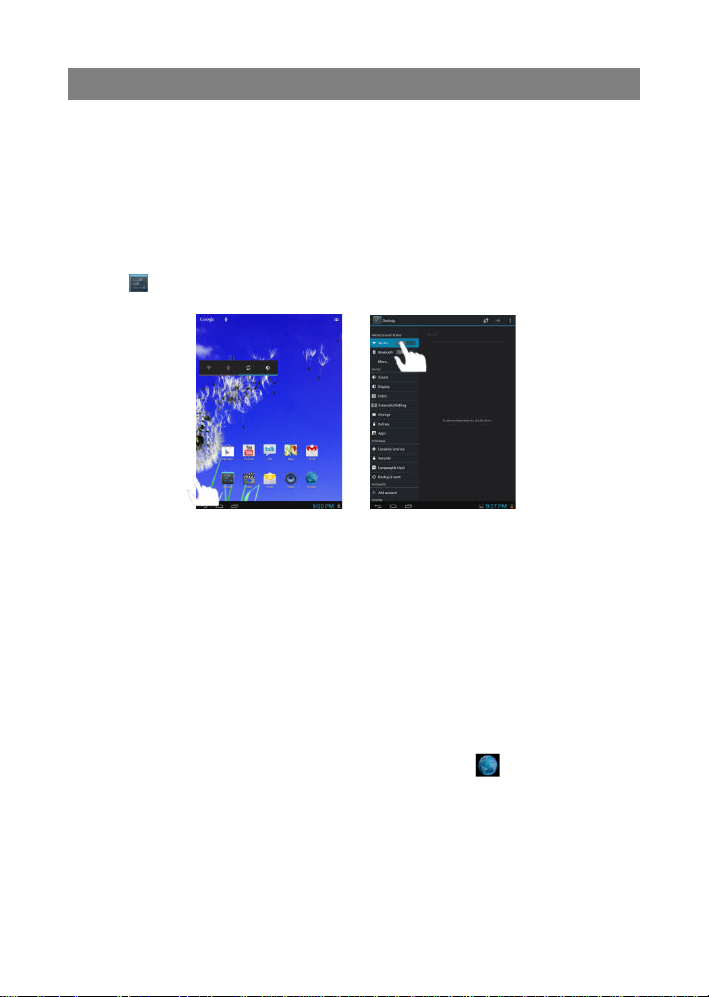
Make WI-FI Connection
Before launching an Internet application such as the web browser, you first need to
activate the Wi-Fi and configure a Wi-Fi network.
(1) Tap “ ”inthe Home screen.
(2) Slide the WIFI toggle switch to “ON”to turn on WIFI.
(3) Your Tablet will scan automatically for available WiFi networks and display them in
the right panel. The list of available networks shows all the wireless networks in
range of your device. Choose a network from the list and then tap “Connect”to
connect. Some network may be secured with password, enter the password
before connecting. If the connection is successful, the message Connected
to… (WiFi Network Name) will appear under the WIFI Setting.
Note:
a) The available network list is constantly refreshed automatically.
b) When the Wi-Fi is enabled, the device will connect automatically to your configured networks
when they are in range.
c) If the device detects a network that has never been configured, it will display a notification icon.
Launching the Web browser
To launch the Web browser, you tap the Browser icon in the Applications
screen.
10
Page 11

To display menus, tap .
Caps Lock:
quickly
tap twice to input all
letters in capital; briefly
tap once to input the
To enter a new address, tap the address bar and then type in address.
Note: Not all wireless networks offer access to the Internet. Some Wi-Fi networks only link several
computers together, without any Internet connection.
Tapping on any text input field can open the virtual board. With the virtual keyboard, you can
enter a website address or any text required.
first letter in capital.
Using the Web Browser
You can scroll the screen up and down by tapping on the page and dragging it up
or down (be careful not to tap a link until you are ready!).
To open a link, simply tap it.
Using the Virtual Keyboard
11
Page 12

To go back to the previous page that you browsed, tap the Back icon .
k.
Progress bar
a
b
d
f
h
i
To display the available menu items, tap the Menu icon .
To go back directly to the Home screen, tap the Home icon .
Playing Music
Tap the Music icon in the application page to launch the music player.
Music Library
You should enter the music library once you start the music
player. The Music Library shows your music files sorted by
categories (Artist, Album, etc.) if your music files contain these
song information tags. If some of your music files do not
contain information tags, they will be classified as (Unknown)
in the Music Library. When new music is copied to the device,
the Music Library will be updated automatically.
You can drag your finger up and down on the file list to
scroll through it.
Tap a song to play.
Artist
Album
Songs
Playlists
Now Playing
List music files by artist.
List music files by album.
List all music files.
List your favorite songs.
Go to the Now Playing screen.
Shuffle songs
In the library, tap the Menu icon to display options –Play all, Party shuffle and
Shuffle all.
Play all –play tracks in normal order.
Party shuffle –shuffle 7-8 songs as a group each time.
Shuffle all –shuffle all songs stored in the device.
Playback Screen
c
e
g
j
a. Now Playing List
b. Shuffle songs /Not shuffle
c. Repeat /Not repeat
d. Display lyric
e. Artist Name
f. Album Name
g. Title (holding your tap on the title can search for
information about the track from the Internet.)
h. Previous song/Rewind
i. Play/Pause
j. Next song/Fast Forward
12
Page 13

Playback menu
During playback of a music file, tap on the MENU icon to bring up a context
menu:
Library–return to music library menu.
Party Shuffle –select Party Shuffle mode
Add to playlist –add a song to the playlist.
Delete –delete a song.
Sound Effects –Set the sound effects for the
music playback.
Playlist
The playlist is a list of songs that you have added manually.
To add the current track to a playlist, tap duringplayback, selelect “Add to playlist”
and then choose a playlist or tap “new”tocreate a new playlist.
To play a playlist,
(1) In the Music menu, tap the Playlist icon to display all the playlist. All songs
that you have added are listed.
(2) Tap a song to start playing.
Playing Video
Tap the Video icon in the application page to launch the video player.
Navigate through Video Files
You should see the video list when you enter the video player.
You can drag your finger up and down on the video list to scroll the video list up
and down.
Tap a video to start playing.
Playback Screen
a. VOLb. Progress bar
c. VOL+
d. Bookmark
e. Brightness
f. Previous Video/Fast Rewind
g. Play/Pause
h. Next video/Fast forward
a b
d e f g h i j k l
c
i. View Mode
j. Thumbnail view mode
k. Video settings
13
Page 14

Note: Some video files may not be played correctly with the device. Refer to the Technical Specifications at
the end of the manual, and make sure the video resolution, encoding format or file type is supported.
Video Playback Settings
Tap on the icon to display the video settings.
Delete Bookmark and Play
from beginning
Delete Bookmark Delete the video bookmark.
Play Mode
Help Get instructions on playing video.
Return Exit from the menu.
Delete bookmark and play from beginning.
Single –plays the current video and then stops after playing.
Repeat One –Repeat the current video.
Repeat All –Repeat all videos.
Viewing Photos
Tap the Gallery icon in the application page to launch the Photo Gallery.
Viewing Photos
(1) Photos should be listed in thumbnail. You can slide your finger on the screen left
or right to browse photos.
(2) Tap a photo thumbnail to view the photo in full screen.
14
Page 15

(3) To display the previous/next picture, slide your finger on the screen horizontally.
(4) To zoom in or out the picture, pinch your finger on the picture.
Display Menu
When you are viewing the picture, you can tap on the screen or the Menu icon to
show a menu.
15
Page 16

Using the Camcorder/Camera
Tap the Camera in the application page to launch the Camera.
Zoom
Viewfinder
To start making video clips, tap on the Start/Stop button tostart video
Front/back camera switch
Start/Stop
Settings
VCR mode
Panorama mode
Photography mode
recording.
Tap on the Start/Stop button againto stop video recording or photographing.
The video clip / photo can be previewed in the Preview Window.
To play the video clip that you have made, enter the Video Player, and then tap the
video.
To view the photo that you have taken, enter the Photo Viewer mode, and then tap
the photo.
Exploring Files
You can explore files and folders with either the Explorer. In the Home Screen, tap the
Applications shortcut to display all applications and then tap the Explorer icon to enter
the file explorer mode.
Using the Explorer
Navigate through Files and Folders
You can drag your finger up and down to scroll the file list up and down.
To open a file or folder, tap the file/folder.
Tap the menu icon ,you can manage the applications (see details in the
16
Page 17

“Managing 3rdparty Applications”section).
You can go back or forward one level in the interface by tapping on the Back icon
or Next icon .
You can go back one level in the directory by tapping on the LevelUp button .
Wherever you are in the interface, you can go back directly to the Home screen by
tapping on the Return icon or Home icon .
Tap the Home icon to go to the root directory.
Using the Toolbar
You can use the toolbar to navigate through your device’s internal memory/ memory
card and delete or copy files.
Tappingon the grey area can hide/display the toolbar.
Sliding your finger on the toolbar can scroll through all tools.
Home
LevelUp
Multi
Editor
Back
Next
Go to the Home Screen.
Go back one level in the directory.
Select more than one file.
Copy, delete, move, paste or rename the file or folder.
Go back one level in the interface.
Go forward one level in the interface.
Copy/Move Files and Folders
(1) In the file list, scroll up and down by sliding your finger to
select the file/folder that you want to copy or move.
(2) Hold the selected file/folder until a pop-up menu appears.
(3) Select “Copy”or “Move”from the pop-up menu.
(4) Navigate to the location where you wish to copy or move the
file/folder to.
(5) Select the Editor icon from the toolbar and then choose “Paste.”
Delete Files and Folders
(1) In the file list, scroll up and down the list by sliding finger to select the file/folder
that you want to delete.
(2) Hold the selected file/folder until a pop-up menu appears.
(3) Select “Delete”from the pop-up menu, then select “Delete”to confirm or “Cancel”
to quit.
Rename Files and Folders
(1) In the file list, scroll up and down the list by sliding finger to select the file/folder
that you want to rename.
(2) Hold the selected file/folder until a pop-up menu appears.
17
Page 18

(3) Select “Rename”fromthe pop-up menu.
(4) Tap the input field to display the virtual keyboard, and then choose letters from
the virtual keyboard to rename the file/folders.
(5) Tap “OK”to confirm the new name.
Select Multiple Items
You can select more than one file or folder together.
(1) In the top toolbar, tap the Multi icon “ .”
(2) Tap the files/folders you want to choose. The file/folder name turns red when
selected. (To deselect the file/folder, tap it again.)
(3) Once you finished selection, you can delete, copy or move the selected files by
tapping on the Editor icon .
Sending/Receiving E-mails
This device has an E-mail application pre-installed. You can send or receive e-mails
from the Internet at any time with this device. Make sure you have an Internet
connection before using the email service.
In the Home Screen, tap the Applications shortcut to display all applications and then
tap the Email icon to launch the e-mail application.
Setup Email Account
First you need to setup an E-mail account for receiving or sending emails.
(1) Start up the email application by tapping the Email application icon and you are
prompted to setup an account.
(2) Input your email address and login password. You can set the account as default
by selecting the option “Send email from this account by default”.
(3) Tap “Manual Setup”to set the email server information.
(4) Choose the server type from POP3, IMAP or Exchange for incoming emails. To
know what type of your email server is, you can consult the service provider,
network administrator or search for information in the Internet.
(5) Input required information (server, port etc.). You can obtain the information from
the service provider, network administrator or the Internet.
(6) Choose the server type for outgoing emails, and input required server information.
(7) Click “Next”to continue. Your tablet will check the server settings. When it prompts
you that “Your account is set up, and email is on its way”, your account is set up
successfully.
(8) Input your name and then tap on “Done”to finish.
Note: If you have more than one account, every time when you start up the email application, you enter the
default email account.
Manage Accounts
You can setup more than one account and manage these accounts by checking
information about the account, adding another account or deleting an account.
18
Page 19

Add another Account
Following these steps to add another account if you want.
(1) Launch the email application and then tap on the Menu icon to display the
menu item. Choose “Accounts”to display accounts.
(2) Tap on the Menu icon to display the menu item, and then choose “Add
account”.
(3) Follow the steps of setting up a Email Account to add an account.
Delete an Email Account
(1) When you are in the email box, tap on the Menu icon to display the menu
items.
(2) Tap on “Accounts”to display all email accounts.
(3) Hold your tap on the account that you want to delete until a menu pop up.
(4) Tap on “Remove Account”,and then tap on “OK”to confirm.
Check the Account Setting
(1) When you are in the email box, tap on the Menu icon to display the menu
items.
(2) Tap on “Accounts”to display all email accounts.
(3) Hold your tap on the account that you want to check until a menu pop up.
(4) Tap “Account settings”,and then you should see all setting information about the
account. You can edit these settings as you want.
View Emails
You should enter your mailbox when you start up the email application.
In the mailbox, you can slide your finger up and down to scroll through the email
list.
Tap on an email to open it.
Holding your tap on the email can display a menu. With the menu, you can open,
reply, forward or delete the email.
Email Menu Items
In the email list, tap on the Menu icon to display the menu.
Refresh
Compose
Folders
Accounts
Account Settings
Refresh the emails.
Compose a new email.
Go back to email box.
View all email accounts.
Check your account settings.
Managing 3rdParty Applications
Your device provides support to many useful third-party applications. You can
purchase the applications to add more functions to your device. They are available
online at the Internet or directly on your product.
19
Page 20

Pre-installed Applications
The device has pre-installed applications when it was manufactured. You can see
them by tapping the Applications icon . They are video player, audio player,
browser, alarm clock, calculator etc.
Install Applications
You can install applications manually by the following methods:
Download and install the installation file directly from the built-in application library.
Make sure the file is in format of .apk which is supported by your Internet Tablet
system.
Copy the installation file to your Internet Tablet by USB connection. Turn on the
Internet Tablet, locate the installation file with the Explorer and then tap it to install.
Once the application is installed successfully, you can find it in the application page.
Uninstall Applications
(1) Tap the Settings shortcut in the Home Screen to
display all system settings.
(2) Select “Apps”.
(3) Tab on the application that you want to uninstall.
(4) Tab on “Uninstall”to uninstall the application.
Note:
You cannot uninstall the pre-installed applications.
Some of the applications developed for Android mobile might not run
properly in the Device. Please consult the respective software
developer for further information.
Close Recent Applications
Your device can remember applications that you used recently. That’s very useful
when you want to go back to a window you opened recently. Also, you can close
these applications to enhance system performance.
(1) Tap to display applications
that you used recently.
(2) Hold your tap on the application you want
to stop, and then select “Remove from list”.
20
Page 21

Troubleshooting
Reset this device
In the event that the device freezes, you can force the device to shut down by holding
the Power button for a few seconds longer than powering off, and then restart the
device.
Specifications
Item Description
CPU
DDR 1GB
Built-in operating system AndroidOS 4.1
Hardware IBM PC or compatible PC, Note-book or Macintosh with USB port
Internal Memory 4GB/8GB/16GB (Optional)
Memory Card type Micro-SD card: 2GB, 4GB (SDHC), 8GB (SDHC), 16GB, 32GB(optional)
Operation System Windows2000/XP/Vista/windows 7/Linux2.4/ MAC OS 10.6.7 above
Interface
Connection Agreement WiFi(802.11 b/g/n)
G-sensor Support 360 rotation
E-Book
Photo Format
Audio
Video
File Format EPUB/TXT/FB2/RTF
Coding
Format
File Format MP3/WAV/OGG/FLAC/APE/AAC/WMA(license required)
Coding
Format
File Format AVI, 3GP,MP4, RM, RMVB, FLV, MKV, MOV,MPG, VOB, DAT,WMV,ASF
Coding
Format
Based on Cortex-A9(dual core)
Main CPU frequency: 1.6GHz
USB2.0 High speed
SD (compatible SDHC)
3.5mm Earphone
EPUB Format: .Open
TXT / FB2/ RTF Format: .Open
JPEG(Baseline) :8000*8000 pixels (Max.)
BMP
GIF (Static): 6000x 4500 pixels (Max.)
PNG: 8000x8000 pixels (Max.)
MP3 (MPEG1/2/2.5 Audio Layer 1/2/3): 8~48KHZ/8~320Kbps,CBR and
VBR
WAV(MS-ADPCM, IMA-ADPCM, PCM): 8~48KHZ
OGG (Q1- Q10): 8~48KHZ
FLAC(Compress Level 0~8): 8~48KHZ
APE (Version 3.95,3.97,3.98,3.99,normaland fast) : 8~48KHZ
AAC(ADIF,ATDS Header AAC-LC and AAC-HE): 8~48KHZ
WMA (Version 4, 4.1, 7, 8, 9, WMA Pro) 8~48KHZ/8~320Kbps,CBR and
VBR (license required)
AVI(MPEG4,XVID,DIVX3/4/
5/6, MS MPEG4 V3)
3GP/MP4(H.264,H.263,MP
EG4,XVID,DIVX3/4/5/6, MS
MPEG4 V3)
RM/RMVB(Real video 8/9)
FLV(SorensonSpark)
1920*1088pixels/30FPS (Max)
Audio Codec:MP2/MP3/AC3/AAC/PCM
MPEG4,XVID,DIVX3/4/5/6:
1920*1080pixels/30FPS (Max.)
H.264: 1920*1088pixels/30FPS (Max)
Audio Codec: MP2/MP3/AC3/AAC/PCM
1920*1080pixels/30FPS (Max)
Audio Codec: Cook/AAC
1920*1080pixels/30FPS (Max)
Audio Codec: MP3
21
Page 22

MPEG4, XVID,DIVX3/4/5/6, MS MPEG4
MOV(H.264,
H.263,MPEG4,XVID,DIVX3/
4/5/6, MS MPEG4 V3)
MPG/DAT/VOB(MPEG1/2)
MKV
MPG/DAT/VOB
WMV/ASF(license require)
Battery Charge Time About 4 Hours
Battery Life
Display 8.0-inch IPS LCD, capacitive touch screen, 1024X768 pixels.
SNR >=80dB
Frequency Response Range 20Hz— 20KHz
Power Supply
Storage Temp. -20℃ ~ +65℃
Ambient Temp. 0℃ ~ +50℃
Operation Relative Humidity 20% ~ 90%(40℃)
Storage Relative Humidity 20% ~ 93%(40℃)
About 6 hours of music playback;
About 5 hours of video playback;
About 5 hours of web browsing.
Rechargeable lithium-ion polymer battery;
AC Adapter: AC Input 100-240V~50/60Hz, DC Output 5V/2A
V3: 1920*1080 pixels / 30FPS/ 38.4Mbps
(Max.)
H.264:
1920*1080pixels/30FPS/20Mbps(Max)
Audio Codec: MP2/MP3/AC3/AAC/AMR
1920*1080pixels/30FPS/80Mbps(Max.)
Audio Codec: MP2/MP3
1920*1080pixels/30FPS
Video Codec: H.264, MPEG4,WMV3
Audio Codec: MP2/MP3/AC3/AAC/PCM
1920*1080pixels/30FPS
Video Codec: MPEG1/2
Audio Codec: MP2/MP3
1920*1080pixels/30FPS
Video Codec: WMV3
Audio Codec: WMA2/3
22
Page 23

Consignes de sécurité
Ne faites pas subir àl’appareil des chocs importants et ne le laissez pas tomber
de haut.
N’utilisez pas l’appareil dans un environnement particulièrement chaud, froid,
poussiéreux ou humide. Ne l’exposez pas àla lumière directe du soleil.
Évitez d’utiliser l’appareil près de champs magnétiques puissants.
Le fonctionnement normal de l’appareil peut être perturbé par les décharges
électrostatiques. Dans ce cas, réinitialisez l’appareil et redémarrez-le en suivant
les instructions du manuel. Pendant la transmission de fichiers, maniez l’appareil
avec précaution et maintenez-le dans un environnement sans électricitéstatique.
Tenez l’appareil à l’écart de l’eau et autres liquides. Si de l’eau ou d’autres
liquides pénètrent dans l’appareil, débranchez immédiatement l’appareil et
nettoyez-le.
N’utilisez pas de produits chimiques pour nettoyer l’appareil afin d’éviter toute
corrosion. Nettoyez-le àl’aide d’un chiffon sec.
N’installez pas cet appareil dans un espace confiné, comme une bibliothèque ou
un meuble similaire. Ne bloquez pas la ventilation en obstruant les orifices prévus
àcet effet avec des objets comme un journal, une nappe, des rideaux, etc.
Ne placez aucune source de flammes, telle qu’une bougie allumée, sur l’appareil.
Veillez à respecter les considérations environnementales relatives à la mise au
rebut de la batterie.
Utilisez l’appareil sous des climats tempérés.
Nous n’assumons aucune responsabilité en cas d’altération ou de perte de
données occasionnée par un dysfonctionnement, une utilisation inappropriée,
une modification de l’appareil ou le remplacement incorrect de la batterie.
N’essayez pas de démonter, réparer ou modifier le produit. Cela annulerait la
garantie.
Si vous prévoyez de ne pas utiliser l’appareil pendant une période prolongée,
chargez la batterie au moins une fois par mois pour préserver sa longévité.
Chargez la batterie dans les conditions suivantes :
a) L’icône de niveau de la batterie (pile vide) s’affiche.
b) L’appareil s’éteint automatiquement lorsque vous le redémarrez.
c) L’appareil ne répond pas quand vous appuyez sur les touches alors qu’elles
sont déverrouillées et que la batterie est chargée.
N’éteignez pas l’appareil et ne le débranchez pas lors du formatage ou du
transfert de fichiers. Sinon, vous risqueriez d’endommager ou de perdre vos
données.
En cas d’utilisation de l’appareil en tant que disque dur portatif, respectez
strictement les instructions. Sinon, vous risqueriez de perdre définitivement vos
données.
Utilisez et installez les données à l’aide des accessoires fournis, en respectant
les instructions du fabricant.
Reportez-vous aux informations relatives à l’électricité et à la sécurité situées
1
Page 24

Page 25

Pays de la CommunautéEuropéenne dans lesquels le produit peut être utiliséen
toute sécurité: Allemagne, Royaume-Uni, Italie, Espagne, Belgique, Pays-Bas,
Portugal, Grèce, Irlande, Danemark, Luxembourg, Autriche, Finlande, Suède,
Norvège et Islande. En France, la loi interdit l’utilisation des canaux autres que
ceux compris entre 10 et 13.
Précautions en matière d’écoute
Ce produit respecte la législation en vigueur limitant le volume de sortie des
appareils audio grand public à un niveau dit de sûreté. En écoutant votre
appareil à un volume élevé avec des écouteurs ou un casque, vous risquez
d’endommager votre audition de manière irréversible. Même si vous êtes
habituéàdes volumes élevés et que cela vous semble normal, vous risquez tout
de même d’endommager votre audition. En réduisant le volume de votre
appareil àun niveau raisonnable, vous éviterez d’endommager votre audition de
manière irréversible. Si vous entendez des sifflements, réduisez le volume ou
éteignez l’appareil. Nous vous conseillons d’utiliser uniquement des modèles
d’écouteurs respectant la législation en vigueur ; Les autres types d’écouteurs
peuvent produire des niveaux sonores supérieurs.( À pleine puissance, l’écoute
prolongée d’un baladeur peut endommager l’audition de l’utilisateur).
Tension de sortie maximale <=150 mv
N’utilisez pas l’appareil lorsque vous conduisez un véhicule motorisé. Cela
pourrait entraîner des risques pour votre sécurité et est illégal dans de
nombreuses régions.
Utilisez l’appareil avec une extrême prudence ou éteignez-le temporairement
dans les situations oùune limitation de l’audition peut s’avérer dangereuse.
Même si vos écouteurs ou votre casque sont de types ouverts et conçus pour
vous permettre d’entendre les sons environnants, ne réglez jamais l’appareil sur
un volume qui vous empêche de les entendre.
Le son peut être trompeur. Au fil du temps, votre « niveau de confort » auditif
s’adapte àdes volumes toujours plus élevés. Le son qui vous semble « normal »
peut être en fait élevé et dangereux pour votre audition. Pour éviter ce risque,
réglez le volume de votre appareil àun niveau sécuriséAVANT que votre ouïe ne
s’adapte.
Pour définir un niveau sonore sûr :
a. Réglez le volume sur une valeur faible.
b. Montez lentement le son jusqu’à un niveau d’écoute confortable et clair,
sans distorsion. Une fois ce niveau sonore confortable atteint, n’y touchez
plus.
Le présent manuel est susceptible de ne pas refléter le fonctionnement réel de votre appareil.
3
Page 26

Toutes les informations qu’il contient sont sujettes à modification sans information préalable.
Veuillez respecter les instructions d’utilisation applicables àvotre appareil.
Sommaire
Consignes de sécurité..............................................................................................1
Précautions en matière d’écoute .............................................................................. 3
Vue d’ensemble des fonctionnalités..........................................................................5
Accessoires ............................................................................................................. 5
Touches et ports....................................................................................................... 5
Chargement de la batterie........................................................................................6
Transfert de fichiers.................................................................................................. 6
Mise en marche de l’appareil.................................................................................... 6
Écran d’accueil......................................................................................................... 7
Déverrouillage de l’écran.......................................................................................... 9
Conseils pour l’utilisation de l’écran tactile ................................................................ 9
Accès àInternet ..................................................................................................... 10
Utilisation du clavier virtuel..................................................................................... 11
Lecture de livres électroniques ............................................................................... 12
Lecture de musique................................................................................................ 14
Lecture de vidéos................................................................................................... 16
Affichage de photos................................................................................................ 17
Utilisation du caméscope/de l’appareil photo .......................................................... 19
Navigation dans les fichiers.................................................................................... 19
Envoi/Réception d’e-mails ......................................................................................23
Gestion des applications tierces ............................................................................. 25
Fermeture des applications récentes...................................................................... 25
Gestion des tâches ................................................................................................ 26
Résolution des problèmes ...................................................................................... 26
Caractéristiques techniques ................................................................................... 27
Déclaration FCC ....................................................................................................28
4
Page 27

Vue d’ensemble des fonctionnalités
souris
; connexion àune clé3G via le câble USB.
ConnectivitéWi-Fi
Grâce à la technologie Wi-Fi la plus récente, cet appareil vous permet de vous
connecter àInternet depuis n’importe où.
Écran tactile 8 pouces (20,3 cm)
L’appareil répond immédiatement lorsque vous touchez l’écran ou faites glisser votre
doigt dessus.
Prise en charge des applications tierces
Grâce au système d’exploitation Android TM embarqué, vous pouvez installer de
nombreuses applications tierces sur cet appareil (plus d’un million d’apps disponbles).
Objectif photo intégré
Grâce à son objectif photo intégré, cet appareil peut être utilisé en tant que
qu’appareil photo, webcam ou caméscope.
Capteur d’orientation intégré
L’écran passe automatiquement en mode paysage ou portrait lorsque vous faites
pivoter l’appareil.
Divertissement
Sur cet appareil, vous pouvez écouter de la musique, regarder des films ou des
photos et lire des livres électroniques.
Accessoires
Appareil ● Câble USB ●Adaptateur secteur
Manuel de l’utilisateur ● Carte de garantie ● Chiffonnette
Touches et ports
A.VOL+ –Pour augmenter le volume.
B.VOL+ –Pour réduire le volume.
C.Marche –Appuyer et maintenir pour allumer ou éteindre
l’appareil ; appuyer brièvement pour verrouiller ou
déverrouiller l’écran.
D.Prise casque –Pour brancher des écouteurs ou un casque
stéréo.
E.Port DC-IN – Raccordement àune source électrique standard
via l’adaptateur secteur
F.Port micro-USB –Branchement au PC via le câble USB ;
connexion USB àla mémoire de l’appareil, un clavier ou une
G. Emplacement pour carte Micro SD
H. Interface mini-HDMI –Branchement
àune TV HD prenant en charge la
connexion HDMI.
I. Microphone intégré
J. Webcam intégrée
K. Témoin de charge –Rouge pendant
le chargement, orange une fois le
chargement terminé.
L. Objectif photo arrière
M. Haut-parleurs intégrés
5
Page 28

Chargement de la batterie
Cet appareil est équipéd’une batterie rechargeable intégrée. Vous n’avez aucune
batterie supplémentaire àinstaller. Il suffit de recharger l’appareil lorsque le témoin
vous indique que la batterie est faible.
Pour recharger la batterie, branchez l’appareil àune prise secteur murale standard
via le port DC-IN àl’aide de l’adaptateur secteur. La charge compète de la batterie
dure environ 5 heures. Une fois la batterie complètement rechargée, le témoin de
charge s’allume en orange. Pendant le chargement, le témoin s’allume en rouge.
Remarque :
a. Il est vivement conseillé de recharger immédiatement la batterie lorsque le témoin indique qu’il
reste moins de 15 % d’autonomie !
b. Vous pouvez utiliser l’appareil même lorsqu’il est en charge. Toutefois, pour prolonger la durée de vie de
la batterie, nous vous conseillons de ne PAS utiliser l’appareil pendant le rechargement.
c. Nous vous recommandons de charger la batterie avant la première utilisation de l’appareil.
d. Pour offrir des performances optimales, les batteries lithium-ion doivent être utilisées fréquemment. Si
vous n’utilisez pas souvent l’appareil, veillez à recharger la batterie au moins une fois par mois.
e. Pour le rechargement, veillez à utiliser uniquement l’adaptateur secteur fourni avec l’appareil.
Transfert de fichiers
Avant de lire des fichiers multimédia, vous devez les transférer sur l’appareil depuis un
ordinateur.
(1) Branchez l’appareil àun ordinateur àl’aide du câble USB fourni.
(2) Appuyez sur «Activer le stockage USB »pour connecter l’appareil àl’ordinateur.
(3) Une fois la connexion établie, deux disques durs amovibles s’affichent sur
l’ordinateur. Le premier représente la mémoire interne de l’appareil, le second la
carte mémoire insérée dans l’appareil. Vous pouvez àprésent copier des fichiers
depuis et vers ces disques durs comme vous le feriez sur le disque dur d’un
ordinateur.
(4) Une fois le transfert terminé, sélectionnez «Désactiver le stockage USB »pour
déconnecter l’appareil.
(5) Débranchez l’appareil de l’ordinateur en toute sécurité.
Les applications préinstallées et le systèm e d’exploitation Android occupent une place considérable dans la
mémoire (un peu plus d’2 Go). Il est donc normal de constater une différence importante entre l’espace
mémoire disponible et la capacité mémoire totale. La mémoire disponible pour l’utilisateur est d’environ
5,69Go.
Mise en marche de l’appareil
Pour allumer l’appareil, appuyez sur la touche Marche et maintenez-la
jusqu’àce que l’écran de démarrage s’affiche. Le démarrage du système peut
prendre quelques minutes ; veuillez patienter avant de continuer.
Pour éteindre l’appareil, appuyez sur la touche Marche et maintenez-la
jusqu’à que l’option «Eteindre » s’affiche, puis appuyez sur «Eteindre » et
«OK ».
6
Page 29

Conseil : Afin d’économiser l’énergie, cet appareil peut passer en veille (écran éteint) en cas d’absence
Accès àla page
de recherche
batterie
appuyé
Appuyez dans cette
zone pour afficher
Appuyez sur le triangle
d’interaction pendant une période prolongée correspondant àla période définie dans le paramètre « Veille ».
Appuyez brièvement sur la touche Marche pour réactiver l’appareil.
Écran d’accueil
Accès à la
WiFi
activé
page
Applications
les paramètres
Google
Météo
Retour
pour changer de ville
Heure
Écran d’accueil étendu
Faites glisser votre doigt horizontalement sur l’écran pour accéder au volet gauche ou droit
de l’écran d’accueil étendu.
Personnalisation du contenu de l’écran d’accueil
Pour ajouter un élément àl’écran d’accueil (raccourci, widget, dossier, etc.), appuyez sur
l’icône Applications pour afficher toutes les applications, puis maintenez le doigt sur
l’élément pour le déplacer sur l’écran d’accueil.
Accès à
l’écran
d’accueil
Applications
récemment
utilisées
7
Maintenir
Niveau
de
Page 30

Pour déplacer un élément sur l’écran d’accueil, maintenez le doigt dessus jusqu’àce qu’il
soit mis en surbrillance, faites-le glisser à l’emplacement souhaité, puis relâchez.
Pour supprimer un élément de l’écran d’accueil, maintenez le doigt dessus jusqu’à ce qu’il
soit mis en surbrillance, faites-le glisser dans la corbeille «Supprimer », puis relâchez.
Modification du papier peint
Appuyez sur l’écran d’accueil, jusqu’à ce qu’un menu s’affiche. Appuyez sur «Papier
peint », puis choisissez une image d’arrière-plan pour le bureau.
Applications présélectionnées
De nombreuses applications utiles sont préinstallées sur l’appareil. Appuyez sur
l’onglet Applications pour les afficher.
8
Page 31

L’écran se verrouille lorsque l’appareil reste inactif pendant quelques secondes. Pour
déverrouiller l’écran et continuer à utiliser l’appareil, faites glisser l’icône Verrou vers la
droite.
Conseils pour l’utilisation de l’écran tactile
Appui : Un bref appui sur un élément permet d’ouvrir une application ou une
page.
Glissé horizontal : Lorsque vous regardez une vidéo ou écoutez de la musique,
appuyez sur la barre de progression pour lire
une section spécifique du fichier. Faites glisser
le curseur de la barre de progression vers n’importe
quelle partie déjàlue du fichier.
Glissé vertical : Dans les différents navigateurs
(fichiers, musique, vidéos, photos, etc.),
maintenez le doigt appuyésur l’écran, puis faites
le glisser vers le haut ou le bas pour faire défiler la
liste des fichiers.
Déverrouillage de l’écran
Maintien : Dans certains navigateurs (fichiers,
musique, vidéos, photos, Internet, etc.),
maintenez le doigt appuyésur un élément pour
afficher ses options.
Pincé: Pincez les doigts pour effectuer un zoom sur la page.
9
Page 32

Accès àInternet
Cet appareil intègre la technologie Wi-Fi pour vous permettre d’accéder à Internet via
un réseau Wi-Fi.
Tout d’abord, vous devez configurer un réseau Wi-Fi. Pour cela, vous devez vous
trouver dans une zone couverte par le Wi-Fi. Lorsque vous vous trouvez àportée d’un
réseau Wi-Fi que vous avez configuré, l’appareil tente d’établir une connexion.
Établissement d’une connexion WI-FI
Avant de lancer une application Internet telle qu’un navigateur, vous devez activer le
Wi-Fi et configurer un réseau Wi-Fi.
(1) Appuyez sur l’icône sur la page d’accueil.
(2) Faites glisser le commutateur WIFI sur «ON » pour activer le WI-FI.
(3) Votre tablette recherche automatiquement les réseaux Wi-Fi disponibles et les
affiche dans le volet droit. La liste des réseaux disponibles affiche tous les réseaux
sans fil à portée de votre appareil. Choisissez un réseau dans la liste, puis
appuyez sur «Connecter » pour établir la connexion. Certains réseaux peuvent
être protégés par un mot de passe. Dans ce cas, tapez le mot de passe avant
d’établir la connexion. Lorsque la connexion est établie, le message «Connecté
à… (nom du réseau Wi-Fi) »s’affiche sous le paramètre WI-FI.
Remarque :
a) La liste des réseaux disponibles est mise à jour en permanence de manière automatique.
b) Lorsque la fonction Wi-Fi est act ivée, l’a ppareil se connecte automatiquement aux réseaux
configurés, à condition qu’ils soient àportée.
c) En cas de détection d’un réseau non configuré, l’appareil affiche une icône de notification.
Lancement du navigateur Internet
Pour lancer le navigateur Internet, appuyez sur l’icône Navigateur de la page
Applications.
10
Page 33

Pour afficher les menus, appuyez sur l’icône .
Retour
Entrée
Verrouillage
Pour entrer une nouvelle adresse, appuyez sur la barre d’adresse, puis tapez
l’adresse.
Remarque : tous les réseaux sans fil ne permettent pas d’accéder àInternet. Certains réseaux Wi-Fi
permettent d’interconnecter des ordinateurs sans connexion àInternet.
Appuyez sur n’importe quel champ de saisie de texte pour ouvrir le clavier virtuel. Avec le
Utilisation du clavier virtuel
clavier virtuel, vous pouvez saisir l’adresse d’un site Web ou n’importe quel texte.
Majuscule: appuyez
brièvement à deux
reprises pour saisir
toutes les lettres en
majuscules ; appuyez
brièvement une seule
fois pour saisir la
première lettre en
majuscule.
Utilisation du navigateur Internet
Faites défiler l’écran en appuyant sur la page et en la faisant glisser vers le haut
ou vers le bas (en veillant àne cliquer sur aucun lien).
Pour ouvrir un lien, appuyez simplement dessus.
Pour revenir àla page précédente, appuyez sur l’icône Retour .
Pour afficher les options de menu disponibles, appuyez sur l’icône Menu .
Pour revenir directement àl’écran d’accueil, appuyez sur l’icône Accueil .
11
Page 34

Lecture de livres électroniques
Lecture hors ligne
Vous pouvez lire les livres électroniques enregistrés sur l’appareil. Avant la lecture,
transférez ou téléchargez des livres électroniques sur l’appareil.
1. Branchez l’appareil àl’ordinateur via le câble USB, puis copiez les livres
électroniques du disque dur local de l’ordinateur vers l’appareil (voir le chapitre
«Transfert de fichiers »plus haut).
Remarque : vérifiez que vos livres électroniques sont au format EPUB, TXT, FB2 ou RTF.
2. Sur la page Applications, appuyez sur «Livre électronique »pour ouvrir le
lecteur de livres électroniques.
3. Faites glisser votre doigt vers la gauche ou vers la droite pour explorer la
bibliothèque, puis appuyez sur le livre de votre choix pour commencer
immédiatement àle lire.
4. Lorsque vous lisez une page, appuyez sur pour afficher un menu, puis
choisissez pour accéder àla bibliothèque locale.
5. Appuyez sur «Arborescence »pour choisir les livres électroniques
enregistrés sur l’appareil. Sélectionnez «Appareil », puis « sdcard »pour accéder
àla mémoire interne de l’appareil. (Pour rechercher les livres enregistrés sur une
12
Page 35

carte SD externe, sélectionnez «Carte mémoire », puis « external_sdcard ».)
Appuyez sur le livre électronique que vous voulez ouvrir.
6. Pendant la lecture d’un livre électronique, vous pouvez effectuer les
opérations suivantes :
Faites glisser votre doigt sur l’écran vers la gauche ou vers la droite pour
avancer ou reculer d’une page.
(pour tourner les pages)
Appuyez sur pour afficher le menu de paramétrage du livre électronique.
Appuyez sur pour afficher le sommaire.
Appuyez sur , puis sur «Nouveau signet »pour insérer un signet
(marque-page) sur la page en cours.
Pour supprimer un signet, appuyez sur la liste des signets jusqu’àce qu’un
menu s’affiche, puis sélectionnez «Supprimer le signet »dans le menu.
13
Page 36

Appuyez sur l’icône pour rechercher des livres électroniques dans la
bibliothèque en ligne.
Lecture en ligne
1. Appuyez sur l’icône pour rechercher
des livres électroniques dans la bibliothèque en ligne (vérifiez que la fonction Wi-Fi
est activée).
2. Saisissez les critères de recherche, puis
appuyez sur Entrée sur le clavier pour lancer la recherche. Dans la liste des
résultats, appuyez sur le livre de votre choix, puis sur «Télécharger »pour le
télécharger. Une fois le téléchargement terminé, appuyez sur «Lire la copie
locale »pour commencer la lecture.
Lecture de musique
Appuyez sur l’icône Musique de la page Applications
pour lancer le lecteur de musique.
Discothèque
Accédez àla discothèque après avoir lancéle
lecteur. La discothèque affiche vos fichiers
musicaux triés par catégories si ces derniers
14
Page 37

contiennent des informations spécifiques. Les fichiers ne contenant pas
a
b
d
e
g
h
i
j
d’informations sont classés dans la catégorie Inconnu de la discothèque. Lorsque
vous copiez un nouveau titre sur l’appareil, la discothèque est automatiquement mise
àjour.
Pour parcourir la liste, faites glisser votre doigt vers le haut ou vers le bas.
Appuyez sur le titre d’un morceau pour le lire.
Artiste
Album
Titres
Playlists
Lecture en
cours
Classe les fichiers musicaux par
artiste.
Classe les fichiers musicaux par
album.
Répertorie tous les fichiers
musicaux.
Répertorie vos morceaux
préférés.
Permet d’accéder à l’écran
Lecture en cours.
Lecture aléatoire
Dans la discothèque, appuyez sur l’icône Menu pour afficher les options Lire tout,
Aléatoire partiel et Aléatoire complet.
Lire tout : lit tous les morceaux dans l’ordre normal.
Aléatoire partiel : lance la lecture aléatoire par groupe de 7-8 titres.
Aléatoire complet : lance la lecture aléatoire de tous les titres enregistrés sur
l’appareil.
Écran de lecture
c
f
k
a. Liste Lecture en cours
b. Lecture aléatoire ou non
c. Répétition ou non
d. Affichage des paroles
e. Nom de l’artiste
f. Nom de l’album
g. Titre (appuyez sur le titre pour rechercher
des informations le concernant sur
Internet.)
h. Titre précédent/Retour
i. Lecture/Pause
j. Titre suivant/Avance rapide
k. Barre de progression
Menu de lecture
Pendant la lecture d’un fichier musical, appuyez sur l’icône MENU pour afficher
un menu contextuel :
15
Page 38

Discothèque : pour revenir à la discothèque.
k.
Paramètres vidéo
Aléatoire partiel : sélectionne le mode
Aléatoire partiel
Ajouter àla playlist : ajoute un titre à la
playlist.
Supprimer : pour supprimer un titre.
Effets sonores : pour définir les effets sonores
pour la lecture de musique.
Playlist
La playlist est une liste de titres que vous avez ajoutés manuellement.
Pour ajouter le titre en cours de lecture àune playlist, appuyez sur pendant la
lecture, sélectionnez « Ajouter àla playlist », puis choisissez une playlist ou appuyez
sur «Nouvelle »pour en créer une.
Pour lire une playlist :
(1) Dans le menu Musique, appuyez sur l’icône Playlist pour afficher toutes les
playlists. Tous les titres que vous avez ajoutés sont répertoriés.
(2) Appuyez sur le titre d’un morceau pour lancer la lecture.
Lecture de vidéos
Appuyez sur l’icône Vidéo de la page Applications pour lancer le lecteur vidéo.
Navigation dans les fichiers vidéo
Lorsque vous accédez au lecteur vidéo, vous devez voir la liste des vidéos.
Pour parcourir la liste des vidéos, faites glisser votre doigt vers le haut ou vers le
bas.
Appuyez sur le titre d’une vidéo pour lancer la lecture.
Écran de lecture
a. VOL- (diminuer le volume)
b. Barre de progression
c. VOL+ (augmenter le volume)
d. Signet
e. Luminosité
f. Vidéo précédente/Retour rapide
g. Lecture/Pause
h. Vidéo suivante/Avance rapide
a b
c
d e f g h i j k
Remarque : certains fichiers vidéo risquent de ne pas être lus correctement par l’appareil. Reportez-vous
au chapitre «Caractéristiques techniques »à la fin du présent manuel pour vérifier si la résolution vidéo, le
format d’encodage et le type de fichier sont pris en charge.
i. Mode d’affichage
j. Quitter
16
Page 39

Paramètres de lecture vidéo
Appuyez sur l’icône pour afficher les paramètres vidéo.
Supprimer le signet et lire
depuis le début
Supprimer le signet Supprime le signet vidéo.
Mode de lecture
Aide Affiche les instructions relatives à la lecture de vidéos.
Retour Permet de quitter le menu.
Supprime le signet et lance la lecture depuis le début.
Simple : lit la vidéo en cours, puis s’arrête après la lecture.
Répéter sélection : répète la vidéo en cours.
Répéter tout : répète toutes les vidéos.
Affichage de photos
Appuyez sur l’icône Galerie de la page Applications pour ouvrir la galerie de photos.
Affichage de photos
(1) Les photos s’affichent sous forme de miniatures. Faites glisser votre doigt vers
la gauche ou la droite de l’écran pour faire défiler les photos.
(2) Appuyez sur la miniature d’une photo pour afficher la photo en plein écran.
Pour afficher la photo précédente/suivante, faites glisser votre doigt
(3)
horizontalement sur l’écran.
17
Page 40

(4) Pour effectuer un zoom avant ou arrière sur la photo, pincez les doigts sur la
photo.
Affichage du menu
Lorsque vous regardez la photo, appuyez sur l’écran ou sur l’icône Menu pour
afficher un menu.
18
Page 41

Utilisation du caméscope/de l’appareil
photo
Appuyez sur l’icône Appareil photo de la page Applications pour activer l’appareil
photo.
Zoom
Viseur
Pour enregistrer une séquence vidéo, appuyez sur la touche Marche/Arrêt
Commutateur appareil
Marche/arrêt
Paramètres
Mode Caméscope
Mode Panorama
Mode Photographie
afin de lancer l’enregistrement.
Appuyez ànouveau sur la touche Marche/Arrêt pour arrêter l’enregistrement
vidéo ou la prise de photos.
Vous pouvez afficher un aperçu de la séquence vidéo/photo dans
la fenêtre d’aperçu.
Pour lire la séquence vidéo que vous venez de filmer, accédez au lecteur vidéo,
puis appuyez sur la vidéo.
Pour afficher la photo que vous venez de prendre, passez en mode Photographie,
puis appuyez sur la photo.
Navigation dans les fichiers
Vous pouvez naviguer dans les fichiers et les
dossiers àl’aide de l’explorateur ou de l’application
ASTRO. Sur l’écran d’accueil, appuyez sur le
raccourci Applications, puis sur l’icône Explorateur
ou ASTRO pour accéder au mode Explorateur de
fichiers.
Utilisation de l’explorateur
Navigation dans les fichiers et les dossiers
Pour parcourir la liste des fichiers, faites glisser votre doigt vers le haut ou vers le
bas.
Pour ouvrir un fichier ou un dossier, appuyez sur son nom.
Pour gérer les applications, appuyez sur l’icône (pour plus de détails, voir le
19
Page 42

chapitre «Gestion des applications tierces »).
Pour avancer ou reculer d’un niveau dans l’interface, appuyez sur l’icône
Précédent ou Suivant .
Pour reculer d’un niveau dans le répertoire, appuyez sur l’icône Remonter .
Où que vous vous trouviez dans l’interface, pour revenir directement àl’écran
d’accueil, appuyez sur l’icône Retour ou Accueil .
Pour accéder àla racine du répertoire, appuyez sur l’icône Accueil .
Utilisation de la barre d’outils
Utilisez la barre d’outils pour naviguer dans la mémoire interne ou la carte mémoire
de votre appareil afin de supprimer ou de copier des fichiers.
Tapez sur la zone grise pour masquer/afficher la barre d’outils.
Faites glisser votre doigt sur la barre d’outils pour naviguer parmi les outils.
Accueil
Remonter
Multi
Éditeur
Précédent
Suivant
Pour accéder à l’écran d’accueil
Pour reculer d’un niveau dans le répertoire.
Pour sélectionner plusieurs fichiers.
Pour copier, supprimer, déplacer, coller ou renommer le fichier
ou dossier.
Pour reculer d’un niveau dans l’interface.
Pour avancer d’un niveau dans l’interface.
Copie/Déplacement des fichiers et dossiers
(1) Faites défiler la liste des fichiers vers le haut ou vers le bas
en faisant glisser votre doigt pour sélectionner le fichier ou
dossier que vous voulez copier ou déplacer.
(2) Appuyez sur le fichier ou dossier sélectionnéjusqu’àce
qu’un menu contextuel s’affiche.
(3) Sélectionnez «Copier »ou « Déplacer »dans le menu contextuel.
(4) Naviguez jusqu’àl’emplacement auquel vous voulez copier ou déplacer le
fichier ou dossier.
(5) Sélectionnez l’icône Éditeur dans la barre d’outils, puis choisissez
«Coller ».
Suppression des fichiers et dossiers
(1) Faites défiler la liste des fichiers vers le haut ou vers le bas en faisant glisser
votre doigt pour sélectionner le fichier ou dossier que vous voulez supprimer.
(2) Appuyez sur le fichier ou dossier sélectionnéjusqu’àce qu’un menu contextuel
s’affiche.
(3) Sélectionnez «Supprimer »dans le menu contextuel, puis «Supprimer »pour
confirmer ou «Annuler »pour quitter.
20
Page 43

Attribution d’un nouveau nom aux fichiers et dossiers
Appuyez sur la zone grise pour masquer/afficher la barre d’outils
(1) Faites défiler la liste des fichiers vers le haut ou vers le bas en faisant glisser
votre doigt pour sélectionner le fichier ou dossier que vous voulez renommer.
(2) Appuyez sur le fichier ou dossier sélectionnéjusqu’àce qu’un menu contextuel
s’affiche.
(3) Sélectionnez «Renommer »dans le menu contextuel.
(4) Appuyez sur le champ de saisie pour afficher le clavier virtuel, puis servez-vous
des lettres du clavier virtuel pour renommer le fichier ou dossier.
(5) Appuyez sur «OK »pour confirmer le nouveau nom.
Sélection de plusieurs éléments
Vous pouvez sélectionner plusieurs fichiers ou dossiers au cours d’une même
opération.
(1) Dans la barre d’outils supérieure, appuyez sur l’icône Multi .
(2) Appuyez sur les fichiers ou dossiers àsélectionner. Les noms des fichiers ou
dossiers s’affichent en rouge lorsqu’ils sont sélectionnés. (Pour désélectionner
un fichier ou dossier, appuyez à nouveau dessus.)
(3) Une fois la sélection terminée, vous pouvez supprimer, copier ou déplacer les
fichiers ou dossiers en question en appuyant sur l’icône Éditeur .
Utilisation d’ASTRO
Navigation dans les fichiers et les dossiers
Pour parcourir la liste des fichiers, faites glisser votre doigt vers le haut ou vers le
bas.
Pour ouvrir un fichier ou un dossier, appuyez sur son nom.
Pour gérer les applications, appuyez sur l’icône (pour plus de détails, voir le
chapitre «Gestion des applications tierces »).
Pour avancer ou reculer d’un niveau dans l’interface, appuyez sur l’icône
Précédent ou Suivant .
Pour reculer d’un niveau dans le répertoire, appuyez sur l’icône Remonter .
Où que vous vous trouviez dans l’interface, pour revenir directement àl’écran
d’accueil, appuyez sur l’icône Retour ou Accueil .
Pour accéder àla racine du répertoire, appuyez sur l’icône Accueil .
Utilisation de la barre d’outils
Utilisez la barre d’outils pour naviguer dans la mémoire interne ou la carte mémoire
de votre appareil afin de supprimer ou de copier des fichiers.
.
Faites glisser votre doigt sur la barre d’outils pour naviguer parmi les outils.
21
Page 44

Accueil
Haut
Multi
Éditeur
Recherche
Précédent
Suivant
Vue
Trier
Préfs
Réseau
Pour accéder àl’écran d’accueil
Pour reculer d’un niveau dans le répertoire.
Pour sélectionner plusieurs fichiers.
Pour copier, supprimer, déplacer, coller ou renommer le fichier ou
dossier.
Pour rechercher un fichier ou dossier spécifique
Pour reculer d’un niveau dans l’interface.
Pour avancer d’un niveau dans l’interface.
Pour afficher les fichiers et dossiers sous forme de liste ou d’icônes.
Pour trier les fichiers et dossiers par nom, date, taille ou type.
Préférences pour ASTRO
Pour activer le réseau Wi-Fi ou la fonction Bluetooth.
Copie/Déplacement des fichiers et dossiers
(1) Parcourez les fichiers ou dossiers et repérez le fichier ou dossier de votre choix.
(2) Appuyez sur l’icône Multi , puis sur le ou les fichiers ou dossiers de votre
choix. Vous pouvez sélectionner plusieurs éléments en appuyant dessus. Pour
désélectionner le ou les éléments, appuyez sur l’icône Annuler .
(3) Sélectionnez «Copier »ou « Déplacer »dans le menu contextuel.
(4) Naviguez jusqu’àl’emplacement auquel vous voulez copier ou déplacer le
fichier ou dossier.
(5) Sélectionnez l’icône Éditeur dans la barre d’outils, puis choisissez
«Coller ».
Suppression des fichiers et dossiers
(1) Parcourez les fichiers ou dossiers et repérez le fichier ou dossier de votre choix.
(2) Appuyez sur l’icône Multi , puis sur le ou les fichiers ou dossiers de votre
choix. Vous pouvez sélectionner plusieurs éléments en appuyant dessus. Pour
désélectionner le ou les éléments, appuyez sur l’icône Annuler .
(3) Sélectionnez «Supprimer »dans le menu contextuel, puis «Supprimer »pour
confirmer ou «Annuler »pour quitter.
Archivage des fichiers ou dossiers au format Zip
(1) Parcourez les fichiers ou dossiers et repérez le fichier ou dossier de votre choix.
(2) Appuyez sur l’icône Multi , puis sur le ou les fichiers ou dossiers de votre
choix. Vous pouvez sélectionner plusieurs éléments en appuyant dessus. Pour
désélectionner le ou les éléments, appuyez sur l’icône Annuler .
(3) Sélectionnez «Zip »dans le menu contextuel.
(4) Entrez le nom de l’archive, puis appuyez sur «Créer ».
Options des fichiers
Maintenez le doigt appuyésur un élément pour
afficher les options suivantes :
Détails : informations relatives au fichier
Ouvrir avec : pour ouvrir le fichier avec une autre
application.
22
Page 45

Éditeur : pour copier, supprimer, déplacer ou archiver le fichier
Envoyer : pour envoyer le fichier par e-mail (connexion àune messagerie
électronique requise.)
Définir comme : pour définir le fichier en tant que bureau
Envoi/Réception d’e-mails
Une application de messagerie électronique est préinstallée sur cet appareil. Vous
pouvez envoyer ou recevoir des e-mails depuis Internet àtout moment avec cet
appareil. Vérifiez que vous disposez d’une connexion àInternet avant d’utiliser le
service de messagerie.
Sur l’écran d’accueil, appuyez sur le raccourci Applications pour afficher toutes les
applications, puis appuyez sur l’icône Email pour lancer l’application de messagerie.
Configuration d’un compte de messagerie
Tout d’abord, vous devez configurer un compte de messagerie pour la réception et
l’envoi d’e-mails.
(1) Lancez l’application de messagerie en appuyant sur l’icône Email. Un message
vous invite àconfigurer un compte.
(2) Saisissez votre adresse e-mail et votre mot de passe de connexion. Si vous le
souhaitez, définissez ce compte par défaut en sélectionnant l’option «Envoyer les
e-mails àpartir de ce compte par défaut ».
(3) Appuyez sur «Configuration manuelle »pour configurer les informations du
serveur de messagerie.
(4) Choisissez le type de serveur parmi POP3, IMAP et Exchange pour les messages
entrants. Pour connaître le type de votre serveur de messagerie, adressez-vous
au fournisseur d’accès ou àl’administrateur réseau, ou recherchez ces
informations sur Internet.
(5) Saisissez les informations requises (serveur, port, etc.). Vous pouvez obtenir ces
informations auprès de votre fournisseur d’accès, de l’administrateur réseau ou
sur Internet.
(6) Choisissez le type de serveur pour les messages sortants, puis saisissez les
informations serveur requises.
(7) Cliquez sur «Suivant »pour continuer. Votre tablette vérifie les paramètres du
serveur. Lorsque le message «Votre compte est configuré, un e-mail est en
cours »s’affiche, votre compte est correctement configuré.
(8) Saisissez votre nom, puis appuyez sur «Terminé» pour terminer.
Remarque : si vous disposez de plusieurs comptes, àchaque démarrage de l’application de messagerie,
vous devez indiquer le compte de messagerie par défaut.
Gestion des comptes
Vous pouvez configurer plusieurs comptes et les gérer en vérifiant les informations
relatives au compte, en ajoutant d’autres comptes ou en en supprimant.
23
Page 46

Ajout d’un compte
Procédez comme suit pour ajouter un compte si vous le souhaitez.
(1) Lancez l’application de messagerie, puis appuyez sur l’icône Menu pour
afficher les options du menu. Choisissez «Comptes »pour afficher les comptes.
(2) Appuyez sur l’icône Menu pour afficher les options du menu, puis
sélectionnez «Ajouter un compte ».
(3) Suivez les instructions de configuration d’un compte de messagerie pour ajouter
un compte.
Suppression d’un compte de messagerie
(1) Dans la boîte de réception de la messagerie, appuyez sur l’icône Menu pour
afficher les options du menu.
(2) Appuyez sur «Comptes »pour afficher tous les comptes de messagerie
électronique.
(3) Maintenez le doigt sur le compte que vous voulez supprimer jusqu’àce qu’un
menu s’affiche.
(4) Appuyez sur «Supprimer le compte »,puis sur «OK » pour confirmer.
Vérification des paramètres du compte
(1) Dans la boîte de réception de la messagerie, appuyez sur l’icône Menu pour
afficher les options du menu.
(2) Appuyez sur «Comptes »pour afficher tous les comptes de messagerie
électronique.
(3) Maintenez le doigt sur le compte que vous voulez vérifier jusqu’àce qu’un menu
s’affiche.
(4) Appuyez sur «Paramètres du compte ». Vous devez voir toutes les informations
de configuration relatives au compte. Modifiez les paramètres comme bon vous
semble.
Affichage des e-mails
Vous devez accéder àvotre boîte de réception au démarrage de l’application de
messagerie.
Dans la boîte de réception, faites glisser votre doigt vers le haut ou vers le bas
pour faire défiler la liste des e-mails.
Appuyez sur un e-mail pour l’ouvrir.
Maintenez le doigt appuyésur l’e-mail pour afficher un menu. Dans le menu, vous
pouvez ouvrir, transférer ou supprimer l’e-mail et y répondre.
Options du menu e-mail
Dans la liste des e-mails, appuyez sur l’icône Menu pour afficher le menu.
Actualiser
Composer
Dossiers
Comptes
Pour actualiser les e-mails.
Pour rédiger un nouvel e-mail.
Pour revenir àla boîte de réception.
Pour afficher tous les comptes de messagerie.
24
Page 47

Paramètres du
compte
Pour contrôler les paramètres de votre compte.
Gestion des applications tierces
Votre appareil prend en charge de nombreuses applications tierces très utiles. Vous
pouvez les acheter pour ajouter des fonctions àvotre appareil. Elles sont disponibles
en ligne sur Internet ou directement sur votre tablette.
Applications préinstallées
L’appareil dispose d’applications préinstallées au moment de sa fabrication. Pour les
voir, appuyez sur l’icône Applications . Il s’agit du lecteur vidéo, du lecteur audio,
du navigateur, de la pendule, de la calculatrice, etc.
Installation d’applications
Vous pouvez installer des applications manuellement en procédant comme suit :
Téléchargez et installez le fichier d’installation directement depuis la bibliothèque
d’applications intégrées (par exemple, SlideMe). Vérifiez que le fichier est au
format .apk pris en charge par le système de votre tablette Internet.
Copiez le fichier d’installation sur votre tablette via la connexion USB. Allumez la
tablette, localisez le fichier d’installation àl’aide de l’Explorateur, puis appuyez sur
son nom pour l’installer.
Une fois correctement installée, l’application s’affiche sur la page Applications.
Désinstallation d’applications
(1) Appuyez sur le raccourci Paramètres de l’écran
d’accueil pour afficher tous les paramètres système.
(2) Sélectionnez «Apps ».
(3) Appuyez sur l’application que vous voulez
désinstaller.
(4) Appuyez sur «Désinstaller » pour désinstaller
l’application.
Remarque :
Vous ne pouvez pas désinstaller les applications préinstallées..
Certaines applications développées pour les téléphones portables Android risquent de ne pas
fonctionner correctement sur l’appareil. Consultez le développeur du logiciel concerné pour en savoir
plus.
Fermeture des applications récentes
Votre appareil peut mémoriser les applications que vous avez récemment utilisées.
Cette option est très utile pour revenir àune fenêtre que vous avez récemment
ouverte. De plus, vous pouvez fermer ces applications pour améliorer les
performances du système.
25
Page 48

(1) Appuyez sur pour afficher
les applications récemment
utilisées.
(2) Maintenez le doigt appuyésur
l’application àarrêter, puis sélectionnez
«Supprimer de la liste ».
Gestion des tâches
Votre tablette peut gérer simultanément plusieurs tâches. Par exemple, vous pouvez
regarder des photos tout en écoutant de la musique. Cette configuration multitâches
est utile, mais inefficace si vous exécutez de trop nombreuses tâches. Pour
économiser la mémoire système et améliorer les performances, vous pouvez mettre
fin aux tâches que vous n’utilisez pas pour le moment.
(1) Appuyez sur l’application «Task
Killer ».
Appuyez sur «Arrêter les applications sélectionnées »pour terminer la tâche.
(3)
(2) Appuyez sur la tâche que vous
souhaitez terminer.
Résolution des problèmes
Réinitialisation de l’appareil
En cas de blocage de l’appareil, vous pouvez le forcer às’éteindre en appuyant
sur la touche Marche pendant 15 secondes.
Si la touche Marche ne permet pas la réinitialisation de l’appareil, utilisez le
bouton de «réinitialisation àtrou d’épingle » de l’appareil.
26
Page 49

Caractéristiques techniques
MS MPEG4 V3)
Élément Description
Processeur
DDR 1 Go
Système d’exploitation
embarqué
Matériel Tablette tactile avec port USB
Mémoire interne 8 Go
Mémoire disponible 5,69 Go
Type de carte mémoire Compatible Carte Micro SD : 32 Go (non fournie)
Système d’exploitation Windows 2000/XP/Vista/Windows 7/Linux 2.4/ MAC OS 10.6.7 et supérieur
Interface
Accord de connexion WiFi (802.11 b/g/n)
Capteur d’orientation Prise en charge de la rotation à360°
Livres
électroniq
ues
Formats photo
Audio
Vidéo
Formats de
fichiers
Format
d’encodage
Formats de
fichiers
Formats
d’encodage
Formats de
fichiers
Formats
d’encodage
Cortex-A9 (dual core)
Fréquence principale : 1,6 GHz
Android OS 4.1
USB 2.0 Haut débit
SD (compatible SDHC)
Prise casque 3,5 mm
EPUB/TXT/FB2/RTF
Format EPUB : .Open
Format TXT / FB2/ RTF : .Open
JPEG(Baseline) :8 000 x 8 000 pixels (max.)
BMP
GIF (Statique) : 6 000x 4 500 pixels (max.)
PNG : 8 000 x 8 000 pixels (max.)
MP3/WAV/OGG/FLAC/APE/AAC/WMA(licence requise)
MP3 (MPEG1/2/2.5 Audio Layer1/2/3) : 8~48KHZ/8~320Kbps,CBR et VBR
WAV (MS-ADPCM, IMA-ADPCM, PCM) : 8~48 KHz
OGG (Q1- Q10) : 8~48 KHz
FLAC(niveau de compression 0~8) : 8~48 KHz
APE (Version 3.95, 39.7, 3.98, 3.99, normale et rapide) : 8~48 KHz
AAC(ADIF, ATDSAAC-LC et AAC-HE) : 8~48 KHz
WMA (Version 4, 4.1, 7, 8, 9, WMA Pro) 8~48 KHz/8~320 Kbits/sec,CBR
et VBR (licence requise)
AVI, 3GP, MP4, RM, RMVB, FLV, MKV, MOV, MPG, VOB, DAT, W MV,ASF
(MPEG4,XVID,DIVX3/4/5/6,
AVI
(MPEG4,XVID,DIVX3/4/5/6,
MS MPEG4 V3)
RM/RMVB(Real video 8/9)
FLV(Sorenson Spark)
1 920 x 1 080 pixels/30 images/sec (max)AVI
Codec audio :MP2/MP3/AC3/AAC/PCM
MPEG4,XVID,DIVX3/4/5/6 :
1 920 x 1 080 pixels/30 images/sec (max)
H.264 : 1 920 x 1 080 pixels/30 images/sec
(max)
Codec audio : MP2/MP3/AC3/AAC/PCM
1 920 x 1 080 pixels/30 images/sec (max)
Codec audio : Cook/AAC
1 920 x 1 080 pixels/30 images/sec (max)
Codec audio : MP3
27
Page 50

AVI (MPEG4,XVID,DIVX3/4/5/6, MS
MS MPEG4 V3)
AVI
(MPEG4,XVID,DIVX3/4/5/6,
MPG/DAT/VOB(MPEG1/2)
MKV
MPG/DAT/VOB
WMV/ASF(licence requise)
Durée de rechargement de
la batterie
Autonomie de la batterie
Affichage Écran LCD IPS HD 8 pouces (20,3 cm), tactile, 1 024 X 768 pixels.
Rapport signal/bruit >=80 dB
Plage de réponse en
fréquence
Alimentation
Temp. de stockage -20℃ ~ +65℃
Temp. ambiante 0℃ ~ +50℃
Humiditérelative en
fonctionnement
Humiditérelative en
stockage
Environ 4 heures
Environ 6 heures de lecture pour la musique ;
Environ 5 heures de lecture vidéo ;
Environ 5 heures de navigation sur Internet.
20 Hz - 20 KHz
Batterie polymère lithium-ion rechargeable
Adaptateur secteur : Entrée CA 100-240 V~50/60 Hz, sortie CC 5 V/2 A
20 % ~ 90 %(40℃)
20 % ~ 93 %(40℃)
MPEG4 V3) 1 920 x 1 080 pixels /
30 images/sec/ 38,4 Mbits/sec (max.)
H.264 : 1 920
x1 080 pixels/30 images/sec/20 Mbits/sec
(max)
Audio Codec: MP2/MP3/AC3/AAC/AMR
1 920x1 080 pixels/30 images/sec/80 Mbits/
sec (max)
Codec audio : MP2/MP3
1 920 x 1 080 pixels/30 images/sec
Codec vidéo : H.264, MPEG4,WMV3
Codec audio : MP2/MP3/AC3/AAC/PCM
1 920 x 1 080 pixels/30 images/sec
Codec vidéo : MPEG1/2
Codec audio : MP2/MP3
1 920 x 1 080 pixels/30 images/sec
Codec vidéo : WMV3
Codec audio : WMA2/3
Déclaration FCC
Cet équipement a ététestéet certifié conforme aux limites définies pour un appareil numérique de
classe B, en vertu de l’article 15 de la réglementation FCC. Ces limites sont conçues pour assurer
une protection raisonnable contre les interférences nuisibles dans une installation résidentielle.
Cet équipement génère, utilise et peut émettre des fréquences radio qui, s’il n’est pas installé et
utilisé conformément aux instructions, peuvent causer des interférences nuisibles aux
communications radio. Toutefois, nous ne pouvons pas garantir l’absence d’interférences dans une
installation spécifique. Si cet équipement occasionne des interférences nuisibles pour la réception
de la radio ou de la télévision, ce qui peut être déterminéen éteignant et rallumant les appareils
concernés, nous conseillons à l’utilisateur d’essayer de résoudre ce problème en adoptant une ou
plusieurs des mesures suivantes :
-- Réorienter ou déplacer l’antenne de réception.
28
Page 51

-- Augmenter la distance entre l’équipement et le récepteur.
-- Raccorder l’équipement àune prise ou un circuit différent de celui ou celle auquel le récepteur
est branché.
-- S'adresser au revendeur ou solliciter l'aide d'un technicien radio/TV expérimenté.
Attention : toute modification apportée àcet appareil qui n’est pas expressément approuvée par le
fabricant peut annuler votre autorisation à utiliser cet équipement.
États-Unis :
subordonnée aux deux conditions suivantes :
Toute modification non expressément approuvée par la partie responsable de la conformité peut
annuler l’autorisation de fonctionnement de l’équipement accordée à l’utilisateur.
Canada :
- Cet appareil est conforme àla norme ou aux normes RSS sans licence d’Industry Canada. Son
Déclaration FCC relative aux radio-fréquences :
Cet appareil a été testé et déclaré conforme aux exigences relatives à l’exposition aux
radio-fréquences. Il peut être utilisé sans restriction dans des conditions d’exposition mobiles.
Cet appareil est conforme à l’article 15 de la réglementation FCC. Son utilisation est
(1) cet appareil ne doit pas occasionner d’interférences, et
(2) cet appareil doit pouvoir accepter différentes interférences, y compris les interférences
susceptibles d’entraîner un mauvais fonctionnement.
utilisation est subordonnée aux deux conditions suivantes : (1) cet appareil ne doit pas
occasionner d’interférences, et 2) cet appareil doit pouvoir accepter différentes interférences, y
compris les interférences susceptibles d’entraîner un mauvais fonctionnement.
29
 Loading...