

Haier 50UG6550G User Manual
50UG6550G

1
English
Energy Star
This product qualifies for ENERGY STAR in the factory default setting and this is the setting in which power savings
will be achieved. Changing the factory default picture setting or enabling other features will increase power
consumption that could exceed the limits necessary to qualify for ENERGY STAR rating.
Apparatus shall not be exposed to dripping or splashing and no objects filled with liquids, such as vases, shall be
placed on the apparatus.
Batteries installed warning
Caution - Danger of explosion if battery is incorrectly replaced. Replace only with the same or equivalent type.
The batteries (battery pack or batteries installed) shall not be exposed to excessive heat such as sunshine, fire or the
like.
FOR YOUR SAFETY
Before operating the TV, please read this manual thoroughly. This manual should be retained for future reference.
FCC Class B Radio Frequency Interference Statement
WARNING: (FOR FCC CERTIFIED MODELS)
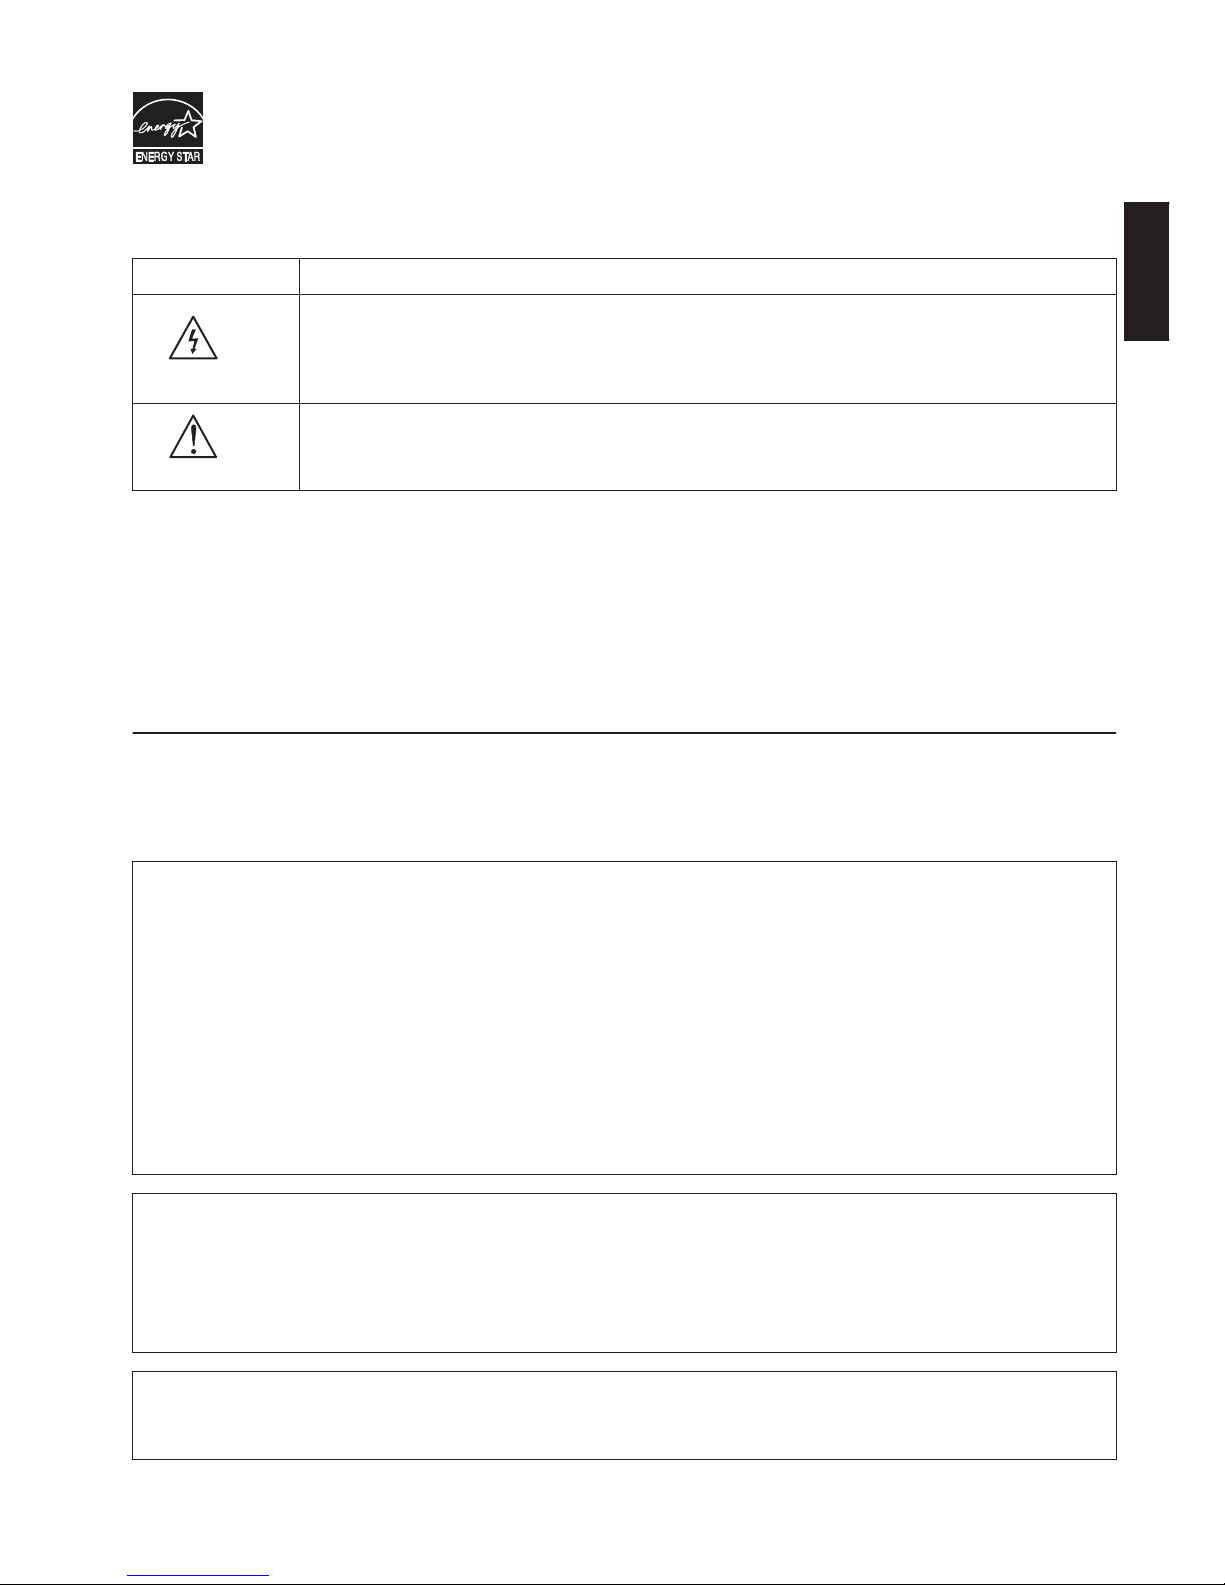
SYMBOL SYMBOL DEFINITION
DANGEROUS VOLTAGE: The lightning flash with arrowhead symbol, within an equilateral
triangle, is intended to alert the user to the presence of uninsulated “dangerous voltage”
within the product’s enclosure that may be of sufficient magnitude to constitute a risk of
electrical shock to persons.
INSTRUCTIONS: The exclamation point within an equilateral triangle is intended to alert the
user to the presence of important operating and maintenance (servicing) instruction in the
literature accompanying the appliance.
NOTE: This equipment has been tested and found to comply with the limits for a Class B digital device, pursuant
to Part 15 of the FCC Rules. These limits are designed to provide reasonable protection against harmful
interference in a residential installation. This equipment generates, uses and can radiate radio frequency energy,
and if not installed and used in accordance with the instructions, may cause harmful interference to radio
communications. However, there is no guarantee that interference will not occur in a particular installation. If this
equipment does cause harmful interference to radio or television reception, which can be determined by turning
the equipment off and on, the user is encouraged to try to correct the interference by one or more of the
following measures:
1. Reorient or relocate the receiving antenna.
2. Increase the separation between the equipment and receiver.
3. Connect the equipment into an outlet on a circuit different from that to which the receiver is connected.
4. Consult the dealer or an experienced radio/TV technician for help.
NOTICE
1. The changes or modifications not expressly approved by the party responsible for compliance could void the
user's authority to operate the equipment.
2. Shielded interface cables and AC power cord, if any, must be used in order to comply with the emission limits.
3. The manufacturer is not responsible for any radio or TV interference caused by unauthorized modification to
this equipment. It is the responsibilities of the user to correct such interference.
WARNING:
To prevent fire or shock hazard, do not expose the TV to rain or moisture. Dangerously high voltages are present
inside the TV. Do not open the cabinet. Refer servicing to qualified personnel only.
SA 1965
SA 1966
2
PRECAUTIONS AND REMINDERS
Notice for Remote Control
Place unit on even surfaces. Unplug immediately if other
foreign materials are put inside TV
box or if the TV fell down.
Do not cover or block any vents
and openings. Inadequate
ventilation may shorten the life of
the display unit and cause
overheating.
Unplug immediately if
malfunction like no video/audio
occurs, or smoke and bad odor
come from TV.
Prohibit/Avoid opening TV
cabinet.
Avoid direct sunlight, dusty,
humid and smoky areas.
Don't throw any object inside the
TV box like metals or other
flammable materials.
Remember to unplug the AC cord
from the AC outlet before
cleaning. Do not use liquid
cleaners or aerosol cleaners to
clean the display.
Call service personnel to clean the
internal part of the TV once a year.
Don't place the TV in confined
spaces or in a box when using it.
Make sure to unplug the unit
when not in use for a long period
of time (days).
Do not place the display near
water, suchasbathtub, washbasin,
kitchen sink, laundry tub,
swimming pool or in a damp
basement.
Avoid Dropping Avoid Liquids Avoid Aerosol Cleaners
6 in.
NOT E

3
English
IMPORTANT SAFETY INSTRUCTIONS
Read before operating equipment.
tTo reduce the risk of electric shock or component damage, switch off the power before connecting other
components to your TV.
tRead these instructions.
tKeep these instructions.
tHeed all warnings.
tFollow all instructions.
tDo not use this apparatus near water.
tClean only with a dry cloth.
tDo not block any ventilation openings. Install in accordance with the manufacturer’s instructions.
tDo not install near any heat sources such as radiators, heat registers, stoves, or other apparatus (including
amplifiers) that produce heat.
tDo not defeat the safety purpose of the polarized or grounding-type plug. A polarized plug has two blades and a
third grounding prong. The wide blade or the third prong are provided for your safety. If the provided plug does
not fit into your outlet, consult an electrician for replacement of the obsolete outlet.
tProtect the power cord from being walked on or pinched, particularly at plugs, convenience receptacles, and the
point where they exit from the apparatus.
tOnly use attachments/accessories specified by the manufacturer.
tUse only with the cart, stand, tripod, bracket, or table specified by the manufacturer, or sold with the
apparatus. When a cart is used, use caution when moving the cart/apparatus combination to avoid
injury from tip-over.
tUnplug this apparatus during lightning storms or when unused for long periods of time.
tRefer all servicing to qualified service personnel. Servicing is required when the apparatus has been
damaged in any way, such as when the power-supply cord or plug is damaged, liquid has been spilled or objects
have fallen into the apparatus, the apparatus hasbeen exposed to rain or moisture, does not operate normally or
has been dropped.
tUnplug the power cord before cleaning your TV.
tWhen moving your TV from an area of low temperature to an area of high temperature, condensation may form
in the housing. Wait before turning on your TV to avoid causing fire, electric shock, or component damage.
tA distance of at least three feet should be maintained between your TV and any heat source, such as a radiator,
heater, oven, amplifier etc. Do not install your TV close to smoke. Operating your TV close to smoke or moisture
may cause fire or electric shock.
tSlots and openings in the back and bottom of the cabinet are provided for ventilation. To ensure reliable
operation of your TV and to protect it from overheating, be sure these openings are not blocked or covered. Do
not place your TV in a bookcase or cabinet unless proper ventilation is provided.
tNever push any object into the slots and openings on your TV cabinet. Do not place any objects on the top of
your TV. Doing so could short circuit parts causing a fire or electric shock. Never spill liquids on your TV.
tYour TV should be operated only from the type of power source indicated on the label. If you are not sure of the
type of power supplied to your home, consult your dealer or local power company.
tDo not apply pressure or throw objects at your TV. This may compromise the integrity of the display. The
manufacturer’s warranty does not cover user abuse or improper installations.
tThe power cord must be
replaced when using different voltagethan the voltage specified. For more information,
contact your dealer.
tWhen connected to a power outlet, power is always flowing into your TV. To totally disconnect power, unplug
the power cord.
tDo not overload power strips and extension cords. Overloading can result in fire or electric shock.
tThe wall socket should be installed near your TV and easily accessible.
tOnly power of the marked voltage can be used for your TV. Any other voltage than the specified voltage may
cause fire or electric shock.
tDo not touch the power cord during lightning. To avoid electric shock, avoid handling the power cord during
electrical storms.
tUnplug your TV during a lightning storm or when it will not be used for long period of time. This will protect your
TV from damage due to power surges.
tDo not attempt to repair or service your TV yourself. Opening or removing the back cover may expose you to
high voltages, electric shock, and other hazards. If repair is required, contact your dealer and refer all servicing to
qualified service personnel.

4
tWARNING: Keep your TV away from moisture. Donot expose your TV torain or moisture. If water penetrates into
your TV, unplug the power cord and contact your dealer. Continuous use in this case may result in fire or electric
shock.
tDo not use your TV if any abnormality occurs. If any smoke or odor becomes apparent, unplug the power cord
and contact your dealer immediately. Do not try to repair your TV yourself.
tAvoid using dropped or damaged appliances. If your TV is dropped and the housing is damaged, the internal
components may function abnormally. Unplug the power cord immediately and contact your dealer for repair.
Continued use of your TV may cause fire or electric shock.
tDo not install your TV in an area with heavy dust or high humidity. Operating your TV in environments with
heavy dust or high humidity may cause fire or electric shock.
tFollow instructions for moving your TV. Ensure that the power cord and any other cables are unplugged before
moving your TV.
tWhen unplugging your TV, hold the AC/DC power adapter, not the cord. Pulling on the power cord may damage
the wires inside the cord and cause fire or electric shock. When your TV will not be used for an extended period
of time, unplug the power cord.
tTo reduce risk of electric shock, do not touch the connector with wet hands.
tInsert batteries in accordance with instructions. Incorrect polarities may cause the batteries to leak which can
damage the remote control or injure the operator. Do not expose batteries to excessive heat such as sunshine,
fire or the like.
tIf any of the following occurs, contact the dealer:
- The power cord fails or frays.
- Liquid sprays or any object drops into your TV.
- Your TV is exposed to rain or other moisture.
- Your TV is dropped or damaged in any way.
- The performance of your TV changes substantially.
tThis apparatus shall not be exposed to dripping or splashing and no objects filled with liquids, such as vases,
shall be placed on the apparatus.
tThe mains plug or appliance coupler is used as the disconnect device, the disconnect device shall remain readily
operable.
tCAUTION - These servicing instructions are for use by qualified service personnel only. To reduce the risk of
electric shock, do not perform any servicing other than that contained in the operating instructions unless you
are qualified to do so.
tOutdoor Antenna Grounding – If an outside antenna is connected to the receiver, be sure the antenna system is
grounded so as to provide some protection against voltage surges and built up static charges. Section 810 of the
National Electric Code, ANSI/NFPA No. 70-1984, provides information with respect to proper grounding of the
mats and supporting structure grounding of the lead-in wire to an antenna discharge unit, size of grounding
connectors, location of antenna discharge unit, connection to grounding electrodes and requirements for the
grounding electrode. See Figure below.
EXAMPLE OF ANTENNA GROUNDING AS PER NATIONAL ELECTRICAL CODE
Note to the CATV system installer: This reminder isprovided to call the CATV system installer’s attention to Article
820-40 of the NEC that provides guidelines for proper grounding and, in particular, specifies that the cable
ground shall be connected to the 6 English grounding system of the building, as close to the point of cable entry
as practical. Please, make sure to connect the power plug to the wall outlet socket after connecting the TV to the
adapter!
ANT ENNA
ANT ENNA DIS CHARG EU NIT
GRO UNDING C ONDUC TORS
POW ER SERVI CE GROU NDING E LECTR ODE SYS TEM
GRO UND CLAM PS
ELE CTRIC S ERVICE E QUIPM ENT
GRO UND CLA MP

5
English
SAVE THESE INSTRUCTIONS
Thank you for purchasing this Haier product. This easy-to-use manual will guide you in
getting the best use of your product. Remember to record the model and serial number.
They are on the label on back of the unit.
Staple your receipt to your manual. You will need it to obtain warranty service
Model number
Serial number
Date of purchase

6
FOR YOUR SAFETY . . . . . . . . . . . . . . . . . . . . . . . . . . . . . . . . . . . . . . . . . . . . . . . . . . . . . . . . . . . . . . . . . . 1
PRECAUTIONS AND REMINDERS . . . . . . . . . . . . . . . . . . . . . . . . . . . . . . . . . . . . . . . . . . . . . . . . . . . . . 2
IMPORTANT SAFETY INSTRUCTIONS . . . . . . . . . . . . . . . . . . . . . . . . . . . . . . . . . . . . . . . . . . . . . . . . . 3
PREPARATION . . . . . . . . . . . . . . . . . . . . . . . . . . . . . . . . . . . . . . . . . . . . . . . . . . . . . . . . . . . . . . . . . . . . . . 7
ATTACHING THE STAND . . . . . . . . . . . . . . . . . . . . . . . . . . . . . . . . . . . . . . . . . . . . . . . . . . . . . . . . . . . . . . . . . . . 7
PREPARING YOUR LCD TV FOR WALL MOUNTING . . . . . . . . . . . . . . . . . . . . . . . . . . . . . . . . . . . . . . . . . . . 7
TURNING ON THE TV. . . . . . . . . . . . . . . . . . . . . . . . . . . . . . . . . . . . . . . . . . . . . . . . . . . . . . . . . . . . . . . . . . . . . . . 7
PERIPHERAL CONNECTION AND CONTROLS . . . . . . . . . . . . . . . . . . . . . . . . . . . . . . . . . . . . . . . . . 8
PERIPHERAL CONNECTION. . . . . . . . . . . . . . . . . . . . . . . . . . . . . . . . . . . . . . . . . . . . . . . . . . . . . . . . . . . . . . . . . 8
BUTTON CONTROL
. . . . . . . . . . . . . . . . . . . . . . . . . . . . . . . . . . . . . . . . . . . . . . . . . . . . . . . . .
. . . . . . . . . . . . . . . . . . . 8
MAKING CONNECTIONS. . . . . . . . . . . . . . . . . . . . . . . . . . . . . . . . . . . . . . . . . . . . . . . . . . . . . . . . . . . . . 9
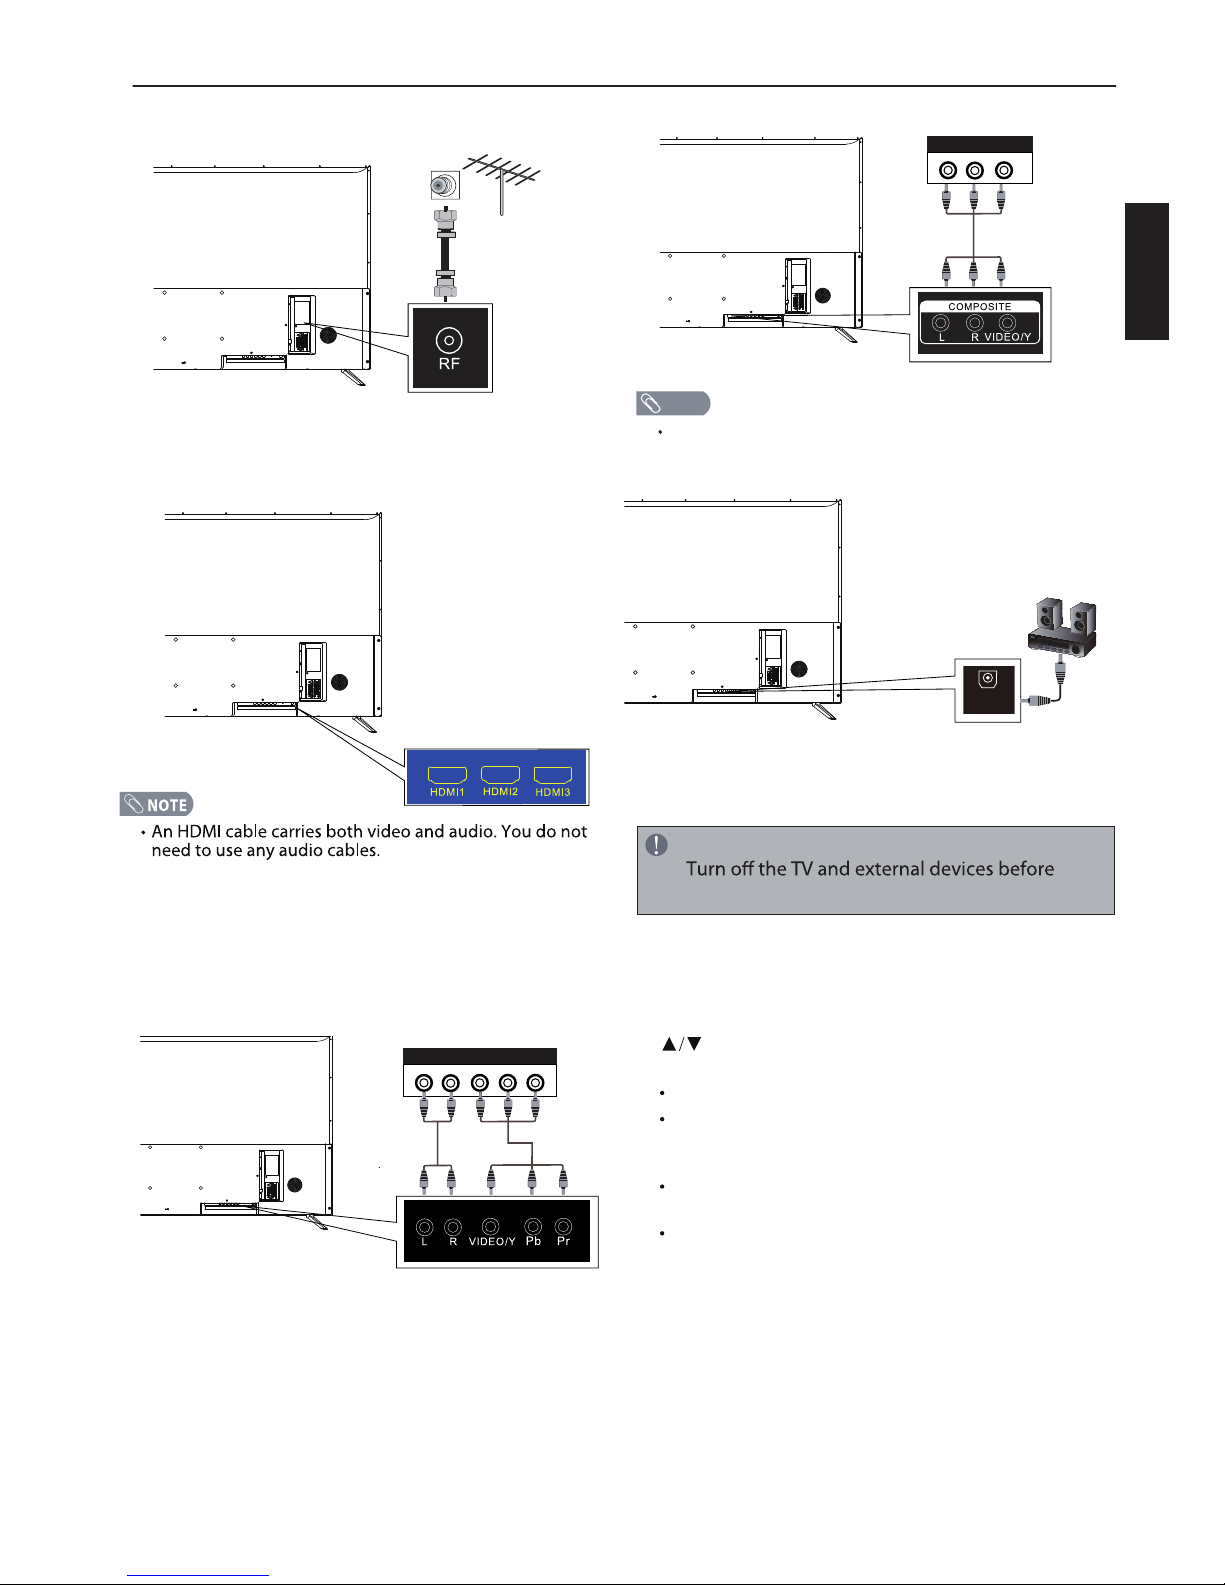
CONNECTING TO AN ANTENNA/CABLE WALL JACK . . . . . . . . . . . . . . . . . . . . . . . . . . . . . . . . . . . . . . . . . 9
CONNECTING EXTERNAL AUDIO/VIDEO DEVICE . . . . . . . . . . . . . . . . . . . . . . . . . . . . . . . . . . . . . . . . . . . . 9
CONNECTING HEADPHONES. . . . . . . . . . . . . . . . . . . . . . . . . . . . . . . . . . . . . . . . . . . . . . . . . . . . . . . . . . . . . . . 9
CONNECTING DIGITAL AUDIO DEVICE . . . . . . . . . . . . . . . . . . . . . . . . . . . . . . . . . . . . . . . . . . . . . . . . . . . . . . 9
OPERATING INSTRUCTIONS . . . . . . . . . . . . . . . . . . . . . . . . . . . . . . . . . . . . . . . . . . . . . . . . . . . . . . . . 10
USING THE REMOTE CONTROL . . . . . . . . . . . . . . . . . . . . . . . . . . . . . . . . . . . . . . . . . . . . . . . . . . . . . . . . . . . . 10
INITIAL SETUP . . . . . . . . . . . . . . . . . . . . . . . . . . . . . . . . . . . . . . . . . . . . . . . . . . . . . . . . . . . . . . . . . . . . . . . . . . . . 11
INPUT SOURCE . . . . . . . . . . . . . . . . . . . . . . . . . . . . . . . . . . . . . . . . . . . . . . . . . . . . . . . . . . . . . . . . . . . . . . . . . . . 11
NAVIGATING THE ON-SCREEN MENU . . . . . . . . . . . . . . . . . . . . . . . . . . . . . . . . . . . . . . . . . . . . . . . . . . . . . . 11
PICTURE. . . . . . . . . . . . . . . . . . . . . . . . . . . . . . . . . . . . . . . . . . . . . . . . . . . . . . . . . . . . . . . . . . . . . . . . . . . . . . . . . . 11
SOUND . . . . . . . . . . . . . . . . . . . . . . . . . . . . . . . . . . . . . . . . . . . . . . . . . . . . . . . . . . . . . . . . . . . . . . . . . . . . . . . . . . . 12
SETTING
. . . . . . . . . . . . . . . . . . . . . . . . . . . . . . . . . . . . . . . . . . . . . . . . . . . . . . . . . . . .
. . . . . . . . . . . . . . . . . . . . 13
CHANNEL
. . . . . . . . . . . . . . . . . . . . . . . . . . . . . . . . . . . . . . . . . . . . . . . . . . . . . . . . . . . . .
. . . . . . . . . . . . . . . . . . . . . . . 13
TIME . . . . . . . . . . . . . . . . . . . . . . . . . . . . . . . . . . . . . . . . . . . . . . . . . . . . . . . . . . . . . . . . . . . . . . . . . . . . . . . . . . . . . 14
LOCK
. . . . . . . . . . . . . . . . . . . . . . . . . . . . . . . . . . . . . . . . . . . . . . . . . . . . . . . . . . . . .
. . . . . . . . . . . . . . . . . . . . . . 14
Cast TV . . . . . . . . . . . . . . . . . . . . . . . . . . . . . . . . . . . . . . . . . . . . . . . . . . . . . . . . . . . . . . . . . . . . . . . . . . . . . . . . . . . 16
TIPS . . . . . . . . . . . . . . . . . . . . . . . . . . . . . . . . . . . . . . . . . . . . . . . . . . . . . . . . . . . . . . . . . . . . . . . . . . . . . . . . . . . . . . 17
LEGAL NOTICES . . . . . . . . . . . . . . . . . . . . . . . . . . . . . . . . . . . . . . . . . . . . . . . . . . . . . . . . . . . . . . . . . . . . . . . . . . 17
PRODUCT SPECIFICATION . . . . . . . . . . . . . . . . . . . . . . . . . . . . . . . . . . . . . . . . . . . . . . . . . . . . . . . . . . 18
TROUBLESHOOTING . . . . . . . . . . . . . . . . . . . . . . . . . . . . . . . . . . . . . . . . . . . . . . . . . . . . . . . . . . . . . . . 19
WARRANTY . . . . . . . . . . . . . . . . . . . . . . . . . . . . . . . . . . . . . . . . . . . . . . . . . . . . . . . . . . . . . . . . . . . . . . . . 20
WARNING
. . . . . . . . . . . . . . . . . . . . . . . . . . . . . . . . . . . . . . . . . . . . . . . . . . . . . . . . . . . .
. . . . . . . . . . . . 21
TABLE OF CONTENTS

7
English
PREPARATION
IMPORTANT: Do not apply pressure to the screen display
area which may compromise the integrity of the display.
The manufacturer’s warranty does not cover user abuse
or improper installations.
ATTACHING THE STAND
IMPORTANT: The stand of the TV must be assembled
prior to usage.
1.
(blanket, foam, cloth, etc.) to prevent any damage to
the TV.
PREPARING YOURLCD TVFOR WALLMOUNTING
We suggest that you keep your TV at least 2.36 inches
(60 mm) from the wall to prevent cable interference.
Before mounting your TV on the wall, you need to
remove the stand.
For your safety, please use only with a UL listed wall
mount bracket with minimum weight of the TV without
stand. (Please see page 18 for the weight of the TV.)
To attach a wall mount bracket to your TV:
1. Remove the screws holding your TV to the stand.
2. Remove the stand from your TV.
3. Secure the wall mount bracket to the back of your TV
using four screws (see page 18 for the size of the
screws). Follow the instructions of the user manual
that came with the wall mount bracket to install.
TURNING ON THE TV
1. Install the stand and place the TV on a solid surface.
Ensure that the TV is placed in a position to allow free
back cover.
To prevent any unsafe situations, no naked sources,
such as lighted candles, should be placed on or in the
vicinity.
Avoid heat, direct sunlight and exposure to rain or water.
The equipment shall not be exposed to dripping or
splashing.
2. Connect the antenna cable or cable TV cable to the
ANT IN aerial socket on the back of the TV set. See
"CONNECTING TO AN ANTENNA/CABLE WALL JACK"
on page 9.
3. Remote control:
Remove the cover of the battery compartment.
Insert the 2 supplied batteries (Type AAA 1.5V).
4. Power:
Plug the cord into a working power outlet.
5. Turn the TV on:
Press on the remote control or POWER button on
the side control panel of the TV.
NOTE
The wall mount bracket are not included.
Min
1 m
NOTE
M4x24 mm
(4pcs )
2.
Fix the stand to the bottom of the TV with
the four M4 X 24 mm screws.
8
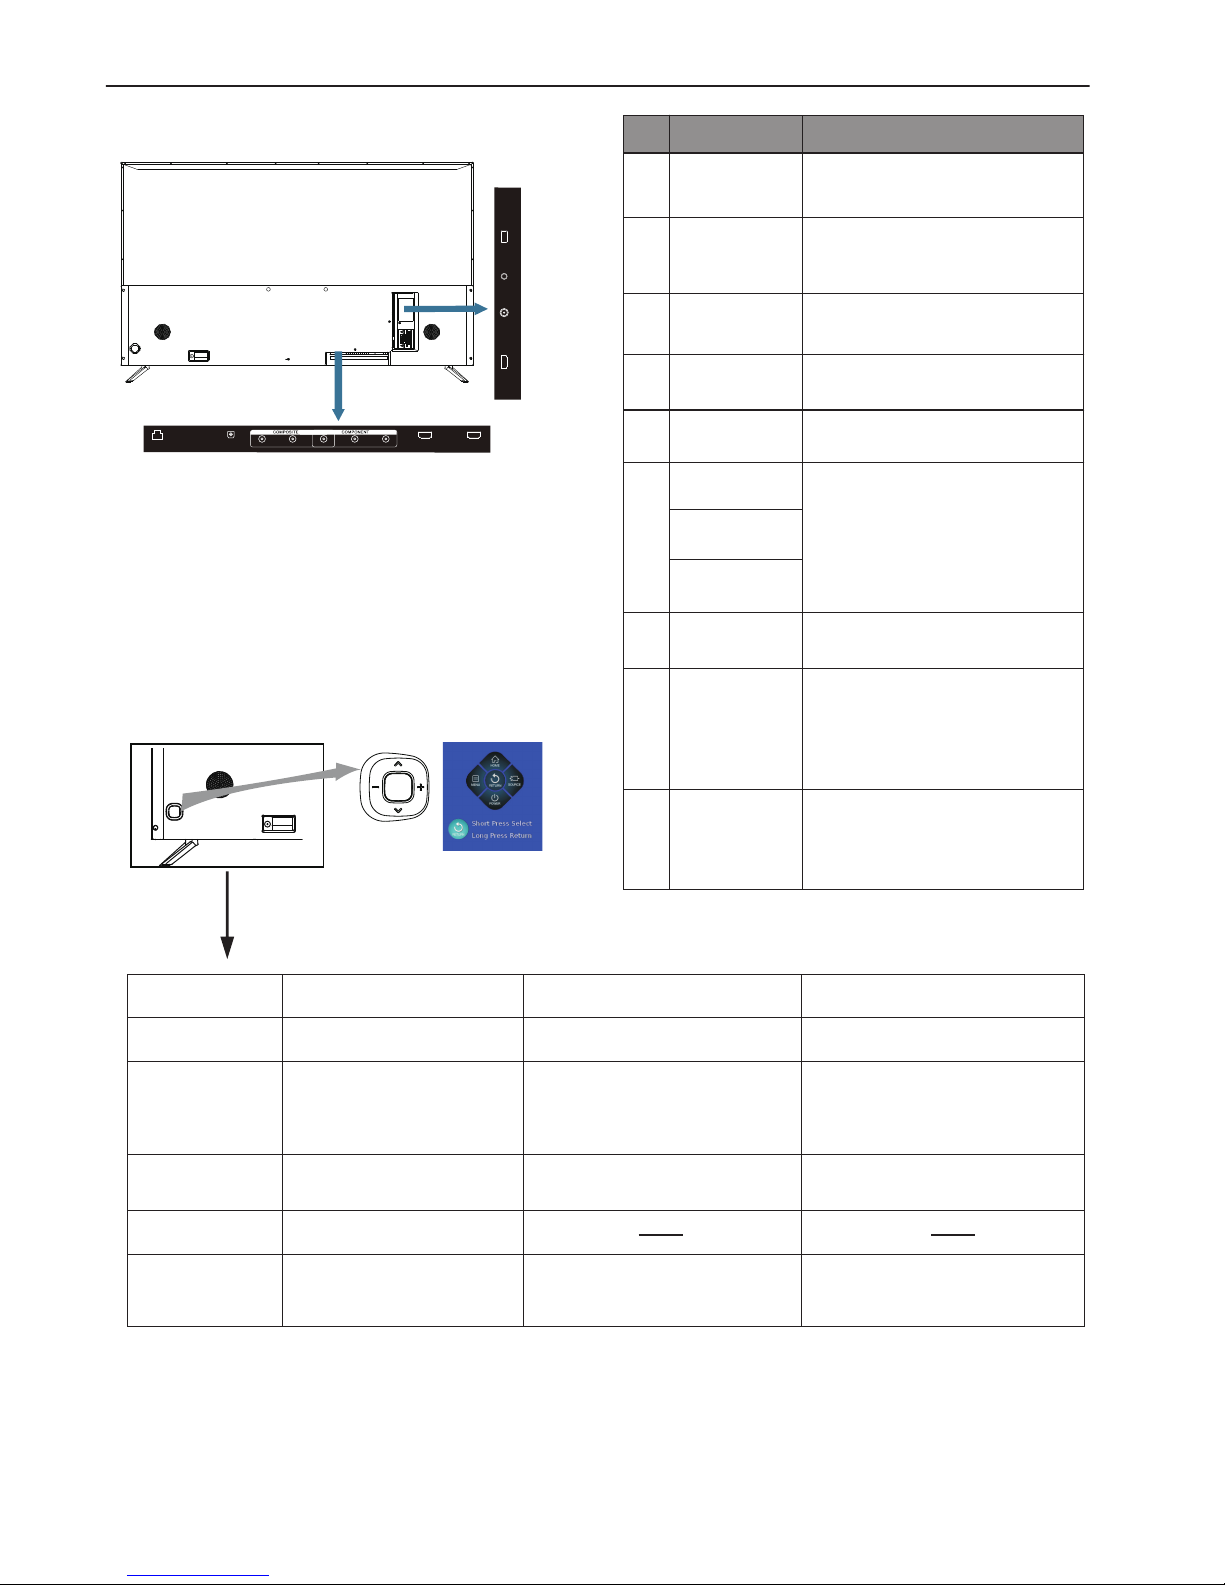
PERIPHERAL CONNECTION AND CONTROLS
LORTNOC
BUTTON
NOITCENNOCLAREHPIREP
# Item Description
2
3
Optical Out
1
RJ45
Connect a optical audio cable
Connect the interface of the
network card.
from a sound bar, stereo system,
receiver, etc.
4
Headphone
Connect headphones to this jack.
Connect the power adaptor .
When headphones are inserted,
the TV speakers will be muted.
5
RF
Connect an antenna or cable TV
cable to this jack.
6
7
8
USB
Insert the USB storage device into
the USB port to upgrade the
system.
9
VIDEO
Connect the video cable for a
composite device.
L
R
Connect the audio cables for a
co mponent or composite device.
YPbPr
Connect the video cables for a
component device.
HDMI1
HDMI2
HDMI3
Connect HDMI devices to these
jacks. An HDMI cable carries both
video andsound. You do notneed
to make an audio connection for
an HDMI device.
HDMI1 HDMI2
(ARC)
Y/VIDEO PbL PrR
OPTICAL OUTRJ45
HDMI3 RF HEADPHONE USB
BACK
On analog and digital TV, the channel
can be switched on and off.
In the absence of audio playback state,
press the volume up / down control.
Open the navigation menu
Navigation menu status
(If this model does not
have the corresponding
function, the icon is grey
and not optional)"
No dispaly in TV
TV Status Middle key Pull Up/Down Pull Left/Right
Navigation menu
Press to open the navigation menu,
press again to close the menu. If there is
no operation, the menu automatically
disappears after 5 seconds.
Press to enter the home page, standby,Press
the corresponding button, the corresponding
icon highlighted, to remind the user has been
operating successfully, and to achieve the
corresponding functions.
Press to enter the menu, input source,Press the
corresponding button, the corresponding icon
highlighted, to remind the user has been
operating successfully, and to achieve the
corresponding functions.
Menu, Home, or
Application status in TV
confirmation key on the remote control.
Short press for confirm,equal to the
return key on the remote control.
Long press to return, equal to the
to the Up/Down key on the remote control.
Achieve up and down buttons function,equal Achieve left and right buttons function,equal
to the Left/Right key on the remote control.
the standby state
Press to power on
Other states
key on the remote control. If the media video
player, can be played and suspended, and
pop-up setting menu.
Press to confirm,equalto theconfirmation
to the Pull Up/Down key on the remote control.
Achieve up and down buttons function,equal
Achieve left and right buttons function,equal to the
Left/Right key on the remote control. If it is in the
case of the pop-up media video player setting menu,
achieve fast forward and fast rewind function.
9
MAKING CONNECTIONS
CONNECTING TO AN ANTENNA/CABLE WALL
JACK
Using component cables (better)
Using composite cable (good)
Cables are often color-coded to match color-coded jacks.
CONNECTING OPTICAL OUT
NOTE
NOTE
making connections.
English
COMPONENT OUT
L R Y PBP
R
OPT ICAL
OUT
COMPOSITE OUT
L R VIDEO
CONNECTING EXTERNAL AUDIO/VIDEO DEVICE
Using HDMI cable (best)
To play from the external device:
1. Turn on the TV and the connected device.
2. Press INPUT to open the input source list, then press
to highlight the input to which the device was
connected and press OK to switch.
Select TV to watch TV from the RF input.
Select HDMI1, HDMI2,HDMI3
to play
from a device connected to the HDMI1,
HDMI2,HDMI3
input.
Select Composite to play from the device
connected to the COMPOSITE input.
Select Component to play from the device
connected to the COMPONENT input.
10
OPERATING INSTRUCTIONS
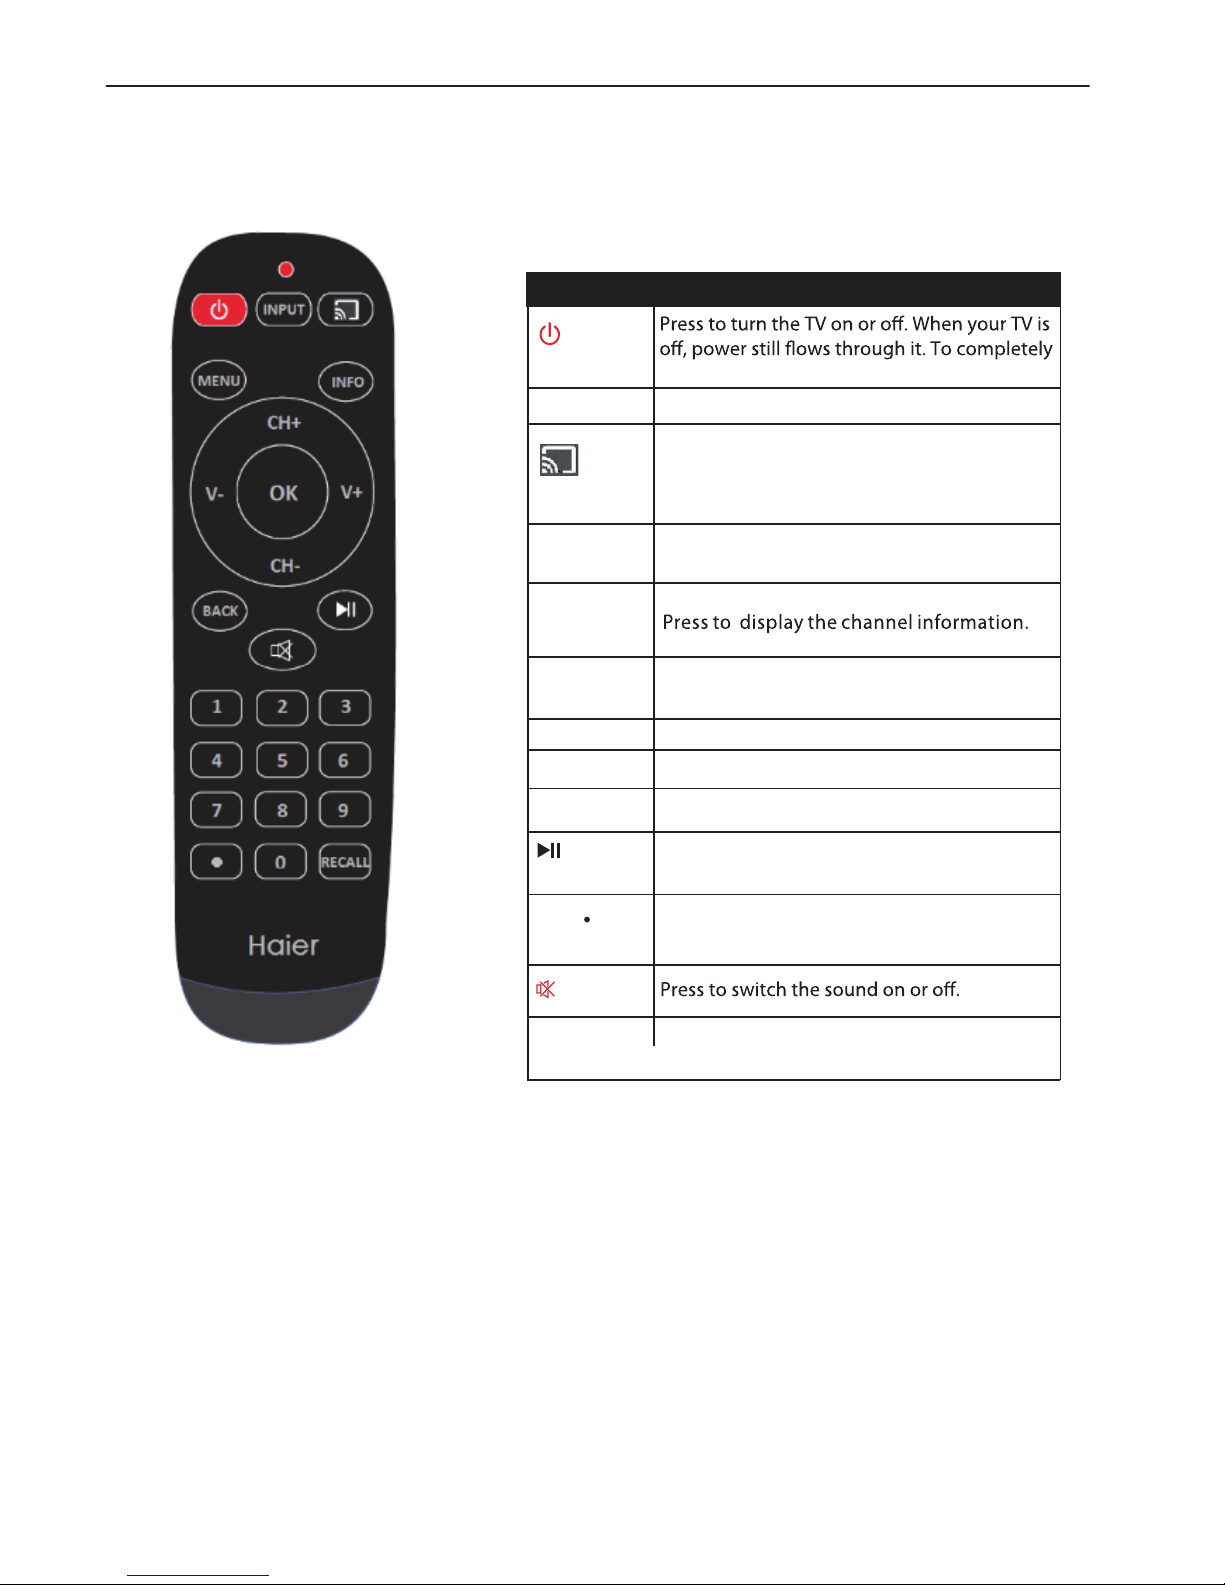
USING THE REMOTE CONTROL
Item Descriptions
Power
OK
Enter the selected option or perform the
selected operation.
0~9 /
number
Press to enter a TV channel number
(Press "." to choose the sub-channel).
Chromecast
Press to switch to Chomecast input (Cast TV
mode)
INPUT Press to open the input source list.
Press to open or close the on-screen
Press to play or pause in chromecast mode .
m
enu.
CH+/CH -
Press CH+ or CH- to change TV channels.
VOL+/VOL-
Press VOL+ or VOL- to adjust volume level.
RECALL Press to switch to last viewed channel.
MENU
INFO
BACK Return to the previous menu.
disconnect power, unplug the power cord.
MUTE
PLAY/PAUSE
11
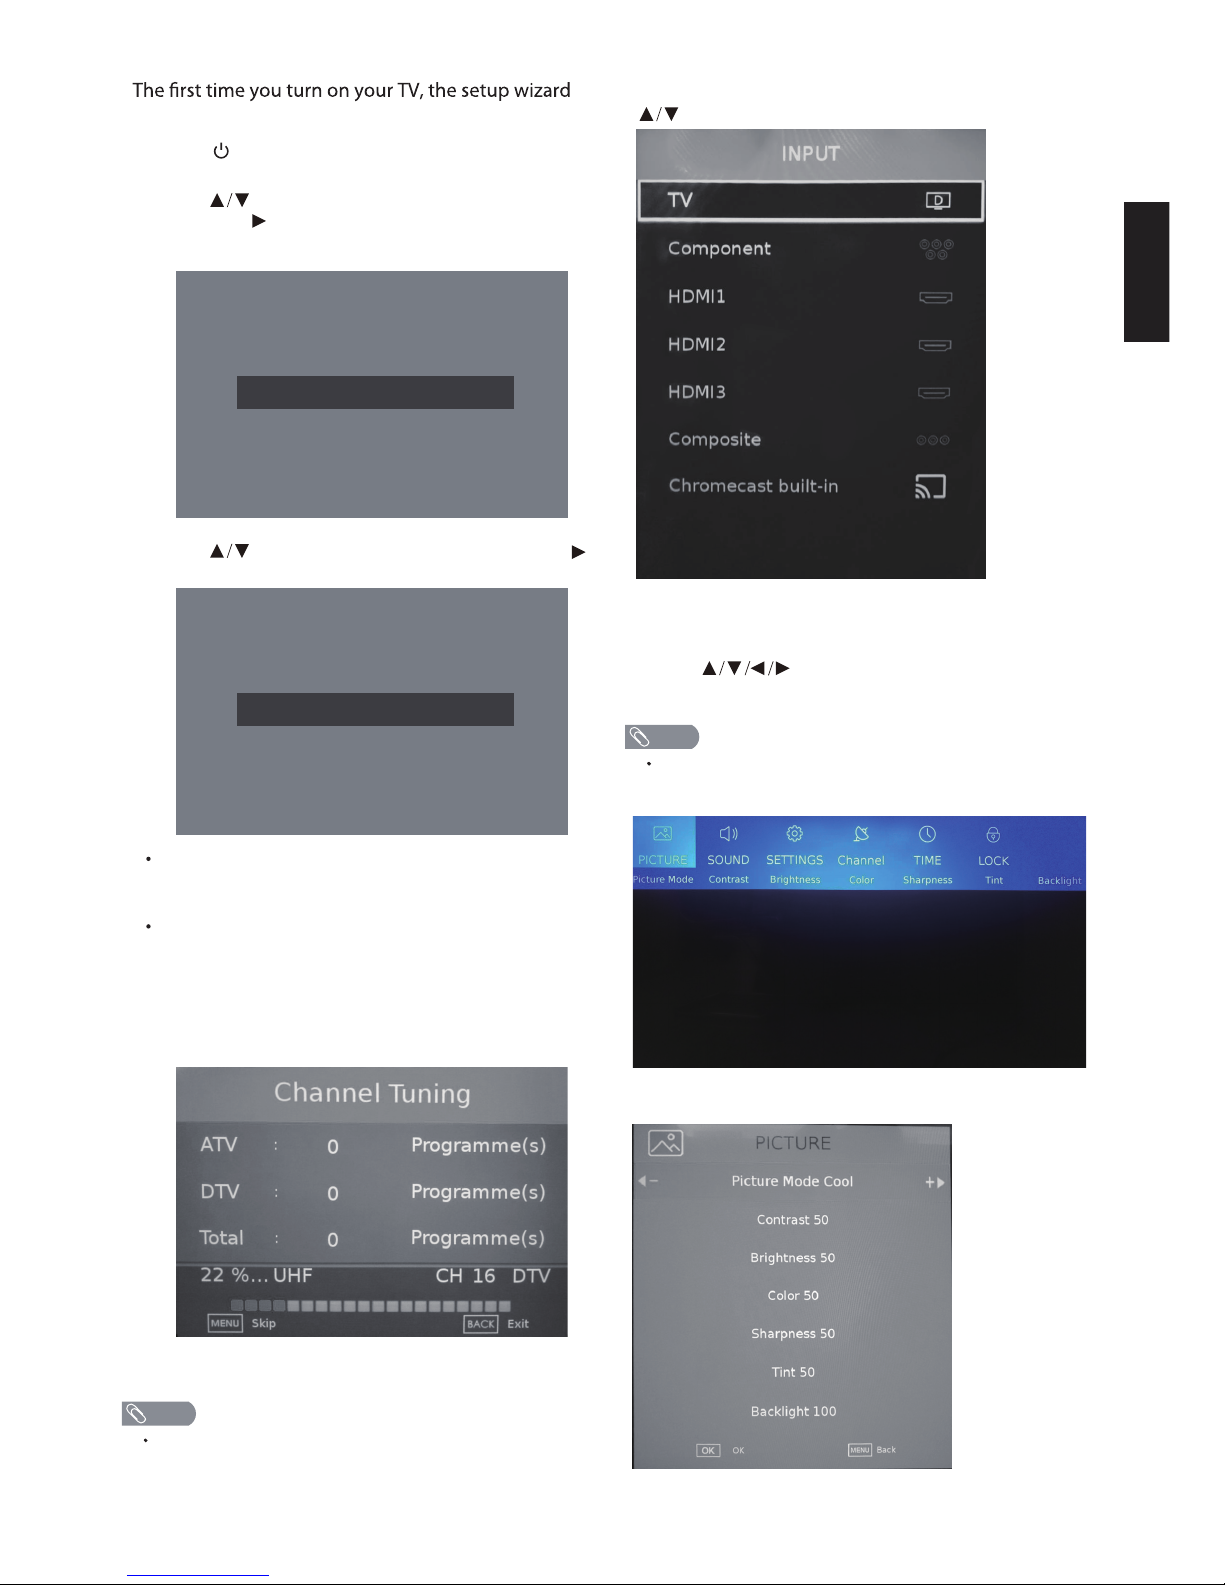
INITIAL SETUP
will guide you through setting up basic settings.
1. Press to turn on the TV. The setup wizard screen
opens. Press OK to start the wizard.
3.
Press to select your tuner type, then press
to start channel scan.
Air – Set the signal type to antenna. When set to
Air, the TV can receive analog and digital (ATSC)
broadcasting signals.
Cable – Set the signal type to cable. When set to
Cable, the TV can receive analog and QAM
broadcasting signals.
6. The auto channel scan usually takes a few minutes
to complete but can take up to 20 minutes. You can
cancel the channel scan by pressing
EXIT.
During initial setup, press EXIT to exit the initial setup.
INPUT SOURCE
Press INPUT to open the input source list, then press
to highlight an input and press OK to
switch.
NAVIGATING THE ON-SCREEN MENU
1. Press MENU button to display the main menu.
2. Press button to select what you want set.
3. Press OK to enter setting.
Press MENU to return to the previous menu. If the main
menu is displayed, pressing MENU will close the onscreen menu.
egaugnaLputeSlaitinI
p
Welcome
uteSlaitinI
Home mode
Store Mode
p
Welcome
uteSlaitinI
NOTE
NOTE
2. Press to select Home Mode or Store Mode,
then press to continue.
PICTURE
English
Air
Cable
Auto Volume Level, then press button to choose
12
Picture Mode – Select the picture mode. You can select:
Standard – A standard picture. The contrast,
brightness, and sharpness are moderately increased.
Vivid – A bright and vivid picture. The contrast,
brightness, and sharpness are
increased.
Mild – A soft picture. The brightness, contrast and
sharpness level are lowered.
User – Customized picture. Picture settings such as
brightness, contrast, and color are manually
adjusted.
Manually adjusting picture settings will automatically
change the Picture Mode to User.
Brightness – Adjust the brightness of the dark areas of
the picture. Press to darken the picture. Press
to brighten the picture.
Contrast – Adjust the brightness of the light areas of
the picture. Press to decrease the contrast. Press
to increase the contrast.
Color – Adjust the color intensity of the picture.
Tint – Adjust the color balance of the picture. Press
to increase the red tones. Press
tones.
to increase
the green
Sharpness – Adjust the color details of picture. Press
to soften the picture. Press to sharpen the
picture.
Color
Aspect Ratio
Temperature
Adjust the overall color of the image.
Press ▼ ▲ to select Aspect Ratio, press to select.
(Optional:Auto, 16:9, 4:3, Zoom1, Zoom2 ).
Press to select Color Temperature , press to
select.(Optional: Cool, Normal, Warm).
Cool Produces a gentle blue-hued image.
Normal Produces a vivid image.
Warm Produces a red-hued image.
NOTE
SOUND
Sound Mode – Select the sound mode. You can select:
Standard – Balanced treble and bass. This setting is
good for watching standard TV broadcasts.
Music – Increase the treble and bass and preserve
the original sound. This setting is good for listening
to a musical program.
Movie – Moderately decrease and enhance treble
and bass for a rich sound experience.
User – Let you manually adjust sound settings.
Sports– Enhances vocals for sports.
Manually adjusting audio settings will automatically
change the Sound Mode to User.
Balance –
Adjust
Auto Volume Level – Press button to select
the
balance
between
the left andright
audio channels.
Bass – Adjust the low frequency sound. Press to
decrease bass. Press to increase the bass.
Treble
– Adjustthe high frequency sound. Press to
decrease treble. Press to increase the treble.
NOTE
Digital Output
– Press button to select digital
Auto – Pass through the original digital audio sound.
PCM – Output audio in 2-channel stereo.
When “ON” is selected, the volume will attempt to stay
at a constant.
output, then press to select.(Options:PCM, Auto, Off)
ON/OFF.
Energy Saving – The backlight brightness is
decreased to save energy.
Noise Reduction
Setting the option to eliminate image noise intensity.
Press ▼ ▲ to select Noise Reduction, press to select.
(Optional:Off, Weak, Middle, Strong, Auto ).
120 Full Motion-Adjust the 120 Full Motion of picture.
You can select Off、On.
, then press button to choose
Surround – Press button to select Surround
ON/OFF.
then press button to select.
(Optional:Default, 1.4, 2.0 )
Active Standby Mode Off, then press button to
choose
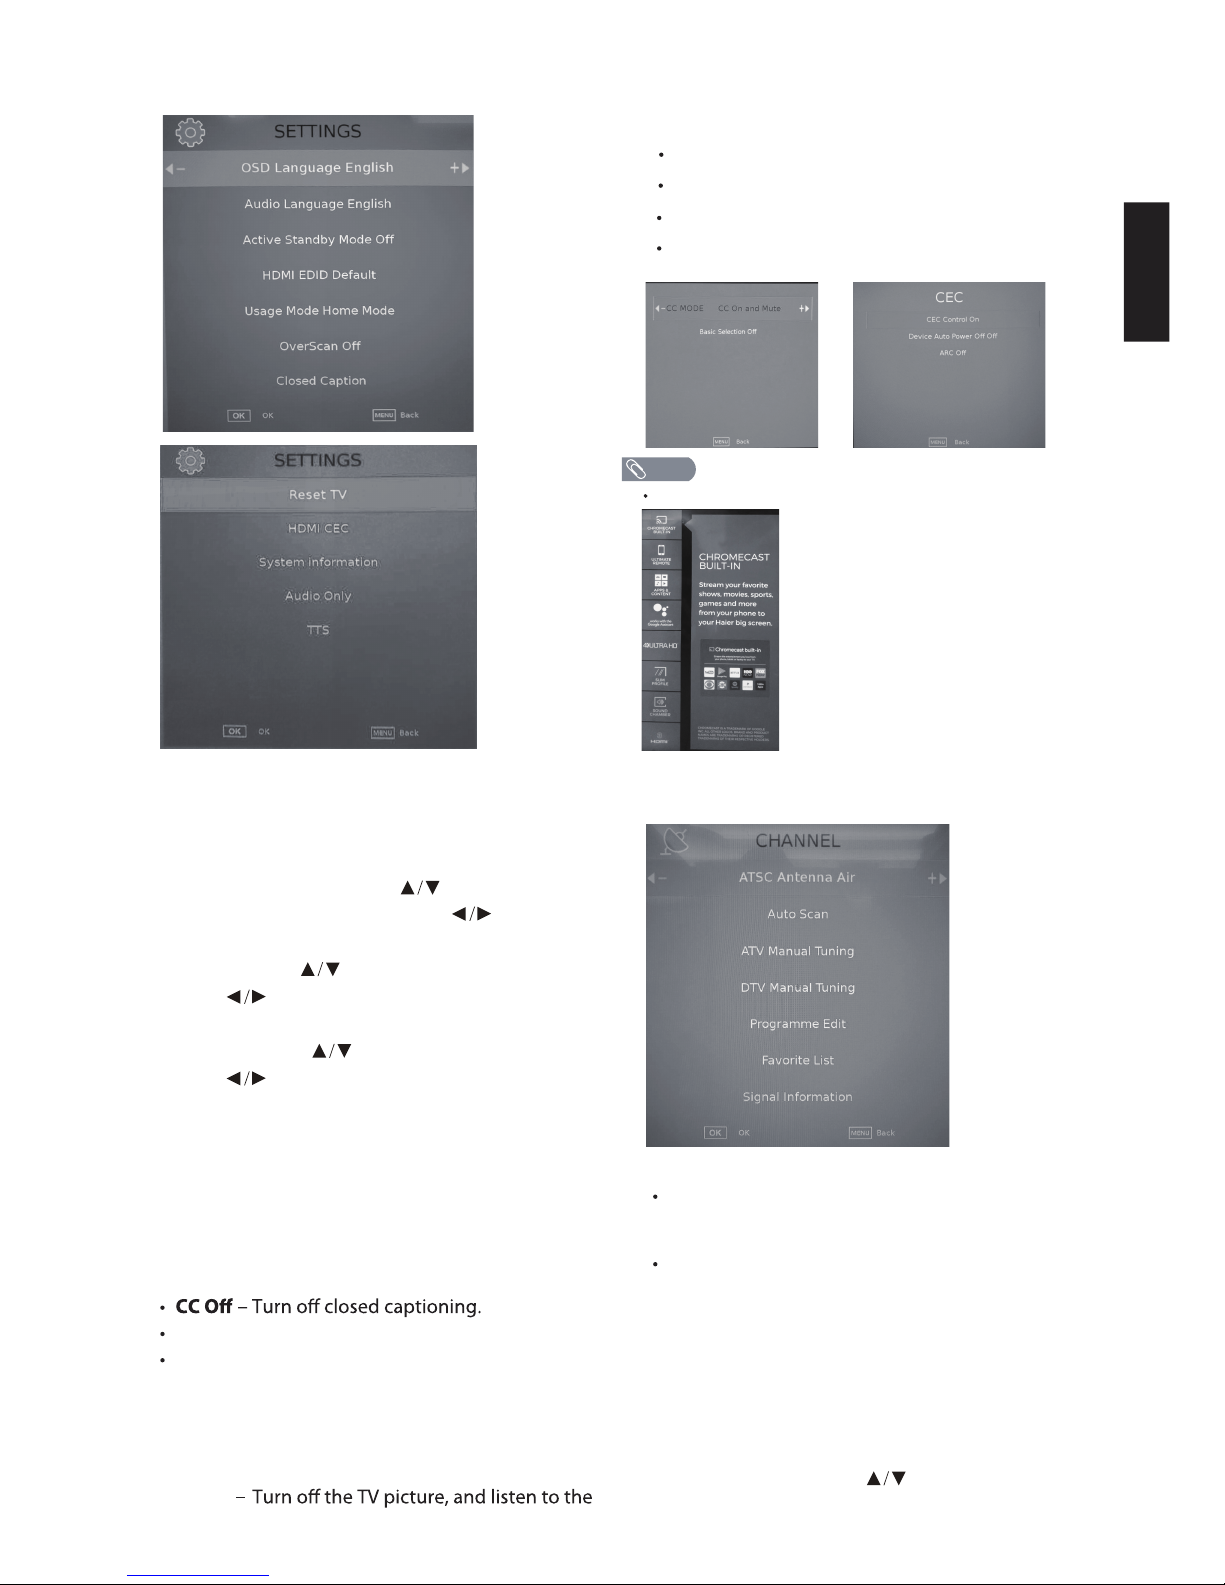
SETTINGS
When in shop mode, the following label will show up.
NOTE
13
English
CHANNEL
Air/Cable – Select the signal type.
Air – Set the signal type to antenna. When set to Air,
the TV can receive analog and digital (ATSC)
broadcasting signals.
Cable – Set the signal type to cable. When set to
Cable, the TV can receive analog and QAM
broadcasting signals.
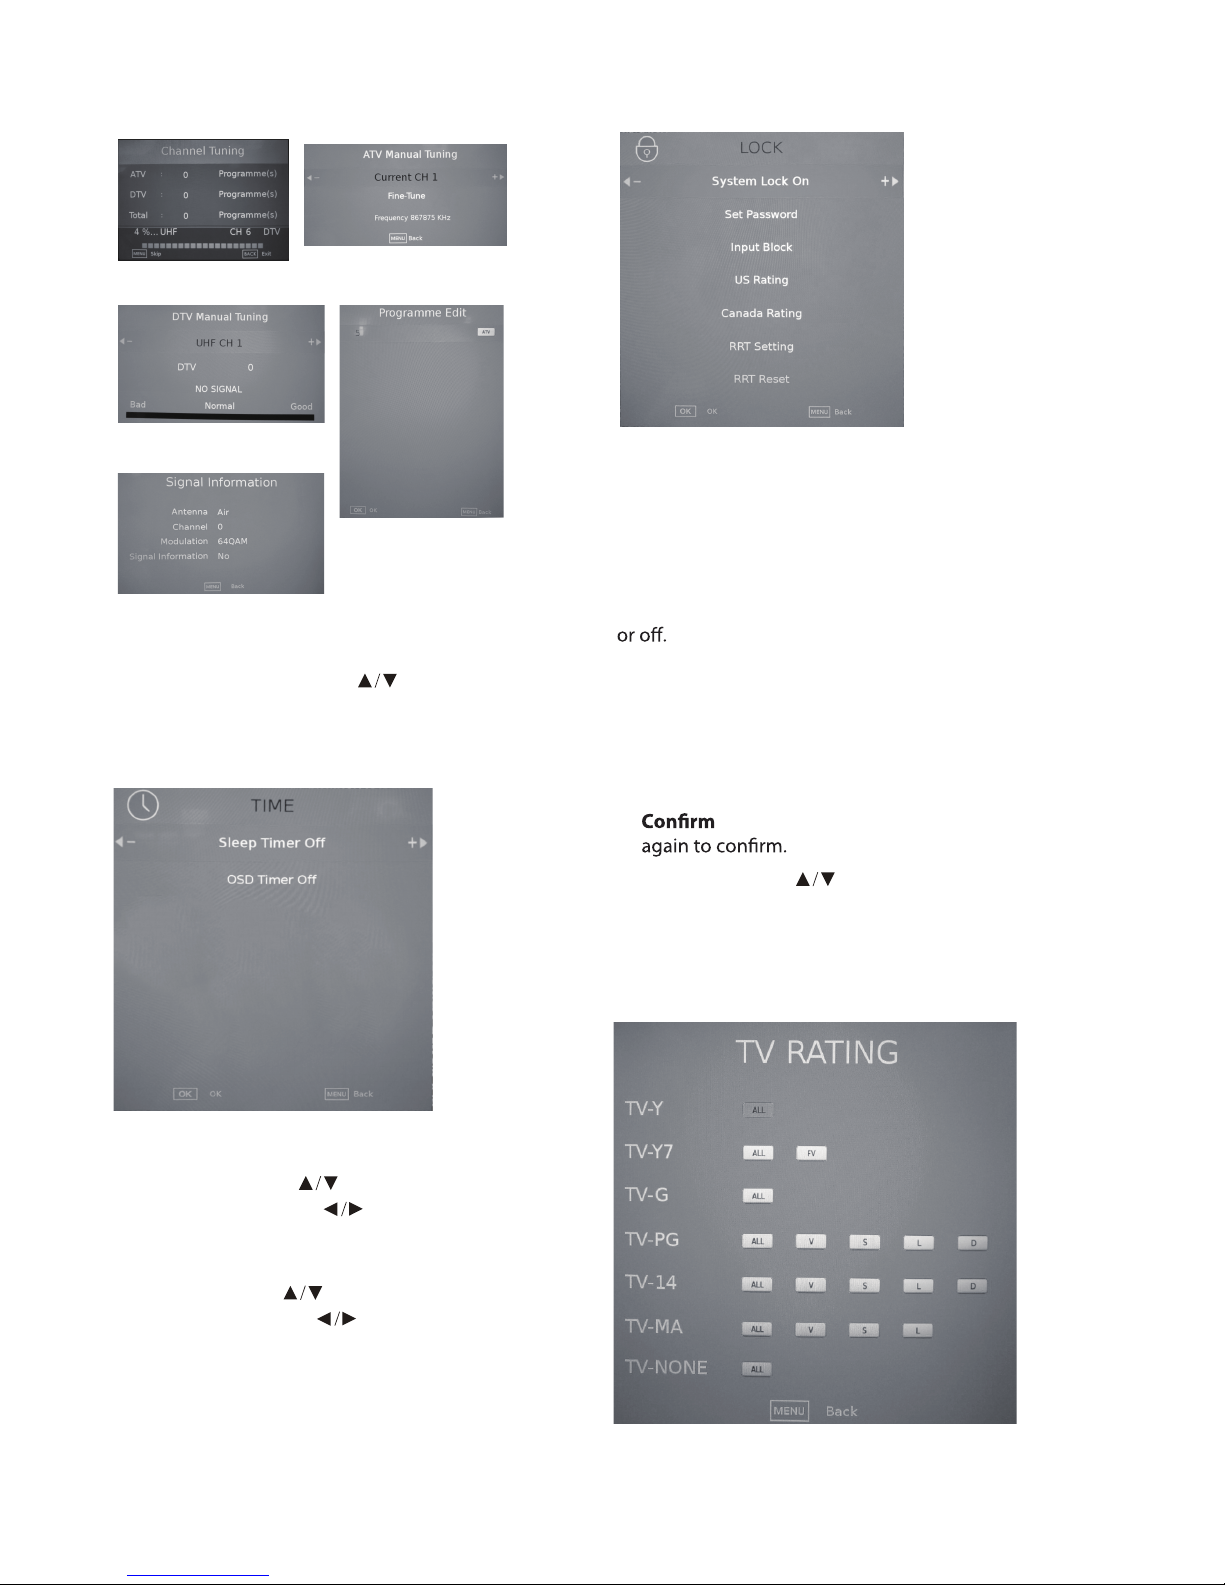
Auto Scan – Press OK to start the auto channel scan.
ATV Manual Tuning – Press OK to start the ATV
Closed Caption – Adjust the closed captioning settings.
CC Mode – Select closed captioning mode. You can
select:
CC On – Turn on closed captioning.
CC on Mute – Turn on closed captioning when the
sound is muted.
OSD Language – Select on-screen display OSD
language. You can select English/Français/Español.
Audio Language – Select on-screen display Audio
HDMI EDID –
Press button to select HDMI EDID,
language. You can select English/Français/Español.
Reset TV
TTS
– Reset all settings to the factory defaults.
HDMI CEC
–Press OK button to enter CEC Control
Active Standby Mode – Press button to select
ON/OFF.
then press button to select.
(Optional:Home Mode, Shop Mode )
Usage Mode – Press button to select Usage Mode,
Please refer to the real TV specific picture.
submenu.
Manual Tuning.
DTV Manual Tuning – Press
Programme Edit
– Press button to select
OK to start the DTV
Manual Tuning.
editing programs, press OK to enter the sub-menu.
Audio Only
audio.
TTS – Select On or Off.
Pitch – Select Mid/High/Low.
Volume – Select Mid/High/Low.
Rate Support – Select Mid/Fast/Slow.
– Press OK button to enter sub-menu:
Over Scan – Extend part of the display past the visible
area of the screen. The resulting picture will “zoom in”
on the image center.
Auto Scan ATV Manual Tuning
DTV Manual Tuning
Favorite List -Add and skip channels in your
favorite channel list.
14
LOCK
1. Press OK to enter password.
2. Use the number buttons on the remote control to
enter your 4-digit password. The default password is
“0000”.
3. After the correct password is entered, the Lock submenu screen opens.
Set Password – Press OK to set a new 4-digit password.
Enter Old Password – Enter your old 4-digit
password.
Enter New Password – Enter your new 4-digit
password.
Password – Enter your new 4-digit password
System Lock – Turn the US and Canada rating limits on
Input Block
US Rating – Set the U.S. rating limits.
TV – U.S. TV ratings. The TV ratings compose of two
aspects: age-based and content-based.
Time – Adjust the time settings.
Sleep Timer
then press button to select.
(Optional:off, 10min, 20min, 30min, 60min,
120min, 180min, 240min )
TIME
Programme Edit
– Press button to select
Sleep Timer ,
OSD Timer
then press button to select.
(Optional:off, 5s, 10s, 15s, 20s )
– Press button to select
OSD Timer ,
Signal Information
Signal Information
– Press button to select
editing programs, press OK to enter the sub-menu.
– Press button to select Input Block
, press OK to enter the sub-menu.
15
English
TV rating levels
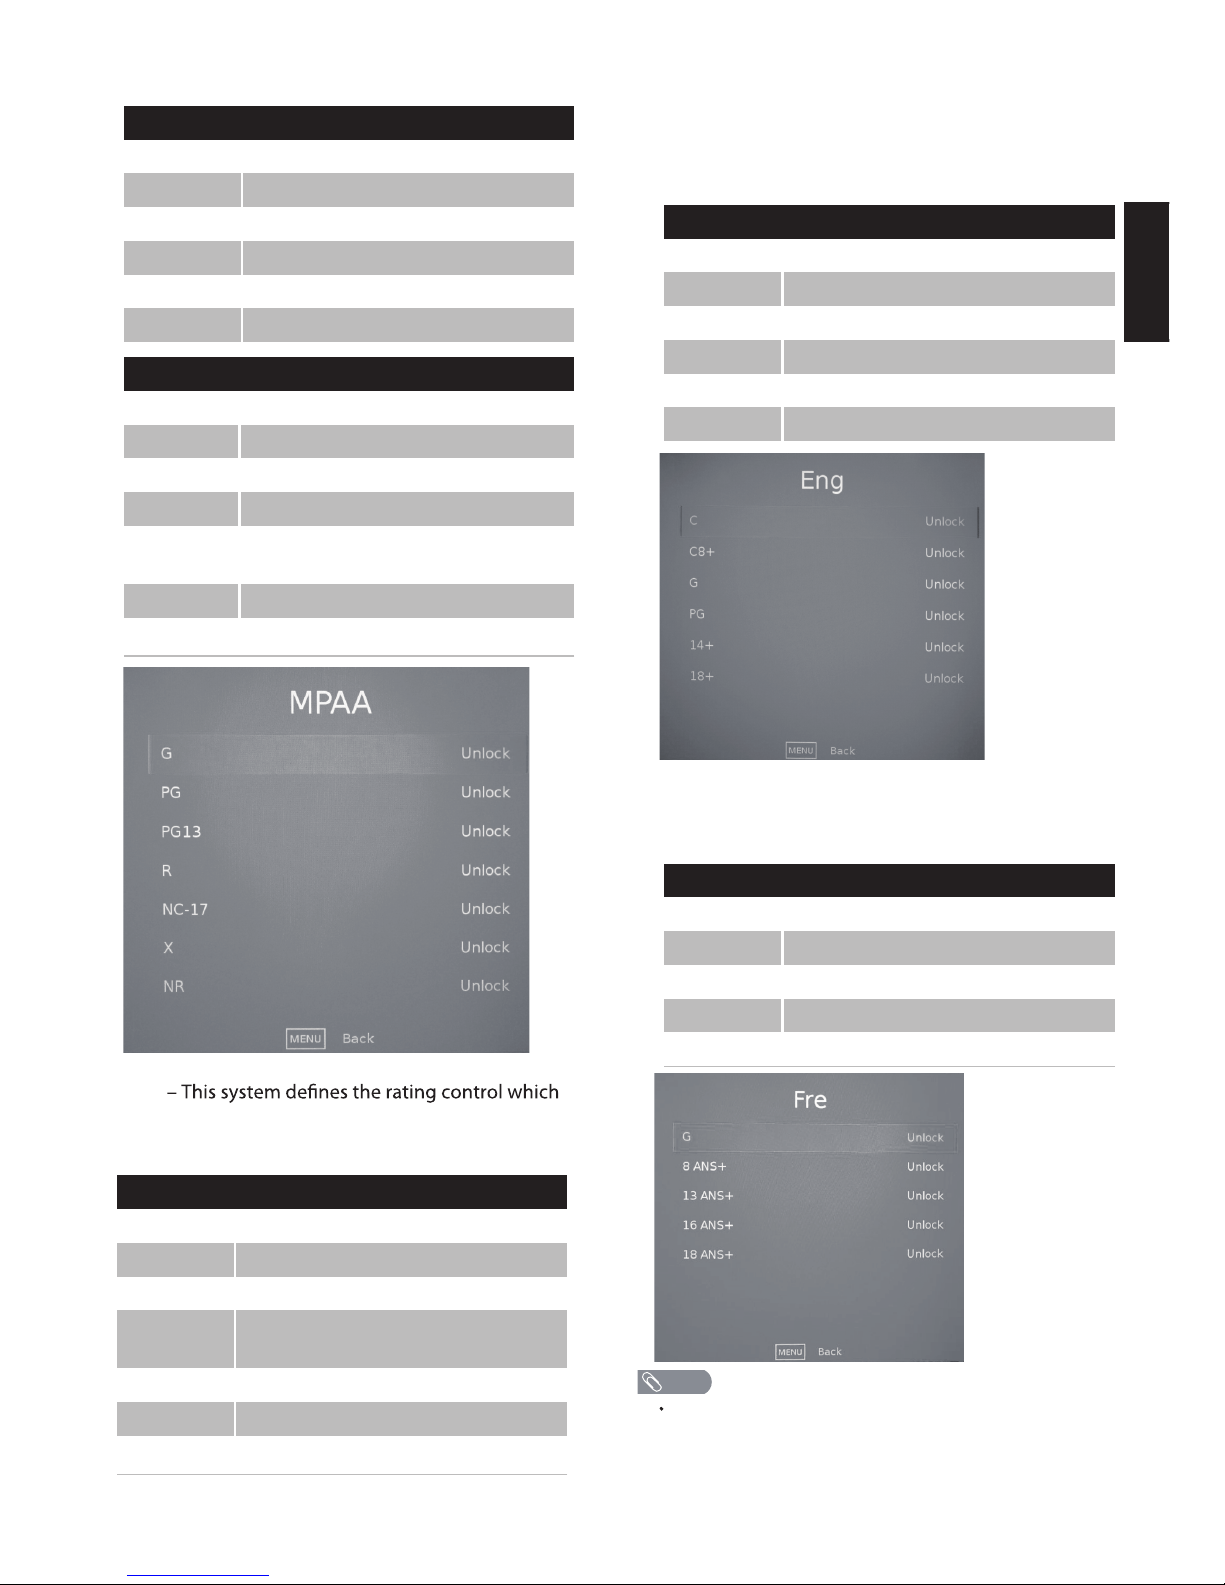
MPAA
comes from MPAA rules.
MPAA rating levels
Canada Rating – Set the Canada rating limits.
Canada English – The ratings are for programs using
the English rating system.
Canada English rating levels
Canada French – The ratings are for programs using
the French rating system.
Canada French rating levels
When a rating is locked, that rating and all other higher
ratings are locked. When a rating is unlocked, that rating
and all lower ratings are unlocked.
RRT Setting – Adjust RRT settings.
Reset RRT – Reset RRT settings to the factory default.
U.S TV ratings (content-based)
ALL All ratings
FV Fantasy violence
V Violence
S Sexual situations
L Strong language
D Suggestive dialog
U.S TV ratings (age-based)
TV-Y All children.
TV-Y7 Suitable for children 7 and older.
TV-G General audiences.
TV-PG Parental guidance suggested.
TV-14
Parental guidance strongly
suggested.
TV-MA Mature audiences onl
TV-NONE ALL ages.
NR Not rated.
y.
U.S movie (MPAA) ratings
G General audiences.
PG Parental guidance suggested.
PG-13 Suitable for children 13 and older.
R
Parental guidance suggested for
children under 17.
NC-17 Not suitable for children under 17.
X Adults only.
Canadian English ratings
C Suitable for all children.
C8+ Suitable for children 8 and older.
G General audiences.
PG Parental guidance suggested.
14+ Suitable for children 14 and older.
18+ Adults only.
Canadian French ratings
G General audiences.
8 ans+ Suitable for children 8 and older.
13 ans+ Suitable for children 13 and older.
16 ans+ Suitable for children 16 and older.
18 ans+ Adults only.
NOTE
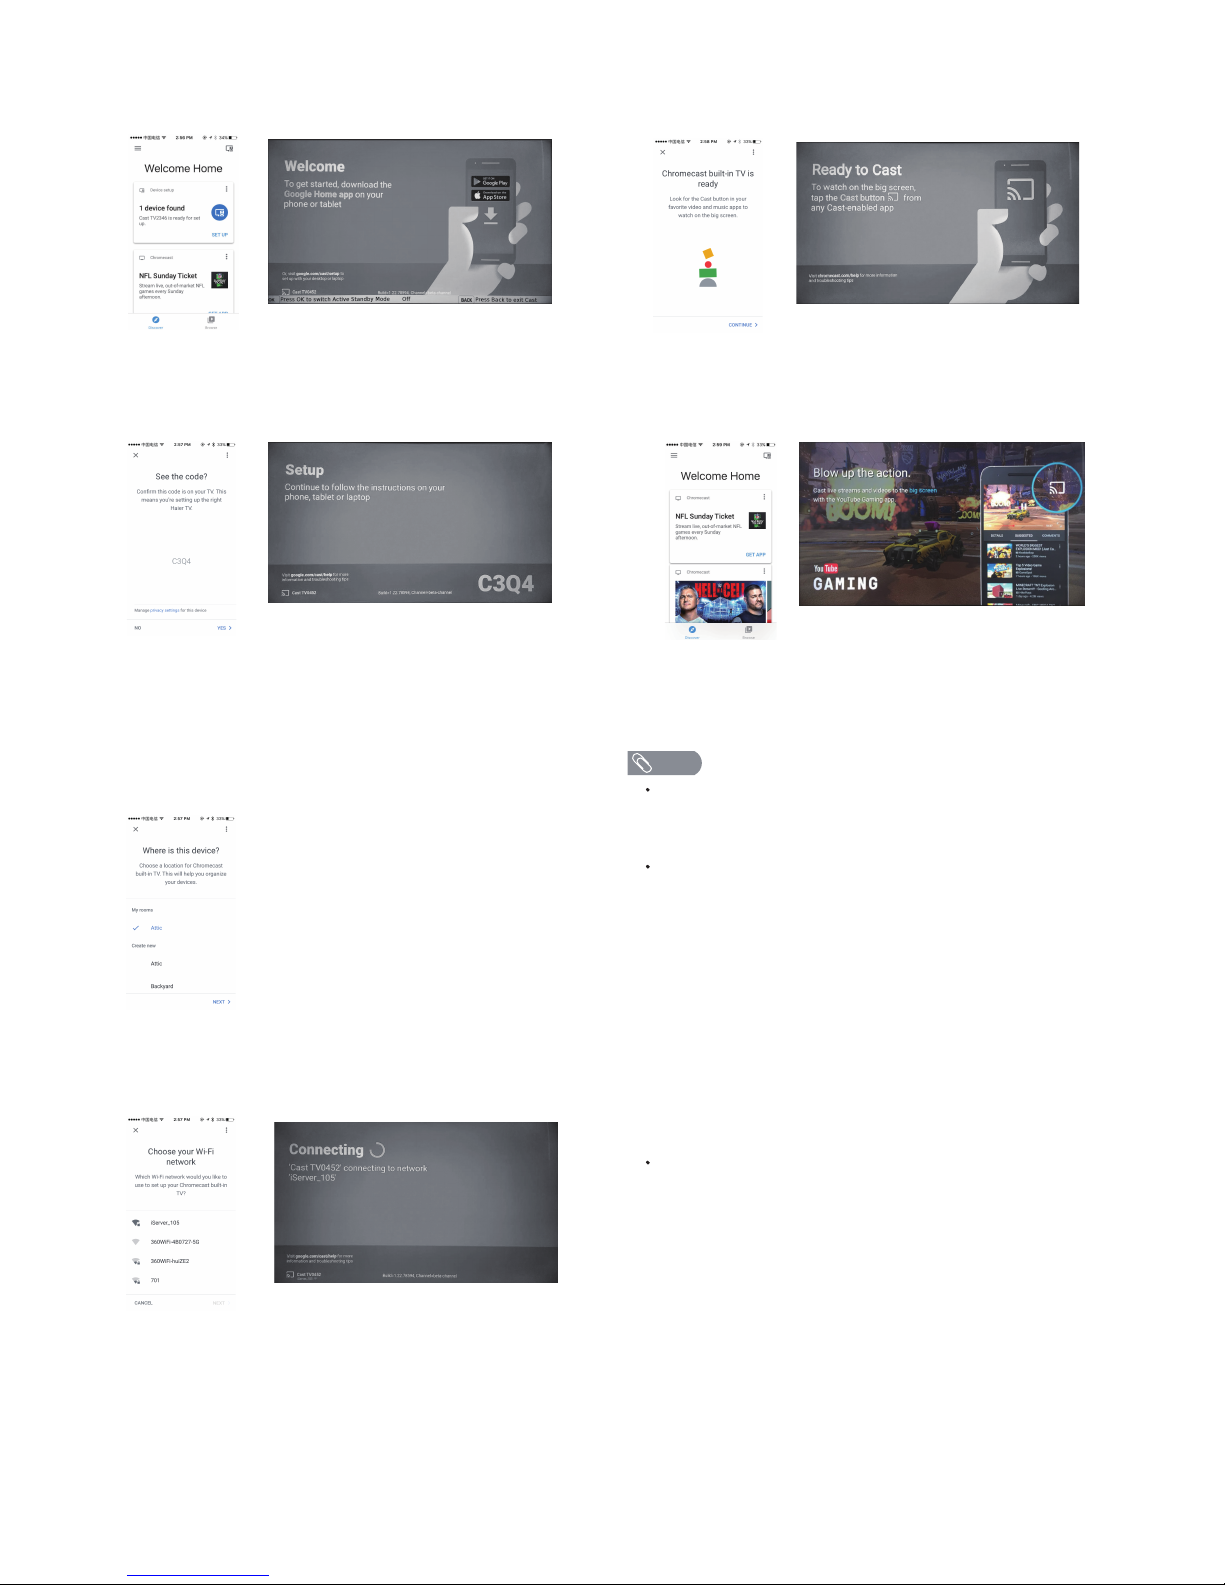
1. Open GoogleHome on your mobile device and find
the device .
The version of the Android device uses Android 5.1 or
above as much as possible. Ios device Make sure Bluetooth
is on before connecting to Cast.
The above shows the use of IOS phone for mobile devices,
Android device interface and operating procedures will be
slightly different.
Mobile can not find CAST TV in GoogleHome
Possible reasons are as follows:
1. If it is IOS phone, may be the phone Bluetooth is not
open, please open the phone Bluetooth, re-view the device
list.
2. TV board connected to the wired network, and wired
network with the mobile phone WIFI connected to the
network is not a network, so the phone can not find this
TV device. Please unplug the cable network and restart the
TV device, so that the phone through the WIFI to TV
equipment.
3. TV Wifi module is not working properly or antenna
signal is weak.
NOTE
16
Cast TV
TV sideMobile terminal
2. Select the device, follow the prompts to continue,
when the Mobile terminal and TV display as shown in the
state when the phone connected TV success. Please
confirm the verification code.There will be a process of
rotation waiting in the process, please be patient.
3. Choose a location for Chomecast bulit-in TV. This
will help you organize your devices.
4. Choose a Wi-Fi network to use to set up Chomecast
bulit-in TV.
TV sideMobile terminal TV sideMobile terminal
TV side
Mobile terminal
Mobile terminal
5. Chromecast buile-in TV is ready.
6. Open the App's Cast icon, and then select the Cast
TV, the connection is successful, click to play the video,
the TV will be able to load the normal playback.
TV sideMobile terminal

17
English
TIPS
Care of the screen
Do not rub or strike the screen with anything hard as
this may scratch, mar, or damage the screen
permanently.
Unplug the power cord before cleaning the screen. Dust
the TV by wiping the screen and the cabinet with a soft,
clean cloth. If the screen requires additional cleaning,
use a clean, damp cloth. Do not use liquid cleaners or
aerosol cleaners.
Mobile telephone warning
To avoid disturbances in picture and sound,
malfunctioning of your TV or even damage to the TV,
keep your mobile telephone away from the TV.
End of life directives
We are paying a lot of attention to produce
environmentally friendly products. Your new television
contains materials, which can be recycled and reused.
At the end of its life, specialized companies can
dismantle the discarded receiver to collect the
reusable materials and to minimize the amount of
materials to be disposed of.
Please ensure you dispose of your old receiver
according to local regulations. Haier is committed to
safely recycling electronic products and product
materials. Please check for a local recycling location in
the United States at: 1800RECYCLING.COM.
LEGAL NOTICES
Modications
The FCC requires the user to be notified that any
changes or modifications made to this device that are
not expressly approved by our company may void the
user’s authority to operate the equipment.
Cables
Connections to this device must be made with shielded
cables with metallic RF/EMI connector hoods to
maintain compliance with FCC Rules and Regulations.
Canada ICES-003 statement
This Class B digital apparatus complies with Canadian
ICES-003. Standard Television Receiving Apparatus —
Appareil de réception télévision ordinaire, Canada BETS7/NTMR-7.
Canadian notice
This Class B digital apparatus meets all requirements of
the Canadian Interference-Causing Equipment
Regulations.
Avis Canadian
Cat apparel numerous de la classed B respected toutes
les exigencies du règlement sur le materiel brouilleur du
Canada.
HDMI, the HDMI logo, and High-Definition Multimedia
Interface are trademarks or registered trademarks of
HDMI Licensing LCC in the United States and other
countries.
Never place a television set in an unstable location. A television set may fall, causing
serious
personal injury or death. Many injuries, particularly to children, can be avoided by taking
simple precautions such as:
a) --Using cabinets or stands recommended by the manufacturer of the television set.
b) – Only using furniture that can safely support the
television set.
c) – Ensuring the television set is not overhanging the edge of the suppprting
furniture.
d) – Not placing the television set on tall furn
iture (for example, cupboards or
bookcases) without anchoring both the furniture and the television set to a suitable
support.
e) – Not placing the television set on cloth or other materials
that may be located between the television set and supporting funiture.
f) – Educating children about the dangers of climbing on
funiture to reach the television set or its controls.
If your existing television set is being retained and relocated, the same considerations as
above should be applied.
WARNING
18
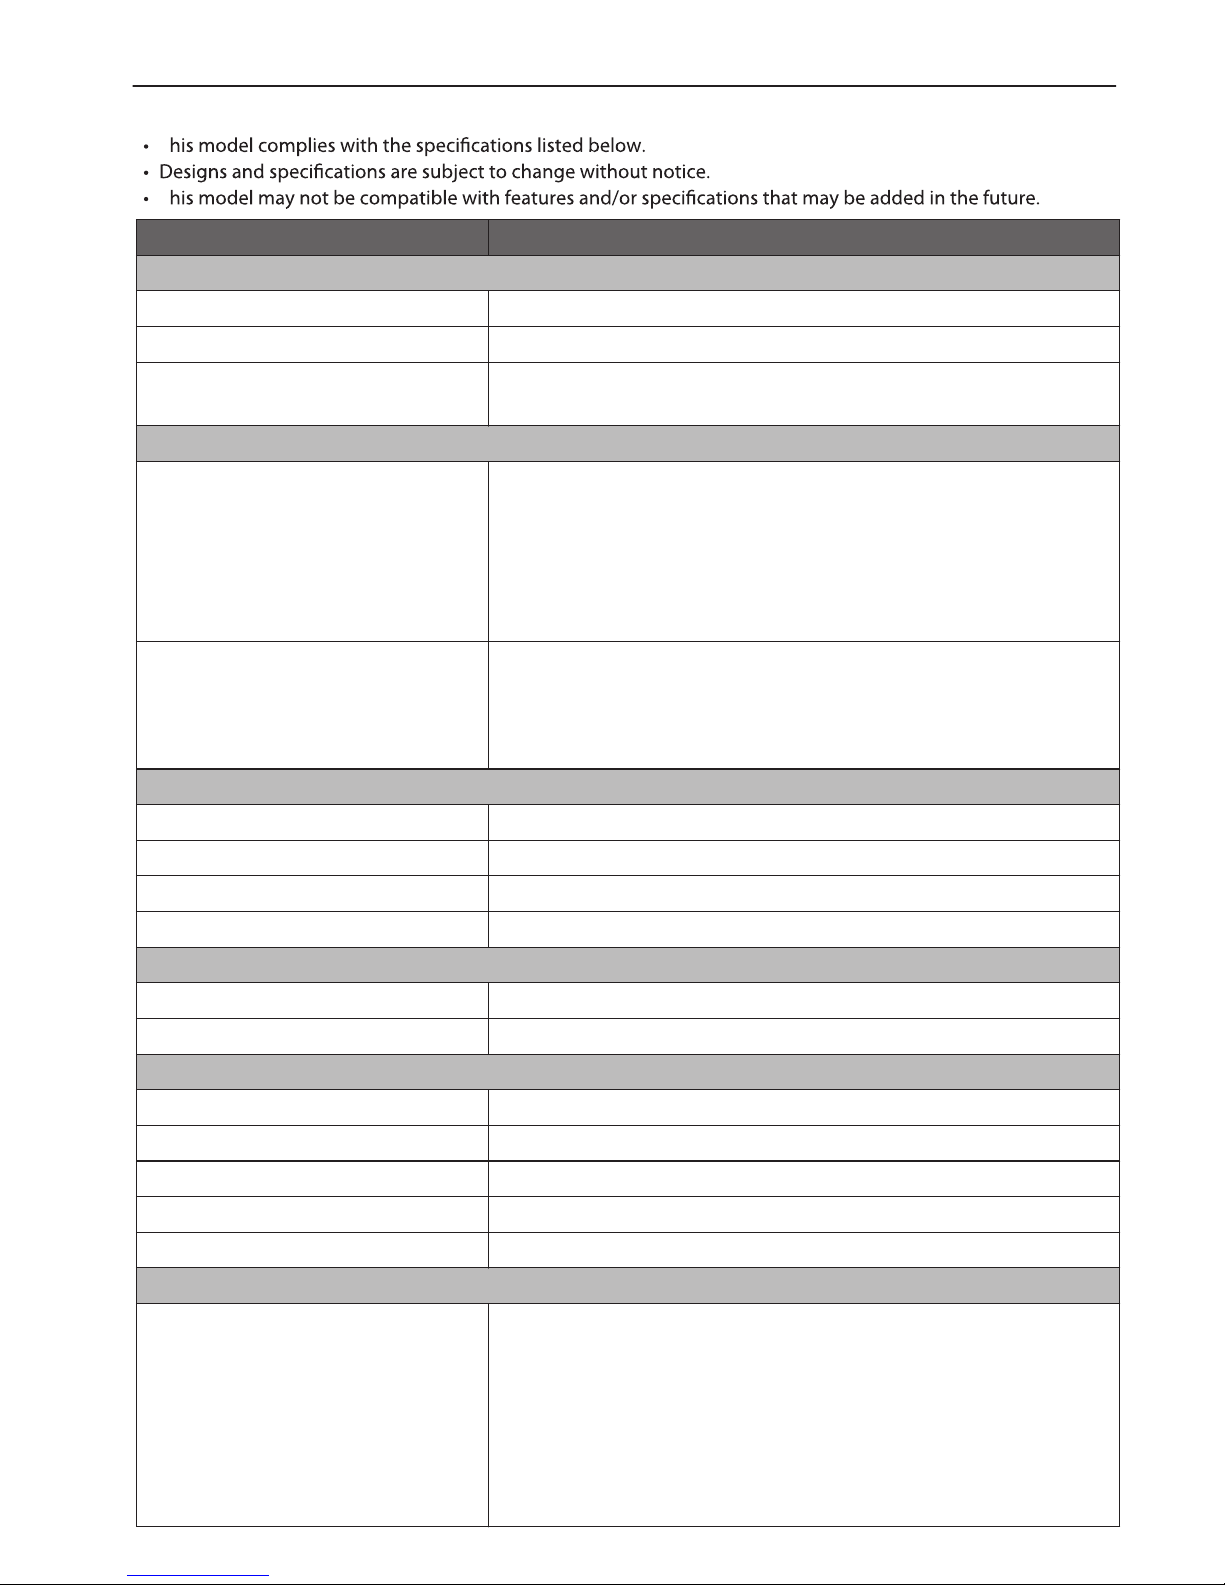
PRODUCT SPECIFICATION
NOTE
T
T
Model 50UG6550G
DISPLAY
50”(127cm)
elbaweiV
Television System NTSC, ATSC
Channel Coverage NTSC: CH2-CH69 (Antenna)/CH1-CH135 (Cable)
ATSC: CH2-CH69 (Antenna)/CH1-CH135 (Cable)
CONNECTIONS
R
L
srotcennoCraeR
VIDEO/Y
Pr
Pb
HDMI3
(3840*2160@60FPS)
HDMI1/2(3840*2160@60FPS)
Headphone
RF
OPTICAL OUT
RJ45
srotcennoCediS
USB
44.15” x 27.71” x 9.6”
44.15” x 25.58” x 2.36”
WEIGHT & DIMENSION
Dimensions with Stand (W x H x D)
Dimensions without Stand (W x H x D)
Weight with Stand 26.24 lbs
Weight without Stand
25.79 lbs
WALL MOUNTING
Wall Mount Pattern (H x V) 200 x 200 mm
M8 x 8mm epytwercS
POWER
Power Consumption
140W
0.50W≤ybdnatS
120V~60HzrewoPsniaM
10W+10WrewoPoiduA
Ambient Temperature 41°F ~ 95°F
PACKAGE CONTENTS
Package Contents
TV unit x 1
TV stand x 2
Remote control x 1
Stand screws x 4
User manual x 1
Registration card x 1
Battery x 2
19
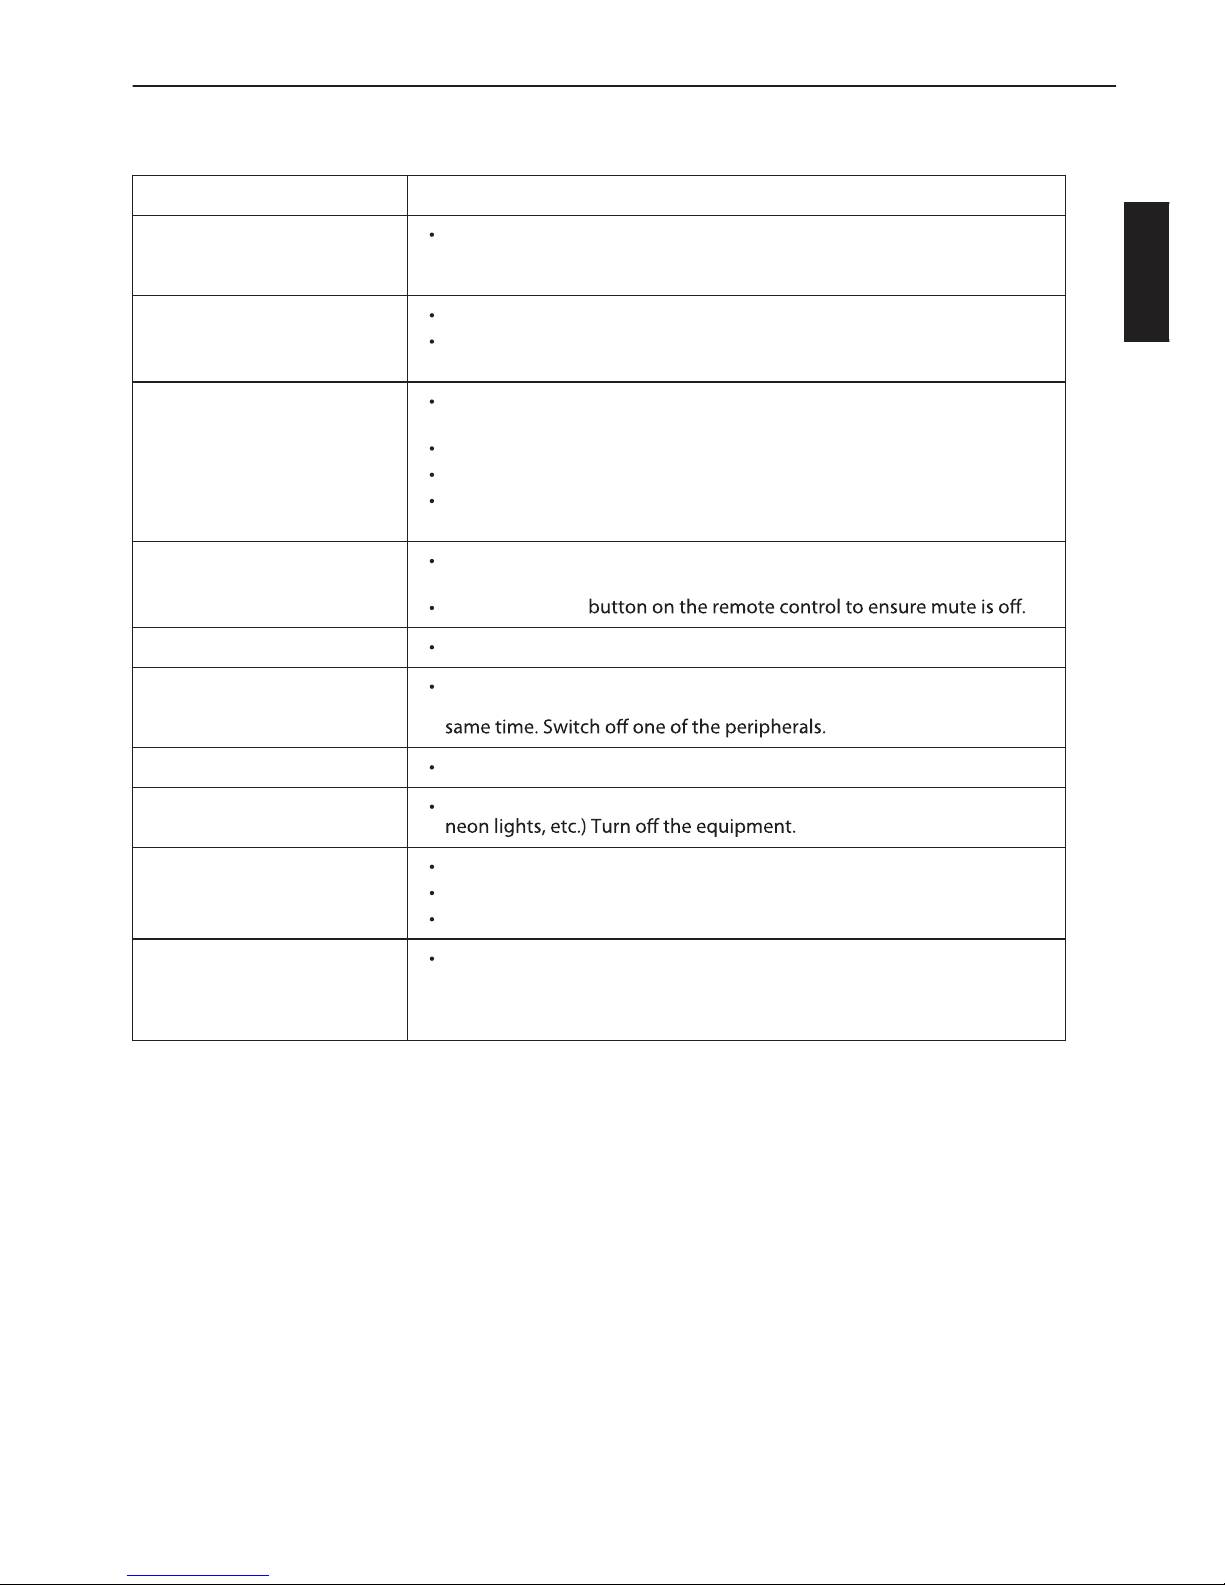
TROUBLESHOOTING
Please make these simple checks before calling service. These tips may save you time and money since charges for
receiver installation and adjustments of customer controls are not covered under your warranty.
wolloFotsnoitcAdnakcehCotsmetIsmotpmyS
“Ghost” or double image
This may be caused by obstruction to the antenna due to high rise
buildings or hills. Using a highly directional antenna may improve the
picture.
No power
Check if the TV’s AC power cord is plugged into the outlet.
Unplug the TV, wait for 60 seconds. Then reinsert plug into the outlet
and turn on the TV again.
No picture
Check antenna connections at the rear of the TV to see if it is properly
connected to the TV.
Possible broadcast station trouble. Try another channel.
Adjust the contrast and brightness settings.
Check the Closed Captions control. Some TEXT modes could block the
screen.
Good picture but no sound
Increase the volume level by pressing the VOL+ button on the remote
control or on the TV side control panel.
Press the MUTE
Good sound but poor color Adjust the contrast, color and brightness settings.
Poor picture
Poor picture quality may occur when an activated S-VHS camera or
camcorder is connected to your TV and other peripherals at the
Snowy picture and noise Check the antenna connection.
Horizontal dotted line
This may be caused by electrical interference (e.g. hair dryer, nearby
Television not responding to
remote control
Check whether the batteries are working. Replace if necessary.
Clean the remote control sensor lens on the TV.
You can still use the buttons on the side of your TV.
Pixels (dots) that are always
dark or always lit
Your TV is precision-manufactured using an extremely high level of
technology. However, sometimes pixels may not display correctly.
These types of occurrences are inherent to this type of product and do
not constitute a defective product.
English
20
WARRANTY
This Haier brand product, when shipped in its original container, will be free from defective workmanship
and materials, and agrees that it will, at its option, either repair the defect or replace the defective product
with a new or re-manufactured equivalent, for parts or labor for the periods set forth below:
This warranty does not apply to the appearance of the product or the exterior of the product, which has
additional excluded items set forth below:
The warranty commences on the date the item was purchased and the original purchase receipt must be
presented to the authorized service center before warranty repairs are rendered.
The limited warranty described herein is in addition to whatever implied warranties may be granted to
purchasers by law. ALL IMPLIED WARRANTIES INCLUDING THE WARRANTIES OF MERCHANTABILITY AND
FITNESS FOR USE ARE LIMITED TO THE PERIOD(s) FROMTHE DATE OF PURCHASE SET FORTH BELOW. Some
states do not allow limitations on how long an implied warranty lasts, so the above limitation may not
apply to you.
Neither the sales personnel of the seller nor any other person is authorized to make any warranties other
than those described herein, or to extend the duration of any warranties beyond the time period
described herein on behalf of Haier.
The warranties described herein shall be the sole and exclusive warranties granted by Haier and shall be
the sole and exclusive remedy available to the purchaser. Correction of defects in the manner and for the
Haier to the purchaser with respect to the product, and shall constitute full satisfaction of all claims,
whether based on contract, negligence, strict duality or otherwise. In no event shall Haier be liable, or in
any way responsible for any damages or defects in the product which were caused by repairs or
attempted repairs performed by anyone other than an authorized service center or dealer; nor shall Haier
be liable, or in any way responsible for incidental or consequential economic or property damage. Some
states do not allow the exclusion o
l or consequential da mages, so that above exclusion may not
apply to you.
THIS WARRANTY GIVES YOU SPECIFIC LEGAL RIGHTS. YOU MAY ALSO HAVE OTHER RIGHTS WHICH VARY
FROM STATE TO STATE.
Additional items excluded from warranty coverage: non-rechargeable batteries. What to do to obtain
service or to obtain product literature, accessories, supplies or customer assistance: Simply call 855-HaierTV
(855-424-3788). Be sure to have proof of purchase.
Warranty period for 50UG6550G one years parts and labor.
 Loading...