

Haier 42EP24STV User Manual

PLASMA TV
OWNER`S MANUAL
MODELS: 42EP24STV
Please read this manual carefully and completely
before operating the unit, and retain this manual for
future reference.
WARNING
RISK ELECTRIC SHOOK
DO NOT OPEN
WARNING : To reduce the risk of electric shock do not remove cover or back.
No user-serviceable parts inside refer service to qualified service personnel.
Safety of operators has been taken into consideration at the design and manufacture
phase, but inappropriate operation may cause electric shock or fire. To prevent the product
from being damaged, the following rules should be observed for the installation, use and
maintenance of th product. Read the following safety instruction before starting the operation.
The User Manual uses the following symbols to ensure a safe operation and prevent
any damage to operators or properties:
THIS SYMBOL INDICATES THAT HIGH VOLTAGE IS PRESENT
INSIDE. IT IS DANGEROUS TO MAKE ANY KIND OF CONTACT
WITH ANY INSIDE PART OF THIS PRODUCT.
THIS SYMBOL INDICATES THAT THERE ARE IMPORTANT
OPERATING AND MAINTENANCE INSTRUCTIONS IN THE
LITERATURE ACCOMPANYING THE APPLIANCE.
FCC STATEMENT
This equipment has been tested and found to comply with the limits for a Class B digital
device, pursuant to Part 15 of the FCC Rule. These limits are designed to provide
reasonable protection against harmful interference in a residential installation.
This equipment generates, use and can radiate radio frequency energy and, if not
installed and used in accordance with the instructions, may cause harmful interference
to radio communications. However ,there is no guarantee that interference with not occur
in a particular installation. If this equipment does cause harmful interference to radio or
television reception, which can be determined by turning the equipment off and on, the
user is encourage to try to correct the interference by one or more of the following
measures:
*Reorient or relocate the receiving antenna.
*Increase the separation between the equipment and receiver.
*Connect the equipment into an outlet on a circuit different from that to which the receiver
is connected.
*Consult the dealer or an experienced radio/TV technician for help.
This device compiles with Part 15 of the FCC Rules. Operation is subject to the following
two conditions: (1) This device may be not cause harmful interference, and (2) this device
must accept any interference received, including interference that may cause undesired
operation.
FCC CAUTION:
To assure continued compliance and possible undesirable interference, the provided ferrite
cores must be used when connecting this plasma display to video equipment; and maintain
at least 40cm spacing to other peripheral device.
CANADIAN NOTICE:
This Class B digital apparatus compiles with Canadian ICES-003.
2 Plasma TV

IMPORTANT SAFETY INSTRUCTIONS
Read all of the instructions before using this appliance. When using this
appliance, always exercise basic safety precautions, including the following:
1)Save these Instructions ---the safety and operating instructions should be
retained for future reference.
2)All warning on the appliance and in the operating instructions should be followed.
3)Cleaning --- Unplug from the wall outlet before cleaning. Do not use liquid
cleaners or aerosol cleaners. Use only dry cloth for cleaning.
4)Attachments ---do not use attachments not recommended by the manufacturer
as they may cause hazards.
5)Water and moisture -- do not place this product near water, for example, near a
bathtub, wash bowl, kitchen sink, laundry tub, in a wet basement, or near a
swimming pool.
6)Accessories ---do not place this unit on an unstable cart, stand, tripod, bracket,
or table. Use only with a cart, stand, tripod, bracket, or table recommend by the
manufacture, or sold with the unit.
7)Ventilation ---Slots and openings in the cabinets and the back or bottom are
provided for ventilation. These openings must not be blocked. In a built in
installation such a bookcase or rack do not install product unless proper ventilation
is provided.
8)Power Source ---this TV should be operated only from the type of power source
indicated on the rating label. If you are not sure of the type of power supply to your
home, consult your appliance dealer or local power company.
9)Do not defeat the safety purpose of the polarized or grounding-type plug. A
polarized plug has two blades with one wider than the other. A grounding type plug
has two blades and a third grounding prong. The wide blade or the third prong are
provided for your safety. If the provided plug does not fit into your outlet, consult an
electrician for replacement of the obsolete outlet. To prevent electric shock, ensure
the grounding pin on the AC cord power plug is securely connected.
10)Power cord protection ---Power supply cords should be routed so that they are
not likely to be walked on or pinched by items placed upon or against them. Pay
particular attention to cords or plugs, convenience receptacle, and the point where
they exit from the appliance.
11)Lighting precaution ---for added protection for this product during a lighting
storm or when it is left unattended for long period of time, unplug it from the wall
outlet and disconnect the antenna or cable system. This will prevent damage to the
product due to lighting and power line surges.
12)Never push objects of any kind into this product through openings as they may
touch dangerous voltage point or short out parts that could result in a fire or electric
shock. Avoid spilling liquid of any kind on the product.
13)Servicing ---do not attempt to service the product by yourself, as opening or
removing covers may expose you to dangerous voltage or other hazards. Refer all
servicing to authorized service personnel.
14)Unplug this unit from the wall outlet and refer servicing to qualified service
personnel under the following conditions:
a. When the power supply cord or plug is damaged or frayed.
Owner s Manual 3

b.If liquid has been spilled, or objects have been fallen into the unit.
c.If the unit has been exposed to rain or water.
d.If the unit does not operate normally by following the operating instructions.
Adjust only those controls that are covered by the operating instructions, as
improper adjustment of other controls may result in damage and will often
require extensive work by a qualified technician to restore the unit to its normal
operation.
e.If the unit has been dropped or damaged in any way.
f.When the unit exhibits a distinct change in performance; this indicates a need
for service.
15)Heat --- The product should be situated away heat source such as radiators, heat
registers, stoves, or other products (Including amplifiers) that product heat.
16)Overloading ---Do not overload wall outlets and extension cord as this can result
in a risk of fire or electric shock.
SAVE THESE INSTRUCTIONS
Thank you for using our Haier product. This easy-to-use manual will guide you in
getting the best use of your product. Remember to record the model and serial
number. They are on label in back of the unit.
Model number
serial number
Date of purchase
4 Plasma TV
Warning..............................................................2
Safety Instructions............................................ 3-4
Introduction
Controls...........................................................6
Connection Options...........................................7
emote Control Key Functions
R ...........................8
Installing Batteries............................................8
Installation
Installation instructions....................................9
VCR Setup
Cable TV Setup
External A/V Source Setup...............................11
DVD Setup.....................................................11
DTV Setup
Monitor Out Setup...........................................12
PC Setup.......................................................13
Install the Speakers........................................14
Install the Stand.............................................15
Install the Stand to the PDP............................. 15
Operation
Turning the TV On
Turning on the TV .......................................16
Choose the Menu Language
Choose the Input Source
Basic Function
Operation Menu..........................................17
Sound Mode................................................17
Picture Mode...............................................17
Sleep Timer.................................................17
System Menu
Channel Type
CATV Type
Automatic Scan
Fine Tune
Color System ..................... ...........................19
Skip ..............................................................19
.......................................... .......... 10
................................... .......... 10
.....................................................12
........................16
.............................16
................................................18
....................................................18
..............................................18
......................................................19
Prog. Switch.......................................................19
Picture Quality adjust
Picture Quality Adjust
Sound Adjustment
Sound Adjust
Adjustment Setup
Adjustment Setup ...............................................22
Function Setup
Function Setup...................................................23
Menu Menu Language Option ..............................23
Menu Time out Option.........................................23
Menu Background Option....................................23
Calendar Display and Check ...............................23
Auto Off.............................................................23
BlueScreen .......................................................23
Close Caption....................................................24
Parental............................................................24
Time Setup............................................................25
Clock Setting ....................................................26
Off/On time .......................................................26
Rimind Time/Remind Prog. .................................26
Lock Menu Options
Lock Setup........................................................27
Change Password..............................................27
Tuning Lock .....................................................27
Preset Prog. ....................................................27
Prog. Num .......................................................28
Source Lock.................................................... 28
Child Lock....................................................... 28
Max Volume.....................................................28
Unlock............................................................ 28
Screen Menu Options............................................. 28
Auto Adjustment ................................................29
Setting Picture Format .......................................29
Screen Position ................................................29
Troubleshooting Checklist...................................... 30
Maintenance......................................................... 31
Product Specifications........................................... 32
......................................................21
.........................................20
Setup and Operation Checklist
(See pages 10~15 for available connection and operational setup options.)
1. Unpack TV and all accessories.
2. Connect all external video and audio equipment. See pages 10 ~ 13.
3.Install the speakers and stand. see pages 14~16 .
4. Install batteries in remote control. See page 8.
5. Turn TV on. See page 16
6. Turn video source equipment on.
Owner s Manual 5
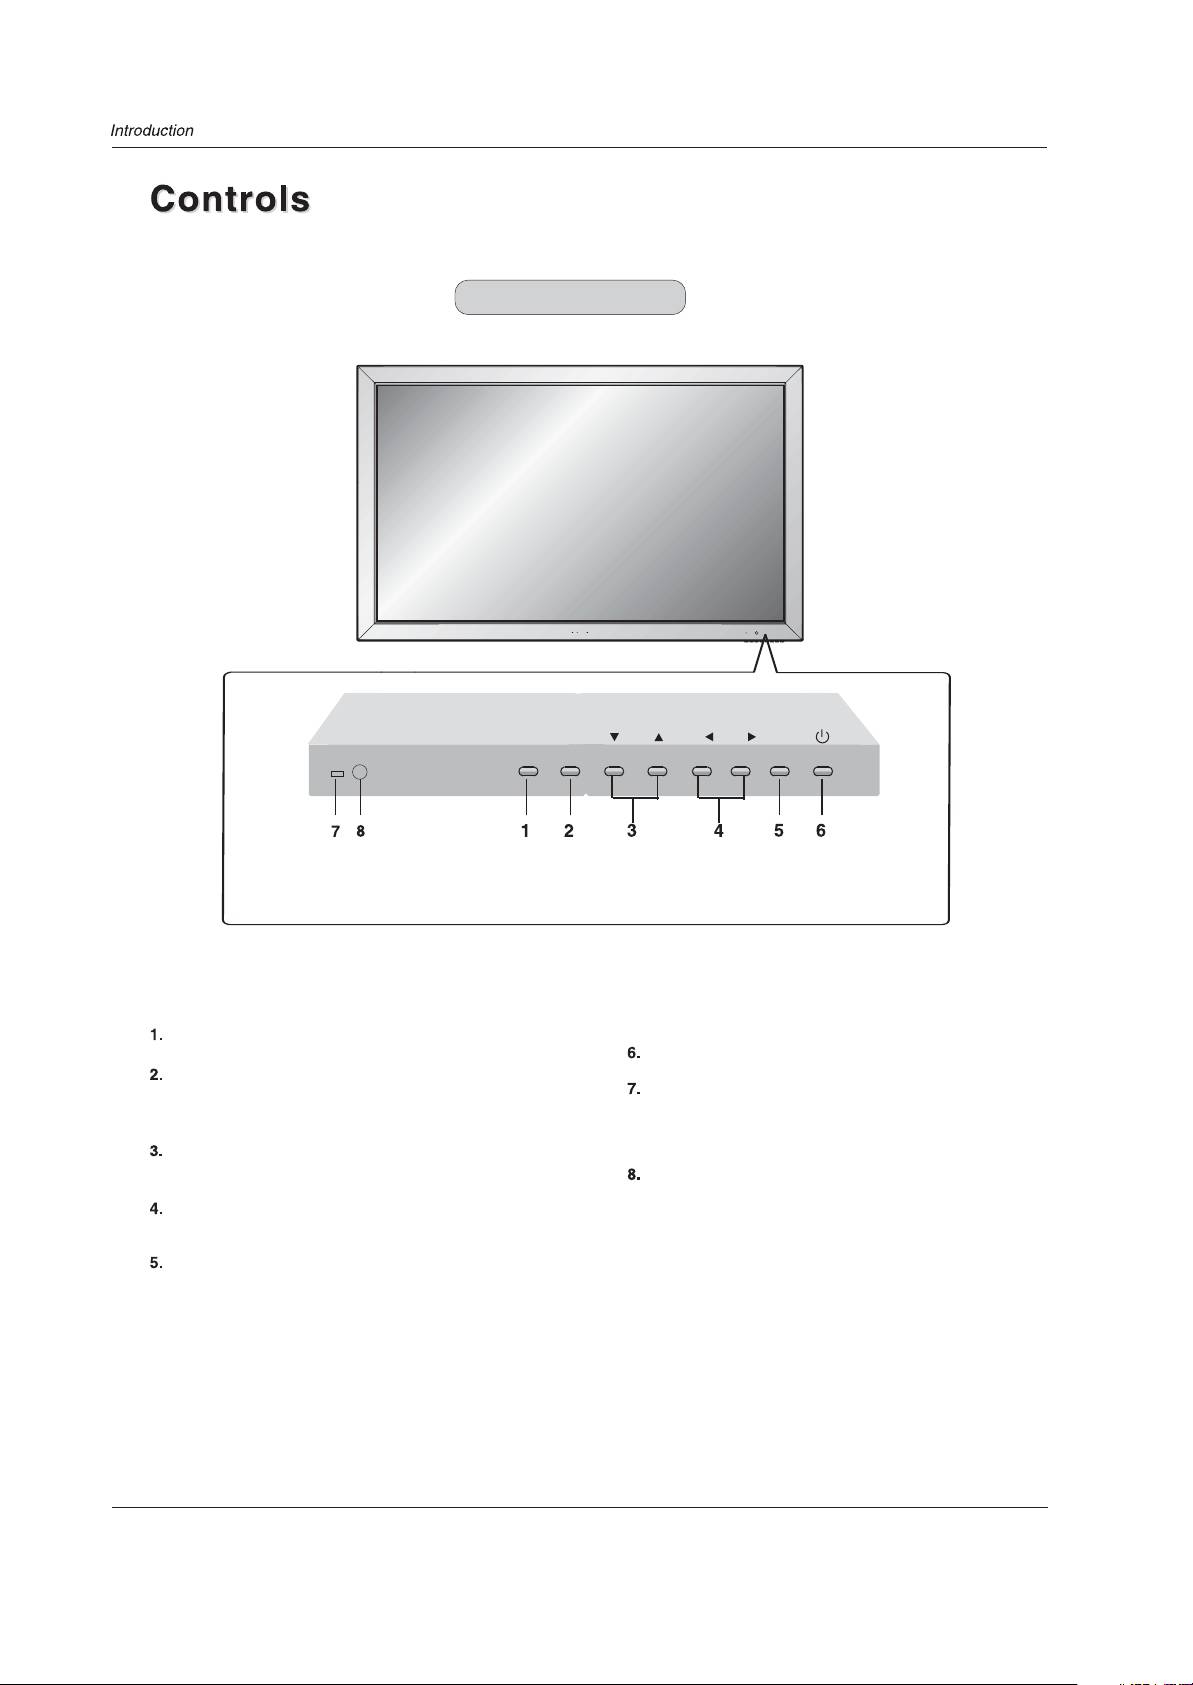
Front panel controls
EXIT INPUT MENU
Menu exit
Signal source input option
Down/Up. Sel ct desired option on MENU or tune
e
to the desired channel.
VOLUME Buttons
MENU Button
VOL VOL
Power On/Off Button
Power Standby Indicator
illuminates red in standby mode,illuminates blue when
the display is turned on
Remote Control Sensor
6 Plasma TV
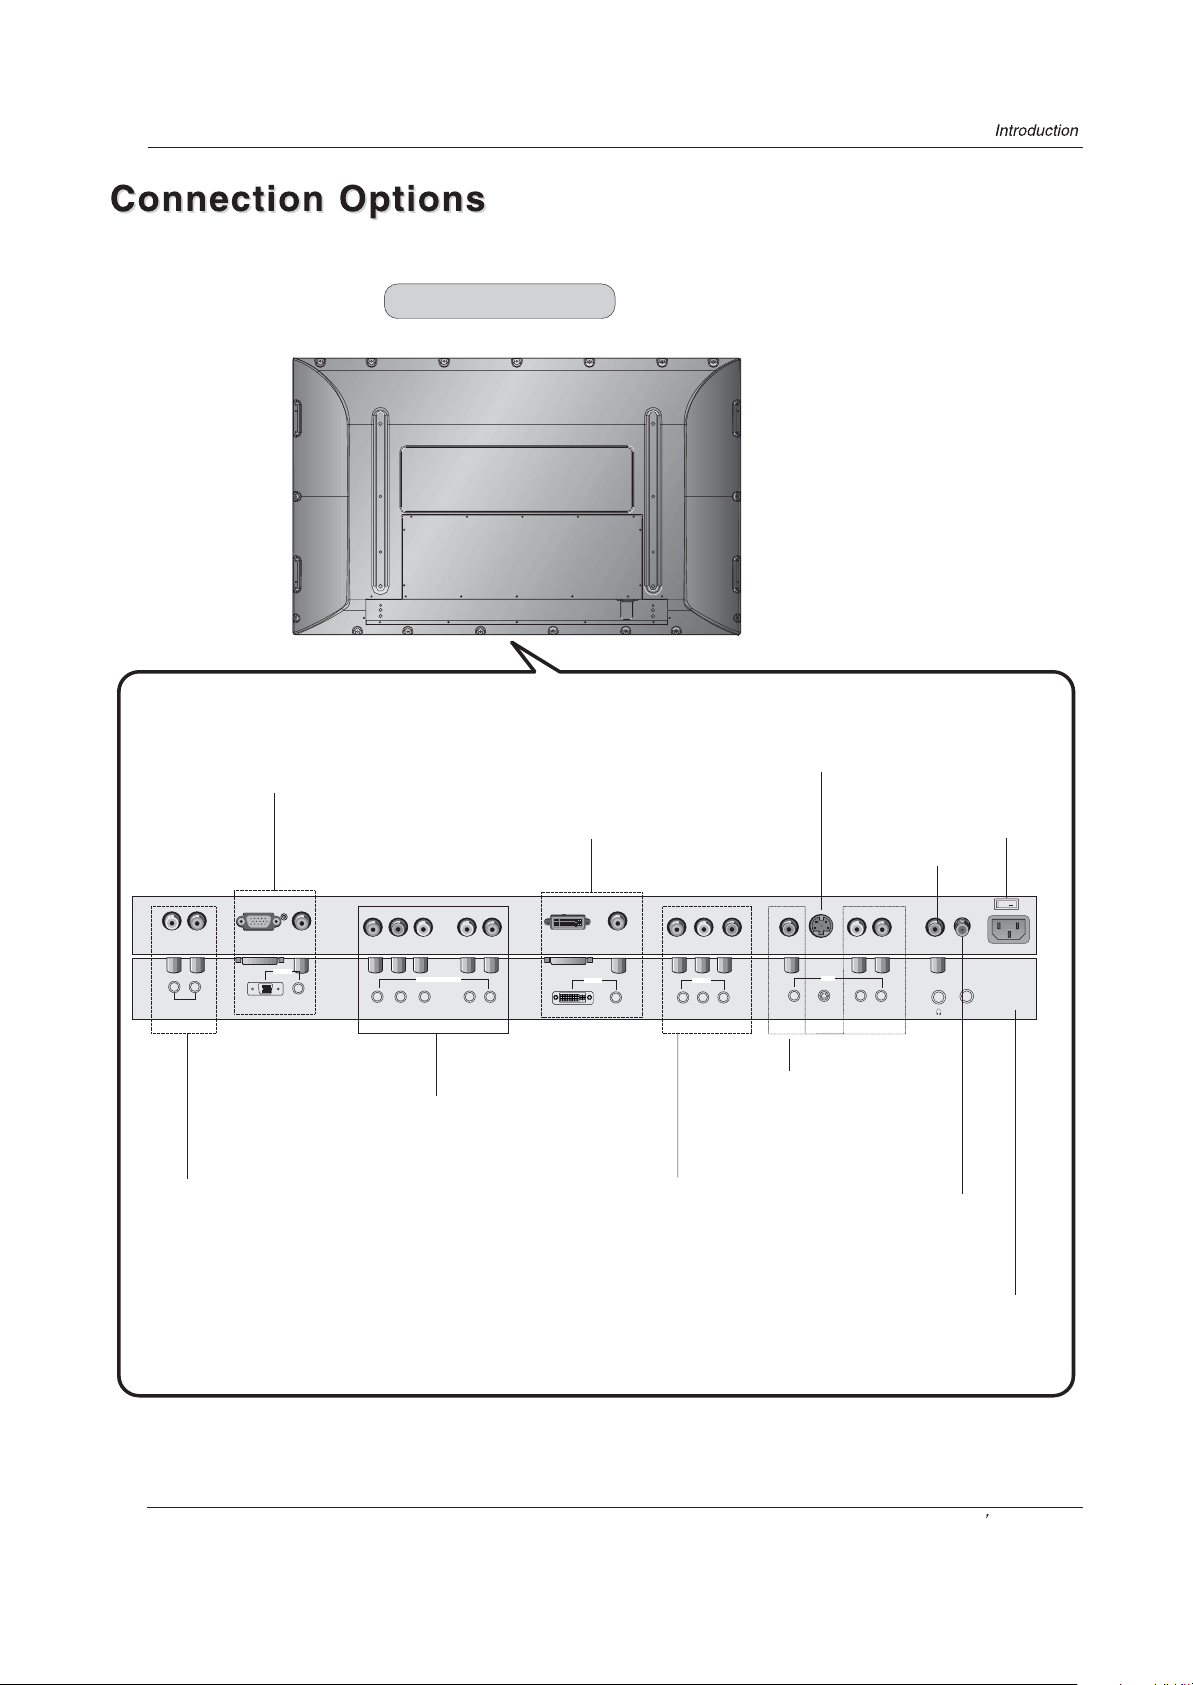
VGA Input/Audio input
Real panel controls
DVI Input/Audio input
connect your cable/PC
through the input
S-Video Input
Power On/Off
Earphone port
R
L
AUDIOOUT
AUDIO output
VGAIN
VGA
AUDIO
Connect a component video/audio
device to these jacks
COMPONENT IN
Pr/Cr Pb/Cb Y L-AUDIO-R
DVD/DTV Input
DVIIN
DVI
AUDIO
External audio/
video output
AV OUT
L-AUDIO-R
VIDEO
Audio/Video Input
Connect audio/video
output from an external
device to these jacks
Connect cable or antenna signals to
the TV, either directly or through your
This TV operates on AC power. The voltage is
indicated on the specifications page. Never
0
AV IN
S-VIDEOVIDEO
L-AUDIO-R
ANTIN
SWITCH
AC-INPUT
Antenna Input
cable box.
Power Cord Socket
attempt to operate the TV on DC power
Owner s Manual 7
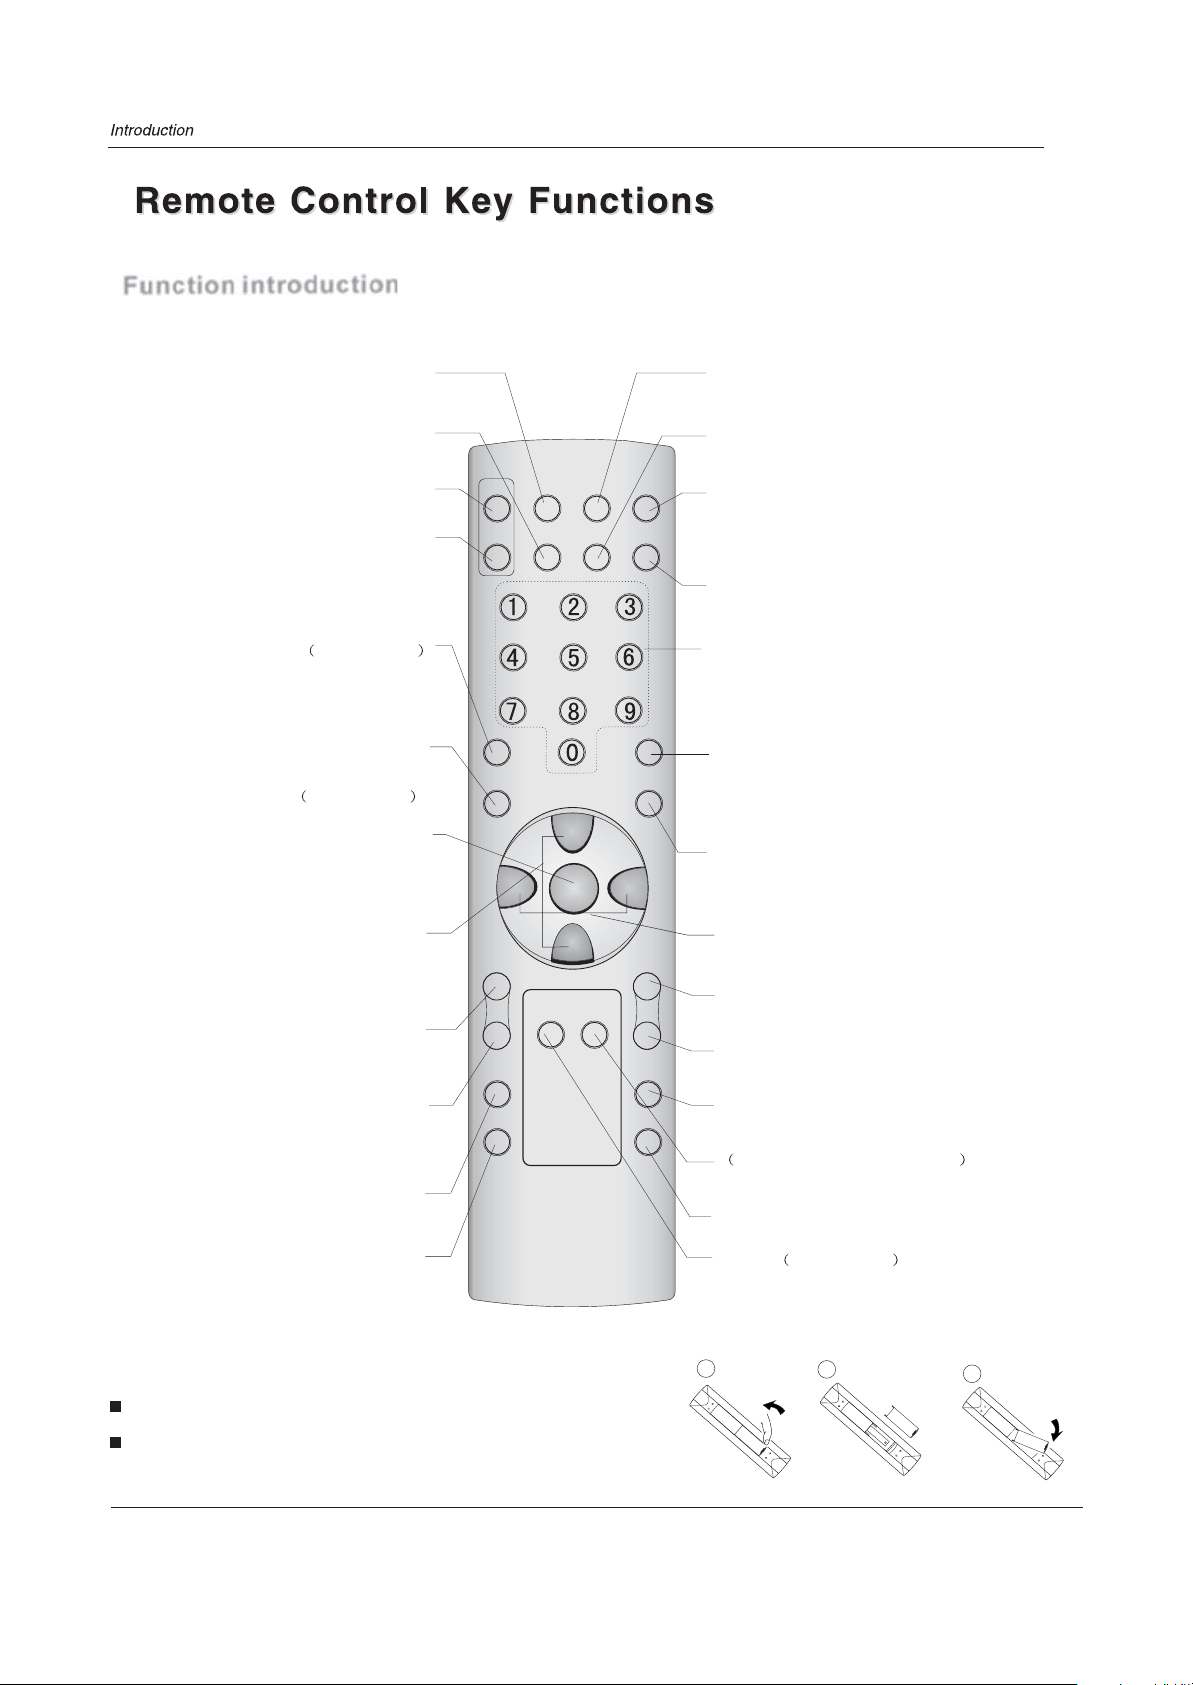
When using the remote control. Aim it towards the remote sensor on the TV.
Function introduction
Freezes the currently-viewed picture.
FREEZE
SLEEP
Press this key to set sleeptimer.
Select PC source
AUTO
Auto adjust for PC
FAVORITE
no available
MTS/SAP
Selects MTS sound: Mono, Stereo, and
SAP in Analog mode. Change the audio
Menu Language in DTV mode.
no available
MENU
Brings up the main menu to the screen.
CHANNEL UP/DOWN
Selects available channels found with
channel Scan.
P.STD
Selects a factory preset picture mode
depending on the viewing environment.
S.STD
Selects the sound appropriate for
the program's character.
LOCK
CALENDAR
PC
INPUT
Ratates the source input mode.
MUTE
Switches the sound on or off
POWER
PC FREEZE
INPUT
POWER
Turns your TV or any other programmed
AUTO
SLEEP
MUTE
DISPLAY
equipment on or off, depending on mode.
Information display
Display of current channel
signals, program and systems
Digits
Program direct option(when edit program,
every press can set different sign by turns among
the digits and sign on top of them)
-
Q.VIEW
Q.VIEW
MTS/SAP
VOL-
P.STD
S.STD
LOCK
CALENDAR
CH+
MENU
CH-
GUIDE
EXIT
VOL+
CC
AVC
RATING
ARC
DNR
.Press to enter the Lock Set menu
Switch the current channel to the
last channel you have viewed.
EXIT
Clears all on-screen displays and returns to
TV viewing from any menu.
VOLUME UP/DOWN
Increases/decreases the sound level.
CC(Closed Caption)
RATING
set the parental control.
ARC
Changes the aspect ratio.
AVC
Automatic Volume Control
DNR
Digital noise reduction
GUIDE no available
Shows program schedule.
Installing Batteries
Open the battery compartment cover on the back side and install
the batteries matching correct polarity (+ with +, - with -).
Install two 1.5V AA batteries. Don`t mix old or used batteries with
new ones.Replace cover.
8 Plasma TV
1
2
3
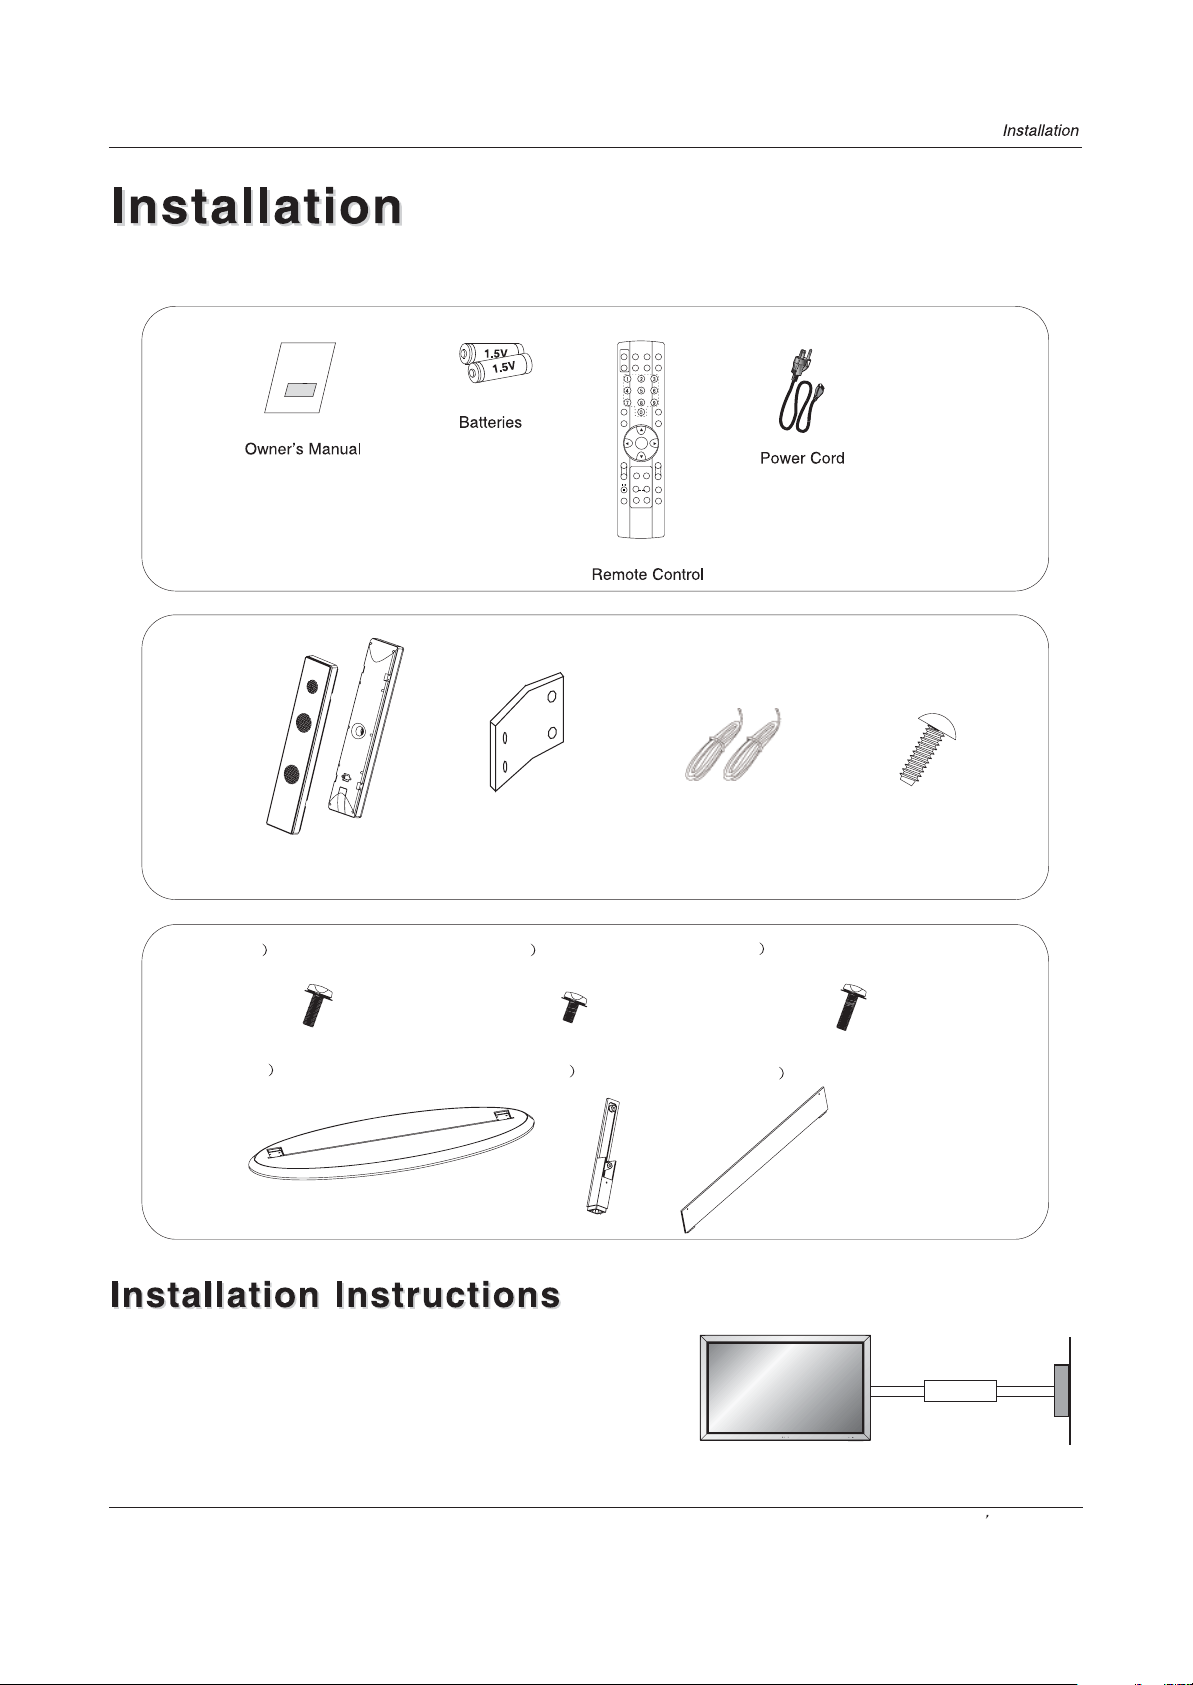
Ensure that the following accessories are included with your plasma display. If an accessory is missing, please contact the
dealer where you purchased the product.
PC
INPUT POWER
VIDEO
DISPLAY
MUTE
DVI
AUTO
MENU
DNR
EXIT
AVC
ENTER
P.STD
VOL+
CALENDAR
LOCK
VOL-
S.STD
SAVING
ARC
CC
/
SURROUND
FREEZE
SLEEP
RATING
(2.5MX2)
Speaker unit(X2)
1 M4X12 x8Screws
4 Stand
x1
Connecting block X4
2 M4X8 x2Screws
5 brace pole x2
Connection cord
- The TV can be installed in various ways such as on a wall, or on a desktop etc.
- The TV is designed to be mounted horizontally.
GROUNDING
Ensure that you connect the earth ground wire to prevent possible electric
shock. If grounding methods are not possible, have a qualified electrician
install a separate circuit breaker. Do not try to ground the unit by connecting
it to telephone wires, lightening rods, or gas pipes.
ST4X16
Screw(x16)
3 M5X16 x4Screws
6 PMMA baffle x1
Power
Supply
Short-circuit
Breaker
Owner s Manual 9
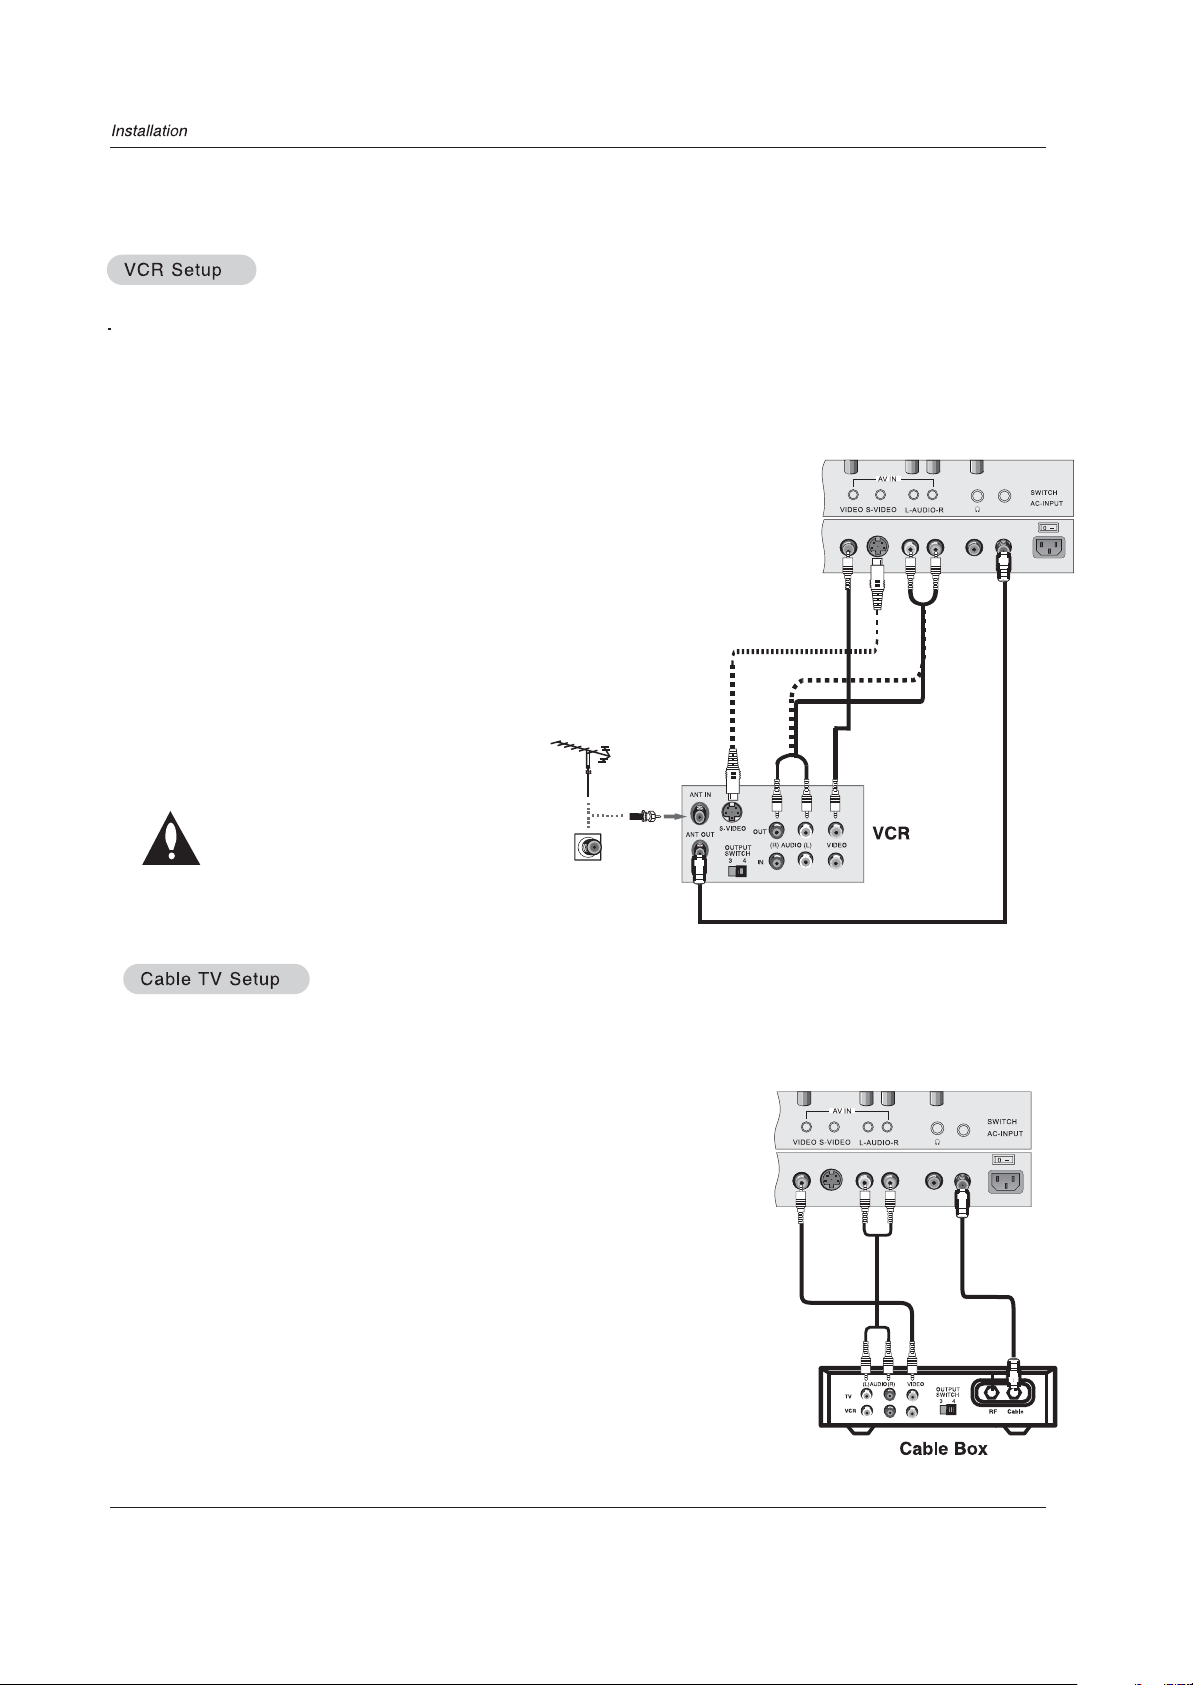
- To avoid picture noise (interference), leave an adequate distance between the VCR and TV
Do not leave a still picture from a VCR on the screen for a long If the 4:3 format is used, the fixed images on the
sides of the screen may remain visible on the screen, if this format is used day after day. This is known as burn-in, it
is uneven wear of the screen area. Reduce contrast when displaying fixed images on the screen for a long
1. Connect the audio and video cables from the
VCR's output jacks to the input jacks,
as shown in the figure.
When connecting the to VCR, match
the jack colors (Video = yellow, Audio Left = white,
and Audio Right = red).
If you connect an S-VIDEO output from VCR to
the S-VIDEO input, the picture quality is
improved; compared to connecting a regular
VCR to the Video input.
TV
TV
2. Insert a video tape into the VCR and press
PLAY on the VCR. (Refer to the VCR owner`s
manual.)
3. Select the input source by the INPUT button
on the remote control.
Do not connect to both Video and
S-Video at the same In the
event that you connect both Video
and the S-Video cables, only the
S-Video will work. So you should
not connect to S-Video if you want
to use Video.
- After subscribing to a cable TV service from a local provider you can watch cable TV programming. The cannot
display TV programming unless a TV tuner device or cable TV converter box is connected to the .
- For further information regarding cable TV service, contact your local cable TV service provider(s).
TV
TV
ANT IN
1. Connect the co-axial cable from antenna out of the cable box to
antenna in of the TV.
2. Connect the audio and video cables from the Cable Box's output
jacks to the TV`s AV IN input jacks, as shown in the figure.
When connecting the TV to a Cable Box, match the jack colors
(Video = yellow, Audio Left = white, and Audio Right = red).
(If you have a digital cable box please refer to page 12 , for DTV setup)
3. Select the input source by using the INPUT button on the
remote control. (If connected to AV IN, select AV1/S-VIDEO input source)
4. Select your desired channel with the remote control for cable box.
10 Plasma TV
ANT IN
(Co-axial)
 Loading...