

Page 1

WIRELESS LOUDSPEAKERS
RS-Set 2
ǵ
Page 2

______________________________________________________________________________________________________
2
DEUTSCH
ENGLISH
FRANÇAIS
ITALIANO
PORTUGUÊS
ESPAÑOL
NEDERLANDS
DANSK
SVENSKA
SUOMI
3 Aufstellen und Sicherheit 10 Informationen
6 Auf einen Blick 94 Service
8 Anschließen und Betrieb
12 Set-up and safety 19 Information
15 Overview 94 Service
17 Connection and operation
22 Installation et sécurité 29 Informations
25 Vue d’ensemble 94 Service
27 Raccordement/fonctionnement
31 Installazione e sicurezza 38 Informazioni
34 In breve 94 Service
36 Collegamento e funzionamento
40 Instalação e segurança 47 Informações
43 Vista geral 94 Service
45 Ligação e funcionamento
49 Instalación y seguridad 56 Información
52 Vista general 94 Service
54 Conexión y funcionamiento
58 Installatie en veiligheid 65 Informatie
61 In een oogopslag 94 Service
63 Aansluiten en gebruik
67 Opstilling og sikkerhed 74 Informationer
70 Kort oversigt 94 Service
72 Tilslutning og brug
76 Uppställning och säkerhet 83 Information
79 En överblick 94 Service
81 Ansluta och använda
85 Sijoittaminen ja turvallisuus 92 Tietoja
88 Yleiskatsaus 94 Service
90 Liittäminen ja käyttö
Page 3
12
SET-UP AND SAFETY
______________________________________________
To ensure that these high-quality, easy-to-use loudspeakers provide you with
lasting enjoyment, please observe the following instructions when setting them
up.
These loudspeakers are designed for the playback of wireless audio signals.
Any other use is expressly prohibited.
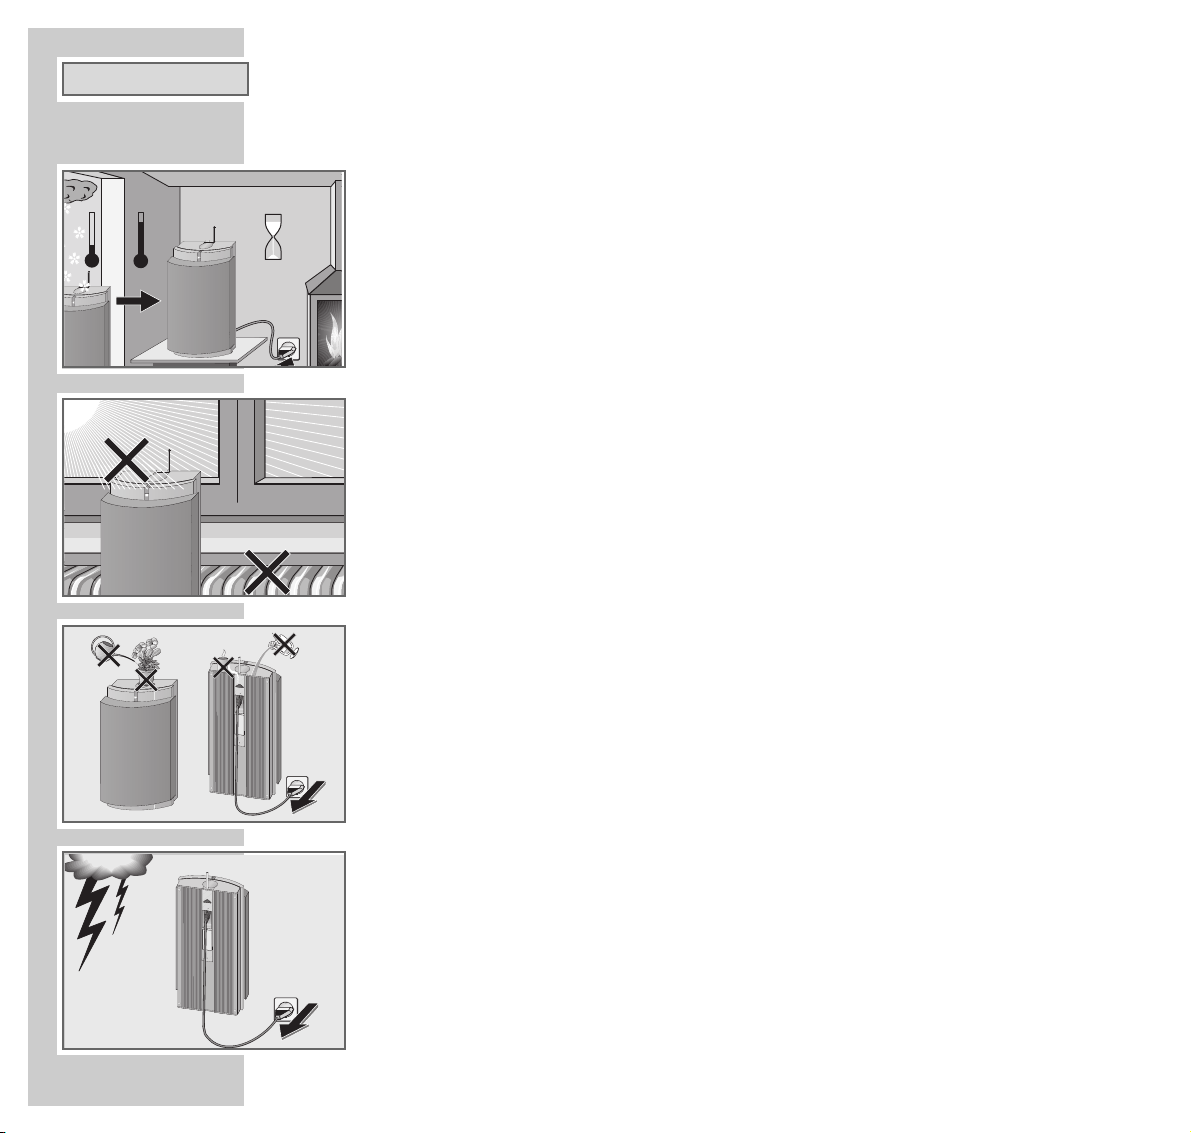
If the loudspeakers are subjected to sudden changes in temperature, for example if they are brought in from the cold to a warm room, let them stand for at
least two hours. Do not connect them to the mains supply during this time.
The loudspeakers are designed for use in dry rooms. You must make sure that
the device is protected from moisture such as rain or splashing water.
When deciding where to place the device, please note that furniture surfaces
are covered by various types of varnish and plastic, most of which contain chemical additives. These additives can corrode the device supports, resulting in
residues on the furniture surfaces which are difficult or impossible to remove.
Do not place the loudspeakers close to heating units or in direct sunlight, as this
will impair the internal cooling.
Do not place any vessels containing fluids such as vases on the loudspeakers.
Should they be knocked over, fluid may spill on the electrical components, thus
presenting a safety risk.
Do not open the loudspeaker casing under any circumstances. The manufacturer
will not accept any liability for damage resulting from improper handling.
Thunderstorms are a danger to all electrical devices. Even if the loudspeakers
are switched off, they can be damaged by a lightning strike to the mains.
Always remove the mains plug in the event of an electrical storm.
Clean the gauze of the loudspeakers with a vacuum cleaner from time to time
(at low vacuum power without exerting any pressure).
°C
2h
°C
ǵ
ǵ
ǵ
ǵ
M
A
IN
S
2
3
0
V
5
0
/
6
0
H
z
R
E
S
E
T
ǵ
! SERVICE !! SERVICE !! SERVICE !
ǵ
M
A
IN
S
2
3
0
V
5
0
/
6
0
H
z
R
E
S
E
T
ENGLISH
Page 4

ENGLISH
13
SET-UP AND SAFETY
_________________________________________________________________
The wireless transmission system
Your loudspeakers are equipped with an HF system which enables them to transmit and receive audio and data signals. Cables, with the exception of the mains
cable are no longer necessary.
The HF transmission strength is limited by national and international regulations
to prevent radio interference from neighbouring devices.
The HF transmission power of the whole system is < 10 mW. This guarantees an
unhindered reception range of approximately 100 m. This range is restricted
inside buildings, depending on the construction materials used.
Avoid placing the system near metal objects such as radiators or electrical devices such as cordless telephones which use radio signals.
Since the audio and data signals are not transmitted on an exclusive range we
cannot guarantee that this will not cause interference. To avoid interference you
can change the communication channel for the audio transmitter (WT2).
In some circumstances, people, walls and other surfaces can reflect radio signals. Reflected signals can mix with direct (non-reflected) signals thus causing a
type of interference known as multi-path reception. This can lead to noise or a
temporary loss of sound. If such interference does occur, simply move the loudspeakers or change transmission channels.
System components
Your RS-Set 2 loudspeakers are only suitable for use with the WT2 wireless
transmitter (in conjunction with the GRUNDIG Lenaro television).
Page 5

14
SET-UP AND SAFETY
_________________________________________________________________
MAINS
0/60Hz
Positioning the active loudspeakers
There are two options for the RS-Set 2: wall-mounting or placing them on the
floor, on furniture or shelves.
1 Place the active loudspeakers in the room around the television;
– or
hang the loudspeaker by the recess on the back of the speakers on a screw
which has been firmly anchored in the wall.
Note:
We recommend using the RS-Set 2 active loudspeaker as the rear loudspeaker. The LSP2 active loudspeakers can then be used as the front loudspeakers.
The rear loudspeakers should be placed at a sufficient distance and a suitable
height to the left and right or behind the listener. When setting up the active
loudspeakers, note that the minimum distance to the television is 50 cm.
When setting up the active loudspeakers, make sure that they stand securely
and are not affected by vibrations caused by resonance at high volumes.
Three feet are attached to the bottom of each active loudspeaker to increase
stability. If you hang the active loudspeakers to the wall you can remove the
feet from the bottom.
230V
5
Page 6

ENGLISH
15
OVERVIEW
________________________________________
The controls and connections for the RS-Set 2
Z
Power switch, on the top of the device: switches the
device on and off again.
The loudspeaker is only fully disconnected from the
mains after the plug has been pulled out.
I Antenna.
Indicator In the mains button:
Flashing orange: installation phase 1 (sending identification);
Flashing green: installation phase 2 (identification
acknowledged);
Continuous orange: the loudspeaker is in stand-by
mode;
Continuous green: the loudspeaker is in operation;
Flashing green and red: reset mode – the loudspeakers have not been installed. This display changes to
flashing orange after a few seconds (see Installation
Phase 1).
Flashing red: the protective circuit has been actuated.
Note:
If the protection circuit is actuated, switch off the
loudspeaker using the »Z« button and let it cool
down for at least 15 minutes.
ǵ
Page 7

16
OVERVIEW
______________________________________________
RESET Back of device: press briefly to start installation with
WT2 manually; hold down (more than 10 seconds)
to delete the stored installation settings (initial state).
230 V Back of device: connection socket for mains
50/60 Hz cable.
Back of device: Flash plug cover. Only for dealers
for updating the device software.
RESET
RESET
MAINS
230V
50/60Hz
Page 8

ENGLISH
17
Connection and installation
Connecting the mains cable
1 Plug the mains cable into the »230 V 50/60 Hz« socket on the back of
the device.
2 Insert the power cord plug in the socket.
3 For instructions on how to install the loudspeakers with a WT2 transmitter
please refer to the appropriate operating manual.
Switching on and operating after installation
1 Switch on both loudspeakers with »Z«.
– The orange indicators on the loudspeakers light up (stand-by).
2 Switch on the television.
– The green indicators on the loudspeakers light up (operation).
Note:
The loudspeakers switch on or to stand-by mode automatically depending
on control signals from the WT2.
The change to stand-by function depends on the audio source and can take
up to 30 minutes.
CONNECTION AND OPERATION
_____________
MAINS
230V
50/60Hz
ǵ
Page 9

18
CONNECTION AND OPERATION
___________________________________________
Installing additional loudspeakers
For installation when expanding the system (for example from two to four
active loudspeakers), see the operating and installation instructions for WT2.
Resetting the loudspeakers to the original state
Note for dealers:
With this function you can delete all existing installation data and reset the
active loudspeakers to their original state.
1 When switched on, press » RESET« on the bottom of the device for longer
than 10 seconds, using an implement such as a thin pencil.
– The display flashes green and red.
Note:
After the installation data has been deleted, the loudspeakers must be installed again.
Reset mode is not required during operation and installation, and is therefore only available for specialist dealers.
RESET
RESET
Page 10

ENGLISH
19
INFORMATION
_____________________________________________________________
These loudspeakers are noise-suppressed according to the applicable EC directives.
This product fulfils the European directives 89/336/EEC, 73/23/EEC and 93/68/EEC.
This device conforms to the safety regulation DIN EN 60065 (VDE 0860) and therefore the international safety regulation IEC 60065.
The type plate with information on the mains supply voltage and radio certification is located on the
back of the device.
The loudspeakers are intended for sale within the EU in the following countries: Belgium, Denmark,
Germany, UK, Finland, France, Ireland, Luxembourg, Netherlands, Norway, Austria, Portugal,
Sweden.
System
2-way bass reflex
Operating voltage: 230 V~ ± 10%
Mains frequency: 50/60 Hz
Max. power consumption: 210 W
Power consumption in Stand-by: < 3 W
Dimensions:
W x H x L 220 x 375 x 120 mm
Weight: 6,1 kg
Amplifier unit
Output: 75 W sine
120 W music
Receiver unit
Reception range – audio signal:
863...865 MHz
Reception range – data signal:
869.7…870 MHz
Transmission range: 50 ... 25,000 Hz
Technical data - RS-Set 2
DFM 869
Technical and optical modifications reserved.
Page 11

20
INFORMATION
__________________________________________________________________________
Additional information for units sold in the UK.
Units sold in the UK are suitable for operation from a 240V ac, 50Hz mains supply.
The range of multi-system receivers is built to work in most European countries. However, the mains plug and
socket system for the UK differs from many European countries.
This appliance has been supplied with a fitted, non-removable, approved converter plug for use in the UK. This
converter plug is fitted with a 5A rated fuse.
In case this appliance is supplied with a moulded 2-pin Euro plug only, which is unsuitable for UK operation, this
must be cut off and immediately disposed of. An approved 13A, 3-pin UK plug should then be fitted by a
qualified electrician.
Note:
The severed Euro plug must be destroyed to avoid a possible shock hazard should it be inserted into a socket
elsewhere.
If a non-rewireable 3-pin plug or a rewireable 13A (BS1363) 3-pin plug is used, it must be fitted with a 5A ASTA
or BSI approved BS1362 fuse. If any other type of plug is used it must be protected by a 5A fuse either in the
plug, or at the distribution board. If this type of plug becomes defective, ensure that the fuse is removed before
disposal, to eliminate potential shock hazard.
If it is necessary to change the fuse in the non-rewireable plug, the correct type and rating (5A ASTA or BSI
approved BS1362) must be used and the fuse cover must be refitted. If the fuse cover is lost or damaged, the lead
and plug must not be used until a replacement is obtained. Replacement fuse covers should be obtained from
your dealer.
Important:
The wires in the mains lead are colour coded in accordance with the following code:
BLUE – NEUTRAL
BROWN – LIVE
As the colours of the wires in the mains lead of your appliance may not correspond with the coloured marking
identifying terminals in your plug, proceed as follows:
Connect the BLUE coloured wire to plug terminal marked with the letter “N” or coloured black.
Connect the BROWN coloured wire to the plug terminal marked with the letter “L” or coloured red.
In no circumstance must any of the wires be connected to the terminal marked with the letter “E”, earth symbol
“
z”, coloured green, or green & yellow.
Replacement mains lead sets can be obtained from your local dealer, or by contacting Grundig Consumer
Relations (01788 570088)
Moulded 3-pin lead set, suitable for UK use:
Ref: Leadset UK 8290-991-224
Moulded 2-pin Euro lead set, not suitable for UK use:
Ref: Leadset Euro 8290-991-316
Page 12

ENGLISH
21
INFORMATION
__________________________________________________________________________
Rectifying minor problems
If the remedies below are not successful, please consult an authorised GRUNDIG dealer.
Fault
The active loudspeakers do
not work.
The LED in the power button
on the active loudspeaker
flashes orange.
The LED in the power button
on the active loudspeaker
flashes red.
There is noise interference
on the active loudspeakers.
Movements in the room
interfere with the playback
of the active loudspeakers.
Possible cause
The active loudspeakers are not switched
on.
The WT2 is not activated by the audio
source.
The active loudspeaker has not been
installed.
The active loudspeaker is overheated.
Possibly interference from another device.
The active loudspeakers have been
mounted / placed too low.
Remedy
Check the power cable and press
»Z« to switch on the active loudspeaker.
Check the connection from the WT2
to the audio source.
Install the active loudspeaker.
Switch off the active loudspeaker
using the »Z« button and allow it
to cool down.
Select a different transmission
channel or change the position of
the active loudspeakers.
Remember the minimum height
approx. 0.8 m (ear height of a
seated listener).
Page 13

Grundig AG • Beuthener Str. 41 • D-90471 Nürnberg • http://www.grundig.com 27011 401 7000
 Loading...