

MILK FROTHER
MF 5260
ENGLISH
EN

_______________________________________
A
B
C
D
E
F
G H
3

SAFETY AND SET–UP _______________
Please read this instruction manual thoroughly
before using this appliance! Follow all safety
instructions in order to avoid damages due to
improper use!
Keep the instruction manual for future reference. Should this appliance be given to a third
party, then this instruction manual must also be
handed over.
7
This appliance is intended for private domestic
use only and is not suitable for professional–
catering purposes. It should not be used for
commercial purposes.
7
Do not use the appliance for anything other
than its intended use. The milk frother is designed for frothing and heating milk. Do not
use the milk frother to heat any other liquids
and tinned, jarred or bottled food.
7
Never use the appliance in or near to combustible, inflammable places and materials.
7
Do not use the appliance outdoors or in the
bathroom.
4 ENGLISH

SAFETY AND SET–UP _______________
7
Check if the mains voltage on the rating label
corresponds to your local mains supply. The
only way to disconnect the appliance from the
mains is to pull out the plug.
7
For additional protection, this appliance
should be connected to a redisual current
protection switch with no more than 30 mA.
Please contact an electrician for advice.
7
Do not immerse the appliance, base, power
cord or power plug in water or in other liquids
and do not clean parts in the dishwasher.
7
Disconnect the power plug after using the appliance, before cleaning the appliance, before leaving the room or if a fault occurs.
7
Do not disconnect the plug by pulling on the
cord.
7
Do not wrap the power cord around the appliance.
7
Do not squeeze or bend the power cord and
do not rub it on sharp edges in order to prevent any damage. Keep the power cord away
from hot surfaces and open flames.
5ENGLISH

SAFETY AND SET–UP _______________
7
Do not use an extension cord with the appliance.
7
Never use the appliance if the power cord or
the appliance is damaged.
7
Our GRUNDIG Household Appliances meet
applicable safety standards; if the appliance
or power cord is damaged, it must be repaired
or replaced by a service centre to avoid any
dangers. Faulty or unqualified repair work
may cause danger and risks to the user.
7
Do not dismantle the appliance under any
circumstances. No warranty claims are accepted for damage caused by improper handling.
6 ENGLISH

SAFETY AND SET–UP _______________
7
This appliance can be used by children (aged
from 8 years) and persons with re duced physical, sensory or mental capabilities or lack of
experience and knowledge if they have been
given supervision or instruction concerning utilisation of the delete appliance in a safe way
and if they understand the hazards involved.
Chil dren shall not play with the appliance.
Clean ing and user maintenance shall not be
made by children without supervision.
7
Do not leave the appliance unattended as
long as it is in use. Extreme caution is advised
when the appliance is being used near children and people with limited physical, sensory or mental capabilities.
7
Before using the appliance for the first time,
clean all parts carefully which come into contact with milk. Please see full details in the
“Cleaning and Care” section.
7
Dry the appliance and all accessories before
connecting it to mains supply and before attaching any parts.
7ENGLISH

SAFETY AND SET–UP _______________
7
Never operate or place any part of this appliance on or near hot surfaces such as a gas
burner, electric burner or heated oven.
7
Operate the appliance with delivered parts
only.
7
Operate the appliance with its original base.
Do not use the base for any other purpose.
7
Do not use the appliance with damp or wet
hands.
7
Do not touch rotating parts, there is a risk of
injury.
7
Always use the appliance on a stable, flat,
clean and dry surface.
7
Make sure that there is no danger that the
power cord could be accidentally pulled out
that someone could trip over it when the appliance is in use.
7
The appliance has to be positioned in such a
way that the plug is always accessible.
8 ENGLISH

SAFETY AND SET–UP _______________
7
Make sure that when using the milk frother,
the lid always remains closed properly.
7
Do not fill the milk frother below the minimum
level indicator.
7
Never operate the appliance without any milk
inside it.
7
Do not stick any foreign objects on the appliance.
7
By exceeding the filling capacity, the jug may
overflow.
7
Do not insert any objects and/or fingers in the
appliance apertures.
7
Scalding may occur if the lid is removed during the cooking.
9ENGLISH

AT A GLANCE __________________________
Dear Customer,
Congratulations to the purchase of
your new GRUNDIG Milk Frother
MF 5260.
Read the following user notes carefully to ensure full enjoyment of
your quality GRUNDIG product
for many years to come.
A responsible approach!
GRUNDIG focuses
on contractually
agreed social working conditions with
fair wages for both
internal employees
and suppliers. We also attach great
importance to the efficient use of
raw materials with continuous
waste reduction of several tonnes of
plastic every year. Furthermore, all
our accessories are available for at
least 5 years.
For a future worth living.
For a good reason. Grundig.
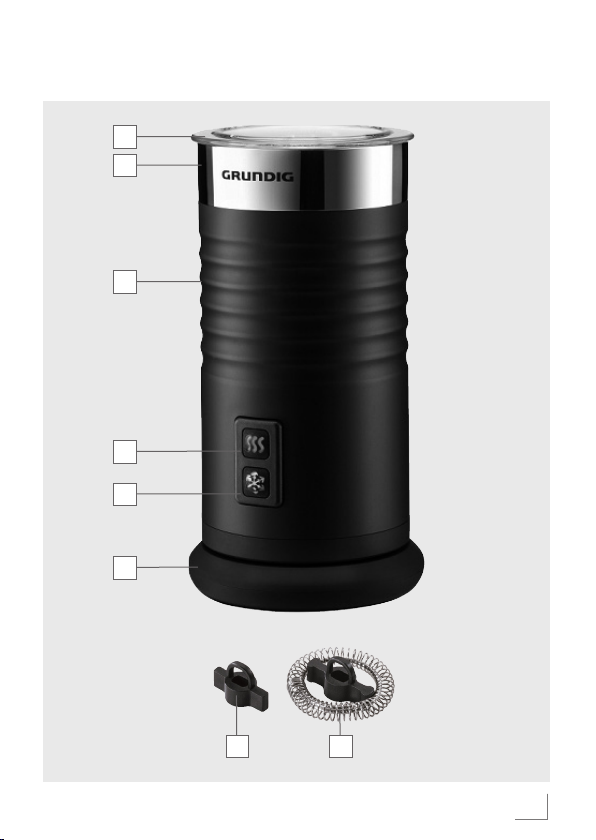
Controls and parts
See the figure on page 3.
A
Transparent Lid
B
Spout
C
Jug
D
Frothing & Heating
E
Frothing
F
Power Base
G
Stir attachment
H
Whisk attachment
10 ENGLISH

AT A GLANCE __________________________
Whisk/Stir Functions Max capacities Completion time
Frothing cold
milk
Frothing &
Heating
Heating (with a
small amount of
froth)
100ml 60 sec.
100ml 65–80 sec.
200ml 110–130 sec.
11ENGLISH

OPERATION ___________________________
Preparation
1 Clean the milk frother well be-
fore first use. For details please
read the "Cleaning and care"
section.
Operation
1 Open the lid A.
2 Insert the attachment of your
choise.
– Whisk attachment H for
creamy milk foam.
– Stir attachment G for hot milk.
3 Fill the jug with milk (attend the
max. /min. capacities above for
reference).
Notes
7
Do not place the jug C on the
base F while filling it with milk.
7
Never fill the jug C above the
maximum level indicator.
4 Close the lid A.
5 Place the jug C on the power
base F. Make sure that it is
sitting in an upright and stable
position.
6 Insert the plug into the wall sock-
et.
7 Push the button D for frothing
and heating or button E for
frothing.
– The indicator light of the
pushed button lights up: red if
you pushed D or blue if you
pushed E.
8 After the frothing or heating
process, the indicator light of
button D or button E flashes
for 30 seconds.
9 Disconnect the plug from the
wall socket.
10 Take the jug C from the power
baseF.
11 Open the transparent lid by A
removing it. Pour the milk or
foam from the jug C by using
the spout B in the cup or glass
you want to use.
Note
7
Let the milk frother cool down
between each heating process.
7
Use whole milk (fat content
3.0%) for best results.
7
Milk heats to approximately
65+/-5°C. This is the ideal
temperature to ensure the best
flavor.
12 ENGLISH

INFORMATION ________________________
Cleaning and care
Caution
7
Never use petrol, solvents
or abrasive cleaners or hard
brushes to clean the appliance.
7
Never put the appliance, power
base F or power cord in water
or any other liquid.
1 Turn the appliance off and dis-
connect it from the wall socket.
2 Let the appliance cool down
completely.
3 Remove the jug C from the power
base F before cleaning, separate
the lid A and the silicon ring from
the jug C and wash with warm
water.
4 Remove the whisks from the jug
C
and wash with warm water.
5 Clean the inner walls with soapy
water and a non–abrasive cloth.
Then wipe them dry with a soft
cloth.
Note
7
Before using the appliance after
cleaning, dry all parts carefully
using a soft towel.
Storage
7
If you do not plan to use the appliance for a long period of time,
please store it carefully.
7
Store the whisk and stir attachment directly with the appliance.
The second attachment can be
stored in the bracket at the lid.
7
Make sure the appliance is unplugged and completely dry.
7
Store the appliance in a cool,
dry place.
7
Make sure the appliance is kept
out of the reach of children.
13ENGLISH

INFORMATION ________________________
Environmental note
This product has been made from
high–quality parts and materials
which can be re–used and which
are suitable for recycling.
Therefore, do not dispose of the product with
normal household
waste at the end of its
service life. Take it to a
collection point for the recycling of
electrical and electronic appliances. This advice is indicated by this
symbol on the product, in the instruction manual and on the packaging.
Please consult your local authorities
to find out where the nearest collection point is.
Help protect the environment by recycling used products.
Technical data
This product conforms to
the European directives
2004/108/EC,
2006/95/EC , 2009/125/EC
2011/65/EU.
Power supply:
220–240 V ~, 50/60 Hz
Power: 365–435 W
Technical and design modifications reserved.
14 ENGLISH

Grundig Intermedia GmbH
Beuthener Strasse 41
D–90471 Nürnberg
www.grundig.com
72011 908 7600 14/20
 Loading...