

Page 1
GUFSAT02SD
SD digital box
Instruction Manual
IMPORTANT: Please read all instructions
carefully before use and keep for future reference.
Page 2
Welcome
Thank you for choosing this Grundig digital box.
Not only can it receive over 140 subscription free channels, but you can also get
radio channels.
It’s really simple to use; it’s all done using the clear, easy to understand on screen menus which are
operated from the remote control. It even has a reminder function so that you won’t miss your favourite
programmes.
For a one off payment, you can buy a digital
box, satellite dish and installation giving you
over 140 channels covering the best of TV
and more.
1
A digital box lets you access digital channels
that are broadcast in the UK. It uses a digital
signal, received through your satellite dish
and lets you watch it through your existing
television.
Page 3
OK
SWAP
BACK
EXIT
TEXT
SUB
AD
CH
LIST
CH
VOL
i
GUIDE
MENU
2 abc1 3 def
5 jkl4 ghi 6 mno
8 tuv
7 pqrs 9 wxyz
[
. ,
& @ _
0
AUDIO
08
Contents
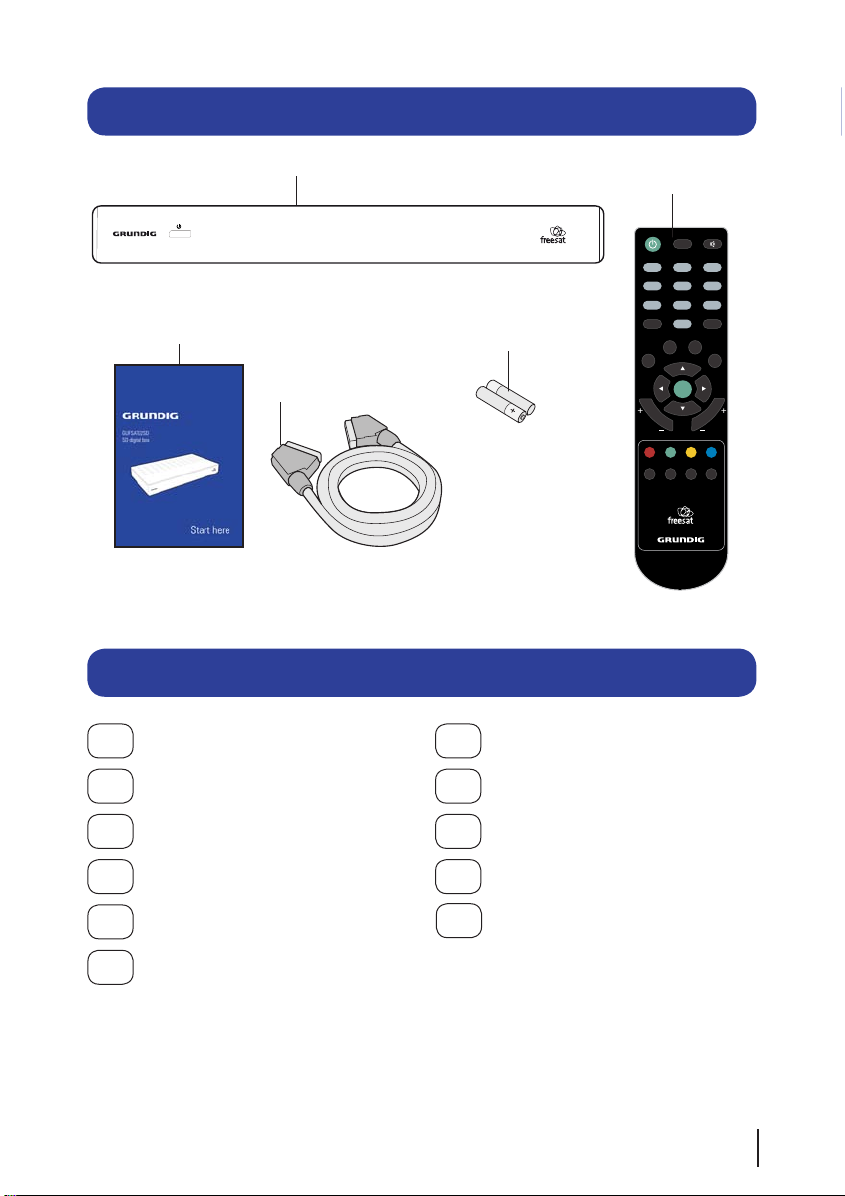
Your new digital box
2 x AAA batteries
SCART cable
Quick start guide
Remote control
2
What’s in the box?
Your digital box................... 3
Your remote control............ 4
Connecting up..................... 5
Get started.......................... 6
Daily use............................. 7
The menu system............... 9
Using the reminder............ 12
Non-freesat services......... 13
Help and advice................. 14
Safety................................ 17
Electrical safety................. 18
01
02
03
04
05
07
09
10
06
11
Page 4
AC230V~50Hz
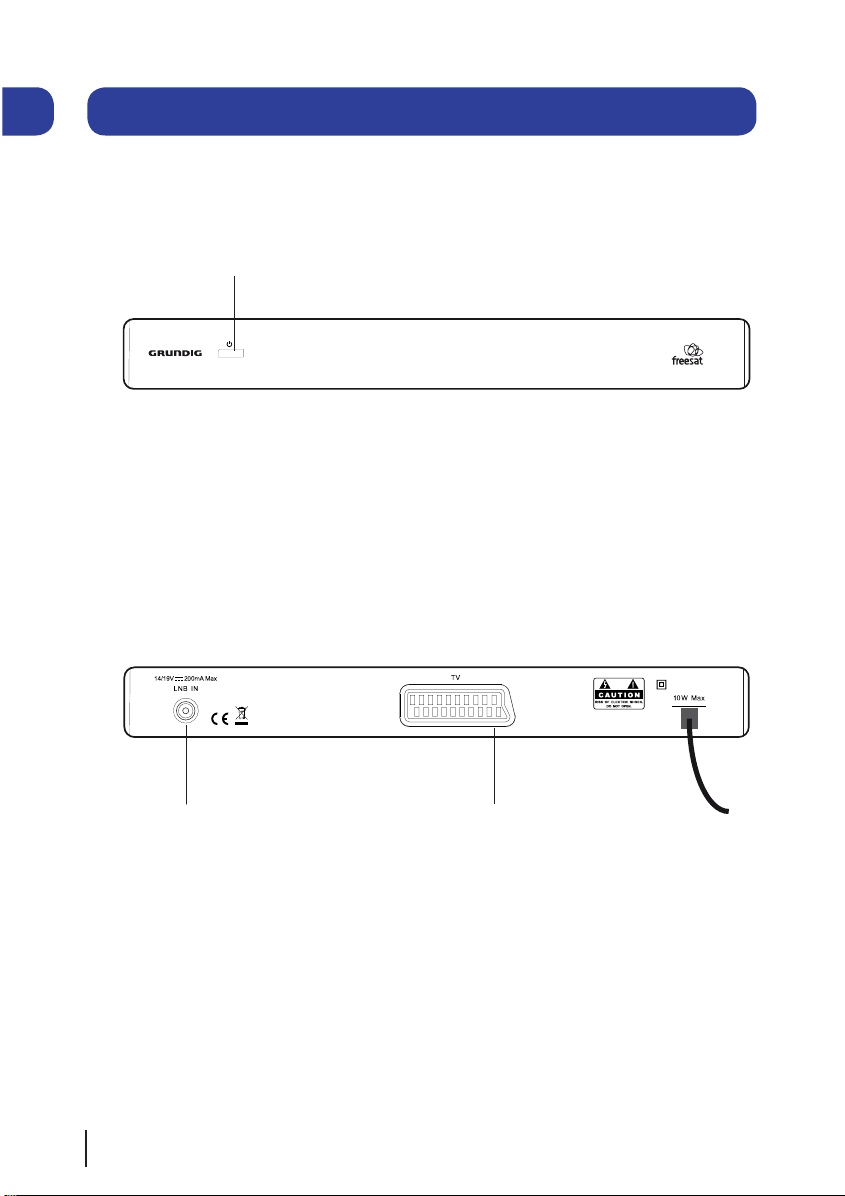
Your digital box
Front view
Rear view
STANDBY Power On/Standby.
3
01
LNB IN Signal In from
LNB on satellite
TV Standard definition
SCART output (For
connection to a non HD TV
or recording device)
Page 5
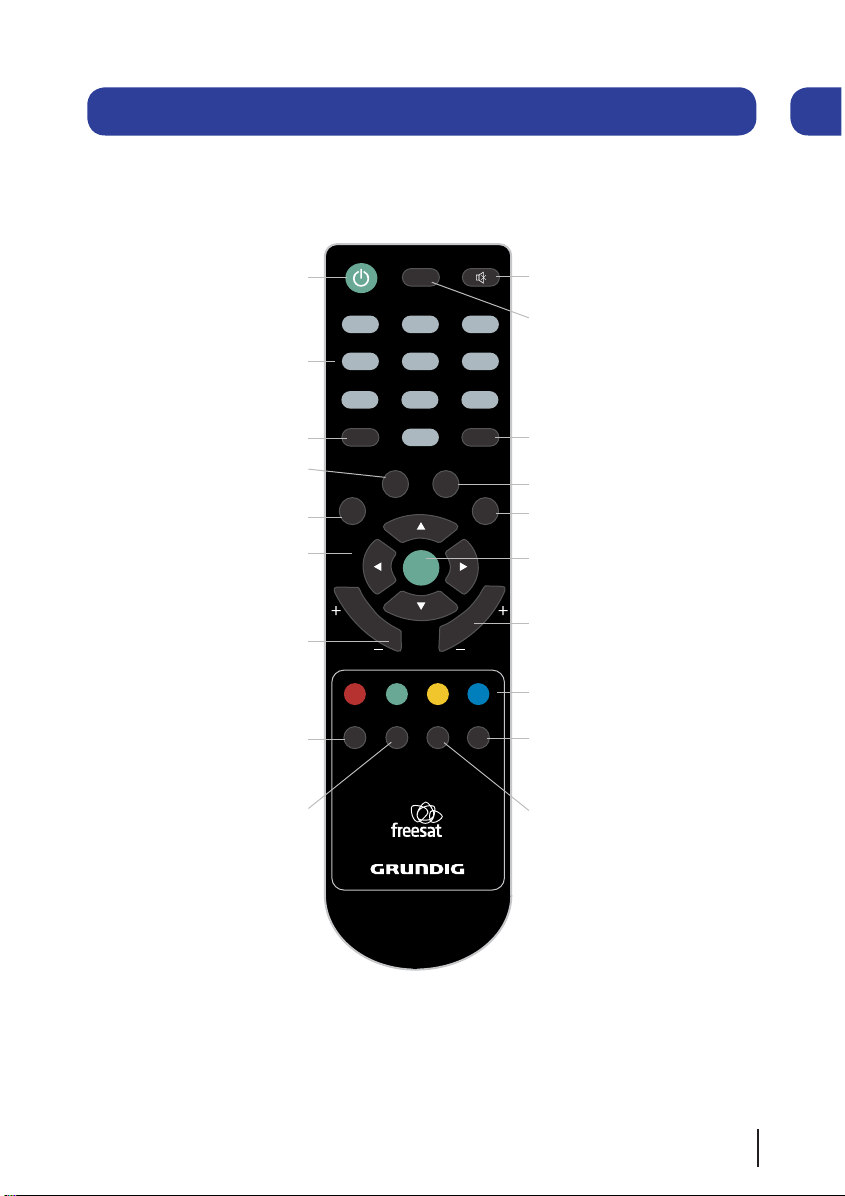
Your remote control
4
02
OK
SWAP
BACK
EXIT
TEXT
SUB
AD
CH
LIST
CH
VOL
i
GUIDE
MENU
2 abc1 3 def
5 jkl4 ghi 6 mno
8 tuv
7 pqrs 9 wxyz
[
. ,
& @ _
0
AUDIO
STANDBY Power On/Standby.
MUTE Turns the volume On
and Off.
NUMBER PAD Enter values and
select the channel number
directly by entering it’s number.
AUDIO Opens the audio selection
menu.
INFO Display the Info bar.
NAVIGATION Navigate up/down/
left/right in menus/on screen
displays.
OK Confirm selection in menu/on
screen displays.
EXIT Closes menu.
BACK Takes you back to the
previous menu.
CH +/- Channel up and down.
COLOUR BUTTONS For interactive
use and navigating menus.
CH LIST Opens the channel list
menu.
SUB Turns the subtitles On and
Off.
AD Turns audio description on or
off. Also opens the audio menu
when the info banner is displayed.
GUIDE Opens the genre list and
the programme list.
TEXT Displays digital text when
available.
VOL +/- Volume up and down.
SWAP Return to the previous
selected channel.
MENU Opens the main menu.
Page 6
5
03
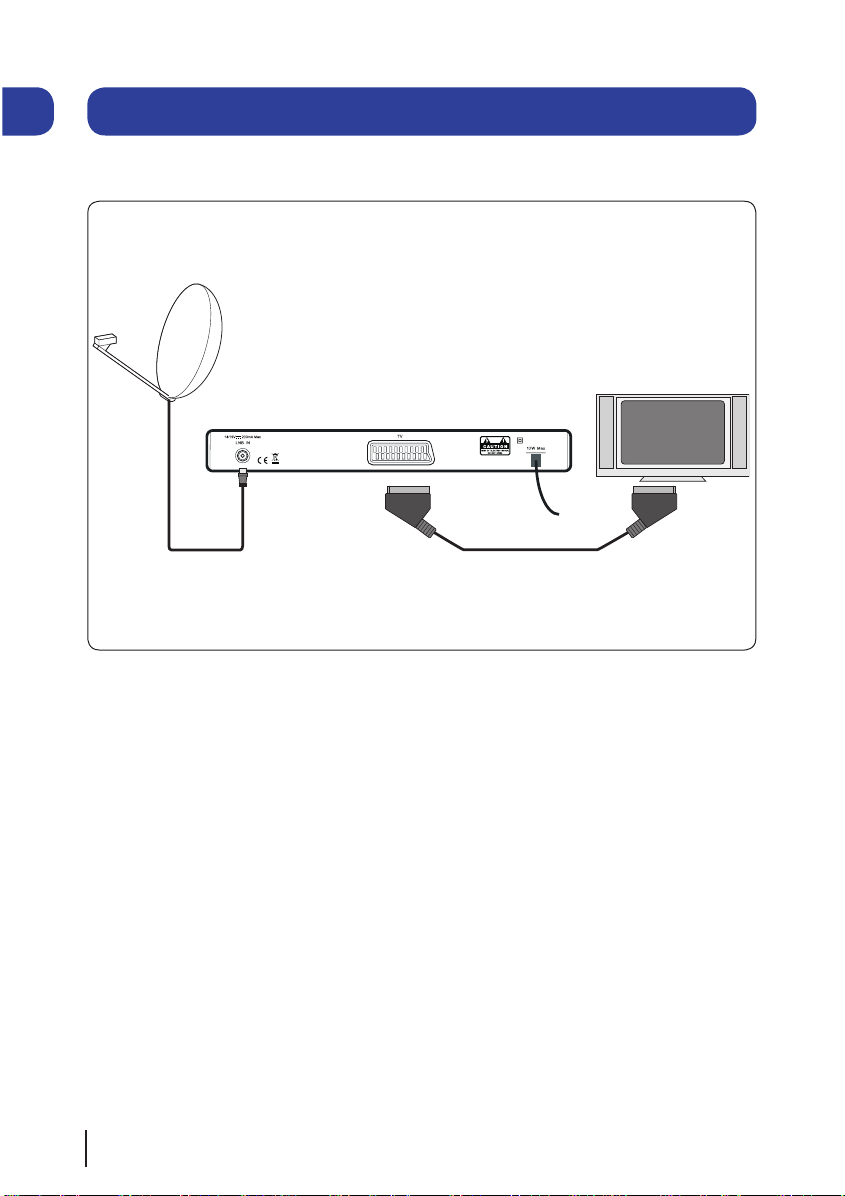
Connecting up
AC230V~50Hz
TV
SCART CableRG6 co-axial Cable with
an ‘F’ type connector
Getting connected
Connecting to the TV
Connect a RG6 co-axial cable fitted with an ‘F’ type connector from your satellite dish to the ‘LNB IN’
socket on the back panel of your digital box.
Connect the SCART cable that came with your digital box between the TV socket on the back panel of
your digital box and the SCART socket on your TV.
Page 7

Getting started
04
6
Put batteries in the remote control
Open the battery cover of the remote control and
put two size AAA batteries so that the ‘+’ and ‘-’
marks on the batteries match the ‘+’ and ‘-’ marks
inside the remote control. Replace the battery cover.
1
2
3
Plug in and switch on
Insert the digital box mains plug into a mains
socket. The standby light on the front will come
on.
Switch your TV on, and then press the standby
button on your digital box remote control.
The easy install screen
The first time installation screen will appear on
screen.
If the signal strength is above 50% press the
[OK] button on your remote control to continue
the setup.
Follow the instructions on screen to complete
the setup.
Make sure that your digital box has been installed correctly before
continuing the installation.
92%
If signal strength is less than 50% please check the dish
position and cable connections.
Press to Continue
Network ID
Transport ID
Signal Strength
Page 8

Daily use
Introducing the channel lists
There are three channel lists available to you;
The ‘Channel list’ shows all the available
channels that you can receive.
Show TV List
Show F a v List
Edit F a v List Lock Channel
W a tch
T u esday 17 Mar 20:15
Exit Menu
101 BBC 1 East (E)
102 BBC 2 England
103 ITV1 Anglia S
104 Channel 4
105 Five
106 BBC THREE
107 BBC FOUR
108 BBC HD
TV Listings
110 BBC ALBA
113 ITV2
114 ITV2+1
Delete
The ‘Genre list’ filters all the available TV and
radio stations into specific genres.
View Genre
Fr iday 13 Mar 17:35
Exit Menu
Genre List
Radio
Shopping
Gaming & Dating
Music
Children
Special Intere st
News & Sport
Movies
Life style
Entertainment
All Channels
Regional
You can use the arrow buttons to select a
genre and the [OK] button to show the selected
channels in the programme list.
The ‘Programme list’ shows the
scheduled programmes for the selected genre.
P a ge Down
P a ge Up
+24 Hrs-24 Hrs
W a tch
Fr iday 13 Mar 17:10
17:00 - 18:00 The We akest Link. Anne Robinson presents the
quick-fire gener a l knowledge quiz in which contestants must decide at
the end of each ro und which of their number should be eliminated. [S]
Exit Menu
101 BBC 1 East (E)
102 BBC 2 England
103 ITV1 Anglia S
104 Channel 4
105 Five
106 BBC THREE
107 BBC FOUR
108 BBC HD
17:00 Fr i 13/03 19:00
Flog It! Egg Heads Pr iceless
This is BBC THREE
This is BBC FOUR
The We akest Li
BBC News Look East
Britian’s Best Di Anglia T o night ITV Evening Ne
The P a ul O’Gr a d The Simpsons Hollyoaks
Five News Neighbours Home and Away Monkey
In the Nig In the Nig Doctors After Y o u
SUB
You can use the arrow buttons to select a
different channel and use the coloured buttons
to move to a new page of channels.
Press [OK] to watch the selected programme.
Changing the channel
You can select the channel you want to watch
by using the [CH+] and [CH-] buttons on the
remote control. Alternatively use the number
buttons to key in the channel number.
When you change the channel the information
screen will be displayed for a few seconds. This
shows the details of the programme currently
showing and the next programme for the
selected channel.
Select
Mo re
14:00 - 15:00
103 ITV1 Anglia S Now 14:25
Dickinson’s Real Deal
Ne xt
CH+ / CH-
05
7
Page 9

If you press the [INFO] button while the
information screen is displayed, the extended
information screen will shown. This provides a
programme summary.
If you press the [AD] button while the
information screen is displayed, the audio menu
will be shown.
Select Audio
Exit Menu
S P A
POR
RUS
Audio
FRE
GER
I T A
ENG AD
ENG Stereo
ARA
Change Audio
Use the arrow buttons to select an audio
language, then press the [OK] button. Audio
description languages have ‘AD’ after their
description.
Changing the volume
You can change the volume by using the [VOL+]
and [VOL-] buttons on the remote control. You
can turn off the volume by pressing the [MUTE]
button. To turn it back on press the [MUTE]
button again.
Daily use
Audio description
Audio description is an additional
narration that describes all significant visual
information such as body language, facial
expression, scenery, costumes - anything that
is important to the plot of the story, event or
image.
Press the [AD] button to turn audio
description on (if available). Press the [AD]
button again to turn the audio
description off.
Subtitles
Press the [SUB] button to display subtitles (if
available). Press the [SUB] button again to turn
them off.
8
05
Page 10

The right arrow button lets you delete a channel
from the TV list.
The [RED] button opens/returns to the full TV
listing menu and shows you the full channel line
up available.
The [GREEN] button will show you all your
channels in your favourite list.
The [YELLOW] button lets you edit your favourite
channel list so that you can add and delete
channels that you use most often.
The [BLUE] button lets you lock channels so
that they can’t be viewed. This can be useful
if you want to restrict children from watching
unsuitable channel content.
Show TV List
Show F a v List
Edit F a v List Lock Channel
W a tch
T u esday 17 Mar 20:15
Exit Menu
101 BBC 1 East (E)
102 BBC 2 England
103 ITV1 Anglia S
104 Channel 4
105 Five
106 BBC THREE
107 BBC FOUR
108 BBC HD
TV Listings
110 BBC ALBA
113 ITV2
114 ITV2+1
Delete
Enter lock Code
* _ _ _
DON’T FORGET! To lock and unlock a
channel you will need to enter the code
0000.
The [SWAP] button shows any Free to Air
channels that you have manually tuned.
DON’T FORGET! You must enable ‘Show
Manual Channels’ in the settings menu
before you can view Free to Air channels.
The menu system
The main menu
To open the main menu screen press the [MENU]
button on the remote control.
To select a menu, press the relevant number
button to open it. For example press [1] on the
remote control to open ‘TV Listings’.
To close any of the menu screens, press the
[EXIT] button.
TV listings menu
The TV listings menu shows you all of your
available channels. This list is updated
automatically each time you open the menu, so
there is no need to re-tune your digital box when
new channels become available.
Show TV List
Show F a v List
Edit F a v List Lock Channel
W a tch
T u esday 17 Mar 20:15
Exit Menu
101 BBC 1 East (E)
102 BBC 2 England
103 ITV1 Anglia S
104 Channel 4
105 Five
106 BBC THREE
107 BBC FOUR
108 BBC HD
TV Listings
110 BBC ALBA
113 ITV2
114 ITV2+1
Delete
TV Listings
Settings
Language
Information
Exit Main Menu
Main Menu
06
9
Page 11

The menu system
The settings menu
The settings menu allows you to change the
default settings on your digital box.
To select one of the options use the arrow
buttons, then press the [OK] button to select.
Select
Fr iday 13 Mar 17:35
Exit Menu
Settings
P a re ntal Settings
Menu T r ansparency Settings
Receiver Upgr a de
Genre Settings
TV Screen Size
SCART Output
Ke y Beep
First Time Install
Show Non-Fr eesat Services
Add Non-Fr eesat Services
Key Beep
This setting lets you turn the Audio Description
key beep on or off.
Genre Settings
This setting lets you turn off the Genre window
when you press the [GUIDE] button on the
remote control, so that all channels are shown
in the programme list as default.
TV screen size
This changes the format of the screen. Select
the option that best suits your type of TV.
SCART output
You can set the output type of the SCART
socket. The options are Composite or RGB.
Parental settings
This allows you to change the channel lock
code.
Menu transparency settings
This allows you to make the channel list and
main menu transparent so that you can continue
watching TV while using them.
Receiver upgrade
You can set your digital box to search for
new system software either manually or
automatically.
First time install
This allows you to put your digital box back to
the factory default settings. You will need to
enter your lock code to continue. The default
lock code is 0000.
Enter your postcode then press to continue
Postcode
TV Screen Size
2
Widescreen (16:9)
CV21 1FF
DON’T FORGET! Use the right arrow key on
the remote control to select your TV screen
size. Press the [OK] button to continue.
06
10
Page 12

The menu system
06
Add Manual Channels
This menu allows you to manually add Free to
Air channels to the channel list.
DON’T FORGET! Manually added Free to
Air channels will not be shown in the
programme list.
Show Manual Channels
This menu allows you to see the manually added
Free to Air channels in the channel list.
DON’T FORGET! The default setting is not to
show manually added Free to Air channels.
The language menu
The language menu allows you to change the
default language settings for audio and subtitle
languages.
Use the arrow buttons to select a language
type, then press the [OK] button to select.
To select between English, Welsh or Gaelic use
the arrow buttons, then press the [OK] button
to select.
Select
Fr iday 13 Mar 17:35
Exit Menu
Language
Subtitle Language
Audio Language
The information menu
This menu shows you information about your
digital box.
T u esday 17 Mar 15:35
Exit Menu
Info rmation
Helpline Number
Signal Stre ngth
Signal Quality
Hard wa r e V e rsion
Softwa re V e rsion
Post Code
Model Number
Manufacture r
Lock Indicator
Network ID
T r ansport Str e am
0871 2304695
1.0
0.5.1
CM77 7AZ
02
Grundig
OK
003b
07fe
DON’T FORGET! It is useful to have this
information when contacting the call
centre.
11
Page 13

P a ge Down
P a ge Up
+24 Hrs-24 Hrs
W a tch
Fr iday 13 Mar 17:10
17:00 - 18:00 The We akest Link. Anne Robinson presents the
quick-fire gener a l knowledge quiz in which contestants must decide at
the end of each ro und which of their number should be eliminated. [S]
Exit Menu
101 BBC 1 East (E)
102 BBC 2 England
103 ITV1 Anglia S
104 Channel 4
105 Five
106 BBC THREE
107 BBC FOUR
108 BBC HD
17:00 Fr i 13/03 19:00
Flog It! Egg Heads Pr iceless
This is BBC THREE
This is BBC FOUR
The We akest Li
BBC News Look East
Britian’s Best Di Anglia T o night ITV Evening Ne
The P a ul O’Gr a d The Simpsons Hollyoaks
Five News Neighbours Home and Away Monkey
In the Nig In the Nig Doctors After Y o u
When the reminder time is reached, the digital
box will automatically switch over to the correct
channel and your programme will start.
DON’T FORGET! To cancel a programme
reminder, highlight the programme where
the reminder has been set, and press the
[OK] button. The clock icon will disappear
and the reminder will be cancelled.
Using the reminder
You can use the reminder function to let you
know when a programme is going to start.
Press the [GUIDE] button on the remote control
and then press the [OK] button.
The programme list will be displayed. The
channel and programme that you are currently
watching are highlighted in orange.
Show TV List
Show F a v List
Edit F a v List Lock Channel
W a tch
T u esday 17 Mar 20:15
Exit Menu
101 BBC 1 East (E)
102 BBC 2 England
103 ITV1 Anglia S
104 Channel 4
105 Five
106 BBC THREE
107 BBC FOUR
108 BBC HD
TV Listings
110 BBC ALBA
113 ITV2
114 ITV2+1
Delete
Using the arrow buttons on the remote control,
move to a different programme that you want to
set as a reminder.
Press the [OK] button to set the reminder.
When the reminder has been set a clock icon is
shown before the programme name.
07
12
Page 14

Non-freesat services
You can manually tune any free channels on the
digital box, if you have the frequency in MHz, the
symbol rate and the LNB polarisation.
Adding Free to Air channels will not affect the
freesat channels in any way. You can add free
channels from the Astra satellite at 28.2° East
and the Eurobird satellite at 28.5° East.
You can find channel frequencies online.
Open the add manual channels menu as
described on page 11. Use the arrow
buttons to select manual. Press the [OK] button.
The add non-freesat services screen will be
displayed.
Select
Change Fr eq
Add Non-Freesat Services
Lock
9
Lev el
Quality
CH+ / CH- Change preview
LNB Polarisation
Scan
Symbol Rate
Fr equency (MHz)
10788
22000
Ve rtical
Stopped
Network ID
Services found
FEC
5/6
- - - -
- -
T r ansport ID
Services added
- - - -
- -
Using the arrow and number buttons, select
and enter the frequency, symbol rate and LNB
polarisation.
Use the arrow buttons to select ‘scan’. Press the
right arrow button to begin searching for Free to
Air channels.
Once the search is complete, any new channels
will be available in the channel list.
DON’T FORGET! To view non freesat
channels, you must select ‘yes’ in the
‘show manual channels’ menu.
08
13
Page 15

Help and advice
Frequently asked questions What you can do
In which direction should my satellite dish be
positioned?
Your satellite dish should be fitted on a south facing
wall in the direction of 28.2 ° east of south.
Can I connect more than one digital box to
my satellite dish?
Yes you can. You will need an LNB (the box on
your satellite dish) fitted that has more than one
connection. You will need one connection for each
digital box.
Can I connect this digital box to my normal
roof aerial?
No. This box must be connected to a satellite dish for
it to work.
The digital box will not switch on. What
should I do?
Check the mains power cable and make sure it is
plugged into a suitable power outlet. Check that the
mains supply is switched On. Connect the power
cable to a different power outlet.
My digital box can’t find the ‘Network ID’
and ‘Transport ID’ what should I do?
Make sure that your satellite dish is positioned
correctly, and check the cables and connections
again.
Why do I have to enter my postcode in the
first time set-up?
This makes sure that you receive programmes for
your local region.
How do I enter a space when entering the
postcode?
Your digital box will automatically enter the space
for you. Enter your full postcode using the number
buttons and then press the ‘OK’ button.
How do I do a first-time installation again? You can do a first-time installation again using the
settings menu. See page 10 for more information.
I’m not getting a picture on the TV. What
should I do?
• MakesurethatthedigitalboxisOn.(Pressthe
‘STANDBY’ button.)
• MakesurethattheSCARTcableisfirmly
connected to the TV.
• CheckthebrightnessleveloftheTV.
14
09
Page 16

Help and advice
Frequently asked questions What you can do
Can I receive high-definition programmes
with this digital box?
No. High-definition channels may be shown in the TV
programme guide, but you cannot watch them with
this receiver.
Can I change the audio language for the
programme I am watching?
Yes. Some channels broadcast other audio
languages. Press the [AD] button when you are
watching a programme to see if other languages are
available.
Do I have to retune my digital box when
digital switchover happens in my region?
No. Freesat receivers do not have to be retuned as it
receives its signal from a satellite and not an aerial.
Do I have to retune my digital box when new
channels are added?
No. Your receiver will automatically add new
channels for you, and display them in the TV
programme guide.
Can I use ‘red button’ interactive services
with this receiver?
Yes. Some channels offer interactive services such as
news, sport and weather. When interactive services
are available, a red dot will appear in the top righthand side of the screen. Simply press the red button
on your remote control to access them.
Can I add ‘FTA (Free To Air)’ channels to my
digital box?
Yes. You can add these using the ‘Add Non-Freesat
Services’ menu. See page 13 for more information.
I have been asked to enter a lock code.
What is it?
Your default code is 0000. You can change this to
something else in ‘Parental Settings’.
Why can’t I see my FTA channels? Free to Air channels are not shown in the TV
programme guide. Make sure that ‘Show NonFreesat Services is set to ‘yes’. Press the ‘CH LIST’
button and then press the ‘SWAP’ button to see
them.
How can I find out system information about
my receiver?
Press the ‘MENU’ button and select option 0.
09
15
Page 17

You may find the information you are
looking for on our web site.
www.grundigdigital.co.uk
or on the freesat website
www.freesat.co.uk
If you still need help or information you can
phone our call centre on:
0871 230 4695
Calls are charged at 10p per minute when called
from a BT land line. Call charges may vary if
using other networks.
Need extra information or help setting up?
Help and advice
Frequently asked questions What you can do
My picture and sound quality is poor. What
should I do?
• Makesuretherearenomobilephones,DECT
phones, wireless routers or microwave ovens
near the receiver.
• Keepthepowerandthesatellitecableapart
from each other.
• Checkthesignallevelsusingthesystem
information screen. The signal level may be
affected by weather conditions. If the LNB
is covered with snow or there is heavy rain,
the sound and picture quality may be poor
temporarily.
16
09
Page 18

Safety
General Safety
This equipment has been designed and
manufactured to meet European safety
standards, but like any electrical equipment,
care must be taken if you are to obtain the best
results and safety is to be assured.
Do read these operating instructions before you
attempt to use the equipment.
Do ensure that all electrical connections
(including the mains plug, extension leads and
interconnections between pieces of equipment)
are properly made in accordance with the
manufacturer’s instructions.
Switch off and remove the mains plug when
making or changing any connections.
Do consult your dealer if you are ever in doubt
about the installation, operation or safety of your
equipment.
Don’t continue to operate the equipment if you
are ever in doubt about it working normally, or if
it is damaged in any way. Switch it off withdraw
the plug from the mains and consult your dealer.
Don’t remove any fixed covers as this may
expose you to dangerous voltages.
Don’t leave the equipment switched On when it
is unattended for long periods of time, unless it
is specifically stated that
it is designed for unattended operation or has a
standby mode.
Make sure that other people in your household
are conversant with the equipment.
Don’t obstruct the ventilation vents on the
equipment, for example with curtains or soft
furnishings.
Overheating will cause damage and shorten the
life of the product.
Don’t allow electrical equipment to be exposed
to rain or moisture.
10
17
Page 19

Electrical Safety
18
11
Make sure your electricity supply is the same voltage as the voltage printed on the label on the bottom
of the main unit of your receiver.
The receiver needs a 230-volt (V) 50-hertz (Hz) mains supply. Do not use any other supply. The receiver
comes with a fitted plug. If the plug breaks, you cannot reuse the plug. If you need to change the fuse
in a moulded plug you must refit the fuse cover. If you lose or damage the fuse cover, you must not use
the plug until you have a replacement plug cover or plug.
If you have to change the plug because it is not suitable for your socket, or it is damaged, you should
remove it and fit the right plug using the wiring diagram below. You must throw the plug away safely.
You could get an electric shock if you use it again.
The colours of the wires in the receiver’s power lead may not match the coloured markings in your
plug, so you should follow these instructions.
You must connect the blue wire to the terminal marked with the letter ‘N’ or which is coloured
black.
You must connect the brown wire to the terminal marked with the letter ‘L’ or which is coloured
red.
You should not connect anything to the earth terminal of the plug marked with the letter ‘E’ or
which is coloured green.
You must always use the same fuse value as your receiver’s power-lead plug if you replace it.
No connection (E - earth)
Fuse
Brown (L - live)
Blue (N - neutral)
Cable grip
Mains cable
Page 20

www.grundigdigital.co.uk
0871 230 4695
 Loading...