

Page 1
GUDB20USB3 Digital Box
Instruction Manual
IMPORTANT: Please read all instructions
carefully before use and keep for future reference.
Page 2
2
3
Digital TV
Contents
IMPORTANT: Use of any electrical equipment should be undertaken with care.
Please read the safety section on page 43 before using your Digital Box. This
appliance is for household use only.
A Digital Box lets you access the free
digital channels that are broadcast in
the UK. It uses a digital signal, received
through your normal aerial and lets you
watch it through your existing television.
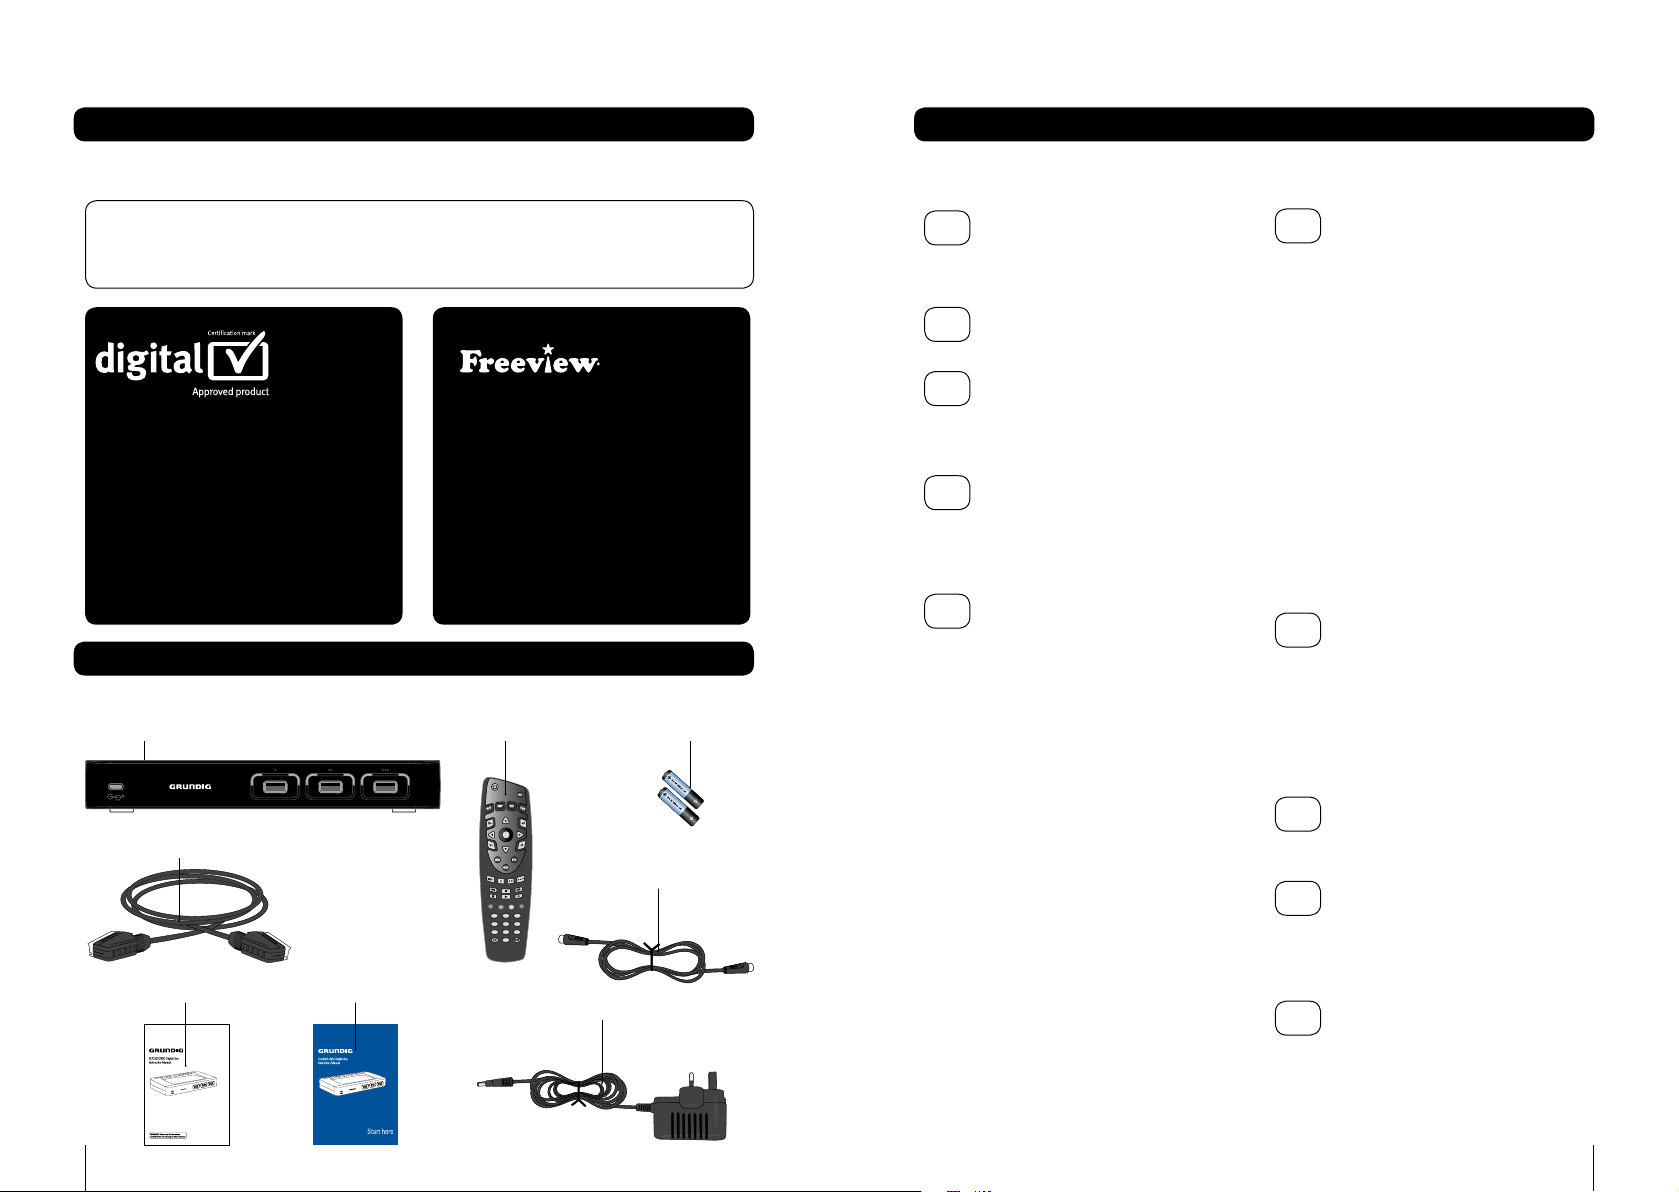
What’s in the box?
Digital box Remote control 2 batteries (AA/LR06)
SCART cable
User guide Quick-start guide
The Freeview+ digital TV recorder gives
you up to 48 digital TV channels which
you can pause, record and rewind at the
touch of a button (requires a USB stick
not supplied). And the real plus is that
there is no subscription or contract in
sight. For more information on FREEVIEW,
and to check reception in your area
please visit www.freeview.co.uk
OK
RF (coaxial) cable
1 2 3
4 5 6
8 9
7
0
AC mains adaptor
01
Your Digital Box ....................... 4
Front panel
Rear panel
02
Your remote control ................ 5
03
Connecting up ......................... 6
Getting connected
Other connections
04
Getting started ..................... 7-8
Install batteries in remote
Using your digital box for the first time
Inserting USB flash devices
05
Basic features .................. 10-19
Using standby
Changing channels
Volume control
Programme guide
Now and next information
Pause live TV
Instant record
Record live TV
Managing clashes
Alternative recording
Record using the programme guide
Series record
Split programme
Play
Fast-forward a recording
Rewind a recording
Skip
Pause playback
Stop playback
Delete a recording
Schedule record summary
Schedule reports
Using audio description
Using subtitles
Using digital text
Help pages
06
Advanced features ........... 21-31
Favourites
Parental control
Censorship
Accessibility set-up
Using the main menu
Recording schedules
Using a VCR/DVD with your digital box
Managing your recorded programmes
Recorded programme icons
Copy
Search recorded programmes
Sort by name or by date
Rename a recording
Channel organiser
TV set-up
Setting the viewing standard
General set-up
07
Device management ........32-34
Free Space
Capacity
Status
Formatting
Compatible devices and formats
Lights on the front of the digital box
08
Retuning instructions ...... 35-36
Retune channels
09
Troubleshooting ...............37-41
Understanding the messages on your
digital box
General problem solving
10
Specifications ....................... 42
Digital TV switchover
Page 3
Your digital box01
Your remote control 02
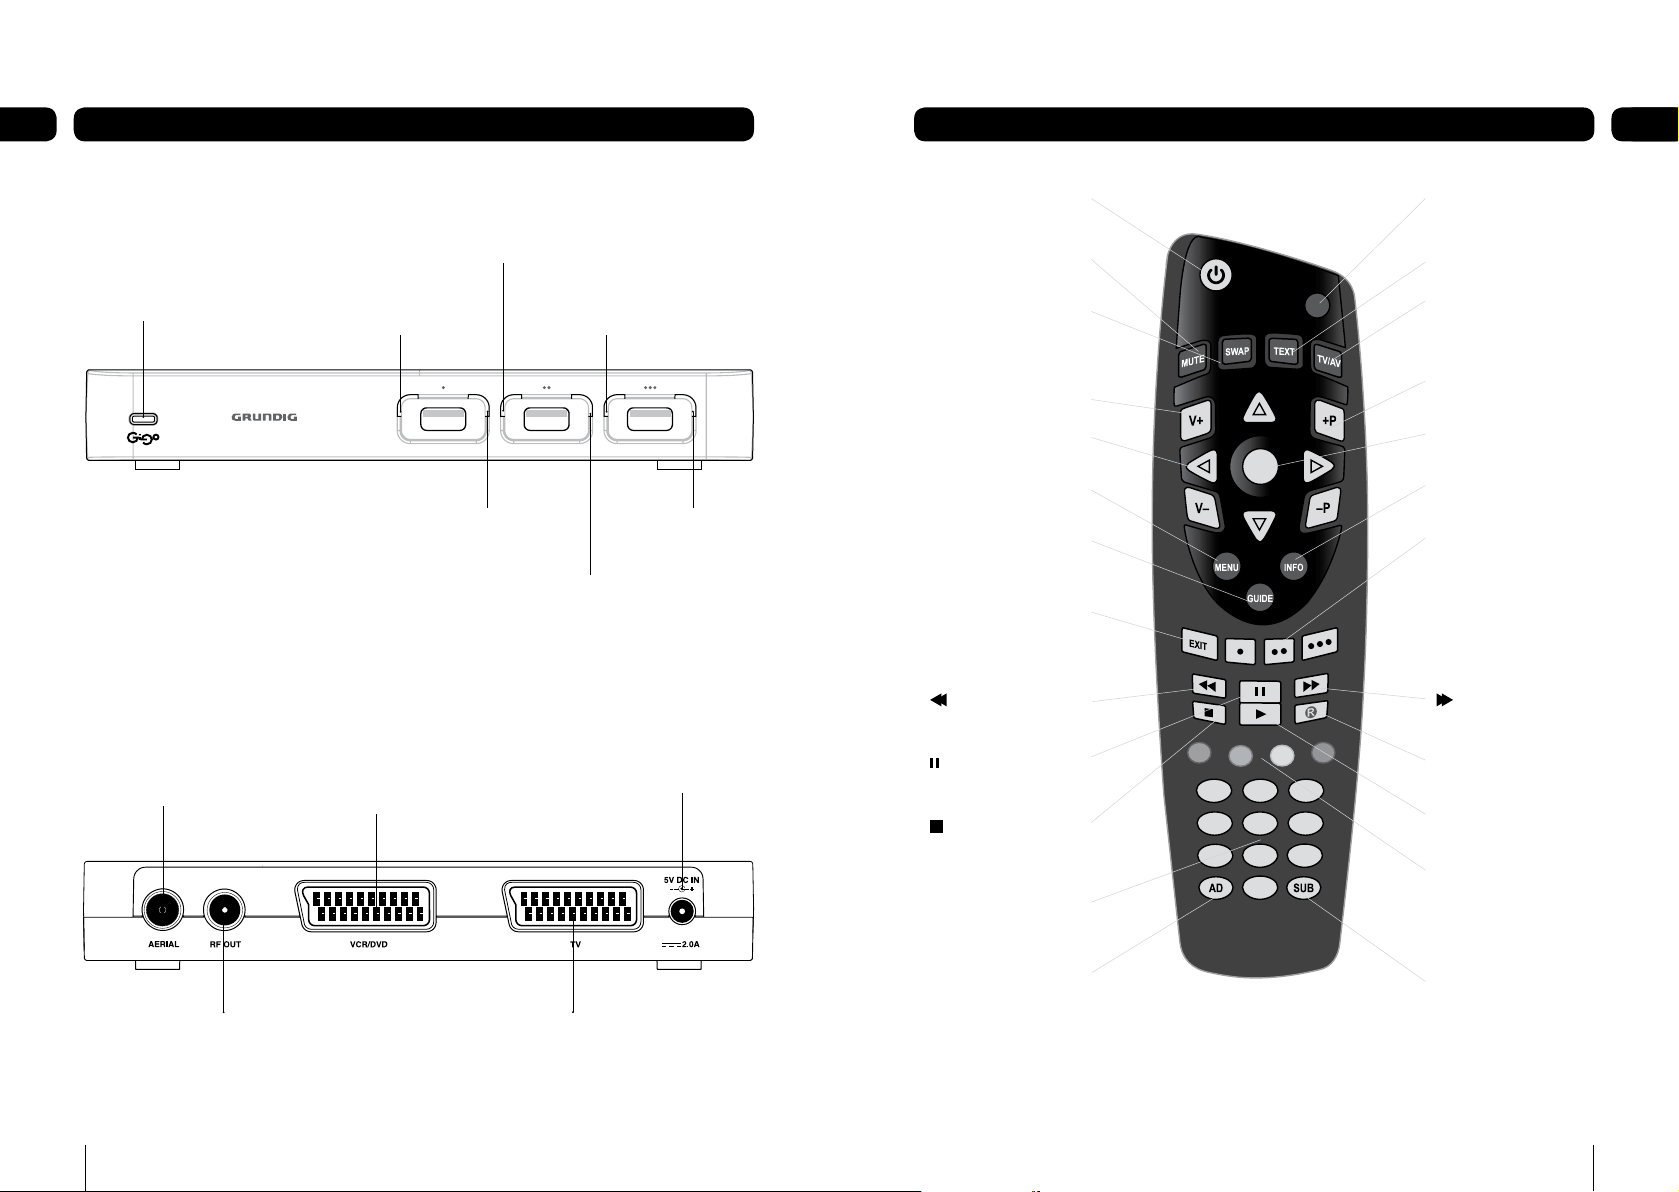
Front panel
Power On/Off LED
flashes green and red
when remote control
is activated
Rear panel
Aerial Input.
Connect the aerial
to this socket
RF output.
Connect the supplied
RF cable to the TV.
USB • Green LED
On when ready,
flashes when playing
AUX Scart
for connection to a VCR
or a DVD Recorder
USB •• Green LED
On when ready,
flashes when playing
USB • Red LED
On when recording,
flashes when copying
USB ••• Green LED
On when ready,
flashes when playing
USB •• Red LED
On when recording,
flashes when copying
TV Scart
Connection to TV
USB ••• Red LED
On when recording,
flashes when copying
5 Volt DC Input
[�] Switches the receiver on
and off (into standby).
[MUTE] Turns the digital box
volume off and on.
[SWAP] Switches between
the channel you’re watching
and the channel you were
previously watching.
[VOL + –] Increases or
lowers the digital box volume.
[pqtu] Moves
around the on-screen menus.
[MENU] Enters and exits the
main menu screen.
[GUIDE] Shows the TV
guide, also called electronic
Programme guide (EPG).
[EXIT] Exits the menu system
and goes back to the last
programme you were watching.
[ ] [REWIND] Backward
search through a recorded
programme.
[ ] [PAUSE] Pauses live TV
and starts recording. Pauses a
recording or playback.
[ ] [STOP] Stops a
recording or playback.
[0 to 9] Selects channels
and enters your PIN.
[AD] Switches audio
description on and off.
OK
1 2 3
4 5 6
8 9
7
0
HELP
[HELP] Enters and exits the
help screen.
[TEXT] Gives digital teletext,
where available.
[TV/AV] Selects the TV input
channels.
[P + –] Goes up and down
the channel list.
[OK] Selects the options on
the on-screen menu.
[INFO] Gives programme
information on the TV screen.
[•] Selects USB1 port. Instant
record to USB device in port 1.
[••] Selects USB2 port.
Instant record to USB device
in port 2.
[•••] Selects USB3 port.
Instant record to USB device
in port 3.
[ ] [FAST FORWARD]
Forward search through a
recorded programme.
[®] [RECORD] Opens the
‘select device’ menu to record
current programme.
[u] [PLAY] Opens the
recorded programmes list.
[RGYB BUTTONS]
The red, green, yellow and
blue buttons change or go to
different options when on the
digital text pages. Also used for
menu navigation.
[SUB] Switches subtitles on
and off.
4
5
Page 4

Connecting up03
Getting started 04
Getting connected
Connecting to the TV with SCART
Aerial lead
RF cable
Other connections
Connecting to the TV and DVD recorder with SCART
Aerial lead
RF cable
SCART cable*
SCART cable
SCART cable
DVD/RECORDER
TV
TV
RF cable*
Install batteries in remote
1
Remove the battery cover. Insert two size AA
batteries so that the ‘+’ and ‘-’ marks on the
batteries match the ‘+’ and ‘-’ marks inside the
unit. Replace the battery cover.
Plug in and switch on
2
Insert the Digital Box mains plug into a mains socket. The standby light on the front
will come on. Switch your TV on.
Using your digital box for the first time
3
Press [�] on the remote control. The green
power light should light up on the front panel of
the digital box.
Press [OK] on your remote control to begin
searching for digital channels.
* Not included in the box
6
If you cannot see the picture, go to the trouble
shooting section of this guide.
You will then be asked to select your television
type – normal or wide screen.
Use [t] and [u] to select.
1.
Press [OK] to accept.
2.
If your aerial has been correctly inserted.
3.
Press [OK] to continue.
7
Page 5
8
Getting started049Getting started 04
Usually, the search will take between two and five minutes, depending on the digital
TV service in your area. In some areas it may take longer (five to seven minutes).
As channels are found, their names are listed on the TV screen.
When the scan has finished, the digital box will automatically switch to the first
channel in the list.
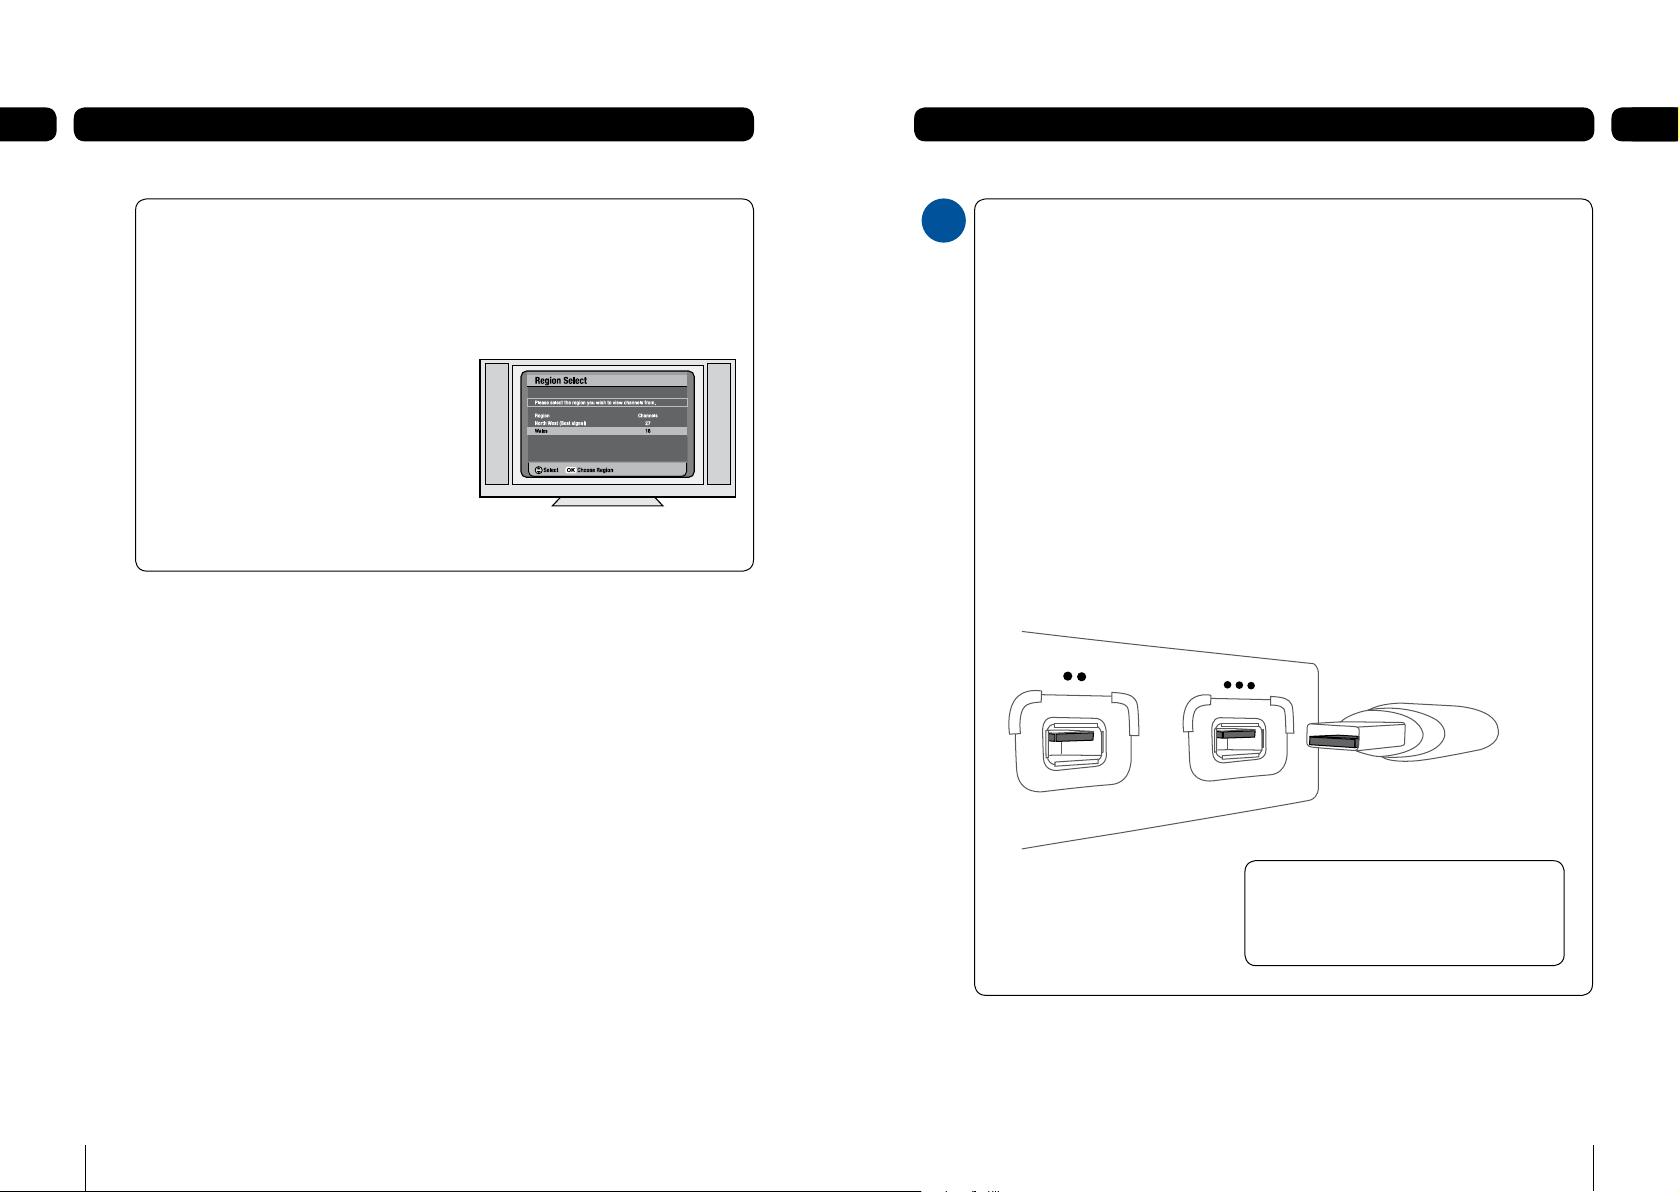
The receiver may pick up channels from
more than one region and you will be asked
to select the region you want to watch
channels from.
ress [p] and [q] to select and [OK]
• P
to choose.
You can now explore and enjoy the channels available on your digital TV service.
4
Inserting USB flash devices
You can insert a USB device at any time.
Recommended USB flash device: USB2.0 HS (high speed) formatted as FAT32 is
compatible and should be used to ensure the best user experience. Please insert a
suitable device. Read the ‘Compatible devices and formats’ section on page 33.
First make sure the digital box is positioned over a stable and even surface.
Insert the flash device into one of the USB ports labelled [•], [••] and [•••].
Look at the image below for guidance.
After a few seconds the green light next to the port should turn on indicating the
USB device has been inserted correctly and is in ‘ready’ status.
You can now record, play and copy to this device.
If the light does not turn on, the device is faulty, unformatted or is not a suitable
device.
Don’t Forget! When inserting a USB
device you may want to place one hand
on top of the digital box to ensure it
doesn’t move.
Page 6
10
Basic functions0511Basic functions 05
Don’t Forget! Press and hold [p] or [q]
to move a page up and a page down.
Don’t Forget! Press and hold [p] or [q]
to move a page up and a page down.
Don’t Forget! Scheduled recordings will
not take place if the box is switched off at
the mains.
Don’t Forget! Scheduled recordings will
not take place if the box is switched off at
the mains.
Using standby
When you’re not watching TV, you should set
your digital box to standby.
To do this
Press [�] to switch between on (green
1.
light on) and standby (red light on).
If no recordings are scheduled in the next 2
hours after 10 seconds the digital box will
go into low power mode. This is to save
energy. The red light will turn off.
To come out of low power mode press [�].
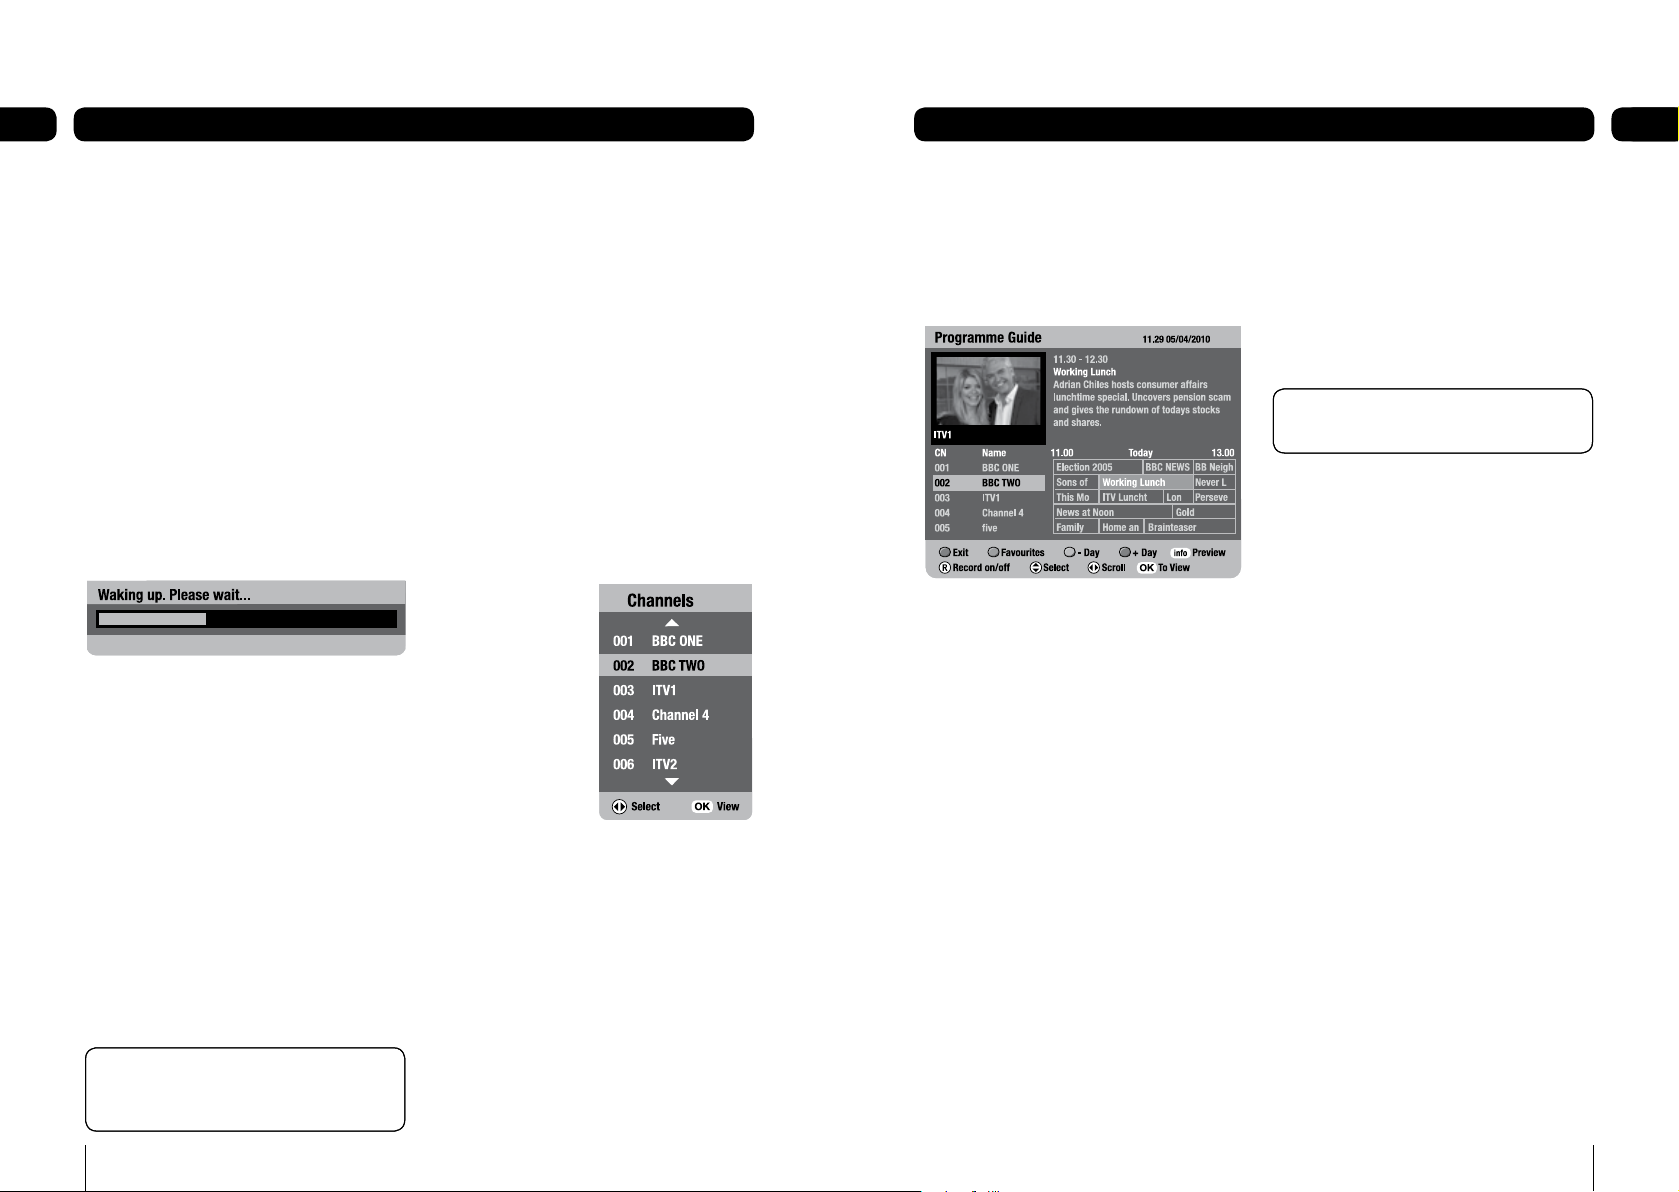
1.
Whilst the box wakes up you will see the
following message. This takes a few seconds.
The green light will turn on and so will the
digital box.
The box will automatically wake from low
power mode every 2 hours and check for
scheduled recordings. The red light will be on
during this time.
After 2 hrs. 59 min. of inactivity the box will
automatically go into low power mode.
A message will appear on screen before this
occurs. To cancel press [RED].
If you plan to leave your digital box unattended
for a long time, put the digital box on standby
and wait 20 seconds before switching it off at
the mains.
Changing channels
1.
Press [CH+] or [CH-] on your remote
control to move through the channels.
The [SWAP] button lets you keep an eye
on two TV channels by switching between
the programme you are watching and the
programme you were previously watching. So
you can ‘hop’ between the two channels.
To view a channels list
1.
Press [OK] when watching live TV to
display list of all channels.
2.
To highlight a channel press [p] or [q].
3.
Press [OK] to view.
To choose a
particular channel
1.
Press one of the
buttons [0] to [9]
then press [OK].
To select two or three
digit channels (10
to 999), press the
number buttons you
need after each other,
then press [OK].
If you do not press [OK], the digital box will
change to the selected channel after about
one second.
Volume control
Press [Vol+] to raise the volume and
1.
[Vol-] to lower the volume of your digital
box.
Programme guide
The Programme guide shows a full list of
channels and programmes that are available
for the next eight days.
Using the programme guide
Press the [guide] button.
1.
Press [p] or [q] to move through the
2.
list of channels.
To move through the programmes press
3.
[t] and [u].
To move forwards one day, press [blue].
4.
To move backwards, press [yellow].
To preview a current programme in
5.
the small inset screen, highlight the
programme and press [info].
To see a favourites list, press [green].
6.
To record the selected programme press
7.
the [®] button.
To select a device press [•], [••] or
8.
[•••] or use [t] and [u] then press
[OK].
The programme will be highlighted in red.
To set a reminder, highlight a future
1.
programme and press [green].
To watch a current programme, highlight
2.
the programme and press [OK].
To exit the programme guide without
3.
changing channel, press [exit], [guide] or
the [red] button.
Reminder
The reminder feature makes sure you never
miss your favourite programmes.
When you set a reminder for a programme,
there will be a reminder message on screen
when the programme starts.
To set a reminder
Press the [guide] button.
1.
To set a reminder, highlight a future
2.
programme and press [green].
The programme will be highlighted in green.
To watch a reminder programme
When the reminder message appears press
the [red] button to cancel or [OK] to watch it.
Page 7
12
Basic functions0513Basic functions 05
Don’t Forget! When watching a paused
programme. Fast-forwarding through the
adverts is a good way of catching up with
the live broadcast.
Don’t Forget! While recording it is also
possible to watch a previously recorded
programme.
Don’t Forget! While recording it is also
possible to watch a previously recorded
programme.
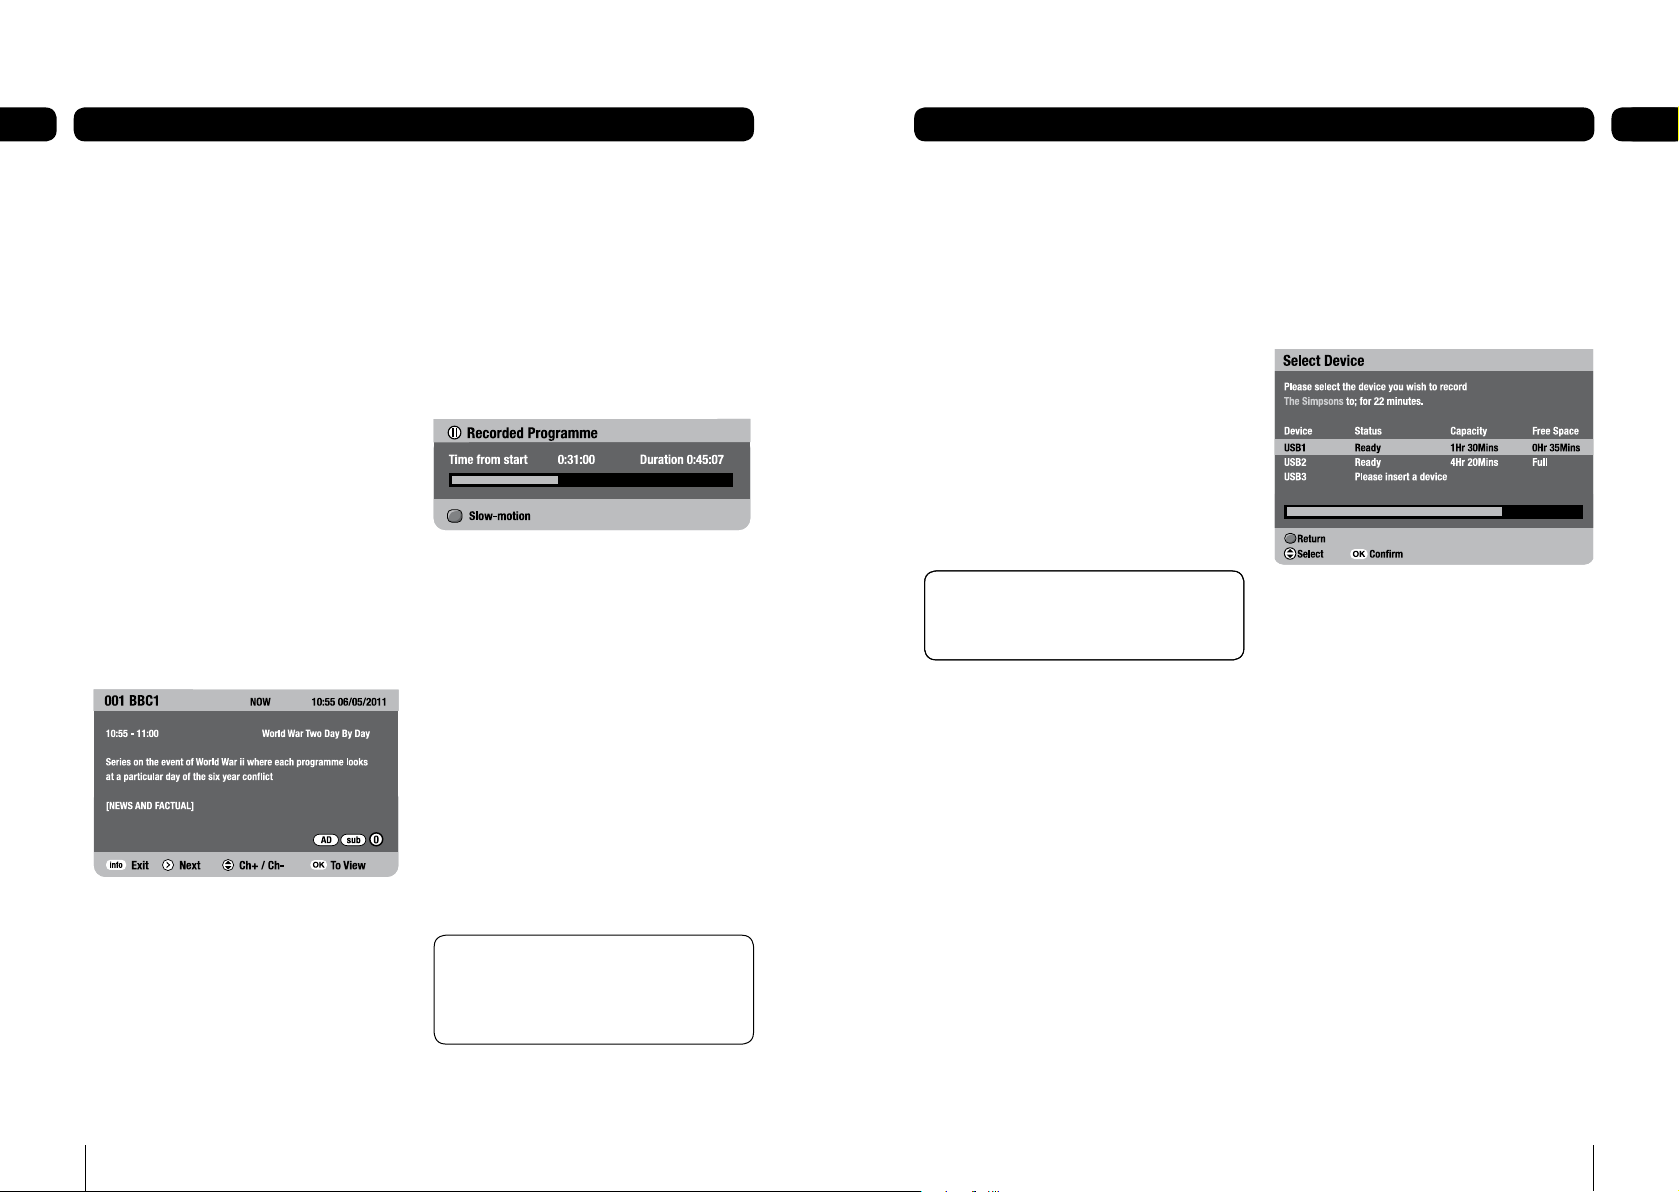
Now and next information
Now and next gives you information on
the current and next programmes on each
channel.
To open the now and next menu press
1.
[info]. This shows information on the
programme showing now.
If subtitles are available the sub icon will
appear.
To see information on the programme
1.
showing next, press [u].
To change the channel you want
2.
information for press [p] or [q].
To watch the highlighted channel press
3.
[OK].
To exit the now and next menu without
4.
changing channel press [exit].
To show the name and duration of the
programme showing now.
Pause live TV
Pause live TV, lets you pause a programme
that you are watching and continue watching
it later.
To pause live TV
While watching TV, press [PAUSE].
1.
This will freeze the picture and sound.
The ‘Recorded programme’ banner will
be displayed, indicating how long the
programme has been paused. The remainder
of the programme is automatically recorded
onto the USB device inserted with the most
available free space.
To continue watching a paused programme
Press [PLAY].
1.
To go back to watching live TV
Press [STOP].
1.
Paused programmes will appear on the
‘recorded programmes list’ like all other
recordings.
Instant record
Instant record, lets you record the channel
you’re watching at the touch of a button.
Press [•], [••] or [•••] to start recording.
The programme will be recorded onto the
device selected.
If no device is inserted or the device selected
does not have enough free space for the
recording the ‘device selection’ menu will
open.
To select a device press [•], [••] or
1.
[•••] or use [p] and [q] then press
the [OK] button to begin recording.
Record live TV
To record a programme that you’re watching
or that is about to start.
Press the [®] button. The ‘device
1.
selection’ menu will open.
To select a device press [•], [••] or
2.
[•••] or use [p] and [q] then press
the [OK] button to begin recording.
To cancel press [RED]
3.
If [OK] is not pressed within 30 seconds, the
recording menu will clear and the recording
will be cancelled.
To stop/cancel a recording
Press the [STOP] button and follow the
1.
on-screen instructions.
Press [u] when watching live TV.
1.
Follow the on screen instructions -as above
- to view information on other channels or
watch another channel.
Page 8
14
Basic functions0515Basic functions 05
Don’t Forget! If the programme
you want to record clashes with a
scheduled series, pressing [BLUE] will
cancel recording all the episodes in
the series schedule..
Don’t Forget! If the programme
you want to record clashes with a
scheduled series, pressing [BLUE] will
cancel recording all the episodes in
the series schedule..
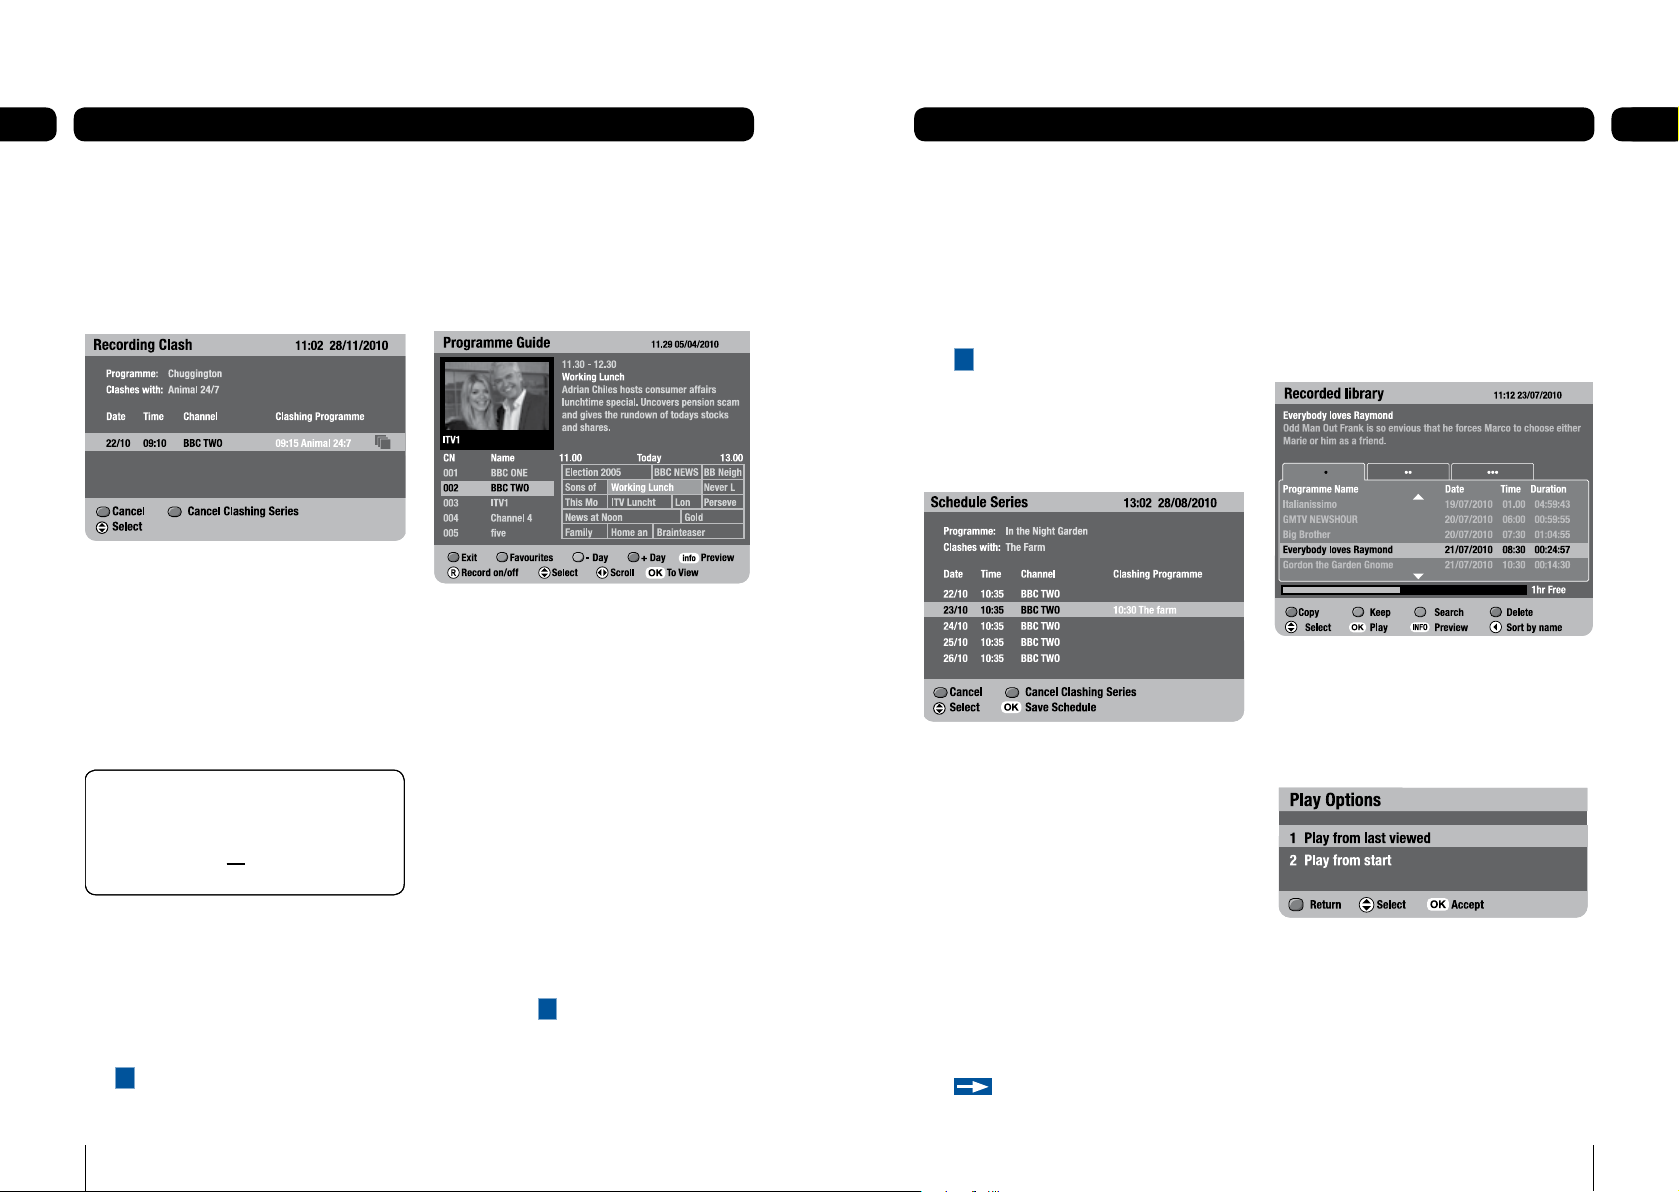
Managing clashes
If the programme you want to record clashes
with another programme or series scheduled
the ‘recording clash’ screen will show the
clash.
1.
Use [p] and [q] to select.
2.
Press [RED] to cancel the recording you
are scheduling.
3.
Press [BLUE] to cancel the clashing
schedule.
4.
When you have cancelled the clash press
[OK] to schedule..
Alternative recording
If the programme you want to record clashes
at the time you are setting the recording but
is free at another time, possibly on another
channel, the recording will be scheduled.
icon will show an alternative schedule
The
A
is booked.
Record using the programme guide
The easiest way to schedule a recording is by
using the programme guide. This lets you
review 8 days of programmes and quickly
choose the ones you wish to record.
Record using the programme guide
Press the [GUIDE] button.
1.
Press [p, q, t, u] to highlight the
2.
programme you want to record.
Press [•], [••] or [•••] to set a
3.
recording on the selected device.
or
Press the [®] button.
1.
The ‘device selection’ bar will be displayed.
To select a device press [•], [••] or
1.
[•••] or use [t] and [u] then press
the [OK] button to set a recording.
The chosen programme will be highlighted
in red, marked
‘Recording schedule’.
To cancel press [RED].
1.
and will be added to your
R
Series record
If the programme you want to record is part
of a series you can set to record the entire
series when setting a recording.
1.
Press [GREEN] to record an entire series.
icon will show a series schedule is
The
S
booked.
The ‘schedule screen’ will show any clashes
in your schedule over the next 8 days and
allow you to save your schedule.
1.
Use [p] and [q] to select.
2.
Press [RED] to cancel the recording you
are scheduling.
3.
Press [BLUE] to cancel the clashing
schedule.
4.
Press [OK] to save the schedule.
Split programme
If the programme you are scheduling is split,
for example either side of the news, the
schedule will be set to record after the break.
The
recording is scheduled.
icon will indicate the rest of the
In the ‘Recorded library’ the programme will
appear split - as more than one recording.
Play
To watch a recorded programme
Press [PLAY].
1.
To select a device press [•], [••] or
2.
[•••] or use [t] and [u].
Use [p] or [q] to select the programme
3.
you want to watch.
Press [OK] or [PLAY] to start playback.
4.
Use [p] or [q] to select a play option.
5.
Press [OK] or [PLAY] to start playback.
6.
Page 9

16
Basic functions0517Basic functions 05
Fast-forward a recording
While watching a recording, you can fastforward through the programme.
To fast-forward
1.
Press [FAST-FORWARD].
2.
Press [FAST-FORWARD] again to step up
through the fast-forward speeds (x3, x6,
x12, x24, x48).
3.
Slow down the speed of fast-forward by
pressing the [REWIND] button.
4.
Fast-forward will continue until you press
[PLAY], [PAUSE] or [STOP] or until you
reach the end of the recording. When
you reach the end of the recording, the
‘Recorded library’ will open.
If you are fast forwarding a paused
programme, when you reach the end you will
go back to watching live TV.
Rewind a recording
While watching a recording, you can rewind
through the programme.
To rewind
Press [REWIND].
1.
Press [REWIND] again to step up through
2.
the rewind speeds (x3, x6, x12, x24, x48).
Slow down the speed of rewind by
3.
pressing the [FAST-FORWARD] button.
Rewind will continue until you press
4.
[PLAY], [PAUSE] or [STOP] or until you
reach the beginning of the recording,
when it will pause.
Skip
Whilst watching a recording you can skip
forward (through adverts for example) in 30
second, 1, 2, 3, 5 and 10 minute blocks.
To set the Skip duration:
1.
Press [MENU], highlight ‘System set-up’
and press [OK].
2.
Highlight ‘Recorded programme’ option
and press [OK].
3.
Highlight ‘Skip duration’ and press [OK].
4.
Use [t] and [u] to change the skip
duration.
To skip
1.
Press [u] once to skip forward by the
set ‘Skip duration’. (If, for example, you
set the record duration to 2 minutes it will
skip forward by 2 minutes. Alternatively,
press [t] once to skip back by 2 minutes.
2.
Press [u] twice to skip forward 4
minutes and so on.
Pause playback
To pause a recording you are watching
1.
press [PAUSE]. You can then press [PLAY]
to resume playback, or choose one of
the other playback options: fast-forward,
rewind or stop.
During pause press [BLUE] to use slow-
2.
motion.
Stop playback
To stop a recording you are watching
1.
press [STOP].
Delete a recording
Press [PLAY] to enter the ‘recorded library’
1.
Press [•], [••] or [•••] or use [t] and
2.
[u] to select a device.
Use [p] and [q] to highlight the recording
3.
you want to delete and then press [BLUE].
The DELETE icon will appear next to the
recording you want to delete.
Press [OK].
1.
The ‘Confirm Delete’ menu will open.
To cancel deletion, press [RED].
1.
To confirm deletion, press [BLUE].
2.
Schedule record summary
The ‘Schedule record summary’ works out
how many recordings you have scheduled
with in a time frame and how much recording
space is needed for each USB device. It
allows you to view 24 hrs. and 8 days of
scheduled recordings.
Using the Schedule Record Summary
Press [MENU].
1.
Press [q] to highlight ‘Recording planner’
2.
and press [OK].
Press [q] to highlight ‘Schedule record
3.
summary’ and press [OK].
Press [t] and [u] to select the time
4.
period you want to view.
Page 10

18
Basic functions0519Basic functions 05
1 2 3
4 5 6
7
8 9
0
OK
1 2 3
4 5 6
7
8 9
0
OK
Don’t Forget! Digital text does not work
when recording.
Don’t Forget! Digital text does not work
when recording.
Schedule reports
The ‘schedule reports’ screen lists any
scheduled recordings that have not been
booked because of a clash. It list future and
past attempted schedules.
To view the ‘schedule reports’ screen:
Press [MENU].
1.
Press [q] to highlight ‘Recording planner’
2.
and press [OK].
Press [q] to highlight ‘Schedule reports’
3.
and press [OK].
Press [p] and [q] to select a
4.
programme. Information about why the
recording did or will not happen will
appear above.
Press [RED] to exit.
5.
Freeview Plus checks schedules and if
possible fixes clashes on a regular basis.
Using audio description
Many programmes are broadcast with audio
description.
To set-up audio description
Press [menu].
1.
Press [3] or use [q] to highlight
2.
‘Accessibility set-up’ and press [OK].
Use [q] to highlight ‘Audio description’.
3.
Use [t] and [u] to select the language
4.
you want, then press [OK].
Using subtitles
Many programmes are broadcast with
subtitles.
To set-up subtitles
Press [menu].
1.
Press [3] or use [q] to highlight
2.
‘Accessibility set-up’ and press [OK].
Use [q] to highlight ‘Subtitles’.
3.
Use [t] and [u] to select the language
4.
you want, then press [OK].
To switch subtitles on and off
Press [sub] on your remote control.
1.
Some programmes are broadcast in more
than one language. When alternative
languages are available, they will be
displayed in the ‘audio’ menu.
Using digital text
Your digital box gives you access to digital
text and teletext.
Digital text and teletext services vary
depending on the country and channel. Check
with your retailer or TV guide for more
information about the services available.
To see the text service on the channel you
1.
are watching, press [text].
Depending on the service, you can see
2.
these pages by typing in the page number
or by using the coloured buttons on
your remote control. See the on-screen
instructions for which buttons to press.
Interactive digital text lets you interact with
some TV programmes and channels. If a
programme is interactive, the broadcaster’s
interactive symbol will be on the screen.
On some channels digital text is used as well
as, or instead of a picture. In this case, you
might need to wait a few more seconds for
the information to load.
When a clash occurs Freeview Plus will
attempt to find an alternative showing for
the schedule or clashing programme.
If an alternative is found a recording will be
scheduled and marked
If no alternative is found the schedule
attempt will appear in the ‘schedule reports’.
A
.
Page 11

Basic functions05
Advanced functions 06
Help pages
The help pages give you advice and
information on many of the features of this
digital box.
To get to the help pages press the [help]
1.
button.
To select a help topic press one of the
2.
buttons [1] to [8].
To go back to the index page press [0].
3.
To go to the screen being described on the
4.
help pages press [blue].
To go back to the help page press the
5.
[help] button.
To go back to the previous screen you
6.
were on in the menu press the [red]
button.
To exit the help pages press the [exit]
7.
button.
Favourites
The favourites list lets you move up and down
a list of channels, ignoring the channels you
rarely or never watch.
To watch a channel that is not on your
favourites list, you must type its number
using the number buttons, or disable the
favourites list, because [p] and [q] will
skip over any channels that are not in the
favourites list you are watching.
Creating your favourites list
Press [menu].
1.
Press [4] or use [q] to highlight the
2.
‘Favourites’ option and press [OK].
Press [green] to create a new list.
3.
Press [yellow] to edit the list.
4.
Use [p] and [q] to highlight the
5.
channels you want to add and press [OK]
to add each channel. You can have up to
20 channels in your favourites list.
To switch Favourites On
Press [menu].
1.
Highlight Favourites and press [OK].
2.
At the next screen again highlight
3.
favourites and press [OK].
Favourites are now enabled.
To switch Favourites Off
Repeat above operation but select OFF then
press the [OK] button. Favourites will be
switched off.
Editing your list
Press [menu].
1.
Press [4] or use [q] to highlight the
2.
‘Favourites’ option and press [OK].
To delete a channel from your favourites
list
Highlight the favourites list and then press
1.
the [yellow] button.
Use [u] to select the stored favourite
2.
channels and [p] and [q] to highlight
the channel you want to delete.
Press the [blue] button to delete the
3.
channel.
To change the order of a list of favourite
channels
Highlight the favourites list and press the
1.
[yellow] button.
Use [u] to select the stored favourite
2.
channels and [p] and [q] to highlight
the channel you want to move.
Press the [green] button.
3.
20
21
Page 12

22
Advanced functions0623Advanced functions 06
Don’t Forget! The censorship option
only works when the broadcaster gives
censorship information.
Don’t Forget! The censorship option
only works when the broadcaster gives
censorship information.
your digital box to standby and then turn it
back on.
problem solving section of this document.
your digital box to standby and then turn it
back on.
problem solving section of this document.
Use [p] and [q] to move the
4.
highlighted channel up or down the
favourite list.
Press [OK] to confirm the change.
5.
To delete your favourites list
Highlight the list and press [blue].
1.
Parental control
The parental control feature allows you to
lock or unlock programmes or change the
censorship options (where available) using
a PIN.
To enter the Parental control menu
Press [menu] to open the main menu.
1.
Press [5] or use [q] to highlight the
2.
‘System set-up’ option and press [OK].
Press [2] or use [q] to highlight ‘Channel
3.
set-up’ then press [OK].
Press [2] or use [q] to highlight ‘Parental
4.
control’ then press [OK].
Censorship
In the parental control menu
Highlight ‘Parental control’.
1.
Press [1] or use [t] and [u] to change
2.
the censorship level.
These settings affect the whole service on
your digital box.
Parental control options
will block all channels.
‘4 to 18’ will block programmes with an age
rating of and over what you have selected.
Off will not block any channels.
When a programme is blocked by the
parental control set-up, you can watch the
programme by entering your PIN.
Changing your PIN
In the ‘Parental control’ menu
Highlight ‘Change PIN’ and press [OK].
1.
Follow the on-screen instructions.
2.
Lock and unlock individual channels
In the parental control menu
Highlight ‘Lock and unlock channels’ and
1.
press [OK].
Use [p] or [q] to highlight the channel
2.
you want to lock or unlock.
Press [OK] to move between the lock and
3.
unlock settings.
Type in your PIN (the default PIN is 0000).
5.
Page 13

24
Advanced functions0625Advanced functions 06
Don’t Forget! If your selected audio
language is not available, the broadcast
default language will be used.
Don’t Forget! If your selected audio
language is not available, the broadcast
default language will be used.
Don’t Forget! The quickest way to get to
the submenus is by pressing the number
buttons [1 - 5] on your remote control.
Don’t Forget! The quickest way to get to
the submenus is by pressing the number
buttons [1 - 5] on your remote control.
Accessibility set-up
Accessibility set-up lets you select and
change the settings of subtitles and the audio
language or the current programme.
Using button press beep
When button press beep is switched on, the
digital box will beep once every time a button
is pressed.
To set-up button press beep
Press [menu].
1.
Press [3] or use [q] to highlight
2.
‘Accessibility set-up’ and press [OK].
Press [3] or use [q] to highlight ‘Button
3.
press beep’.
Use [t] and [u] to switch button press
4.
beep off or choose a volume level (low,
medium or high), then press [OK].
The volume keys will not beep when ‘Button
press beep’ is activated.
Using audio language
Some programmes are broadcast in more
than one language. You can set your preferred
audio language in the ‘audio language’ menu.
To set-up audio language
Press [menu].
1.
Press [3] or use [q] to highlight
2.
‘Accessibility set-up’ and press [OK].
Press [4] or use [q] to highlight ‘audio
3.
language’.
Use [t] and [u] to select the language
4.
you want, then press [OK].
Using audio description volume
To adjust the volume level of audio
description.
Press [menu].
1.
Press [3] or use [q] to highlight
2.
‘Accessibility set-up’ and press [OK].
Use [q] or press [5] to highlight ‘audio
3.
description volume’.
Use [t] and [u] to choose a volume
4.
level (-5 to 5), then press [OK].
Using the main menu
The main menu lets you choose and change a
wide range of your digital box’s features.
To go to the main menu, press [menu].
1.
Use [p] or [q] to highlight a submenu.
2.
Press [OK] to enter.
3.
The menu options
1 Recorded library – lets you save, rename,
delete or watch your recorded programmes.
2 Recording planner – lets you schedule
a recording and view a schedule record
summary.
3 Accessibility set-up – lets you select and
change the settings of subtitles and the audio
language or the current programme.
4 Favourites – helps you move quickly
between your favourite TV channels. You can
have up to 10 favourites lists.
5 System set-up – lets you change how
programmes are displayed on your TV,
organise channels, set controls on what
channels you can watch, check important
information about the quality of the signal and
manage your USB devices.
Page 14

26
Advanced functions0627Advanced functions 06
Don’t Forget! Your digital box must be on
the channel you want to record for the full
length of the recording.
Don’t Forget! Your digital box must be on
the channel you want to record for the full
length of the recording.
Don’t Forget! A quick way to open the
‘Recorded library’ is to press [PLAY].
Don’t Forget! A quick way to open the
‘Recorded library’ is to press [PLAY].
Don’t Forget! To exit the ‘Recorded library’
at any time press [EXIT].
Don’t Forget! To exit the ‘Recorded library’
at any time press [EXIT].
Recording schedules
Press [MENU].
1.
Press [q] to highlight ‘Recording planner’
2.
and press [OK].
Press [q] to highlight ‘Recording
3.
schedules’ and press [OK].
Press [q] to highlight a schedule.
4.
Press [BLUE] to delete a scheduled
5.
recording.
Press [INFO] to view the ‘Schedule info’.
6.
This shows the next 8 days of scheduled
recordings and any clashes.
Using a VCR/DVD with your digital box
To record and watch a digital channel
Select the digital channel you want to
1.
record.
Select the digital box channel on your VCR
2.
or DVD, and press record or set your
recording timer.
Managing your recorded programmes
Recordings are managed in the ‘Recorded
library’. Your digital box lists the recordings
on the devices inserted. It gives information
about each programme, its duration and
when it was recorded.
To view the Recorded library
Press [MENU], highlight ‘Recorded library’
1.
and press the [OK] button.
To select a device press [•], [••] or
2.
[•••] or use [t] and [u].
Recorded programme icons
Icons may be displayed to the right of the
programmes in the ‘Recorded library’.
This is what they mean
The recording is currently playing.
This recording has been marked for
deletion.
This recording has been marked for copy.
This programme is being recorded.
The horizontal bar at the bottom of the
‘Recorded library’ shows how much recording
time has been used on the device, and how
many hours or minutes are still available.
Copy
You can copy programmes from one inserted
device to another by using the copy feature.
To return to the previous menu, press
7.
[RED].
To exit to TV, press [EXIT].
8.
Press and hold [p] or [q] to page up
9.
and page down.
In the ‘Recorded library’
Press [•], [••] or [•••] or use [t] and
1.
[u] to select a device.
Use [p] or [q] to select the programme
2.
you want to copy and press [RED].
Use [p] or [q] to select other
3.
Page 15

28
Advanced functions0629Advanced functions 06
programmes you want to copy and press
[RED] to highlight them.
Press [•], [••] or [•••] or use [t] and
4.
[u] to select the device you want to copy
onto. Press [OK].
The confirm copy screen will appear.
Press [RED] to cancel copying.
1.
Press [BLUE] to start copying.
2.
The copy progress screen will appear.
Press [RED] to return to the ‘Recorded
1.
library’ (copying will continue).
Press [GREEN] to cancel copying.
2.
Press [EXIT] to watch TV. Copying will
3.
continue.
To return to the ‘Copy progress’ screen at any
time.
Press [PLAY] to enter the ‘recorded
1.
library’.
Press [RED] to view progress screen.
2.
Search recorded programmes
The search facility lets you sift through your
recorded programmes by genre, making it
easy to find the recording you want to watch.
The ‘Recorded library’ will re-open displaying a
list of genre specific recordings.
Highlight the recording you want to watch
1.
and press [OK].
Or press [YELLOW] to search another
2.
genre.
Sort by name or by date
You can arrange your recordings by name/
date.
From the ‘Recorded library’, use [swap]
1.
to toggle between sort by name and sort
by date.
Rename a recording
Press [MENU], highlight ‘System set-up’
1.
and press [OK].
Highlight ‘Recorded programme set-up’
2.
and press [OK].
Highlight ‘Rename recorded programme’
3.
and press [OK].
The ‘Edit’ screen will open.
To select a device press [•], [••] or
1.
[•••] or use [t] and [u].
Use [p] or [q] to select the programme
2.
you want to rename and press [OK].
Use the on-screen keyboard to rename
3.
the recording and press [GREEN] to save.
Channel organiser
The Channel organiser lists the channels
available on your digital TV service.
To organise your channels
Press [menu] to open the main menu.
1.
Press [5] or use [q] to highlight the
2.
‘System set-up’ option and press [OK].
Press [2] or use [q] to highlight ‘Channel
3.
set-up’. Press [OK].
Highlight ‘Channel organiser’ and press
4.
[OK].
To delete a channel
Press [blue]. (You will be asked for a PIN
1.
– the default is 0000.)
To search your recorded programmes
From the ‘Recorded library’, press
1.
[YELLOW].
Use [p] and [q] to skip through the
2.
different genres.
Highlight the genre you want to search
3.
and press [OK].
Page 16

30
Advanced functions0631Advanced functions 06
searching for new channels and channels
that no longer broadcast programmes.
Channels that no longer broadcast
programmes will be marked ‘DEL’ and you
should delete them. To delete a channel
see the channel set-up and channel
organiser sections.
searching for new channels and channels
that no longer broadcast programmes.
Channels that no longer broadcast
programmes will be marked ‘DEL’ and you
should delete them. To delete a channel
see the channel set-up and channel
organiser sections.
4:3 Letter box 4:3 Centre cut-out4:3 Letter box 4:3 Centre cut-out
Don’t Forget! The default standard is RGB.
If you’re using a normal SCART lead, this
setting gives you the best picture quality.
Don’t Forget! The default standard is RGB.
If you’re using a normal SCART lead, this
setting gives you the best picture quality.
Don’t Forget! Low power mode saves
energy. It is recommended you always
have it set to ‘on’.
Don’t Forget! Low power mode saves
energy. It is recommended you always
have it set to ‘on’.
To change the order of a channel
Press [green] and then move it using [p]
1.
and [q]. To save its position, press [OK].
To rename a channel
Highlight the channel you want to rename
1.
and press [yellow].
Rename the channel using the on-screen
2.
keyboard.
Press [green] to save.
3.
Press and hold [p] or [q] to move to a
page up and a page down.
TV set-up
Television type
Television type lets you tell the digital box
whether you have a standard or widescreen
TV.
Press [menu] to open the main menu.
1.
Press [5] or use [q] to highlight the
2.
‘System set-up’ option and press [OK].
Press [OK] to select the ‘TV set-up’ option.
3.
To change the television-type setting use
4.
the [t] or [u] buttons.
If you have a widescreen TV choose ‘16:9
widescreen’.
If you have a normal 4:3 TV choose ‘4:3’.
You can then select the widescreen option of
letter box or centre cut-out.
Press [q] to highlight widescreen and
1.
use the [t] or [u] buttons to select.
Letter box – shows a black border on the
top and the bottom of the screen when you
are watching a widescreen broadcast on a
4:3 TV.
Setting the viewing standard
To change the viewing standard
In the ‘TV set-up’ menu.
Use [q] to highlight ‘standard’.
1.
If you have an RCA connector, set the
2.
standard to CVBS.
If your TV supports S-Video, set the
3.
standard to S-video.
General set-up
If you choose to disable the low power mode
and the inactivity features on your box you can
do this in the general set-up menu.
Press [menu].
1.
Press [5] or use [q] to highlight the
2.
system set-up option and press [OK].
Press [4] or use [q] to highlight the
3.
general set-up option and press [OK].
Use [t] and [u] to change between on
4.
and off.
Press [red] to return to the previous menu.
5.
Centre cut-out – trims the left and right
edges of the picture.
Page 17

32
Device management0733Device management 07
Don’t Forget! Formatting will clear the
device of all recordings plus any other files
stored in the device.
Don’t Forget! Formatting will clear the
device of all recordings plus any other files
stored in the device.
Don’t Forget! The box cannot read files
that are in folders or that are encrypted.
Make sure the programmes you would like
to view are stored in the root directory of
the USB device.
Don’t Forget! The box cannot read files
that are in folders or that are encrypted.
Make sure the programmes you would like
to view are stored in the root directory of
the USB device.
Don’t Forget! Some flash drives are
partitioned and have secure areas. These
devices cannot be read by the box and
must be re partitioned on a computer.
Don’t Forget! Some flash drives are
partitioned and have secure areas. These
devices cannot be read by the box and
must be re partitioned on a computer.
Don’t Forget! The use of the ports for
other types of devices (such as charging
mobile phones) is not recommended and
may cause the box to fail.
Don’t Forget! The use of the ports for
other types of devices (such as charging
mobile phones) is not recommended and
may cause the box to fail.
The ‘Device management’ menu gives
information about the devices inserted. It
shows their free space, capacity and status.
To view the ‘Device management’ menu
Press [menu].
1.
Press [5] or use [q] to highlight the
2.
‘system set-up’ option and press [OK].
Press [4] or use [q] to highlight ‘device
3.
management’. Press [OK].
Free Space
This shows space available on a device, in
hours and minutes.
Capacity
Recording: the device is recording.
Copying: the device is copying to or from
another device.
Unformatted: the digital box cannot read the
device. Format the device; this should leave
all compatible devices in ‘ready’ status.
If no device is inserted the message ‘Please
insert a device’ will appear.
Formatting
Formatting erases all the contents from a
UBS device and leaves it in ‘ready’ status.
To format a device on the ‘Device
management’ menu.
Use [p] or [q] to select a device.
1.
To format a device press [BLUE].
2.
To stop formatting at any time press
3.
[GREEN].
You can turn the box into stand-by and
formatting will continue.
Compatible devices and formats
This product allows you to record your
favourite programmes onto USB “Flash
drives”, sometimes know as a “thumbdrive”
or “pendrive”.
There are many kinds of USB flash drives but
not all are compatible with this product.
What USB device do I use?
USB2.0 HS (high speed) is compatible and
should be used to ensure the best user
experience.
Avoid FS (Full speed) or LS (low speed)
devices as they will not work with
this product. USB1.1 devices are not
recommended.
What format should it have?
FAT32 - Most USB2.0 HS flash drives will be
formatted as FAT32. If you insert a USB2.0
HS flash drive and it is unformatted you can
format it. Please refer to Formatting on page
28 for details.
USB Hard disk drives can also be used,
provided they are FAT32 and are self powered
(ie have an external power supply).
Download and Playback on a PC/Mac
Once you have recorded onto a USB device
you can download the content on your
computer (PC or MAC) to archive or watch it.
Download
The download process is the same as with all
files on USB.
Recordings will be stored in MPEG2-TS
format.
Playback
To playback your recordings on your computer
you will need to view them on a media player
that reads MPEG2-TS format.
Archiving
When archiving files on your computer you
can change the name of the files but do not
change the .MPG ending to the file.
This shows total capacity of a device in hours
and minutes.
Status
This shows the current status of a device.
These are:
Ready: the device is inserted correctly and
ready to play, record or copy.
Playing: the device is playing back a
recording.
Page 18

Device management07
Lights on the front of the digital box
If the light on the left of the box is red the
digital box is in standby. When the digital box
is turned on the light will be green. It also
indicates the remote control is working by
flickering between green and red.
Each USB port on the front of the digital box
has two lights, one green and one red.
What the lights on USB ports mean:
When the USB device has been inserted
correctly and is in ready status the green light
shall be lit.
When the USB device is playing or copying to
another device the relevant green light shall
flash.
When the USB device is recording the
relevant red light shall be lit.
When the USB device is being copied to by
another device the relevant red light shall flash.
Retuning instructions 08
Press [p] and [q] to select and [OK] to
Retune channels
If you are missing channels, channel
information or would like to search for new
channels available, you should scan at any
time.
To retune channels
Press [menu].
1.
Press [5] or use [q] to highlight the
2.
‘System set-up’
Press [2] or use [q] to highlight ‘Channel
3.
set-up’
Press [3] or use [q] to highlight ‘Channel
4.
Tuning: Full scan’ option to start a full scan
and replace all existing channels.
‘Channel tuning: full scan’ scans for new
channels and adds them to your line-up. It
then deletes all channels that are no longer
broadcast. If you cancel this scan part way
through, you will keep your existing channels.
1.
choose.
The receiver may pick up channels from more
than one region and you will be asked to
select the region you want to watch channels
from.
34
35
Page 19

Retuning instructions 08
Don’t Forget! You may see retune
messages more than once before a
retune.
Don’t Forget! You may see retune
messages more than once before a
retune.
Troubleshooting 09
Auto retune and associated messages
A signal is sent out by the broadcaster when
channels change or new ones are available.
Auto retune (assisted retune) picks up this
signal and automatically scans for new
channels. This can happen at any time and
may happen more than once during the digital
switchover. You can adjust this so the retune
starts with or without your permission.
In the channel set-up menu
Select ‘Auto retune’.
1.
Use [t] and [u] to change the auto
2.
retune settings.
Press [OK] to accept.
3.
Always ask – a ‘confirm retune screen’
will appear before a retune.
Always start – retune starts
automatically, warning you during the
retune.
Auto retune messages
You can also receive messages about
changes that are happening in the future.
There are three types of message.
Major – retune information and user
action is needed.
Minor – retune information, user action is
not needed.
Information – other broadcast
information, not needing a retune.
Adjusting the auto retune messages
You can choose how the messages will
appear on your receiver.
In the channel set-up menu
Select ‘Auto retune messages’.
1.
Use [t] and [u] to change the auto
2.
retune messages settings.
All – shows all types of messages.
No minor – shows ‘information’ and
‘major’ messages.
Information only – shows ‘information’.
None – no messages will be shown
unless auto retune is set to ‘Always ask’,
when ‘major’ messages will be shown.
Understanding the messages on your digital box
Message Possible cause What to do
No channels. No channels have been stored on
the digital box.
Encrypted channel. The channel may have been
encrypted by the broadcaster.
No signal. Your TV aerial may not be
connected properly. The signal
from your aerial may be too
high, too low or distorted by
something between your aerial
and the digital box.
No channel. No
channels added.
Your digital box was not able
to find and decode any digital
channels while it was setting up.
Censored channel.
Locked channel.
The channel has been censored
or locked by the parental-control
settings.
Unable to complete
copy due to an error.
Unable to continue
with the copy due
An unknown error has occurred
when copying.
The device was removed during
the copy process.
to the device being
removed.
Unable to copy any
more due to the
device running out
The device being copied to has
run out of space during the copy
process.
of space.
The digital box needs to be tuned
into the available broadcasts. See
the channel set-up section of this
document.
Try switching to a different
channel.
Check your aerial and any
connections between the
aerial and the digital box. Try
re-scanning the channels (see
section –channel tuning). You
may need to speak to an aerial
installer
Check all of the aerial
connections. Check that the
digital signal is available in your
area. For more information about
digital TV reception, please visit
www.freeview.co.uk
Type in your PIN to watch a
channel.
Try copying again onto another
device.
Re insert the device and start
copy again.
Insert another device and start
copy again.
36
37
Page 20

38
Troubleshooting0939Troubleshooting 09
General problem solving
(USB1, USB2 or
USB3) is now
full. The current
recording has
stopped.
A recording has
not started due to
no device present
in (USB1, USB2 or
USB3).
(USB1, USB2 or
USB3) has been
removed. The
current recording
has stopped.
A recording has not
started as (USB1,
USB2 or USB3) is
full.
Device is too slow
to use.
The device being recorded to
has run out of space during the
record process.
A USB device was not inserted
in the correct slot when the
recording was scheduled to start
The USB device was removed
when recording therefore the
recording has stopped.
The USB device inserted in the
slot when the recording was
scheduled to start was full.
The device inserted does not
meet the required specification
and will not work well with this
product.
Insert another device and press
[®]. You will lose some of the
programme. The recording will be
split over the 2 devices.
Insert a device and re schedule
the recording.
Re insert the device and re
schedule the recording.
Remove the full device. Insert
a device with free space and re
schedule the recording.
Use the ‘Schedule record
summary’ to check how
much free space is needed for
scheduled recordings.
Insert a compatible device. Please
refer to the ‘Compatible devices
and formats’ section on page 33.
What happens What to do
You cannot see the
opening picture (Press OK
to start) from the digital
box.
Your remote control isn’t
working.
Subtitles do not appear
although they are set to
‘on’.
The digital box does not
seem to work and there is
nothing shown on the TV.
Select the AV channel using the button on your TV remote
control marked AV, EXT, TV/AV, O/E or a symbol, or read your TV
manual. Make sure both ends of your SCART cable are firmly
connected to the relevant sockets. Make sure you followed the
instructions for setting up your digital box correctly.
Make sure you are pointing the remote control directly at
your digital box and that nothing is in the way. Check that the
remote-control light works when you press a button. Check the
batteries are in the right way round. Try replacing the batteries.
Some programmes broadcast without subtitles.
Is the green power light on? If the light is not on:
press the [�] button on your remote control;
1.
make sure that all cables are firmly connected to the digital
2.
box and TV/VCR; and
check that the digital box is properly plugged into the power
3.
supply.
If the light is on:
check you have the correct channel and input selected on
1.
your TV;
check that all cables are correctly attached;
2.
make sure the VCR/DVD is switched off if it is connected to
3.
the digital box; and
check if your VCR/DVD is causing the problem by
4.
disconnecting the VCR/DVD.
The picture appears to be
‘squashed’ or ‘cut off’.
I forgot to plug in the aerial
when I set up the digital
box.
Make sure your TV settings are correct. Please refer to page 30
of this guide.
Switch off your digital box at the mains supply. Plug in the
aerial. Switch the digital box mains supply back on. Please read
section about channel tuning.
Page 21

40
Troubleshooting0941Troubleshooting 09
The picture or sound keep
breaking up.
No channels were found
when searching for
channels.
I am missing some
channels.
I cannot see digital
channels after I have
moved the digital box to a
different house.
I have forgotten my PIN.
There are several possible causes of this type of problem.
Your signal may be weak, you may have an old, lowperformance or damaged aerial, or the cable between your
aerial and TV may be damaged. Check for any obvious damage
to the aerial and cables and make sure that the connectors
are properly fitted. If this does not work, get a professional to
check installation – your aerial may provide a better signal if it is
moved somewhere else.
Please remember that older aerials and indoor aerials aren’t as
effective as new outdoor and roof aerials. Or, try using a signal
amplifier or booster to improve the reception. Check the digital
TV coverage in your area. For more information about digital TV
reception, please visit www.freeview.co.uk
Some TV channels are not available in every area. For more
information about digital TV reception, see the general
information section. Your signal may be weak. Get a
professional to check your installation – your aerial may provide
a better signal if it is moved somewhere else. Please remember
that older aerials and indoor aerials aren’t as effective as new
outdoor and roof aerials. Or, try using a signal amplifier or
booster to improve reception. You may need to scan the digital
channels again. Please read the section about channel tuning.
Scan for channels again. Please read the section about channel
tuning. It is possible that the aerial at your new house is not
able to receive digital TV or that there is a poor signal in your
area. For more information about digital TV reception, please
visit www.freeview.co.uk
Press [menu]. Press [5] or use [q] to highlight ‘System set-up’
and press [OK]. Select ‘software reset’ and press [OK]. You will
see the PIN screen. Type in 8500. Press [OK] again to reset the
software. When the digital box shuts down, switch it off at the
mains and leave it for 10 seconds before switching it back on.
After you switch the digital box on, press [OK] when you are
asked to and the digital box will automatically scan for channels.
Please remember You will lose all your previous settings
when you reset the software.
The digital box is behaving
in an unusual way, for
example, the wrong
information is on the
screen.
I set 5 recordings to a
device but only 3 were
recorded.
The green light is not
turned on when the USB
device is inserted.
Press the [�] button on your remote control to turn the box off
and then on again. If there is no improvement, put the box on
standby, switch it off at the mains and leave it for 10 seconds
before switching it back on. If this does not work, reset the
software Press [menu]. Press [5] or use [q] to highlight
‘System set-up’ and press [OK]. Select ‘software reset’ and
press [OK]. You will see the PIN screen. Type in your PIN. Press
[OK] again to reset the software. When the digital box shuts
down, switch it off at the mains and leave it for 10 seconds
before switching it back on. After you switch the digital box
on, press [OK] when you are asked to and the digital box will
automatically scan for channels. Please remember you will
lose all your previous settings when you reset the software,
your favourites list and recording schedules will be cleared.
This could have happened for various reasons:
The USB device could have been removed during recording.
The USB device could have been run out of space when
recording.
To avoid this problem in future refer to the ‘Schedule record
summary’. This helps you view scheduled recordings in periods
of 24 hrs., 1 week, 2 weeks or 4 weeks.
Make sure you have USB devices with enough free space
inserted when a recording is scheduled.
Press [PLAY] to view the ‘Recorded programmes list’. The
screen will show one of the following messages - unformatted
or device is too slow to use. Format the device or insert a
compatible device.
Need extra help?
Don’t worry we are just the other end of
the phone. If you’re experiencing problems
using your new product, before returning it
to the retailer just call 0871 230 1777 or
visit www.grundig.co.uk
Need a spare part?
In the unlikely event of requiring spare
parts, please contact our spare parts
department on: 0871 230 0790
Page 22

Specifications10
Warnings
Tuner and channel
Decoder
• Transport stream
• Profile level
• Input rate
• Video format
• Audio format
• Video output
Connection
• Mains
• Tuner
• Video
• Audio
• Data port
Power supply
• Input voltage
• Power consumption
• RF input connector
(IEC-TYPE, IEC169-2, female)
RF output connector
•
(IEC-TYPE, IEC169-2, male)
Frequency range:
•
470MHz ~862MHz (UHF)
MPEG-2 ISO/IEC 13818
MPEG-2 Main profile @main level
MAX. 15Mbit/s
4:3/16:9 Switchable
MPEG Layer I & II, 32 / 48KHz
RGB, CVBS
Plug top type
Antenna input
RGB and composite video output, twin scart
Stereo audio output on SCART
Triple USB 2.0 HS
AC 230V ~50Hz
MAX. 10W/standby <4.5W
• Unqualified attempts to repair this Digital
Box will invalidate the warranty.
efer repairs to this Digital Box to a
• R
qualified service personnel only.
o not disassemble this Digital Box.
• D
• There are dangerous-voltage parts inside
that may cause electric shock even after
power is disconnected.
tore your Digital Box in a clean, dry
• S
environment.
nplug the Digital Box immediately
• U
if it gets wet, and consult a servicing
technician.
lways unplug the Digital Box before
• A
cleaning it.
ipe dust off the cabinet of the Digital
• W
Box with a clean, dry and soft cloth.
o not place any objects on top of the
• D
Digital Box.
void exposing your Digital Box directly to
• A
sunlight or other heat sources.
Safety Tips
If smoke, abnormal noise or odour comes
out of this Digital Box, unplug from the
mains supply immediately and contact the
retailer. Never try to repair the Digital Box
on your own. Always contact the dealer for
repairs.
Note
This manual contains for-reference-only
graphics and information that are subject to
change without notice.
WEEE
This appliance is labelled in
accordance with European Directive
2002/96/EG concerning used
electrical and electronic appliances
(waste electrical and electronic
equipment - WEEE). The guideline
determines the framework for
the return and recycling of used
appliances as applicable throughout
the EU.
ut your Digital Box in a well-ventilated
• P
area away from high humidity.
o not expose this Digital Box to rain or
• D
moisture, dripping or splashing.
or stubborn stains use a damp (not
IMPORTANT: Due to continual revision and improvements to our products design,
specifications are subject to change without notice.
• F
dripping) cloth.
o not use any cleaning solutions on this
• D
Digital Box.
42
43
Page 23

44
45
Digital TV switchover
Page 24

Retune channels
If you are missing channels, channel
information or would like to search for new
channels available, you should scan at any
time.
To retune channels
Press [menu].
1.
Press [5] or use [q] to highlight the
2.
‘System set-up’
Press [2] or use [q] to highlight ‘Channel
3.
set-up’
Press [3] or use [q] to highlight ‘Channel
4.
Tuning: Full scan’ option to start a full scan
and replace all existing channels.
‘Channel tuning: full scan’ scans for new
channels and adds them to your line-up. It
then deletes all channels that are no longer
broadcast. If you cancel this scan part way
through, you will keep your existing channels.
The receiver may pick up channels from more
than one region and you will be asked to
select the region you want to watch channels
from.
Press [p] and [q] to select and [OK] to
1.
choose.
For other ways to retune please read the ‘Retune Instructions’ section of this guide.
46
Rev141209Kev058701
Page 25

www.grundig.co.uk
0871 230 1777
 Loading...