

CONTACT GRILL
CG 5040

________________________________________________________
2
P
A
BCDE
H
Q
I
J
K
L
M
N
FG
O
________________________________________________________
3
________________________________________________________
DEUTSCH 05 - 12
ENGLISH 13 - 19
NEDERLANDS 62 - 68
FRANÇAIS
20- 26
ITALIANO
69 - 75
ESPAÑOL
27- 33
PORTUGUÊS
76 - 82
POLSKI
83 - 89
NORSK
41 - 47
SVENSKA
48 - 54
ƅƋƋƇƍƉƊŸ
55 - 61
TÜRKÇE
34- 40
4

ENGLISH
SAFETY AND SET-UP ________________________
Please read this instruction manual thoroughly
prior to using this appliance! Follow all safety
instructions in order to avoid damages due to
improper use!
Keep the instruction manual for future reference.
Should this appliance be given to a third party,
than this instruction manual must also be handed
over.
The appliance is designed for domestic use
only.
The appliance is designed to prepare food
only
.
Do not use the appliance for anything other
than its intended use.
Do not use the appliance outdoors or in the
bathroom.
Check if the mains voltage on the rating label
corresponds to your local mains supply. The
only way to disconnect the appliance from
the mains is to pull out the plug.
For additional protection, this appliance
should be connected to a household faulty
current protection switch with no more than
30 mA. Consult your electrician for advice.
Do not immerse the appliance, power cord
or power plug in water or in other liquids; do
not hold it under running water and do not
clean parts in dishwasher.
Disconnect the power plug after using the
appliance, before cleaning the appliance,
before leaving the room or if a fault occurs.
Do not disconnect the plug by pulling on the
cord.
Do not wrap the power cord around the
appliance.
Prevent damage to the power cord by not
squeezing, bending or rubbing it on sharp
edges. Keep the cord away from hot surfaces
and open flames.
Do not use an extension cord with the
appliance.
Never use the appliance if the power cord or
the appliance is damaged.
Our GRUNDIG Household Appliances
meet applicable safety s
tandards, thus if
the appliance or power cord is damaged, it
must be repaired or replaced by the dealer,
a service centre or a similarly qualified and
authorized service person to avoid any
dangers. Faulty or unqualified repair work
may cause danger and risks to the user.
Do not dismantle the appliance under any
circumstances. No war
ranty claims are
accepted for damage caused by improper
handling.
Keep the appliance always out of the reach
of children.
The appliance should not be used by the
following persons, including children: those
with limited physical, sensory or mental
capabilities and also those with a lack of
experience and knowledge. This does not
apply to the latter if they were instructed
in the use of the appliance or if they use it
under the supervision of a person responsible
for their safety. Children should always be
supervised to ensure that they do not play
with the appliance.
Do not leave the appliance unattended as
long as it is in use. Extreme caution is advised
when the appliance is being used near
children and people with limited physical,
sensory or mental capabilities.
Before using of the appliance for first time,
clean all parts. Please see details in the
“Cleaning and Care” section.
Always ensure the appliance is cooled down
completely prior to cleaning.
Dry the appliance and all accessories before
attaching the parts and before connecting it
to mains supply.
Never operate or place any part of this
appliance on or near to hot surfaces such as
gas burner, electr
ic burner or heated oven.
13

ENGLISH
Never use the appliance in or near to
combustible, inflammable places, materials
and furniture. Do not let the appliance
come into contact with or become covered
by inflammable materials e.g. curtains,
textiles, walls, etc. Please make sure that the
appliance is always kept a safe distance
away from flammable materials and furniture.
Do not use paper, cardboard, plastic in or
under the appliance.
Operate the appliance with delivered parts
only.
Do not use the appliance with damp or wet
hands.
Always use the appliance on a stable, flat,
clean, dry and non-slip surface.
Make sure that there is no danger that the
power cord could be accidentally pulled
or that someone could trip over it when the
appliance is in use.
Position the appliance in such a way that the
plug is always accessible.
During operation accessible parts of the
appliance could become very hot, avoid
contact with hot surfaces.
Do not stick any foreign objects on the
appliance.
This appliance must not be operated with
an external clock timer or separate remote
control system.
In case of fire, disconnect the plug from the
wall socket first before using appropriate firefighting measures.
To avoid the risk of fire, frequently clean
the grill plate. Always ensure that there is
sufficient ventilation during use.
If the appliance begins to emit smoke during
operation, immediately stop the process and
unplug the appliance before you pull out the
food. Be careful, the food can be very hot.
Do not pour water on the appliance,
especially when it is still plugged in.
The appliance can only be switched on when
the plug is connected to a wall socket.
Do not use any tools or objects in the
appliance. Metal objects could cause short
circuits or electric shock. Do not damage the
heating elements and mechanics.
Do not use the appliance as a source of heat.
SAFETY AND SET-UP ________________________
14

ENGLISH
AT A GLANCE ______________________________
Dear Customer,
Congratulations on the purchase of your new
GRUNDIG Contact Grill CG 5040.
Please read the following user notes carefully to
ensure you can enjoy your quality product from
GRUNDIG for many years to come.
Special features
The GRUNDIG Contact Grill is equipped with:
Double grill areas.
Removable grill plates.
power.
Controls, parts and accessories
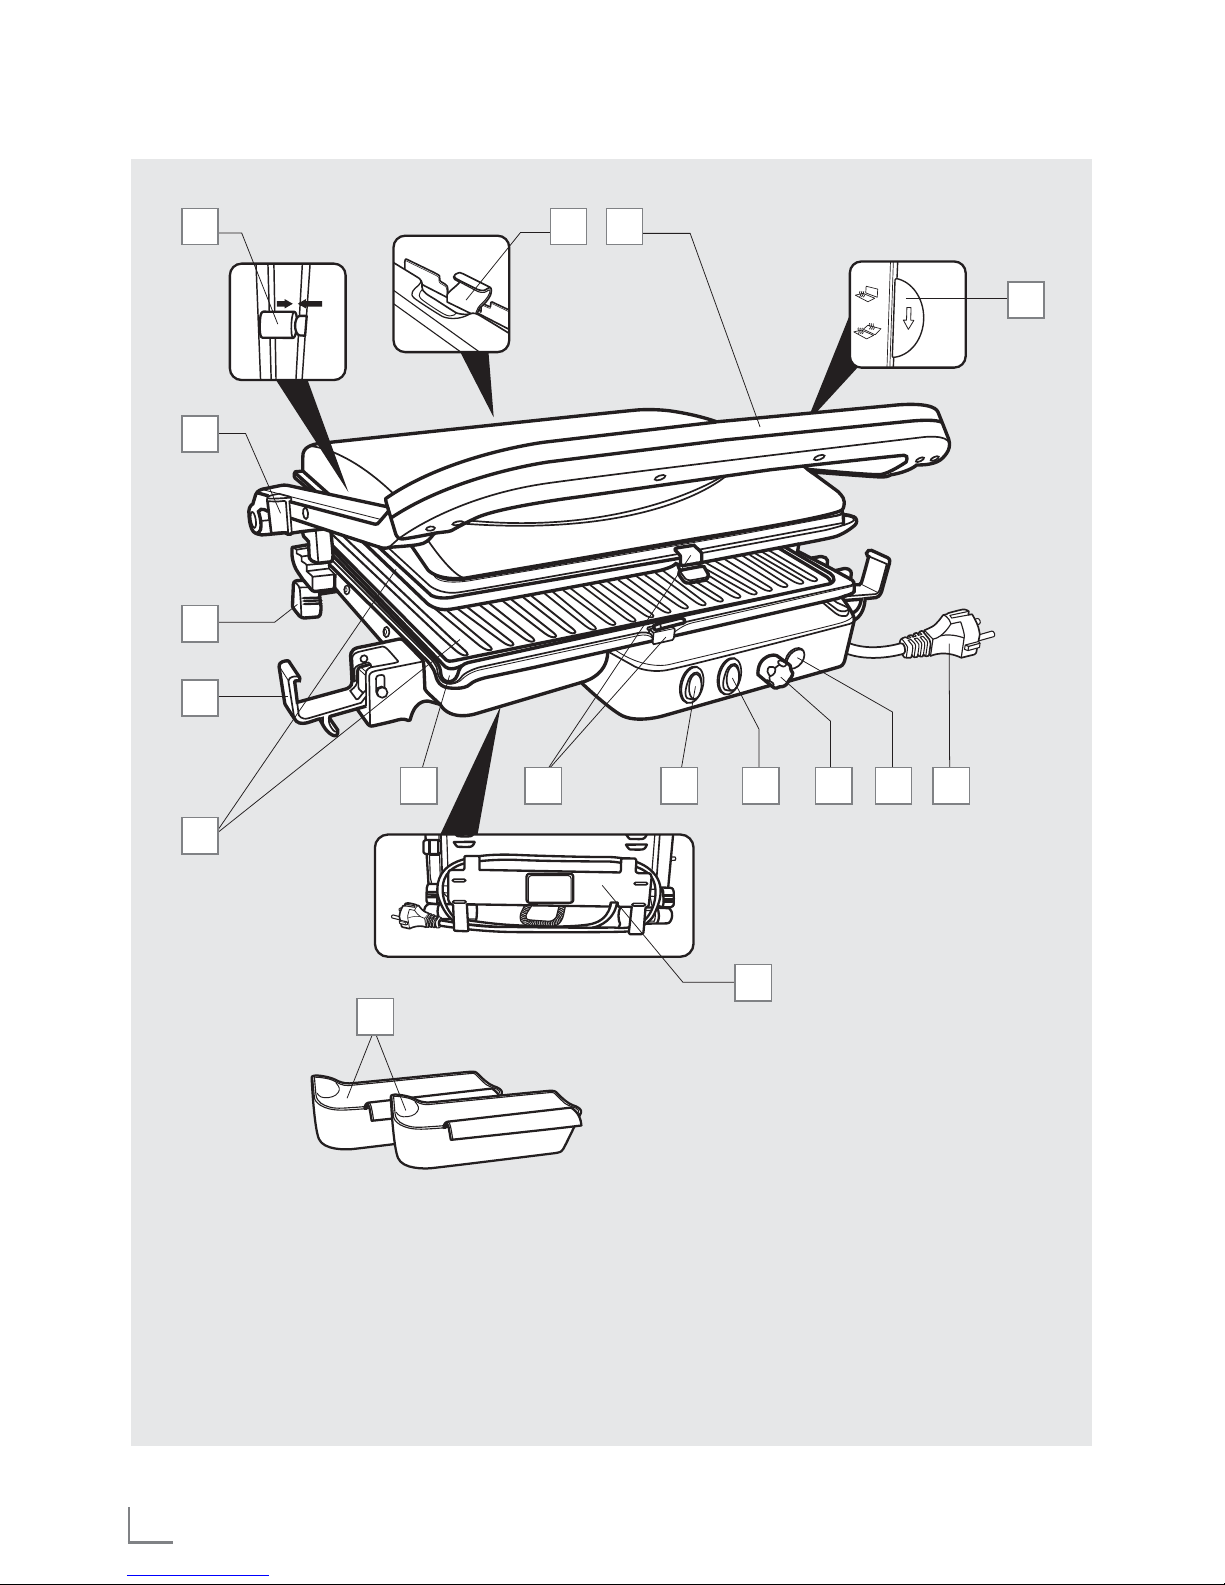
Controls and parts
See the figure on page 3.
A
Unlocking hinge for table grill position
B
Power cord
C
Temperature control indicator
D
Temperature control
E
On/Off switch (I/O) (illuminated in On mode)
F
Upper/lower switch for grill plate (● ●●)
G
Plate release
H
Cord winding device
I
Grease drainage opening
J
Upper/lower grill plates
K
Transport lock
L
Adjustable stand
M
Height adjustment mechanism for the upper
grill plate
N
Arrestor for the upper grill plate
O
Plate latch
P
Handle
Accessory
Q
Grease drip tray
OPERATION _______________________________
Before first use
1 Remove all packaging and sticker materials
and dispose them according to the applicable
legal regulation.
2 Before using of the appliance for first time,
clean the appliance (See the “Cleaning and
care” section).
3 Make sure that the appliance is sitting in an
upright position and on a stable, flat, clean,
dry and non-slip surface.
Caution
■ When using for the first time, smoke can
develop due to production residues. However,
this does not mean the appliance is defective.
The first time you turn it on, use the appliance
without food. Ensure for proper room
ventilation.
Grilling positions
Closed position
The closed position is suited for grilling at high
temperatures. The upper and lower grill plates come
into contact with food. If the food does not come into
contact with the upper grill plate, then the height of
the upper grill plate can be adjusted as needed. This
position is suitable for preparing sandwiches, toast,
pizza, panini, hamburger, steaks and other foods
which require high upper and lower temperatures.
Separately heated
2 extra large, hinged and removable
grill plates.
Grilling, gratinate and contact grill
function.
15
1680–2000 W

ENGLISH
OPERATION _______________________________
The height of the upper grill plate can be
adjusted as follows:
1 Release the transport lock
K
on both sides
and open the grill halfway.
2 Push the handle of the height adjustment
mechanism
M
to the left or right in order to
determine the height.
4321 0
0 indicates the lowest
position. The plates touch
each other.
4 indicates the highest
position.
Table grill position
In this position, the grill can be folded out and
thus offers two large gr
illing areas. This position
is suitable for preparing sausages, steaks, fish,
vegetables and fruit.
1 Release the transport lock K on both sides.
2 Pull the handle
P
about ¾ of the way up
and hold it in this position. Make sure that the
arrestor for the upper grill plate N is in the
locked position.
3 Push the unlocking hinge A in the direction of
the arrow and guide the upper half of the grill
downwards.
4 Turn the adjustable stand
L
to the table
grill position in order to simplify drainage
of grease and juice. For the closed position,
turn the adjustable stand back in the initial
position.
Preparation
1 Completely unwind the power cord B from
the cord winding device H on the bottom of
the contact grill and lay it out.
2 Unlock the transport lock K on both sides by
pulling them upwards and then folding them
down.
3 Open the contact grill with the handle
P
.
4 Select a grilling position (See the “Grilling
positions” section).
5 Depending on the grilling position, position
one or both grease drip trays Q, under the
grease drainage opening
I
.
6 Connect the power plug B into the wall
socket.
Notes
■ When connecting to the power supply the
on/off switch I/0 E must be set in position 0.
■ To prevent foods from sticking to the grill
plates J put a few drops of cooking oil on
the plates and spread it with a brush or cloth.
Be careful, the plates can be very hot.
16

ENGLISH
OPERATION _______________________________
Grilling
Notes
■ Before you place food on the grill, let the grill
preheat for a few minutes.
■ For optimal grilling results, place the food in
the middle of the grill plates.
■ The grilling time depends on the type of food,
the thickness and your individual taste.
1 Lay the food in the middle of the lower grill
plate. Use the handle
P
to open and close
the grill (for closed position) or distribute the
food on both grill plates (table grill position).
2 Press upper/lower switch for grill plate F.
The switch settings can be adjusted as
follows:
6QQFSBOEMPXFSIFBUppCPUIQMBUFT
heat up.
-PXFSIFBUpPOMZUIFMPXFSQMBUF
heats up.
3 Press On/Off switch I/0 E to I position.
‒ The On/Off switch I/0 E illuminates and
the process starts.
4 Adjust the grilling temperature by using the
temperature control D.
Notes
■ Turn the temperature control
D
all the way to
the left for lowest temperature, all the way to
the right for highest temperature.
■ The temperature control indicator
C
illuminates when the adjusted temperature has
been reached. In other cases, the temperature
control indicator goes off.
5 Switch the On/Off switch I/0
E
to the 0
position when you want to stop the process
and disconnect the power plug B out of wall
socket.
6 Take out the food from the grill.
Caution
■ Be very careful when taking the food out
of the appliance as the metal parts of the
appliance also the food can become very
hot.
■ Use tools made of wood or suitable plastic
to turn the food over or to take it off the grill.
Metal objects could cause short circuits or
electric shock. Do not damage the heating
elements and mechanics.
7 Let the grill cool down completely.
8 Clean the grill after each use to prevent
bacterial growth and to keep the grill in good
condition (See "Cleaning and care” section).
Hints and tips
■ Sausages could burst during grilling and can
lead to injuries and cause a mess. Therefore
poke sausages or cut them a little before
putting them on the grill.
■ Fresh meat produces better results than frozen
or thawed out meat.
■ It is important that the grilling meat is not too
thick.
17

ENGLISH
INFORMATION ____________________________
Taking off and putting on the grill
plates
Caution
■ Prior to handling the grill plates
J
, make sure
that the grill has completely cooled down.
Never touch the grill plates when they are hot.
1 Turn the grill off, disconnect the power plug
and let the grill cool down completely.
2 F
irst remove the grease, oil and juice with
paper towel.
3 Push the plate release G down and hold
the plate up. Follow the same steps for both
the upper and lower plates. Do not touch
the heating coils underneath the plates after
removing the plates.
4 To put on the grill plates, set them from the
rear into the plate latches
O
. Make sure that
the plates click into place.
Cleaning and care
Caution
■ Never use petrol, solvents or abrasive
cleaners, metal objects or hard brushes to
clean the appliance.
■ The grill plates are coated. Do not damage
the plates by using hard tools. Use tools made
of wood or suitable plastic and soft clothes
only.
■ Never put the appliance or power cord in
water or any other liquid.
1 Turn the appliance off and disconnect it from
wall socket.
2 Let the appliance cool down completely.
3 Use a damp soft cloth and a small mild
cleanser to clean the exterior of the
appliance. Dry the exterior of the appliance
thoroughly.
4 The grill plates
J
and the grease drip tray Q
can be cleaned with water and a small mild
cleanser.
Notes
■ Only use a sponge or a soft cloth to clean the
grill plates so the non-stick coating does not
get damaged.
■ To remove food stuck to the grill, let the grill
plates soak in dish soap and water for about
5 minutes.
■ Do not clean grill plates and the grease drip
tray in the dishwasher.
■ Before using the appliance after cleaning
or storing, dry all parts carefully using a soft
towel.
Storage
1 There is a cord winding device H on the
bottom of the grill. Wind the power cord
around the mounted hooks.
2 Close the grill and the transport lock K by
pulling them up and hanging them on the
handle. To store it in an upright position, close
the transport lock. Now the grill can be set on
its feet in an upright position.
If you do not plan to use the appliance for a
long period of time, please store it carefully.
Make sure that the appliance is unplugged
and completely dry.
Do not wrap the power cord around the
appliance. Store it in a cool, dry place.
Make sure the appliance is always kept out
of the reach of children.
18

ENGLISH
INFORMATION ____________________________
Environmental note
This product has been made from high-quality
parts and materials which can be re-used and
are suitable for recycling.
Therefore, do not dispose the
product with normal household
waste at the end of its service
life. Take it to a collection point
for the recycling of electrical
and electronic equipment. This is
indicated by this symbol on the product, in the
operating manual and on the packaging.
Help protect the environment by recycling used
products.
Technical data
This product conforms to the European
directives 2004/108/EC and
2006/95/EC.
Power supply: 220 V – 240 V~, 50 Hz
Power:
Technical and design modifications reserved.
Please consult your local authorities to find
out where the nearest collection point is.
19
1680 – 2000 W

www.grundig.com
72011 907 4500
 Loading...