

Ground Zero Uranium GZUA 4.150SQ-PLUS Service Manual

URANIUM-SERIES
AMPLIFIER
GZUA 2.250SQ-PLUS
GZUA 4.150SQ-PLUS
GZUA 6.200SQ-PLUS
OWNER’S MANUAL
Common Features
2 Ohm stable stereo (GZUA 4.150SQ-PLUS & 6.200SQ-PLUS)
1 Ohm stable stereo (GZUA 2.250SQ-PLUS)
Adjustable BIAS control (for each pair of channels separately)
High End WIMA
Latest BURR-BROWN
Status LED
Wide-band adjustable high pass & low pass filters
Band-pass feature with activated LPF & HPF
Adjustable input sensitivity
Soft delayed remote turn on
Bass remote control (GZUA 2.250SQ-PLUS with activated LPF)
Phase shift control (GZUA 2.250SQ-PLUS with activated LPF)
Bass boost control from 0 - 12dB @45 Hz(GZUA 2.250SQ-PLUS)
Thermal / speaker short circuit / overload / over current protection
Temperature sensor controlled cooling fan
®
Capacitors
®
operational amplifiers
2
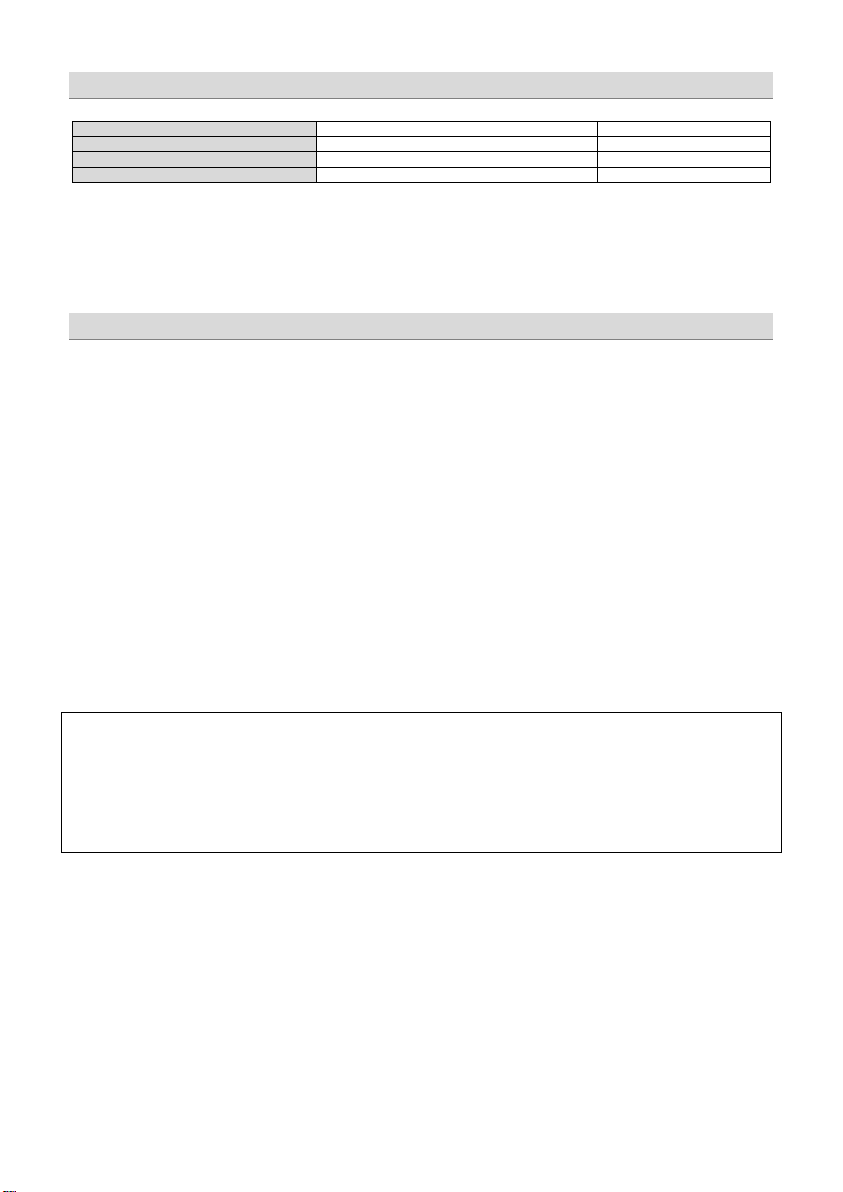
GZUA 2.250SQ-Plus / GZUA 4.150SQ-Plus
GZUA 6.200SQ-Plus
Speaker wires
min 2.5 mm² / 13 AWG
min 2.5 mm² / 13 AWG
Power supply wires
min 20.0 mm² / 4 AWG
min. 35.0 mm² / 2 AWG
Remote wire
min 0.75 mm² / 20 AWG
min 0.75 mm² / 20 AWG
Mounting instructions
Recommended wiring
As a precaution, it is recommended to disconnect the vehicles battery before mounting (also note the vehicles manual!)
The power supply wire (+12 V) has to be protected within max. 20 cm / 8” by a main fuse holder with matching fuse value
(Main fuse value has to be equal to the sum of values of the fuses of each connected device)
If necessary, replace a defective fuse by a new one with identical value
Never drill a hole to the vehicles gas tank or brake lines, to wirings or any other important vehicle part!
Never pass wires over sharp edges or vehicle parts
Keep the wiring away from the antenna and electronic devices contributing to radio reception
Install the power supply wiring locally separated from the speaker wiring
The amplifier contains a temperature protection circuit that turns the device off in case of overheating. After a certain cooling
time the amplifier will turn on again automatically. To avoid heat build-up, it´s necessary to provide sufficient air supply for
the amplifier cooling. Therefore, never cover the surface of the heatsink entirely.
The amplifier should not be mounted on a strongly vibrating part or surface (e.g. subwoofer enclosure)
If a pre-amplified output (RCA) is available (on the head unit) it is recommended to make use of them
WARNING !
Powerful car audio systems are able to create extremely high SPL similar to real live concert levels. Permanent exposure to excessively high
sound levels may cause damage to or loss of the hearing.
Furthermore, operation of a motor vehicle while listening to audio equipment at high volume levels may impair your ability to concentrate
on road traffic and external sounds such as horns, warning signals or emergency vehicles. In the interest of general and own safety, it is
recommended to listen to music at appropriately low volume levels while driving.
3
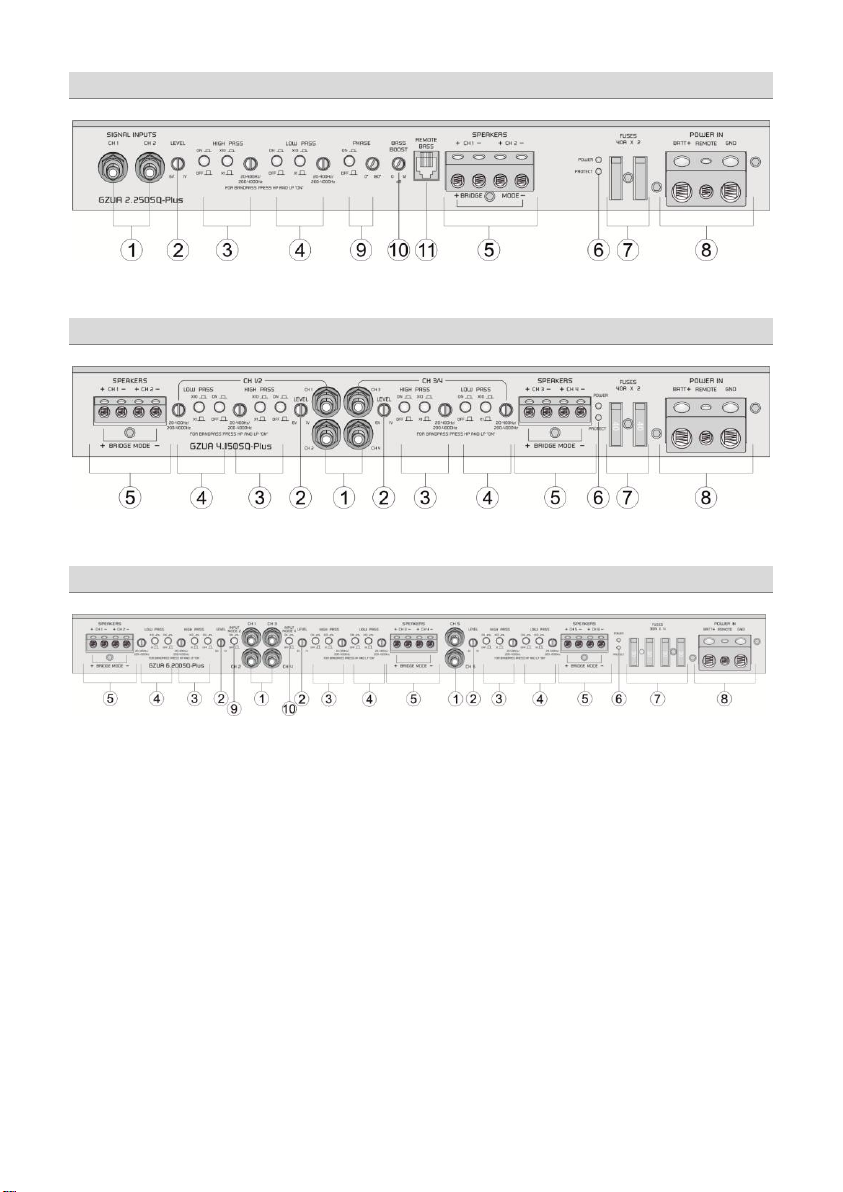
Controls & Features – GZUA 2.250SQ-PLUS
Controls & Features – GZUA 4.150SQ-PLUS
Controls & Features – GZUA 6.200SQ-PLUS
4
1
INPUT sockets
Input sockets to connect RCA wires - to avoid any malfunction, it is recommended to use
only high quality RCA cables
Cable recommendation: GZCC X-TP series (available lengths 0.57 / 1.14 / 3.14 / 5.49 m)
2
LEVEL control
Controller to adjust the input sensitivity of the according pair of channels
3
Crossover activation switch*
Push the switch to the ON position to activate the high pass filter
Crossover multiplication switch
Push the switch to the X10 position to multiply the selected frequency by the factor of 10
The crossover frequency range will change from 20 – 400 Hz to 200 – 4000 Hz
HIGH PASS filter controller*
Adjust the required crossover point using the controller. Frequencies below the selected
crossover point will be filtered (20 to 400 Hz / 200 to 4000 Hz).
4
Crossover activation switch*
Push the switch to the ON position to activate the low pass filter
Crossover multiplication switch
Push the switch to the X10 position to multiply the selected frequency by the factor of 10
The crossover frequency range will change from 20 – 400 Hz to 200 – 4000 Hz
LOW PASS filter control*
Adjust the required crossover point using the controller. Frequencies above the selected
crossover point will be filtered (20 to 400 Hz / 200 to 4000 Hz)
*
BANDPASS feature
Bandpass filter is activated as soon as high and low pass switches are in the ON position
Depending on the multiplication switch the bandpass filter range varies from 20 to 4000 Hz
5
SPEAKER terminal
To connect the speaker wires in stereo or bridged mode
6
Status LED
POWER -> white -> ok (correct operation)
PROTECT -> red -> error / protection
7
Fuses
Replace defective fuses always using fuses with identical value
8
POWER supply
terminal
BATT +
Connect to a positive power wire from the battery terminal (12 Volt)
REMOTE
Connect to the remote output wire of the head unit or DSP/pre-amplifier
GND
Connect to a wire from the ground terminal of the battery or to chassis ground
9
PHASE control
Activating switch and controller (0 to 180˚)
10
BASS BOOST control
Controller to adjust the bass boost level ( from 0 to +12 dB @ 45 Hz)
11
BASS REMOTE socket
Connect the wire of the bass remote control
9
10
INPUT MODE 2 switch
INPUT MODE 4 switch
INPUT MODE 2 “OFF” and INPUT MODE 4 ”OFF”
Each input channel provides signal to the according channel
INPUT MODE 2 “ON” and INPUT MODE 4 ”OFF”
Input CH1 provides signal to CH1 & CH3 & CH5
Input CH2 provides signal to CH2 & CH5 & CH6
INPUT MODE 2 “OFF” and INPUT MODE 4 ”ON”
Input CH1 provides signal to CH1
Input CH2 provides signal to CH2
Input CH3 provides signal to CH3 and CH5
Input CH5 provides signal to CH5 and CH6
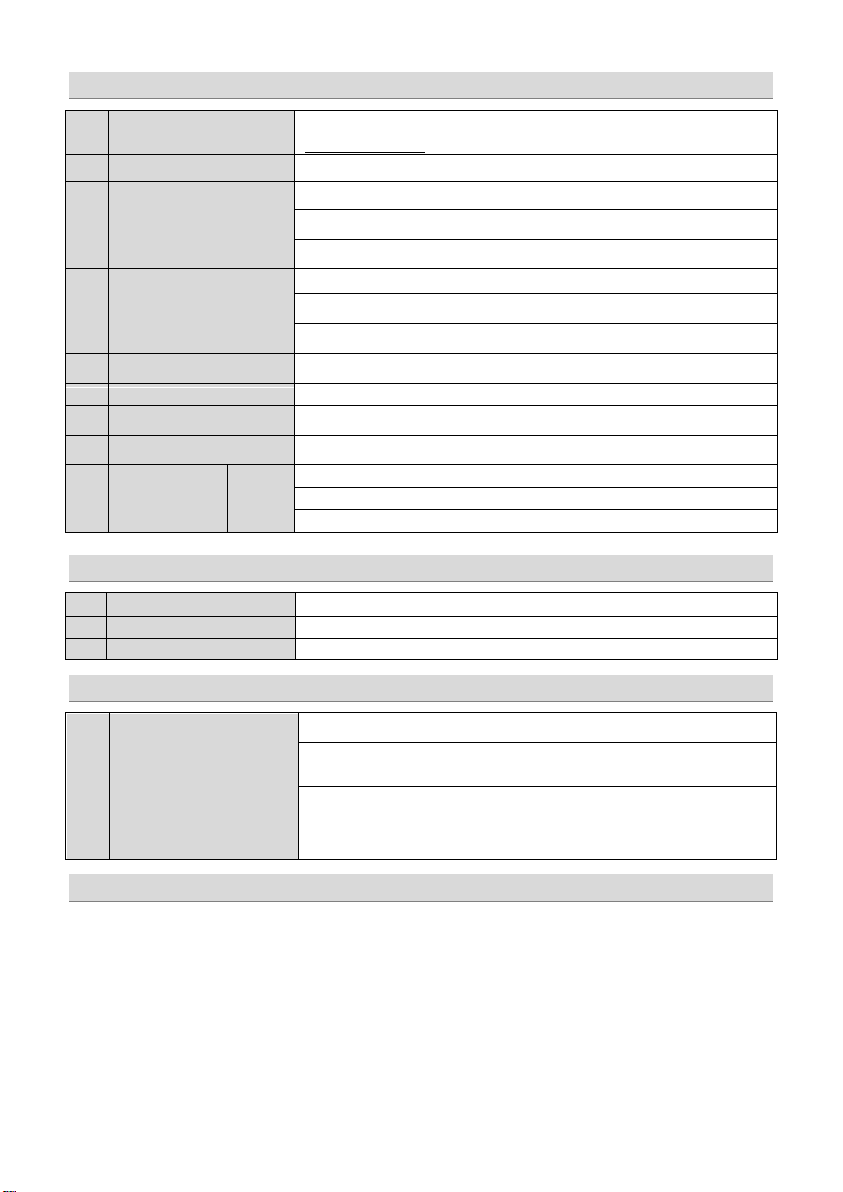
Controls & Features GZUA SQ-PLUS series amplifiers
Additional Controls & Features GZUA 2.250SQ-PLUS
Additional Controls & Features GZUA 6.200SQ-PLUS
BIAS setting
The BIAS setting affects the operation mode of the amplifier.
It is continuously adjustable from <MIN> (actual Class A/B mode) to <MAX> (close to Class A mode).
An amplifier in Class A mode sounds warm and creates a pleasant atmosphere. Compared to that, the
Class A/B mode of an amplifier sounds more direct and dynamic. Depending on the BIAS setting, the
current consumption of the amplifier is growing the closer the operation comes to the Class A mode
leading to an increased temperature. The power rating however, remains identical. The BIAS can be set
using the control on the bottom of the amplifier for each pair of channels, independently.
5
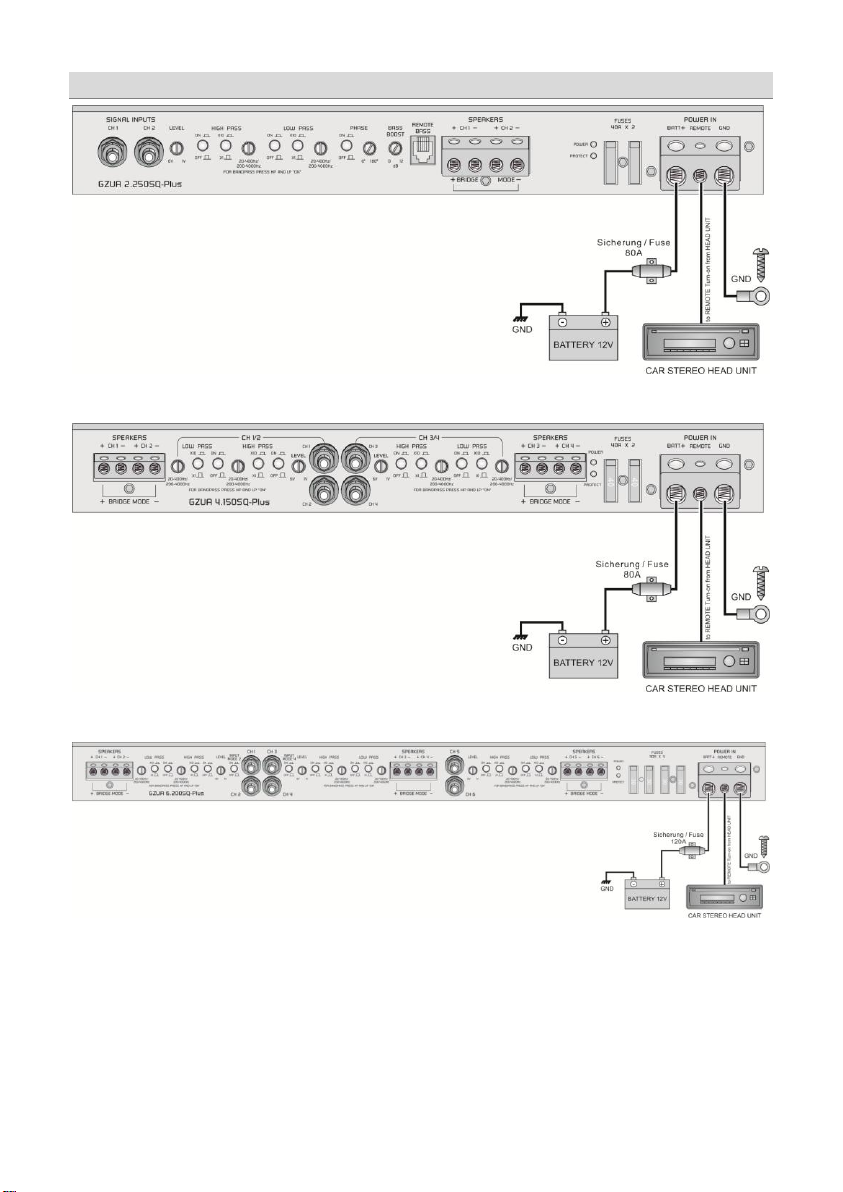
Power wiring – GZUA amplifier series
6
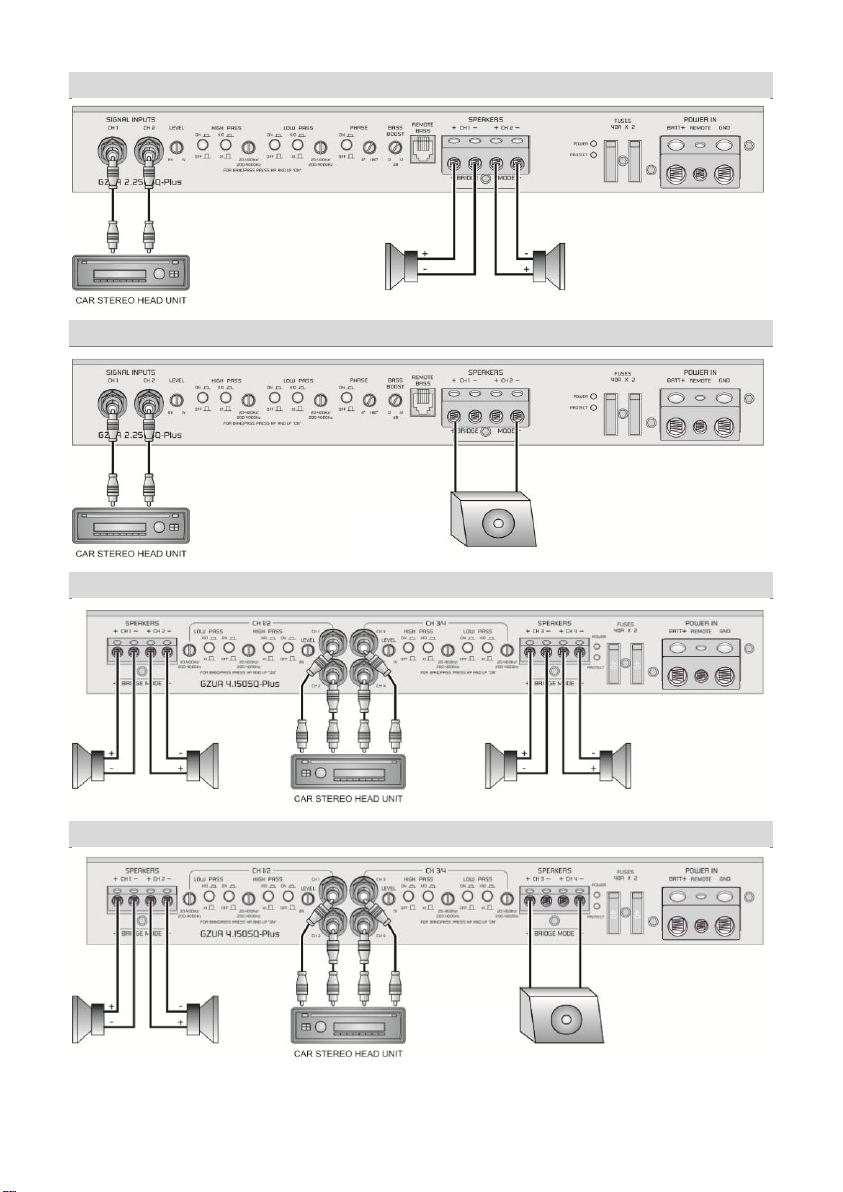
Input & output stereo wiring – GZUA 2.250SQ-PLUS
Speakers 1-4 Ω
Speakers 2-4 Ω
Speakers 2-4 Ω
Speakers 2-4 Ω
Subwoofer 4 Ω
Subwoofer 2-4 Ω
Input & output bridged wiring – GZUA 2.250SQ-PLUS
Input & output stereo wiring – GZUA 4.150SQ-PLUS
Input & output 3-channel wiring – GZUA 4.150SQ-PLUS
7
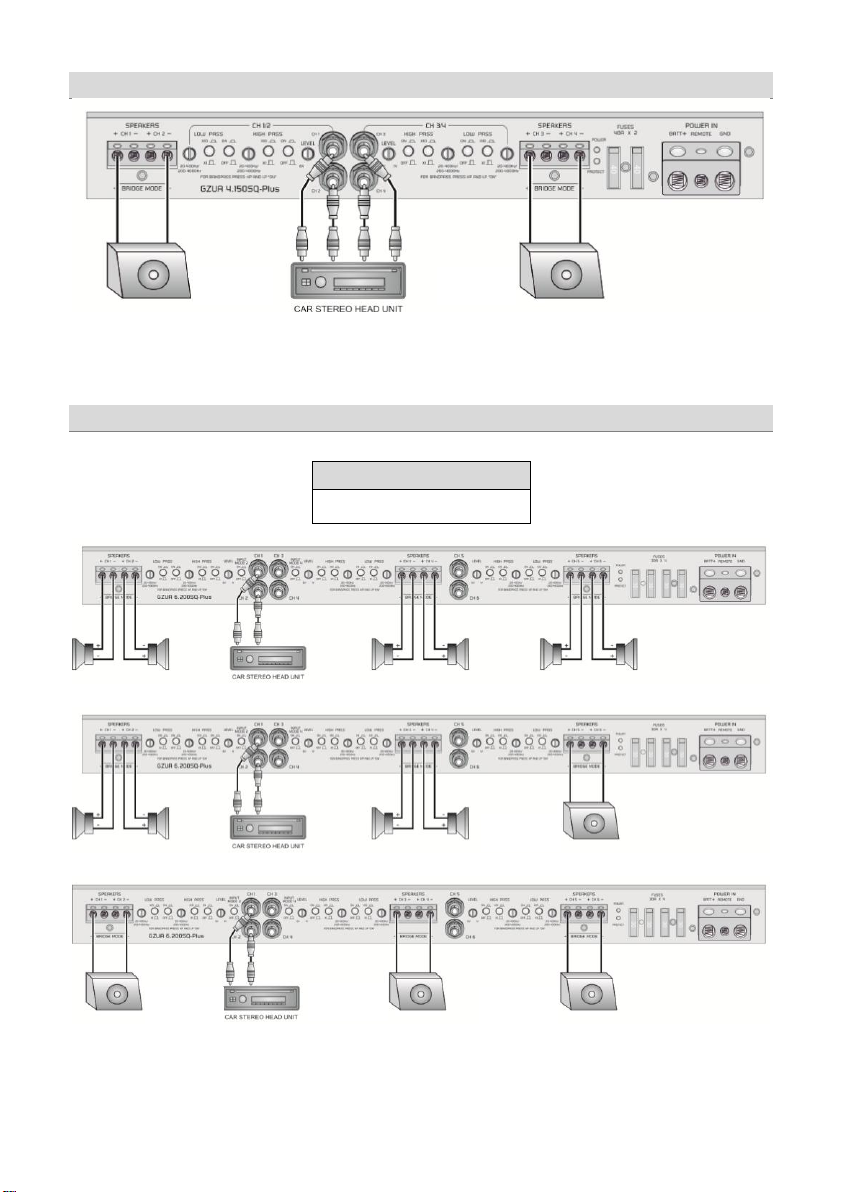
Input & output bridged wiring – GZUA 4.150SQ-PLUS
SET INPUT MODE
INPUT MODE 2 to “ON” position
INPUT MODE 4 to “OFF” position
Subwoofer 4 Ω
Subwoofer 4 Ω
Subwoofer 4 Ω
Speakers 2-4 Ω
Speakers 2-4 Ω
Speakers 2-4 Ω
Speakers 2-4 Ω
Speakers 2-4 Ω
Subwoofer 4 Ω
Subwoofer 4 Ω
Subwoofer 4 Ω
Input & output stereo/bridged wiring – GZUA 6.200SQ-PLUS – 2 channel input
 Loading...