


IRIDIUM-SERIES
AMPLIFIER
OWNER’S MANUAL
GZIA 1.600HPX-II
GZIA 2080HPX-II |
GZIA 2130HPX-II |
GZIA 2235HPX-II |
GZIA 4115HPX-II |
Features
•4 Ohm / 2 Ohm stable Stereo
•1 Ohm stable Mono (GZIA 1.600HPX-II)
•Power & Protection indicator
•Bass Boost (1.600HPX-II)
•Variable highpass (GZIA 2080HPX-II / 2235HPX-II / 2130HPX-II / 4115HPX-II)
•Variable lowpass
•Auto-On @ High Level Input
•Adjustable input sensitivity
•Soft delayed remote turnon
•Bass remote ( 1.600HPX-II / 2235HPX-II & GZIA 2130HPX-II optional)
•Thermal / Short / Overload protection

Tools and materials you need
•Screwdriver
•Electric drill, 3 mm / 0.12” carbide drill bit
•Mounting screws
•Power wire min. 10 mm² / 7 AWG
•Ground wire min. 10 mm² / 7 AWG
•Speaker wire min. 2 x 1,5 mm² / 15 AWG
Please note!
•As a precaution it is advisable to disconnect the vehicle’s battery before making connection to the +12 Volts supply wiring (see owner’s manual of your car for further information).
•Please use great caution drilling your trunk. Your gas tank and brake lines can be damaged by puncturing with your drill bit – this could cause damage or failure of your cars operating systems.
•Never pass wires over sharp angles. It is recommended to buffer the power supply of the amplifier with a capacitor min. 1 Farad to guarantee a stable operation voltage.
WARNING !
High powered audio systems in a vehicle are capable of generating "Live Concert" levels of sound pressure. Continued exposure to excessively high volume sound levels may cause hearing loss or damage. Also, operation of a motor vehicle while listening to audio equipment at high volume levels may impair your ability to hear
external sounds such as; horns, warning signals, or emergency vehicles, thus constituting to a potential traffic hazard. In the interest of safety, Consumer Electronics recommends listening at lower volume levels while driving.
Planning your system
Before beginning the installation, consider the following:
a.If you plan to expand your system by adding other components sometime in the future, ensure adequate space is left, and cooling requirements are met.
b.If your radio / source is equipped with pre-amp outputs, it is possible to utilize them to drive the amplifier
Mounting your amplifier
a.Select a suitable location that is convenient for mounting, is accessible for wiring and has ample room for air circulation and cooling.
b.Use the amplifier as a template to mark the mounting holes, remove the amplifier.
2

Warning
Chose a mounting position where all eclectic wires are protected from being damaged by sharp edges, heat or other conditions. +12Volt DC electrical connections must be fused on the battery side. Make sure your radio and all other devices will be turned off while connection your system.
If you need to replace the power fuse, replace it only with a fuse identical to that supplied with the system. Using a fuse of different type or rating may result in damage to this system which isn’t covered by the warranty.
Controls and functions – GZIA 1.600HPX-II
3

Controls and functions – GZIA 2080HPX-II
4

Controls and functions – GZIA 2130HPX-II
5

Controls and functions – GZIA 2235HPX-II
6
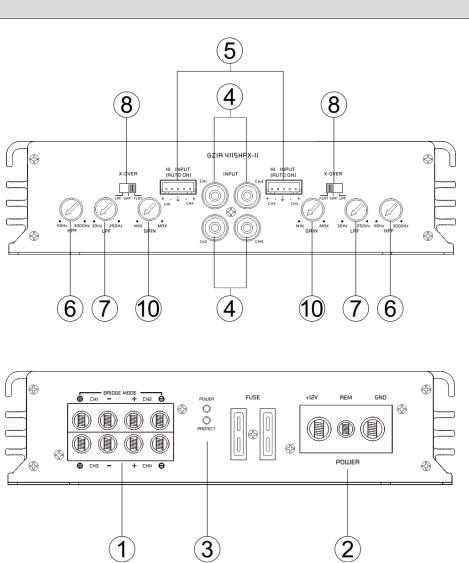
Controls and functions – GZIA 4115HPX-II
7

|
|
|
|
|
|
|
Controls and functions |
|
|
|
|
|
|
|
|
|
|
|
1 |
|
|
Speaker terminals |
For connection of the speakers |
|
||
|
|
|
|
|
|
|
GND -> Ground connection |
|
|
|
2 |
|
|
Power terminals |
|
REM -> Remote antenna terminal [Not for use with High level inputs (5)] |
|
|
|
|
|
|
|
|
BATT -> +12 Volt |
|
|
|
3 |
|
|
Satus indication |
|
GREEN – OK |
|
|
|
|
|
|
RED – Error |
|
||
|
|
|
|
|
|
|
|
|
|
|
|
|
|
|
|
Terminal for connection of the RCA wires. |
|
|
|
|
|
|
|
|
To avoid failure, please use high quality RCA wires. |
|
|
|
4 |
|
|
Cinch inputs |
|
IMPORTANT! |
|
|
|
|
|
|
|
|
|
|
|
|
|
|
|
|
|
Do not use the High level inputs and the Cinch inputs parallel, this can damage |
|
|
|
|
|
|
|
|
the amplifier. Use either the Cinch OR the High Level inputs. |
|
|
|
|
|
|
|
|
These inputs must be used if your head unit is not equipped with a Low Level Cinch |
|
|
|
|
|
|
|
|
|
|
|
|
|
|
|
|
|
ouput. |
|
|
|
|
|
|
|
|
Connect this input to the speaker outputs of your head unit. The amplifier |
|
|
|
|
|
|
|
|
automatically turns on as soon as a signal is received (Auto On). The remote |
|
|
|
5 |
|
|
High Level inputs |
|
connection of the PowerTerminal (2) won’t be used. |
|
|
|
|
|
|
|
|
IMPORTANT! |
|
|
|
|
|
|
|
|
Do not use the High level inputs and the Cinch inputs parallel, this can damage |
|
|
|
|
|
|
|
|
the amplifier. Use either the Cinch OR the High Level inputs. |
|
|
|
|
|
|
|
|
Set the filter switch to „HIGH“ position. |
|
|
|
6 |
|
|
High Pass controller |
|
Adjust the variable HPF crossover frequency to the desired frequency using the |
|
|
|
|
|
|
|
|
controller. All frequency between 40 and 3000 Hz will be reproduced. |
|
|
|
|
|
|
|
|
Only frequencies from 30Hz to 250Hz will be reproduced (depending on the LPF |
|
|
|
|
|
|
|
|
|
|
|
|
7 |
|
|
Low Pass controller |
|
filter controller position). Set the filter switch to „LOW“ position. Adjust the variable |
|
|
|
|
|
|
|
|
LPF frequency to the desired frequency using the controller. |
|
|
|
|
|
|
|
|
Adjust the crossover for the chosen utilization. |
|
|
|
8 |
|
|
Mode switch |
|
LPF – Only bass frequencies (below 30Hz - 250Hz) will be reproduced. |
|
|
|
|
|
|
FLAT – All frequencies will be reproduced. |
|
||
|
|
|
|
|
|
|
|
|
|
|
|
|
|
|
|
HPF – Only middle and high frequencies (over 40Hz – 3000Hz) will be |
|
|
|
|
|
|
|
|
reproduced. |
|
|
|
9 |
|
|
Remote control input |
|
For connection of bass remote control |
|
|
|
|
|
|
(GZIA 2130HPX-II & 2235HPX-II optional/1.600HPX-II) |
|
||
|
|
|
|
|
|
|
|
|
|
10 |
|
|
Input level controller |
With this controller you can adjust the input sensitivity. |
|
||
|
11 |
|
|
Bass Boost controller |
For adjusting a Bass Boost at 45 Hz from 0 – 12 dB |
|
||
High Level Input
Depending on the configuration of your car and sound system, error noises may appear when using the high level inputs. Please use the additional middle ground-connection of this input to reduce these noises.
The Auto-On function allows you to use the amplifier without an additional remote connection. This makes it possible to operate it with an OEM headunit and OEM active systems, which are not equipped with cinch ouputs or switched remote-outputs.
8

High Level Input – GZIA 1.600HPX-II
Depending on the configuration of your car and sound system, error noises may appear when using the high level inputs.
Please use the additional middle ground-connection of this input to reduce these noises.
Connect this wire to the GND powerterminal.
A connection to the GND connection of the signal source can also be useful.
The Auto-On function allows you to use the amplifier without an additional remote connection.
The remote terminal will not be used.
9

High Level Input – GZIA 2080HPX-II
Depending on the configuration of your car and sound system, error noises may appear when using the high level inputs.
Please use the additional middle ground-connection of this input to reduce these noises.
Connect this wire to the GND powerterminal.
A connection to the GND connection of the signal source can also be useful.
The Auto-On function allows you to use the amplifier without an additional remote connection.
The remote terminal will not be used.
10
 Loading...