

Page 1
Installation and Operating Instructions
CALIMA 200 Series Wireless Chime Kit
Kit consisting of a
wireless chime
with LED ring and
wireless bell button
Page 2

Guarantee / Package contents / Materials required
Dear Customer,
With this device you have acquired a quality product which we have developed
and produced for you with the greatest possible care and to the highest
standards. The statutory guarantee period applies. Defects caused by improper
handling, misuse or disregard of the installation and operating instructions are
excluded from this guarantee
Package contents (please check the package contents for
completeness)
o
1 CALIMA 200 wireless chime
o
1 wireless bell button
o
2 wall plugs and 2 Phillips screws for mounting the wireless bell
button
o
1 Allen key for opening the cover of the wireless bell button
You also need (not included in the package)
o
4 x 1.5 V (AA type) batteries for the wireless chime
o
2 x 1.5 V (AAA type) batteries for the wireless bell button
o
Tools / aids such as drill bits, screwdriver, coin
Alternative fixing option (not included)
o
Velcro tape or double-sided adhesive tape instead of mounting
with screws
.
2
Page 3

Safety instructions / Cleaning
Do not expose the wireless chime to dripping or splashing liquid! Do not place
any vessels filled with liquid on it! Do not cover it with objects or blankets,
curtains, etc. and protect it from direct sunlight and naked flames!
Do not expose the batteries in the wireless bell button to excessive heat
(e.g. sunlight, fire or similar)!
Intended use
The devices described here are solely intended as a radio-controlled bell and
signalling system for private use. The function can be impaired by different
influences (flat batteries, radio interference, etc.). Never use this wireless
chime kit in safety-related areas!
If failure of the device could cause a hazard for people, or other consequential
damage is possible, you MUST prevent this through suitable additional safety
measures!
Cleaning
Please clean using only a slightly damp cloth, not a microfibre cloth, as this
could scratch the surface.
3
Page 4

Table of Contents
Initial information:
• Guarantee . . . . . . . . . . . . . . . . . . . . . . . . . . . . . . . . . . . . . . . . . . . . . . . . . . . . . . . . . . . . . . . . . . . . . . . . . . . . . . . . . . . . . . . . . . . . . . . . . . . . 2
• Package contents . . . . . . . . . . . . . . . . . . . . . . . . . . . . . . . . . . . . . . . . . . . . . . . . . . . . . . . . . . . . . . . . . . . . . . . . . . . . . . . . . . . . . . . . 2
• What else you need . . . . . . . . . . . . . . . . . . . . . . . . . . . . . . . . . . . . . . . . . . . . . . . . . . . . . . . . . . . . . . . . . . . . . . . . . . . . . . . . . . . . . . 2
• Alternative fixing option . . . . . . . . . . . . . . . . . . . . . . . . . . . . . . . . . . . . . . . . . . . . . . . . . . . . . . . . . . . . . . . . . . . . . . . . . . . . . . . 2
• Intended use . . . . . . . . . . . . . . . . . . . . . . . . . . . . . . . . . . . . . . . . . . . . . . . . . . . . . . . . . . . . . . . . . . . . . . . . . . . . . . . . . . . . . . . . . . . . . . . . 3
• Safety instructions . . . . . . . . . . . . . . . . . . . . . . . . . . . . . . . . . . . . . . . . . . . . . . . . . . . . . . . . . . . . . . . . . . . . . . . . . . . . . . . . . . . . . . . 3
• Cleaning . . . . . . . . . . . . . . . . . . . . . . . . . . . . . . . . . . . . . . . . . . . . . . . . . . . . . . . . . . . . . . . . . . . . . . . . . . . . . . . . . . . . . . . . . . . . . . . . . . . . . . . 3
CALIMA 200 – the highlights explained briefly
Product overview . . . . . . . . . . . . . . . . . . . . . . . . . . . . . . . . . . . . . . . . . . . . . . . . . . . . . . . . . . . . . . . . . . . . . . . . . . . . . . . . . . . . . . . . . . . . 7
First-time use of the wireless chime
• Inserting the batteries
. . . . . . . . . . . . . . . . . . . . . . . . . . . . . . . . . . . . . . . . . . . . . . . . . . . . . . . . . . . . . . . . . . . . . . . . . . . . . . . . . 8
First-time use of the wireless bell button
• Mounting, inserting the batteries, writing on the nameplate
Individual settings of the wireless chime
• Setting the melody
. . . . . . . . . . . . . . . . . . . . . . . . . . . . . . . . . . . . . . . . . . . . . . . . . . . . . . . . . . . . . . . . . . . . . . . . . . . . . . . . . . . . . . 12
• Setting the colour of the LED ring . . . . . . . . . . . . . . . . . . . . . . . . . . . . . . . . . . . . . . . . . . . . . . . . . . . . . . . . . . . . . . . 14
• Setting the volume . . . . . . . . . . . . . . . . . . . . . . . . . . . . . . . . . . . . . . . . . . . . . . . . . . . . . . . . . . . . . . . . . . . . . . . . . . . . . . . . . . . . . . 16
Mute / slumber function
. . . . . . . . . . . . . . . . . . . . . . . . . . . . . . . . . . . . . . . . . . . . . . . . . . . . . . . . . . . . . . . . . . . . . . . . . . . . . . . . 18
• Switching mute on/off (for an undefined period) . . . . . . . . . . . . . . . . . . . . . . . . . . . . . . . . . . . . . . . . 19
• Switching on / prematurely ending slumber function for 1, 3, 9 hours . . . . . . . . 20
. . . . . . . . . . . . . . . . . . . . . . . . . . . . . . . . . . . . . . . . . . . . . . . . 6
. . . . . . . . . . . . . . . . . . . . . 10
4
Page 5

Table of Contents
Coupling
• Coupling the wireless chime and wireless bell button . . . . . . . . . . . . . . . . . . . . . . . . . . . . . . . . 22
• Optional: Extending by adding further wireless bell buttons /
wireless chimes . . . . . . . . . . . . . . . . . . . . . . . . . . . . . . . . . . . . . . . . . . . . . . . . . . . . . . . . . . . . . . . . . . . . . . . . . . . . . . . . . . . . . . . . . 23
• Deleting the coupling between wireless chime and wireless bell button . . . 24
Optional: Using the alarm function
(only with MISTRAL SE03.1 wireless bell button)
• Alarm function . . . . . . . . . . . . . . . . . . . . . . . . . . . . . . . . . . . . . . . . . . . . . . . . . . . . . . . . . . . . . . . . . . . . . . . . . . . . . . . . . . . . . . . . . . . . 25
Acoustic warning if batteries are low . . . . . . . . . . . . . . . . . . . . . . . . . . . . . . . . . . . . . . . . . . . . . . . . . . . . . . . . . . . 26
Radio range . . . . . . . . . . . . . . . . . . . . . . . . . . . . . . . . . . . . . . . . . . . . . . . . . . . . . . . . . . . . . . . . . . . . . . . . . . . . . . . . . . . . . . . . . . . . . . . . . . . 27
Possible combinations / networking . . . . . . . . . . . . . . . . . . . . . . . . . . . . . . . . . . . . . . . . . . . . . . . . . . . . . . . . . . . . . . 28
Technical data . . . . . . . . . . . . . . . . . . . . . . . . . . . . . . . . . . . . . . . . . . . . . . . . . . . . . . . . . . . . . . . . . . . . . . . . . . . . . . . . . . . . . . . . . . . . . . . 29
Troubleshooting and help . . . . . . . . . . . . . . . . . . . . . . . . . . . . . . . . . . . . . . . . . . . . . . . . . . . . . . . . . . . . . . . . . . . . . . . . . . . . . . 30
Declarations of conformity . . . . . . . . . . . . . . . . . . . . . . . . . . . . . . . . . . . . . . . . . . . . . . . . . . . . . . . . . . . . . . . . . . . . . . . . . . . . 32
Disposal and recycling . . . . . . . . . . . . . . . . . . . . . . . . . . . . . . . . . . . . . . . . . . . . . . . . . . . . . . . . . . . . . . . . . . . . . . . . . . . . . . . . . . 32
Guarantee and liability . . . . . . . . . . . . . . . . . . . . . . . . . . . . . . . . . . . . . . . . . . . . . . . . . . . . . . . . . . . . . . . . . . . . . . . . . . . . . . . . . . 33
Quick-start guide
• Melody selection
• LED ring colour selection
• Volume
• Coupling
• Mute / slumber function
. . . . . . . . . . . . . . . . . . . . . . . . . . . . . . . . . . . . . . . . . . . . . . . . . . . . . . . . . . . . . . . . . . . . . . . . . . . . . . . . . . . . . . . . . 34
5
Page 6

x
CALIMA 200 – the highlights explained briefly
The wireless chime kit is made up of a wireless chime and a wireless bell button.
The wireless chime can be installed in any place in the house or, for example,
on the patio – wherever it is needed. It fits harmoniously into your furnishings
and is nonetheless an eye-catcher. A large number of varied melodies are
clearly distinguished from ambient noises; in addition, the flashing coloured
LED ring assists perception in an ideal way. Thanks to the large range,
CALIMA always announces your visitors or suppliers reliably, even in the
garden.
Ready for use immediately: The wireless bell button is coupled with the
wireless chime in the factory, so that you can use the wireless chime kit
immediately. You can change settings such as the required melody, colour of
the LED ring and volume later.
Networking and individual settings: Several wireless bell buttons and wireless
chimes can be combined with each other and a different melody and colour of
the LED ring can be set for each wireless bell button. So that you know
immediately at which door your visitor is.
Optional alarm function: You can use the wireless chime in combination with
a wireless bell button of the type MISTRAL SE03.1 (not included in the kit) as
an alarm generator. With this wireless bell button, a quickly usable, flexible
and above all, mobile in-house help call system is created. In this way, for
example, a person in need of help can easily draw attention to themselves. To
do this, the wireless bell button must only be pressed for around 3 seconds.
Extendable system: The wireless chime kit can be extended to include an
additional wireless bell button and wireless chime. You can couple a wireless
bell button with any number of wireless chimes
buttons can be coupled with one wireless chime. Interference caused by
other transmitters is prevented, as each wireless bell button sends its own
individual code.
1
6
(Wireless chimes of the ECHO, MISTRAL, CALIMA series only)
1
and up to 11 wireless bell
Page 7

CALIMA 200 wireless chime kit product overview
Loudspeaker
Radio chimeWireless bell button
Select button
LED ring
Menu button
Screws
Battery
compartment
cover
Battery
compartment
Battery holder
Button Nameplate
LED
7
Page 8
First-time use / starting up – wireless chime
Before using for the first time, you
only have to insert the batteries into
the wireless chime and wireless bell
button and mount the wireless bell
button. Simply install the wireless
chime in the required place.
The batteries
included.
Wireless chime:
4 x 1.5 V (AA type) batteries
Wireless bell button:
2 x 1.5 V (AAA type) batteries
required are not
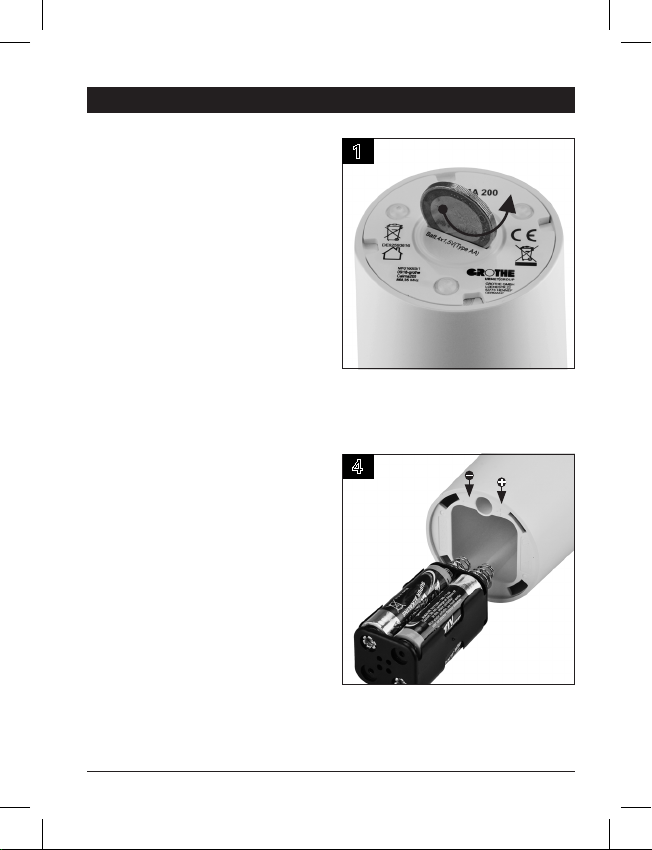
1
Open the battery compartment by
using a coin to unscrew the cover
anti-clockwise.
4
Re-insert the battery holder into the
chime with the springs into front.
8
Page 9
First-time use / starting up – wireless chime
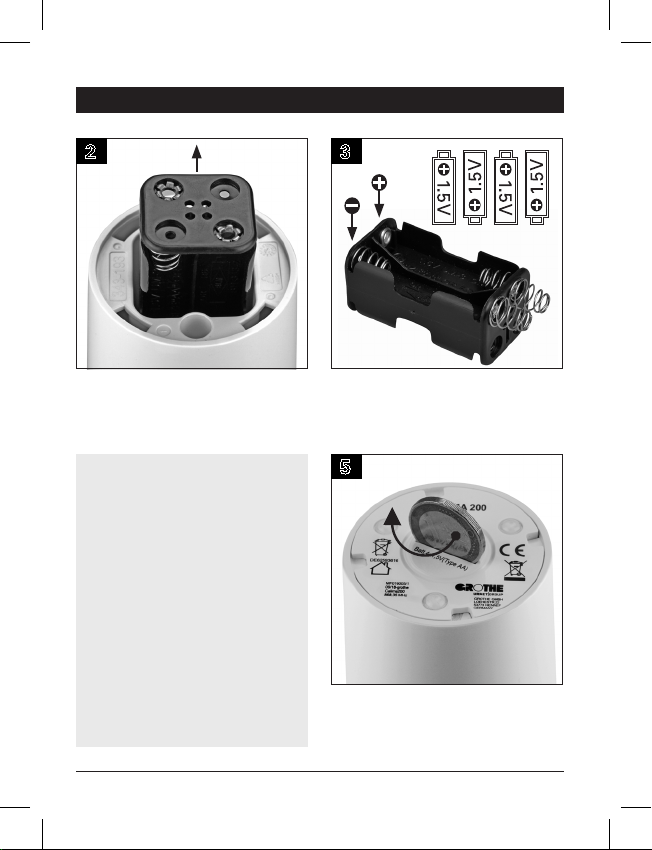
2 3
Remove the battery holder from the
chime.
Please note:
• The contact springs on the
battery holder must always be
positioned where “+” and “–” are
visible at the edge of the bottom
of the housing.
• The two small metal clips inside
the housing must touch the
contact springs of the battery
holder. Otherwise the batteries do
not have any contact.
Insert 4 x 1.5 V (AA type) batteries
into the battery holder. Note the
polarity.
5
Close the battery compartment by
using a coin to screw the cover
clockwise.
9
Page 10
First-time use / starting up – wireless bell button
Wireless bell button:
Mount, insert batteries, write on nameplate
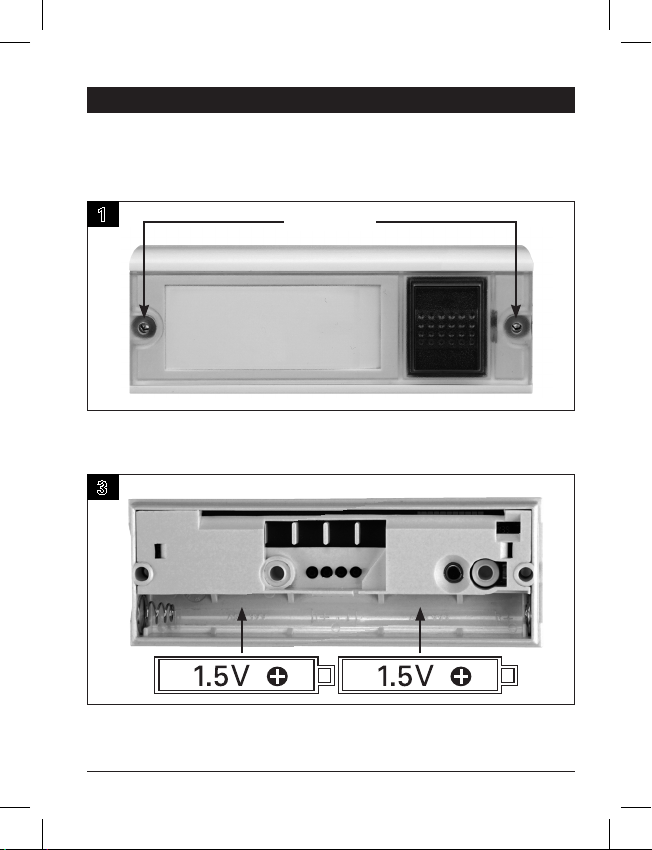
1
Use the Allen key to undo the screws in the cover of the wireless bell button,
and then remove the top half.
Undo screws
3
Insert 2 x 1.5 V (AAA type) batteries into the bottom part of the wireless bell
button. Note the polarity (see markings).
10
Page 11

First-time use / starting up – wireless bell button
Note: Where possible, do not mount the wireless bell button on metal
parts, as this reduces the range significantly.
2
Use the screws supplied to fix the bottom part of the wireless bell button
through the mounting holes and onto the wall.
Mounting holes
4
To label, pull the nameplate out at the side and then push it back in again.
Use the hexagon socket screws to screw the top part of the wireless bell
button firmly onto the bottom part.
11
Page 12

Individual settings – melody
The wireless chime is set and
operated by 2 buttons:
• Selection button (left)
• Menu button (right)
The voice output of the wireless
chime signals the respective
status of the settings.
4
MELODY SELECTION
You will hear “Melody selection”.
1
1x
Press the wireless bell button, that
corresponds to the melody that you
want to set.
5
Press the Select button until the
required melody is played.
12
Page 13

Individual settings – melody
2
1x
Then, press the Menu button on
the wireless chime in its normal
state once.
6
SETTING FINISHED
You will hear "Setting fi nished” as
confi rmation.
3
FLASHES BLUE
The LED ring fl ashes blue as
confi rmation.
From now on, you hear the last
played melody when the wireless
bell button is pressed.
Note: The wireless chime
automatically returns to the normal
state, if no button has been
pressed for 7 seconds.
Repeat this process to set the
melody for other wireless bell
buttons.
13
Page 14

Individual settings – colour of the LED ring
1
1x
Press the wireless bell button to
set the colour of the LED ring on the
wireless chime
5
.
SETTING FINISHED
2
2x
Then, press the Menu button in the
normal state twice.
7 seconds after the last button
was pressed you will hear “Setting
fi nished”.
From now on, the LED ring lights up
in the set colour when the wireless
bell button is pressed.
The wireless chime automatically
returns to the normal state if no
button has been pressed for
7 seconds.
14
Page 15

Individual settings – colour of the LED ring
3
COLOUR SELECTION
You will hear “Colour selection”. The
LED ring lights up with the currently
set colour.
Good to know: You can set the colour with which the LED ring lights up
when a specifi c wireless bell button is pressed.
If you use several wireless bell buttons, this enables you to differentiate at
which door the bell was rung.
4
Now, press the Select button until
the LED ring lights up in the required
colour. Your selection is saved
automatically if no button is pressed
for 7 seconds.
15
Page 16

Individual settings – volume
1
3x
Press the Menu button 3 times in the
normal state.
5
SETTING FINISHED
2
FLASHES GREEN
The LED ring fl ashes green as
confi rmation.
7 seconds after the last button was
pressed you will hear “Setting
fi nished”. From now on, the wireless
chime signals with the last selected
volume.
The wireless chime automatically
returns to the normal state,
if no button has been pressed for
7 seconds.
16
Page 17

Individual settings – volume
3
VOLUME
You will hear “Volume”. Press the Select button until the
Note: The volume
for all wireless bell buttons
of the wireless chime can always only be set the same
used.
4
melody is played with the required
volume. Your selection is saved
automatically if no button is pressed
for 7 seconds.
17
Page 18

Mute / slumber function
If you do not want to be disturbed,
you can mute the wireless chime so
that neither a melody is played, nor
does the LED ring fl ash. The
wireless chime signals neither
visually nor acoustically.
To do this, two options are available
for you to choose from:
• The function can either be
activated for a previously defi ned
period (slumber function)
• or for an unlimited time (mute).
Both functions, i.e. mute and
slumber mode, are indicated
visually. The LED ring fl ashes green
until the wireless chime is back in
active mode, and therefore serves
as a reminder to end muting.
1
1x
Press the Select button in the normal
state once.
18
Page 19

Switching mute on / off (for an undefi ned period)
2 3
1x
FLASHES GREEN
If mute is active, the LED ring fl ashes
green at regular intervals.
LIGHTS UP GREEN
Press the Select button to end mute.
As confi rmation, the LED ring lights
up green while you press the button.
19
Page 20

Start / prematurely end slumber function for 1, 3, 9 hours
1
2
2 – 4x
FLASHES 2 – 4 X YELLOW
Press the Select button 2, 3 or 4
times at one second intervals in the
normal state to activate the slumber
function for 1, 3 or 9 hours.
• You can use the slumber function to mute the wireless chime for a period
limited from the start, i.e. the wireless chime switches back to active mode
automatically.
• You can also end the slumber function at any time before the set period
has expired.
• On the other hand, if you have set mute for an unlimited period, you must
end it actively.
As confi rmation, the LED ring then
fl ashes yellow 2 to 4 times,
depending on how often you pressed
the Select button (see table).
20
Page 21

Start / prematurely end slumber function for 1, 3, 9 hours
3
FLASHES YELLOW
While the slumber function is
active, the LED ring fl ashes yellow
at regular intervals.
The slumber function at a glance
Press button Mute Flashing of the LED ring
2 times for 1 hour 2 times yellow
3 times for 3 hours 3 times yellow
4 times for 9 hours 4 times yellow
4
LIGHTS UP YELLOW
Press the Select button to end the
slumber function prematurely. As
confi rmation, the LED ring lights up
yellow while you press the button.
21
Page 22

Coupling the wireless chime and wireless bell button
1
4x
Press the Menu button in the normal
state 4 times.
5
Press the wireless bell button
within 30 seconds.
2
COUPLING
FLASHES RED
The LED ring fl ashes red as
confi rmation. You will hear
“Coupling”.
6
2. SETTING FINISHED
You will hear the set melody and
“Setting fi nished”. The wireless bell
button is now coupled with the chime.
1. SET MELODY
22
Page 23

Coupling the wireless chime and wireless bell button
3 4
COUPLING ACTIVE
LIGHTS UP RED
Press the Select button within
7 seconds.
At the end of the process the wireless chime returns to the normal state.
Repeat the process to couple additional wireless bell buttons.
The wireless chime returns to the normal state
• if you have pressed the Select button, and did not press a wireless bell
button within 30 seconds at the latest.
• if you do not press the Select button within 7 seconds at the latest after
you have pressed the Menu button 4 times.
Optional extension option: In addition to the wireless bell button and wireless
chime included in the kit, you can couple additional wireless bell buttons with
any number of wireless chimes. You can couple one wireless chime with a maximum of 11 wireless bell buttons. Interference caused by other wireless bell
buttons is prevented as each wireless bell button sends its own individual code.
As confi rmation, the LED ring lights up
red and you will hear “Coupling active".
automatically:
23
Page 24

Deleting the coupling between the wireless chime and bell buttons
1
4x
Press the Menu button in normal
state 4 times.
3
1. COUPLING DELETED
2. SETTING FINISHED
You hear “Coupling deleted” and
then “Setting fi nished”.
12
10 sec.
LED RING GOES OUT
Press the Select button within
7 seconds and keep it pressed for
10 seconds. The LED ring goes
out as confi rmation.
5
After the coupling has been deleted,
the wireless chime no longer responds
if a wireless bell button is pressed.
Note: You always delete all existing
couplings. It is not possible to delete
only one individual coupling between
wireless bell buttons and the wireless
chime.
24
Page 25

Optional: Using the alarm function
The alarm function can be used in combination with the wireless bell button
named below (not included in the kit) as a quickly ready, fl exible and above all
mobile in-house help call system. In this case, the wireless chime acts as an
alarm generator and the optional wireless bell button acts as a signal generator.
In this way, for example, a person in need of help can easily draw attention to
themselves.
Important: To use the integrated
alarm function, you must cut
through a wire link in the wireless
bell button. You can only use the
alarm function in combination with
a special wireless bell button, the MISTRAL SE03.1 wireless bell button.
You can purchase this wireless bell button from your local dealer.
Cutting through the wire link
1
3 sec.
Press the wireless bell button and
keep it pressed for 3 seconds.
The red indicator fl ashes at the
wireless bell button.
2
After you have released the button,
an
alarm sound is played for
3 seconds at the highest volume.
VERY LOUD ALARM
SOUND
25
Page 26

Warning if batteries are low
Wireless chime:
chime issues a warning in the form of beep tones. Replace the batteries as
described on p. 8/9.
Note: Your individual settings (melody, colour of the LED ring, volume) are
retained when you change the batteries or if the batteries are dead!
If the batteries in the wireless chime are low, this is indicated by 2 beep tones
after the melody.
Wireless bell button: Test whether the batteries still have the necessary
voltage. To do this, press the wireless bell button. If the LED of the wireless bell
button flashes for fewer than 6 to 7 times (7 times is the maximum number), you
should replace the batteries.
Optional, only in combination with the wireless bell button (MISTRALSE03.1): If
the batteries of the wireless bell button are low, this is indicated by 4 beep
tones after the melody. Change the batteries soon thereafter, to ensure that the
alarm works when the function is used.
The typical life of the batteries, for normal use, in the wireless chime is approx.
2 years and approx. 7 years in the wireless bell button.
Always only use batteries of the same type and with the same discharge
state.
As soon as the batteries have to be replaced, the wireless
26
Page 27

x
Radio range
The wireless chime kit has a maximum range of 250 m in the free field, provided
that the wireless bell button is not mounted on metal.
Note: Walls, doors, metal parts, etc. can reduce the range significantly.
Overview: Reduction of range by different materials
approx. 80 %: Wood, glass
approx. 50–70 %: Stone
approx. 30–50 %: Concrete wall
approx. 20 %: Concrete ceiling
> 10 %: Metal wall
Wall 2: 80 %
Wall 1: 50 %
approx. 60–70 %: Gypsum board/metal stud wall
Total range through both walls: 40%
100 %: Free field
27
Page 28

x
Possible combinations / networking
The figures show some of the possible combinations. Among other things,
each wireless chime can be activated individually or centrally.
Central call
One wireless bell button can
activate any number of
wireless chimes:
Mel. 1 Mel. 2 Mel. 3
Mel. 1 Mel. 2 Mel. 3
Mel. 1
Mel. 2
Mel. 3
Mel. 4
One wireless bell button is
coupled with several wireless
chimes in different rooms.
Individual call
Up to 11 wireless bell buttons
can activate 1 wireless chime:
Several wireless bell buttons
at different doors/gates are
coupled with one wireless
chime in one room.
Matrix call
Several wireless chimes can
be activated individually.
Several wireless bell buttons
at different doors/gates are
coupled with several wireless
Mel. 1
chimes in different rooms –
including with multiple
coupling.
28
Page 29

x
Technical data
Radio chime
Colour White
Wall mounted No
Radio frequency 868.35 MHz
Call differentiation 11
Volume Max. 83 dB(A), depending on the melody
Dimensions Ø 60 mm x 102 mm
Power supply 4 x 1.5 V batteries (AA type)
Temperature range 5 to 40 °C
Use in dry rooms only
Wireless bell button
Colour White
Wall mounted Yes
Radio frequency 868.35 MHz
Maximum transmission power < 25 mW
Range 250 m
Dimensions 36 x 100 x 17 mm
Power supply 2 x 1.5 V batteries (AAA type)
Degree of protection IP54
Use Indoors and outdoors
Temperature range -15 to 50 °C
29
Page 30

x
Error – Causes – Help
1. The LED of the wireless bell button flashes after the button is pressed, but
the wireless chime does not respond.
1.1. No batteries are inserted into the wireless chime.
Insert 4 x 1.5 V (AA type) batteries (see p. 8/9).
1.2. One or several batteries in the wireless chime have no contact with the
positive terminal in the battery holder.
Push the batteries upwards by hand until the positive terminal of the battery has
contact with the positive terminal of the battery holder. You can check this easily,
by trying to push a piece of paper between the terminals.
(Note: Depending on the battery manufacturer, the circumference of the battery
may be too large, so that the compressive force of the spring is insufficient to
press the battery up to the contact; seealso p.8/9.)
1.3. The batteries in the wireless chime are completely flat.
Replace the batteries (see p. 8/9).
1.4. The batteries in the wireless chime are inserted the wrong way around
(wrong polarity).
Insert the batteries with the plus symbol at the “+” in the battery holder (seep.8/9).
1.5. The battery holder is inserted the wrong way around.
Insert the battery holder with the springs facing the “+” and “–” symbols in the
inner edge of the housing (see p. 8/9)
1.6. The batteries in the wireless chime do not have the required voltage.
Insert four batteries with 1.5 V voltage (AA type) (see p. 8/9).
1.7. The wireless chime is in mute or in slumber mode
Press the Select button to end mute/slumber mode (see p. 18-21).
1.8. The radio range between the wireless chime and wireless bell button has been
exceeded.
Reduce the distance between the wireless bell button and the wireless chime or
change the location of the wireless chime. Walls and similar can reduce the range
significantly (see p. 27).
30
Page 31

x
Error – Causes – Help
2. After the melody, you hear two bleep tones.
2.1. The batteries in the wireless chime do not have the required voltage.
Standard rechargeable batteries often do not have the required voltage; only 1.2V.
Only use batteries or rechargeable batteries with 1.5 V voltage.
2.2. The battery power is low.
Insert 4 new 1.5 V (AA type) batteries.
3. After the melody you hear four beep tones (optional if using the
MISTRAL SE 03.1 wireless bell button).
3.1. The batteries in the wireless bell button do not have the required voltage.
Insert 2 x 1.5 V (AAA type) batteries.
4. The LED of the wireless bell button does not flash after the button is pressed.
4.1. The batteries in the wireless bell button do not have the required voltage.
Insert 2 x 1.5 V (AAA type) batteries.
4.2. The batteries are not inserted correctly (wrong polarity).
Insert the batteries with the plus symbol in the direction of the “+” embossed in
the battery holder.
5. The wireless bell button cannot be coupled with the wireless chime.
5.1. The batteries in the wireless bell button do not have the required voltage.
Important: The LED of the wireless bell button must flash 6 to 7 times (7 times
maximum). If the LED, for example, only flashes 5 or fewer times, the battery
power is insufficient and the batteries must be replaced (seep. 8/9).
5.2. After pressing the Menu button, you waited too long before pressing the
Select button.
Press the Select button within 7 seconds after pressing the Menu button
(seep. 22/23).
31
Page 32

x
Declarations of conformity / Disposal and recycling
Declarations of conformity
We hereby declare that this product is in compliance with the essential
requirements and the other relevant provisions of Directive 2014/53/EU.
Depending on the device type, tested to the respective relevant standards
EN 3000220-2, EN 301489-1, EN 62368-1:2016, EN 55022, EN 50581
o
RED Directive 2014/53/EU
o
EMC Directive 2014/30/EU
o
RoHS Directive 2011/65/EU
o
WEEE Directive 2012/19/EU
EC Declaration of Conformity: visit www.funkgong.de
Countries: for all EU countries
Transmission frequency: 868.35 MHz
Disposal and recycling
Electrical equipment with this labelling must be collected separately and
recycled in an environmentally compatible way.
Electric scrap and batteries (if used) may NOT be disposed of in household or
commercial waste! Dispose of unusable or discontinued electrical equipment
solely via the return and collection systems or via the manufacturer or importer.
32
Page 33

x
Guarantee and liability
Guarantee and liability
GROTHE GmbH chimes are produced using modern technology and are subjected to one hundred percent quality control.
If a defect nonetheless occurs in your device, GROTHE GmbH provides a
guarantee with the following scope.
1.) Our guarantee includes subsequent improvement or replacement delivery
of a device, if it verifiably has functional or material defects.
2.) The guarantee does not cover natural wear and tear or transport damage. It
also does not cover damaged caused by disregard of the installation instructions
or improper installation. The guarantee automatically expires if the device was
opened after the fault diagnosis.
3.) The guarantee period is 24 months from purchase of the device by the
consumer. Compliance with the claim period must be verified by proof of date
of purchase by means of the enclosed invoice, delivery note or similar document.
In case of a defect, please send the device with enclosed description of the
defect to the address of the seller with the above-named documents.
33
Page 34

Quick-start guide
1
1x
Melody selection
1
1x
Colour selection LED ring
1
Volume
1
Coupling
3x
4x
2
2
12
12
2
FLASHES GREEN
COUPLING
FLASHES RED
1x
2x
3
FLASHES BLUE
3
COLOUR SELECTION
3
3
VOLUME
34
Page 35

Quick-start guide
4
MELODY SELECTION
4
4
12
4
COUPLING ACTIVE
LIGHTS UP RED
5
5
SETTING FINISHED
5
SETTING FINISHED
5
1x
6
SETTING FINISHED
Mute / Slumber function
Mute for 1 hour:
Press Select button 2 times,
LED ring fl ashes yellow 2 times
Mute for 3 hours:
Press Select button 3 times,
LED ring fl ashes yellow 3 times
Mute for 9 hours:
Press Select button 4 times,
LED ring fl ashes yellow 4 times
6
2. SETTING FINISHED
1. SET MELODY
35
Page 36

GROTHE GmbH
Löhestraße 22
D- 53773 Hennef
service@grothe.de
www.grothe.de
V1 02/19
 Loading...