

Page 1

User Guide
Page 2

Welcome to GreatCall!
Thank you for choosing the GreatCall Touch3. We’ve made it easy for you to stay
connected to friends and family with the simplicity of GreatCall. Additionally, our
24-hour service professionals and health and safety services are designed to keep
you protected, connected and in control of your life. This helpful guide contains
information you need to start using your new smartphone. And if you have any
questions or need assistance, you can count on us to be here day and night.
Best Regards,
Your friends at GreatCall
For additional information about GreatCall or your new Touch3, visit greatcall.com.
Page 3

Contents
Section 1: Getting Started..................................................................1
Key Items in the Box ................................................................................................2
The Front of your Touch3 .........................................................................................4
The Back of your Touch3 ..........................................................................................6
Understanding Touch Gestures ...............................................................................8
Turning your Phone On and Off................................................................................9
Turning On your Phone ...................................................................................... 9
Turning Off your Phone ...................................................................................10
Activating your Touch3 ..........................................................................................11
Sign into GreatCall ................................................................................................14
Charging the Battery .............................................................................................16
Battery Level Indicator ..........................................................................................17
Getting More Information ......................................................................................18
GreatCall Customer Service ...................................................................................19
Section 2: Understanding the Basics .................................................20
I Table of Contents
Table of Contents
Page 4

Table of Contents
Navigation Buttons ...............................................................................................21
Using the Lock Screen ...........................................................................................23
Lock Screen Features ......................................................................................23
Unlocking your Phone ..................................................................................... 25
Locking your Phone ......................................................................................... 26
Shake for Help ......................................................................................................27
GreatCall Home Screen ........................................................................................28
Home Tab .......................................................................................................29
People Tab ......................................................................................................30
All Apps Button ............................................................................................... 30
GreatCall Button .............................................................................................31
Status Bar ............................................................................................................. 32
Notication Area ............................................................................................33
Status Area .................................................................................................... 34
Notication Panel .................................................................................................35
Expanding the Notication Panel ....................................................................35
Clearing Notications .....................................................................................37
Quick Settings ................................................................................................38
II Table of Contents
Page 5

Closing the Notication Panel ......................................................................... 40
Ringer and Notication Sounds .............................................................................41
Adjusting the Ringer Volume .................................................................................42
Adjusting the Screen Brightness ...........................................................................43
Using the On-Screen Keyboard ..............................................................................44
Landscape Keyboard ...................................................................................... 46
Voice Typing ................................................................................................... 47
Predictive Text ................................................................................................48
Managing Your Usage ...........................................................................................49
What is Data?.................................................................................................. 50
Using Wi-Fi to Reduce Your Data Plan Usage .................................................... 51
Checking your Usage.......................................................................................52
Section 3: Placing and Receiving Calls ..............................................54
Dialing a Number ..................................................................................................55
Redialing a Number ..............................................................................................57
Answering or Ignoring a Call ..................................................................................58
Answering the Call .......................................................................................... 58
III Table of Contents
Table of Contents
Page 6

Table of Contents
Ignoring the Call .............................................................................................58
Speakerphone ......................................................................................................59
Adjusting the Call Volume .....................................................................................60
Accessing the Keypad during Calls ........................................................................61
Voicemail ..............................................................................................................62
Setting up Voicemail ....................................................................................... 62
When to Check Voicemail ................................................................................ 63
People Tab ............................................................................................................65
Creating a People Contact ...............................................................................66
Managing your People Contacts ......................................................................68
Adding Favorites ............................................................................................. 68
Removing Favorites .........................................................................................69
Sorting your Favorites .....................................................................................69
Editing a People Contact ................................................................................. 70
Deleting a People Contact ............................................................................... 70
People History ................................................................................................71
Section 4: Text Messages .................................................................. 72
IV Table of Contents
Page 7

Composing and Sending Text Messages ................................................................73
Reading and Replying to Text Messages ................................................................75
Sending a Photo or Video Message .......................................................................76
Section 5: Camera and Photo Album .................................................78
The Camera App ...................................................................................................79
Taking a Photo ......................................................................................................81
Changing the Camera Mode ..................................................................................82
Recording a Video .................................................................................................83
Viewing your Photos and Videos ...........................................................................84
Sharing your Photos and Videos............................................................................85
Section 6: Email ................................................................................86
Setting up your Email Account ...............................................................................87
Setting up a New Gmail Account .....................................................................88
Setting up an Existing Gmail Account .............................................................. 89
Setting up an Existing Standard Email Account ................................................89
Composing and Sending Email ..............................................................................90
V Table of Contents
Table of Contents
Page 8

Table of Contents
Composing and Sending Email using the Gmail App ........................................90
Composing and Sending Email using the Email App ........................................90
Reading and Replying to an Email .........................................................................91
Sending an Email with a Photo or Video Attachment ..............................................92
Sending an Email with a Photo or Video using the Gmail App .......................... 92
Sending an Email with a Photo or Video using the Email App ...........................93
Section 7: GreatCall Health and Safety Apps .....................................94
5Star ....................................................................................................................95
Urgent Care ...........................................................................................................96
MedCoach ............................................................................................................97
Section 8: Managing your Settings ...................................................98
Wi-Fi .....................................................................................................................99
Connecting to a Wi-Fi Network ........................................................................ 99
Turning Wi-Fi On and Off ...............................................................................100
Bluetooth® .........................................................................................................101
Pairing a Bluetooth Device ............................................................................ 101
VI Table of Contents
Page 9

Turning Bluetooth On and Off ........................................................................102
Airplane Mode ....................................................................................................103
Turning Airplane Mode On and Off ................................................................103
Section 9: Personalize Your Phone ...................................................104
Google Account...................................................................................................105
Setting up a New Google Account .................................................................105
Changing your Color Theme .................................................................................106
Changing the Lock Screen Photo .........................................................................107
Adding a Lock Screen Photo .......................................................................... 107
Removing a Lock Screen Photo ......................................................................107
Changing the Sounds ..........................................................................................108
Replacing the Battery ..........................................................................................109
Adding more Memory ..........................................................................................110
Health and Safety Information .........................................................111
Your Customer Agreement .................................................................................................... 140
Index ...............................................................................................150
VII Table of Contents
Table of Contents
Page 10

Section 1: Getting Started
This section explains how to get started using your GreatCall Touch3 phone.
Topics
• Key Items in the Box
• The Front of your Touch3
• The Back of your Touch3
• Understanding Touch Gestures
• Turning your Phone On and Off
• Activating your Touch3
For additional support, visit us online at greatcall.com/support.
• Sign into GreatCall
• Charging the Battery
• Battery Level Indicator
• Getting More Information
• GreatCall Customer Service
Getting Started
1 Getting Started
Page 11
Key Items in the Box
Getting Started
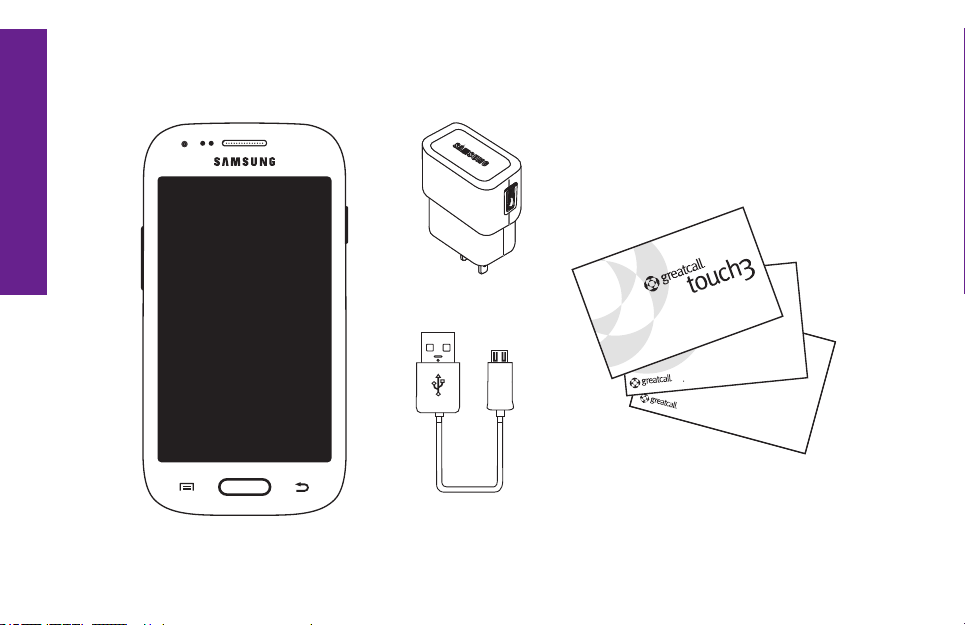
The GreatCall Touch3 box you received includes everything you need to get started:
The GreatCall Touch3
2 Getting Started
Wall Charger
USB Cable
User Guide
With GreatCall Link,
families stay connected,
even when they’re apart.
BACK
For you & a friend.
User Guides
GET
$
25
TM
Page 12

GreatCall Touch3 – your easy-to-use smartphone with the Battery pre-installed
Wall Charger – allows you to charge your phone using any wall outlet
USB Cable – allows you to connect your phone to the Wall Charger or a computer
with a USB port
User Guides – contains important information about activating and using your
phone
3 Getting Started
Getting Started
Page 13
The Front of your Touch3
Getting Started
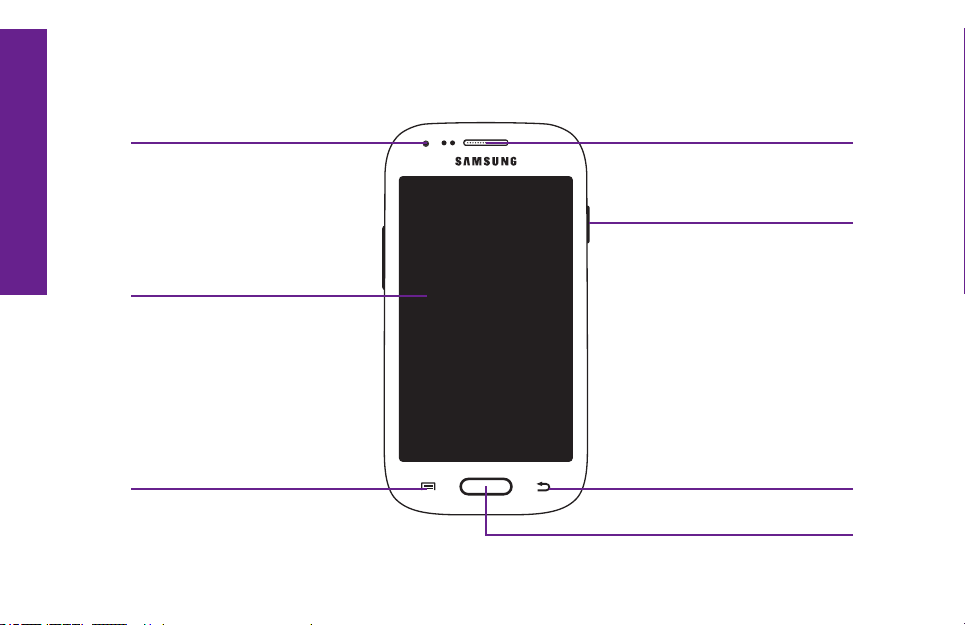
Front-facing Camera Earpiece
Power/Lock Button
Display
Menu Button
4 Getting Started
Back Button
Home Button
Page 14

Front-facing Camera – allows you to take pictures or videos
Earpiece – lets you hear the caller loud and clear
Power/Lock Button – allows you to lock and unlock your phone as well as power it
on and off
Display – shows all the information you need to operate your Touch3
Menu Button ( ) – displays additional options that may be available for the
current screen you are viewing
Back Button ( ) – takes you one step back from your last action
Home Button ( ) – takes you back to the Home Screen
5 Getting Started
Getting Started
Page 15
The Back of your Touch3
Getting Started
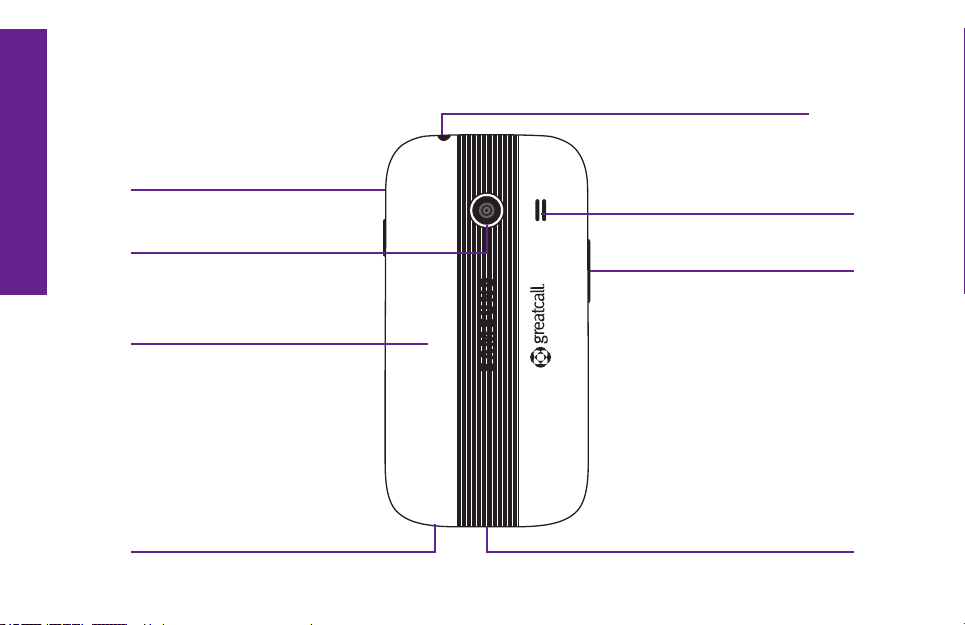
Battery Cover Release
Headset Jack
Speaker
Main Camera
Battery Cover
6 Getting Started
Microphone
Volume Button
Power Connector
Page 16

Headset Jack – allows you to connect a Stereo Headset to safely make calls hands-
free or listen to music
Battery Cover Release – allows you to remove the Battery Cover to replace the
Rechargeable Battery or insert a microSDTM card to expand storage capacity
Speaker – lets you hear the caller loud and clear when Speakerphone is enabled
Main Camera – allows you to take pictures or videos
Volume Button – allows you to adjust the volume of calls and notication sounds
Battery Cover – protects the Rechargeable Battery and the back of your Touch3
Microphone – picks up your voice loud and clear while on a phone call
Power Connector – allows you to charge your Touch3 with the provided Wall Charger
and USB Cable
7 Getting Started
Getting Started
Page 17
Understanding Touch Gestures
Getting Started
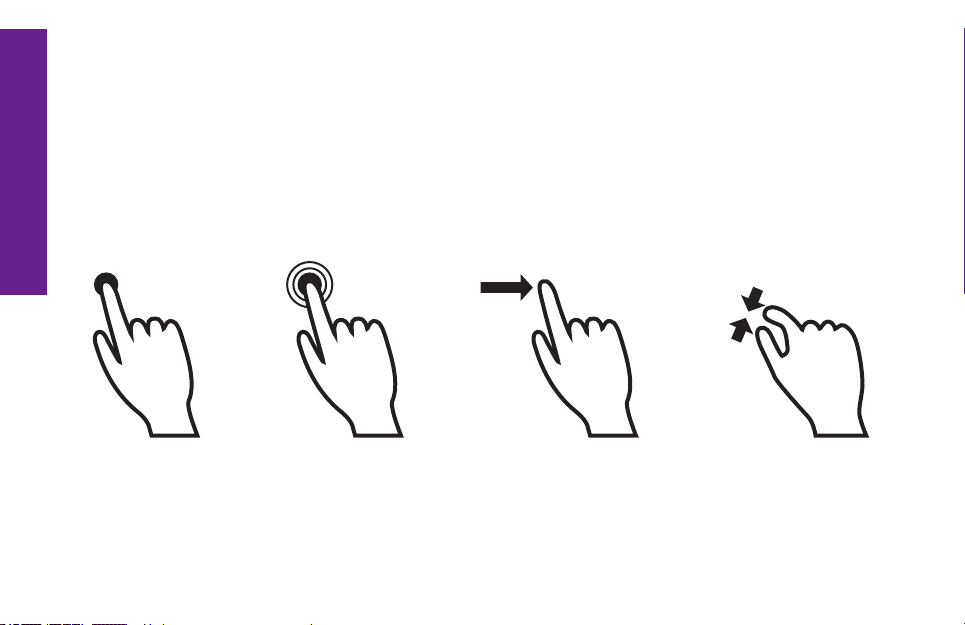
Your smartphone features a large, responsive touch screen that allows you to use
your ngers to interact with what you see on the Display. If this is your rst time
using a smartphone, understanding how to use these touch gestures will ensure that
you get the best Touch3 experience.
TAP
Briey touch the
screen with your
ngertip
8 Getting Started
PRESS AND HOLD
Touch the screen
for an extended
period of time
DRAG
Move your ngertip
across the screen
without losing contact
PINCH AND SPREAD
Touch the screen
with two ngers and
bring them closer or
farther apart
Page 18
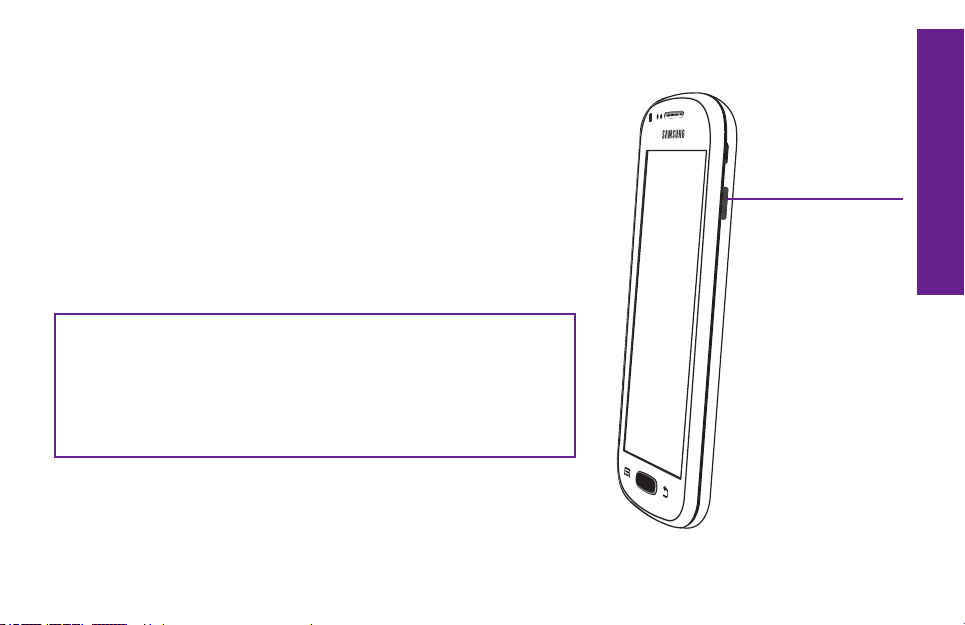
Turning your Phone On and Off
Your phone is off if the Display does not turn on when
the Home Button or Power/Lock Button are briey
pressed.
Turning On your Phone
PRESS AND HOLD the Power/Lock Button on the right
side of your phone until the Display turns on.
NOTE: If your phone does not turn on, the battery
may need to be charged. See “Charging the
Battery” on page 16 for more information on
how to charge your phone.
Power/Lock
Button
9 Getting Started
Getting Started
Page 19
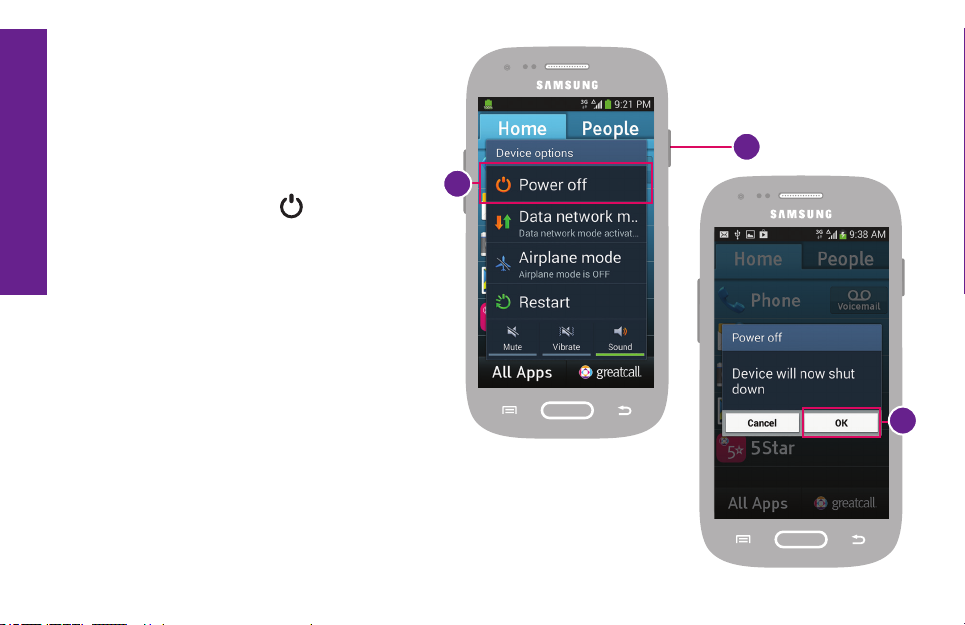
Turning Off your Phone
Getting Started
1. PRESS AND HOLD the Power/
Lock Button on the right side
of the phone until the “Device
options” screen appears.
2. TAP the Power off ( ) option on
the Display. The phone will ask if
you want to proceed.
3. TAP the OK option on the Display.
10 Getting Started
1
2
3
Page 20
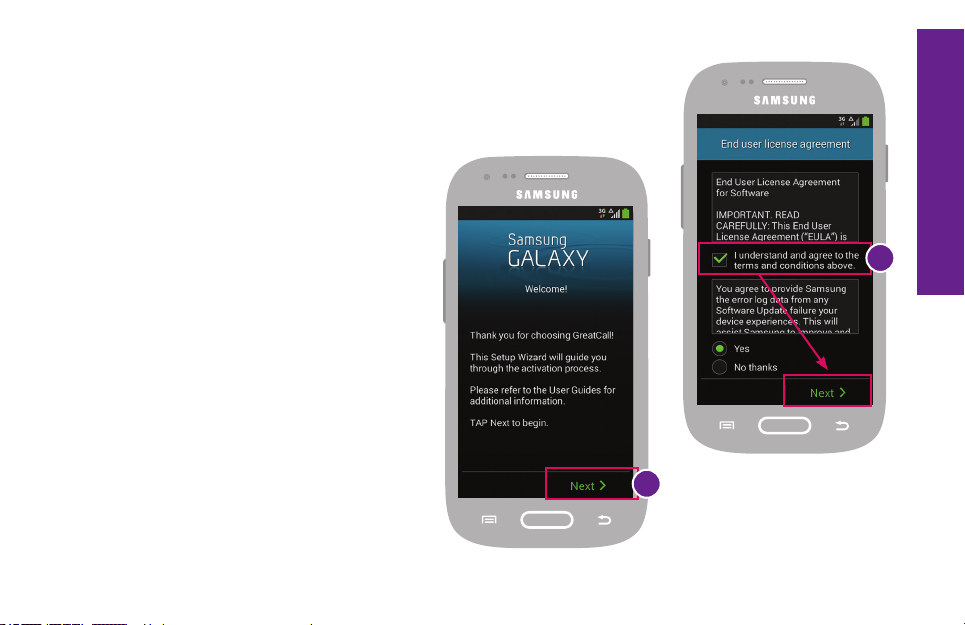
Activating your Touch3
Before using your phone for the rst
time, it needs to be activated. The
Setup Wizard built into your phone
will help guide you through this
process.
Getting Started
1. Power on your phone.
2. TAP Next at the
“Welcome” screen.
3. TAP the check box next to “I
understand and agree to the
terms and conditions above”
and then TAP Next.
3
2
11 Getting Started
Page 21
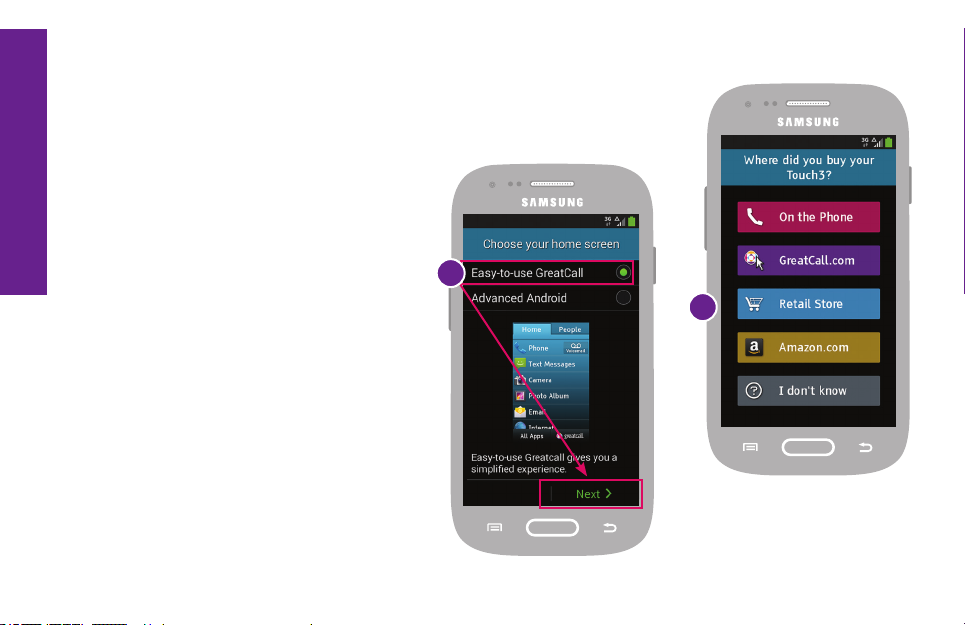
4. IMPORTANT: TAP the “Easy-to-
Getting Started
use GreatCall” option and then
TAP Next.
5. TAP the option that best
describes where the phone
was purchased.
Continue following the on-screen
instructions until you have
successfully activated your phone.
12 Getting Started
4
5
Page 22
IMPORTANT: To ensure you get started quickly, please select “Easy-to-use
GreatCall” at the “Choose your home screen” step before TAPPING Next.
Easy-to-use GreatCall gives you a simplied experience. If you accidentally
selected “Advanced Android”, you can TAP the Back Button ( ) to change your
selection.
NOTE: If you are instructed to go online or call to complete activation, please have
the following information ready:
• Home and billing address
• Phone number
• Email address
• Credit or debit card information
• Emergency contact details
• Serial Number – This can be found on the Setup Wizard screen, printed on the
Activation Card included in the box or on the side of the Touch3 box .
13 Getting Started
Getting Started
Page 23

Sign into GreatCall
Getting Started
Once your phone has completed activation, you may
be prompted to log into your GreatCall (also known as
“MyGreatCall”) account so that your built-in GreatCall health
and safety Apps are ready to go. Depending on how you
purchased your Touch3 smartphone, a MyGreatCall account
may already have been created. If you’re not sure, that’s
alright; we’ll help you set one up.
1. At the MyGreatCall welcome screen, TAP the Set Up button
to continue.
14 Getting Started
Page 24

2. We will detect if a MyGreatCall account already exists for your new phone.
• If one exists, you will just need to enter your password to continue
• If we can’t nd a MyGreatCall account for your phone, you will be asked to enter
a valid email address and a password of your choice so that we can create one
for you. See ”Section 7: GreatCall Health and Safety Apps” on page 94 for
more information on the built-in GreatCall Apps.
NOTE: If you have a MyGreatCall account but you forgot your password, TAP
“Forgot Password” on the GreatCall login screen. An email will be sent to you with
instructions on how to reset your password.
If you are not comfortable signing in to your MyGreatCall account or you just want
to get started using your phone quickly, you can TAP the “Skip this step” button to
skip logging in to MyGreatCall. Just be aware that you will need to log into any of
the built-in GreatCall Apps before using them.
15 Getting Started
Getting Started
Page 25
Charging the Battery
Getting Started
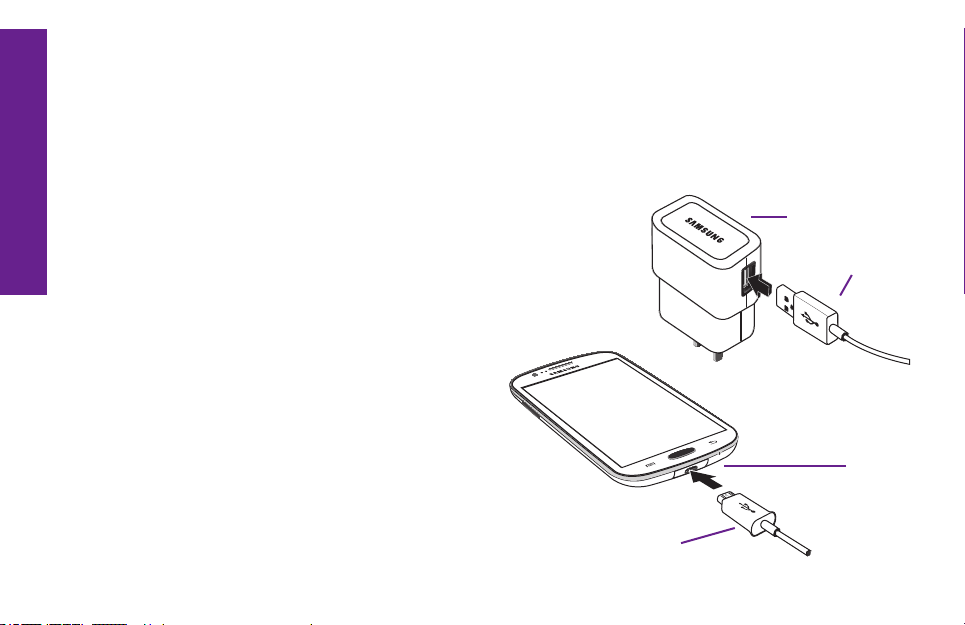
Your phone is powered by a Rechargeable Battery which has been built-in for your
convenience. Before using your phone for the rst time, it is recommended that you
fully charge the battery. A Wall Charger is included with your phone.
1. Connect the larger end of the USB Cable
to the Wall Charger.
2. Insert the smaller end of the USB Cable
into the Power Connector located at the
bottom of the phone.
3. Plug the Wall Charger into a standard
wall outlet.
16 Getting Started
Wall Charger
USB Cable
Power
Connector
USB Cable
Page 26
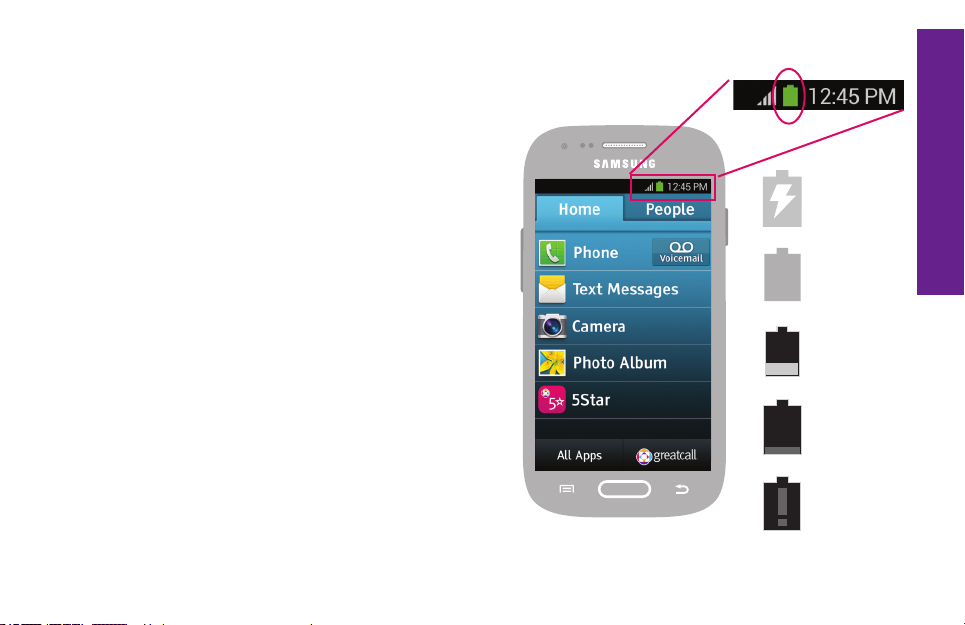
Battery Level Indicator
The battery level is represented as a colored
battery icon at the top right of the Display in
the Status Bar.
The battery is fully charged when the
battery icon is completely green. When the
battery level is low, a warning tone and a
“Battery low” message will repeat at regular
intervals on the Display. When the battery
level becomes too low, the device will
automatically turn off. Charge your phone
when not in use so that it is ready when you
need it most.
More information can be found in “Status
Bar” on page 32.
Charging
Fully
charged
Low
Very Low
Critical
17 Getting Started
Getting Started
Page 27

Getting More Information
Getting Started
GreatCall customers have access to two unique websites that are easy to navigate
and explore: greatcall.com and mygreatcall.com.
The main GreatCall website, greatcall.com, is the place to learn more about the
company, read about new services available, shop for accessories and get answers
to frequently asked questions.
As a GreatCall customer, you have exclusive access to mygreatcall.com where you
can view your remaining monthly minutes, review and pay your monthly bill, add
exclusive apps and services, and update your Personal Prole.
18 Getting Started
Page 28

GreatCall Customer Service
If you have any questions or comments, use any of these ways to contact us:
• Send us an email at customerservice@greatcall.com
• Call us toll-free at 1-800-733-6632
• Write to us at
GreatCall Customer Service
P.O. Box 4428
Carlsbad, CA 92018
19 Getting Started
Getting Started
Page 29

Understanding the Basics
This section introduces you to key features of your phone such as important buttons,
screens and navigation concepts.
Topics
• Navigation Buttons
• Using the Lock Screen
• Shake for Help
• GreatCall Home Screen
• Status Bar
• Notication Panel
For additional support, visit us online at greatcall.com/support.
20 Understanding the Basics
Section 2: Understanding the Basics
• Ringer and Notication Sounds
• Adjusting the Ringer Volume
• Adjusting the Screen Brightness
• Using the On-Screen Keyboard
• Managing your Usage
Page 30

Navigation Buttons
At the bottom of your Touch3 you will nd three buttons that are used frequently to
navigate around your phone.
1. Menu Button ( ) – this gives you additional options for the screen you are
actively viewing. Details on additional options available for certain screens will
be covered later in this User Guide.
2. Home Button ( ) – no matter what you’re doing, this will take you back to
the Home Screen on your phone. If you ever get lost, you can press this button to
help you get back on track.
3. Back Button ( ) – this will take you one step back from your last action. This is
helpful if you need to revisit a screen you may have accidentally skipped.
21 Understanding the Basics
Understanding the Basics
Page 31

Understanding the Basics
1 2 3
NOTE: If you get lost while navigating through your phone, just PRESS the
Home Button to take you back to the Home Screen. If you PRESS AND HOLD the
Home Button your most recently opened Apps will appear. TAP the App you would
like to go to or tap the Back Button ( ) to close.
22 Understanding the Basics
Page 32

Using the Lock Screen
Your phone is equipped with a Lock Screen that appears when your phone is not in
use to prevent accidental dialing.
Lock Screen Features
• Current Time and Date
• 5Star Button – get access to help in any unsafe or uncertain situation (see
“5Star” on page 95)
• Your Phone Number
• Missed Events – quickly see if you missed any calls or messages
• Unlock Buttons – unlocks your phone
23 Understanding the Basics
Understanding the Basics
Page 33

Understanding the Basics
Current Time, Date
and Your Phone Number
Missed Events
24 Understanding the Basics
5Star Button
Unlock Buttons
Page 34

Unlocking your Phone
If the Display is off, you can PRESS the Power/Lock Button to display the Lock Screen:
• At the Lock Screen, TAP1, 2, then 3 in order.
25 Understanding the Basics
Understanding the Basics
Page 35

Locking your Phone
Understanding the Basics
Lock your phone if you are no longer using it to save power and prevent accidental
dialing:
• On any screen, PRESS the Power/Lock Button until the Display turns off.
NOTE: If your phone hasn’t been used after several minutes, it will automatically
lock and turn off the Display to save power and extend the battery life. The phone
will take you back to where you left off once you unlock the phone. When locking
or unlocking your phone, be sure to only PRESS the Power/Lock Button. PRESSING
AND HOLDING the Power/Lock Button will display an option to turn off your
phone.
26 Understanding the Basics
Page 36

Shake for Help
If you need help with commonly used features on your
Touch3, you can shake your phone at any time to bring up
the Help Bubble.
TAP anywhere inside the Help Bubble to open the Help
Guide. Here you will nd useful help topics such as how
to make and receive calls, access your Voicemail and use
the Camera.
If you accidentally opened the Help Bubble you can TAP
the Back Button to close it.
27 Understanding the Basics
Understanding the Basics
Page 37

GreatCall Home Screen
Understanding the Basics
As soon as you unlock your phone for
the rst time, you will see the GreatCall
Home Screen. From this screen you can
access all features of your Touch3.
The Home Screen is organized with two
main tabs—Home and People. It was
designed to be simple, so you can easily
access Apps and contact People that
are the most important to you without
having to search through numerous
icons and features you may never use.
28 Understanding the Basics
People Tab
Home Tab
All Apps Button
GreatCall Button
Page 38

Home Tab
The Home Tab displays your favorite Apps. By default, the Home Tab will show these
Apps:
• Phone ( ) – make and receive calls (See “Section 3: Placing and Receiving
Calls” on page 54)
• Voicemail ( ) – listen to voice messages people have left for you (See
“Voicemail” on page 62)
• Text Messages ( ) – send and receive text messages (See “Section 4: Text
Messages” on page 72)
• Camera ( ) – capture photos or videos (See “The Camera App” on page 79)
• Photo Album ( ) – view your favorite photo or video moments (See “Viewing
your Photos and Videos” on page 84)
• 5Star ( ) – get access to help in an uncertain or unsafe situation (See “5Star”
on page 95)
29 Understanding the Basics
Understanding the Basics
Page 39

People Tab
Understanding the Basics
The People Tab was designed to give you easy access to the contacts that are most
important to you. Creating a list of your favorite contacts will make dialing friends or
family quick and convenient. For more information on managing your People list see
“People Tab” on page 65.
All Apps Button
The Home Tab holds a list of your favorite Apps. To access your full list of Apps,
including the pre-installed GreatCall Apps, TAP the All Apps Button in the lower left
corner of the Home Tab. For more information about the built-in Apps available on
your phone please see “Section 7: GreatCall Health and Safety Apps” on page 94.
30 Understanding the Basics
Page 40

GreatCall Button
In both the Home and People Tabs, you’ll see the GreatCall Button at the bottom
right corner of the screen. TAP this button to see the following options:
• Usage – view how many minutes, text messages and data megabytes you’ve
used and have left, as well as when your next bill date is.
• Featured Apps – several featured apps recommended by GreatCall.
• Help – additional help information about your Touch3.
• Contact Us – options to contact our GreatCall Operators and Customer Service
Representatives, 24/7.
• Sign In/Sign Out – Access your built-in GreatCall health and safety Apps.
31 Understanding the Basics
Understanding the Basics
Page 41

Status Bar
Understanding the Basics
The Status Bar, located at the top of the Display, shows information about the
connection status, signal strength, battery level and time, and displays notications
about incoming messages, calls and other actions. The Status Bar consists of two
halves—a Notication Area on the left and a Status Area on the right.
Status Bar
Notication
Area Status Area
32 Understanding the Basics
Page 42

Notication Area
100%
100%
100%
The Notication Area displays icons associated with important events that occur
such as new email messages, missed calls, new voicemails and new text messages.
Common icons you will see here:
100%
The battery is 100% charged
You have a new text message
You have a new voicemail message
You have a new email message
Understanding the Basics
33 Understanding the Basics
Page 43

Status Area
Understanding the Basics
The Status Area displays icons associated with important statuses of your phone
such as cellular signal strength, Bluetooth connectivity, Wi-Fi connectivity, battery
level and current time. Common icons you will see here:
Your current cellular signal strength. The more bars, the stronger the signal.
Airplane Mode has been turned on. Features such as phone calls, text
messages, email or access to the Internet will be unavailable in this mode.
No cellular signal is available. Try moving to a different location to improve your
cellular signal reception.
Your phone is in Vibrate mode. Incoming calls and notications will not make a
sound, but instead will discretely cause the phone to vibrate.
Displays when your phone is connected to a Wi-Fi network for data.
34 Understanding the Basics
Page 44

Notication Panel
While the icons that appear in the Notication Area of the Status Bar are useful for
a quick glance of your missed events (missed calls, unheard voicemail, new text
messages, etc.), expanding the Notication Panel will allow you to see more detail
about each notication.
Expanding the Notication Panel
1. PRESS AND HOLD anywhere in the Status Bar and DRAG your nger down until
you reach the bottom of the screen. The Notication Panel will expand.
2. TAP any notication in the list to automatically take you to the associated App
that handles that type of notication. For example, if you have a notication for
a new text message, TAPPING that notication will automatically take you to the
Text Messages App where you can read the full message and reply.
35 Understanding the Basics
Understanding the Basics
Page 45

Understanding the Basics
36 Understanding the Basics
Page 46

Clearing Notications
There are two ways you can clear notications that appear in the Notication Area or
Notication Panel.
• One-at-a-time: With the Notication Panel expanded, you can clear each
notication in the list by DRAGGING it to the left or right off the screen. If you
TAP any notication in the list to view more details, it will automatically be
removed from the Notication Panel.
• All-at-once: With the Notication Panel expanded, you can TAP the Clear Button
to dismiss all notications in the list at once.
NOTE: Voicemail notications can only be cleared by listening to your voicemail
messages. See “Voicemail” on page 62 for more information on how to listen
to your voicemail.
37 Understanding the Basics
Understanding the Basics
Page 47

Quick Settings
Understanding the Basics
At the top of the Notication Panel
you will see ve Quick Settings
buttons that allow you to quickly
enable or disable phone functionality. Just TAP the
Quick Settings button you would like to adjust.
A green colored button indicates that the Quick
Settings functionality is on.
• Sound – allows you to change the ringer and
notication sound behavior to Sounds On,
Vibrate or Silent.
• Wi-Fi – allows you to turn Wi-Fi on or off. For
more information, see “Wi-Fi” on page 99.
• Bluetooth – allows you to turn Bluetooth on or
off. For more information, see “Bluetooth®” on
page 101.
38 Understanding the Basics
Page 48

• Screen Rotation – allows you to turn the Screen Rotation feature on or off.
With this feature on, the screen will automatically rotate on certain screens
depending on how you hold the phone.
• Airplane Mode – allows you to turn all cellular and data connectivity off. When
this feature is enabled, you will not be able to make or receive calls, send or
receive messages or access the Internet. See “Airplane Mode” on page 103.
39 Understanding the Basics
Understanding the Basics
Page 49

Closing the Notication Panel
Understanding the Basics
There are three ways to close the Notication Panel:
• TAP the Back Button ( ) or
• PRESS the Home Button ( ) or
• DRAG upwards starting from the bottom of the screen until you reach the top
NOTE: Pressing the Home Button ( ) will take you back to the Home Screen on
your phone. Use the Back Button ( ) if you would like to close the Notication
Panel and return to where you left off.
40 Understanding the Basics
Page 50

Ringer and Notication Sounds
Understanding the sounds that come from your phone will help you determine if
you’re receiving a call or simply getting a notication that you just received a text
message, email or voicemail.
Notication sounds are typically shorter and are only played once per message
received.
Ringer sounds, on the other hand, are typically longer and will loop until the caller
hangs up, the call is directed to your voicemail or the call is answered, similar to a
landline phone.
For more information on how to customize your sounds, see “Changing the Sounds”
on page 108.
41 Understanding the Basics
Understanding the Basics
Page 51

Adjusting the Ringer Volume
Understanding the Basics
The Ringer volume can be adjusted using the Volume
Button, on the left-side of the phone, whenever the phone is
unlocked and not actively on a call.
• TAP the upper part of the Volume Button to increase the
ringer volume.
• TAP the lower part of the Volume Button to decrease the
ringer volume. Lowering the ringer volume all the way
will allow you to set the ringer to Vibrate or Silent.
NOTE: The ringer volume cannot be adjusted at the Lock
Screen or while actively on a call.
42 Understanding the Basics
Page 52

Adjusting the Screen Brightness
Sometimes you may nd the screen too dim or too bright depending on the
environment you’re in. To adjust the screen brightness:
1. TAP the All Apps Button located at the bottom of the Home Tab.
2. Scroll through the All Apps list by DRAGGING your nger up the Display until you
see “Settings.”
3. TAP “Settings.”
4. TAP “My Device.”
5. TAP “Display.”
6. TAP “Brightness.”
7. DRAG the slider until you reach the desired brightness.
8. TAP “OK” to save your brightness setting.
43 Understanding the Basics
Understanding the Basics
Page 53

Using the On-Screen Keyboard
Understanding the Basics
The On-Screen Keyboard will automatically appear on the Display when you have the
ability to input text.
• Shift – changes the text from lower case to upper case. TAP twice to use Caps
Lock.
• Numbers and Symbols – allows you to enter numbers and symbols. Once in the
Numbers and Symbols keyboard, you can TAP
ABC
TAP
to return to the standard keyboard.
1/3
to view additional symbols.
• Voice Typing – automatically converts your voice to on-screen text.
• Spacebar – allows you to enter spaces between words.
• Period – allows you to enter the period punctuation mark.
• Enter – allows you to start a new line of text.
• Backspace – allows you to delete any previously typed characters.
• Predictive Text – predicts and provides options for your next words as you type.
44 Understanding the Basics
Page 54

Predictive
Text
Shift
Numbers and
Symbols
Voice Typing
Backspace
Understanding the Basics
Enter
PeriodSpacebar
45 Understanding the Basics
Page 55

Landscape Keyboard
Understanding the Basics
Some screens automatically rotate on the Display when you hold your phone
horizontally (landscape). If the On-Screen Keyboard is visible, it will be displayed in
a wider format than it usually is when the phone is held vertically (portrait).
NOTE: To close the On-Screen Keyboard, TAP the Back Button ( ).
46 Understanding the Basics
Page 56

Voice Typing
Your Touch3 smartphone features built-in Voice
Typing as an alternative option for text entry. With
Voice Typing activated, the phone will convert your
spoken words into on-screen text.
1. TAP when the On-Screen Keyboard is
visible. Your Touch3 will display “Speak Now”
and begin listening to your voice.
2. Speak clearly and distinctly into the
Microphone. Your spoken words will begin
appearing on the screen.
3. TAP to pause Voice Typing. TAP again to
resume Voice Typing or TAP to return to the
On-Screen Keyboard.
Understanding the Basics
47 Understanding the Basics
Page 57

Predictive Text
Understanding the Basics
The Predictive Text feature will predict what word you may be entering based on
each letter you type. This feature will also try to predict the correct word even if you
accidentally mistype.
1. Use the On-Screen Keyboard as you normally
would. As you type, a list of predicted words will
appear directly above the On-Screen Keyboard.
2. If you would like to use the predicted word
provided, TAP the word you would like to be
inserted into your message.
48 Understanding the Basics
Page 58

Managing Your Usage
Your Touch3 phone allows you to do much more than just calling your friends and
family. It’s an easy-to-use smartphone with a broad range of capabilities, from
sending pictures and videos via email, sharing pictures on Facebook, browsing the
Internet to catch up on the latest news or recipes, to downloading the latest Apps
and games.
All of these great features require a data plan, and GreatCall offers a variety of
exible plans that will t your needs. For more information on choosing the right
data plan for you, visit us online at greatcall.com.
49 Understanding the Basics
Understanding the Basics
Page 59

What is Data?
Understanding the Basics
Data is electronic information sent between your phone and other devices.
Examples of features that typically require data are:
• Sharing photos or videos via email or on social media sites like Facebook
• Sending and receiving email messages
• Browsing the Internet using a mobile browser
• Watching streaming videos on a website or using an app like YouTube™
• Listening to streaming music on a website or using an app like Pandora
• Turn-by-turn directions using the Maps App
• Downloading apps from the Google Play™ Store
50 Understanding the Basics
®
Page 60

Using Wi-Fi to Reduce Your Data Plan Usage
If your household already has high-speed Internet access and a Wi-Fi network,
sometimes called a wireless network, you can connect your Touch3 to your WiFi connection to reduce data usage on your monthly GreatCall data plan. When
successfully connected to your Wi-Fi network, all data usage will go through your
home’s high-speed Internet access instead of the cellular network, and therefore will
not affect your GreatCall monthly data plan usage. For more information on how to
set up a Wi-Fi connection, see “Wi-Fi” on page 99.
IMPORTANT: When using a Wi-Fi network for data, periodically check the Status
Bar to see that the Wi-Fi icon (
) is there indicating you are connected. If not,
data usage may be applied to your monthly GreatCall data plan. Data overage fees
will be applied if you exceed your monthly allowed data usage.
Always check your usage periodically using the built-in Usage App on your Touch3
phone or online via your MyGreatCall account at mygreatcall.com.
51 Understanding the Basics
Understanding the Basics
Page 61

Checking your Usage
Understanding the Basics
It is recommended to periodically check your usage to avoid any overage fees.
GreatCall provides you two convenient ways for you to check your talk, text and data
usage:
• Access the Usage App directly on your Touch3 by TAPPING the GreatCall Button
at the bottom-right corner of the Home Screen and then TAPPING the Usage App.
• Access the “My Usage” tab online via your mygreatcall.com account. If you
haven’t created a MyGreatCall account yet, it’s easy. Just navigate to
mygreatcall.com and follow the instructions under “Create Account.”
NOTE: There may be a slight delay in displaying your exact usage. Usage is based
on the estimated minutes, text messages and data that you use per billing cycle.
You should check this often to ensure you are within your monthly plan.
52 Understanding the Basics
Page 62

Understanding the Basics
Usage App
on the Touch3
“My Usage” tab at mygreatcall.com
53 Understanding the Basics
Page 63

Section 3: Placing and Receiving Calls
This section describes how to place and receive calls, listen to your voicemail and
Placing and Receiving Calls
manage your contacts.
Topics
• Dialing a Number
• Redialing a Number
• Answering or Ignoring a Call
• Speakerphone
For additional support, visit us online at greatcall.com/support.
54 Placing and Receiving Calls
• Adjusting the Call Volume
• Accessing the Keypad during Calls
• Voicemail
• People Tab
Page 64

Dialing a Number
Making phone calls is easy on your Touch3. Make sure you are in an area where
cellular service is available. Check that the signal strength icon ( ) in the Status
Bar has at least one bar. More bars in the signal strength icon ( ) mean a stronger
and clearer connection.
1. TAP Phone ( ) on the Home Tab screen.
2. Using the Dial Pad, enter the phone number you would like to call. If you make a
mistake, TAP the Delete Button (
3. TAP the green Call Button to place the call.
4. When you’re ready to end your call, TAP the End Call Button.
NOTE: Always dial using the 10-digit number (area code + phone number)
whenever placing a call (even if calling from the same area code).
DEL
) to make any corrections.
55 Placing and Receiving Calls
Placing and Receiving Calls
Page 65

Placing and Receiving Calls
1
2
56 Placing and Receiving Calls
3
4
Page 66

Redialing a Number
Previous numbers you have called are saved in
your Call History. You can TAP any of your call
history contacts to quickly redial the number.
1. Tap Phone ( ) on the Home Tab.
2. TAP the Call History Button.
3. TAP the phone number or contact in your
call history that you wish to redial.
4. When you’re ready to end your call, TAP the
End Call Button.
2
Placing and Receiving Calls
57 Placing and Receiving Calls
Page 67

Answering or Ignoring a Call
When receiving an incoming call, two icons appear on your
screen.
Placing and Receiving Calls
Answering the Call
• PRESS AND HOLD the Green Phone Button
( ) and DRAG it to the right.
Ignoring the Call
• PRESS AND HOLD the Red Phone Button ( )and DRAG it
to the left.
• Alternatively, you can PRESS the Volume Button while the
phone is ringing to stop the ringer sound.
NOTE: Ignoring incoming calls will send the caller to your voicemail.
58 Placing and Receiving Calls
Page 68

Speakerphone
The Speakerphone provides the convenience to make a call
without holding the phone to your ear. The Speakerphone can
be turned on at any time while you are actively on a call.
While in an active call, TAP the Speaker Button on the screen
to turn on the Speakerphone. TAP the Speaker Button again
to turn the Speakerphone off and send audio back to the
Earpiece.
To end the call, TAP the End Call Button.
Placing and Receiving Calls
59 Placing and Receiving Calls
Page 69

Adjusting the Call Volume
While on an active call, TAP the Volume Button up or down until the sound reaches
a desirable level. The Speakerphone volume can also be adjusted using the Volume
Placing and Receiving Calls
Button while Speakerphone is enabled.
NOTE: The Call Volume can only be adjusted with the Volume Button during an
active call.
60 Placing and Receiving Calls
Page 70

Accessing the Keypad during Calls
There are some situations that may
require you to use the keypad in order to
enter a number or phone extension while
in a phone call.
1. While on an active call, TAP the
Keypad Button to bring up the
keypad.
2. Once you’re nished with the keypad
you can TAP the Hide Button to hide
the keypad and take you back to the
contact details screen.
Placing and Receiving Calls
61 Placing and Receiving Calls
Page 71

Voicemail
Before your Touch3 can receive a voicemail
message, you need to record your name and a
Placing and Receiving Calls
personal greeting. Once you have set up your
voicemail, all unanswered calls to your phone are
automatically transferred to your voicemail even if
your phone is in use or turned off.
Setting up Voicemail
1. From the Home Tab, TAP the Voicemail Button
( ) next to Phone.
2. Listen to and follow the prompts to record
your name and a personalized greeting.
62 Placing and Receiving Calls
Page 72

When to Check Voicemail
You have a voicemail message to listen to if you see the new voicemail icon ( ) in
the Status Bar. To listen to your voicemail message you have two options:
• Expand the Notication Panel (see “Status Bar” on page 32) and TAP the
voicemail notication to automatically call your voicemail. Listen to the prompts
in order to playback, save or delete the message.
• On the Home Tab, TAP the Voicemail Button ( ) to call your voicemail. Listen
to the prompts in order to playback, save or delete the message.
NOTE: Checking Voicemail messages uses your talk time minutes.
63 Placing and Receiving Calls
Placing and Receiving Calls
Page 73

Placing and Receiving Calls
64 Placing and Receiving Calls
New Voicemail in Notication Panel
New Voicemail in Status Bar
Page 74

People Tab
The People Tab was designed to give you easy access to
the contacts that are the most important to you. Creating
a list of your favorite contacts will make dialing friends
or family quick and convenient. Once you’ve added your
rst People contacts, you will be able to quickly call them
just by tapping their name in the People Tab. Much like
an address book, you will also be able to save other
contact details like their email and mailing address.
65 Placing and Receiving Calls
Placing and Receiving Calls
Page 75

Creating a People Contact
1. While on the People Tab, TAP the
Menu Button ( ).
Placing and Receiving Calls
2. TAP “Add New” to add a new person
to your People contact list.
3. TAP the “Name” eld to enter the
name of the contact with the OnScreen Keyboard.
4. TAP the “Phone number” eld to
enter the number of the contact. You
can TAP the description eld to the
left of the phone number to identify
if it is a home, mobile, work or fax
number. TAP the “+” to the right of
66 Placing and Receiving Calls
3 4 5
21
Page 76

the eld if there are multiple numbers you would like to add for this contact.
5. Continue entering any other details you would like for this contact. Once you’re
done, TAP “Save” at the top right to save at the top right.
NOTE: You can even add a photo to your contact which will be visible in your
People list and every time you are on a call with them. While adding your contact,
just TAP the “face icon” ( ) to the left of the Name eld and take a new picture or
select an existing image. See “Taking a Photo” on page 81 for more information
on how to take a photo.
67 Placing and Receiving Calls
Placing and Receiving Calls
Page 77

Managing your People Contacts
Once you have added your People contacts, you can organize who appears in the
“People” Tab and “All People” List.
Placing and Receiving Calls
• The People Tab shows your favorite People contacts
• The All People List is all of your People contacts including those in your favorite
People contacts.
Adding Favorites
1. While on the People Tab or All People List, TAP the Menu Button ( ).
2. TAP “Add Favorites.” A list of all of your People contacts will appear.
3. TAP the check box next to each of the names you would like to be set as favorites.
4. TAP “OK” at the bottom-left of the screen to save your selection. The checked
contacts will now appear in the People Tab as favorites.
NOTE: You can also add any contact under your All People list to your favorites by
PRESSING AND HOLDING their name.
68 Placing and Receiving Calls
Page 78

Removing Favorites
1. While on the People Tab, TAP the Menu Button ( ).
2. TAP “Remove Favorites.” A list of your favorite contacts will appear.
3. TAP the check box next to each of the names you would like to be removed from
your favorites list. This will not delete the contact information, and they will
remain in the All People List.
4. TAP “OK” at the bottom-left of the screen to save your selection. The checked
contacts will no longer appear in the People Tab as favorites. You can still access
these contacts by going to the All People List.
Sorting your Favorites
You can change the order of your favorite contacts under the People Tab by
PRESSING AND HOLDING their name and DRAGGING them up and down the list.
NOTE: You can’t change the order of the All People list which is always sorted
alphabetically. PRESSING AND HOLDING on a contact while in the All People list
will move that contact into your favorites under the People Tab.
69 Placing and Receiving Calls
Placing and Receiving Calls
Page 79

Editing a People Contact
1. TAP the People contact you would like to edit either from the People Tab or from
your All People List.
Placing and Receiving Calls
2. TAP the Menu Button ( ).
3. TAP “Edit”. TAP any of the contact information elds to make your edits with the
On-Screen Keyboard.
4. When done editing, TAP “Save” at the top-right of the screen.
Deleting a People Contact
1. TAP the People contact you would like to delete either from the People Tab or
from your All People List.
2. TAP the Menu Button ( ).
3. TAP “Delete”.
4.TAP “OK” to conrm deletion. This People contact will no longer appear in your
favorites People Tab or in the All People list.
70 Placing and Receiving Calls
Page 80

People History
Historical call or message activity that is related to any of your saved People contacts
will automatically be associated to them in their “People History” view. To view call
or message history of any of your People contacts, just TAP their name in the People
Tab or your All People List.
Incoming Text Message – they sent you a Text Message
Outgoing Text Message – you sent them a Text Message
Incoming Call – they called you and you answered their call
Missed Call – you missed their call
Outgoing Call – you called them
71 Placing and Receiving Calls
Placing and Receiving Calls
Page 81

Section 4: Text Messages
This section describes how to use the Text Messaging feature to send and receive
short messages with your friends and family.
Text Messages
Topics
• Composing and Sending Text Messages
• Reading and Replying to Text Messages
• Sending a Photo or Video Message
For additional support, visit us online at greatcall.com/support.
72 Text Messages
Page 82

Composing and Sending Text Messages
Text Messages are a quick and simple way to send short
messages to anyone that has a cell phone capable of
receiving them. This is an alternative to email which is
typically used for longer messages or messages with a lot
of recipients.
1. On the Home Tab, TAP the Text Messages ( ) App.
You will be taken to your Text Messages “Inbox”.
2. TAP Compose at the top of the screen.
3. In the “Enter recipient” eld you can:
• Enter a 10-digit phone number
• Begin typing a name which will automatically display
a list of matches from your All People List; TAP the
name you would like to add to the recipient list
Text Messges
73 Text Messages
Page 83

• TAP the Contacts button below the “Enter recipient” eld to check any of the
names from your All People List you would like to message; TAP “Done” at the
top right of the screen to add the contacts to the recipient list.
4. TAP the “Enter Message” eld to begin composing a text message.
5. When you are nished composing your message, TAP the Send button.
Text Messages
74 Text Messages
Page 84

Reading and Replying to Text Messages
If you receive a new text message notication in the Status Bar, you have two ways
of reading the new text message:
• Expand the Notication Panel and TAP the new text message notication from
the list to read the message
• TAP the Text Messages App from the Home Tab and then TAP the message in
your Inbox to read the message
Once you’ve read the text message, you can reply to the sender by TAPPING the
“Enter message” eld at the bottom of the screen and composing a message. When
you are nished composing your message, TAP the Send button.
75 Text Messages
Text Messges
Page 85

Sending a Photo or Video Message
You can attach your photos or videos, also known as
“multimedia attachments,” to text messages so that
you can share them with your friends and family. Any
text messages sent with a multimedia attachment will
Text Messages
automatically be sent as a “multimedia message”
instead.
1. While composing a new text message or replying to a
text message, TAP the “paper clip” icon ( ). A popup will appear with several multimedia attachment
options.
76 Text Messages
Page 86

2. TAP one of the following multimedia attachment types:
• Image – to select a previously captured photo
• Take picture – to take a new photo (see “Taking a
Photo” on page 81)
• Video – to select a previously recorded video
• Record video – to take a new video (see “Recording a
Video” on page 83)
3. Once you have selected your multimedia attachment,
TAP the “Send” button.
Text Messges
77 Text Messages
Page 87

Section 5: Camera and Photo Album
This section describes how to use the Camera and Photo Album Apps to capture,
view and share pictures and videos.
Camera and Photo Album
Topics
• The Camera App
• Taking a Photo
• Changing the Camera Mode
For additional support, visit us online at greatcall.com/support.
78 Camera and Photo Album
• Recording a Video
• Viewing your Photos and Videos
• Sharing your Photos and Videos
Page 88

The Camera App
The Camera App allows you to capture photos or videos using the Main Camera or
Front-Facing Camera. To launch the Camera App, TAP Camera on the Home Tab. With
the Camera App opened, you will see the following on-screen features:
• Photo Album (Gallery)–view your photos and videos
• Camera Mode Indicator–indicates what camera mode you are using
• Camera Selection ( )–allows you to switch between the Main Camera and
the Front-Facing Camera
• Auto-Focus Point–indicates where the camera will focus
• Change Camera Mode ( )–allows you to change the camera mode
• Take Picture ( )–allows you to take a photo
• Record Video ( )–allows you to record a video
NOTE: You can rotate your phone to capture photos or videos in “landscape”
mode. The on-screen buttons will remain stationary, but the icons will rotate to
match the orientation of the phone.
79 Camera and Photo Album
Camera and Photo Album
Page 89

Camera Mode Indicator
Camera and Photo Album
Photo Album
Auto-Focus Point
Change Camera Mode
Take Picture
80 Camera and Photo Album
Camera Selection
Record Video
Page 90

Taking a Photo
1. With the Camera App open, TAP the Camera Selection ( )button to switch to
the Main Camera or Front-Facing Camera.
2. Aim the camera so that the subject being captured is framed to your liking.
3. TAP the Take Picture ( )button.
4. TAP anywhere on the screen to set the focusing point.
81 Camera and Photo Album
Camera and Photo Album
Page 91

Changing the Camera Mode
TAP the Change Camera Mode ( ) button for additional creative tools:
• Auto–automatically adjust your camera to optimize color and brightness. This is
Camera and Photo Album
the default setting.
• Beautyface–use this to take photos with lightened faces for gentler images.
• Panorama–use this to take wide panoramic photos. When you have this mode
selected, TAP the Take Picture ( ) button to start the panorama and then
move in any direction. Once moving, the camera will guide you in the direction
you started. TAP the Take Picture ( ) button again to stop the panorama.
• Night–Use this to take photos in low-light conditions.
82 Camera and Photo Album
Page 92

Recording a Video
1. With the Camera App open, TAP the Camera Selection ( ) button to switch to
the Main Camera or Front-Facing Camera.
2. Aim the camera so that the subject being captured is framed to your liking.
3. TAP the Record Video ( ) button to start recording a video. You can move your
phone around to follow the action.
4. TAP the Stop Video ( ) button again to stop recording the video.
83 Camera and Photo Album
Camera and Photo Album
Page 93

Viewing your Photos and Videos
After you have captured a photo or a video, you can view it by accessing the Photo
Album:
• While in the Camera App, TAP the Photo Album button at the top-left of the
Camera and Photo Album
screen. This will take you to the last captured photo or video. TAP the Back
Button ( ) button at the top-left of the screen to take you back to the “Album”
view.
• From the Home Tab, TAP the Photo Album App. This will take you to the “Album”
view where your photos and videos are sorted by where they are from. Photos
and videos captured by your camera will be in the “Camera” album.
84 Camera and Photo Album
Page 94

Sharing your Photos and Videos
You can also share, via email or text message, any of the photos or videos you’ve
already captured:
1. Find the photo or video you would like to share in the Photo Album.
2. With the preview of the photo or video up, TAP the “Share” Button ( )at the top
of the screen. A pop-up of share options will appear.
3. TAP “Email” if you would like to share by email or “Messages” if you would like
to share by attaching to a text message.
NOTE: Sharing photos and videos requires data. Use a Wi-Fi connection to reduce
data usage on your GreatCall data plan. Always check your usage monthly with the
Usage App on your Touch3 or by going online to mygreatcall.com.
85 Camera and Photo Album
Camera and Photo Album
Page 95

Section 6: Email
This section describes how to set up your email account and how to send and
receive emails on your phone.
Topics
• Setting up your Email Account
Email
• Composing and Sending Email
• Reading and Replying to an Email
• Sending an Email with a Photo or Video Attachment
For additional support, visit us online at greatcall.com/support.
86 Email
Page 96

Setting up your Email Account
Email allows you to send messages to your friends and family. It differs from Text
Messages by allowing you to compose much longer messages, and does not require
the recipient to have a cell phone with text messaging capabilities.
NOTE: Sending and receiving emails requires data. To reduce your data usage on
your GreatCall data plan, use a Wi-Fi network if available. See “Wi-Fi” on page
99 for more information on setting up a Wi-Fi connection.
Your Touch3 smartphone provides two ways to use email:
• Gmail
• Standard Email–set up your phone with an existing email address you have that
TM
(Google®Email)–set up your phone with an existing email account from
Google.
isn’t from Google.
87 Email
Email
Page 97

NOTE: If you do not have a Gmail account, it is recommended that you create one.
Setting up a Gmail account will get you access to the Google Play Store where you
can update your phone’s software, and access additional GreatCall and
third-party Apps.
Setting up a New Gmail Account
Email
If you don’t have an existing Gmail account, follow these instructions to create one
on your phone:
1. Under All Apps, TAP the Gmail App ( ).
2. TAP “New”.
3. Enter in your First and Last Name.
4. Enter in your desired email address.
5. Enter in your desired password.
6. You can optionally set up password recovery options.
7. You can optionally join Google+TM, which is Google’s social media site similar to
Facebook, otherwise you may skip.
88 Email
Page 98

8. Choose your Google backup and email communication options.
9. Accept Google’s Terms of Service and Privacy Policy.
Setting up an Existing Gmail Account
If you already have a Gmail account, follow these instructions to access your email
on your phone:
1. Under All Apps, TAP the Gmail App ( ).
2.Tap “Existing”.
3. Log in using your existing Gmail email address and password.
Setting up an Existing Standard Email Account
If you already have an email address from another service provider, TAP the Email
App ( )under All Apps, enter your email address and password, and follow the
on- screen instructions. You may need to go to your email service provider’s website
or contact them directly to obtain the specic settings needed to continue setup on
your phone.
89 Email
Email
Page 99

Composing and Sending Email
Once you have set up your email, you can compose and send your rst email from
your Touch3 smartphone.
Composing and Sending Email using the Gmail App
1. In the Gmail App, TAP the “Compose” button ( )at the top-right of the screen.
2. Enter the email recipients in the “To” eld.
Email
3. Enter a subject into the “Subject” eld.
4. Enter your message into the “Compose email” eld.
5. When you’re ready to send your email, TAP the “Send” ( ) button at the
top right of the screen.
Composing and Sending Email using the Email App
1. In the Email App, TAP the “Compose” button at the top-left of the screen.
2. Enter the email recipients in the “To” eld.
3. Enter in a subject into the “Subject” eld.
4. Enter your message into the white space below the “Subject” eld.
90 Email
Page 100

5. When you’re ready to send your email, TAP the “Send”( ) button at the top
right of the screen.
Reading and Replying to an Email
If you receive a new email notication in the Status Bar, you have two ways of
reading the email message:
• Expand the Notication Panel and TAP the new email notication from the list to
read the message.
• Launch the Email or Gmail App and then TAP the message in your Inbox to read.
Once you’ve read the email message, you can reply to the sender by TAPPING
the “Reply” button ( in the Gmail App or in the Email App).
When you are nished composing your message, TAP the “Send” button.
91 Email
Email
 Loading...