

Page 1

ser Guide
Page 2
User Guide
Welcome to GreatCall!
The all-new Jitterbug Touch 2 – An
AndroidTM smartphone with the
simplicity of Jitterbug. This U ser Guide
features all the information you need
to get the most out of your phone, so
please read this before y ou get st arted.
For more information on the Jitterbug Touch 2, go to
www.greatcall.c om.
1User Guide
Page 3

User Guide 2
Page 4

Contents
Chapter 1: Jitterbug Touch 2 Introduction ..........................7
1.1 Battery .......................................................................10
Charging the Battery .................................................................... 10
1.2 Jitterbug T ouc h 2 Overview .............................................11
1.3 Using the On- Screen K eyboard .......................................12
1.4 Using the Lock Screen ....................................................14
1.5 The Main Screen Overv iew .............................................16
Chapter 2: The Main Screen – Home Tab .........................17
2.1 Home T ab Overview ........................................................18
2.2 Phone .............................................................................19
Making Y our First Call ...................................................................19
Dialing a Number ........................................................................ 19
Redialing a Number ..................................................................... 19
Answering a Call ..........................................................................20
Ignoring a Call ..............................................................................20
2.3 Setting up Voicem ail .......................................................21
2.4 Text Messages ................................................................22
Sending a T ext Mes sag e .............................................................22
Composing and Sending a Text Message ...................................22
Sending a Photo or Video Message .............................................23
3User Guide
Page 5

2.5 Camera ...........................................................................24
Accessing the C amer a .................................................................24
Taking a Photo ............................................................................. 25
Viewing a Photo from the Camera App ....................................... 25
Recording a Video........................................................................26
2.6 Photo Album ...................................................................27
Viewing a Picture in your Photo Album ........................................ 27
Sending a Photo .........................................................................28
2.7 5Star Urgent Response ...................................................29
2.8 Urgent Care .....................................................................31
2.10 Customizing your Home Tab .........................................33
Chapter 3: The Main Screen – P eople Tab .......................35
3.1 People T ab Overview ......................................................36
3.2 Creating a C ontact ..........................................................37
3.3 Creating a Favorite ..........................................................38
3.4 Deleting a Contact ..........................................................39
3.5 Calling a C ontact .............................................................40
Chapter 4: GreatCall Button .............................................41
4.1 GreatCall Button – Introduction ......................................42
4.2 Usage .............................................................................43
4.3 Help ................................................................................45
User Guide 4
Page 6

Chapter 5: Setting Up and Using Em ail and Gmail ...........47
5.1 Introduction ....................................................................48
5.2 Setting up your Google Gmail Acc ount ...........................49
Creating an Gmail Ac cou nt from y our C omputer ................49
Linking Y our Google Ac c ount to Your Jitterbug T ouc h 2......50
5.3 Email ...............................................................................51
Chapter 6: All Apps Button ...............................................53
6.1 All Apps Overview ...........................................................54
6.2 Google Play Store ...........................................................55
Downloading a free app ....................................................56
Purchasing an app ............................................................56
Chapter 7: Settings and Options .....................................57
7.1 Options ...........................................................................58
7.2 Settings ..........................................................................59
7.3 Setting the Screen Lock ..................................................60
Chapter 8: Commercial Mobile Alert S ystem (CMAS) .......61
8.1 About CMAS ...................................................................62
8.2 T ypes of Alerts ................................................................63
The Fine Print ...................................................................64
5User Guide
Page 7

User Guide 6
Page 8

Chapter 1: Jitterbug Touch 2 Introduction
This chapter expl ains how to st art using your
Jitterbug Touc h 2.
• Device Battery
• Jitterbug Touch 2 Overview
• Using the Lock Screen
• Main Screen Overview
For additional support, visit us online at www.greatc all.c om.
7User Guide
Page 9
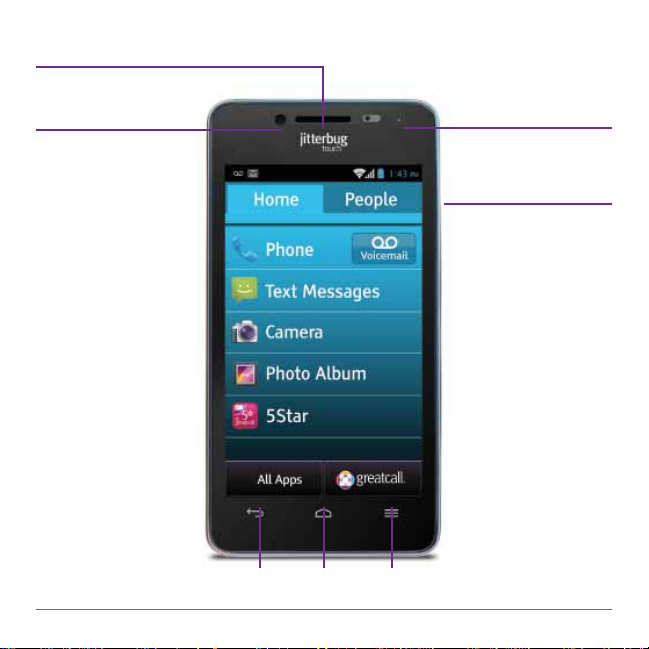
Earpiece
Front-Facing
Camera
Back Home Menu
User Guide 8
LED
Indicator Light
Volume Key
Page 10
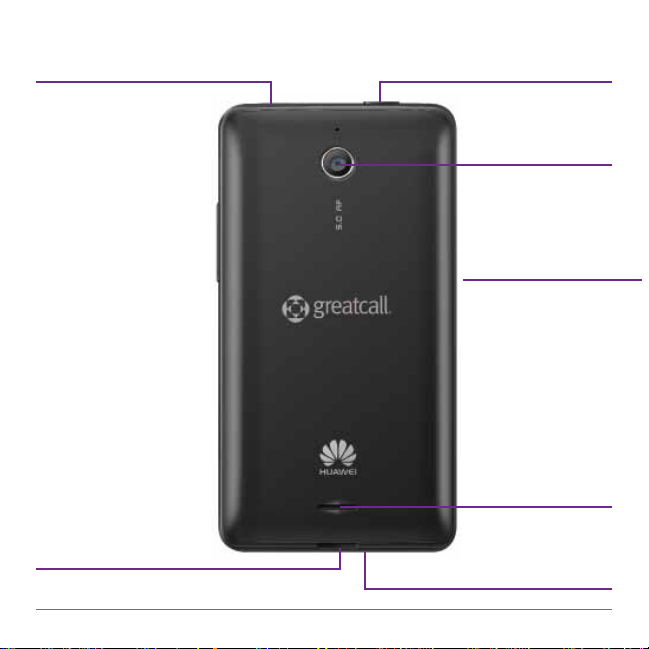
Headset Jack
Battery Cover
Release
Power Key
Rear-Facing
Camera
Charger/
Data Port
Speaker
Microphone
9User Guide
Page 11
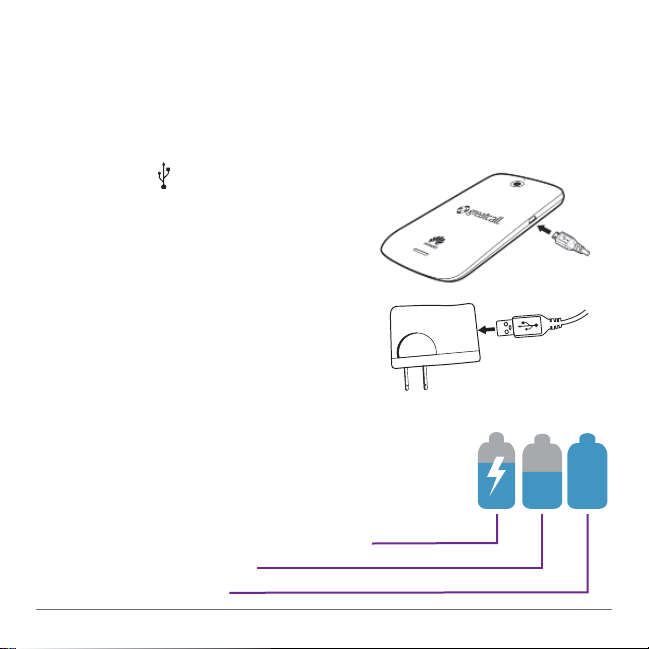
1.1 Battery
Y our Jitterbug Touch 2 comes with the battery pre-installed
and pre-charged so y ou can g et started right away .
Charging the Battery
1. With the symbol on the
charger f acing up and your
phone’s touch screen facing
down, insert the small end of
the charger into the microUSB port on the phone.
2. Insert the large end of the
charger c ord into the port on
the wall adapter.
3. Plug the adapter into a standard outlet.
The battery icon in the upper right of the
screen tells you whether the devic e i s:
- Charging (the icon is animated)
- Partially charged
- Fully charged
User Guide 10
Page 12

1.2 Jitterbug Touch 2 Overview
Get familiar with the three main k eys, a s y ou wil l use them
to navigate your phone.
1. Home key – no matter what you’re doing, this wil l
take you bac k to the Main screen on your phone.
2. Menu key – this gives y ou a menu of option s for
every section of the phone. For example, this
button will allow y ou to add and delete cont acts
while in your contacts li st.
3. Back key – this wil l tak e y ou bac k to the previous
screen.
11User Guide
Page 13

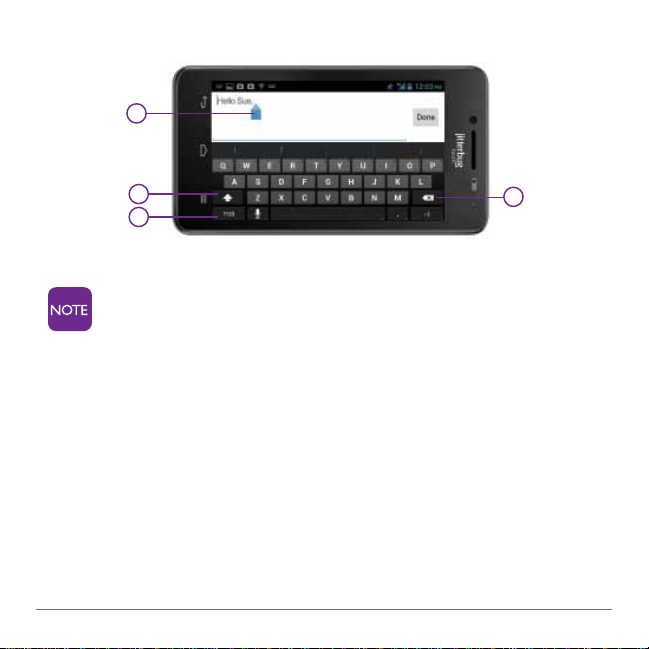
1.3 Using the On- Screen K eyboard
When typing an email or text, simply tap the screen in the
message entry area. This i s the white are a shown in the
image to the right.
1. The blue cursor will appe ar when tapping a text fi eld
on the screen and can be used to navigate y our typed
text. Y ou c an select a specifi c place in the text by simply
tapping the place or by touc hing & dr agging the cursor
to the desired location.
2. The Shift key changes the text from lower ca se to
upper case. Touch and hold for cap s loc k.
3. The Symbols/Numbers key enables you to c hoose
from numbers and various symbols. Onc e you h ave
reached the symbols/numbers k eyboard, tap
see an additional keyboard of symbols. Press the
button to return to the original keyboard.
4. The Delete key allows you to delete any previously
typed characters.
User Guide 12
=\<
to
ABC
Page 14
1
2
3
4
To c h ange the orientation of your k eyboard to
horizontal (shown above), simply rotate y our phone
and hold it horizontally . The on-screen keyboard w ill
shift automatically .
13User Guide
Page 15
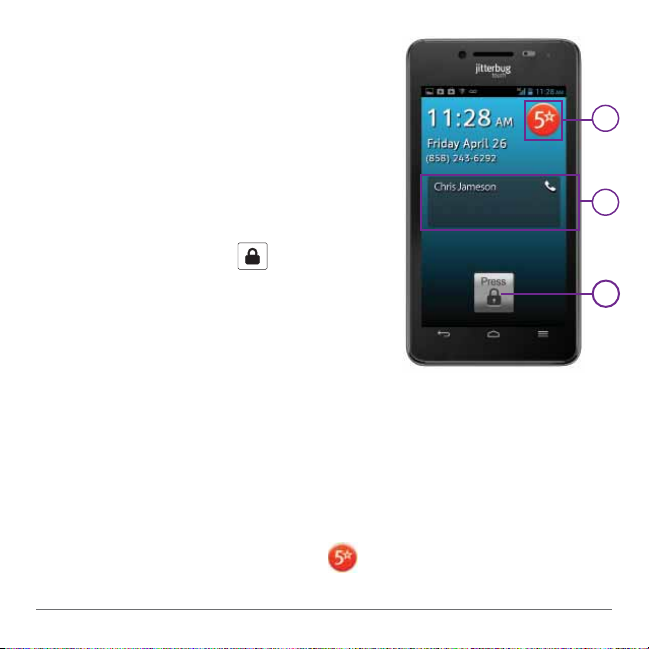
1.4 Using the Lock Screen
Y our phone is equipped w ith a loc k
screen that appears when your phone
is not in use, to prevent acc ident al
dialing.
3
1. The Unlock F unction
– T o un lock the screen, press and
hold the lock ic on
and drag it
toward the top of the screen.
2. The Events Window
– The Events W indow shows your
missed messages and call s.
– T o ac ce ss these events, you w ill
need to unlock the screen.
3. 5Star
– This button gives you ac c ess to immediate help with 5St ar
Urgent Response
TM
. This innovative s afety app c omes
pre-installed on your Jiterbug T ouc h 2. To open the app, press
and release the 5Star button .
User Guide 14
2
1
Page 16

– In order to use 5Star Urgent Response, you will need to visit
www.mygreatcal l.com to set up y our acc ount and a P ersonal
Profi le. If you do not set up a 5St ar acc ount, this button w ill
take you to a screen where y ou can ac ces s 9-1-1 quic kly in an
emergency situation.
For more information on 5Star Urgent R esponse, see
page 29.
After several minutes of non-use, y our phone will g o
into “sleep” mode to save battery power. To wake
your phone, press the power button once.
15User Guide
Page 17
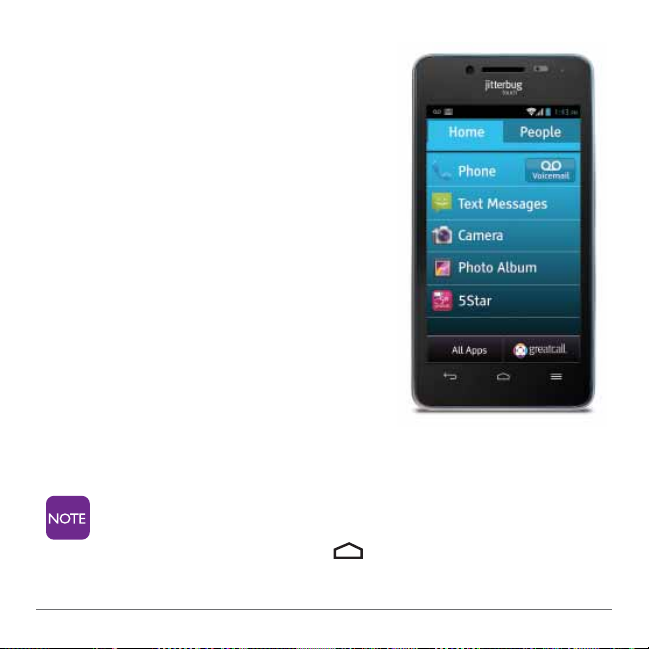
1.5 The Main Screen Overview
As soon as you u nloc k your phone,
you will see the Main screen. From
this screen you can use every
function of your Jitterbug Touch 2.
The Main screen features only two
tabs – “Home” and “People.” It w as
designed to be simple, so you can
easily access the apps and people
that are most important to you,
without having to dig through icon s
and features you ma y never use.
The following two chapters show in
detail how to use these two tabs.
If you were ever to get lost in
your phone, you can alway s
press the Home button
to return to this Main screen.
User Guide 16
Page 18

Chapter 2: The Main Screen – Home Tab
This chapter expl ains the Home Tab.
• Home Tab Overview
• Phone
• Voicemail
• Text Messages
• Camera
• Photo Album
• 5Star
• Urgent Care
• Customizing your Apps List
17User Guide
Page 19

2.1 Home Tab Overview
Y our Jitterbug Touch 2 Home tab lists features that wi ll be
most useful to you.
1. Phone
2. Text Messag es
3. Camera
4. Photo Album
5. 5Star
6. Urgent Care
To le arn more about the “Al l Apps” button see
page 53.
User Guide 18
7. Email
8. Internet
9. Maps
10. Clock
Page 20
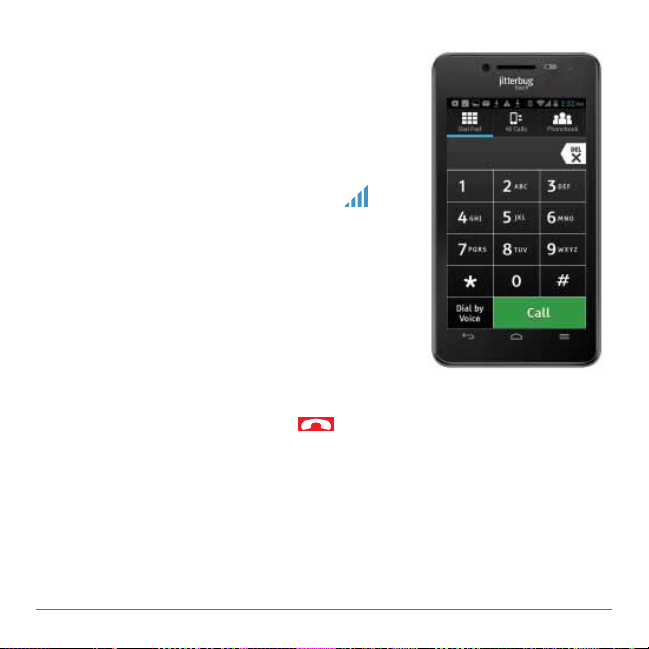
2.2 Phone
Making Y our First Cal l
Making phone calls is ea sy on y our
Jitterbug T ouc h 2. Mak e sure you are in
an area where a signal can be rec eived.
Look for the sign al strength icon in
the upper right of the screen. The more
bars, the stronger the signal.
Dialing a Number
1. T ap “Phone” on the Home tab .
2. Using the dialpad, enter the phone
number.
3. T ap the “C all” button to dial the number.
4. T o end the c all, tap the symbol.
Redialing a Number
1. Tap “Phone” on the Home t ab.
2. At the dialpad, tap the “All C alls” button at the top of
the screen.
3. T ap the number or c ontact you w ish to redial.
19User Guide
Page 21
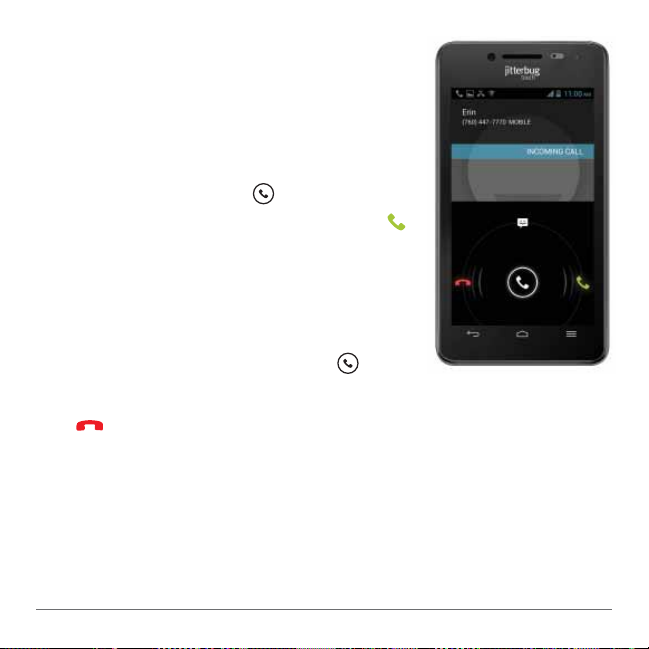
Answering a Call
1. When receiving an incoming c all,
three icons appear on y our screen
as shown in the image to the right.
2. To an swer a cal l, touc h and hold the
center phone icon and drag it
toward the green phone symbol
on the right side of the screen.
Ignoring a Call
1. To ignore a c all and send the cal ler
straight to your v oicem ail, touc h and
hold the center phone icon
drag it toward the red phone symbol
on the left side of the screen. You
can also press the Volume key to
silence the ringer . After several sec onds, the caller will be sent to your
voicemail.
User Guide 20
and
Page 22

2.3 Setting up Voic email
Before your Jitterbug Touch 2 can rec eive a voic email
mess ag e, you need to rec ord a personal greeting and
set a password. Once you have set up your voic email,
all unanswered c alls to your phone are autom atical ly
transferred even if your phone i s in use or turned off .
1. From the Home tab, tap the “V oic email” button next to
“Phone.”
2. Listen to and follow the prompts to create a password
and record a greeting.
At the dialpad, you can also touc h and hold “1” to
acces s voic email.
21User Guide
Page 23

2.4 T ext Messages
Sending a T e xt Mess age
The Jitterbug T ouc h 2 was designed to send text mess ages
easily to your friends and family who have cell phones
capable of rec eiving them.
Composing and Sending a Text Message
1. T ap “Text Messages” on the Home t ab.
2. T ap the new mess age symbol
create a new text message.
3a. If sending a message to a s aved cont act, begin typing
the name. A list of cont acts w ill appe ar - tap to select
a contact. The c ontact’s n ame and phone number wi ll
populate the “T o” box. Tap the fi eld labeled “T ype
message” to compose your text mes sag e.
b. If sending a mes sage to a new person, type the 10-digit
phone number into the “To” fi eld. Tap the fi eld labeled
“Type mess age” to compose your text mess age.
4. After you fi nish composing your mes sag e, tap the
“Send” button.
User Guide 22
on the lower left to
Page 24

Sending a Photo or Video Messag e
1. While in “Text Message s,” tap the new messag e
symbol
2. Once you have entered the des ired contact or phone
number in the “To” fi eld, tap the attachment symbol
in the upper right corner of your screen.
3. To att ac h an exis ting photo from your phone’s Photo
Album, tap “Pictures.” To attach an exis ting video, t ap
“Videos.”
4. T o tak e a new photo to att ac h to your mes sag e, tap
“Capture Picture.” To record a new video to attac h to
your message, tap “C apt ure V ideo.”
5. Once you have c aptured/c hosen your photo or v ideo
you will return to your c ompose messag e screen where
you can then tap “Send.”
in the lower left corner.
,
23User Guide
Page 25

2.5 Camera
Access ing the Camer a
1. Tap “C amera” on the Home t ab and y our phone wil l turn
into a digital camera.
Adjust the settings
Select one of the four options below by tapping the symbol
at the top of the screen.
1. Settings – Tap this button to adjust things lik e photo
size and quality.
2.
White balance – Tap this to adjust the white
balance of y our camer a to either incandesc ent, daylight,
fl ourescent, or cloudy . You can also set it to “Auto.”
3. Effects – Tap this to select a lense effect suc h a s
Sepia or Aqua.
4. Shooting Mode – Tap this to select either single or
panoramic shooting mode.
User Guide 24
Page 26

T aking a Photo
Rear-Facing C amera
1. Tap “Camera” on the Home tab .
2. The phone screen will display the view of the camer a
and represents the image that w ill be c aptured for the
picture.
3. Tap the circular white button in the center of the
bottom of the screen. Y ou w ill hear a shutter , indicating
the photo was taken.
Front-Facing Camer a
1. Tap “Camera” on the Home tab .
2. Tap the lens rotation symbol to switch the lens
between front facing and rear fac ing.
3. Tap the circular white button in the center of the
bottom of the screen. Y ou w ill hear a shutter , indicating
the photo was taken.
Viewing a Photo from the Camera App
1. While in the c amera app, s imply tap the sm all
thumbnail image in the lower left corner of the screen.
25User Guide
Page 27

2. The last pict ure tak en wil l appear on screen.
3. Touch and hold the screen and slide it to the left or right
to view another photo.
4. Hit the bac k button to ret urn to the camer a app.
Recording a Video
1. Tap “Camera” on the Home tab .
2. Use the slider control on the bottom right corner
of the screen to switch from c amera to video mode.
3. Tap the c ircular red button in the center of the
bottom of the screen to begin recording. Tap it again
to stop recording.
User Guide 26
Page 28

2.6 Photo Album
The Photo Album is where you can see al l the pictures y ou
have on your phone. Your phone will automatic ally sort
pictures into “Albums,” so you can see where the pict ure
originated – such as “C amera” or “Down loads.”
Viewing a Picture in your Photo Album
1. T ap “Photo Album” on the Home tab .
2. At the albums list, tap the album y ou wish to view .
3. Y ou wi ll see thumbn ails of the photos in the album. Tap
the thumbnail to enlarge it.
4. T ouc h and hold the screen and slide it to the left or right
to view the next photo.
27User Guide
Page 29

Sending a Photo
1. Enlarge the photos you w ish to send by tapping the
thumbnail view.
2. T ap the share symbol in the upper right corner of the
screen.
3. Select a sharing option from the list, whic h will include
numerous options based on the ac counts y ou have set
up (e.g. Gmail, Facebook and more).
4. To send the pict ure in a text mess age, t ap the
messaging symbol .
User Guide 28
Page 30

2.7 5Star Urgent Response
GreatCall’s 5St ar Urgent R esponse c omes pre-loaded on
your Jitterbug T ouc h 2, however , you wil l need to h ave a
5Star subscription to acc ess thi s servic e. Thi s app
transforms your c ell phone into a personal safety dev ic e.
In any unsafe or unc ertain sit uation, 5Star gives you
immediate access to NAED C ertifi ed Respon se Agents who
will identify you and y our location, ev aluate y our situation
and get you the help y ou need.
If you have a GreatC all Service Plan th at includes
free access to the 5Star Urgent Respon se service,
you will need to visit www.mygreatcall.c om and clic k
“Phones” under the “Create Acc ount” section. The
username and password you create w ill allow y ou
to gain acces s to your 5Star servic e and set up your
Personal Profi le. From there, you c an simply t ap the
5Star app on the Home tab and enter your username
and password.
29User Guide
Page 31

If you do not have ac c ess to 5Star through a
GreatCall Service Pl an you c an add the service
separately to your monthly pl an by creating and
logging into your
Simply click “Phones” under the “C reate an
Account” section. You will be able to add 5Star
Urgent Response, as well a s a number of other
innovative services from GreatC al l.
User Guide 30
www.mygreatcal l.com ac c ou nt.
Page 32

2.8 Urgent Care
Urgent Care comes pre-loa ded on your Jitterbug Touch 2. If
you have a GreatCal l Service Plan, you w ill h ave free,
unlimited acce ss to a regi stered nurse or board-certifi ed
doctor, no appointment neces sary . Thi s app also gives you
access to a robust medical dictionary and symptom c hec k er
tool. T o ac c ess Urg ent C are, simply tap the app and enter
your name and state.
If you do not have ac c ess to Urgent C are through a
GreatCall Service Plan, you w ill stil l have ac c ess to
the service, however you will be c harged a fee to c all
a nurse or doctor.
31User Guide
Page 33

2.9 Internet
Since the Jitterbug Touch 2 has a large color screen, browsing the Web is ea sy .
1. From the Home tab or the “All Apps” button, scroll down
until you see “Internet.” Tap to select.
2. Y ou wi ll be brought to the www.g oogle.c om home page.
3. T o type in a speci fi c website address, t ap the text fi eld
at the top of the screen and enter a URL.
User Guide 32
Page 34

2.10 Customizing your Home Tab
Y ou can customiz e y our Home tab by selecting your f avorite
apps that y ou use most often.
1. From the Home tab, press the Menu key .
2. Tap “Add F avorites” and y ou wil l brought to a li st of al l
the apps on your phone.
3. To select an app, just tap the square bo x to the right and
a green checkm ark wil l appe ar.
4. Tap “OK” when fi nished and the selected Apps will now
appear on the Home tab.
5. To c h ange the order of the app s on your Home t ab,
simply touch and hold an app and drag it up or down to
place it elsewhere in y our list.
The “Phone” app cannot be moved.
Before you use the Calendar or Gmail apps, we
recommend you set up a Google ac cou nt.
See page 49 for additional information.
33User Guide
Page 35

User Guide 34
Page 36

Chapter 3: The Main Screen – People Tab
This chapter expl ains the P eople Tab.
• People Tab Overview
• Creating a Contact
• Creating a Favorite
• Removing a Favorite
• Deleting a Contact
• Calling a Contact
35User Guide
Page 37

3.1 People Tab Overview
The People tab was designed to give you easy access to the
contacts that are most important to y ou. Cre ating a list of
Favorites will m ak e dialing friends or family a snap.
Tapping the P eople tab shows you a list of y our fav orite
contacts. To learn how to create a Favorite, see page 38.
Tap the “Al l People” button to see al l of your
contacts.
If you are upgrading from a previous Jitterbug phone,
and have your Phonebook set up with Gre atC all, y ou
can import your contacts all at one time. When you
turn on your Jitterbug Touch 2, you w ill see a pop-up
window that offers y ou the option to import your
contacts. Press “OK” to import them.
If you choose not to import your c ontacts, you c an
select this option later by g oing to All People and
pressing the Menu key . Tap “Import Jitterbug
Contacts” and y ou wil l see a pop-up window . Press
“OK” to import your contacts.
User Guide 36
Page 38

3.2 Creating a C ontact
1. From the People tab, press the menu key .
2. Tap “Add New” to add a new cont act to y our cont acts
list.
3. At the new contact screen, tap “Name” to enter
a fi rst and last name.
4. Tap “Next” at the bottom right to enter a phone number.
5. If applicable, enter additional phone numbers, em ail
addresses and other contact det ails.
6. Tap “Done” in the upper left c orner to s ave.
7. Your c ontact wil l now be s aved in the “All P eople” list.
37User Guide
Page 39

3.3 Creating a Favorite
While you may have doz ens of people in y our cont act list,
the Jitterbug T ouc h 2 has made it easy to quick ly acc ess your
most important contacts from the People t ab.
1. From the People tab, tap “All People.”
2. Press the Menu key .
3. Tap “Add to F avorites.”
4. Y ou wil l see a list of al l y our cont acts.
5. Tap the c hec k bo x next to a n ame, and a green c hec k -
mark wil l appe ar. Tap “OK.”
6. The selected contacts will now appear on your People
tab.
Y ou can pres s and hold a single n ame to add them
to your favorites w ithout using the menu fu nction.
User Guide 38
Page 40

3.4 Deleting a Contact
1. From the People tab, tap the “All People” button.
2. Tap the c ontact you w ish to delete.
3. Once you’re on the cont act screen, press the Menu
key .
4. Tap “Delete.” Tap “OK” to confi rm deletion.
5. This contact w ill no longer appe ar in your c ontact list or
on your People tab.
39User Guide
Page 41

3.5 Calling a C ontact
Calling a Favorite from the People Tab
1. From the People tab, tap the
contact you w ish to c all.
2. T ap “Call.”
Calling a C ontact from
the Contact Li st
1. From the People tab, tap the “Al l
People” button.
2. Tap the contact y ou wish to c all.
3. T ap “Call.”
If a contact has multiple
numbers, a selection will
appear. Choose the
appropriate number.
User Guide 40
Page 42

Chapter 4: GreatCall Button
This chapter expl ains addition al feat ures on y our
Jitterbug T ouc h 2 avail able when you t ap the GreatC all
button .
• Introduction
• Usage
• Help
41User Guide
Page 43

4.1 GreatCall Button – Introduction
In both the Home and People tabs, you’l l see the GreatC al l
button at the bottom right corner of y our screen.
Tap thi s button to see the follow ing options:
1. “Usage” – View how many minutes, text mess ages,
data megabytes you’ve used, how m any y ou have left,
and when your next bill date is.
2. “Featured Apps” – Several featured app s rec ommended
by GreatCal l.
3. “Help” – Help and information about your Jitterbug
Touc h 2.
4. “Contact U s” – Options to c ontact our GreatC all
Operators or Customer Service Representatives.
User Guide 42
Page 44

4.2 Usage
The usage feature will allow you to easily keep track of your
usage right from your Jitterbug Touch 2. In addition to
minute and text usage, your phone w ill trac k your data
usage, or “megabyte” usag e. Data is what your phone uses
to access the Internet, download an app, or send an email.
See the next page for examples of data us age.
There may be a slight delay in displaying your exact
usage. Usage i s ba sed on the estimated minutes,
text messages and data that you use per bil ling
cycle. Y ou should c hec k this often to ensure you are
within your monthly plan.
43User Guide
Page 45

How much data is enough?
Data What you can do w ith it
10 MB
Send 50 emails, and send 7 emails with attachments, and
View 20 web pages, and
Post 2 photos on social media sites, and
Watch 1 minute of streaming video
50 MB
100 MB
250 MB
500 MB
Send 250 emails, and send 35 emails with attachments, and
View 100 web pages, and
Post 12 photos on social media sites, and
Watch 5 minutes of stre aming video
Send 500 emails, and send 70 emails with attachments, and
View 200 web pages, and
Post 25 photos on social media sites, and
Watch 10 minutes of stre aming video
Send 1250 emails, and send 185 emails with attachments, and
View 500 web pages, and
Post 62 photos on social media sites, and
Watch 25 minutes of streaming video
Send 2500 emails, and send 375 emails with attac hments, and
View 1000 web pages, and
Post 125 photos on social media sites, and
Watch 50 minutes of stre aming video
User Guide 44
Page 46

4.3 Help
With the Jitterbug T ouc h 2, you can easi ly
fi nd help whenever you need it. W e h ave
included an entire on-screen guide for
easy reference.
1. Tap the Gre atCal l button.
2. Tap “Help .”
3. Y ou wil l see a list of v arious help
topics. T ap one to select. While in a
help topic, you can scroll up or down
to read all the content or use the left
or right arrows to see the next topic.
Y our Jitterbug Touch 2 also
features “Shake for HelpTM.” If you need help while
anywhere on the Main screen, just shake y our phone
and a help bubble will appear .
45User Guide
Page 47

User Guide 46
Page 48

Chapter 5: Setting Up and Us ing Email and Gm ail
This chapter expl ains how to set up and use email on your
Jitterbug Touc h 2.
• Introduction
• Gmail
• Email
47User Guide
Page 49

5.1 Introduction
The Jitterbug T ouc h 2 offers two way s to use Email: St andard
Email and Gmail (Google Email).
If you don’t have a Gm ail ac cou nt, we highly rec ommend
setting one up to get the most out of your phone.
User Guide 48
Page 50

5.2 Setting up your Google Gm ail Ac cou nt
To g et the most out of y our Jitterbug Touch 2 we strongly
recommend linking your devic e to a Google em ail ac cou nt.
This will al low you to down load apps from the Google Play
Store, access y our email and add c ontacts to your phone via
your computer. If you do not already h ave a Google ac cou nt,
follow the steps below to get started:
Creating an Gmail Ac cou nt from y our C omputer
The easiest way to create a Gmail account is right from your
computer.
1. Launch the Internet.
2. Go to www.google.com.
3. Select “Sign-In” to see the Google login page.
4. Select “Create an acc ount” to cre ate a new acc ount.
5. Follow the prompts to create a free ac cou nt.
Y ou can sy nc h other types of st andard email
accounts w ith y our Jitterbug Touch 2 as wel l.
See page 51 for details.
49User Guide
Page 51

Linking Y our Google Ac c ount to Your Jitterbug Touch 2
1. From the Home tab, tap the “All Apps” button.
2. Tap “Gm ail.”
3. At the “Add a Google account” screen, t ap “Exis ting.”
4. At the “Sign in” screen, enter your Google username
and password.
5. Tap “Save.”
User Guide 50
Page 52

5.3 Email
Y ou can use your Jitterbug Touch 2 to view , compose and
manage Email mess ages. It’s e asy to sy nc h most standard
Email accou nts – lik e Yahoo, AOL or Hotmail – in just a few
steps.
1. From the Home T ab, tap the “All App s” button.
2. Tap “Email.”
3. Select which type of email addres s you have.
4. Enter an email address and password in the entry
boxes.
5. Tap “Next.”
6. Follow the instructions on the screen.
51User Guide
Page 53

User Guide 52
Page 54

Chapter 6: All Apps Button
This chapter expl ains the Al l App s button on your Jitterbug
Touc h 2.
• All Apps Button Overview
• Internet
• Calendar
• Google Play Store
53User Guide
Page 55

6.1 All Apps Overview
Y our Jitterbug Touch 2 comes with some of the primary apps
pre-programmed into your Home tab as “Fav orites.” There
are, however, many other apps you c an ac ces s by tapping
the “All Apps” button in the lower left c orner of the Home
tab.
Some of the apps require you to have a Gmail or GreatC all
account, while others work immediately. If there are c ertain
apps you wil l be us ing more often, you c an add them to y our
“Favorites” on the Home tab for quick er ac c ess.
Y ou can also down load new apps from the Google Play Store
after you link your Google email (Gmail) ac c ount to your
phone. See pages 55-56 for details.
User Guide 54
Page 56

6.2 Google Play Store
After linking your Gmail ac c ount to your phone,
you can acc ess the Google Play Store and download games, movies, music and any other app s
that interest you. There are over 600,000 app s to
choose from.
1. From the Home tab, tap the “All Apps” button.
2. Tap “Play Store.”
3. Y ou wil l be brought to the Googl e Play Store where you
can easily search and download apps.
55User Guide
Page 57

Downloading a free app
Once you see a free app y ou wish to down load:
1. Simply tap “Install” and then “Ac c ept & Download.”
2. Once downloaded, your new ap p will appear in your “All
Apps” list.
Purchasing an app
Once you see an app y ou wish to purc h ase and download:
1. Tap the pric e of the app .
2. T ap “Ac c ept & Buy .”
3. Tap “OK.”
4. Once downloaded, your new app w ill now appear in
your “All Apps” list, and Googl e wil l c harg e the credit
card you use for your Google ac c ount. You will not see
this charg e on your Gre atC all bil l.
Y ou wil l only be c harged if you agree to purc h ase an
app from the Google Play Store.
User Guide 56
Page 58

Chapter 7: Settings and Option s
This chapter expl ains how you c an customize the w ay your
phone looks and performs.
• Options
• Settings
• Setting the Screen Lock
57User Guide
Page 59

7.1 Options
We’ve made it e asy to adjust some of the most c ommonly
used phone settings.
1. From the Home tab, press the menu key .
2. Tap “Options.”
3. Y ou c an adjust C olor Theme, Loc k Screen Photo, Blue-
tooth, Airplane Mode, Wi-fi and Sounds.
4. Simply tap the option y ou wish to adjust. F or example,
to adjust the color theme of your Home screen:
-Tap “Color Theme”
-Tap the bo x next to the c olor y ou prefer
-Press the back button to return
User Guide 58
Page 60

7.2 Settings
There are multiple additional settings you c an adjust with
your Jitterbug T ouc h 2, so th at it best suits your needs,
including:
• Call Settings
• Display
• Security
• Date & Time
T o adjust y our settings
1. From the Home tab, tap the “All Apps” button.
2. T ap “Settings.”
3. Y ou wil l see a list of settings. Tap the setting you wish to
adjust.
4. Follow the prompts to adjust the setting.
59User Guide
Page 61

7.3 Setting the Screen Lock
Y ou can protect your Jitterb ug Touch 2 from un authorized
use by setting a password or other type of loc k on your
Home screen.
1. From the Home tab, tap the “All Apps” button.
2. Tap “Settings.”
3. Tap “Security .”
4. Tap “Screen L oc k.”
5. Choose whichever security method you prefer.
For example, to use a PIN code:
-Tap “PIN.”
-Enter a numeric pin code of at lea st 4 digits.
-Tap “Continue.”
6. Enter your code again and tap “OK.”
If you set a screen loc k, y ou will be ask ed to enter y our
password or pin when you un lock your phone.
User Guide 60
Page 62

Chapter 8: Commerci al Mobile Alert S ystem (CMAS)
This chapter expl ains CMAS on your Jitterbug Touch 2.
• About
• Types of Alerts
61User Guide
Page 63

8.1 About CMAS
The Commercial Mobile Alert Sy stem (CMAS) is a new
national public s afety system th at allows people who own
a CMAS-enabled mobile device to rec eive g eographic allytargeted messages. These broadcast mess ages will alert
customers of imminent threats to their s afety within their
immediate area.
Receiving a CMAS alert messag e on y our Jitterbug
Touc h 2 – Although alerts from CMAS are not text
messages, the alerts will look similar to text
messages. They w ill be short (not more than 90
characters) and ea sy to read. The alert mess ages
will provide ba sic inf ormation on safety/security
issues urging customers to tak e action to protect
themselves.
User Guide 62
Page 64

8.2 T ypes of Alerts
There are three types of alerts through CMAS:
1. Alerts issued by the President
2. Alerts involving imminent threats to life or property
issued by the National W e ather Service or other
authorized emergency manag ement ag ency .
3. Amber Alerts – missing child alert
Alert messages are prov ided by appro ved emergency
agencies and delivered via the F ederal Emergency
Management Agency (FEMA).
CMAS does not use the customer mobile number to transmit
messages and does not use the GPS location of the devic e.
Instead, CMAS broadca sts mess ages similar to th at of r adio
today.
There is no charg e for receiv ing CMAS messag es.
63User Guide
Page 65

The Fine Print
Warnings and Precautions
This section contains important information pertaining to the operating in structions of y our
device. It also contains inform ation about how to use the devic e s afely . Re ad this information
carefully before using your device.
Electronic Device
Power off your device if using the dev ic e is prohibited. Do not use the dev ice when us ing the
device causes danger or interference with electronic dev ices.
Medical Device
• Follow rules and regulations set forth by hospitals and he alth care f acilities. Do not use your
device when using the device is prohibited.
• Pacemaker manufact urers rec ommend that a minimum di stanc e of 15 c m be maintained
between a device and a pacemaker to prevent pot ential interferenc e with the pac emak er. If
you are using a pacemaker, use the dev ice on the opposite side of the pac emak er and do
not carry the device in your front poc k et.
• Some wireless devices m ay affect the performance of hearing aids. F or any suc h problems,
consult your service provider .
• To ensure that the Hearing Aid C ompatibility rating for your dev ice i s m aintained, sec ondary
transmitters such as Bluetooth and W i-Fi components must be dis abled during a c all.
Potentially Explosive Atmosphere
Power off your device in any area w ith a potential ly explosive atmosphere, and c omply w ith all
signs and instructions. Areas that may have potentially explosive atmospheres include the areas
where you would normally be advised to turn off your vehicle engine. T rigg ering of sparks in suc h
areas could cause an explosion or a fi re, resulting in bodily injuries or even deaths. Do not power
on your device at refueling points suc h as servic e stations. C omply with restriction s on the use
of radio equipment in fuel depots, storage, and distribution area s, and c hemical plants. In addition, adhere to restrictions in areas where blasting operations are in progress. Before using the
device, watch out for areas that have potentially explosive atmospheres that are often, but not
always, clearly marked. Such loc ations include areas below the dec k on boats, c hemic al transfer
or storage facilities, and areas where the air contains chemicals or particles such as grain, dust,
or metal powders. Ask the manufactur ers of vehicles using liquefi ed petroleum gas (suc h as
propane or butane) whether this device can be safely used in their v icinity .
Traffi c Security
Observe local laws and regulations while using the devic e. In addition, if using the dev ice while
driving a vehicle, comply with the following guidelines:
User Guide 64
Page 66

• Concentrate on driving. Your fi rst responsibility is to drive safely.
• Do not talk on the device while driving. U se hands-free ac c essories.
• When you have to make or answer a c all, park the vehicle at the road s ide before using y our
device.
• RF signals may affect electronic sy stems of motor vehicles. F or more information, c onsult the
vehicle manufacturer.
• In a motor vehicle, do not place the device o ver the air bag or in the air bag deployment area.
Otherwise, the device may hurt you owing to the strong forc e when the air bag infl ates.
• Do not use your device while fl ying in an aircraft. Power off your device before boarding an
aircraft. Using wireless devices in an aircr aft ma y cause dang er to the operation of the aircraft
and disrupt the wireless telephone network. It may also be c onsidered il legal.
Operating Environment
• Do not use or charge the device in dusty , damp, and dirty plac es or pl ac es with m agnetic
fi elds. Otherwise, it may result in a malfunction of the circuit.
• The device complies with the RF specifi cations when the device is used near your ear or at a
distance of 0.59 inch (1.5 cm) from your body . En sure that the dev ice ac c es sories suc h as a
device case and a device holster are not composed of metal c omponents. K eep y our devic e
0.59 inch (1.5 cm) away from your body to meet the requirement earlier mentioned.
• On a stormy day with thunder, do not use your devic e when it is being c harg ed, to prevent
any danger caused by lightning.
• When you are on a call, do not touch the antenna. Touching the antenna affects the call quality and results in increase in power consumption. As a result, the talk time and the st andby
time are reduced.
• While using the device, observe the local laws and regulation s, and respect others’ privacy
and legal rights.
• Keep the ambient temperature between 32°F (0°C) and 113°F (45°C) while the devic e is being charged. Keep the ambient temperat ure between 14°F (-10°C) to 113°F (45°C) for using
the device powered by a battery.
Prevention of Hearing Damage
Using a headset at high volume can dam age y our hearing. To reduce the risk of damage to hearing, lower the headset volume to a safe and comfortable level.
Safety of Children
Comply with all precautions with regard to c hildr en’s s afety . Letting the c hild play with y our
device or its acces sories, whic h may include parts that c an be detac hed from the dev ice, m ay be
65User Guide
Page 67

dangerous, as it may present a c hoking haz ard. Ensure th at smal l c hildren are k ept away from
the device and accessories.
Accessories
Choose only batteries, chargers, and acc essories approved for use with this model by the devic e
manufacturer. The use of any other type of battery , c harger , or ac c essory ma y invalidate any warranty for the device, may be in v iolation of loc al rules or laws, and may be
dangerous. Please contact your dealer for inform ation about the av ailability of approved batter ies, chargers, and acces sories in your area.
Battery and Charger
• Unplug the charger from the electrical plug and the devic e when not in use.
• The battery can be charged and disc harg ed hundreds of times before it eventually wears
out. When the standby time and the talk time are shorter than the normal time, replac e the
battery.
• Use the AC power supply defi ned in the specifi cations of the charger . An improper power
voltage may cause a fi re or a malfunction of the charger.
• Do not connect two poles of the battery with conductors, suc h as metal m aterials, k eys, or
jewelries. Otherwise, the battery may be short-circuited and may cause injuries and burns on
your body.
• If battery electrolyte leaks out, ensure that the electrolyte does not touc h your sk in and eyes.
When the electrolyte touches your skin or splashes into your eyes, w ash y our eyes w ith clean
water immediately and consult a doctor.
• If there is a case of battery deformation, color c hange, or abnorm al heating while you c harg e
or store the battery, remove the battery immediately and stop using it. Otherwise, it may lead
to battery leakage, overheating, explosion, or fi re.
• If the power cable is damaged (for example, the c ord is exposed or broken), or the plug
loosens, stop using the cable at once. Otherwise, it may lead to an electric shoc k, a short
circuit of the charger, or a fi re.
• Do not dispose of batteries in fi re as they may explode. Batteries may also explode if dam-
aged.
• Do not modify or remanufacture, attempt to insert foreign objects into the battery, immerse
or expose to water or other liquids, expose to fi re, explosion or other hazard.
• Avoid dropping the device or battery. If the devic e or battery is dropped, espec ially on a h ard
surface, and the user suspects damage, take it to a quali fi ed service center for inspection.
• Improper battery use may result in a fi re, explosion or other hazard.
User Guide 66
Page 68

• Promptly dispose of used batteries in accordanc e with loc al regulation s.
• The device should only be connected to products that be ar the USBIF logo or h ave completed
the USB-IF compliance program.
• Only use the battery with a charging system that has been qualifi ed with the system per this
standard, IEEE-Std-1725. Use of an unqualifi ed battery or charger may present a risk of fi re,
explosion, leakage, or other hazard.
• Replace the battery only with another battery that has been qualifi ed with the system per this
standard, IEEE-Std-1725. Use of an unqualifi ed battery may present a risk of fi re, explosion,
leakage or other hazard.
• Do not disassemble or open, crush, bend or deform, puncture or shred the battery . Other-
wise, it may lead to electrolyte leakage, o verheating, fi re, or explosion.
Cleaning and Maintenance
• The device, battery, and ch arger are not w ater-res ist ant. Keep them dry . Protect the dev ice,
battery, and charger from water or vapor . Do not touc h the devic e or the c harg er with a wet
hand. Otherwise, it may lead to a short circuit, a malfunction of the devic e, and an electric
shock to the user.
• Do not place your device, battery , and c harg er in plac es where they c an get damaged
because of collision. Otherwise, it m ay le ad to battery leakag e, devic e malfu nction, overhe ating, fi re, or explosion.
• Do not place magnetic storage media suc h as m agnetic c ards and fl oppy disks near the
device. Radiation from the device may er ase the information stored on them.
• Do not leave your device, battery, and c h arger in a pl ace w ith an extreme high or low tem-
perature. Otherwise, they may not function properly and m ay le ad to a fi re or an explosion.
When the temperature is lower than 32°F (0°C), performance of the battery is affected.
• Do not place sharp metal objects suc h as pins near the earpiec e. The earpiec e ma y attract
these objects and hurt you when you are using the device.
• Before you clean or maintain the device, power off the devic e and disc onnect it from the
charger.
• Do not use any chemical detergent, powder , or other c hemic al agents (suc h as alcohol and
benzene) to clean the device and the charg er . Otherwise, parts of the devic e ma y be damaged or a fi re can be caused. You c an clean the devic e and the c h arger with a piec e of damp
and soft antistatic cloth.
• Do not dismantle the device or acc essories. Otherwi se, the warr anty on the devic e and ac ce s-
sories is invalid and the manufacturer is not liable to pay for the damage.
67User Guide
Page 69

• If the device screen is broken by co lliding with h ard objects, do not touc h or try to remove the
broken part. In this case, stop using the device immediately, and then contact an authorized
service center in time.
Emergency Call
You can use y our devic e for emergency cal ls in the service are a. The connection, however , cannot
be guaranteed in all conditions. You should not rely solely on the device for essential communications.
Certifi cation Information (SAR)
This device meets guidelines for exposure to radio w aves. Your device is a low-power radio
transmitter and receiver. As recommended b y intern ational guidelines, the dev ic e is des igned
not to exceed the limits for exposure to radio waves. These guidelines were developed by the
independent scientifi c organization International Commission on Non-Ionizing Radiation Protec-
tion (ICNIRP) and include safety measures designed to ensure safety for all users, reg ardless of
age and health.
The Specifi c Absorption Rate (SAR) is the unit of meas urement for the amount of r adio frequency
energy absorbed by the body when using a device. The SAR value i s determined at the highest certifi ed power level in laboratory conditions, but the actual SAR level of the dev ic e when
being operated can be well below the value. Thi s is because the dev ice i s des igned to use the
minimum power required to reach the network. The S AR limit adopted b y US A and Can ada is 1.6
watts/kilogram (W/kg) averaged over one gram of tissue. The highest S AR value reported to the
FCC and IC for this devic e type when tested for use at the ear is 0.917 W/k g, and when properly
worn on the body is 0.741 W/kg. and when using the WiFi function i s 0.132 W/kg.
FCC Statement
This equipment has been tested and found to comply with the limits for a Class B digital device,
pursuant to Part 15 of the FCC Rules. These limits are designed to pro vide re asonab le protection
against harmful interference in a residential instal lation. This equipment gener ates, uses and
can radiate radio frequency energy and, if not inst alled and used in ac cordanc e w ith the instructions, may cause harmful interference to radio c ommunic ations. However , there is no guarantee
that interference will not occur in a particular in stall ation. If thi s equipment does cause h armful
interference to radio or television reception, which can be determined by turning the equipment
off and on, the user is encouraged to try to correct the interference by one or more of the following measures:
--Reorient or relocate the receiving antenna.
--Increase the separation between the equipment and receiver.
--Connect the equipment into an outlet on a circuit different from that to which the rec eiver i s
User Guide 68
Page 70

connected.
--Consult the dealer or an experienced ra dio/TV tec hnician for help .
This device complies with P art 15 of the FC C R ules. Operation is subject to the follow ing two
conditions: (1) this device may not c ause harmful interferenc e, and (2) this devic e must ac c ept
any interference received, including interference that may cause u ndesired operation.
Caution
Chan ges or modifi cations made to this device not expressly approved by Huawei Technologies
Co., Ltd. may void the FCC authorization to operate this device.
Hearing Aid Compatibility (HAC) regulations for Mobile phones
In 2003, the FCC adopted rules to mak e digital w ireless telephones compatib le with he aring aids
and cochlear implants. Although analog wireles s phones do not usually cause interferenc e with
hearing aids or cochlear implants, digit al wireles s phones sometimes do bec ause of electrom agnetic energy emitted by the phone’s antenna, backlight, or other c omponents.
Your phone is c ompliant with FCC HAC regulations (ANSI C63.19). While some wireless phones
are used near some hearing devices (hearing aids and c oc hle ar implants), users m ay detect a
buzzing, humming, or whining noise. Some hearing devices are more immu ne than others to
this interference noise, and phones also vary in the amount of interference they g enerate. The
wireless telephone industry has developed a rating system for
wireless phones, to assist hearing device users fi nd phones that may be compatible with their
hearing devices. Not all phones have been r ated. Phones th at are rated h ave the rating on their
box or a label located on the bo x. The r atings are not guarantees. Results wil l v ary depending on
the user’s hearing device and hearing loss. If your hearing dev ic e
happens to be vulnerable to interference, you m ay not be able to use a r ated phone succ es sfully .
Trying out the phone with your hearing dev ice i s the best w ay to ev aluate it for your personal
needs.
M-Ratings: Phones rated M3 or M4 meet FCC requirements and are lik ely to g enerate less interference to hearing devices than phones that are not labeled.
M4 is the better/higher of the two ratings.
T-Ratings: Phones rated T3 or T4 meet FCC requirements and are likely to be more usable with a
hearing device’s telecoil (“T Switc h” or “Telephone Switch”) than unrated phones. T4 is the better/higher of the two ratings. (Note that not all hearing dev ices have telec oils in them.)
Hearing devices may also be meas ured.
Your phone meets the M4/T3 level rating. He aring devic es may also be r ated. Your hearing
device manufacturer or hearing health profes sional may help y ou fi nd this rating.
This phone has been tested and rated for use with hearing aids for some of the wireless technol-
69User Guide
Page 71

ogies that it uses. However, there may be some newer w ireless tec hnologies used in this phone
that have not been tested yet for use with hearing aids. It is important to try the different features
of this phone thoroughly and in different locations, us ing y our hearing aid or coc h lear implant,
to determine if you hear any interfering noise. Consult y our service prov ider or the manuf acturer
of this phone for information on hearing aid compatibility . If you have question s about return or
exchange policies, consult your servic e provider or phone ret ailer.
For more information about the FCC He aring Aid C ompatibility ple ase
go to http://transition.fcc.gov/c gb/dro/hearing.html
Personal Information and Data Security
The use of some functions or third-party applications on your dev ic e could result in your person al
information and data being lost or becoming acces sibl e to others. Sever al me asures are rec ommended to help you protect personal and confi dential information.
• Place your device in a s afe area to prevent it from un authorized use.
• Set your device screen to loc k and create a pa ssword or u nloc k
pattern to open it.
• Periodically back up personal information k ept on your SIM/UIM card, memory c ard, or
stored in your device memory. If y ou ch ange to a different devic e, be sure to move or delete
any personal information on your old device.
• If you are worried about viruses when you rec eiv e messag es or emails from a stranger , you
can delete them without opening them.
• If you use your device to browse the Internet, av oid websites that might pose a security ri sk
to avoid theft of your personal information.
• If you use services such as Wi-Fi tether or Bluetooth, set pas swords for these services to
prevent unauthorized acces s. When these servic es are not in use, turn them off .
• Install or upgrade device security softw are and regularly sc an for v iruses.
• Be sure to obtain third-party applications from a legitimate source. Down loaded third-party
applications should be scanned for viruses.
• Install security software or patches relea sed by Huawei or third-party applic ation prov iders.
• Some applications require and transmit loc ation information. As a result, a third-party may
be able to share your location information.
• Your devic e may prov ide detection and diagnostic inform ation to third-party application
providers. Third party vendors use this information to improve their products and services.
• If you have concerns about the security of your person al inform ation and data, plea se cont act
mobile@huawei.com.
Legal Notice
User Guide 70
Page 72

Copyright © Huawei Technologies Co., Ltd. 2013. All rights reserved.
No part of this manual may be reproduced or transmitted in any form or by any mean s without
prior written consent of Huawei T ec hnologies C o., Ltd. and its affi liates (“Huawei”).
The product described in this manual may include co pyrighted software of Huawei and possib le
licensors. Customers shall not in any manner r eproduc e, distribute, modify , decompile, di sa ssemble, decrypt, extract, reverse engineer, lease, assign, or sublicense the said software, unless
such restrictions are prohibited by applicable l aws or suc h actions are approved b y respective
copyright holders.
Trademarks and Permissions
, and and are trademarks or registered trademarks of Huawei Technologies Co.,
Ltd.
Android, Google, Google Play and other marks are trademarks of Google Inc.
The Bluetooth
and any use of such marks by Huawei Technologies Co., Ltd. is under lic ense. Other tr ademark s,
product, service and company names mentioned may be the property of their respective owners.
Notice
Some features of the product and its acc essories described herein rely on the software in stalled,
capacities and settings of local network, and therefore m ay not be activ ated or may be limited
by local network operators or network service prov iders. Thus, the descriptions herein m ay not
exactly match the product or its ac c essories whic h you purc h ase.
Huawei reserves the right to change or modify any information or specifi cations contained in this
manual without prior notice and without any liability.
Third-Party Software Statement
Huawei does not own the intellectual property of the third-party software and applications that
are delivered with this product. Therefore, Huawei will not prov ide any warr anty of any kind for
third party software and applications. Neither will Huawei provide support to customers who use
third-party software and applications, nor be responsible or liable for the functions or performance of third-party software and applications. Third-party software and application s service s
may be interrupted or terminated at any time, and Huawei does not guarantee the av ailability
of any content or service. Third-party service prov iders prov ide cont ent and service s through
network or transmission tools outside of the control of Huawei. To the greatest extent permitted
by applicable law, it i s explicitly stated that Huawei shal l not compens ate or be liable for servic es
provided by third-party service providers, or the interruption or termination of third-party contents or services. Huawei shall not be responsib le for the legality , quality, or any other aspects of
any software installed on this product, or for any uploaded or downloaded thir d-party works in
®
word mark and logos are registered trademark s owned by Bluetooth SIG, Inc.
71User Guide
Page 73

any form, including but not to limited texts, images, videos, or softwar e etc. C ustomers shal l bear
the risk for any and all effects, including inc ompatibility between the software and thi s product,
which result from installing software or uploading or downloading the thir d-party works. This
product is based on the open-source Android™ platform. Huawei has made necessary changes
to the platform. Therefore, this product may not sup port all the function s th at are supported by
the standard Android platform or may be incompatible with third-party software. Huawei does
not provide any warranty and representation in c onnection with any such c ompatibility and
expressly excludes all liability in connection with suc h matters.
User Guide 72
Page 74

GreatCall, Inc. Headquarters:
10935 Vista Sorrento Parkway
Suite 200
San Diego, CA 92130
Tel: 1–858–720–7500
Customer Service Center:
P.O. Box 4428
Carlsbad, CA 92018
Tel: 1–800–733–6632
Internet Address:
www.greatcall.com
Copyright ©2013 GreatCall, Inc. Jitterbug and GreatCall are registered trademarks of
GreatCall, Inc.
73User Guide
Page 75

Disclaimer Of Warranties; Exclusion Of Liability
ALL CONTENTS OF THIS MANUAL ARE PRO VIDED “AS IS”. EX CEP T AS REQUIRED B Y APPLICABLE
LAWS, NO WARRANTIES OF ANY KIND, EITHER EXPRE S S OR IMPLIED , INCL UDING BUT NO T LIMITED
TO, THE IMPLIED WARRANTIE S OF MERCHANT ABILIT Y AND FITNES S FOR A P AR TICULAR PURPO SE,
ARE MADE IN RELATION TO THE ACCURACY , RELIABILIT Y OR CONTENTS OF THIS MANUAL. T O THE
MAXIMUM EXTENT PERMITTED BY APPLICABLE LAW , IN NO EVENT SHALL HUA WEI OR GREATCALL
BE LIABLE FOR ANY SPECIAL, INCIDENT AL, INDIRE CT, OR CONSEQUENTIAL D AMAGES, OR LOSS OF
PROFITS, BUSINESS, REVENUE, DA TA, GOODWILL SAVINGS OR ANTICIP ATED SAVINGS RE GARDLESS OF WHETHER SUCH L O SS ES ARE FORS EEABLE OR NO T. THE MAXIMUM LIABILITY (THIS
LIMITA TION SHALL NO T APPLY TO LIABILITY FOR PERSONAL INJURY T O THE EXTENT APPLICABLE
LAW PROHIBITS SUCH A LIMIT ATION) OF HUAWEI OR GREA TCALL ARISING FROM THE USE OF THE
PRODUCT DESCRIBED IN THIS MANUAL SHALL BE LIMITED TO THE AMOUNT P AID B Y C UST OMERS
FOR THE PURCHASE OF THIS PRODUCT.
User Guide 74
Page 76

Your Customer Agreement
1. Welcome T o The GreatC all® Family.
Please read this agreement regarding your phone and service. When you accept this
agreement, you’re bound by its conditions. It applies to all of your services from GreatCall
and covers important topics such as:
• How long this agreement lasts
• Your rights to refuse or cancel this agreement
• Our friendly 30-day return policy
• Our rights to limit or end service or this agreement
• Limitations of liability and privacy
• How to handle disputes if they arise, including arbitration
2. Your Monthly Rate Plan
The monthly rate plan you select is part of this agreement. To the extent any condition in
your plan expressly confl icts with this agreement, the condition in your plan will apply.
3. Your Rights To Refuse Or Cancel This Agreement
After you’ve had an opportunity to review this agreement, it will begin when you do any of the
following to indicate your acceptance:
• Activate your service
• Give us a written or electronic signature indicating your acceptance
• Tell us electronically that you accept
If you do not wish to accept this agreement, do not do any of the above actions.
75User Guide
Page 77

3.1 30-Day Return Policy
If for any reason, within 30 days from date of purchase, you are not completely satisfi ed with
your device, we will refund the activation fee, the fi rst month’s service charge and the cost of
the device, plus applicable taxes if you:
• Have used less than 30 minutes of talk time; and
• Return the device in “like new” condition, as determined by GreatCall, in the original box
with all components and materials.
The shipping charges are non-refundable and you will be charged a $10 restocking fee. If
you have used more than 30 minutes of talk time or more than 25 MB of data, then we will
charge you the lesser of:
• Your monthly service charge; or
• 35¢ per minute for each additional minute over 30 minutes
Return Information:
• Please contact our Customer Service Department at 1-800-733-6632, available 24 hours
a day, 7 days a week, to cancel your account and obtain a return authorization number.
• Approved returns must be shipped back at the customer’s expense in the original
packaging.
• Refunds, if applicable, will be processed back to the party that paid in the same manner
that payment was received. Please allow 21 business days for processing.
3.2 Service Cancellation
If for any reason you are not completely satisfi ed with your service and you wish to cancel,
you’ll be able to do so as described below. However, if you have purchased any Add-On
Minutes, they are not refundable and these minutes will expire after your last bill.
User Guide 76
Page 78

You will receive a fi nal bill that will detail all the charges and credits on your account.
If you wish to cancel your service before the end of a given month, you’ll be responsible for
any account charges and overages through the date of your fi nal bill. If you have purchased
any Add-On Minutes, they are not refundable and these minutes will expire after your fi nal
bill.
Although cancellations are effective immediately, we don’t bill for partial months; therefore,
you’ll be charged for the entire month.
4. Charges And Fees
There is a fee associated with beginning your service and there may be a fee associated
with reactivating your service. Usage charges vary depending on where, when and how you
call, including toll-free and Operator-assisted calls. Additional features and services, such as
Operator assistance, may have extra charges.
4.1 Roaming And Long Distance Charges
There are no long distance or roaming charges for any calls made within the domestic U.S.
There may be additional charges for international calls and texts.
4.2 International Rates
When calling from the domestic U.S. to other countries, or when calling from outside of the
domestic U.S., additional international calling rates will apply.
4.3 Taxes, Fees And Assessments
We are required by law to charge you certain taxes, surcharges and assessments that will be
included on your bill. You are responsible for paying all taxes, surcharges and assessments
associated with your GreatCall products and services. These may change from time to time,
and we may not be able to give you advance notice about how these changes may affect you.
77User Guide
Page 79

Except as prohibited by law, we may also, at our discretion, require you to pay regulatory and
administrative fees to recover our costs of complying with regulatory mandates and Universal
Service fees or similarly imposed charges. Any customer who is eligible for an exemption
from any tax or fee must provide us with a verifi able, valid and properly executed tax-exempt
certifi cate. Any tax exemption applies only after the date we receive the certifi cate from you and
have verifi ed your eligibility for the exemption.
4.4 How We Calculate Your Bill
Your bill is our notice to you of your fees, charges and other important information. It refl ects
the fees and charges in effect for your service plan at the time they are incurred. We charge
for usage after calls are made or received and charge access and other fees in advance.
The length of a call will be rounded up to the next full minute. Charges start when you’re
connected to an outgoing or incoming call and end after you hang up your phone, the other
party on your call hangs up, or the call ends through disconnection. We only bill for calls that
connect, including calls answered by machines. Standard usage charges apply to toll-free
calls. There may be additional usage charges for credit card or third party Operator-assisted
calls, which may be required in certain areas. You will incur usage charges at a minimum rate
of $0.35 per minute if you exceed your service plan minutes. Billing for usage and related
charges may sometimes be delayed. Delayed usage charges may be applied in the month
they appear on your bill against minutes included in your service plan for that month, rather
than against the included minutes for the month when you actually made or received the
call. This may result in charges higher than you’d expect in the later month.
4.5 Payments, Deposits, Credit Cards, And Checks
Payment is due in full as stated on your bill. IF WE DON’T RECEIVE PAYMENT IN FULL WHEN DUE,
WE MAY, TO THE EXTENT PERMITTED BY THE LAW OF THE STATE OF THE BILLING ADDRESS WE
HAVE ON FILE FOR YOU AT THE TIME, CHARGE YOU A LATE FEE UP TO 1.5 PERCENT A MONTH (18
PERCENT ANNUALLY) OR A FLAT $5 A MONTH, WHICHEVER IS GREATER, ON UNPAID BALANCES.
WE MAY ALSO CHARGE YOU FOR ANY COLLECTION AGENCY FEES BILLED TO US FOR TRYING
TO COLLECT FROM YOU. SHOULD WE NOT RECEIVE YOUR LATE PAYMENT, WE MAY SUSPEND
User Guide 78
Page 80

YOUR SERVICE UNTIL PAID IN FULL. WE RESERVE THE RIGHT TO CHARGE A REASONABLE
RECONNECTION FEE. IF YOUR ACCOUNT REMAINS UNPAID, WE WILL CANCEL SERVICE FOR NONPAYMENT. We reserve the right to require recurring credit card billing for certain products or
services. We also reserve the right to require an advance deposit (or an increased deposit) from
you based on your payment history and changes in your plan and/or the frequency of use of
our services. We’ll pay simple interest on any deposit at the rate the law requires. Please retain
your evidence of deposit. You agree that we can apply deposits, payments, or repayments in
any order to any amounts you owe us on your account(s). You can’t use a deposit to pay any
bill unless we agree. We will not honor limiting notations you make on or with your checks. We
may charge you up to $25 for any returned check or denied credit card charges, depending on
applicable law.
5. Service Subject To Change
Your service is dependent upon our business requirements, including policies, practices
and procedures, which we can change without notice. Unless otherwise prohibited by law,
we can also change prices and any other conditions in this agreement at any time by sending
you written notice prior to the billing period in which the changes would go into effect. If you
choose to use your service after that point, you’re accepting the changes. If the changes have
a material adverse effect on you, however, you can end the affected service, without any early
cancellation fee, just by calling us within 60 days after we send notice of the change.
6. Rights In Numbers And Electronic Addresses We Assign To You
You do not have any rights in the personal identifi cation number, email address or
identifi er we assign to you. The same is true for your wireless phone numbers, except for
your right to transfer it. In the event we need to change or reassign them, we’ll let you know.
Please know that your wireless phone number and/or name may appear when you call
someone. We rely on this feature to provide services you enjoy.
7. Transferring Or “Porting” Phone Numbers
79User Guide
Page 81

You may be able to transfer or “port” your phone number from us to another carrier or service
provider. We cannot guarantee that this transfer will be successful. If you request that another
service provider transfer or “port” your phone number, we will treat this request in the same
manner as a request to cancel your GreatCall service. When the transfer is complete you will
be responsible for all the terms of cancellation described in Section 3 of this agreement. We
may not be able to provide you with some services, such as 9-1-1 location services, while we
implement the transfer.
8. Availability Of Service
Wireless phones use radio transmissions to access service. Therefore, we can’t provide
service when your wireless phone is out of range of our provider’s transmission site
or if suffi cient network capacity is not available. You may not receive service in certain
places, particularly in remote areas, with no service at all. Weather, topography, buildings,
your wireless phone and other conditions that are outside of our control may also cause
dropped calls or other problems with your service.
9. Suspending Service If Your Phone Is Lost Or Stolen
Please notify us immediately if someone steals your phone or you lose it. We’ll be happy
to provide a courtesy suspension of service for 30 days or until you choose to replace or
recover your phone – whichever comes fi rst – if you haven’t received a courtesy of this kind
within the prior year. Until we provide a courtesy suspension, you’ll be responsible for all
fees and charges, including those related to the use of services, even if used by another
party. We may require a sworn statement about the loss or theft.
10. Our Rights To Limit/End Service Or This Agreement
You agree not to resell our service to someone else without prior written permission from
GreatCall. You also agree that your wireless phone won’t be used for any purpose that is
illegal, isn’t allowed by this agreement or by your User Guide. WE CAN, WITHOUT NOTICE,
LIMIT, SUSPEND OR END YOUR SERVICE OR ANY AGREEMENT WITH YOU FOR VIOLATING
User Guide 80
Page 82

THIS AGREEMENT OR FOR ANY OTHER GOOD CAUSE, INCLUDING, BUT NOT LIMITED TO:
a. Two or more late payments in a 12-month period.
b. Incurring charges greater than your required deposit or billing limit (even if we
haven’t yet billed the charges) if you are unwilling to increase your deposit with us.
c. Incurring charges materially in excess of your monthly access charge (even if we
haven’t yet billed the charges).
d. Harassing our employees or agents.
e. Lying to us.
f. Interfering with our operations.
g. Becoming insolvent or going bankrupt.
h. Breaching this agreement.
i. “Spamming,” or other abusive messaging or calling.
j. Modifying your phone from the manufacturer’s specifi cations.
k. Providing credit information we can’t verify.
l. Using your service in a way that adversely affects other customers.
m. Allowing anyone to tamper with your GreatCall number.
We can also temporarily limit your service for any operational or governmental reason.
11. Your Privacy
You agree to the terms of our Privacy Policy, available on our website at www.greatcall.com/
privacypolicy, when you use our services. It may change from time to time, so please review
this policy with regularity and care. Among other things, the policy outlines the information
we collect about you, how we use that information and with whom we share that information.
For example, it may be used to provide certain services, to protect our rights and interests, to
respond to legal process or to facilitate a merger. We may also monitor or record your calls with
GreatCall representatives to ensure the quality of our services and for other lawful purposes. If
you don’t agree with the terms of our Privacy Policy, do not purchase a GreatCall phone or use
GreatCall services.
81User Guide
Page 83

12. Disclaimer Of Warranties
WE MAKE NO REPRESENTATIONS OR WARRANTIES, EXPRESS OR IMPLIED, INCLUDING, TO
THE EXTENT PERMITTED BY APPLICABLE LAW, ANY IMPLIED WARRANTY OF MERCHANTABILITY
OR FITNESS FOR A PARTICULAR PURPOSE CONCERNING YOUR SERVICE OR YOUR PHONE. WE
CAN’T PROMISE UNINTERRUPTED OR ERROR-FREE SERVICE AND DON’T AUTHORIZE ANYONE
TO MAKE ANY WARRANTIES ON OUR BEHALF. THIS DOESN’T DEPRIVE YOU OF ANY WARRANTY
RIGHTS YOU MAY HAVE AGAINST ANYONE ELSE.
13. Indemnifi cation
You agree to indemnify, defend and hold GreatCall harmless from any claims arising out of
use of the phone or service, breach of this agreement or violation of any laws or regulations
or the rights of any third party by you or any person on your account or that you allow to use
your phone or service.
14. Waivers And Limitations Of Liability
UNLESS THE LAW FORBIDS IT IN ANY PARTICULAR CASE, WE EACH AGREE TO LIMIT CLAIMS
FOR DAMAGES OR OTHER MONETARY RELIEF AGAINST EACH OTHER TO DIRECT DAMAGES. THIS
LIMITATION AND WAIVER WILL APPLY REGARDLESS OF THE THEORY OF LIABILITY, WHETHER
FRAUD, MISREPRESENTATION, BREACH OF CONTRACT, PERSONAL INJURY, PRODUCTS
LIABILITY, OR ANY OTHER THEORY. THIS MEANS THAT NEITHER OF US WILL SEEK ANY
INDIRECT, SPECIAL, CONSEQUENTIAL, TREBLE, OR PUNITIVE DAMAGES FROM THE OTHER. THIS
LIMITATION AND WAIVER ALSO APPLIES TO ANY CLAIMS YOU MAY BRING AGAINST ONE OF
OUR SUPPLIERS, TO THE EXTENT THAT WE WOULD BE REQUIRED TO INDEMNIFY THE SUPPLIER
FOR SUCH CLAIM. You agree we aren’t liable for problems caused by you or a third party; by
buildings, hills, network congestion, tunnels, weather, or other things we don’t control. You
also agree GreatCall is not liable for missed VoiceMail(s), or deletions of VoiceMail(s) from your
VoiceMail box (if you have one), even if you’ve saved them.
15. Handling Disputes With GreatCall
ANY CLAIM OR DISPUTE BETWEEN YOU AND GREATCALL IN ANY WAY RELATED TO OR
User Guide 82
Page 84

CONCERNING THE AGREEMENT, OR THE PROVISION OF SERVICES OR PRODUCTS TO
YOU, INCLUDING ANY BILLING DISPUTES (CLAIM), SHALL BE SUBMITTED TO FINAL,
BINDING ARBITRATION BEFORE THE AMERICAN ARBITRATION ASSOCIATION (“AAA”). THIS
AGREEMENT TO ARBITRATE ALSO REQUIRES YOU TO ARBITRATE CLAIMS AGAINST OTHER
PARTIES RELATING TO SERVICES OR PRODUCTS PROVIDED OR BILLED TO YOU, INCLUDING
SUPPLIERS OF SERVICES AND PRODUCTS AND OUR RETAIL DEALERS, IF YOU ALSO ASSERT
CLAIMS AGAINST US IN THE SAME PROCEEDING. YOU AND WE ACKNOWLEDGE THAT THE
AGREEMENT AFFECTS INTERSTATE COMMERCE AND THAT THE FEDERAL ARBITRATION ACT
AND FEDERAL ARBITRATION LAW APPLY TO ARBITRATIONS UNDER THE AGREEMENT. BEFORE
INSTITUTING ARBITRATION, YOU AGREE TO PROVIDE US WITH AN OPPORTUNITY TO RESOLVE
YOUR CLAIM BY SENDING A WRITTEN DESCRIPTION OF YOUR CLAIM TO US AT: GREATCALL,
P.O. BOX 4428, CARLSBAD, CA 92018, AND NEGOTIATING WITH US IN GOOD FAITH
REGARDING YOUR CLAIM. IF WE ARE NOT ABLE TO RESOLVE YOUR CLAIM WITHIN 30 DAYS
OF RECEIPT OF YOUR NOTICE, THEN YOU OR WE, INSTEAD OF SUING IN COURT, MAY INITIATE
ARBITRATION PROCEEDINGS WITH THE AAA. ARBITRATION WILL BE CONDUCTED UNDER
THE AAA’S PUBLISHED WIRELESS INDUSTRY ARBITRATION RULES AND SUPPLEMENTAL
PROCEDURES FOR CONSUMER-RELATED DISPUTES, WHICH ARE AVAILABLE BY CALLING THE
AAA AT 800-778-7879 OR VISITING ITS WEB SITE AT WWW.ADR.ORG. THE AAA HAS A FEE
SCHEDULE FOR ARBITRATIONS. YOU WILL PAY YOUR SHARE OF THE ARBITRATOR’S FEES AND
ADMINISTRATIVE EXPENSES (“FEES AND EXPENSES”) EXCEPT THAT:
(A) FOR CLAIMS LESS THAN $25, WE WILL PAY ALL FEES AND EXPENSES; AND
(B) FOR CLAIMS BETWEEN $25 AND $1,000, YOU WILL PAY ONLY $25 IN FEES AND EXPENSES,
OR ANY LESSER AMOUNT AS PROVIDED UNDER AAA’S SUPPLEMENTAL PROCEDURES
FOR CONSUMER-RELATED DISPUTES.YOU AND WE AGREE TO PAY OUR OWN OTHER
FEES, COSTS, AND EXPENSES, INCLUDING THOSE FOR ANY ATTORNEYS, EXPERTS, AND
WITNESSES. AN ARBITRATOR MAY ONLY AWARD AS MUCH AND THE TYPE OF RELIEF AS
A COURT WITH JURISDICTION IN THE PLACE OF ARBITRATION THAT IS CONSISTENT WITH
LAW AND THIS AGREEMENT. AN ARBITRATOR MAY ISSUE INJUNCTIVE OR DECLARATORY
83User Guide
Page 85

RELIEF BUT ONLY APPLYING TO YOU AND US AND NOT TO ANY OTHER CUSTOMER OR
THIRD PARTY. AS A LIMITED EXCEPTION TO THE AGREEMENT TO ARBITRATE, YOU AND WE
AGREE THAT:
(A) YOU MAY MAKE CLAIMS TO SMALL CLAIMS COURT, IF YOUR CLAIMS QUALIFY FOR
HEARING BY SUCH COURT; AND
(B) IF YOU FAIL TO TIMELY PAY AMOUNTS DUE, WE MAY ASSIGN YOUR ACCOUNT FOR
COLLECTION, AND THE COLLECTION AGENCY MAY PURSUE IN COURT CLAIMS LIMITED
STRICTLY TO THE COLLECTION OF THE PAST DUE DEBT AND ANY INTEREST OR COST
OF COLLECTION AGREEMENT. AS PERMITTED BY LAW, OR WHETHER CLASS ACTION
IN COURT, WAIVER SMALL CLAIMS COURT, OR ARBITRATION, YOU AND WE MAY ONLY
BRING CLAIMS AGAINST EACH OTHER IN AN INDIVIDUAL CAPACITY AND NOT AS A CLASS
REPRESENTATIVE OR A CLASS MEMBER IN A CLASS OR REPRESENTATIVE ACTION. IF A
COURT OR ARBITRATOR DETERMINES IN A CLAIM BETWEEN YOU AND US THAT YOUR
WAIVER OF ANY ABILITY TO PARTICIPATE IN CLASS OR REPRESENTATIVE ACTIONS IS
UNENFORCEABLE UNDER APPLICABLE LAW, THE ARBITRATION AGREEMENT WILL NOT
APPLY, AND YOU AND WE AGREE THAT SUCH CLAIMS WILL BE RESOLVED BY A COURT OF
APPROPRIATE JURISDICTION, OTHER THAN A SMALL CLAIMS COURT. JURY TRIAL WAIVER,
WHETHER ANY CLAIM IS IN ARBITRATION OR IN COURT, YOU AND WE WAIVE ANY RIGHT
TO JURY TRIAL INVOLVING ANY CLAIMS OR DISPUTES BETWEEN YOU AND US.
16. About 5Star Service
NOT ALL PERSONAL EMERGENCY RESPONSE SYSTEMS (PERS) HAVE THE SAME FEATURES.
YOU SHOULD DETERMINE WHICH FEATURES ARE IMPORTANT TO YOU. CALCULATION WAS
DETERMINED BY AVERAGING THE PERS MARKET LEADERS’ MONTHLY PUBLISHED FEES. 5STAR
URGENT RESPONSE SERVICE REQUIRES THE PURCHASE OF THE 5STAR AND A ONE-TIME
SET-UP FEE FOR SERVICE ACTIVATION OF $35. COVERAGE AND SERVICE ARE NOT AVAILABLE
EVERYWHERE. OTHER CHARGES AND RESTRICTIONS MAY APPLY. 5STAR SERVICE MAY NOT
BE AVAILABLE IN REMOTE OR ENCLOSED AREAS. 5STAR SERVICE WILL BE ABLE TO TRACK
AN APPROXIMATE LOCATION WHEN YOUR DEVICE IS TURNED ON AND FULLY CHARGED,
BUT WE CANNOT GUARANTEE AN EXACT LOCATION. 5STAR SERVICE DOES NOT REQUIRE A
User Guide 84
Page 86

CONTRACT AND CAN BE CANCELLED AT ANY TIME. MONTHLY SERVICE FEES DO NOT INCLUDE
GOVERNMENT TAXES OR ASSESSMENT SURCHARGES. PRICES AND FEES ARE SUBJECT TO
CHANGE. OUR COVERAGE MAP ESTIMATES WHERE YOUR DEVICE WILL WORK. A NUMBER OF
FACTORS AFFECT THE SPECIFIC COVERAGE YOU WILL GET. YOU WILL NOT BE ABLE TO MAKE
9-1-1 CALLS WHEN CELLULAR SERVICE IS NOT AVAILABLE. GREATCALL IS NOT A HEALTH CARE
PROVIDER AND DOES NOT PROVIDE HEALTH CARE SERVICES. YOU SHOULD SEEK THE ADVICE
OF YOUR PHYSICIAN IF YOU HAVE ANY QUESTIONS ABOUT MEDICAL TREATMENT. GREATCALL
IS A REGISTERED TRADEMARK OF GREATCALL, INC. AND/OR ITS RELATED ENTITIES. 5STAR
URGENT RESPONSE AND 5STAR ARE TRADEMARKS OF GREATCALL, INC. COPYRIGHT 2013
GREATCALL, INC. NATIONAL ACADEMIES OF EMERGENCY DISPATCH © 2013.
17. About You
You represent that you’re at least 18 years old and have the legal capacity to accept this
agreement. If you are ordering for a friend or a member of your family, you are bound by the
terms of this agreement, unless and until, your friend or family member has agreed to the terms
of this agreement. If you’re ordering for a company, you’re representing that you are authorized
to bind the company to the terms of this agreement, where the context “you” means the
company.
18. About This Agreement
If either of us waives or doesn’t enforce a requirement under this agreement in an instance,
we don’t waive our right to later enforce that requirement. You can’t assign this agreement
or any of your rights or duties under it. We may assign all or part of this agreement or your
debts to us without notice, and you agree to make all subsequent payments as instructed.
Notices are considered delivered when we send them by email or fax to any email or fax
number you’ve provided to us, or three days after mailing to the most current billing address
we have on fi le for you, if by us, or to the Customer Service address on your most recent
bill. If any part of this agreement, including any part of its arbitration provisions, is held
invalid, that part may be severed from this agreement. This agreement and the documents
85User Guide
Page 87

to which it refers form the entire agreement between us on their subjects. You can’t rely on any
other documents or statements on those subjects by any sales or service representatives, and
you have no other rights with respect to service or this agreement, except as specifi cally provided
by law. This agreement isn’t for the benefi t of any third party except our parents, affi liates,
subsidiaries, agents and predecessors/successors in interest. Except to the extent we’ve agreed
otherwise in the provisions on late fees and arbitration, this agreement and disputes covered by
it are governed by the laws of the state of California, without regard to the confl icts of the laws or
rules of that state.
19. Additional Terms For Text Messaging
The message rates that we charge depend on the GreatCall service plan that you selected.
You will incur message charges when you send or receive a message, whether the message
has been read or unread, viewed or unviewed, solicited or unsolicited. GreatCall does not
guarantee that messages will be received. We are not responsible for lost or misdirected
messages.
User Guide 86
Page 88

www.greatcall.c om
HUAWEI Ascend Y300
HUAWEI M881
JBT2-USERGUIDE
 Loading...