

Page 1

greatcall.com
Model SPH-a310 and SPH-a310ZRA/Dual Band Tri-Mode/Part # GH68-32504A
Quick-Start Guide
Page 2

The Inside Of Your Jitterbug
1. Earpiece Speaker
®
Inside Display
2.
3. U
p/Down Button
4.
Speakerphone Button
5.
6.
Button
Power Connect
ccessory Connector
A
or and
7. Noise Reduction
Technology
ower Button
8. P
9.
Button
10. Microphone
Quick-Start Guide 6
Quick-Start Guide
Page 3
Quick-Start Guide
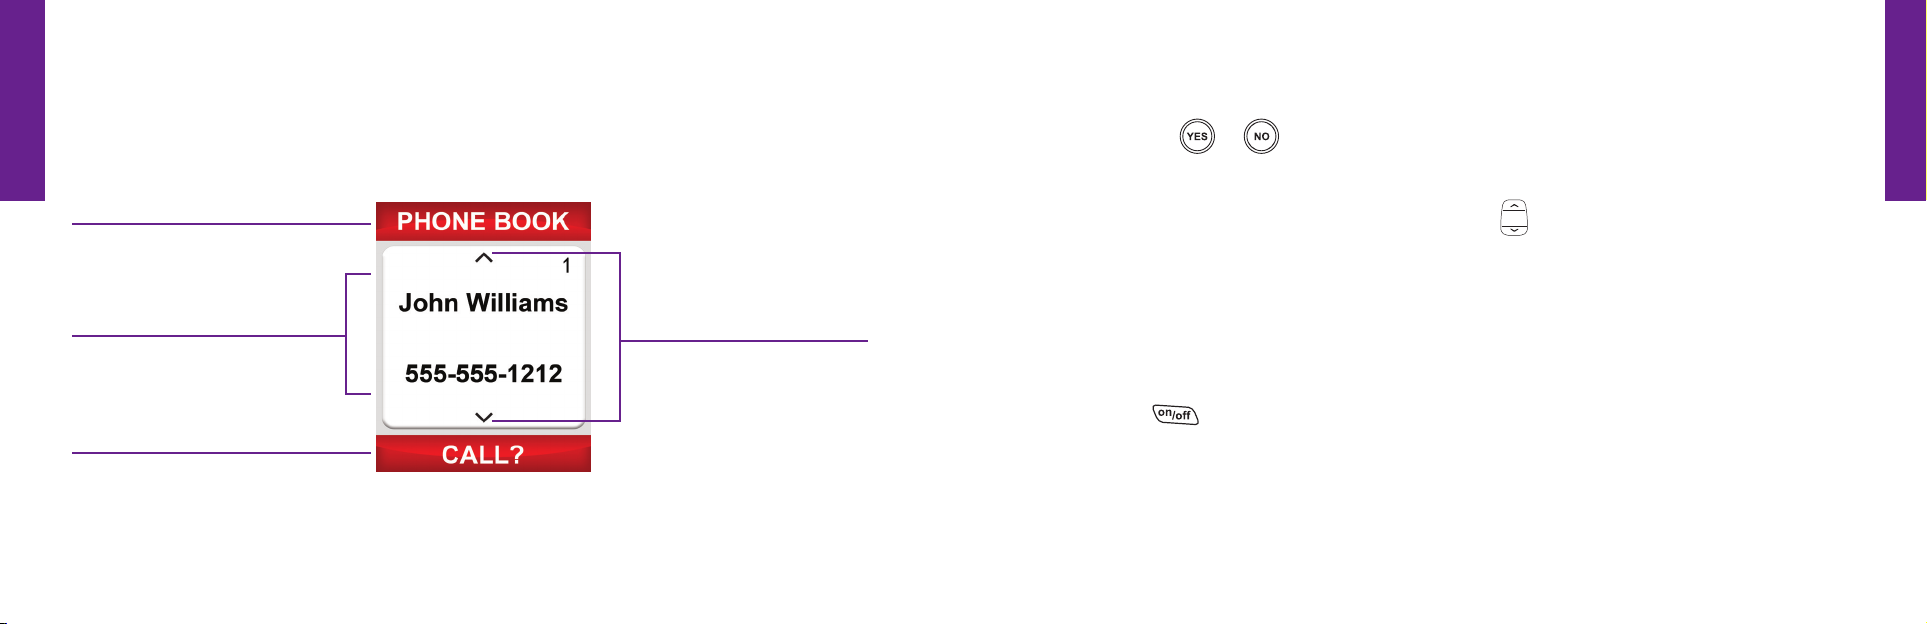
How To Read The Inside Display
The screen on the inside of your Jitterbug® is referred to as the Inside Display. The
following diagram explains the areas of the Inside Display.
1. Feature Area
2. Detail Area
3. Action Line
1. Feature Area – identies the feature you are using. For example, when you are in the
Phone Book, you will see “PHONE BOOK” in the Feature Area.
7 Quick-Start Guide
4. Additional
Entries Exist
2. Detail Area – the middle of the Inside Display provides the details of each feature.
3. Action Line –line where questions or commands are displayed. You can respond by
pressing the
4. Additional Entries Exist– the small arrows indicate when entries are available before
or after the current screen. Use the “Up/Down”
or buttons.
button to scroll through entries.
Turning Your Jitterbug On
1. Open your Jitterbug.
2. Press the
turns on and the Jitterbug logo appears on the Inside Display.
3. When you hear a dial tone, your Jitterbug has service and is ready to use. If a
connection is not possible, a “No Service” message will appear on the Outside
Display and a dial tone will not be heard.
button in the upper right corner of the keypad until your Jitterbug
Quick-Start Guide 8
Quick-Start Guide
Page 4

Quick-Start Guide
Your Main Screen
For your convenience, each time you turn your Jitterbug® on, you
will see the Main Screen as shown. The Main Screen displays your
phone number at the top of the screen and allows you to access
all of the features on your Jitterbug. Your Jitterbug is designed
with the following four features installed in your phone:
1. Phone Book – store up to 50 of the names and numbers that you
call most often.
2. Call History – an easy way to review your last ten incoming,
outgoing and missed calls, listed with the most recent rst.
3. Phone Info – gives you your phone number, battery life, signal strength and
approximate minutes used per month.
9 Quick-Start Guide
4. Settings – you can change the color of the Inside Display, select Ring Tones, turn the
®
Jitterbug start-up Jingle on/off and change Bluetooth
settings.
You can easily access all of your features within the Main Screen using three simple
buttons located at the top of the keypad.
1. Use the “Up/Down”
button to scroll through the features of the Main Screen.
2. When the feature you want to select is highlighted in gray in the middle of the Inside
Display, press the
3. The
button enables you to answer “No” to questions in the Action Line and return to
button to select that feature.
a previous screen. If you make a mistake while dialing a number or typing a Text Message,
you can press the
button to back up and delete what you entered.
If you ever nd yourself confused when using your Jitterbug, there are two easy
ways to return to the Main Screen. Simply press the
button several times in
a row, or close and then re-open your phone at any time. Both of these options
will give you a fresh start at the Main Screen.
Quick-Start Guide 10
Quick-Start Guide
Page 5

Quick-Start Guide
Placing A Call
1. Open your Jitterbug.® You will hear a dial tone to indicate that there is service available.
2. Dial the full ten digit number using your keypad. If you accidentally press a wrong
button, press the
3. Press the
button to place the call when you are nished dialing.
button to back up and delete the last number.
Using The Phone Book To Make A Call
1. Starting from the Main Screen, use the “Up/Down” button and press the
button when “Phone Book” is highlighted in gray in the middle of the Inside Display.
2. Press the “Up/Down”
3. When you nd the desired name and number, press the
You will see “Calling...” on the Inside Display followed by “Connected.”
11 Quick-Start Guide
button to scroll through the contacts in your Phone Book.
button to make the call.
Receiving A Call
Indicators of an incoming call when your Jitterbug is open:
• The Light Signal on the front of your Jitterbug ashes.
Quick-Start Guide
• The phone number of the person calling will appear on the Outside Display.
• If the caller’s number is stored in your Phone Book then the name and number will appear
on the Inside Display. If the caller cannot be identied, you may not see the phone
number or you may see “Unavailable” or “Restricted.”
Receiving a call when your Jitterbug is closed:
1. If the caller’s name and number are stored in your Phone Book or the caller ID is
recognized, either the name or the phone number appears on the Outside Display.
2. Open your Jitterbug when you hear it ring. The Ring Tone will stop when the phone is opened.
Quick-Start Guide 12
Page 6

Quick-Start Guide
3. A “Connected” message will appear on the Inside Display and the caller’s voice can
be heard through the earpiece speaker.
Receiving a call when your Jitterbug® is open:
1. When the “ANSWER?” question appears on the Inside Display press the button to connect.
2. A “Connected” message will appear on the Inside Display and the caller’s voice will
be heard through the earpiece speaker.
Ending A Call
To end a call, press the button or close your Jitterbug.
Adjusting The Earpiece Speaker Volume
When you’re on a call, press the volume button up or down until the sound reaches a
comfortable level. Your Jitterbug
you can adjust while on a call.
13 Quick-Start Guide
has three volume options for your earpiece speaker that
Adjusting The Ringer Volume
1. Open your Jitterbug and conrm it’s on.
2. Press the volume
Press the top of the button to increase the volume and the bottom of the button to
decrease the volume.
button on the outside of the phone below the Outside Display.
Turning Your Jitterbug Off
1. Press and hold the button in the upper right corner of the keypad until the
Jitterbug logo appears in the Inside Display.
2. Your Jitterbug will then turn off.
We recommend keeping your Jitterbug on at all times and charging it overnight
so you can always stay connected.
Quick-Start Guide 14
Quick-Start Guide
Page 7

Quick-Start Guide
Calling Operator Assistance
Live Operators are available 24 hours a day, seven days a week, and can help you:
• Update and manage your Phone Book.
• Look up a residential, business or government phone number.
• Connect you to any number in the U.S. or Canada.
• Place calls to anyone in your Phone Book.
It’s easy to call a Operator, just follow these three steps:
1. Open your Jitterbug.
2. Press the
3. Press the
15 Quick-Start Guide
button on the keypad.
button to place the call.
Personalize Your Experience
LiveNurse - FREE on most rate plans
Get unlimited, 24-hour advice from experienced, registered nurses in English or Spanish.
You’ll also have access to a pre-recorded health library, featuring current information on
1
hundreds of general health topics
.
The Wellness Call - FREE on most rate plans
We’ve partnered with wellness expert and bestselling author Brian Alman, Ph.D. to help you feel
better immediately and long-term. If you struggle with things like stress, sleeplessness or weight,
2
this service can help with one motivational 4-5 minute call per week
.
Medication Reminders - $10 per month
Easily follow your medication schedule as prescribed by your doctor, track your adherence to
3
that schedule and even be connected to the pharmacy for prescription rells
.
Quick-Start Guide 16
Quick-Start Guide
Page 8

Quick-Start Guide
The Check-in Call - $5 per month
Daily phone calls ensure you or a loved one are being checked on. If assistance is needed,
3
a notication will be sent to your personal contacts for help
.
Daily Health Tips - FREE on all rate plans
Stay healthy with our Daily Health Tips service, brought to you in partnership with the American
Heart Association’s Go Red For Women
that support a heart-healthy lifestyle, delivered right to your phone.
TM
Movement. Every day you’ll receive informative tips
Handset Replacement - $4 per month
This helpful service brings peace of mind if your phone is ever lost, stolen or damaged.
You’re covered if anything ever happens to your phone, we’ll replace it no questions asked.
17 Quick-Start Guide
Quick-Start Guide
Quick-Start Guide 18
Page 9

Other charges and restrictions may apply. Coverage and service is not available everywhere. 1LiveNurse, brought to you in partnership with FONEMED,® is not a
substitute for dia ing 911 and should not be used in a case of emergency. FONEMED’s registered nurses offer advice regarding hea th care decisions, but they do
not prescribe medications or make diagnoses. GreatCall is not liable for any act or omission, including neg igence, of any FONEMED employee. LiveNurse is free
on select plans, but airtime charges do apply for the length of the calls made to the service. 2The information on Wellness Calls is NOT medical advice. Standard
usage rates apply while istening to Wellness Calls on your phone.
Reminders and Check-in Calls are not a substitute for professional medical advice, diagnosis, or treatment. You should seek the advice of your physician if you
have any questions about medical treatment. JItterbug and GreatCall are registered trademarks of GreatCall, Inc. Samsung is a registered trademark of Samsung
Electronics America, Inc. and its related entities. Copyright ©2010 GreatCall , Inc.
GH68-32504A
3
GreatCall is not a hea th care provider and does not provide hea th care services. Medication
 Loading...