

Page 1

User Guide
Page 2

Welcome to the GreatCall® Family.
Thank you for choosing the Jitterbug5. At GreatCall, we’ve made it easy for
you to stay connected to friends and family with the simplicity of the Jitterbug5.
Additionally, our 24-hour service professionals and health and safety services
are designed to keep you protected, connected and in control of your life. This
helpful guide contains all the information you need to start using your new cell
phone. And if you have any questions or need assistance, you can count on us to
be here for you day and night.
Best Regards,
Your friends at GreatCall
For additional information about GreatCall, visit www.greatcall.com.
Page 3

Table of Contents
Section 1: Getting Started ....................................................................... 1
Key Items In The Jitterbug Box ............................................................................2
The Front Of Your Jitterbug .................................................................................3
The Back Of Your Jitterbug ..................................................................................5
The Inside Of Your Jitterbug ...............................................................................7
Activating Your Jitterbug ..................................................................................... 9
Charging The Battery ........................................................................................ 13
• Using The Wall Charger: ............................................................................13
Battery Level Indicator .....................................................................................15
Turning Your Jitterbug On And Off ..................................................................... 17
• Turning Your Jitterbug On: ......................................................................... 17
• To Turn Your Jitterbug Off: .........................................................................18
How To Read The Inside Display .......................................................................19
• Using The Main Screen .............................................................................21
• Making Your First Call................................................................................26
The 5Star Button .............................................................................................. 27
MyCalendar .....................................................................................................29
Table of Contents I
Table of Contents
Page 4

Table of Contents
• Online ......................................................................................................30
• By Phone .................................................................................................. 32
Operator Assistance ......................................................................................... 33
• To Call An Operator: ..................................................................................34
Emergency 9-1-1 Service .................................................................................. 35
• To Make An Emergency Call.......................................................................35
Installing And Removing The Battery ................................................................36
• To Remove The Battery ..............................................................................36
• To Install The Battery ................................................................................37
Getting More Information ................................................................................. 38
GreatCall Customer Service .............................................................................39
Section 2: Placing And Receiving Calls .................................................. 40
Placing A Call ................................................................................................... 41
• Using An Operator To Make A Call: ............................................................42
• Using Your Phone Book To Make A Call ...................................................... 43
Speakerphone .................................................................................................45
Answering A Call ..............................................................................................47
• Answering A Call When Your Jitterbug Is Closed ......................................... 48
II Table of Contents
Page 5

• Receiving A Call When Your Jitterbug Is Open ............................................49
Ending A Call ...................................................................................................49
Ignoring A Call .................................................................................................49
• To Ignore A Call When Your Jitterbug Is Closed ...........................................49
• To Ignore A Call When Your Jitterbug Is Open .............................................50
Adjusting The Ringer Volume ............................................................................ 51
Adjusting The Earpiece Speaker Volume ........................................................... 53
Call Waiting .....................................................................................................53
Using Call History To See Recent Calls ..............................................................56
• To Review Call History: .............................................................................. 56
Returning Missed Calls And Redialing ..............................................................58
Using Voice Dial ..............................................................................................59
Setting Up Voice Mail ....................................................................................... 61
Changing Your Voice Mail Greeting ................................................................... 62
When To Check Your Voice Mail Messages ........................................................63
Listening To Voice Mail Messages .....................................................................64
Listening To Saved Voice Mail Messages ..........................................................65
International Dialing ........................................................................................67
Table of Contents III
Table of Contents
Page 6

Table of Contents
Section 3: GreatCall Health and Safety Services ....................................68
GreatCall GoPlans ............................................................................................69
5Star Service ...................................................................................................70
Urgent Care ......................................................................................................71
Medication Reminders .....................................................................................71
Brain Games ....................................................................................................72
Your new Jitterbug gives you access to fun innovative games, clinically-proven
to sharpen your mind. Make A Pair and Quick Match come pre-loaded on your
phone. This section will explain how to use them. ............................................72
– About Make A Pair ....................................................................................72
– About Quick Match ...................................................................................72
– Accessing Your Games ..............................................................................73
Section 4: Managing Your Phone Book .................................................. 79
About Phone Book ...........................................................................................80
Use The Operator To Add, Change And Delete Numbers .................................... 81
Use mygreatcall.com To Add, Change And Delete Numbers...............................82
Adding A Contact Directly On Your Jitterbug ......................................................84
Modifying A Contact Directly On Your Jitterbug .................................................. 86
IV Table of Contents
Page 7

Deleting A Contact Directly On Your Jitterbug .................................................... 88
Section 5: Using The Camera ................................................................. 90
Taking A Photo With Your Jitterbug ...................................................................91
Viewing A Photo On Your Jitterbug ....................................................................92
Sending A Photo From Your Jitterbug ................................................................93
Deleting A Photo From Your Jitterbug ................................................................95
Receiving A Photo On Your Jitterbug .................................................................97
Section 6: Using Text Messaging ........................................................... 98
Receive A New Text Message ............................................................................99
Read A New Text Message ..............................................................................100
Reply To A Text Message ................................................................................. 101
Saving And Deleting A Text Message ..............................................................103
• Saving A Text Message:...........................................................................103
• Deleting A Text Message: ........................................................................105
– Deleting A New Text Immediately After Reading: ......................................105
– Deleting An Old Text From Your Saved Messages .....................................108
Sending A New Text Message ......................................................................... 109
Modes For Creating Your Own Text Message ..................................................114
Table of Contents V
Table of Contents
Page 8

Table of Contents
– 123 Mode...............................................................................................114
– ABC Mode ..............................................................................................115
– Abc-S Mode ............................................................................................115
– Abc-W Mode ...........................................................................................116
– abc Mode ...............................................................................................116
®
Section 7: Using Bluetooth
................................................................117
About Bluetooth ............................................................................................118
Using Your Jitterbug With Your Bluetooth Headset ..........................................119
Turning The Bluetooth Feature On Your Jitterbug On And Off ...........................119
Setting Your Bluetooth Headset To Pairing Mode ............................................123
Setting Your Jitterbug To Pairing Mode ...........................................................124
Answering A Call When Paired With Your Bluetooth Headset ...........................128
Ending A Call When Paired With Your Bluetooth Headset ................................128
• To End A Call When Your Jitterbug Is Open ............................................... 128
• To End A Call When Your Jitterbug Is Closed ............................................. 128
Section 8: Managing Settings .............................................................129
Using Your Settings ........................................................................................130
Selecting The Color Of The Inside Display .......................................................131
VI Table of Contents
Page 9

Changing Ring Tones ...................................................................................... 133
Turning The Start-Up GreatCall Jingle On And Off ............................................135
• Turning The Jingle Off ..............................................................................135
• Turning The Jingle On ..............................................................................136
Table of Contents VII
Table of Contents
Page 10

Section 1: Getting Started
This section explains how to start using your Jitterbug® phone.
Topics
• Key Items In The Jitterbug Box
• The Front Of Your Jitterbug
• The Back Of Your Jitterbug
• The Inside Of Your Jitterbug
• Activating Your Jitterbug
• Charging The Battery
• Battery Level Indicator
• Turning Your Jitterbug
On And Off
For additional support, visit us online at www.greatcall.com/support.
• How To Read The Inside Display
• Using The Main Screen
• Making Your First Call
• The 5Star Button
• MyCalendar
• Operator Assistance
• Installing and Removing The Battery
• Getting More Information
• GreatCall Customer Service
Getting Started 1
Section 1
Page 11
Section 1
GET
BACK
For you & a friend.
$
25
With GreatCall Link,
families stay connected,
even when they’re apart.
TM
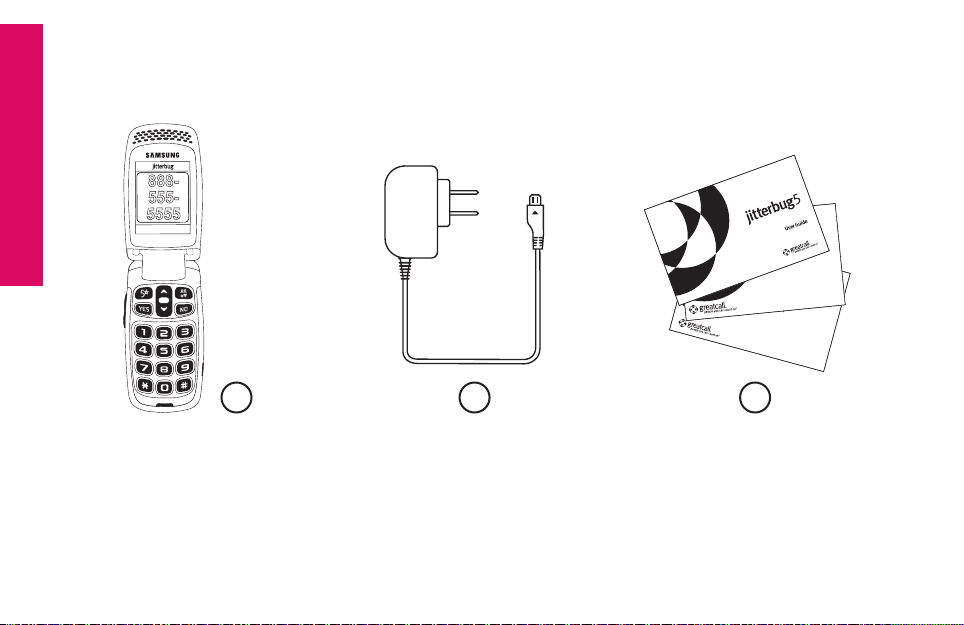
Key Items In The Jitterbug Box
The Jitterbug box you received includes everything you need to get started:
888555-
5555
CALL?
1 2 3
1. Jitterbug cell phone and rechargeable battery - the battery has been pre-installed for
your convenience
2. Wall Charger – to charge your phone
3. User Guides – to get important information about activating and using your Jitterbug
2 Getting Started
Page 12
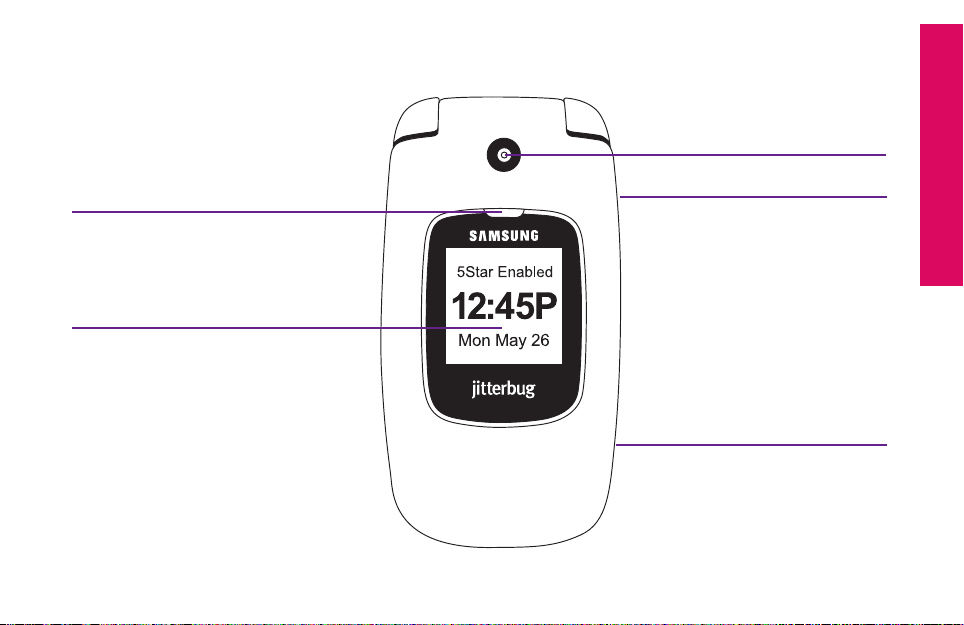
The Front Of Your Jitterbug
Indicator Light
Outside Display
Camera
Headset Jack (side)
Power Connector (side)
Getting Started 3
Section 1
Page 13

Indicator Light – the area just above the outside display will light up for incoming
Section 1
calls or when the phone is fully charged. The following list outlines the Indicator
Light and what each one means:
• The Indicator Light is on when the battery is completely charged
• The Indicator Light ashes continually to indicate the following:
- A missed call - A missed Text Message - A new Voice Mail Message
Camera – allows you to take a picture with your Jitterbug
Headset Jack – connect to a headset to listen to calls
Outside Display – view the current time, the current date and notications about
charging status, incoming calls, or messages
Power Connector – allows you to charge your Jitterbug with the provided Wall
Charger, as well as connect several accessories to your Jitterbug
4 Getting Started
Page 14
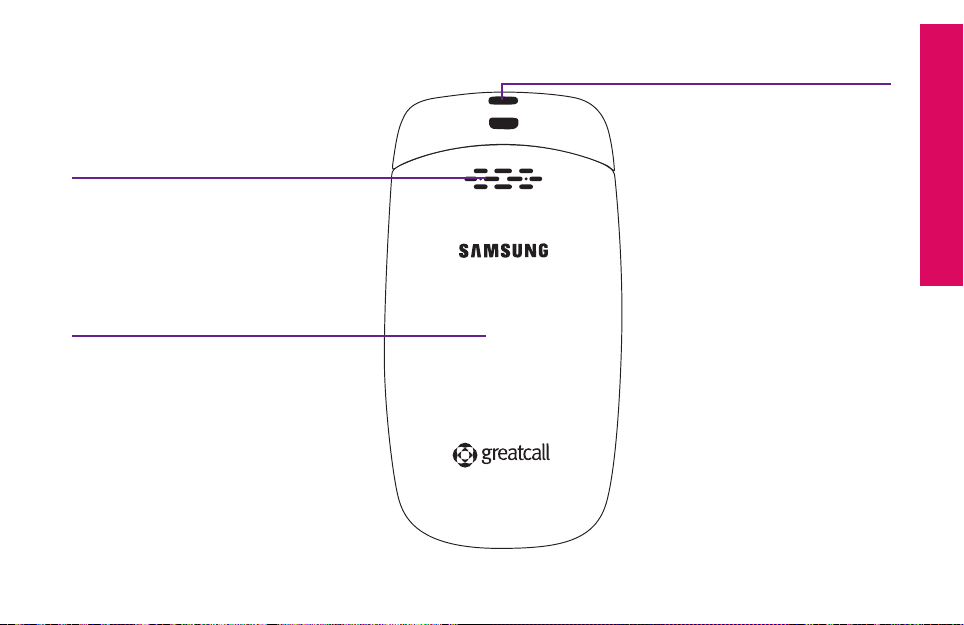
The Back Of Your Jitterbug
External Speaker
Battery Cover
Lanyard Connector
Section 1
Getting Started 5
Page 15

External Speaker – delivers loud and clear sound when the Speakerphone
Section 1
feature is enabled (pg. 48)
Battery Cover – protects the rechargeable battery and the back of your Jitterbug.
Lanyard Connector – makes it easy to attach a lanyard or wrist strap to carry
your Jitterbug.
NOTE:
To purchase a Jitterbug lanyard or any other Jitterbug accessory, visit us
online at www.greatcall.com/jitterbug/accessories.
6 Getting Started
Page 16
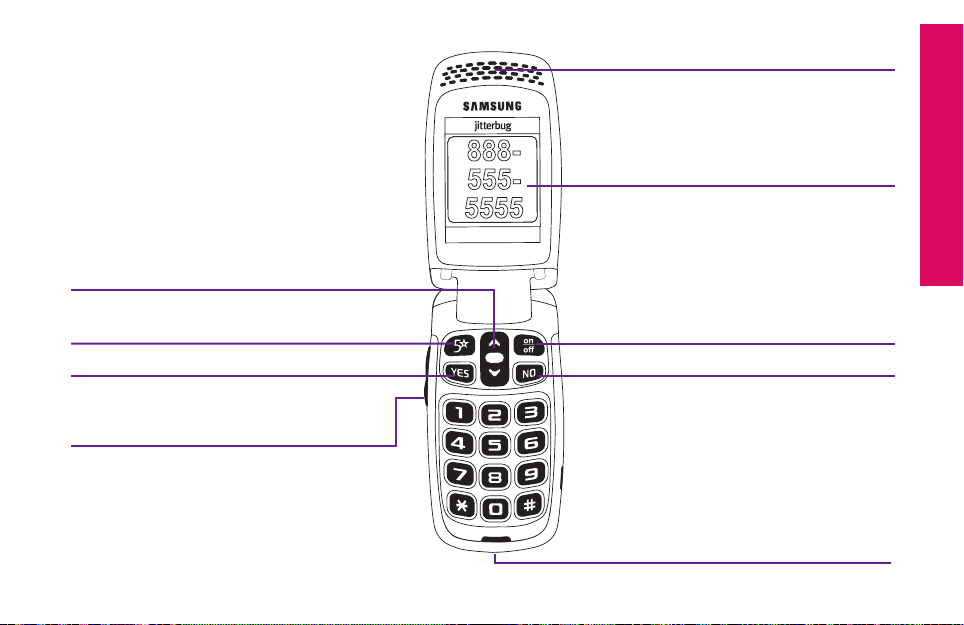
The Inside Of Your Jitterbug
Earpiece Speaker
Up/Down Button
5Star Button
“YES” Button
Volume Button
888555-
5555
CALL?
Section 1
Inside Display
On/Off Button
“NO” Button
Microphone
Getting Started 7
Page 17

Earpiece Speaker – lets you hear the caller loud and clear
Section 1
Inside Display – shows all the information you need to operate your Jitterbug
Up/Down Button – for navigating between screens on the Inside Display
5Star Button – allows you to get help in an unsafe or uncertain situation (see page 28
for more information)
YES Button – allows you to answer “Yes” to questions or commands on the Inside
Display.
On/Off Button – turns your Jitterbug on and off
NO Button – allows you to answer “No” to questions or commands on the Inside
Display
Microphone – picks up your voice loud and clear
8 Getting Started
Page 18

Activating Your Jitterbug
IMPORTANT!
Please do not turn on your phone until instructed to do so. If you turn it on
prior to setting up your account, the device may fail to activate. If the device
fails to activate, power off and start with step
To ensure that your Jitterbug phone is activated successfully, it is important that
you follow these simple steps when activating.
• If you purchased your Jitterbug phone directly from GreatCall by phone or on
greatcall.com, please skip to step . Otherwise proceed to step .
.
Getting Started 9
Section 1
Page 19

Section 1
1
Gather the required information.
Home and billing address
Phone number
Email address
Credit or debit card information
Emergency contact details
The 18-digit Serial Number found on the side of your Jitterbug box, or on the
Activation Card you received inside the Jitterbug box.
MEID-DEC:
123456789012345678
10 Getting Started
Page 20

Go Online Or Call To Set Up Your Account.
2
If you do not have a GreatCall account, visit us online at
www.greatcall.com/activate. There you can enter your Jitterbug Serial
Number and follow the instructions to set up your account. If you do not
have Internet access, please call
1-866-482-1424.
- OR -
If you are an existing GreatCall customer and would like to replace,
upgrade, or add a Jitterbug phone to your account, or need to activate
more than one device, call us at 1-866-482-1424.
Section 1
Getting Started 11
Page 21

Section 1
on
off
3
Turn On Your Jitterbug To Activate.
You can now open your Jitterbug and press the
button and the activation process
will automatically begin.
This process may take a few minutes and you may notice the phone reboot several
times. Once complete you will see a screen “Phone was set up successfully!”
Congratulations! Your Jiiterbug is now activated.
12 Getting Started
Page 22

Charging The Battery
Your Jitterbug can be charged with the included Wall Charger or with the optional
Car Charger that can be purchased by visiting
www.greatcall.com/jitterbug/accessories.
Using The Wall Charger:
1. Plug the large end of the Wall Charger into a standard
wall outlet (110/220 VAC).
2. Plug the smaller end of the Wall Charger into the Power
Connector on the side of your Jitterbug. You’ll see a
“Charging” message appear on the Outside Display.
3. When the battery is fully charged, you’ll see a “Charging
Completed” message on the Outside Display.
Getting Started 13
Section 1
Page 23

Section 1
IMPORTANT!
The Jitterbug Rechargeable Battery must be fully charged before using the phone
for the rst time. We recommend an initial charge of up to 12 hours. Failure to do so
may damage your battery. If you use your Jitterbug without charging the battery, and
it is critically low, it will turn itself off.
14 Getting Started
Page 24

Battery Level Indicator
Your Jitterbug will remind you to charge the battery. Reminders appear on the
Inside Display and Outside Display with the following messages:
• Battery Low – a low battery alert and a message will tell you that your battery
is beginning to get low.
• Battery Critical – a low battery alert and a message will appear when the
battery has approximately 20% of battery life remaining.
IMPORTANT!
Jitterbug batteries have been designed specically for the Jitterbug phone.
Using other batteries could damage your Jitterbug and may void your
warranty.
Getting Started 15
Section 1
Page 25

Section 1
NOTE:
You can easily check the remaining charge on the Jitterbug battery by
navigating to the Phone Info menu and pressing the button to view.
Please reference page 23 for more information on Phone Info.
The Jitterbug features a standby time of up to 25 days. Talk time is
approximately 5 hours. Common factors that affect battery performance
include text messaging, taking or sending pictures, usage of 5Star Service
and making calls. Always make sure to charge your phone when not in use.
16 Getting Started
Page 26

Turning Your Jitterbug On And Off
IMPORTANT!
If you have not activated your Jitterbug, please refer to page 10 before turning
your Jitterbug on for the rst time.
Turning Your Jitterbug On:
1. Open your Jitterbug.
Section 1
2. Press the
on
button in the upper right corner of the keypad until your Jitterbug
off
turns on and the GreatCall logo appears on the Inside Display.
3. When you hear a dial tone, your Jitterbug has service and is ready to use.
If a connection is not possible, a “No Service” message will appear on the
Outside Display and a dial tone will not be heard.
Getting Started 17
Page 27

Section 1
To Turn Your Jitterbug Off:
1. Press and hold the
on
button in the upper right corner of the keypad until the
off
GreatCall logo appears on the Inside Display.
2. Your Jitterbug will then turn off.
NOTE:
We recommend keeping your Jitterbug on at all times and charging it over
night so you can always stay connected.
18 Getting Started
Page 28
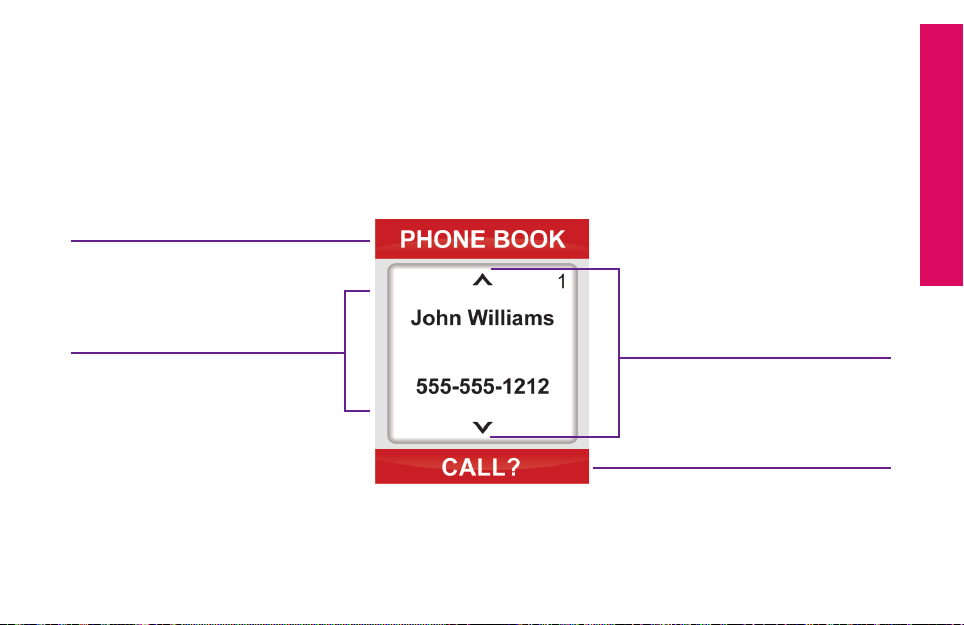
How To Read The Inside Display
Throughout this guide, the screen on the inside of your Jitterbug is referred to as
the Inside Display. The following diagram explains the areas of the Inside Display
and how to use them, using the Phone Book as an example.
Feature Area
Section 1
Detail Area
Additional
Information Exists
Action Line
Getting Started 19
Page 29

Feature Area – the top of the Inside Display is the Feature Area. It identies the
Section 1
feature you are using. For example, when you are in the Phone Book, you will see
“PHONE BOOK” in the Feature Area.
Detail Area – the middle of the Inside Display provides the details of each
feature. For example, information such as detailed entries from your Phone Book,
will appear in this area.
Action Line – the bottom of the Inside Display is the Action Line where
questions or commands are displayed. You can respond by pressing
the or buttons.
Additional Information Exists – the small arrows at the top and bottom of the
Inside Display indicate when information is available before or after the current
screen. Use the “Up/Down” button to scroll through entries.
NOTE:
If you are ever not sure what to do, simply press or buttons to answer
the question in the Action Line at the bottom of the Inside Display.
20 Getting Started
Page 30
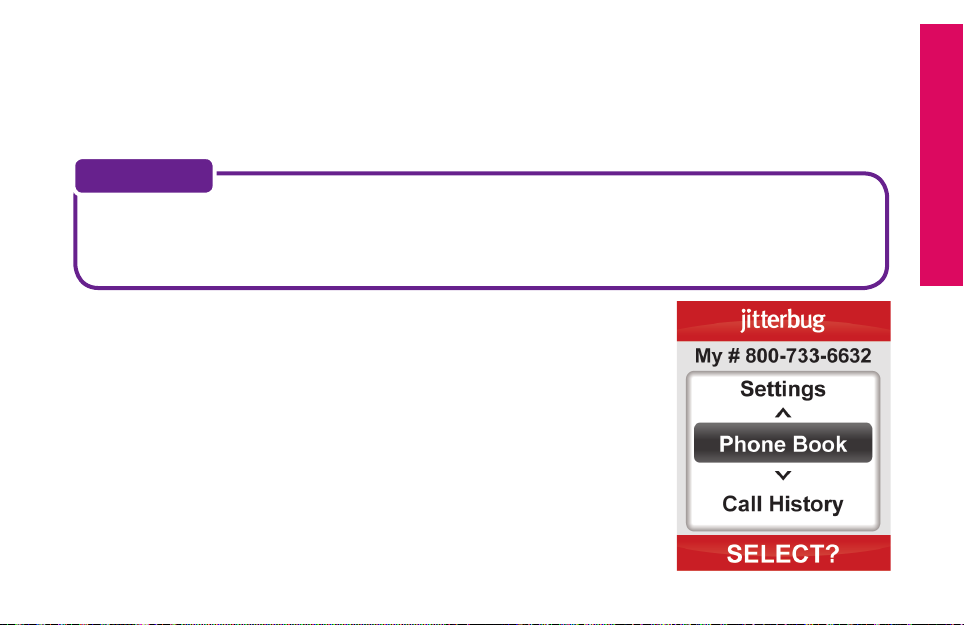
Using The Main Screen
When you open your Jitterbug while it is powered on, you will see the Main
Screen as shown in the diagram at the bottom of the page.
NOTE:
The Main Screen will display your Jitterbug phone number at the top of the
screen as shown in the following screen as, “My # 800-733-6632.”
The Main Screen is where you access the features on your
Jitterbug. Your Jitterbug is designed with the following six
features installed in your phone:
1. Phone Book – store up to 200 of the names and
numbers that you call most often. Operators can
even set-up the Phone Book for you. Please reference
page 85 for more information.
Getting Started 21
Section 1
Page 31

2. Call History – an easy way to review your last ten incoming, outgoing and
Section 1
missed calls, listed with the most recent rst. Please reference page 59 for
more information.
3. Phone Info – gives you the following important points of information about your
Jitterbug.
• My phone number
• Battery life
• Signal strength
• Approximate minutes used per month
4. Settings – the following items can be changed from within the Settings
feature. Please reference Section 5, page 139 for more information.
• Colors: Change the color of the Inside Display
• Jingle ON: Turn the GreatCall start-up Jingle on or off
• Ring Tones: Change the ring tone on your Jitterbug
• Bluetooth: Turn the Bluetooth feature on or off
22 Getting Started
Page 32

5. Camera– this is where you will take photos that will be automatically stored in
My Photos. See page 97 for more information.
6. My Photos – an easy way to view, delete or send photos. See page 97 for more
information.
NOTE:
Approximate minutes used per month shows your estimated minute usage
each month. This time resets at the beginning of your monthly billing cycle.
Your Main Screen may contain additional features depending on your plan.
Getting Started 23
Section 1
Page 33

Section 1
on
off
You can easily access all of your features
within the Main Screen using three
simple buttons located at the top of
the keypad.
1 2 3
1. When the feature you want to select is highlighted in gray in the middle of
the Inside Display, press the button to select that feature.
2. Use the “Up/Down” button to scroll through the features of the
Main Screen.
3. The button enables you to answer “No” to questions in the Action Line
and return to a previous screen. If you make a mistake while dialing a
number or typing a Text Message, you can always press the button to
back up and delete what you entered.
24 Getting Started
Page 34

NOTE:
For your ease-of-use, you can change the start-up screen of your Jitterbug.
For example, you may nd it easier to have your Jitterbug start directly in your
Phone Book each time you turn your Jitterbug on. You have two options to
choose from as your start-up screen:
1. Main Screen – your new Jitterbug comes with this turned on.
2. Phone Book – please see page 85 to learn more about your Phone Book.
To change your start-up screen, please give us a call anytime, 24 hours a day,
seven days a week by dialing “0” on your Jitterbug to reach an Operator.
Getting Started 25
Section 1
Page 35

Section 1
Making Your First Call
1. You can make a call directly from your Main Screen at any
time by using your keypad. Simply enter the ten digit phone
number and press the button to dial.
2. You will see “Calling...” on the Inside Display followed
by “Connected” conrming you are connected – as
displayed on the following screen.
3. When your call is nished, press the button or close
your Jitterbug to end the call.
4. You can also make a call directly from your Phone Book. Starting from the Main
Screen, use the “Up/Down” button to scroll until“Phone Book” appears and
press the button. When you nd the desired name and number, press the
button again to make the call.
To learn more about placing and receiving calls, please reference page 43.
26 Getting Started
Page 36

The 5Star Button
on
off
Customers with a GreatCall GoPlanTM have access to the 5Star Service. Simply
press the red 5Star button to be connected to a 5Star Agent in an unsafe or
uncertain situation. The 5Star Agent will assess the situation, conrm your
location using GPS and connect you to emergency services if you need it. See
page 75for more information on GoPlans, 5Star Service and GreatCall’s suite of
health and wellness services.
Getting Started 27
Section 1
Page 37

Section 1
IMPORTANT!
If you do not have a GreatCall GoPlan, you will be asked if you would like to
be connected directly to 9-1-1 services when the 5Star button is pressed.
Press “YES” if you would like to call 9-1-1 or “NO” if you would like to hang
up.
28 Getting Started
Page 38

MyCalendar
MyCalendar makes it easy for you to enter your appointments and events online at
mygreatcall.com. Or, simply press the button on your Jitterbug Plus to reach one
of our friendly GreatCall Operators, who can manage and update your calendar for
you. MyCalendar will ensure you never have to worry about missing important dates
or appointments, so you can spend more time focusing on the things that matter
most to you.
There are two easy ways to add a new event to your calendar: online or by phone.
NOTE:
In order to manage your MyCalendar online, you will need to have a
mygreatcall.com account. Simply visit mygreatcall.com to register for an
account if you have not done so already. Have your GreatCall phone number,
home address and email address handy.
Getting Started 29
Section 1
Page 39

Online
Section 1
1. Log in to your personal account at mygreatcall.com. After logging in to
mygreatcall.com, click on “My Apps” tab. Under services, click “View/Edit”
under “MyCalendar”.
2. Click on the “Add Calendar Event” button at the top right of your calendar,
or click on the day you would like to add an event. You will see a small box
appear on your screen
3. Click on the “Subject” box to enter a brief description of the event. There is
a limit of 24 characters.
4. The “Date” box shows the date that you selected to schedule the event. To
change the date, click on the box and a small calendar will appear on your
screen. Click on the day that you would like to schedule the event and the
date will be updated.
5. To change the start time, move the “Hour” and “Minute” sliders under the
calendar to the desired event start time and click the “Done” button to
save the selected date and start time.
30 Getting Started
Page 40

6. The “Duration” box shows the length of the event. Click to select All Day
Event, 30 Minutes, 1 Hour, 2 Hours, or 4 Hours.
7. If you are scheduling a recurring event, such as a weekly appointment,
the “Repeats” box allows you to select the frequency of the event. You
can select between Daily, Weekly, Monthly or Yearly events. This will
automatically add recurring future events into your calendar. If you are
scheduling a one-time event, select “One-time event.”
8. The “Remind Me” box allows you to set a reminder for the scheduled
event. Your Jitterbug Plus will remind you with an alert sound. To change
the alert time, click the box and select how long before the event you
would like to be notied.
9. Click on the description box to enter any additional details about the
event.
10. Click the “Add” to save your calendar event.
Getting Started 31
Section 1
Page 41

Section 1
By Phone
Call a friendly GreatCall Operator, available 24 hours a day, seven days a week. If you
would prefer to use our helpful Operator Assistance to update your calendar, we’ve
made it easy to do so. Simply press the button on your Jitterbug Plus to reach an
Operator who can manage your events and reminders for you.
32 Getting Started
Page 42

Operator Assistance
Live Operators are available 24 hours a day, seven days a week, and can help you:
1. Update and manage your Phone Book.
2. Look up a residential, business or government phone number.
3. Connect you to any number in the U.S. or Canada.
4. Place calls to anyone in your Phone Book.
5. Add events and appointments to your calendar (if MyCalendar is enabled).
Getting Started 33
Section 1
Page 43

To Call An Operator:
Section 1
1. Open your Jitterbug.
2. Press the button on the keypad.
3. Press the button to place the call.
NOTE:
Minutes are used while speaking with the Operator and for the length of
any call they connect for you. If the Operator performs one of the convenient
items listed above, an additional ve minutes will be deducted from your account for the service. Most wireless carriers charge over $1 for similar
services; we keep it simple by deducting only ve minutes.
34 Getting Started
Page 44

Emergency 9-1-1 Service
To Make An Emergency Call
1. Open your Jitterbug and make sure it’s on.
2. Dial 9–1–1 using the keypad.
3. Press the button when you see “CALL?” at the
bottom of the Inside Display.
Section 1
Getting Started 35
Page 45

Section 1
on
off
Installing And Removing The Battery
The battery has been pre-installed into your Jitterbug phone for your
convenience.
To Remove The Battery
1. If the phone is on, turn it off by opening your Jitterbug and holding down the
button until the GreatCall logo appears. The phone will then turn off.
2. With the back of the Jitterbug facing up, hold the phone with both hands so
that the GreatCall and Samsung logos are upsidedown.
3. Place both of your thumbs over the Samsung logo,
while squeezing the phone between your ngers and
thumbs, push the Battery Cover away from you.
4. To remove the battery, simply slide a ngernail in the
groove at the top of the battery, and gently pull the
battery out.
36 Getting Started
Page 46

To Install The Battery
1. Hold the battery with the Samsung logo facing up, slide the battery into the
back of your Jitterbug so the gold contacts on the side of the battery connect
with the gold pins inside the phone.
2. Push the battery into place.
3. Place the cover over the back of the phone so the hinges align with the slots
near the top of the phone.
4. While holding the phone with both hands
place your thumbs on the Samsung logo.
Make sure the logo is facing right-side-up.
Push the Battery Cover up while squeezing
the phone. The Battery Cover will click into
place.
Getting Started 37
Section 1
Page 47

Section 1
Getting More Information
GreatCall customers have access to two unique websites that are easy to
navigate and explore – www.greatcall.com and www.mygreatcall.com.
The main GreatCall website – greatcall.com – is the place to learn more about
the company, read about new services available, shop for Jitterbug accessories
or get answers to frequently asked questions.
As a GreatCall customer, you have exclusive access to www.mygreatcall.com
where you can update your Phone Book, view your remaining monthly minutes,
review and pay your monthly bill, add exclusive apps and services, and update
your prole. For more information on mygreatcall.com please reference page 88.
38 Getting Started
Page 48

GreatCall Customer Service
Use any of these ways to contact us:
• Send us an email at customerservice@greatcall.com
• Call us toll-free at 1-800-733-6632
• Write to us at:
GreatCall Customer Service
P.O. Box 4428
Carlsbad, CA 92018
Section 1
Getting Started 39
Page 49

Section 2
This section explains how to use the calling and answering features on your Jitterbug.
Section 2: Placing And Receiving Calls
Topics
• Placing A Call
• Using Your Phone Book To
Make A Call
• Speakerphone
• Answering A Call
• Ending A Call
• Ignoring A Call
• Adjusting The Ringer Volume
• Adjusting The Earpiece
Speaker Volume
• Call Waiting
For additional support, visit us online at www.greatcall.com/support.
• Using Call History
To See Recent Calls
• Using Voice Dial
• Setting Up Voice Mail
• Changing Your Voice Mail Greeting
• When To Check Your Voice Mail
Messages
• Listening To Voice Mail Messages
• Listening To Saved Voice Mail
Messages
• International Dialing
40 Placing And Receiving Calls
Page 50

Placing A Call
You can dial a phone number directly from almost every screen on your Jitterbug.
1. When you open your Jitterbug, you will hear a dial tone to indicate that service is
available. If service is not available, there will be no dial tone and you will see “No
Service” on the Inside Display.
2. Dial the full ten-digit number using your keypad. You may be required to dial
the number “1” rst before placing a call in some areas.
3. Press the button to place the call.
If you accidentally press a wrong button, press the button to back up and
delete the last number.
Placing And Receiving Calls 41
Section 2
Page 51

Section 2
NOTE:
There are three screens where you cannot dial a phone number: (1) when
typing a Text Message, (2) when entering a new name and number into your
Phone Book using your keypad and (3) when using Voice Dial.
Using An Operator To Make A Call:
A live Operator can connect you to anyone in your Phone Book or to any number
in the U.S. or Canada.
1. Press the button on your keypad.
2. Press the button when you see “CALL?” at the bottom of the Inside
Display.
3. “Calling Operator” will appear on the Inside Display followed by the words
“Connected...”
42 Placing And Receiving Calls
Page 52

4. Tell the Operator the name of the person in your Phone Book you want to call
or tell them the ten digit number you want to call.
5. When the call is nished, press the button or simply close your Jitterbug to end
the call.
Using Your Phone Book To Make A Call
To place a call to a number in your Phone Book:
1. Starting from the Main Screen, use the “Up/Down” button
and scroll until “Phone Book” appears highlighted in gray in the
middle of the Inside Display.
2. Press the button to view your “Phone Book.”
3. Your Phone Book will always start with the rst name and number you’ve
entered in the Phone Book, as indicated by the number “1” in the top right
corner of the Inside Display. You can manage the order of the names and
Placing And Receiving Calls 43
Section 2
Page 53

numbers of your Phone Book at mygreatcall.com. Please reference page 88 to
Section 2
learn more about mygreatcall.com.
4. You can scroll through the names and numbers in your
Phone Book by pressing the “Up/Down” button.
5. When you nd the desired name and number, press the
button to place the call.
6. You will see “Calling...” on the Inside Display followed by
“Connected” to conrm you are connected, as shown.
7. When you’re nished with the call, press the button or
close your Jitterbug to end the call.
NOTE:
While in the Phone Book, you can dial any phone number you need by using
the keypad. Simply dial the number you wish to call and press the button
to connect.
44 Placing And Receiving Calls
Page 54

Speakerphone
The Speakerphone provides you the convenience to make a call without holding
the phone to your ear. The Speakerphone can be activated at any time while you
are actively on a call. During your call, you will see an indicator at the top of the
Inside Display indicating the current status of the Speakerphone. “SPEAKER OFF”
indicates that the Speakerphone is off, and “SPEAKER ON” indicates that the
Speakerphone is on.
To turn your Speakerphone on, press the up arrow on the
“Up/Down” button on your keypad until “SPEAKER ON” is
displayed on the Inside Display.
With the Speakerphone you do not need to hold the phone
to your ear. Depending on your surroundings, you can enjoy
a conversation using your Speakerphone up to two feet from
your Jitterbug.
Placing And Receiving Calls 45
Section 2
Page 55

To turn your Speakerphone off, press the up arrow on the “Up/Down” button
Section 2
on your keypad until “SPEAKER OFF” is displayed on the Inside Display
NOTE:
If you choose to turn the Speakerphone off during a call, your conversation will not
end. The audio will be transferred to the Earpiece Speaker that you hold to your
ear.
If you close your Jitterbug during a conversation while using the
Speakerphone, the call will end and the Speakerphone will be turned off.
46 Placing And Receiving Calls
Page 56

Answering A Call
Your Jitterbug rings or vibrates (depending on how you set the ringer volume
level) to indicate an incoming call. Additionally, there are other indications of
incoming calls:
• The Light Indicator on the outside of your Jitterbug ashes.
• The name or phone number of the person calling will
appear on the Outside Display.
• If the caller’s number is stored in your Phone Book then
the name and number will appear on the Inside Display, as
shown.
• If the caller cannot be identied, you may see the phone
number or you may see “Unavailable” or “Restricted.”
Placing And Receiving Calls 47
Section 2
Page 57

Answering A Call When Your Jitterbug Is Closed
Section 2
1. If the caller’s name and number are stored in your Phone Book or the caller ID
is recognized, either the name or the phone number appears on the Outside
Display, as shown.
2. Open your Jitterbug when you hear it ring. The ring tone
will stop when the phone is opened.
3. A “Connected” message will appear on the Inside Display
and the caller’s voice can be heard through the earpiece
speaker.
888-555-5555
48 Placing And Receiving Calls
Call from
Page 58

Receiving A Call When Your Jitterbug Is Open
1. When the “ANSWER?” question appears on the Inside Display, press the
button to connect.
2. A “Connected” message will appear on the Inside Display and the caller’s
voice will be heard through the earpiece speaker.
Ending A Call
To end any active call, press the button or close your Jitterbug.
Ignoring A Call
To Ignore A Call When Your Jitterbug Is Closed
When the phone is ringing you can press the volume button to mute the ringer.
If Voice Mail is active, the caller will be directed to your Voice Mail. If Voice Mail
is not active, callers will get a message that you are not available.
Placing And Receiving Calls 49
Section 2
Page 59

To Ignore A Call When Your Jitterbug Is Open
Section 2
You can send a caller directly to your Voice Mail by pressing the button
when you see “ANSWER?” at the bottom of the Inside Display. This will give an
unavailable message if you do not have Voice Mail.
To ignore an incoming call while you are already on a call, press the button.
NOTE:
Your Jitterbug will continue to ring until:
• You answer the call
• The calling party hangs up
• You mute the ringer
• The call is sent to Voice Mail
50 Placing And Receiving Calls
Page 60

Adjusting The Ringer Volume
1. Open your Jitterbug to conrm it’s on and not actively on a call.
2. Press the Volume Button on the left-hand side of the phone. Press
the top of the Volume Button to increase the volume and the
bottom of the Volume Button to decrease the volume.
The available options are:
• Max
• High
• Medium
• Low
• Vibrate
Volume Button
Placing And Receiving Calls 51
Section 2
Page 61

Section 2
NOTE:
The selected volume level will appear on the Inside Display. The Ringer
Volume cannot be adjusted while actively on a call.
The ringer can be silenced by pressing the volume button down until
“Vibrate” appears on the Inside Display. With “Vibrate” selected your
Jitterbug will only vibrate to alert you of incoming calls. This can come in
handy at a movie, a library or any other location where a ringer may be a
distraction.
52 Placing And Receiving Calls
Page 62

Adjusting The Earpiece Speaker Volume
When you’re on a call, press the volume button up or down until the sound
reaches a comfortable level.
Your Jitterbug has three volume options for your earpiece speaker that you can
adjust while on a call as shown below:
• High
• Medium
• Low
Call Waiting
Call Waiting is a feature that allows you to accept a second call if you are already
on a call with another person. The phone does not come with this helpful feature
enabled, but if you would like to turn it on, simply call us at 1-800-733-6632. A
Call Waiting signal alerts you that there is a second caller waiting. The following
steps outline how to use Call Waiting on your Jitterbug:
Placing And Receiving Calls 53
Section 2
Page 63

1. When a second person calls your Jitterbug while you are already on a call with
Section 2
someone else, you will hear an audible beep and a message will appear on the
Inside Display to notify you of a second incoming call.
2. To answer the second incoming call, press the button. You will switch to
the second caller and the rst caller will be put on hold and will remain on the
other line.
3. To switch between the two callers, press the button. The Inside Display will
indicate the name and number of the person you are connected with.
4. To end a call at anytime, simply press the button.
NOTE:
To ignore an incoming call while you are already on a call with someone else,
simply press the button. The second caller will go directly to your Voice Mail (if
enabled).
54 Placing And Receiving Calls
Page 64

NOTE:
This section only applies if you have enabled Call Waiting. The feature is not
automatically enabled, but is available for free if you are interested in using
it. To enable Call Waiting, please call us at 1-800-733-6632.
Placing And Receiving Calls 55
Section 2
Page 65

Using Call History To See Recent Calls
Section 2
Your Jitterbug keeps a list of your ten most recent outgoing, incoming and missed calls.
To Review Call History:
1. Starting from the Main Screen, use the “Up/Down” button and scroll until “Call
History” appears highlighted in gray in the middle of the Inside Display.
2. Press the button to select “Call History.”
3. The rst number you will see in your Call History will be your most recent
phone call.
4. Using the “Up/Down” button, scroll down to view your Call History in
sequence according to the time of occurrence.
NOTE:
If a call matches a number from your Phone Book, the name and number of
that person will appear on the Inside Display.
56 Placing And Receiving Calls
Page 66

5. As you scroll through your Call History you will see the following information
on the Inside Display:
• Feature Area – you will see “CALL HISTORY” indicating
that you are in your Call History.
• Detail Area – you will see the following messages:
CALL HISTORY
Missed
03:27 PM - 01/12/14
888-555-5555
CALL?
• “Missed” if you missed an incoming call
• “Incoming” if you received and answered a call
• “Outgoing” if you placed a call
In the middle of the Inside Display you will see the time,
date and phone number for each call.
• Action Line – you will see “CALL?”
Placing And Receiving Calls 57
Section 2
Page 67

Returning Missed Calls And Redialing
Section 2
You can use Call History to directly return missed calls and redial both incoming
and outgoing calls.
1. Starting from the Main Screen, use the “Up/Down” button and scroll until “Call
History” appears highlighted in gray in the middle of the Inside Display.
2. Press the button to select “Call History.”
3. Using the “Up/Down” button, scroll up and down to see your Call History.
4. Select the call you would like to return.
58 Placing And Receiving Calls
Page 68

Using Voice Dial
Voice Dial – this free service enables you to retrieve a name that has been stored
in your Phone Book by speaking the exact name into the microphone.
1. Starting from the Main Screen, use the “Up/Down” button and scroll until
“Voice Dial” appears highlighted in gray in the middle of the Inside Display.
2. Press the button to select “Voice Dial.”
3. In the Earpiece Speaker you will hear an audible prompt to “Say the name”
and then a short beep. After the beep, say the name exactly as it appears in your
Phone Book.
4. If Voice Dial recognizes the name it will ask for conrmation by asking
“Did you say ______?” Conrm by saying “Yes” after the beep.
Placing And Receiving Calls 59
Section 2
Page 69

5. If Voice Dial is unsure it will say “Repeat the name” followed by a beep.
Section 2
6. Voice Dial will dial the number of the person whose name you selected.
7. Press the button or close your Jitterbug to end the call.
8. “Call Ended” will appear, letting you know the call has concluded.
NOTE:
If Voice Dial is unable to nd the name, press the button to retry, or the
button to exit to the Main Screen.
To ensure a successful Voice Dial experience, remember these important tips:
• Wait for the system beep before speaking
• Speak clearly and in your normal voice
• Say the name exactly as it appears in your Phone Book
• Make sure each Phone Book entry is unique in its description
60 Placing And Receiving Calls
Page 70

Setting Up Voice Mail
This section only applies if you have purchased Voice Mail with your
GreatCall service. To purchase Voice Mail service for your Jitterbug,
please call us at 1-800-733-6632.
Follow these steps to set up Voice Mail:
1. Starting from the Main Screen, use the “Up/Down” button and scroll until
“Voice Mail” appears highlighted in gray in the middle of the Inside Display.
2. Press the button to dial the GreatCall Voice Mail system.
3. Your Jitterbug will know it is your rst time setting up Voice Mail. You will be
guided through your Voice Mail set-up the rst time you connect. Follow the
instructions, pressing the and buttons as prompted.
Placing And Receiving Calls 61
Section 2
Page 71

Changing Your Voice Mail Greeting
Section 2
1. Starting from the Main Screen, use the “Up/Down” button and scroll until
“Voice Mail” appears highlighted in gray in the middle of the Inside Display.
2. Press the button to select “Voice Mail” and listen to the prompts.
The system will ask you if you would like to review your greeting – press the
button.
3. Follow the instructions, pressing the and buttons as prompted.
4. To exit your Voice Mail, simply close your Jitterbug at any time.
62 Placing And Receiving Calls
Page 72

When To Check Your Voice Mail Messages
If you miss a call and the caller leaves you a message, your Jitterbug will notify
you by:
1. Displaying “New Voice Mail” on the Outside Display.
2. Displaying “You have a new voice message” on the Inside
Display, as shown.
3. The Indicator Light will ash every 15 seconds until your
Jitterbug is opened.
4. An audible alert will play once every ve minutes for up to
30 minutes or until your Jitterbug is opened.
Placing And Receiving Calls 63
Section 2
Page 73

Listening To Voice Mail Messages
Section 2
• If you have a new Voice Mail message, your Jitterbug will notify you by
displaying “You have a new voice message” on the Inside Display and
“LISTEN?” in the Action Line.
• Press the button to listen to your message.
• Simply listen to the prompts and follow along to save or delete your
messages.
IMPORTANT!
Once a message is deleted, there is no way to retrieve it.
64 Placing And Receiving Calls
Page 74

Listening To Saved Voice Mail Messages
1. Starting from the Main Screen, use the “Up/Down” button and scroll until
“Voice Mail” appears highlighted in gray in the middle of the Inside Display.
2. Press the button to select “Voice Mail” and listen to the prompts to play
your saved messages.
3. To exit your Voice Mail, simply close your Jitterbug at any time.
NOTE:
To quickly manage multiple messages, press the button at any time while
listening to a message. You will then be given the option to save or delete
your message. Pressing the
your next Voice Mail message.
button will save that message and advance to
Placing And Receiving Calls 65
Section 2
Page 75

5. Press the button to return the call.
Section 2
6. Press the button or close your Jitterbug to end the call.
7. “Call Ended” will appear, letting you know the call has concluded.
66 Placing And Receiving Calls
Page 76

International Dialing
If you expect to make calls beyond the U.S. or Canada, consider our
convenient International Calling option. Add the International Calling option to
your account and you’ll be ready to call internationally in no time! To dial
internationally, you may need to access the + symbol before entering in the
country code and phone number. To access the + symbol, please hold down the
button until the + symbol appears on the Internal Display.
Placing And Receiving Calls 67
Section 2
Page 77

Section 3: GreatCall Health and Safety Services
Section 3
This section describes additional services that make your Jitterbug more than
just an easy-to-use cell phone. With access to a network of health and safety
experts, your Jitterbug becomes a mobile medical alert device.
Topics
• GreatCall GoPlans
• 5Star Service
• Urgent Care
• Medication Reminders
For additional support, visit us online at www.greatcall.com/support.
• Brain Games
• The Wellness Call
• The Check-in Call
• Daily Health Tips
68 GreatCall Health and Safety Services
Page 78

GreatCall GoPlans
The Jitterbug5 is more than an easy-to-use cell phone, it’s also a network of
people who are health and safety experts. Combined with affordable talk minutes,
GreatCall GoPlans make it easier than ever to stay connected, safe and healthy.
With a GreatCall GoPlan you have access to convenient health and safety services
such as:
•5Star – Get help from NAED (National Academies of Emergency Dispatch)
Certied Response Agents in any uncertain or unsafe situation.
•Urgent Care – Access registered nurses and board-certied doctors for advice,
diagnoses and/or prescriptions 24/7.
•Medication Reminders – Stay on schedule with your medications and rells.
•Brain Games - Improve cognitive functions while having fun.
•The Wellness Call – Receive motivational calls from Brian Alman, PhD.
•The Check-in Call – Friendly automated calls will check in with you daily.
•Daily Health Tips – Get free tips for maintaining a healthy lifestyle.
If you’re interested in a GreatCall GoPlan please call us at 1-800-292-5174 or visit
us online at greatcall.com to learn more.
GreatCall Health and Safety Services 69
Section 3
Page 79

5Star Service
Section 3
Our award-winning service, 5Star, transforms your Jitterbug into a mobile
medical alert device. Press the button on your keypad and you’ll speak
immediately with an NAED Certied Response Agent. These Agents, who are
trained in CPR and other emergency procedures, will conrm your location,
evaluate the situation and get you the help you need. They’ll even connect you to
a registered nurse or dispatch emergency services, if needed.
70 GreatCall Health and Safety Services
Page 80

Urgent Care
With Urgent Care, which also comes with a GoPlan, you can speak to a nurse who
will triage your medical questions and, if needed, have a doctor call you back
within 30 minutes. The doctor may give assessments, advice and/or diagnoses
for a wide range of conditions over the phone, and even prescribe common
medications.
Medication Reminders
With this award-winning service, a friendly phone call will remind you to take
your medications at the correct time of day and when to rell your prescriptions.
You can schedule your reminders by logging in to mygreatcall.com, or calling
us at 1-888-767-6288 to speak with a friendly GreatCall Customer Service
Representative who will get you started.
GreatCall Health and Safety Services 71
Section 3
Page 81

Brain Games
Section 3
Your new Jitterbug gives you access to fun innovative games, clinically-proven to sharpen your mind. Make A Pair and Quick Match come pre-loaded on your phone. This section will explain how to use them.
About Make A Pair
Make a Pair is designed to improve your memory. Try your best to remember each
card drawn, as your score is based on your ability to determine a card pair within
the allotted amount of time.
About Quick Match
Quick Match is designed to improve your focus. Pay close attention to the objects
on the screen, as your score is based on your ability to determine a match in
objects within the allotted amount of time.
72 GreatCall Health and Safety Services
Page 82

Accessing Your Games
1. Starting from the Main Menu, use the “Up/Down” button and scroll until
“Games” appears highlighted in gray in the middle of the Inside Display.
2. Press the button to view “Games.”
3. Use the “Up/Down” button and scroll until “Make A Pair” or “Quick Match”
appears highlighted in gray in the middle of the Inside Display.
4. Use the “Up/Down” button and scroll to the level you would like to play until
it appears highlighted in gray in the middle of the Inside Display.
5. Press the button to begin your game.
GreatCall Health and Safety Services 73
Section 3
Page 83

The Wellness Call
Section 3
With this service, you’ll get a motivational 2-3 minute call once per week from
wellness expert and best-selling author Brian Alman, Ph.D. Start feeling better
and live a happier, healthier lifestyle with proven, interactive coaching and
stress-management techniques that promote better relaxation and self-care. The
Wellness Call works around your schedule. Simply choose a time and day of the
week that will work best for you to receive your call.
74 GreatCall Health and Safety Services
Page 84

You can set up your calls in one of two ways:
1. Online: Log in to your personal account on mygreatcall.com.
2. By phone: You can call 1-888-767-6288 to reach a GreatCall Customer Service
Representative who can enter your call schedule for you.
When calling a GreatCall Customer Service Representative, there are three easy
steps to set up your call:
1. Make sure you have your Jitterbug5 phone number handy and be prepared to
share that along with your home time zone.
2. To make sure you can focus on Dr. Alman’s personalized tips, simply provide
us a day and time that you are generally available and free from distractions.
3. Sit back, relax, and enjoy your journey towards wellness
GreatCall Health and Safety Services 75
Section 3
Page 85

The Check-in Call
Section 3
This service will automatically call to check in with you as often as you’d like.
If you reply that you need assistance, or if you miss a call, we will send a
notication for help to a friend or relative you have listed as a personal contact.
Once your schedule is set, we can begin checking in with you up to six times a
day and sending notications for assistance to your list of designated contacts if
necessary.
You can set up your calls in one of two ways:
1. Online: Log in to your personal account on mygreatcall.com
2. By phone: You can call 1-888-767-6288 to reach a GreatCall Customer Service
Representative who can enter your call schedule for you
76 GreatCall Health and Safety Services
Page 86

When you are ready to set up your calls, have the following information handy:
1. What would you like us to check on? You can choose from the following four
options:
a. General well-being - in general, are you feeling well today?
b. Appetite - is your appetite good today?
c. Pain level - are you in pain?
d. Sleeping - are you getting enough sleep to maintain a healthy lifestyle?
2. On what day(s) would you like us to call you? You can specify one day, multiple
days, or every day.
3. For the days you selected, how many times per day would you like us to check
in with you? You can choose to receive a Check-in Call up to six times per day.
4. If you need assistance, who should be contacted for help?
Daily Health Tips
Receive a daily text message with heart-healthy tips from the American Heart
Association® right on your phone.
GreatCall Health and Safety Services 77
Section 3
Page 87

You can personalize your Jitterbug with only the features and additional services
that you want. Please call us at 1-800-733-6632. We’ll be glad to assist you.
Section 3
NOTE:
We offer a variety of helpful services and applications that will further
enhance your Jitterbug experience and even keep you safe and healthy. Be
sure to visit www.mygreatcall.com to view and add these services to your
account.
78 GreatCall Health and Safety Services
Page 88

Section 4: Managing Your Phone Book
This section explains how to use your Phone Book to save and nd the names
and numbers of people you call frequently.
Topics
• About Phone Book
• Use The Operator To Add, Change And Delete Numbers
• Use mygreatcall.com To Add, Change And Delete Numbers
• Adding A Contact Directly On Your Jitterbug
• Modifying A Contact On Your Jitterbug
• Deleting A Contact On Your Jitterbug
For additional support, visit us online at www.greatcall.com/support.
Managing Your Phone Book 79
Section 4
Page 89

About Phone Book
Your Jitterbug allows you to store up to 200 names and numbers of the people
Section 4
you call on a regular basis.
You can manage your Phone Book by adding, changing or deleting names and
numbers.
80 Managing Your Phone Book
Page 90

Use The Operator To Add, Change And Delete Numbers
1. Simply press the button on your keypad.
2. Press the button and a “Calling...” message will appear on the Inside
Display, followed by the message “Connected to Operator.”
3. When the Operator answers, let the Operator know the name and number you
want to add, change or delete.
4. To end the call, press the button or close your Jitterbug.
Managing Your Phone Book 81
Section 4
Page 91

Use mygreatcall.com To Add, Change And Delete Numbers
If this is your rst time visiting mygreatcall.com, you will need to register your
Section 4
account. Have your GreatCall phone number handy and be prepared to enter your
home address and email address. Simply follow the on-screen instructions to
set up your account.
After setting up your account, you will be able to enter phone numbers online. All
phone numbers you enter will automatically appear on your Jitterbug within four
hours.
NOTE:
It is easy to manage your account online with mygreatcall.com, a free, helpful
tool that allows you to make changes to your account at your convenience.
82 Managing Your Phone Book
Page 92

Here are some other helpful things you can do on mygreatcall.com:
1. Update your Personal Prole
2. Check your minute usage
3. Add new services to your account
4. Edit your services
5. Update your Phone Book and calendar entries
You can visit mygreatcall.com anytime to learn about new offerings for your
Jitterbug phone and keep your account updated.
Managing Your Phone Book 83
Section 4
Page 93

Adding A Contact Directly On Your Jitterbug
1. Starting from the Main Screen, use the “Up/Down” button and scroll until “Phone
Section 4
Book” appears highlighted in gray in the middle of the Inside Display.
2. Press the button to view your “Phone Book.”
3. Using the “Up/Down” button, scroll until “EDIT PHONE BOOK” appears and
press the button.
4. Using the “Up/Down” button, scroll until “Add” appears highlighted in gray
in the middle of the Inside Display.
5. Press the button to select the item “Add.”
84 Managing Your Phone Book
Page 94

6. Using the keypad, enter the name of the contact you would like to create. If
you accidentally press a wrong button, just press the button to back up
and delete the incorrect entry.
7. Press the button when you are done.
8. Using the keypad, enter the phone number for the new contact. If you make a
mistake while typing, use the button to backspace.
9. Press the button when you are done.
10. “Successfully Added” will appear, letting you know the new contact has
been added.
Managing Your Phone Book 85
Section 4
Page 95

Modifying A Contact Directly On Your Jitterbug
1. Starting from the Main Screen, use the “Up/Down” button and scroll until
Section 4
“Phone Book” appears highlighted in gray in the middle of the Inside Display.
2. Press the button to select “Phone Book.”
3. Using the “Up/Down” button, scroll until “EDIT PHONE BOOK” appears and
press the button.
4. Using the “Up/Down” button, scroll until “Modify” appears highlighted in
gray in the middle of the Inside Display.
5. Press the button to select “Modify.”
6. Using the “Up/Down” button, scroll to the contact you would like to change.
7. Press the button to select the contact you would like to change.
86 Managing Your Phone Book
Page 96

8. To change the contact’s name, use the button to delete the necessary
letters. Use the keypad to re-enter the name.
9. Press the button when you are done.
10. To change the contact’s number, use the button to delete the necessary
numbers. Use the keypad to re-enter the numbers.
11. Press the button when you are done.
12. “SuccessfullyModied” will appear, letting you know the contact has been
modied.
Managing Your Phone Book 87
Section 4
Page 97

Deleting A Contact Directly On Your Jitterbug
1. Starting from the Main Screen, use the “Up/Down” button and scroll until
Section 4
“Phone Book” appears highlighted in gray in the middle of the Inside Display.
2. Press the button to select the “Phone Book” feature.
3. Using the “Up/Down” button, scroll until “EDIT PHONE BOOK” appears and
press the button.
4. Using the “Up/Down” button, scroll until “Delete” appears highlighted in
gray in the middle of the Inside Display.
5. Press the button to select “Delete.”
6. Using the “Up/Down” button, scroll to the contact you would like to delete.
7. Press the button to delete the contact.
88 Managing Your Phone Book
Page 98

8. Press the button to conrm deleting the contact.
9. “Successfully Deleted” will appear, letting you know the contact has been
removed.
Managing Your Phone Book 89
Section 4
Page 99

Section 5: Using The Camera
This section explains how to take, view, delete and share photos on your
Section 5
Jitterbug.
Topics
• Taking A Photo With Your Jitterbug
• Viewing A Photo On Your Jittterbug
• Sending A Photo From Your Jitterbug
• Deleting A Photo From Your Jitterbug
• Receiving A Photo On Your Jitterbug
For additional support, visit us online at www.greatcall.com/support.
90 Using The Camera
Page 100

Taking A Photo With Your Jitterbug
1. Starting from the main screen, use the “Up/Down” button and scroll until
“Camera” appears highlighted in gray in the middle of the Inside Display.
2. Press the button to open the camera.
3. Make sure that the image you would like to capture appears on the Inside Display.
4. Press the button to capture the image.
5. Press “Yes” to store your photo. “Photo Successfully Saved” will appear on the Inside Display.
6. Press “No” to delete your photo and return to the camera.
NOTE:
Any photo saved on your Jitterbug will be stored in a photo gallery called “My
Photos.”
Using The Camera 91
Section 5
 Loading...