

Page 1
K2 Dyno
Replay System
Quick Start Guide
Software Version 1.6
071-8681-02
April 2010
Page 2
Affiliate with the N.V. KEMA in The Netherlands
CERTIFICATE
Certificate Number: 510040.001
The Quality System of:
Thomson Inc, and its worLdwide Grass Valley division affiliates DBA
GRASS VALLEY
Headquarters
400 Providence Mine Rd
Nevada City, CA 95959
United States
15655 SW Greystone Ct.
Beaverton, OR 97006
United States
10 Presidential Way
Suite 300
Woburn, MA 01801
United States
Kapittelweg 10
4827 HG Breda
The Nederlands
7140 Baymeadows Way
Ste 101
Jacksonville, FL 32256
United States
2300 So. Decker Lake Blvd.
Salt Lake City, UT 84119
United States
Rue du Clos Courtel
CS 31719
35517 Cesson-Sevigné Cedex
France
1 rue de l’Hautil
Z.I. des Boutries BP 150
78702 Conflans-Sainte
Honorine Cedex
France
Technopole Brest-Iroise
Site de la Pointe du Diable
CS 73808
29238 Brest Cedex 3
France
40 Rue de Bray
2 Rue des Landelles
35510 Cesson Sevigné
France
Spinnereistrasse 5
CH-5300 Turgi
Switzerland
Brunnenweg 9
D-64331 Weiterstadt
Germany
Carl-Benz-Strasse 6-8
67105 Schifferstadt
Germany
Including its implementation, meets the requirements of the standard:
ISO 9001:2008
Scope:
The design, manufacture and support of video and audio hardware and software products and
related systems
.
This Certificate is valid until: June 14, 2012
This Certificate is valid as of: June 14, 2009
Certified for the first time: June 14, 2000
H. Pierre Sallé
President
KEMA-Registered Quality
The method of operation for quality certification is defined in the KEMA General Terms
And Conditions For Quality And Environmental Management Systems Certifications.
Integral publication of this certificate is allowed.
KEMA-Registered Quality, Inc.
4377 County Line Road
Chalfont, PA 18914
Ph: (215)997-4519
Fax: (215)997-3809
CRT 001 073004
Accredited By:
ANAB
Page 3
K2 Dyno
Replay System
Quick Start Guide
Software Version 1.6
071-8681-02
April 2010
Page 4

Copyright Copyright © Grass Valley, Inc. All rights reserved. Printed in the United States of America.
Portions of software © 2000 – 2010, Microsoft Corporation. All rights reserved. This document
may not be copied in whole or in part, or otherwise reproduced except as specifically permitted
under U.S. copyright law, without the prior written consent of Grass Valley, Inc., P.O. Box
59900, Nevada City, California 95959-7900. This product may be covered by one or more U.S.
and foreign patents.
Disclaimer Product options and specifications subject to change without notice. The information in this
manual is furnished for informational use only, is subject to change without notice, and should
not be construed as a commitment by Grass Valley, Inc. Grass Valley, Inc. assumes no
responsibility or liability for any errors or inacc uracies that may appear in this publication.
U.S. Government
Restricted Rights
Legend
Trademarks and
Logos
Revision Status
Use, duplication, or disclosure by the United States Government is subject to restrictions as set
forth in subparagraph (c)(1)(ii) of the Rights in Technical Data and Computer Software clause
at DFARS 252.277-7013 or in subparagraph c(1) and (2) of the Commercial Computer
Software Restricted Rights clause at FAR 52.227-19, as applicable. Manufacturer is Grass
Valley, Inc., P.O. Box 59900, Nevada City, California 95959-7900 U.S.A.
Grass Valley, K2, Aurora, Summit, Dyno, Solo, Infinity, Turbo, Profile, Profile XP, NetCentral,
NewsBrowse, NewsEdit, NewsQ, NewsShare, Ne wsQ Pro, and Media Manager are either
registered trademarks or trademarks of Grass Valley, Inc. in the United States and/or other
countries. Grass Valley, Inc. products are covered by U.S. and foreign patents, issued and
pending. Additional information regarding Grass Valley, Inc. trademarks and other proprietary
rights may be found at www.grassvalley.com. Other trademarks and logos used in this
document are either registered trademarks or trademarks of the manufactu rers or vendors of
the associated products, such as Microsoft® Windows® operating system, Windows Media®
player, Internet Explorer® internet browser, and SQL Server™. QuickTime and the QuickTime
logo are trademarks or registered trademarks of Apple Computer, Inc., used under license
therefrom.
Rev Date Description
June 17, 2009 Initial release of the K2 Dyno Replay System Quick Start Guide –
071-8681-00
January 28, 2010 Updates for version 1.5 – 071-8681-01
April 13, 2010 Updates for version 1.6 – 071-8681-02
4 K2 Dyno Replay System Quick Start Guide 13 April 2010
Page 5

Chapter 1
Installation
This section documents the installation of the bundled K2™ Summit™ Production
Client and K2 Dyno™ Replay Controller that you buy as a Dyno-Pack. If you are
connecting a K2 Solo™ Media Server or a K2 Summit Production Client that is not
part of a Dyno-Pack and has not been previously controlled by a K2 Dyno Controller,
refer to the K2 Dyno Controller Installation Manual.
Unpack and check contents
Find the following items in the packaging for the K2 Summit Production Client.
PRODUCTION
K2 SUMMIT
CLIENT
K2 Summit Production Client
NOTE: Do not lose the Recovery Flash
Drive that is stored inside the bezel.
It contains the image for this specific
K2 Summit Production Client.
!rass ! all! ! ! roup
!rass ! all! ! ! roup
!! us! ! s! ! s
!! us! ! s! ! s
!! us! ! s! ! s
!rass ! all! ! ! roup
!! us! ! s! ! s
!rass ! all! ! ! roup
!rass ! all! ! ! roup
!rass ! all! ! ! roup
!rass ! all! ! ! roup
!rass ! all! ! ! roup
Licenses and
Warranties
!! us! ! s! ! s
!! us! ! s! ! s
!! us! ! s! ! s
!! us! ! s! ! s
!! us! ! s! ! s
!! us! ! s! ! s
!! us! ! s! ! s
!! us! ! s! ! s
Release Notes
Power cords
Rack slides
LTC cables
Documentation CD
Find the following items in the packaging for the K2 Dyno Controller.
K2 Dyno Replay Controller
Keyboard
s
s
s
s
s
sdgsgd
s
roup
qu
s
roup
G
s
roup
lley G
Va
alley
sdgsgd
rass
sdgsgd
ss V
roup
Valley G
ra
qu
G
roup
G
rass
G
roup
G
alley
alley
ss V
V
ra
ss
Valley G
ra
G
rass
G
Mouse
Licenses and
Warranties
Release Notes
Power cord
Documentation CD
Recovery Flash Drive
NOTE: Do not lose the Recovery Flash
Drive. It contains the image for this
specific K2 Dyno Replay Controller.
roup
G
s
s
alley
sdgsgd
rass V
qu
roup
G
sdgsgd
A
G
sdgsgd
qu
s
u
A
q
sdgsgd
s
alley
A
qu
sdgsgd
sdgsgd
A
u
u
rass V
q
G
sdgsgd
A
Aq
sdgsgd
A
qu
A
qu
sdgsgd
A
u
q
A
qu
G
A
A
G
13 April 2010 K2 Dyno Replay System Quick Start Guide 5
Page 6
Chapter 1 Installation
Gather additional items
To complete a typical K2 Dyno Replay System, as referenced in this Quick Start
Guide, you must provide the following items:
• Two VGA monitors (1024 x 768
x 32 or greater) and cables
• Video monitors and cables • Audio monitoring system
• USB keyboard • USB mouse
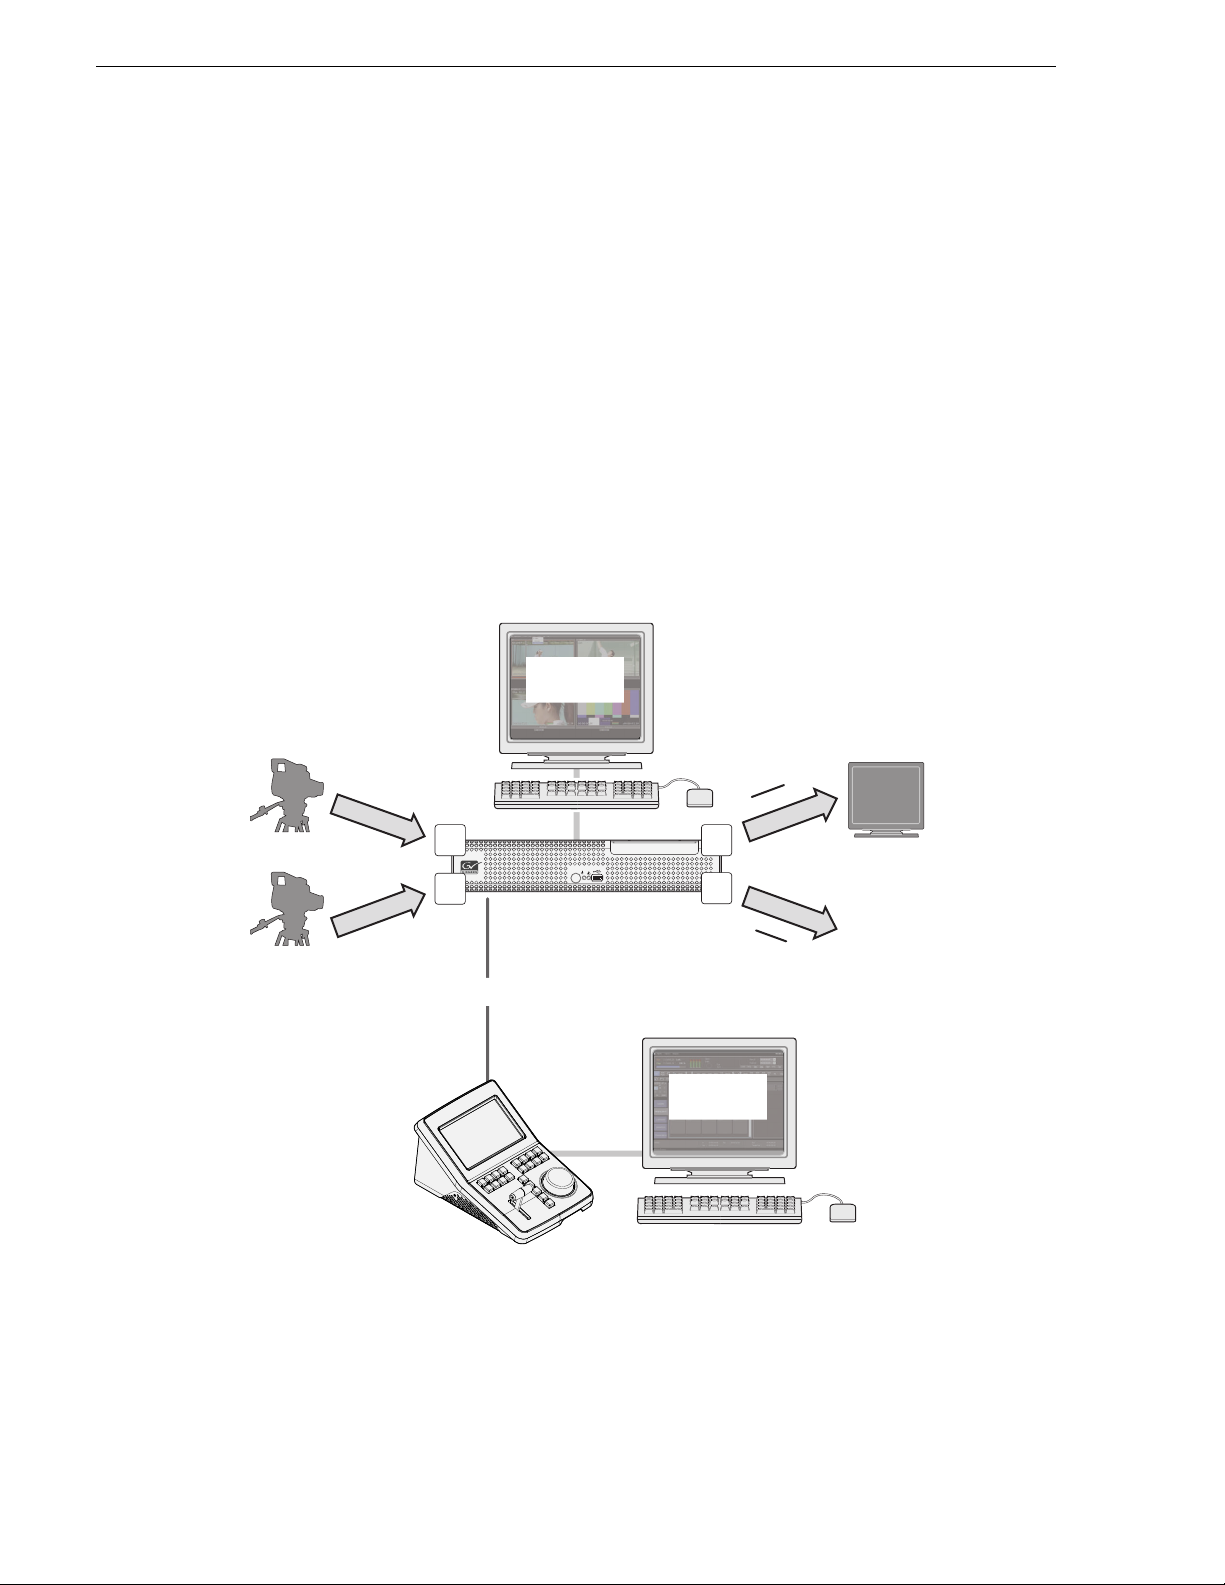
System overview
The procedures and explanations in this Quick Start Guide assume a typical K2 Dyno
Replay System, such as that illustrated in the following diagram. If your installation
requires a different system configuration, apply the information in this Quick Start
Guide accordingly.
SDI in (A)
Record
SDI in (B)
C1
C2
AppCenter Pro
on K2 Summit
Production Client
K2 SUMMIT
K2 Summit Client
• Ethernet cable, either crossover or
straight-through
PGM
P1
SDI out (C)
C3
PRODUCTION
CLIENT
Play
C4
SDI out (D)
PVW
P2
Video/audio monitoring
Ethernet
connection
K2 Dyno Replay
application VGA
output
K2 Dyno Controller
Also refer to “Channel operation overview” on page 25 and “ChannelFlex Suite
modes” on page 27.
6 K2 Dyno Replay System Quick Start Guide 13 April 2010
Page 7
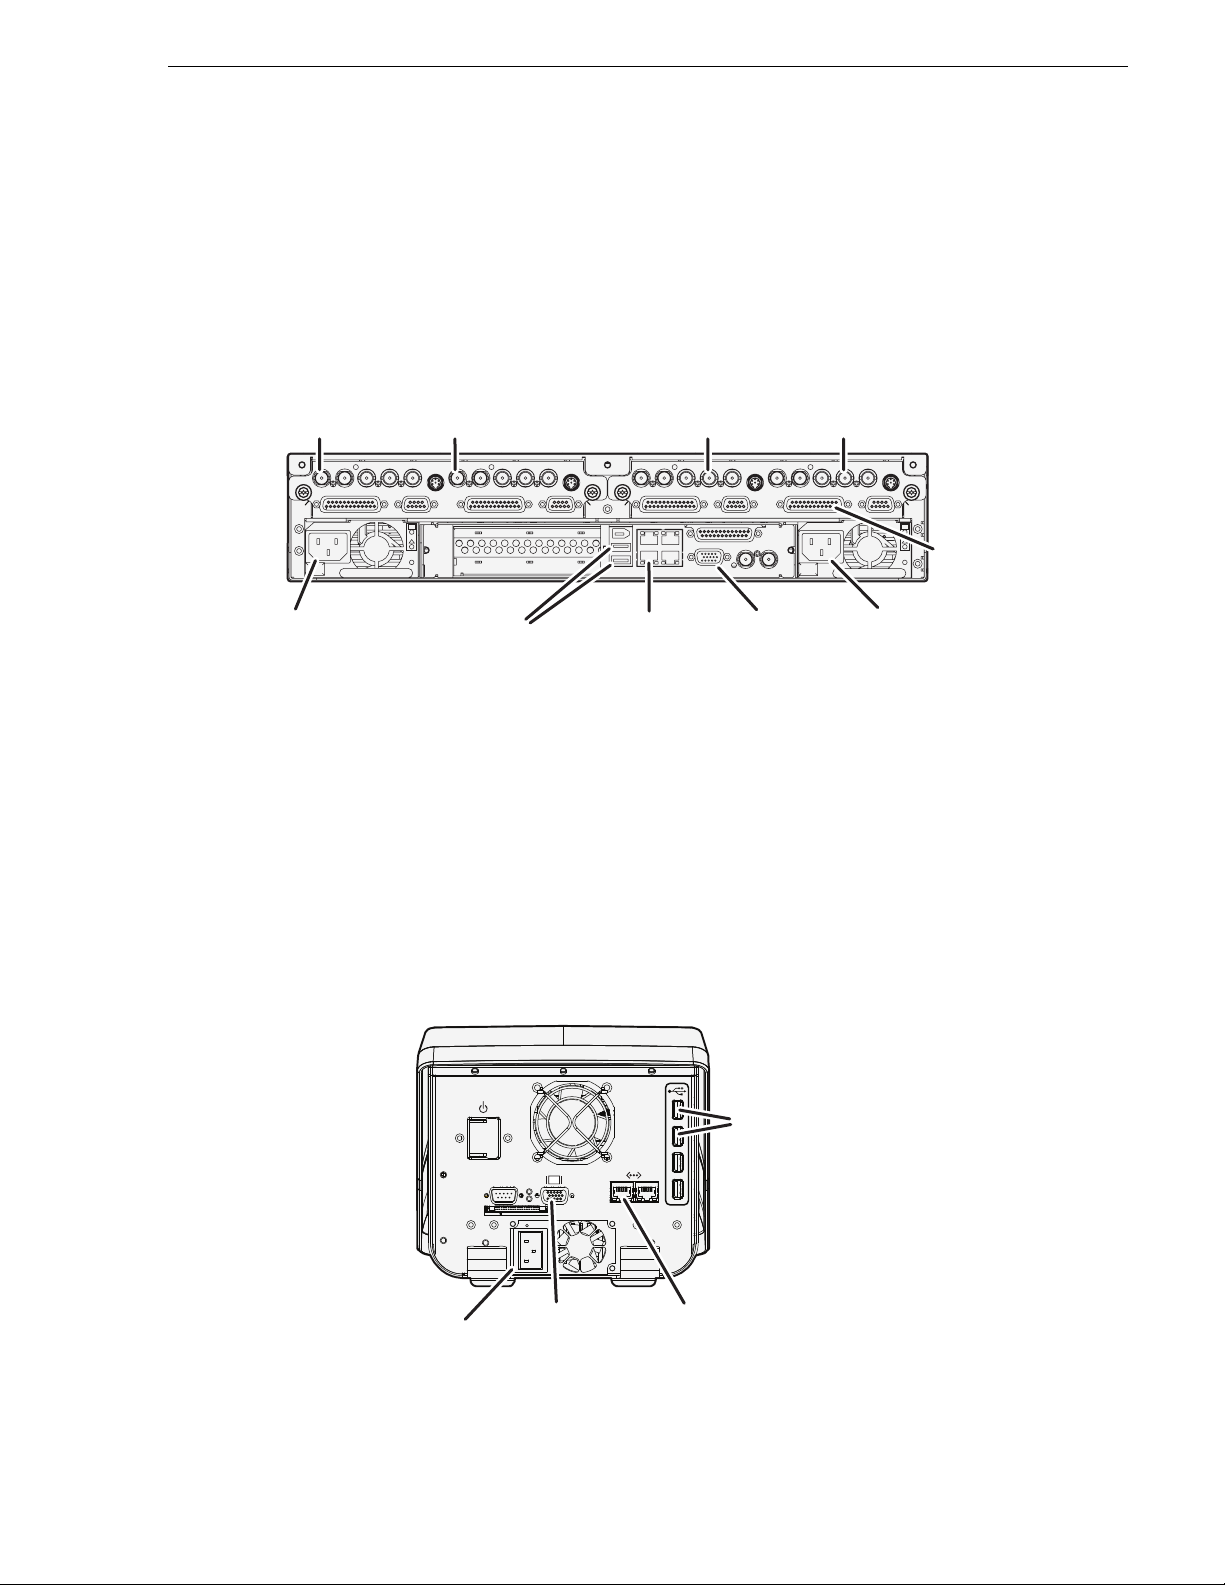
Cable K2 Summit Client
If desired, mount the K2 Summit Client in an equipment rack. Refer to the K2 System
Guide for rack mount procedures.
Make K2 Summit Client cable connections as illustrated.
Channels (C1, C2, C3, C4) are bi-directional
Cable K2 Summit Client
Use C1 as
record channel.
Connect SDI in
SDI IN1 SDI OUT1 SDI OUT2
SDI IN2 SDI IN3 SDI IN1 SDI IN2 SDI IN3 SDI IN1 SDI OUT1 SDI OUT2
AES AUDIO RS422
C1
Power
cord
Use C2 as
record channel.
Connect SDI in
LTC I/O
AES AUDIO RS422
OK
!
~AC
Keyboard
and mouse
SDI OUT1 SDI OUT2
LTC I/O
Each channel can be bo th an inpu t (recor d channel ) and an o utput (pl ay channe l). For
the K2 Dyno Replay System documented in this Quick Start Guide, C1 and C2 are
record channels and C3 and C4 are play channels.
For complete cabling ins tructions, refer to t he K2 System Guide. If using ChannelFl ex
Suite™ features, refer to the K2 Dyno Controller Installation Manual and the K2
AppCenter User Manual.
Cable K2 Dyno Controller
Make K2 Dyno Controller cable connections as illustrated.
Use C3 as
play channel.
Connect SDI out
SDI IN2 SDI IN3 SDI IN1 SDI IN2 SDI IN3
AES AUDIO RS422
C2 C3 C4
GPI
USB/1394 100BT/1000BT
VGA REF. LOOP THROUGH
Ethernet
Use C4 as
play channel.
Connect SDI out
LTC I/O
SDI OUT1 SDI OUT2
AES AUDIO RS422
VGA
monitor
LTC I/ O
OK
~AC
Power
cord
!
AES
audio
Keyboard
and mouse
RS-232
100-240 V~
4A 50-60Hz
Power
cord
VGA
monitor
Ethernet
The Ethernet connect ion be tween the K2 Summit Clien t and the K2 Dyno Cont roll er
can be via direct connect cable or via an Ethernet switch.
13 April 2010 K2 Dyno Replay System Quick Start Guide 7
Page 8
Chapter 1 Installation
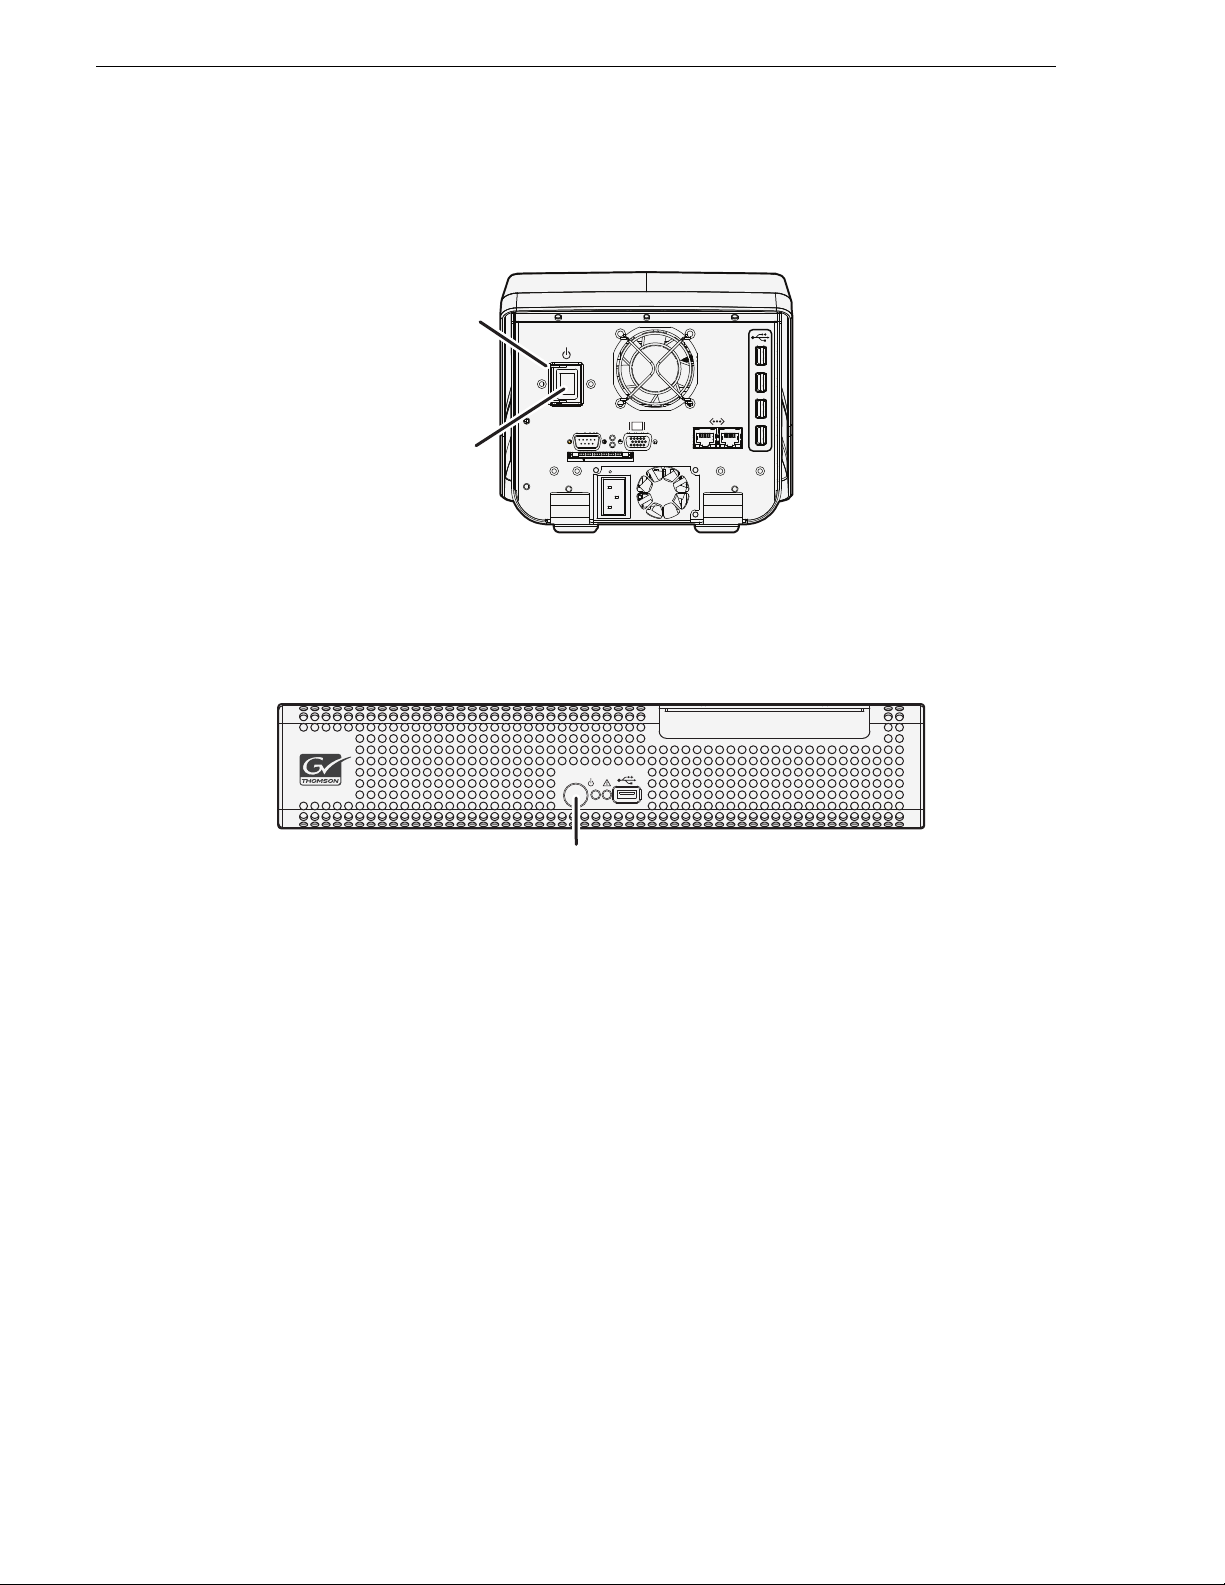
Open
power
switch
door
Press
power
switch
Start up K2 Dyno Controller
There is no logon for the K2 Dyno Controller.
Start up K2 Summit Client
100-240 V~
4A 50-60Hz
RS-232
K2 SUMMIT
PRODUCTION
CLIENT
Press
standby
switch
Log on to the K2 Summit Client with the default Windows administrator account:
• Username: Administrator
• Password: adminK2
(The password is case sensitive)
At first startup, End User License Agreements appear on the K2 Summit Client
screen. Accept the agreements to continue.
The Power LED goes on and stays on. The Service LED stays off. Startup processes
complete in approximately two minutes and the K2 Summit Production Client is
ready for connection and operation.
8 K2 Dyno Replay System Quick Start Guide 13 April 2010
Page 9
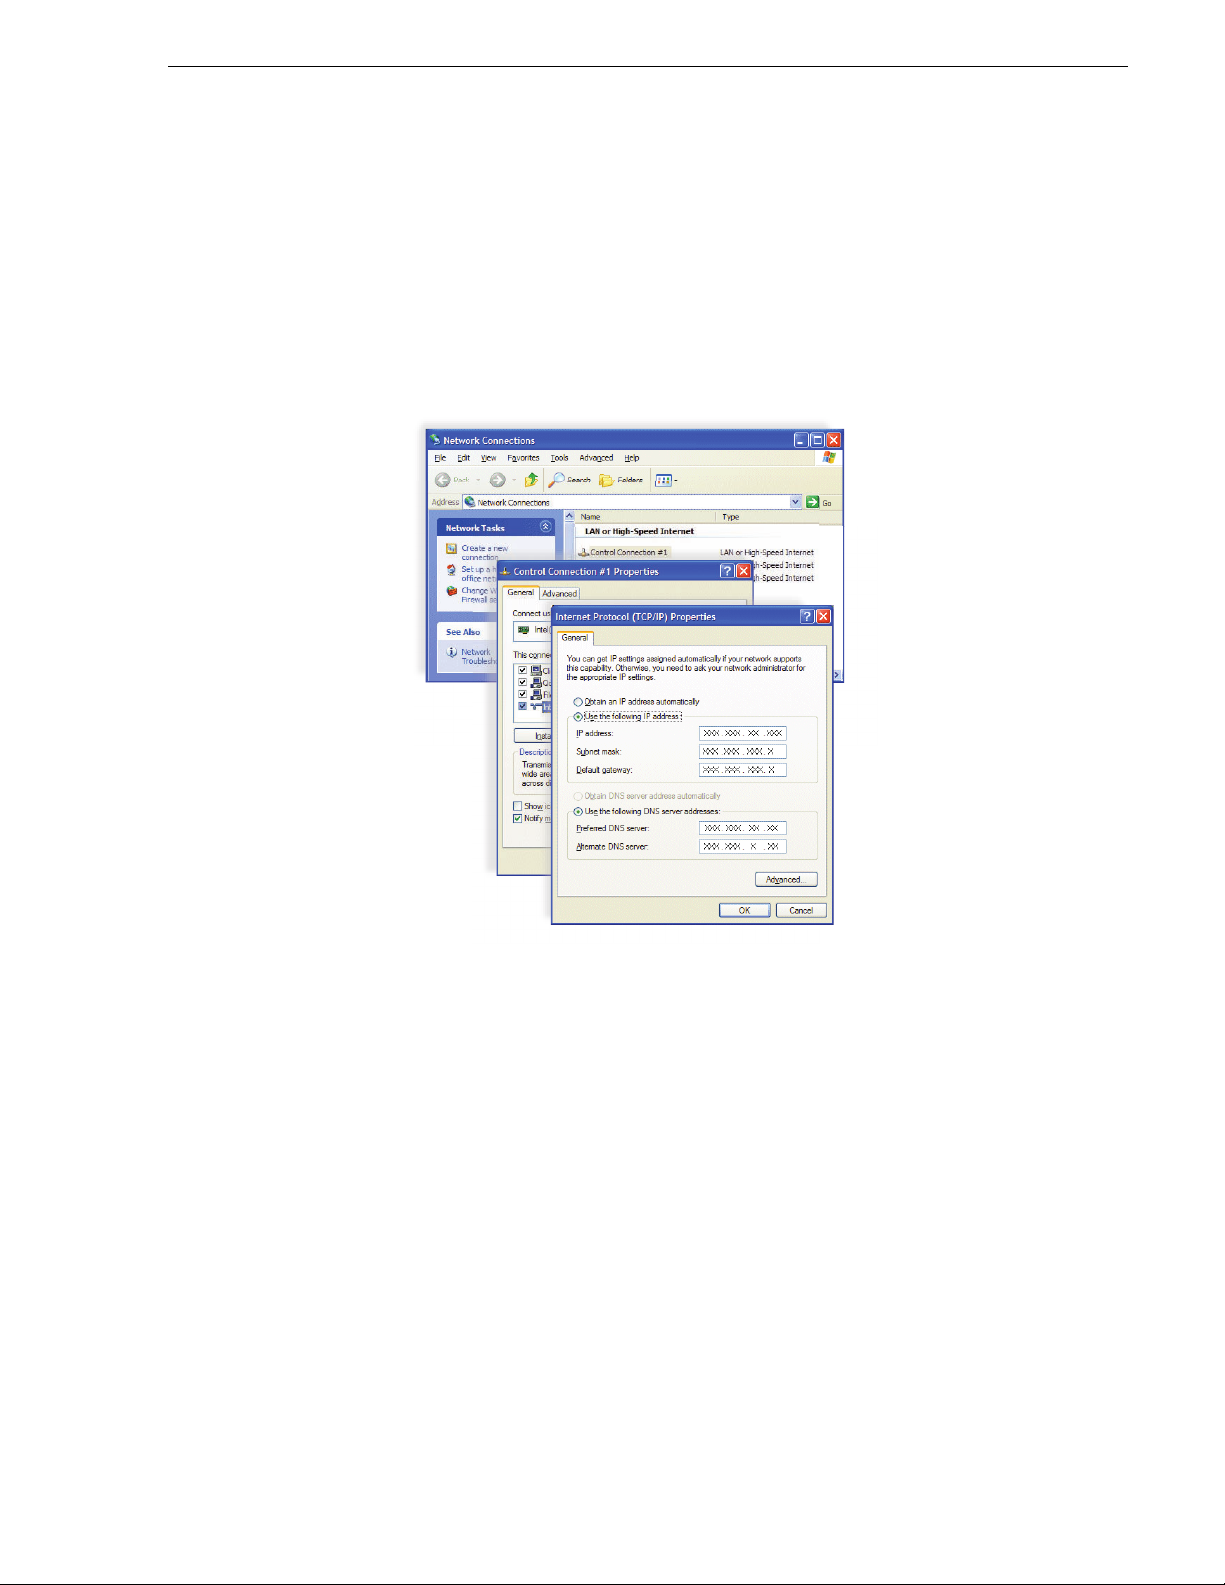
Configure network
On both the K2 Summit Client an d on the K2 Dyno Controller , use standard Windows
operating system proced ures to config ure a static IP addres s. IP addresses must be on
the same subnet. You can also configure a host name if desired.
Configure network
13 April 2010 K2 Dyno Replay System Quick Start Guide 9
Page 10
Chapter 1 Installation
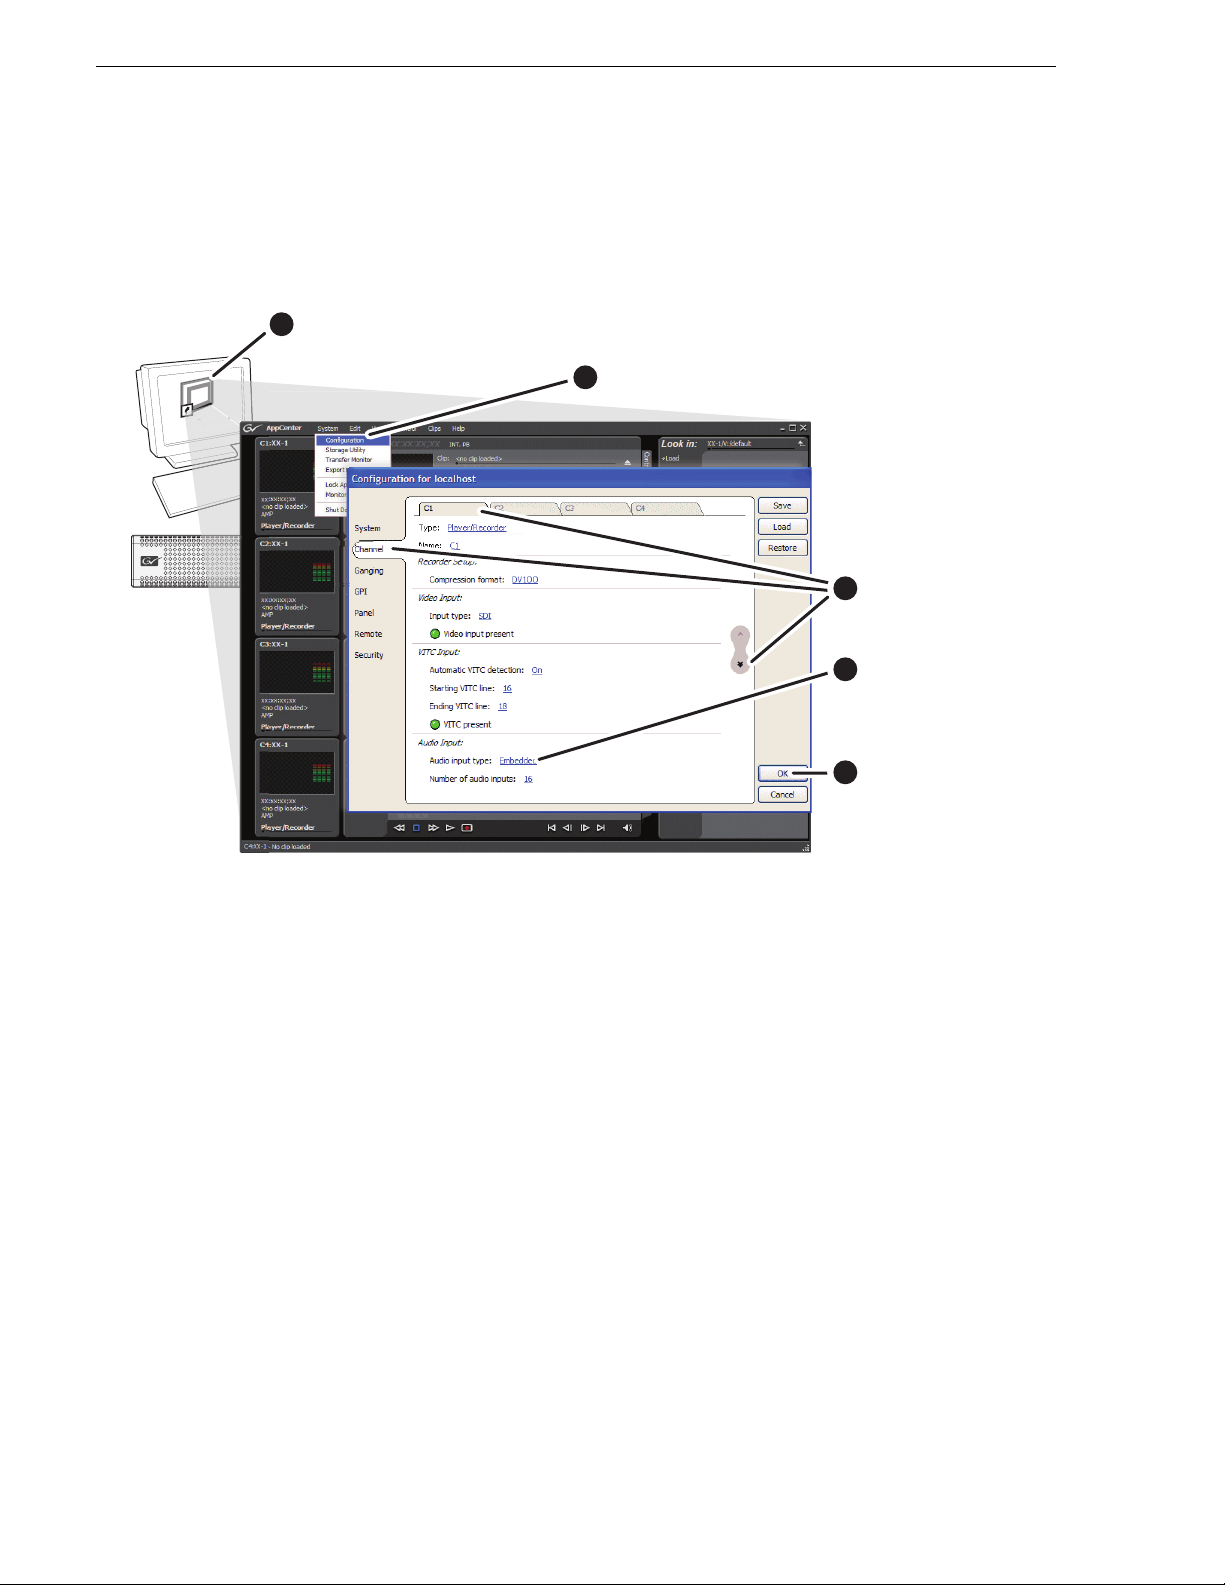
AppCenter
A
Open AppCenter and logon with the K2 administrator account. If a licensing message
appears, refer to K2 Release Notes.
Click System | Configuration.
Click tabs, buttons,
and scroll bar to
locate settings.
Select from drop-down
lists to make settings.
Click OK and Yes
to save settings.
1
2
3
4
5
Configure K2 Summit Client channels
Configure channels according to your required formats and resolutions.
For the default K2 administrator account, use the following to logon:
• Username: K2Admin
• Password: K2admin
(The password is case sensitive)
In Configuration Manager, click
settings for 2 record 2 play mode as follows:
• Configure channels
C1 and C2 as record channels. Make video and audio settings
Channel and then select a channel tab to make
as appropriate for your input.
• Configure channels
C3 and C4 as play channels. Make vi deo and audio setting s a s
appropriate for your output.
If using ChannelFlex Suite™ features, refer to the K2 AppCenter User Manual.
10 K2 Dyno Replay System Quick Start Guide 13 April 2010
Page 11
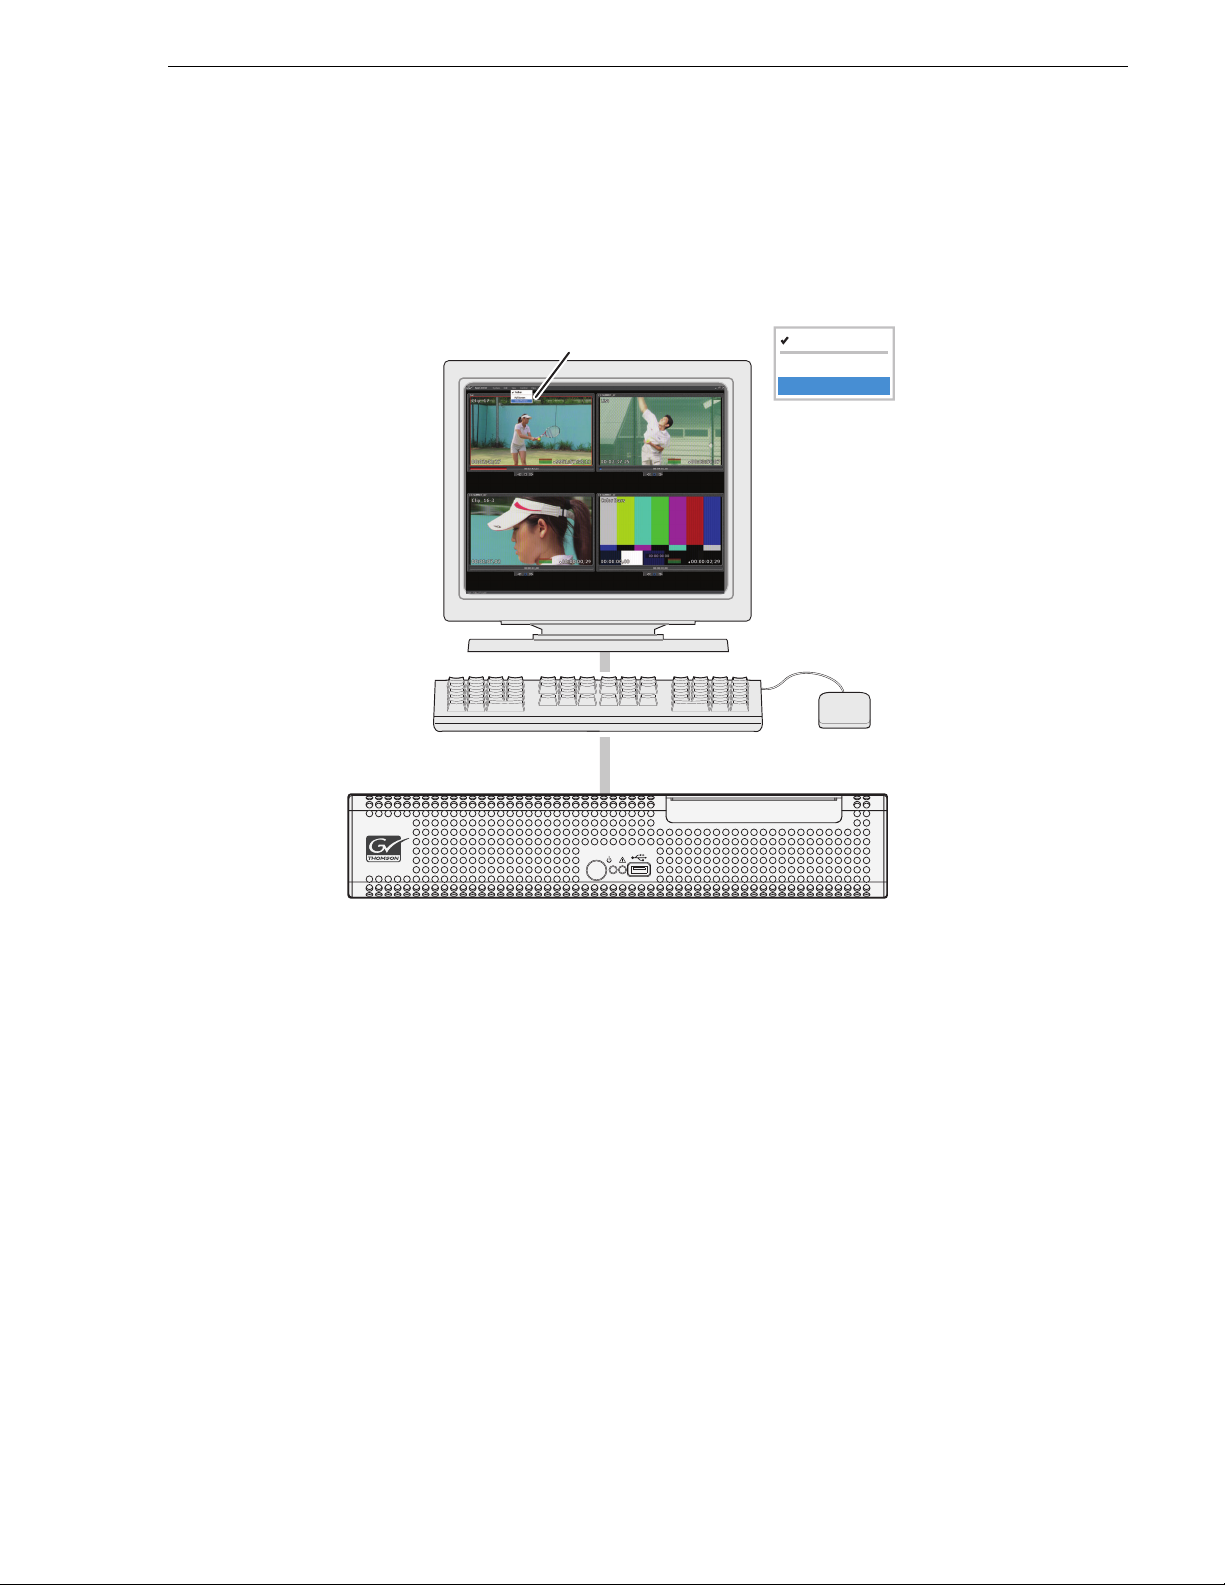
Monitor K2 Summit Client channels
On the VGA monitor connected to the K2 Summit Client, you can monitor the four
channels. This requires an AppCenter Pro license.
Monitor K2 Summit Client channels
In AppCenter, click View | Video Monitor
K2 SUMMIT
Toolbar
Full Screen
Video Monitor
PRODUCTION
CLIENT
You can also double-click on a monitor area in multi-view or control screen to switch
between views.
13 April 2010 K2 Dyno Replay System Quick Start Guide 11
Page 12

Chapter 1 Installation
12 K2 Dyno Replay System Quick Start Guide 13 April 2010
Page 13

K2 Replay
Client
On the K2 Dyno Replay Controller, open K2 Replay Client
1
Select
Configure
2
Select the K2 Summit
Client and Next
3
Select a new session
and Next
4
Set C1 and C2 to Recorder,
C3 and C4 to Player and
Next
5
Set C3 to PGM, C4 to
PVW and Start
6
Chapter 2
Operation
Start a new session
Prerequisite: Dyno Ser ver soft ware must be ins talled on the K2 Summit/ Solo. On the
K2 Summit Production Client that you receive with the K2 Dyno Replay System
(Dyno-Pack), it is pre-installed.
In approximately one minute the K2 Dyno Replay application should appear on the
touch screen and on the VGA screen.
Loop record can be set when you configure a Dyno session, and cannot be changed
during the active recording session. Exporting HL clips and Playlists is best done in
regular record mode (loop record off).
13 April 2010 K2 Dyno Replay System Quick Start Guide 13
Page 14

Chapter 2 Operation
1
Select Home tab
2
Check available
storage
3
Check audio
levels
1
Select A or B input
(camera angle)
M/E
PGM
Send
Goto
P1 P2
PVW
2
Select P1 or P2
playout
View home page st atus
Select input and playout channels
To gang channels, press both P1 and P2 at the same time.
For more information about channel operation modes, refer to “Channel operation
overview” on page 25.
14 K2 Dyno Replay System Quick Start Guide 13 April 2010
Page 15

Replay
M/E
PGM
Send
Goto
P1 P2
PVW
Shift
Chapter 2 Operation
Start Record
1
(button lights red)
Local
Live
Record channel starts
recording
3
Play
or
Fast
Live/Local button
Red = Live: You are watc hing the live video of the
selected channel being recorded.
Local
Live
Shift button
Clear = Bottom function: For each button, the
function shown on the b ottom o f the button
label is currently active.
Tr i m
Ta ke
The Shift button also affects the function of controls displayed on the touch screen.
Press A or B to switch angles during playout.
Refer to “Controller buttons: Reference” on the inside back cover for more
information on button functions.
Slo Mo
playback
2
Jog to playback point
Player channel
program is controlled.
Yellow = Local: You are controlling your replay in
still, slow motion, or normal playout mode .
Local
Live
Yellow = Top function: For each button, the function
Shift
The recording of the live video continues
while you are in this mode.
shown on the to p of the button label is
currently active.
Tr i m
Ta ke
13 April 2010 K2 Dyno Replay System Quick Start Guide 15
Page 16

Chapter 2 Operation
M/E
PGM
Send
Goto
P1 P2
PVW
Capture highlight clip
7
Change
highlight
views*
6
View
highlights on
Highlight tab
1
Locate IN point
5
Add highlight
to HL bin
Add Lib
Add HL
2
Mark IN
To p
In
4
3
Mark OUT
Btm
Out
Locate OUT point
*Highlight views on VGA monitor:
Highlight clip plus metadata keywords
Highlight clip plus thumbnail
Highlight clips in table format
16 K2 Dyno Replay System Quick Start Guide 13 April 2010
Page 17

Add metadata
2
Open the
metadata
screen
1
Select highlight
3
Name highlight*
5
Assign stars
(rating)*
*Keyboard shortcuts:
Name - Ctrl + 4
Keywords - Ctrl + 1, 2, 3
Rating - Ctrl + Space
4
Select preset
keyword names*
6
Select icon
7
Return to
highlight screen
Chapter 2 Operation
13 April 2010 K2 Dyno Replay System Quick Start Guide 17
You can pre-make metadata keywords with the Dyno Keyword Editor application,
which you install on a separate PC. You then import K2 Dyno Editor files (XML) into
the Dyno Controller using the IMP/EXP soft key on the Config menu. See Import
page.
Page 18

Chapter 2 Operation
M/E
PGM
Send
Goto
P1 P2
PVW
Shift
Fn
Play highlight clip
1
Select Highlight tab
2
Select a highlight
3
Cue highlight
You can customize play operations as follows:
• On the VGA monitor click
Auto Cue. In this mode, when you select a
highlight, it is automatically cued up.
• On the VGA monitor click
Auto Play. In this mode, when you select a
highlight, it automatically plays.
• To configure play options, including pre-set play speed, on the controller touch
screen, press
Shift and then touch PLAYOPT.
Auto
Cue
Auto
Play
4
Play highlight.
PLAYOPT
TIMELINE
Match
Cue Up
Fast
• To play at pre-set speed, press
FN and then PLAY.
Fast
18 K2 Dyno Replay System Quick Start Guide 13 April 2010
Page 19

Create a playlist: VGA interface
1
Select Highlight tab
2
3
Select a highlight
Add highlight
to playlist
Press and hold Fn to select multiple highlights
and add to playlist in order selected
New PL
Add PL
Click and drag
highlights into
playlist
You can also move highlight clips within the playlist using the mouse.
Chapter 2 Operation
Create a playlist: Controller interface
On the controller to uch screen, sele ct the Playlist ta b to see the highl ight clip adde d to
the playlist.
13 April 2010 K2 Dyno Replay System Quick Start Guide 19
Page 20

Chapter 2 Operation
2
Select mix effects
M/E
PGM
Send
Goto
P1 P2
PVW
3
Play the playlist
with mix effects
4
Skip to next highlight
with flying mix effects
1
Cue playlist (press 3 times)
M/E
PL
M/E
PL
M/E
PL
++
M/E
PL
+
Fast
Tr i m
Ta ke
Shift
M/E
Play a playlist with mix effects
Additional controls for mix effects are as follows:
• To select mix effects, press
Shift . The Flying M/E button lights green when
Shift
M/E is on.
• To configure mix effects, such as duration times and transition types, touch the
CONFIG tab, scroll with < or >, and then touch M/E.
• Playlist target duration can be adjusted on the Playlist tab.
20 K2 Dyno Replay System Quick Start Guide 13 April 2010
Page 21

Import
1
4
Select
External Clip
3
Touch
Imp/Exp
2
Select
CONFIG
tab
1
Insert
USB
drive
1
6
Double-touch
to open USB
drive
5
Touch
IMPORT
7
Select
a clip
8
Touch LOAD
The clip is imported to the V drive
1
Chapter 2 Operation
On the CONFIG tab touch TransMon to monitor transfer progress. Indicators on
highlight clip thumbnails also show progress.
You can also import key word XML files using the IMP/EXP menu screen. You create
these files with the Dyno Keyword Editor application.
13 April 2010 K2 Dyno Replay System Quick Start Guide 21
Page 22

Chapter 2 Operation
Set export path
1
Insert
USB
drive
2
Select
CONFIG tab
3
Touch NETWORK
1
5
Select the USB drive
4
Touch
Local
Controller
11
Select
HIGHLIGHT
tab
6
Touch SELECT
7
Touch PRIMARY or ALL
8
Touch APPLY*
9
Turn the path ON
10
Touch APPLY*
13
Press Shift
Shift
12
Select
highlight clip
14
Press Send
Send
Goto
You can similarly set and/or select other paths.
On the
CONFIG tab touch TransMon to monitor transfer progress. Indicators on
highlight clip thumbnails also show progress.
22 K2 Dyno Replay System Quick Start Guide 13 April 2010
Page 23

Manage bins
1
Select HIGHLIGHT tab
3
Browse up to
see bins
Chapter 2 Operation
2
Open the
bin screen
1
4
Double-touch to
open a bin
5
Rename bin. Use
keyboard if desired.
Touch < or > to navigate between bins.
13 April 2010 K2 Dyno Replay System Quick Start Guide 23
Page 24

Chapter 2 Operation
Shutdown K2 Dyno Controller
1
Select
CONFIG tab
2
Press Shift
3
Touch
SHUTDOWN
Shift
4
Touch
Close
Session
5
Touch QUIT
The Dyno controller application closes and the
Windows operating system shuts down.
You can also select RETURN TO INITIAL SCREEN rather than SHUTDOWN to close the
current session and return to the session start up screen.
24 K2 Dyno Replay System Quick Start Guide 13 April 2010
Page 25

Channel operation overview
The following sections explain channel operation modes.
Standard mode
3 Record, 1 Playback/PGM
K2 Summit Client
Record Record Record Play
Chapter 2 Operation
C1 C4C3C2
A
DCB
K2 Dyno Controller
• The 3 Record and 1 Playba ck channel set-up is don e when the session is configured
at start-up screen
• A,B,C angles can be selected for playback on the D (P2) channel
• In this mode the P1 and P2 Player channel always illuminates red.
Multichannel independent mode
2 Record, 2 Playback. Also known as “A-Side, B-Side”.
Record
C1
A
P2
PGM playout
P2
with transitions
Record
C2
B
Play Play
P2P1
C3
P1
Cue A or B angle on P1
or P2 channel.
Playback independently
C4
P2
Select either P1 or
P2 button to control
that playout channel.
• The 2 Record and 2 Playba ck channel set-up is don e when the session is configured
at start-up screen
• A,B, angles can be selected for playback on P1 or P2
• P1 and P2 playout channel cont ent can be “swapped” by press ing butt ons Fn then
Take.
13 April 2010 K2 Dyno Replay System Quick Start Guide 25
Page 26

Chapter 2 Operation
A
Record
Record
Play Play
P2 gangP1 gang
C1
C4
P2
C3
P1
B
C2
Cue A or B angle on P1
or P2 channel.
Playback independently
then put in Gang mode.
Press both P1 and
P2 buttons at same
time to enter Gang
mode. Press P1 or
P2 to get out of
Mutichannel mode.
Multichan nel + gang mode
2 Record, 2 Playback. Player channels in sync.
• The 2 Record and 2 Playba ck channel set-up is do ne when the session is configured
at start-up screen
• A,B, angles can be selected for playback on the P1, (C3) or P2 (C4)
• Gang operation is b ased on Inde pendent mode with se lection of both cha nnels and
turning on gang
Preview/Program mode
2 Record, 1 Playback/PGM, 1 Preview.
Toggle Preview
control mode
on and off.
Press Shift
then PVW or
PGM button
• The 2 Record and 2 Playback channel set-up is done when the session is configured
• A,B, angles can be selected for playback on the C Program (C3) an d D (C4) Previ ew
• In this mode, the PVW butt on illumin ates yellow when PGM is s elected. PVW lights
• P1 and P2 playout channel content can be “swapped” by pressing buttons Fn then
at start-up screen
green when selecte d and the Ta ke button illu minates gr een to ind icate ready for Take
to PGM channe l.
Take.
Record
C1
A
Play Play
C3
P1
TAKE
Cue A or B angle on
Preview channel.
Record
C2
B
C4
P2
PVWPGM
Press Take to
put Preview
cued point onto
Program.
26 K2 Dyno Replay System Quick Start Guide 13 April 2010
Page 27

ChannelFlex Suite modes
K2 Summit Client
K2 Dyno Controller
SDI IN2 (B)
SDI IN1 (A)
C1
SDI out )
SDI out
C3
PGM
P1
Record
Play
PVW
P2
C4
SDI IN1 (C)
SDI IN2 (D)
C2
K2 Summit Client
K2 Dyno Controller
SDI IN3
SDI IN2
SDI IN1
C1
SDI out )
SDI out
C3
PGM
P1
Record
Super Slo-Mo
Play
PVW
P2
C4
SDI IN1 (C)
SDI IN2 (D)
C2
(A)
Dyno-Packs are available to provide ChannelFlex Suite features, such as those
illustrated.
K2 SUMMIT
PRODUCTION
CLIENT
Chapter 2 Operation
PRODUCTION
K2 SUMMIT
CLIENT
13 April 2010 K2 Dyno Replay System Quick Start Guide 27
Page 28

Chapter 2 Operation
To open the Setup screen, press
three buttons at the same time
Fn
Shift
Tips and shortcuts
• To configure play options , press the Shift button and t hen on the touch scre en select
PLAYOPT.
• To assign a rating (stars) to a highlight clip, use keyboard shortcut
• The Shift button toggles between the top and bottom functions, as labeled on the
controller’s b uttons. The Shift b utton also affec ts the function of controls displ ayed
on the touch screen.
• From the Setup Screen, y ou can adjust con troller panel at tributes, such as LCD and
button brightness, and optimize jog knob sensitivity to 5% or 10%.
Send
Goto
Ctrl + Space.
PGM
PVW
P1 P2
M/E
28 K2 Dyno Replay System Quick Start Guide 13 April 2010
Page 29

Chapter 2 Operation
• You can adjust th e s peed, range, and other par amet er s o f t he jog knob and the T-bar .
On the Config tab, touch
with settings.
• You can lock/unlock the controller panel (buttons, jog knob, and T-bar) to prevent
accidental operations. On the Home tab, at the bottom of the screen, touch
(On Air Lock).
• To play an angle from the beginning of the clip, press
• Swap channels between PI and P2 playout channels by pressing
• Set T-Lever control and knob spee d/response in Config menu, Play- 2 and Play-3 tabs.
< or > and then touch PLAY2 or PLAY3 to access screens
OALOCK
FN and then press A or B or C.
Fn and then Take.
13 April 2010 K2 Dyno Replay System Quick Start Guide 29
Page 30

Chapter 2 Operation
30 K2 Dyno Replay System Quick Start Guide 13 April 2010
Page 31

Chapter 3
Problems and solutions
The following table provides corrective action for some common problems.
Problem Possible Cause Corrective Action
Dyno Replay Controller can
not connect to K2 Summit
Client.
Bad cable connection or network
setup.
Check network cable connections. At the Command
Prompt, ping the networ k IP add re s s.
Play channel vid e o ou tpu t is
periodically unstable in E-to-E
mode.
The channel output is black in
E-to-E, but playback is fine.
Audio level too high or too low Record or play channel audio
Compression artifacts are
present in the output.
Digital video display device
does not display properly .
Video reference is not connected. If E-to-E mode is used, you must connect a video
Loss of input signal. Verify that you have a valid input signal .
level adjusted too low.
SD video data rate setting is too
low for your program material.
Wrong video output type selected
for the Play channel.
reference signal.
In Summit AppCenter, use the audio level in recorder
to adjust audio level. Use audio lev el adjust in player
to adjust audio output level.
In Summit AppCenter, se lec t high e r SD vid e o data
rate.
Verify and select video output type required by the
display device (see di splay device manuals).
13 April 2010 K2 Dyno Replay System Quick Start Guide 31
Page 32

Chapter 3 Problems and solutions
Finding more information
You can find the information you need in product manuals and elsewhere.
K2 Dyno Release Notes and K2 Release Notes — The release notes contain the latest
information about the software shipped on your system. The information includes
software upgrade instructions, software specifications, software requirements, feature
changes from the pr evi ous releases, and any known problems. Because release notes
contain the latest information, they are provided as a printed document, rather than
being included on the Documentation CD-ROM.
K2 Summit Production Client Quick Start Guide — You receive this guide in the
product packaging with your K2 Summit Production Client. The Quick Start Guide
provides step-by-step installation instructions for basic installation and operation of
your K2 Summit Production Client, including recording and playing clips.
K2 Documentation CD — Except for the release notes, the full set of support
documentation, including this Quick Start Guide, is available on the Documentation
CD-ROM that you receive with your product. The K2 Documentation CD includes
the following document s:
K2 Dyno Installation Manual — Provides instructions for a installing a K2 Dyno
•
Replay System using a K2 Solo Media Server or a K2 Summit Production Client
that is not part of a Dyno-Pack and has not been previously controlled by a K2
Dyno Controller.
K2 Dyno User Manual — Provides instruc tions for configuring and op erating the K2
•
Dyno Replay Application via the controller and the VGA interface.
•
K2 Dyno Service Manual — Contains information on servicing and maintenance.
•
K2 System Guide — Contains the product specifications and step-by-step
instructions for modifying system settings.
•
K2 AppCenter User Manual — Provides instructions for configuring and operating
the media channels of the K2 Summit Production Client.
•
K2 Summit Production Client Service Manual — Contains inf ormation on servicin g
and maintenance.
•
K2 Solo Media Server Service Manual — Contains information on servicing and
maintenance.
32 K2 Dyno Replay System Quick Start Guide 13 April 2010
Page 33

Grass Valley Product Support
To get technical assis tance, check on the statu s of a question, or to re port a new issues,
contact Grass Valley Product Support via e-mail, the Web, or by phone or fax.
Web Technical Support
To access support infor mation on the Web, v isit the pr oduct support Web page on the
Grass Valley Web site. You can download software or find solutions to problems.
World Wide Web:http://www.grassvalley.com/support/
Technical Support E-mail Address:gvgtechsupport@grassvalley.com
Telephone Support
Use the following information to contact Product Support by phone.
International Support Centers
Our international support centers are available 24 hours a day, 7 days a week.
Grass Valley Product Support
Support Center Toll free In country
France +800 80 80 20 20 +33 1 48 25 20 20
United States +1 800 547 8949 +1 530 478 4148
Authorized Local Support Representative
A local support represen ta ti ve ma y be avai l abl e in your count ry. To locate a support
center duri ng normal local business hours, refer to the following list. Th is list is
regularly updated on the website for Grass Valley Product Support
(http://www.grassvalley.com/support/contact/phone/)
After–hours local phone support is also available for warranty and contract
customers.
Region County Telephone
Asia China +86 10 5883 7575
Hong Kong, Taiwan, Korea,
Macau
Japan +81 3 6848 5561
Southeast Asia - Malaysia +603 7492 3303
Southeast Asia - Singapore +65 6379 1313
India +91 22 676 10300
+852 2531 3058
Pacific Australia 1 300 721 495
New Zealand 0800 846 676
For callers outside Australia or
New Zealand
13 April 2010 K2 Dyno Replay System Quick Start Guide 33
+61 3 8540 3650
Page 34

Chapter 3 Problems and solutions
Region County Telephone
Central Amer ic a , South America All +55 11 5509 3440
North America North America, Mexico,
Europe UK, Ireland, Isr a e l +44 118 923 0499
+1 800 547 8949;
Caribbean
Benelux – Netherlands +31 (0) 35 62 38 421
Benelux – Belgium +32 (0) 2 334 90 30
France +800 80 80 20 20;
+1 530 478 4148
+33148252020
Germany, Austria,
Eastern Europe
Belarus, Russia, Tadzhikistan,
Ukraine, Uzbekistan
Nordics (Norway, Sweden,
Finland, Denmark, Iceland)
Southern Europe – Italy Rome: +39 06 87 20 35 28 ; +39
Southern Euro pe – Spain +34 91 512 03 50
Switzerland +41 56 299 36 32
Middle East, Near East, Africa Middle East +971 4 299 64 40
Near East and Africa +800 80 80 20 20;
+49 6150 104 444
+7 095 258 09 20;
+33 (0) 2 334 90 30
+45 40 47 22 37; +32 2 333 00 02
06 8720 35 42. Milan: +39 02 48
41 46 58
+33148252020
Waste Electrical and Electronic Equipment Directive
34 K2 Dyno Replay System Quick Start Guide 13 April 2010
Page 35

Waste Electrical and Electronic Equipment Directive
13 April 2010 K2 Dyno Replay System Quick Start Guide 35
Page 36

Controller buttons: Reference
1234 56 78
9
10 11 12 13 14 15 16
17
18
19
20
21
New PL
1
Create new playlist
Add PL
Add current selected item to PL as bottom
event
12
Fn
Invokes special functions
Add Lib
2
3
Add clip to Libra ry type bin
Add HL
Add selected item to selected Highlight bin.
Match
Match to timecode point in record train
Cue Up
Cue up current selected item
Enable Shift Function. On buttons, toggles
Shift
4
between top and bottom functions. On touch
screen, similarly toggles function of controls.
Fast
5
6
Toggles Fast Jog on/off
Z
Play
Open
Open selected playlist
Stop
■
13
14
15
16
17
Local
Switch between local (playback) and
Live
live (record)
Brws
Browse using knob
Add Mrk
Adds mark at current point
PGM
Toggles Preview/Program mode
P1
Player 1 output channel sel ection
PVW
Toggles Preview/Program mode
P2
Player 2 output channel sel ection
M/E
Turn on/off Flying M/E (Lights gre e n)
PL
Open Playlist page . If cue p oint not i n PL, cue
up last. If cue point in PL, cue up first.
Send
7
8
9
Navigate to previous
Navigate to next
D
Change current angle to D
A
Change current angle to A
18
19
20
Send clip to preset path
Goto
Go to selection, HL, TC
Top
Cue up beginning of clip
Mark in point
Btm
Cue up to end of clip
Mark out point
E
10
11
Change current angle to E
B
Change current angle to B
F
Change current angle to F
C
Change current angle to C
• Pressing Shift then Live/Local returns to the Home screen.
• For other buttons, the Shift button toggles between top and bottom functions.
• To lock/unlock buttons, on the Home tab, at the bottom of the screen, touch
• To multi-select, press and hold
Trim
21
Trim HL or event in and out point
Take
Skip to next event in pl aylist. Swap video on
preview channel and program channel,
complete Trim function.
OALOCK (On Air Lock)
Fn. Highlight clips are added to playlist in order selected.
 Loading...