

Page 1

Grandstream Networks, Inc.
126 Brookline Ave, 3rd Floor
Boston, MA 02215. USA
Tel : +1 (617) 566 - 9300
Fax: +1 (617) 249 - 1987
www.grandstream.com
For Warranty and RMA information, please visit www.grandstream.com
GXV3610_HD/FHD v2
Day/Night Fixed Dome HD IP CAMERA
Quick Installation Guide
Page 2

Content
English......................................................1
Español...................................................11
Français..................................................21
简体中文................................................31
Deutsch................................................41
Italiano................................................51
Русскй................................................61
Português............................................... 71
Polski.......................................................81
Page 3

EN
12V
PRECAUTIONS
• Do not attempt to open, disassemble, or modify the
device
• Do not use a third party power adapter
• Do not expose this device to temperatures outside
the range of -20 °C to +50 °C for operating or -30 °C
to +60 °C for storage
• Do not expose this device to environments outside
of the following humidity range: 10-90% RH
(non-condensing)
• Please install camera properly for correct function
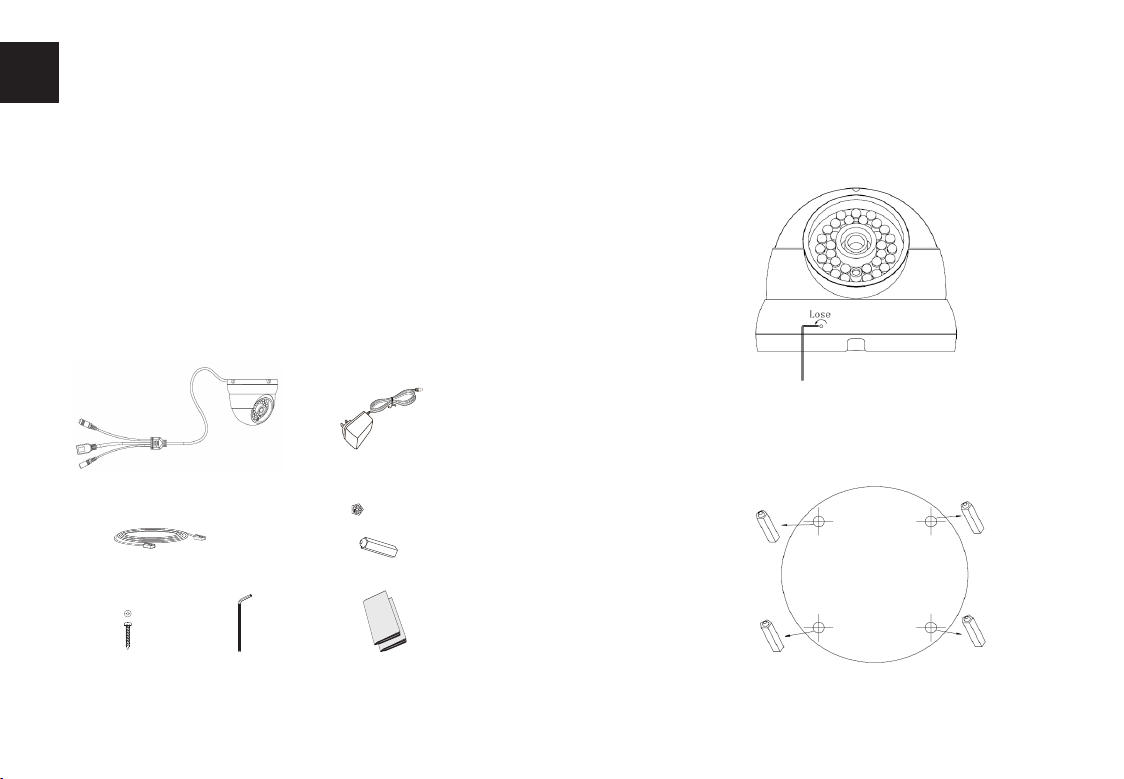
PACKAGE CONTENTS
1 x GXV3610_HD/FHD
1 x 12V Power Supply
MOUNTING GXV3610_HD/FHD
Step 1:
Loosen the screw using the supplied hex key.
Rotate to open the camera collar rings.
Step 2:
Drill holes and use wall anchors if necessary
(reference with supplied drill template)
1 x Ethernet Cable
4 x Screws 1 x Hex Key 1 x Quick Start Guide
4 x Wall Anchors
1 x GPL License
~1~ ~2~
Page 4
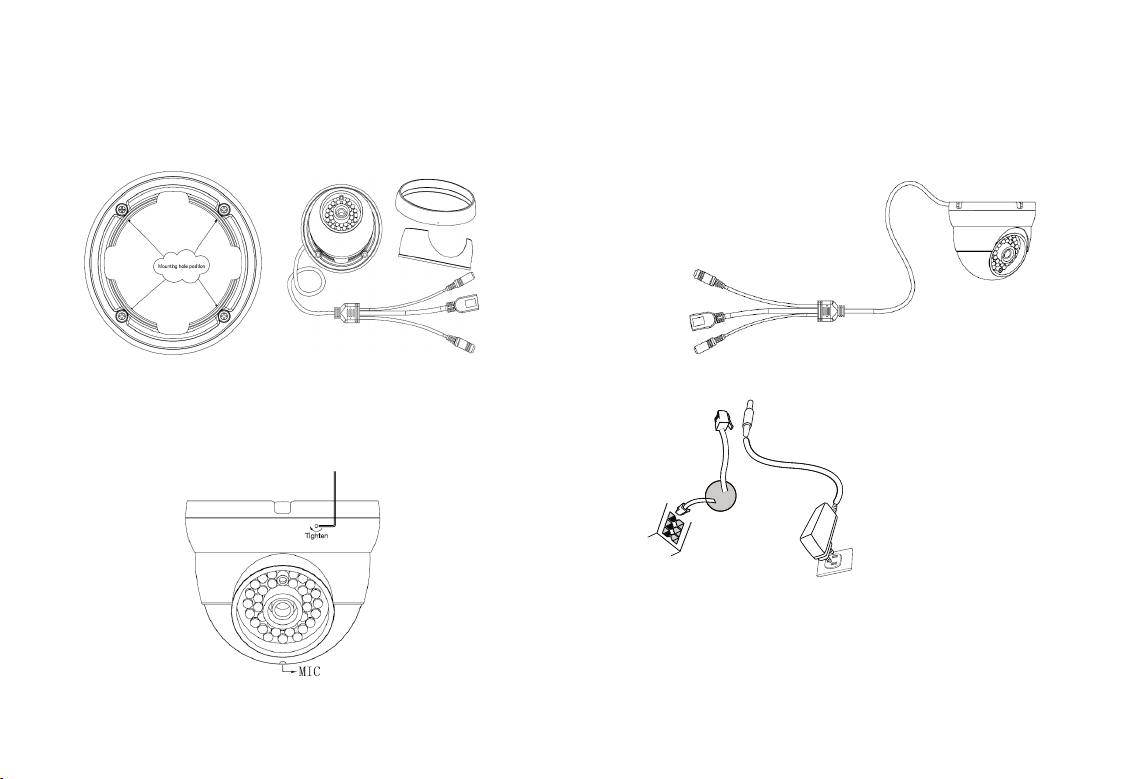
Step 3:
Mount the top collar ring of camera
(with cable out from the slot of top collar ring)
CONNECTING THE GXV3610_HD/FHD
Refer to the illustration below when following the
instructions on the next page.
Step 4:
Reassemble the camera (with microphone exposed
downward), and tighten the screw with hex key.
~3~ ~4~
Network
Port
Option B:
RJ45 Ethernet Cable
to Power over Ethernet
(PoE) Switch
NOTE: Choose Option A if using the power supply; or choose
Option B if using a Power over Ethernet (PoE) switch.
Power Port
Option A:
Power Adapter To AC
Outlet
12V
Page 5
Option A
Step 1: Insert the power adapter into the 12V DC
socket of the tail cable in GXV3610_HD/
FHD. Plug the other end of the adapter
into an AC power outlet.
Step 2: Plug an RJ45 Ethernet cable into the net-
work socket of the tail cable in GXV3610_
HD/HD. Plug the other end into a
switch/hub or router.
Option B
Step 1: Plug an RJ45 Ethernet cable into the
network socket of the tail cable in
GXV3610_HD/FHD. Plug the other end
into a Power over Ethernet(PoE) switch.
NOTE:
Use the Hex Key losing the screw in the middle ring to adjust
camera during installation and tight it when done.
GXV3610_HD/FHD CONFIGURATION
Conguring the GXV3610_HD/FHD using Firefox,
Chrome or Microsoft Internet Explorer (with
related plug-in installed)
Connect the GXV3610_HD/FHD to a DHCP
Server Enabled Network
Step 1: Download and install GS_Search tool:
http://www.grandstream.com/products/
tools/surveillance/GS_Search.zip
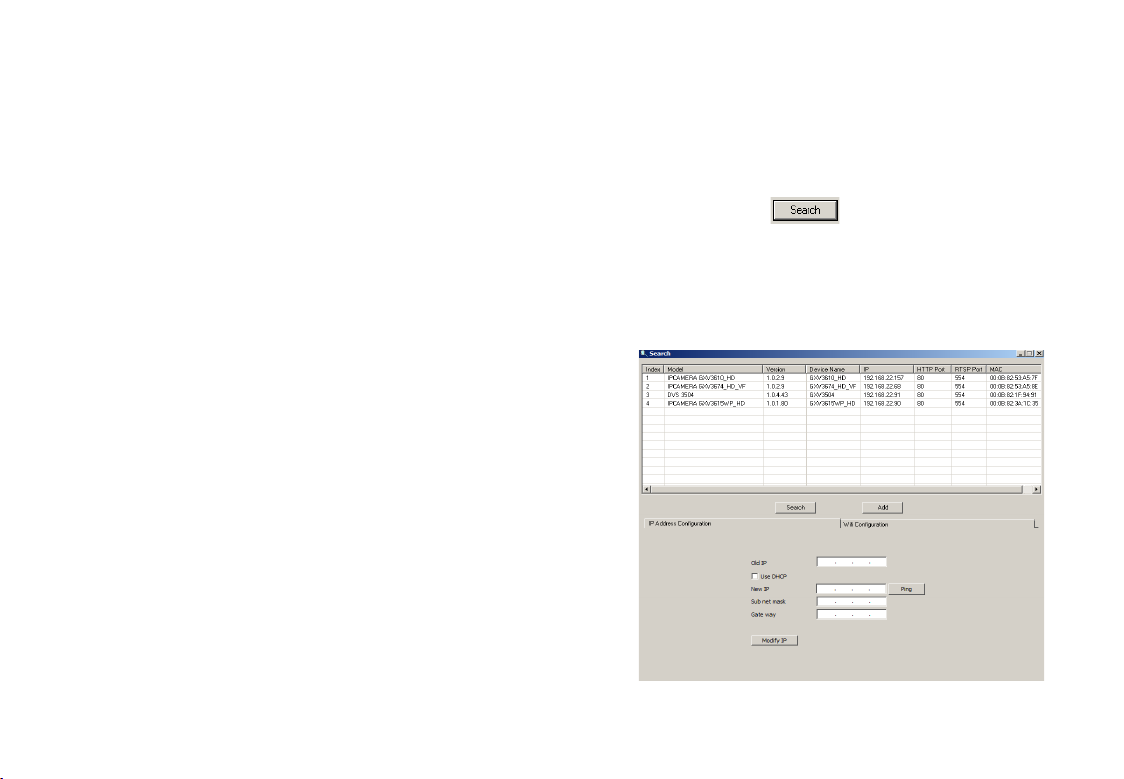
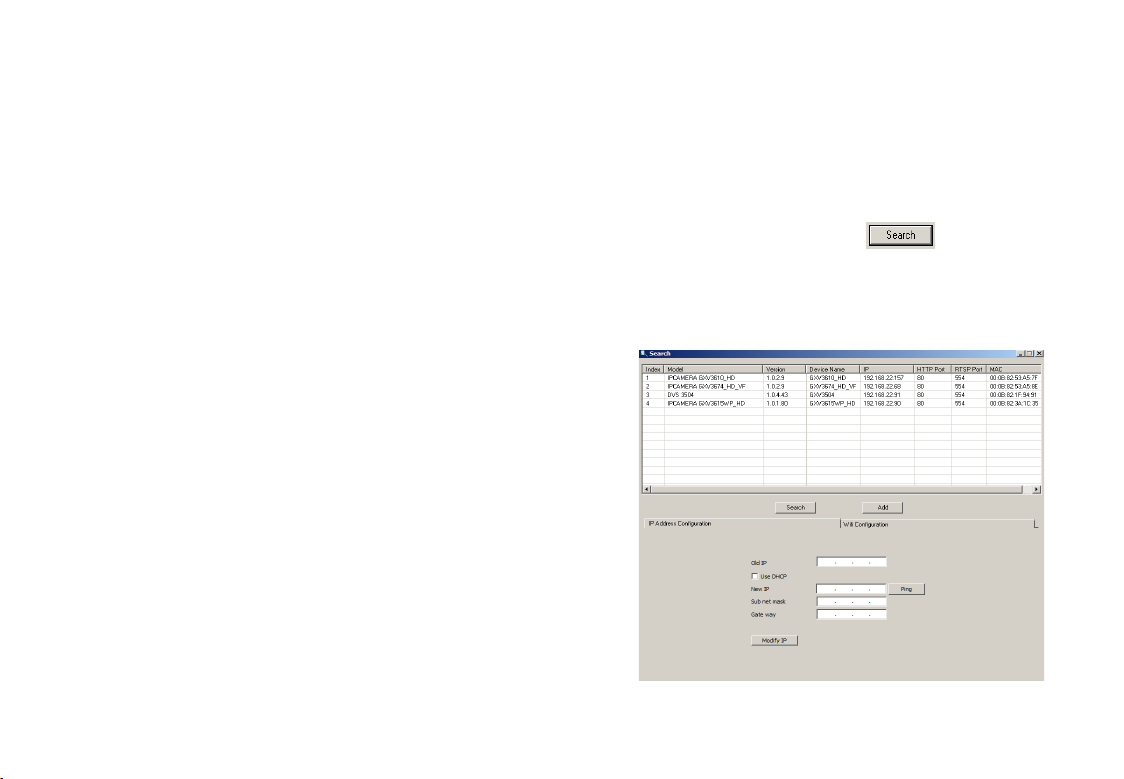
Step 2: Run the Grandstream GS_Search tool.
Step 3: Click on button to start device
detection.
Step 4: The detected devices will appear in the
output eld as below.
~5~ ~6~
Page 6

Step 5: Double click on the detected device. The
default browser(MS IE in this example) will
open displaying the camera’s webGUI.
Step 6: A pop-up window will prompt for user name
& password. The default administrator user
name and password are both set to
“admin” as to after the factory reset.
Step 7: Once you log into the webGUI, the device
will indicate that an Active-X or video plug in is required. Follow the displayed instruc tion to download and install the plug-in.
Step 8: If downloading or installing is unsuccessful
due to browser setting or slow Internet con
nection, please download the les from the
link below. Save and install the program
then restart the browser. The video will now
appear embedded inside the camera’s
web interface.
• Plug-in:
http://www.grandstream.com/products/tools/
surveillance/webcontrl_plugin.zip
Step 9: Here is a sample screenshot with successful
Active-X or Plug-in installation. Click on the
play button to view the video feed.
Step 10: Click through the menu on the left hand side
of the web interface for more advanced
conguration parameters.
~7~ ~8~
Page 7

Connect GXV3610_HD/FHD using Static IP
If the camera does not get response from the DHCP
server or the network without DHCP server, after 3
minutes, it can be accessed by the default IP address
192.168.1.168.
Step 1: Use RJ-45 Ethernet cable to connect your
computer network port directly to the
Ethernet socket of GXV3610_HD/FHD.
Step 2: Run the GS_Search tool as above. It will show
the original IP of the GXV3610_HD/FHD
(default IP address 192.168.1.168).
Step 3: Input the NEW IP Address, Subnet Mask and
Default Gateway, according to your network
conguration. Please check with local system
administrator for the necessary information.
Step 4: Click on “Modify IP”. The desired IP address
will be applied to GXV3610_HD/FHD.
Please download the User Manual, refer to online
documents and FAQ for more detailed information:
http://www.grandstream.com/index.php/products/
ip-video-surveillance/gxv3610
http://www.grandstream.com/support
GXV3610_HD/FHD v2 SPECIFICATIONS
Image Sensor
Sensitivity
Focal Length 3.6 mm
Aperture F1.8
Field Angle (FOV) 100.2°(D) x 77°(H) x 54°(V)
IR Cut Filter Yes. Mechanical
Day & Night Mode Color & B/W mode
Minimum
Illumination
Responsivity HD: 5.48V/lux-sec (550nm)
Maximum Video
Resolution and
Frame Rate
Panning Range 0º - 180º (Manual)
Tilting Range 0º - 180º (Manual)
Day & Night Mode
Shutter: 1/10000 - 1/30 second
IR LED covering up to 10m
0.05 Lux
0 lux with IR LED on
FHD: 1.9 V/lux-sec (550nm)
HD: 1280 x 960 (25fps)
FHD: 2048 x 1536 (15fps)
http://www.grandstream.com/support/tools
~9~ ~10~
Page 8
ES
PRECAUCIONES
• No abrir, desarmar o intentar modicar este equipo
• No use adaptadores de corriente distintos al sumi nistrado
• No exponga este dispositivo a temperaturas fuera
del rango de -20 °C a +50 °C en funcionamiento y
desde -30 °C a +60 °C cuando están almacenadas
• No exponga este dispositivo a ambientes fuera del
siguiente rango de humedad: 10-90% RH
(Sin condensación)
• Por favor, instale la cámara adecuadamente para
un funcionamiento correcto
CONTENIDO DEL PAQUETE
12V
1 x GXV3610_HD/FHD
1 x Cable Ethernet 4 x Anclaje de pared
1 x Adaptador de
corriente de 12 VDC
INSTALACIÓN GXV3610_HD/FHD
Paso 1:
Aoje el tornillo con la llave hexagonal suministrada.
Gire para abrir el anillo de collar de la cámara.
Paso 2:
Perfore los oricios y utilice anclajes de pared si es
necesario (utilice como referencia la plantilla
suministrada).
4 x Tornillos
1 x Llave
exagonal
1 x Guía de Instalación rápida
1 x Licencia GPL
~11~ ~12~
Page 9

Paso 3:
Coloque el anillo de collar de la cámara (con el
cable en la ranura del anillo del collar superior).
CONEXIÓN DE LA GXV3610_HD/FHD
Consulte la siguiente ilustración y siga las instrucciones de la siguiente pagina.
Paso 4:
Re-ensamble la cámara (con el micrófono expuesto hacia abajo), y aprete el tornillo con la llave
hexagonal.
~13~ ~14~
Puerto de
Red
Opción B:
Cable de Red RJ45 a
un switch PoE (Power
over Ethernet)
NOTA: Seleccione la opción A si desea usar la fuente
de poder o seleccione la Opción B si tiene un
switch PoE (Power over ethernet).
Puerto de
Alimentación
Opción A:
Adaptador de corriente
a la toma de CA
12V
Page 10

Opción A:
Paso 1: Conecte el adaptador de corriente en el
conector de 12 VDC que esta en la parte
posterior de la GXV3610_HD/FHD y conecte
el otro extremo del adaptador a una toma
de corriente AC.
Paso 2: Conecte un cable Ethernet RJ45 en el puerto
de red que esta en la parte posterior de la
GXV3610_HD/FHD y conecte el otro
extremo a un switch/hub o router.
Opción B:
Paso 1: Conecte el cable de red Ethernet RJ45 al
conector que esta en la parte posterior de
la GXV3610_HD/FHD y conecte el otro
extremo al switch PoE (Power over Ethernet).
NOTA:
Para ajustar la camara durante la instalación, aoje
el tornillo en el anillo central con la llave hexagonal.
Apriete el tornillo cuando culmine.
CONFIGURACION DE LA
GXV3610_HD/FHD
Conguración de la GXV3610_HD/FHD usando Firefox, Chrome o con Microsoft Internet
Explorer
Conecte la GXV3610_HD/FHD a una red con
un servidor DHCP activo
Paso 1: Descargue e instale la herramienta GS_Search
http://www.grandstream.com/products/tools/
surveillance/GS_Search.zip
Paso 2: Ejecute la herramienta de Grandstream
GS_Search.
Paso 3: Haga Click en botón para iniciar
la detección de dispositivos en la red.
Paso 4: Los dispositivos detectados se mostraran en
el campo de salida como se muestra abajo.
~15~ ~16~
Page 11

Paso 5: Haga Doble click en el dispositivo detectado.
El navegador por defecto (MS IE por
ejemplo) se abrirá mostrando la interfaz web
de la cámara.
Paso 6: Una ventana emergente le pedirá el nombre
de usuario y contraseña. El nombre de usuario
y la contraseña por defecto es “admin”
para la conguración predeterminada de
fábrica.
Paso 7: Una vez que inicie sesión en la interfaz webGUI,
el dispositivo indicará que un Active-X o el
plug-in de vídeo es necesario. Siga las
instrucciones que aparecen para la
descargar e instalación del plug-in.
Paso 8: Si la descarga/instalación no es correcta de-
bido a la conguración de su navegador o
debido a una conexión lenta a Internet, des cargue los archivos desde el siguiente enlace.
Descargue e instale el programa y reinicie el
navegador. El vídeo se mostrara ahora dentro
de la interfaz web de la cámara.
• Plug-in:
http://www.grandstream.com/products/tools/
surveillance/webcontrl_plugin.zip
Paso 9: Aquí esta una captura de pantalla con un
ejemplo de una instalación exitosa del
Active-X o del Plug-in. Haga clic en el botón
play para reproducir el vídeo.
Paso 10: Haga clic en el menú de la parte izquierda
de la interfaz web para mas parámetros de
conguración avanzados.
~17~ ~18~
Page 12

Conecte la GXV3610_HD/FHD usando
IP estática
Si la cámara no recibe una respuesta desde el servidor
DHCP o la red no tiene un servidor DHCP, después de
3 minutos, se puede acceder por la dirección IP predeterminada 192.168.1.168.
Paso 1: Use el cable de red Ethernet RJ45 para cone ctar el puerto de red de su computadora dir ectamente al conector Rj45 de la
GXV3610_HD/FHD.
Paso 2: Ejecute la herramienta GS_Search como se
indica anteriormente, se mostrara la IP de la
GXV3610_HD/FHD (La dirección IP por
defecto es 192.168.1.168).
Paso 3: Ingrese la nueva dirección IP, mascara de red,
y puerta de enlace predeterminada de acu-
erdo a la conguración de su red, por favor
contacte al administrador de su red para la
información necesaria.
Paso 4: Haga Click en “Modicar IP”. La dirección IP
deseada se aplicara en la GXV3610_HD/FHD.
Por favor, descargue el Manual del usuario, consulte
la documentación en línea y preguntas frecuentes
para obtener información más detallada.
http://www.grandstream.com/index.php/products/
ip-video-surveillance/gxv3610
http://www.grandstream.com/support
http://www.grandstream.com/support/tools
ESPECIFICACIONES DE LA
GXV3610_HD/FHD v2
Sensibilidad del
sensor de imagen
Longitud Focal 3.6 mm
Apertura F1.8
Ángulo de campo
(FOV)
Filtro de corte IR Si, Mecánico
Modo día y noche Modo a color y blanco y
Iluminación mínima 0.05 Lux
Responsividad HD: 5.48V/lux-sec (550nm)
Resolución máxima
de vídeo y velocidad
de cuadro
Rango panorámico 0º - 180º (Manual)
Rango de inclinación 0º - 180º (Manual)
Modo día y noche
Obturador:
1/10000 – 1/30 segundos
100.2°(D) x 77°(H) x 54°(V)
negro, cobertura del LED IR
de hasta 10m
0 Lux con el LED IR
FHD: 1.9V/lux-sec (550nm)
HD: 1280 x 960 (25fps)
FHD: 2048 x 1536 (15fps)
~19~ ~20~
Page 13

PRECAUTIONS
FR
• Ne pas tenter d’ouvrir, de désassembler, ou de
modier le dispositif
• Ne pas utiliser un adaptateur d’alimentation tiers
• Ne pas exposer cet appareil à des températures en
dehors de la plage des -20°C à +50°C en opération
ou de -30°C à +60°C en stockage
• Ne pas exposer cet appareil à un environnement
avec humidité en dehors de la plage de 10-90% RH
(sans condensation)
• Veuillez convenablement installer la caméra pour
un fonctionnement correct.
CONTENU DU PACK
1 x GXV3610_HD/FHD
12V
1 x 12V Adaptateur
d’alimentation
INSTALLATION DU GXV3610_HD/FHD
Etape 1:
Desserrez la vis en utilisant la clé Hex fournie. Tournez
pour ouvrir les anneaux de collier de la caméra.
Etape 2:
Percez les trous et utilisez des chevilles si nécessaire
(en référence au modèle de perçage fourni)
1 x Câble Ethernet
4 x Vis 1 x Clé Hexagonale
~21~ ~22~
4 x Attaches murales
1 x Guide d’Installation
Rapide, 1 x Licence GPL
Page 14

Etape 3:
Montez l’anneau du col supérieur de la caméra
(avec câble hors de la fente de l’anneau du col
supérieur)
CONNEXION DU GXV3610_HD/FHD
Reportez-vous à l’illustration ci-dessous en suivant les
instructions sur la page suivante.
Etape 4:
Réassemblez la caméra (avec microphone exposé
vers le bas), et resserrez la vis avec la clé Hex.
~23~ ~24~
Port
Réseau
Option B:
Câble Ethernet RJ45 à un switch avec
port Ethernet pré-alimenté (PoE)
NOTE: Choisissez l’option A si vous utilisez l’alimentation,
ou choisissez l’option B si vous utilisez un switch
à port Ethernet pré-alimenté (PoE).
Port d’alimentation
Option A:
Adaptateur d’alimentation
à une prise électrique
12V
Page 15
Option A
Etape 1: Insérez l’adaptateur d’alimentation dans le
port 12V DC du GXV3610_HD/FHD.
Branchez l’ autre extrémité à une prise
électrique.
Etape 2: Branchez un câble Ethernet RJ45 au port
réseau. Branchez l’ autre extremité à un hub/
switch ou routeur.
Option B
Etape 1: Branchez un câble Ethernet RJ45 sur le port
réseau du GXV3610_HD/FHD.
Branchez l’autre extrémité à un switch
avec port Ethernet pré-alimenté (PoE).
NOTE:
Utilisez la clé héxagonale pour desserrer la vis située
dans l’anneau du milieu an de régler la caméra durant l’installation et serrez la lorsque vous terminez.
CONFIGURATION DU GXV3610_HD/FHD
Congurer le GXV3610_HD/FHD en utilisant le
navigateur Firefox, Chrome ou Microsoft Internet Explorer (avec plugin installé)
Connecter le GXV3610_HD/FHD à un serveur
DHCP
Etape 1: Téléchargez et installez l’outil GS_Search:
http://www.grandstream.com/products/tools
/surveillance/GS_Search.zip
Etape 2: Exécutez l’outil Grandstream GS_Search.
Etape 3: Cliquez sur le bouton pour lancer la
détection des appareils.
Etape 4: Les appareils détectés s’afcheront dans le
champ de sortie comme ci-dessous.
~25~ ~26~
Page 16

Etape 5: Double cliquez sur l’appareil détecté. Le
navigateur par défaut (MS IE dans cet
exemple) s’exécutera en afchant l’interface
web de la caméra.
Etape 6: Une fenêtre pop-up invitant à entrer un nom
d’utilisateur et un mot de passe apparaîtra.
Le nom d’utilisateur et le mot de passe
administrateur sont congurés initialement
à “admin”.
Etape 7: Une fois connecté sur l’interface WebGUI
l’appareil indiquera qu’un Active-X ou
plugin vidéo est requis. Suivez les instructions
afchées pour télécharger et installer le
plugin vidéo.
Etape 8: Si le téléchargement/installation échoue à
cause des paramètres du navigateur ou
de lenteur de connexion Internet, veuillez
télécharger les chiers à partir du lien suivant.
Enregistrez et installez le programme
puis redémarrez le navigateur. La vidéo
sera maintenant afchée.
• Plug-in:
http://www.grandstream.com/products/tools/
surveillance/webcontrl_plugin.zip
Etape 9: Voici une capture d’écran montrant une
installation réussie de l’Active-X ou Plugin.
Etape 10: Pour les paramètres de conguration
avancés cliquez sur le menu dans la partie
gauche de l’interface web.
~27~ ~28~
Page 17

Connecter le GXV3610_HD/FHD en utilisant
une adresse IP Statique
Si la caméra ne reçoit pas de réponse du serveur DHCP
ou qu’il n’y pas de serveur DHCP sur le réseau, au bout
de 3 minutes, vous pouvez y accéder par l’adresse IP
par défaut 192.168.1.168.
Etape 1: Utilisez un câble Ethernet RJ-45 pour connec ter le port réseau de votre PC directement
au port réseau du GXV3610_HD/FHD.
Etape 2: Exécutez l’outil GS_Search comme ci-dessus.
Il afchera l’adresse IP originale du
GXV3610_HD/FHD
(adresse IP par défaut 192.168.1.168).
Etape 3: Saisissez la NOUVELLE adresse IP, Masque du
Sous-Réseau et la passerelle par défaut, sui-
vant la conguration de votre réseau. Veuill-
ez consulter votre administrateur système
pour les informations nécessaires.
Etape 4: Cliquez sur “Modify IP”. L’adresse IP souhaitée
sera appliquée au GXV3610_HD/FHD
Veuillez télécharger le Manuel d’Utilisateur, consultez
les documents en ligne et FAQ pour des informations
plus détaillées.
http://www.grandstream.com/index.php/products/
ip-video-surveillance/gxv3610
http://www.grandstream.com/support
http://www.grandstream.com/support/tools
SPECIFICATIONS DU GXV3610_HD/FHD v2
Sensibilité Capteur
d'Images
Distance Focale 3.6 mm
Ouverture F1.8
Angles de vue (FOV) 100.2°(D) x 77°(H) x 54°(V)
Filtre IR Cut Oui, Mécanique.
Mode Jour & Nuit Couleur & mode N/B. LED
Illumination
Minimum
Sensibilité HD: 5.48V/lux-sec (550nm)
Résolution Vidéo
Maximum et Taux de
Trames
Champ de Rotation
Horizontale
Champ de Rotation
Verticale
Mode Jour & Nuit.
Obturateur:
1/10000 - 1/30 seconde
IR couverant jusqu’à 10m
0.05 Lux
0 Lux avec LED IR allumé
FHD: 1.9V/lux-sec (550nm)
HD: 1280 x 960 (25fps)
FHD: 2048 x 1536 (15fps)
0º - 180º (Manuel)
0º - 180º (Manuel)
~29~ ~30~
Page 18

ZH
注意事项
•请不要打开、拆卸或修改该设备
•请不要使用第三方的电源适配器
•请不要在超出-20至50摄氏度环境下使用此设备;
请不要在超出-30至60摄氏度环境下保存此设备
•请不要将GXV3610_HD/FHD暴露在超出相对
湿度10-90%范围外的环境下
•请准确安装保证GXV3610_HD/FHD正常工作
包装内容
12V
GXV3610_HD/FHD一个
12V DC 电源一个
安装 GXV3610_HD/FHD
步骤 1:
用所附六角扳手松开六角螺丝, 旋转圈环套拆开
GXV3610_HD/FHD
步骤 2:
用所附安装贴纸引导钻孔, 在孔内塞入塑胶壁虎.
网线一根
螺丝四个
六角扳手一个
~31~ ~32~
墙体固定零件四个
快速入门指南一本
GPL 许可证 一份
Page 19

步骤 3:
拧上螺丝, 线材从底座穿出,卡入出线槽, 拧紧底座固定螺丝.
GXV3610_HD/FHD 连接方法
请参照下图以及下一页的操作说明。
步骤 4:
装回GXV3610_HD/FHD. 中圈安装好后, 用扳手拧紧图示
小孔内的固定六角螺丝.
~33~ ~34~
网络接口
电源接口
方案A:
使用12V DC 电源
适配器供电
12V
方案B:
使用RJ45以太网
接口通过PoE供电
注意:
选择A方案使用电源适配器给设备供电
或选择B方案使用PoE给设备供电。
Page 20

方案A
步骤 1: 将电源适配器与GXV3610_HD/FHD连线上的
12V DC 端口相连;
步骤 2: 将RJ45网线一端与 GXV3610_HD/FHD 连线上
的网络接口相连,另一端与集线器、交换机或
路由器相连。
方案B
步骤 1: 将RJ45网线一端与GXV3610_HD/FHD连线上
的网络接口相连,另一端与以太网供电 (PoE) 交
换机相连。
注意:
请松开中间圆环中的固定螺丝, 方便安装调试,然后紧
固螺丝, 完成安装.
GXV3610_HD/FHD配置
通过Firefox, Chrome 或Microsoft Internet
Explorer 浏览器配置GXV3610_HD/FHD (需安装插
件)
连接GXV3610_HD/FHD到DHCP服务器环境下,
GXV3610_HD/FHD默认通过DHCP获取IP地址
步骤 1: 通过浏览器访问地址下载并安装 GS_Search
http://www.grandstream.com/products/tools/
surveillance/GS_Search.zip
步骤 2: 运行下载的 GS_Search 工具
步骤 3: 点击 按键,搜索该网段下的设备
IP地址
步骤 4: 搜索到的设备IP地址及HTTP端口将显示在以
下界面
~35~ ~36~
Page 21

步骤 5: 双击界面上检测到的设备,默认浏览器(
如IE浏览器)将会打开并显示 GXV3610_
HD/FHD 的Web界面
步骤 6: 界面将会跳出输入用户名及密码的验证框出
厂时默认的用户名和密码均为 admin
步骤 7: 登陆到GXV3610_HD/FHD网络界面后 ,
浏览器将提示您安装插件。参照提示下载插
件Active-X 或Video Plug-in
步骤 8: 如果由于浏览器设置或网速慢等原因无法下
载安装插件,请使用以下链接下载插件文件。
保存并安装插件,重启浏览器。此时浏览器将
显示GXV3610_HD/FHD Web界面中的
视频
• 插件:
http://www.grandstream.com/products/tools/
surveillance/webcontrl_plugin.zip
步骤 9: 插件安装成功后,用户可以看到如下图所示
的 Web 界面。点击播放按钮观看视频
步骤 10: 点击Web界面左侧的菜单进行更多的高级
配置
~37~ ~38~
Page 22

通过默认的静态IP地址访问
如果将GXV3610_HD/FHD置于非 DHCP环境下或
三分钟后未从 DHCP服务器得到响应,它将使用默
认的静态IP地址 192.168.1.168。
步骤 1: 将您的PC与GXV3610_HD/FHD通过
RJ45网线相连
步骤 2: 在PC上运行GS_Search工具
GXV3610_HD/FHD的初始IP地址将会
显示:
192.168.1.168(默认初始IP地址);
步骤 3: 请根据您的网络配置为GXV3610_HD/FHD
输入新IP地址,子网掩码以及默认网关地
址。如有需要,请联系您的网络系统管理员
获取必要信息
步骤 4: 请点击Modify IP,新的IP地址将会应用在
GXV3610_HD/FHD 上
请下载用户手册,网站文档以及常见问题解答,取
得更详细的配置说明。下载地址:
http://www.grandstream.com/index.php/products/
ip-video-surveillance/gxv3610
http://www.grandstream.com/support
http://www.grandstream.com/support/tools
GXV3610_HD/FHD v2 参数
图像传感器
灵敏度
焦距
通光孔径
视场角 (FOV)
光圈 是,机械
白天/夜晚模式 彩色或黑白模式
最低限度照明
响应
最高视频分辨率及
帧速率
水平旋转范围 0º - 180º (手动)
倾斜范围 0º - 180º (手动)
白天和夜晚模式
快门: 1/10000 - 1/30 秒
3.6 mm
F1.8
100.2°(D) x 77°(H) x 54°(V)
IR LED 覆盖范围至10米
0.05 Lux
0 lux, 当 IR LED 开启时
HD: 5.48V/lux-sec (550nm)
FHD: 1.9V/lux-sec (550nm)
HD: 1280 x 960 (25fps)
FHD: 2048 x 1536 (15fps)
~39~ ~40~
Page 23

DE
WICHTIGE HINWEISE
• Versuchen Sie nicht, das Gerät zu öffnen, zu zerlegen
oder zu modizieren.
• Verwenden Sie keine Netzteile von anderen Herstell ern.
• Das Gerät darf nicht bei Temperaturen jenseits von
-20 °C bis +50 °C betrieben oder gelagert werden
von -30 °C bis +60 °C.
• Die Luftfeuchtigkeit muss innerhalb des folgenden
Bereichs liegen: 10–90% rel. Luftfeuchtigkeit
(nicht-kondensierend)
• Die Kamera muss ordnungsgemäß montiert werden,
damit sie einwandfrei funktioniert.
LIEFERUMFANG
12V
1 GXV3610_HD/FHD
1 12-V-Netzteil
MONTAGE DER GXV3610_HD/FHD
Schritt 1:
Lösen Sie die Schrauben am Kameragehäuse mit
dem beigefügten Inbusschlüssel. Zum Öffnen des
Kameragehäuses drehen Sie bitte den Gehäusering
heraus.
Schritt 2:
Bohren Sie die Befestigungslöcher in die Wand und
benutzen Sie bei Bedarf passende Wanddübel. (Bitte
beigefügte Bohrschablone beachten / benutzen)
1 Ethernet-Kabel
4 Schrauben
4 Wandhalterungen
1 Sechskant-
schlüssel
1 Schnellstarth-andbuch
1 GPL-Lizenz
~41~ ~42~
Page 24

Schritt 3:
Montieren Sie nun das Kameragehäuse und
beachten Sie bitte, dass die Kabel dabei sauber und
genau durch die dafür vorgesehene Aussparung
geführt werden.
Schritt 4:
Setzen Sie nun die Kamera wieder zusammen,
beachten Sie bitte, dass das Mikrofon nach unten
zeigt. Befestigen Sie die Schrauben mit dem Inbusschlüssel.
ANSCHLIESSEN DES GXV3610_HD/FHD
Orientieren Sie sich bei den Anweisungen auf der
nächsten Seite an der folgenden Abbildung.
Netzwerkanschluss
Option B:
RJ45-Ethernet-Kabel
an PoE-Switch (Power
over Ethernet)
HINWEIS: Wählen Sie bei Verwendung einer Steckdose
Option A und bei Verwendung eines PoE Switches (Power over Ethernet) Option B.
Stromanschluss
Option A:
Netzteil an Netzsteckdose
12V
~43~ ~44~
Page 25

Option A
Schritt 1: Stecken Sie das Netzteil in die 12-V-DC-Buch-
se des rückwärtigen Kabels in der GXV3610_
HD/FHD. Stecken Sie das andere Endedes
Netzteils in die Steckdose.
Schritt 2: Stecken Sie ein RJ45-Ethernet-Kabel in die
Netzwerkbuchse des rückwärtigen Kabels in
der GXV3610_HD/FHD. Stecken Sie das and ere Ende in einen Switch/Hub oder Router.
Option B
Schritt 1: Stecken Sie ein RJ45-Ethernet-Kabel in die
Netzwerkbuchse des rückwärtigen Kabels
in der GXV3610_HD/FHD. Stecken Sie das
andere Ende in einen PoE-Switch.
HINWEIS:
Lockern Sie die schraube in dem mitteln Ring mit dem
Allen-Schlüssel, um das Kamera während der Einstellung zu regeln, und Ziehen Sie es fest wenn Sie fertig
sind.
KONFIGURATION DES GXV3610_HD/FHD
Konguration der GXV3610_HD/FHD über Firefox,
Chrome oder Microsoft Internet Explorer (mit installiertem Plug-In)
GXV3610_HD/FHD an Netzwerk mit aktiviertem
DHCP-Server anschließen
Schritt 1: Laden Sie das Tool GS_Search herunter, und
installieren Sie es.
http://www.grandstream.com/products/tools/
surveillance/GS_Search.zip
Schritt 2: Starten Sie das Tool GS_Search.
Schritt 3: Klicken Sie auf die Taste “(Suche)”,
um die Geräteerkennung zu starten..
Schritt 4: Die erkannten Geräte werden im Ausgabe feld wie folgt angezeigt.
~45~ ~46~
Page 26

Schritt 5: Doppelklicken Sie auf das erkannte Gerät.
Daraufhin öffnet sich die Web-Benutzeroberf läche der Kamera im Standard-Browser (in
diesem Beispiel Internet Explorer).
Schritt 6: Sie werden in einem Popup-Fenster zur Einga be des Benutzernamens und des Kennworts
aufgefordert. Der Standard-Benutzername
und das Standard-Kennwort des Administra tors sind beide auf “admin” voreingestellt.
Schritt 7: Wenn Sie sich bei der Web-Benutzeroberäc-
he der GXV3610_HD/FHD anmelden,
wird Ihnen gemeldet, dass ein ActiveX Element bzw. ein Video-Plug-In benötigt wird.
Befolgen Sie die angezeigten Anweisungen zum Herunterladen und Installieren des
ActiveX-Elements (Internet Explorer) bzw. des
Video-Plug-Ins (Firefox, Chrome).
Schritt 8: Falls Sie das benötigte Plug-In aufgrund der
Browsereinstellungen oder einer langsamen
Internetverbindung nicht herunterladen bzw.
installieren können, laden Sie die Dateien bit te über den folgenden Link herunter. Speich ern und installieren Sie das Programm, und
starten Sie dann den Browser neu. Das Video
wird nun in die Web-Benutzeroberäche der
Kamera eingebettet anzeigt.
• Plug-in:
http://www.grandstream.com/products/ools/
surveillance/webcontrl_plugin.zip
~47~ ~48~
Schritt 9: Dies ist ein Beispiel-Screenshot nach erfolgrei-
cher Installation des ActiveX-Elements bzw.
des Video-Plug-Ins. Klicken Sie auf die Wied-
ergabe-Schaltäche, um das Video anzusehen.
Schritt 10: Über das links in der Web-Benutzeroberäc he bendliche Menü können Sie erweiterte
Kongurationsparameter aufrufen.
Page 27

GXV3610_HD/FHD über eine statische
IP-Adresse anschließen
Wenn die Kamera innerhalb von drei Minuten keine
Antwort vom DHCP-Server oder dem Netzwerk ohne
DHCP-Funktion erhält, kann sie über die Standard-IPAdresse 192.168.1.168 angesprochen werden.
Schritt 1: Sie können den Netzwerkanschluss des Com puters über ein RJ-45-Ethernet-Kabel direkt
mit dem Ethernet-Anschluss der GXV3610_HD/
FHD verbinden.
Schritt 2: Starten Sie das Tool GS_Search wie weiter
oben beschrieben. Darin wird die Original-IP-Ad resse des GXV3610_HD/FHD angezeigt
(die Standard-IP-Adresse lautet 192.168.1.168).
Schritt 3: Geben Sie die NEUE IP-Adresse, Subnetzmaske
und das Standard-Gateway entsprechend
Ihrer Netzwerkkonguration ein. Erfragen Sie
die Angaben ggf. beim zuständigen System administrator.
Schritt 4: Klicken Sie auf „Modify IP“ (IP-Adresse ändern).
Nun wird die gewünschte IP-Adresse für
das GXV3610_HD/FHD eingestellt.
Wenn Sie sich eingehender informieren möchten, laden Sie das Benutzerhandbuch herunter, schlagen Sie
in den verfügbaren Online-Dokumenten nach, und
lesen Sie die Antworten auf häug gestellte Fragen
(FAQ).
http://www.grandstream.com/index.php/products/
ip-video-surveillance/gxv3610
http://www.grandstream.com/support
http://www.grandstream.com/support/tools
~49~ ~50~
TECHNISCHE DATEN DER GXV3610_HD/FHD v2
Empndlichkeit
des Bildsensors
Brennweite 3.6 mm
Apertur F1.8
Feldwinkel (FOV) 100.2°(D) x 77°(H) x 54°(V)
Infrarot-Sperrlter ja, mechanisch
Tages- und Nacht-
modus
Mindestbeleuch-
tung
Empndlichkeit HD: 5.48V/lux-sec (550nm)
Maximale Vid-
eoauösung und
-bildfrequenz
Schwenkbereich 0º - 180º (manuell)
Neigungsbereich 0º - 180º (manuell)
Tages- und Nachtmodus.
Blende: 1/10000 – 1/30 Sekunde
Farb- und SW-Modus.
IR-LED, Abdeckung bis zu 10m
0.05 lux
0 lux mit aktivem IR-LED
FHD: 1.9V/lux-sec (550nm)
HD: 1280 x 960 (25fps)
FHD: 2048 x 1536 (15fps)
Page 28

12V
IT
PRECAUZIONI
• Non tentare di aprire, smontare o modicare il dis-
positivo
• Non utilizzare un adattatore di alimentazione di terzi
• Non esporre il dispositivo a temperature non incluse
nell’intervallo da -20 °C a +50 °C per l’operatività o
da -30 °C a +60 °C per l’immagazzinaggio
• Non esporre il dispositivo ad ambienti non inclusi nel
seguente intervallo di umidità: 10 - 90 % di umidità
relativa (senza condensa)
• Installare la videocamera per consentire il corretto
funzionamento
CONTENUTO DELL’IMBALLAGGIO
INSTALLAZIONE GXV3610_HD/FHD
Step 1:
Allentare la vite tramite la chiave esagonale in
dotazione. Ruotare per aprire gli aneli del collare
della telecamera
Step 2:
Effettuare dei fori e utilizzare i tasselli, se necessario
( fare riferimento al template allegato)
1 GXV3610_HD/FHD
1 cavo Ethernet
4 viti 1 chiave esagonale 1 guida introduttiva
1 alimentatore da12 V
4 ancoraggi a parete
1 GPL License
~51~ ~52~
Page 29

Step 3:
Montare l’anello del collare superiore della telecamera ( lasciando il cavo al di fuori della fessura posta
nella parte superiore dell’anello del collare)
COLLEGAMENTO DEL DISPOSITIVO
GXV3610_HD/FHD
Per le istruzioni contenute nella pagina successiva,
fare riferimento all’illustrazione riportata di seguito.
Step 4:
Rimontare la telecamera ( con il microfono girato
verso il basso ) e stringere la vite con la chiave
esagonale
~53~ ~54~
Porta di
rete
Opzione B:
Cavo Ethernet RJ45 nello
switch PoE (Power over
Ethernet)
NOTA: scegliere l’opzione A se si utilizza l’alimentatore
o l’opzione B se si utilizza lo switch PoE (Power
over Ethernet).
Porta di alimentazione
Opzione A:
Adattatore di alimentazione
nella presa c.a.
12V
Page 30

Opzione A
Passo 1: inserire l’adattatore di alimentazione nella
presa c.c. da 12 V del cavo di coda nel
dispositivo GXV3610_HD/FHD. Collegare
l’altra estremità dell’adattatore alla presa di
alimentazione c.a.
Passo 2: collegare un cavo Ethernet RJ45 nella presa
di rete del cavo di coda nel dispositivo
GXV3610_HD/FHD. Collegare l’altra estremità
in uno switch/hub o un router.
Passo 1: scaricare e installare lo strumento GS_Search
http://www.grandstream.com/products/tools
/surveillance/GS_Search.zip
Passo 2: eseguire lo strumento Grandstream
GS_Search.
Passo 3: fare clic sul pulsante di ricerca per iniziare il
rilevamento del dispositivo.
Opzione B
Passo 1: collegare un cavo Ethernet RJ45 nella presa
di rete del cavo di coda nel dispositivo GXV 3610_HD/FHD. Collegare l’altra estremità
in uno switch PoE (Power over Ethernet).
NOTA:
Utilizzare la chiave esagonale per allentare la vite
sul anello centrale per regolare la telecamera
durante l’installazione. Una volta terminato
stringere bene la vite.
CONFIGURAZIONE DI GXV3610_HD/FHD
Congurazione di GXV3610_HD/FHD mediante
Firefox, Chrome o Microsoft Internet Explorer
(con plug-in installato)
Collegamento di GXV3610_HD/FHD a una rete
abilitata per server DHCP
~55~ ~56~
Passo 4: i dispositivi rilevati verranno visualizzati nel
campo di output come indicato di seguito.
Page 31

Passo 5: fare doppio clic sul dispositivo rilevato. Nel
browser predenito (in questo esempio)
verrà visualizzata l’interfaccia Web della
videocamera.
Passo 6: in una nestra a comparsa verranno richiesti
il nome utente e la password. Il nome utente
e la password predeniti dell’amministratore
vengono impostati entrambi su “admin”
come congurazione di fabbrica predenita.
Passo 7: una volta eseguito l’accesso all’interfaccia
Web del dispositivo GXV3610_HD/FHD,
verrà richiesto un plug-in video o Active-X.
Seguire le istruzioni visualizzate per scaricare
e installare Active-X o il plug-in video.
Passo 8: se si verica un errore in fase di download o
installazione a causa delle impostazioni del
browser o della lentezza della connessione
Internet, scaricare i le dal collegamento di
seguito. Salvare e installare il programma,
quindi riavviare il browser. Il video risulterà
ora incorporato all’interfaccia Web della
video-camera.
• Plug-in:
http://www.grandstream.com/products/tools/
surveillance/webcontrl_plugin.zip
Passo 9: di seguito è riportata una schermata
di esempio con una corretta installazione
di Active-X o del plug-in. Fare clic sul
pulsante di riprodu zione per visualizzare
la trasmissione video.
Passo 10: fare clic nel menu a sinistra dell’interfaccia
Web per individuare i parametri di
congurazione più avanzati.
~57~ ~58~
Page 32

Collegamento del dispositivo
GXV3610_HD/FHD mediante un IP statico
Se la videocamera non ottiene una risposta dal server DHCP o dalla rete senza un server DHCP, dopo 3
minuti è possibile accedervi dall’indirizzo IP predenito
192.168.1.168.
Passo 1: utilizzare il cavo Ethernet RJ-45 per collegare
la porta di rete del computer direttamente
alla presa Ethernet del dispositivo
GXV3610_HD/FHD.
Passo 2: eseguire lo strumento GS_Search come
indicato in precedenza. Verrà visualizzato l’IP
originale del dispositivo GXV3610_HD/FHD
(indirizzo IP predenito 192.168.1.168).
Passo 3: inserire il NUOVO indirizzo IP, la subnet mask
e il gateway predenito in base alla
congurazione della rete. Vericare le
informazioni necessarie con l’amministratore
di sistema locale.
Passo 4: fare clic sull’opzione per modicare l’IP.
L’ indirizzo IP desiderato verrà applicato al
dispositivo GXV3610_HD/FHD.
Per ulteriori informazioni dettagliate, scaricare il
manuale dell’utente e fare riferimento ai documenti
online e alle domande frequenti.
http://www.grandstream.com/index.php/products/
ip-video-surveillance/gxv3610
http://www.grandstream.com/support
http://www.grandstream.com/support/tools
SPECIFICHE DI GXV3610_HD/FHD v2
Sensibilità del
sensore immagini
Lunghezza focale 3.6 mm
Apertura F1.8
Angolo di campo
(FOV)
Filtro IR Cut sì, meccanico
Modalità giorno e
notte
Illuminazione
minima
Capacità di
risposta
Risoluzione video
massimoe frequenza dei fotogrammi
Intervallo
panoramica (pan)
Intervallo
inclinazione (tilt)
modalità giorno e notte.
Otturatore: 1/10000 - 1/30
secondo
100.2°(D) x 77°(H) x 54°(V)
modalità a colori e in B/N.
LED IR no a 10m
0.05 Lux
0 Lux con LED IR acceso
HD: 5.48V/lux-sec (550nm)
FHD: 1.9V/lux-sec (550nm)
HD: 280 x 960 (25fps)
FHD: 2048 x 1536 (15fps)
0º - 180º (manuale)
0º - 180º (manuale)
~59~ ~60~
Page 33

12V
RU
ПРЕДВАРИТЕЛЬНЫЕ УСЛОВИЯ
• Не пытайтесь открывать, разбирать или изменять
устройство
• Не используйте адаптер питания другого
производителя
• Не допускается использование устройства при
температурах вне диапазона от -20 °C до +50 °C при
эксплуатации и от -30 °C до +60 °C при хранении
• Не допускается выставлять устройство наружу при
относительной влажности вне диапазона 10-90%
(без конденсата)
• Нормальная работа камеры возможна только при
правильной установке
КОМПЛЕКТ ПОСТАВКИ
1 x GXV3610_HD/FHD
Питание 1 x 12 В
Yстановка GXV3610_HD/FHD
Шаг 1:
Ослабьте винт с помощью шестигранного ключа (в
комплекте). Откройте корпус камеры поворотом.
Шаг 2:
Просверлите отверстия и используйте дюбеля
из комплекта при необходимости, для удобства
используйте наклейку с расположением
отверстий (в комплекте).
1 x кабель Ethernet
4 x винта
1 x шестигранных
4 x стеновых анкера
1 x краткое руководство
ключа
пользователя
1 x лицензия GPL
~61~ ~62~
Page 34

Шаг 3:
Прикрепите крышку камеры к потолку (не
забудьте провести кабель через крышку).
ПОДКЛЮЧЕНИЕ GXV3610_HD/FHD
При выполнении инструкций на следующей странице
см. приведенный рисунок.
Шаг 4:
Соберите камеру (микрофон направлен вниз), и
заверните винт с помощью шестигранного ключа.
~63~ ~64~
Сетевой
порт
Вариант B:
Кабель Ethernet RJ45 на
переключатель питания
через Ethernet (PoE)
ПРИМЕЧАНИЕ: при питании от сети применяется
вариант A; при питании через
переключатель питания через
Ethernet (PoE) применяется вариант B.
Порт питания
12V
Вариант A:
Адаптер питания на вывод
переменного тока
Page 35

Вариант A
Шаг 1: вставьте адаптер питания в гнездо 12 В
постоянного тока отвода кабеля в
GXV3610_HD/FHD. Вставьте другой конец
адаптера в выход питания переменного тока.
Шаг 2: вставьте кабель Ethernet RJ45 в сетевое гнездо
отвода кабеля в GXV3610_HD/FHD. Вставьте
другой конец в узел/выключатель или
маршрутизатор.
Вариант B
Шаг 1: вставьте кабель Ethernet RJ45 в сетевое
гнездо отвода кабеля в GXV3610_HD/FHD.
Вставьте другой конец в переключатель через
Ethernet.
ПРИМЕЧАНИЕ:
С помощью шестигранника ослабьте винт на
центральном кольце, настройте камеру и затяните
винт.
КОНФИГУРАЦИЯ GXV3610_HD/FHD
Конфигурация GXV3610_HD/FHD с помощью
Firefox, Chrome или Microsoft Internet Explorer (с
установленным подключаемым модулем)
Подключите GXV3610_HD/FHD к включенной сети
сервера DHCP
Шаг 1: загрузите и установите инструмент GS_Search.
http://www.grandstream.com/products/tools
/surveillance/GS_Search.zip
Шаг 2: запустите инструмент Grandstream GS_Search.
Шаг 3: для запуска определения устройства щелкните
кнопку “ ”.
Шаг 4: обнаруженные устройства появятся в поле
вывода, как показано ниже.
~65~ ~66~
Page 36

Шаг 5: дважды щелкните на обнаруженное
устройство. Откроется обозреватель по
умолчанию (в данном примере IE)
и отобразит веб-интерфейс камеры.
Шаг 6: во всплывающем окне появится имя
пользователя и пароль. Заводская
конфигурация имени и пароля пользователя
администратора по умолчанию установлена
на “admin”.
Шаг 7: при регистрации на веб-интерфейсе
GXV3610_HD/FHD устройство укажет, что
требуется подключение Active-X или видео.
Для загрузки и установки Active-X (MS IE) или
подключения видео (Firefox or Chrome)
следуйте появляющимся инструкциям.
Шаг 8: Если вследствие настроек обозревателя или
медленного соединения с Интернетом
загрузка и установка не получились, загрузите
файлы из приведенной ниже ссылки.
Сохраните и установите программу, после
чего перезапустите обозреватель. Теперь
видео появитсякак встроенное в веб-интерфейс
камеры.
• Plug-in:
http://www.grandstream.com/products/tools/
surveillance/webcontrl_plugin.zip
Шаг 9: приведен образец снимка при успешной
установке Active-X или подключенного модуля.
Для просмотра внешнего видеосигнала
щелкните кнопку “Воспроизведение”.
Шаг 10: дополнительные параметры конфигурации
находятся в меню с левой стороны веб интерфейса.
~67~ ~68~
Page 37

Подключите GXV3610_HD/FHD
с помощью Static IP
Если камера не получает сигнал от сервера DHCP или
от сети без сервера DHCP через 3 минуты, его можно
получить по IP-адресу по умолчанию 192.168.1.168.
Шаг 1: С помощью Ethernet-кабеля RJ-45 подключите
сетевой порт компьютера непосредственно к
гнезду Ethernet GXV3610_HD/FHD.
Шаг 2: запустите инструмент GS_Search, как указано
выше. Появится оригинальный IP-адрес
GXV3610_HD/FHD (IP-адрес по умолчанию
192.168.1.168).
Шаг 3: введите НОВЫЙ IP-адрес, маску подсети и шлюз
по умолчанию в соответствии с конфигурацией
сети. Проверьте необходимую информацию у
администратора локальной системы.
СПЕЦИФИКАЦИИ GXV3610_HD/FHD v2
Чувствительность
датчика изображений
Фокусная длина 3.6 mm
Апертура F1.8
Зона видимости
(FOV)
ИК-фильтр с
ограниченной
полосой пропускания
Дневной и ночной
режим
Минимальное
иллюминирование
дневной и ночной режим.
Затвор: 1/10000 - 1/30 секунды
100.2°(D) x 77°(H) x 54°(V)
да, механический
цветной и черно-белый режим.
Покрытие ИК-светодиода до
10 м
0.05 люкс
0 люкс при включенном ИКсветодиоде
Шаг 4: щелкните “Изменить IP”. Нужный IP-адрес будет
применен для GXV3610_HD/FHD.
Более подробную информацию можно получить,
загрузив Руководство пользователя, а также онлайновую
документацию и часто задаваемые вопросы.
http://www.grandstream.com/index.php/products/
ip-video-surveillance/gxv3610
http://www.grandstream.com/support
http://www.grandstream.com/support/tools
~69~ ~70~
Чувствительность HD: 5.48 В/люкс-сек (550 нм)
Максимальное
разрешение видео и
частота кадров
Диапазон
панорамирования
Диапазон пределов
наклона
FHD: 1.9 В/люкс-сек (550 нм)
HD: 1280 x 960 (25 кадров в
секунду).
FHD: 2048 x 1536 (15 кадров в
секунду)
0º - 180º (в ручном режиме)
0º - 180º (в ручном режиме)
Page 38

PT
PRECAUÇÕES
• Não tente abrir, desmontar ou modicar o
dispositivo.
• Não use adaptador de energia de terceiros.
• Não exponha este dispositivo fora do intervalo de
temperaturas de -20 ° C a 50 ° C durante a opera ção ou -30 ° C a 60 ° C durante o armazenamento.
• Não exponha este aparelho em ambientes fora da
seguinte gama de umidade: 10-90% RH (sem con densação).
• Por favor, instalar a câmera adequadamente para
uma função correta.
CONTEÚDO DO PACOTE
INSTALAÇÃO GXV3610_HD/FHD
Passo 1:
Use a chave hexagonal fornecida para remover o
parafuso. Gire para abrir o anel da câmera
1 x GXV3610_HD/FHD
1 x Cabo de Ethernet
4 x Parafusos
1 x Chave
hexagonal
12V
1 x Fonte de alimentação de 12V
4 x Buchas de parede
1 x Guia de Instalação
Rápida, 1 x GPL License
Perfure orifícios e use buchas de parede, se necessário (use como referência o modelo fornecido).
~71~ ~72~
Passo 2:
Page 39

Passo 3:
Coloque o anel da câmera (com o cabo na
ranhura do anel).
CONEXÃO DA GXV3610_HD/FHD
De acordo com a ilustração abaixo, siga as instruções na página seguinte.
Passo 4:
Remonte a câmera (com o microfone exposto
para baixo), e aperte o parafuso com a chave
hexagonal.
~73~ ~74~
Porta de
rede
Porta de alimentação
Opção A:
Adaptador de tomada
AC
12V
Opção B:
Cabo de Ethernet RJ45 a
Power over Ethernet (PoE)
Switch
NOTA: Escolha a opção A se estiver usando a fonte de alimentação, ou escolher Opção B se estiver usando um switch
Power over Ethernet (PoE).
Page 40

Opção A
Passo 1: Insira o adaptador de alimentação ao
conector 12 VDC na parte de trás do
GXV3610_HD/FHD. Ligue a outra extremi dade do adaptador em uma tomada AC.
Passo 2: Conecte um cabo Ethernet RJ45 na porta
de rede que está na parte de trás do
GXV3610_HD/FHD e conecte a outra
extremidade do cabo em um switch/hub
ou roteador.
Passo 1: Faça o download e instale a ferramenta
GS_Search:
http://www.grandstream.com/products/tools/
surveillance/GS_Search.zip
Passo 2: Execute a ferramenta GS_Search da
Grandstream.
Passo 3: Clique no botão para iniciar
detecção de dispositivos na rede.
Opção B
Passo 1: Ligue o conector Ethernet RJ45 que
está na parte de trás do GXV3610_HD/
FHD e ligue a outra extremidade do
cabo em um switch PoE.
NOTA:
Para ajustar a câmera durante a instalação, soltar o parafuso no centro do anel com a chave hexagonal. Aperte o
parafuso quando nalize.
CONFIGURAÇÃO DE GXV3610_HD/FHD
Congurando o GXV3610_HD/FHD usando
Firefox, Chrome ou Microsoft Internet Explorer
Ligue a GXV3610_HD/FHD em uma rede com
um servidor DHCP ativo
~75~ ~76~
Passo 4: Os dispositivos detectados serão exibidos
no campo de saída, conforme mostrado
abaixo.
Page 41

Passo 5: Dê um duplo clique no dispositivo
detectado. O navegador padrão (Internet
Explorer, por exemplo) se abrirá, mostrando
a interface web da câmara.
Passo 6: Uma janela pop-up vai solicitar o nome de
usuario e senha, o nome e senha do
usuario padrão é admin.
Passo 7: Após acessar a Interface Web, o dispositivo
indicará que um Active-X ou plug-in de
vídeo é necessário. Siga as instruções
para baixar e instalar o plug-in.
Passo 8: Se o download/instalação não for bem
sucedida, devido a congurações do seu
navegador ou conexão de Internet lenta,
faça o download dos arquivos a partir do
link abaixo. Baixe e instale o programa e
reinicie o navegador. O vídeo será exibido
agora dentro da interface web da câmera.
Passo 9: Segue abaixo exemplo de imagem de
uma instalação com sucesso do Active-X e
Plug-in. Clique no botão reproduzir para
ver o vídeo.
• Plug-in:
http://www.grandstream.com/products/tools/
surveillance/webcontrl_plugin.zip
~77~ ~78~
Passo 10: Clique no menu esquerdo da interface
web para obter parâmetros de
conguração avançada.
Page 42

Conectar à GXV3610_HD/FHD
utilizando endereço IP estático
Se a câmara não receber uma resposta do servidor
DHCP ou se a rede não possuir um servidor DHCP,
após três minutos, poderá acessa-la pelo endereço
IP padrão 192.168.1.168.
Passo 1: Utilize um cabo Ethernet RJ45 para
conectar a porta da rede do seu
computador diretamente ao conector
RJ45 do GXV3610_HD/FHD.
Passo 2: Execute a ferramenta GS_Search como
indicado acima, mostrará o endereço IP
do GXV3610_HD/FHD (endereço IP padrão
é 192.168.1.168).
Passo 3: Digite o novo endereço IP, máscara de
sub-rede, e o gateway padrão, de acordo
com a conguração de sua rede, contate
seu administrador de rede para
informações necessárias.
Passo 4: Clique em “Modicar IP”. O endereço IP
desejado será aplicado no
GXV3610_HD/FHD.
Para informações mais detalhadas, favor efetuar o
download do Manual do Usuário, consultar a documentação on-line e FAQs.
http://www.grandstream.com/index.php/products/
ip-video-surveillance/gxv3610
http://www.grandstream.com/support
http://www.grandstream.com/support/tools
ESPECIFICAÇÕES DA GXV3610_HD/FHD v2
Sensibilidade do
sensor de imagem
Distância focal 3.6 mm
Abertura F1.8
Ângulo de visão
do campo (FOV)
Filtro de corte IR Sim, mecânico
Modo Dia e Noite Cor B/W,
Iluminação
mínima
Resposta HD: 5.48V/lux-sec (550nm)
Vídeo Máximo
permitido
Resolução e taxa
de quadros
Panning Gama 0º - 180º (Manual)
Faixa de inclinação
Modo Dia e Noite.
Obturador : 1/10000 – 1/30
Segundo
100.2°(D) x 77°(H) x 54°(V)
IR LED cobrindo até 10m
0.05 Lux
0 lux com IR LED
FHD: 1.9 V/lux-sec (550nm)
HD: 1280 x 960 (25fps)
FHD: 2048 x 1536 (15fps)
0º - 180º (Manual)
~79~ ~80~
Page 43

PL
OSTRZEŻENIA
• Nie wolno otwierać, rozbierać oraz modykować
urządzenia
• Nie wolno używać zasilaczy innych producentów
• Nie wystawiać sprzętu na temperatury spoza poda nego zasięgu -20 °C do +50 °C dla działania i -30 °C
do +60 °C dla przechowywania
• Nie wystawiać urządzenia poza dopuszczalne ramy
kondensacji powietrza: 10 ~ 90% RH (Dla stanu nies kondensowanego)
• Kamera powinna zostać zainstalowana poprawnie
dla dobrego działania
Zawartość kompletu
12V
INSTALACJA GXV3610_HD/FHD
Krok 1:
Wykręć blokadę używając dostarczonego klucza ampulowego. Przekręć aby odblokować kręgi kamery.
Krok 2:
Wywierć otwory używając dostarczonej formatki, użyj
wkrętów jeżeli są potrzebne.
1 x GXV3610_HD/FHD
1 x kabel ethernetowy
4 x śruby do
montażu
1 x Klucz ampulowy
1 x 12V zasilacz
4 x kołki rozporowe
1 x Skrócona instrukcja
1 x Licencja GPL
~81~ ~82~
Page 44

Krok 3:
Zamontuj górny krąg kamery (z kablem
wychodzącym poprzez slot w podstawie).
Krok 4:
Zmontuj ponownie kamerę (z mikrofonem
ustawionym w dół) i zablokuj kluczem ampulowym.
Podłączanie GXV3610_HD/FHD
Prosimy o korzystanie z ilustracji poniżej przy stosowaniu instrukcji ze strony następnej
Gniazdo zasilacza 12V
Opcja A:
Zasilacz do kontaktu
12V
Opcja B:
Kabel ethernetowy RJ45 podłączamy
do switcha z wbudowanym PoE
(Power over Ethernet )
UWAGA: Wybierz opcje A jeżeli używasz zasilacza, lub wybi-
erz opcję B dla zasilania PoE.
~83~ ~84~
Page 45

Opcja A
Działanie 1: Podłącz zasilacz do kamery,
a następnie podłącz do kontaktu.
Działanie 2: Podłącz kabel etherenetowy do
kamery a następnie podłącz do
routera, switcha bądź gniazda z
siecią.
Opcja B
Działanie 1: Podłącz kabel etherenetowy do
kamery a następnie podłącz do
routera, switcha bądź gniazda
z siecią.
UWAGA:
Podczas instalacji użyj kluczy ampulowych
na środkowym kręgu aby dopasować ustawienia
dla kamery.
KONFIGURACJA GXV3610_HD/FHD
Konguracja kamery GXV3610_HD/FHD przy
użyciu Firefox, Chrome lub Microsoft Internet
Explorer (z zainstalowanym odpowiednią
wtyczką)
Podłącz kamerę do sieci z serwerem DHCP
Działanie 1: Pobierz i zainstaluj oprogramowanie
GS_Search tool:
http://www.grandstream.com/products/tools/
surveillance/GS_Search.zip
Działanie 2: Uruchom program GS_Search tool.
Działanie 3: Naciśnij aby znaleźć kamery
w otoczeniu sieciowym.
Działanie 4: Wykryte urządzenia zostaną
wyświetlone w górnej części okna.
~85~ ~86~
Page 46

Działanie 5: Wybierz poszukiwaną kamerę,
uruchomienie jej otworzy okno z
interfejsem GUI kamery w domyślnej
przeglądarce.
Działanie 6: Pojawi się okienko z logowaniem,
domyślnym Loginem i hasłem jest
“admin”, podobnie jak po resecie do
ustawień fabrycznych.
Działanie 7: Po zalogowaniu przeglądarka
zgłosibrak wtyczki do obsługi wideo,
aby ją zainstalować należy wykonać
instalację wtyczki.
Działanie 8: Jeżeli z jakiś powodów ściągniecie
bądź instalacja wtyczki zakończyła się
niepowodzeniem prosimy o pobranie
wtyczki z linku poniżej. Po pobraniu i
zainstalowaniu należy zrestartować
przeglądarkę. Po tych działaniach
obraz z kamery powinien się pokazać.
• WTYCZKA:
http://www.grandstream.com/products/tools/
surveillance/webcontrl_plugin.zip
Działanie 9: Poniżej przykładowe zrzuty ekranu z
zainstalowaną wtyczką wideo.
Wybranie “Play” pokaże obraz z
kamery.
Działanie 10: Bardziej zaawansowane ustawienia
są dostępne po lewej stronie ekrany
przeglądarki.
~87~ ~88~
Page 47

Podłączenie kamery GXV3610_HD/FHD
przy użyciu statycznego adresu IP
Jeżeli kamera nie otrzyma adresu z serwera DHCP lub
takiego nie ma w sieci to po 3 minutach przyjmie Statyczny adres IP 192.168.1.168.
Działanie 1: Podłącz kamerę do sieci za pomocą
kabla RJ45.
Działanie 2: Uruchom program GS_Search tool jak
powyżej, kamera pokaże się ze
statycznym adresem (domyślnie
192.168.1.168).
Działanie 3: Wprowadź NOWY adres IP, maskę
podsieci(Subnet Mask) oraz bramę
wyjściową (Default Gateway) zgodnie
z twoją siecią komputerową. W razie jej
nieznajomości trzeba się skontaktować
z lokalnym administratorem sieci
komputerowej.
Działanie 4: Naciśnij “Modify IP”, zapisze i wyśle to
nowe ustawienia dla kamery.
Więcej informacji w instrukcji użytkownika,
dokumentach na stronach lub FAQ:
http://www.grandstream.com/index.php/products/
ip-video-surveillance/gxv3610
http://www.grandstream.com/support
SPECYFIKACJA GXV3610_HD/FHD v2
Sensor obrazu
Czułość
Zmienna ogniskowa
Aperture F1.8
Kąt widzenia
(FOV)
Filtr IR Tak. Mechaniczny
Tryb Dnia i Nocy Tryb koloru & B/W
Minimalne
oświetlenie
Reakcja HD: 5.48V/lux-sec (550nm)
Maksymalna
rozdzielczość
i ilość klatek
Zasięg przesu-
wania
Zasięg pochylenia 0º - 180º (ręczny)
Tryb dnia i nocy
Migawka: 1/10000 - 1/30
sekund
3.6 mm
100.2°(D) x 77°(H) x 54°(V)
Doświetlenie do 10 metrów
0.05 Lux
0 lux z IR LED
FHD: 1.9 V/lux-sec (550nm)
HD: 1280 x 960 (25fps)
FHD: 2048 x 1536 (15fps)
0º - 180º (ręczny)
http://www.grandstream.com/support/tools
~89~ ~90~
 Loading...