

Page 1
Grandstream Networks, Inc.
GXV3350
High-End Smart Video Phone
User Guide
Page 2

P a g e | 2
GXV3350 User Guide
Version 1.0.3.27
COPYRIGHT
©2021 Grandstream Networks, Inc. http://www.grandstream.com
All rights reserved. Information in this document is subject to change without notice. Reproduction or
transmittal of the entire or any part, in any form or by any means, electronic or print, for any purpose without
the express written permission of Grandstream Networks, Inc. is not permitted.
The latest electronic version of this guide is available for download here:
http://www.grandstream.com/support
Grandstream is a registered trademark and Grandstream logo is trademark of Grandstream Networks, Inc.
in the United States, Europe and other countries.
CAUTION
Changes or modifications to this product not expressly approved by Grandstream, or operation of this
product in any way other than as detailed by this guide, could void your manufacturer warranty.
WARNING
Please do not use a different power adaptor with devices as it may cause damage to the products and void
the manufacturer warranty.
Page 3

P a g e | 3
GXV3350 User Guide
Version 1.0.3.27
U.S. FCC Statement
Part 68 Regulatory Information
This equipment complies with Part 68 of the FCC rules. Located on the equipment is a label that contains,
among other information, the ACTA registration number and ringer equivalence number (REN). If requested,
this information must be provided to the telephone company.
The REN is used to determine the quantity of devices which may be connected to the telephone line.
Excessive REN’s on the telephone line may result in the devices not ringing in response to an incoming
call. In most, but not all areas, the sum of the REN’s should not exceed five (5.0). To be certain of the
number of devices that may be connected to the line, as determined by the total REN’s contact the
telephone company to determine the maximum REN for the calling area.
This equipment cannot be used on the telephone company-provided coin service. Connection to Party Line
Service is subject to State Tariffs.
If this equipment causes harm to the telephone network, the telephone company will notify you in advance
that temporary discontinuance of service may be required. If advance notice isn’t practical, the telephone
company will notify the customer as soon as possible. Also, you will be advised of your right the file a
complaint with the FCC if you believe it is necessary. The telephone company may make change in its
facilities. If this happens, the telephone company will provide advance notice in order for you to make the
necessary modifications in order to maintain uninterrupted service.
If the trouble is causing harm to the telephone network, the telephone company may request you to remove
the equipment from the network until the problem is resolved.
This equipment uses the following USOC jacks: RJ45C.
It is recommended that the customer install an AC surge arrester in the AC outlet to which this device is
connected. This is to avoid damaging the equipment caused by local lightening strikes and other electrical
surges.
Since this device has the HAC function, the earpiece is easy to absorb small, please take care to avoid
scratching.
If trouble is experienced with this equipment, please contact (Agent in the US):
Company Name: Grandstream Networks, Inc.
Address: 126 Brookline Ave, 3rd Floor Boston, MA 02215, USA
Tel: 1-617-5669300
Fax: 1-617-2491987
Page 4

P a g e | 4
GXV3350 User Guide
Version 1.0.3.27
Part 15 Regulatory Information
This device complies with part 15 of the FCC Rules. Operation is subject to the following two condition:
(1) this device may not cause harmful interference, and
(2) this device must accept any interference received, including interference that may cause undesired
operation.
Any Changes or modifications not expressly approved by the party responsible for compliance could void
the user’s authority to operate the equipment.
Note: This equipment has been tested and found to comply with the limits for a Class B digital device,
pursuant to part 15 of the FCC Rules. These limits are designed to provide reasonable protection against
harmful interference in a residential installation. This equipment generates, uses and can radiate radio
frequency energy and, if not installed and used in accordance with the instructions, may cause harmful
interference to radio communications. However, there is no guarantee that interference will not occur in a
particular installation. If this equipment does cause harmful interference to radio or television reception,
which can be determined by turning the equipment off and on, the user is encouraged to try to correct the
interference by one or more of the following measures:
- Reorient or relocate the receiving antenna.
- Increase the separation between the equipment and receiver.
- Connect the equipment into an outlet on a circuit different from that to which the receiver is connected.
- Consult the dealer or an experienced radio/TV technician for help.
This equipment complies with FCC radiation exposure limits set forth for an uncontrolled environment. This
equipment should be installed and operated with minimum distance 20cm between the radiator & your body.
This transmitter must not be co-located or operating in conjunction with any other antenna or transmitter.
Page 5

P a g e | 5
GXV3350 User Guide
Version 1.0.3.27
Canada Regulatory Information
Operation of 5150-5250 MHz is restricted to indoor use only.
This device contains licence-exempt y=transmitter(s)/receiver(s) that comply with Innovation, Science and
Economic Development Canada’s licence-exempt RSS(s). Operation is subject to the following two
conditions:
(1) This device may not cause interference.
(2) This device must accept ant interference, including interference that may cause undesired operation of
the device.
L’émetteur / récepteur exempt de licence contenu dans le présent appareil est conforme aux CNR
d'Innovation, Sciences et Développement économique Canada applicable aux appareils radio exempts de
licence. L'exploration est autorisée aux deux conditions suivantes:
(1) L'appareil ne doit pas produire de brouillage ;
(2) L'appareil doit accepter tout brouillage radioélectrique subi, même si le brouillage est susceptible d'en
compromettre le fonctionnement.
CAN ICES-3(B)/NMB-3(B)
The device meets the exemption from the routine evaluation limits in section 2.5 of RSS 102 and compliance
with RSS-102 RF exposure, users can obtain Canadian information on RF exposure and compliance.
This equipment should be installed and operated with minimum distance 20cm between the radiator & your
body. This transmitter must not be co-located or operating in conjunction with any other antenna or
transmitter.
EU Regulatory Information
Support Frequency Bands and Power:
WLAN/BT 2.4 GHz < 20 dBm;
WLAN 5.2 GHz <23 dBm;
WLAN 5.3/5.6 GHz <20 dBm;
This equipment should be installed and operated with minimum distance 20cm between the radiator & your
body. Transmitter must not be co-located or operating in conjunction wirh any other antenna or transmitter.
The simplified EU declaration of conformity referred to in Article 10(9) shall be provided as follows:
Hereby, Grandstream Networks, Inc. declares that the radio equipment type GXV3350 is in compliance
with Directive 2014/53/EU.
The full text of the EU declaration of conformity is available at the following internet address:
www.grandstream.com
Page 6

P a g e | 6
GXV3350 User Guide
Version 1.0.3.27
CE Authentication
Hereby, Grandstream Networks, Inc. declares that the radio equipment GXV3350 is in compliance with
Directive 2014/53/EU.
The full text of the EU declaration of conformity is available at the following internet address:
http://www.grandstream.com/support/resources/
Page 7

P a g e | 7
GXV3350 User Guide
Version 1.0.3.27
Table of Content
DOCUMENT PURPOSE ............................................................................................... 17
CHANGE LOG .............................................................................................................. 18
Firmware Version 1.0.3.27 .............................................................................................................. 18
Firmware Version 1.0.3.25 .............................................................................................................. 18
Firmware Version 1.0.3.20 .............................................................................................................. 18
Firmware Version 1.0.3.19 .............................................................................................................. 18
Firmware Version 1.0.3.17 .............................................................................................................. 18
Firmware Version 1.0.3.13 .............................................................................................................. 18
Firmware Version 1.0.1.8 ................................................................................................................ 18
WELCOME ................................................................................................................... 19
PRODUCT OVERVIEW ................................................................................................ 20
Feature Highlights ................................ .......................................................................................... 20
GXV3350 Technical Specifications .................................................................................................. 21
GETTING STARTED ..................................................................................................... 23
Equipment Packaging ..................................................................................................................... 23
Description of the GXV3350 ............................................................................................................ 24
Front View ............................................................................................................................... 24
Back View ............................................................................................................................... 26
Connecting and Setting Up the GXV3350 ....................................................................................... 28
Using the Phone Stand ............................................................................................................ 28
Using the Slots for Wall Mounting (Wall Mount *Sold Separately) ............................................. 28
Connecting the GXV3350 ............................................................................................................... 29
GBX20 Extension Module ............................................................................................................... 29
Installing the GBX20 to GXV3350 ............................................................................................ 30
Cleaning the Phone ........................................................................................................................ 31
GETTING TO KNOW GXV3350 .................................................................................... 32
Use the Touchscreen ...................................................................................................................... 32
Page 8

P a g e | 8
GXV3350 User Guide
Version 1.0.3.27
Use the Desktop ............................................................................................................................. 34
Desktop Menu ......................................................................................................................... 34
Add Widget to Desktop ............................................................................................................ 35
Manage Desktop Items ............................................................................................................ 35
Auto Adjust Screen ................................................................ .................................................. 37
Set Wallpapers ........................................................................................................................ 38
Set Weather Widget ................................................................................................................. 39
Manage Running Applications ................................................................ .................................. 40
Idle Screen ................................ ................................................................ ..................................... 41
Switch Idle Screens ................................................................................................................. 41
Set Up Idle Screen .................................................................................................................. 42
Use the Status Bar ......................................................................................................................... 44
Notifications in Status Bar ............................................................................................................... 46
System Settings in Status Bar .................................................................................................. 49
Use the GXV3350 Keys ................................ .................................................................................. 49
Keypad Shortcut Functions ...................................................................................................... 50
Use the On-Screen Keyboard ......................................................................................................... 51
Use the Message Waiting Indicator ................................................................................................. 52
MAKE PHONE CALLS ................................................................................................. 54
Register SIP Accounts .................................................................................................................... 54
Account Status ........................................................................................................................ 54
Configure SIP Account ............................................................................................................. 55
Dial a Number Directly .................................................................................................................... 56
Redial ............................................................................................................................................. 57
Dial a Number via Contact .............................................................................................................. 57
Dial a Number via Call History ........................................................................................................ 58
Direct IP Call .................................................................................................................................. 59
Answer a Call ................................................................................................................................. 60
Single Incoming Call ................................................................................................................ 60
Preview Function for Incoming Call ................................................................................................ 61
Transfer Function for Incoming Call ............................................................................................... 62
Multiple Calls/Call Waiting........................................................................................................ 63
Call Progress Status ................................................................................................................ 64
Call Hold......................................................................................................................................... 64
Page 9

P a g e | 9
GXV3350 User Guide
Version 1.0.3.27
Call Recording ................................................................................................................................ 65
MPK Monitoring .............................................................................................................................. 66
Mute ............................................................................................................................................... 67
Turn on Video during Audio Call ................................................................ ...................................... 68
Call Details during Call................................................................................................ .................... 69
Quick DTMF During Call ................................................................................................ ................. 70
Switch Audio Channel During Call ................................................................................................... 71
Call Transfer ................................................................................................................................... 71
Blind Transfer .......................................................................................................................... 71
Attended Transfer .................................................................................................................... 72
Transfer via MPKs ................................................................................................................... 74
6-Way Conference .......................................................................................................................... 75
Initiate Conference .................................................................................................................. 75
Remove Party from Conference ............................................................................................... 79
End Conference....................................................................................................................... 80
Hold and Resume Conference ................................................................................................. 80
Auto Conference Mode ............................................................................................................ 80
Multicast Paging ............................................................................................................................. 81
Multicast Listening switch ........................................................................................................ 81
UCM Conference ............................................................................................................................ 82
Participate in UCM Conference Room...................................................................................... 82
CCM (Conference Call Menu) .................................................................................................. 82
Conference Call Operations ..................................................................................................... 83
CEI (Conference Event Indicator) ............................................................................................ 85
Missed Call ..................................................................................................................................... 85
DND (Do Not Disturb) ..................................................................................................................... 86
Voicemail/Message Waiting Indication ............................................................................................ 86
Call Forward ................................................................................................................................... 87
Call Features .................................................................................................................................. 89
CONTACTS................................................................................................................... 92
Local Contacts ................................................................................................................................ 92
Add Single Contacts ....................................................................................................................... 92
Import/Export Contacts ................................................................................................................... 93
Page 10

P a g e | 10
GXV3350 User Guide
Version 1.0.3.27
Download Contacts......................................................................................................................... 95
Search Contacts ............................................................................................................................. 96
Use Contacts ................................................................................................................................ .. 97
Make a Call to Contacts ........................................................................................................... 97
Select Contacts ....................................................................................................................... 97
Add Contacts to Favorites ........................................................................................................ 97
Edit Contacts ........................................................................................................................... 98
Send Contacts to Desktop Shortcut ................................................................ ......................... 98
Share Contacts via Bluetooth ................................................................................................... 98
Add Contacts to Blacklist ......................................................................................................... 99
Add Group ............................................................................................................................... 99
Add contacts to Group ........................................................................................................... 100
Contacts Storage Status ........................................................................................................ 100
PROGRAMMABLE KEYS .......................................................................................... 101
Programmable Keys Application ................................................................................................... 101
GBX20 Extension Boards ............................................................................................................. 102
Diagnostics ................................................................................................................ 104
GXV3350 SETTINGS .................................................................................................. 106
HARASSMENT INTERCEPTION ............................................................................... 108
Blocked Contacts .......................................................................................................................... 108
Block History ................................................................................................ ................................ 108
Delete Block History .............................................................................................................. 109
Edit Blacklist .......................................................................................................................... 109
Intercept Anonymous calls ............................................................................................................ 110
CALL HISTORY .......................................................................................................... 112
Local Call History .......................................................................................................................... 112
Dial Out from Call History ...................................................................................................... 112
Call History Options ............................................................................................................... 113
Delete Call History ................................................................................................................. 113
Call History Details ................................................................................................................ 113
SMS ............................................................................................................................ 115
View SMS ..................................................................................................................................... 115
Page 11

P a g e | 11
GXV3350 User Guide
Version 1.0.3.27
Create New SMS .......................................................................................................................... 116
Delete SMS .................................................................................................................................. 116
SMS Settings ................................................................................................................................ 117
FILE MANAGER ......................................................................................................... 118
Files Operations ........................................................................................................................... 118
Copy and Paste Files ............................................................................................................. 118
Move Files ............................................................................................................................. 119
Send Files ............................................................................................................................. 120
Delete Files ........................................................................................................................... 120
Rename a File ....................................................................................................................... 121
File Categories ............................................................................................................................. 122
GS MARKET ............................................................................................................... 123
FTP SERVER .............................................................................................................. 124
STATEDETECTION .................................................................................................... 126
CAMERA .................................................................................................................... 128
Take Picture.................................................................................................................................. 128
Record Video ................................................................................................................................ 128
Angle Adjustment .......................................................................................................................... 129
Gallery .......................................................................................................................................... 129
Screensaver ................................................................................................................................. 132
BROWSER ................................................................................................................. 134
ACTION URL .............................................................................................................. 136
CONNECTING GXV3350 TO DOOR SYSTEMS ........................................................ 137
CONNECT TO NETWORK AND DEVICES ................................................................ 138
Ethernet........................................................................................................................................ 138
WI-FI ............................................................................................................................................ 138
Turn On/Off Wi-Fi................................................................................................................... 138
Connect to Wi-Fi Networks .................................................................................................... 138
Wi-Fi Settings Shortcut .......................................................................................................... 141
Page 12

P a g e | 12
GXV3350 User Guide
Version 1.0.3.27
Bluetooth ...................................................................................................................................... 142
Turn On/Off Bluetooth ............................................................................................................ 142
Change Bluetooth Device Name ............................................................................................ 142
Pair GXV3350 with a Bluetooth Device .................................................................................. 142
Unpair a Bluetooth Device ................................................................ ..................................... 143
Bluetooth Settings Shortcut.................................................................................................... 143
EHS Headset ................................................................................................................................ 145
USB Headset ................................................................................................................................ 145
USB ............................................................................................................................................. 147
EMERGENCY CALL ................................................................................................... 148
EXPERIENCING THE GXV3350 APPLICATION PHONE .......................................... 150
Table of Tables
Table 1: GXV3350 Features in a Glance ................................................................................................ 20
Table 2: GXV3350 Technical Specifications ............................................................................................ 21
Table 3: Equipment Packaging ................................................................................................ ............... 23
Table 4: GXV3350 Front View ................................................................................................................ 25
Table 5: GXV3350 Back View ................................................................................................................ 26
Table 6: GBX20 Extension Module Packaging ....................................................................................... 30
Table 7: GXV3350 Status Bar Notification Icons ..................................................................................... 47
Table 8: GXV3350 Keys ......................................................................................................................... 50
Table 9: GXV3350 MWI LED Status ................................................................................................ ....... 53
Table 10: GXV3350 Feature Code ......................................................................................................... 89
Table of Figures
Figure 1: GXV3350 Package Content .................................................................................................... 23
Figure 2: GXV3350 Front and GBX20 Extension Module Front .............................................................. 24
Figure 3: GXV3350 Back View ............................................................................................................... 26
Figure 4: Phone Stand and Mounting Slots on GXV3350 ....................................................................... 28
Figure 5: Tab on The Handset Cradle..................................................................................................... 29
Figure 6: GXV3350 Back / Side View ..................................................................................................... 29
Figure 7: GBX20 with connector ............................................................................................................ 30
Figure 8: Connect GXV3350 and GBX20 ............................................................................................... 30
Figure 9: GXV3350 Default Home Screen ................................................................ .............................. 32
Page 13

P a g e | 13
GXV3350 User Guide
Version 1.0.3.27
Figure 10: GXV3350 Onscreen Menu .................................................................................................... 32
Figure 11: GXV3350 Finger Gestures on the Touch Screen.................................................................... 33
Figure 12: GXV3350 Desktop Menu....................................................................................................... 34
Figure 13: Add Widget to the Desktop .................................................................................................... 35
Figure 14: Open Clock Widget ............................................................................................................... 36
Figure 15: Resize Digital Clock Widget ................................................................................................ .. 36
Figure 16: Move Clock Widget ............................................................................................................... 37
Figure 17: Creating a Folder grouping Apps ........................................................................................... 37
Figure 18: Auto Adjust Screen ................................................................................................................ 38
Figure 19: GXV3350 Choose Wallpaper ................................................................................................ 39
Figure 20 : Accessing Available Widgets ................................................................................................ 39
Figure 21: Minimized display of Weather App ................................ ......................................................... 40
Figure 22: Maximized Display of Weather APP ...................................................................................... 40
Figure 23: GXV3350 Recent Applications .............................................................................................. 41
Figure 24: GXV3350 Switch Idle Screens .............................................................................................. 42
Figure 25: Set up Home Idle Screen ...................................................................................................... 42
Figure 26: Add an Idle Screen ................................................................................................................ 43
Figure 27: Delete an Idle Screen............................................................................................................ 44
Figure 28: GXV3350 Top Status Bar ...................................................................................................... 44
Figure 29: Status Bar - More Options ..................................................................................................... 45
Figure 30: GXV3350 Top Status Bar – Notification ................................................................................. 45
Figure 31: GXV3350 Top status Bar - Get more information ................................................................... 46
Figure 32: GXV3350 Top status Bar – Wi-Fi ........................................................................................... 46
Figure 33: System Settings in Status Bar ............................................................................................... 49
Figure 34: GXV3350 Keys ..................................................................................................................... 49
Figure 35: GXV3350 Onscreen Keyboard - English Keyboard ................................................................ 51
Figure 36: GXV3350 Onscreen Keyboard - Lowercase and Uppercase .................................................. 51
Figure 37: English Keyboard - Number and Symbols ............................................................................. 52
Figure 38: English Keyboard - More Symbols ........................................................................................ 52
Figure 39: GXV3350 Account Widget ..................................................................................................... 54
Figure 40: GXV3350 Dial Screen ........................................................................................................... 55
Figure 41: Disable Video Call Feature on Dial Screen ............................................................................ 56
Figure 42: GXV3350 View Contacts ....................................................................................................... 58
Figure 43: GXV3350 Call History ........................................................................................................... 58
Figure 44: Call mode from call history .................................................................................................... 59
Figure 45: Single Incoming Call – Audio................................................................................................. 60
Figure 46: Single Incoming Call – Video ................................................................................................. 60
Figure 47: Single Incoming Call – Preview-1 .......................................................................................... 61
Figure 48: Single Incoming Call – Preview-2 .......................................................................................... 62
Figure 49: Single Incoming Call – Transfer-1.......................................................................................... 62
Figure 50: Single Incoming Call – Transfer-2.......................................................................................... 63
Figure 51: Call Waiting........................................................................................................................... 63
Figure 52: Touch to Return to Call Screen .............................................................................................. 64
Page 14

P a g e | 14
GXV3350 User Guide
Version 1.0.3.27
Figure 53: Call on Hold .......................................................................................................................... 65
Figure 54: GXV3350 Call Recording ...................................................................................................... 65
Figure 55: MPK button ........................................................................................................................... 66
Figure 56: MPK list ................................................................................................................................ 67
Figure 57: GXV3350 Call Mute .............................................................................................................. 67
Figure 58: Turn on Video During Audio Call ............................................................................................ 68
Figure 59: Accept Video During Audio Call ............................................................................................. 68
Figure 60: Select Call Details During Video Call ..................................................................................... 69
Figure 61: Call Details ........................................................................................................................... 69
Figure 62: Select Quick DTMF During Call ............................................................................................. 70
Figure 63: DTMF During Call ................................................................................................................. 70
Figure 64: Blind Transfer........................................................................................................................ 71
Figure 65: Attended Transfer.................................................................................................................. 72
Figure 66: Attended Transfer - Transferring ............................................................................................ 73
Figure 67: Attended Transfer – Split ....................................................................................................... 73
Figure 68: Attended Transfer.................................................................................................................. 74
Figure 69: Transfer via MPK .................................................................................................................. 75
Figure 70: MPK list ................................................................................................................................ 75
Figure 71: Add Conference Members from Dial Screen .......................................................................... 76
Figure 72: Add Conference Members from Dial Screen 2 ....................................................................... 76
Figure 73: GXV3350 Conference Screen ............................................................................................... 77
Figure 74: GXV3350 Conference - Add Existing Call to Conference ....................................................... 78
Figure 75: 3-Way Conference Call Established ...................................................................................... 78
Figure 76: Notification of joining the conference ..................................................................................... 78
Figure 77: Notification of exiting the conference ..................................................................................... 79
Figure 78: GXV3350 Conference - Remove Party from Conference ....................................................... 79
Figure 79: Multicast Listening widget – On ............................................................................................. 81
Figure 80: Join UCM Conference Room................................................................................................. 82
Figure 81: UCM conference Menu ......................................................................................................... 82
Figure 82: Conference Menu Options ................................................................ .................................... 83
Figure 83: Conference’s members list ................................ .................................................................... 83
Figure 84: Invite a member .................................................................................................................... 84
Figure 85: Conference Bridge ................................................................................................................ 84
Figure 86: Mute all members ................................................................................................................. 85
Figure 87: Missed Call Screen ............................................................................................................... 85
Figure 88: Enable/Disable DND ............................................................................................................. 86
Figure 89: Retrieve Voicemail ................................................................................................................ 87
Figure 90: Unconditional Call Forward ................................................................................................... 88
Figure 91: Call Forward – Unconditional ................................................................................................ 88
Figure 92: Call Forward - Time Based .................................................................................................... 88
Figure 93: Call Forward - Busy/No Answer/DND .................................................................................... 89
Figure 94: GXV3350 Contacts ............................................................................................................... 92
Figure 95: GXV3350 Contacts - Add New Contact ................................................................................. 93
Page 15

P a g e | 15
GXV3350 User Guide
Version 1.0.3.27
Figure 96: Add to Contacts from Dial Pad .............................................................................................. 93
Figure 97: GXV3350 Contacts - Import Contacts .................................................................................... 94
Figure 98: GXV3350 Contacts - Export Contacts ................................................................................... 95
Figure 99: GXV3350 Contacts - Download Contacts ................................................................ .............. 96
Figure 100: GXV3350 Contacts - Search Contacts................................................................................. 96
Figure 101: GXV3350 Contacts - Select Contacts .................................................................................. 97
Figure 102: Add Contacts to Favorites ................................................................................................... 98
Figure 103: GXV3350 Contacts - Add New Group .................................................................................. 99
Figure 104: GXV3350 Contacts - Storage Status ................................................................................. 100
Figure 105: GXV3350 Programmable Key APP – Add Number ............................................................ 101
Figure 106: GXV3350 Programmable Key APP – Add number from Contacts ...................................... 102
Figure 107: GXV3350 Programmable Key APP – Number List ............................................................. 102
Figure 108: Port & Network Status ....................................................................................................... 104
Figure 109: Account Status .................................................................................................................. 104
Figure 110: Speaker Diagnosis ............................................................................................................ 105
Figure 111: Microphone diagnosis ........................................................................................................ 105
Figure 112: GXV3350 Settings ............................................................................................................. 106
Figure 113: List of blocked contacts ..................................................................................................... 108
Figure 114: Block History ..................................................................................................................... 108
Figure 115: GXV3350 Blacklist - Add Number to Blacklist ..................................................................... 109
Figure 116: Manually Add Number to Blacklist...................................................................................... 110
Figure 117: Intercept Anonymous Calls ................................................................................................. 111
Figure 118: GXV3350 Call History........................................................................................................ 112
Figure 119: GXV3350 Call History – Options ........................................................................................ 113
Figure 120: GXV3350 Call History - Details.......................................................................................... 114
Figure 121: GXV3350 SMS Message .................................................................................................. 115
Figure 122: View SMS Dialog .............................................................................................................. 115
Figure 123: Create a New SMS ........................................................................................................... 116
Figure 124: SMS Settings ................................................................ .................................................... 117
Figure 125: GXV3350 File Manager – Copy File .................................................................................. 118
Figure 126: Paste File.......................................................................................................................... 119
Figure 127: GXV3350 File Manager - Move ......................................................................................... 119
Figure 128: GXV3350 File Manager - Options ...................................................................................... 120
Figure 129: Delete File(s) via File Manager .......................................................................................... 121
Figure 130: Rename File ..................................................................................................................... 122
Figure 131:GS Market – Onscreen Menu .......................................................................................... 123
Figure 132: FTP Server – Start ............................................................................................................ 124
Figure 133: FTP Server – Stop ............................................................................................................ 124
Figure 134: FTP Server – Settings ....................................................................................................... 125
Figure 135: StateDetection APP........................................................................................................... 126
Figure 136: General Detection ................................ ............................................................................. 126
Figure 137: Audio Detection ................................................................ ................................................. 127
Figure 138: GXV3350 Camera ............................................................................................................. 128
Page 16

P a g e | 16
GXV3350 User Guide
Version 1.0.3.27
Figure 139: Recent pictures and videos page ...................................................................................... 129
Figure 140: Edit picture ........................................................................................................................ 130
Figure 141: Access to the Gallery ........................................................................................................ 130
Figure 142: GXV3350 Gallery .............................................................................................................. 131
Figure 143: GXV3350 Gallery - Picture Options ................................................................................... 131
Figure 144: Screensaver settings ......................................................................................................... 132
Figure 145: Use Network Images ................................ ......................................................................... 133
Figure 146: Network Image Path.......................................................................................................... 133
Figure 147: GXV3350 Web Browser .................................................................................................... 134
Figure 148: GXV3350 Browser Menu Options ................................................................ ...................... 134
Figure 149: Open New Window in Browser .......................................................................................... 135
Figure 150: GXV3350 Web Browser-Bookmarks .................................................................................. 135
Figure 151: Incoming call from GDS3710 door system ......................................................................... 137
Figure 152: GXV3350 Connect to Wi-Fi ............................................................................................... 139
Figure 153: GXV3350 Connect to Wi-Fi-Show Advanced Options ........................................................ 140
Figure 154: Wi-Fi - Add network ................................................................ ........................................... 140
Figure 155: Wi-Fi Settings Shortcut...................................................................................................... 141
Figure 156: Wi-Fi Shortcut - Wi-Fi List ................................................................................................. 141
Figure 157: GXV3350 Bluetooth - Paired Device .................................................................................. 143
Figure 158: Bluetooth Settings Shortcut ............................................................................................... 144
Figure 159: Bluetooth Setting shortcut 2 .............................................................................................. 144
Figure 160: EHS headset................................................................ ..................................................... 145
Figure 161: USB Headset Connected .................................................................................................. 146
Figure 162: USB Headset Used for Call ............................................................................................... 146
Figure 163: USB Storage Device Connected to GXV3350.................................................................... 147
Figure 164: Emergency Access under GXV3350 Locked Screen ......................................................... 148
Figure 165: Emergency Dial Screen..................................................................................................... 148
Page 17

P a g e | 17
GXV3350 User Guide
Version 1.0.3.27
DOCUMENT PURPOSE
This document describes how to configure the GXV3350 via phone's LCD menu and web UI menu to fully
manipulate phone's features. To learn advanced functions of GXV3350, please visit
http://www.grandstream.com/support to download the latest “GXV3350 Administration Guide”.
This guide covers following topics:
Product Overview
Getting started
Getting to know GXV3350
Make phone calls
Contacts
GXV3350 Settings
Harassment Interception
Call history
SMS
File manager
GS Market
FTP Server
StateDetection
Camera
Browser
Action URL
Connecting GXV3350 to Door Systems
Connect to network and devices
Emergency call
Experiencing the GXV3350 applications
Page 18

P a g e | 18
GXV3350 User Guide
Version 1.0.3.27
CHANGE LOG
This section documents significant changes from previous versions of user guide for GXV3350. Only major
new features or major document updates are listed here. Minor updates for corrections or editing are not
documented here.
Firmware Version 1.0.3.27
Added a “Mute” option to account ring tone list. [Account Ringtones]
Firmware Version 1.0.3.25
Supported switching cities from the weather widget directly. [Weather Widget]
Added call type icon in Call History app to indicate audio or video calls. [Dial a Number via Call
History]
Updated “No/Noise” button in Audio Diagnostics to two separate ones. [Audio Diagnostics]
Added multicast intercom global switch in LCD widget. [Multicast]
Updated button in attended transfer from “Blind” to “Transfer now”. [Attended Transfer]
Supported selecting call mode when calling from history. [Dial a Number via Call History]
Updated calling account display to Account Name instead of SIP Authentication ID. [Account Status]
Added support so that Apps can be grouped into folders on home screen. [Group Apps]
Firmware Version 1.0.3.20
No Major Change.
Firmware Version 1.0.3.19
Added support for integrated call control features with GUV3000/3005 [USB Headset]
Firmware Version 1.0.3.17
No Major Change.
Firmware Version 1.0.3.13
Added AutoAdjustScreen app to make third-party app display more friendly. [Auto Adjust Screen]
Firmware Version 1.0.1.8
This is the initial version.
Page 19

P a g e | 19
GXV3350 User Guide
Version 1.0.3.27
WELCOME
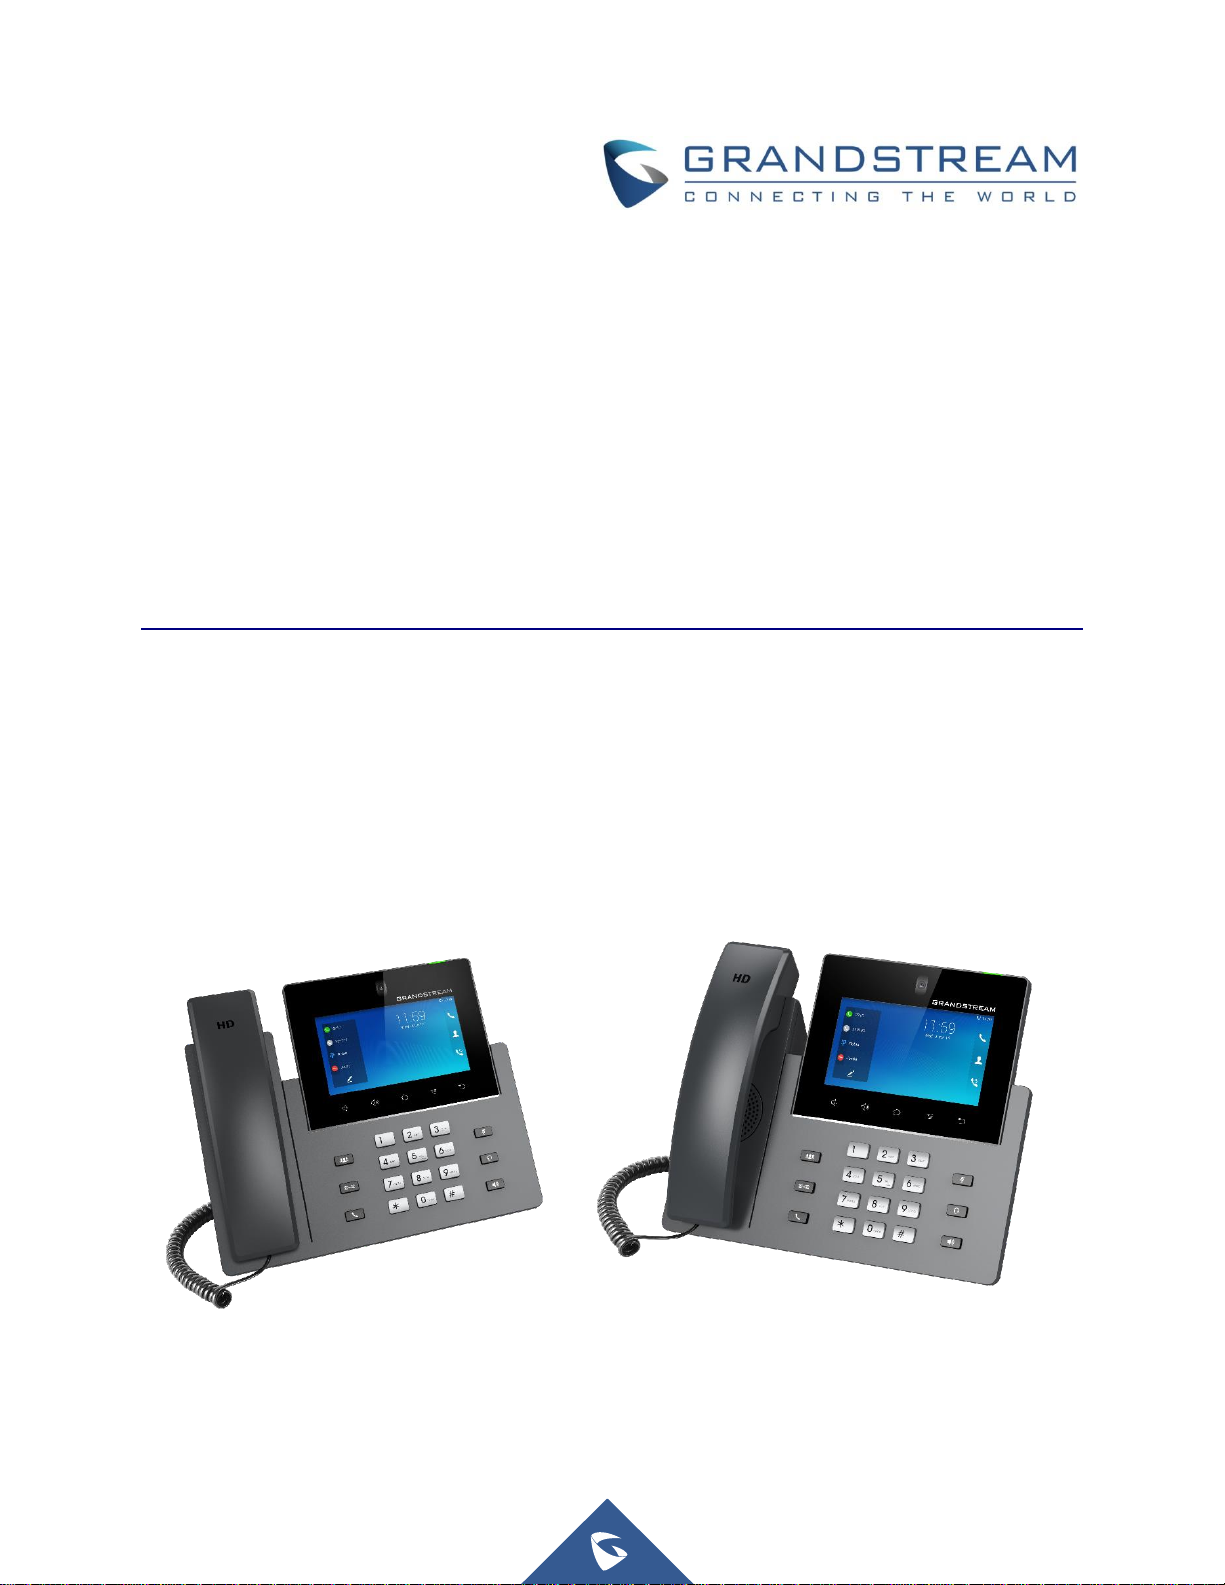
Thank you for purchasing Grandstream GXV3350 High-End Smart Video Phone for Android
TM
. The
GXV3350 IP Video Phone for Android combines a 16-line IP video phone with a multi-platform video
collaboration solution and the functionality of an Android tablet to offer an all-in-one communications
solution. This IP video phone delivers a powerful experience through its’ 5 inch 1280x720 capacitive touch
screen, tiltable camera, HDMI output, dual microphones and support for 720p HD video. The GXV3350
adds dual Gigabit ports with PoE/PoE+, integrated Wi-Fi and Bluetooth support. It also runs Android 7.0
and offers instant access to hundreds of thousands of Android apps. By combining a state-of-the-art IP
video phone, an advanced video collaboration solution, and the functionality of an Android tablet, the
GXV3350 offers businesses throughout the world a powerful desktop communication and productivity
solution.
Page 20
P a g e | 20
GXV3350 User Guide
Version 1.0.3.27
PRODUCT OVERVIEW
Feature Highlights
The following tables contain the major features of the GXV3350:
Table 1: GXV3350 Features in a Glance
GXV3350
16 lines with up to 16 SIP accounts, up to 6-way audio conference
and 3-way 720p 30fps HD video conference, phonebook with up to
1000 contacts, call history with up to 1000 records.
Dual switched 10/100/1000Mbps network ports, Dual-band 2.4GHz &
5GHz Wi-Fi (802.11a/b/g/n), PoE/PoE+, Bluetooth 4.2+EDR, USB,
HDMI, EHS with Plantronics headsets support.
5" (1280x720) capacitive (5 points) touch screen TFT LCD, mega
pixel CMOS sensor camera with privacy shutter.
Dual MIC & HD speakerphone with noise reduction, advanced echo
cancellation and excellent double-talk performance.
Runs the Android™ Operating System 7.0.
Built-in support for GXV series of video surveillance cameras, and
GDS37xx series of access control devices.
Create Android applications for any business need to run on
GXV3350 using Grandstream's SDK toolkit.
Page 21
P a g e | 21
GXV3350 User Guide
Version 1.0.3.27
GXV3350 Technical Specifications
The following table resumes all the technical specifications including the protocols / standards supported,
voice codecs, telephony features, languages and upgrade/provisioning settings for the phone GXV3350.
Table 2: GXV3350 Technical Specifications
Protocols/Standards
SIP RFC3261, TCP/IP/UDP, RTP/RTCP, HTTP/HTTPS, ARP, ICMP, DNS (A
record, SRV, NAPTR), DHCP, PPPoE, SSH, TFTP, NTP, STUN, SIMPLE, LLDPMED, LDAP, TR-069, 802.1x, TLS, SRTP, IPv6, OpenVPN®
Network Interfaces
Dual switched 10/ 100/ 1000 Mbps ports with integrated PoE/PoE+
Graphic Display
5 inch 1280x720 capacitive touch screen (5 points) TFT LCD
Camera
Tiltable 1 mega-pixel CMOS camera with privacy shutter, 720P@30fps
Bluetooth
Yes, integrated. Bluetooth 4.2+EDR.
Wi-Fi
Yes, dual-band (2.4GHz & 5GHz) with 802.11 a/b/g/n
Auxiliary Ports
RJ9 headset jack (allowing EHS with Plantronics headsets), USB port, HDMI-out
(1.4 up to 720p30fps)
Feature Keys
11 functions keys for CONFERENCE, TRANSFER, SEND/REDIAL, MUTE,
EARPHONE, SPEAKERPHONE, VOLUME -/+. 3 dedicated Android keys for
HOME, MENU, and BACK
Voice Codec
Wide-band Opus, wide-band G.722, G.711μ/a, G. 729A/B, G.726-32, iLBC, inband and out-of-band DTMF (In audio, RFC2833, SIP INFO), VAD, CNG, AEC,
PLC, AJB, AGC, ANS
Video Codec and
Capabilities
H.264 BP/MP/HP, video resolution up to 720p, frame rate up to 30 fps, bit rate up
to 2Mbps, 3-way video conference (720p@30fps), anti-flickering, auto focus and
auto exposure
Telephony Features
Hold, transfer, forward (unconditional/no-answer/busy), call park/pickup, 6-way
audio conference(including the host), shared-call-appearance (SCA) / bridgedline-appearance (BLA), virtual Programmable Key, downloadable contacts (XML,
LDAP, up to 1000 items), call record(local and server), call log (up to 1000 records),
call waiting, auto answer, XML customization of screen, click-to-dial, flexible dial
plan, hot desking, personalized music ringtones and music on hold, server
redundancy & fail-over
Sample Applications
Local apps: Contacts, Call History, File Manager, Programmable Key, Settings,
Browser, Voicemail, Clock, Calculator, Recorder, GS Market, etc.
Support third-party Android apps
API/SDK available for advanced custom application development
Applications
Deployment
Support Android 7.0 compliant applications to be developed, downloaded and run
on the device with provisioning control
Page 22
P a g e | 22
GXV3350 User Guide
Version 1.0.3.27
HD Audio
Yes, 2 omnidirectional microphones, HD handset and speakerphone with support
for wideband audio
Base Stand
Yes, base stand with three adjustable levels
Extension Module
Yes, can power up to 4 GBX20 EXT modules which feature a 272x480 color LCD,
20 quick-dial/ BLF keys with dual-color LED, 2 navigation keys and less than
1.2W power consumption per unit
*The second GBX20 must be powered on by a 12V/1A PSU when 2 or more GBX20 extension modules are
connected to GXV3350
QoS
Layer 2 QoS (802.1Q, 802.1p) and Layer 3 (ToS, DiffServ, MPLS) QoS
Security
User and administrator level passwords, MD5 and MD5-sess based authentication,
256bit-AES encrypted configuration file, TLS, SRTP, HTTPS, 802.1x media access
control
Multi-language
English, German, Italian, French, Spanish, Portuguese, Russian, Croatian,
Chinese, Korean, Japanese, and more
Upgrade/ Provisioning
Firmware upgrade via TFTP / HTTP / HTTPS or local HTTP upload, mass
provisioning using TR-069 or AES encrypted XML configuration file
Power and Green
Energy Efficiency
Universal power adapter included: Input: 100-240VAC 50-60Hz; Output 12VDC
1.5A
Integrated PoE* 802.3af Class 3, PoE+ 802.3at, Class 4
Physical information
Dimension: 210mm (L) x 243mm (L) x 47.5mm (H)
Unit weight: 1.24kg
Package weight: 1.67kg
Temperature and
Humidity
Operation: 0oC to 40
o
C
Storage: -10oC to 60
o
C
Humidity: 10% to 90% Non-condensing
Package Content
GXV3350 phone, handset with cord, base stand, universal power supply, network
cable, quick installation guide, brochure, GPL license
Compliance
FCC: Part 15 Class B; Part 15 Subpart C(15.247); Part 15 Subpart E(15.407); Part
68 HAC
IC: RSS-247; RSS-Gen; RSS-102; IECS-003; CS03
CE: EN 55032; EN 55035; EN 61000-3-2; EN 61000-3-3; EN 62368-1; EN 301
489-1; EN 301 489-17; EN 300 328; EN 301 893; EN 62311
RCM: AS/NZS CISPR 32; AS/NZS 4268; AS/NZS 62368.1; AS/CA S004
Page 23
P a g e | 23
GXV3350 User Guide
Version 1.0.3.27
GETTING STARTED
This chapter provides basic installation instructions including the list of the packaging contents and also
information for obtaining the best performance with the GXV3350.
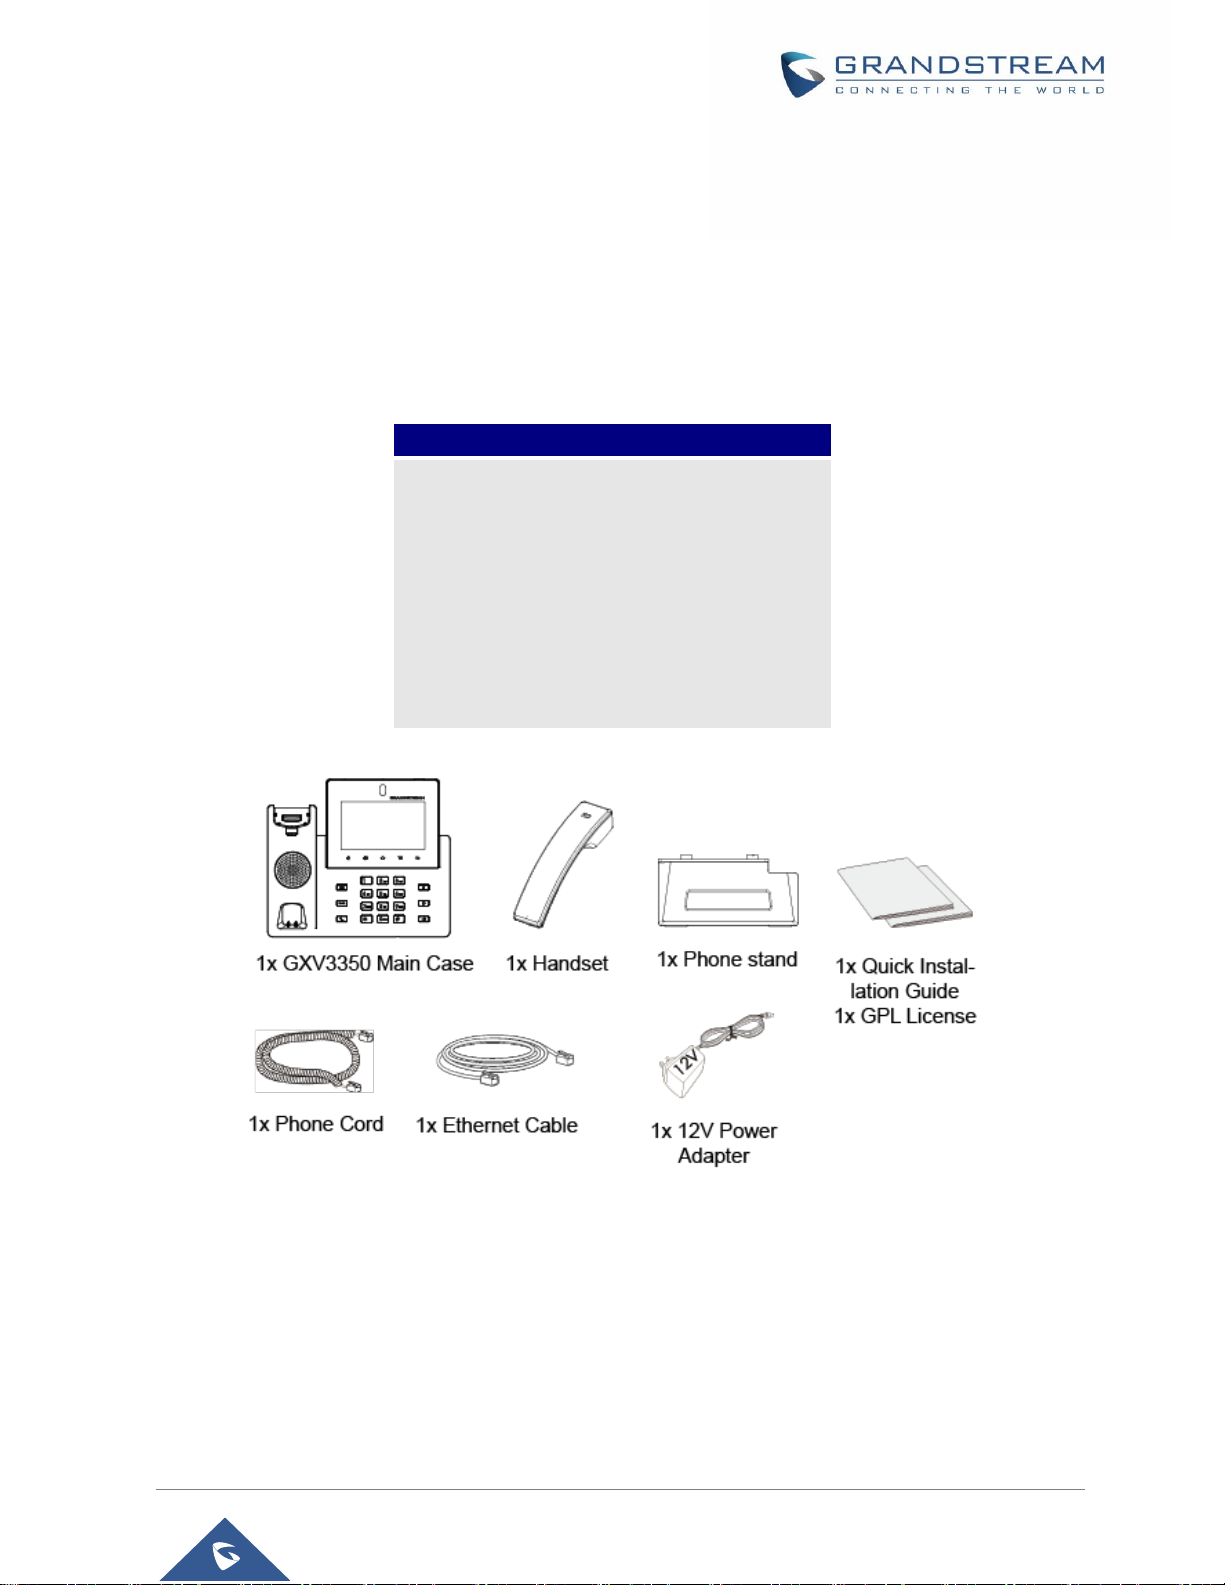
Equipment Packaging
Table 3: Equipment Packaging
Note: Check the package before installation. If you find anything missing, contact your system administrator.
GXV3350
1x GXV3350 Main Case.
1x Handset.
1x Phone Cord.
1x Phone Stand
1x Ethernet Cable.
1x 12V Power Adapter.
1x Quick Installation Guide.
1x GPL License.
Figure 1: GXV3350 Package Content
Page 24
P a g e | 24
GXV3350 User Guide
Version 1.0.3.27
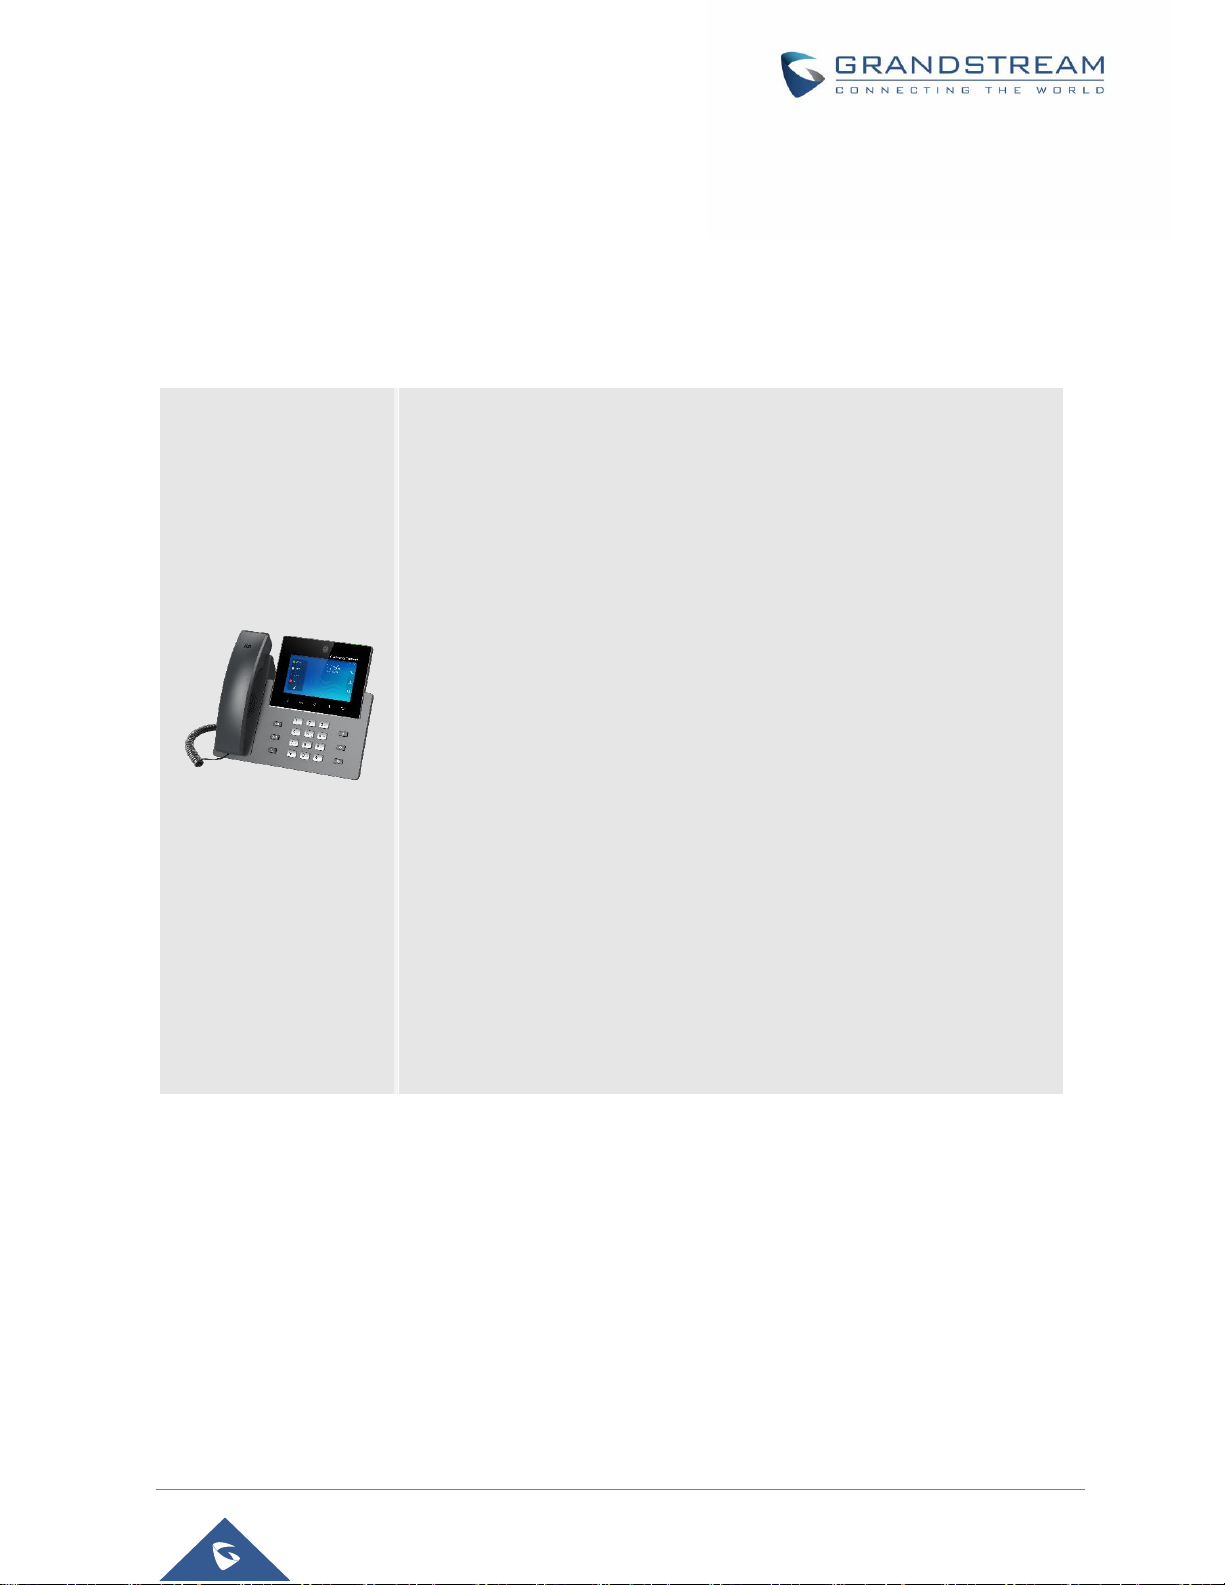
Description of the GXV3350
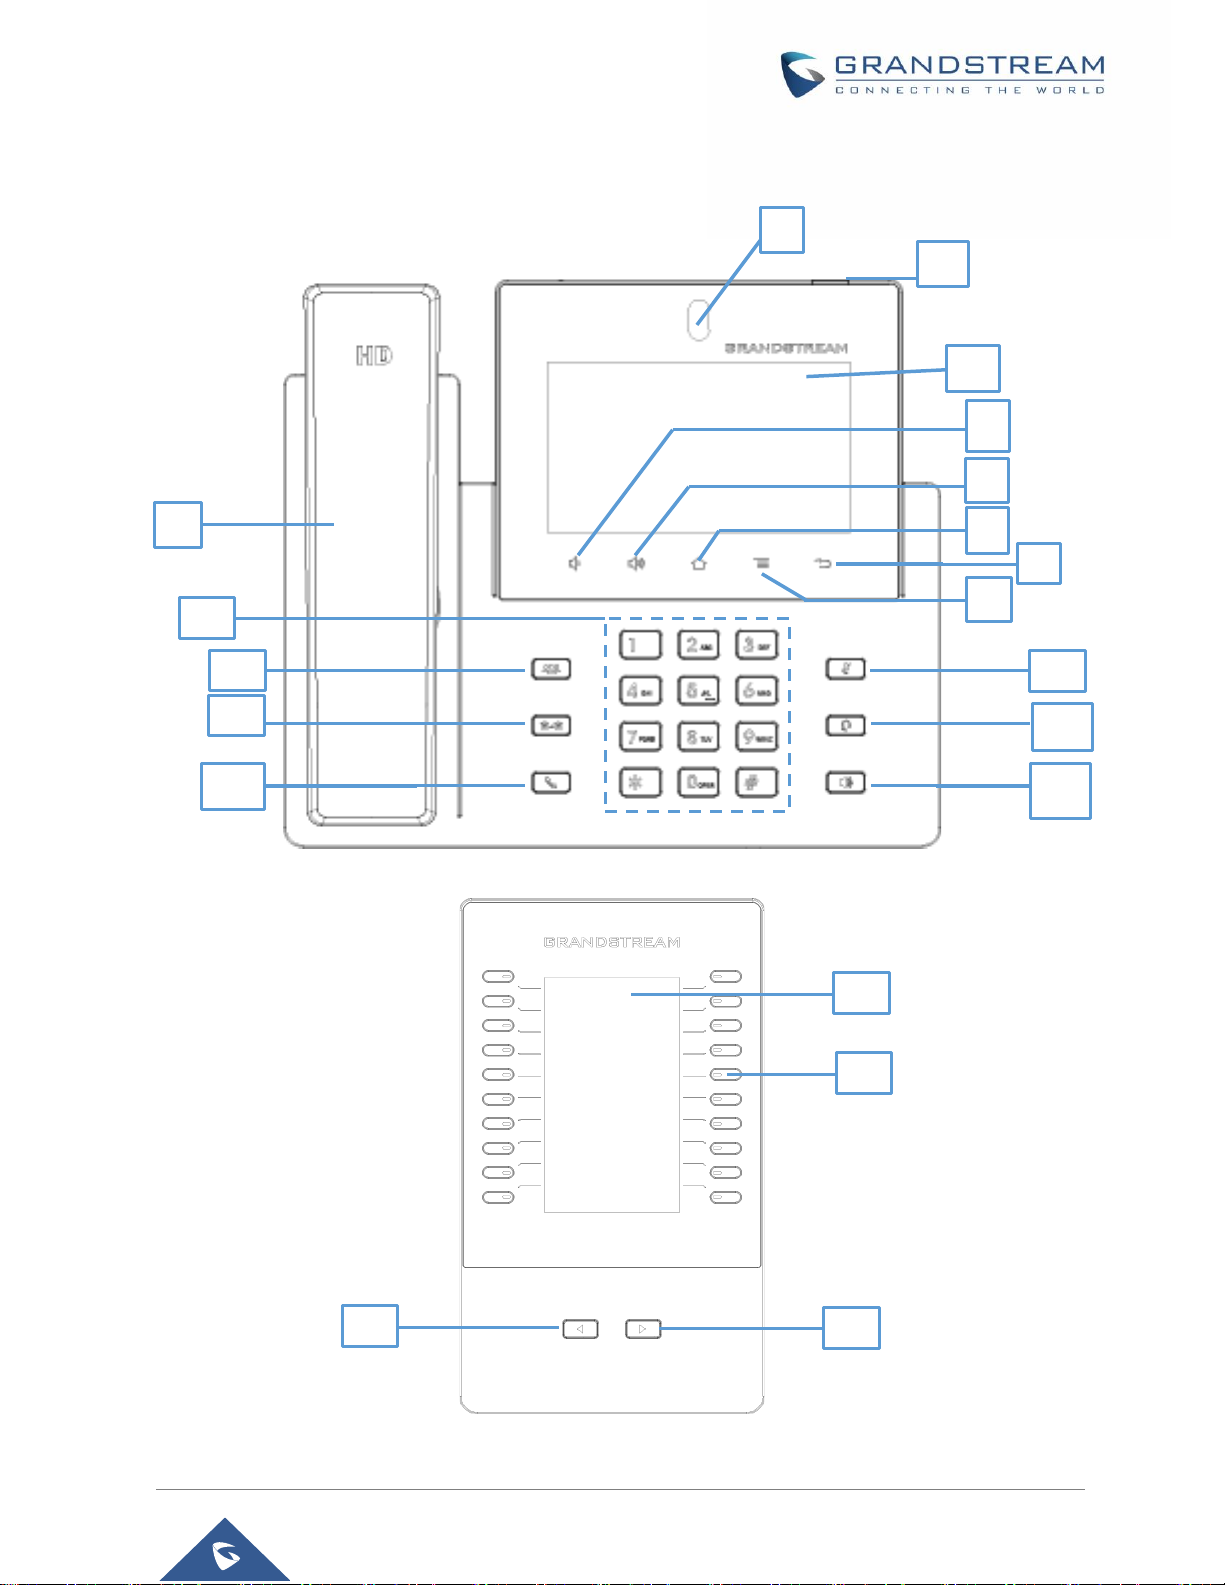
Front View
Figure 2: GXV3350 Front and GBX20 Extension Module Front
1
2
3
4
5
6
7
8
9
11
121314
15
16
10
17
18
19
20
Page 25
P a g e | 25
GXV3350 User Guide
Version 1.0.3.27
Table 4: GXV3350 Front View
Item
Name
Description
1
Front Camera
Mega pixel front camera. The angle can be adjusted, and the
camera can be blocked by scrolling up/down the wheel on the back
of the camera.
2
MWI LED Indicator
To indicate message status, call status and phone's system status
using the LED indicator.
3
LCD
5 (1280*720) capacitive (5 points) touch screen.
4
Volume Down
Tap to turn down the call volume and media volume.
5
Volume Up
Tap to turn up the call volume and media volume.
6
Home
Tap to go back to Home screen; or touch and press for about 2
seconds to take a screenshot of phone’s screen.
7
Menu
Press MENU key to access phone’s display settings, edit widgets
and thread manager. Or press and hold on the MENU key for 2
seconds to enter managing application interface directly.
8
Back
Tap to go back to the previous menu.
9
Handset
Off hook to use handset as the audio channel for calls and media.
10
Keypad
Tap to dial or send DTMF
11
Conference
Tap to enter into conference, then make an online meeting
12
Transfer
Tap to transfer the call
13
Dial/Send
Tap to make a call
14
Mute
Mute / Unmute the call. Or enable DND when free
15
Earphone
Tap to enter into the dial interface or switch the media channel to
earphone
16
Speaker
Tap to enter into the dial interface or switch the media channel to
speaker
17
GBX20 LCD
272*480 color LCD
18
Multiple Button
Tap to make all kinds of call, like speed dial, BLF and so on
19
Turn Last Page
Turn last page
20
Turn Next Page
Turn next page
Page 26
P a g e | 26
GXV3350 User Guide
Version 1.0.3.27
Back View
Figure 3: GXV3350 Back View
Table 5: GXV3350 Back View
Item
Name
Description
1
Camera Adjusting Wheel
Scroll up/down to adjust the camera angle.
2
Phone Stand Slot
Put the phone stand from left to right into the slots.
3
Handset Port
RJ9 handset connector port.
4
Headset Port
RJ9 headset connector port (supporting EHS with
Plantronics headset).
5
Power Jack
12V DC Power connector port.
6
LAN Port
10/100/1000Mbps RJ-45 port connecting to Ethernet.
PoE/PoE+ is supported.
7
PC Port
10/100/1000Mbps RJ-45 port connecting to PC.
1
2
8 34 5 6 7 9
10
Page 27

P a g e | 27
GXV3350 User Guide
Version 1.0.3.27
8
USB Port
USB devices can be connected via the USB port. For
example, connect a USB flash drive to save captured
pictures.
9
Side GBX20 Connection
Slot
The slots for connecting GXV3350 and GBX20.
10
HDMI-out Port
Connect display device to the HDMI port via HDMI cable.
Page 28
P a g e | 28
GXV3350 User Guide
Version 1.0.3.27
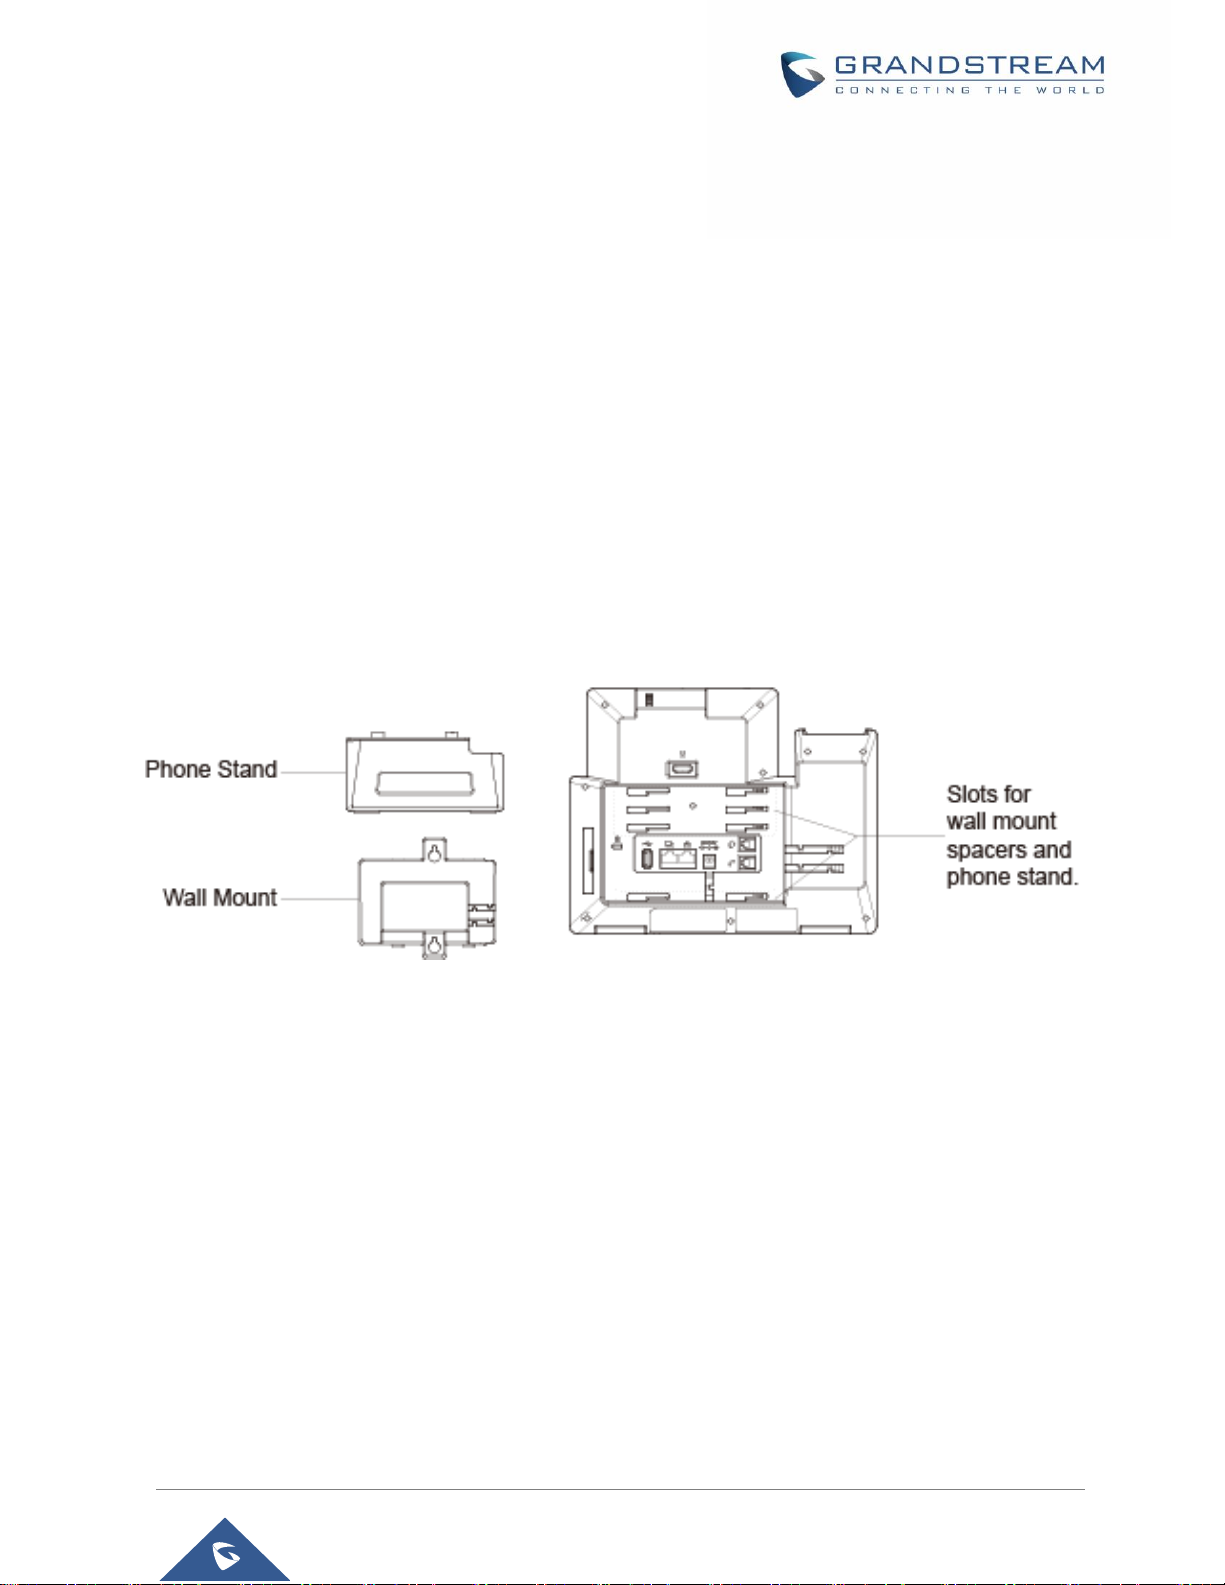
Connecting and Setting Up the GXV3350
The GXV3350 can be installed on the desktop using the built-in stand or attached on the wall using the
slots for wall mounting.
Using the Phone Stand
The GXV3350 has a phone stand. To set up the GXV3350 as your desk phone, follow the steps below:
1. For installing the phone on the table with the phone stand, attach the phone stand to the bottom of the
phone where there is a slot for the phone stand, (upper half, bottom part);
2. Connect the handset and main phone case with the phone cord;
3. Connect the LAN port of the phone to the RJ-45 socket of a hub/switch or a router (LAN side of the
router) using the Ethernet cable;
4. Connect the 12V DC output plug to the power jack on the phone; plug the power adapter into an
electrical outlet. If PoE switch is used in step 3, this step could be skipped;
The LCD will display the booting up screen or firmware upgrading information. Before continuing, please
wait for the main screen display to show up.
Figure 4: Phone Stand and Mounting Slots on GXV3350
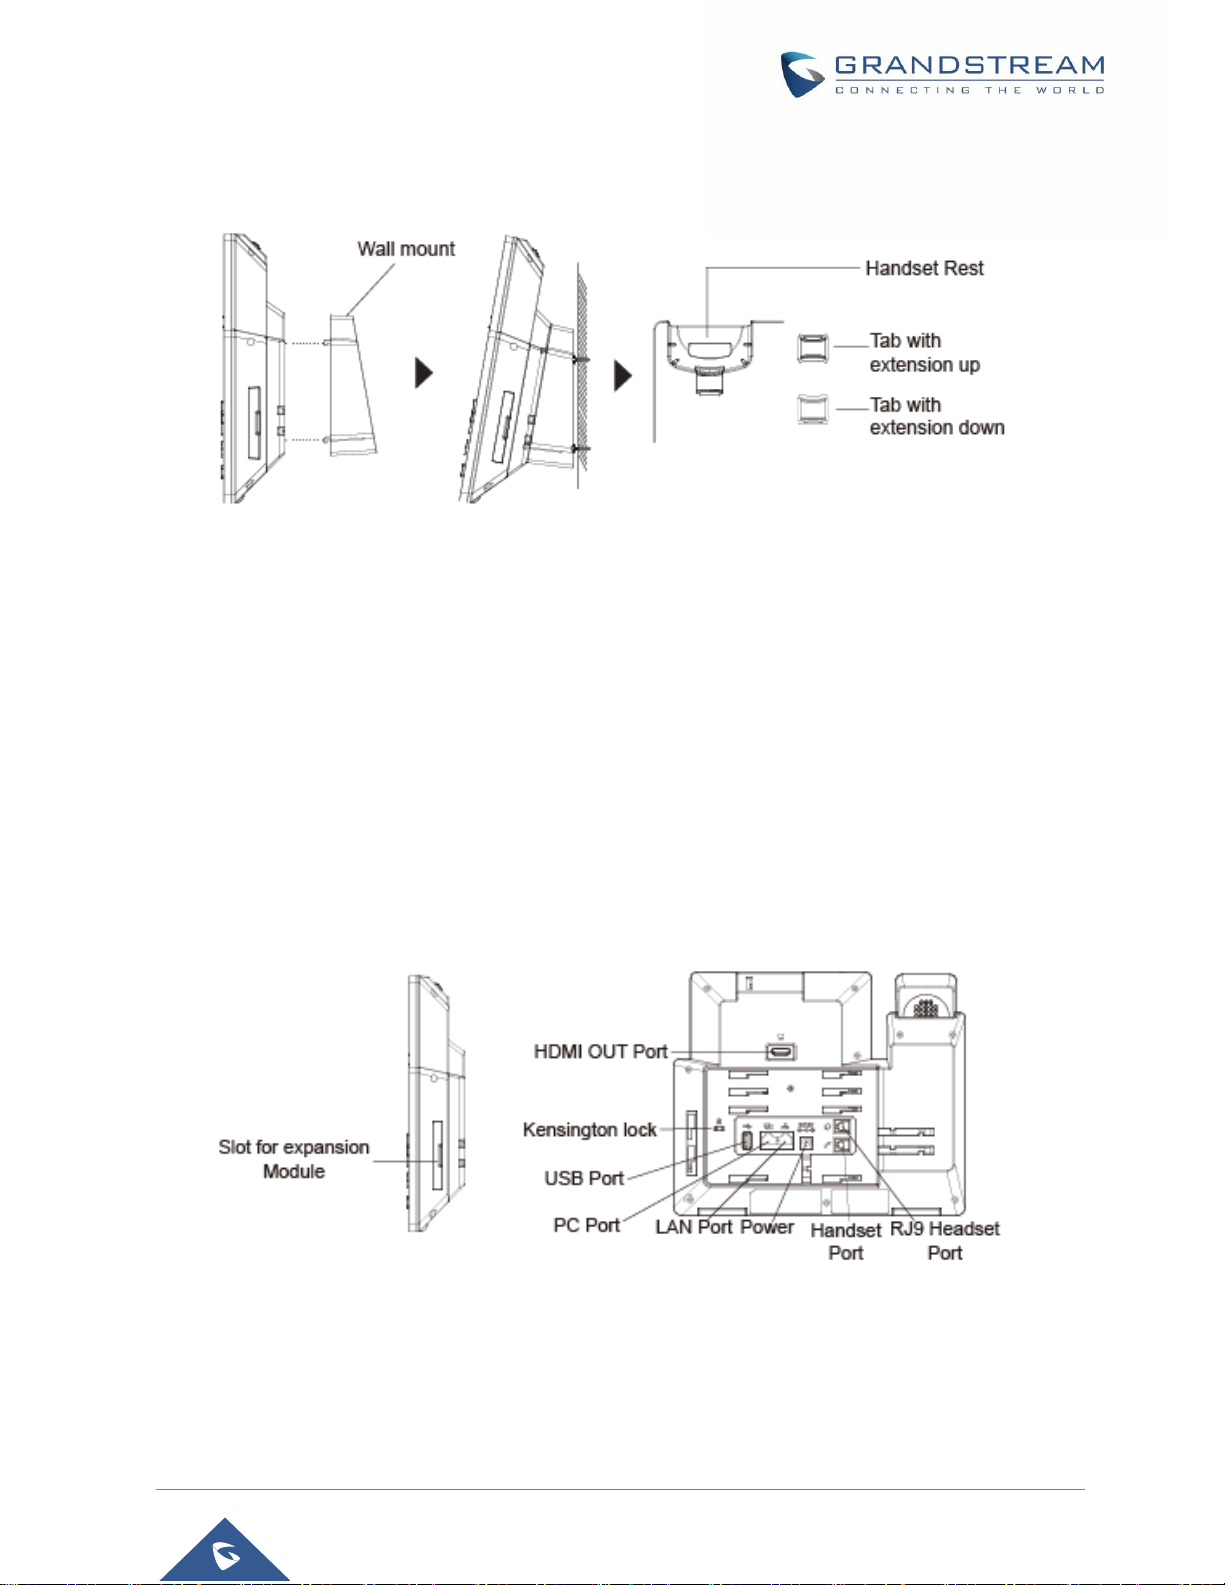
Using the Slots for Wall Mounting (Wall Mount *Sold Separately)
1. Attach the wall mount to the slots for wall mount spaces on the back of the phone;
2. Attach the phone to the wall via the wall mount hole;
3. Pull out the tab from the handset cradle (see figure below);
4. Rotate the tab and plug it back into the slot with the extension up to hold the handset while the
phone is mounted on the wall.
5. Connect the handset and main phone case with the phone cord;
6. Connect the LAN port of the phone to the RJ-45 socket of a hub/switch or a router (LAN side of the
router) using the Ethernet cable;
7. Connect the 12V DC output plug to the power jack on the phone; plug the power adapter into an
electrical outlet. If PoE switch is used in step 3, this step could be skipped;
Page 29
P a g e | 29
GXV3350 User Guide
Version 1.0.3.27
The LCD will display the booting up screen or firmware upgrading information. Before continuing,
please wait for the main screen display to show up.
Figure 5: Tab on The Handset Cradle
Connecting the GXV3350
To setup your GXV3350, please follow the steps below:
1. Connect the handset and main phone case with the phone cord;
2. Connect the LAN port of the phone to the RJ-45 socket of a hub/switch or a router (LAN side of the
router) using the Ethernet cable;
3. Connect the 12V DC output plug to the power jack on the phone; plug the power adapter into an
electrical outlet. If PoE switch is used in step 2, this step could be skipped;
4. The LCD will display booting up or firmware upgrading information. Before continuing, please wait
for the main screen display to show up;
5. Using the web configuration interface or from the menu of the touch screen, you can further
configure network connection using static IP, DHCP etc.
Figure 6: GXV3350 Back / Side View
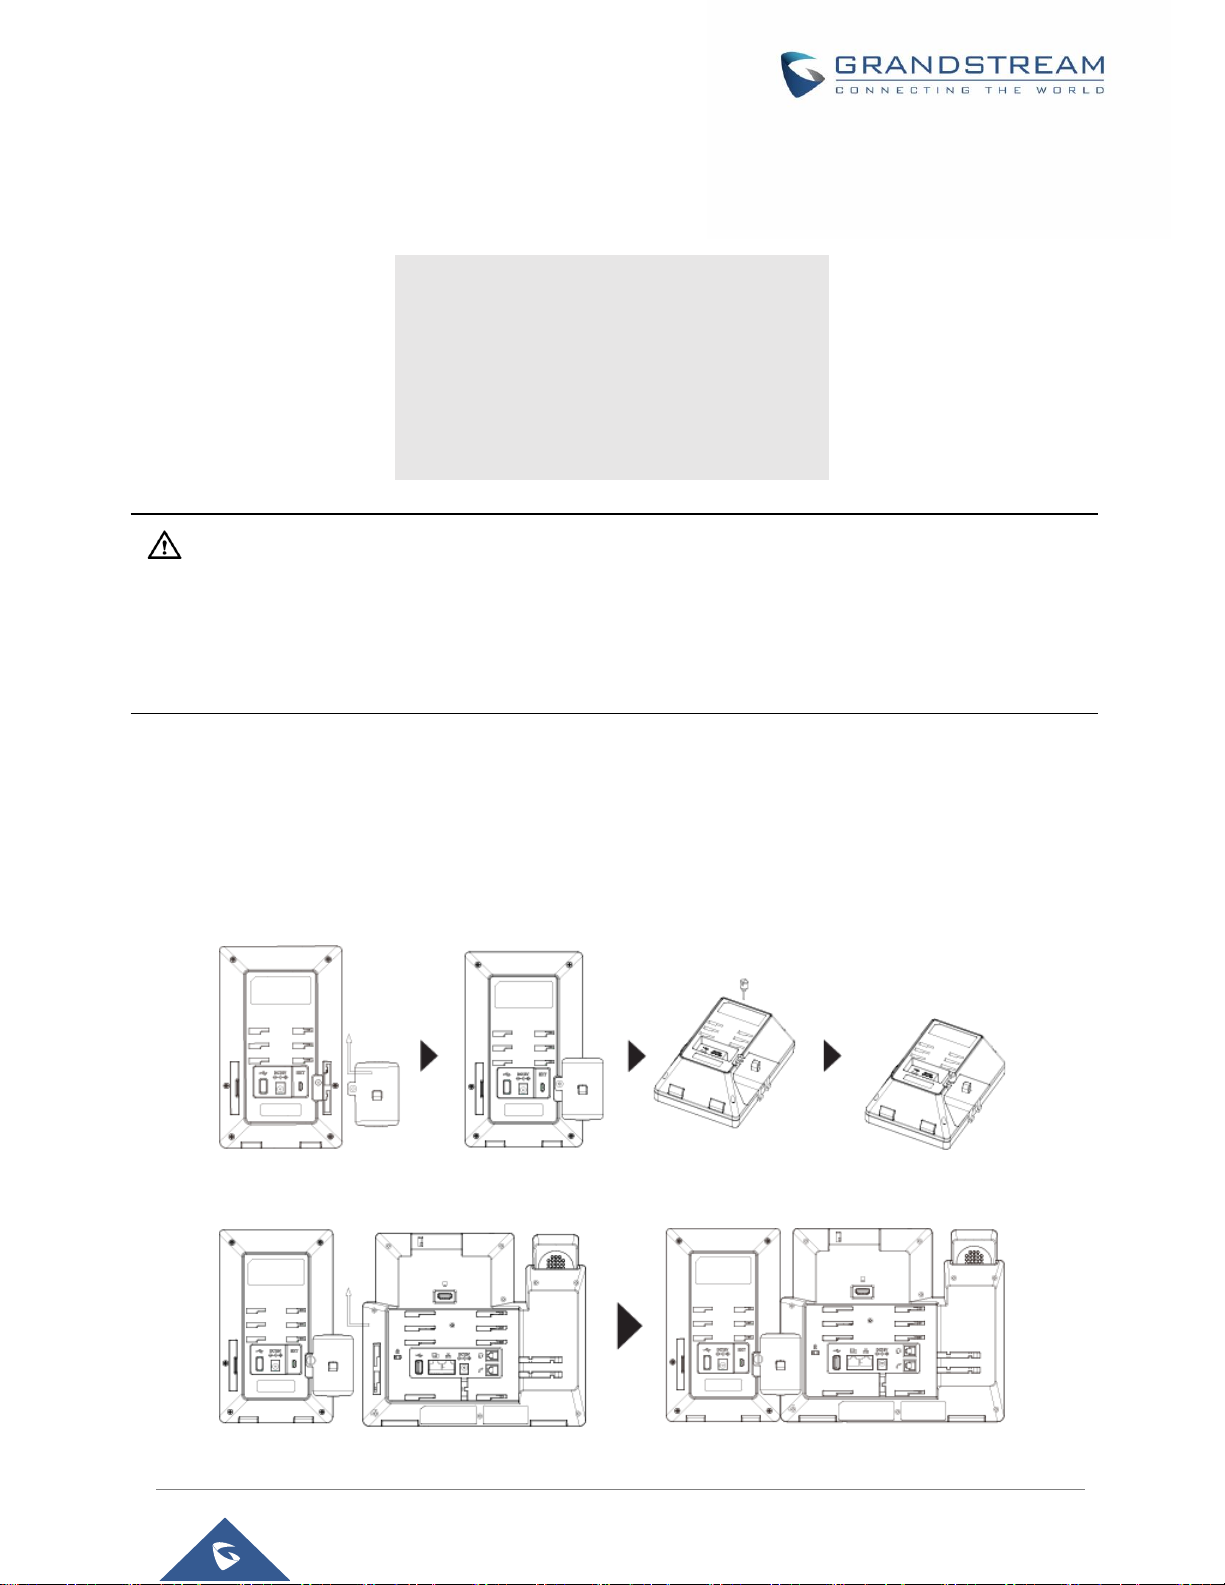
GBX20 Extension Module
The GXV3350 uses GBX20 as the extension module. The extension module is an ideal solution for the
busy enterprise environment looking to add the ability to receive and dispatch calls efficiently.
Page 30
P a g e | 30
GXV3350 User Guide
Version 1.0.3.27
Each GBX20 extension module has 20 programmable buttons, Left and Right buttons, supporting 40
Multiple Purpose Keys to be configured. GXV3350 supports up to 4 extension modules, adding 160 fully
programmable phone extensions to the phone.
Table 6: GBX20 Extension Module Packaging
1x GBX20.
1x GBX20 Stand.
1x Connector.
1x TypeA-MicroB USB Cable.
1x 12V/1A Power Adapter.
1x Screw.
1x Quick Installation Guide.
Note:
1. The GBX20 is an additional accessory for the GXV3350. Therefore, theGBX20 (including extension
module accessories for installation) is not included in the GXV3350 package.
2. In case two or more GBX20 extension modules are connected to the GXV3350, the second GBX20
needs to be powered on by a 12V/1A PSU.
Installing the GBX20 to GXV3350
To set up the GBX20 with the GXV3350, please follow the steps below:
1. On the back of the GBX20 and the GXV3350 there are slots for connector plate. Attach the connector
plate between the slots for the GBX20, Apply the screw provided and securely tighten the connector
plate to the GBX20 (see figure below).
Figure 7: GBX20 with connector
2. Attach the other side of the connector plate to the GXV3350’s EXT slots like shown in the figure below:
Figure 8: Connect GXV3350 and GBX20
Page 31

P a g e | 31
GXV3350 User Guide
Version 1.0.3.27
3. Connect the GBX20 to the GXV3350 via the USB port using the USB cable provided with the GBX20.
4. Install the phone stands on the GXV3350 and the GBX20.
5. Power up the GXV3350. The GBX20 will show the booting up screen with version information and
connecting status.
6. After successfully booting up, the extension board will stay in idle. Press and hold the LEFT and RIGHT
button at the same time to check the version information and status.
The GBX20 can be configured via the web GUI of the GXV3350 connected. After successfully configured,
press LEFT and RIGHT button on the GBX20 and users could browse all the Programmable Keys' status
in different pages.
For more information on installing, connecting and configuring the GBX20 with GXV3350, please refer to
the GBX20 user manual in http://www.grandstream/com/support.
Cleaning the Phone
For daily dust removal and fingerprint removal, please use the screen cleaning cloth in the factory package
to wipe the phone. Before you clean the touchscreen, we recommend turning cleaning mode on, so that
you will not activate phone functions while wiping the touchscreen.
You can go to LCD Settings Basic Accessibility to enable cleaning mode. Once finished, you can
enable the touchscreen again by pressing any hardkey on the phone.
For some special cases like medical environment, you can use medical alcohol or isopropanol. The steps
are as followed:
1. Before cleaning the phone, stop using it and disconnect it from the power supply.
2. Spray a small amount of disinfectant on screen, camera, handle and other places that are easily
touched by users.
3. Wipe the phone with screen cleaning cloth.
4. Power on until the disinfectant is completely volatilized.
Notes:
Keep the power plug clean and dry, or may lead to electric shock or other perils.
DO NOT use disinfectant too frequently.
DO NOT use high degree or even pure disinfectant. It could damage the phone.
Page 32

P a g e | 32
GXV3350 User Guide
Version 1.0.3.27
GETTING TO KNOW GXV3350
Use the Touchscreen
When the phone boots up in HOME screen, the LCD will display as below. A registered account is shown
in the following figure and users might need register their own account to have the account status displayed.
Figure 9: GXV3350 Default Home Screen
Swipe from right to show the application menu of the phone. The settings and applications installed will be
brought up as shown below.
Figure 10: GXV3350 Onscreen Menu
The Status Bar shows time, network
connectivity, signal strength, notification
information etc...
Date and Time
Shortcut: Contacts
Shortcut: Call History
Shortcut: Phone Dialer
Account information Widget. Up to 6
accounts/Programmable-keys can
be displayed.
Page 33

P a g e | 33
GXV3350 User Guide
Version 1.0.3.27
To fully manipulate the GXV3350 capacitive touch screen, use your fingers to operate the following on the
GXV3350 icons, buttons, menu items, onscreen keyboard etc.
Figure 11: GXV3350 Finger Gestures on the Touch Screen
Tap
Slightly touch the screen with fingertip to initiate menu, options or applications. For example, to select
items on the screen (e.g., setting options, apps etc.); to press onscreen buttons (e.g., "End" or "Options"
softkey during the call); to type letters and symbols using the onscreen keyboard.
Long Press
Touch the screen with fingertip and press for about 2 seconds without lifting your finger from the screen
till an action occurs. For example, long press on a picture to bring up selection option.
Flick and Slide
Touch the screen with fingertip and slide over the screen. For example, user could slide up to scroll up
the page, slide down to open dropdown menu, slide left or slide right to delete an item from the list. If
your finger stays on the screen for too long, the item may be selected, and sliding won't occur.
Press and Drag
Touch and press the item, then move it by dragging it up, down, left or right, without lifting your finger
from the screen.
Page 34

P a g e | 34
GXV3350 User Guide
Version 1.0.3.27
Zoom In/Zoom Out
Place two fingers on the screen, then pinch them together (zoom out) or spread them apart (zoom in).
Double Tap
Quickly touch the screen twice with fingertip to switch between default display and zoomed-in display.
This is usually used when viewing photos or web pages.
Use the Desktop
Desktop Menu
When the GXV3350 is on idle screen, press the MENU key to bring up phone's menu. Users can
access the following in the desktop menu:
Figure 12: GXV3350 Desktop Menu
Desktop page
Add, delete or edit desktop pages, set Home page and change the screen sequence.
Wallpaper
Select wallpaper from Local gallery or from the available system Wallpapers
Widgets
Add widgets to the desktop by touching and holding the widget from the widget menu.
Management
Manage running applications on the GXV3350.
Page 35

P a g e | 35
GXV3350 User Guide
Version 1.0.3.27
Add Widget to Desktop
The GXV3350 provides widgets like account bar, clock, contacts etc. Users could conveniently add those
widgets to the desktop as preferred. To add a widget:
1. Press the Menu key or long press on an empty space on the idle screen and select "Widgets".
2. Different widgets will be displayed on the right side of the screen.
3. Select and drag the widget to the desired spot to be placed on the desktop. Please make sure there is
enough space on the desktop. Otherwise, the widget won't be added.
Figure 13: Add Widget to the Desktop
Manage Desktop Items
On the GXV3350 desktop, users could tap on the desktop items to manage shortcuts and widgets. The
following operations can be done:
Tap on the shortcut icon to open the application.
For example, tap on "File Manager" icon to access file manager application.
Tap on the widget to open and edit it.
For example, tap on the digital clock on the desktop. The clock settings will be brought up for users to
set up timer, stopwatch or alarm.
Page 36

P a g e | 36
GXV3350 User Guide
Version 1.0.3.27
Figure 14: Open Clock Widget
Certain widgets such as the MPK Widget can be resized on the desktop.
To resize a widget, press and hold the widget for about 2 seconds. Then lift your finger from the screen.
This will bring up the white frame as shown in the following figure. Touch and drag the border of the
frame to adjust the size.
Figure 15: Resize Digital Clock Widget
Move/delete Application/Widget
To move a shortcut/widget to a different spot on the desktop or to a different idle screen, touch and
press the item for about 1 seconds until a recycle bin icon shows up on the top of the screen. Drag the
item up/down/left/right to the destination spot on the screen. Lift your finger once done. To delete the
item/widget, press on it for about 1 seconds then move it to the recycle bin on the top of the screen.
Page 37

P a g e | 37
GXV3350 User Guide
Version 1.0.3.27
Figure 16: Move Clock Widget
Group Apps into folders on home screen
To group different Apps in a folder, hold press on the app and drag it on top of the other app the folder will
be created with a dark background showing icons of the Apps added.
Figure 17: Creating a Folder grouping Apps
Tap the folder to display the Apps included, you can rename the folder by touching the upper box to
display the keyboard.
Auto Adjust Screen
This app is running in background and automatically triggered when the user opens a third-party app, such
Page 38

P a g e | 38
GXV3350 User Guide
Version 1.0.3.27
as YouTube, Skype, Zoom, Teams, etc, so that app layout would be correct. When the user goes back to
the LCD desktop, the app adjusts the screen back to normal.
The notification would show as below:
Figure 18: Auto Adjust Screen
Set Wallpapers
On the GXV3350 desktop, touch and press on an empty spot for about 2 seconds or users could press
menu key and select "Wallpaper" to set up the wallpaper for the desktop. Users could select wallpaper
from different categories:
Local
Open Gallery application and tap on the picture to preview. Touch and drag the picture to adjust the
frame that will be used as wallpaper. Then tap on "Set Wallpaper" to set the selected area of the picture
as wallpaper.
Wallpapers
On the right side of the Wallpaper menu of the GXV3350. Select the picture from the default wallpapers
available to preview and then tap on "Set wallpaper".
Note:
Deleting an application icon will systematically pop up a window asking the permission to uninstall the
application from the screen. Press ok to uninstall or press cancel to abort.
Page 39

P a g e | 39
GXV3350 User Guide
Version 1.0.3.27
Figure 19: GXV3350 Choose Wallpaper
Set Weather Widget
On the GXV3350 desktop, touch and press on an empty spot for about 2 seconds or users could press
menu key and select Widgets to display available choices, Long press the Weather widget to add it to
the desktop.
Figure 20 : Accessing Available Widgets
Page 40

P a g e | 40
GXV3350 User Guide
Version 1.0.3.27
Figure 21: Minimized display of Weather App
Use the Right/Left icons to switch between added cities on the minimized weather screen. Or when
maximized use swiping movement to change between cities.
Figure 22: Maximized Display of Weather APP
Manage Running Applications
On the GXV3350 desktop, press an empty spot for about 2 seconds then select “Management” or select
"Management" after pressing Menu button ..
Page 41

P a g e | 41
GXV3350 User Guide
Version 1.0.3.27
Figure 23: GXV3350 Recent Applications
Users could use the thread manager to do the following:
Slide the running thread to the left or right to stop the application.
Tap on icon to delete all running threads.
Tap on "Application" softkey to access application menu for advanced management options.
Idle Screen
Switch Idle Screens
The GXV3350 supports multiple idle screens by sliding the screen horizontally. On the GXV3350 screen,
slightly touch an empty area and slide to the left or right using your finger to switch between different idle
screens.
Page 42

P a g e | 42
GXV3350 User Guide
Version 1.0.3.27
Figure 24: GXV3350 Switch Idle Screens
Set Up Idle Screen
Set home screen
Follow the steps below to set up the HOME screen.
1. GXV3350 is up and running on idle screen.
2. Press the MENU button . This will zoom out all the screens as shown in [Figure 25: Set up Home
Idle Screen].
3. The screen with displayed is the HOME screen. Others are shown with icon . Tap on the
icon to select the corresponding screen as the new HOME screen.
Figure 25: Set up Home Idle Screen
Page 43

P a g e | 43
GXV3350 User Guide
Version 1.0.3.27
Add/Delete idle screen
As shown in [Figure 25: Set up Home Idle Screen], this section shows the available desktop screens.
Users could add or delete idle screen.
Add idle screen.
Tap on to add a new idle screen.
Figure 26: Add an Idle Screen
Delete idle screen.
Tap on to delet the Idle screen. Please make sure the apps, shortcuts or widgets on the idle
screen are removed first. Otherwise, the icon won't show for the idle screen.
Page 44

P a g e | 44
GXV3350 User Guide
Version 1.0.3.27
Figure 27: Delete an Idle Screen
Use the Status Bar
The status bar on the top of the GXV3350 screen provides visual notifications for the system settings and
status, as well as quick access for important system settings. To access it, on the GXV3350 idle screen,
slowly slide down from the top to the bottom of the screen as the following figure shows.
Figure 28: GXV3350 Top Status Bar
For more options on the Status Bar (call forward, RJ9 headset…) users can slip right the status bar.
Page 45

P a g e | 45
GXV3350 User Guide
Version 1.0.3.27
Figure 29: Status Bar - More Options
The running process and notifications will show up in the list. For example, the following figures indicate
that there is a notification for an available Wi-Fi network.
Figure 30: GXV3350 Top Status Bar – Notification
Tap on the notification message to view the details.
Slide the notification message to the left or the right side to remove it.
For more information about specific features in the notification bars, you can press the bottom right of the
feature in question.
Page 46

P a g e | 46
GXV3350 User Guide
Version 1.0.3.27
Figure 31: GXV3350 Top status Bar - Get more information
For example, you can see the available Wi-Fi Networks.
Figure 32: GXV3350 Top status Bar – Wi-Fi
Notifications in Status Bar
The following table describes the icons used on the status bar for notification purpose.
Page 47

P a g e | 47
GXV3350 User Guide
Version 1.0.3.27
Table 7: GXV3350 Status Bar Notification Icons
Network connected via Ethernet cable.
Trying to connect to the network via Ethernet cable.
Network disconnected via Ethernet cable.
Handset is off hook.
Speaker is being used. (x)
RJ9 headset is connected.
RJ9 headset is being used for calls.
Wi-Fi is enabled and still not connected.
Wi-Fi network is available.
Wi-Fi is enabled and connected.
Onscreen keyboard is activated.
Bluetooth is enabled but not connected.
Bluetooth is enabled and connected.
Bluetooth headset is connected.
Bluetooth headset is being used for calls.
Downloading files via Bluetooth.
Alarm is set up and enabled.
DND is enabled.
Silent mode is enabled. When it's on, the incoming call/message
won't produce ring tone/notification tone from phone's speaker.
Page 48

P a g e | 48
GXV3350 User Guide
Version 1.0.3.27
USB flash drive is inserted.
Downloading files via Internet connection.
Unread voicemail to be retrieved.
Incoming call from blacklist contact.
Camera is disabled.
Contact storage is full.
HDMI cable is connected to display device.
The phone is powered up using PoE.
Call forward is set up.
PPPoE is connected.
PPPoE is not connected.
Warning message.
Page 49

P a g e | 49
GXV3350 User Guide
Version 1.0.3.27
System Settings in Status Bar
Slide down the top status bar and select System Settings. Users will see the following settings.
Figure 33: System Settings in Status Bar
Use the GXV3350 Keys
Figure 34: GXV3350 Keys
Turn on/off LCD display.
Turn on/off DND. When DND is
on, all the calls to the registered
accounts will be blocked.
Turn on/off Bluetooth.
Turn on/off Wi-Fi.
Turn on/off the voice of
the phone
Go to phone Settings
Show more options
Adjust the lightness
1
2
35478
91011
12
6
Page 50

P a g e | 50
GXV3350 User Guide
Version 1.0.3.27
Table 8: GXV3350 Keys
1
Volume Down
Tap to turn down the call volume and media volume.
2
Volume Up
Tap to turn up the call volume and media volume.
3
Home
Tap to go back to Home screen; or touch and press for about 2
seconds to take a screenshot.
4
Menu
Tap to view options for different screens or applications.
5
Back
Tap to go back to the previous menu.
6
Keypad
Tap to enter numbers or send DTMF
7
Conference
Tap to enter into conference, then make an online meeting
8
Transfer
Transfer the call.
9
Dial/Send
Make a call or send DTMF.
10
Mute
Mute / Unmute the call. Or enable DND when free.
11
Earphone
Tap to enter into the dial interface or switch the media channel to
earphone
12
Speaker
Tap to enter into the dial interface or switch the media channel to
speaker
Keypad Shortcut Functions
The GXV3350 supports keys shortcuts for certain special system functions.
Screenshot
Press and hold the Home button for about 2 seconds to capture screenshot. The screenshot can
be accessed via File Manager Pictures. The screenshot picture size is 1024x600 pixels.
Firmware upgrade via USB
For users that could not use remote upgrade or could not access the phone's Web GUI to upload firmware,
upgrading via external USB is an alternative. Follow the steps below to upgrade GXV3350 via USB.
1. Download the firmware file to PC and save it in USB.
2. Insert the USB to GXV3350.
3. Power cycle the GXV3350.
4. Wait for the LED in the upper right of the phone to light up in Green, then about 2 seconds later press
the both keys “3” and “ * ” at the same time, it will go into the upgrading process.
Page 51

P a g e | 51
GXV3350 User Guide
Version 1.0.3.27
5. The GXV3350 will start upgrading and display the upgrading process in the screen.
6. Wait until the upgrading is done.
7. The GXV3350 will reboot itself.
8. Check the firmware status and remove the USB.
Hard reset
For users that want to factory reset the device manually, hard reset is an alternative:
1. Power cycle the GXV3350.
2. Wait for the LED in the upper right of the phone to light up in Green, then about 2 seconds, press the
both keys “1” and “9” at the same time, it will go into the factory reset process.
3. The LCD screen will display “Factory reset, please wait”.
4. The GXV3350 will reboot with factory default settings.
Use the On-Screen Keyboard
The GXV3350 onscreen keyboard can be activated by tapping on an input field.
English Keyboard
This is the default keyboard on GXV3350.
Figure 35: GXV3350 Onscreen Keyboard - English Keyboard
To switch input between lowercase and uppercase, tap on (lowercase) or (uppercase).
Figure 36: GXV3350 Onscreen Keyboard - Lowercase and Uppercase
Number and symbols
To input number and symbols, tap on the default keyboard to switch to number/symbols. Tap on
to switch back.
Page 52

P a g e | 52
GXV3350 User Guide
Version 1.0.3.27
Figure 37: English Keyboard - Number and Symbols
Tap on to access more symbols.
Figure 38: English Keyboard - More Symbols
Note:
To configure keyboard and input methods options, please refer to the following steps:
1. Go to SettingsBasicLanguage & KeyboardVirtual Keyboard
2. Click on “+” to add more input method.
3. Go to SettingsLanguage & KeyboardCurrent Keyboard, and choose from the input
methods.
4. After these steps, the method would change to the new one.
Users could touch and press the key on the keyboard for about 2 seconds to input the alternative
character. For example, touch and press the "+" key for about 2 seconds can get the selection "±".
Use the Message Waiting Indicator
The GXV3350 message waiting indicator LED is on the upper right corner of the device. It could notify the
users with different messages and status of the phone. Please refer to the status description below. The
priority for the LED indicator is from high to low in the following table.
Page 53

P a g e | 53
GXV3350 User Guide
Version 1.0.3.27
Table 9: GXV3350 MWI LED Status
Color
LED Status
Description
Fast Flashing
Incoming call
Solid
Calling, Talking, Conferencing, Screensaver on when the
LCD is off
Slow Flashing
A call is on hold
Flashing
Missed call (s), New voicemail (s), New SIP Message (s)
Solid
High memory usage, Maximum contact storage, Network
disconnect
Fast Flashing
Upgrading
OFF
OFF
Normal
Page 54

P a g e | 54
GXV3350 User Guide
Version 1.0.3.27
MAKE PHONE CALLS
Register SIP Accounts
The GXV3350 supports up to 16 independent SIP accounts. Each account can have separate SIP servers,
usernames and NAT configurations.
Account Status
On the idle screen, the account widget shows the account name, and registration status.
The following figure shows the account is successfully registered (account icon is green).
If the account icon is grey, it's still trying to register or unable to register.
Figure 39: GXV3350 Account Widget
Page 55

P a g e | 55
GXV3350 User Guide
Version 1.0.3.27
Configure SIP Account
To register a SIP account, users can access phone's LCD menuSettingsAdvanced Account
Settings
Or users could log in the GXV3350 web GUIAccount page to fill in the necessary registration information,
i.e., Account active, Account name, SIP Server, SIP User ID, SIP Authentic ID, SIP Authentic Password,
etc. Once the correct information is entered and saved, the account registration status will show on the
main screen.
Note:
For web GUI login and configuration information, please refer to GXV3350 Administration Guide.
If the account is successfully registered, users could use one of the following ways to bring up dial screen
to start making calls.
Take the handset off hook.
Select an account from the account widget in the idle screen.
On the shortcut’s menu of the idle screen, tap on icon to open dial screen.
Figure 40: GXV3350 Dial Screen
Page 56

P a g e | 56
GXV3350 User Guide
Version 1.0.3.27
If Enable Video Call option is disabled, the Video Call option on GXV3350 dial screen won’t be available
Figure 41: Disable Video Call Feature on Dial Screen
Dial a Number Directly
1. Use the methods mentioned above to open dial screen [Figure 40: GXV3350 Dial Screen].
2. Select the account to dial out on the left panel of the dial screen. The selected account will be displayed
in green
3. Choose the call mode to be used (call, paging or IP call), the call mode used will be displayed under
the account.
4. Enter the digits to be dialed out using the keypad. If the digit matches call history, a list of numbers will
be displayed for users to select from.
5. Tap on (audio call only) or (video call) to send the number. If no key is pressed, by default
the call will be automatically dialed out after 4 seconds timeout.
Page 57

P a g e | 57
GXV3350 User Guide
Version 1.0.3.27
Note:
By default, the "No Key Entry Timeout" is 4 seconds, meaning if no key is pressed after entering a
number, the call will be automatically sent out after the timeout. The timeout interval can be configured
under web GUIAccountCall Settings.
GXV3350 allows users to press # key as SEND key. This behavior can be disabled via option "Use #
as Dial Key" under web GUIAccountCall Settings.
GXV3350 allows users to press # key as REDIAL key. This behavior can be disabled via option “Use
# as Redial Key” under Web GUIAccountCall Settings.
When the user enters the digit on the dial screen, if there is digit matching call history, or contacts
name/number, the drop-down list will show the numbers. For example, if "John" is saved in the contacts,
entering 5 (JKL) 6 (MNO) 4 (GHI) 6 (MNO) will show call log with 5646 as the first four digits, as well
as John's number. Users could then directly select one of them from the list, instead of entering all the
digits.
Redial
Users can dial out the last dialed number if there is dialed call log, using the same SIP account making the
call last time.
1. Enter the dial screen.
2. A list of dialed calls will be displayed on the left side of the dial pad. Tap on the number you would like
to call, the number will be added to the dialing field, press Audio call or Video call to redial.
Dial a Number via Contact
Follow the steps below to dial a number via Contact.
1. Access Contacts by tapping on icon on the left side of the idle screen.
2. Navigate in the contacts entries by sliding up/down on the screen.
3. Tap on the dial icon for the contact .
Page 58

P a g e | 58
GXV3350 User Guide
Version 1.0.3.27
Figure 42: GXV3350 View Contacts
Dial a Number via Call History
1. Access Call History by tapping on icon on the bottom of the idle screen.
2. The LCD will display all call history types: "All", "Missed", "Outgoing" and "Incoming" calls.
3. Navigate in the call history list by selecting the call history category and sliding up/down on the screen.
4. Tap on the entry to show more details or tap on to dial out.
Figure 43: GXV3350 Call History
Page 59

P a g e | 59
GXV3350 User Guide
Version 1.0.3.27
Note: The icon next each call indicates the Call Type with which the call was made, icon means this
was a Video call. Moreover, means it was an Audio call.
Figure 44: Call mode from call history
Direct IP Call
Direct IP Call allows two phones to talk to each other in an ad-hoc fashion without a SIP proxy. VoIP calls
can be made between phones if:
Both phones have public IP addresses, Or
Both phones are on the same LAN/VPN using private or public IP addresses, Or
Both phones can be connected through a router using public or private IP addresses (with necessary
port forwarding or DMZ).
To make a direct IP call, please follow the steps below:
1. Directly enter the 192*168*xxx*xxx through the Number Buttons in the idle screen to bring up dial
screen on GXV3350.
2. Set the call mode as "IP Call".
3. Input the target IP address. For example, if the target IP address is 192.168.0.116 and the port is 5062
(i.e., 192.168.0.116:5062), input the following:
192*168*0*116#5062. The * key represents the dot (.) and the # key represents the colon (:).
4. Press on (audio call only) or (video call) to dial.
Page 60

P a g e | 60
GXV3350 User Guide
Version 1.0.3.27
Answer a Call
Single Incoming Call
When the phone is in idle and there is an incoming audio call, the phone will show the call screen as
below. Tap on "Answer" softkey to answer the call via speaker or pick up the handset the answer the
call.
Figure 45: Single Incoming Call – Audio
When the phone is in idle and there is an incoming video call, the phone will show the call screen as
below. To answer the call with audio only, tap on "Audio" to answer the call via speaker. To answer the
call with both audio and video, tap on "Video". During video call or pick up the handset, the audio will
switch to handset if picking up the handset.
Figure 46: Single Incoming Call – Video
Page 61

P a g e | 61
GXV3350 User Guide
Version 1.0.3.27
Note: Users could select the Video Display Mode on phone’s Web UIPhone SettingsVideo Settings.
Set the video display mode to "Original proportion", "Cut proportionally" or "Add black margin
proportionally".
If set to "Original proportion", the phone displays video in its original proportion. If the video display
proportion is different from the one on the phone, the phone will stretch or compress video to display it. If
set to "Cut proportionally", the phone will cut video to meet its own display proportion. If set to " Add black
margin proportionally ", the phone will display video in its original proportion, if still exists spare space,
the phone will add black edge on it.
Preview Function for Incoming Call
If the phone set the “Preview” feature for the incoming call from Web UI, the phone will display one
more key “Preview” when there is an incoming video call. End users will preview the remote end without
answering the video call. After previewing, end user can tap on Answer key to answer the video call, or
“Reject” key to reject it. This feature should be supported by the SIP server. Please contact service
provider for more information.
Figure 47: Single Incoming Call – Preview-1
Page 62

P a g e | 62
GXV3350 User Guide
Version 1.0.3.27
Figure 48: Single Incoming Call – Preview-2
Transfer Function for Incoming Call
If the phone set the “Transfer” feature for the incoming call from Web UI, the phone will display one
more key “Transfer” when there is an incoming call. End users will have the possibility to transfer the
call without answering. After pressing “Transfer” button, end user can enter manually destination or
press “MPK” to select a destination. “Reject” key to reject it. This feature should be supported by the
SIP server. Please contact service provider for more information.
Figure 49: Single Incoming Call – Transfer-1
Page 63

P a g e | 63
GXV3350 User Guide
Version 1.0.3.27
Figure 50: Single Incoming Call – Transfer-2
Multiple Calls/Call Waiting
1. When there is another incoming call during active call, users will hear a call waiting tone, with the LCD
displaying the caller name and ID for the incoming call. In the prompt window, it shows new incoming
call from "316307" with the caller number; the account bar in purple is the current active call with
"316307".
Figure 51: Call Waiting
2. Similar to single incoming call, if the incoming call is video call, users can choose to “Audio Answer” or
to “Video Answer” to answer the call.
Page 64

P a g e | 64
GXV3350 User Guide
Version 1.0.3.27
3. Once the new call is answered, the current active call will be placed on hold. If the new call is rejected
by tapping on "Reject" softkey, the current active call will not be interrupted.
Call Progress Status
During an active call if Home Button is pressed, the phone will go back to the home screen and the call-inprogress status will be shown on the GXV3350 status bar, once clicking the bar it will go back to call screen.
Figure 52: Touch to Return to Call Screen
Call Hold
During the active call, press HOLD softkey. The LCD screen will show as below. To resume the call, press
UNHOLD softkey on the bottom of the screen.
Page 65

P a g e | 65
GXV3350 User Guide
Version 1.0.3.27
Figure 53: Call on Hold
Call Recording
1. During the call, users could record the conversation to the phone by tapping on “Record”
2. If need to stop the recording, tap on “Stop Recording”
3. The recording files can be retrieved from the GXV3350 Web GUI→Applications→Recording.
Figure 54: GXV3350 Call Recording
Note:
Users can configure the recording mode via Web GUI→Phone Settings→Call Settings→Record Mode.
Five modes are available:
Page 66

P a g e | 66
GXV3350 User Guide
Version 1.0.3.27
Record Locally: The phone will use the local recorder for call recording, and the audio file will be
saved according to the recorder setup.
Record on PortaOne: The phone will send the specified SIP messages to the corresponding server
Record on UCM: The phone will send the recording feature code to the UCM server to request for
recording, and the recording function will be executed by the server.
Record on BroadSoft: The phone will send the recording feature code to the Broadsoft server to
request for recording, and the recording function will be executed by the server.
Disable: The phone cannot record in a call.
Users can configure the phone to Auto-Record all calls established via Web GUI→Phone Settings→Call
Settings→Enable Auto Record When Call Established. But, if Record Mode is set to “Disable”, this option
cannot be configured.
MPK Monitoring
During the call, users could view and monitor the programmable keys configured for the current Account:
Figure 55: MPK button
1. During the Call, press the MPK button as shown above.
2. The list of MPK configured for the active account will be displayed.
Page 67

P a g e | 67
GXV3350 User Guide
Version 1.0.3.27
Figure 56: MPK list
3. User can choose an MPK from the list as they see convenient
Mute
During an active call, press “Mute” button to mute the call. The mute icon will be displayed behind
the local number on the top of leftof the screen. Press “Mute” button again to unmute the call.
Figure 57: GXV3350 Call Mute
Page 68

P a g e | 68
GXV3350 User Guide
Version 1.0.3.27
Turn on Video during Audio Call
Users could establish audio call first and then turn on video or accept video request during the call if the
other party supports video call as well.
Turn on video during audio call
During an active audio call, on the call screen, tap on "More" and select "Video On", a video request
will be sent to the other party.
Figure 58: Turn on Video During Audio Call
Accept video request
Figure 59: Accept Video During Audio Call
Page 69

P a g e | 69
GXV3350 User Guide
Version 1.0.3.27
If the GXV3350 receives video request during the audio call, a message "Accept video?" will be prompted.
Select "Accept" to establish video during the call. If the Enable Video Call Feature is not enabled on
GXV3350, the “Video On” option on GXV3350 will be hidden during the audio call. However, if the GXV3350
receives video request during the audio call, users could tap to accept the video request.
Call Details during Call
During an active/video call, on the call screen, tap on “Mode” and select “Call details.
Figure 60: Select Call Details During Video Call
The call details for RTCP info report will be displayed as shown below.
Figure 61: Call Details
Page 70

P a g e | 70
GXV3350 User Guide
Version 1.0.3.27
Quick DTMF During Call
During an Audio/Video call, users have the ability to show DTMF buttons and each one of them can perform
a different action. On the call screen, tap on “Mode” and select “Quick DTMF”.
Figure 62: Select Quick DTMF During Call
This feature can be configured by following below steps:
1. Go to GXV3350 Web GUI→Value-added Service→Value-added Service.
2. Configure the service type as DTMF and specify its Display Name.
3. Set the DTMF content in “DTMF Content” field.
4. Repeat the same steps in order to get more DTMF Buttons displayed during the call. See the following
figure.
Figure 63: DTM F During Call
Page 71

P a g e | 71
GXV3350 User Guide
Version 1.0.3.27
Switch Audio Channel During Call
GXV3350 allows users to switch among handset, speaker or headset(RJ9 headset, Plantronics EHS
headset and Bluetooth headset) when making calls. Onhook to switch to handset; press the Headset
button to switch to headset; press the Speaker button to switch to speaker.
If Bluetooth headset is connected, the audio will be automatically switched to Bluetooth headset once
the call is established.
The status bar on the top of the screen shows the current audio channel being used during the call. If
pressing the corresponding key for the currently used audio channel, the call will be hang up.
Call Transfer
A call can be transferred to another party during the call. The GXV3350 supports blind transfer and attended
transfer.
Blind Transfer
1. During the active call, tap on “Transfer” button.
2. Select "Transfer" to bring up the transfer screen.
3. Select transfer mode as "Blind" by tapping on the highlight area [Figure 64: Blind Transfer].The default
transfer mode is "Blind".
4. Enter the digits.
5. Tap on "Transfer" softkey.
6. The call will be transferred and GXV3350 will hang up the call.
Figure 64: Blind Transfer
Page 72

P a g e | 72
GXV3350 User Guide
Version 1.0.3.27
Note:
If wrong digits are entered, tap on to delete the digit one by one;
If users would like to cancel the transfer, press button to go back to the previous talking
screen.
Attended Transfer
GXV3350 supports attended transfer:
1. During the active call, tap on "Transfer" button to bring up transfer screen.
2. Select transfer mode as "Attended" by tapping on the mode selection area (see figure below).
Figure 65: Attended Transfer
3. Enter the transfer target number, and then press the "Transfer" soft key on the right.
4. Before transfer target answers the call, GXV3350 hears the ringback tone, and the touch screen
prompts shown as below. Users could tap on "Cancel" to cancel the transfer, tap on “End” or simply
hang up the call to complete call transfer.
Page 73

P a g e | 73
GXV3350 User Guide
Version 1.0.3.27
Figure 66: Attended Transfer - Transferring
5. After transfer target answers the call, the following screen will be shown up. If the user simply hangs
up or taps on “End” soft key, the call wil be transferred, and GXV3350 will hang up the call. If the user
taps on "Split" soft key to separate the calls, the user will talk to the second established call while the
first call is on hold.
Figure 67: Attended Transfer – Split
6. Besides attended transfers above, users could also consult the third party first before transferring the
call.
7. During the active call, tap More then New Call to make the second call. This will place the current call
on hold.
8. The second call establishes after the call is answered.
9. During the active call, tap on "Transfer" button to bring up transfer screen. The other call on hold will
be displayed such as .
Page 74

P a g e | 74
GXV3350 User Guide
Version 1.0.3.27
10. Select transfer mode as “Attended” in the transfer mode bar and tap on the call on hold such as
to transfer the call.
11. The call will be transferred, and GXV3350 will hang up the call.
Figure 68: Attended Transfer
Transfer via MPKs
Users have the possibility to transfer calls via Transfer or non-transfer programmable keys (BLF keys)
1. During an active call, press the Transfer softkey then press on MPK
Page 75

P a g e | 75
GXV3350 User Guide
Version 1.0.3.27
Figure 69: Transfer via MPK
2. Choose the destination to transfer calls to from the MPKs list
Figure 70: MPK list
Note: The transfer via programmable keys will follow the Default Transfer Mode whether it’s Blind
Transfer or Attended Transfer specified in WEB UI under Phone Settings -> Call Settings -> Default
Transfer Mode.
Note:
To transfer calls across SIP domains, SIP service providers must support transfer across SIP domains;
If users would like to cancel the transfer, press button to go back to the previous talking screen.
6-Way Conference
The GXV3350 supports up to 6-way Audio conferencing and 3-way HD Video conferencing.
Initiate Conference
There are three ways to initiate a conference call.
Initiating conference from dial screen
1. Bring up the dial screen using one of the methods described previously [Figure 40: GXV3350 Dial Screen].
2. Enter the extension number then press on it on the left panel of the screen
Page 76

P a g e | 76
GXV3350 User Guide
Version 1.0.3.27
Figure 71: Add Conference Members from Dial Screen
3. The extension number will be added to dialing field and users can dial another number
Figure 72: Add Conference Members from Dial Screen 2
4. Using the same method add the other members then press “Audio Call” for an Audio conference or
“Video Call” for a video Conference
Initiating conference during a phone call
1. When the phone is on call screen, tap on "Conference" button;
2. Enter the third-party number or choose an available number on the left menu from call history or
contacts to form a conference of 3. After the call is established, the conference screen is brought up;
3. Tap on to add another member to the conference;
Page 77

P a g e | 77
GXV3350 User Guide
Version 1.0.3.27
Initiating conference directly using conference soft key
1. On idle screen, press “Conference” button.
2. Tap on to add the members of the conference.
Figure 73: GXV3350 Conference Screen
Note: When users press on to invite another member to the conference, a dial tone will be heard for
the user to start dialing the number.
If there are calls on hold, they will show up when adding member to the conference. Users could then tap
on the call to add it to the conference directly.
Page 78

P a g e | 78
GXV3350 User Guide
Version 1.0.3.27
Figure 74: GXV3350 Conference - Add Existing Call to Conference
3. Repeat the above steps to add more parties into the conference. The following figure shows a 3-way
conference established.
Figure 75: 3-Way Conference Call Established
Note: Every time a conference participant joins or exits the conference when using Full screen, a notification
will appear in order to make the GXV3350 host aware of the participant’s actions during the conference.
Figure 76: Notification of joining the conference
Page 79

P a g e | 79
GXV3350 User Guide
Version 1.0.3.27
Figure 77: Notification of exiting the conference
Remove Party from Conference
To remove a party from the conference:
1. Tap on the participant icon of the user you want to remove. The below window will show up giving the
possibility to Mute enable video Enlarge or hang up.
2. Tap on icon to remove the a party from the conference.
Figure 78: GXV3350 Conference - Remove Party from Conference
Page 80

P a g e | 80
GXV3350 User Guide
Version 1.0.3.27
End Conference
To end the conference, tap on to disconnect all the parties from the conference. GXV3350 will hang
up the call. If the remote party hangs up the call itself, it will be disconnected from the conference but other
parties on GXV3350 will stay in the existed conference.
Hold and Resume Conference
During the conference, users could tap on Hold to hold the conference at any time. To resume the call tap
on Unhold.
Auto Conference Mode
The GXV3350 also supports "Auto Conference" which allows users to establish conference call in a quick
and easy way, instead of adding the other parties one by one. To enable Auto Conference feature, go to
web GUIPhone SettingsCall SettingsCall Features and set "Auto Conference" to "Yes".
To esablish call with auto conference when there are 1 or more calls on the GXV3350, simply tap on
"Conf" button. All the calls on GXV3350 will be brought into the conference.
Page 81

P a g e | 81
GXV3350 User Guide
Version 1.0.3.27
Multicast Paging
Multicast paging is an approach to let different SIP users to listen to a page from a common multicast IP
address. In multicast page call, one way audio will setup from sender to listeners, but the listeners cannot
talk to each other. The sender and listeners must be located within the same LAN.
Sender multicast page configurations are under Web UI Settings Applications Programmable Key
BLF, users will need to press on Add in order to configure the option:
1. Set the key Mode to Multicast Paging in dropdown list.
2. Enter the multicast paging description in Display Name field.
3. Enter multicast paging address and port in URL field. The range of multicast page address is 224.0.0.0
to 239.255.255.255 with a port not in use by phone.
To receive multicast page, the GXV3350 must be well configured to listen to the right address and port. The
configurations are under Phone Settings Multicast Paging Multicast Listening. There are 10
listening address supported. After multicast page listening well configured, please reboot the phone to let
the settings take effect.
Multicast Listening switch
Users can Enable/Disable multicast listening feature from Multicast listening widget. When Multicast
Listening Widget is set to ON; The phone will be listening to Multicast paging calls.
Figure 79: Multicast Listening widget – On
Page 82

P a g e | 82
GXV3350 User Guide
Version 1.0.3.27
UCM Conference
Participate in UCM Conference Room
Users could dial the UCM conference room extension to join the conference. If password is required, enter
the password to join the conference as a normal user, or enter the admin password to join the conference
as administrator.
Figure 80: Join UCM Conference Room
CCM (Conference Call Menu)
During a UCM conference, Administrators can tap on the UCM conf menu
Figure 81: UCM conference Menu
Page 83

P a g e | 83
GXV3350 User Guide
Version 1.0.3.27
Administrators could view/invite members, bridge conference, remove bridge, mute, unmute and lock the
conference
Figure 82: Conference Menu Options
Conference Call Operations
Click on to list all the users currently in the conference
Figure 83: Conference’s members list
Click on to invite other users into the conference room.
Users can send invitations to others to participate in the conference by pressing on the Invite option and
then enter the member number an invitation will be sent to that number to join the conference room.
Page 84

P a g e | 84
GXV3350 User Guide
Version 1.0.3.27
Figure 84: Invite a member
Click on to bridge another conference, Enter the conference number and password and
Bridge request will be sent.
Figure 85: Conference Bridge
Click on to remove Conf Bridging.
Click on to Mute conference.
Click on to Unmute.
Click on to lock this conference room so that other users cannot join it anymore.
Page 85

P a g e | 85
GXV3350 User Guide
Version 1.0.3.27
Click on to remove all members who are not the hosts.
CEI (Conference Event Indicator)
If CEI is enabled, Events like members joining/Leaving the conference, Invitation sent, Mute/Unmute … will
be displayed in the call screen as the examples shown below:
Figure 86: Mute all members
Missed Call
When there is a missed call, the LCD will show missed call dialog on the idle screen.
Figure 87: Missed Call Screen
Page 86

P a g e | 86
GXV3350 User Guide
Version 1.0.3.27
Users can tap on the missed call entry to access the missed call log. To close the missed call screen and
return to the idle screen, tap on the screen except the dialog.
DND (Do Not Disturb)
When DND is on, the incoming calls to the GXV3350 will be blocked for all registered accounts with a
reminder ring produced. To turn on/off DND:
1. Touch and drag the status bar down on the GXV3350 idle screen.
2. Tap on the DND icon to turn it on. The status bar shows icon indicating DND is on.
3. Tap on the DND icon to turn if off.
Figure 88: Enable/Disable DND
Note:
When the phone is in an active call, turning on/off DND won't affect the current active call. It will take
effect starting from the next incoming call.
When DND is on, all the incoming call logs will be saved in Missed.
Voicemail/Message Waiting Indication
When there is a new voicemail, the Message Waiting Indication (MWI) LED icon will blink in red on the
upper right corner of the GXV3350 and will show up in the status bar.
Page 87

P a g e | 87
GXV3350 User Guide
Version 1.0.3.27
To retrieve the voicemail:
1. Tap on the Message icon from the applications section to bring up voicemail screen. All the
registered accounts and the number of voicemails are displayed there.
2. Tap on the account to dial into the voicemail box. Then follow the Interactive Voice Response (IVR) for
the message retrieval process.
Figure 89: Retrieve Voicemail
For each account, the Voicemail User ID can be set up under web GUIAccount XGeneral Settings:
"Voicemail Access Number". This is the number that will be dialed out to access voicemail message when
tapping on the account in Voice Mail screen.
Call Forward
Call forward feature can be set up from GXV3350 LCD or Web GUI.
From LCD
Go to onscreen MenuSettingsFeaturesCall Forward. Select account name and tap on Call
Forwarding to activate the feature. Then the list of options will be available. Select the option Call
Forward Mode to configure the call forward type (Unconditional, Time Based, Others) and then enter
necessary number in the fields.
Page 88

P a g e | 88
GXV3350 User Guide
Version 1.0.3.27
Figure 90: Unconditional Call Forward
From Web GUI
Log in GXV3350 web GUI and go to Account pageCall Settings. By default, Call Forward feature
is set to "None". The Call Forward feature options are:
Unconditional Forward: All the incoming calls will be forwarded to the number set up in "All To"
field.
Figure 91: Call Forward – Unconditional
Time Based Forward: All the incoming calls will be forwarded to the number as schedule in the
time period. During the setup time, the call will be forwarded to the number in "In Time Forward To:"
field. Other period the call will be forwarded to the number in "Out Time Forward To:" field.
Figure 92: Call Forward - Time Based
Call Forward on Busy / Call Forward No Answer / Call Forward on DND: The incoming call will
be forwarded when the GXV3350 is busy or no answer after certain interval "Delayed Call Forward
Wait Time (s)", or if the phone is on DND mode then the call will be forwarded to the configured
destination number.
Page 89

P a g e | 89
GXV3350 User Guide
Version 1.0.3.27
Figure 93: Call Forward - Busy/No Answer/DND
Call Features
The GXV3350 supports traditional and advanced telephony features including caller ID, caller ID with caller
Name, call waiting, call forward etc. Before using the following feature codes, please make sure "Enable
Call Features" option is set to "Yes" under web GUIAccount pageCall Settings.
Table 10: GXV3350 Feature Code
*01
Use Preferred Codec (per call)
Dial *01 followed by the preferred codec code and the phone number.
The phone will try to use this codec during the call.
Codec code:
PCMU: 7110
PCMA: 7111
G726-32: 72632
G722: 722
iLBC: 7201
For example, if the user would like to use PCMA as the preferred codec to call
phone number 334455, enter *017111334455.
Page 90

P a g e | 90
GXV3350 User Guide
Version 1.0.3.27
*02
Force Codec (per call)
Dial *02 followed by the preferred codec code and the phone number.
The phone will be forced to use this codec during the call.
Codec code:
PCMU: 7110
PCMA: 7111
G726-32: 72632
G722: 722
iLBC: 7201
For example, if the user would like to use PCMA to call phone number 334455,
enter *027111334455.
*30
Block Caller ID (for all subsequent calls)
Dial *30.
*31
Send Caller ID (for all subsequent calls)
Dial *31.
*50
Disable Call Waiting
Dial *50.
*51
Enable Call Waiting
Dial *51.
*67
Block Caller ID (per call)
Dial *67 followed by the phone number.
*82
Send Caller ID (per call)
Dial *82 followed by the phone number.
*70
Disable Call Waiting (per Call)
Dial *70 followed by the phone number.
*71
Enable Call Waiting (per Call)
Dial *71 followed by the phone number.
*72
Unconditional Call Forward. To set up unconditional call forward:
Dial *72 followed by the phone number to forward the call.
*73
Cancel Unconditional Call Forward. To cancel the unconditional call forward:
Dial *73.
*74
Paging Call
Dial *74 followed by the phone number to send the paging call.
Page 91

P a g e | 91
GXV3350 User Guide
Version 1.0.3.27
*83
Force Audio Calling (per call)
Dial *83 followed by the phone number to send the audio call.
*84
Force Video Calling (per call)
Dial *84 followed by the phone number to send the video call.
*90
Busy Call Forward. To set up busy call forward:
Dial *90 followed by the phone number to forward the call.
*91
Cancel Busy Call Forward. To cancel the busy call forward:
Dial *91.
*92
Delayed Call Forward. To set up delayed call forward:
Dial *92 followed by the number to forward the call. The default timeout
before the call is forwarded is 20 seconds.
*93
Cancel Delayed Call Forward. To cancel the delayed call forward:
Dial *93.
Page 92

P a g e | 92
GXV3350 User Guide
Version 1.0.3.27
CONTACTS
The GXV3350 supports local, LDAP Contacts.
To access GXV3350 contacts, on the phone’s idle screen, tap on icon on the right panel. The following
figure shows Contacts on the GXV3350.
Figure 94: GXV3350 Contacts
Local Contacts
The local contacts can save up to 1000 entries. Users can manage contacts by adding, deleting and
modifying single contacts, downloading contacts from HTTP/TFTP server, importing contacts from external
storage and exporting contacts to external storage.
Note: A reminder prompt is shown on the GXV3350 LCD screen when adding a number of contacts more
than the allowed one (when importing contacts for instance).
Add Single Contacts
1. On the Local Contacts menu Tap on to bring up "Create Contact" dialog to manually add a new
contact. See figure below.
2. Type First name, Last name, Phone number and other information for the new contacts. Please make
sure the account number field is selected so the GXV3350 will use this account to dial out the new
contact. The account number field is located on the left of the "Phone" filed as highlighted below.
Page 93

P a g e | 93
GXV3350 User Guide
Version 1.0.3.27
Figure 95: GXV3350 Contacts - Add New Contact
Note: When typing a number using dial pad, “Add to contacts” button will appear as displayed on following
picture, to add a new entry to your contacts list if the input number does not match any entry in your contacts.
Figure 96: Add to Contacts from Dial Pad
Import/Export Contacts
If the users have the GXV3350 phonebook file saved in local storage or external storage device that has
been plugged into the GXV3350, the phonebook file can be directly imported to the Contacts. There are
two different formats supported for the phonebook file:"vcard", and "xml". Users could manually create
contacts first and export the phonebook file in vcard or xml format to take a look on the phonebook file.
Page 94

P a g e | 94
GXV3350 User Guide
Version 1.0.3.27
To Import Contacts:
1. Open Contacts.
2. Tap on More on the upper right corner of the Contacts screen.
3. Select "Import contacts" to bring up the dialog below.
4. Fill in the import options and scroll down to the bottom of the screen.
5. Tap on "Select file" to import phonebook file from the directory in internal or external storage device.
Figure 97: GXV3350 Contacts - Import Contacts
To Export Contacts:
1. Open Contacts.
2. Tap on More on the upper right corner of the Contacts screen.
3. Select "Export Contacts " to bring up dialog below.
4. Select the file encoding and file type for the exported phonebook file. By default, the GXV3350 is using
"UTF-8" as the encoding method.
5. Tap on "Choose Directory" and select the directory where the phonebook file will be exported to.
Page 95

P a g e | 95
GXV3350 User Guide
Version 1.0.3.27
Figure 98: GXV3350 Contacts - Export Contacts
Download Contacts
The GXV3350 supports downloading XML phonebook from a remote HTTP/TFTP/HTTPS server to local
Contacts. When downloading the phonebook, the GXV3350 sends request to the HTTP/TFTP/HTTPS
server looking for file phonebook.xml. For more details about GXV3350 phonebook, please refer to the
following link:
http://www.grandstream.com/sites/default/files/Resources/gxv3275_xml_phonebook_guide_1.pdf
To download phonebook:
1. Make sure the GXV3350 can connect to the HTTP/TFTP/HTTPS server and the phonebook.xml file in
correct format is downloadable from the HTTP/TFTP/HTTPS server.
2. Open Contacts.
3. Tap on More on the upper right corner of the Contacts screen.
4. Select "Download Contacts" to bring up the dialog below.
5. Fill in the necessary options and then tap on in the upper right corner of the screen. The GXV3350
will send out request to the configured HTTP/TFTP/HTTPS server.
Page 96

P a g e | 96
GXV3350 User Guide
Version 1.0.3.27
Figure 99: GXV3350 Contacts - Download Contacts
Search Contacts
1. Open Contacts.
2. Tap on the search field .
3. Enter a contact's name or a number to search. The search result will be automatically updated and
displayed when entering the key words.
Figure 100: GXV3350 Contacts - Search Contacts
Page 97

P a g e | 97
GXV3350 User Guide
Version 1.0.3.27
Use Contacts
Once the contacts are added, users could navigate in the contacts list to make a call and manage the
contacts furthermore.
Make a Call to Contacts
Scroll up/down to find the contact in the list and tap on to call this contact.
Select Contacts
1. Scroll up/down to find the contact in the list.
2. Touch and press on the contact for about 2 seconds to show more options such as Delete contact, add
to blacklist etc.
3. To select a batch of contacts at the same time, press More on the upper right corner of the
contacts screen and select Batch operation, Tap on the checkbox for the contacts to be selected.
indicates the contact is selected.
Figure 101: GXV3350 Contacts - Select Contacts
Add Contacts to Favorites
1. Select the contact/contacts to be added as described in [Select Contacts].
2. Then tap on to add the contacts selected to Favorites
Page 98

P a g e | 98
GXV3350 User Guide
Version 1.0.3.27
There are two other methods to add contacts to favorites.
Directly pressing on the contact and tap on to add the contact to favorite.
Tapping on “Favorites” on the Contacts screen to navigate to favorites category and tap on to
select the contacts to be added to favorites then tap on .
Figure 102: Add Contacts to Favorites
Edit Contacts
1. Tap on a contact from the contacts list
2. Tap on to edit the contact.
Send Contacts to Desktop Shortcut
1. Long press on the contact
2. Tap on Send to Desktop from the menu.
Share Contacts via Bluetooth
Users can share a single contact or a batch of contacts. Refer to the following steps to do so:
Sharing a single contact:
1. Long press on the contact
Page 99

P a g e | 99
GXV3350 User Guide
Version 1.0.3.27
2. Select “Send” from the menu then choose the Bluetooth device that you want to share the contact with.
Sharing a batch of contacts:
1. Select the contacts as described in [Select Contacts].
2. Press on to share the selected contacts via Bluetooth
Add Contacts to Blacklist
Users can add a single contact or a batch of contacts to the black list. Refer to the following steps to do so:
Add a single contact to black list:
1. Long press on the contact
2. Select "Add to Blacklist" from the menu.
Add a batch of contacts to black list:
1. Select contacts as described in [Select Contacts].
2.Press on to add the selected contacts to the blacklist
Add Group
Open Contacts and tap on to access “Group”. To add a new group, tap on and name the
new group.
Figure 103: GXV3350 Contacts - Add New Group
Page 100

P a g e | 100
GXV3350 User Guide
Version 1.0.3.27
Add contacts to Group
To add contacts to a group, tap on the group then tap on , check the contacts to be added to the
group and press .
Note:
Users could also select a group for the contact when adding or editing the contact.
Ringtone can be assigned in group as well as single contact. If the group has ringtone set to "Custom
Ringtone", this ring tone has the highest priority when there is an incoming call to the contact.
Contacts Storage Status
The GXV3350 default maximum contacts storage is up to 1000. To check contact storage status, tap on
More on the upper right corner of the contacts screen to bring up contacts options, scroll down and
select "Storage Status".
Figure 104: GXV3350 Contacts - Storage Status
Note:
Users could increase the number of maximum contacts storage to more than 1000 contacts on GXV3350.
Users may access the phone through SSH and change the P value P1688 to another number (<=10000)
to increase the default contacts storage. In this case, if users increase this default P value, the phone
resource will be cost, and the phone performance will be slower.
 Loading...