

Page 1

Grandstream Networks, Inc.
126 Brookline Ave, 3rd Floor
Boston, MA 02215. USA
Tel : +1 (617) 566 - 9300
Fax: +1 (617) 249 - 1987
www.grandstream.com
*Android is a Registered Trademark of Google, Inc.
HDMI, the HDMI Logo, and High-Denition
TM
Multimedia Interface are trademarks or registered
trademarks of HDMI Licensing LLC in the United
States and other countries.
For Warranty and RMA information, please visit www.grandstream.com
GXV3275
IP Multimedia Phone for Android
Quick Installation Guide
TM
Page 2

Content
English..............................................................................1
简体中文..........................................................................7
Español............................................................................13
Français...........................................................................19
Deutsch...........................................................................25
Italiano............................................................................31
Русскй.............................................................................37
Português........................................................................43
Page 3
EN
The GXV3275 is not pre-congured to support or
carry emergency calls to any type of hospital, law
enforcement agency, medical care unit (“Emergency
Service(s)”) or any other kind of Emergency Service.
You must make additional arrangements to access
Emergency Services. It is your responsibility to purchase SIP-compliant Internet telephone service, prop-
erly congure the GXV3275 to use that service, and
periodically test your conguration to conrm that it
works as you expect. If you do not do so, it is your responsibility to purchase traditional wireless or landline
telephone services to access Emergency Services.
GRANDSTREAM DOES NOT PROVIDE CONNECTIONS TO EMERGENCY SERVICES VIA THE
GXV3275. NEITHER GRANDSTREAM NOR ITS
OFFICERS, EMPLOYEES OR AFFILIATES MAY
BE HELD LIABLE FOR ANY CLAIM, DAMAGE, OR
LOSS. YOU HEREBY WAIVE ANY AND ALL SUCH
CLAIMS OR CAUSES OF ACTION ARISING FROM
OR RELATING TO YOUR INABILITY TO USE THE
GXV3275 TO CONTACT EMERGENCY SERVICES,
AND YOUR FAILURE TO MAKE ADDITIONAL ARRANGEMENTS TO ACCESS EMERGENCY SERVICES IN ACCORDANCE WITH THE IMMEDIATELY
PRECEDING PARAGRAPH.
PRECAUTIONS:
WARNING: Please DO NOT power cycle the GXV3275 during system boot
up or rmware upgrade. You may corrupt rmware images and cause the unit to
malfunction.
WARNING: Use only the power adapter included in the GXV3275 package.
Using an alternative non-qualied power adapter may possibly damage the unit.
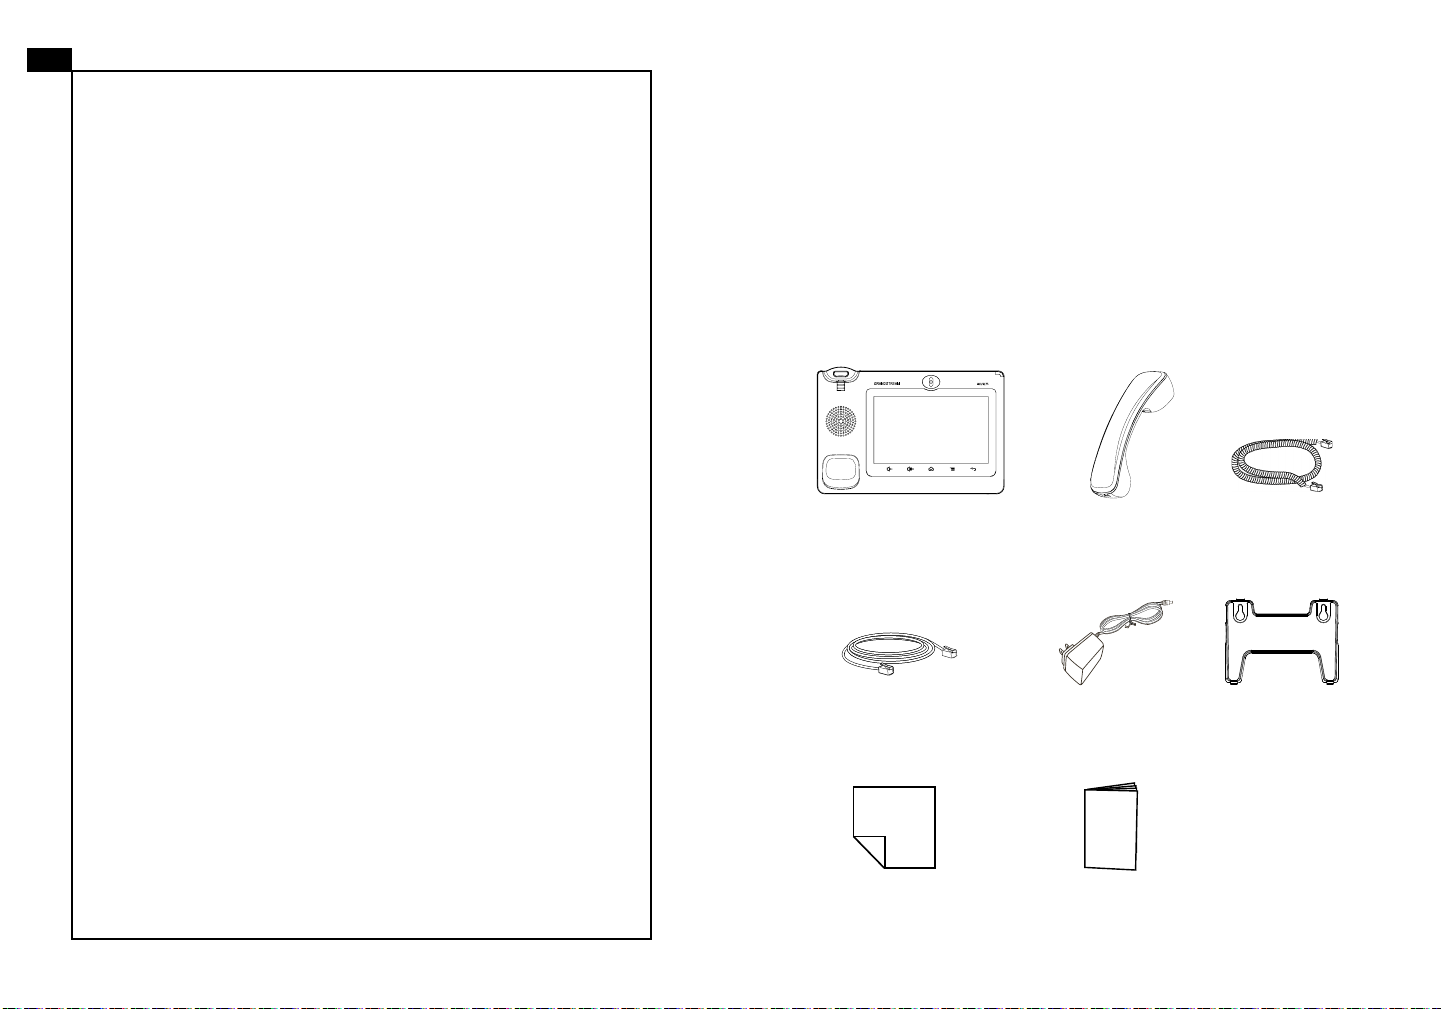
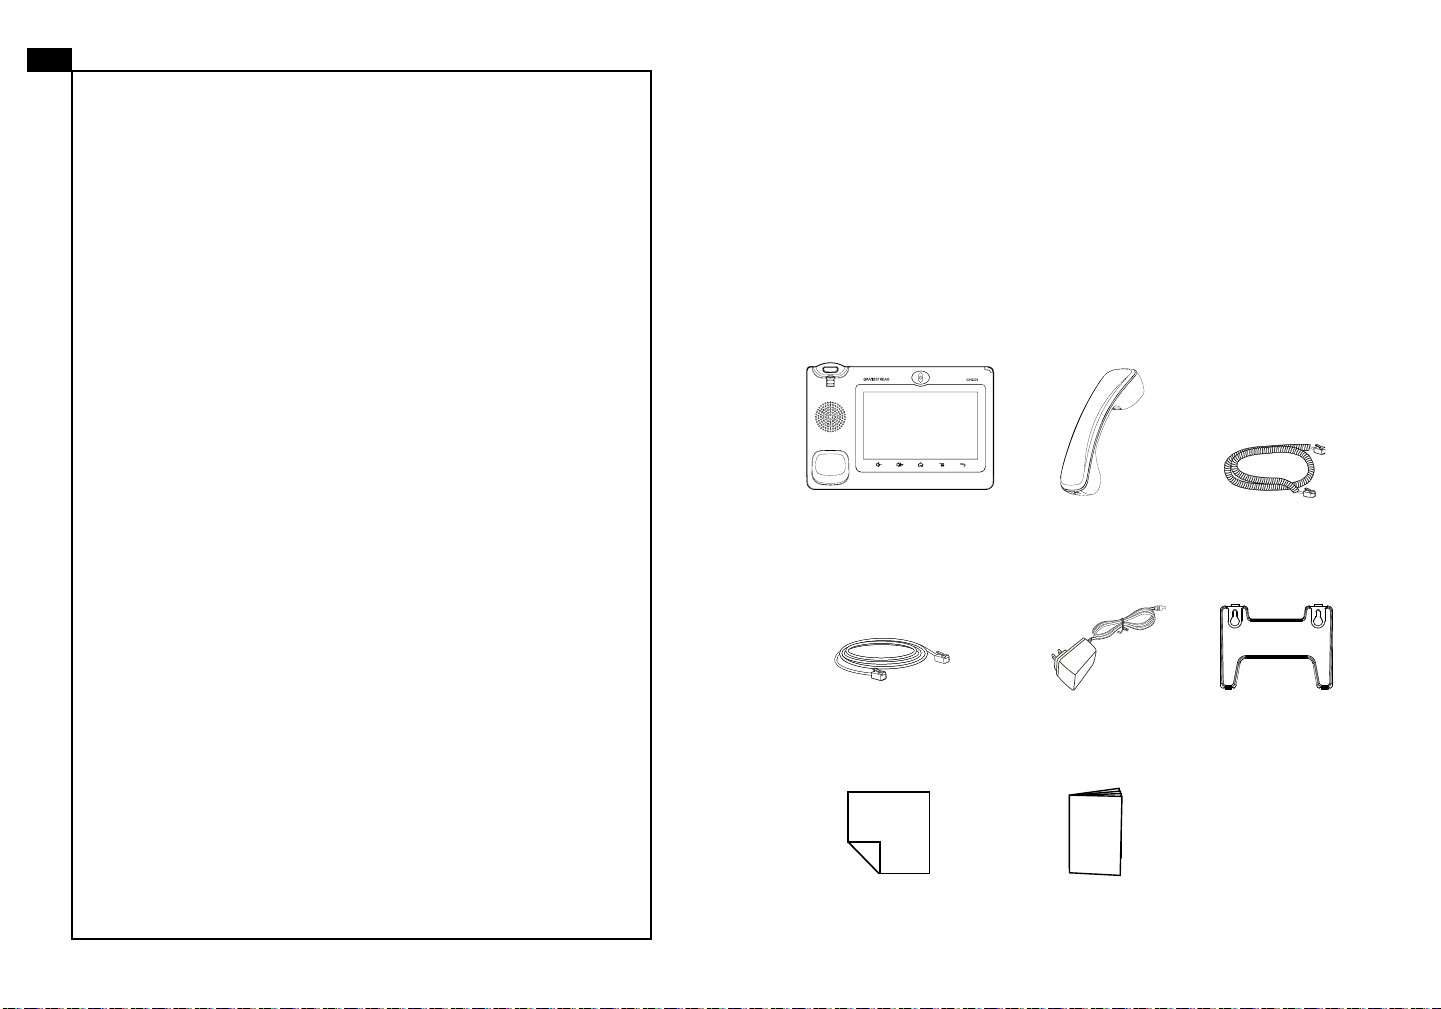
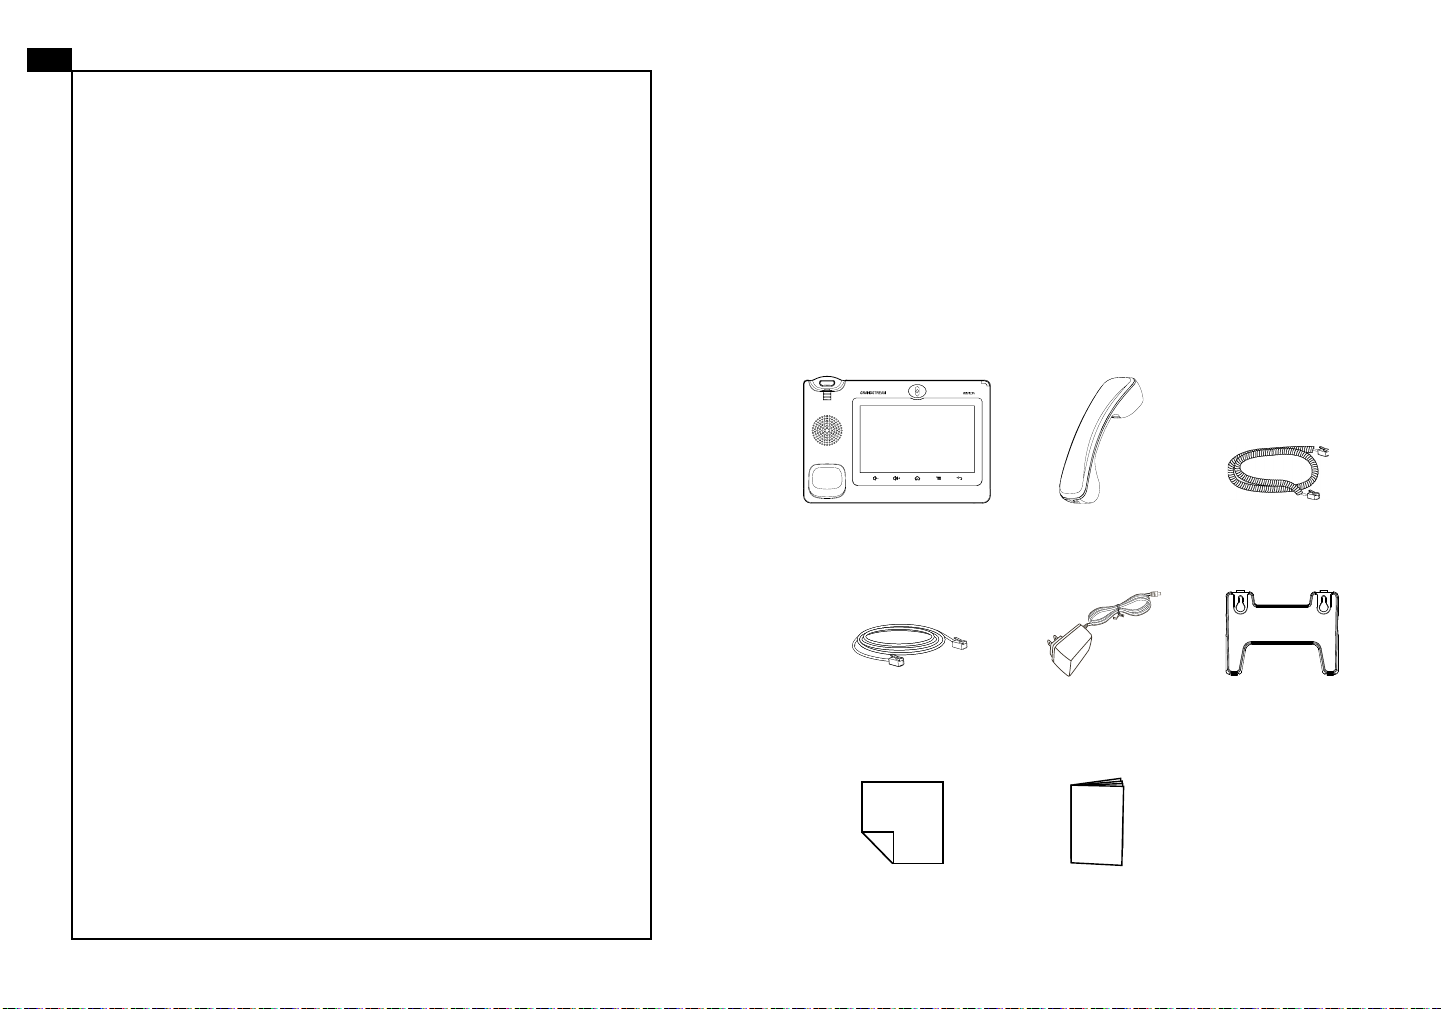
PACKAGE CONTENTS:
1 X GXV3275 Main Case
1 X Ethernet Cable
1 X Handset 1 X Phone Cord
12V
1 X 12V Power Adapter
1 X Wall Mount
1 X Screen Cleaning Cloth
1 X Quick Installation Guide
1 2
Page 4

OVERVIEW:
GXV3275 represents the future in personal IP multimedia communication, featuring Android™ Operating System 4.2 and its vast number of 3rd party applications, a large 7” (1024×600) capacitive touch screen, a tiltable mega-pixel CMOS
sensor, dual Gigabit network ports, integrated Wi-Fi, PoE and Bluetooth. The
GXV3275 delivers superior HD audio and video, leading edge telephony features
and integration of rich Web content with access to the rapidly growing Android™
applications base and automated provisioning. GXV3275 redenes the desktop
communication experience with a raised level of innovation and integration of
state-of-art real time video conferencing, personalized rich media presentation &
delivery, popular Web and social networking applications and advanced business
productivity tools.
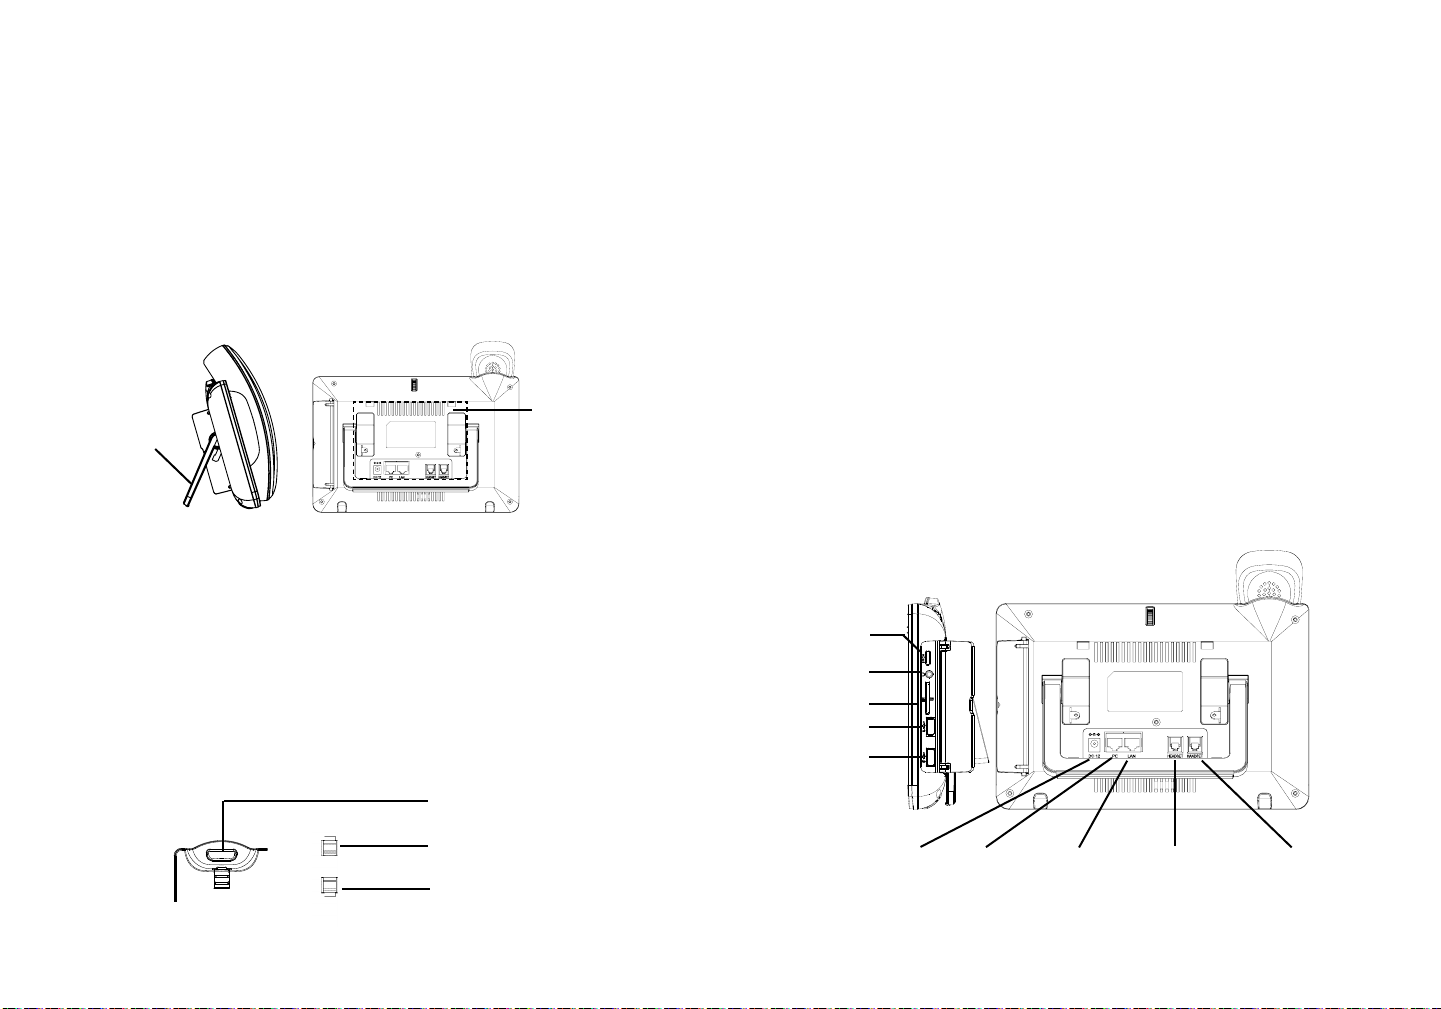
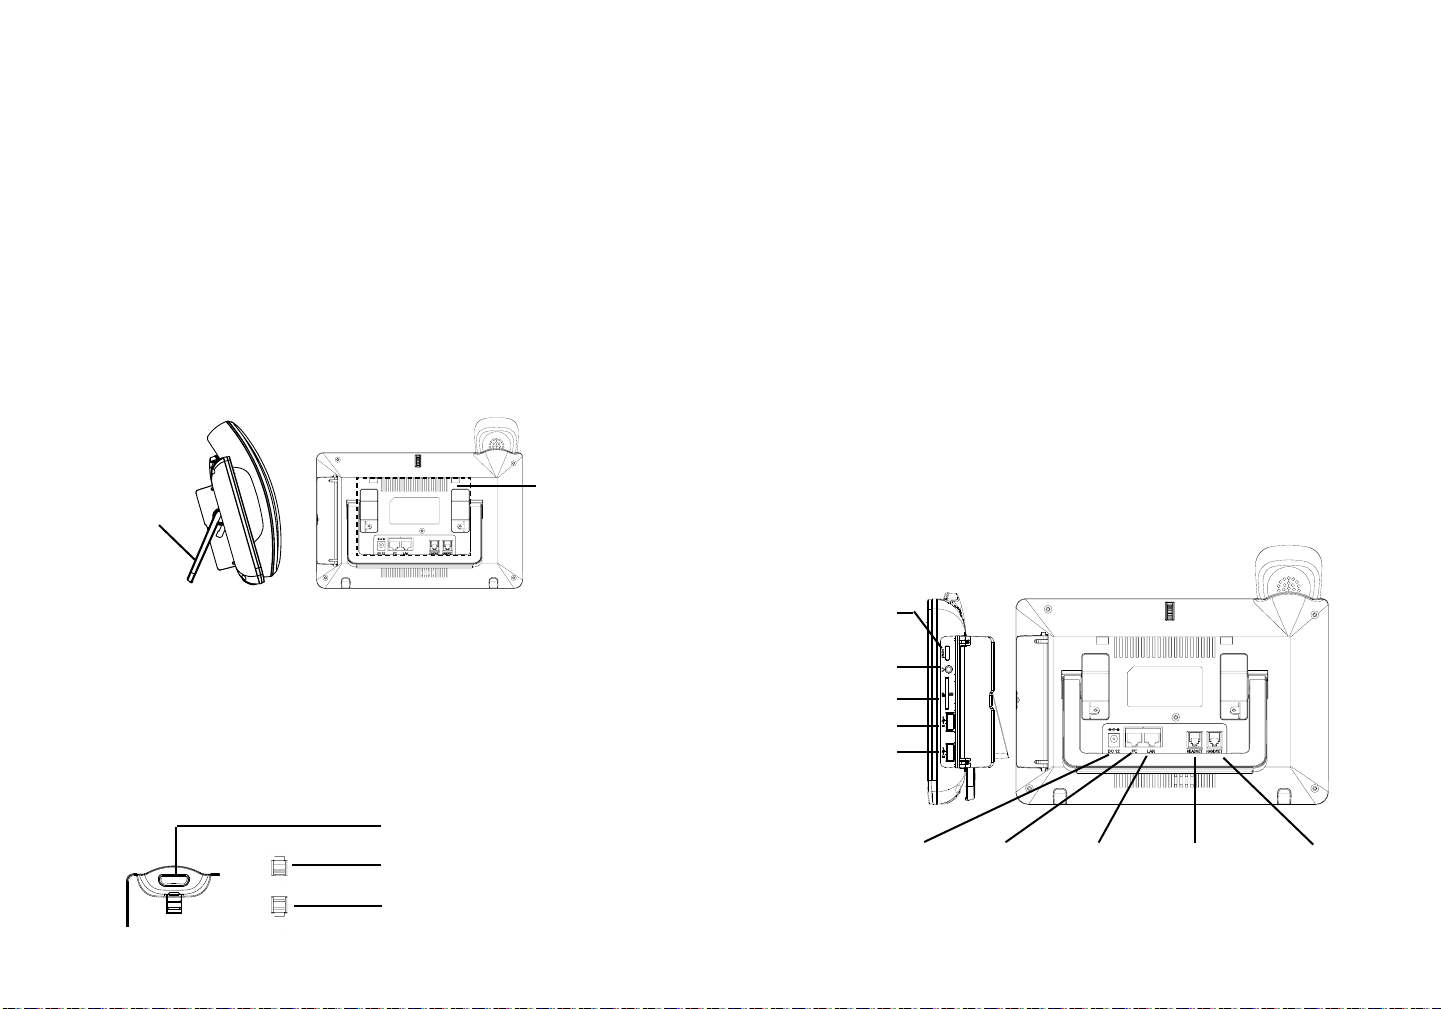
PHONE SETUP:
Built-in phone
stand for desktop
Slots for
wall mount
Using The Phone Stand:
The GXV3275 has a built-in phone stand. To use it, pull out the phone stand
handle on the back of the phone. Adjust the angle as preferred and make sure the
phone stands still on the desktop.
CONNECTING THE PHONE:
1. Connect the handset and main phone case with the phone cord;
2. Connect the LAN port of the phone to the RJ-45 socket of a hub/switch or a rou ter (LAN side of the router) using the Ethernet cable;
3. Connect the 12V DC output plug to the power jack on the phone; plug the power
adapter into an electrical outlet. If PoE switch is used in step 2, this step could
be skipped;
4. The LCD will display booting up or rmware upgrading information. Before con-
tinuing, please wait for the main screen display to show up;
5. Using the web conguration interface or from the menu of the touch screen, you
can further congure network connection using static IP, DHCP and etc.
Installing The Phone (Wall Mount):
HDMI Port
1. Attach the wall mount to the slots on the back of the phone;
2. Attach the phone to the wall via the wall mount hole;
3. Pull out the tab from the handset cradle (see gure below);
4. Rotate the tab and plug it back into the slot with the extension up to hold the
handset while the phone is mounted on the wall.
Handset Rest
Tab with extension up
Tab with extension down
3.5mm
Headset Port
SD Card Slot
USB Port 1
USB Port 2
Power
PC Port
LAN Port
RJ9 Headset Port
Handset Port
3 4
Page 5
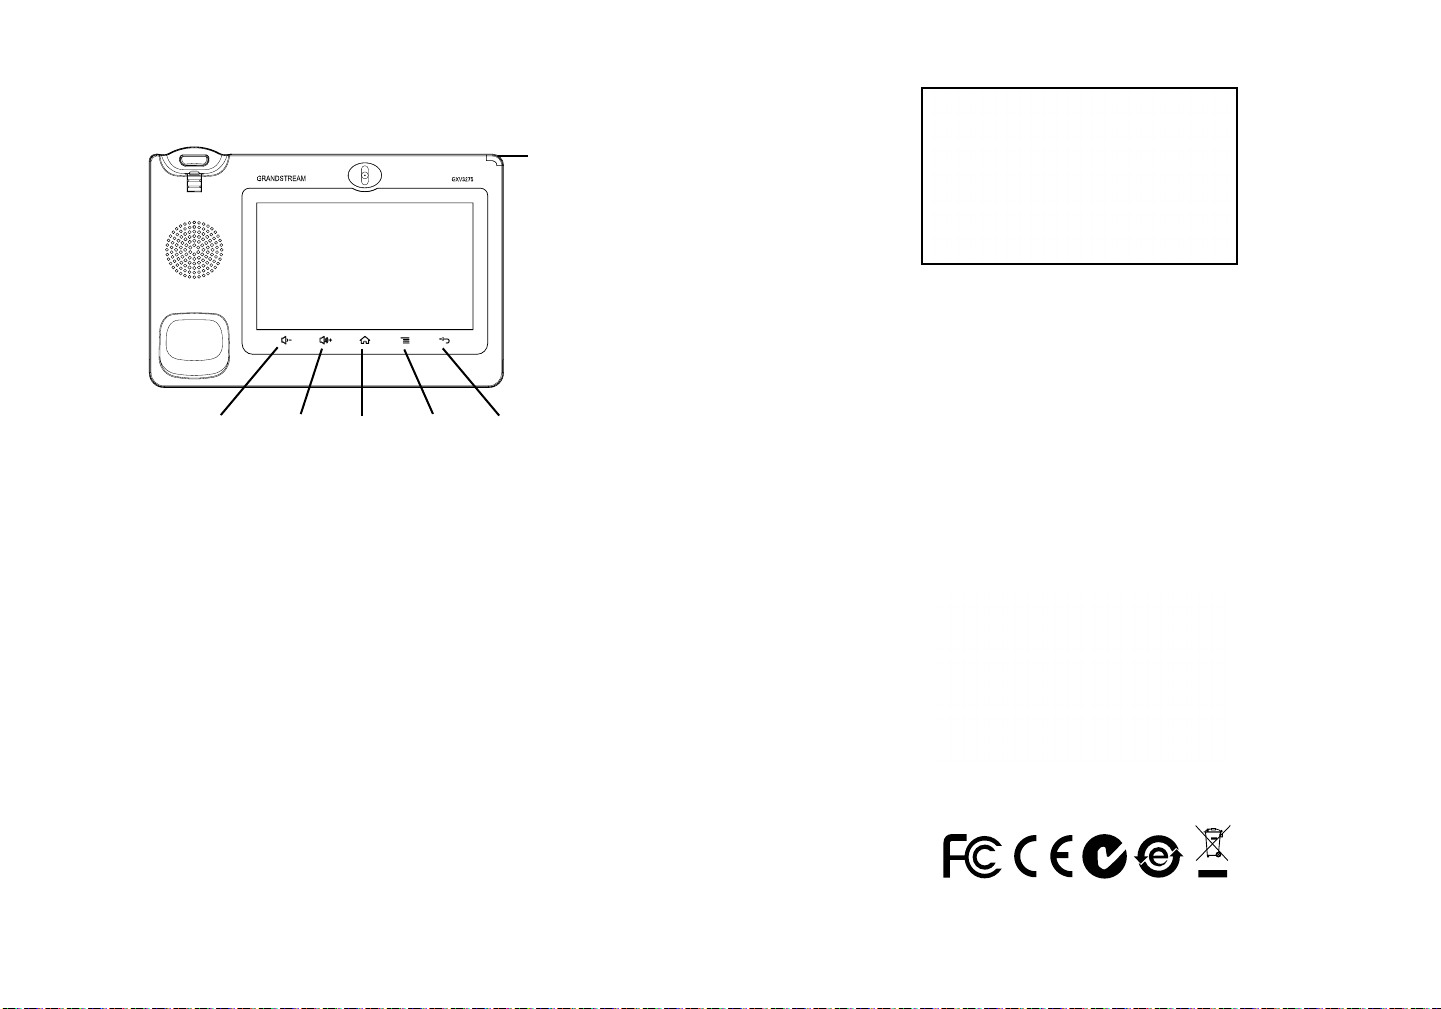
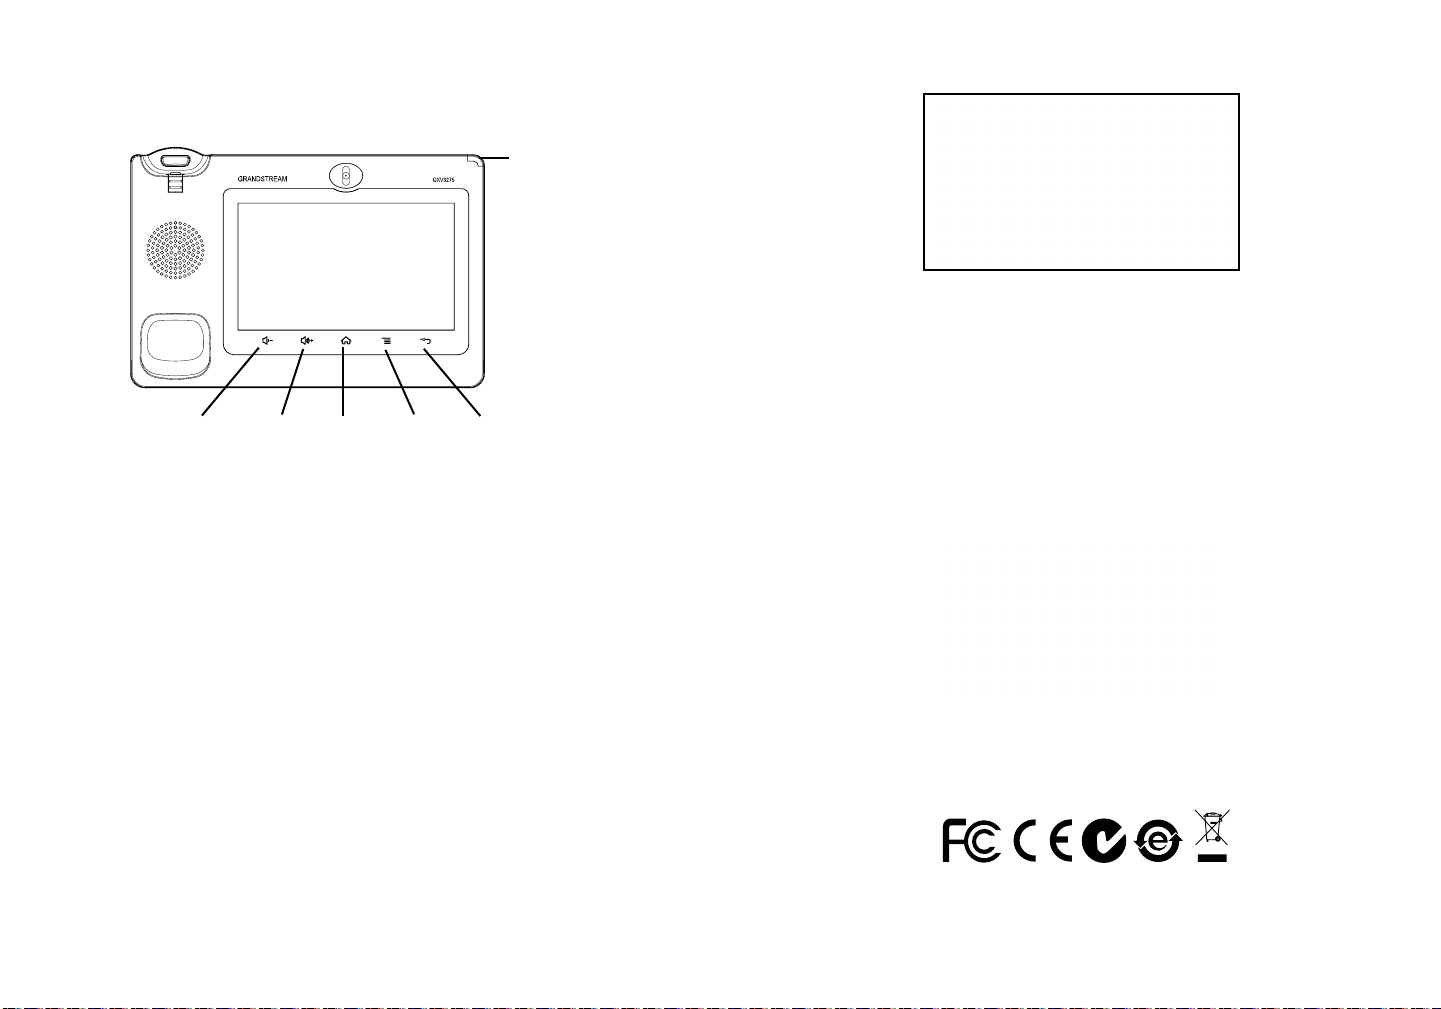
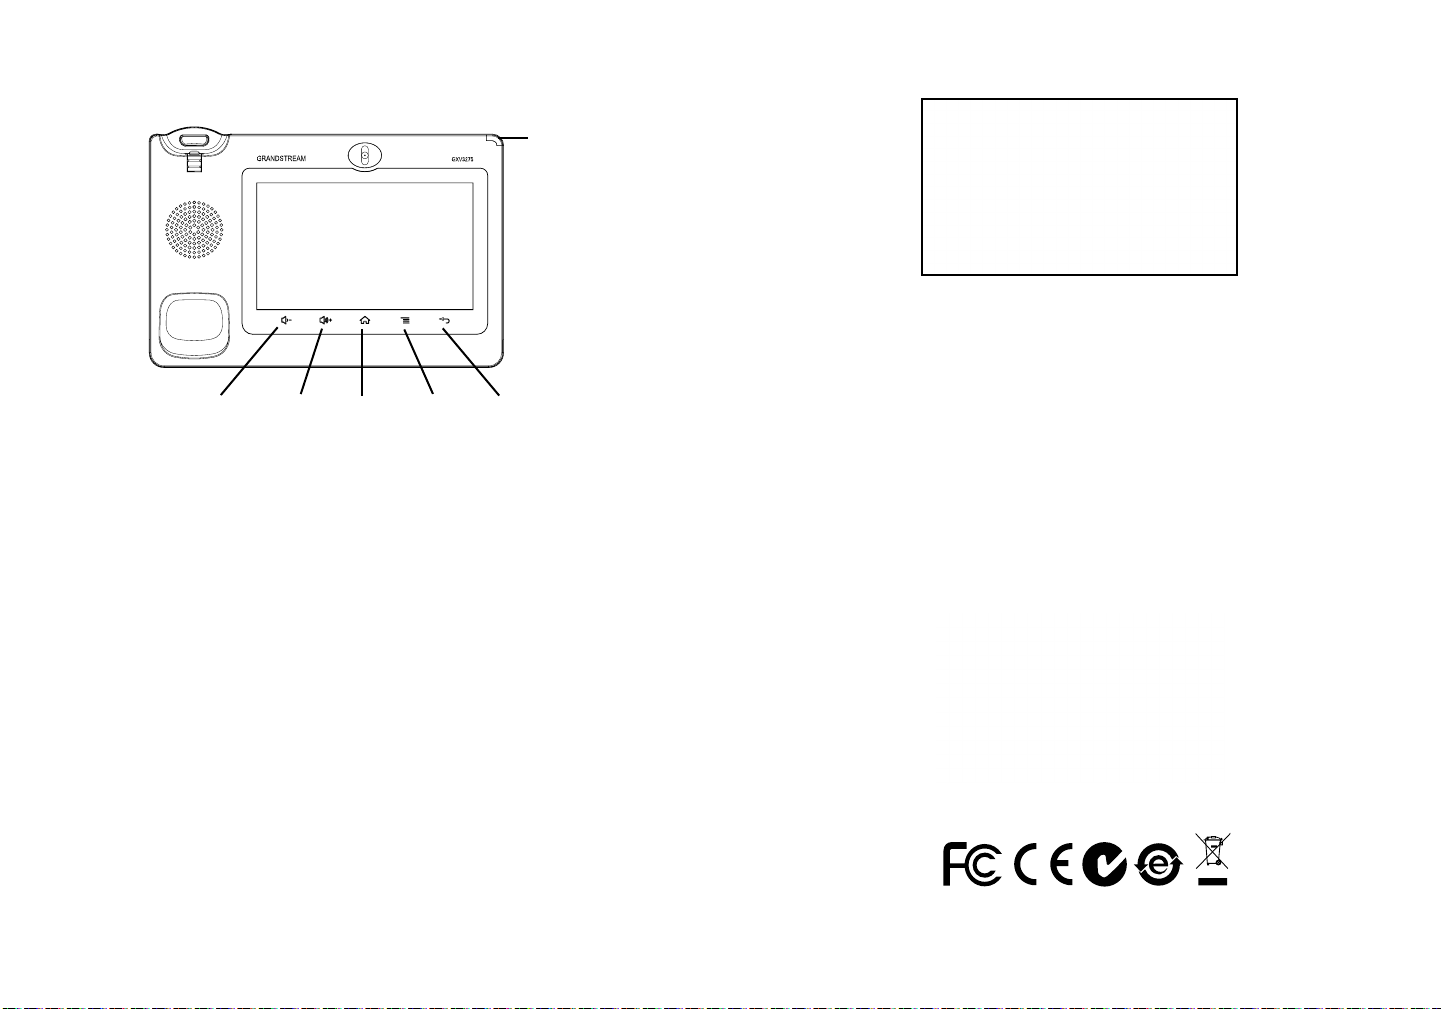
Tips For Using the Keys:
MESSAGE
WAITING
INDICATOR
VOLUME DOWN
1. Tap on VOLUME DOWN/VOLUME UP keys to adjust volume on the phone;
2. Tap on HOME key to return to the default idle screen. Or press and hold on the
HOME key for 2 or more seconds to enter managing application interface;
3. Press MENU key to access phone’s applications and settings;
4. Press BACK key to go back to the previous menu.
VOLUME UP
HOME
MENU
BACK
PHONE CONFIGURATION:
Conguring the GXV3275 Using Touch Screen:
1. Make sure the phone is properly powered up and in idle screen;
2. Tap on the MENU key to access GXV3275’s applications and settings;
3. Select Settings -> Advanced Settings -> Account. Tap on one of the Account to
congure Account name, SIP Server, SIP User ID, SIP Auth ID, SIP Auth Pass-
word to register account on the GXV3275. After successfully registered, the
main screen will be shown as the gure below;
4. Follow the Menu options to congure other settings on the phone. For example,
to congure static IP on the GXV3275, set up static IP address via LCD Menu
-> Settings -> Wireless & Network -> Ethernet Settings;
5. Please contact your ITSP (Internet Telephony Service Provider) for additional
settings that may be necessary to congure the phone.
Conguring the GXV3275 Using Web Browser:
1. Ensure your phone is properly powered up and connected to the Internet;
2. The IP address of the phone will show in the main screen when pressing the
HOME key;
3. Type the phone’s IP address in your PC’s browser (See gure in the next page);
4. The default username and password for administrator are “admin” and “admin”.
The default username and password for user are “user” and “123”;
5. In the web GUI, select Account 1/2/3/4/5/6 page to congure Account name,
SIP Server, SIP User ID, Authenticate ID and Authenticate Password to register
the account on the GXV3275.
Note: For the detailed user manual, please download from:
http://www.grandstream.com/support
5 6
Page 6
ZH
GXV3275不预设对医院,执法机构,医疗中
心(急救服务)以及各种紧急服务的紧急通话服
务。用户必须自行设定紧急通话功能。用户必
须自行购买SIP兼容的网络电话服务,正确的设
定GXV3275使用该服务,并定期测试您的配置
以确保GXV3275如预期工作,否则请购买传统
无线或有线电话服务来拨打紧急通话。
Grandstream Networks 公司的GXV3275不支
持紧急通话服务。Grandstream Networks公
司、其管理者和员工以及其相关机构对此所造
成的任何索赔、损失或者损害都不负有任何法
律追究责任。在此,您将无权对任何以及所有
由于无法通过GXV3275拨打紧急电话以及没有
遵照前段文字描述而造成紧急通话失败的事件
提出诉讼。
注意事项:
警告:请不要在设备启动未完成的时候或设备的软件升级过程中断开电源。如上
所述的操作会导致话机本身的程序损坏,进而造成设备无法启动。
警告:请使用设备包装中的电源。使用其他没有经过认证的替代电源适配器有可
能对设备造成损害。
设备包装清单:
GXV3275话机(1台)
电话手柄(1个) 手柄连线(1根)
12V
网线 (1根)
擦镜布(1块)
电源适配器 (1个)
快速安装手册(1本)
墙体支架 (1个)
7 8
Page 7
产品概览:
使用电话桌面支架:
GXV3275是一台功能丰富的IP多媒体电话。它基于Android™ 4.2操作系统平台,
广泛支持第三方应用,使用1024x600电容式触摸屏,可倾斜百万像素CMOS感应
摄像头,2个Gigabit网络接口,内嵌Wi-Fi,支持PoE供电和蓝牙。GXV3275具有
优异的高清晰语音质量和视频质量,完备的电话功能,集成了大量最新Android™
应用,并且支持自动配置。GXV3275是一款集实时视频会议,个性化多媒体信
息,社交网络应用和先进的商务工具于一体的理想智能桌面电话。
安装电话:
墙体支架插槽
话机自带
桌面支架
安装电话墙体支架:
1.将墙体支架插入电话背面的支架插槽中;
2.通过墙孔将电话固定在墙上;
3.如下图所示,将话机手柄槽下方的扣机零件取出;
4.将该零件倒转,然后重新插入原处。此时零件凸出处在外,当电话使用墙体支
架固定在墙上时,手柄可以垂直地稳定扣入手柄槽中,不会滑落。
GXV3275话机上自带桌面支架。使用时,将话机背面桌面支架拉出,并且调整支
架角度以保持话机平稳。
电话的连接:
1.用手柄连线连接电话手柄和电话主机;
2.用网线连接电话的网络接口和外部网络接口(如:集线器或交换机上的RJ-45网
络接口);
3.用12V电源适配器连接电话电源接口和交流电源插座。如果在第二步中使用了
PoE交换机,可忽略此步骤;
4.电话屏幕将会显示设备启动或固件升级信息。请耐心等待至主画面显示;
5.话机启动后,用户可以在主菜单或WEB浏览器进一步设置静态IP,DHCP等其他
配置,从而获得网络连接。
HDMI端口
3.5mm
耳机端口
SD卡插槽
USB端口1
USB端口2
话机手柄插槽
凸出处向上
凸出处向下
12V电源
PC端口
网络连接端口
RJ9耳机连接端口
手柄连接端口
9 10
Page 8
使用GXV3275按键:
信息指示灯
音量减小
1.按下“音量减小”“音量增大”按键调整话机音量;
2.按下“主界面”按键返回话机默认待机界面。若持续按住“主界面”按键超过2
秒以上,话机将显示管理应用界面;
3.按下“菜单”按键,话机将显示菜单(包括应用和设置等选项);
4.按下“返回”按键,话机将回到上一级菜单。
音量增大
主界面 菜单
返回
电话的配置:
通过触摸屏配置GXV3275:
1.请确保电话已正常启动,并且显示空闲状态;
2.按下“菜单”按键,此时电话会显示菜单(包括应用和设置等选项);
3.进入设置->高级设置->账号,选择一个账号,配置账号显示名、SIP服务器、SIP
用户ID、认证ID、认证密码等信息注册账号。注册成功后,GXV3275屏幕主画
面将如下图所示;
4.使用菜单中各选项进行其它配置。例如,若需设置电话静态IP地址,进入设置->
网络->以太网设置;
5.如有其它需要的设置,请联系您的服务提供商。
通过WEB浏览器配置GXV3275:
1.请确保电话与电源,电话与网络已正确连接;
2.用户可以按下“主界面”按键,电话的IP地址将会显示在话机屏幕主界面上;
3.在电脑浏览器中输入话机的IP地址。请参见下页中图片;
4.默认管理员的用户名是“admin”,密码是“admin”;默认终端用户的用户名
是“user”,密码是“123”;
5.在WEB界面中,选择账号1/2/3/4/5/6页面,配置账号显示名、SIP服务器、SIP
用户ID、认证ID、认证密码等信息,可以在GXV3275上注册账号。
备注:欲获取详细的话机使用信息,请在以下链接中下载GXV3275用户手册。
http://www.grandstream.com/support
11 12
Page 9

ES
El teléfono GXV3275 no viene pre congurado ni tiene acceso a información de ningún tipo de servicio de llamadas
de emergencia, hospitales, servicios policiales, unidades
de cuidados médicos o cualquier otro tipo de servicio de
socorro. Usted deberá hacer las coordinaciones necesarias
para poder acceder a estos servicios. Será su responsabilidad, el contratar el servicio de telefonía por internet com-
patible con el protocolo SIP, congurar apropiadamente
el teléfono GXV3275 para usar dicho servicio y periódicamente, probar su conguración para conrmar su funcionamiento de acuerdo a sus expectativas. Si usted decide
no hacerlo, será su responsabilidad comprar servicios de
telefonía tradicional, ya sea por línea ja o inalámbrica para
poder acceder a los servicios de emergencia.
GRANDSTREAM NO PROVEE CONEXIONES CON
NINGUN SERVICIO DE EMERGENCIA MEDIANTE EL
GXV3275. NI GRANDSTREAM NI SUS DIRECTORES,
EMPLEADOS O AFILIADOS, PUEDEN SER SUJETOS
REPONSABLES POR NINGUN RECLAMO, DAÑO O
PERDIDA. POR LO TANTO, POR LA MEDIANTE, USTED
RENUNCIA A SU DERECHO DE RECLAMO O DENUNCIA
QUE PUEDA SURGIR DEBIDO A LAS LIMITACIONES EN
EL USO DEL GXV3275 PARA CONTACTAR A LOS SERVICIOS DE EMERGENCIA, ASI COMO A SU NEGLIGENCIA
DE REALIZAR LAS COORDINACIONES NECESARIAS
PARA ACCEDER A TODOS LOS SERVICIOS DE EMERGENCIA, MENCIONADOS EL PARRAFO PRECEDENTE.
PRECAUCIONES:
CUIDADO: Por favor NO apague el GXV3275 durante el arranque o durante
la actualización del rmware. La interrupción de la actualización del rmware
puede causar mal funcionamiento del equipo.
CUIDADO: Use solamente el adaptador de corriente incluido con el GXV3275.
Usar uno alternativo puede dañar el equipo.
CONTENIDO DEL PAQUETE:
1 X GXV3275 Base Principal
1 X Cable de Red
1 X Auricular
12V
1 X Adaptador de
Alimentación de 12V
1 X Cable Telefónico
1 X Montaje en Pared
1 X Paño para limpiar
la pantalla
1 X Guía Rápida
13 14
Page 10
INFORMACIÓN GENERAL:
El GXV3275 representa el futuro de la comunicación multimedia IP personalizada,
cuenta con el sistema operativo Android™ 4.2 y su gran número de aplicaciones
3ª partes, una pantalla táctil capacitiva de 4.3” (480x272), una cámara con sensor
CMOS inclinable, doble puerto de red Gigabit, Wi-Fi integrado, PoE y Bluetooth.
El GXV3275 ofrece audio y video en HD, cuenta con las principales funciones de
telefonía de ultima generación y permite la integración de contenidos de la Web
con acceso a la creciente base de aplicaciones de Android™ y aprovisionamiento
automatizado. GXV3275 redene la experiencia de la comunicación de escritorio
con un nivel avanzado en la innovación y la integración de las videoconferencias
en un estado de arte en tiempo real, permite la personalización multimedia y es
compatible con las principales aplicaciones de redes sociales, Web y con las herramientas avanzadas de productividad empresarial.
INSTALACIÓN DEL TELÉFONO:
Soporte del
teléfono para
escritorio
integrado
Ranuras para
el montaje de
pared
Uso del soporte del teléfono:
El GXV3275 cuenta con un soporte de teléfono incorporado. Para usarlo, Gire
el soporte del teléfono en la parte posterior, ajuste el ángulo de su preferencia y
asegúrese de que el teléfono permanezca inmóvil en el escritorio.
CONECTANDO EL TELÉFONO:
1. Conecte el auricular a la unidad utilizando el cable telefónico;
2. Conecte el Teléfono a un hub/Switch o router usando el cable de Ethernet a tra-
vés del puerto LAN RJ-45;
3. Conecte el adaptador de 12V DC en el conector de alimentación del teléfono en
la parte posterior, luego conecte el adaptador en una toma de corriente, si esta
usando un switch PoE puede omitir este paso;
4. La pantalla LCD mostrará información del arranque del teléfono o la actualizaci-
ón del rmware. Por favor espere que la pantalla termine estos procesos;
5. Use la interfaz de conguración Web o el menú de la pantalla táctil, para cong-
urar las funciones de redes, puede usar IP estática, DHCP, etc.
Puerto HDMI
Instalando El Teléfono (Montaje en Pared):
1. Fije el soporte de pared con la ranura en la parte posterior del teléfono;
2. Fije el teléfono a la pared a través del oricio de montaje en pared;
3. Remover la Lengüeta del Auricular. (Véase la gura a continuación);
4. Gire la lengüeta y vuelva a conectarlo en la ranura con la extensión hasta sos tener el auricular cuando el teléfono está montado en la pared.
Soporte de Auricular
Lengüeta con extensión hacia arriba
Lengüeta con extensión hacia abajo
Puerto de manos
libres 3.5mm
Ranura de
tarjeta SD
Puerto 1 USB
Puerto 2 USB
Alimentación
Puerto PC Puerto LAN
Puerto de manos
libres RJ9
Puerto Auricular
15 16
Page 11

Consejos para el uso de las teclas:
Indicador de
Mensaje en
Espera
BAJAR VOLUMEN
1. Presione las teclas BAJAR VOLUMEN/SUBIR VOLUMEN para ajustar el nivel
de volumen en el teléfono;
2. Presione la tecla HOME para volver a la pantalla de inicio predeterminada o pr esione y mantenga el botón HOME durante 2 o más segundos para entrar en
la interfaz de administración de las aplicaciones;
3. Presione la tecla MENÚ para acceder a las aplicaciones del teléfono y ajustes;
4. Pulse la tecla ATRÁS para volver al menú anterior.
SUBIR VOLUMEN
MENÚHOME
ATRÁS
CONFIGURACIÓN DEL TELÉFONO:
Conguración del GXV3275 usando la pantalla táctil:
1. Asegúrese que el teléfono este correctamente encendido y que la pantalla del
teléfono este inactiva;
2. Toque el icono de menú en la pantalla del GXV3275 para acceder a la congu-
ración de aplicaciones;
3. Seleccione Conguración -> Conguraciones avanzadas -> Cuenta. Toque so bre una de las cuentas para congurar el nombre de la cuenta, Servidor SIP,
Usuario SIP, Nombre de usuario y contraseña para registrar la cuenta en el
GXV3275. después que el registro haya sido exitoso, la pantalla principal se
mostrará como la imagen de abajo;
4. Siga las opciones del menú de la pantalla LCD para congurar otros ajustes en
el teléfono. Por ejemplo, para congurar una IP estática en el GXV3275, cong ure la dirección IP estática mediante la pantalla LCD en Menú -> Conguración
-> Conexiones inalámbricas y redes Ethernet -> Ajustes;
5. Por favor contacte a su PSI (Proveedor de Servicio de Internet) para los ajustes
adicionales que sean necesarios para congurar el teléfono.
Congurando el GXV3275 utilizando un navegador Web:
1. Asegúrese que su teléfono esté encendido y conectado a internet;
2. La dirección IP del teléfono se mostrará en la pantalla principal cuando presio ne el botón de inicio;
3. Escriba la dirección IP del teléfono en el navegador de su PC (ver gura en la
siguiente página);
4. El nombre de usuario y contraseña por defecto para el administrador es “admin”
y “admin”, y el nombre de usuario y contraseña por defecto para el usuario es
“user” y “123”;
5. En la interfaz de conguración Web del usuario, seleccione la cuenta 1/2/3/4/5/6
para congurar el nombre de la cuenta, Servidor SIP, Usuario SIP, Nombre de
usuario y contraseña para registrar la cuenta en el GXV3275.
Nota: Para obtener el manual de usuario, favor haga click aquí:
http://www.grandstream.com/support
17 18
Page 12
FR
Le GXV3275 n’est pas préconguré pour prendre en
charge ou de procéder les appels d’urgence à tout
type d’hôpital, d’application de la loi, ou unité de soins
médicaux (“Service (s) d’urgence”) ou tout autre type
de service d’urgence. Vous devez faire des arrangements pour l’accès aux services d’urgence. C’est
votre responsabilité d’acheter un service téléphonique
Internet compatible SIP, congurer correctement le
GXV3275 à utiliser ce service et, périodiquement, de
tester votre conguration an de conrmer qu’il fonctionne comme prévu. Si vous ne le faites pas, c’est
votre responsabilité d’acheter un accès au service té-
léphonique traditionnel sans l ou laire an d’accéder
aux services d’urgence.
PRECAUTIONS:
AVERTISSEMENT: Veuillez ne pas éteindre le GXV3275 pendant le démar-
rage du système ou la mise à jour du rmware. Cela risque de rompre l’image du
rmware et en conséquence rendre l’unité inutilisable.
AVERTISSEMENT: Utilisez seulement le boitier d’alimentation inclus dans le
pack du GXV3275. L’utilisation d’un boitier d’alimentation alternative non qualié
peut endommager l’équipement.
CONTENU DU PACK:
GRANDSTREAM NE FOURNIT AUCUNE CONNEX-
1 X Boîtier principal
1 X Combiné 1 X Cordon téléphonique
ION AUX SERVICES D’URGENCE VIA LE GXV3275.
NI GRANDSTREAM, NI SES DIRIGEANTS, EMPLOYES OU FILIALES PEUVENT ETRE TENUS RESPONSABLE POUR TOUTE RECLAMATION OU CAUSE
12V
D’ACTION DECOULANT OU RELATIF A VOTRE INCAPACITE D’UTILISER LE GXV3275 POUR CONTACTER LES SERVICES D’URGENCE ET VOTRE
1 X Câble Ethernet
1 X 12V Adaptateur
secteur
1 X Support Mural
ECHEC DE FAIRE DES ARRANGEMENTS SUPPLEMENTAIRES POUR ACCEDER AUX SERVICES
D’URGENCE EN CONFORMITE AVEC LE PARAGRAPHE PRECEDENT.
1 X Tissu de nettoyage
de l’écran LCD
1 X Guide express
19 20
Page 13

PRESENTATION:
GXV3275 représente l’avenir de la communication IP multimédia personnelle,
supportant Android™ 4.2 et son large pannel d’applications tierces, un large écran
tactile capacitif de 7” (1024×600), un Capteur CMOS méga pixels réglable, deux
ports réseau Gigabit, WiFi, PoE et Bluetooth intégrés. Le GXV3275 offre une qualité audio et vidéo HD supérieure, fonctionnalités téléphoniques à la pointe de la
technologie, intégration de contenu web riche avec accès à la base d’applications
Android™ à croissance rapide et mise en service automatisé. GXV3275 redénit
l’expérience de la communication bureau avec un niveau supérieur d’innovation et
avec l’intégration de la vidéo conférence en temps réel, la présentation et la livraison média riches et personnalisables, les applications web populaires et réseaux
sociaux, et des outils de productivité avancés pour les entreprises.
INSTALLATION DU TELEPHONE:
Fentes pour le
montage mural
Support bureau
intégré
En utilisant le support du téléphone:
Le GXV3275 possède un support de téléphone intégré. Pour l’utiliser, retirez la
languette à l’endos du téléphone. Ajustez l’angle selon vos préférences et assurez-vous que le téléphone se trouve toujours aligné sur le bureau.
CONNECTER LE TELEPHONE:
1. Connectez le combiné et la base principale du téléphone en utilisant le cordon
téléphonique;
2. Connectez le port LAN du téléphone à la prise RJ-45 d’un hub /switch ou rout eur (côté LAN du routeur) via le câble Ethernet;
3. Connectez la che de sortie 12V DC au port du courant du téléphone, branchez
l’adaptateur dans la prise d’alimentation. Si un Switch PoE est utilisé dans l’éta pe 2, cette étape peut être ignorée;
4. L’écran LCD afchera des informations de démarrage ou de mise à jour du rm ware. Avant de continuer, veuillez attendre l’afchage l’écran principal;
5. A partir de l’interface web de conguration ou du menu de l’écran tactile, vous
pouvez toujours congurer la connexion réseau en utilisant soit IP statique ou
DHCP et etc.
Installation du Téléphone (Support Mural):
1. Attachez le support mural à la fente arrière du téléphone;
2. Attachez le téléphone au mur à travers les trous de xation murale;
3. Retirez l’attache à partir du crochet du téléphone (voir gure ci-dessous);
4. Retournez l’attache et rebranchez-la dans la fente d’extension jusqu’à tenir le
combiné lorsque le téléphone est monté sur le mur.
Appui du combiné
Attache avec appui vers le haut
Attache avec appui vers le bas
Port HMDI
Port Casque
3.5mm
Port Carte SD
Port USB 1
Port USB 2
Alimentation
Port PC
Port LAN
Port Casque RJ9
Port Combiné
21 22
Page 14

Consignes d’utilisation des touches:
Indicateur de
message en
attente
VOLUME HAUT
1. Appuyez sur les touches VOLUME HAUT/VOLUME BAS pour ajuster le volume
du téléphone;
2. Appuyez sur la touche ACCUEIL pour revenir à l’écran de veille par défaut. Ou
appuyez longuement sur la touche ACCUEIL pendant plus de 2 secondes pour
accéder à l’interface de l’application de gestion;
3. Appuyez sur la touche MENU pour accéder aux applications et aux paramètres
du téléphone;
4. Appuyez sur la touche RETOUR pour revenir au menu précédent.
MENU RETOURACCUEILVOLUME BAS
CONFIGURATION DU TELEPHONE:
Congurez le GXV3275 en utilisant l’écran tactile:
1. Assurez-vous que le téléphone est bien alimenté et que l’écran de veille est af-
ché;
2. Cliquez sur l’icône MENU sur l’écran pour accéder aux applications et paramè tres du GXV3275;
3. Sélectionnez Paramètres->Paramètres Avancés->Compte. Cliquez sur l’un des
comptes pour congurer le nom du compte, Serveur SIP, Ident. Utilisateur SIP,
Ident. d’Authentication, et Mot de Passe d’Auth pour enregistrer le compte sur
le GXV3275. Après un enregistrement réussi, l’écran principal sera afché co mme dans la gure ci-dessous;
4. Suivez les options du menu LCD pour congurer les autres paramètres du télé-
phone. Par exemple, pour attribuer une adresse IP statique au GXV3275, veu-
illez congurer une adresse IP statique à travers le Menu LCD->Paramètres->
Sans l et Réseaux->Paramètres Ethernet;
5. Veuillez contacter votre FAI (Fournisseur d’Accès à Internet) pour les paramèt-
res supplémentaires qui peuvent être nécessaires pour congurer le téléphone.
Congurer le GXV3275 en utilisant le Navigateur web:
1. Assurez-vous que votre téléphone est bien alimenté et correctement connecté
à Internet;
2. L’adresse IP du téléphone sera afchée sur l’écran principal lorsque vous app-
uyez sur la touche ACCUEIL;
3. Saisissez l’adresse IP du téléphone dans le navigateur web de votre PC (voir la
gure sur la page suivante);
4. Par défaut le nom et le mot de passe Administrateur sont “admin” et “admin”.
Par défaut le nom et le mot de passe Utilisateur sont “user” et “123”;
5. Sur l’interface Web, sélectionnez la page du compte 1/2/3/4/5/6 pour congurer
le nom du compte, Serveur SIP, Ident. Utilisateur SIP, Ident. d’authentication,
et Mot de Passe d’Auth. pour enregistrer le compte sur le GXV3275.
Note: Pour plus de détails, veuillez consulter le manuel d’utilisation sur:
http://www.grandstream.com/support
23 24
Page 15

DE
Das GXV3275 ist nicht für die Durchführung von Notrufen
an Krankhäuser, Strafverfolgungsbehörden, medizinische
Pegeeinrichtungen (“Notdienste”) oder jegliche andere
Form von Notdiensten ausgerichtet. Sie müssen zusätzliche Einstellungen vornehmen, um Zugang zu Notdiensten
zu erhalten. Es liegt an Ihnen, einen SIP-kompatiblen Internettelefoniedienst zu erwerben, das GXV3275 korrekt
für die Nutzung dieses Dienstes zu kongurieren und die
Kongurierung regelmäßig auf ihre Funktionstüchtigkeit zu
testen. Andernfalls liegt es an Ihnen, herkömmliche Drahtlosoder Festnetztelefoniedienste zu erwerben, um Zugang
zu Notdiensten zu erhalten.
GRANDSTREAM BIETET ÜBER DAS GXV3275 KEINE
VERBINDUNG ZU NOTRUFEN AN. WEDER DAS UNTERNEHMEN GRANDSTREAM NOCH SEINE FUNKTIONÄRE, ANGESTELLTEN ODER PARTNER KÖNNEN
FÜR FORDERUNGEN, SCHADEN ODER VERLUSTE
HAFTBAR GEMACHT WERDEN. SIE VERZICHTEN
HIERMIT AUF JEGLICHE UND ALLE SOLCHE FORDERUNGEN ODER RECHTLICHEN SCHRITTE, DIE DURCH
DIE UNMÖGLICHKEIT, ÜBER DAS GXV3275 NOTRUFE
ZU NUTZEN, SOWIE DURCH IHR VERSÄUMNIS, DIE
GEMÄß DEM VORHERGEHENDEN PARAGRAPH NOTWENDIGEN ZUSÄTZLICHEN EINSTELLUNGEN FÜR
DEN ZUGANG ZU NOTRUFEN VORZUNEHMEN, VERURSACHT WERDEN KÖNNEN.
VORSICHTSMAßNAHMEN:
WARNUNG: Schalten Sie das GXV3275 beim Systemstart oder bei der Firm-
ware-Aktualisierung NICHT aus und wieder ein. Andernfalls können FirmwareBilder beschädigt werden und es könnten Funktionsstörungen am Gerät auftreten.
WARNUNG: Verwenden Sie nur den im GXV3275 Paket eingeschlossenen
Netzadapter. Die Verwendung eines alternativen, nicht geeigneten Netzadapters
kann vielleicht das Gerät beschädigen.
PACKUNGSINHALT:
1 X GXV3275
1 X Ethernet-Kabel
1 X Hörer 1 X Telefon-Kabel
12V
1 X 12V Netzteil
1 X Wandmontage
1 X Reinigungstuch
für den Bildschirm
1 X Kurzanleitung
25 26
Page 16

ÜBERSICHT:
Nutzung des Standfusses:
Das auf Android™ 4.2 basierende GXV3275 repräsentiert die Zukunft in der multimedialen IP-Kommunikation und ermöglicht seinem Nutzer den Zugang zu einer
Vielzahl von Applikationen von Drittanbietern. Das GXV3275 wartet mit einem
phantastischen 7” (1024x600) großen, kapazitiven Touch-Display sowie einer
neigbaren Megapixel-CMOS Kamera auf und stellt natürlich Schnittstellen wie:
Dual-Gigabit-Netzwerk mit PoE, WiFi, und Bluetooth zur Verfügung. Desweiteren
bietet das GXV3275 erstklassige HD-Video- und Audioqualität, eine umfangreiche
Auswahl an professionellen Telefonfunktionen, sowie unzählige Applikationen
aus dem schnellwachsenden Android-Marktplatz. Der Bereich der IP- Multime-
dia-Telefone wird mit dem GXV3275 neu deniert, die wegweisende, innovative
Technnologie ermöglicht freie und unabhängige Kommunikation bei Sprache,
Video und Multimedia.
EINRICHTUNG DES TELEFONS:
Montag-
Eingebauter
Standfuss für den
Schreibtisch
eschlitz zur
Wandmontage
Installieren des Telefons (Wandmontage):
1. Wandmontage in die Einbaustelle im hinteren Teil des Telefons anbringen;
2. Telefon an die Wand mittels des Wandmontagelochs anbringen;
3. Stecker von der Hörergabel entfernen (siehe Abbildung unten);
4. Stecker drehen und ihn wieder in die Einbaustelle einstecken um den Hörer
festzuhalten, während das Telefon an die Wand angebracht wird.
Das GXV3275 hat einen integrierten Standfuss. Um diesen zu nutzen, klappen
Sie ihn bitte rückseitig aus dem Telefon und stellen den gewünschten Standwinkel
ein. Beachten Sie bitte, dass das Telefon plan und gerade auf dem Tisch steht.
TELEFON ANSCHLIESSEN:
1. Hörer und Gehäuse mit dem Telefonkabel anschließen;
2. LAN Port des Telefons an den RJ-45 Anschlussdose eines Netzknoten / Switch
oder eines Routers (LAN Seite des Routers) mittels des Ethernet-Kabels ansch-
ließen;
3. Verbinden Sie den 12V DC Ausgangsstecker mit der Strombuchse am Telefon.
Schließen Sie dann das Netzteil an eine Steckdose an. Wenn der PoE-Switch in
Schritt 2 verwendet wird, kann dieser Schritt übersprungen werden;
4. Das Display zeigt Informationen über den aktuellen Status oder ein Firmware Upgrade an. Bevor Sie fortfahren, warten Sie bitte, bis das Hauptmenu im Dis play erscheint;
5. Mit der Web-Kongurationsoberäche oder aus dem Menü des Touchscreens
können Sie die Netzwerkverbindung kongurieren, zum Beispiel mit statischer
IP, DHCP usw.
HDMI Anschluß
3,5mm
Anschlussbuchse
für Headsets
SD Card Slot
USB Anschluß 1
USB Anschluß 2
Hörergabel
Stecker mit Ansatzstück auf
Stecker mit Ansatzstück runter
Strom
PC Anschluß LAN Anschluß
RJ9 Anschlussbuchse
für Headsets
HörerAnschluss
27 28
Page 17

Tipps zur Tastenbelegung:
Mitteilungwarteanzeige
Kongurieren des GXV3275 mit dem Touchscreen:
1. Achten Sie darauf, dass das Telefon ordnungsgemäß eingeschaltet und die Ru-
hezustandsanzeige sichtbar ist;
LAUTSTÄRKE
ERHÖHEN
1. Drücken Sie zur Regelung der Lautstärke die Tasten LAUTSTÄRKE ERHÖHEN
/ LAUTSTÄRKE VERRINGERN;
2. Über die HOME Taste gelangen Sie wieder zurück zur Standard-Startbildschir mansicht. Wenn Sie die HOME Taste 2 Sekunden gedrückt halten, öffnet sich
das Menü zur Verwaltung und Einstellung der Applikationen.
3. Drücken Sie die MENÜ Taste um an die Einstellungen und Applikationen des
Telefons zu gelangen.
4. Durch drücken der ZURÜCK Taste gelangen Sie zum vorangegangengen
Menüpunkt zurück.
LAUTSTÄRKE
VERRINGERN
HOME
MENÜ
ZURÜCK
KONFIGURATION DES TELEFONS:
2. Tippen Sie auf MENU-Taste, um auf die Anwendungen und Einstellungen des
GXV3275 zuzugreifen;
3. Wählen Sie Einstellungen->Erweiterte Einstellungen->Konto. Tippen Sie auf
eines der Konten, um Kontoname, SIP-Server, SIP User ID, SIP-Auth-ID, SIP-
Auth Passwort zu kongurieren-, und um das Konto auf dem GXV3275 registri-
eren. Nach erfolgreicher Registrierung wird die Hauptanzeige wie in der folgen den Abbildung gezeigt;
4. Folgen Sie den LCD Menüpunkten zur Konguration verschiedenster Einstel lungen des Telefons. Drücken Sie beispielsweise zur Konguration der statisch-
en IP Adresse am GXV3275: Einstellungen - Wireless & Netzwerk - Ethernet
Einstellungen...
5. Bitte kontaktieren Sie Ihren Internettelefonie-Provider für zusätzliche Einstellun-
gen, die für die Kongurierung Ihres Telefons nötig sein könnten.
Kongurieren Sie das GXV3275 über einen Webbrowser:
1. Stellen Sie sicher, das Telefon richtig eingeschaltet und mit dem Internet ver
bunden ist;
2. Die IP-Adresse des Telefons wird auf dem Hauptbildschirm durch Drücken der
Home-Taste angezeigt;
3. Geben Sie die IP-Adresse des Telefons in Ihrem PC-Browser ein (siehe Abbil dung auf der nächsten Seite);
4. Standard-Benutzername und Kennwort für den Administrator lauten “admin”
und “admin”. Standard-Benutzername und Kennwort für den Benutzer lauten
“user” und “123”;
5. In der Web-GUI wählen Sie die Seite Konto 1/2/3/4/5/6, um Kontoname, SIP-
Server, SIP User ID, Authentizierungs-ID und Authentizierungs-Passwort zu
kongurieren-, und um das Konto auf dem GXV3275 zu registrieren.
Bemerkung: Das ausführliche Benutzerhandbuch kann geladen werden von:
http://www.grandstream.com/support
29 30
Page 18

IT
GXV3275 non è precongurato per supportare o effettuare chiamate di emergenza a qualsiasi tipo di ospedale, struttura giudiziaria, unità di assistenza medica (“Servizi di emergenza”) o a qualsiasi altro tipo di
servizio di emergenza. È necessario effettuare accordi
supplementari per accedere ai Servizi di emergenza.
È a Vostra esclusiva responsabilità acquistare ser-
vizi di telefonia internet conformi con SIP, congurare
GXV3275 correttamente per usare tale servizio ed effettuare test periodici della congurazione per assicurarsi che funzioni in modo idoneo. Se non si effettua
ciò, è Vostra responsabilità acquistare servizi telefonici
ssi o wireless tradizionali per accedere ai Servizi di
emergenza.
PRECAUZIONI:
AVVERTENZA: NON spegnere e riaccendere il GXV3275 durante l’avvio del
sistema o l’aggiornamento del rmware. Si possono corrompere le immagini del
rmware e causare problemi di funzionamento.
AVVERTENZA: Usare solo l’alimentatore incluso nella confezione del
GXV3275. L’uso di un alimentatore alternativo non idoneo potrebbe danneggiare
l’unità.
CONTENUTO DELLA CONFEZIONE:
GRANDSTREAM NON FORNISCE COLLEGAMENTI
AI SERVIZI DI EMERGENZA ATTRAVERSO
1 X GXV3275
Apparecchi principale
1 X Ricevitore 1 X Cavo Telefonico
GXV3275. NÈ GRANSTREAM NÈ I SUOI RESPONSABILI, DIPENDENTI O AFFILIATI POSSONO ESSERE RITENUTI RESPONSABILI DI QUALSIASI
RECLAMO, DANNO O PERDITA, E DI QUALSIASI
12V
AZIONE LEGALE DERIVANTE DA TALI RECLAMI O
CAUSE IN RELAZIONE ALL’IMPOSSIBILITÀ DI US-
1 X Cavo Ethernet
1 X 12V Alimentatore
1 X Supporto montaggio
a parete
ARE IL GXV3275 PER CHIAMATE AI SERVIZI O DI
STRINGERE ACCORDI SUPPLEMENTARI PER ACCEDERE AI SERVIZI DI EMERGENZA IN CONFORMITÀ AL PARAGRAFO PRECEDENTE.
1 Panno per la pulizia
dello schermo
1 X Guida Rapida
31 32
Page 19

PANORAMICA:
GXV3275 rappresenta il futuro per le comunicazioni IP multimediali, sfrutta il sistema operativo Android™ 4.2 e la vasta gamma di applicazioni di terzi che questo
offre, un ampio schermo dotato di touch screen capacitivo da 7” (480 x 272), un
sensore CMOS mega-pixel inclinabile, due porte di rete Gigabit, Wi-Fi integrato,
PoE e Bluetooth. GXV3275 offre video e audio HD di qualità superiore, caratteristiche telefoniche all’avanguardia, integrazione di ricchi contenuti Web che
accedono alle applicazioni in rapida espansione basate su Android™ e provision-
ing automatico. GXV3275 ridenisce l’utilizzo della comunicazione da telefono
sso, introduce innovazioni di livello superiore e integra una conferenza video in
tempo reale altamente tecnologica, presentazione multimediale personalizzata e
distribuzione, le più diffuse applicazioni Web e social networking, oltre a strumenti
di produttività aziendale avanzata.
MONTAGGIO TELEFONO:
Base del telefono integrata
da tavolo
Asole di
ancoraggio
a muro
Utilizzo della base del telefono:
GXV3275 dipone di una base del telefono integrata. Per utilizzarla, estrarre la leva dalla base del telefono posta nella parte posteriore del telefono. Regolare l’angolatura secondo preferenza e accertarsi che la base del telefono sia in piano
sul tavolo.
CONNESSIONE DEL TELEFONO:
1. Collegare il ricevitore e il case principale del telefono con il cavo telefonico;
2. Collegare la porta LAN del telefono alla presa RJ-45 di un hub o di un router
(lato LAN del router) usando un cavo ethernet;
3. Collegare la spina da 12V CC alla presa di corrente del telefono, collegare l’ada ttatore di alimentazione ad una presa elettrica. Se si usa l’interruttore PoE nel
punto 2, questo passaggio può essere saltato;
4. Il display LCD visualizzerà informazioni sull’avvio o sull’aggiornamento del rm-
ware. Prima di continuare, attendere la visualizzazione della schermata princi pale;
5. Utilizzando l’interfaccia di congurazione web o dal menu del touch screen, è
possibile congurare ulteriormente la connessione di rete usando DHCP, IP
statico, ecc.
Installazione del telefono (montaggio a parete):
1. Fissare il supporto per il montaggio allo slot sul retro del telefono;
2. Fissare il telefono alla parete attraverso il foro di montaggio a parete;
3. Estrarre l’aletta dal ricevitore. (Si veda la gura di seguito);
4. Ruotare l’aletta e riposizionarla nell’alloggiamento con l’estensione verso l’alto
in modo da poter sostenere il ricevitore mentre il telefono è montato a parete.
Supporto ricevitore
Aletta con estensione
verso l’alto
Aletta con estensione
verso il basso
Porta HDMI
Porta cufe
3.5mm
Slot per SD
Card
Porta USB 1
Porta USB 2
Alimentazione
Porta PC
Porta LAN
Porta cufe RJ9
Porta ricevitore
33 34
Page 20

Suggerimenti per l’utilizzo dei tasti:
Messaggio Indicatore in attesa
RIDUCI VOLUME AUMENTA VOLUME
1. Premere i tasti RIDUCI VOLUME/AUMENTA VOLUME per regolare il volume
sul telefono;
2. Premere il tasto HOME per tornare alla schermata inattiva predenita. Oppure,
premere e tenere premuto 2 o più secondi il tasto HOME per accedere all’inter faccia dell’applicazione di gestione;
3. Premere il tasto MENU per accedere alle impostazioni e applicazioni del tele fono;
4. Premere il tasto INDIETRO per tornare al menu precedente.
HOME
MENU
INDIETRO
CONFIGURAZIONE DEL TELEFONO:
Congurare il GXV3275 usando il Touch Screen:
1. Assicurarsi che il telefono sia correttamente acceso e in standby;
2. Toccare l’icona Menu schermo per accedere alle applicazioni e alle impostazi oni del GXV3275;
3. Selezionare Settings->Advanced Settings->Account (Impostazioni-> Impostazi-
oni Avanzate -> Account). Toccare uno degli account per congurare nome ac-
count, Server SIP, ID utente SIP, autorizzazione ID e password SIP per registra re l’account sul GXV3275. Dopo aver completato la registrazione, verrà mostra ta la schermata principale (vedi sotto);
4. Seguire le opzioni del menu sullo schermo LCD per congurare altre impostazi oni del telefono. Per esempio, per congurare l’IP statico su GXV3275, impos-
tare l’indirizzo IP statico dal menu sullo schermo LCD Menu -> Impostazioni ->
Wireless e Rete -> Impostazioni Ethernet;
5. Contattare il vostro ITSP (fornitore servizi di telefonia internet) per le impostazi-
oni supplementari che possono essere necessarie per la congurazione del
telefono.
Congurazione del GXV3275 mediante un browser web:
1. Vericare che il telefono sia acceso e connesso a Internet;
2. Quando si preme il pulsante Home nella schermata principale apparirà l’indirizzo
IP del telefono;
3. Digitare l’indirizzo IP del telefono nel browser del vostro PC (vedi gura alla pag-
ina seguente);
4. Il nome utente e la password per l’amministratore sono “admin” e “admin”. Il no me utente e la password per l’utente è “user” e “123”;
5. Nella GUI Web, selezionare Account pagina 1/2/3/4/5/6 per congurare nome
dell’account, Server SIP, ID utente SIP, autenticazione ID e password per poter
registrare l’account su GXV3275.
Nota: Scaricare il manuale utente dettagliato da:
http://www.grandstream.com/support
35 36
Page 21

RU
GXV3275 не предназначен для поддержки и выполнения срочных звонков в медицинские учреждения,
правоохранительные органы, учреждения здравоохранения (“Экстренные службы”) и в какие-либо другие
экстренные службы. Для доступа к экстренным службам необходимо предпринять дополнительные меры.
Приобретение SIP-совместимой услуги Интернет
телефонии, надлежащая конфигурация GXV3275 для
использования данной услуги и периодическая проверка
конфигурации с целью подтверждения правильности
работы являются обязанностью заказчика. Если это
не сделано, то для доступа к экстренным службам
необходимо подключиться к услугам беспроводной или
проводной телефонной связи.
GRANDSTREAM НЕ ПРЕДОСТАВЛЯЕТ ПОДКЛЮЧЕНИЕ К ЭКСТРЕННЫМ СЛУЖБАМ ЧЕРЕЗ GXV3275.
КРОМЕ ТОГО, НИ КОМПАНИЯ GRANDSTREAM, НИ ЕЕ
РУКОВОДИТЕЛИ, ОТРУДНИКИ И АФФИЛИРОВАННЫЕ
ЛИЦА НЕ НЕСУТ ОТВЕТСТВЕННОСТИ В СЛУЧАЕ
КАКИХ-ЛИБО ПРЕТЕНЗИЙ, УЩЕРБА ЛИБО ПОТЕРЬ,
И ВЫ ТЕМ САМЫМ ОТКАЗЫВАЕТЕСЬ ОТ КАКИХЛИБО
ТРЕБОВАНИЙ ИЛИ ОСНОВАНИЙ ДЛЯ ИСКА, ЯВЛЯЮЩИХСЯ РЕЗУЛЬТАТОМ ИЛИ КАСАЮЩИХСЯ ВАШЕЙ
НЕСПОСОБНОСТИ ИСПОЛЬЗОВАТЬ GXV3275,
ЧТОБЫ СВЯЗАТЬСЯ С АВАРИЙНЫМИ СЛУЖБАМИ
И ВАШИМ ОТКАЗОМ СДЕЛАТЬ ДОПОЛНИТЕЛЬНЫЕ
ПРИГОТОВЛЕНИЯ, ЧТОБЫ ПОЛУЧИТЬ ДОСТУП
К АВАРИЙНЫМ СЛУЖБАМ В СООТВЕТСТВИИ С
ПРЕДЫДУЩИМ ПАРАГРАФОМ.
ПРЕДВАРИТЕЛЬНЫЕ УСЛОВИЯ:
ПРЕДУПРЕЖДЕНИЕ Не следует выключать/включать GXV3275 во
время загрузки системы или обновления микропрограммного обеспечения.
Возможно повреждение встроенных программ, что приведет к поломке
устройства.
ПРЕДУПРЕЖДЕНИЕ
входящий в комплект поставки GXV3275. Использование другого не
отвечающего требованиям адаптера может привести к повреждению
устройства.
Следует использовать только адаптер питания,
КОМПЛЕКТ ПОСТАВКИ:
1 x корпус GXV3275
1 x кабель Ethernet
1 x телефонная трубка 1 x телефонный шнур
12V
1 x адаптер питания 12 В
1 x Крепление на стену
1 X Платок для
протирки экрана
1 x краткое руководство
пользователя
37 38
Page 22

ОБЩИЙ ОБЗОР:
GXV3275 - будущее персональных IP-медиакоммуникаций, оснащен
операционной системой Android 4.2 и большим количеством дополнительных
приложений для нее, большим емкостным сенсорным дисплеем с
диагональю 7 дюймов (1024×600), наклоняемым мегапиксельным CMOSсенсором, двумя гигабитными сетевыми портами, встроенным Wi-Fi, PoE и
Bluetooth. GXV3275 обеспечивает превосходное HD-качество аудио и видео,
передовые функции телефонии и интеграцию большого количества вебконтента с доступом к стремительно растущей базе приложений для Android
и автоматизированным пре-конфигурированием. GXV3275 обеспечивает
принципиально новый опыт офисных коммуникаций с повышенным уровнем
инноваций и интеграции с превосходным режимом видеоконференции в
реальном времени, персонализированной богатой презентацией и отправкой
медиа, популярными Веб-приложениями и социальными сетями, а также
продвинутым инструментарием для повышения продуктивности бизнеса.
УСТАНОВКА ТЕЛЕФОНА:
Гнезда для
Встроенная
настольная
подставка
крепления
на стену
Использование подставки под телефон:
GXV3275 оснащен встроенной подставкой. Для ее использования,
вытащите ручку подставки на задней части телефона. Настройте угол как
Вам удобно и убедитесь в том, что подставка не шатается.
ПОДКЛЮЧЕНИЕ ТЕЛЕФОНА:
1. Соедините шнуром телефонную трубку и корпус;
2. С помощью кабеля Ethernet подключите порт LAN телефона и гнездо RJ-45
узла/выключателя или маршрутизатора (со стороны LAN маршрутизатора);
3. Подключите вилку выхода 5 В постоянного тока к гнезду питания телефона;
вставьте адаптер питания в электрический выход. Если на этапе два испо льзуется переключатель PoE, этот этап можно пропустить;
4. На ЖК-экране будут отображены сведения о загрузке или обновлении мик-
ропрограммного обеспечения. Перед тем как продолжить, подождите выв ода главного экрана;
5. Используя интерфейс настройки сети или меню на сенсорном экране, мож но выполнять дополнительные настройки сети, используя статический IP,
DHCP и т. д.
Установка телефона (на стене):
1. Присоедините подставку для крепежа на стену в посадочное место на
тыльной стороне телефона;
2. Закрепите телефон на стене в специальном отверстии в стене;
3. Вытащите контакт из подставки телефона (см. рисунок ниже);
4. Проверните контакт и вставьте его обратно в отверстие так, чтобы доста точно пространства при установке телефона на стене.
Телефон в неподвижном состоянии
Контакт с расширением вверх
Контакт с расширением вниз
Порт HDMI
Порт гарнитуры 3.5 мм
Разъем для
SD-карты
USB-порт 1
USB-порт 2
Питание
Порт ПК Порт LAN
Порт гарнитуры
JR9
Порт для трубки
39 40
Page 23

Советы по использованию клавиш:
Индикатор
ожидания
сообщений
Настройка GXV3275 с помощью сенсорного экрана:
1. Убедитесь, что телефон не активен;
2. Коснитесь значка Menu (Меню) на экране для доступа к приложениям и
настройкам GXV3275;
ПРИБАВИТЬ
ГРОМКОСТЬ
1. Коснитесь клавиш УБАВИТЬ ГРОМКОСТЬ/ПРИБАВИТЬ ГРОМКОСТЬ для
настройки громкости телефона;
2. Коснитесь клавиши ДОМОЙ для возвращения к основному экрану. Или
нажмите и удерживайте клавишу ДОМОЙ в течение двух или более секунд
для входа в интерфейс управления;
3. Нажмите клавишу МЕНЮ для доступа к приложениям и параметрам теле фона;
4. Нажмите клавишу НАЗАД для возврата к предыдущему меню.
УБАВИТЬ
ГРОМКОСТЬ
МЕНЮ НАЗАДДОМОЙ
НАСТРОЙКА ТЕЛЕФОНА:
3. Выберите Settings (Настройки)->Advanced Settings (Дополнительные наст ройки)->Account (Учетная запись). Коснитесь одной из учетных записей
для настройки имени учетной записи, сервера SIP, идентификатора поль-
зователя SIP, идентификатора проверки подлинности SIP и пароля прове-
рки подлинности SIP для регистрации учетной записи на GXV3275. После
успешной регистрации основной экран будет показан на рисунке ниже;
4. Используйте опции меню LCD для конфигурирования параметров на теле фоне. Например, чтобы задать статический IP на GXV3275, установите
статический адрес через меню LCD-меню->Параметры->Сеть и беспрово-
дное соединение->Параметры Ethernet;
5. Дополнительные настройки, которые могут быть необходимы для конфигу рации телефона, можно получить, обратившись к провайдеру по обслужив анию Интернет-телефонии.
Настройка GXV3275 с помощью веб-обозревателя:
1. Проверьте, подключен ли телефон к питанию и к Интернету;
2. IP-адрес телефона будет выведен на основном экране при нажатии кнопки
“На главную”;
3. Введите IP-адрес в обозреватель ПК (См. рисунок справа);
4. Именем пользователя и паролем администратора по умолчанию являются
“admin” и “admin”. Именем пользователя и паролем пользователя по умол чанию являются “user” и “123”;
5. В графическом интерфейсе пользователя для Интернета выберите стран ицу учетной записи 1/2/3/4/5/6 для настройки имени учетной записи, сер вера SIP, идентификатора пользователя SIP, идентификатора проверки по-
длинности и пароля проверки подлинности для регистрации учетной записи
GXV3275.
Примечание. Подробное руководство пользователя можно загрузить здесь.
http://www.grandstream.com/support
41 42
Page 24

PT
O GXV3275 não está pré-congurado para suportar ou realizar chamadas de emergência a nenhum tipo de hospital, agência de aplicação da lei, unidade de atendimento
médico (“ Serviço de Urgência (s) “), ou cualquer outro tipo
de serviço de emergência. Você deve tomar medidas adicionais para acessar à serviços de emergência. É de sua
responsabilidade adquirir o serviço de telefone SIP com-
patível com Internet, congurar corretamente o GXV3275
para usar esse serviço, e testar periodicamente a sua conguração para conrmar que ele funciona como você espera. Se você não fazer isso, é de sua responsabilidade a
compra de serviços tradicionais de telefonia móvel ou xo
para acessar aos serviços de emergência.
GRANDSTREAM NÃO FORNECE CONEXÕES PARA
SERVIÇOS DE EMERGÊNCIA ATRAVÉS DO GXV3275.
NEM GRANDSTREAM NEM SEUS EXECUTIVOS, EMPREGADOS OU ASSOCIADOS PODE SER RESPONSÁVEL POR QUALQUER RECLAMAÇÃO, DANO OU
PERDA. RENUNCIA POR ESTE MEIO TODAS E QUAISQUER REIVINDICAÇÕES OU CAUSAS DE AÇÃO RESULTANTE DE OU ELACIONADOS À SUA INCAPACIDADE
DE USO DO GXV3275 DE CONTACTAR OS SERVIÇOS
DE EMERGÊNCIA, E SUA FALHA EM FAZER REFORMAS ADICIONAIS PARA ACESSAR OS SERVIÇOS DE
EMERGÊNCIA DE ACORDO COM PARÁGRAFO IMEDIATAMENTE ANTERIOR.
PRECAUÇÕES:
ATENÇÃO: Por favor, não desligue e ligue o GXV3275 durante a inicialização
do sistema ou atualização de rmware. Você pode corromper as imagens de rmware e fazer que a unidade funcione mal.
ATENÇÃO: Use apenas o adaptador de alimentação incluído no pacote do
GXV3275. Usando um adaptador de alimentação alternativo não-qualicado possivelmente pode danicar o aparelho.
CONTEÚDO DO PACOTE:
1 X GXV3275
1 X Cabo de ethernet
1 X Fone 1 X Cabo de telefone
12V
1 X Adaptador de
alimentação 12V
1 X Suporte para
montagem de parede
1 X Pano de limpeza para tela
1 X Guia de instalação rápida
43 44
Page 25

OVERVIEW:
O GXV3275 representa o futuro em comunicação multimídia IP pessoal, com
Sistema Operacional Android™ 4.2 e amplo número de aplicações de terceiros,
uma tela de toque capacitiva de 7 “(1024 × 600) , um sensor mega-pixel CMOS
inclinável, duas portas de rede Gigabit, Wi-Fi integrado , PoE e Bluetooth. O
GXV3275 oferece qualidade de áudio e vídeo HD superior, fornecendo recursos
de telefonia de ponta e integração de amplo conteúdo da Web com acesso à
crescente base de aplicativos Android ™ e provisionamento automatizado. Ele
redene a experiência de comunicação com um elevado nível de inovação e integração de vídeo-conferência em tempo real, apresentação e entrega de uma
ampla variedade de conteúdo personalizado, aplicações de redes sociais e ferramentas avançadas de produtividade empresarial.
INSTALANDO TELEFONE:
Inclui suporte
de telefone
para mesa
Ranhuras para
montagem de
parede
Usando suporte de telefone:
O GXV3275 tem um suporte de telefone incorporado. Para usá-lo, puxe a alça
de suporte do telefone na parte de trás do telefone. Ajuste o ângulo preferido e
verique se o telefone ca parado na área de trabalho.
CONECTANDO O TELEFONE:
1. Conecte o cabo espiral à base do monofone e à parte traseira do telefone;
2. Conecte um cabo de rede à porta LAN RJ45 do telefone ao switch/roteador;
3. Conecte a fonte 12V DC no plugue traseiro do telefone; ligue a fonte à tomada.
Se a alimentação for feita via PoE, esse passo será ignorado;
4. O display LCD irá indicar carregamento (booting up) ou atualização de rmwre
(rmware upgrading). Antes de continuar, aguarde até esses processos termi-
narem;
5. Usando a interface web para conguração ou via menu do display, você pode
congurar os dados da rede usando IP estático, DHCP, entre outros.
Instalando o telefone (Montagem de parede):
1. Fixe o suporte de parede às ranhuras na parte traseira do telefone;
2. Conecte o telefone à parede pelos orifícios próprios;
3. Puxe a lingueta do gancho (veja a foto abaixo);
4. Inverta a posição da lingueta e recoloque-a no orifício para que ela segure o
monofone.
Descanço do monofone
Lingueta na posição parede
Lingueta na posição mesa
Porta HDMI
Porta fone de
ouvido 3.5mm
Entrada para
cartão SD
Porta USB 1
Porta USB 2
Ligar
Porta PC
Porta LAN
Porta fone RJ9
Porta monofone
45 46
Page 26
Dicas para usar as teclas:
Indicador de
mensagem
em espera
VOLUME BAIXO
1. Toque em VOLUME BAIXO/ VOLUME CIMA para ajustar o volume no telefone
2. Toque na tecla INICIO para voltar para a tela inicial padrão. Ou pressione e
segure a tecla INICIO por 2 ou mais segundos para entrar na interface de
gestão de aplicação;
3. Pressione a tecla MENU para acessar às aplicações do e congurações;
4. Pressione a tecla VOLTAR para voltar ao menu anterior.
VOLUME CIMA
INICIO
MENU
VOLTAR
CONFIGURAÇÃO DO TELEFONE:
Congurando o GXV3275 usando Touch Screen:
1. Verique se o telefone está corretamente ligado e na tela inicial;
2. Toque no ícone MENU no LCD para acessar aplicativos e congurações do
GXV3275;
3. Toque em uma das Contas para congurar o nome da conta, servidor SIP, ID
de usuário SIP, ID de autenticação SIP, senha de autentição SIP para registrar
a conta no GXV3275. Depois de registrado com êxito, a tela principal será mo-
strado como a gura abaixo;
4. Siga as opções do menu LCD para congurar outras congurações no telefone.
Por exemplo, para congurar o IP estático no GXV3275, congurar o endereço
IP estático via Menu LCD-> Congurações-> Wireless & Rede-> Congurações
de Ethernet;
5. Entre em contato com seu ITSP (fornecedor serviço de telefonia IP) para con-
gurações adicionais que podem ser necessárias para congurar o telefone.
Congurando o GXV3275 Usando Web Browser:
1. Verique se o seu telefone está devidamente ligado e conectado à Internet;
2. O endereço IP do telefone vai ser mostrado na tela principal quando se pres
siona o botão Inicio;
3. Digite o endereço IP do telefone no navegador do seu PC (ver gura na próxima
página);
4. O nome de usuário e a senha padrão do administrador são “admin” e “admin”.
O nome de usuário e a senha padrão para o usuário são “user” e “123”;
5. Na interface do usuário web, Selecionar conta na página 1/2/3/4/5/6 para con-
gurar o nome da conta, Servidor SIP , ID de usuário SIP, ID de Autenticação
e autenticar senha para registrar a conta no GXV3275.
Nota: Para o manual do usuário detalhado, faça o download desde:
http://www.grandstream.com/support
47 48
 Loading...