

Configuring the USB Wireless Adapter with GXV3140
1.1 How to Enable Wifi Features
1.1.1 Configuring us i ng the web configuration int er face
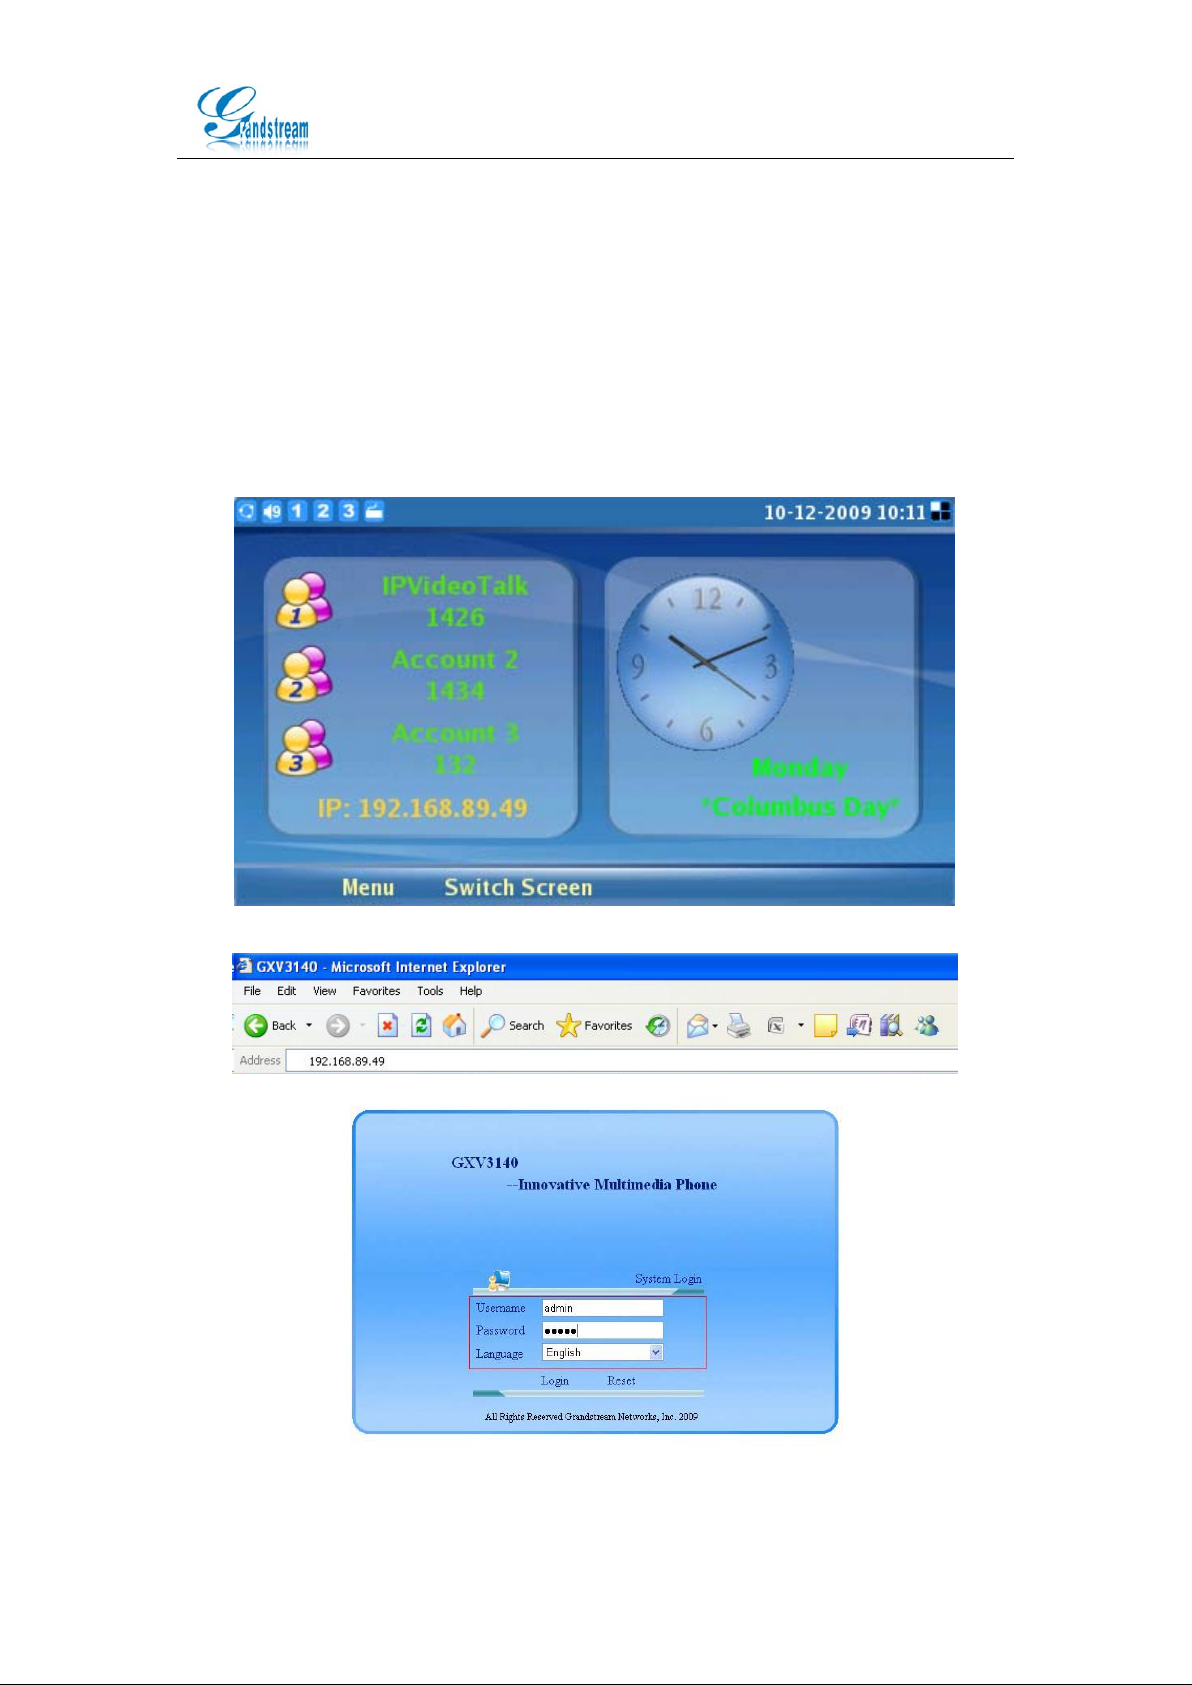
Ty pe the I P address o f the GX V3140 (as s how n on t he pho ne LC D scree n, se e figure
1-1 below) in the URL bar of a web browser to log into the web conf igurat ion int erfac e.
The user will be prompted for the login credentials. By default, the username and
password are both s et t o admin. (See figure 1-3 below).
Figure 1-1
Figure 1-2
Grandstream Networks, Inc. Configuring the USB Wireless Adapter with GXV3140 Page 1 of 7
http://www.grandstream.com Updated 12/2009
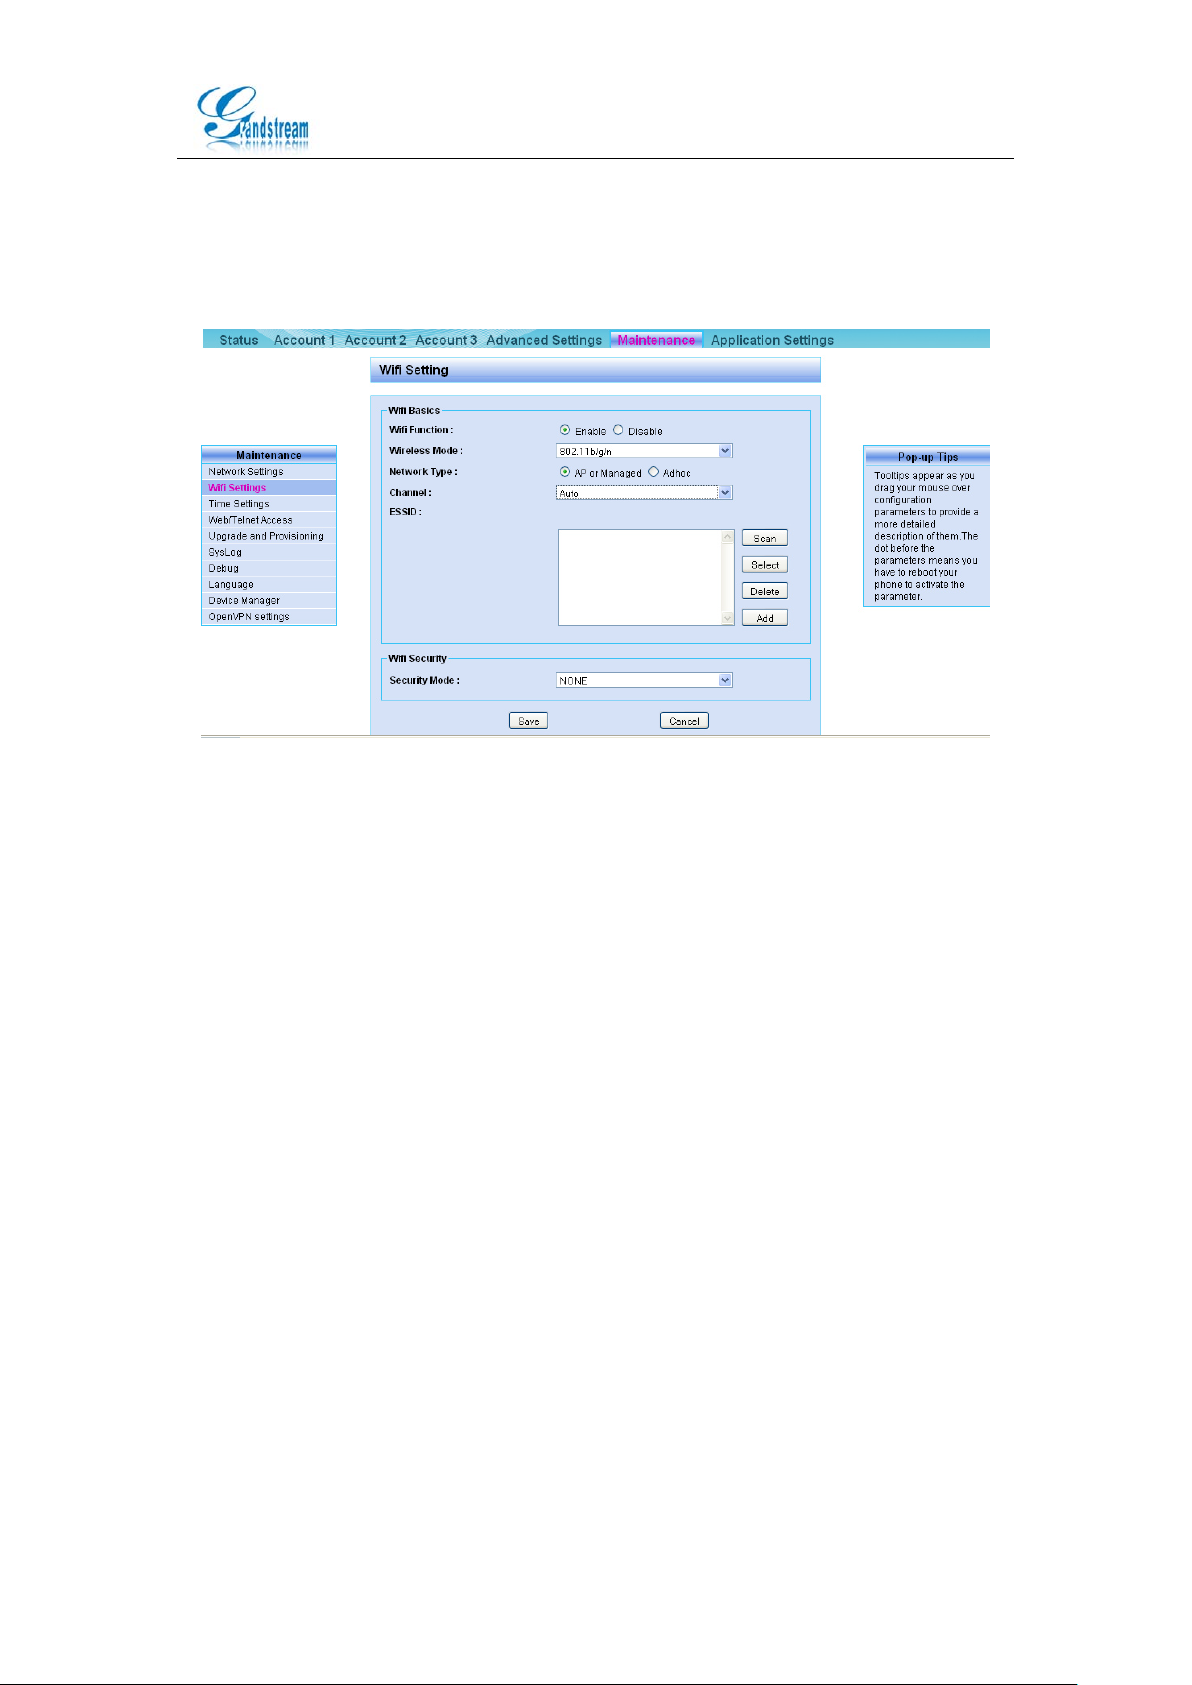
After logging into the GXV3140 Web configur ation interface, clic k on Maint enance->
Wifi Settings. Set Wifi Function to “Enable” and click on “Save” (see figure 1-4
below).
Figure 1-4
Wifi Function:The setting to enable/disable the Wifi functions. By default, Wifi
functions are disabled. If users are not using the Wifi function, please leave it as the
default setting.
Wireless Mode: The setting used to configure the GXV3140 wireless mode. These
are the modes supported: 802.11b/g, 802.11b, 802.11g, 802.11n, 802.11g/n, 802.11
b/g/n. It is recommended to use 802.11 b/g/n.
Network Type: Select “AP or Managed” for wireless networ ks with access points.
Select “Adhoc” if it is an ad-hoc network and there are no access points. It is
recommended to use the “AP or Managed” network type if there are acces s points.
Note: W ith “AP or Managed” network type, the signals between the devices would
have to go through the access point (router). With Adhoc network, the devices can
send signals to other devi ces directly without going through the access point s .
Channel:Configure the wireless signal channel based on the settings on your
wireless router. If the channel setting on the wireless router is set to 6, please also
select 6 for this setting.
Security Mode:C onfi gur e the securit y mode ba se d on the set tings on y our wireless
router. If the wireless router uses WEP, please also select WEP for t he security mode
and configure the keys.
Grandstream Networks, Inc. Configuring the USB Wireless Adapter with GXV3140 Page 2 of 7
http://www.grandstream.com Updated 12/2009
1.1.2 Configuring using the GXV3140 keypad
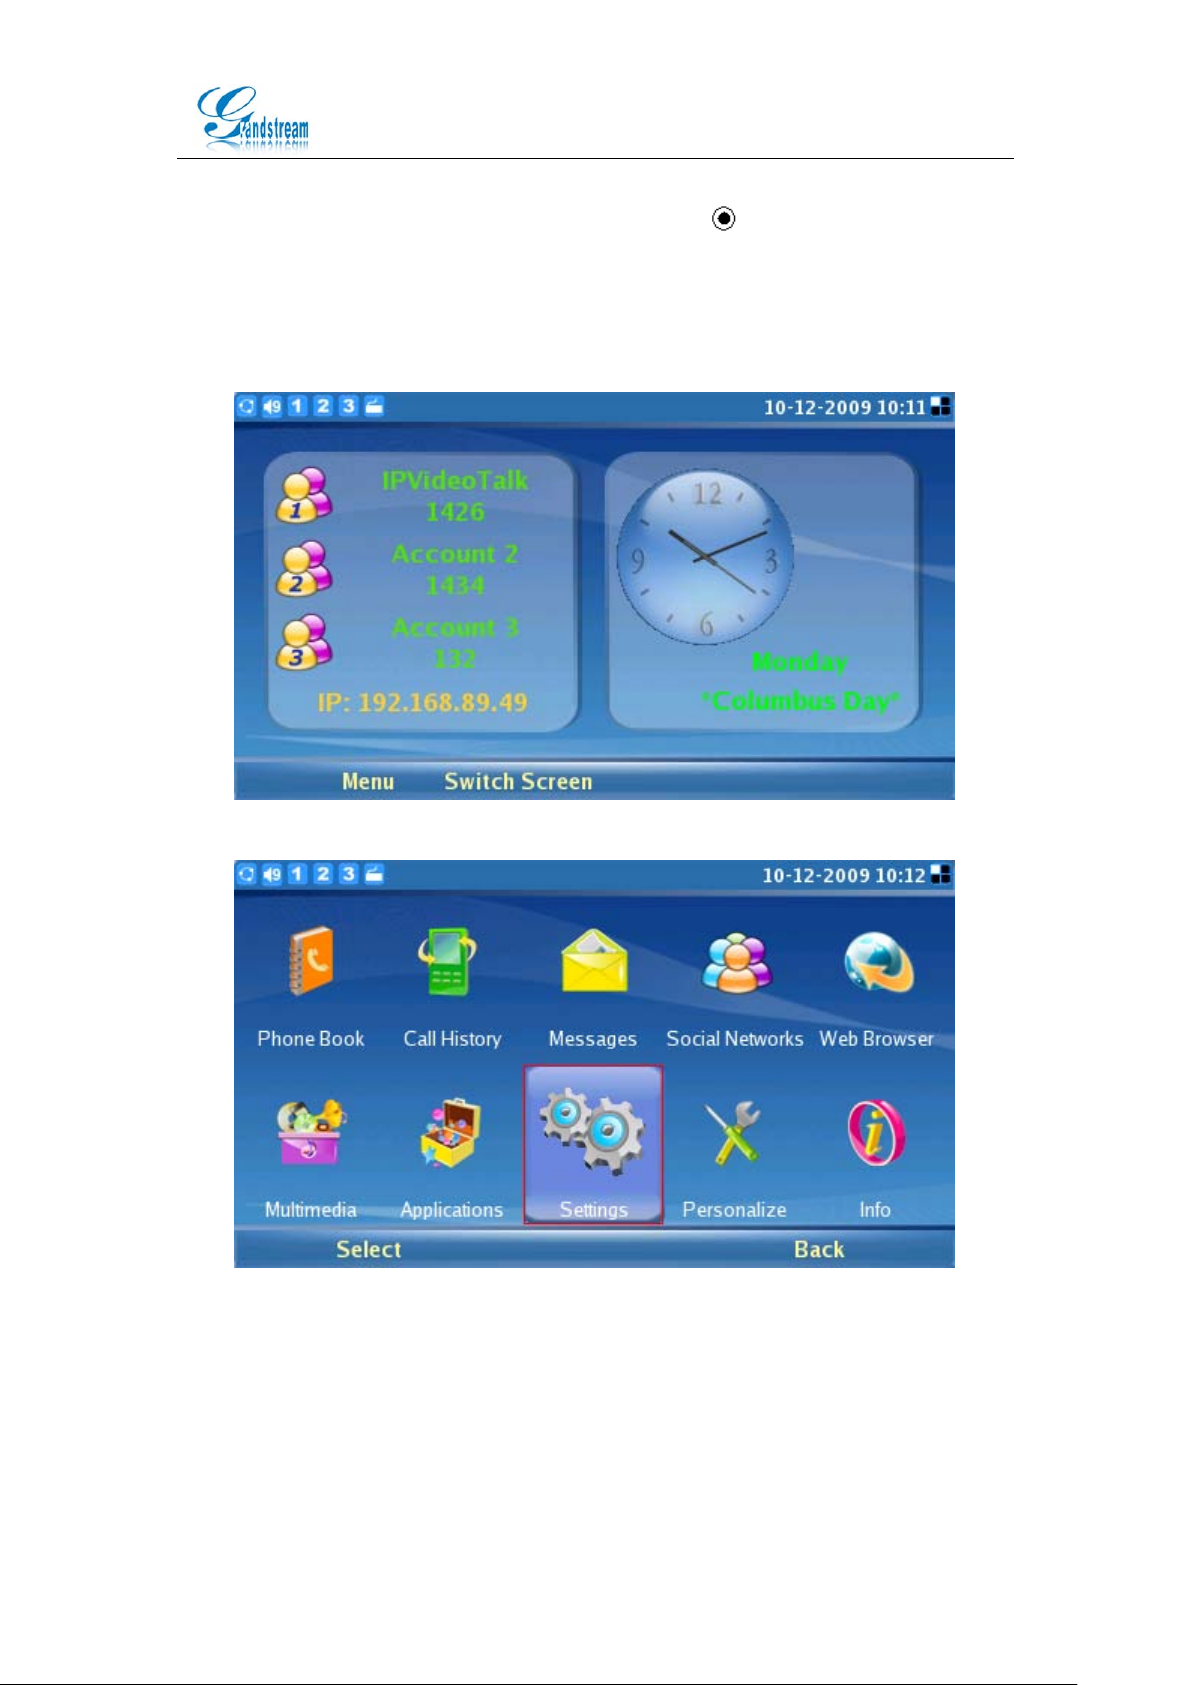
Press the F1 button or the round submit button (
the menu. Use the up/down/left/right navigation keys to navigate through the
menu and select “Settings” (see figure 2-2).Select “Network” (see figure 2-3), and
use the left/right arrow key to select “Wifi” (see figure 2-4). Configure the Wifi
settings and press F3 to save the settings.
) on the GVX3140 to access
Figure 2-1
Figure 2-2
Grandstream Networks, Inc. Configuring the USB Wireless Adapter with GXV3140 Page 3 of 7
http://www.grandstream.com Updated 12/2009

Figure 2-3
Figure 2-4
Wifi Function:The setting to enable/disable the Wifi functions.
ESSID: The ide nt ifying name (ESSID) for t he wireless network.
Security Mode:The data encryption method will be based on the s ecurity mode.
There are five encryption methods: WEP, WEP PSK TKIP, WEP PSK AES, WEP2
PSK TKIP, WEP2 PS K AES. Configure the security mode based on the settings on
your wireless router. If the setting on the wireless router is set to WEP, select W EP
and configure the corresponding WEP key set on the router.
Configure: Configure the ESSID of the wireless network. Add/Delete ESSID or scan
for available wireless networks.
Key: The key conf igured for the wireless net work, should be corresp onding to t he key
configured on the wireless r out er.
Show Pwd:If selected, the password will be shown in plain text.
Grandstream Networks, Inc. Configuring the USB Wireless Adapter with GXV3140 Page 4 of 7
http://www.grandstream.com Updated 12/2009

1.2 Hardware Connection
When the Wifi functions is enabled, plug the 802.11n Wifi USB dongle into the USB
port on the GXV3140. After 10-15 seconds, when the USB Wifi dongle has
successfully connected to the phone, the small icon will be shown on the phone LCD
screen (see figure 3-1)
Figure 3-1
1.3 Using the Wifi Dongle
Configure the USB Wifi dongle using the two methods described above. On the
GXV3140, select MENU->Settings->Network and use the left/right arrow key to toggle
to “Wifi”. Select “Configure” to configure the ESSID configuration page (as shown in
Figure 4-1). Select “Scan” and press the round Submit butt on (
scan and show all the available wireless networks in its range. The ESSID of the
network and the signal qu ality will be d isplayed. Th e larger t he number i s for the sig nal
quality, the better the signal quality i s. To add a wireless network, select the ESSID
and press the round submit button (
F4 to go back to the setting and the network with the new ESSID should be added
(see figure 4-2). After the settings are modified, press F3 to sav e t hese set t ings. If the
wireless network is not encrypted by a key, the user should be able to connect to the
network in a few seconds.
) or enter the ESSID and select “Add”. Select
) and the phone will
Grandstream Networks, Inc. Configuring the USB Wireless Adapter with GXV3140 Page 5 of 7
http://www.grandstream.com Updated 12/2009

Figure 4-1
Figure 4-2
FAQ
Q:How do I configure the Key?
A:As shown in figure 4-3, the security mode use d when ESSID is 1 is WEP and uses
WEP Key 1 as its default key. The user would need to configure the key to be
corresponding to the key on the wireless router. For exampl e, if the WE P key set on
the wireless router is set to 123456, configure the WEP Key1 to 123456. Press F3 to
save the settings. If both the configurations and the key are correct, the user should
be able to connect to the Wifi network in a few seconds. Users can also con figure the
keys from the web configurat ion i nt er f ace (see figure 4-4 below).
Grandstream Networks, Inc. Configuring the USB Wireless Adapter with GXV3140 Page 6 of 7
http://www.grandstream.com Updated 12/2009

Figure 4-3
Figure 4-4
Grandstream Networks, Inc. Configuring the USB Wireless Adapter with GXV3140 Page 7 of 7
http://www.grandstream.com Updated 12/2009
 Loading...