

Page 1
Grandstream Networks, Inc.
126 Brookline Ave, 3rd Floor
Boston, MA 02215. USA
Tel : +1 (617) 566 - 9300
Fax: +1 (617) 249 - 1987
www.grandstream.com
For Warranty and RMA information, please visit www.grandstream.com
AT BE CY CZ DK EE FI
FR DE EL HU IE IT LV
LT LU MT NL PL PT SK
SI ES SE UK BG RO HR
In all EU member states, operation of 5150
-5250 MHz is restricted to indoor use only.
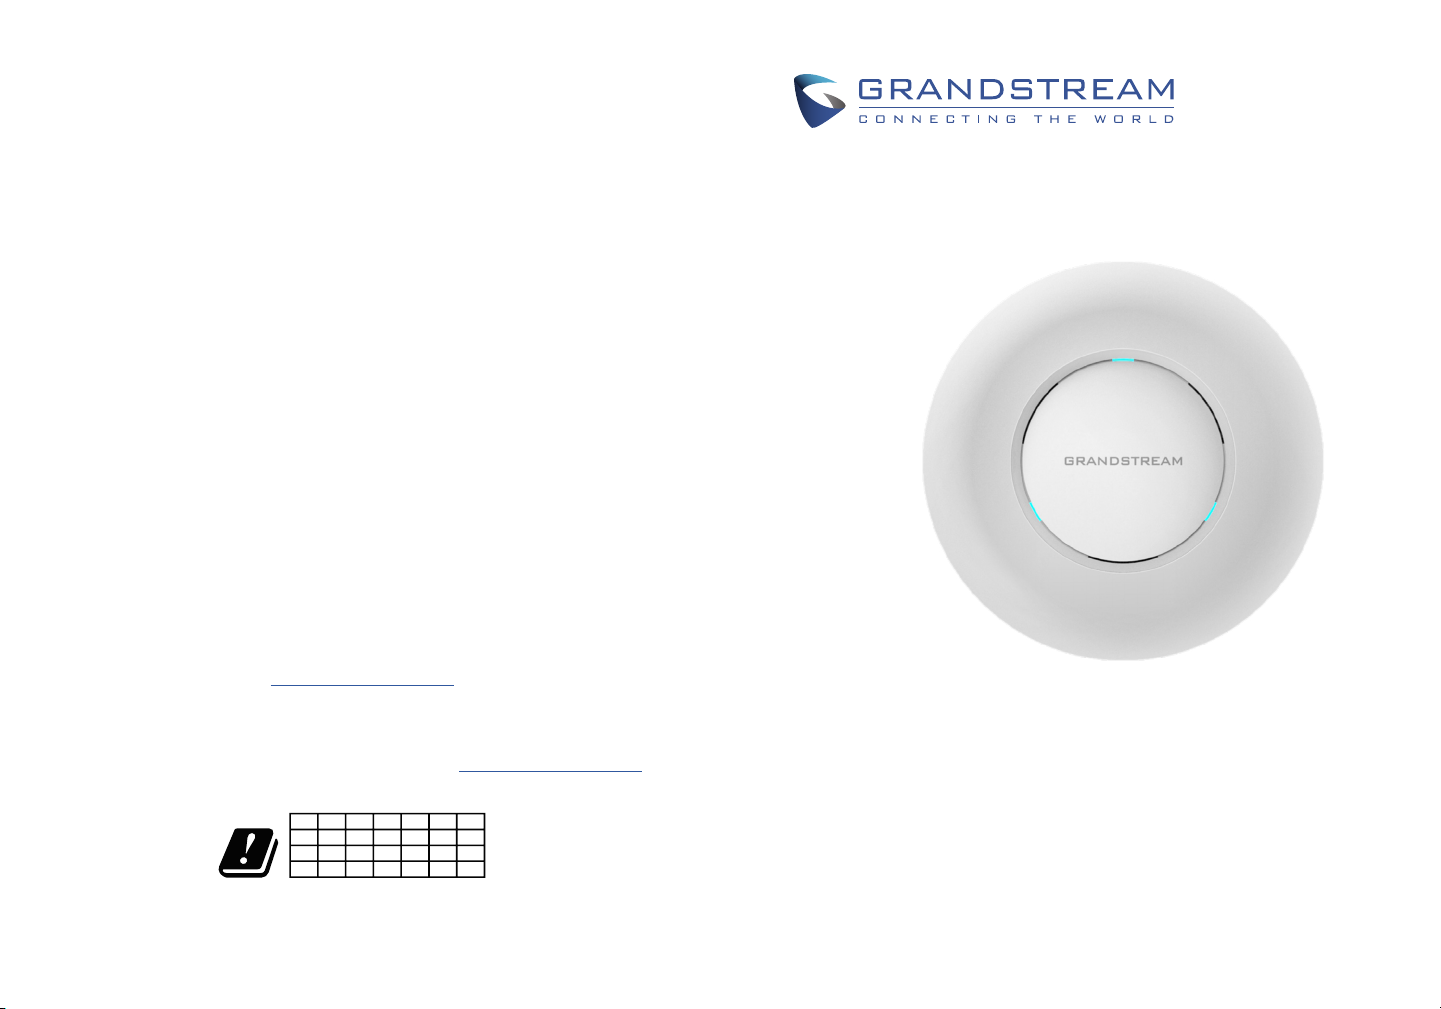
GWN7610
Wireless Access Point
Quick Installation Guide
Page 2

Content
English......................................................... 1
简体中文..................................................... 11
Español....................................................... 21
Français...................................................... 31
Deutsch....................................................... 41
Italiano........................................................ 51
Polski.......................................................... 61
Português................................................... 71
Русскйй.................................................. ....81
Page 3

EN
OVERVIEW
The GWN7610 is a high performance, simultaneous dual-band MIMO enterprise wireless
access point. GWN7610 provides businesses of all sizes with expanded WiFi coverage,
reducing user complaints about weak signal and dropped connections. GWN7610 adopts
a controller-less design, eliminating the need for extra controller software and hardware.
GWN series wireless access points are powered by Grandstream’s highly scalable network management system. Depending on the size of the installation, GWN wireless access
points can be self-managed, or managed by a GWN7000/GWN7000W enterprise router.
PRECAUTIONS
• Do not attempt to open, disassemble, or modify the device.
• Do not expose this device to temperatures outside range of 0 °C to 50 °C.
• Do not expose the GWN7610 to environments outside of the following humidity range:
10-90% RH (non-condensing).
• Do not power cycle your GWN7610 during system boot up or rmware upgrade. You
may corrupt rmware images and cause the unit to malfunction.
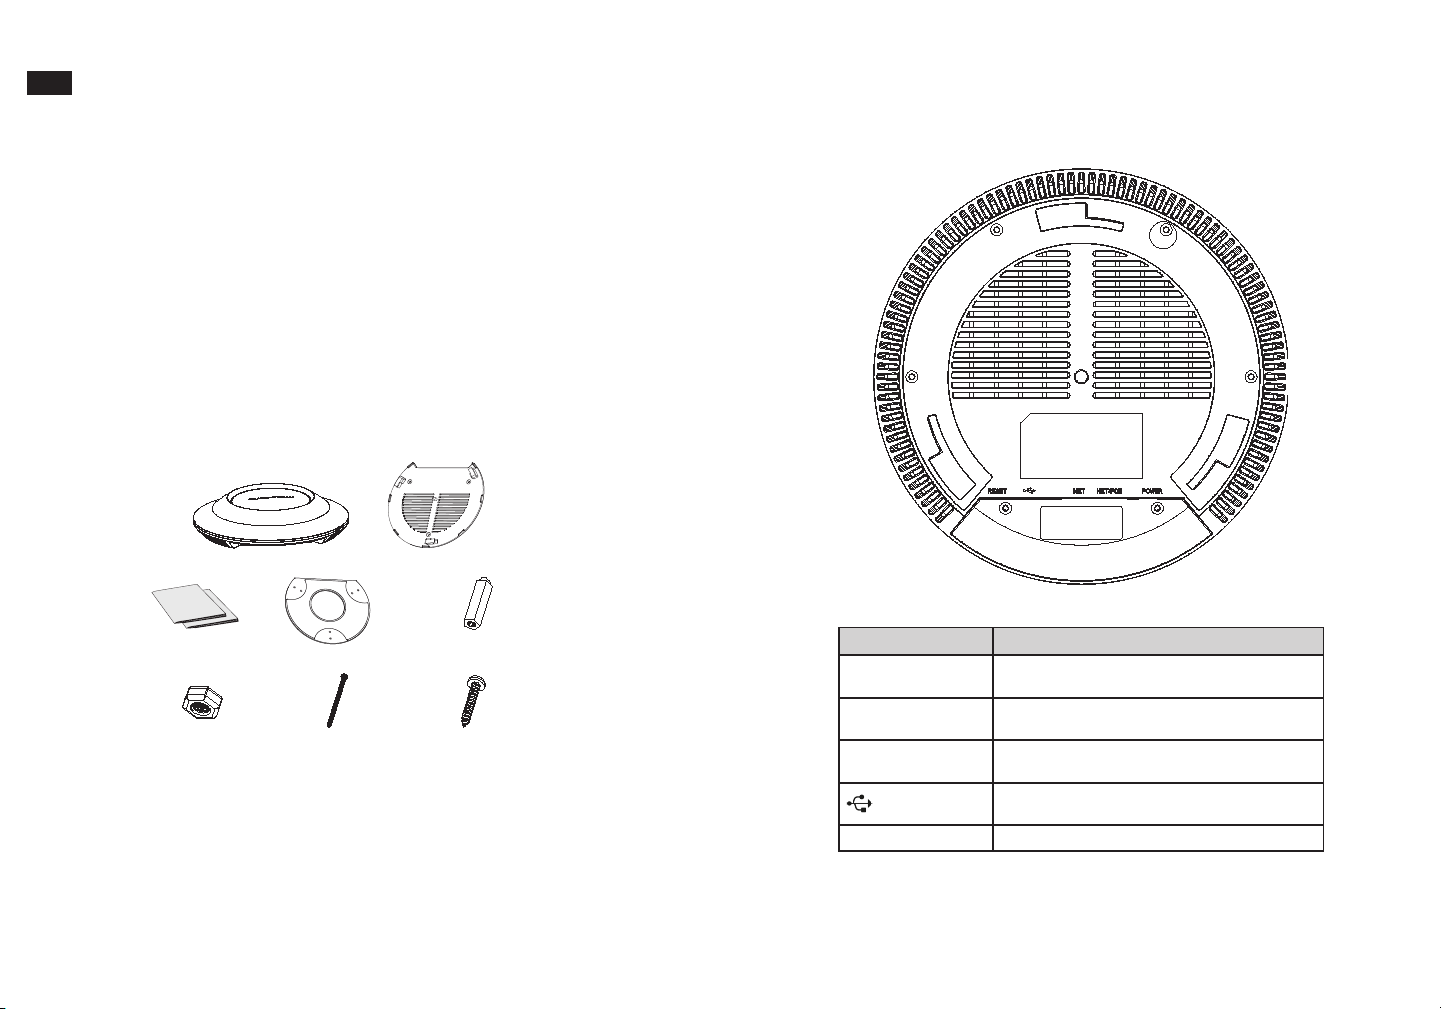
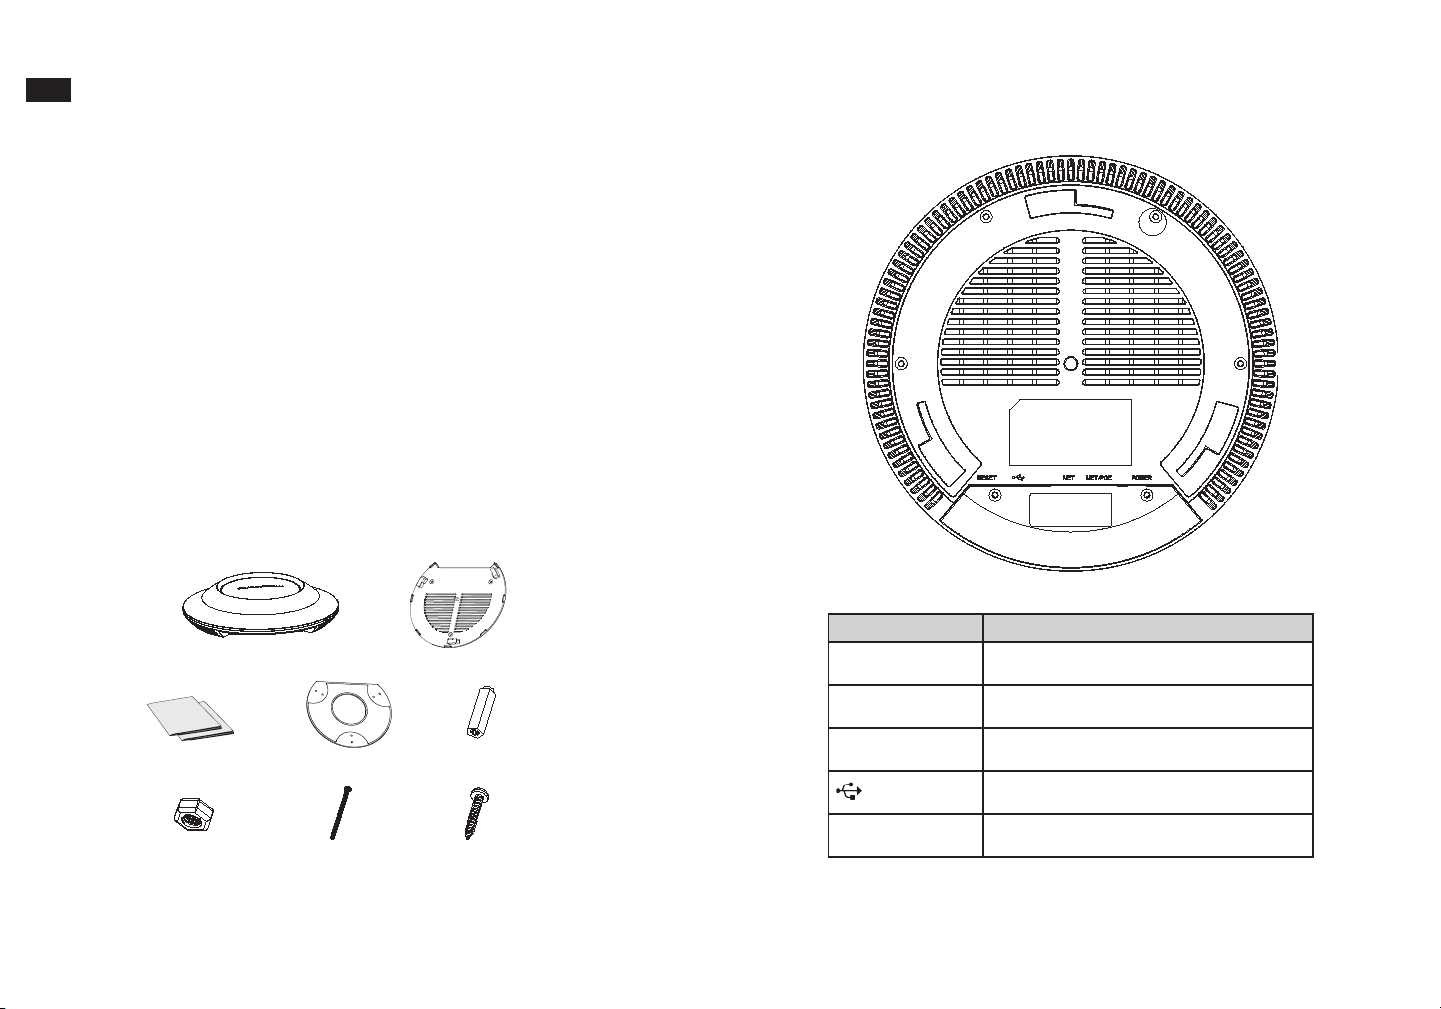
PACKAGE CONTENTS
GWN7610 Access Point
1 x Quick Installation Guide
1 x GPL Statement
3 x M3 NUT
Ceiling Mounting Bracket
3 x Screw (PM 3 x 50)
Mounting Bracket
3 x Plastic Expansion Bolt
3 x Screw (PA 3.5 x 20 )
GWN7610 PORTS
Port Description
POWER Power adapter connector (DC24V, 1A)
Note: Power adapter is not provided.
NET/POE Ethernet RJ45 port (10/100/1000Mbps) supporting
PoE.
NET Ethernet RJ45 port (10/100/1000Mbps) to your
router or another GWN7610.
USB 2.0 port (for future IOT & location based
applications)
RESET Factory reset button. Press for 7 seconds to reset
factory default settings.
1
2
Page 4

HARDWARE INSTALLATION
Wall
PA3.5 x 20
Screw
Plastic Expansion
Bolt
GWN7610 can be mounted on the wall or ceiling, Please refer to the following steps for
the appropriate installation.
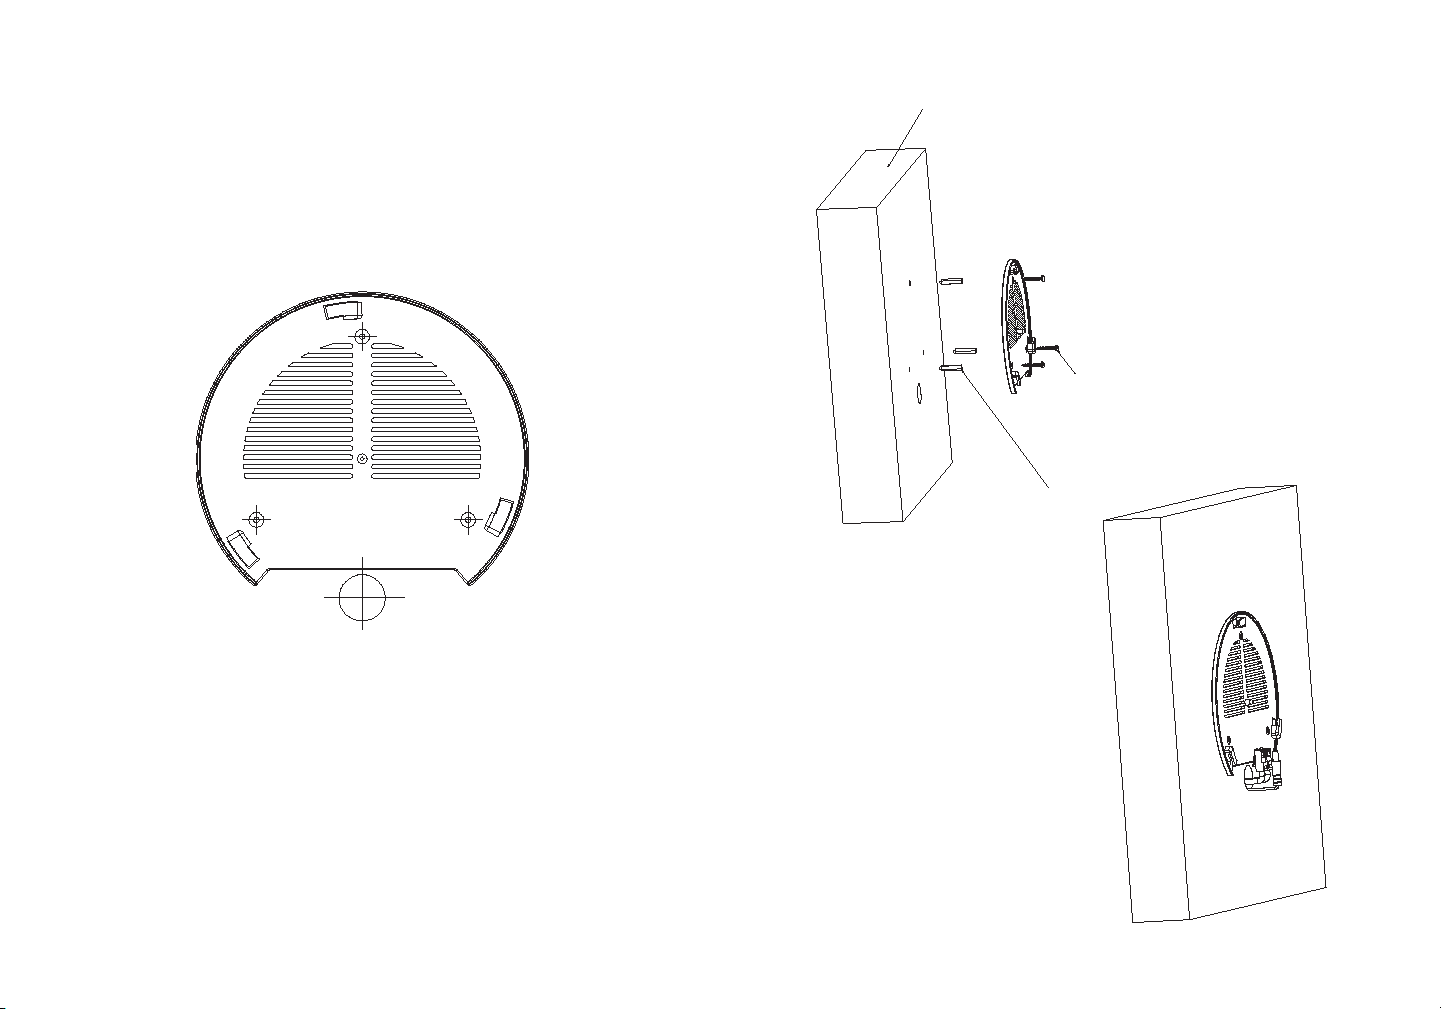
Wall Mount
1. Position the mounting bracket at the desired location on the wall with the arrow pointing
up.
2. Use a pencil to mark the four mounting holes (screw holes DIA 5.5mm, reticle hole DIA
25mm).
3. Insert screw anchors into the 5.5 mm holes. Attach the mounting bracket to the wall by
inserting the screws into the anchors.
3 4
Page 5

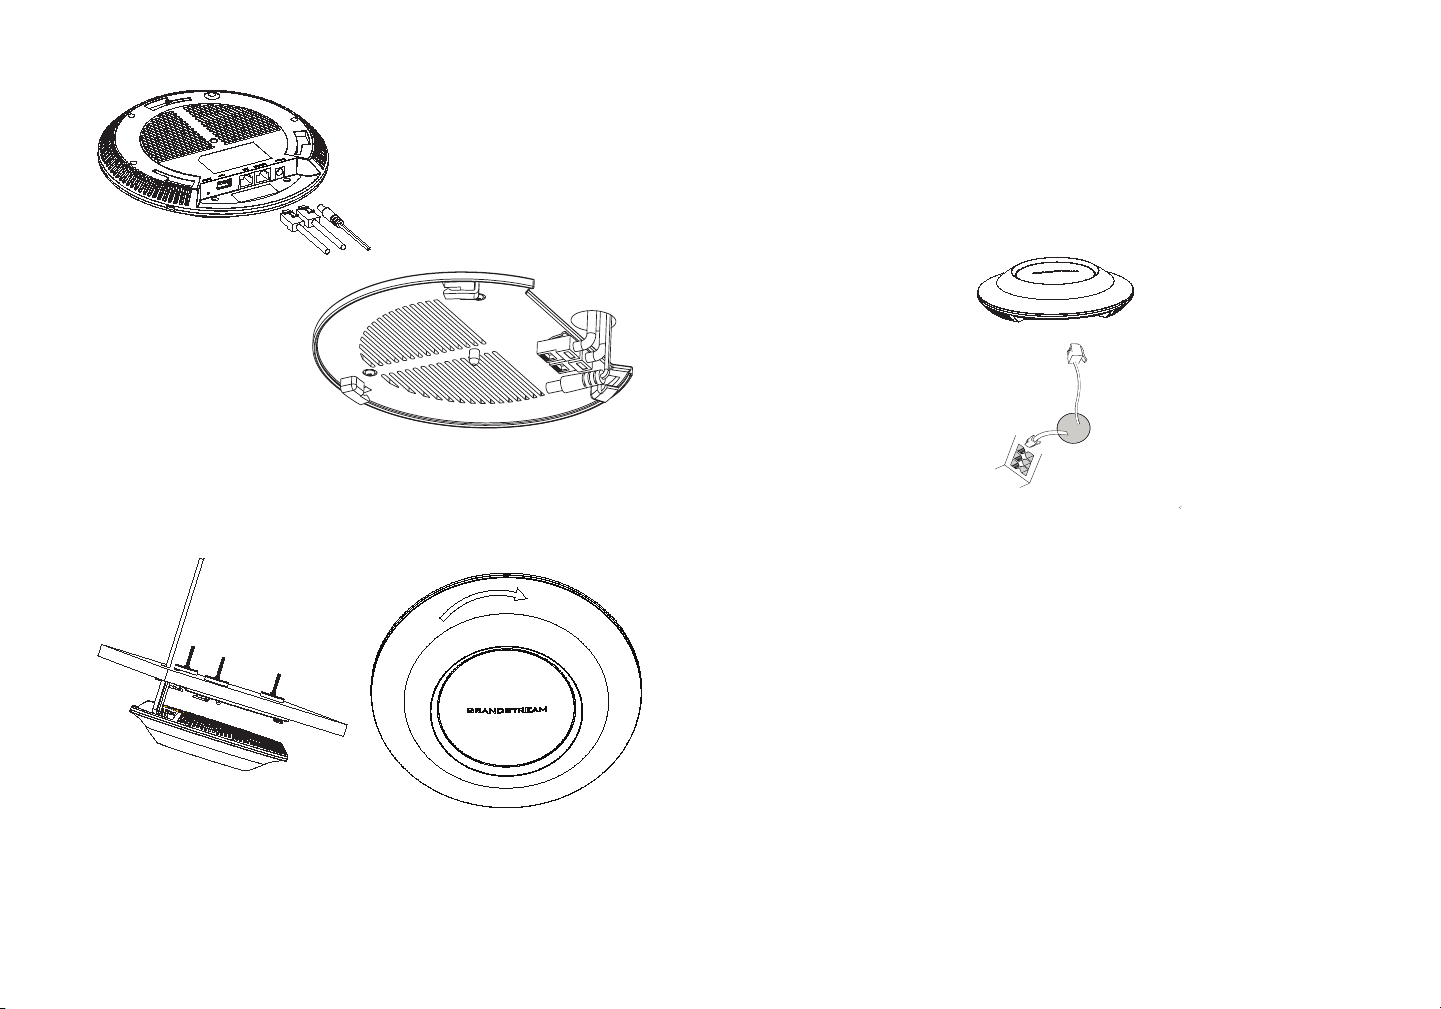
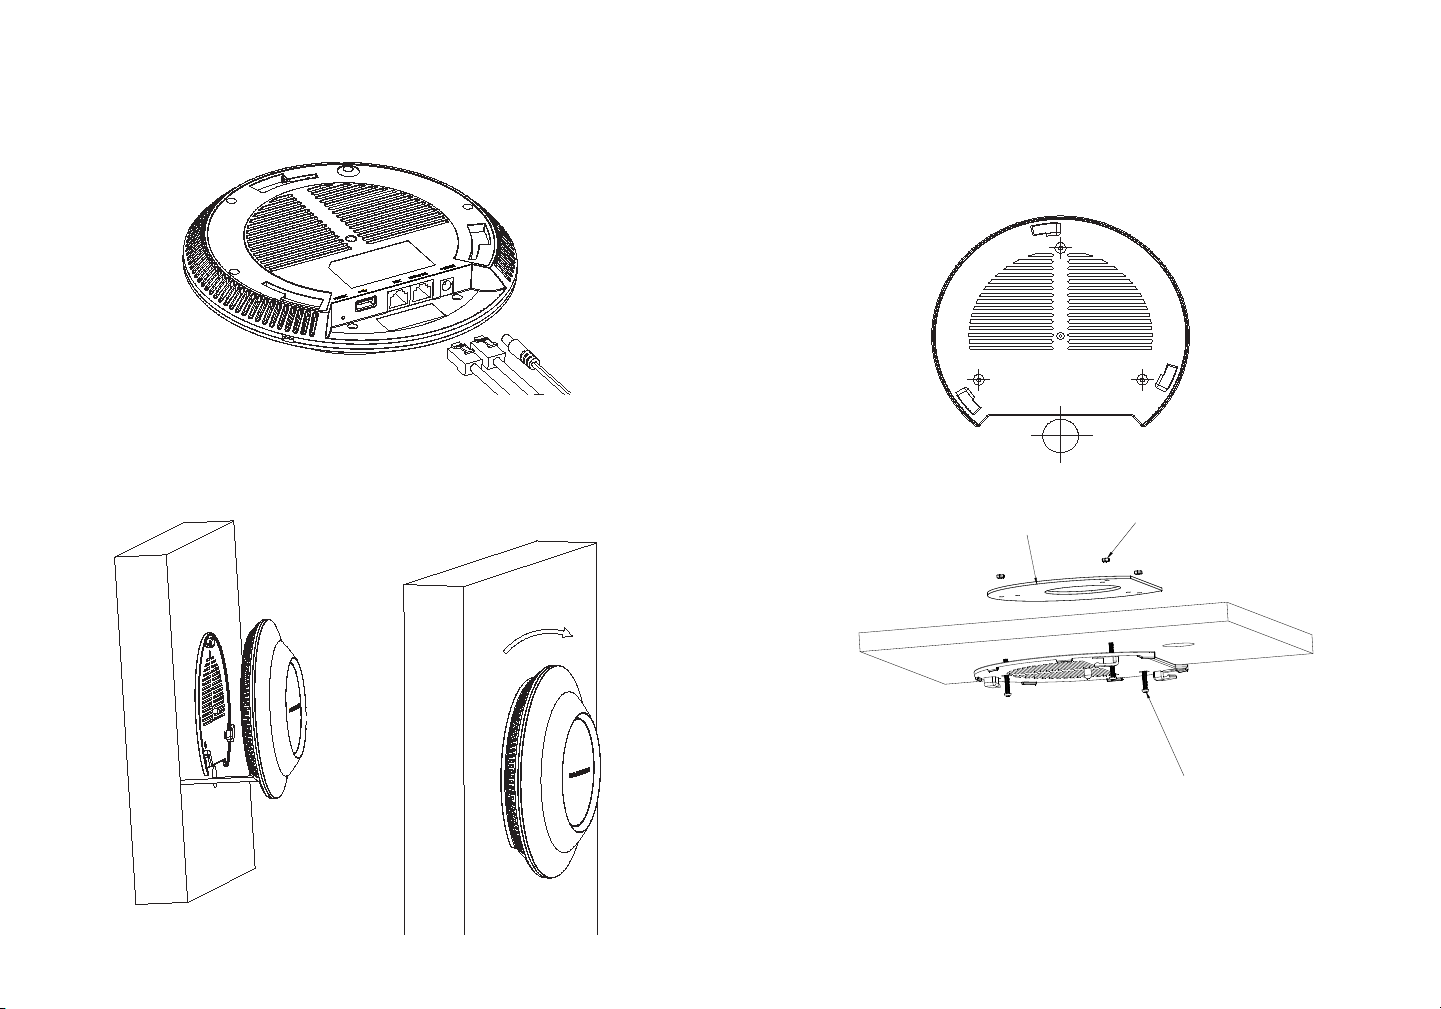
4. Connect the power cable and the ethernet cable (RJ45) to the correct ports of your
GWN7610.
5. Align the arrow on the GWN7610AP with the arrow on the locking tab of the mounting
bracket and ensure that your GWN is rmly seated on the mounting bracket.
6.Turn the GWN clockwise until it locks into place and ts the locking tab.
Ceiling Mount
1. Remove the ceiling tile.
2. Place the ceiling backing plate in the center of the ceiling tile and mark the mounting
screw holes (screw holes DIA 5.5mm, reticle hole DIA 25mm).
3. Insert the screws through the mounting bracket.
Ceiling Mounting
M3 nut
4. Connect the power cable and the Ethernet cable (RJ45) to the correct ports of your
GWN7610.
M3.0x50 screw
5
6
Page 6

RJ45 Ethernet Cable
to Power over Ethernet
(PoE) Switch
Network
Port
5. Align the arrow on the GWN7610AP with the arrow on the locking tab of the mounting
bracket and ensure that your GWN is rmly seated on the mounting bracket and connect
the network and power cables.
6.Turn the GWN clockwise until it locks into place and ts the locking tab.
POWERING AND CONNECTING THE GWN7610
GWN7610 can be powered on using PoE/PoE+ switch using following steps:
Step 1: Plug a RJ45 Ethernet cable into the network port of the GWN7610
Step 2: Plug the other end into the uplink port of the power over Ethernet (PoE) switch.
Note: Ceiling mounting is recommended for optimal coverage performance.
7
8
Page 7
CONNECT TO GWN7610 DEFAULT WIFI NETWORK
GWN7610 can be used as standalone access point out of box, or after factory reset with
Wi-Fi enabled by default.
After powering the GWN7610 and connecting it to the network, GWN7610 will broadcast
a default SSID based on its MAC address GWN[MAC’s last 6 digits] and a random
password.
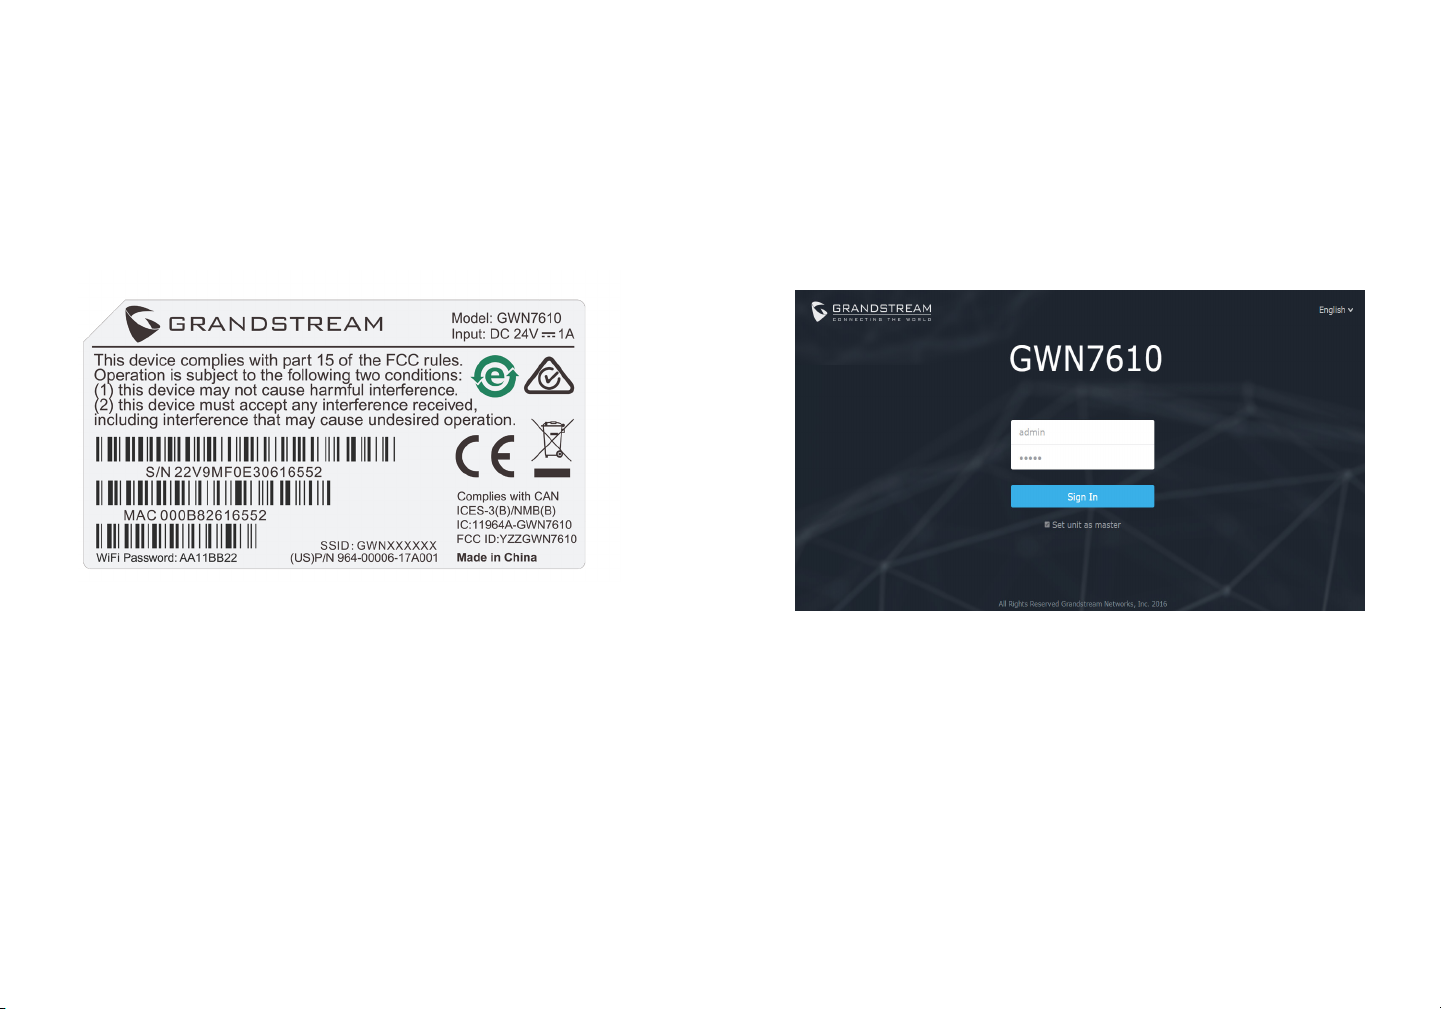
Note: GWN7610’s default SSID and password information are printed on the MAC tag of
the unit.
ACCESSING THE CONFIGURATION INTERFACE
A computer connected to the GWN7610’s SSID, or to the same network as the GWN7610
can discover and access its conguration interface using one of the below methods:
Method 1: Discover GWN7610 using its MAC Address.
1. Locate the MAC address on the MAC tag of the unit, which is on the underside of the
device, or on the package.
2. From a computer connected to same network as the GWN7610, type in the following
address using the GWN7610’s MAC address on your browser https://gwn_<mac>.local
Example: if a GWN7610 has the MAC address 00:0B:82:8B:4E:28, this unit can be accessed by typing https://gwn_000b828b4e28.local on the browser.
Method 2: Discover GWN7610 using GWNDiscoveryTool.
1. Download and install GWNDiscoveryTool from the following link:
http://www.grandstream.com/support/tools
2. Open the GWNDiscoveryTool, and click on Scan.
3. The tool will discover all GWN7610 Access Points connected on the network showing
their MAC and IP addresses.
4. Click on Manage Device to be redirected directly to the GWN7610’s conguration interface, or type in manually the displayed IP address on your browser.
Using one of the above methods, the login screen will appear. Type in “admin” in both
Username and Password elds and click on Sign In.
Notes :
- Make sure that the GWN7610 is not already paired with another GWN7610 Access
Point as slave, or GWN7000 Router Series, otherwise the conguration interface cannot
be accessed.
- If the GWN7610 is already paired, make sure to unpair it rst, or do a factory reset.
- For more information, please download the GWN7610 User Manual from:
http://www.grandstream.com/support
9 10
Page 8
ZH
概述
GWN7610是一款高性能,双频MIMO企业级无线热点。对于不同的商业需求,GWN7610
能够提供完全的WiFi覆盖,并降低用户对弱信号和连接掉线的投诉。GWN7610采用无控
制器的设计,消除了对额外的控制器的软件和硬件的需要。GWN系列无线热点由潮流网络
的高度可扩展网络系统管理。取决于部署范围的大小,GWN无线热点可以是自我管理,或
由GWN7000/GWN7000W企业路由器管理。
注意事项
• 不要尝试打开,拆解或修改设备。
• 不要将本设备暴露在温度0℃至50℃以外。
• 不要将本设备暴露在环境湿度如下范围以外:10-90%RH(无冷凝)。
• 系统启动或固件升级期间不要中断电源。这可能会损坏设备固件,并导致设备故障。
包装内容
GWN7610 端口
11
GWN7610 无线热点
1 x 快速安装手册
1 x GPL 声明
3 × M3螺帽
天花板安装支架
3 x 螺丝(PM 3×50)
安装支架
3 × 塑料膨胀螺栓
3 x 螺丝(PA 3.5×20)
端口 描述
POWER
NET/POE
NET
RESET
电源适配器(DC24V,1A)
注:不包含电源适配器。
以太网RJ45端口(10/100 /1000Mbps),需要支
持PoE 。
以太网RJ45端口(10/100 /1000Mbps),连接至
路由器或另一个GWN7610。
USB 2.0端口(用于未来的IOT或定位应用)
恢复出厂设置按钮。按7秒恢复出厂默认设置。
12
Page 9
硬件安装
⬨⭐
婉€
᧤3$᧥
⫠㠨吷协婉㪢
GWN7610可安装在墙壁或天花板上,请参阅下列步骤进行适当的安装。
壁挂式安装
1. 将安装支架放置在所需安装的位置并箭头朝上。
2. 用铅笔标出四个安装孔(螺丝孔直径5.5mm的十字线孔直径25mm)。
3. 将膨胀螺栓放入5.5毫米的孔。通过将螺丝拧入螺栓把安装支架固定在墙上。
13
14
Page 10

4. 将电源和以太网电缆(RJ45)连接到GWN7610正确的端口。
5. 将在GWN7610AP的箭头与安装支架的锁定选项卡上的箭头,并确保您的周报牢固就
位安装支架。
6. 将GWN7610顺时针旋转直至其锁定到位。
顶式安装
1. 拆下吊顶板。
2. 将吊顶板放在天花板的中央并标记安装螺丝孔(螺丝孔直径5.5mm的十字线孔直径25
毫米)。
3. 将螺钉放入安装托架。
4. 将电源线和以太网电缆(RJ45)连接到您的GWN7610正确的端口。
天花板安装支架 M3螺帽
15
16
Page 11
5-ⅴ⮹几䟄冕扭㘴Ⓙⅴ⮹几∪䟄
3R(᧥䤓ℳ㗱㧉
几♲
5.将在GWN7610AP的箭头与安装支架的锁定选项卡上的箭头对齐。确保您的GWN牢固地
安装在支架上并连接上了网络和电源线。
6. 将GWN7610顺时针旋转直至其锁定到位。
上电和连接GWN7610
GWN7610可以使用PoE或PoE +的通过以下步骤来供电:
第1步:将RJ45以太网电缆插入GWN7610的网络端口。
第2步:将RJ45以太网电缆的另一端插入有PoE供电的交换机口。
备注: 推荐将设备安装在天花板上以确保信号的最优覆盖性能。
17 18
Page 12
连接到GWN7610默认的无线网络
新的GWN7610会有默认的WiFi广播。 恢复出厂设置也能使默认WiFi启动。
将GWN7610上电起机并连接至网络,GWN7610会广播默认的SSID。该SSID是基于设备
的MAC地址后六位: GWN[MAC后六位],并且使用随机的密码。
注意:GWN7610的默认SSID和随机密码打印在设备的MAC地址贴纸上。
访问配置界面
将电脑连接到GWN7610广播的无线网,或GWN7610所在的局域网。就可以用以下的几种
方式来发现并访问GWN7610的配置页面:
方法1:用MAC地址来发现GWN7610。
1. 在设备的背面的贴纸上,或者设备的外包装盒上可以找到设备的MAC地址。
2. 在连接到GWN7610广播的无线网,或GWN7610所在的局域网的电脑上,用浏览器输入
网址:https://gwn_<mac>.local
比如:如果GWN7610的MAC地址为00:0B:82:8B:4E:28,那么则输入
https://gwn_000b828b4e28.local
方法2:用GWNDiscoveryTool发现GWN7610。
1. 从下面的连接下载GWNDiscoveryTool: http://www.grandstream.com/support/tools
2. 打开GWNDiscoveryTool,并点击Scan(扫描)。
3. 这个软件将帮助你发现局域网下所有的GWN7610并显示他们MAC地址和IP地址。
4. 点击Manage Device(管理设备)后,你将被引导到GWN7610的配置界面。或者也可以
通过在浏览器中输入所查找到GWN7610的IP地址。
使用上面所述的一种方法,你会看到一个登陆界面。在用户名和密码均输入默认的”admin”
,点击Sign in (登陆)。
备注:
- 确认GWN7610并没有被配对到另一个GWN7610或者GWN7000系列路由器,否则配置界
面将会是关闭的。
- 如果GWN7610已经被配对,请从它的配主那里接触配对,或者恢复该设备的出厂设置。
- 欲获取详细的话机使用信息,请在以下链接中下载GWN7610用户手册。
http://www.grandstream.com/support
19 20
Page 13
ES
RESUMEN
El GWN7610 es un punto de acceso inalámbrico empresarial de alto rendimiento, de doble
banda MIMO. El GWN7610 proporciona a las empresas de todos los tamaños con cobertura
WiFi expandida, reduciendo las quejas de usuarios acerca de la señal débil y conexiones
caídas. El GWN7610 adopta un diseño sin controlador, eliminando la necesidad de controladores adicionales de software y hardware. La serie GWN de puntos de acceso inalámbricos son alimentados por el sistema de gestión de red altamente escalable de Grandstream.
Dependiendo del tamaño de la instalación, los puntos de acceso inalámbricos GWN pueden
ser auto administrados, o gestionado por un router empresarial GWN7000/GWN7000W.
PRECAUCIONES
• No intente abrir, desarmar o modicar el dispositivo.
• No exponga este dispositivo a temperaturas fuera del rango de 0°C a 50°C.
• No exponga el GWN7610 a entornos fuera del siguiente rango de humedad: 10-90% RH
(sin condensación).
• No apague su GWN7610 durante el reinicio del sistema o actualización de Firmware.
Puede corromper la imagen del rmware y causar un mal funcionamiento de la unidad.
CONTENIDO DEL PAQUETE
Punto de Acceso GWN7610
1 x Guía de instalación Rápida
1 x Declaración GPL
3 x M3 NUT
Soporte para montaje
en techo
3 x Tornillos (PM 3x50)
Soporte de Montaje
3 x Pernos de
expansión de plástico
3 x Tornillos (PA 3.5X20)
PUERTOS GWN7610
Puerto Descripción
POWER Conector de adaptador de corriente (DC24V, 1A)
Nota: el adaptador de corriente no está previsto.
NET/POE Puerto Ethernet RJ45 (10/100/1000Mbps) con
soporte de PoE.
NET Puerto Ethernet RJ45 (10/100/1000Mbps) para su
router u otro GWN7610.
Puerto USB 2.0 (para futuros IOT y aplicaciones
basadas en ubicación).
RESET Botón de reinicio de fábrica. Presione por 7 se-
gundos para llevar a los ajustes de fábrica.
21
22
Page 14

INSTALACIÓN DE HARDWARE
Pared
Tornillos
(PA 3.5X20)
Pernos de expansión
de plástico
El GWN7610 puede ser montado en la pared o techo, por favor consulte los siguientes
pasos para la instalación apropiada.
Montura de Pared
1. Situe el soporte de montaje en la locación deseada sobre la pared con la echa
apuntando hacia arriba.
2. Use un lápiz para marcar los cuatro agujeros de montaje (agujeros de los tornillos DIA
5.5mm, agujero retícula DIA 25mm).
3. Inserte los anclajes de tornillo en los oricios de 5.5mm. Fije el soporte de montaje a la
pared mediante la inserción de los tornillos en los anclajes.
23
24
Page 15
4. Conecte el cable de alimentación y el cable ethernet (RJ45) a los puertos correspondientes de su GWN7610.
5. Alinee la echa sobre el GWN7610AP con la echa en la lengüeta de bloqueo del
soporte de montaje y asegúrese de que su GWN esté rmemente asentado en el
soporte de montaje.
6. Gire el GWN al sentido del reloj hasta que encaje en su lugar y se ajuste la lengüeta
de jación.
Montura de Techo
1. Retire la losa del techo.
2. Coloque la placa de soporte de techo en el centro de la placa de techo y marque
los oricios de los tornillos de montaje (oricios de los tornillos de 5.5mm DIA, retícula
diámetro del agujero 25mm).
3. Inserte los tornillos a través del soporte de montaje.
Soporte para montaje en techo M3 nut
4. Conecte el cable de alimentación y el cable ethernet (RJ45) a los puertos correspondientes de su GWN7610.
Tornillos (M3.0x50)
25
26
Page 16

Cable Ethernet RJ45
Puerto
de Red
5. Alinee la echa sobre el GWN7610AP con la echa en la lengüeta de bloqueo del
soporte de montaje y asegúrese de que su GWN esté rmemente asentado en el soporte
de montaje y conecte los cables de red y alimentación.
6. Gire el GWN al sentido del reloj hasta que encaje en su lugar y se ajuste la lengüeta
de jación.
ENCENDIENDO Y CONECTANDO EL GWN7610
El GWN puede ser alimentado usando un switch PoE/PoE+ por medio de los siguientes
pasos:
Paso 1: conecte un cable Ethernet RJ45 en el puerto de red del GWN7610.
Paso 2: conecte el otro extremo del cable en el puerto del switch (PoE).
Nota: Se recomienda un montaje en el techo para obtener un óptimo rendimiento de
cobertura.
27
28
Page 17

CONECTAR AL GWN7610 CON LA RED WIFI PREDETERMINADA
El GWN7610 puede ser usado como punto de acceso autónomo al sacarlo de caja, o
después del restablecimiento de fábrica con Wi-Fi activado por defecto.
Después de encender el GXWN7610 y establecer la conexión a la red, el GXW7610
emitirá un SSID predeterminado basado en su dirección MAC GWN[6 últimos dígitos
del MAC] y una contraseña aleatoria.
Nota: La información del SSID y contraseña por defecto del GWN7610 están impresas
en la etiqueta MAC de la unidad.
ACESSO A LA INTERFAZ DE CONFIGURACIÓN
Un ordenador conectado al SSID del GWN7610, o en la misma red que el GWN7610
puede descubrir y acceder a su interfaz de conguración usando uno de los siguientes
métodos:
Método 1: Descubrir GWN7610 utilizando su dirección MAC.
1. Localice la dirección MAC del equipo que esta en la etiqueta de la unidad, ubicada en
la parte posterior del equipo o en la caja.
2. Desde un ordenador conectado a la misma red del GWN7610, escriba la siguiente
dirección utilizando la dirección MAC del GWN7610 en su navegador https://gwn_
<MAC>.local.
Ejemplo: De un GWN7610 que tenga la dirección MAC 00: 0B: 82: 8B: 4E: 28, esta
unidad se puede acceder escribiendo en el navegador https://gwn_000b828b4e28.local
en el navegador.
29 30
Método 2: Descubrir el GWN7610 utilizando la herramienta GWNDiscoveryTool.
1. Descargar e instalar el GWNDiscoveryTool desde el siguiente enlace:
http://www.grandstream.com/support/tools
2. Abrir la herramienta GWNDiscoveryTool, y haga clic en Escanear.
3. La herramienta descubrirá todos los Puntos de Acceso GWN7610 conectados a la red
mostrando sus direcciones MAC´s e IP´s.
4. Haga clic en Administrar dispositivos para que sea redirigido directamente a la
interfaz de conguración de la GWN7610, o escriba manualmente la dirección IP que se
muestra en su navegador.
Usando uno de los métodos anteriores, aparecerá la pantalla de inicio de sesión. Usar
por default “admin” en los campos Nombre de usuario y contraseña y hacer clic en
Iniciar sesión.
Nota :
- Asegúrese que el GWN7610 no esté vinculado con otro punto de acceso GWN7610
como esclavo, o algún router de la serie GWN7000, de lo contrario no podrá ingresar a la
interfaz de conguración.
- Si el GWN7610 ya está enlazado, asegúrese de eliminar el enlace en primer lugar, o
realizar un restablecimiento de fábrica.
- Para obtener el manual de usuario, favor haga click aquí:
http://www.grandstream.com/support
Page 18

FR
PRESENTATION
Le GWN7610 est un point d’accès sans l à haute performance pour entreprises
, avec double bande simultanée MIMO. Le GWN7610 fournit aux entreprises de
toutes tailles une couverture WiFi étendue, réduisant ainsi les problèmes concernant la faiblesse du signal et connexions interrompues. Le GWN7610 adopte une
conception sans contrôleur, éliminant ainsi la nécessité d’un logiciel ou matériel de
contrôle supplémentaire. La série GWN des points d’accès sans l sont alimentés
par le système de gestion de réseau hautement évolutif de Grandstream. En fonction de la taille de l’installation, les points d’accès sans l GWN peuvent être automatiquement gérés, ou gérés par un routeur d’entreprise GWN7000/GWN7000W.
PRECAUTIONS
• Ne pas tenter d’ouvrir, de désassembler, ou de modier le dispositif.
• Ne pas exposer cet appareil à des températures hors de la plage de 0 °C à 50 °C.
• Ne pas exposer cet appareil à un environnement avec humidité hors de la plage de 10-
90% RH (sans condensation).
• Ne pas éteindre le GWN7610 pendant le démarrage du système ou la mise à jour du
rmware. Cela risque de rompre l’image du rmware et en conséquence rendre l’unité
inutilisable.
CONTENU DU PACK
Point d’Accès GWN7610
1 x Guide d’installation rapide
1 x Licence GPL
3 x Ecrou M3
Support de montage
mural
3 x Vis (PM 3 x 50)
Support de montage
3 x Boulon expansion
en plastique
3 x Vis (PA 3.5 x 20 )
PORTS DU GWN7610
Port Description
POWER Connecteur Adaptateur Secteur (DC24V, 1A)
Note: L’adapteur secteur n’est pas fourni dans le
pack.
NET/POE Port Ethernet RJ45 (10/100/1000Mbps) support-
ant PoE.
NET Port Ethernet RJ45 (10/100/1000Mbps) connecter
à votre router ou à un autre GWN7610.
Port USB 2.0 (Pour interopérabilité & applications
basées sur localisation ultérieurement )
RESET Bouton de réinitialisation. Appuyez pendant 7 sec-
ondes pour réinitialiser les paramètres d'usine.
31
32
Page 19

INSTALLATION MATERIEL
Mur
Vis
PA3.5 x 20
Boulon Expansion
en plastique
GWN7610 peut être monté sur le mur ou le plafond. Veuillez se référer aux étapes suivantes pour l’installation appropriée.
Montage Mural
1. Placer le support de montage à l’endroit désiré sur le mur avec la èche pointant vers
le haut.
2. Utiliser un crayon pour marquer les quatre trous de montage (trous de vis DIA 5.5mm,
trou de réticule DIA 25mm).
3. Insérer les vis d’ancrages dans les trous 5.5 mm. Fixez le support de montage au mur
en insérant les vis dans les ancres.
33
34
Page 20

4. Brancher le câble d’alimentation et le câble Ethernet (RJ45) aux ports appropriés de
votre GWN7610.
5. Aligner la èche sur le GWN7610 avec la èche sur la languette de verrouillage du
support de montage et veiller à ce que votre GWN est bien en place sur le support de
montage.
6. Pivoter le GWN dans le sens horaire jusqu’à ce qu’il se verrouille en place et correspond à la languette de verrouillage.
Montage au Plafond
1. Retirer la dalle de plafond.
2. Placer la plaque du support de plafond dans le centre de la dalle de plafond et marquer les trous des vis de montage (les trous de vis DIA 5.5mm, trou réticule DIA 25mm).
3. Insérer les vis dans le support de montage.
4. Brancher le câble d’alimentation et le câble Ethernet (RJ45) aux ports appropriés de
votre GWN7610.
Support de montage mural Ecrou M3
Vis M3.0x50
35
36
Page 21

Câble Ethernet RJ45
au Switch PoE
Port Réseau
5. Aligner la èche sur le GWN7610 avec la èche sur la languette de verrouillage du
support de montage et veiller à ce que votre GWN est bien en place sur le support de
montage et de connecter les câbles réseau et d’alimentation.
6. Pivoter le GWN dans le sens horaire jusqu’à ce qu’il se verrouille en place et correspond à la languette de verrouillage.
ALIMENTATION ET RACCORDEMENT DU GWN7610
GWN7610 peut être alimenté avec un switch PoE/PoE+ en suivant les étapes ci-dessous.
Etape 1: Brancher un câble Ethernet RJ45 au port réseau du GWN7610.
Etape 2: Brancher l’autre extrémité au port Uplink du Switch PoE
Note: Montage au plafond est recommandé pour une couverture optimale.
37
38
Page 22

CONNEXION AU RESEAU WIFI PAR DEFAUT DU
GWN7610
Le GWN7610 peut être utilisé comme point d’accès autonome avec Wi-Fi activé par
défaut lors de la première utilisation, ou après réinitialisation aux paramètres d’usine.
Après la mise sous tension du GWN7610 et connexion au réseau, le GWN7610 diffusera
un SSID par défaut en fonction de son adresse MAC GWN[6 derniers chiffres du MAC]
et un mot de passe aléatoire.
Note: Le SSID et mot de passe par défaut du GWN7610 sont imprimés sur l’étiquette
MAC de l’unité.
ACCEDER A L’INTERFACE DE CONFIGURATION
Un ordinateur connecté au SSID du GWN7610, ou au même réseau que le GWN7610
peut découvrir et accéder à son interface de conguration en utilisant une des méthodes
suivantes:
Méthode 1: Détecter le GWN7610 en utilisant son adresse MAC.
1. Localisez l’adresse MAC sur l’étiquette MAC de l’unité située à la face arrière de
l’unité, ou sur l’emballage.
2. A partir d’un ordinateur connecté au même réseau que le GWN7610, tapez
l’adresse suivante en utilisant l’adresse MAC du GWN7610 sur votre navigateur:
https://gwn_<mac>.local
Exemple: Un GWN7610 avec l’adresse MAC 00:0B:82:8B:4E:28 peut être accessible à
partir d’un navigateur web en utilisant l’URL: https://gwn_000b828b4e28.local
39 40
Méthode 2: Détecter le GWN7610 en utilisant GWNDiscoveryTool.
1. Téléchargez et installez GWNDiscoveryTool à partir du lien suivant:
http://www.grandstream.com/support/tools
2. Ouvrez le GWNDiscoveryTool, et cliquez sur Scan.
3. L’outil permettra de découvrir tous les points d’accès GWN7610 connectés sur le réseau
montrant leurs adresses MAC et IP.
4. Cliquez sur Manage Device pour être redirigé directement à l’interface de conguration
du GWN7610, ou saisir manuellement sur votre navigateur l’adresse IP afchée.
En utilisant l’une des méthodes ci-dessus, l’écran de connexion apparaîtra. Tapez “admin” dans les deux champs Nom d’utilisateur et Mot de passe et cliquez sur Sign In.
Notes :
- Assurez-vous que le GWN7610 n’est pas déjà associé à une autre GWN7610 Access
Point en tant qu’esclave, ou GWN7000 Router Series, sinon l’interface de conguration
ne sera pas accessible.
- Si le GWN7610 est déjà associé, assurez-vous de le dissocier ou de faire une réinitialisation aux paramètres d’usine.
- Pour plus de détails, veuillez consulter le manuel d’utilisation sur:
http://www.grandstream.com/support
Page 23

DE
ÜBERSICHT
Der GWN7610 ist ein hochperformanter, simultan-Dual-Band MIMO Wireless-Access-
Point für höchste Anforderungen. Der GWN7610 bietet hervorragende WLAN (WiFi)
Abdeckung für sehr viel Einsatz-Szenarien und reduziert signikant Verbindungsabbrüche und ungenügende Signalqualität. Durch das innovative technische Design
des GWN7610 wird kein separater Soft- oder Hardware-Controller benötigt. Die GWN
Access-Points werden über das hoch skalierbare Grandstream-Network-Management
System verwaltet. Je nach Netzwerkgröße können die GWN-Access-Points über die Self-Man-
agement Funktion, oder einen GWN7000/GWN7000W Enterprise-Router verwaltet werden.
SICHERHEITSHINWEISE
• Das Produkt darf nicht geöffnet, zerlegt oder verändert werden.
• Das Produkt darf nur innerhalb einer Umgebungs-Temperatur von 0°C bis 50°C genutzt
werden.
• Das Produkt darf nur in Umgebungen mit einem relativen Luftfeuchtebereichs von10%
bis 90% (nicht kondensierend) genutzt werden.
• Die Stromversorgung darf während des Start- bzw. Upgradevorgangs nicht unterbrochen werden. Dies kann die Firmware beschädigen und zu unerwünschten Fehlfunktionen führen.
VERPACKUNGSINHALT
GWN7610 Access Point
1 x Kurzinstallationsanleitung
1 x GPL Erklärung
3 x M3 Muttern
Halterung für die Deckenmontage
3 x Schraube M3 x 50
Montagewinkel
3 x Abstandstüllen
3 x Schraube 3,5 x 20
GWN7610 ANSCHLÜSSE
Port Beschreibung
POWER Anschluss für das Netzteil (Wechselstrom 24V/1A)
Hinweis: Netzteil nicht enthalten.
NET/POE RJ45 Ethernet-Anschluß (10/100/1000MBit/s) mit
PoE Unterstützung.
NET RJ45 Ethernet-Anschluß (10/100/1000MBit/s) zum
Router oder einem weiteren GWN7610.
USB 2.0 Port (für zukünftige Anwendungen sowie
Standort-basierende Applikationen).
RESET Reset-Taste. Drücken Sie die Taste min. 7
Sekunden, um das Produkt auf Werkseinstellung
zurückzusetzen.
41 42
Page 24

HARDWARE-INSTALLATION
Wand
Schraube
3,5 x 20
Abstandstüllen
Der GWN7610 kann sowohl an der Wand, als auch an der Decke montiert werden. Beide
Varianten sind nachfolgend beschrieben.
Wandmontage
1. Positionieren der Halterung an der gewünschten Stelle mit dem Richtungspfeil nach
oben.
2. Markieren der Montagelöcher mit einem Stift. (Lochdurchmesser 5,5mm, Lochkreisradius 25mm).
3. Stecken Sie die Montagedübel in die gebohrten 5,5mm Löcher. Halten Sie die Halterung über die Montagelöcher, stecken Sie die Schrauben in die Dübel und ziehen Sie
diese fest.
43 44
Page 25

4. Stecken Sie das Strom- und Ethernetkabel (RJ45) in die jeweils richtige Buchse des
GWN7610
5. Zur Montage des GWN7610AP muss der Richtungspfeil am Access-Point mit dem
Richtungspfeil an der montierten Halterung übereinstimmen, die Geräte passen nur so
korrekt zusammen.
6. Drehen Sie nun den GWN Access-Point im Uhrzeigersinn bis dieser fest in der
Halterung sitzt.
Deckenmontage
1. Nehmen Sie die Deckenplatte heraus.
2. Platzieren Sie den Access-Point in der Plattenmitte und markieren Sie die Montagelöcher mit einem Stift. (Lochdurchmesser 5,5mm, Lochkreisradius 25mm).
3. Befestigen Sie die Halterung mit den beiliegenden Schrauben.
Halterung für die Deckenmontage M3 Muttern
4. Stecken Sie das Strom- und Ethernetkabel (RJ45) in die jeweils richtige Buchse des
GWN7610.
Schraube M3 x 50
45
46
Page 26

RJ45 Ethernetkabel
Netzwerk
Port
5. Zur Montage des GWN7610AP muss der Richtungspfeil am Access-Point mit dem
Richtungspfeil an der montierten Halterung übereinstimmen, die Geräte passen nur so
korrekt zusammen.
6. Drehen Sie nun den GWN Access-Point im Uhrzeigersinn bis dieser fest in der Halterung sitzt.
STROMVERSORGUNG UND ANSCHLUß DES GWN7610
Der GWN7610 kann wie nachfolgend beschrieben über PoE/PoE+ mit Strom versorgt
werden:
1. Stecken Sie das RJ45 Ethernetkabel in den Netzwerk-Port am GWN7610.
2. Stecken Sie das andere Ende des Netzwerkkabels in den passenden Port am PoE
Switch.
Bemerkung: Wir empfehlen das Produkt an der Decke zu montieren, um eine optimale
Leistung und Ausleuchtung zu erzielen.
47
48
Page 27

VERBINDEN SIE SICH MIT DEM VOREINGESTELLTEN
WIFI-NETZWERK DES GWN7610
Der GWN7610 kann als “Stand-alone” Access-Point direkt verwendet werden - oder nach
einem Reset auf Werkseinstellungen - WiFi ist in der Grundeinstellung immer aktiviert.
Sobald der GWN7610 mit Strom versorgt und an das Netzwerk angeschlossen ist, sendet
der Access-Point eine voreingestellte SSID, diese basiert auf der MAC Adresse des
Gerätes (die letzten sechs Ziffern/Buchstaben der MAC Adresse) sowie einem Zufallspasswort.
HINWEIS: Die SSID und Passwortinformationen benden sich auf dem MAC-Adressen
Aufkleber auf der Rückseite des Gerätes.
ZUGANG ZUR KONFIGURATIONSSCHNITTSTELLE
Sobald ein Computer zur SSID des GWN7610 oder im selben Netzwerk angeschlossen
ist, kann nach ihm gesucht werden um so zur Kongurationsschnittstelle zu gelangen.:
Methode 1: Suche nach dem GWN7610 via MAC Adresse.
1. Die MAC-Adresse des Gerätes bendet sich entweder auch dem Aufkleber auf der
Unterseite des Gerätes, oder auf dem Aufkleber an der Verpackung.
2. Nutzen Sie einen Computer im selben Netzwerk wie der GWN7610 geben Sie die
MAC Adresse in den Internetbrowser ein, nutzen Sie bitte nur dieses Format:
https://gwn_<mac>.local
Beispiel: Lautet die MAC Adresse des GWN7610 z.B. 00:0B:82:8B:4E:28 dann tippen
Sie diese bitte wie folgt in die Adresszeile des Browsers:
https://gwn_000b828b4e28.local
Methode 2: Suche nach dem GWN7610 via GWNDiscoveryTool.
1. Laden Sie das GWNDiscoveryTool von der Grandstream Support-Website:
http://www.grandstream.com/support/tools
2. Öffnen Sie das GWNDiscoveryTool und klicken Sie auf Scan.
3. Das Tool (Werkzeug) wird alle im Netz installierten GWN7610 Access-Points nden und
deren MAC Adresse sowie die jeweilige IP Adresse anzeigen.
4. Klicken Sie auf Manage Device (Gerät verwalten) um direkt auf die Kongurationsseite des GWN7610 zu gelangen oder tippen Sie einfach die angezeigte IP Adresse in die
Adresszeile des Browsers.
Bei beiden Methoden wird anschließend der Log-In Screen (Anmeldefenster) erscheinen.
Tippen Sie admin jeweils in das Feld für Username (Benutzername) sowie Password
(Passwort) und klicken anschließend auf Sign In (Anmelden).
Bemerkung :
- Stellen Sie sicher, dass der GWN7610 nicht schon einem anderen GMN7610 oder
einem GWN7000 Router zugeordnet (Paired) ist, da sich ansonsten das Kongurationsfenster nicht öffnen lässt.
- Ist der GWN7610 bereits zugeordnet, lösen Sie diese Zuordnung oder setzen Sie den
Access Point auf Werkseinstellungen zurück.
- Das ausführliche Benutzerhandbuch kann geladen werden von:
http://www.grandstream.com/support
49 50
Page 28

IT
PANORAMICA
GWN7610 è un punto di accesso wireless aziendale MIMO a due bande simultanee
ad alte prestazioni. GWN7610 fornisce imprese di tutte le dimensioni copertura WiFi
estesa, riducendo i reclami degli utenti in merito a segnale debole e perdita di connessione. GWN7610 adotta un design senza centralina, eliminando la necessità di hardware e software extra per la centralina. I punti di accesso wireless della serie GWN
sono caratterizzati da un sistema di gestione della rete altamente scalabile di Grandstream. A seconda delle dimensioni dell’impianto, i punti di accesso wireless GWN
possono essere autogestiti, o gestiti da un router aziendale GWN7000/GWN7000W.
PRECAUZIONI
• Non tentare di aprire, smontare o modicare il dispositivo.
• Non esporre questo dispositivo a temperature fuori dall’intervallo 0 °C-50 °C.
• Non esporre GWN7610 ad ambienti fuori dal seguente intervallo di umidità: 10-90% UR
(senza condensa).
• Non spegnere/accendere il GWN7610 durante l’avvio del sistema o l’aggiornamento
del rmware. Ciò potrebbe comportare il danneggiamento del rmware e il malfunzionamento dell’unità.
CONTENUTO DELLA CONFEZIONE
Punto di accesso GWN7610
1 x Guida installazione rapida
1 x Licenza GPL
3 x Dadi 3M
Staffa per montaggio a softto
3 x Viti (PM 3 x 50)
Staffe di montaggio
3 x Perni di espansione di plastica
3 x Viti (PA 3,5 x 20 )
PORTE GWN7610
Porta Descrizione
POWER Connettore alimentatore (CC24V, 1A)
Nota: Alimentatore non fornito.
NET/POE Porta Ethernet RJ45 (10/100/1000Mbps) che
supporta PoE.
NET Porta Ethernet RJ45 (10/100/1000Mbps) al proprio
router o altro GWN7610.
Porta USB 2.0 (per applicazioni basate su IOT e
località)
RESET Pulsante ripristino di fabbrica. Premere per 7
secondi per ripristinare le impostazioni predenite
di fabbrica.
51
52
Page 29

INSTALLAZIONE HARDWARE
Parete
Viti
(PA 3,5 x 20)
Perni di espansione
di plastica
GWN7610 può essere montato a parete o softto. Fare riferimento ai passi seguenti per
la corretta installazione.
Supporto montaggio a parete
1. Posizionare la staffa di montaggio nella posizione desiderata sulla parete con la freccia
rivolta verso l’alto.
2. Usare una matita per contrassegnare i quattro fori di montaggio (fori vite DIA 5,5 mm,
foro reticolo DIA 25 mm).
3. Inserire gli ancoraggi delle viti nel foro da 5,5 mm. Fissare la staffa di montaggio alla
parete inserendo le viti negli ancoraggi.
53
54
Page 30

4. Collegare il cavo di alimentazione e il cavo Ethernet (RJ45) alle porte corrette del
proprio GWN7610.
5. Allineare la freccia sul GWN7610AP con la freccia sulla linguetta di bloccaggio della
staffa di montaggio e assicurare che il proprio GWN sia posto in modo saldo sulle staffe
di montaggio.
6. Ruotare il GWN in senso orario no a quando si blocca in posizione e si adatta alla
linguetta di bloccaggio.
Montaggio a softto
1. Rimuovere la piastrella del softto.
2. Porre la piastra posteriore per il softto al centro della piastrella del softto e con-
trassegnare i fori delle viti di montaggio (fori vite DIA 5,5 mm, foro reticolo DIA 25 mm).
3. Inserire le viti attraverso la piastra di montaggio.
Staffa per montaggio a softto Dadi 3M
Viti (PM 3x50)
4. Collegare il cavo di alimentazione e il cavo Ethernet (RJ45) alle porte corrette del
proprio GWN7610.
55 56
Page 31

Cavo Ethernet RJ45 a
interruttore Alimentazione
su Ethernet (PoE)
Porta
di rete
5. Allineare la freccia sul GWN7610AP con la freccia sulla linguetta di bloccaggio della
staffa di montaggio e assicurare che il proprio GWN sia posto in modo saldo sulle staffe
di montaggio e collegare i cavi di rete e di alimentazione.
6. Ruotare il GWN in senso orario no a quando si blocca in posizione e si adatta alla
linguetta di bloccaggio.
ACCENSIONE E COLLEGAMENTO DEL GWN7610
GWN7610 possono essere alimentati usando l’interruttore PoE/PoE+ mediante i passi
seguenti:
Passo 1: Collegare il cavo Ethernet RJ45 alla porta di rete del GWN 7610.
Passo 2: Collegare l’altra estremità nella porta uplink dell’interruttore power over Ether-
net (PoE).
Nota: Montaggio a softto è raccomandato per prestazioni di copertura ottimali.
57 58
Page 32

COLLEGAMENTO DEL GWN7610 ALLA RETE WIFI PREDEFINITA
GWN7610 può essere usato come punto di accesso indipendente o dopo il ripristino alle
impostazioni di fabbrica con Wi-Fi abilitato come predenito.
Dopo l’accensione del GWN7610 e il collegamento alla rete, GWN7610 trasmetterà un
SSID predenito basato sul suo indirizzo MAC GWN[ultime 6 cifre del MAC] e una
password casuale.
Nota: Le informazioni password e SSID predenito di GWN7610 sono stampate
sull’etichetta MAC dell’unità.
ACCESSO ALL’INTERFACCIA DI CONFIGURAZIONE
Un computer collegato all’SSID del GWN7610 o alla stessa rete del GWN7610 può
scoprire e accedere all’interfaccia di congurazione usando uno dei seguenti metodi:
Metodo 1: Scoprire GWN7610 usando il suo indirizzo MAC.
1. Individuare il mac address sull’etichetta posizionata nella parte bassa dell’apparato o
sulla confezione.
2. Da un computer collegato alla stessa rete del GWN7610, digitare il seguente indirizzo
usando l’indirizzo MAC del GWN7610 sul proprio browser https://gwn_<mac>.local
Esempio: se un GWN7610 ha come indirizzo MAC 00:0B:82:8B:4E:28, è possibile accedere a questa unità digitando https://gwn_000b828b4e28.local sul browser.
Metodo 2: Scoprire GWN7610 usando GWNDiscoveryTool.
1. Scaricare e installare GWNDiscoveryTool dal link seguente:
http://www.grandstream.com/support/tools
2. Aprire il GWNDiscoveryTool e fare clic su Scan.
3. Il tool scoprirà tutti i Punti di accesso GWN7610 collegati alla rete mostrando i loro
indirizzi MAC e IP.
4. Fare clic su on Gestisci dispositivo per essere reindirizzati direttamente all’interfaccia
di congurazione GWN7610 o digitare manualmente l’indirizzo IP visualizzato sul proprio
browser.
Utilizzando uno dei metodi precedenti, appare la schermata di accesso. Digitare “admin”
in entrambe i campi Nome utente e Password e fare clic su Accedi.
Nota :
- Assicurarsi che il GWN7610 non sia già accoppiato con un altro Punto di accesso
GWN7610 come slave, o serie router GWN7000, altrimenti non è possibile accedere
all’interfaccia di congurazione.
- Se il GWN7610 è già accoppiato, scollegarlo prima o effettuare un ripristino alle im-
postazioni di fabbrica.
- Scaricare il manuale utente dettagliato da:
http://www.grandstream.com/support
59 60
Page 33

PL
INFORMACJE OGÓLNE
GWN7610 to zaawansowany, bezprzewodowy punkt dostępu dla przedsiębiorstw
oferujący możliwość jednoczesnej pracy w dwóch zakresach MIMO. Urządzenie
GWN7610 zapewnia rmom różnej wielkości poszerzony zasięg WiFi, co przekłada się
na mniejszą liczbę skarg ze strony użytkowników dotyczących słabego sygnału i przerwanych połączeń. Urządzenie GWN7610 nie wymaga stosowania zycznych kontrolerów, a co za tym idzie dodatkowego obsługującego ich oprogramowania i sprzętu
komputerowego. Bezprzewodowe punkty dostępu z serii GWN są obsługiwane przez
wysoce skalowalny system zarządzania siecią rmy Grandstream. W zależności od rozmiaru instalacji bezprzewodowe punkty dostępu GWN mogą funkcjonować samodzielnie, lub mogą być zarządzane przez ruter GWN7000/GWN7000W dla przedsiębiorstw.
ŚRODKI OSTROŻNOŚCI
• Nie próbować otwierać, demontować lub modykować urządzenia.
• Nie narażać urządzenia na działanie temperatur spoza zakresu od 0°C do 50°C.
• Nie narażać urządzenia GWN7610 na oddziaływanie warunków spoza zakresu
wilgotności względnej 10–90% (bez kondensacji).
• Nie wyłączać urządzenia GWN7610 podczas rozruchu systemu lub aktualizacji oprogramowania sprzętowego. W przeciwnym razie może dojść do uszkodzenia obrazów
oprogramowania sprzętowego.
ZAWARTOŚĆ ZESTAWU
Punkt dostępu GWN7610
1 x podręcznik szybkiej instalacji
1 x oświadczenie o licencji GPL
3 x NAKRĘTKA M3
Wspornik do montażu sutowego
3 x śruba (PM 3 x 50)
Mocowanie
3 x śruba rozporowa
z tworzyw sztucznych
3 x śruba (PA 3,5 x 20)
PORTY URZĄDZENIA GWN7610
Port Opis
POWER Gniazdo zasilacza (prąd stały, 24 V, 1 A)
Uwaga! Zasilacz nie jest załączony.
NET/POE Port Ethernet RJ45 (10/100/1000 Mb/s)
obsługujący zasilanie PoE.
NET Port Ethernet RJ45 (10/100/1000 Mb/s) do rutera
lub innego urządzenia GWN7610.
Port USB 2.0 (do zastosowania w przyszłości
z Internetem rzeczy i usługami bazującymi na
lokalizacji).
RESET Przycisk przywracania ustawień fabrycznych.
Przytrzymać przez 7 sekund, aby przywrócić
domyślne ustawienia fabryczne.
61
62
Page 34

INSTALACJA SPRZĘTU
Ściana
śruba
(PA 3,5 x 20)
śruba rozporowa
z tworzyw sztucznych
Punkt dostępu GWN7610 można zamontować na ścianie lub sucie. Poniżej znajdują się
informacje na temat poprawnej instalacji.
Montaż na ścianie
1. Umieścić wspornik montażowy w odpowiednim miejscu na ścianie. Strzałka musi być
skierowana w górę.
2. Ołówkiem zaznaczyć cztery otwory mocujące (otwory na śruby o średnicy 5,5 mm,
otwór oznaczony krzyżykiem o średnicy 25 mm).
3. Umieścić kołki rozporowe w otworach 5,5 mm. Zamocować wspornik montażowy do
ściany, wkładając śruby w kołki rozporowe.
63
64
Page 35

4. Podłączyć kabel zasilania i kabel Ethernet (RJ45) do właściwych portów w urządzeniu
GWN7610.
5. Wyrównać strzałkę na punkcie dostępu GWN7610AP ze strzałką na elemencie
blokującym wspornika montażowego i upewnić się, że urządzenie jest mocno osadzone
na wsporniku.
6. Przekręcić urządzenie GWN w prawo do momentu zablokowania w miejscu i wyrównania z elementem blokującym.
Montaż na sucie
1. Zdjąć płytę sutową.
2. Umieścić płytę mocującą do sutu na środku płyty sutowej i zaznaczyć otwory na
śruby (otwory na śruby o średnicy 5,5 mm, otwór oznaczony krzyżykiem o średnicy
25 mm).
3. Przełożyć śruby przez wspornik montażowy.
Wspornik do montażu sutowego NAKRĘTKA M3
4. Podłączyć kabel zasilania i kabel Ethernet (RJ45) do właściwych portów w urządzeniu
GWN7610.
śruba (PM 3 x 50)
65 66
Page 36

Kabel RJ45 Ethernet
do przełącznika PoE
Port
sieciowy
5. Wyrównać strzałkę na punkcie dostępu GWN7610AP ze strzałką na elemencie
blokującym wspornika montażowego i upewnić się, że urządzenie jest mocno osadzone
na wsporniku, a następnie podłączyć kabel sieciowy i kabel zasilania.
6. Przekręcić urządzenie GWN w prawo do momentu zablokowania w miejscu i wyrównania z elementem blokującym.
ZASILANIE I PODŁĄCZANIE URZĄDZENIA GWN7610
Urządzenie GWN7610 można zasilać, korzystając z przełącznika PoE/PoE+ zgodne
z poniższymi instrukcjami
Krok 1: Włożyć wtyczkę kabla RJ45 Ethernet do portu sieciowego urządzenia GWN7610.
Krok 2: Podłączyć drugi koniec do portu uplink przełącznika PoE (Power over Ethernet).
Uawaga: Montaż sutowy jest zalecany w celu osiągnięcia optymalnego zasięgu
działania.
67 68
Page 37

POŁĄCZYĆ Z DOMYŚLNĄ SIECIĄ WIFI GWN7610
GWN7610 można wykorzystać jako samodzielny punkt dostępu bezpośrednio lub po
przywróceniu ustawień fabrycznych z domyślnie aktywną siecią Wi-Fi.
Po naładowaniu GWN7610 i podłączeniu do sieci GWN7610 będzie transmitował
domyślny identykator SSID na podstawie adresu MAC GWN[6 ostatnich cyfr adresu
MAC] i losowego hasła.
Uwaga: Domyślny identykator SSID GWN7610 oraz hasło znajdują się na nalepce
zawierającej adres MAC modułu.
DOSTĘP DO INTERFEJSU KONFIGURACJI
Komputer podłączony do identykatora SSID GWN7610 lub do tej samej sieci, co
GWN7610, może odkryć interfejs konguracji i uzyskać do niego dostęp, korzystając z
jednej z poniższych metod:
Metoda 1: Odkryć GWN7610 na podstawie jego adresu MAC.
1. Adres MAC znajdziesz na tylnej stronie jednostki i na pudełku.
2. Na komputerze podłączonym do tej samej sieci, co GWN7610, wpisać w przeglądarce
poniższy adres, korzystając z adresu MAC GWN7610 https://gwn_<mac>.local
Przykład: jeżeli GWN7610 posiada adres MAC 00:0B:82:8B:4E:28, dostęp do tego
modułu można uzyskać, wpisując w przeglądarce https://gwn_000b828b4e28.local.
Metoda 2: Odkryć GWN7610 za pomocą narzędzia GWNDiscoveryTool.
1. Narzędzie GWNDiscoveryTool należy pobrać i zainstalować z poniższego łącza:
http://www.grandstream.com/support/tools
2. Otworzyć narzędzie GWNDiscoveryTool i kliknąć Skanuj.
3. Narzędzie odkryje wszystkie punkty dostępu GWN7610 podłączone do sieci i pokaże
ich adresy MAC i IP.
4. Kliknięcie Zarządzaj urządzeniem przekieruje bezpośrednio do interfejsu konguracji
GWN7610. Można także wpisać ręcznie w wyszukiwarce wyświetlony adres IP.
Po zastosowaniu jednej z poniższych metod pojawi się ekran logowania. Wpisać „admin”
zarówno w polu Nazwa użytkownika, jak i Hasło, i kliknąć Zaloguj.
Uwaga :
- Sprawdzić, czy GWN7610 nie sparowano wcześniej z innym punktem dostępu
GWN7610 w charakterze urządzenia podporządkowanego (slave) ani z routerem
GWN7000, gdyż w przeciwnym razie nie można będzie uzyskać dostępu do interfejsu
konguracji.
- Jeżeli GWN7610 jest już sparowany, należy najpierw go rozparować lub przywrócić
ustawienia fabryczne.
- Aby uzyskać szczegółową instrukcję, należy pobrać z:
http://www.grandstream.com/support
69 70
Page 38

PT
VISÃO GERAL
O GWN7610 é um access point empresarial MIMO de banda dupla de alto desempenho. O GWN7610 oferece cobertura WiFi expandida para todos os tipos de empresas,
reduzindo as queixas dos usuários por debilidade no sinal e conexões derrubadas. O
GWN7610 adota um desenho sem controladores, eliminando a necessidade de controladores extra de software e hardware. A série de access points wireless GWN é
agilizada pelo sistema de gerenciamento de rede da Grandstream altamente escalável. Dependendo do tamanho da instalação , o access point wireless GWN pode ser
auto administrado, ou administrado pelo router empresarial GWN7000/GWN7000W.
PRECAUÇÕES
• Não tente abrir, desmontar, ou modicar o dispositivo.
• Não exponha este dispositivo a temperaturas fora do intervalo de 0 °C até 50 °C.
• Não exponha este dispositivo em ambientes com umidade fora do intervalo: 10-90% HR
(sem condensação).
• Não desligue e ligue a energia do GWN7610 durante o reinicio do sistema ou durante a
atualização de rmware. Você pode corromper o rmware e causar a avaria do dispositivo.
CONTEÚDO DO PACOTE
Access Point GWN7610
1 x Guia de Instalação Rápida
1 x Declaração GPL
3 x Porca M3
Suporte de montagem no teto
3 x Parafuso (PM 3 x 50)
Suporte de Montagem
3 x Parafuso de
expansão de plástico
3 x Parafuso (PA 3.5 x 20 )
PORTAS DO GWN7610
Porta Descrição
POWER Conector de adaptador de energia (DC24V, 1A)
Aviso: O adaptador de energia não está incluído.
NET/POE Porta Ethernet RJ45 (10/100/1000Mbps) suporta
PoE.
NET Portas Ethernet RJ45 (10/100/1000Mbps) para
conectar o seu roteador ou outro GWN7610.
Porta USB 2.0 (para IOT futuros é aplicações
baseadas em localização).
RESET Tecla de reset de fábrica. Pressionar durante 7
segundos para restabelecer as congurações aos
padrões de fábrica.
71 72
Page 39

INSTALAÇÃO DO HARDWARE
Parede
Parafuso
(PA 3.5 x 20)
Parafuso de expansão
de plástico
O GWN7610 pode ser montado na parede ou no teto. Por favor consulte os seguintes
passos para uma correta instalação.
Montagem na Parede
1. Posicionar o suporte de montagem na ubicação desejada na parede com a seta
apontando para acima.
2. Utilize um lápis para marcar o lugar dos quatro furos da montagem (furo do parafuso
DIA 5.5mm, furo da retícula DIA 25mm).
3. Insira as buchas dos parafusos nos furos de 5.5 mm. Segure o suporte de montagem
à parede inserindo os parafusos nas buchas.
73 74
Page 40

4. Conecte a energia e o cabo ethernet (RJ45) às portas correspondentes no seu
GWN7610.
5. Alinhar a seta do GWN7610AP com a seta que esta no guia de travamento do
suporte de montagem e vericar que seu GWN está rmemente xado no suporte de
montagem.
6. Vire o GWN em sentido horário até encaixar no lugar e se encaixa no guia de travamento.
Montagem no Teto
1. Remover a placa do teto.
2. Colocar a o suporte de teto no centro da placa do teto e marque o lugar dos furos
para os parafusos da montagem (furo do parafuso DIA 5.5mm, furo da retícula DIA
25mm).
3. Inserir os parafusos através do suporte de montagem.
Suporte de montagem no teto Porca M3
Parafuso M3.0x50
4. Conecte o cabo da fonte de alimentação e o cabo ethernet (RJ45) às portas correspondentes no seu GWN7610.
75
76
Page 41

Cabo ethernet RJ45
para o switch PoE
Porta
de rede
5. Alinhar a seta do GWN7610AP com a seta que esta no guia de travamento do suporte
de montagem e vericar que seu GWN está rmemente xado no suporte de montagem
e conecte os cabos de alimentação e de rede.
6. Vire o GWN em sentido horário até encaixar no lugar e se encaixa no guia de travamento.
INICIANDO E CONECTANDO O GWN7610
O GWN7610 pode ser alimentado utilizando um switch PoE/PoE+ seguindo as seguintes
instruções:
Passo 1: Conecte o cabo ethernet RJ45 à porta de rede do GWN7610.
Passo 2: Conecte a outra ponta na porta do switch PoE (Power over Ethernet).
Nota: A montagem no teto é recomendada para um otimo desempenho de cobertura.
77 78
Page 42

CONECTAR À REDE WIFI PADRÃO DO GWN7610
O GWN7610 pode ser utilizado como um access point independente ao momento de
abrir a caixa, ou após um reset de fabrica com o Wi-Fi habilitado por padrão.
Depois de abrir a caixa do GWN7610 e conecta-lo à rede, o GWN7610 irá transmitir o
SSID padrão baseado no endereço MAC GWN[últimos 6 dígitos da MAC] e uma senha
aleatória.
Aviso: A informação do SSID e senha padrão do GWN7610 estão impressos na etiqueta
da MAC do dispositivo.
ACESSAR À INTERFACE DE CONFIGURAÇÃO
Um computador conectado ao SSID do GWN7610, ou em a mesma rede que o
GWN7610 pode descobrir e acessar à interface de conguração utilizando um dos métodos mencionados abaixo:
Método 1: Descobrir o GWN7610 utilizando o endereço MAC.
1. Localize o endereço MAC na etiqueta que está na parte de baixo do dispositivo, ou na
embalagem.
2. A partir do computador conectado na mesma rede que o GWN7610, coloque no
seu navegador o endereço https://gwn_<mac>.local utilizando o endereço MAC do
GWN7610.
Exemplo: se um GWN7610 possui o endereço MAC 00:0B:82:8B:4E:28, esta unidade
pode ser acessada colocando o endereço https://gwn_000b828b4e28.local no seu
navegador.
Método 2: Descobrir o GWN7610 utilizando o GWNDiscoveryTool.
1. Baixar o GWNDiscoveryTool a partir do link:
http://www.grandstream.com/support/tools
2. Abrir o GWNDiscoveryTool, e clique em Scan.
3. A ferramenta irá descobrir todos os Access Points GWN7610 conectados à rede, exibindo os endereços MAC e IP.
4. Clique em Manage Device para ser direcionado diretamente à interface de conguração do GWN7610, ou coloque manualmente no navegador o endereço IP exibido.
Utilizando um dos métodos anteriormente descritos, a tela de login irá aparecer. Coloque
“admin” em ambos os campos Username e Password e clique em Sign In.
Nota :
- Conra que o GWN7610 não está emparelhado como escravo com outro Access point
GWN7610, ou com algum Router da série GWN7000, caso contrario a interface de
conguração não poderá ser acessada.
- Se o GWN7610 está emparelhado, em primeiro lugar desemparelhe o dispositivo ou
aplique um reset de fabrica.
- Para o manual do usuário detalhado, faça o download desde:
http://www.grandstream.com/support
79 80
Page 43

RU
ОБЗОР ПРОДУКТА
GWN7610 является высокопроизводительной, одновременной двухдиапазонной
беспроводной точкой доступа на основе технологии MIMO, предназначенной
для корпоративного использования. GWN7610 обеспечивает беспроводным
интернетом предприятия любого масштаба, уменьшая тем самым жалобы
пользователей на ухудшение сигнала и на нестабильное подключение.
GWN7610 выполнено в минималистичном дизайне, не требует подключения
дополнительного программного обеспечения и устройств. Точки беспроводного
доступа серии GWN приводятся в действие высоко масштабируемыми
системами управления сетью Grandstream. В зависимости от размера сети, точки
беспроводного доступа GWN могут быть самоуправляемыми, либо с возможностью
управления через корпоративный маршрутизатор GWN7000/GWN7000W.
МЕРЫ ПРЕДОСТОРОЖНОСТИ
• Не пытайтесь открыть, разобрать или изменить устройство.
• Не подвергайте устройство воздействию температуры, выходящей за диапазон от
0 °C до 50 °C.
• Не используйте данное устройство в среде, где значение влажности выходит за
диапазон:
Относит. влажность 10%-90% (без конденсации)
• Не включать-выключать устройство GWN7610 в процессе начального запуска
системы или в процессе обновления прошивки. Вы можете тем самым повредить
заводскую прошивку устройства и вывести его из строя.
СОДЕРЖИМОЕ УПАКОВКИ
Точка доступа GWN7610
1 x Руководство по быстрой установке
1 x GPL Заявление
3 x M3 гайки
Потолочный монтажный кронштейн
3 x Винта (PM 3 x 50)
Монтажный Кронштейн
3 x Пластиковые дюбеля
3 x Винта (PM 3,5 x 20)
81
ПОРТЫ GWN7610
Порты Описание
POWER Соединитель адаптера питания (DC24V, 1A)
Внимание: Адаптер питания не предусмотрен.
NET/POE Порт Ethernet RJ45 (10/100/1000Мбит/сек) с
поддержкой PoE.
NET Порт Ethernet RJ45 (10/100/1000Мбит/сек)
для подключения вашего роутера или другого
устройства GWN7610.
USB 2.0 порт (для обновления прошивки и
приложений, основанных на местоположении).
RESET Кнопка сброса до заводских настроек Нажать и
удерживать в течение 7 секунд для сброса до
заводских настроек.
82
Page 44

УСТАНОВКА УСТРОЙСТВА
Настенное
Винта
(PM 3,5 x 20)
Пластиковые
дюбеля
GWN7610 может быть установлен на стену или потолок. Пожалуйста, следуйте
инструкции по установке.
Установка на стену
1. Расположите монтажный кронштейн на нужное место на стене, стрелкой вверх.
2. Используйте карандаш для разметки отверстий (отверстие под винт диам. 5,5
мм, отверстие диаметром 25мм).
3. Вставьте анкера в отверстия диаметром 5,5 мм. Прикрепите монтажный
кронштейн к стене, вставив винты в дюбеля.
83
84
Page 45

4. Присоединить кабель питания и Ethernet (RJ45) кабель для корректировки портов
GWN7610.
5. Совместите стрелку на устройстве GWN7610AP со стрелкой на кронштейне и
убедитесь, что ваш GWN плотно сидит в креплении.
6. Поверните GWN по часовой стрелке для фиксации его на месте.
Крепление на потолок
1. Снимите потолочную плитку.
2. Разместите потолочную монтажную пластину по центру плитки и обозначьте
место под винты (отверстия под винты диам. 5,5мм, отверстие диам. 25мм).
3. Вставьте винты в монтажную пластину.
Потолочный монтажный кронштейн M3 гайки
Винта M3.0x50
4. Присоединить кабель питания и Ethernet (RJ45) кабель для корректировки
портов вашего устройства GWN7610.
85
86
Page 46

RJ45 Ethernet кабель
подключен к PoE+
Сетевой
порт
5. Совместите стрелку на устройстве GWN7610AP со стрелкой на кронштейне,
убедитесь, что ваш GWN плотно сидит в креплении, и подсоедините сетевой кабель
и кабель питания.
6. Поверните GWN по часовой стрелке для фиксации его на месте.
ВКЛЮЧЕНИЕ И НАСТРОЙКА УСТРОЙСТВА GWN7610
Устройство GWN7610 может быть подключено, используя PoE/PoE+ переключатель
в несколько шагов:
Шаг 1: Вставить Ethernet кабель RJ45 в сетевой порт устройства GWN7610.
Шаг 2: Подключите другой конец в порт PoE переключателя.
Примечание: Для наилучшего покрытия рекомендуется установка на потолок.
87 88
Page 47

ПОДКЛЮЧИТЬ К WIFI СЕТИ GWN7610 ПО
УМОЛЧАНИЮ
GWN7610 можно использовать как отдельную готовую точку доступа, или после
сброса к заводским настройкам с включённым по умолчанию Wi-Fi.
После запитывания GWN7610 и подключения её к сети, GWN7610 передаст SSID по
умолчанию, на основе MAC-адреса GWN[6 последних цифр MAC] и произвольный
пароль.
Примечание: GWN7610 SSID и пароль по умолчанию указаны на ярлыке MAC на
устройстве.
ВХОД В ИНТЕРФЕЙС НАСТРОЙКИ
С помощью компьютера, подключённого к SSID GWN7610, или к тоже сети, что и
GWN7610, можно обнаружить и войти в интерфейс настройки, при помощи одного
из нижеуказанных методов:
Метод 1: Обнаружение GWN7610 по её MAC-адресу.
1. Найдите MAC адрес указанный на наклейке на обратной стороне устройства,
либо на коробке.
2. Используя компьютер, подключённый к той же сети, что и GWN7610, в браузере
введите MAC-адрес GWN7610 в следующем виде: https://gwn_<mac>.local
Пример: Если у GWN7610 MAC-адрес 00:0B:82:8B:4E:28, то доступ к устройству
можно получить введя https://gwn_000b828b4e28.local в браузере.
Метод 2: Обнаружение GWN7610 при помощи программы GWNDiscoveryTool.
1. Скачайте и установите программу GWNDiscoveryTool перейдя по следующей
ссылке: http://www.grandstream.com/support/tools
2. Откройте программу GWNDiscoveryTool, и щёлкните по Scan.
3. Программа найдёт все точки доступа GWN7610, подключённые к сети, с указанием
их MAC и IP-адресов.
4. Щёлкните по Manage Device для перехода прямо в интерфейс настройки
GWN7610, или самостоятельно введите отображаемый IP-адрес в своём браузере.
После использования одного из вышеуказанных методов, появиться окно входа.
Введите в оба поля, Имя пользователя и Пароль, “admin” и щёлкните по Sign In.
Примечание :
- Убедитесь, что GWN7610 не сопряжена уже с другой точкой доступа GWN7610 в
качестве подчинённой, или с маршрутизатором серии GWN7000, в ином случае в
интерфейс настройки нельзя будет войти.
- Если GWN7610 уже сопряжена, сначала отключите её или выполните сброс к
заводским настройкам.
- Подробное руководство пользователя можно загрузить здесь:
http://www.grandstream.com/support
89 90
 Loading...