

Page 1
Grandstream Networks, Inc.
126 Brookline Ave, 3rd Floor
Boston, MA 02215. USA
Tel : +1 (617) 566 - 9300
Fax: +1 (617) 249 - 1987
www.grandstream.com
TM
For Warranty and RMA information, please visit www.grandstream.com
HDMI, the HDMI Logo, and High-Denition Multimedia
Interface are trademarks or registered trademarks of
HDMI Licensing LLC in the United States and other
countries.
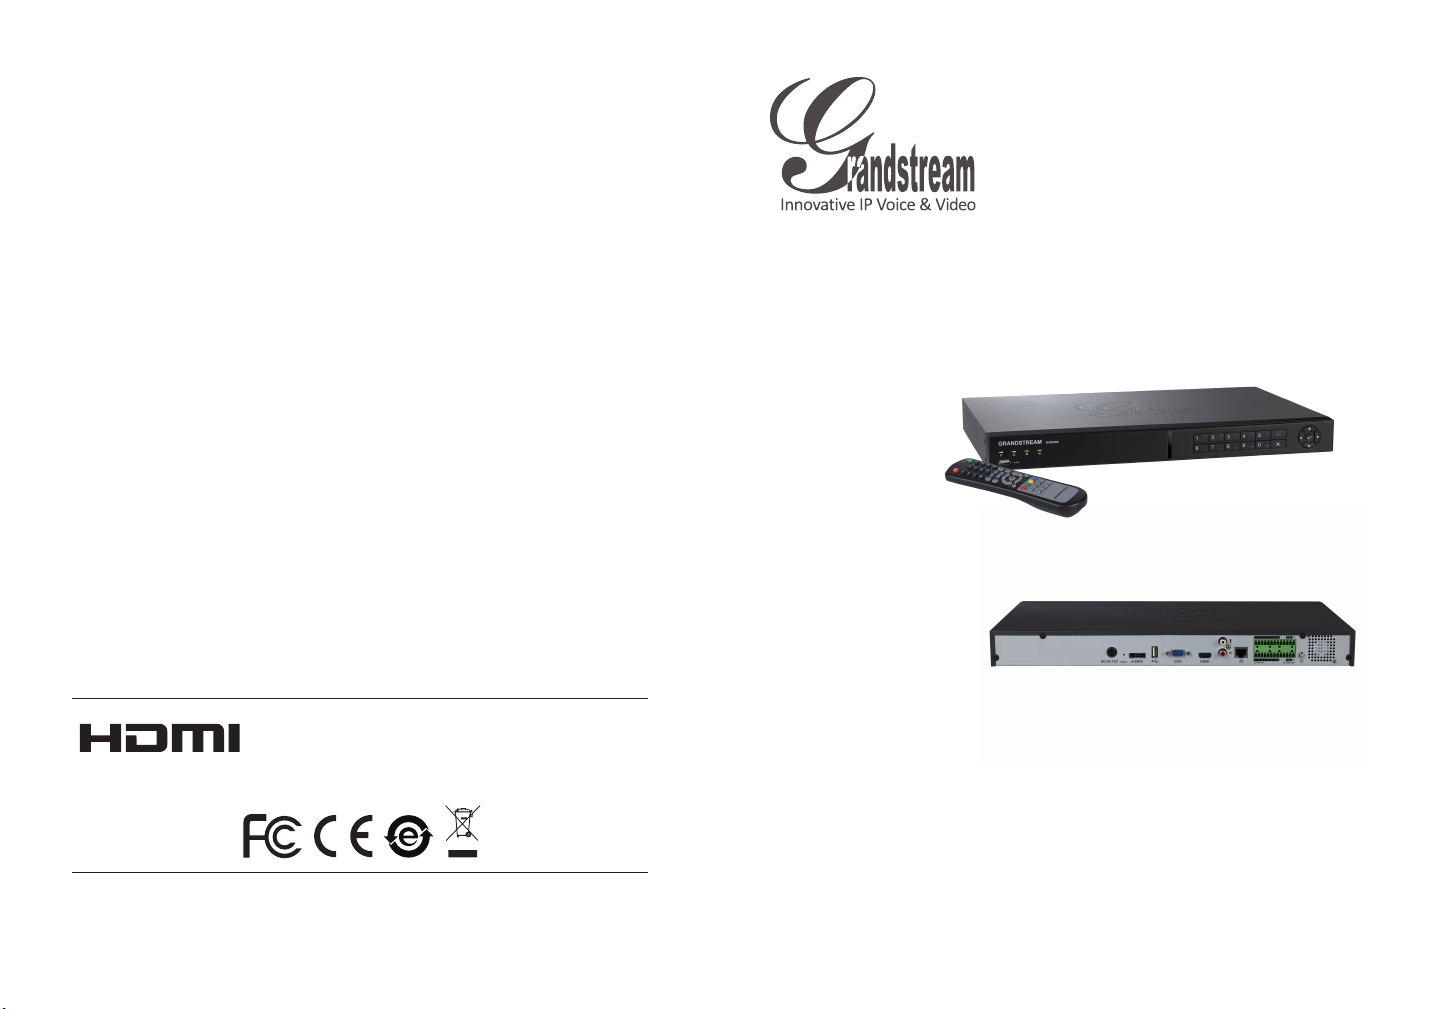
GVR3550
Network Video Recorder
Quick Installation Guide
Page 2

Content
English.................................................................................1
Español................................................................................9
Français..............................................................................17
简体中文..........................................................................25
Deutsch..............................................................................33
Italiano...............................................................................41
Русскй...............................................................................49
Português...........................................................................57
Polski.................................................................................65
Page 3

EN
PRECAUTIONS: OVERVIEW:
• Do not expose this device to temperatures outside the range of 0°C to +50°C
for operating or -20°C to +60°C for storage.
• Do not expose this device to environments outside of the following humidity
range: 10-90% RH (non-condensing).
• Do not install HDD while device is powered on.
• Do not power cycle the device during system bootup or rmware upgrade. It may
corrupt rmware and damage the device.
• Only use supplied power adapter. Other adapter may damage the product and
void the warranty.
• Please follow this guide before operating the device.
CHANGE OR MODIFICATIONS TO THIS PRODUCT NOT EXPRESSLY APPROVED BY GRANDSTREAM NETWORKS, INC., OR PERATION OF THE
PRODUCT IN ANY WAY OTHER THAN AS DESCRIBED BY THIS GUIDE
COULD VOID THE FACTORY WARRANTY.
REPRODUCTION OR RETRANSMITTAL OF THE ENTIRE OR ANY PART OF
THIS DOCUMENT, IN ANY FORM OR BY ANY MEANS, ELECTRONIC OR
PRINT, FOR ANY PURPOSE WITHOUT THE EXPRESS WRITTEN PERMISSION FROM GRANDSTREAM NETWORKS, INC. IS NOT PERMITTED.
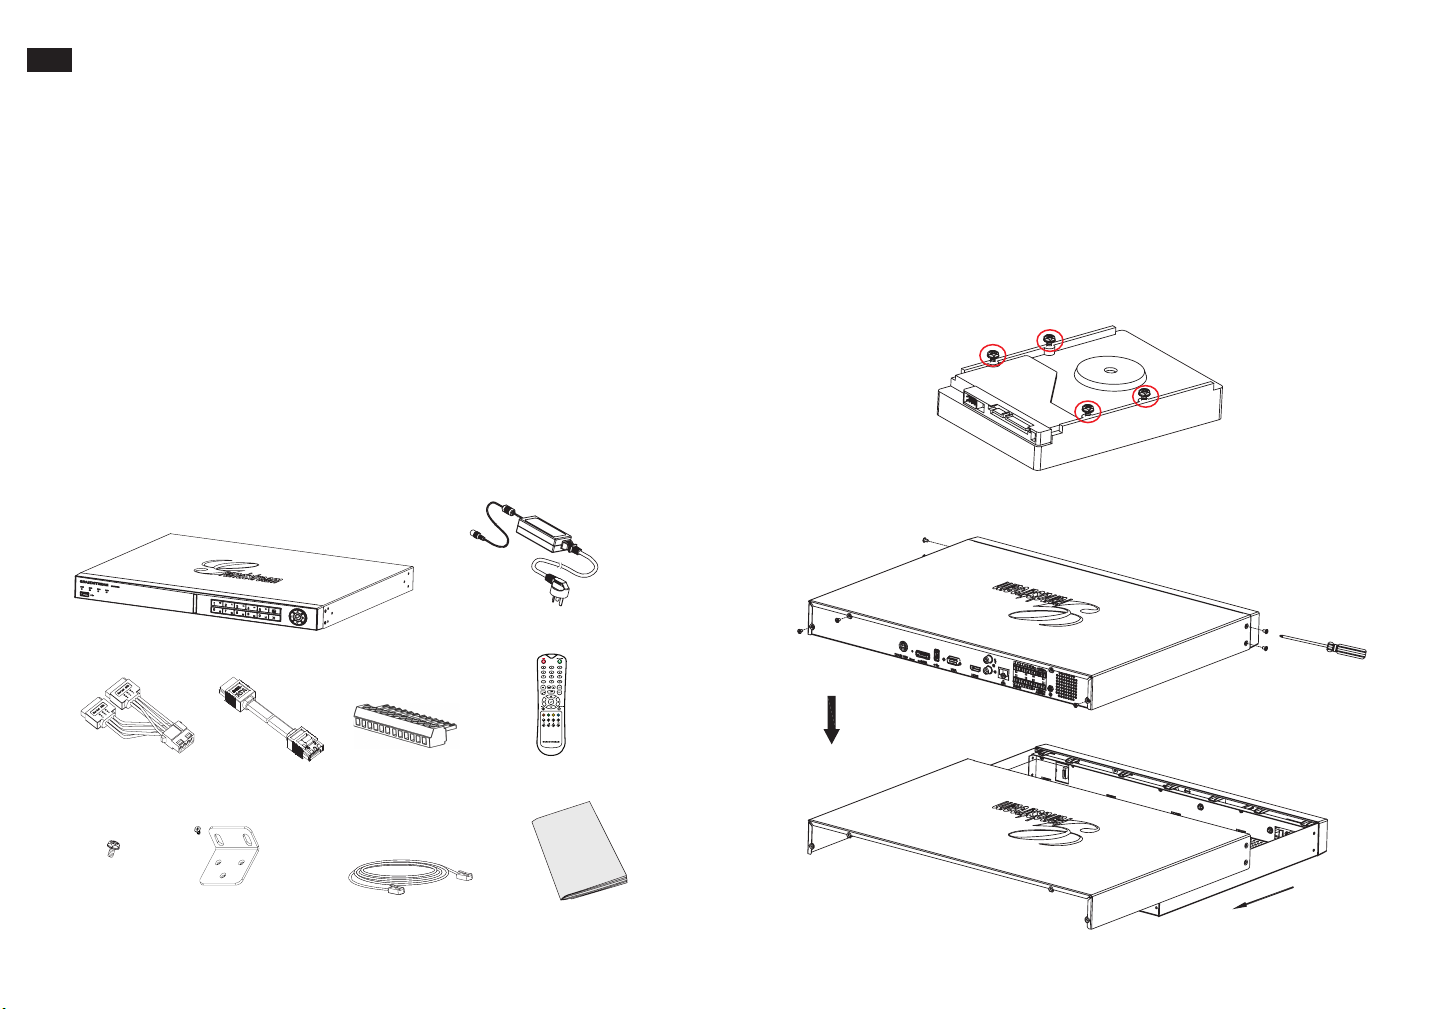
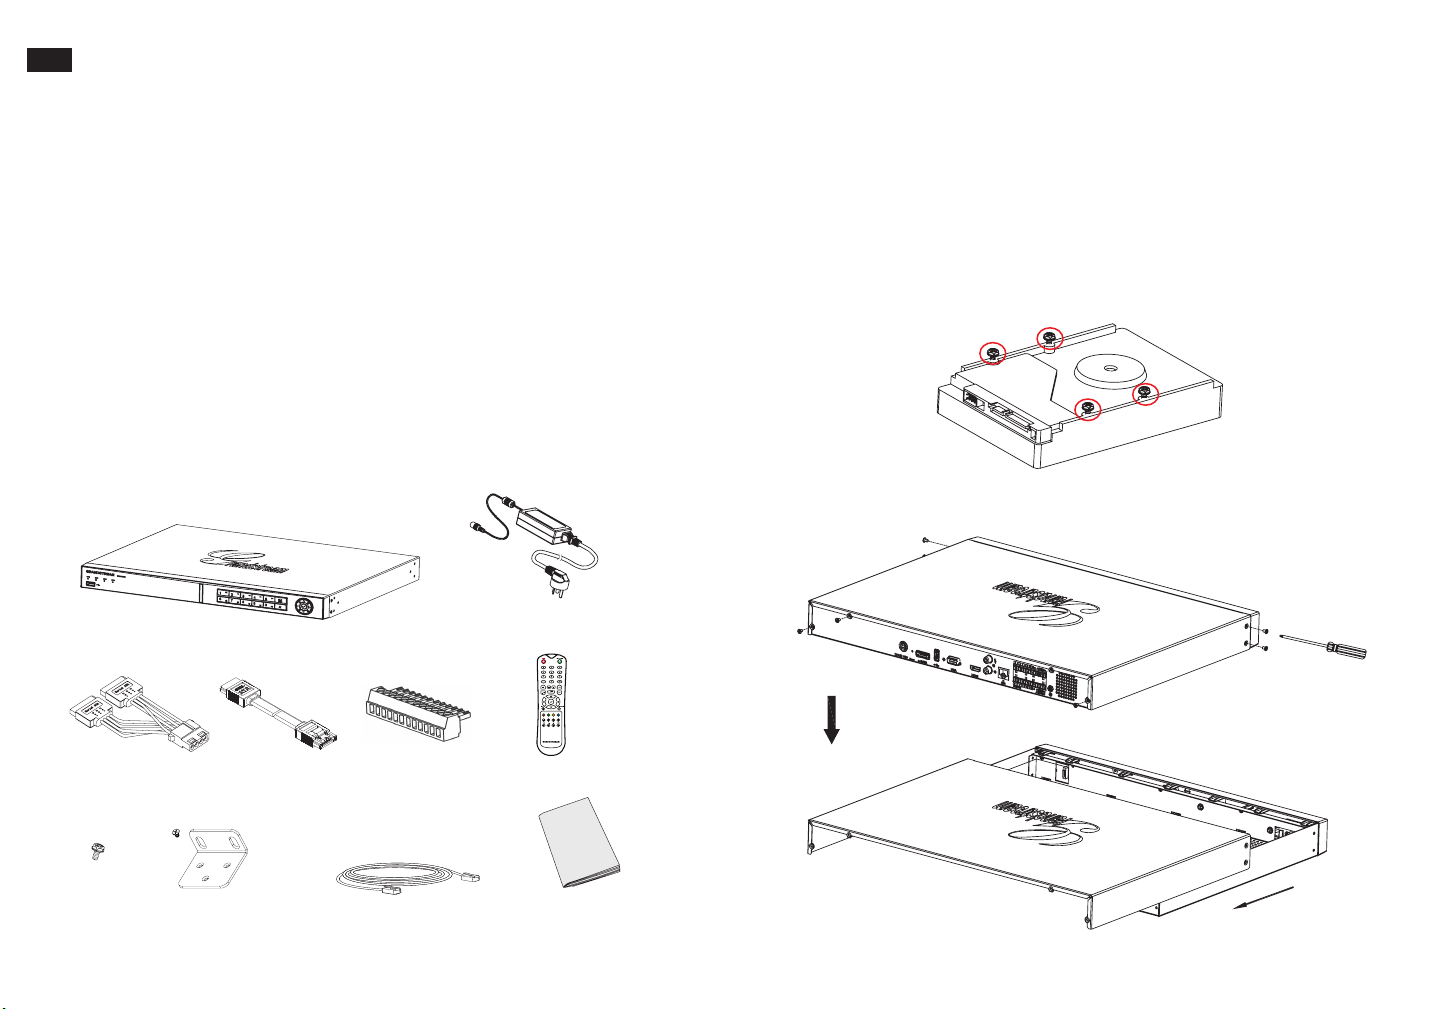
PACKAGE CONTENT:
1 x Power Adapter1 x Main Case
GVR3550 is a NVR device with high performance and large HDD capacity. It pro-
vides a set of unied remote monitor system solution for small and medium-sized
enterprises at low cost. It is equipped with HDD detection and management, network conguration, alarm event list, remote/local quick search, integrated local
and remote preview, multiple screen display and alarm record. It also supports
quick operation using mouse, keyboard, remote controller and front panel buttons.
INSTALL THE HDD:
1. Install the supplied screws to the 4 holes on the bottom of the HDD loosely.
2. Remove the 8 screws on back and side panel of the device then open the
cover panel.
2 x SATA
Power Cable
18 x HDD
Screws
4 x SATA
Data Cable
4 x Mount Bracket
with 12 Screws
2 x Wire
Clamper
1 x Ethernet Cable
1 x Remote Controller
1 x Quick Installation Guide
1 2
Page 4
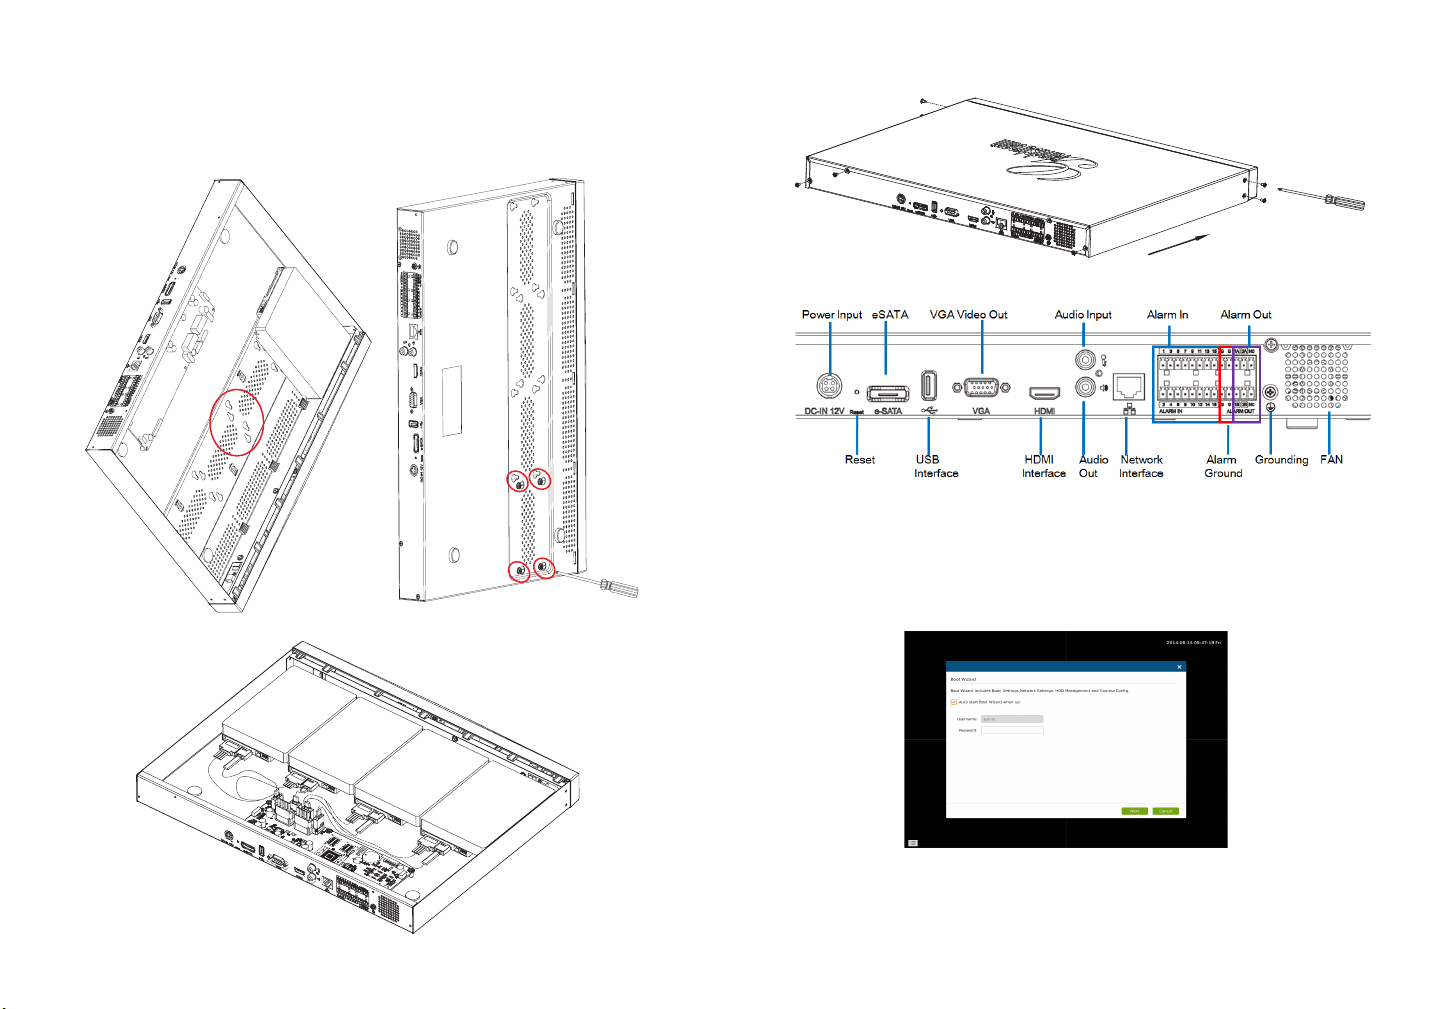
3. Side standing the opened device so the screws holes at the oor shell can be
easily spotted.
4. Put the HDD (with 4 screws on) into the holes on oor shell, sliding it to narrow
opening, tighten the 4 screws.
5. Repeat the above steps if having multiple HDDs.
6. Connect the SATA power and data cables from HDDs to the PCB board.
7. Close the cover panel and tighten the 8 screws.
CONNECTING THE GVR3550:
1. Connect a display device to the HDMI or VGA interface.
2. Connect the network cable from RJ45 interface of GVR3550 to a network
switch (Gigabit switch recommended).
3. Connect power adapter from device to power source.
4. When the GVR3550 is powered on successfully, it will display the local view
main screen as shown below. Follow the “Boot Wizard” to install the system.
Note:
- GVR3550 can automatically adapt to 1080p or 720p HDMI monitor.
- VGA doesn’t support automatic resolution matching. When VGA and HDMI port are both
connected, only the HDMI display will be active.
- User can manually congure output display and resolution from the conguration menu.
3 4
Page 5
Optional Devices:
USB mouse/keyboard:
Connect a mouse or keyboard to the USB port to use with the local view of
GVR3550.
USB storage device:
Connect an USB storage device to the USB port to store video or picture les.
eSATA device:
Connect the eSATA device to the corresponding interface on the back panel of
the GVR3550. Power up the eSATA device or use USB cable to supply power (the
connection mode is in accordance with eSATA specication).
Output devices:
GVR3550 supports microphone and (amplied) speaker with RCA interface.
Alarm devices:
1. Connect alarm input device to alarm input port.
2. Connect alarm output device to alarm output port.
Note:
- Please consult the User Manual to set up optional devices. Additional conguration may be
required.
- If mouse/keyboard is not working, it may be incompatible with the GVR3550.
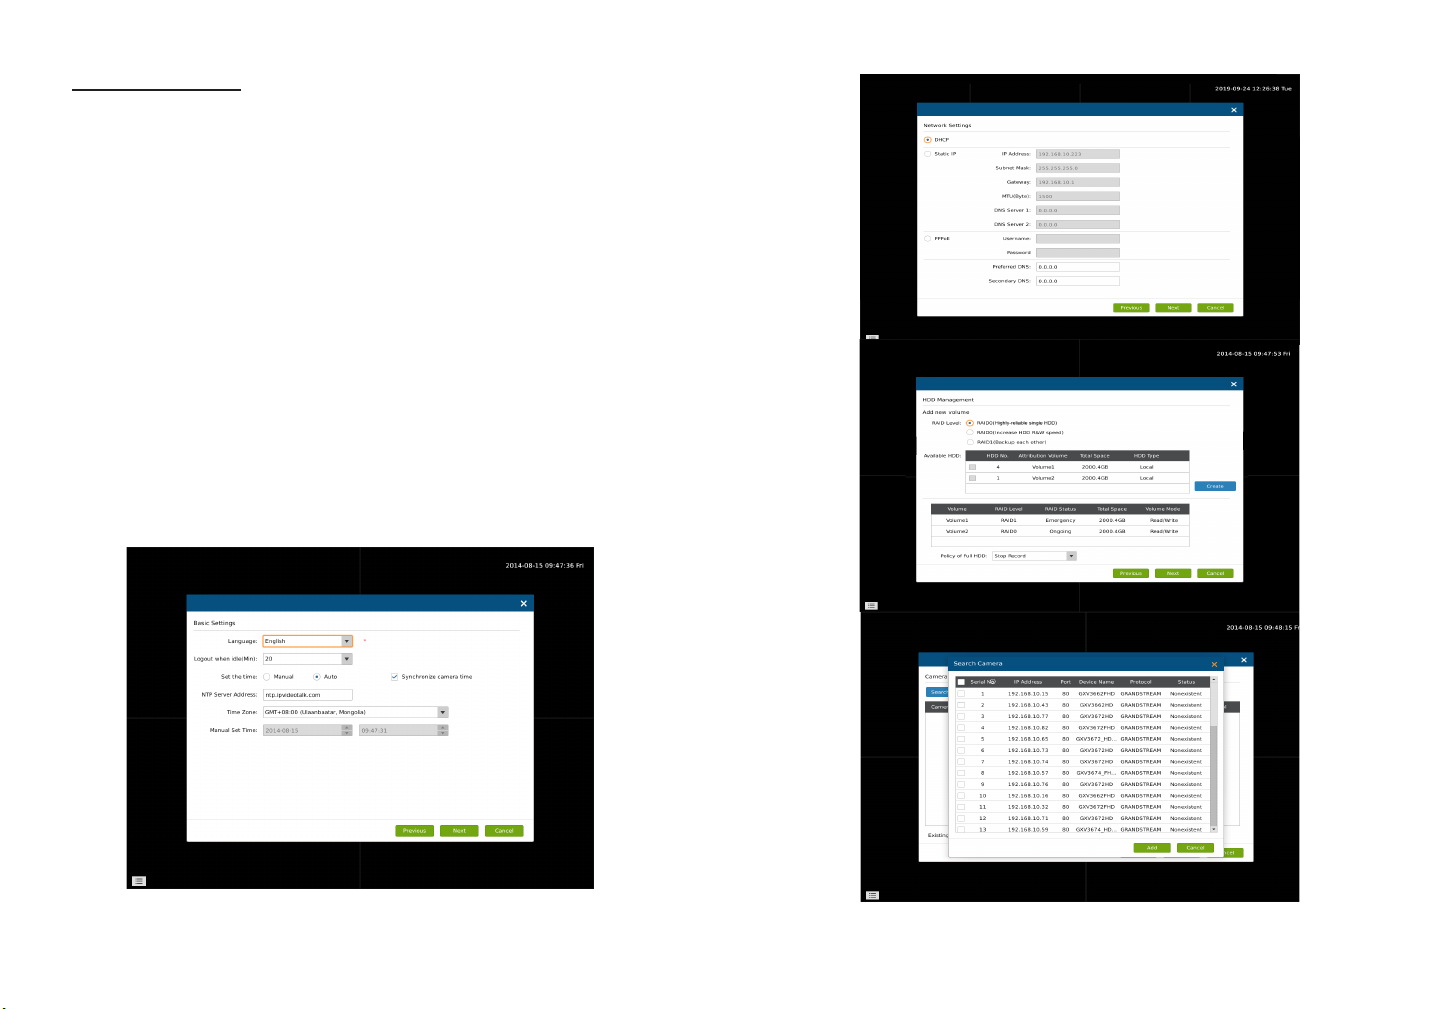
CONFIGURING GVR3550 VIA LOCAL VIEW:
1. Follow the “Boot Wizard” to congure the GVR3550.
2. Click “Search Camera” to search and add IP Cameras from LAN.
5 6
Page 6

4. Click “Live View”, download “GVRView.exe”. Close browser and install
“GVRView.exe” le, then open browser.
CONFIGURING GVR3550 VIA REMOTE WEB GUI:
1. Log in to the local view and go to “Main Menu”=>”Status”=>“Network Info” to
identify the IP address of the GVR3550.
2. Open web browser and enter the IP address of GVR3550 into the
URL eld in the format (default port is 80): http://IP-Address_GVR3550:Port
3. Login to the conguration interface as shown below using “admin” as the user
name and password.
For more detailed information, please visit our website to download the User
Manual or refer to online documents and FAQ.
http://www.grandstream.com/index.php/products/ip-video-surveillance/gvr3550
http://www.grandstream.com/support
7 8
Page 7
ES
PRECAUCIONES: DESCRIPCIÓN GENERAL:
• No exponga este dispositivo a temperaturas fuera del rango de 0 °C a +50 °C
en operación o de -20°C a +60 °C para almacenamiento.
• No exponga este dispositivo a ambientes fuera del siguiente rango de humdad
10-90% RH (Sin condensación).
• No instale discos duros mientras el dispositivo este encendido.
• No apague el dispositivo cuando el sistema esta iniciándose o el rmware este
actualizándose. Esto puede corromper el rmware y dañar el dispositivo.
• Solo use el trasformador original de energía. Otros transformadores pueden
dañar el producto y anular la garantía.
• Por favor lea esta guía antes de operar el dispositivo.
LOS CAMBIOS O MODIFICACIONES DE ESTE PRODUCTO NO ESTAN EXPRESAMENTE APROVADOS POR GRANDSTREAM NETWORKS, INC., LA
OPERACION DE ESTE PRODUCTO DE CUALQUIER FORMA QUE NO SEA
COMO LA QUE DESCRIBE ESTA GUÍA PODRÍAN ANULAR LA GARANTÍA DE
FÁBRICA.
LA REPRODUCCIÓN O RETANSMISIÓN DE TOD O CUALQUIER PARTE DE
ESTE DOCUMENTO, EN CUALQUIER FORMA O POR CUALQUIER MEDIO,
ELECTRÓNICO O IMPRESO, PARA CUALQUIER PROPÓSITO SIN EL PERMISO EXPRESO Y POR ESCRITO DE GRANDSTREAM NETWORKS, INC., NO
ESTA PERMITIDA.
CONTENIDO:
El GVR3550 es un dispositivo NVR con un alto rendimiento y gran capacidad
de disco duro. Proporciona un conjunto de soluciones de sistemas de monitoreo
remoto unicado de bajo costo para las pequeñas y medianas empresas. Está
equipado con detección y administración de disco duro, conguración de red, lista
de eventos de alarma, búsqueda rápida local o remota, vista previa local y remota
integrada, pantalla múltiple y grabación de alarma. También es compatible con
un funcionamiento rápido a través del ratón, teclado, control remoto y botones
del panel frontal.
INSTALACION DEL DISCO DURO:
1. Inserte los tornillos suministrados en los 4 hoyos del disco duro cuidadosa-
mente.
2. Remueva los 8 tornillos del panel lateral y posterior del dispositivo, luego abra
la cubierta protectora.
1 x Equipo Principal
2 x Cable de
Energía SATA
18 x HDD
Tornillos
9 10
4 x Cable de
Datos SATA
4 x Soporte de
Montaje con 12
Tornillos
2 x Abrazadera
de Alambre
1 x Cable Ethernet
1 x Transformador
1 x Control Remoto
1 x Guía Rápida
Page 8

3. Coloque de costado el dispositivo tal que los tornillos del panel inferior puedan
ser removidos fácilmente.
4. Coloque el disco (con sus tornillos) en los huecos del panel inferior, deslizánd olo hacia la apertura angosta, apriete los tornillos.
5. Repita los pasos anteriores si tiene múltiples discos.
6. Conecte los cables SATA de energía y datos de los discos en el tablero PCB.
7. Cierre la cubierta y apriete los 8 tornillos.
CONECTANDO EL GVR3550:
1. Conecte un dispositivo a la toma HDMI o interfaz VGA.
2. Conecte el cable de red del GVR3550 a un switch (Se recomienda Gigabit).
3. Conecte el transformador del dispositivo a la fuente de energía.
4. Cuando el GVR3550 este encendido, se mostrará la vista local de la pantalla
principal como se muestra. Siga el “Asistente de arranque” para instalar el sistema
Nota:
- El GVR3550 puede adaptarse automáticamente a 1080p o 720p.
- El modo VGA no soporta resolución automática. Cuando los puertos VGA y HDMI están
conectados, sólo la pantalla HDMI se activa.
- El usuario puede congurar manualmente la pantalla y la resolución de salida desde el menú
de conguración.
11 12
Page 9

Dispositivos Opcionales:
Ratón o teclado USB:
Conecte un ratón o un teclado al puerto USB para su uso con la vista local de
GVR3550.
Dispositivo de almacenamiento USB:
Conecte un dispositivo de almacenamiento USB al puerto USB para almacenar
archivos de vídeo o de imagen.
Dispositivo eSATA:
Conecte el dispositivo eSATA a la interfaz correspondiente en el panel posterior
de la GVR3550. Alimente el dispositivo eSATA o use el cable USB para suministrar energía (el modo de conexión es de conformidad con la especicación eSATA).
Dispositivos de salida:
El GVR3550 soporta micrófono y Altavoz (amplicado) con interfaz RCA.
Dispositivos de alarma:
1. Conecte el dispositivo de entrada de alarma a su puerto.
2. Conecte el dispositivo de salida de alarma a su Puerto.
Nota:
- Por favor consulte el manual del usuario para la conguración de dispositivos opcionales.
- Puede ser necesaria una conguración adicional. Si el ratón o el teclado no funcionan, pu-
ede que sean incompatibles con el GVR3550.
CONFIGURANDO EL GVR3550 VIA VISTA LOCAL:
1. Siga el “Asistente de arranque” para congurar el GVR3550.
2. Haga clic en “Búsqueda Cámara” para buscar y añadir cámaras IP de LAN.
13 14
Page 10

4. Haga clic en “Live View”, descarga “GVRView.exe”. Cerrar navegador e
instalar Archivo “GVRView.exe”, el navegador se abrirá.
CONFIGURANDO EL GVR3550 VIA WEB GUI:
1. Conéctese a la vista local y vaya a “Main Menu” => ”Status” => “Network
Status” para identicar la dirección IP del GVR3550.
2. Abra el navegador web e introduzca la dirección IP del GVR3550 en el
campo URL en el formato: http://IP-Address_GVR3550:Port
(El Puerto predeterminado es 80).
3. Ingrese a la interfaz de conguración, utilizando “admin” como nombre de usuario y
contraseña.
Para más información, por favor visite nuestro sitio web para descargar el manual de usuario
o documentos en línea y FAQ.
http://www.grandstream.com/index.php/products/ip-video-surveillance/gvr3550
http://www.grandstream.com/support
15 16
Page 11
FR
1 x Câble Ethernet
PRECAUTIONS:
• Ne pas exposer cet appareil à une température hors l’intervalle de 0 °C à
+50 °C durant son fonctionnement ou -20°C à +60 °C en stockage.
• Ne pas exposer l’appareil à des environnements hors l’intervalle d’humidité
suivant: 10-90% RH (sans condensation).
• Ne pas installer le disque dur quand le dispositif est sous tension.
• Ne pas arrêter l’appareil puis le remettre sous tension durant le redémarrage
du système ou la mise à niveau du micro-logiciel. Cela peut corrompre ce
dernier ou endommager l’appareil.
• Utiliser seulement l’adaptateur fourni. Un autre adaptateur peut endommager le
produit et annuler sa garantie.
• Veuillez suivre les instructions sur ce guide avant d’utiliser l’appareil.
TOUT CHANGEMENT OU MODIFICATION DE CE PRODUIT NON EXPLICITEMENT APPROUVES PAR GRANDSTREAM NETWORKS, INC. OU TOUTE
OPERATION DU PRODUIT DIFFERENTE DE CELLES DECRITES DANS CE
GUIDE PEUVENT ANNULER LA GARANTIE.
TOUTE REPRODUCTION OU TRANSMISSION TOTALE OU PARTIELLE DE
CE DOCUMENT, SOUS N’IMPORTE QUELLE FORME OU PAR N’IMPORTE
QUEL MOYEN, ELECTRONIQUE OU IMPRIME, POUR TOUTE FIN SANS
L’AUTORISATION EXPLICITEMENT ECRITE PAR GRANDSTREAM NETWORKS, INC. EST INTERDITE.
CONTENU DU PACK:
PRESENTATION:
GVR3550 est un dispositif NVR avec une haute performance et une grande capacité de disque dur. Il fournit un ensemble de solutions uniées de système de
surveillance à distance pour les petites et moyennes entreprises à faible coût. Il
est équipé de la détection et la gestion du disque dur, la conguration du réseau, la
liste des événements d’alarme, la recherche rapide locale ou à distance, afchage
en local ou à distance intégrés, écrans multiples et enregistrement d’alarme. Il
supporte également le fonctionnement rapide en utilisant la souris, le clavier, la
télécommande et les touches de panneau d’avant.
INSTALLATION DU DISQUE DUR:
1. Installez les vis fournies dans les 4 trous en bas du disque dur sans forcer.
2. Retirez les 8 vis de la partie latérale et arrière de l’appareil, puis ouvrez le
couvercle.
1 x Unité principale
2 x Câble
d’alimentation SATA
18 x HDD
Vis
4 x Support de
Montage avec 12 Vis
4 x Câble de
données SATA
2 x Fil de
Serrage
1 x Adaptateur de secteur
1 x Télécommande
1 x Guide de
Démarrage Rapide
17 18
Page 12

3. Tenez l’appareil ouvert sur son côté an que les trous des vis dans la coque du
puissance sortie vidéo entrée entrée sortie
d'entrée eSATA VGA audio d'alarme d'alarme
remettre l'interface l'interface sortie interface alarme sol fan
USB HDMI audio réseau sol
bas peuvent être facilement repérables.
4. Mettez le disque dur (avec les 4 vis) dans les trous dans la coque, en le faisant
glisser à travers l’ouverture étroite, serrez les 4 vis.
5. Répétez les étapes ci-dessus si vous avez plusieurs disques durs.
6. Connectez les câbles de l’alimentation et des données SATA du disque dur à
la carte de circuit imprimé.
7. Fermez le couvercle et serrez les 8 vis.
CONNEXION DU GVR3550:
1. Connectez un dispositif d’afchage à l’interface HDMI ou VGA.
2. Connectez le câble réseau de l’interface RJ45 du GVR3550 à un commutateur
de réseau (Gigabit recommandé).
3. Connectez l’adaptateur d’alimentation de l’appareil à la source d’alimentation.
4. Lorsque le GVR3550 est allumé avec succès, il va afcher l’écran principal de
l’afchage local, comme indiqué ci-dessous. Suivez le “Assistant d’amorçage”
pour installer le système
Remarque:
- GVR3550 peut automatiquement s’adapter aux moniteurs HDMI 1080p ou 720p.
- VGA ne supporte pas la correspondance automatique de résolution. Lorsque les ports VGA
et HDMI sont tous les deux connectés, seul l’afchage HDMI sera activé.
- L’utilisateur peut manuellement congurer l’afchage et la résolution de sortie à partir du
menu de conguration.
19 20
Page 13

Périphériques Optionnels:
Souris/clavier USB:
Connectez une souris ou un clavier au port USB pour l’utiliser avec l’afchage
local du GVR3550.
Périphérique de stockage USB:
Connectez un périphérique de stockage USB au port USB an de stocker des
vidéos ou des chiers image.
Périphérique eSATA:
Connectez le périphérique eSATA à l’interface correspondante sur le panneau
d’arrière du GVR3550. Mettez le périphérique sous tension ou utilisez le câble
USB pour l’alimentation (Le mode de connexion est conforme à la spécication
eSATA).
Périphériques de sortie:
Le GVR3550 supporte le microphone et haut-parleur (amplié) avec une interface
de RCA.
Les dispositifs d’alarme:
1. Connectez un périphérique d’entrée d’alarme au port d’entrée d’alarme.
2. Connectez un périphérique de sortie d’alarme pour alarme port de sortie.
Note:
- Veuillez consulter le Manuel d’Utilisation pour la conguration des périphériques optionnels.
Une conguration supplémentaire peut être nécessaire.
- Si la souris/le clavier ne fonctionne pas, ils peuvent être incompatibles avec le GVR3550.
CONFIGURATION DU GVR3550 VIA AFFICHAGE LOCAL:
1. Suivez le “Boot Wizard” pour congurer le GVR3550.
2. Cliquez sur “Rechercher appareil photo” pour rechercher et ajouter des
caméras IP depuis le réseau local.
21 22
Page 14

4. Cliquez sur “Live View”, le téléchargement “GVRView.exe”. Fermer
navigateur et installer “GVRView.exe” chier, le navigateur s’ouvre.
CONFIGURATION A DISTANCE DU GVR3550 VIA L’INTERFACE WEB:
1. Connectez-vous à la vue locale et allez au “Menu Principal”=>”Status” => “Etat
du réseau” pour identier l’adresse IP du GVR3550.
2. Ouvrez votre navigateur Web et saisissez l’adresse IP de GVR3550 dans le
Champ URL dans le format: http://IP-Address_GVR3550:Port
(port par défaut est 80)
3. Connectez-vous à l’interface de conguration comme indiqué ci-dessous en utilisant
“admin” comme nom d’utilisateur et mot de passe.
Pour plus d’informations, veuillez visiter notre site pour télécharger le manuel d’utilisation
ou se référer aux documents en ligne et le FAQ.
http://www.grandstream.com/index.php/products/ip-video-surveillance/gvr3550
http://www.grandstream.com/support
23 24
Page 15

ZH
注意事项: 产品概览:
• 请不要在以下温度范围外进行储藏或使用设备:
运行温度:0°C至+50°C;储藏温度:-20°C至+60°C
• 请不要在相对湿度10-90%以外的环境中储藏或使用设备。
• 请不要在设备运行时插拔硬盘。
• 请不要在设备启动未完成或系统升级的过程中断开电源,因为如刚
才所述的操作会导致设备本身的程序损坏,进而导致设备无法启
动。
• 请使用设备包装中的电源,因为使用其他没有经过认证的替代电源
适配器可能对设备造成损害。
• 进行设备操作前请仔细阅读本手册。
未经GRANDSTREAM允许擅自更改或修改本产品,或者以任何非本手册
中介绍的方式操作本产品所造成的设备损害不在制造商保修范围内。
未经GRANDSTREAM书面许可,任何人不得以任一方式对该手册的任何
部分进行电子或书面的复制或转发。
设备包装清单:
1x电源适配器1x主机
GVR3550是一款高性能、大容量的网络硬盘录像设备。产品为中小企业
提供了一套低成本一体化的网络视频监控解决方案。GVR3550集硬盘诊
断及管理、网络配置、报警事件列表以及远程及本地快速搜索为一体,具
备本地以及远程预览、视频多画面分割显示、报警录像,硬盘满覆盖等功
能,支持鼠标键盘和遥控器的快捷操作。
安装硬盘:
1.将四颗螺丝拧在硬盘底部,不要太紧。
2.松开背面和两侧八颗螺丝,打开设备盖板。
2x硬盘电源线
18x硬盘螺丝
4x硬盘信号线
4x固定支架
和12x螺丝
2x线夹持器
1x网线
1x遥控器
1x快速安装手册
25 26
Page 16

3.将主机箱侧立,使底壳螺孔容易看见。
4.将(装好螺丝的)硬盘放入螺孔,滑入窄槽,拧紧硬盘螺丝。
5.如有多个硬盘,请重复上述步骤,将其他硬盘全部安装好。
6.分别连接硬盘数据线和电源线到主板接口。
7.盖上主机盖板并拧好八颗螺丝。
设备的连接:
1.连接HDMI或者VGA显示设备。
2.将网线的一端连接到GVR3550网口,另一端连接到路由器或者交换设
备。
3.连接电源适配器。
4.当GVR3550上电后,设备正常启动,显示如下本地界面.按照
“启动向导”安装系统
注意:
-GVR3550可自适应匹配分辨率为1080P及720P的HDMI显示器。
-VGA设备不支持自动分辨率匹配。当VGA/HDMI显示屏同时接入时,默认HDMI输
出。
-用户可以在系统设置界面手动设置显示输出和分辨率。
27 28
Page 17

可选设备:
USB鼠标/键盘:
连接USB鼠标或键盘到USB接口,进行GVR3550的本地视频和控制操作。
USB存储设备:
连接USB存储设备到任一USB接口,进行视频和图片文件的复制和备份操
作。
eSATA设备:
连接eSATA设备到GVR3550背面的eSATA接口。上电eSATA设备或用
USB电缆供电。(请按规定方式连接)
音频输出设备:
GVR3550支持RCA接口的麦克风和有源音箱。
报警设备:
• 连接报警输入设备(传感器)到报警输入端口。
• 连接报警输出设备到报警输出端口。
注意:
-请查询用户手册来连接和设置可选的第三方设备,也许需要额外的配置。
-如果接入的鼠标或键盘不工作,说明其可能不兼容GVR3550。
通过本地界面配置GVR3550:
1.按照“启动向导”安装系统。
2.选“通道配置”,点“搜索设备”,搜寻并添加位于本地网络的IP摄像机。
29 30
Page 18

4.点击"实时预览"并下载“GVRView.exe”。关闭浏览器并安装文
件。重新打开浏览器,远程观看视频实时预览。
通过远端WEB浏览器配置GVR3550:
1.登入本地显示画面,选择“主菜单”=>“状态”=>“网络状态”,查看
GVR3550的IP地址。
2.打开网络浏览器,在网址栏输入:
http://摄像机IP地址:端口 (缺省端口是80)
3.用管理员帐号和密码“admin”登入如下图所示配置界面。
需要更多详细信息,请访问官方网站,下载用户手册,查看在线文档资料和常见问题FAQ.
http://www.grandstream.com/index.php/products/ip-video-surveillance/gvr3550
http://www.grandstream.com/support
31 32
Page 19

DE
Sicherheitsinformationen:
• Bitte beachten Sie den Temperaturbereich von 0°C bis 50°C bei der Nutzung
bzw. -20°C bis 60°C bei der Lagerung des Produktes.
• Bitte beachten Sie die Einhaltung der Werte zur minimalen und maximalen Luft-
feuchte von 10%-90%, nicht kondensierend.
• Installieren Sie keine Festplatte wenn das Gerät eingeschaltet ist.
• Schalten Sie das Gerät während des Startvorganges oder während eines Firm
ware-Upgrades nicht wechselnd Ein/Aus, die Firmware kann dadurch beschädigt
werden.
• Verwenden Sie nur das mitgelieferte Netzteil. Die Verwendung anderer Netzteile
kann zur Beschädigung des Gerätes und zur Aberkennung der Garantie führen.
• Bitte lesen Sie die Bedienungsanleitung bevor Sie das Gerät benutzen.
VERÄNDERUNGEN ODER MODIFIZIERUNGEN DIESES PRODUKTES IN JED-
ER ART UND WEISE OHNE AUSDRÜCKLICHE GENEHMIGUNG VON GRANDSTREAM INC., SIND NICHT GESTATTET UND FÜHREN ZUR ABERKENNUNG
DER GARANTIE UND GEWÄHRLEISTUNG.
DIE VERVIELFÄLTIGUNG SOWIE DIE VERBREITUNG DIESES DOKUMENTES, GANZ ODER TEILWEISE, IST NUR MIT AUSDRÜCKLICHER, SCHRIFTLICHER GENEHMIGUNG VON GRANDSTREAM NETWORKS, INC. GESTATTET.
Lieferumfang:
1 x Netzteil
1 x Hauptgerät
Übersicht:
Der GVR3550 ist ein leistungsstarker NVR mit hoher Festplattenkapazität. Er bietet eine Vielzahl von Aufzeichnungsmöglichkeiten bei vergleichsweise niedrigen
Anschaffungskosten. Der GVR 3550 ist unter anderem mit Festplatten-Erkennung
und Management, Netzwerkkonguration, Alarmlisten, Schnell-Suchfunktion, Lokal-und Remote-Vorschaufunktion, Mehrfach-Monitoranzeige und Alarmaufzeichnung ausgestattet. Das Gerät kann per Maus/Tastatur, Fernbedienung und über
die Tasten an seiner Vorderseite bedient werden.
INSTALLATION DER FESTPLATTE:
1. Drehen Sie die 4 Schrauben locker in die dafür vorgesehenen Löcher auf der
Rückseite der Festplatte.
2. Entfernen Sie die 8 Schrauben seitlich bzw. an der Rückseite des Hauptgerätes
und heben Sie den Deckel ab.
18 x HDD
Schrauben
4 x SATA Daten2 x SATA Stromkabel
4 x Halterung
12 x Schrauben
2 x Leitungsklemme
1 x Ethernetkabel
1 x Fernbedienung
1 x SchnellInstallationsanleitung
33 34
Page 20

3. Steht das Gerät auf der Seite, sind nun auf der Unterseite die Aufnahmelöcher
für die Festplatte sichtbar.
4. Legen Sie die Festplatte mit den 4 Schrauben in die Öffnungen und schieben
Sie die Festplatte zurück. Schrauben Sie die vier Schrauben fest.
5. Bei mehreren Festplatten wiederholen Sie diese Schritte.
6. Verbinden Sie das SATA Strom- und die Datenkabel mit dem PCB-Board.
7. Schließen Sie die Deckplatte und die festziehen 8 Schrauben.
ANSCHLUSS DES GVR3550:
1. Schließen Sie einen Monitor via HDMI oder VGA an.
2. Verbinden Sie den Netzwerkanschluß des GVR3550 per RJ45 Kabel mit einem
Netzwerk-Switch (Gigabit empfohlen).
3. Stecken Sie das Stromkabel in den GVR3550 und dann in eine Steckdose.
4. Nach erfolgtem Start des GVR3550 sieht die Ansicht wie nachfolgend aus.
Folgen Sie der “Boot-Assistenten”, um das System zu installieren
Achtung:
- GVR3550 passt sich automatisch der Monitorauösung von 1080p oder 720p per HDMI
Anschluss an.
- VGA unterstützt diese automatische Funktion nicht. Ist sowohl der HDMI als auch der VGA Anschluß verbunden, ist nur der HDMI Anschluß aktiv.
- Die Auösung und die Signalausgabe kann manuell im Kongurationsmenü geändert
werden.
35 36
Page 21

Optionale Geräte:
USB Maus/Tastatur:
Verbinden Sie eine Maus oder eine Tastatur via USB um diese am GVR3550 lokal
zu nutzen.
USB Festplatte:
Verbinden Sie eine USB Festplatte, um darauf Bilder oder Videos zu speichern.
eSATA Anschluß:
Die Nutzung einer eSATA Festplatte erfolgt über die passende Schnittstelle an der
Geräterückseite des GVR3550. Die Stromversorgung der eSATA Platte kann auch
via USB Kabel erfolgen (gemäß den eSATA Spezikationen).
Ausgabegeräte:
Der GVR3550 unterstützt Mikrofon (MIC) und Lautsprecher (verstärkt) mit Chinch
(RCA) Schnittstelle.
Alarm:
1. Schließen Sie Alarmgeber an den Alarm Input Port.
2. Schließen Sie Alarmnehmer an den Alarm Output Port.
Achtung:
- Bitte lesen Sie das Benutzerhandbuch für weitere Anschlußmöglichkeiten.
- Falls die Maus oder die Tastatur nicht funktionieren, sind sie eventuell nicht kompatibel mit
dem GVR3550.
KONFIGURATION DES GVR3550 VIA LOKALANSICHT:
1. Folgen Sie der “Boot-Assistenten”, um die GVR3550 kongurieren.
2. Klicken Sie auf “Suche Kamera” zu suchen und hinzufügen, IP-Kameras von
LAN.
37 38
Page 22

4. Klicken Sie auf “Live View”, herunterladen “GVRView.exe”. Close-Browser und
installieren Datei “GVRView.exe”, dann öffnen Browser.
KONFIGURATION DES GVR3550 VIA WEB-SCHNITTSTELLE:
1. Rechts-Klick in der lokalen Ansicht auf “Hauptmenü” => ”Status” => “Netzwerk
Status”, Sie sehen die IP-Adresse des GVR3550.
2. Öffnen Sie den Web browser und geben Sie die IP Adresse des
GVR3550 in das URL Eingabefeld in diesem Format ein:
http://IP-Adresse_GVR3550:Port (Voreingestellter Port ist 80).
3. Nutzen Sie zum Log-In in das Kongurationsmenü das Wort “admin” als Be
nutzername und Passwort.
Für weitere Produkt-Informationen,Benutzerhandbücher und Online-Dokumentationen sowie
technische Fragen/Antworten besuchen Sie bitte unsere Webseite.
http://www.grandstream.com/index.php/products/ip-video-surveillance/gvr3550
http://www.grandstream.com/support
39 40
Page 23

IT
PRECAUZIONI: PANORAMICA:
• Non esporre il dispositivo a temperature esterne alla gamma da 0°C a +50°C
per il funzionamento o alla gamma da -20 °C a +60 °C per la conservazione.
• Non esporre il dispositivo ad ambienti in cui l’umidità relativa è esterna alla gam-
ma: da 10 a 90% UR (senza condensa).
• Non installare unità disco rigido quando il dispositivo è acceso
• Non spegnere/accendere il dispositivo durante l’avvio del sistema o l’aggiorna-
mento del rmware. Questa operazione può corrompere il rmware e danneggi-
are il dispositivo.
• Utilizzare solo l’adattatore di corrente in dotazione. Altri adattatori possono dan
neggiare il prodotto e invalidare la garanzia.
• Consultare la presente guida prima di mettere in funzione il dispositivo.
CAMBIAMENTI O MODIFICHE DEL PRODOTTO NON ESPRESSAMENTE ROVATI DA GRANDSTREAM NETWORKS, INC., O IMPIEGHI DEL PRODOTTO
DIFFORMI DA QUANTO DESCRITTO NELLA PRESENTE GUIDA POSSONO
INVALIDARE LA GARANZIA DEL COSTRUTTORE.
NON È CONSENTITA LA RIPRODUZIONE O LA TRASMISSIONE PER INTERO O PARZIALE, IN QUALSIASI FORMA O TRAMITE QUALSIASI SUPPORTO, ELETTRONICO O CARTACEO, SENZA AUTORIZZAZIONE SCRITTA
DI GRANDSTREAM NETWORKS, INC.
CONTENUTO DELLA CONFEZIONE:
GVR3550 è un dispositivo NVR ad alte prestazioni e con unità disco rigido di
grande capacità. Fornisce una soluzione a basso costo, basata su un sistema di
monitor remoti unicati per piccole e medie imprese. È dotato di rilevamento e gestione unità disco rigido, congurazione di rete, elenco eventi di allarme, ricerca veloce remota/locale, anteprima remota e locale integrata, visualizzazione schermo
multiplo e registrazione allarmi. Supporta anche operazioni rapide tramite mouse,
tastiera, pulsanti sul pannello frontale e telecomando.
INSTALLAZIONE UNITÀ DISCO RIGIDO:
1. Installare le viti in dotazione nei 4 fori presenti sul lato inferiore dell’unità disco
rigido, senza avvitarle troppo.
2. Rimuovere le 8 viti dai pannelli posteriore e laterale del dispositivo per aprire il
pannello di rivestimento.
1 x Unità principale
2 x Cavo di
alimentazione
SATA Cavo
18 x HDD
Viti
4 x Staffa di Montaggio
con 12 Viti
4 x Cavo dati
SATA Cavo
2 x Filo
Clamper
1 x Cavo Ethernet
1 x Adattatore dicorrente
1 x Telecomando
1 x Guida Introduttiva
41 42
Page 24

3. Appoggiare su un lato il dispositivo aperto, in modo che possano essere facil mente individuati i fori delle viti sulla base inferiore della struttura.
4. Inserire l’unità disco rigido (con le 4 viti montate) in corrispondenza dei fori sulla
base della struttura, facendolo scorrere nell’apertura stretta, quindi serrare le
4 viti.
5. Ripetere i passaggi nel caso di più unità disco rigido.
6. Collegare i cavi SATA per alimentazione e dati dall’unità disco rigido alla scheda
a circuito stampato.
7. Chiudere il pannello di rivestimento e serrare le 8 viti.
COLLEGAMENTO DI GVR3550:
1. Collegare un dispositivo di visualizzazione sull’interfaccia HDMI o VGA.
2. Collegare il cavo di rete dall’interfaccia RJ45 di GVR3550 a uno switch di rete
(consigliato Gigabit).
3. Collegare l’adattatore di corrente dal dispositivo alla fonte di alimentazione.
4. Quando GVR3550 è correttamente alimentato, viene mostrata la schermata
principale delle visualizzazioni locali, come illustrato di seguito. Seguire il
“Boot Wizard” per installare il sistema
Nota:
- GVR3550 può regolarsi automaticamente a monitor HDMI 1080p o 720p.
- VGA non supporta la correzione automatica della risoluzione. Nel caso fossero collegate
entrambe le porte VGA e HDMI, funzionerà solo la visualizzazione HDMI.
- Dal menu di congurazione, l’utente può congurare manualmente la visualizzazione e la
risoluzione.
43 44
Page 25

Dispositivi Opzionali:
Mouse/tastiera USB:
Collegare un mouse o una tastiera alla porta USB per l’uso nella visualizzazione
locale di GVR3550.
Dispositivo di archiviazione USB:
Collegare un dispositivo di archiviazione USB per memorizzare le video o immagine.
Dispositivo eSATA:
Collegare il dispositivo eSATA all’interfaccia corrispondente sul pannello posteriore
di GVR3550. Mettere in tensione il dispositivo eSATA o utilizzare il cavo USB per
fornire alimentazione (la modalità di collegamento rispetta le speciche eSATA).
Dispositivi di uscita:
GVR3550 supporta microfono e altoparlante (amplicato) con interfaccia RCA.
Dispositivi di allarme:
1. Collegare il dispositivo di ingresso allarme alla porta di ingresso allarme.
2. Collegare il dispositivo di uscita allarme alla porta di uscita allarme.
Nota:
- Consultare il Manuale utente per congurare i dispositivi opzionali.
- Può essere necessaria una congurazione supplementare.
- Se mouse/tastiera non funzionano, è possibile che siano incompatibili con GVR3550.
CONFIGURAZIONE DI GVR3550 TRAMITE LA
VISUALIZZAZIONE LOCALE:
1. Seguire il “Boot Wizard” per congurare il GVR3550.
2. Fare clic su “Search Camera” per cercare e aggiungere telecamere IP di rete
LAN.
45 46
Page 26

4. Fare clic su “Live View”, download “GVRView.exe”. Chiudere il browser e
installare. File “GVRView.exe”, quindi aprire il browser.
CONFIGURAZIONE DI GVR3550 TRAMITE
L’INTERFACCIA GRAFICA REMOTA:
1. Accedere alla visualizzazione locale e selezionare “Menu principale” => ”Stato”
=> “Stato della rete” per identicare l’indirizzo IP di GVR3550.
2. Aprire il browser Web e immettere l’indirizzo IP di GVR3550
nella barra degli indirizzi, secondo il formato:
http://Indirizzo_IP_di_GVR3550:Porta (La porta predenita è la 80).
3. Accedere all’interfaccia di congurazione come mostrato di seguito, utilizzando
“admin” per il nome utente e la password.
Per informazioni più dettagliate, visitare il nostro sito Web per scaricare il Manuale utente o
consultare la documentazione in linea e le FAQ.
http://www.grandstream.com/index.php/products/ip-video-surveillance/gvr3550
http://www.grandstream.com/support
47 48
Page 27

RU
МЕРЫ ПРЕДОСТОРОЖНОСТИ: ОБЗОР ПРОДУКТА:
• Не подвергать прибор воздействию температуры сверх диапазона от 0 °C до +50 °C
– в условиях эксплуатации и от -20°C до +60 °- в условиях хранения.
• Не подвергать прибор воздействию влаги сверх диапазона 10-90% относительной
влажности (без образования конденсата).
• Не устанавливать дисковод для жестких дисков, пока прибор подключен к сети
питания.
• Не прибегать к циклу включения-выключения прибора в процессе начального запуска
системы или в процессе обновления прошивки. Это может привести к повреждению
микропрограммы и устройства.
• Использовать только тот адаптер, который входит в комплект поставки. Использование
другого адаптера может привести к повреждению прибора и к нарушению условий
гарантии.
• Пожалуйста, ознакомьтесь с данным руководством перед началом эксплуатации
прибора.
ИЗМЕНЕНИЯ ИЛИ МОДИФИКАЦИИ ДАННОГО ПРОДУКТА, НЕ УТВЕРЖДЕННЫЕ
КОМПАНИЕЙ GRANDSTREAM NETWORKS, INC., ЛИБО ЭКСПЛУАТАЦИЯ ПРОДУКТА
ЛЮБЫМ СПОСОБОМ, ОТЛИЧНЫМ ОТ УКАЗАННОГО В ДАННОМ РУКОВОДСТВЕ
МОГУТ ПРИВЕСТИ К НЕДЕЙСТВИТЕЛЬНОСТИ ЗАВОДСКОЙ ГАРАНТИИ.
ВОСПРОИЗВОДСТВО ИЛИ ПЕРЕДАЧА ПРИВЕДЕННЫХ ЗДЕСЬ ДАННЫХ ЦЕЛИКОМ
ИЛИ ЛЮБОЙ ИХ ЧАСТИ, В ЛЮБОЙ ФОРМЕ И ЛЮБЫМИ СРЕДСТВАМИ, В
ЭЛЕКТРОННОМ ИЛИ ПЕЧАТНОМ ВИДЕ, ДЛЯ ЛЮБЫХ ЦЕЛЕЙ БЕЗ ПИСЬМЕННОГО
РАЗРЕШЕНИЯ GRANDSTREAM NETWORKS, INC НЕ ДОПУСТИМО.
СОДЕРЖИМОЕ УПАКОВКИ:
1 x адаптер источника питания
1 x корпус
Модель GVR3550 представляет собой высокопроизводительное устройство
NVR с большой емкостью жесткого диска. Продукт предоставляет решение
единой системы дистанционного наблюдения для малых и средних
предприятий по низким ценам. Прибор оснащен функциями обнаружения
HDD и управления, конфигурации сети, списка событий сигнализации,
быстрого дистанционного / местного поиска, встроенной функцией
локального и удаленного предварительного просмотра, изображения на
нескольких экранах и функцией записи аварийного сигнала. Устройство
также поддерживает функцию быстродействия с помощью мыши, клавиатуры
дистанционного управления и кнопок на передней панели.
УСТАНОВКА ЖЕСТКОГО ДИСКА:
1. Ввернуть болты из комплекта поставки в 4 отверстия в нижней части жестк ого диска.
2. Вывернуть 8 болтов на задней и боковой панели устройства и открыть
крышку.
2 x кабель
питания SATA
18 x HDD
болтов
4 x кабель
данных SATA
4 x кронштейн
с 12 болтов
2 x провод
фиксатор
1 x кабель Ethernet
49 50
1 x пульт дистанционного
управления
1 x Краткое практическое
руководство
Page 28

3. Сдвинуть крышку таким образом, чтобы можно было видеть отверстия для
болтов в нижней части корпуса.
4. Поместить жесткий диск (с 4 болтами) над отверстиями в нижней секции и
закрутить 4 болта.
5. Повторить вышеуказанные шаги, если имеется несколько дисков.
6. Подключить кабель питания SATA и кабели данных от дисков к панели-
PCB.
7. Закрыть крышку и ввернуть 8 болтов.
ПОДКЛЮЧЕНИЕ GVR3550:
1. Подключить дисплей к HDMI или VGA разъему.
2. Подключить сетевой кабель разъемом RJ45 устройства GVR3550 к
сетевому коммутатору (рекомендуется гигабитная сеть).
3. Подключите адаптер питания от устройства к источнику питания.
4. Когда устройство GVR3550 правильно подключено на экране будет
отображаться главное меню, как указано ниже. Следуйте “загрузки
мастера”, чтобы установить систему.
Примечание:
- GVR3550 может автоматически переключаться между разрешением 1080p или 720p
HDMI монитора.
- VGA-монитор не поддерживает автоматическое согласование разрешения. При
одновременном подключении через VGA и HDMI порт, только дисплей HDMI будет
активен.
- Пользователь может вручную настроить через конфигурационное меню монитор
и разрешение монитора.
51 52
Page 29

Дополнительные устройства:
Мышь/клавиатура USB:
Подключить мышь или клавиатуру к USB порту для просмотра изображения с устройства
GVR3550.
Внешние USB-устройства хранения данных:
Подключить внешнее USB-устройство к порту USB для хранения видео или файлов с
изображениями.
Устройство eSATA:
Подключить устройство eSATA к соответствующему разъему на задней панели GVR3550.
Запитать устройство eSATA или использовать USB-кабель для подключения устройства
(режим подключения в соответствии со спецификацией eSATA).
Устройства вывода:
GVR3550 поддерживает микрофон и звуковые колонки (со встроенным илителем)
через RCA-разъем.
Сигнальное устройство:
1. Подключить входной порт сигнального устройства.
2. Подключить выходной порт сигнального устройства.
Примечание:
- Пожалуйста, ознакомьтесь с руководством пользователя для установки дополнит ельных устройств. Может потребоваться дополнительная настройка.
- Если мышь / клавиатура не работает, возможно, они не поддерживаются устройс твом GVR3550.
НАСТРОЙКА GVR3550 ЧЕРЕЗ ГЛАВНОЕ МЕНЮ:
1. Следуйте “загрузки мастера”, чтобы настроить GVR3550.
2. Нажмите кнопку “Поиск фотокамеры”, чтобы найти и добавить IP-камер
от локальной сети.
53 54
Page 30

4. Нажмите кнопку “Live View”, скачать “GVRView.exe”. Закрыть браузер и
установите “GVRView.exe” файл, а затем открыть браузер.
НАСТРОЙКА GVR3550 ЧЕРЕЗ УДАЛЕННЫЙ WEB-ИНТЕРФЕЙС:
1. Войти в локальное состояние и перейти в “Главное меню”=>”Состояние”=>
“Состояние сети” для определения IP-адреса устройства GVR3550.
2. Открыть веб-браузер и ввести IP-адрес GVR3550 в поле URL
в формате: http://IP-Address_GVR3550:Port
(По умолчанию используется порт 80).
3. Введите логин и пароль к меню настройки, как показано ниже, используя
“admin” в качестве имени пользователя и пароля.
Для получения более подробной информации, пожалуйста, посетите наш веб-сайт,
чтобы загрузить руководство пользователя, просмотреть документы в режиме
online или часто задаваемые вопросы.
http://www.grandstream.com/index.php/products/ip-video-surveillance/gvr3550
http://www.grandstream.com/support
55 56
Page 31

PT
PRECAUTIONS: RESUMO:
• Não exponha este dispositivo a temperaturas fora do intervalo de 0 °C a
+50 °C quando em operação ou -20°C a +60 °C quando em armazenamento.
• Não exponha este dispositivo a ambientes fora do seguinte intervalo de humi-
dade: 10-90% HR (sem condensação).
• Não instalar disco rígido enquanto o dispositivo estiver ligado.
• Não reinicialize o dispositivo quando o sistema está arrancando ou durante atu-
alização rmware. Pode corromper o rmware e danicar o dispositivo.
• Use apenas a fonte de alimentação fornecida pelo dispositivo. Outro adaptador
pode danicar o dispositivo e anulará a garantia.
• Por favor, siga este guia antes de utilizar o dispositivo.
ALTERAÇÕES OU MODIFICAÇÕES AO DISPOSITIVO NÃO APROVADAS EXPRESSAMENTE PELA GRANDSTREAM NETWORKS, INC., OU A OPERAÇÃO
DO DISPOSITIVO DE QUALQUER FORMA DIFERENTE DA DESCRITA POR
ESTE GUIA PODE ANULAR A GARANTIA DE FÁBRICA.
REPRODUÇÃO OU RETRANSMISSÃO DE TODA OU QUALQUER PARTE
DESTE DOCUMENTO, SOB QUALQUER FORMA OU POR QUALQUER MEIO,
ELETRÔNICO OU IMPRESSÃO, PARA QUALQUER FINALIDADE SEM A PERMISSÃO EXPRESSA POR ESCRITO DA GRANDSTREAM NETWORKS, INC.
NÃO É PERMITIDA.
CONTEÚDO DA EMBALAGEM:
GVR3550 é um dispositivo NVR com alto desempenho e grande capacidade de
armazenamento em disco rígido. Ele fornece uma solução unicada em sistemas
de monitorização remotos para pequenas e médias empresas, e a baixo custo.
É equipado com deteção e gestão de disco rígido, conguração de rede, lista de
eventos de alarme, busca rápida remota/local, previsualização local e remota integrada, exibição em tela múltipla e gravação de alarme.Também suporta operação
rápida usando rato, teclado, controle remoto e botões no painel frontal.
INSTALANDO O DISCO RÍGIDO:
1. Coloque, deixando folga, os parafusos fornecidos nos 4 orifícios na superfície
inferior do disco rígido.
2. Remova 8 parafusos dos painéis traseiro e de lado do dispositivo, e em se
guida, abra o painel de cobertura.
1 x Caixa Principal
2 x Cabo de
Alimentação SATA
18 x HDD
Parafusos
57 58
Dados SATA
4 x Suporte de
Montagem com
12 Parafusos
2 x Grampeador
de os
1 x Cabo de Ethernet
1 x Adaptador
1 x Controle Remoto4 x Cabo de
1 x Guia de Iniciação
Rápida
Page 32

3. Levante e coloque de lado a caixa aberta para visualizar claramente os orifícios
no painel inferior.
4. Coloque o disco rígido (com os 4 parafusos montados) nos orifícios do painel
inferior, deslize-o contra a abertura estreita, e aperte os parafusos.
5. Repita os passos acima se tiver mais discos rígidos.
6. Conecte os cabos SATA de alimentação e dados the entre os discos rígidos e
a placa PCB.
7. Monte de novo o painel de cobertura e aperte os 8 parafusos.
CONECTANDO O GVR3550:
1. Conecte um monitor ao interface HDMI ou VGA.
2. Conecte o cabo Ethernet entre a porta RJ45 do GVR3550 e o switch da rede
(Gigabit recomendado).
3. Conecte o adaptador entre o dispositivo e a tomada elétrica.
4. Quando o GVR3550 é inicializado com sucesso, o monitor irá exibir a vista local
da tela principal como ilustrado abaixo. Siga o “Assistente de Inicialização”
para instalar o sistema
Nota:
- GVR3550 se adapta automaticamente a monitores HDMI 1080p ou 720p.
- VGA não suporta detecção automática de resolução. Quando as portas VGA e HDMI estão
ambas conectadas, apenas a ligação HDMI cará activa.
- O usuário pode congurar manualmente o monitor e a resolução através do menu de
denições.
59 60
Page 33

Dispositivos Opcionais:
Rato/teclado USB:
Conecte um rato ou teclado à porta USB para uso com a vista local do GVR3550.
Dispositivo de armazenamento USB:
Conecte um dispositivo de armazenamento à porta USB para guardar cheiros
de video ou imagem.
Dispositivo eSATA:
Conecte o dispositivo eSATA ao interface correspondente no painel traseiro do
GVR3550. Lige o dispositivo eSATA ou use um cabo USB para alimentação (o
modo de conexão está em conformidade com a especicação de eSATA).
Dispositivo de Saída:
GVR3550 suporta o microfone e alto-falante (amplicado) com interface de jack
de RCA.
Dispositivos de Alarme:
1. Ligue o dispositivo de entrada de alarme na porta de entrada de alarme.
2. Conecte o dispositivo de saída de alarme na porta de saída de alarme.
Nota:
- A Por favor consulte o Manual do usuário para congurar os dispositivos opcionais.
Conguração adicional pode ser necessária.
- Se o rato ou teclado não está funcionando, pode ser que seja incompatível com o
GVR3550.
CONFIGURANDO GVR3550 VIA VISTA LOCAL:
1. Siga o “Assistente de Inicialização” para congurar o GVR3550.
2. Clique em “Procurar Camera” para procurar e adicionar câmeras IP da LAN.
61 62
Page 34

4. Clique em “Live View”, baixe “GVRView.exe”. Feche o navegador e instale
Arquivo “GVRView.exe”, abra o navegador de novo.
CONFIGURAÇÃO REMOTA VIA GUI DA WEB:
1. Faça login in vista local e aceda a “Menu Principal”=>“Status”=>“Estado da
Rede” e identique o endereço IP address do GVR3550.
2. Abra o navegador da web e digite o endereço IP do GVR3550 no
campo URL no seguinte formato: http://IP-Address_GVR3550:Port
(A porta padrão é 80)
3. Faça login para o interface de conguração, como mostrado abaixo usando
“admin” como o nome de usuário e senha.
Para informação mais detalhada, visite o Web site para baixar o Manual do usuário, ou aceder
a documentos on-line e FAQ.
http://www.grandstream.com/index.php/products/ip-video-surveillance/gvr3550
http://www.grandstream.com/support
63 64
Page 35

PL
ŚRODKI OSTROŻNOŚCI: OPIS URZĄDZENIA:
• Nie należy wystawiać urządzenia na działanie temperatur wykraczających
poza zakres 0°C do +50°C podczas eksploatacji i -20°C do +60°C podczas
przechowywania.
• Nie należy używać urządzenia w środowisku o wilgotności wykraczającej poza
zakres: 10–90% wilgotności względnej (bez kondensacji).
• Nie należy instalować dysku twardego, gdy urządzenie jest włączone.
• Nie należy wyłączać i ponownie włączać urządzenia, podczas rozruchu systemu
lub aktualizacji oprogramowania układowego. Może to spowodować uszkodze nie oprogramowania układowego i urządzenia.
• Należy korzystać wyłącznie z dołączonych zasilaczy. Stosowanie innych zasi-
laczy może spowodować uszkodzenie produktu i unieważnienie gwarancji.
• Przed rozpoczęciem korzystania z urządzenia należy zapoznać się z tą instrukcją.
ZMIANY LUB MODYFIKACJE TEGO PRODUKTU NIEZATWIERDZONE
WYRAŹNIE PRZEZ FIRMĘ GRANDSTREAM NETWORKS, INC. LUB
UŻYTKOWANIE PRODUKTU W JAKIKOLWIEK INNY SPOSÓB NIŻ OPISANY W NINIEJSZEJ INSTRUKCJI MOŻE SPOWODOWAĆ UNIEWAŻNIENIE
GWARANCJI PRODUKTU.
REPRODUKCJA LUB RETRANSMISJA NINIEJSZEGO DOKUMENTU LUB
JAKIEJKOLWIEK JEGO CZĘŚCI W DOWOLNEJ FORMIE I PRZY UŻYCIU
JAKICHKOLWIEK ŚRODKÓW, ELEKTRONICZNYCH LUB PISEMNYCH, W
JAKIMKOLWIEK CELU BEZ WYRAŹNEJ PISEMNEJ ZGODY FIRMY GRANDSTREAM NETWORKS, INC. NIE JEST DOZWOLONA.
ZAWARTOŚĆ OPAKOWANIA:
Urządzenie GVR3550 jest rejestratorem NVR o wysokiej wydajności i dużej
pojemności dysku twardego. Oferuje ono zestaw zunikowanych rozwiązań zdalnego monitorowania dla małych i średnich przedsiębiorstw w przystępnej cenie.
Dysponuje funkcją wykrywania dysku twardego i zarządzania nim, konguracji
sieci, listy zdarzeń alarmów, zdalnego/lokalnego szybkiego wyszukiwania, zintegrowanego lokalnego i zdalnego podglądu, wyświetlania na wielu ekranach oraz
rejestracji alarmów. Urządzeniem można w szybki sposób sterować przy użyciu
myszy, klawiatury, pilota zdalnego sterowania i przycisków panelu przedniego.
INSTALACJA DYSKU TWARDEGO:
1. Luźno wkręcić dołączone śruby w 4 otwory na spodzie dysku twardego.
2. Wykręcić 8 śrub z tylnej i bocznej ściany urządzenia, a następnie zdjąć pokrywę
górną.
1 x jednostka główna
2 x przewód
zasilania SATA
18 x HDD
śruba
65 66
4 x przewód
danych SATA
4 x wspornik do
montażu na
z 12 śruba
2 x clamper
drutu
1 x przewód Ethernet
1 x zasilacz
1 x pilot zdalnego sterowania
1 x Skrócona instrukcja
obsługi
Page 36

3. Ustawić w pionie otwarte urządzenie na jego bocznej ścianie, aby otwory na
śruby w pokrywie dolnej były widoczne.
4. Umieścić dysk twardy (z 4 śrubami), dopasowując łby śrub do otworów w pokry
wie dolnej, przesunąć dysk, tak aby łby śrub znalazły się w węższej części
otworów, a następnie dokręcić 4 śruby.
5. Powtórzyć powyższe kroki w przypadku instalacji kilku dysków twardych.
6. Przewodami zasilania i danych SATA połączyć dysktwardy z płytką drukowaną.
7. Założyć pokrywę i wkręcić 8 śrub.
PODŁĄCZANIE URZĄDZENIA GVR3550:
1. Podłączyć urządzenie wyświetlające do gniazda HDMI lub VGA.
2. Podłączyć kabel sieciowy do gniazda RJ45 urządzenia GVR3550 i przełącznika
sieciowego (zalecane urządzenie rmy Gigabit).
3. Podłączyć zasilacz do urządzenia i źródła zasilania.
4. Po pomyślnym włączeniu zasilania urządzenia GVR3550 wyświetlony zostanie
ekran główny widoku lokalnego, jak pokazano poniżej. Postępuj zgodnie z
“Boot Wizard”, aby zainstalować system
Uwaga:
- Urządzenie GVR3550 umożliwia automatyczne dostosowywanie parametrów wyświetlania
do monitora HDMI o rozdzielczości 1080p lub 720p.
- Automatyczne dostosowywanie rozdzielczości nie jest obsługiwane w przypadku gniazda
VGA. W przypadku jednoczesnego połączenia przez porty HDMI i VGA aktywne będzie
wyłącznie wyświetlanie za pośrednictwem interfejsu HDMI.
- Użytkownik może ręcznie skongurować ekran wyjściowy i rozdzielczość w menu kongu
racyjnym.
67 68
Page 37

Urządzenia opcjonalne:
Mysz/klawiatura USB:
Istnieje możliwość podłączenia myszy lub klawiatury do portu USB w celu użycia
z widokiem lokalnym na urządzeniu GVR3550.
Pamięć masowa USB:
Podłączenie pamięci masowej USB do portu USB umożliwia zapisywanie plików
lmów i obrazów.
Urządzenie eSATA:
Urządzenie eSATA można podłączyć do odpowiedniego gniazda na tylnej ścianie
urządzenia GVR3550. Należy podłączyć zasilanie do urządzenia eSATA lub użyć
kabla USB do podłączenia zasilania (tryb połączenia powinien być zgodny ze
specykacją urządzenia eSATA).
Urządzenia wyjściowe:
Urządzenie GVR3550 umożliwia podłączenie mikrofonu oraz głośnika (ze wzmocnieniem) za pomocą interfejsu RCA.
Urządzenia alarmowe:
1. Podłączyć urządzenie wejściowe alarmu do portu wejściowego alarmu.
2. Podłączyć urządzenie wyjściowe alarmu do portu wyjściowego alarmu.
Uwaga:
- Informacje o konguracji opcjonalnych urządzeń znajdują się w Instrukcji obsługi.
- Może być konieczna dodatkowa konguracja. Jeśli mysz/klawiatura nie działa, może być niezgodna z
urządzeniem GVR3550.
KONFIGURACJA URZĄDZENIA GVR3550 W
WIDOKU LOKALNYM:
1. Postępuj zgodnie z “Boot Wizard”, aby skongurować GVR3550.
2. Kliknij przycisk “Search” do wyszukiwania aparatu i dodaj kamer IP z sieci
LAN.
69 70
Page 38

4. Kliknąć “Live View”, pobierz “GVRView.exe”. Zamknij przeglądarkę i zainstalować
“GVRView.exe” plik, a następnie otwórz przeglądarkę.
KONFIGURACJA URZĄDZENIA GVR3550 Z POZIOMU
ZDALNEGO GRAFICZNEGO INTERFEJSU SIECIOWEGO:
1. Zalogować się do widoku lokalnego i przejść do opcji “Main Menu” (Menu
główne) => “Status” (Stan) => “Network Status” (Stan sieci), aby określić adres
IP urządzenia GVR3550.
2. Otwórz przeglądarkę internetową i wpisz adres IP GVR3550 do URL
pole w formacie: http://Adres-IP_GVR3550:Port (Domyślny port to 80).
3. Zalogować się do interfejsu konguracyjnego, jak pokazano poniżej, używając
nazwy użytkownika i hasła “admin”.
Bardziej szczegółowe informacje znajdują się w naszej witrynie internetowej, gdzie można pobrać Instrukcję
obsługi lub zapoznać się z dokumentami online oraz najczęściej zadawanymi pytaniami.
http://www.grandstream.com/index.php/products/ip-video-surveillance/gvr3550
http://www.grandstream.com/support
71 72
 Loading...