

Page 1

Grandstream Networks, Inc.
GSurf_Pro
Video Management Software
GSurf_Pro User Manual www.grandstream.com
Version 1.0.0.12 http://esupport.grandstream.com
Page 2

TABLE OF CONTENTS
GSurf_Pro User Manual
WELCOME.................................................................................................................................................... 5
PRODUCT OVERVIEW ................................................................................................................................ 6
FEATURE HIGHTLIGHTS ..................................................................................................................... 6
INSTA LLATION GUIDE ................................................................................................................................ 7
MINIMUM RECOMMENDED SYSTEM REQUIREMENT ..................................................................... 7
INSTALL GSURF_PRO ......................................................................................................................... 7
UNINSTALL GSURF_PRO .................................................................................................................... 8
LOGIN GSURF_PRO ............................................................................................................................ 9
GSURF_PRO MAIN WINDOW ............................................................................................................ 10
GSURF_PRO TOOLBAR .................................................................................................................... 11
GSURF_PRO VIDEO PLAY BAR ........................................................................................................ 12
CONFIGURATION GUIDE .......................................................................................................................... 13
ADD/DELETE DEVICE ........................................................................................................................ 13
ADD DEVICE ................................................................................................................................ 13
DELETE DEVICE ......................................................................................................................... 15
SEARCH DEVICE ................................................................................................................................ 16
SEARCH DEVICE ........................................................................................................................ 16
MODIFY IP.................................................................................................................................... 17
CONFIGURE TIME SCHEDULE ......................................................................................................... 18
CONFIGURE ALARM TRIGGERS AND RULES ................................................................................. 20
LOCAL CONFIGURATION .................................................................................................................. 22
SOFTWARE CONFIGURATION .................................................................................................. 22
RECORD CONFIG ....................................................................................................................... 22
DEVICE CONFIGURATION ................................................................................................................. 23
LANGUAGE DISPLAY ......................................................................................................................... 23
RECORD CONFIGURATION .............................................................................................................. 24
MANUAL RECORD ...................................................................................................................... 24
AUTOMATIC RECORD ................................................................................................................ 24
REPLAY ........................................................................................................................................ 25
ELECTRONIC MAP ............................................................................................................................. 26
ADD MAP ..................................................................................................................................... 26
ADD DEVICE TO MAP ................................................................................................................. 27
SET ALARM ON MAP .................................................................................................................. 28
LOCK/UNLOCK MAP ................................................................................................................... 28
REMOVE DEVICE FROM MAP ................................................................................................... 28
Grandstream Networks, Inc. GSurf_Pro USER MANUAL Page 2 of 45
Version 1.0.0.12 Updated : 06/2013
Page 3

REMOTE CONFIGURATION ............................................................................................................... 28
PTZ CONTROL .................................................................................................................................... 29
VIDEO MONITOR ................................................................................................................................ 30
INDIVIDUAL VIEW ....................................................................................................................... 30
GROUP VIEW/PATROL MODE .................................................................................................... 30
BROADCAST ....................................................................................................................................... 32
SYNCHRONIZE DEVICE TIME ........................................................................................................... 33
CONVERT VIDEO FORMAT ............................................................................................................... 34
USER MANAGEMENT ........................................................................................................................ 34
IMPORT/EXPORT CONFIGURATION ................................................................................................ 36
GSURF_PRO TRANSFER SERVER ......................................................................................................... 37
SERVER SIDE ..................................................................................................................................... 37
CLIENT SIDE ....................................................................................................................................... 39
GSURF_PRO FILE SERVER ..................................................................................................................... 40
SERVER SIDE ..................................................................................................................................... 40
CLIENT SIDE ....................................................................................................................................... 41
FREQUENTLY A SKED QUESTIONS ........................................................................................................ 42
EXPERIENCING THE GRANDSTREAM GSURF_PRO ............................................................................ 43
T
ABLE OF TABLES
GSurf_Pro User Manual
Table 1: GSURF_PRO MAIN WINDOW ITEMS ......................................................................................... 10
Table 2: GSURF_PRO TOOLBAR ICONS ................................................................................................. 11
Table 3: GSURF_PRO VIDEO PLAY BAR ICONS ..................................................................................... 12
Table 4: COMPARISON OF GSURF_PRO AND GSURF…………………………………………………….. 44
Grandstream Networks, Inc. GSurf_Pro USER MANUAL Page 3 of 45
Version 1.0.0.12 Updated : 06/2013
Page 4

TABLE OF FIGURES
GSurf_Pro User Manual
Figure 1: GSurf_Pro Overview ...................................................................................................................... 6
Figure 2: GSurf_Pro Installation .................................................................................................................... 8
Figure 3: GSurf_Pro Login ............................................................................................................................ 9
Figure 4: GSurf_Pro Main Window ............................................................................................................. 10
Figure 5: GSurf_Pro Video Display Window - Play B a r .............................................................................. 12
Figure 6: Add Device ................................................................................................................................... 14
Figure 7: Video Display After Adding Device .............................................................................................. 14
Figure 8: Delete Device ............................................................................................................................... 15
Figure 9: GSurf_Pro Search Tool - Search Devices ................................................................................... 16
Figure 10: GSurf_Pro Search Tool - Modify IP ............................................................................................ 17
Figure 11: Gsurf_Pro Time Schedule .......................................................................................................... 18
Figure 12: GSurf_Pro Auto Record Time Schedule .................................................................................... 19
Figure 13: GSurf_Pro Alarm Action Rule .................................................................................................... 20
Figure 14: Assign Alarm Action Rule To Device .......................................................................................... 21
Figure 15: GSurf_Pro Local Configure - Record Configure ........................................................................ 22
Figure 16: Language Displa y ...................................................................................................................... 23
Figure 17: Manual Record........................................................................................................................... 24
Figure 18: Automatic Record....................................................................................................................... 24
Figure 19: Replay ........................................................................................................................................ 25
Figure 20: Add Map ..................................................................................................................................... 26
Figure 21: Add Map Alarm........................................................................................................................... 27
Figure 22: Remote Configur ation ................................................................................................................ 29
Figure 23: Add Device To Group ................................................................................................................. 30
Figure 24: Configure Group Attributes For Patrol Mode ............................................................................. 31
Figure 25: Broadcast ................................................................................................................................... 32
Figure 26: Device Time Configuration ......................................................................................................... 33
Figure 27: Media Convert Tool .................................................................................................................... 34
Figure 28: User Management ..................................................................................................................... 35
Figure 29: Configuration Impor t and Expor t ................................................................................................ 36
Figure 31: Transfer Server Configuration .................................................................................................... 38
Figure 32: Add Devices To Transfer List ..................................................................................................... 38
Figure 33: RTSP Server .............................................................................................................................. 39
Figure 34: GSurf_Pro File Server ............................................................................................................... 40
Figure 35: Replayer Remote Search .......................................................................................................... 41
Grandstream Networks, Inc. GSurf_Pro USER MANUAL Page 4 of 45
Version 1.0.0.12 Updated : 06/2013
Page 5

WELCOME
Thank you for using Grandstream GSurf_Pro Network Video Surveillance System. Based on TCP/IP,
Gsurf_Pro utilizes C/S architecture on distributed system, managing up to 10*36 channels. It can
effectively reduce the network traffic and cameras' workload by providing the transferring mechanism. Also,
users could search and download the recording files remotely via the file management. Featuring functions
of electronic map, preview, search, recording, alarm, playback, PTZ and etc., Gsurf_Pro is a powerful
monitoring and recording system with intuitive interface as well as easy operation.
This user manual is des igned to help you understand how to integrate your cameras and digita l video
servers with GSurf_Pro software.
Note:
This document is s ubject to change without no tice. The latest electronic version of this user manual is
available for download here:
http://www.grandstream.com/support
Reproduction or transm ittal of the entire or an y part, in any form or by any means, electronic or pr int, for
any purpose without the express written permission of Grandstream Networks, Inc. is not permitted.
Grandstream Networks, Inc. GSurf_Pro USER MANUAL Page 5 of 45
Version 1.0.0.12 Updated : 06/2013
Page 6

PRODUCT OVERVIEW
FEATURE HIGHTLIGHTS
• Built-in transfer server to forward the front-end real-time video streaming across network
• Capability to configure primary stream and secondary stream display according to the PC platform
• Embedded file sharing server for searching and do wnl oad ing rec orded files remotely
• PTZ control
• Integrated tools to synchronize time on the cameras, transform format for the recording files
• 36 channels video streams for group viewing or patrol mode
• Two-way audio/video monitoring and alarm
• Flexible alarm mechanism including relay output control and email alarm
Figure 1: GSurf_Pro Overview
Grandstream Networks, Inc. GSurf_Pro USER MANUAL Page 6 of 45
Version 1.0.0.12 Updated : 06/2013
Page 7

INSTALLATION GUIDE
MINIMUM COMPUTER SYSTEM REQUIREMENT
SERVER:
Operating System: Windows 2003/2008 Server; Windows XP SP2/SP3; Windows 7 32bit/64bit
Processor: Intel® Core™ i3; 2.6GHz or above recommended
Memory Capacity (RAM): 4GB or above
Hard Drive Capacity: 320G (dependi ng on video recording requirement)
Graphics Card Type: Discrete Graphics Card (nVIDIA GEFORCE® GTX660 or above recommended)
Network Adapter: 1000Mbps network adapter
CLIENTS:
Operating System: Windows XP SP2/SP3; Windows Vista; Windows 7 32bit/64bit; Windows 8
Processor: Intel® Core 2 Duo ™ or above
Memory Capacity (RAM): 2GB or above
Hard Drive Capacity: 120G (depending on recording requirement)
Graphics Card Type: Discrete Graphics Card recommended
Network Adapter: 100Mbps network adapter, 1000Mbps recommended
NOTE:
UPS is required for SERVER to prevent database or video record file corruption caused by power outage.
Grandstream Networks, Inc. GSurf_Pro USER MANUAL Page 7 of 45
Version 1.0.0.12 Updated : 06/2013
Page 8

INSTALL GSURF_PRO
Click to run the GSurf_Pr o installation .exe file. Follow the instructions in the prompted windows to s tart
installation. Once done, the following screen will show.
Figure 2: GSurf_Pro Installation
NOTE:
• The initial installation only supporting English.
• Once program installed, user can switch to supported different langu ages.
Grandstream Networks, Inc. GSurf_Pro USER MANUAL Page 8 of 45
Version 1.0.0.12 Updated : 06/2013
Page 9

UNINSTALL GSURF_PRO
To uninstall GSurf_Pro, in your windows PC Start Menu->Programs->GSurf_Pro, click on Uninstall
GSurf_Pro to start uninstall pr oces s. Or you could uni nstal l the program f rom your windows PC's Contr ol
Panel.
LOGIN GSURF_PRO
Click to run GSurf_Pro. The login page will prompt for your User ID and Password. The administrator User
ID and Password are both set to admin at the factory default settings.
For security purpose, please change the password after the first time you log in to GSurf_Pro.
Figure 3: GSurf_Pro Login
Grandstream Networks, Inc. GSurf_Pro USER MANUAL Page 9 of 45
Version 1.0.0.12 Updated : 06/2013
Page 10
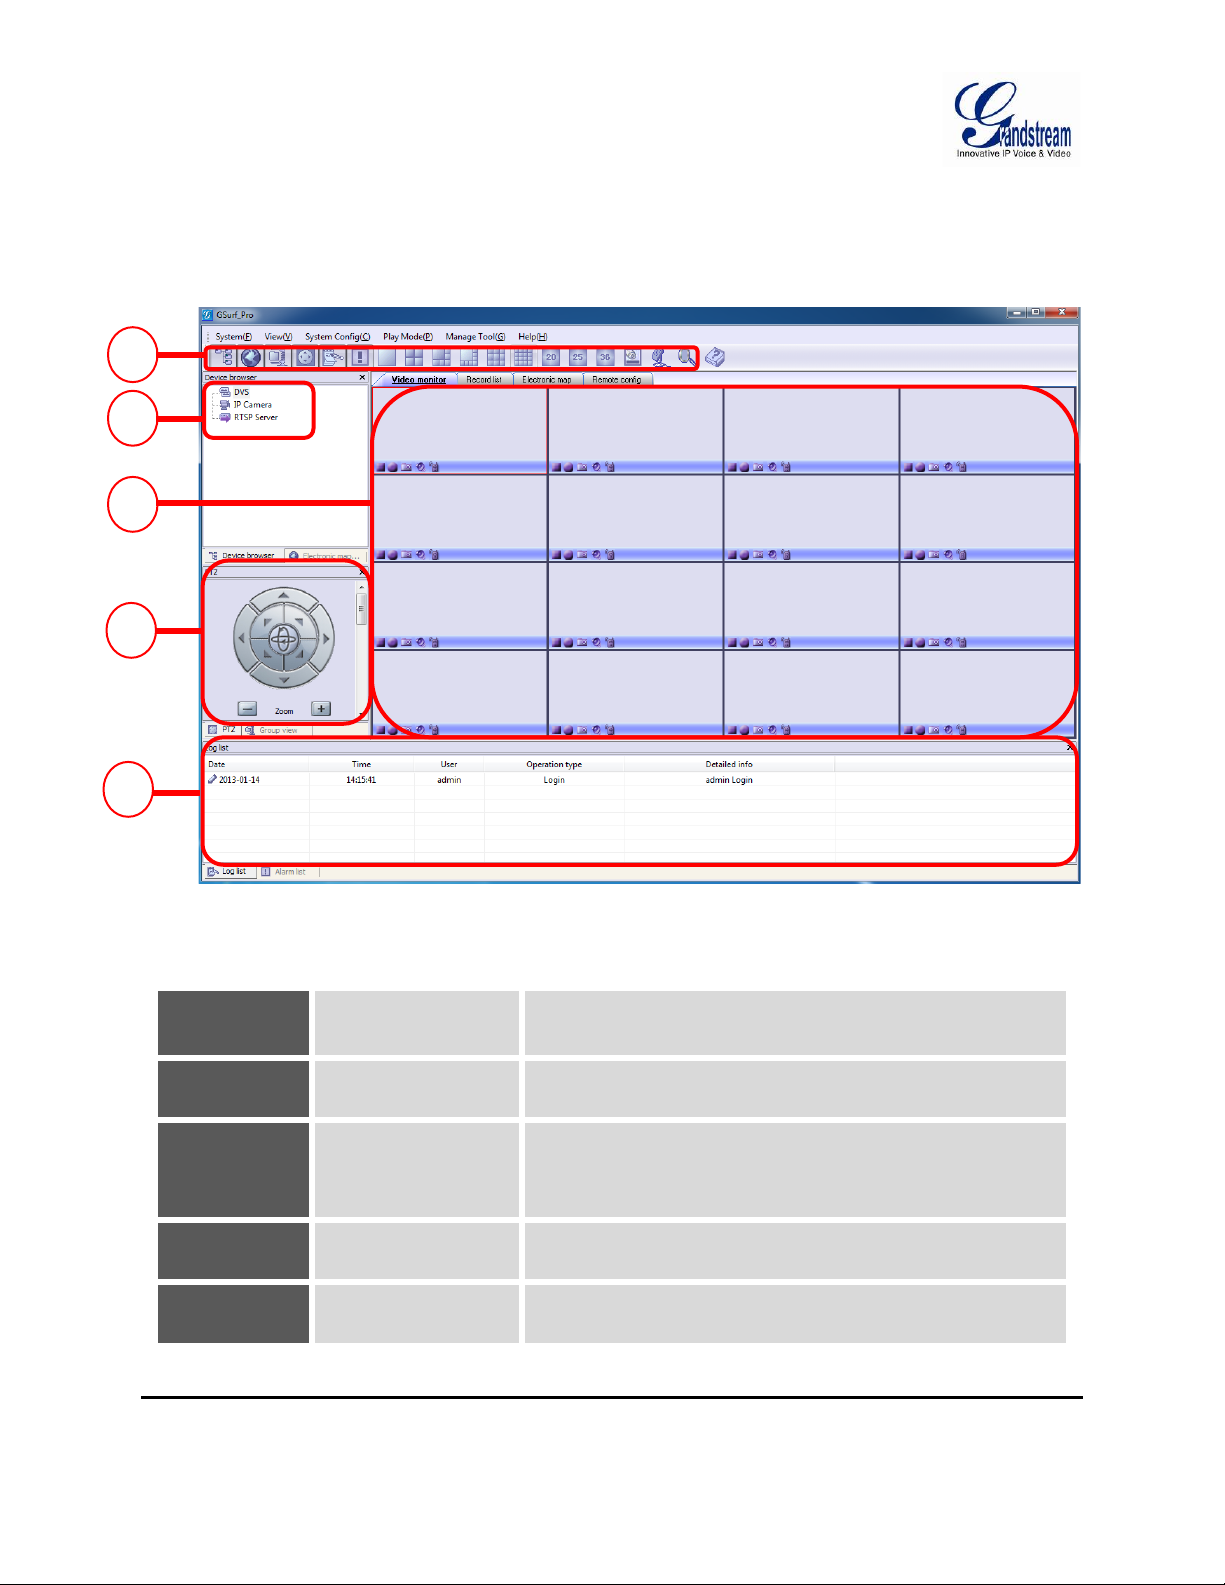
GSURF_PRO MAIN WINDOW
1 2 3 4 5
The GSurf_Pro user inter face is des igned f or eas e-of-use to offer quick acces s to cam er as and rec ording
in the system. Please refer to the following figure and table for main window descriptions.
Figure 4: GSurf_Pro Main Window
Table 1: GSURF_PRO MAIN WINDOW ITEMS
1 Toolbar
2 Device Browser
3 Video Display
4 PTZ Control
5 Log List
Quick access to designated functions
View, add and manage devices; view electronic map
Display up to 36 video streams. Double clicking on one
video will display its primary stream in full window.
PTZ control (PTZ device is required on the camera)
View operation log and alarm log
Grandstream Networks, Inc. GSurf_Pro USER MANUAL Page 10 of 45
Version 1.0.0.12 Updated : 06/2013
Page 11

GSURF_PRO TOOLBAR
manage groups and video
Table 2: GSURF_PRO TOOLBAR ICONS
Browse and manage the connected DVS or cameras
Open Electronic Map Browser. Right click to add a new
map
Open Group View panel,
channels.
Open RS-485 panel for PTZ control
Display log list
Display alarm list
Choose different n umber of channels to be displayed
on the main window (max number 36).
Open/hide play bar in each video display window.
Send audio (broadcasting) to selected device in the list
Search all the cameras' IP within the same LAN
Show GSurf_Pro software information
Grandstream Networks, Inc. GSurf_Pro USER MANUAL Page 11 of 45
Version 1.0.0.12 Updated : 06/2013
Page 12
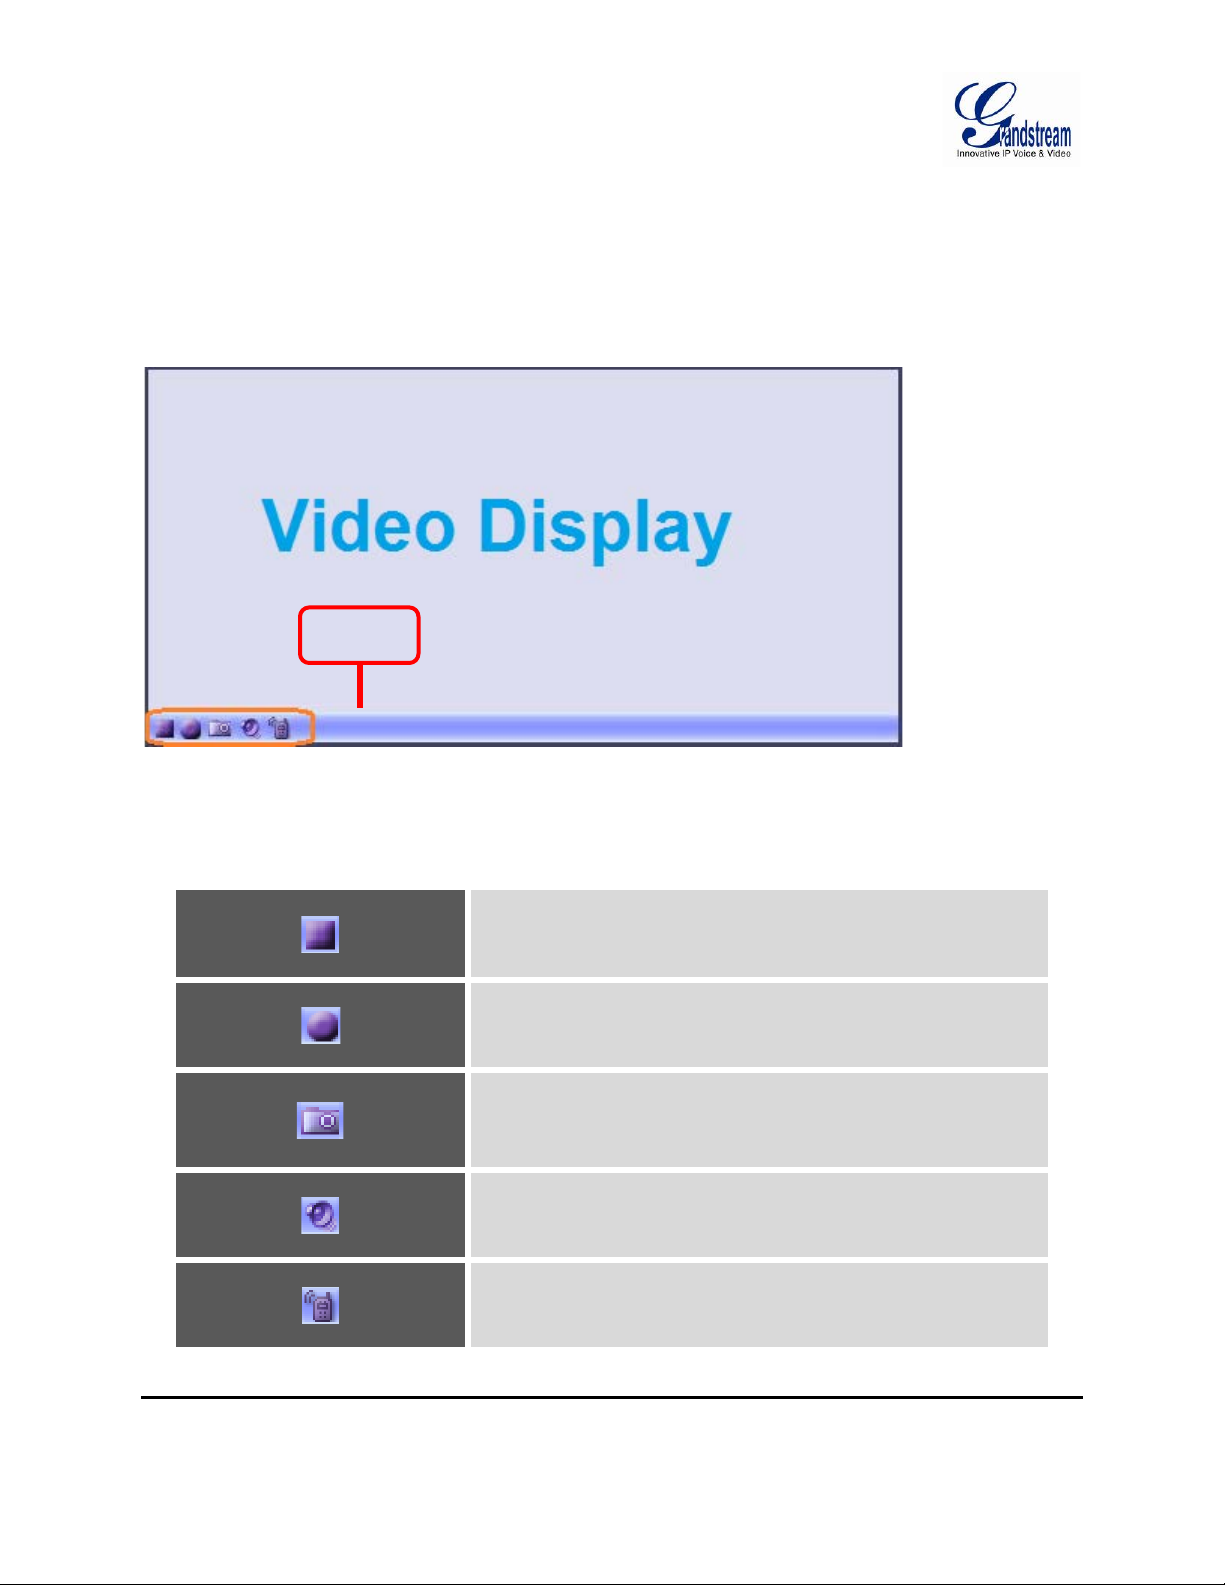
GSURF_PRO VIDEO PLAY BAR
In the video display window, each video channel has a play bar on the bottom.
Play Bar
Figure 5: GSurf_Pro Video Di splay Window - Play B a r
Table 3: GSURF_PRO VIDEO PLAY BAR ICONS
Stop the displayed video in the channel
Start recording the video in the channel. By default, the
recorded video file will be saved in directory C:\Record
Capture a snapshot of the current video in the channel. By
default, the captured snapshot will be saved in directory
C:\Snapshot
Turn on/off sound of the current channel. T he default setting is
off
Turn on/off two-way audio of the current channel. T he default
setting is off
Grandstream Networks, Inc. GSurf_Pro USER MANUAL Page 12 of 45
Version 1.0.0.12 Updated : 06/2013
Page 13

CONFIGURATION GUIDE
After installing GSurf _Pro, it must be configured for your network cameras or digital video servers. This
section describes ho w t o c onfigure GSurf _Pro, as well as ho w to s et up auto rec ording, m otion detec tion,
alarms and etc.
ADD/DELETE DEVICE
ADD DEVICE
1. In the top Menu bar, click System Config->Device Confi g.
2. In the Device Configuration window, click Add button to open the Add Device dialog.
3. Enter the device information.
• Device Name: Enter a name for the device.
• Device Type: Select the device type, DVS or IPCAM.
• Count of channels: Select the number of channe ls that your de vice supports. For example, the
GXV3504 has 4 channels.
• IP: Enter the IP address of the device.
• Domain Name: Enter the domain name of the device.
• RTSP Port: Enter the RTSP port for video streaming. If the devic e's web acces s port is 80, enter
554 as RTSP Port. Otherwise, add 2000 to the device's web access port and enter here.
4. Click Ok to save.
After successfully add ing th e device, users could view the v id eo b y double-cl ick ing on the de vice nam e in
the Device browser panel on the left.
Grandstream Networks, Inc. GSurf_Pro USER MANUAL Page 13 of 45
Version 1.0.0.12 Updated : 06/2013
Page 14

Figure 6: Add Device
Figure 7: Video Display After Adding Device
Grandstream Networks, Inc. GSurf_Pro USER MANUAL Page 14 of 45
Version 1.0.0.12 Updated : 06/2013
Page 15

DELETE DEVICE
1. In the top Menu bar, click System Config->D ev ice Co nf ig.
2. In the Device Configuration window, Select the device to be deleted.
3. Click Delete button.
4. Or, users could click on Delete all to remove all the added devices.
Figure 8: Delete Device
Grandstream Networks, Inc. GSurf_Pro USER MANUAL Page 15 of 45
Version 1.0.0.12 Updated : 06/2013
Page 16

SEARCH DEVICE
The built-in Search tool i n GSur f_Pro al lows user to s earch al l the DV S and IP Cam era devices within the
same LAN. Additionally, users could modify the I P address for the devices listed in the searching result.
SEARCH DEVICE
1. In the GSurf_Pro toolbar, click button.
2. In the Search tool, click Search button. A list of surveillance devices will display in the list.
Figure 9: GSurf_Pro Search Tool - Search Devices
Grandstream Networks, Inc. GSurf_Pro USER MANUAL Page 16 of 45
Version 1.0.0.12 Updated : 06/2013
Page 17

MODIFY IP
Use DHCP to
available
1. Select the device in the searching result.
2. To set up new static IP, input the new I P, subnet mask and gat ewa y, then click on Modify IP b utton. To
make sure the new static IP is availab le in the network, after filling o ut the new IP address, c lick on Ping
button and the result will show in the prompted message.
3. To set up new IP with DHCP, user could check the option Us e DHCP so a new IP will be automaticall y
assigned.
assign new IP
To check if the
new static IP is
Figure 10: GSurf_Pro Search Tool - Modify IP
Grandstream Networks, Inc. GSurf_Pro USER MANUAL Page 17 of 45
Version 1.0.0.12 Updated : 06/2013
Page 18

CONFIGURE TIME SCHEDULE
The GSurf_Pro time schedule is used to configure automatic recording. Up to 10 schedules can be
configured.
1. In the top Menu bar, click System Config->Time Schedule.
2. The Time Schedul e window will pop up.
3. Select a schedule on the left panel to be configured.
4. Select the time frame for each day. The scheduled interval will be marked in blue (See Figure 11:
Gsurf_Pro Time Schedule).
5. Click Save button.
Figure 11: Gsurf_Pro Time Schedule
6. To assign this schedule to a device, open System Config->Device Config.
7. Select the device from which you would like to record the videos.
8. In Auto Record option, select schedule from the drop down list.
9. Click Save button.
Grandstream Networks, Inc. GSurf_Pro USER MANUAL Page 18 of 45
Version 1.0.0.12 Updated : 06/2013
Page 19

This channel will then start automatically recording as specified in the designated time schedule.
Additionally, users could select Batch Configuration to assign the same time schedule to multiple
devices.
Figure 12: GSurf_Pro Auto Record Time Schedule
Grandstream Networks, Inc. GSurf_Pro USER MANUAL Page 19 of 45
Version 1.0.0.12 Updated : 06/2013
Page 20

CONFIGURE ALARM TRIGGERS AND RULES
Grandstream's network cameras and digital video servers support motion detection and alarm events.
They can report motion detection or alarm events to GSurf_Pro. On the GSurf_Pro side, it can be
configured to tak e actions, i.e., to notif y such events t o users. U p to 10 rules c an be set up with differ ent
alarm actions. The instructions below will ass ist you wi th this setup .
1. In the top Menu bar, click System Config->Alarm Config.
2. In the Alarm action rule window, select the Alarm index and configure the action.
• Sound: If it's checked, G S urf _Pr o will p lay a sound when recei ving an alar m report. Make sure to
select a sound file and the duration for it to play.
• Record: If it's checked, GSurf_Pro wi ll record the video upon rece iving an alarm report. Users
could also select the duration for the recording.
• Pop up video window: If it's checked, a pop up vide o window will appe ar on receiving an al arm
report.
• Warning on the E-map: If it's check ed, the corresponding icon of that c hannel in the electronic
map will flash in red upon receiving an alarm report.
• Save to database: If it's checked, the alarm event will be written to the alarm log.
3. Click Save button to save the settings.
Figure 13: GSurf_Pro Alarm Action Rule
Grandstream Networks, Inc. GSurf_Pro USER MANUAL Page 20 of 45
Version 1.0.0.12 Updated : 06/2013
Page 21

4. T o assign this alarm action rule to a device, open System Config->Device Config.
5. In the Device Configuration window, select the device.
6. Select an Alarm action rule for Motion Detection to monitor m otion detecti on events; select an alarm
action rule for Alarm Input if you would like to monitor alarm input events .
7. Click Save button to save the settings.
Figure 14: Assign Alarm Action Rule To Device
Additionally, users could select Batch Configuration to assign the same alarm action to multiple devices.
Grandstream Networks, Inc. GSurf_Pro USER MANUAL Page 21 of 45
Version 1.0.0.12 Updated : 06/2013
Page 22

LOCAL CONFIGURATION
Click on System Config->Local Config to configure software and local recording features for GSurf_Pro.
SOFTWARE CONFIGURAT ION
Configure log reserved days, video window layout and startup options.
RECORD CONFIG
• Record Path: This section displ ays name, total s pace and free spac e of the local disk s. Users could
select the loc al disk to store rec orded video files. If users select multiple disks, GSurf_Pro will start
from the first disk until the free space equals the reserved space, and then go to the next one.
• Reserved free space: Configure the reser ved free space for the disk . When the disk free space is
less than the reserved free space (1 GB in this example), the video will be recorded in the next
selected disk.
• Record file duration time: Configure the duration for each recording file.
• Disk Full: W hen the disk is full, users could choose to st op rec ord ing, or keep rec ordin g whi le s t orin g
new reco rding by deleting the old files.
• Capture Path: Configure the path to save the snapshot pictures.
Figure 15: GSurf_Pro Local Configure - Record Configure
Grandstream Networks, Inc. GSurf_Pro USER MANUAL Page 22 of 45
Version 1.0.0.12 Updated : 06/2013
Page 23

DEVICE CONFIGURATION
Click System Config->Device Config, the device configuration window will prompt for users to add,
delete and edit devices. O nce a device is selected, users could conf igure the device properties, alarm
action rule and record option.
• Device Properties: Device Name, Device IP, Domain Name, RTSP Port and Transport protocol.
• Alarm Action Rule: Select alarm action rule for motion detection and alarm input.
• Auto Record: Select time schedule for auto record.
LANGUAGE DISPLAY
In the GSurf_Pro interf ace, users could switc h language at any tim e. Go to System Conf ig->Language
and select the language to be displayed.
Figure 16: Language Display
Grandstream Networks, Inc. GSurf_Pro USER MANUAL Page 23 of 45
Version 1.0.0.12 Updated : 06/2013
Page 24

RECORD CONFIGURATION
MANUAL RECORD
In the video display window, click on the Record button to start recording.
Figure 17: Manual Record
AUTOMATIC RECORD
The automatic record wi ll be running in the backgroun d. The recording tim e is specif ied in Auto Record
option after selecting device under System Config->Device Config.
Figure 18: A utomatic Record
Grandstream Networks, Inc. GSurf_Pro USER MANUAL Page 24 of 45
Version 1.0.0.12 Updated : 06/2013
Page 25

REPLAY
The GSurf_Pro Replay tool provides the ability to replay recorded videos. It also provides a search function
which allows you to perform a search based on start time, end time, IP address, channel and etc. To replay
the recorded video, in the t op Menu bar, go to Manage Tool->Replay Tool to open the Rep layer. Select
time, device, channel, file type and disk to search the video. Then click on the video file to play.
Figure 19: Replayer
In the Replayer, users could also op en up the Time selection tab to sp ecify the recorded files b y filterin g
the start time. All the configured start time will be marked in green in the time chart.
Grandstream Networks, Inc. GSurf_Pro USER MANUAL Page 25 of 45
Version 1.0.0.12 Updated : 06/2013
Page 26

ELECTRONIC MAP
E-map is an important feature in video surveillance system to provide users a visual overview of the
cameras in your insta llation. A map is an image file on w hich you place cam eras and views. GSurf_Pro
supports an electronic map for users to identify the locations of your cameras and the status of their
alarms.
To configure E-map on GSurf_Pro, open the map browser by clicking in the toolbar.
ADD MAP
1. In the Electronic map browser, right click and Add map option will show up.
2. Choose a map image from your local PC to upload. Then it will be displayed in the electronic map field.
Figure 20: Add Map
Note:
The supported im age files are bmp, j pg or g if. GSurf _Pro wil l displa y the elec tronic m ap in f ull resol ution.
And the users can use the scroll bars to view the whole image.
Grandstream Networks, Inc. GSurf_Pro USER MANUAL Page 26 of 45
Version 1.0.0.12 Updated : 06/2013
Page 27

ADD DEVICE TO MAP
1. Open your map in the main window.
2. In the left side panel, click on Device browser so you r devices will show in the list.
3. Click on the device/channel, drag and drop it to the preferred destination on the map.
4. An icon with the device name and the channel number will now be shown on the map. Right click
on the icon to change the icon settings.
Figure 21: A dd Map Alarm
Grandstream Networks, Inc. GSurf_Pro USER MANUAL Page 27 of 45
Version 1.0.0.12 Updated : 06/2013
Page 28

SET ALARM ON MAP
1. After adding the device to the map, go to System Config->Alarm Config to configure alarm action rule.
Make sure the option Warning on the E-map is checked.
2. Go to System Config->Device Config. Select your device and configure the alarm action rule set up in
step 1.
3. When GSurf_Pro receives an alarm report, the corresponding icon on the map will flash in red .
LOCK/UNLOCK MAP
T o av oid changing the positions of cameras on the map accidently, the users can lock the map after adding
all devices. Right click on the map, lock/unlock option will be available in the pop-up menu,
When the map is unlocked, users could drag devices to the map. When the map is locked, double-clicking
on the camera will open up a new window for real time video from this camera.
REMOVE DEVICE FROM MAP
On the map, right click on the icon and click Delete Icon to remove the device from the map.
REMOTE CONFIGURATION
The IP Camera devices c an be remotely accessed via web browser . S elect a d ev i c e on the l ef t s ide panel
and click on Remote config tab to access the camera's web GUI.
Grandstream Networks, Inc. GSurf_Pro USER MANUAL Page 28 of 45
Version 1.0.0.12 Updated : 06/2013
Page 29

Figure 22: Remote Configuration
PTZ CONTROL
In the toolbar, click to open PTZ control pa ne l. If the connected devices are PTZ cameras or have a
PTZ device connected, users can use the console to adjust the focus, brightness, contrast, rotating speed,
IRIS, and also pan/tilt the devices.
Note:
Before using PTZ control, PTZ device needs to be set up in RS-485 port and properly configured.
Grandstream Networks, Inc. GSurf_Pro USER MANUAL Page 29 of 45
Version 1.0.0.12 Updated : 06/2013
Page 30

VIDEO MONITOR
INDIVIDUAL VIEW
Drag the device from the device browser to video display window to watch the video immediately.
GROUP VIEW/PATROL MODE
1. In the tool bar, click on to open the Group view panel.
2. Drag the device in Device browser panel to the group in Group view panel.
Figure 23: Add Device To Group
3. Right click on the gr oup to c onfigur e the group attr ib utes. Check the Allow Patrol option and co nf igure
Pause time which is the patrol interval for the group.
Grandstream Networks, Inc. GSurf_Pro USER MANUAL Page 30 of 45
Version 1.0.0.12 Updated : 06/2013
Page 31

Figure 24: Configure Gr oup Attributes For Patrol Mode
4. Click Ok to save the settings.
5. In the top Menu bar, click on Play Mode->Patrol ling View to start playing vide os fr om differ ent grou ps
in a loop.
Grandstream Networks, Inc. GSurf_Pro USER MANUAL Page 31 of 45
Version 1.0.0.12 Updated : 06/2013
Page 32

BROADCAST
1. In the tool bar, click the button to open up broadcast window.
2. Add broadcast device by selecting the devices from the left side list to the right side list.
3. Click Start Broadcasting button to start sending audio from PC's microphone.
Figure 25: Broadcast
Grandstream Networks, Inc. GSurf_Pro USER MANUAL Page 32 of 45
Version 1.0.0.12 Updated : 06/2013
Page 33

SYNCHRONIZE DEVICE TIME
In the top Menu bar, click on M anage tool->Synchronize device time. Then users could sync up the
device time with local PC time.
Figure 26: Device T ime Configuration
Grandstream Networks, Inc. GSurf_Pro USER MANUAL Page 33 of 45
Version 1.0.0.12 Updated : 06/2013
Page 34

CONVERT VIDEO FORMAT
The recorded video is saved in H264 form at, which might not be s upported by certain video players. An
AVI converter tool is provided in GSurf_Pro. Clic k on Manage tool->AVI Conv ersion Tool to ope n the
converter. Add video to be converted and the output file will be saved in the configured direc tory in AVI
format.
Figure 27: Media Convert Tool
Grandstream Networks, Inc. GSurf_Pro USER MANUAL Page 34 of 45
Version 1.0.0.12 Updated : 06/2013
Page 35

USER MANAGEMENT
The GSurf_Pro adm inistrator can add , modify and del ete users as well as issue users different privilege
levels.
1. Click on Manage tool->User Manage.
2. In the User Manag e win do w, users could add, ed it and delete users. A list of configuratio n au thorities is
provided so each user could be assigned with different privileges.
Figure 28: User Management
Grandstream Networks, Inc. GSurf_Pro USER MANUAL Page 35 of 45
Version 1.0.0.12 Updated : 06/2013
Page 36

IMPORT/EXPORT CONFIGURATION
The GSurf_Pro configuration can be imported or exported for backup and restore purpose. Click on
System Config->Export Config to open the import/export window. Users could also select the
configurations for the backup file.
Figure 29: Configuration Import and Export
Grandstream Networks, Inc. GSurf_Pro USER MANUAL Page 36 of 45
Version 1.0.0.12 Updated : 06/2013
Page 37

GSURF_PRO TRANSFER SERVER
The GSurf_Pro embedded transfer server can cooperate with client side to effectively reduce the workload
on the front-end cam eras. The surveillance s ystem utilizes the tr ansfer server as the m edium to monitor
the devices in a distributed manner.
SERVER SIDE
1. Open the Transfer server from Manage Tool->Tran Server. A lo gin window will pop up.
Figure 30: Transfer Server Login
2. After login, c lick on Config->System Config to open the follo wing server configuration window. The
listening IP address is the PC's IP address. For the port number, it is recommended to use default value or
big value.
Grandstream Networks, Inc. GSurf_Pro USER MANUAL Page 37 of 45
Version 1.0.0.12 Updated : 06/2013
Page 38

Figure 30: Transfer Server Configuration
3. Click on to open the search tool.
4. In the search tool, press Search button to get a list of devices in the same LAN.
5. Select the devices in the result list and click Add.
Figure 31: Add Devices to Transfer List
6. Those devices will then be displayed in the transfer list.
The main display window will show the traffic status when the traffic starts.
Grandstream Networks, Inc. GSurf_Pro USER MANUAL Page 38 of 45
Version 1.0.0.12 Updated : 06/2013
Page 39

CLIENT SIDE
The client side is the GSurf_Pro RTSP server.
1. In the Device browser, right click on RTSP server.
2. Click Server Config to add devices to the local list.
Figure 32: RTSP Server
Grandstream Networks, Inc. GSurf_Pro USER MANUAL Page 39 of 45
Version 1.0.0.12 Updated : 06/2013
Page 40

GSURF_PRO FILE SERVER
SERVER SIDE
The file server can provide the record files in local disk to other hosts within the network for search,
download and replay. To configure the GSurf_Pro as the file server, go to Manage T ool ->File Server. Click
on the Configuration button to set up listening IP and port. Then start the server.
Figure 33: GSurf_Pro File Server
Grandstream Networks, Inc. GSurf_Pro USER MANUAL Page 40 of 45
Version 1.0.0.12 Updated : 06/2013
Page 41

CLIENT SIDE
The client side is the replay tool in the GSurf_Pro. Go to Manage Tool->Re play Tool to open the Replayer.
When option Remote Search is selected, users would need fill in Recorder address and Recorder port of
the server side. Once searching is done, the record files can be downloaded and played locally.
Figure 34: Replayer Remote Search
Grandstream Networks, Inc. GSurf_Pro USER MANUAL Page 41 of 45
Version 1.0.0.12 Updated : 06/2013
Page 42

FREQUENTLY ASKED QUESTIONS
Q: How many cameras does GSurf_Pro support?
A: The GSurf_Pro can support up to 10 groups or 36 channels cameras at the same time. However, when
using HD camera (720P and up), the maximum number might be limited by the PC processor. When
displaying multiple videos, the GSur f_Pro will adj ust the displa y to secondar y stream to inc rease system
resource efficiency. If users click on one of the video, the display will be automatically converted to primary
stream for better quality.
Q: Does GSurf_Pro have any requirement on the PC where it's installed?
A: Yes. Please refer to section [MINIMUM COMPUTER SYSTEM REQUIREMENT] for details. Before
installing GSurf_Pro, it is recommended to e valuate the system requirement (network traffic, disk space,
file directory and etc.).
Q: Is there any requirement on the transfer server?
A: In most of the cases, the transfer server will have large amount of network flow going through.
Therefore, it is recommended to use the machine with Gigabyte network interface card.
Q: What are the factors that might affect the disk space?
A: The disk space is mainly affected b y the primary stream bit rate. Normally HD video will tak e more
space than standard definition video.
Q: I have configured the alarm action on GSurf_Pro already but I still didn't get alarm . Why?
A: B esides conf iguring al arm action on G Surf _Pro sid e, the alarm has to be acti vated o n the cam era s ide
and configured to report to the alarm center. Users could configure this by directly accessing camera's web
GUI or via GSurf_Pro’s remote configure interface.
Grandstream Networks, Inc. GSurf_Pro USER MANUAL Page 42 of 45
Version 1.0.0.12 Updated : 06/2013
Page 43

EXPERIENCING THE GRANDSTREAM GSURF_PRO
Please visit our website: http://www.grandstream.com
to receive the most up- to-date updates on firmware
releases, additional features, FAQs, documentation and news on new products.
We encourage you to browse our product related documentation, FAQs and User and Developer For um
for answers to your general questions. If you have purchased our products through a Grandstream
Certified Partner or Reseller, please contact them directly for immediate support.
Our technical support staff is trained and ready to answer all of your questions. Contact a technical support
member or submit a trouble ticket online
to receive in-depth support.
Thank you again for using Grandstream GSurf_Pro Network Video Surveillance System.
Grandstream Networks, Inc. GSurf_Pro USER MANUAL Page 43 of 45
Version 1.0.0.12 Updated : 06/2013
Page 44

Table 4: COMPARISON OF GSURF_PRO AND GSURF
Feature Comparison Gsurf Gsurf_Pro
Real-time Play
Real-time Recording
Backend Recording
Primary/2nd stream switchable based on
arrangement of display windows.
Electronic Map
Operation and Alarm Log
Control Console
Group Patrol Viewing
Sorting Display Window Order when in
Group Patrol Mode
1,4,6,8,9,16,20,25,36 Display Window
Time Table Configuration in Automatic
Recording
Configuration of Alarm DO/DI
Local Configuration
Local Configuration - Smart Deletion
√ √
√ (primary, 2nd stream) √ (Primary Only)
√
√
√ √
√ √
√ √
√ √
√
√ √
√ √
√ √
√ √
√
Local Configuration –
WatchDog Switch ON/OFF
Local Configuration - Autorun as service
when power on
Local Configuration - Display window
arrangement of primary stream
Device Configuration
Device Configuration - Batch configuration
of automatic scheduled (time) recording
Server Configuration
√
√ √
√
√ √
√
√
Grandstream Networks, Inc. GSurf_Pro USER MANUAL Page 44 of 45
Version 1.0.0.12 Updated : 06/2013
Page 45

Import, Export Configuration
Play Mode (Manual, Patrol)
Multi-Language Switch
Management Tool - User management, Log
management
Management Tool - Replay Tool
Management Tool - Search Tool
Management Tool –
Search Tool with Wi-Fi Configuration
Transaction Server
File Server
Multi-Screen Display
√ √
√ √
√
√ √
√ (Single Window Replay)
√ √
√
√
√(Combined with Replay Tool)
√
√ (up to 4 Window Replay,
Remote download Replay)
H264 - AVI Convert Tool
Synchronization tool for device time
Broadcasting Tool
Smart Delete Module
√
√
√ √
√ (Only delete based on
files with earliest date, not
accurate)
√ (Delete based on Date, delete
based on earliest file, more
accurate)
Grandstream Networks, Inc. GSurf_Pro USER MANUAL Page 45 of 45
Version 1.0.0.12 Updated : 06/2013
 Loading...