

Page 1
Operation / Fonctionnement / Funcionamiento / Funzionamento /
Funcionamento / Bediening
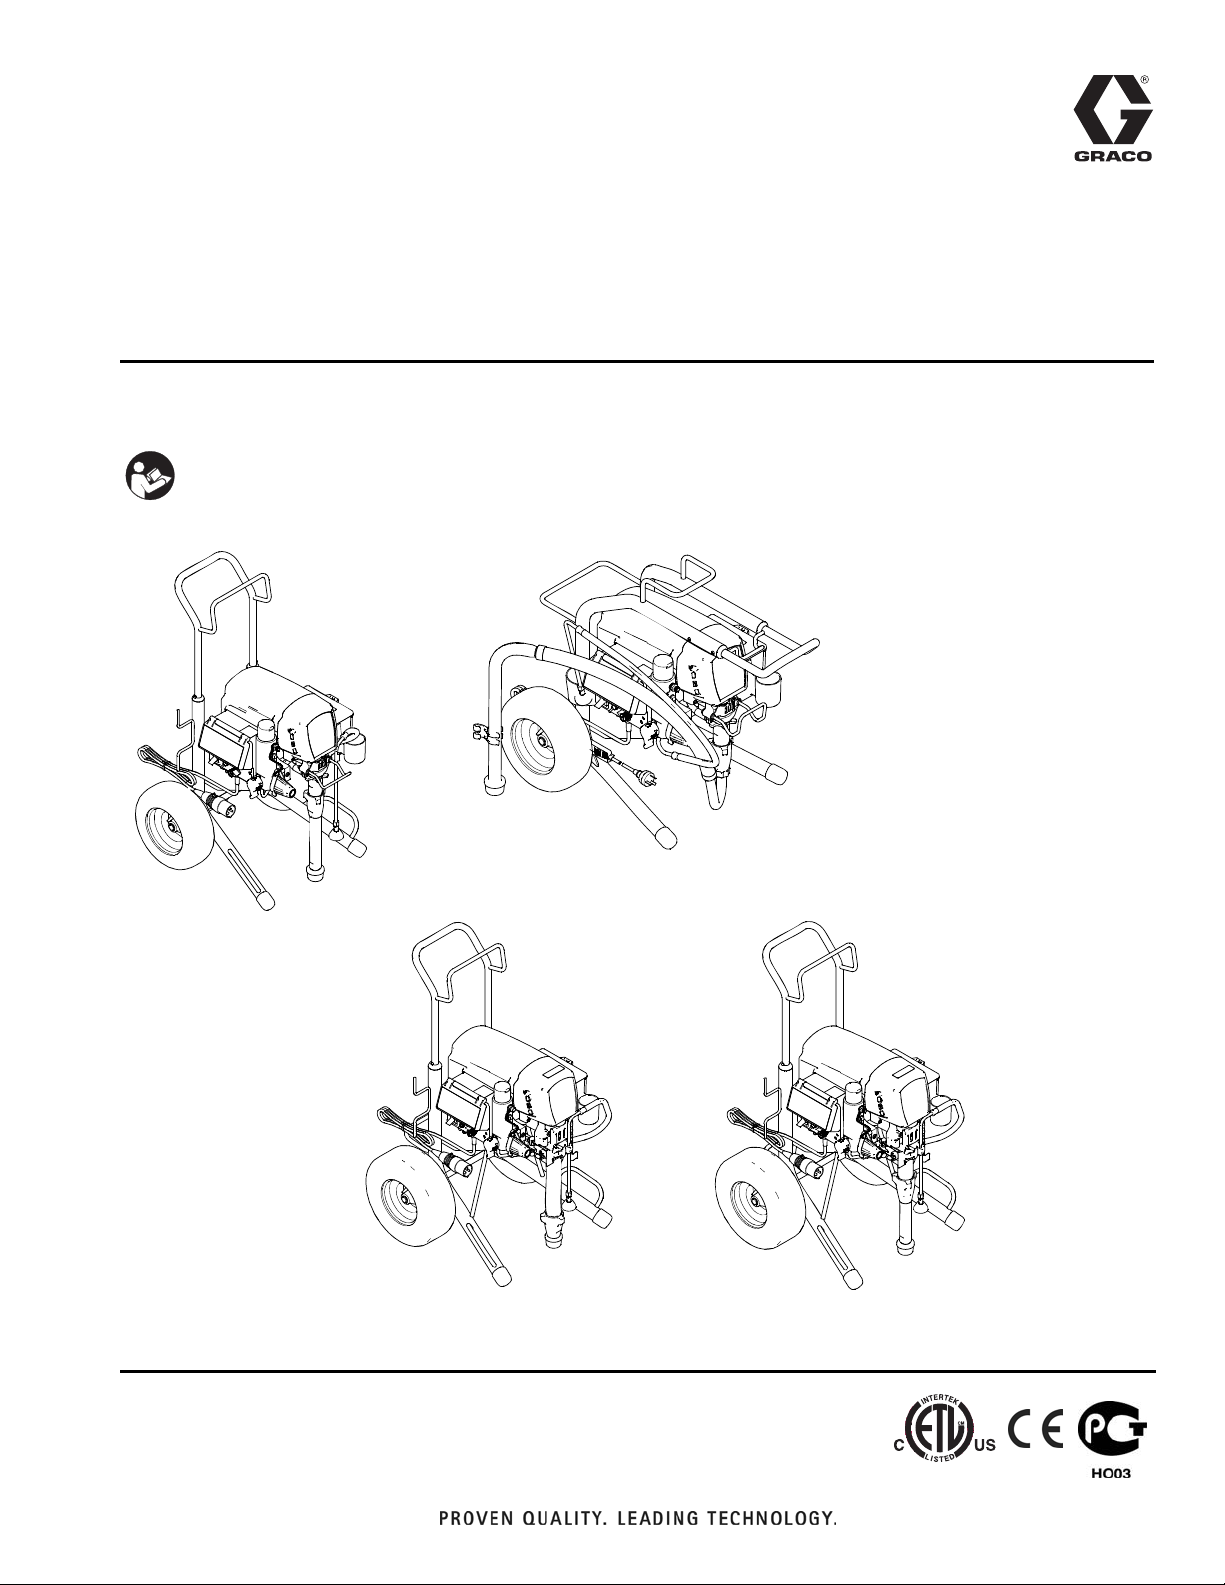
Electric Airless Sprayers
Pulvérisateurs électriques Airless
Pulverizadores eléctricos sin aire
Spruzzatori airless elettronici
Equipamentos de pintura a alta pressão eléctricos
Elektrische airless spuittoestellen
3300 psi (227 bar, 22.7 MPa) Maximum Working Pressure
IMPORTANT SAFETY INSTRUCTIONS.
Read all warnings and instructions in this manual.
Save these instructions.
311344E
ti13450a
695/795 HI
ti13461a
MARK V
ti13459a
695/795 LOW
ti13460a
1095/1595 HI
Page 2
Warnings
Warnings
The following warnings are for the setup, use, grounding, maintenance and repair of this equipment. The exclamation
point symbol alerts you to a general warning and the hazard symbol refers to procedure-specific risks. Refer back to
these warnings. Additional, product-specific warnings may be found throughout the body of this manual where applicable.
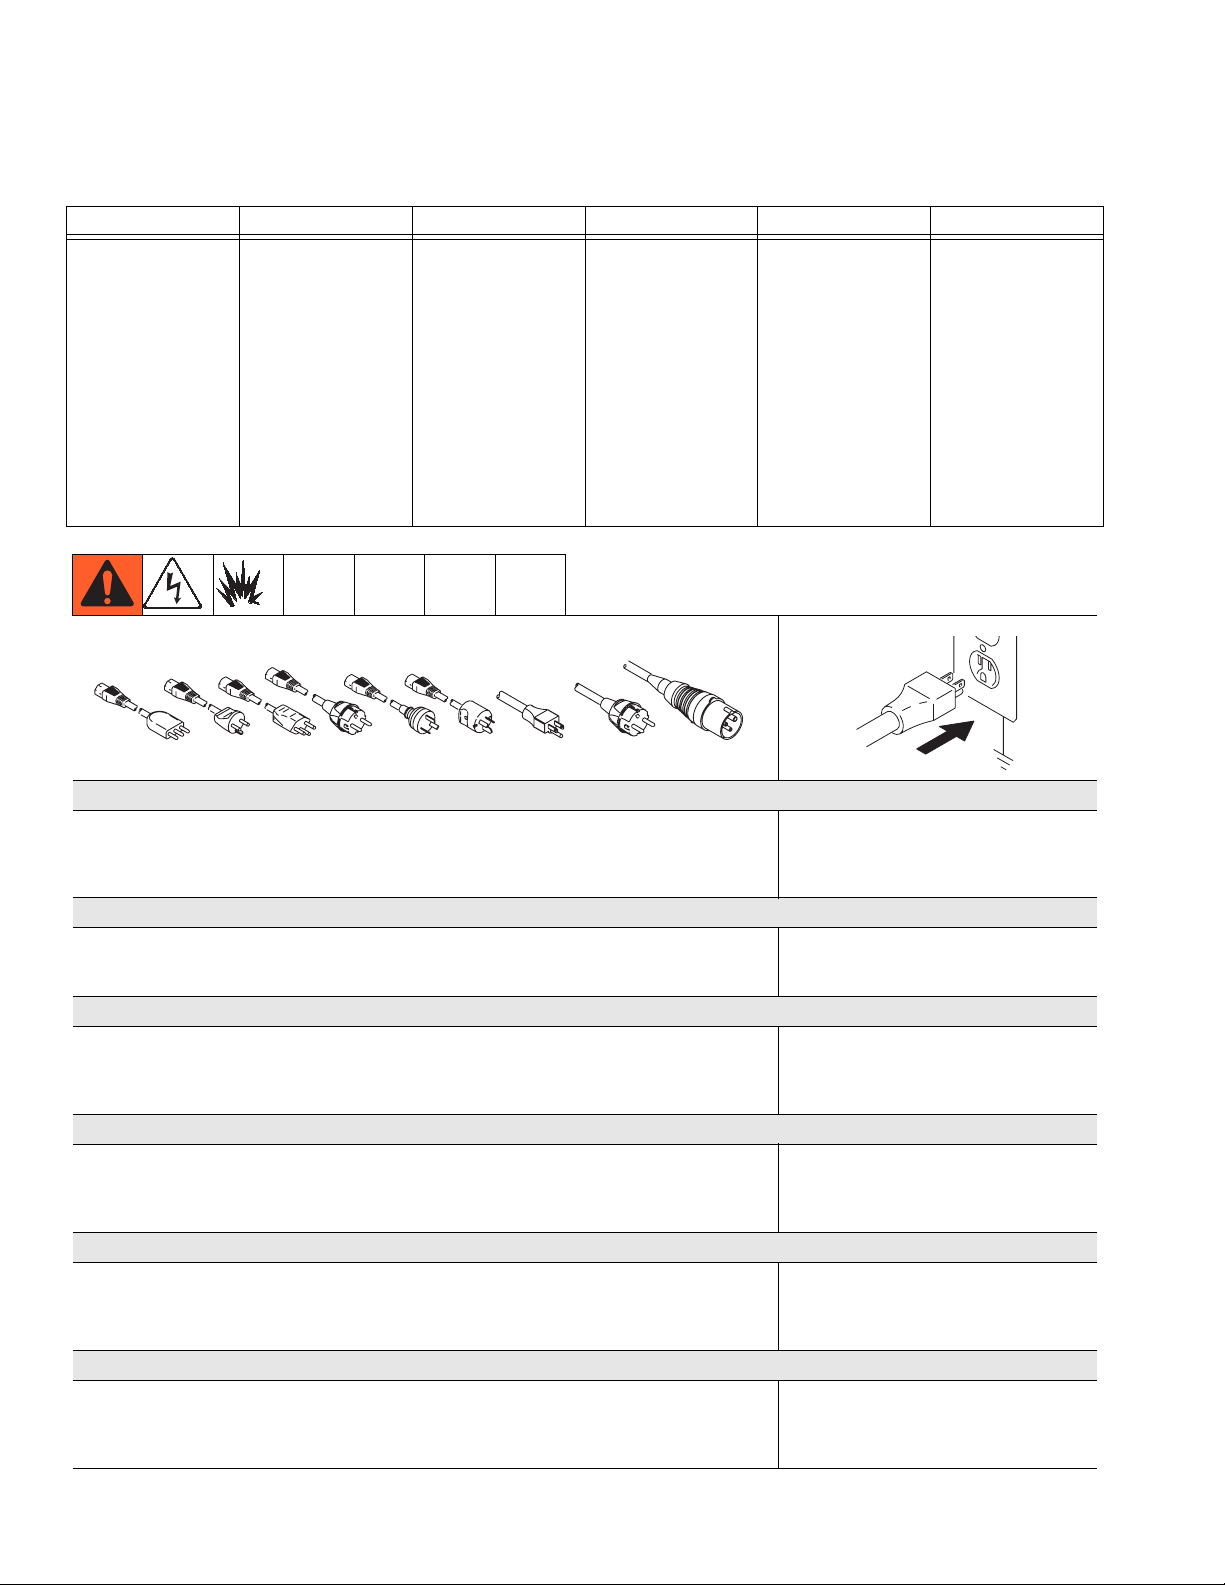
Grounding Instructions
This product must be grounded. In the event of an electrical short circuit, grounding reduces the risk of electric shock
by providing an escape wire for the electric current. This product is equipped with a cord having a grounding wire with
an appropriate grounding plug. The plug must be plugged into an outlet that is properly installed and grounded in
accordance with all local codes and ordinances.
WARNING
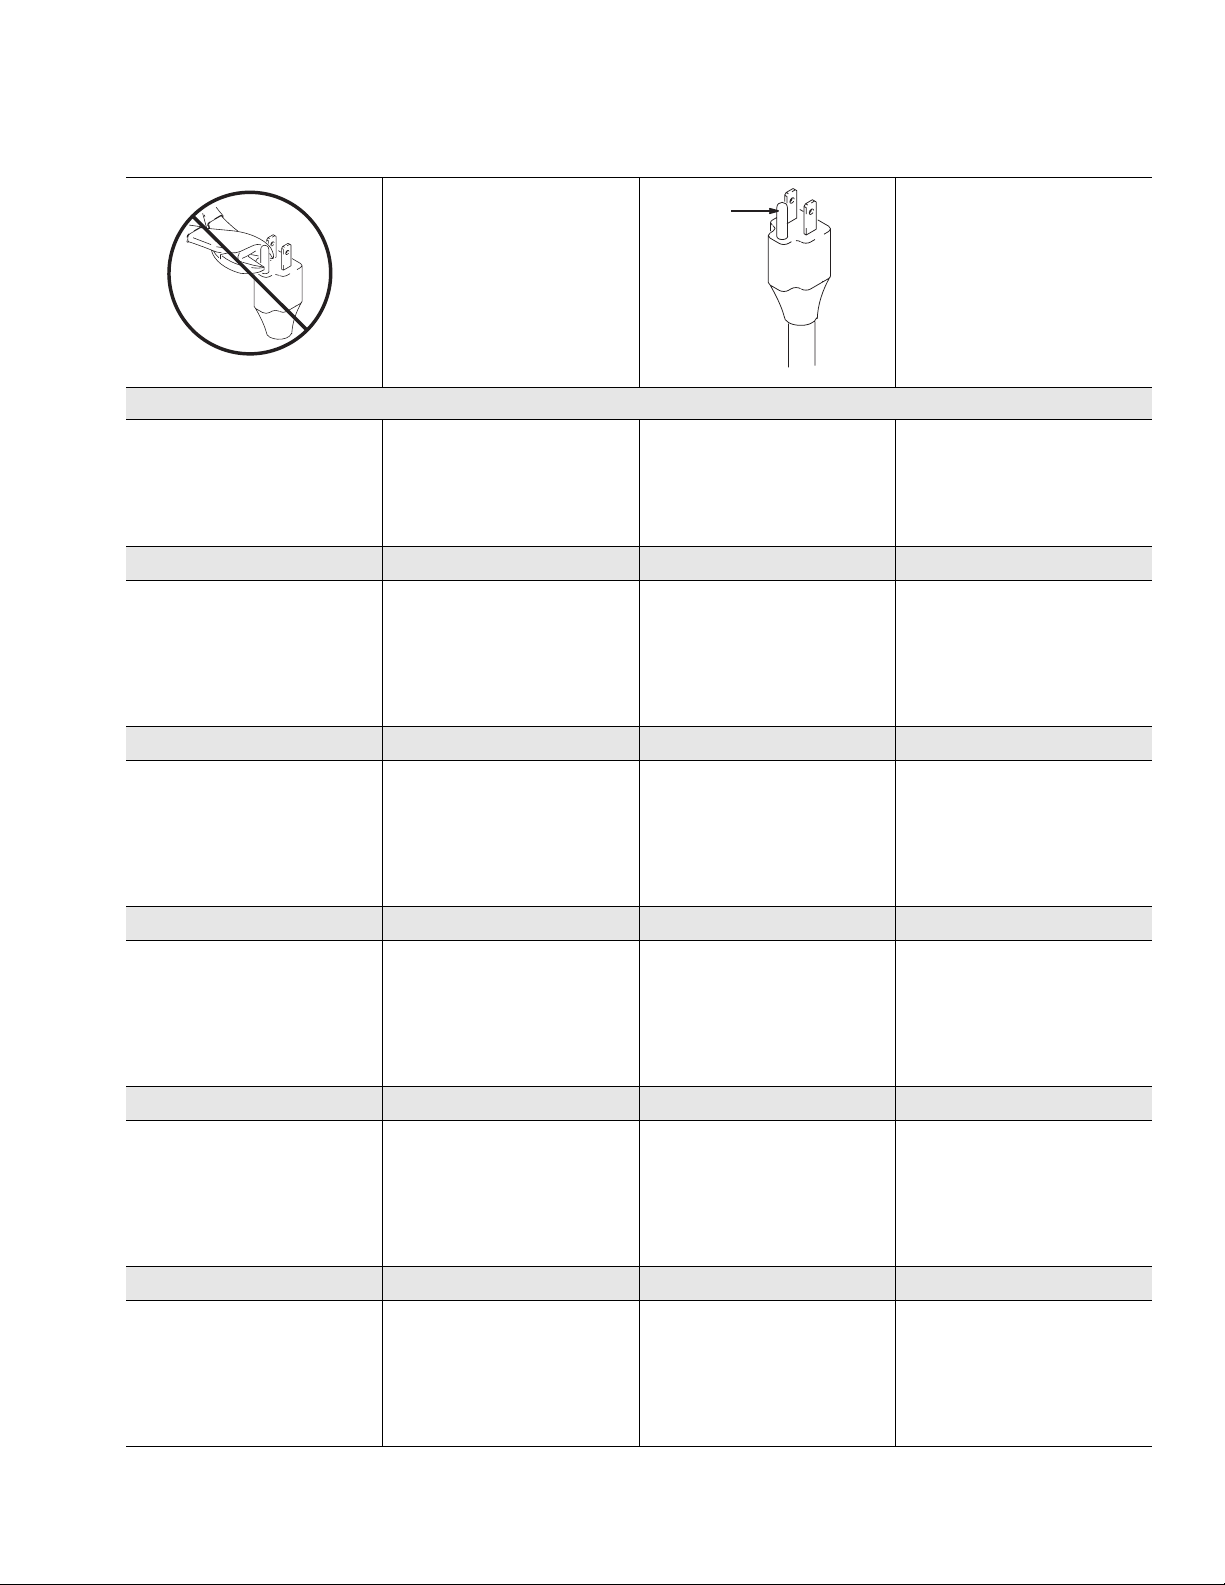
GROUNDING
• Improper installation of the grounding plug is able to result in a risk of electric shock.
• When repair or replacement of the cord or plug is required, do not connect the grounding wire to
either flat blade terminal.
• The wire with insulation having an outer surface that is green with or without yellow stripes is the
grounding wire.
• Check with a qualified electrician or serviceman when the grounding instructions are not completely
understood, or when in doubt as to whether the product is properly grounded.
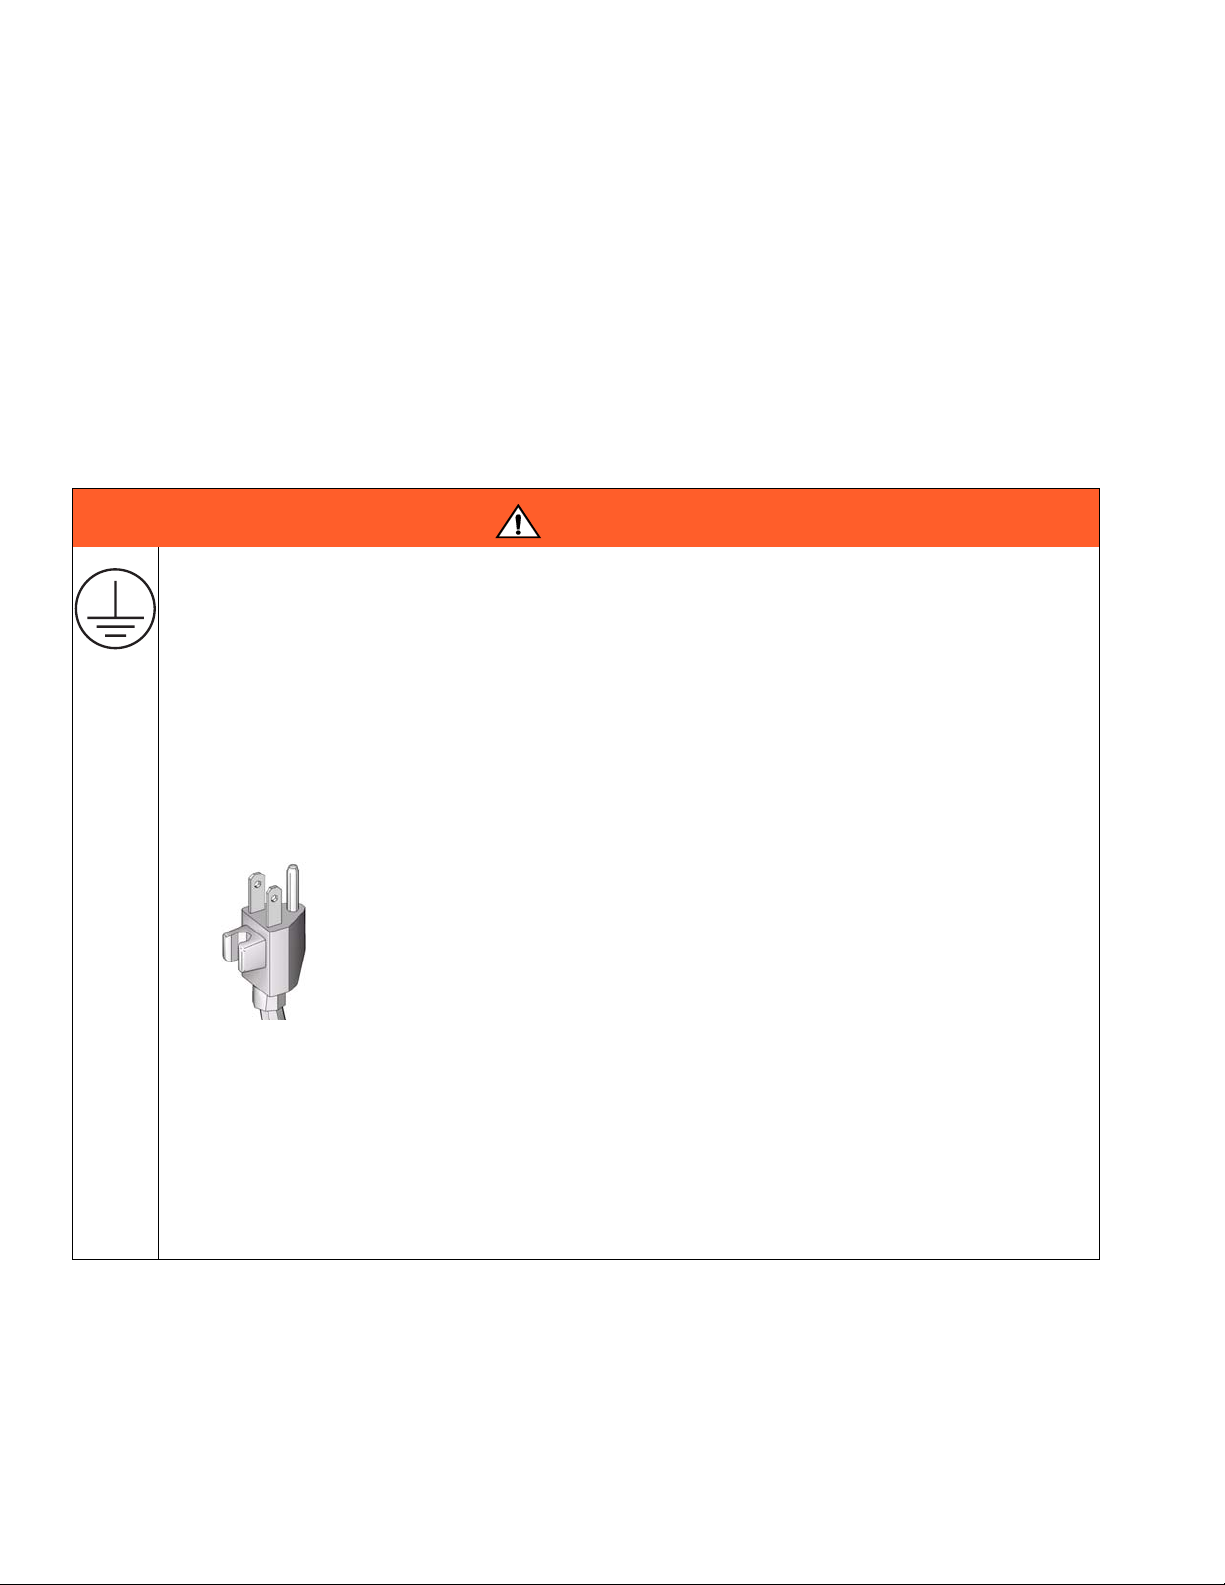
• Do not modify the plug provided; if it does not fit the outlet, have the proper outlet installed by a qualified electrician.
• This product is for use on a nominal 120V circuit and has a grounding plug similar to the plug illustrated in the figure below.
ti9164a
• Only connect the product to an outlet having the same configuration as the plug.
• Do not use an adapter with this product.
Extension Cords:
• Use only a 3-wire extension cord that has a 3-blade grounding plug and a 3-slot receptacle that
accepts the plug on the product.
• Make sure your extension cord is not damaged. If an extension cord is necessary, use 12 AWG
2
(2.5 mm
• An undersized cord results in a drop in line voltage and loss of power and overheating.
2 311344E
) minimum to carry the current that the product draws.
Page 3
Warnings
WARNING
FIRE AND EXPLOSION HAZARD
Flammable fumes, such as solvent and paint fumes, in work area can ignite or explode. To help prevent
fire and explosion:
• Do not spray flammable or combustible materials near an open flame or sources of ignition such as
cigarettes, motors, and electrical equipment.
• Paint or solvent flowing through the equipment is able to result in static electricity. Static electricity
creates a risk of fire or explosion in the presence of paint or solvent fumes. All parts of the spray system, including the pump, hose assembly, spray gun, and objects in and around the spray area shall
be properly grounded to protect against static discharge and sparks. Use Graco conductive or
grounded high-pressure airless paint sprayer hoses.
• Verify that all containers and collection systems are grounded to prevent static discharge.
• Connect to a grounded outlet and use grounded extensions cords. Do not use a 3-to-2 adapter.
• Do not use a paint or a solvent containing halogenated hydrocarbons.
• Keep spray area well-ventilated. Keep a good supply of fresh air moving through the area. Keep
pump assembly in a well ventilated area. Do not spray pump assembly.
• Do not smoke in the spray area.
• Do not operate light switches, engines, or similar spark producing products in the spray area.
• Keep area clean and free of paint or solvent containers, rags, and other flammable materials.
• Know the contents of the paints and solvents being sprayed. Read all Material Safety Data Sheets
(MSDS) and container labels provided with the paints and solvents. Follow the paint and solvents
manufacturer’s safety instructions.
• Fire extinguisher equipment shall be present and working.
• Sprayer generates sparks. When flammable liquid is used in or near the sprayer or for flushing or
cleaning, keep sprayer at least 20 feet (6 m) away from explosive vapors.
SKIN INJECTION HAZARD
• Do not aim the gun at, or spray any person or animal.
• Keep hands and other body parts away from the discharge. For example, do not try to stop leaks
with any part of the body.
• Always use the nozzle tip guard. Do not spray without nozzle tip guard in place.
• Use Graco nozzle tips.
• Use caution when cleaning and changing nozzle tips. in the case where the nozzle tip clogs while
spraying, follow the Pressure Relief Procedure for turning off the unit and relieving the pressure
before removing the nozzle tip to clean.
• Do not leave the unit energized or under pressure while unattended. When the unit is not in use, turn
off the unit and follow the Pressure Relief Procedure for turning off the unit.
• High-pressure spray is able to inject toxins into the body and cause serious bodily injury. In the event
that injection occurs, get immediate surgical treatment.
• Check hoses and parts for signs of damage. Replace any damaged hoses or parts.
• This system is capable of producing 3300 psi. Use Graco replacement parts or accessories that are
rated a minimum of 3300 psi.
• Always engage the trigger lock when not spraying. Verify the trigger lock is functioning properly.
• Verify that all connections are secure before operating the unit.
• Know how to stop the unit and bleed pressure quickly. Be thoroughly familiar with the controls.
311344E 3
Page 4
Warnings
WARNING
EQUIPMENT MISUSE HAZARD
Misuse can cause death or serious injury.
• Always wear appropriate gloves, eye protection, and a respirator or mask when painting.
• Do not operate or spray near children. Keep children away from equipment at all times.
• Do not overreach or stand on an unstable support. Keep effective footing and balance at all times.
• Stay alert and watch what you are doing.
• Do not operate the unit when fatigued or under the influence of drugs or alcohol.
• Do not kink or over-bend the hose.
• Do not expose the hose to temperatures or to pressures in excess of those specified by Graco.
• Do not use the hose as a strength member to pull or lift the equipment.
ELECTRIC SHOCK HAZARD
Improper grounding, setup, or usage of the system can cause electric shock.
• Turn off and disconnect power cord before servicing equipment.
• Use only grounded electrical outlets.
• Use only 3-wire extension cords.
• Ensure ground prongs are intact on sprayer and extension cords.
• Do not expose to rain. Store indoors.
PRESSURIZED ALUMINUM PARTS HAZARD
Do not use 1, 1, 1-trichloroethane, methylene chloride, other halogenated hydrocarbon solvents or fluids
containing such solvents in pressurized aluminum equipment. Such use can cause serious chemical
reaction and equipment rupture, and result in death, serious injury, and property damage.
MOVING PARTS HAZARD
Moving parts can pinch or amputate fingers and other body parts.
• Keep clear of moving parts.
• Do not operate equipment with protective guards or covers removed.
• Pressurized equipment can start without warning. Before checking, moving, or servicing equipment,
follow the Pressure Relief Procedure in this manual. Disconnect power or air supply.
PERSONAL PROTECTIVE EQUIPMENT
You must wear appropriate protective equipment when operating, servicing, or when in the operating
area of the equipment to help protect you from serious injury, including eye injury, inhalation of toxic
fumes, burns, and hearing loss. This equipment includes but is not limited to:
• Protective eye wear
• Clothing and respirator as recommended by the fluid and solvent manufacturer
•Gloves
• Hearing protection
4 311344E
Page 5
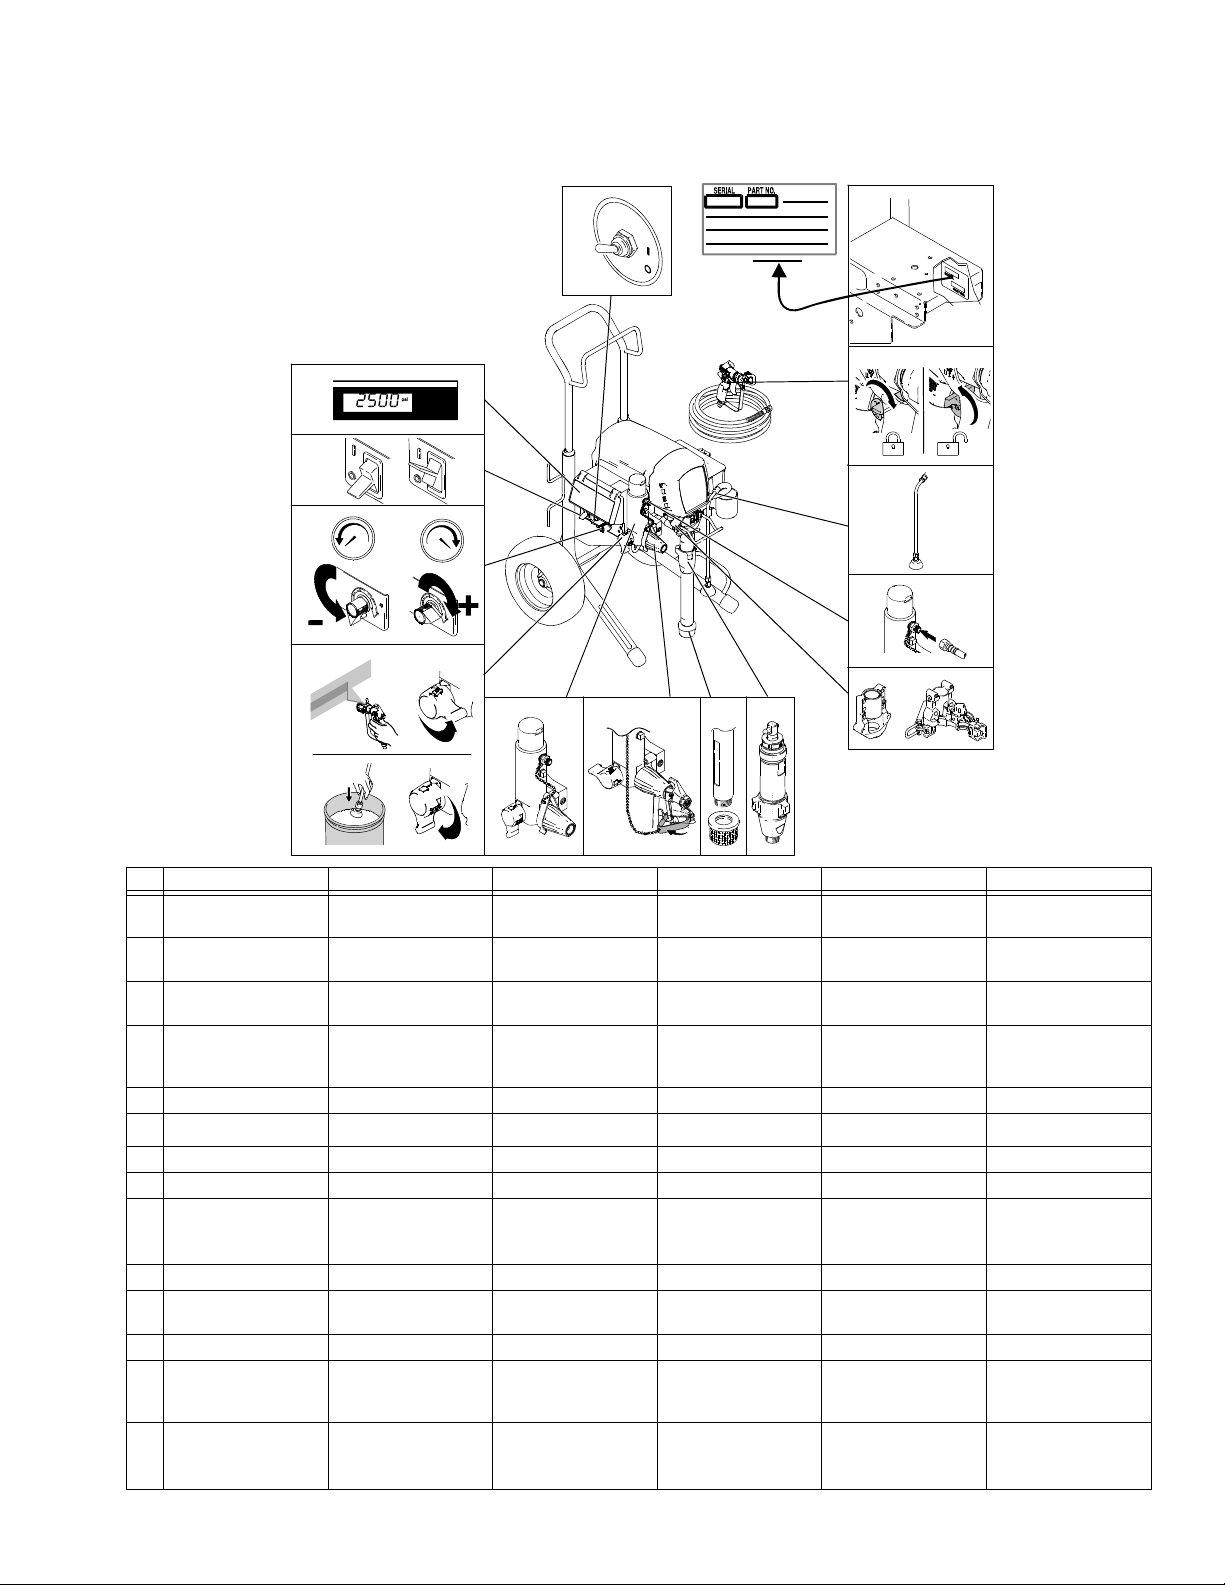
Component Identification / Identification des composants / Identificación de los componentes / Identificazione dei componenti /
Component Identification / Identification des composants / Identificación de los componentes / Identificazione dei componenti / Identificação dos componentes / De onderdelen
13.14.
1.
12.
2.
11.
3.
10.
4.
9.
5. 6. 7. 8.
ti13451a
English Français Español Italiano Português Nederlands
1 Premium Digital
Display
2 ON/OFF switch Bouton
3 Pressure control Régulation de la
4 Prime / Spray valve Vanne d’amorçage/
Affichage numérique
Premium
MARCHE/ARRÊT
pression
de pulvérisation
Pantalla digital
Premium
Interruptor de
encendido/apagado
Dispositivo de control
de la presión
Válvula de
cebado/pulverización
Display digitale
Visor digital Premium Digitale display
Premium
Interruttore ON/OFF Interruptor de
ligar/desligar
Dispositivo controllo
Regulador da pressão Drukregeling
della pressione
Valvola di
adescamento/
spruzzatura
Válvula de
segurança/
bico de injector
Premium
ON/OFF-schakelaar
Voorpomp-/
spuitventiel
5 Filter Filtre Filtro Graco Filtro Filter
6
AutoClean
™
2
AutoClean
™
2
AutoClean
™
2
AutoClean
™
2
AutoClean
™
2
AutoClean
™
2
7 Siphon tube Tuyau de succion Tubo de aspiración Flessibile del sifone Tubo de sucção Sifonbuis
8 Pump Pompe Bomba Pompa Bomba Pomp
9 Bearing Housing /
ProConnect
™
Corps de palier /
ProConnect
™
Alojamiento
del cojinete /
ProConnect
Sede del cuscinetto/
™
ProConnect
Caixa de rolamentos/
™
ProConnect
™
Lagerhuis /
ProConnect
™
10 Fluid Outlet Sortie produit Salida de fluido Uscita del fluido Saída de líquido Vloeistofuitlaat
11 Drain tube Tuyau de vidange Tubo de drenaje Flessibile di
Tubo de drenagem Aftapbuis
drenaggio
12 Trigger Lock Verrouillage gâchette Seguro del gatillo Sicura del grilletto Fecho do gatilho Veiligheidspal
13 Model/serial tag Étiquette avec
modèle et numéro
de série
14
WatchDog
(not Mark V)
™
Switch
Commutateur
WatchDog
™
(pas Mark V)
Etiqueta con
modelo/número
de serie
Interruptor
WatchDog™
(excepto Mark V)
Etichetta modello/
n. serie
Interruttore
WatchDog™
(diverso da Mark V)
Etiqueta do
modelo/número
de série
Interruptor do
WatchDog
™
(excepto Mark V)
Model/serienummer-
plaatje
WatchDog
™
-schakelaar
(niet Mark V)
311344E 5
Page 6
Grounding / Mise à la masse / Conexión a tierra / Messa a terra / Ligação à terra / Aarding
Grounding / Mise à la masse / Conexión a tierra /
Messa a terra / Ligação à terra / Aarding
English Français Español Italiano Português Nederlands
The sprayer must be
grounded. Grounding
reduces the risk of
static and electric
shock by providing an
escape wire for the
electrical current due
to static build up or in
the event of a short
circuit.
Ce pulvérisateur doit
être raccordé à la
terre. La mise à la
terre réduit les risques
d’électricité statique
et de décharge
électrique grâce à
un fil permettant au
courant de s’échapper
en cas d’accumulation
d’électricité statique
ou de court-circuit.
Este pulverizador
debe estar conectado
a tierra. La conexión
a tierra reduce el
riesgo de descargas
eléctricas y estáticas
al proporcionar un
cable por donde
puede escapar la
corriente eléctrica
debida a la
acumulación estática
o en caso de que haya
un cortocircuito.
Lo spruzzatore deve
essere collegato a
terra. La messa a
terra riduce il rischio
di shock statico ed
elettrico dovuto
all’accumulo statico
o a eventuali corti
circuiti grazie a un filo
di fuga per la corrente
elettrica.
O equipamento tem
que ter ligação à
terra. A ligação à terra
reduz o risco de
choque eléctrico
e electrostático,
fornecendo um cabo
de fuga para a
corrente eléctrica
gerada pela carga
electrostática ou em
caso de curto-circuito.
ti2810a
Het spuitapparaat
moet worden geaard.
Aarding verlaagt de
kans op statische en
elektrische schokken
omdat het een
ontsnappingsdraad
biedt voor de
elektrische stroom die
ontstaat als gevolg
van statische
elektriciteit en bij
eventuele kortsluiting.
English
• The sprayer cord includes a grounding wire with an appropriate grounding contact. • The plug must be plugged into an outlet
that is properly installed and grounded
in accordance with all local codes and
ordinances.
Français
• Le cordon d’alimentation possède un fil de terre relié à un contact de mise à la terre approprié. • Cette fiche doit être enfichée dans une
prise montée et reliée à la terre conformément à la réglementation locale.
Español
• El cable del pulverizador incluye un hilo de conexión a tierra con el contacto de conexión a
tierra adecuado.
Italiano
• Il cavo dello spruzzatore include un filo di terra con un contatto di terra appropriato. • La spina deve essere collegata a una
Português
• O cabo do equipamento inclui um cabo de ligação à terra com um pino adequado para tal. • A ficha deve estar ligada a uma tomada
Nederlands
• In de stroomkabel van het spuitapparaat zit een aardingsdraad met een bijbehorend aardings-
contact.
• La clavija debe estar enchufada en una
toma correctamente instalada y
conectada a tierra de acuerdo con los
códigos y decretos locales.
uscita che sia correttamente installata e
collegata a terra secondo tutte le ordinanze e norme locali.
eléctrica devidamente instalada e
ligada à terra, de acordo com as
normas e regulamentos locais.
• De stekker moet worden gestoken in
een goed geïnstalleerd stopcontact dat
is geaard conform alle ter plekke
geldende regels en voorschriften.
6 311344E
Page 7
Grounding / Mise à la masse / Conexión a tierra / Messa a terra / Ligação à terra / Aarding
Ground
ti4297a
English
• Do not modify plug! If it will not fit
in outlet, have grounded outlet
installed by a qualified electrician. Do not use an adapter.
• Ne pas modifier le connecteur! S’il
ne rentre pas dans la prise, faire
installer une prise avec mise à la
terre par un électricien qualifié.
Ne pas utiliser d’adaptateur.
• ¡No modifique la clavija
suministrada! Si no encaja en
la toma eléctrica, pida a un
electricista cualificado que
instale una toma de corriente
conectada a tierra. No utilice
un adaptador.
Power Requirements
• 100-120V units require
100-120 VAC, 50/60 Hz, 15A,
1 phase.
• 230V units require 230 VAC,
50/60 HZ, 7.5A, 1 phase.
Spécification électrique
• Les appareils de 100-120V
fonctionnent en 100-120 VCA,
50/60 Hz, 15 A, 1 phase.
• Les appareils de 230V
fonctionnent en 230 VCA,
50/60 HZ, 7,5A, 1 phase.
Requisitos eléctricos
• Las unidades de 100-120V
requieren 100-120 VCA,
50/60 Hz, 15A, monofásico.
• Las unidades de 230V requieren
230 VCA, 50/60 HZ, 7,5A,
monofásico.
120V
ti4295a
Power Requirements
• Use an extension cord with an
undamaged ground contact.
Rallonges
• Utiliser un cordon d’alimentation
électrique muni d’un contact de
mise à la terre en bon état.
Cables de extensión
• Utilice un cable de extensión con
un contacto en buen estado.
• If an extension cord is necessary,
use a 3-wire, 12 AWG (2.5 mm
minimum.
• Si une rallonge est nécessaire,
utiliser un fil à 3 conducteurs,
de 12 AWG (2,5 mm2) minimum.
• Si fuera necesario utilizar un
cable de extensión, utilice un
cable de 3 hilos, 12 AWG
(2,5 mm2) como mínimo.
2
)
• Non modificare la spina.
Se non si adatta all’uscita, far
installare l’uscita collegata a
terra da un tecnico qualificato.
Non utilizzare un adattatore.
• Não altere a ficha! Se a ficha
não encaixar na tomada, peça a
um electricista qualificado que
instale uma com ligação à terra.
Não utilize um adaptador.
• Geen veranderingen aanbrengen
aan de stekker! Als hij niet in
het stopcontact past, laat een
bevoegd elektricien dan een
geaard stopcontact aanleggen.
Geen adapter gebruiken.
Requisiti di alimentazione
• Le unità da 100-120 V richiedono
alimentazione da 100-120 V ca,
50/60 Hz, 15 A, monofase
• Le unità da 230 V richiedono
alimentazione da 230 V ca,
50/60 Hz, 7,5 A, monofase.
Requisitos de energia
• As unidades de 100-120 V
precisam de 100-120 VCA,
50/60 Hz, 15 A, 1 fase.
• As unidades de 230 V precisam
de 230 VCA, 50/60 HZ, 7,5 A,
1fase.
Voedingvereisten
• Voor 100-120V systemen moet
100-120 V/AC, 50/60 Hz, 15A,
1-fase worden gebruikt.
• Voor 230V systemen moet
230 V/AC, 50/60 HZ, 7.5A,
1-fase worden gebruikt.
Prolunghe
• Utilizzare una prolunga
con un contatto di terra
non danneggiato.
Cabos de extensão
• Utilize um cabo de extensão com
um pino de ligação à terra em
perfeitas condições.
Verlengsnoeren
• Gebruik een verlengkabel met
een onbeschadigd aardecontact.
• Se è necessaria la prolunga,
utilizzare una prolunga tripolare
da almeno 2,5 mm
• Se for necessário um cabo de
extensão, utilize um trifilar de
12 AWG (2,5 mm
• Als er een verlengkabel nodig is,
gebruik dan minimaal een
3-draads, 12 AWG (2,5 mm
kabel.
2
(12 AWG).
2
), no mínimo.
2
)
311344E 7
Page 8

Grounding / Mise à la masse / Conexión a tierra / Messa a terra / Ligação à terra / Aarding
English
Pails
• Solvent and oil/based fluids: follow
local code. Use only conductive
metal pails, placed on a grounded
surface such as concrete.
Seaux
• Solvants et fluides à l’huile/à
l’eau: Respecter la réglementation
locale. N’utiliser que des seaux
métalliques conducteurs placés sur
une surface reliée à la terre, sur du
béton par exemple.
Bidones
• Disolvente y fluidos a base de
aceite: de acuerdo con las normas
locales. Utilice sólo latas metálicas
conductoras, colocadas sobre una
superficie de tipo cemento.
Secchi
• Solvente e fluidi a base oleosa:
seguire le normative locali.
Utilizzare esclusivamente secchi
metallici conduttivi posti su di una
superficie collegata a terra, come
il cemento.
ti5850a
• Do not place pail on a nonconductive
surface such as paper or cardboard
which interrupts grounding continuity.
• Ne pas poser le seau sur une
surface non conductrice telle que
du papier ou du carton car cela
aurait pour effet d’interrompre la
continuité de la mise à la terre.
• No coloque el bidón sobre una
superficie no conductora, como
papel o cartón, que pueda
interrumpir la continuidad
de la conexión a tierra.
• Non poggiare il secchio su superfici
non conduttive, come carta o
cartone, in quanto interrompono
la continuità di messa a terra.
ti5851a
• Grounding a metal pail: connect a
ground wire to the pail by clamping
one end to pail and other end to a
true earth ground such as a water
pipe.
• Mise à la terre du seau métallique:
brancher un fil de terre sur le seau
en pinçant une extrémité sur le seau
et l’autre sur une véritable terre,
comme une conduite d’eau par
exemple.
• Conexión a tierra del bidón
metálico: conecte un cable de
conexión a tierra al bidón sujetando
un extremo al bidón y el otro
extremo a una tierra verdadera,
por ej. una tubería de agua.
• Collegamento a terra di un
secchio di metallo: collegare
un filo di terra al secchio fissando
un’estremità al secchio e l’altra
a una messa a terra efficace
come un tubo dell’acqua.
ti13243a
• To maintain grounding
continuity when flushing or
relieving pressure: hold metal
part of spray gun firmly to side
of a grounded metal pail. Then
trigger gun.
• Pour maintenir la continuité de
la mise à la terre pendant le
rinçage ou la décompression:
appuyer une partie métallique du
pistolet contre le côté d’un seau
métallique relié à la terre, puis
appuyer sur la gâchette du
pistolet.
• Para mantener la continuidad
de la puesta a tierra durante la
limpieza o la liberación de la
presión: sujete firmemente una
pieza metálica de la pistola de
pulverización contra el borde de
una lata metálica con conexión a
tierra. Después dispare la pistola.
• Per conservare la continuità
di terra quando si lava o si
scarica la pressione, mantenere
una parte metallica della pistola a
spruzzo a contatto con il lato di un
secchio metallico collegato a
terra. Quindi premere il grilletto.
Baldes
• Solventes e produtos à base de
óleo: cumpra o regulamento local.
Utilize apenas baldes metálicos
condutores, colocados numa
superfície com ligação à terra,
como é o caso do cimento.
Emmers
• Voor materialen op basis van
oplosmiddel en op oliebasis:
conform de ter plekke geldende
voorschriften. Alleen geleidende
metalen emmers gebruiken; plaats
ze op een geaarde ondergrond.
• Não coloque o balde sobre uma
superfície não condutora, como
papel ou cartão, pois a continuidade da ligação à terra seria
interrompida.
• De emmer niet op een nietgeleidende ondergrond plaatsen,
zoals papier of karton, aangezien
dan de continuïteit van de aarding
wordt onderbroken.
• Ligação à terra de um balde
metálico: ligue um fio terra ao
balde, fixando uma extremidade
ao balde e a outra a um objecto
verdadeiramente ligado à terra,
tal como a um cano de água.
• Een metalen emmer aarden:
verbind een aardingsdraad aan de
emmer door een uiteinde aan de
emmer vast te klemmen en het
andere aan een ware massa,
bijvoorbeeld een waterbuis.
• Para manter a continuidade
da ligação à terra durante a
lavagem ou descompressão:
encoste a parte metálica da
pistola de pintura firmemente
a um balde metálico com ligação
à terra. De seguida, accione
a pistola.
• Om de goede continuïteit van
de aarding te handhaven bij
het doorspoelen of wanneer
de druk wordt ontlast: houd
een metalen gedeelte van het
spuitpistool stevig tegen de
zijkant van een geaarde metalen
emmer. Druk vervolgens de
trekker van het pistool in.
8 311344E
Page 9
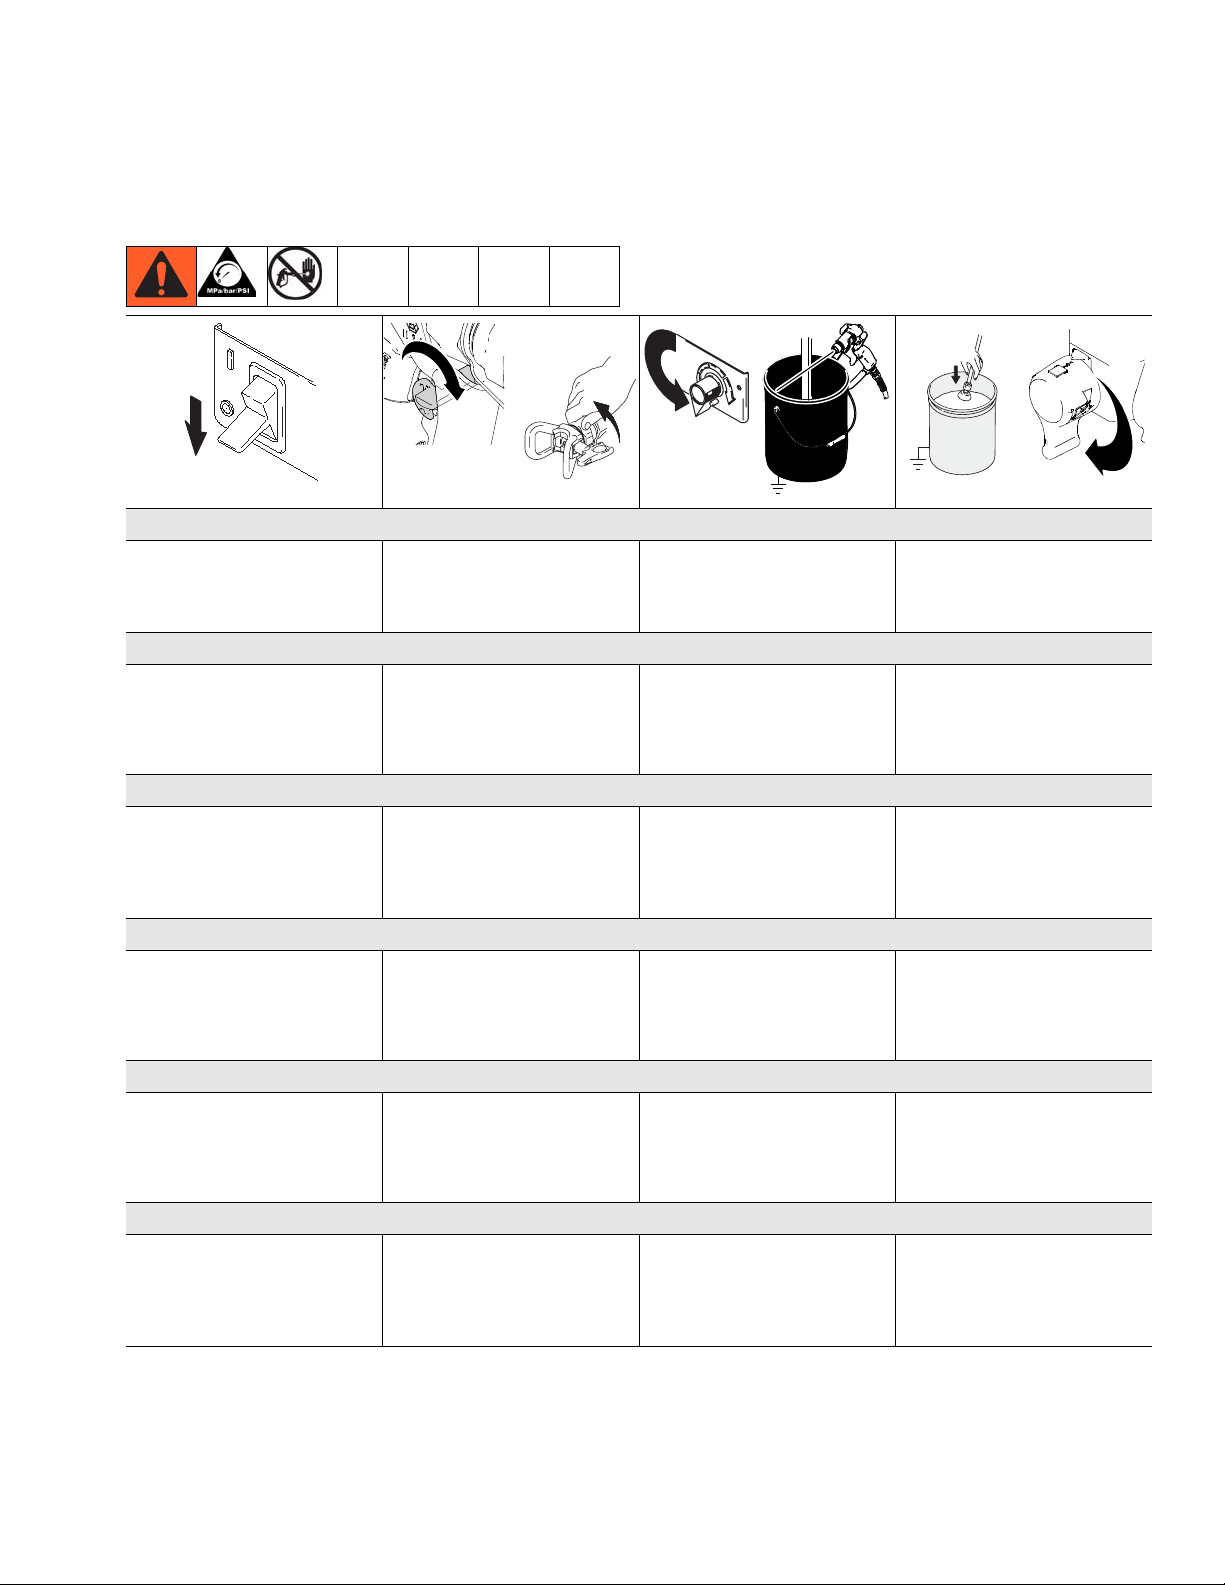
Pressure Relief Procedure / Procédure de décompression / Procedimiento de descompresión / Procedura di decompressione / Pro-
Pressure Relief Procedure / Procédure de décompression / Procedimiento de descompresión / Procedura di decompressione / Procedimento de descompressão / Drukontlastingsprocedure
ti4265a
English
Pressure Relief
1 Turn power OFF. Wait
7 seconds for power to
dissipate.
Décompression
1 Mettre HORS tension.
Attendre 7 secondes que
la tension se dissipe.
Descompresión
1 Apague la fuente de
alimentación. Espere
7 segundos hasta que
se disipe la energía.
Sfogo della pressione
1 SPEGNERE il motore.
Attendere 7 secondi per la
dissipazione dell’energia.
ti10166a
2 Lock gun trigger safety.
Remove guard and
SwitchTip.
2 Verrouiller la gâchette.
Démonter la garde et
la buse SwitchTip.
2 Enganche el seguro
del gatillo. Retire el
portaboquillas y la boquilla
SwitchTip.
2 Inserire la sicura del
grilletto della pistola.
Rimuovere la protezione
elo SwitchTip.
ti2769a
-
ti13458a
3 Turn pressure to lowest
setting. Trigger gun to
relieve pressure.
3 Réduire la pression au plus
bas. Actionner le pistolet
pour relâcher la pression.
3 Fije la presión en el valor
más bajo. Dispare la pistola
para liberar la presión.
3 Impostare la pressione sul
valore più basso. Premere
il grilletto per scaricare la
pressione.
ti2595a
4 Put drain tube in pail. Turn
prime valve to DRAIN
position.
4 Mettre le tuyau de vidange
dans le seau. Tourner la
vanne d’amorçage vers
le bas pour ouvrir la vanne
de vidange.
4 Coloque el tubo de drenaje
en un cubo. Coloque la
válvula de cebado hacia
abajo para abrir la válvula
de drenaje.
4 Mettere il flessibile di
drenaggio nel secchio.
Abbassare la valvola di
adescamento per aprire
la valvola di drenaggio.
ti13455a
Descompressão
1 Desligue o equipamento
OFF. Aguarde 7 segundos
para a corrente se dissipar.
Drukontlasting
1 Draai de hoofdschakelaar
op OFF. Wacht 7 seconden
totdat de stroom volledig is
afgevloeid.
2 Bloqueie o dispositivo de
segurança do gatilho da
pistola. Retire o protector
eo SwitchTip.
2 Vergrendel de veiligheidspal
van het pistool. Verwijder
de beschermer en de
SwitchTip.
3 Reduza a pressão para o
valor mínimo. Accione a
pistola para descomprimir.
3 Draai de druk op de laagste
stand. Druk de trekker van
het pistool in om de druk te
ontlasten.
4 Coloque o tubo de
drenagem no balde. Rode a
válvula de segurança para
baixo para abrir a válvula
de retorno.
4 Plaats de afvoerbuis in
de opvangbak. Draai de
inspuitkraan omlaag om
de afvoerkraan te openen.
311344E 9
Page 10

Setup / Installation / Puesta en marcha / Configurazione / Instalação / Opstellen
Setup / Installation / Puesta en marcha /
Configurazione / Instalação / Opstellen
ti13452a
English
1. Connect Graco airless hose
to sprayer. Hose must be
rated at least 3300 psi
maximum working pressure.
Tighten securely.
Français
1. Brancher le flexible sans air
de Graco sur le pulvérisateur.
Le flexible doit être
dimensionné pour une
pression de service maximale
d’au moins 3300 psi (227,5
bars, 22,7 MPa). Bien serrer.
Español
1. Conecte la manguera sin
aire al pulverizador Graco.
La manguera debe estar
homologada a una presión
de trabajo máxima de al
menos 3300 psi. Apriete
firmemente.
Italiano
1. Collegare il tubo flessibile
airless Graco allo spruzzatore.
Il flessibile deve essere adatto
all’uso con una pressione di
esercizio massima di almeno
3300 psi. Serrare saldamente.
Português
1. Ligue o tubo flexível de
alta pressão Graco ao
equipamento. O tubo tem
de ter uma capacidade
mínima de 3300 psi de
pressão de trabalho máxima.
Aperte firmemente.
Nederlands
1. Sluit een airless Graco-slang
aan op het spuitapparaat.
De slang moet geschikt zijn
voor een maximum werkdruk
van minstens 3300 psi.
Stevig vastdraaien.
ti13022a
2. Connect other end of hose
to gun.
2. Brancher l’autre extrémité
du flexible sur le pistolet.
2. Conecte el otro extremo
de la manguera a la pistola.
2. Collegare l’altra estremità
del flessibile alla pistola.
2. Ligue a outra extremidade
do tubo flexível à pistola.
2. Sluit het andere uiteinde van
de slang aan op het pistool.
ti13031a
3. Tighten securely. 4. Remove tip guard.
3. Bien serrer. 4. Retirer le garde-buse.
3. Apriete firmemente. 4. Retire el portaboquillas.
3. Serrare fermamente. 4. Rimuovere la protezione
3. Aperte firmemente. 4. Retire o protector do bico.
3. Vast aandraaien. 4. Verwijder de tipbeschermer.
ti2769a
dell’ugello.
10 311344E
Page 11

Setup / Installation / Puesta en marcha / Configurazione / Instalação / Opstellen
English
5 Remove protective cover
and check inlet strainer for
clogs and debris.
5 Vérifier si la crépine d’entrée
est bouchée ou contient des
impuretés.
5 Revise el elemento filtrante
de entrada en busca de
obstrucciones o suciedad.
ti13088a
6 Fill throat packing nut with
Graco TSL to prevent
premature packing wear.
Do this each time you spray.
6 Remplir l’écrou du presse-
étoupe de liquide TSL Graco
pour empêcher une usure
prématurée des garnitures.
Le faire à chaque
pulvérisation.
6 Llene la tuerca
prensaestopas del cuello
con Graco TSL para evitar
el desgaste prematuro de
las empaquetaduras.
Haga esto cada vez que
utilice el pulverizador.
ti4265a
ti2810a
7 Turn power OFF. 8 Plug power supply cord into
a properly grounded
electrical outlet.
7 COUPER l’alimentation
électrique.
8 Brancher le cordon
d’alimentation sur une prise
électrique correctement
raccordée à la terre.
7 Apague el suministro de
energía.
8 Enchufe el cable de
alimentación eléctrica a una
toma eléctrica con conexión
a tierra.
5 Controllare il flessibile di
ingresso da intasamenti
e detriti.
5 Verifique se o filtro de
entrada está obstruído
ou tem resíduos.
5 Controleer of de zeef
verstopt of vervuild is.
6 Riempire il dado
premiguarnizioni con Graco
TSL per prevenire l’usura
prematura delle guarnizioni.
Procedere come descritto
ogni volta che si spruzza.
6 Encha a porca de aperto dos
empanques com Graco TSL
para evitar o desgaste
prematuro do empanque.
Efectue o referido
procedimento sempre que
utilizar o equipamento.
6 Vul de halspakkingmoer met
Graco TSL om te voorkomen
dat de pakking te snel slijt.
Doe dit elke keer als u gaat
spuiten.
7 Spegnere. 8 Inserire il cavo di
alimentazione in una presa
elettrica correttamente
collegata a terra.
7 Desligue o equipamento
(OFF).
8 Ligue o cabo de alimentação
a uma tomada com
protecção terra.
7 Draai de stroomschakelaar
op OFF.
8 Steek de stekker van de
stroomsnoer in een goed
geaard stopcontact.
311344E 11
Page 12

Setup / Installation / Puesta en marcha / Configurazione / Instalação / Opstellen
PAI NT
ti13455a
English
9 Turn prime valve to DRAIN
position.
9 Tourner la vanne
d’amorçage vers le bas.
9 Gire la válvula de cebado
hacia abajo.
9 Abbassare la valvola di
adescamento.
ti2756a
FLUSH
10 Place pump in grounded metal pail partially filled with flushing fluid. Attach a ground wire to pail and to
true earth ground. Do 1. - 5. of Startup to flush out storage oil shipped in sprayer. Use water to flush
water-base paint and mineral spirits to flush oil-base paint and storage oil.
10 Plonger le tuyau d’aspiration dans un seau métallique mis à la terre et rempli en partie de fluide de
rinçage. Fixer le fil de terre sur le seau et le raccorder à une véritable terre. Effectuer les opérations
1. - 5. de la rubrique Démarrage pour chasser l’huile d’entreposage laissée à l’intérieur du
pulvérisateur. Rincer à l’eau pour éliminer la peinture à base aqueuse et au white-spirit pour éliminer
la peinture à l’huile et l’huile d’entreposage.
10 Coloque el tubo de aspiración en un recipiente metálico parcialmente lleno con líquido de lavado.
Sujete el cable de conexión a tierra a una tierra verdadera. Lleve a cabo los pasos 1. - 5. de la Puesta
en marcha para eliminar el aceite de almacenamiento enviado con el pulverizador. Utilice agua para
eliminar las pinturas acuosas y alcoholes minerales para las pinturas a base de aceite y el aceite de
almacenamiento.
10 Mettere il flessibile del sifone in un secchio metallico collegato a terra riempito per metà con fluido di
lavaggio. Collegare un filo di terra al secchio e a una presa di terra efficace. Eseguire le operazioni di
avviamento 1.-5. per lavare l’olio di conservazione fornito in dotazione con lo spruzzatore. Utilizzare
l’acqua per la vernice a base acquosa e l’acqua ragia minerale per la vernice a base oleosa e per l’olio
di conservazione.
9 Rode a válvula de
segurança para baixo.
10 Coloque o tubo de sucção dentro de um balde metálico com protecção terra parcialmente cheio com
líquido de lavagem. Ligue um fio terra ao balde e à terra. Efectue os passos 1. a 5. do procedimento de
Colocação em serviço para eliminar o óleo utilizado para a armazenagem do equipamento. Utilize
água para tintas à base de água e diluente para tintas à base de óleo e o óleo utilizado para a
armazenagem.
9 Draai de inspuitkraan
omlaag.
10 Plaats de sifonbuisset in een geaarde metalen bak die deels gevuld is met spoelvloeistof. Bevestig
een massadraad aan de bak en aan een goede aarding. Voer stappen 1 t/m 5 van de Startprocedure
uit om de opslagolie uit te spoelen die tijdens de verzending in het spuittoestel zat. Spoel verf op
waterbasis uit met water en verf op oliebasis en de opslagolie uit het systeem met thinner.
12 311344E
Page 13

Startup / Démarrage / Puesta en marcha / Avviamento / Arranque / Opstarten
Startup / Démarrage / Puesta en marcha / Avviamento / Arranque / Opstarten
ti4266a
15sec.
-
English
1 Turn pressure control to
lowest pressure.
1 Régler la régulation de
pression au niveau le plus
bas.
1 Ajuste el dispositivo de
control de presión al valor
más bajo.
1 Posizionare il controllo di
pressione alla pressione
più bassa.
1/2
-
2 Turn power ON. 3 Increase pressure 1/2 to start
motor and allow fluid to
circulate through drain tube
for 15 seconds; turn pressure
down.
2 Mettre en MARCHE. 3 Augmenter la pression jusqu’à
moitié pour que le moteur
démarre et faire circuler le
produit pendant 15 secondes
dans le tuyau de vidange;
réduire la pression.
2 Encienda la fuente de
alimentación.
2 Accendere il motore. 3 Aumentare la pressione a
3 Aumente 1/2 la presión para
poner en marcha el motor y
deje que el fluido circule por
el tubo de drenaje durante
15 segundos; baje la
presión.
1/2 per avviare il motore e
consentire al fluido di
circolare attraverso il
flessibile di drenaggio
per 15 secondi; abbassare la
pressione.
ti13457a
4 Turn prime valve to SPRAY.
Take spray gun trigger safety
OFF.
4 Positionner la vanne
d’amorçage vers le haut
pour fermer la vanne de
vidange. DÉVERROUILLER
la gâchette du pistolet.
4 Coloque la válvula de
cebado hacia arriba para
cerrar la válvula de drenaje.
Suelte el seguro del gatillo
de la pistola
de pulverización.
4 Girare la valvola di
adescamento verso l’alto
per chiudere la valvola di
drenaggio. Disinserire la
sicura del grilletto della
pistola a spruzzo.
1 Coloque o regulador da
pressão no valor mais baixo.
1 Draai de drukregeling op de
laagste druk.
2 Ligue o equipamento. 3 Aumente a pressão em 1/2
2 Draai de stroomschakelaar
op ON.
para colocar o motor em
funcionamento e permitir a
circulação do líquido através
do tubo de drenagem
durante 15 segundos;
reduza a pressão.
3 Verhoog de druk tot 1/2 om
de motor te starten en het
materiaal 15 seconden lang
te laten circuleren door de
afvoerbuis; draai de druk
omlaag.
4 Rode a válvula de
segurança para cima para
fechar a válvula de retorno.
Retire o dispositivo de
segurança do gatilho da
pistola.
4 Draai de inspuitkraan
omhoog om de afvoerkraan
te sluiten. Zet de
trekkerbeveiliging van
het spuitpistool op OFF.
311344E 13
Page 14

Startup / Démarrage / Puesta en marcha / Avviamento / Arranque / Opstarten
1
/
2
ti4271a
ti13243a
English
5 Hold gun against grounded
metal flushing pail. Trigger gun
and increase fluid pressure to
1/2. Flush 1 minute.
5 Appuyer le pistolet contre un
seau de rinçage métallique mis
à la terre. Actionner le pistolet
et augmenter la pression du
produit jusqu’à moitié. Rincer
pendant 1 minute.
5 Mantenga la pistola contra un
recipiente metálico de lavado
conectado a tierra. Dispare la
pistola y aumente la presión
de fluido a 1/2. Lave durante
1minuto.
5 Tenere la pistola contro il
secchio metallico di lavaggio
collegato a terra. Attivare la
pistola e aumentare la
pressione del fluido a 1/2
Lavare per 1 minuto.
Inspect for leaks. Do not stop leaks
with hand or a rag! If leaks occur,
perform Pressure Relief. Tighten
fittings. Do Startup, 1. - 5. If no
leaks, proceed to 6.
Contrôler l’étanchéité. Ne pas arrêter
une fuite avec la main ou un chiffon!
En cas de fuite, effectuer une
Décompression. Resserrer les
raccords. Répéter Démarrage, 1 - 5.
En l’absence de fuite, passer à 6.
Inspeccione los racores en busca de
fugas. ¡No detenga las fugas con la
mano o con un trapo! Si hubiera
fugas, lleve a cabo el Procedimiento
de descompresión. Apriete los
racores. Lleve a cabo el
procedimiento de Puesta en
marcha, 1. - 5. Si no hubiera fugas,
proceda al paso 6.
Verificare la presenza di perdite. Non
interrompere le perdite con la mano
o con uno straccio. Se sono presenti
perdite, scaricare la pressione.
Serrare i raccordi. Eseguire
l’avviamento, passi 1.-5. Se non ci
sono perdite, proseguire con il passo
6.
ti2714a
6 Place siphon tube in
paint pail.
6 Mettre le tuyau de
succion dans un seau
de peinture.
6 Coloque el tubo de
aspiración en la lata
de pintura.
6 Collocare il flessibile
del sifone nel secchio
per la vernice.
ti13029a
7 Trigger gun again into flushing pail until
paint appears. Move gun to paint pail
and trigger for 20 seconds. Set gun
safety ON. Assemble tip and guard,
see instructions on next page.
7 Actionner le pistolet en le tenant dans
un seau de rinçage jusqu’à ce que la
peinture s’écoule. Diriger le pistolet
vers le seau de peinture et presser la
gâchette pendant 20 secondes.
VERROUILLER le pistolet. Assembler
la buse et la garde ; voir les
instructions à la page suivante.
7 Vuelva a dispara la pistola en el
recipiente de lavado hasta que salga
pintura. Mueva la pistola al bidón de
pintura y dispárela durante
20 segundos. Enganche el seguro del
gatillo. Instale la boquilla y el
portaboquillas, vea las instrucciones
de la página siguiente.
7 Attivare nuovamente la pistola nel
secchio di lavaggio finché non
compare la vernice. Muovere la pistola
per verniciare il secchio e attivare per
20 secondi. INSERIRE la sicura della
pistola. Montare l’ugello e la
protezione, fare riferimento alle
istruzioni nella pagina successiva.
5 Encoste a pistola a um balde
de lavagem metálico com
ligação terra. Accione a pistola
e aumente a pressão do líquido
para 1/2. Deixe o líquido
circular durante 1 minuto.
5 Houd het pistool tegen de
geaarde metalen spoelbak.
Druk de trekker van het pistool
in en verhoog langzaam de
materiaaldruk tot 1/2. Spoel
1 minuut lang.
Verifique se há fugas. Não impeça
as fugas com a mão nem com um
pano! Caso haja fugas, efectue a
descompressão. Aperte os encaixes.
Efectue os passos 1. a 5. do procedimento de Colocação em serviço.
Caso não se verifiquem fugas, prossiga para o passo 6.
Kijk of er lekken zijn. Lekken niet met
de hand of met een doek afstoppen!
Als er sprake is van een lekken, voer
dan de drukontlastingsprocedure uit.
Draai de koppelingen vast. Herhaal
Starten, 1. – 5. Als er geen lekken
zijn, ga dan verder bij 6.
6 Coloque o tubo de
sucção no balde de
tinta.
6 Plaats de sifonbuis in
de verfemmer.
7 Accione novamente a pistola para
dentro do balde de lavagem até
aparecer tinta. Desloque a pistola para
o balde de tinta e accione durante 20
segundos. Accione o dispositivo de
segurança da pistola. Monte o bico e o
respectivo protector, veja as instruções
na página seguinte.
7 Spuit met het pistool weer in de
opvangbak tot er verf te zien is. Breng
het pistool vervolgens over naar de
verfemmer en druk de trekker nog 20
seconden in. Zet de veiligheidspal van
het pistool op ON. Zet de tip en
de beschermer in elkaar; zie
de instructies op de volgende pagina.
14 311344E
Page 15

Switch Tip Installation
Startup / Démarrage / Puesta en marcha / Avviamento / Arranque / Opstarten
C
B
A
ti13023a
English
1. Use spray tip (A) to insert OneSeal
(B) into guard (C).
Français
1. Utiliser une buse de pulvérisation
(A) pour glisser le joint OneSeal™
(B) dans le garde (C).
Español
1. Utilice la boquilla de pulverización
(A) para insertar la junta OneSeal™
(B) en la protección (C).
Italiano
1. Utilizzare l’ugello di spruzzatura (A)
per inserire OneSeal™ (B) nella
protezione (C).
Português
1. Utilize o bico (A) para inserir
o OneSeal™ (B) no protector (C).
Nederlands
1. Gebruik de spuittip (A)
om de OneSeal™ (B) in de
beschermer (C) te installeren.
ti2710a
ti13024a
™
2. Insert SwitchTip. 3. Screw assembly onto gun. Tighten.
2. Insérer la buse SwitchTip. 3. Visser l’ensemble sur le pistolet.
Serrer.
2. Introduzca la boquilla SwitchTip. 3. Enrosque el conjunto en la pistola.
Apriete.
2. Inserire l’ugello reversibile. 3. Avvitare il gruppo sulla pistola.
Serrare
2. Introduza o SwitchTip. 3. Enrosque o conjunto na pistola.
Aperte.
2. Breng de SwitchTip in. 3. Schroef het geheel in het pistool.
Aandraaien.
311344E 15
Page 16

Startup / Démarrage / Puesta en marcha / Avviamento / Arranque / Opstarten
ti10166a
ti13033a
ti13030a
ti13025a
ti10167a
Spray Clear Clog
1 Spray test pattern. Adjust
pressure to eliminate heavy
edges. Use smaller tip size if
pressure adjustment can not
eliminate heavy edges.
2 Hold gun perpendicular, 10-12 in.
(25-30 cm) from surface. Spray
back and forth. Overlap by 50%.
Trigger gun before moving and
release after moving.
1 Release trigger, put safety ON.
Rotate SwitchTip. Take safety
OFF. Trigger gun to clear clog.
Never point gun at your hand or
into a rag!
Pulvériser Déboucher
1 Faire un essai de pulvérisation.
Ajuster la pression pour
supprimer les bords trop
chargés. Prendre une buse de
plus petit diamètre si le réglage
de pression ne parvient pas
à supprimer les bords trop
chargés.
2 Tenir le pistolet
perpendiculairement à la
surface à peindre, à 10-12 in.
(25-30 cm). Faire des
mouvements de va-et-vient.
Chevaucher de 50 %. Actionner
le pistolet avant d’initier un
mouvement et relâcher la
gâchette une fois le mouvement
terminé.
1 Relâcher la gâchette, la
VERROUILLER. Faire
pivoter la buse SwitchTip.
DÉVERROUILLER la gâchette.
Actionner le pistolet pour
déboucher la buse. Ne jamais
pointer le pistolet sur votre main
ou un chiffon!
Pulverizar Elimine la obstrucción
1 Pulverice la plantilla de prueba.
Ajuste la presión para suprimir
los extremos densos. Si no logra
hacerlo, utilice una boquilla más
pequeña.
2 Mantenga la pistola en posición
perpendicular, a 10-12 pulg.
(25-30 cm) de la superficie.
Pulverice hacia adelante y hacia
atrás. Superponga las pasadas
en un 50%. Apriete el gatillo
antes de mover la pistola
y suéltelo después de moverla.
1 Suelte el gatillo, y enganche
el seguro. Gire la boquilla
SwitchTip. Suelte el seguro.
Dispare la pistola para despejar
la obstrucción. ¡Nunca apunte la
pistola hacia su mano o hacia un
trapo!
Spruzzare Pulizia delle ostruzioni
1 Spruzzare un getto di prova.
Regolare la pressione per
eliminare i bordi pesanti.
Utilizzare un ugello di dimensioni
più piccole se la regolazione
della pressione non riesce
a eliminare i bordi pesanti.
2 Tenere la pistola
perpendicolarmente, a 25-30 cm
(10-12 pollici) dalla superficie.
Spruzzare avanti e indietro.
Sovrapporre del 50%. Azionare
la pistola prima di usarla e
rilasciarla dopo averla usata.
1 Rilasciare il grilletto ed inserire la
sicura della pistola. TOGLIERE
la sicura e premere il grilletto per
liberare l’ostruzione. Non puntare
mai la pisola sulle mani o in uno
straccio!
Aplicar Desobstrução
1 Pinte um leque de teste.
Regule a pressão, para eliminar
extremidades acentuadas.
Utilize um tamanho de bico
menor se a regulação da
pressão não eliminar as
extremidades acentuadas.
2 Segure a pistola na
perpendicular, a uma distância
de aprox. 25-30 cm (10-12 pol.)
da superfície. Pinte com um
movimento para a frente e para
trás. Sobreponha em 50%.
Accione a pistola antes de
iniciar o movimento e liberte
o gatilho no final do movimento.
1 Solte o gatilho e coloque o
dispositivo de segurança. Rode o
SwitchTip. RETIRE o dispositivo
de segurança do gatilho. Accione
a pistola, para a desobstruir.
Nunca aponte a pistola para
a mão nem para um pano!
Spuiten Verstopping verwijderen
1 Spuit een testpatroon. Pas de
druk aan om zware randen te
voorkomen. Gebruik een kleiner
formaat tip als de zware randen
niet verdwijnen door aanpassing
van de druk.
2 Houd het pistool loodrecht op
10-12 inch (25-30 cm) van het
oppervlak. Spuit heen en weer.
Zorg voor een overlapping
van 50%. Druk de trekker van
het pistool in voordat u gaat
bewegen en laat de trekker
los na de beweging.
1 Laat de trekker los, zet de trekker
op de veiligheidspal. Keer de
SwitchTip. ONTGRENDEL de
veiligheidspal. Druk de trekker
van het pistool in om de
verstopping eruit te spuiten. Het
pistool nooit op uw hand richten
of in een doek spuiten!
ti10166a
ti13034a
ti10167a
2 Put safety ON. Return SwitchTip
to original position. Take safety
OFF and continue spraying.
2 VERROUILLER la gâchette.
Remettre la buse SwitchTip
en position initiale.
DÉVERROUILLER la gâchette
et poursuivre la pulvérisation.
2 Enganche el seguro del gatillo.
Vuelva a colocar la boquilla
Switch en su posición original.
Suelte el seguro del gatillo
y siga pulverizando.
2 Inserire la sicura, rimettere
lo SwitchTip nella posizione
originale, TOGLIERE la sicura
e continuare a spruzzare.
2 Coloque o dispositivo de
segurança do gatilho. Volte a
colocar o SwitchTip na posição
original. Retire o dispositivo de
segurança e continue a pintar.
2 VERGRENDEL de
veiligheidspal. Zet de SwitchTip
weer in de oorspronkelijke
stand. ONTGRENDEL de
veiligheidspal weer en ga door
met spuiten.
16 311344E
Page 17

WatchDog™ Protection System / Système de protection WatchDog™ / Sistema de protección WatchDog™ / Sistema di protezione
WatchDog™ Protection System / Système de protection WatchDog™ /
Sistema de protección WatchDog
Sistema de protecção WatchDog
™
/ Sistema di protezione WatchDog™ /
™
/ WatchDog™-beschermingssysteem
ti7398a
ti6224a
Pump stops automatically when material pail is empty
To activate:
1Do Startup.
2 Premium units with digital display: Turn
WatchDog switch ON and WD ON displays.
EMPTY displays/flashes and pump stops
when Watchdog protection system detects
an empty material pail.
La pompe s’arrête automatiquement dès que le seau est vide
Pour activer:
1 Démarrer.
2 Appareils Premium à affichage numérique:
mettre le commutateur WatchDog sur ON ; on
voit s’afficher WD ON. VIDE s’affiche/clignote
et la pompe s’arrête si le système de
protection WatchDog détecte que le seau
est vide.
Cuando el bidón de material se vacía, la bomba se para automáticamente
Para activar:
1 Realice la Puesta en marcha.
2 Unidades Premium con pantalla digital:
Encienda el interruptor WatchDog y las
pantallas WD ON. Se visualiza/parpadea
EMPTY (VACÍO) y la bomba se para cuando
el sistema de protección WatchDog detecta
un bidón de producto vacío.
La pompa si spegne automaticamente quando il secchio del materiale è vuoto
Per attivare:
1 Eseguire l’Avvio.
2 Unità Premium con display digitale: attivare
l’interruttore WatchDog e viene visualizzato
WD ON. Viene visualizzato EMPTY e la
pompa si arresta quando il sistema di
protezione Watchdog rileva un secchio
di materiale vuoto.
A bomba pára automaticamente quando o balde de material está vazio
Para activar:
1 Efectue o Arranque.
2 Unidades Premium com visor digital: ligue
o interruptor do WatchDog (ON), surge
a indicação WD ON. A indicação EMPTY
surge/fica intermitente e a bomba pára
quando o sistema de protecção WatchDog
detecta um balde de material vazio.
De pomp stopt automatisch als de materiaalemmer leeg is
Activeren:
1 Voer Opstarten uit.
2 Premium-systemen met digitale display: Draai
de schakelaar van WatchDog op ON waarna
WD ON te zien is. EMPTY is te zien op de
display of knippert en de pomp stopt als het
WatchDog-beveiligingssysteem een lege
materiaalhouder detecteert.
ti7399a
3 Turn WatchDog switch OFF. Add material or
reprime sprayer. Turn pump switch OFF and
ON to reset WatchDog protection system.
Turn WatchDog switch back ON to continue
to monitor material level.
3 Mettre le commutateur WatchDog sur OFF.
Faire le plein ou réamorcer le pulvérisateur.
Mettre le bouton de commande de la pompe
sur OFF, puis sur ON pour réinitialiser le
système de protection WatchDog. Remettre
le commutateur WatchDog sur ON pour qu’il
puisse continuer à surveiller le niveau de
produit.
3 Apague el interruptor Turn WatchDog. Añada
producto o vuelva a cebar el pulverizador.
Apague y encienda la bomba para reiniciar
el sistema de protección WatchDog. Vuelva
a encender el WatchDog para seguir
supervisando el nivel de producto.
3 Spegnere l’interruttore di WatchDog.
Aggiungere del materiale o riadescare
lo spruzzatore. Spegnere e riaccendere
l’interruttore della pompa per ripristinare il
sistema di protezione WatchDog. Riportare
l’interruttore WatchDog su ON per continuare
a monitorare il livello di materiale.
3 Desligue o interruptor do WatchDog (OFF).
Adicione material ou volte a ferrar a bomba.
Desligue o interruptor da bomba (OFF) e
ligue-o novamente (ON) para repor o sistema
de protecção WatchDog. Volte a ligar o
interruptor do WatchDog para continuar
a controlar o nível de material.
3 Draai de schakelaar van WatchDog op OFF.
Voeg materiaal toe of pomp het spuitapparaat
weer voor. Draai de pompschakelaar op OFF
en dan weer op ON om het WatchDogbeveiligingssysteem te resetten. Draai de
schakelaar van WatchDog weer op ON
om door te gaan met de bewaking van
het materiaalpeil.
311344E 17
Page 18

Digital Tracking System / Système de suivi numérique / Sistema de rastreo digital / Sistema di controllo digitale / Digital Tracking
Digital Tracking System / Système de suivi numérique / Sistema de rastreo digital / Sistema di controllo digitale / Digital Tracking System / Digitaal Tracking Systeem
ti4266a
Psi
ti13621a
Psi
bar
MPa
ti13605a
-
ti13243a
ti13455a
psi
ti13621a
Operation Main Menu Change Display Units
Short press to move to next display. Press
and hold (5 seconds) to change units or
reset data.
Fonctionnement Menu
principal
Appuyer brièvement pour passer à l’affichage suivant. Appuyer et maintenir enfoncé (5 secondes) pour changer d’unité ou
réinitialiser les données.
Menú principal de
funcionamiento
Pulse brevemente para avanzar hasta
la pantalla siguiente. Pulse y mantenga
pulsado (5 segundos) para cambiar las
unidades o reponer a cero los datos.
Funzionamento
Menu principale
Premere rapidamente per passare al
display successivo. Premere a lungo (per
5 secondi) per cambiare unità o effettuare
il ripristino dei dati.
Funcionamento –
1 Turn pressure to lowest setting.
Trigger gun to relieve pressure.
Turn prime valve to DRAIN.
1 Réduire la pression au réglage
minimum. Actionner le pistolet pour
relâcher la pression. Tourner la
vanne d’amorçage vers le bas.
1 Fije la presión en el valor más bajo.
Dispare la pistola para liberar la
presión. Gire hacia abajo la válvula
de cebado.
1 Impostare la pressione sul valore
più basso. Premere il grilletto per
scaricare la pressione. Abbassare
la valvola di adescamento.
2 Turn power ON. Pressure display
appears. Dashes will not appear unless
pressure is less than 200 psi (14 bar,
1,4 MPa).
2 Mettre sous tension. La pression
s’affiche. Aucun trait n’apparaît sauf
si la pression est inférieure à 200 psi
(14 bars, 1,4 MPa).
2 Encienda el suministro de potencia.
Aparece visualizada la presión. No
aparecerán rayas a menos que
la presión sea menor de 200 psi
(14 bar, 1,4 Mpa).
2 Accendere. Viene visualizzato il display
della pressione. L’area grigia non viene
visualizzata a meno che la pressione
non sia inferiore a 200 psi (14 bar,
1,4 MPa).
Press and hold DTS button for 5 seconds to
change pressure units (psi, bar, MPa) to
desired units. Selection of bar or MPa
changes gallons to liters x 10. To change
display units DTS must be in pressure
display mode and pressure must be at zero.
Changement des unités
affichées
Appuyer et maintenir le bouton DTS enfoncé
pendant 5 secondes pour changer les unités
de pression (psi, bar, MPa). Si l’on
sélectionne les bars ou les MPa, les gallons
passent en litres x 10. Pour changer les
unités d’affichage, le DTS doit être en mode
pression et la pression doit être de zéro.
Cambiar las unidades de la
visualización
Pulse y mantenga pulsado el botón DTS
durante 5 segundos para cambiar las
unidades de presión (psi, bar, MPa) a la
unidad deseada. Si seleccione bar o MPa
se cambiarán los galones a litros x 10.
Para cambiar, las unidades de visualización
el DTS debe estar en modo de visualización
de la presión y ésta debe estar a cero.
Cambiare le unità di
visualizzazione
Tenere premuto il pulsante DTS per
5 secondi per cambiare le unità di
pressione (psi, bar, MPa) nelle unità
desiderate. La selezione di bar o MPa
cambia i galloni in litri x 10. Per cambiare
le unità visualizzate, il sistema DTS
deve essere impostato in modalità di
visualizzazione pressione e su zero.
Alterar as unidades do visor
Menu Principal
Prima e largue para passar para o visor
seguinte. Prima e mantenha (5 segundos)
para mudar as unidades ou repor os dados.
1 Reduza a pressão para o valor
mínimo. Accione a pistola para
descomprimir. Rode a válvula
de segurança para baixo.
2 Ligue o equipamento. Aparece a
indicação da pressão. Os traços só
aparecerão se a pressão for inferior
a 200 psi (14 bar, 1,4 MPa).
Prima continuamente o botão DTS, durante
5 segundos, para alterar as unidades de
pressão pretendidas (psi, bar, MPa). A
selecção de bar ou MPa altera galões para
litros x 10. Para alterar as unidades do
visor, o DTS tem de estar em modo de
indicação da pressão e a pressão tem
de estar a zero.
Bediening, Hoofdmenu De maateenheden op het
scherm veranderen
Druk kort op de knop om naar het volgende
scherm te gaan. Druk de knop en houd
hem (5 seconden) ingedrukt om van
maateenheid te veranderen of de gegevens
weer op de beginstand te zetten.
1 Draai de druk op de laagste stand.
Druk de trekker van het pistool in
om de druk te ontlasten. Draai de
inspuitkraan naar beneden.
2 Schakel het apparaat in. De druk wordt
getoond op het display. Pas als de druk
minder dan 200 psi (14 bar, 1,4 MPa) is,
zijn er streepjes te zien.
Druk op de DTS-knop en houd hem 5 seconden ingedrukt om de drukeenheid te
veranderen (psi, bar, MPa) en in te stellen
op de gewenste eenheden. Bij de keuze
van bar of MPa verandert ook gallons in
liters x 10. Om de schermeenheden te
veranderen moet de DTS in de modus voor
de drukweergave staan en de druk moet op
nul staan.
ti13604a
18 311344E
Page 19

Digital Tracking System / Système de suivi numérique / Sistema de rastreo digital / Sistema di controllo digitale / Digital Tracking
Psi
ti13620a
ti13612a
ti13610a
3 Short press DTS button to move
to Job Gallons (or liters x 10).
Note: JOB displays briefly, then the number
of gallons sprayed above 1000 psi (70 bar,
7 MPa) displays.
3 Appuyer brièvement sur le bouton
du DTS pour passer à gallons par job
(ou litres x 10).
Remarque : JOB s’affiche brièvement,
puis le nombre de gallons (litres) pulvérisés
à une pression supérieure à 1000 psi
(70bars, 7MPa).
3 Pulse brevemente el botón DTS
para pasar a tarea (Job) que muestra
galones (o litros x 10).
Nota: JOB aparece brevemente, seguido
del número de galones pulverizados por
encima de 1000 psi (70 bar, 7 MPa).
3 Premere rapidamente il pulsante DTS
per spostare i galloni per il lavoro
(o litri x 10).
Nota: viene visualizzato brevemente JOB,
quindi il numero dei galloni spruzzati a più
di 70 bar (7 MPa, 1000 psi).
3 Prima brevemente o botão DTS
para passar ao volume do trabalho
(em galões ou litros x 10).
Nota: surge a indicação JOB (trabalho) por
momentos, seguida pelo volume em galões
aplicado acima de 70 bar (7 Mpa, 1000 psi).
3 Druk kort op de DTS-knop om naar
Gallons voor dit werk (of liters x 10)
te gaan.
Opmerking: Het woord JOB verschijnt kort,
waarna het totaal aantal gespoten gallons
op een druk boven 1000 psi (70 bar, 7 MPa)
verschijnt.
OR
ti13601a
ti13617a
ti13611a
Operation Main Menu
4 Press and hold to reset to zero,
or short press DTS button to move
to Lifetime Gallons (or liters x 10).
Note: LIFE displays briefly, then the number
of gallons sprayed above 1000 psi (70 bar,
7 MPa) displays.
5 Short press DTS button to move
Menu principal
4 Appuyer et maintenir enfoncé pour
remise à zéro ou appuyer brièvement
sur le bouton du DTS pour passer
à Total gallons (ou litres x 10).
Remarque : LIFE (En marche) s’affiche
brièvement, puis le nombre de gallons (litres)
pulvérisés à une pression supérieure
à 1000 psi (70 bars, 7 MPa).
5 Appuyer brièvement sur le bouton
Menú principal de funcionamiento
4 Pulse y mantenga pulsado el botón
para volver a cero, o pulse brevemente
el botón DTS para pasar a Lifetime
que muestra galones (o litros x 10).
Nota: LIFE aparece brevemente, seguido del
número de galones pulverizados por encima
de 1000 psi (70 bar, 7 MPa).
5 Pulse brevemente el botón DTS
Funzionamento Menu principale
4 Premere e tenere premuto per
azzerare o premere rapidamente
il pulsante DTS per spostare i galloni
per il lavoro (o litri x 10).
Nota: viene visualizzato brevemente LIFE,
quindi il numero dei galloni spruzzati a più
di 70 bar (7 MPa, 1000 psi).
5 Premere rapidamente il pulsante DTS
Funcionamento – Menu Principal
4 Prima e mantenha este botão premido
para colocar em zeros, ou prima o
botão DTS para passar ao volume até
à data (em galões ou litros x 10).
Nota: surge a indicação LIFE (até à data) por
momentos, seguida pelo volume em galões
aplicado acima de 70 bar (7 Mpa, 1000 psi).
5 Prima o botão DTS para passar
Bediening, Hoofdmenu
4 Druk op de knop en houd hem
ingedrukt om hem weer op nul in te
stellen, of druk kort op de DTS-knop
om naar het verzameltotaal aan
gallons (of liters x 10) te gaan.
Opmerking: Het woord LIFE verschijnt kort,
waarna het totaal aantal gespoten gallons
op een druk boven 1000 psi (70 bar, 7 MPa)
verschijnt.
5 Druk kort op de DTS-knop om weer
ti13603a
ti13627a
ti13456a
to LEARN mode.
Press either E-Control button to link
E-Control to the sprayer. OK will
display briefly, then display will return
to Pressure Display mode.
du DTS pour passer en mode
d’apprentissage LEARN.
Pousser sur un des boutons du
réglage électronique E-Control pour
connecter ce réglage électronique sur
le pulvérisateur. OK s’affichera
brièvement, puis l’écran passera en
mode d’affichage de la pression.
para pasar al modo LEARN.
Pulse el botón del E-Control para
vincularlo al pulverizador. Aparece OK
brevemente, volviendo después
la pantalla al modo de visualización
de la presión.
per passare alla modalità
APPRENDIMENTO (LEARN).
Premere il pulsante E-Control per
collegare il dispositivo E-Control
allo spruzzatore. Verrà brevemente
visualizzato OK, quindi il display
tornerà in modalità visualizzazione
pressione.
ao modo LEARN (obter).
Prima um botão do E-Control
para estabelecer a ligação entre
o E-Control e o equipamento.
Surge OK momentaneamente e,
depois, o visor volta ao modo
de indicação da pressão.
naar de LEREN-functie te gaan.
Druk op een van de E-Control
knoppen om de E-Control te koppelen
aan het spuitapparaat. Er verschijnt
kort OK op de display, waarnaar deze
weer naar de Druk-functie terug gaat.
ti13602a
Psi
ti13620a
6 Short press DTS button to return
to Pressure.
6 Appuyer brièvement sur le bouton
du DTS pour revenir à l’écran
de la pression.
6 Pulse brevemente el botón DTS
para regresar a la visualización
de Presión.
6 Premere rapidamente il pulsante
DTS per tornare a Pressione.
6 Prima brevemente o botão DTS
para regressar à pressão.
6 Druk kort op de DTS-knop om weer
naar Druk te gaan.
311344E 19
Page 20

Digital Tracking System / Système de suivi numérique / Sistema de rastreo digital / Sistema di controllo digitale / Digital Tracking
ti13624a
ti13622a
ti13605a
ti13605a
ti4266a
ti4266a
Secondary Menu - Stored Data and WatchDog™ Pump Protection Modes
1Do Pressure Relief, steps 1
- 4 if they have not already
been done.
2 Turn power switch on while
holding DTS button down.
3 The sprayer model briefly
displays (e.g. U795), SERIAL
NUMBER scrolls past and then
serial number (e.g. 00001)
displays.
Menu secondaire – Données stockées et modes de protection de pompe WatchDog
1 Opérer la Décompression,
points 1 – 4, si cela n’a pas
encore été fait.
2 Mettre sous tension en tenant
le bouton DTS enfoncé.
3 Le pulvérisateur affiche
brièvement (p. ex. U795),
NUMÉRO DE SÉRIE défile,
™
puis le numéro de série
(p. ex. 00001).
Menú auxiliar: Modos de Datos almacenados y WatchDog™ de protección de la bomba
1 Realice los pasos 1 – 4
del procedimiento de
Descompresión, si no
habían sido realizados ya.
2 Encienda el interruptor
de potencia mientras
mantiene pulsado el
botón DTS.
3 Aparecerá brevemente el
modelo del pulverizador (p. ej.
aparece brevemente U795),
SERIAL NUMBER (NÚMERO
DE SERIE) y después aparece
brevemente el número de serie
(p. ej. 00001).
Menu secondario – Dati memorizzati e modi di protezione per pompa WatchDog
1 Eseguire Decompressione,
passi 1 - 4 se non sono stati
già eseguiti.
2 Accendere l’interruttore di
alimentazione tenendo
contemporaneamente
premuto il pulsante DTS.
3 Viene visualizzato brevemente
il modello dello spruzzatore (ad
es. U795) e SERIAL
NUMBER, quindi il numero di
™
serie (p. es. 00001).
Menu secundário – Dados armazenados e modos de protecção da bomba WatchDog
1 Efectue os passos 1 – 4 do
procedimento de
Descompressão, se os
mesmos ainda não tiverem
sido efectuados.
2 Ligue o interruptor eléctrico
enquanto mantém o botão
DTS premido.
3 Surge momentaneamente o
modelo do equipamento (ex.:
U795), passa SERIAL
NUMBER e depois aparece
o número de série (ex.: 00001).
™
Secundaire menu – Opgeslagen gegevens en het WatchDog™-pompbeschermingssysteem
1 Voer stappen 1-4 van de
Drukontlastingsprocedure,
uit als dat nog niet is
gebeurd.
2 Draai de hoofdschakelaar aan
en houd tegelijkertijd de
DTS-knop ingedrukt.
3 Het model van het
spuitapparaat is kort te zien
(bijv. U795), de tekst SERIAL
NUMBER komt voorbij, waarna
het serienummer (bijv. 00001)
te zien is.
ti13618a
ti13619a
ti7362a
4 Short press DTS button and
MOTOR ON scrolls past and
then total motor run hours are
displayed.
4 Appuyer brièvement sur
le bouton DTS. MOTEUR
MARCHE défile, puis c’est le
total des heures de service
du moteur.
4 Pulse brevemente el botón
DTS y aparecerá brevemente
MOTOR ON y después se
mostrarán el total de horas de
funcionamiento del motor.
4 Premere brevemente il
pulsante DTS viene
visualizzato brevemente
MOTOR ON quindi il numero
totale di ore di funzionamento
del motore.
4 Prima o botão DTS e MOTOR
ON (motor ligado) passa,
surgindo depois a totalidade de
horas de funcionamento do
motor.
4 Druk kort op de DTS-knop. De
tekst MOTOR ON komt voorbij,
waarna het totale aantal uren
wordt getoond dat de motor
heeft gedraaid.
20 311344E
Page 21

Digital Tracking System / Système de suivi numérique / Sistema de rastreo digital / Sistema di controllo digitale / Digital Tracking
ti13620a
ti13620a
ti13620a
ti13620a
ti13620a
ti13620a
ti13620a
ti13620a
Secondary Menu - Stored Data and WatchDog™ Pump Protection Modes
5 Short press DTS button.
LAST ERROR CODE
scrolls by and last error code
is displayed; e.g. E=07.
(Manual 311365).
Menu secondaire – Données stockées et modes de protection de pompe WatchDog
5 Appuyer brièvement sur le
bouton DTS. DERNIER
CODE D’ERREUR défile,
puis le dernier code d’erreur
s’affiche; p. ex., E=07.
(Manuel 311365).
6 Press and hold DTS button
to clear error code to zero.
6 Appuyer sur le bouton DTS
et le maintenir enfoncé pour
effacer le code d’erreurs
et le ramener à zéro.
7 Short press DTS button. W-DOG
scrolls past then OFF displays if
watchdog switch is OFF. ON
displays if Watchdog switch
is ON.
7 Appuyer brièvement sur le
bouton DTS. W-DOG défile,
puis ARRÊT s’affiche si le
commutateur watchdog est sur
ARRÊT. MARCHE s’affiche si
Watchdog est sur MARCHE.
8 Press and hold (8 seconds) DTS
button to move to WatchDog
Trigger% menu. Continue to hold
DTS button and Watchdog can be
set to trigger at 30, 40, 50, or 60% of
current sprayer pressure setting.
Release DTS button when desired
% is displayed. default is 50%.
™
8 Appuyer sur le bouton DTS et
le maintenir enfoncé (8 s) pour
afficher le menu Déclenchement
WatchDog en %. Maintenir le
bouton enfoncé pour pouvoir régler
le déclenchement de WatchDog à
30, 40, 50 ou 60 % de la pression
de consigne en cours sur le
pulvérisateur. Relâcher le bouton
DTS dès qu’apparaît le % voulu. La
valeur par défaut est de 50 %.
Menú auxiliar: Modos de Datos almacenados y WatchDog™ de protección de la bomba
5 Pulse brevemente el botón
DTS. Desaparece de la
pantalla LAST ERROR
CODE y aparece
visualizado el último código
de error; p. ej., E=07.
(Manual 311365).
Menu secondario – Dati memorizzati e modi di protezione per pompa WatchDog
5 Premere rapidamente il
pulsante DTS. LAST
ERROR CODE viene
visualizzato
temporaneamente
e successivamente è
visualizzato l’ultimo codice
di errore; ad es., E=07
(manuale 311365).
Menu secundário – Dados armazenados e modos de protecção da bomba WatchDog
5 Prima o botão DTS. Surge
a indicação LAST ERROR
CODE e o último código de
erro é indicado; ex.: E=07.
(Manual 311365)
6 Pulse y mantenga pulsado
el botón DTS para borrar
el código de error.
6 Premere e tenere premuto il
pulsante DTS per annullare
il codice di errore su zero.
6 Prima continuamente
o botão DTS para eliminar
o código de erro para zero.
7 Pulse brevemente el botón DTS.
Aparecerá brevemente W-D OG
y después aparece OFF si el
interruptor watchdog está
apagado. Aparece ON si el
interruptor Watchdog está
encendido.
7 Premere rapidamente il pulsante
DTS. Viene visualizzato
brevemente W-DOG quindi
la scritta OFF se l’interruttore
WatchDog è su OFF. Viene
visualizzato ON se l’interruttore
Watchdog è su ON.
7 Prima o botão DTS. Passa a
indicação W-DO G e surge OFF
(desligado) se o interruptor do
Watchdog estiver desligado.
Surge ON se o interruptor do
Watchdog estiver ligado.
8 Pulse y mantenga pulsado
(8 segundos) el botón DTS
para avanzar hasta el menú
WatchDog Trigger %. Siga
manteniendo pulsado el botón DTS
y podrá fijar el WatchDog de forma
que se dispare cuando se alcance
el 30, 40, 50 ó 60% del ajuste actual
de presión. Suelte el botón DTS
cuando se visualice el % deseado.
El valor predeterminado es 50%.
™
8 Premere e tenere premuto (8 secondi)
il pulsante DTS per passare al menu
WatchDog Trigger %. Continuare a
tenere premuto il pulsante DTS e
WatchDog può essere impostato a
30, 40, 50 o 60% dell’impostazione di
pressione corrente dello spruzzatore.
Rilasciare il pulsante DTS quando
viene visualizzata la % desiderata. Il
valore predefinito è 50%.
™
8 Prima continuamente o botão DTS
(durante 8 segundos) para passar
ao menu da % de disparo do
WatchDog. Mantendo o botão DTS
premido, o WatchDog pode ser
definido para disparar a 30, 40, 50
ou 60% da definição de pressão
actual do equipamento. Solte
o botão DTS quando a %
pretendida for apresentada.
A predefinição é 50%.
Secundaire menu – Opgeslagen gegevens en het WatchDog™-pompbeschermingssysteem
5 Druk kort op de DTS-knop.
De tekst LAST ERROR
CODE komt voorbij op het
display waarna de laatste
foutcode verschijnt;
bijv., E=07.
(Handleiding 311365).
6 Druk op de DTS-knop en
houd hem ingedrukt om de
foutcode te wissen en op
nul te zetten.
7 Druk kort op de DTS-knop. De
tekst W-DO G komt voorbij,
waarna OFF is te zien als de
WatchDog-schakelaar op OFF
staat. ON is te zien als de
WatchDog-schakelaar op ON
staat.
8 Druk op de DTS-knop en houd hem
(8 seconden) ingedrukt om naar het
WatchDog Trigger % menu te gaan.
Houd de DTS-knop ingedrukt.
WatchDog kan worden ingesteld op
activering op 30, 40, 50 of 60% van
de huidige drukinstelling van het
spuitapparaat. Laat de DTS-knop
los als het gewenste percentage te
zien is. Standaard is 50%.
TIA
9 Short press to move to
SOFTWARE REV
9 Appuyer un bref
instant pour passer à
SOFTWARE REV
9 Pulse brevemente
para avanzar hasta
SOFTWARE REV
9 Premere rapidamente
per passare alla
REV SOFTWARE
9 Prima o botão DTS
para passar para
SOFTWARE REV
9 Druk kort om naar
SOFTWARE REV
te gaan
311344E 21
Page 22

Cleanup / Nettoyage / Limpieza / Pulizia / Limpeza / Reinigen
Cleanup / Nettoyage / Limpieza / Pulizia / Limpeza / Reinigen
ti4266a
ti2756a
1Perform Pressure Relief, steps 1
- 4. Remove siphon tube set from
paint and place in flushing fluid.
1 Relâcher la pression,
points 1 - 4. Sortir le tuyau
d’aspiration de la peinture et
le plonger dans le produit de
rinçage.
1 Realice el Procedimiento de
descompresión, pasos 1 - 4.
Retire el conjunto del tubo de
aspiración del cubo de pintura
e introdúzcalo en el líquido de
lavado.
1 Eseguire i passi da 1 a 4 in
Procedura di decompressione.
Rimuovere il flessibile del sifone
dalla vernice e metterlo nel fluido
di lavaggio.
1 Efectue a Descompressão,
passos 1 - 4. Retire o conjunto
do tubo de sucção da tinta e
coloque-o no líquido de lavagem.
1 Voer stappen 1 tot 4 uit van de
Drukontlastingsprocedure.
Haal de sifonbuis uit de verf en
plaats hem in spoelvloeistof.
ti13457a
NOTE: Use water for water base paint
and mineral spirits for oil base paint.
2 Turn power ON. Turn prime
valve to SPRAY.
REMARQUE: Plonger le tuyau
d’aspiration dans le produit de
rinçage. Utiliser de l’eau pour une
peinture à base aqueuse et du
white-spirit pour une peinture à l’huile.
2 Mettre l’appareil SOUS
TENSION. Mettre la vanne
d’amorçage en position haute
pour fermer la vanne de
vidange.
NOTA: Utilice agua para las pinturas
al agua y alcohol mineral para
pinturas al aceite.
2 Encienda la fuente de
alimentación. Gire hacia arriba
la válvula de cebado para cerrar
la válvula de drenaje.
NOTA: utilizzare l’acqua per la vernice
a base acquosa e l’acqua ragia
minerale per la vernice a base oleosa.
2 Accendere il motore. Girare la
valvola di adescamento verso
l’alto per chiudere la valvola di
drenaggio.
NOTA: utilize água para tintas à base
de água e diluente para tintas à base
de óleo.
2 Ligue
OPMERKING: Gebruik water voor
verf op waterbasis en thinner voor verf
op oliebasis.
2 Draai de hoofdschakelaar op
o equipamento. Rode a
lvula de segurança para cima
vá
para fechar a válvula de retorno.
ON. Draai de inspuitkraan
omhoog om de afvoerkraan
te sluiten.
ti13232a
3 Increase pressure to 1/2. Hold
gun against paint pail. Take
trigger safety OFF. Trigger gun
until flushing fluid appears
3 Augmenter la pression de moitié.
Appuyer le pistolet contre le seau
de peinture. DÉVERROUILLER
la gâchette. Actionner le pistolet
jusqu’à ce que le fluide de
rinçage s’écoule.
3 Aumente la presión a 1/2.
Mantenga la pistola contra la lata
de pintura. Suelte el seguro del
gatillo. Dispare la pistola y
aumente la presión hasta que
aparezca líquido de lavado.
3 Aumentare la pressione a 1/2.
Tenere la pistola contro il secchio
metallico per la vernice. Togliere
la sicura della pistola. Attivare
la pistola finché non compare
il fluido di lavaggio
3 Aumente a pressão para 1/2.
Segure a pistola contra um balde
de tinta. RETIRE o dispositivo de
segurança do gatilho. Accione
a pistola até aparecer líquido
de lavagem.
3 Verhoog de druk tot 1/2. Houd
het pistool tegen de verfhouder.
ONTGRENDEL de veiligheidspal
van de trekker. Druk de trekker
van het pistool in tot er
spoelvloeistof verschijnt.
ti13233a
4 Move gun to waste pail, hold gun
against pail, trigger gun to
thoroughly flush system. Release
trigger and put trigger safety ON.
4 Approcher le pistolet du seau à
déchets, l’appuyer contre le seau
et actionner le pistolet pour rincer
soigneusement le pulvérisateur.
Relâcher la gâchette et la
VERROUILLER.
4 Mueva la pistola hasta el bidón
de lavado, mantenga la pistola
contra el bidón y dispárela para
lavar el sistema. Suelte el gatillo
y enganche el seguro.
4 Spostare la pistola verso il
secchio per i rifiuti, mantenere la
pistola contro il secchio, attivare
la pistola per lavare
completamente il sistema.
Rilasciare il grilletto e inserire il
fermo della sicura della pistola.
4 Vire a pistola para o balde de
resíduos, segure a pistola contra
o balde e accione-a para lavar
minuciosamente o sistema. Solte
o gatilho e coloque o respectivo
dispositivo de segurança.
4 Breng het pistool over naar de
afvalemmer, houd het tegen de
emmer aan en druk de trekker
in om het systeem grondig te
spoelen. Laat de trekker los en
zet hem op de veiligheidspal.
22 311344E
Page 23

Cleanup / Nettoyage / Limpieza / Pulizia / Limpeza / Reinigen
ti13455a
5 Turn prime valve to DRAIN
position and allow flushing fluid
to circulate for 15 seconds to
clean drain tube.
5 Positionner la vanne
d’amorçage sur bas pour ouvrir
la vanne de vidange et faire
circuler le produit de rinçage
pendant 15 secondes pour
nettoyer le tuyau de vidange.
5 Gire hacia abajo la válvula
de cebado para abrir la válvula
de drenaje y deje que el líquido
de lavado circule durante
aproximadamente 15 segundos
para limpiar el tubo de drenaje.
5 Abbassare la valvola di
adescamento per aprire
la valvola di drenaggio e
consentire al fluido di lavaggio
di circolare per 15 secondi per
pulire il flessibile di drenaggio.
5 Rode a válvula de segurança
para baixo para abrir a válvula
de retorno e permita que
o líquido de lavagem circule
durante 15 segundos para
limpar o tubo de drenagem.
5 Draai de inspuitkraan omlaag
om de afvoerkraan te openen
en laat de spoelvloeistof
15 seconden circuleren om
de afvoerbuis te reinigen.
ti2820a
6 Raise siphon tube above flushing
fluid and run sprayer for 15 to
30 seconds to drain fluid.
6 Relever le tuyau de succion
au-dessus du niveau de produit
de rinçage et faire fonctionner le
pulvérisateur pendant 15 à 30
secondes pour vidanger le produit.
6 Suba el tubo de aspiración por
encima del líquido de lavado y
haga funcionar el pulverizador
durante 15 a 30 segundos para
drenar el líquido.
6 Sollevare il tubo del sifone sul
fluido di lavaggio e far funzionare
lo spruzzatore da 15 a 30 secondi
per scaricare il fluido.
6 Coloque o tubo de sucção acima
do nível do líquido de lavagem
e coloque o equipamento
em funcionamento durante
15 a 30 segundos, para drenar
o líquido.
6 Til de sifonbuis op tot boven
de spoelvloeistof en laat het
spuitapparaat 15 tot 30 seconden
draaien om het materiaal af te
voeren.
ti13457a
ti13232a
7 Turn prime valve to SPRAY
position. Trigger gun into flushing
pail to purge fluid from hose. Turn
power OFF.
7 Positionner la vanne de rinçage
sur haut pour fermer la vanne de
vidange. Actionner le pistolet
au-dessus du seau de rinçage
pour chasser le fluide du flexible.
Mettre HORS TENSION.
7 Gire hacia arriba la válvula de
cebado para cerrar la válvula de
drenaje. Dispare la pistola en el
recipiente de lavado para purgar
el fluido de la manguera. Apague
el sistema.
7 Girare la valvola di adescamento
verso l’alto per chiudere la valvola
di drenaggio. Azionare la pistola
nel secchio di lavaggio per
spurgare il fluido dal flessibile.
Spegnere il motore.
7 Rode a válvula de segurança
para cima para fechar a válvula
de retorno. Accione a pistola para
dentro do balde de lavagem para
purgar o produto do tubo.
Desligue a alimentação
(posição OFF).
7 Draai de inspuitkraan omhoog
om de afvoerkraan te sluiten.
Spuit met het pistool in de
spoelbak om het materiaal uit
de slang te spoelen. Zet de
hoofdschakelaar op OFF.
ti13455a
8 Turn prime valve to DRAIN
position. Unplug sprayer.
8 Positionner la vanne
d’amorçage vers le bas
pour ouvrir la vanne de
vidange. Débrancher
le pulvérisateur.
8 Gire hacia abajo la válvula
de cebado para abrir
la válvula de drenaje.
Desenchufe el
pulverizador.
8 Abbassare la valvola di
adescamento per aprire
la valvola di drenaggio.
Scollegare lo spruzzatore.
8 Rode a válvula de
segurança para baixo para
abrir a válvula de retorno.
Desligue o equipamento.
8 Draai de inspuitkraan
omlaag om de afvoerkraan
te openen. Haal de stekker
van het spuitapparaat uit
het stopcontact.
ti2718a
311344E 23
Page 24

Cleanup / Nettoyage / Limpieza / Pulizia / Limpeza / Reinigen
ti2776a
ti13454a
9 Remove filters from gun and sprayer,
if installed. Clean and inspect. Install
filters.
9 Démonter les filtres du pistolet et du
pulvérisateur, si existants. Nettoyer
et examiner. Remonter les filtres.
9 Si estuvieran instalados, retire los filtros
de la pistola y del pulverizador.
9 Rimuovere i filtri dallo spruzzatore e
dalla pistola, se installati. Pulire ed
ispezionare. Installare i filtri.
9 Retire os filtros da pistola e do
equipamento de pintura, caso
instalados. Limpe e inspeccione. Instale
os filtros.
9 Verwijder de filters uit het pistool en het
spuitapparaat als deze zijn
aangebracht. Reinig ze en kijk ze na.
Installeer de filters.
ti2895a
10 If flushing with water, flush again with
storage fluid (mineral spirits or Pump
Armor) to leave a protective coating to
prevent freezing or corrosion. Ensure
entire system (including gun and hose)
are completely flushed.
10 En cas de rinçage à l’eau, rincer à
nouveau avec du white-spirit ou un
produit anticorrosion pour que ce produit constitue
un revêtement protecteur qui
empêchera le gel ou la corrosion.
10 Si se utiliza agua para el lavado, vuelva
a lavar con alcohol mineral, o
Protección para bombas y deje este
recubrimiento protector en el
pulverizador para ayudar a evitar la
congelación o la corrosión.
10 Se si lava con acqua, lavare di nuovo
con acqua ragia minerale, o Armor per
pompe e lasciare questo rivestimento
protettivo per evitare il congelamento o
la corrosione.
10 Se efectuar a lavagem com água, lave
novamente com diluente ou Pump
Armor para deixar um revestimento
protector para ajudar a evitar
congelação ou corrosão.
10 Als u spoelt met water, spoel dan
nogmaals met thinner of Pump Armor
voor een beschermlaag om bevriezing
of corrosie te voorkomen.
11 Wipe sprayer, hose and gun with a rag
soaked in water or mineral spirits.
11 Essuyer le pulvérisateur, le flexible et le
pistolet avec un chiffon imbibé d’eau ou
de white-spirit.
11 Frote el pulverizador, la manguera y la
pistola con un paño empapado en agua
o alcohol mineral.
11 Asciugare spruzzatore, flessibile e
pistola con un panno intinto nell’acqua
o nell’acqua ragia minerale.
11 Limpe o equipamento de pintura, o tubo
e a pistola com um pano embebido em
água ou diluente.
11 Veeg het spuittoestel, de slang en het
pistool schoon met een doek die u in
water of thinner hebt gedoopt.
24 311344E
Page 25

Technical Data
Technical Data
100 -
120V,
Model
695
795
795 Plus
1095
Mark V
1595
Mark V
Mark V Plus
Basic Sprayer Wetted Parts..............................
zinc- and nickel-plated carbon steel, nylon, stainless steel, PTFE,
Acetel, leather, UHMWPE, aluminum, tungsten carbide, PEEK,
brass
A, Hz
14,
50/60
15,
50/60
N/A 10,
15,
50/60
N/A 10,
20/15,
50/60
20/15,
50/60
N/A 10,
220 -
240V A, HzGenerator
Minimum W
9,
50/60
10,
50/60
50/60
10,
50/60
50/60
N/A 5000 2.5 (1860) 110 (29) 1.25 (4.7) 0.037 0.025 1/4 in.
N/A 5000 2.5 (1860) 110 (29) 1.25 (4.7) 0.037 0.025 3/8 in.
50/60
5000 1.75
5000 2.00
5000 2.00
5000 2.20
5000 2.20
5000 2.20
Motor HP
(W)
(1300)
(1490)
(1490)
(1640)
(1640)
(1640)
Cycles per
gallon (liter)
243 (64) 0.75 (2.8) 0.027 N/A 1/4 in.
195 (52) 0.95 (3.6) 0.031 0.021 1/4 in.
195 (52) 0.95 (3.6) 0.031 0.021 1/4 in.
123 (33) 1.1 (4.1) 0.033 0.023 1/4 in.
110 (29) 1.2 (4.3) 0.035 0.023 3/8 in.
110 (29) 1.2 (4.3) 0.035 0.023 3/8 in.
Noise Level
Sound power ............................................... 91 dBa*
Sound pressure ........................................... 82 dBa*
*per ISO 3744; measured at 3.1 feet (1 m)
Maximum
Delivery gpm
(lpm)
Maximum Tip
Size
Fluid
Outlet
npsm1 Gun 2 Guns
Dimensions
Weight lb (kg) Height in (cm)
Model
695 94
(43)
795 98
(45)
795 Plus N/A 98
1095 N/A 120
1595 N/A 125
Mark V N/A 130
Mark V Plus N/A 98
94
(43)
98
(45)
(45)
(55)
(57)
(59)
(45)
26.5 (67.3) Handle down,
38.8 (98.6) Handle up
26.5 (67.3) Handle down,
38.8 (98.6) Handle up
N/A 28.5 (72.4) Handle down,
N/A 29.5 (74.9) Handle down,
N/A 29.5 (74.9) Handle down,
N/A 29.5 (74.9) Handle down,
N/A 29.5 (74.9) Handle down,
28.5 (72.4) Handle down,
38.75 (98.4) Handle up
28.5 (72.4) Handle down,
38.75 (98.4) Handle up
38.75 (98.4) Handle up
38.5 (97.8) Handle up
38.5 (97.8) Handle up
38.5 (97.8) Handle up
38.5 (97.8) Handle up
Length in
(cm)
25.75
(65.4)
25
(63.5)
25
(63.5)
26
(66)
26
(66)
26
(66)
26
(66)
Width in
(cm)Lo-Boy Hi-Boy Lo-Boy Hi-Boy
20.5
(52.1)
20.5
(52.1)
20.5
(52.1)
22.5
(57.2)
22.5
(57.2)
22.5
(57.2)
22.5
(57.2)
311344E 25
Page 26

Caractéristiques techniques
Caractéristiques techniques
Modèle
695
795
795 Plus
1095
Mark V
1595
Mark V
Mark V Plus
100120V, A,
Hz
14,
50/60
15,
50/60
N/D 10, 50/60 5000 2.00
15,
50/60
N/D 10,
20/15,
50/60
20/15,
50/60
N/D 10, 50/60 5000 2.20
220 240V A, HzGénératrice
9,
50/60
10,
50/60
10,
50/60
50/60
N/D 5000 2,5
N/D 5000 2,5
Minimum W
5000 1,75
5000 2,00
5000 2,20
5000 2,20
Moteur
HP (W)
(1300)
(1490)
(1490)
(1640)
(1640)
(1860)
(1860)
(1640)
Taille de buse
maxi
Cycles par
gallon (litre)
243
(64)
195
(52)
195 (52) 0.95 (3.6) 0.031 0.021 1/4 in.
123
(33)
110
(29)
110
(29)
110
(29)
110 (29) 1.2 (4.3) 0.035 0.023 3/8 in.
Débit
maximum
gpm (lpm)
0,75
(2,8)
0,95
(3,6)
1,1
(4,1)
1,2
(4,3)
1,25
(4,7)
1,25
(4,7)
1 pistolet
0,027 N/D 1/4 in
0,031 0,021 1/4 in
0,033 0,023 1/4 in
0,035 0,023 3/8 in.
0,037 0,025 1/4 in
0,037 0,025 3/8 in.
2 pistolets
Sortie
produit
npsm
Pièces principales du pulvérisateur au contact du
produit..............................
acier au carbone galvanisé et nickelé, nylon, acier inox, PTFE,
Acetel, cuir,
UHMWPE, aluminium, carbure de tungstène, PEEK, laiton
Dimensions
Poids lb (kg) Hauteur in. (cm)
Modèle
695 94
795 98
795 Plus N/D 98
1095 N/D 120
1595 N/D 125
Mark V N/D 130
Mark V
Plus
(43)
(45)
N/D 98
94
(43)
98
(45)
(45)
(55)
(57)
(59)
(45)
26,5 (67,3) poignée abaissée 38,8
(98,6) poignée relevée
26,5 (67,3) poignée abaissée 38,8
(98,6) poignée relevée
N/D 28.5 (72.4) poignée abaissée
N/D 29,5 (74,9) poignée abaissée
N/D 29,5 (74,9) poignée abaissée
N/D 29,5 (74,9) poignée abaissée
N/D 29.5 (74.9) poignée abaissée,
Niveau de bruit
Puissance sonore
................................................................................. 91 dBa*
Pression sonore
................................................................................... 82 dBa*
* selon ISO 3744; mesuré à 3,1 pieds (1 m)
Longueur
in. (cm)
28,5 (72,4) poignée abaissée
38,75 (98,4) poignée relevée
28,5 (72,4) poignée abaissée
38,75 (98,4) poignée relevée
38.75 (98.4) poignée relevée
38,5 (97,8) poignée relevée
38,5 (97,8) poignée relevée
38,5 (97,8) poignée relevée
38.5 (97.8) poignée relevée
25,75
(65,4)
25
(63,5)
25
(63.5)
26
(66)
26
(66)
26
(66)
26
(66)
Largeur
in. (cm)Lo-Boy Hi-Boy Lo-Boy Hi-Boy
20,5
(52,1)
20,5
(52,1)
20.5
(52.1)
22,5
(57,2)
22,5
(57,2)
22,5
(57,2)
22.5
(57.2)
26 311344E
Page 27

Características técnicas
100-
Modelo
695
795
795 Plus
1095
Mark V
1595
Mark V
Mark V
Plus
120V, A,
Hz
14,
50/60
15,
50/60
N/D 10, 50/60 5000 2.00
15,
50/60
N/D 10,
20/15,
50/60
20/15,
50/60
N/D 10, 50/60 5000 2.20
220 - 240V
A, Hz
9,
50/60
10,
50/60
10,
50/60
50/60
N/D 5000 2,5 (1860) 110
N/D 5000 2,5 (1860) 110
A mínima del
generador
CV del
motor (W)
5000 1,75
5000 2,00
5000 2,20
5000 2,20
(1300)
(1490)
(1490)
(1640)
(1640)
(1640)
Características técnicas
Tamaño máximo de
la boquilla
Ciclos por
galón (litro)
243
(64)
195
(52)
195 (52) 0.95 (3.6) 0.031 0.021 1/4 in.
123
(33)
110
(29)
(29)
(29)
110 (29) 1.2 (4.3) 0.035 0.023 3/8 in.
Caudal
máximo
gpm (lpm)
0,75
(2,8)
0,95
(3,6)
1,1
(4,1)
1,2
(4,3)
1,25
(4,7)
1,25
(4,7)
1
pistola2 pistolas
0,027 N/D 1/4 in.
0,031 0,021 1/4 in.
0,033 0,023 1/4 in.
0,035 0,023 3/8 in.
0,037 0,025 1/4 in.
0,037 0,025 3/8 in.
Salida
de
fluido
npsm
Piezas húmedas del pulverizador básico...........................................
Acero al carbono revestido de zinc y de níquel, nylon,
acero inoxidable, PTFE, acetel, cuero, UHMWPE,
aluminio, carburo de tungsteno, PEEK, latón
Nivel de sonido
Dimensiones
Peso lb (kg) Altura pulg. (cm)
Modelo
695 94
795 98
795 Plus N/D 98
1095 N/D 120
1595 N/D 125
Mark V N/D 130
Mark V
Plus
(43)
(45)
N/D 98
94
(43)
98
(45)
(45)
(55)
(57)
(59)
(45)
Manillar bajado 26,5 (67,3)
Manillar alzado 38,8 (98,6)
Manillar bajado 26,5 (67,3)
Manillar alzado 38,8 (98,6)
N/D Manillar bajado 28.5 (72.4)
N/D Manillar bajado 29,5 (74,9)
N/D Manillar bajado 29,5 (74,9)
N/D Manillar bajado 29,5 (74,9)
N/D Manillar bajado 29.5 (74.9)
Potencia de sonido....................................................................
91 dBa*
Presión de sonido......................................................................
82 dBa*
* según la ISO 3744; medida a 1 m (3,1 pies) de distancia
Manillar bajado 28,5 (72,4)
Manillar alzado 38,75 (98,4)
Manillar bajado 28,5 (72,4)
Manillar alzado 38,75 (98,4)
Manillar alzado 38.75 (98.4)
Manillar alzado 38,5 (97,8)
Manillar alzado 38,5 (97,8)
Manillar alzado 38,5 (97,8)
Manillar alzado 38.5 (97.8)
Longitud
pulg. (cm)
25,75
(65,4)
25
(63,5)
25
(63.5)
26
(66)
26
(66)
26
(66)
26
(66)
Anchura
pulg. (cm)Lo-Boy Hi-Boy Lo-Boy Hi-Boy
20,5
(52,1)
20,5
(52,1)
20.5
(52.1)
22,5
(57,2)
22,5
(57,2)
22,5
(57,2)
22.5
(57.2)
311344E 27
Page 28

Dati tecnici
Dati tecnici
100 -
Modello
695
795
795 Plus
1095
Mark V
1595
Mark V
Mark V
Plus
120 V A,
Hz
14,
50/60
15,
50/60
Non usato 10, 50/60 5000 2.00
15,
50/60
Non usato 10,
20/15,
50/60
20/15,
50/60
Non usato 10, 50/60 5000 2.20
220 240 A, Hz
9,
50/60
10,
50/60
10,
50/60
50/60
Non usato 5000 2,5
Non usato 5000 2,5
W minimo
del generatore
5000 1,75
5000 2,00
5000 2,20
5000 2,20
Motore
HP (W)
(1300)
(1490)
(1490)
(1640)
(1640)
(1860)
(1860)
(1640)
Dimensioni
massime
Cicli per
gallone
(litro)
243
(64)
195
(52)
195 (52) 0.95 (3.6) 0.031 0.021 1/4 in.
123
(33)
110
(29)
110
(29)
110
(29)
1
10 (29) 1.2 (4.3) 0.035 0.023 3/8 in.
Portata
massima
gal/min
(litri/min)
0,75
(2,8)
0,95
(3,6)
1,1
(4,1)
1,2
(4,3)
1,25
(4,7)
1,25
(4,7)
dell’ugello
1
pistola2 pistole
0,027 Non
usato
0,031 0,021 1/4 in
0,033 0,023 1/4 in
0,035 0,023 3/8 in.
0,037 0,025 1/4 in
0,037 0,025 3/8 in.
Uscita
del
fluido
npsm
1/4 in
Parti a contatto coi fluidi dello spruzzatore base....................
Acciaio al carburo con placcatura in zinco e in nichel, nylon,
acciaio inossidabile, PTFE, acetale, cuoio, UHMWPE,
alluminio, carburo al tungsteno, PEEK, ottone
Dimensioni
Peso lb (kg) Altezza pollici (cm)
Modello
695 94
795 98
795 Plus Non usato 98
1095 Non usato 120
1595 Non usato 125
Mark V Non usato 130
Mark V
Plus
(43)
(45)
Non usato 98
94
(43)
98
(45)
(45)
(55)
(57)
(59)
(45)
Maniglia giù 26,5 (67,3)
Maniglia su 38,8 (98,6)
Maniglia giù 26,5 (67,3)
Maniglia su 38,8 (98,6)
Non usato Manillar bajado 28.5 (72.4)
Non usato Maniglia giù 29,5 (74,9) Maniglia
Non usato Maniglia giù 29,5 (74,9) Maniglia
Non usato Maniglia giù 29,5 (74,9) Maniglia
Non usato Manillar bajado 29.5 (74.9)
Rumorosità
Potenza sonora............................................................. 91 dBa*
Pressione sonora.......................................................... 82 dBa*
* per ISO 3744; misurata a 1 m (3,1 piedi)
Lunghezza
pollici (cm)
Maniglia giù 28,5 (72,4) Maniglia
su 38,75 (98,4)
Maniglia giù 28,5 (72,4) Maniglia
su 38,75 (98,4)
Manillar alzado 38.75 (98.4)
su 38,5 (97,8)
su 38,5 (97,8)
su 38,5 (97,8)
Manillar alzado 38.5 (97.8)
25,75
(65,4)
25
(63,5)
25
(63.5)
26
(66)
26
(66)
26
(66)
26
(66)
Larghezza
pollici (cm)Lo-Boy Hi-Boy Lo-Boy Hi-Boy
20,5
(52,1)
20,5
(52,1)
20.5 (52.1)
22,5
(57,2)
22,5
(57,2)
22,5
(57,2)
22.5 (57.2)
28 311344E
Page 29

Características Técnicas
100 -
Modelo
695
795
795 Plus
1095
Mark V
1595
Mark V
Mark V Plus
120 V, A, Hz220 -
14,
50/60
15,
50/60
N/D 10,
15,
50/60
N/D 10,
20/15,
50/60
20/15,
50/60
N/D 10,
240 A, Hz
50/60
50/60
50/60
50/60
50/60
N/D 5000 2,5
N/D 5000 2,5
50/60
9,
10,
10,
W mínimos
do gerador
5000 1,75
5000 2,00
5000 2.00
5000 2,20
5000 2,20
5000 2.20
Cv do
motor (W)
(1300)
(1490)
(1490)
(1640)
(1640)
(1860)
(1860)
(1640)
Ciclos
por galão
(litro)
243
(64)
195
(52)
195
(52)
123
(33)
110
(29)
110
(29)
110
(29)
110
)
(29
Débito
máximo
gpm (lpm)
0,75
(2,8)
0,95
(3,6)
0.95
(3.6)
1,1
(4,1)
1,2
(4,3)
1,25
(4,7)
1,25
(4,7)
1.2
(4.3
)
Características Técnicas
Tamanho máximo
do bico
1
pistola2 pistolas
0,027 N/D 0,6 cm
0,031 0,021 0,6 cm
0.031 0.021 0,6 cm
0,033 0,023 0,6 cm
0,035 0,023 0,95 cm
0,037 0,025 0,6 cm
0,037 0,025 0,95 cm
0.035 0.023 0,95 cm
Saída
de
líquido
npsm
Peças em contacto com o produto do equipamento bási-
co...........................
aço de carbono zincado e niquelado, nylon, aço inoxidável,
PTFE, Acetel, couro, polietileno de peso molecular ultra-elevado (UHMWPE), alumínio, carboneto de tungsténio, poliéter-éter-cetona (PEEK), latão
Dimensões
Peso em lb (kg) Altura pol. (cm)
Modelo
695 94
795 98
795 Plus N/D 98
1095 N/D 120
1595 N/D 125
Mark V N/D 130
Mark V Plus N/D 98
(43)
(45)
94
(43)
98
(45)
(45)
(55)
(57)
(59)
(45)
26,5 (67,3) com a pega para baixo;
38,8 (98,6) com a pega para cima
26,5 (67,3) com a pega para baixo;
38,8 (98,6) com a pega para cima
N/D 28.5 (72.4) com a pega para baixo;
N/D 29,5 (74,9) com a pega para baixo;
N/D 29,5 (74,9) com a pega para baixo;
N/D 29,5 (74,9) com a pega para baixo;
N/D 29.5 (74.9) com a pega para baixo;
Nível de ruído
Potência sonora
.................................................................................. 91 dBa*
Pressão sonora
.................................................................................. 82 dBa*
*em conformidade com a ISO 3744; medidos a 3,1 pés (1 m)
Compri
mento
pol. (cm)
28,5 (72,4) com a pega para baixo;
38,75 (98,4) com a pega para cima
28,5 (72,4) com a pega para baixo;
38,75 (98,4) com a pega para cima25(63,5)
38.75 (98.4) com a pega para cima
38,5 (97,8) com a pega para cima
38,5 (97,8) com a pega para cima
38,5 (97,8) com a pega para cima
38.5 (97.8) com a pega para cima
25,75
(65,4)
25
(63.5)
26
(66)
26
(66)
26
(66)
26
(66)
Largura
pol. (cm)Lo-Boy Hi-Boy Lo-Boy Hi-Boy
20,5
(52,1)
20,5
(52,1)
20.5
(52.1)
22,5
(57,2)
22,5
(57,2)
22,5
(57,2)
22.5
(57.2)
311344E 29
Page 30

Technische gegevens
Technische gegevens
100 -
Model
695
795
795 Plus
1095
Mark V
1595
Mark V
Mark V Plus
Bevochtigde onderdelen basissysteem..................................................
verzinkt en vernikkeld koolstofstaal, nylon, roestvast staal,
PTFE, acetaal, leer, UHMWPE, aluminium, wolfraamcarbide,
PEEK, messing
Geluidsniveau
120 V, A,
Hz
14,
50/60
15,
50/60
N.v.t. 10,
15,
50/60
N.v.t. 10,
20/15,
50/60
20/15,
50/60
N.v.t. 10,
220 240 V A,
Hz
9,
50/60
10,
50/60
50/60
10,
50/60
50/60
N.v.t. 5000 2,5
N.v.t. 5000 2,5
50/60
Minimum
vermogen
generator
(W)
5000 1,75
5000 2,00
5000 2.00
5000 2,20
5000 2,20
0 2.20
500
Motor
pk (W)
(1300)
(1490)
(1490)
(1640)
(1640)
(1860)
(1860)
(1640)
Volledige
slagen per
gallon
(liter)
243
(64)
195
(52)
195
(52)
123
(33)
110
(29)
110
(29)
110
(29)
110
(29)
Niveau geluidsvermo-
gen.................................................................. 91 dBa*
Geluids-
drukniveau........................................................................... 82
dBa*
*conform ISO 3744; gemeten op een afstand van 3,1 voet (1 m)
Maximum
afgifte in
gallon/min
(liter/min)
0,75
(2,8)
0,95
(3,6)
0.95
(3.6)
1,1
(4,1)
1,2
(4,3)
1,25
(4,7)
1,25
(4,7)
1.2
(4.3)
Maximum tipformaat
1
pistool2 pistolen
0,027 N.v.t. 1/4 in
0,031 0,021 1/4 in
0.031 0.021 0,6 cm
0,033 0,023 1/4 in
0,035 0,023 3/8 in.
0,037 0,025 1/4 in
0,037 0,025 3/8 in.
0.035 0.023 0,95 cm
Vloeistofuitlaat
npsm
Afmetingen
Gewicht in lb (kg) Hoogte in (cm)
Model
695 94
795 98
795 Plus N.v.t. 98
1095 N.v.t. 120
1595 N.v.t. 125
Mark V N.v.t. 130
Mark V
Plus
(43)
(45)
N.v.t. 98
94
(43)
98
(45)
(45)
(55)
(57)
(59)
(45)
26,5 (67,3) met neergeklapte hendel,
38,8 (98,6) met opgeklapte hendel
26,5 (67,3) met neergeklapte hendel,
38,8 (98,6) met opgeklapte hendel
N.v.t. 28.5 (72.4) met neergeklapte hendel,
N.v.t. 29,5 (74,9) met neergeklapte hendel,
N.v.t. 29,5 (74,9) met neergeklapte hendel,
N.v.t. 29,5 (74,9) met neergeklapte hendel,
N.v.t. 29.5 (74.9) met neergeklapte hendel,
Lengte in
(cm)
28,5 (72,4) met neergeklapte hendel,
38,75 (98,4) met opgeklapte hendel
28,5 (72,4) met neergeklapte hendel,
38,75 (98,4) met opgeklapte hendel25(63,5)
38.75 (98.4) met opgeklapte hendel
38,5 (97,8) met opgeklapte hendel
38,5 (97,8) met opgeklapte hendel
38,5 (97,8) met opgeklapte hendel
38.5 (97.8) met opgeklapte hendel
25,75
(65,4)
25
(63.5)
26
(66)
26
(66)
26
(66)
26
(66)
Breedte in
(cm)Lo-Boy Hi-Boy Lo-Boy Hi-Boy
20,5
(52,1)
20,5
(52,1)
20.5 (52.1)
22,5
(57,2)
22,5
(57,2)
22,5
(57,2)
22.5 (57.2)
30 311344E
Page 31

Notes / Remarques / Notas / Note / Notas / Aantekeningen
Notes / Remarques / Notas / Note / Notas / Aantekeningen
311344E 31
Page 32

Warranty / Garantie / Garantía / Garanzia / Garantia / Garantie
Warranty / Garantie / Garantía / Garanzia / Garantia / Garantie
Graco warrants all equipment referenced in this document which is manufactured by Graco and bearing its name to be free from defects in
material and workmanship on the date of sale to the original purchaser for use. With the exception of any special, extended, or limited warranty
published by Graco, Graco will, for a period of 36 months from the date of sale, repair or replace any part of the equipment determined by Graco to
be defective. This warranty applies only when the equipment is installed, operated and maintained in accordance with Graco’s written
recommendations.
This warranty does not cover, and Graco shall not be liable for general wear and tear, or any malfunction, damage or wear caused by faulty
installation, misapplication, abrasion, corrosion, inadequate or improper maintenance, negligence, accident, tampering, or substitution of
non-Graco component parts. Nor shall Graco be liable for malfunction, damage or wear caused by the incompatibility of Graco equipment with
structures, accessories, equipment or materials not supplied by Graco, or the improper design, manufacture, installation, operation or
maintenance of structures, accessories, equipment or materials not supplied by Graco.
This warranty is conditioned upon the prepaid return of the equipment claimed to be defective to an authorized Graco distributor for verification of
the claimed defect. If the claimed defect is verified, Graco will repair or replace free of charge any defective parts. The equipment will be returned
to the original purchaser transportation prepaid. If inspection of the equipment does not disclose any defect in material or workmanship, repairs will
be made at a reasonable charge, which charges may include the costs of parts, labor, and transportation.
THIS WARRANTY IS EXCLUSIVE, AND IS IN LIEU OF ANY OTHER WARRANTIES, EXPRESS OR IMPLIED, INCLUDING BUT NOT LIMITED
TO WARRANTY OF MERCHANTABILITY OR WARRANTY OF FITNESS FOR A PARTICULAR PURPOSE.
Graco’s sole obligation and buyer’s sole remedy for any breach of warranty shall be as set forth above. The buyer agrees that no other remedy
(including, but not limited to, incidental or consequential damages for lost profits, lost sales, injury to person or property, or any other incidental or
consequential loss) shall be available. Any action for breach of warranty must be brought within 2 years of the date of sale.
GRACO MAKES NO WARRANTY, AND DISCLAIMS ALL IMPLIED WARRANTIES OF MERCHANTABILITY AND FITNESS FOR A
PARTICULAR PURPOSE, IN CONNECTION WITH ACCESSORIES, EQUIPMENT, MATERIALS OR COMPONENTS SOLD BUT NOT
MANUFACTURED BY GRACO. These items sold, but not manufactured by Graco (such as electric motors, switches, hose, etc.), are subject to
the warranty, if any, of their manufacturer. Graco will provide purchaser with reasonable assistance in making any claim for breach of these
warranties.
In no event will Graco be liable for indirect, incidental, special or consequential damages resulting from Graco supplying equipment hereunder, or
the furnishing, performance, or use of any products or other goods sold hereto, whether due to a breach of contract, breach of warranty, the
negligence of Graco, or otherwise.
POUR LES CLIENTS DE GRACO PARLANT FRANCAIS
Les parties reconnaissent avoir convenu que la rédaction du présent document ainsi que de tous les documents, avis et procédures judiciaires
exécutés, donnés ou intentés à la suite de ou en rapport, directement ou indirectement, avec les procédures concernées, sera en anglais.
PARA LOS CLIENTES DE GRACO QUE HABLAN ESPAÑOL
Las partes reconocen haber convenido que el presente documento, así como todos los documentos, notificaciones y procedimientos judiciales
emprendidos, presentados o establecidos que tengan que ver con estas garantías directa o indirectamente, estarán redactados en inglés.
PER I CLIENTI GRACO GRECI/ITALIANI/SPAGNOLI/PORTOGHESI
Le controparti riconoscono di aver richiesto che il presente documento, e tutti gli altri documenti, avvisi e informazioni di natura legale sottoscritti,
conferiti o istituiti direttamente o indirettamente, siano redatti in lingua inglese.
PARA CLIENTES PORTUGUESES DA GRACO
As partes confirmam que solicitaram que o presente documento, assim como todos os demais documentos, notas e processos legais inseridos,
atribuídos ou instituídos de acordo com o mesmo ou relacionados directa ou indirectamente com este documento, fossem redigidos em inglês.
VOOR GRACO-KLANTEN IN NEDERLAND
De partijen zijn zich ervan bewust dat zij hebben geëist dat het onderhavige document, evenals alle documenten, berichtgevingen en wettelijke
procedures die worden aangegaan, overhandigd of in gang gezet hetzij als gevolg van hetzij rechtstreeks hetzij indirect in relatie tot het
onderhavige worden opgesteld in de Engelse taal.
ADDITIONAL WARRANTY COVERAGE
Graco provides additional warranty as follows:
• Lifetime motor warranty - If the motor fails from normal use, Graco will replace the motor for the original purchaser for the life of the sprayer
• Lifetime drive train warranty - If the drive train fails from normal use, Graco will replace the drive train for the original purchaser for the life of
the sprayer
NOTE: TO PLACE AN ORDER, contact your Graco distributor, or call 1-800-690-2894 to identify the nearest distributor.
All written and visual data contained in this document reflects the latest product information available at the time of publication. Graco reserves the
This manual contains: English, French, Spanish, Italian, Portuguese and Dutch
right to make changes at any time without notice.
mm 311344
International Offices: Belgium, Korea, China, Japan
GRACO INC. P.O. BOX 1441 MINNEAPOLIS, MN 55440-1441
Graco Headquarters: Minneapolis
http://www.graco.com
11/2005, Rev 01/2008
32 311344E
 Loading...