

Soho_user_Manual EU - Jan 2018_V3.indd 1 21/12/2017 15:19
USER MANUAL
V3 | JAN 2018
CONTENT
Italian 53
English 3
German 13
French 23
Dutch 33
Spanish 43
Soho_user_Manual EU - Jan 2018_V3.indd 2 21/12/2017 15:19
2
ENGLISH
Thanks for purchasing this product from ProtelX.
Please read instructions carefully before use and store in a safe
place for future reference
Soho_user_Manual EU - Jan 2018_V3.indd 3 21/12/2017 15:19
33
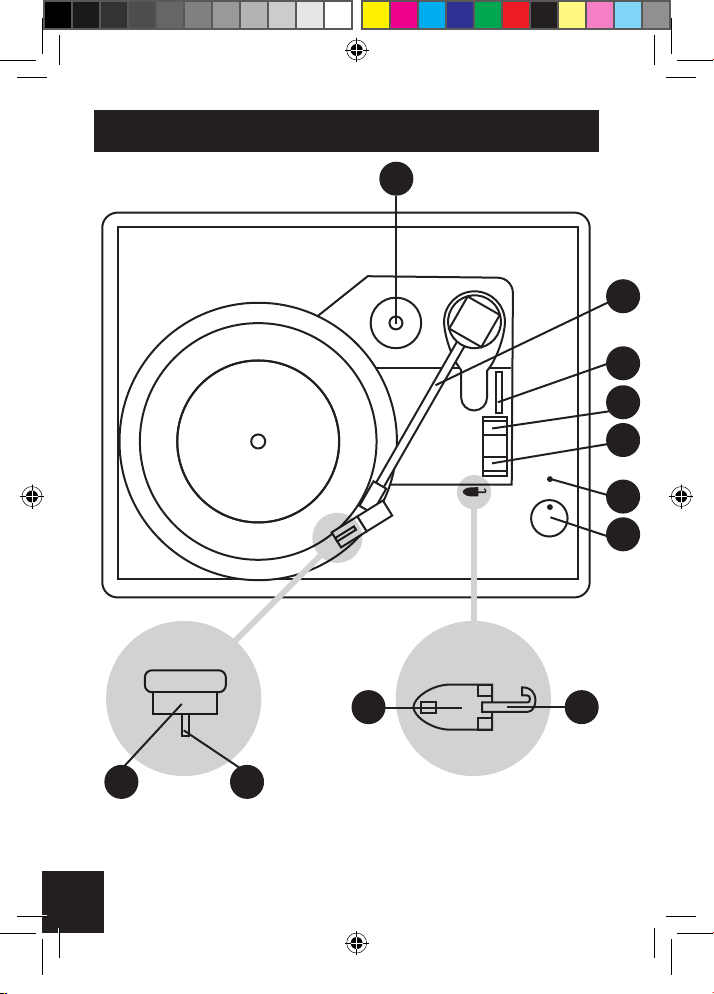
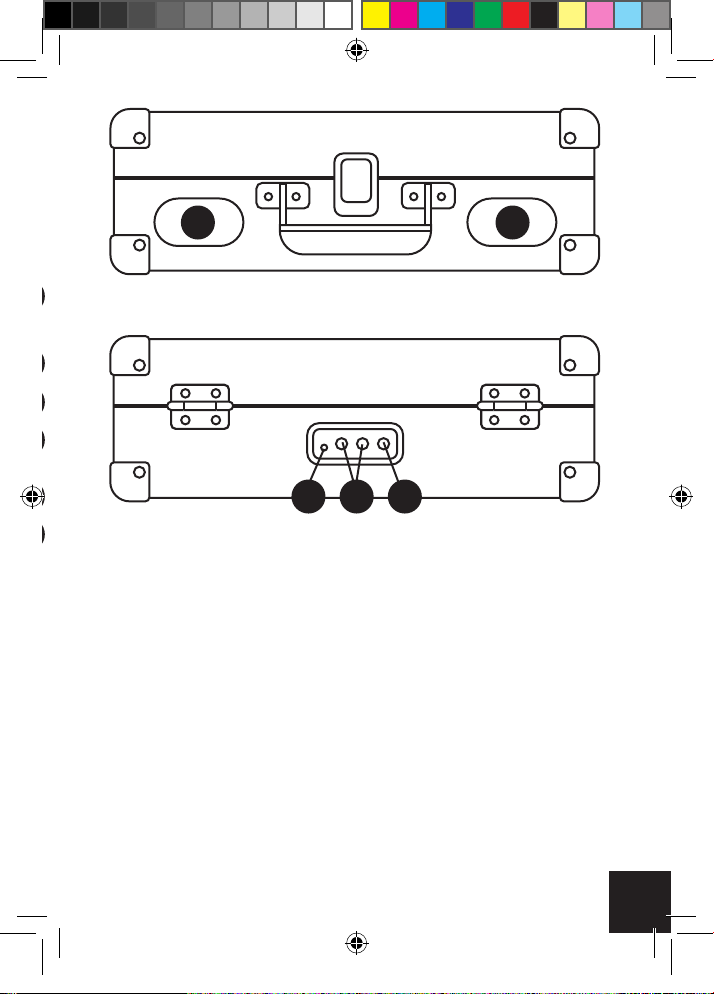
COMPONENT IDENTIFICATION
10
2
5
6
7
9
8
34
Soho_user_Manual EU - Jan 2018_V3.indd 4 21/12/2017 15:19
14
4
15

1
1
11 12 13
Soho_user_Manual EU - Jan 2018_V3.indd 5 21/12/2017 15:19
1. Speakers
2. Tonearm
3. Tonearm lock
4. Tonearm rest
5. Tonearm lever
6. Auto stop control switch
7. Speed cotrol
8. Power/volume knob
9. Power indicator light
10. 45 Rpm adapter
11. 3.5Mm headphone jack
12. Audio rca output
13. Dc 5v input
14. Cartridge
15. Stylus(needle)
5
UNPACKING YOUR TURNTABLE
1. Carefully remove the turntable and accessories from the box.
2. Place the turntable on a at, level surface and open the lid.
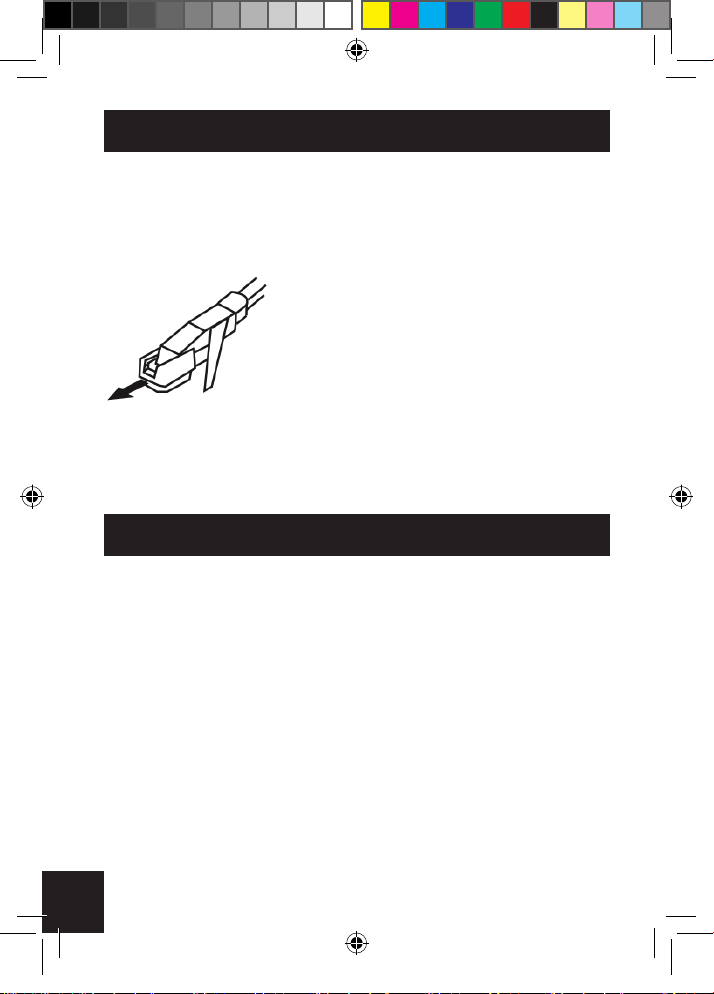
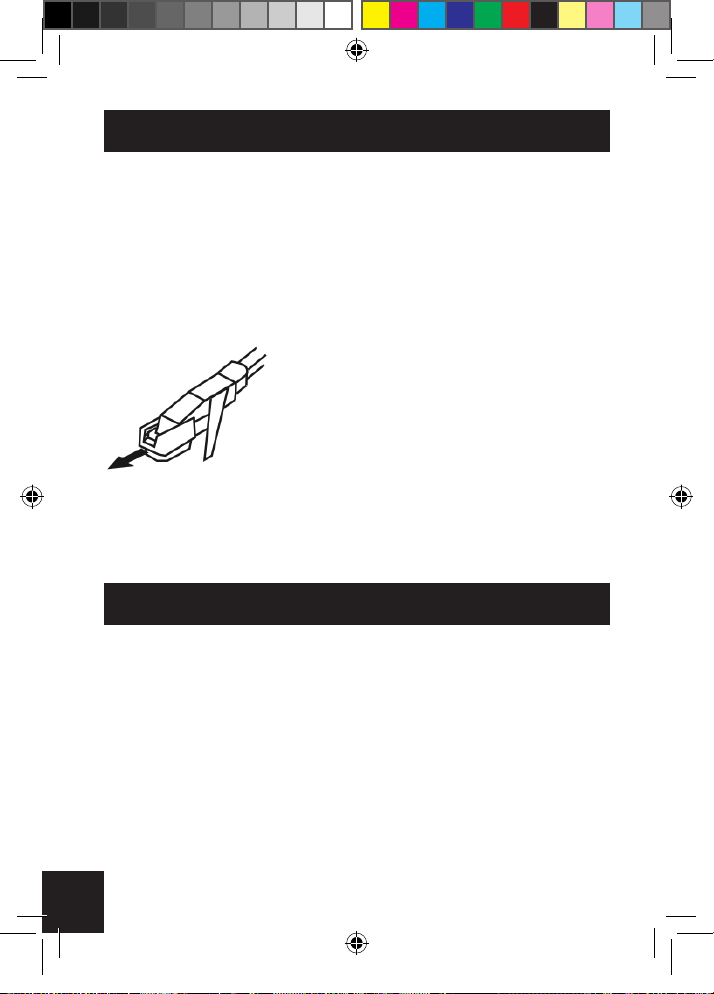
3. Remove the white protective Stylus Cover as shown below.
4. Carefully remove the twist-tie from the TONEARM (2).
5. Release the TONEARM LOCK (3).
POWER
1. Plug the supplied AC 100V~240V, 50/60Hz to DC 5V power adapter
into the DC 5V INPUT (13) located on the rear of the turntable.
2. Insert the wall plug of the power adapter into an electrical wall outlet.
3. Turn the turntable on by turning the POWER/VOLUME KNOB (8)
clockwise.
4. Turn the turntable off by turning the POWER/VOLUME KNOB (8)
counterclockwise
Soho_user_Manual EU - Jan 2018_V3.indd 6 21/12/2017 15:19
6
VOLUME
The Speaker Volume is also controlled by the POWER/VOLUME
KNOB (8).
• To Increase the Volume: Turn the POWER/VOLUME KNOB (8)
clockwise.
• To Decrease the Volume: Turn the POWER/VOLUME KNOB (8)
counterclockwise.
PLAYING A RECORD
1. Set the correct speed for your record (33/45/ 78 RPM).
2. Place the record on the turntable
3. Turn the POWER/VOLUME KNOB (8) clockwise to turn the
player on.
4. Unlock the TONEARM LOCK (3) and the TONEARM (2) will be
ready for playing.
5. Lower the TONEARM (2) using the TONEARM LEVER (5) until the
STYLUS (15) touches the record and begins playing your music.
Make sure the TONEARM LEVER (5) is completely down.
6. Adjust the Volume to the desired level by turning the POWER/
VOLUME KNOB (8).
7. When nished listening, use the TONEARM LEVER (5) to raise the
TONEARM (2) and then place it back on the TONEARM REST (4).
The record will automatically stop spinning.
8. If nished using the turntable, be sure to lock the
TONEARM LOCK (3).
Soho_user_Manual EU - Jan 2018_V3.indd 7 21/12/2017 15:19
7
AUTO STOP
The AUTO STOP feature allows the turntable to automatically stop
playing when the STYLUS (15) reaches the end of the record.
• To turn the AUTO STOP feature ON: Set the AUTO STOP CONTROL
SWITCH (6) to AUTO.
• To turn the AUTO STOP feature OFF: Set the AUTO STOP
CONTROL SWITCH (6) to MANUAL.
NOTE: When using the MANUAL setting, once the record is nished,
the player will continue to spin until you raise the TONEARM (2) and
move it back to the TONEARM REST (4) which stops the spinning.
CONNECTING TO AN EXTERNAL SPEAKER
Use the included Red & White RCA Cables to connect the turntable to
an External Speaker or Stereo system. Simply plug the Red & White
ends of the RCA Cable into the corresponding Red & White AUDIO
OUTPUT JACKS (12) on the rear of the player.
Then connect the other Red & White ends of the RCA Cable into
the corresponding Red & White Audio Input Jacks on your External
Speakers or Stereo system. The speaker requires a pre-AMP inside it.
USING HEADPHONES
Soho_user_Manual EU - Jan 2018_V3.indd 8 21/12/2017 15:19
To use headphones with this player, connect any headphone with a
3.5mm jack into the input on the 3.5mm HEADPHONE JACK (11)
located on the rear of the player.
• NOTE: When headphones are plugged in, no sound will be heard
from the built-in speakers.
8
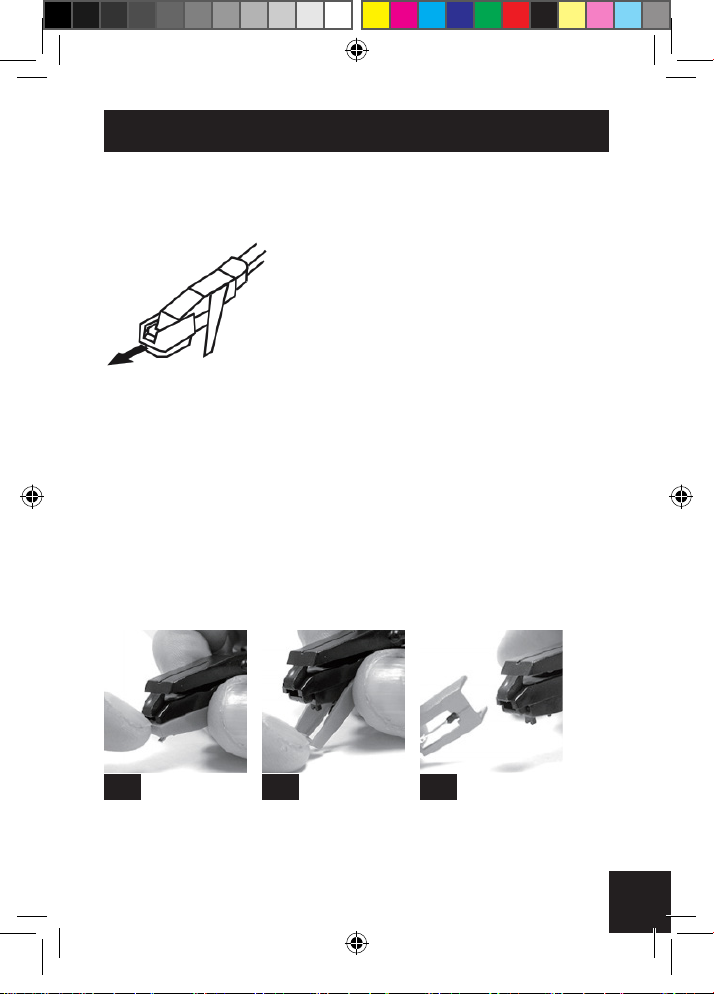
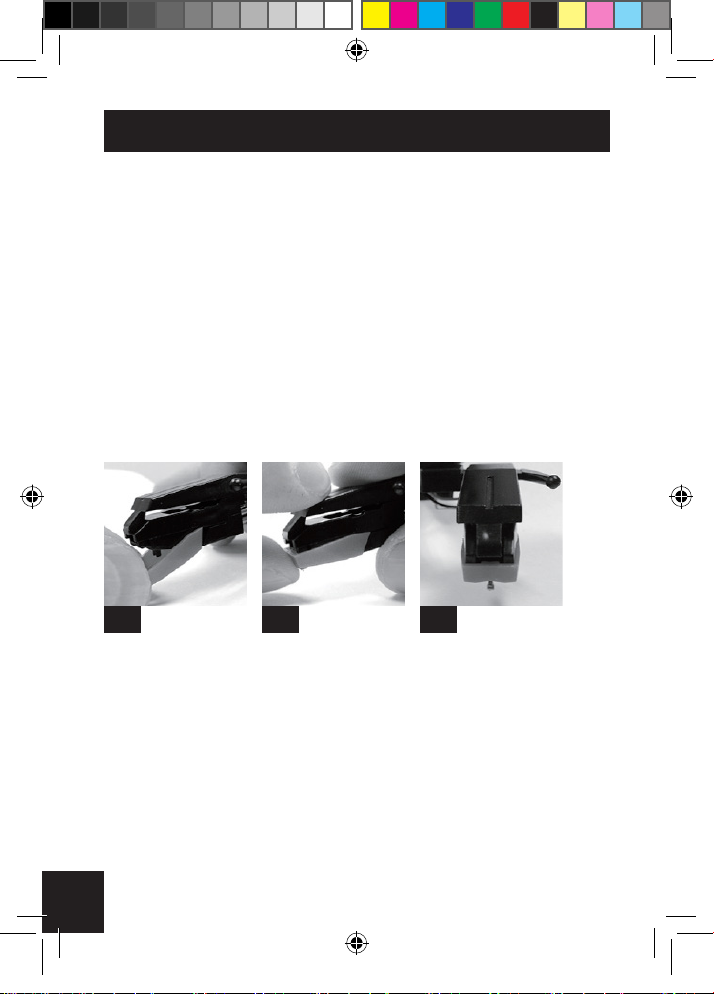
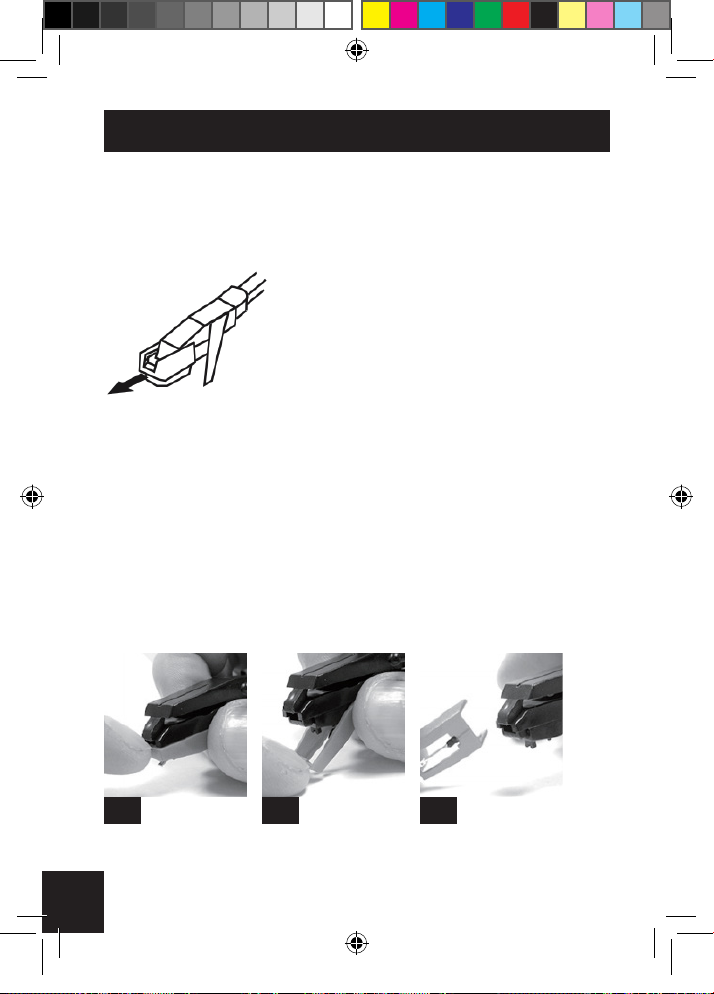
REMOVING THE STYLUS (NEEDLE)
1. Lock the TONEARM (2) on the TONEARM REST (4) by pushing the
TONEARM LOCK (3) to the left.
2. Remove the white protective Stylus Cover (if necessary).
3. Hold the bottom of the CARTRIDGE (14) with your thumb & index
nger as shown below in Fig. 3a. With your other thumb carefully
push down on the top edge of the Red Stylus Assembly (Red piece
includes the needle) until the Stylus Assembly separates from the
CARTRIDGE (14) as shown in Fig 3b.
4. Carefully remove the entire Stylus Assembly from the Cartridge by
pulling the Stylus Assembly away from the CARTRIDGE (14) (FIG
4a).
Soho_user_Manual EU - Jan 2018_V3.indd 9 21/12/2017 15:19
3A 3B 4A
9
INSTALLING A THE STYLUS (NEEDLE)
NOTE: Do not directly touch the STYLUS (NEEDLE) (15) during
installation, or you may cause permanent damage to the STYLUS (15).
1. Hold the front tip of the Stylus Assembly with your thumb and index
ngers and insert the rear edge of the Stylus Assembly on the
CARTRIDGE (14) as shown in Fig 5a.
2. While applying gentle pressure on the top of the TONEARM (2) with
your index nger, carefully push the Stylus Assembly upwards until
you hear a click and the Stylus Assembly locks into place (Fig 6a).
3. The new STYLUS (15) is now ready to use.
• Under normal use a STYLUS (15) should last for about 50-60 hours
of record play.
5A 6A 7A
10
Soho_user_Manual EU - Jan 2018_V3.indd 10 21/12/2017 15:19
TROUBLESHOOTING
MUSIC SOUNDS TOO SLOW OR TOO FAST
• Check to conrm the SPEED CONTROL SWITCH (7) is correctly set
for the record being played (33 , 45, or 78 RPM).
RECORDS KEEP SKIPPING
• Carefully look at the surface of the record under a strong light to see
if there are any signcant scratches or other damage to the record
which will cause it to skip.
• Make sure the turntable is on at and level surface.
• Clean the record with a proper record cleaning brush to remove build-
up of dust & dirt in the grooves of the record.
• Check to make sure the STYLUS (15) is in the correct middle
position.
NO SOUND
• Make sure the white protective Stylus Cover has been removed from
the cartridge.
• Conrm there is nothing plugged into the 3.5mm HEADPHONE JACK
(11) on the rear of the player.
• Check the position of the STYLUS (15) to insure it has not shifted out
of its proper middle position (See Fig. 7a on page 9).
NO POWER
• Make sure the AC 100V~240V, 50/60Hz to DC 5V power adapter
is securely connected to the DC 5V INPUT (13) on the rear of the
turntable as well as the wall outlet.
• Make sure the electrical outlet is working by plugging in another
device.
Soho_user_Manual EU - Jan 2018_V3.indd 11 21/12/2017 15:19
11
12
Soho_user_Manual EU - Jan 2018_V3.indd 12 21/12/2017 15:19

GERMAN
Vielen Dank, dass Sie sich für dieses Produkt von ProtelX entschieden haben.
Bitte lesen Sie diese Bedienungsanleitung aufmerksam und be-
wahren Sie sie zum späteren Nachlesen sicher auf.
Soho_user_Manual EU - Jan 2018_V3.indd 13 21/12/2017 15:19
1313

TEILEBESTIMMUNG
10
2
5
6
7
9
8
34
14
Soho_user_Manual EU - Jan 2018_V3.indd 14 21/12/2017 15:19
14
15
1
1
11 12 13
Soho_user_Manual EU - Jan 2018_V3.indd 15 21/12/2017 15:19
1. Lautsprecher
2. Tonarm
3. Tonarm-verriegelung
4. Tonarm-stütze
5. Tonarm-hebel
6. Autostopp-kontrollschalter
7. Dr eh za hl re ge lu ng
8. Ein/aus/lautstärke-regler
9. Betriebsanzeige
10. Adapter für 45 u/min
11. 3,5 Mm kopfhörer-an-
schlussbuchse
12. Cinch-audioausgang
13. Dc 5v-eingang
14. Tonabnehmer
15. Nadel
15
IHREN PLATTENSPIELER AUSPACKEN
1. Nehmen Sie den Plattenspieler und die Zubehörteile vorsichtig aus
dem Karton
2. Stellen Sie den Plattenspieler auf eine ache, ebene Oberäche und
öffnen Sie die Abdeckhaube.
3. Entfernen Sie die weiße Schutzabdeckung der Nadel wie
nachfolgend gezeigt.
4. Entfernen Sie den Befestigungsdraht vorsichtig vom TONARM (2).
5. Lösen Sie die TONARM-VERRIEGELUNG (3).
EINSCHALTEN
1. Verbinden Sie den mitgelieferten AC 100V~240V, 50/60Hz auf DC
5V Netzadapter mit dem DC 5V-EINGANG (13) auf der Rückseite
des Plattenspielers.
2. Verbinden Sie den Netzstecker des Netzadapters mit einer
Steckdose.
3. Schalten Sie den Plattenspieler ein, indem Sie den EIN/AUS/
LAUTSTÄRKE-REGLER (8) im Uhrzeigersinn drehen.
4. Schalten Sie den Plattenspieler aus, indem Sie den EIN/AUS/
LAUTSTÄRKE-REGLER (8) gegen den Uhrzeigersinn drehen.
16
Soho_user_Manual EU - Jan 2018_V3.indd 16 21/12/2017 15:19

LAUTSTÄRKE
Die Lautstärke lässt sich ebenfalls über den EIN/AUS/LAUTSTÄRKE-
REGLER (8) einstellen.
• Um die Lautstärke zu erhöhen: Drehen Sie den EIN/AUS/
LAUTSTÄRKE-REGLER (8) im Uhrzeigersinn.
• Um die Lautstärke zu verringern: Drehen Sie den EIN/AUS/
LAUTSTÄRKE-REGLER (8) gegen den Uhrzeigersinn
EINE SCHALLPLATTE ABSPIELEN
1. Stellen Sie die richtige Drehzahl für Ihre Schallplatte ein (33/45/ 78
U/min)
2. Legen Sie die Schallplatte auf den Plattenteller
3. Drehen Sie den EIN/AUS/LAUTSTÄRKE-REGLER (8) im
Uhrzeigersinn, um den Plattenspieler einzuschalten.
4. Lösen Sie die TONARM-VERRIEGELUNG (3) und der TONARM (2)
ist bereit zum Abspielen.
5. Senken Sie den TONARM (2) mithilfe des TONARM-HEBELS
(5) ab, bis die NADEL (15) die Schallplatte berührt und mit dem
Abspielen Ihrer Musik beginnt. Stellen Sie sicher, dass der TONARMHEBEL (5) vollständig abgesenkt ist.
6. Stellen Sie die gewünschte Lautstärke ein, indem Sie den EIN/AUS/
LAUTSTÄRKE-REGLER (8) drehen.
7. Um das Abspielen zu beenden, heben Sie mit dem TONARMHEBEL (5) den TONARM (2) anund legen Sie ihn zurück auf die
TONARM-Ablage (4). Die Schallplatte hört automatisch auf, sich zu
drehen.
8. Wenn Sie den Plattenspieler nicht mehr verwenden möchten, stellen
Sie sicher, dass die TONARM-VERRIEGELUNG (3) geschlossen ist.
Soho_user_Manual EU - Jan 2018_V3.indd 17 21/12/2017 15:19
17
AUTOSTOPP
Mit der AUTOSTOPP-Funktion hört die Schallplatte automatisch
auf, sich zu drehen,wenn die NADEL (15) das Ende der Schallplatte
erreicht hat.
• Um die AUTOSTOPP-Funktion einzuschalten: Stellen Sie den
AUTOSTOPP-KONTROLLSCHALTER (6) auf AUTO.
• Um die AUTOSTOPP-Funktion auszuschalten: Stellen Sie den
AUTOSTOPP-KONTROLLSCHALTER (6) auf MANUAL.
• HINWEIS: Wenn Sie die MANUAL-Einstellung verwenden, wird der
Plattenspieler die Schallplatte auch dann weiterdrehen, wenn die
Wiedergabe am Ende angelangt ist. Sie wird so lange weitergedreht,
bis Sie den TONARM (2) anheben und ihn zurück auf die TONARM-
ABLAGE (4) legen. Erst dann wird das Drehen der Schallplatte
gestoppt.
18
Soho_user_Manual EU - Jan 2018_V3.indd 18 21/12/2017 15:19

ANSCHLUSS DES PLATTENSPIELERS AN
EINEN EXTERNEN LAUTSPRECHER ODER
EINE STEREOQUELLE
Verwenden Sie die mitgelieferten roten & weißen RCA-Kabel,
um den Plattenspieler an einen externenLautsprecher oder eine
Stereoquelle anzuschließen. Verbinden Sie die roten & weißen Enden
des RCA-Kabel mit den entsprechenden roten & weißen AUDIO-
AUSGANGSBUCHSEN (12) auf der Rückseite des Plattenspielers.
Verbinden Sie die roten & weißen Enden des RCA-Kabels mit den
entsprechenden roten & weißen AUDIO-AUSGANGSBUCHSEN (12)
auf der Rückseite des Plattenspielers.Der Lautsprecher benötigt eine
eingebaute Vorverstärkung.
KOPFHÖRER VERWENDEN
Um diesen Plattenspieler mit einem Kopfhörer zu verwenden,
verbinden Sie einen beliebigen Kopfhörer mit einem 3,5mm-Anschluss
mit der 3,5 mm KOPFHÖRER-ANSCHLUSSBUCHSE (11) auf der
Rückseite des Plattenspielers.
• HINWEIS: Wenn ein Kopfhörer eingesteckt ist, wird über die
eingebauten Kopfhörer kein Ton ausgegeben.
Soho_user_Manual EU - Jan 2018_V3.indd 19 21/12/2017 15:19
19
ENTFERNEN DER NADEL
1. Verriegeln Sie den TONARM (2) auf der TONARM-ABLAGE (4),
indem Sie die TONARM-VERRIEGELUNG (3) nach links drücken.
2. Endfernen Sie die Schutzabdeckung der Nadel (bei Bedarf).
3. Halten Sie die Unterseite des TONABNEHMERS (12), wie in der
nachfolgenden Abb. 3a gezeigt, mit Ihrem Daumen und Zeigenger
fest. Drücken Sie mit dem anderen Daumen die obere Ecke des
roten Nadeleinsatzes (das rote Teil trägt die Nadel) vorsichtig
herunter, bis sich der Nadeleinsatz, wie in Abb. 3b gezeigt, vom
TONABNEHMER (14) löst.
4. Entfernen Sie den kompletten Nadeleinsatz vorsichtig
vom Tonabnehmer, indem Sie den Nadeleinsatz aus dem
TONABNEHMER (14) herausziehen (Abb. 4a.)
20
Soho_user_Manual EU - Jan 2018_V3.indd 20 21/12/2017 15:19
3A 3B 4A

EINSETZEN DER NEUEN NADEL
HINWEIS:Berühren Sie die NADEL (15) beim Einsetzen nicht, da Sie
die NADEL (15) ansonsten dauerhaft beschädigen könnten.
1. Halten Sie den Nadeleinsatz an der vorderen Spitze mit Ihrem
Daumen und Zeigenger fest und schieben Sie das hintere Ende
des Nadeleinsatzes in den TONABNEHMER (14), wie in Abb. 5a.
gezeigt.
2. Drücken Sie den TONARM (2) von oben mit dem Zeigenger leicht
nach unten und drücken Sie den Nadeleinsatz vorsichtig nach oben,
bis Sie einen Klick hören und der Nadeleinsatz einrastet (Abb. 6a).
3. Die neue NADEL (15) ist jetzt einsatzbereit.
• Bei einer normalen Verwendung sollte die NADEL (15) ca. 50-60
Abspielstunden halten.
5A 6A 7A
Soho_user_Manual EU - Jan 2018_V3.indd 21 21/12/2017 15:19
21

FEHLERBEHEBUNG
DIE MUSIK WIRD ZU LANGSAM ODER ZU SCHNELL ABGESPIELT
• Überprüfen Sie, ob der SCHALTER FÜR DIE
DREHZAHLREGELUNG (7) für die abgespielte Schallplatte auf der
richtigen Einstellung steht (33, 45 oder 78 U/min).
DIE SCHALLPLATTE SPRINGT
• Untersuchen Sie die Oberäche der Schallplatte unter hellem
Licht auf deutliche Kratzer oder Schäden, die für das Springen
verantwortlich sein können.
• Stellen Sie sicher, dass der Plattenspieler auf einer achen und
waagerechten Oberäche steht.
• Reinigen Sie die Schallplatten mit einer speziellen Reinigungsbürste
für Schallplatten, um Staub undSchmutz in den Rillen der Platte zu
entfernen.
• Stellen Sie sicher, dass sich die NADEL (15) in der richtigen Position
in der Mitte bendet.
KEIN TON
• Stellen Sie sicher, dass die weiße Schutzabdeckung der Nadel vom
Tonabnehmer entfernt wurde.
• Stellen Sie sicher, dass nichts in die 3,5 mm KOPFHÖRER-
ANSCHLUSSBUCHSE (11) auf der Rückseite des Plattenspielers
eingesteckt ist.
• Überprüfen Sie die Position der NADEL (15), um sicherzustellen,
dass sie nicht aus der korrekten mittleren Position verrutscht ist
(Siehe Abb. 7a auf Seite 9).
KEINE STROMVERSORGUNG
• Stellen Sie sicher, dass der mitgelieferte AC 100V~240V, 50/60Hz
auf DC 5V Netzadapter sicher mit dem DC 5V-EINGANG (13) auf der
Rückseite des Plattenspielers und der Steckdose verbunden ist.
• Überprüfen Sie, ob die Steckdose ordnungsgemäß funktioniert,
indem Sie ein anderes Gerät einstecken.
22
Soho_user_Manual EU - Jan 2018_V3.indd 22 21/12/2017 15:19

FRENCH
Merci d’avoir acheté ce produit ProtelX.
Veuillez lire attentivement les instructions avant utilisation et rangez
cette notice dans un endroit sûr pour toute référence future.
Soho_user_Manual EU - Jan 2018_V3.indd 23 21/12/2017 15:19
2323

IDENTIFICATION DES COMPOSANTS
10
2
5
6
7
9
8
34
24
Soho_user_Manual EU - Jan 2018_V3.indd 24 21/12/2017 15:19
14
15

1
1
11 12 13
Soho_user_Manual EU - Jan 2018_V3.indd 25 21/12/2017 15:19
1. Haut-parleurs
2. Bras de lecture
3. Dispositif de verrouillage du
bras de lecture
4. Repose-bras de lecture
5. Levier du bras de lecture
6. Interrupteur de commande
d’arrêt automatique
7. Contrôle de vitesse
8. Bouton d’alimentation/volume
9. Témoin lumineux de
l’alimentation
10. Adaptateur 45 tours
11. Prise casque 3,5 mm
12. Sortie audio rca
13. Entrée 5 v cc
14. Cartouche
15. Stylet (aiguille)
25

DÉBALLER VOTRE PLATINE
1. Sortez la platine et les accessoires de la boîte avec précaution.
2. Placez la platine sur une surface plane et ouvrez le couvercle.
3. Retirez le couvercle de protection blanc du stylet comme indiqué
ci-dessous.
4. Rirez avec précaution l’attache du BRAS DE LECTURE (2).
5. Débloquez le DISPOSITIF DE VERROUILLAGE DU BRAS DE
LECTURE (3).
MISE EN MARCHE
1. Branchez l’adaptateur d’alimentation 100 V~240 V CA, 50/60Hz
dans l’ENTRÉE 5 V CC (13) située à l’arrière de la platine.
2. Insérez la prise murale de l’adaptateur d’alimentation dans une prise
de courant murale.
3. Allumez la platine en tournant le BOUTON D’ALIMENTATION/
VOLUME (8) vers la droite.
4. Éteignez la platine en tournant le BOUTON D’ALIMENTATION/
VOLUME (8) vers la gauche.
26
Soho_user_Manual EU - Jan 2018_V3.indd 26 21/12/2017 15:19

VOLUME
Le BOUTON D’ALIMENTATION/VOLUME (8) contrôle également le
volume des haut-parleurs.
• Pour augmenter le volume : tournez le BOUTON D’ALIMENTATION/
VOLUME (8) vers la droite.
• Pour baisser le volume : tournez le BOUTON D’ALIMENTATION/
VOLUME (8) vers la gauche.
LIRE UN DISQUE
1. Réglez la vitesse appropriée de votre disque (33/45/78 tours).
2. Placez le disque sur la platine.
3. Tournez le BOUTON D’ALIMENTATION/VOLUME (8) vers la droite
pour allumer la platine.
4. Débloquez le DISPOSITIF DE VERROUILLAGE DU BRAS DE
LECTURE (3) et le BRAS DE LECTURE (2) sera prêt pour la
lecture.
5. Abaissez le BRAS DE LECTURE (2) à l’aide du LEVIER DU BRAS
DE LECTURE (5) jusqu’à ce que le stylet (15) touche le disque
et commence à lire la musique. Assurez-vous que le LEVIER DU
BRAS DE LECTURE (5) est complètement abaissé.
6. Réglez le volume au niveau désiré en tournant le BOUTON
D’ALIMENTATION/VOLUME (8).
7. Lorsque vous avez terminé l’écoute, utilisez le LEVIER DU BRAS
DE LECTURE (5) pour soulever le BRAS DE LECTURE (2). puis
remettez-le sur le REPOSE-BRAS DE LECTURE (4). Le disque
s’arrêtera automatiquement de tourner.
8. Si vous avez terminé d’utiliser la platine, assurez-vous de bloquer le
DISPOSITIF DE VERROUILLAGE DU BRAS DE LECTURE (3).
27
Soho_user_Manual EU - Jan 2018_V3.indd 27 21/12/2017 15:19

ARRÊT AUTOMATIQUE
La fonction ARRÊT AUTOMATIQUE permet à la platine d’arrêter
automatiquement la lecture lorsque le STYLET (15) atteint la n du
disque.
• Pour ACTIVER la fonction ARRÊT AUTOMATIQUE : placez
l’INTERRUPTEUR DE COMMANDE D’ARRÊT AUTOMATIQUE (6)
sur AUTO.
• Pour ARRÊTER la fonction ARRÊT AUTOMATIQUE : placez
l’INTERRUPTEUR DE COMMANDE D’ARRÊT AUTOMATIQUE (6)
sur MANUEL.
• REMARQUE : En mode MANUEL, une fois le disque terminé, la
platine continuera à tourner tant que le BRAS DE LECTURE (2) n’est
pas soulevé et replacé sur le REPOSE-BRAS DE LECTURE (4).
28
Soho_user_Manual EU - Jan 2018_V3.indd 28 21/12/2017 15:19

RELIER LA PLATINE À UN HAUT-PARLEUR
EXTERNE OU UNE SOURCE STÉRÉO
Utilisez les câbles RCA rouge et blanc pour connecter la platine à un
haut-parleur externe ou à un système stéréo. Il suft de brancher les
extrémités du câble RCA rouge et blanc dans les SORTIES AUDIO
(12) correspondantes rouge et blanche à l’arrière de la platine.
Branchez ensuite les autres extrémités du câble RCA rouge et
blanc dans les entrées audio rouge et blanche de vos haut-parleurs
externes ou de votre système stéréo. Le haut-parleur nécessite un
préamplicateur intégré.
ÉCOUTER LA PLATINE AVEC UN CASQUE
Pour utiliser un casque avec cette platine, branchez des écouteurs
munis d’une prise casque de 3,5 mm dans l’entrée de la PRISE
CASQUE 3,5 mm (11) située à l’arrière du tourne-disque.
• REMARQUE : Une fois le casque branché, aucun son ne sortira des
haut-parleurs intégrés.
Soho_user_Manual EU - Jan 2018_V3.indd 29 21/12/2017 15:19
29

RETIRER LE STYLET (AIGUILLE)
1. Bloquez le BRAS DE LECTURE (2) sur le REPOSE-BRAS DE
LECTURE (4) en poussant le DISPOSITIF DE VERROUILLAGE DU
BRAS DE LECTURE (3) vers la gauche.
2. Retirez le couvercle de protection blanc du stylet (si nécessaire).
3. Tenez la partie inférieure de la CARTOUCHE (14) entre le pouce
et l’index, comme montré ci-dessous dans la gure 3a. Avec l’autre
pouce, poussez avec précaution vers le bas sur le bord supérieur de
l’unité rouge du stylet (la pièce rouge comprend l’aiguille) jusqu’à ce
que le stylet se sépare de la CARTOUCHE (14) comme montré dans
la gure 3b.
4. Retirez avec précaution l’ensemble du stylet de la cartouche en
tirant sur le stylet pour l’écarter de la CARTOUCHE (14) (FIG. 4a).
30
Soho_user_Manual EU - Jan 2018_V3.indd 30 21/12/2017 15:19
3A 3B 4A

INSTALLER UN NOUVEAU STYLET (AIGUILLE)
REMARQUE : Ne touchez pas directement le STYLET (AIGUILLE)
(15) lors de l’installation, ou vous pourriez endommager le STYLET
(15) de façon permanente.
1. Maintenez la pointe avant du stylet entre le pouce et l’index et
insérez le bord arrière du stylet sur la CARTOUCHE (14) comme
montré dans la gure 5a.
2. Tout en exerçant une légère pression sur le BRAS DE LECTURE (2)
avec l’index, poussez avec précaution le stylet vers le haut jusqu’à
ce que vous entendiez un clic et que le stylet s’enclenche (Fig. 6a).
3. Le nouveau STYLET (15) est maintenant prêt à l’emploi.
• Dans des conditions normales d’utilisation, un STYLET (15) devrait
durer environ 50 à 60 heures de lecture de disque.
5A 6A 7A
Soho_user_Manual EU - Jan 2018_V3.indd 31 21/12/2017 15:19
31

DÉPANNAGE
LA MUSIQUE EST TROP LENTE OU RAPIDE
• Vériez que le BOUTON DE CONTRÔLE DE VITESSE (7)
correspond au disque lu (33, 45, ou 78 tours).
LE DISQUE SAUTE CONTINUELLEMENT
• Examinez attentivement la surface du disque sous une source de
lumière vive pour vérier la présence de rayures importantes ou
d’autres dommages qui pourraient le faire sauter.
• Assurez-vous que le tourne-disque est sur une surface plane et plate.
• Nettoyez le disque avec une brosse de nettoyage appropriée pour
éliminer l’accumulation de poussière et la saleté dans les sillons du
disque.
• Vériez que le STYLET (15) est bien dans la position centrale.
PAS DE SON
• Assurez-vous que le couvercle de protection blanc du stylet a été
retiré de la cartouche.
• Contrôlez que rien n’est branché dans la PRISE CASQUE 3,5 mm
(11) à l’arrière de la platine.
• Vériez la position du STYLET (15) pour vous assurer qu’il n’a pas
bougé de la position centrale adéquate (voir Fig. 7a à la page 9).
PAS DE COURANT
• Assurez-vous que l’adaptateur d’alimentation 100 V~240 V CA,
50/60HzAC à 5 V CC est correctement branché
dans l’ENTRÉE 5 V CC (13) à l’arrière de la platine ainsi que dans la
prise murale.
• Vériez que la prise électrique fonctionne en y branchant un autre
appareil.
32
Soho_user_Manual EU - Jan 2018_V3.indd 32 21/12/2017 15:19

DUTCH
Hartelijk dank dat u dit product van ProtelX hebt aangeschaft!
Lees de gebruiksaanwijzing goed door voordat u het product gaat
gebruiken. Bewaar de gebruiksaanwijzing op een veilige plek voor
toekomstig gebruik.
Soho_user_Manual EU - Jan 2018_V3.indd 33 21/12/2017 15:19
3333

ONDERDELEN
10
2
5
6
7
9
8
34
34
Soho_user_Manual EU - Jan 2018_V3.indd 34 21/12/2017 15:19
14
15

1
1
11 12 13
Soho_user_Manual EU - Jan 2018_V3.indd 35 21/12/2017 15:19
1. Speakers
2. Arm
3. Armvergrendeling
4. Armsteun
5. Armhendel
6. Schakelaar automatisch
stoppen
7. Toerentalregeling
8. Knop aan-uit/volume
9. Lampje voeding ingeschakeld
10. Invoegstuk voor singles
(45 toeren)
11. Koptelefoonaansluiting
3,5 mm
12. Rca-uitgang audio
13. Ingang 5 v gelijkstroom
14. Houder
15. Naald
35

DRAAITAFEL UITPAKKEN
1. Haal de draaitafel en de accessoires voorzichtig uit de doos.
2. Zet de draaitafel op een plat en vlak oppervlak en doe het deksel
open.
3. Verwijder de witte beschermkap van de naald zoals hieronder
afgebeeld.
4. Verwijder voorzichtig de draadklem van de ARM (2).
5. Ontgrendel de arm via de ARMVERGRENDELING (3).
VOEDING
1. Sluit de meegeleverde adapter (AC 100 ~240 V, 50/60 Hz naar DC 5
V) aan op de INGANG 5 V GELIJKSTROOM (13) aan de achterzijde
van de draaitafel.
2. Steek de stekker van de adapter in een stopcontact.
3. Zet de draaitafel aan door de KNOP AAN-UIT/VOLUME (8) rechtsom
te verdraaien.
4. Zet de draaitafel uit door de KNOP AAN-UIT/VOLUME (8) linksom te
verdraaien.
36
Soho_user_Manual EU - Jan 2018_V3.indd 36 21/12/2017 15:19

VOLUME
Het volume van de speakers wordt ook geregeld met de KNOP AAN-
UIT/VOLUME (8).
• Zo verhoogt u het volume: Draai de KNOP AAN-UIT/VOLUME (8)
rechtsom.
• Zo verlaagt u het volume: Draai de KNOP AAN-UIT/VOLUME (8)
linksom.
EEN PLAAT AFSPELEN
1. Stel het juiste toerental in voor uw plaat (33/45/ 78 RPM).
2. Leg de plaat op de draaitafel
3. Draai de KNOP AAN-UIT/VOLUME (8) rechtsom om de platenspeler
aan te zetten.
4. Ontgrendel de arm via de ARMVERGRENDELING (3) en dan is de
ARM (2) gereed voor gebruik.
5. Laat de ARM (2) zakken met behulp van de ARMHENDEL (5) totdat
de NAALD (15) contact maakt met de plaat en de muziek begint.
Zorg dat de ARM HENDEL (5) volledig is gedaald.
6. Stel het volume af op het gewenste niveau door de KNOP AAN-UIT/
VOLUME (8) te verdraaien.
7. Als u klaar bent, gebruik dan de ARMHENDEL (5) om de ARM (2)
omhoog te brengen) en breng deze terug naar de ARMSTEUN (4).
De plaat komt automatisch tot stilstand.
8. Als u klaar bent met het afspelen van platen, vergeet dan niet de
arm te vergrendelen met de ARMVERGRENDELING (3).
Soho_user_Manual EU - Jan 2018_V3.indd 37 21/12/2017 15:19
37

AUTOMATISCH STOPPEN
Met de functie AUTOMATISCH STOPPEN zorgt u dat de draaitafel
automatisch stopt wanneer de NAALD (15) het einde van de plaat heeft
bereikt.
• Zo zet u de functie “AUTOMATISCH STOPPEN” AAN: Zet de
SCHAKELAAR AUTOMATISCH STOPPEN (6) in de standAUTO.
• Zo zet u de functie “AUTOMATISCH STOPPEN” UIT: Zet
de SCHAKELAAR AUTOMATISCH STOPPEN (6) in de
standHANDMATIG.
• OPMERKING: Als u de instelling HANDMATIG gebruikt, dan zal de
platenspeler nadat het einde van de plaat is bereikt blijven draaien
totdat u zelf de ARM (2) optilt en terugbrengt naar de ARMSTEUN (4).
38
Soho_user_Manual EU - Jan 2018_V3.indd 38 21/12/2017 15:19

DRAAITAFEL AANSLUITEN OP EEN
EXTERNE SPEAKER OF STEREO BRON
Gebruik de meegeleverde rode en witte RCA-kabels om de draaitafel
aan te sluiten op een externe speaker of extern stereosysteem.
Sluit gewoon de rode en witte uiteinden van de kabels aan op
de bijbehorende rode en witte AUDIO-UITGANGEN (12) aan de
achterzijde van de draaitafel.
Sluit vervolgens de andere rode en witte uiteinden van de RCA-kabel
aan op de bijbehorende rode en witte audio-ingangen op uw externe
speakers of stereosysteem. De speaker moet voorzien zijn van een
interne voorversterker.
LUISTEREN MET EEN HOOFDTELEFOON
Als u een hoofdtelefoon gebruikt bij deze platenspeler, sluit dan een
hoofdtelefoon met een aansluiting van 3,5 mm aan op de ingang op de
HOOFDTELEFOONAANSLUITING 3,5 mm (11) aan de achterkant van
de platenspeler.
• OPMERKING: Als de hoofdtelefoon is aangesloten, komt er geen
geluid uit de ingebouwde speakers.
Soho_user_Manual EU - Jan 2018_V3.indd 39 21/12/2017 15:19
39

NAALD VERWIJDEREN
1. Vergrendel de ARM (2) op de ARMSTEUN (4) door de
ARMVERGRENDELING (3) naar links te duwen.
2. Verwijder de witte beschermkap van de naald (indien nodig).
3. Houd de onderkant van de HOUDER (14) met uw duim en wijsvinger
vast zoals afgebeeld hieronder in Afb. 3a. Duw met uw andere duim
voorzichtig de voorste rand van de rode naaldeenheid omlaag (het
rode deel bevat de naald) totdat de naaldeenheid losraakt van de
HOUDER (14) zoals afgebeeld in Afb 3b.
4. Verwijder voorzichtig de gehele naaldeenheid uit de houder door de
naaldeenheid uit de HOUDER (14) te trekken (AFB. 4a).
40
Soho_user_Manual EU - Jan 2018_V3.indd 40 21/12/2017 15:19
3A 3B 4A

NAALD AANBRENGEN
OPMERKING: Raak de NAALD (15) tijdens het aanbrengen niet
rechtstreeks aan, want zo zou u de NAALD (15) kunnen beschadigen.
1. Houd de voorzijde van de naaldeenheid met uw duim en wijsvinger
vast en voer de achterzijde van de naaldeenheid in de HOUDER
(14) zoals afgebeeld in Afb 5a.
2. Oefen lichte druk uit op de bovenkant van de ARM (2) met uw wijs
vinger, duw de naaldeenheid voorzichtig naar boven totdat u een klik
hoort, dan zit de naaldeenheid goed op zijn plaats (Afb. 6a).
3. De nieuwe NAALD (15) is nu gereed voor gebruik.
• Bij normaal gebruik zou een NAALD (15) ongeveer 50-60 speeluren
mee moeten gaan.
5A 6A 7A
Soho_user_Manual EU - Jan 2018_V3.indd 41 21/12/2017 15:19
41

PROBLEMEN OPLOSSEN
MUZIEK KLINKT NIET GOED (TE HOOG OF TE LAAG TOERENTAL
• Controleer of de SCHAKELAAR VOOR DE TOERENTALREGELING
(7) goed is ingesteld voor de plaat (33 , 45 of 78 RPM).
NAALD VERSPRINGT STEEDS
• Controleer aandachtig het oppervlak van de plaat bij goed licht om
te zien of er soms een kras op de plaat of andere schade te zien is
waardoor de naald verspringt.
• Zorg dat de draaitafel op een plat en vlak oppervlak staat.
• Maak de plaat schoon met een geschikte borstel om stof & vuil in de
groeven van de plaat te verwijderen.
• Controleer of de NAALD (15) in de juiste middelste stand staat.
GEEN GELUID
• Zorg dat de witte beschermkap van de naald is verwijderd van de
houder.
• Controleer of er niets is aangesloten op de
HOOFDTELEFOONAANSLUITING van 3,5 mm (11) aan de
achterkant van de platenspeler.
• Controleer de positie van de NAALD (15) om er zeker van te zijn dat
deze niet uit de juiste middelste stand is verschoven (zie Afb. 7a op
pagina 9).
GEEN VOEDING
• Zorg dat de adapter (AC 100 ~240 V, 50/60 Hz naar DC 5 V) goed
is aangesloten op de INGANG 5 V GELIJKSTROOM (13) aan de
achterzijde van de draaitafel en op het stopcontact.
• Controleer of het stopcontact werkt door er een ander apparaat op
aan te sluiten.
42
Soho_user_Manual EU - Jan 2018_V3.indd 42 21/12/2017 15:19

Spanish
Gracias por adquirir este producto de ProteIX.
Lea las instrucciones detenidamente antes de su uso y guárdelas
en un lugar seguro para consultarlas en el futuro.
Soho_user_Manual EU - Jan 2018_V3.indd 43 21/12/2017 15:19
4343

IDENTIFICACIÓN DE COMPONENTES
10
2
5
6
7
9
8
34
44
Soho_user_Manual EU - Jan 2018_V3.indd 44 21/12/2017 15:19
14
15

1
1
11 12 13
Soho_user_Manual EU - Jan 2018_V3.indd 45 21/12/2017 15:19
1. Altavoces
2. Brazo
3. Bloqueo del brazo
4. Reposabrazo
5. Palanca del brazo
6. Interruptor de control de
autoparada
7. Control de velocidad
8. Botón de encendido/volumen
9. Luz de indicador de
alimentación
10. Adaptador de 45 rpm
11. Toma para auriculares
de 3,5 mm
12. Salida de audio rca
13. Entrada cc 5 v
14. Cartucho
15. Aguja
45

DESEMPAQUETAR SU TOCADISCOS
1. Extraiga con cuidado el tocadiscos y los accesorios de la caja.
2. Coloque el tocadiscos en una supercie nivelada y plana y
abra la tapa.
3. Retire la funda protectora de la aguja de color blanco, tal y como se
muestra a continuación.
. Retire con cuidado el alambre del BRAZO (2).
5. Desactive el BLOQUEO DEL BRAZO (3).
ALIMENTACIÓN
1. Conecte el adaptador de alimentación proporcionado de CA
100V~240V, 50/60Hz a DC 5V a la ENTRADA DE CC 5V (13)
ubicada en la parte trasera del tocadiscos.
2. Inserte el enchufe de pared del adaptador de alimentación en una
toma eléctrica de pared.
3. Encienda el tocadiscos girando el BOTÓN DE ENCENDIDO/
VOLUMEN (8) en el sentido de las agujas del reloj.
4. Apague el tocadiscos girando el BOTÓN DE ENCENDIDO/
VOLUMEN (8) en el sentido contrario a las agujas del reloj.
46
Soho_user_Manual EU - Jan 2018_V3.indd 46 21/12/2017 15:19

VOLUMEN
El volumen de los altavoces también se controla por el BOTÓN DE
ENCENDIDO/VOLUMEN (8).
• Para subir el volumen: Gire el BOTÓN DE ENCENDIDO/VOLUMEN
(8) en el sentido de las agujas del reloj.
• Para bajar el volumen: Gire el BOTÓN DE ENCENDIDO/VOLUMEN
(8) en el sentido contrario a las agujas del reloj.
REPRODUCIR UN DISCO
1. Ajuste la velocidad adecuada para su tocadiscos (33/45/78 RPM).
2. Coloque el disco en el tocadiscos
3. Gire el BOTÓN DE ENCENDIDO/VOLUMEN (8) en el sentido de las
agujas del reloj para activar el reproductor.
4. Desactive el BLOQUE DEL BRAZO (3) y el BRAZO (2) estará listo
para la reproducción.
5. Baje el BRAZO (2) utilizando la PALANCA DEL BRAZON (5) hasta
que la AGUJA (15) entre en contacto con el disco y empiece a
reproducir su música. Asegúrese de que la PALANCA DEL BRAZO
(5) está completamente bajada.
6. Ajuste el volumen al nivel deseado girando el BOTÓN DE
ENCENDIDO/VOLUMEN (8).
7. Cuando termine de escuchar, utilice la PALANCA DEL BRAZO (5)
para elevar el BRAZO (2) y, a continuación, vuelva a colocarlo en el
REPOSABRAZO (4). El disco dejará de girar automáticamente.
8. Si ha terminado de utilizar el tocadiscos, asegúrese de bloquear el
BLOQUEO DEL BRAZO (3).
Soho_user_Manual EU - Jan 2018_V3.indd 47 21/12/2017 15:19
47

DETENCIÓN AUTOMÁTICA
La DETENCIÓN AUTOMÁTICA permite que el tocadiscos deje de
reproducir automáticamente cuando la AGUJA (15) llega al nal del
disco.
• Para activar la función de DETENCIÓN AUTOMÁTICA: Ajuste el
INTERRUPTOR DE CONTROL DE DETENCIÓN AUTOMÁTICA (6) a
AUTO.
• Para desactivar la función de DETENCIÓN AUTOMÁTICA: Ajuste el
INTERRUPTOR DE CONTROL DE DETENCIÓN AUTOMÁTICA (6) a
MANUAL.
• NOTA: Al utilizar la función MANUAL, cuando el disco haya
terminado, el reproductor seguirá girando hasta que levante el BRAZO
(2) y lo vuelva a colocar en el REPOSABRAZO (4), lo que detiene el
giro.
48
Soho_user_Manual EU - Jan 2018_V3.indd 48 21/12/2017 15:19

CONECTAR EL TOCADISCOS A UN
ALTAVOZ EXTERNO O ESTÉREO
Utilice los cables RCA blancos y rojos incluidos para conectar el
tocadiscos a un altavoz o sistema estéreo externo. Sencillamente
conecte los extremos blancos y rojos del cable RCA a las TOMAS DE
SALIDA DE AUDIO rojas y blancas correspondientes (12) en la parte
trasera del reproductor.
A continuación, conecte los otros extremos blancos y rojos del cable
RCA a las tomas de entrada de audio blancas y rojas correspondientes
de sus altavoces externos o sistema estéreo. El altavoz requiere un
preamplicador dentro de él.
ESCUCHAR EL TOCADISCOS CON LOS
AURICULARES
Para utilizar los auriculares con este reproductor, conéctelos con una
toma de 3,5 mm a la entrada de la TOMA DE AURICULARES de 3,5
mm (11) ubicada en la parte trasera del reproductor.
• NOTA: Cuando los auriculares están conectados, no se oirá ningún
sonido en los altavoces integrados.
Soho_user_Manual EU - Jan 2018_V3.indd 49 21/12/2017 15:19
49

RETIRAR LA AGUJA
1. Bloquee el BRAZO (2) en el REPOSABRAZO (4) empujando el
BLOQUEO DEL BRAZO (3) hacia la izquierda.
2. Retire la funda protectora de la aguja de color blanco (si es
necesario).
3. Presione la parte inferior del CARTUCHO (14) con sus dedos índice
y pulgar, tal y como se muestra a continuación en la g. 3a. Con el
otro pulgar, presione cuidadosamente la parte superior de la carcasa
de la aguja de color rojo (la pieza roja incluye la aguja) hasta que la
carcasa de la aguja se separe del CARTUCHO (14) tal y como se
muestra en la g. 3b.
4. Retire cuidadosamente la totalidad de la carcasa de la aguja del
cartucho apartando esta del CARTUCHO (14) (FIG 4a).
50
Soho_user_Manual EU - Jan 2018_V3.indd 50 21/12/2017 15:19
3A 3B 4A

INSTALAR LA NUEVA AGUJA
NOTA: No toque directamente la AGUJA (15) durante la instalación o
podría dañar permanentemente la AGUJA (15).
1. Sujete el extremo frontal de la CARCASA DE LA AGUJA con los
dedos índice y pulgar e inserte la parte trasera de la CARCASA DE
LA AGUJA (14) tal y como se muestra en la g. 5a.
2. Aplicando una suave presión en la parte superior del BRAZO (2)
con el dedo índice, presione cuidadosamente la carcasa de la
aguja hacia arriba hasta que oiga un clic y la carcasa de la aguja se
coloque en su lugar (g. 6a).
3. La nueva AGUJA (15) está lista para usarse.
• Con un uso normal, la AGUJA (15) debería durar alrededor de
50-60 horas de reproducción.
5A 6A 7A
Soho_user_Manual EU - Jan 2018_V3.indd 51 21/12/2017 15:19
51

RESOLUCIÓN DE PROBLEMAS
LA MÚSICA SUENA DEMASIADO RÁPIDAMENTE O LENTAMENTE
• Compruebe que el INTERRUPTOR DE CONTROL DE VELOCIDAD
(7) está ubicado correctamente para el disco que se está
reproduciendo (33, 45 o 78 RPM).
LOS DISCOS SE SALTAN PISTAS
• Compruebe detenidamente la supercie del disco bajo una
luz potente para ver si el disco presenta marcas o arañazos
signicativos, lo que provocaría que saltase.
• Asegúrese de que el tocadiscos se encuentra sobre una supercie
nivelada y plana.
• Limpie el disco con un cepillo apto para discos para eliminar residuos
de polvo o suciedad en las marcas del disco.
• Asegúrese de que la AGUJA (15) se encuentra en la posición media
correcta.
NO HAY SONIDO
• Asegúrese de que la funda protectora blanca de la aguja ha sido
retirada del cartucho.
• Conrme que no hay nada conectado a la TOMA DE AURICULARES
DE 3,5 mm (11) en la parte posterior del reproductor.
• Compruebe la posición de la AGUJA (15) para asegurarse de que no
se ha movido de su posición media correcta (consulte la g. 7a en la
página 9).
NO HAY ALIMENTACIÓN
• Asegúrese de que el adaptador de alimentación de CA 100V~240V,
50/60Hz a CC 5V está correctamente conectado a la ENTRADA DE
CC 5V (13) en la parte posterior del tocadiscos, así como a la toma
de pared.
• Asegúrese de que la toma eléctrica funciona conectando otro
dispositivo.
52
Soho_user_Manual EU - Jan 2018_V3.indd 52 21/12/2017 15:19

Italian
Grazie per aver acquistato questo prodotto ProtelX.
Legga con attenzione le istruzioni prima dell’uso e le conservi in un
luogo sicuro per poterle consultare in futuro.
Soho_user_Manual EU - Jan 2018_V3.indd 53 21/12/2017 15:19
5353

IDENTIFICAZIONE DEI COMPONENTI
10
2
5
6
7
9
8
34
54
Soho_user_Manual EU - Jan 2018_V3.indd 54 21/12/2017 15:19
14
15

1
1
11 12 13
Soho_user_Manual EU - Jan 2018_V3.indd 55 21/12/2017 15:19
1. Altoparlanti
2. Braccio
3. Blocco del braccio
4. Poggiabraccio
5. Leva del braccio
6. Interruttore di arresto
automatico
7. Controllo della velocità
8. Manopola alimentazione/
volume
9. Spia dell’alimentazione
10. Adattatore 45 giri
11. Presa per cufe 3,5 mm
12. Uscita audio RCA
13. Ingresso CC 5 V
14. Testina
15. Puntina (ago)
55

DISIMBALLAGGIO DEL GIRADISCHI
1. Rimuovere con cura il giradischi e gli accessori dalla scatola.
2. Posizionare il giradischi su una supercie piana a livello e aprire il
coperchio.
3. Rimuovere la protezione bianca della puntina come mostrato sotto
4. Rimuovere con attenzione il laccetto dal BRACCIO (2).
5. Rilasciare il BLOCCO DEL BRACCIO (3).
ALIMENTAZIONE
1. Inserire l’adattatore di alimentazione CA 100 V~240 V, 50/60 Hz in
CC 5 V nell’INGRESSO CC 5 V (13) ubicato sul retro del giradischi.
2. Inserire la spina dell’adattatore di alimentazione in una presa
elettrica.
3. Accendere il giradischi ruotando la MANOPOLA DI
ALIMENTAZIONE/VOLUME (8) in senso orario.
4. Spegnere il giradischi ruotando la MANOPOLA DI ALIMENTAZIONE/
VOLUME (8) in senso antiorario.
56
Soho_user_Manual EU - Jan 2018_V3.indd 56 21/12/2017 15:19

VOLUME
Il volume degli altoparlanti viene regolato con la MANOPOLA DI
ALIMENTAZIONE/VOLUME (8).
• Per aumentare il volume: ruotare la MANOPOLA DI
ALIMENTAZIONE/VOLUME (8) in senso orario.
• Per diminuire il volume: ruotare la MANOPOLA DI ALIMENTAZIONE/
VOLUME (8) in senso antiorario.
RIPRODUZIONE DI UN DISCO
1. Impostare la velocità corretta per il disco (33/45/78 giri).
2. Posizionare il disco sul giradischi.
3. Ruotare la MANOPOLA DI ALIMENTAZIONE/VOLUME (8) in senso
orario per accendere il giradischi.
4. Sbloccare il BLOCCO DEL BRACCIO (3) e il BRACCIO (2) sarà
pronto per la riproduzione.
5. Abbassare il BRACCIO (2) usando la LEVA DEL BRACCIO (5)
nché la PUNTINA (15) non tocca il disco e inizia a suonare
la musica. Assicurarsi che la LEVA DEL BRACCIO (5) sia
completamente abbassata.
6. Regolare il volume al livello desiderato ruotando la MANOPOLA DI
ALIMENTAZIONE/VOLUME (8).
7. Al termine dell’ascolto, usare la LEVA DEL BRACCIO (5) per
sollevare il BRACCIO (2) e posizionarlo sul POGGIABRACCIO (4). Il
disco cessa automaticamente di girare.
8. Quando si nisce di usare il giradischi, inserire il BLOCCO DEL
BRACCIO (3).
Soho_user_Manual EU - Jan 2018_V3.indd 57 21/12/2017 15:19
57

ARRESTO AUTOMATICO
La funzione di ARRESTO AUTOMATICO consente di fermare
automaticamente la riproduzione quando la PUNTINA (15) raggiunge
la ne del disco.
• Per attivare la funzione di ARRESTO AUTOMATICO: impostare
l’INTERRUTTORE DI ARRESTO AUTOMATICO (6) su
AUTOMATICO.
• Per spegnere la funzione di ARRESTO AUTOMATICO: impostare
l’INTERRUTTORE DI ARRESTO AUTOMATICO (6) su MANUALE.
NOTA: Quando si usa l’impostazione MANUALE, una volta che il disco
è nito, il giradischi continua a girare nché non si solleva il BRACCIO
(2) e lo si riporta sul POGGIABRACCIO (4). A questo punto cessa di
girare.
58
Soho_user_Manual EU - Jan 2018_V3.indd 58 21/12/2017 15:19

CONNESSIONE A UN ALTOPARLANTE
ESTERNO
Usare i cavi RCA bianco e rosso inclusi per collegare il giradischi a un
altoparlante esterno o impianto stereo. Basta collegare le estremità
del cavo RCA nelle corrispondenti PRESE D’USCITA AUDIO rossa e
bianca (12) sul retro del giradischi.
Collegare le altre estremità, rossa e bianca, del cavo RCA nelle
corrispondenti prese d’ingresso audio rossa e bianca sugli altoparlanti
esterni o impianto stereo. L’altoparlante richiede un pre-amplicatore
all’interno.
USO DI CUFFIE
Per usare delle cufe con questo giradischi, collegarle con una presa
da 3,5 mm nell’ingresso sulla PRESA CUFFIE 3,5 mm (11) situata sul
retro del giradischi.
• NOTA: Quando le cufe sono inserite, dagli altoparlanti incorporati
non viene emesso alcun suono.
Soho_user_Manual EU - Jan 2018_V3.indd 59 21/12/2017 15:19
59

RIMOZIONE DELLA PUNTINA (AGO)
1. Bloccare il BRACCIO (2) sul POGGIABRACCIO (4) spingendo il
BLOCCO DEL BRACCIO (3) verso sinistra.
2. Rimuovere la protezione bianca della puntina (se necessario).
3. Tenere la parte inferiore della TESTINA (14) fra pollice e indice
come mostrato sotto alla Fig. 3a. Con l’altro pollice, spingere con
attenzione sull’estremità superiore del gruppo della puntina rossa (il
pezzo rosso include l’ago) nché non si separa dalla TESTINA (14)
come mostrato alla Fig. 3b.
4. Rimuovere con cura l’intero gruppo della puntina dalla cartuccia
tirandolo via dalla TESTINA (14) (FIG. 4a).
60
Soho_user_Manual EU - Jan 2018_V3.indd 60 21/12/2017 15:19
3A 3B 4A

MONTAGGIO DELLA PUNTINA (AGO)
NOTA: Non toccare direttamente la PUNTINA (AGO) (15) durante
l’installazione per non arrecare danni permanenti alla PUNTINA (15).
1. Tenere la punta anteriore del gruppo della puntina fra pollice e indice
e inserire la parte posteriore del gruppo della puntina sulla TESTINA
(14) come mostrato alla Fig. 5a.
2. Applicando una leggera pressione sulla parte superiore del
BRACCIO (2) con l’indice, spingere con delicatezza il gruppo della
puntina verso l’alto no a sentire un clic (il gruppo della puntina si
blocca in posizione – Fig. 6a).
3. La nuova PUNTINA (15) è ora pronta per l’uso.
• In condizioni di utilizzo normali, una PUNTINA (15) dura per circa 50-
60 ore di riproduzione di dischi.
5A 6A 7A
Soho_user_Manual EU - Jan 2018_V3.indd 61 21/12/2017 15:19
61

RISOLUZIONE DEI PROBLEMI
LA MUSICA VIENE RIPRODOTTA TROPPO LENTAMENTE O TROPPO VELOCEMENTE
• Controllare che l’INTERRUTTORE DI CONTROLLO DELLA
VELOCITÀ (7) sia impostato correttamente per il disco da riprodurre
(33, 45 o 78 giri).
IL DISCO SALTA PARTI IN CONTINUAZIONE
• Osservare con attenzione la supercie del disco sotto una luce forte
per vedere se vi siano graf signicativi o altri danni che provocano i
salti.
• Vericare che il giradischi sia su una supercie piana e a livello.
• Pulire il disco con uno spazzolino apposito per rimuovere l’accumulo
di polvere e sporco nei solchi.
• Controllare che la PUNTINA (15) sia correttamente inserita nella
posizione centrale.
NON VIENE EMESSO ALCUN SUONO
• Vericare che la protezione bianca per la puntina sia stata rimossa
dalla testina.
• Confermare che non vi siano spine inserite nella PRESA PER
CUFFIE da 3,5 mm (11) sul retro del disco.
• Controllare la posizione della PUNTINA (15) per vericare che non si
sia spostata dal centro (vedi Fig. 7a a pagina 9).
NON C’È ALIMENTAZIONE
• Vericare che l’adattatore di alimentazione CA 100 V~240 V, 50/60
Hz a CC 5 V sia connesso correttamente nell’INGRESSO CC 5 V
(13) sul retro del giradischi e nella presa elettrica.
• Assicurarsi che la presa elettrica sia funzionante provando a inserire
un altro dispositivo.
62
Soho_user_Manual EU - Jan 2018_V3.indd 62 21/12/2017 15:19

Soho_user_Manual EU - Jan 2018_V3.indd 63 21/12/2017 15:19
63

EN
Hereby ProtelX, declares that
this equipment (GPO Soho) is
in compliance with the essential
requirements and other relevant
provisions of Directive, you can
access a copy of this certicate on
www.gporetro.com/Certicate-of-
Conformity
DE
Hiermit erklärt ProtelX, dass
dieses Gerät (GPO Soho) den
grundlegenden Anforderungen und
anderen relevanten Bestimmungen
der Richtlinie entspricht, Sie können
eine Kopie dieses Zertikats
runterladen www.gporetro.com/
Certicate-of-Conformity
FR
Par ProtelX, déclare que cet
équipement (GPO Soho) est
conforme aux exigences essentielles
et aux autres dispositions pertinentes
de la Directive, vous pouvez accéder
à une copie de ce certicat sur www.
gporetro.com/Certicate-of-Conformity
NL
Hierbij verklaart ProtelX dat dit
apparaat (GPO Soho) voldoet aan de
essentiële eisen en andere relevante
bepalingen van de richtlijn, u kunt
een exemplaar van dit certicaat
downloaden op www.gporetro.com/
Certicate-of-Conformity
ES
ProtelX, declara que este equipo
(GPO Soho) cumple con los requisitos
esenciales y otras disposiciones
pertinentes de la Directiva, puede
acceder a una copia de este
certicado en www.gporetro.com/
Certicate-of-Conformity
IT
Con la presente, ProtelX dichiara
che questo dispositivo (GPO Soho)
è conforme ai requisiti essenziali e
alle altre disposizioni pertinenti della
direttiva, è possibile scaricare una
copia di questo certicato su www.
gporetro.com/Certicate-of-Conformity
Soho_user_Manual EU - Jan 2018_V3.indd 64 21/12/2017 15:19
www.gporetro.com
IMPORTED AND DISTRIBUTED BY:
ProTelX Ltd, Unit 6, Park 17 Industrial Estate, Moss Lane,
Whiteeld, Manchester, M45 8FJ UK
 Loading...