

USER MANUAL
V2 | JULY 2017

CONTENT
English 3
German 15
French 27
Dutch 39
Spanish 51
2

ENGLISH
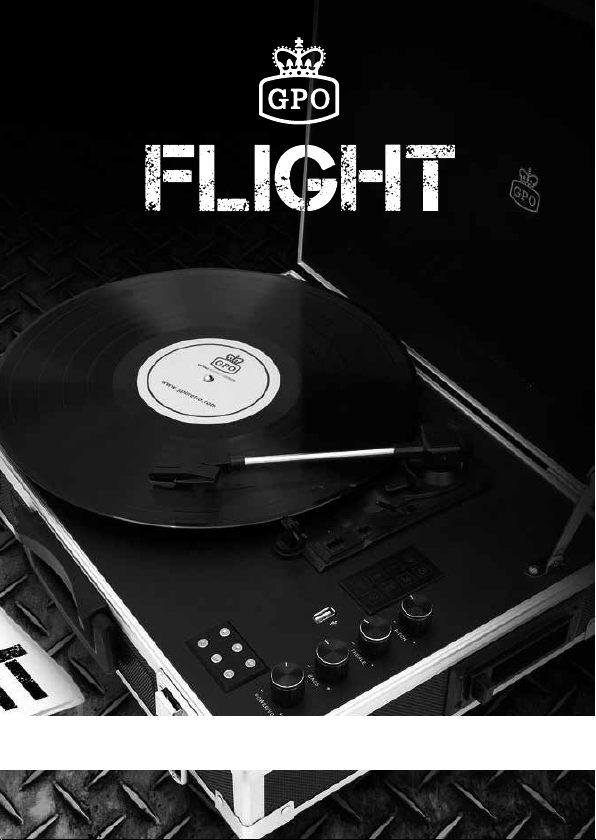
Thanks for purchasing the Flight turntable player from GPO. This
retro-themed unit adds a touch of classic style to any room, while
still providing amazing audio quality through the built in speakers.
To get the most from your new turntable player, please read these
instructions carefully before use, and keep them in a safe place for
future reference.
33

Unpacking
This package contains:
1x Flight Turntable
1x Turntable Needle (tted)
1x Turntable Rubber Slip Mat (placed on the turntable)
1x DC Power Cable
1x RCA Cable
1x Manual
Carefully remove all of the contents from the packaging. Make sure you
retain and store this manual for future reference.
When choosing a location for the unit, avoid inclines, direct sunlight or
sources of heat and moisture.
Keep all of the ventilation holes clear, and do not place any equipment
on top of the unit as this can lead to damage.
Only remove the stylus guard from the stylus assembly during use.
Leaving the guard in place during storage will protect your stylus from
damage.
4

Features
1. 3-speed turntable (33, 45 or 78 RPM)
2. Belt drive and semi-automatic play tone arm
3. Ceramic stereo cartridge and jewel stylus
4. Built-in 45 RPM adapter
5. Aux-in, RCA Audio in and Headphone out functions
6. Built-in 2.1 speakers
7. Rechargeable lithium battery
8. Bluetooth functionality
9. USB playing, recording and segmentation recording
10. Cassette playing
11. Pitch adjustment
12. Treble and Bass adjustment
5

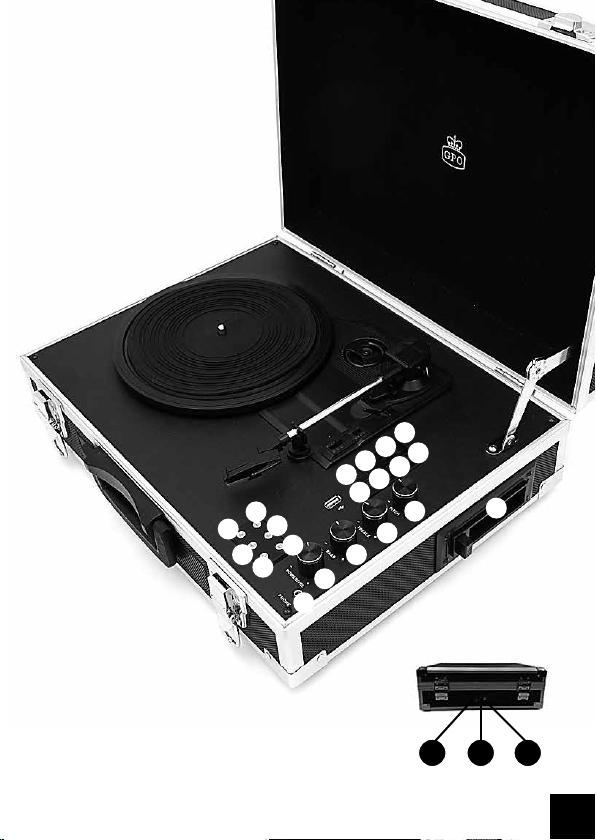
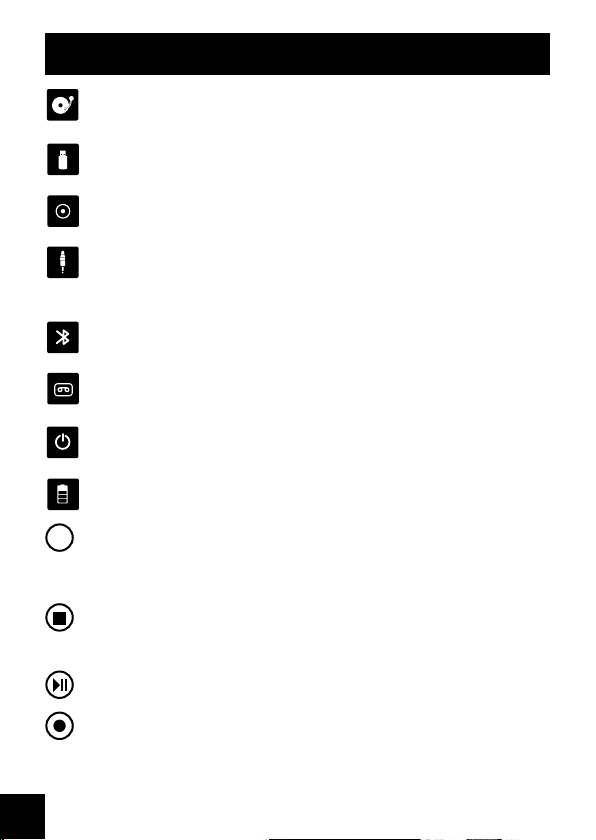
Location of Controls
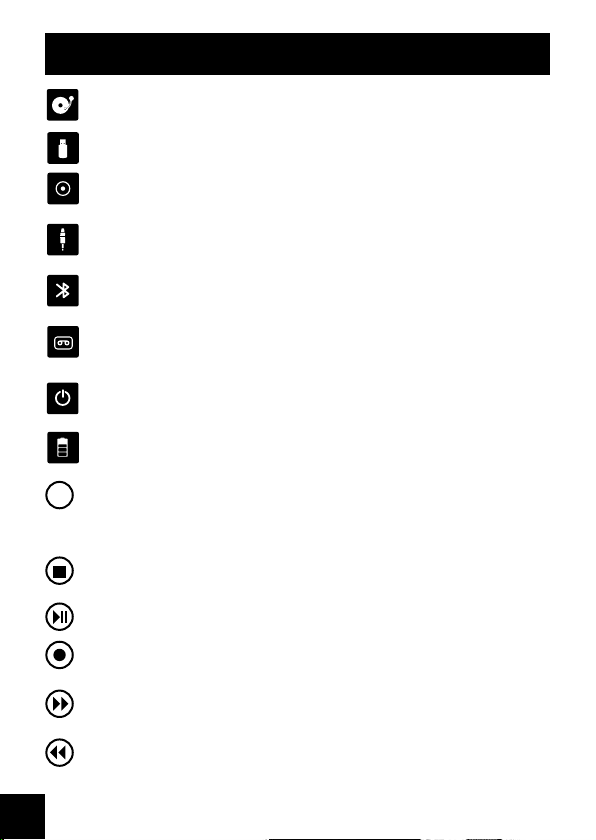
1. Turntable Indicator Light
2. Aux-in Indicator Light
3. USB Indicator Light
4. Cassette Indicator Light
5. Stop Indicator Light
6. Bluetooth Indicator Light
7. Battery Power Indicator Light
8. Recording Indicator Light
9. Cassette Tape Slot
10. Pitch Adjustment
11. Treble Adjustment
12. Bass Adjustment
13. Power on/off and Volume
14. Headphone Jack
15. Play/Pause
16. Fast Forward and Next
17. Stop
18. Rewind and Previous
19. Record
20. Mode Select
21. DC Power Jack
22. RCA Audio in Jack
23. Aux-in Jack
6

1
2
5
3
6
4
7
8
19
17
20
15
18
16
13
14
10
11
12
9
23 22 21
7
Mode Selection
Turntable Mode - play a vinyl record through the unit’s built-in
speakers
USB Mode - play MP3 les stored on an external USB drive
USB Record Mode - record your vinyl and cassette tape to MP3
les on an external USB drive
Aux-in Mode - play music from your music player, smartphone or
other device through the unit’s built in speakers
Bluetooth Mode - connect the unit to external Bluetooth-enabled
speakers
Cassette Mode - play a cassette tape through the unit’s built-in
speakers
Stop Indicator – stop music playing in USB Mode, and stop vinyl/
cassette tape recording in Record mode
Battery Level Indicator - display the current charge status of the
rechargeable battery
To select the Turntable, USB, Cassette, Aux-in or Bluetooth
M
mode, press the mode select button until the relevant indicator
light is illuminated.
Press to STOP music playing in USB mode. Press to STOP
vinyl/cassette tape recording in Record mode.
PLAY or PAUSE the music in USB mode.
Press to record your vinyl record and cassette tape, more
information in record section.
Play NEXT song in USB mode. Hold down for three seconds to
fast forward in USB mode.
Play PREVIOUS song in USB mode. Hold down for three
seconds to rewind in USB mode.
8

Unit Operation
Turntable Mode
1. Turn on the unit power
2. Select Turntable mode using the mode select button
3. Choose the correct speed setting, and place the vinyl record onto
the turntable
4. Place the tone arm into the correct position to begin playback
5. The turntable will stop automatically when the record has nished
Aux-in Play Mode
1. Turn on the unit power
2. Select Aux-in mode using the mode select button
3. Connect your chosen device to the unit’s aux-in jack using the c
able provided
4. Press the play/pause button to begin playback
USB Play Mode
1. Turn on the unit power
2. Select USB mode using the mode select button
3. Connect your USB device to the unit using the USB slot
4. Press the play/pause button to begin playback
Bluetooth Mode
1. Turn on the unit power
2. Select Bluetooth mode by holding the mode button down for three
seconds while in turntable, USB, Cassette or Aux-in mode
3. The Bluetooth indicator light will ash rapidly as the unit searches
for nearby Bluetooth-enabled devices.
4. When paired the blue light will ash shortly with a three second
interval.
9

5. If the devices fail to sync, please repeat points 1-4.
6. Hold down the stop button for three seconds to turn off Bluetooth
mode and move straight to turntable mode
Cassette Play Mode
1. Turn on the unit power
2. Select Cassette play mode using the mode select button
3. Insert your cassette tape in the cassette tape slot
4. The cassette will stop automatically when the tape has nished
Vinyl Record Mode
1. Insert a blank USB stick into the slot
2. Place the desired vinyl onto the turntable or cassette tape in the
cassette tape slot.
3. Press the record button on the control panel, the red light next to
record will begin to ash. Press the record button once to record the
vinyl in one track, press the record button twice to split the tracks.
4. Press the stop button to turn off recording.
Charging the Battery
The battery level indicator displays the current charge status of the
unit’s rechargeable battery.
Red: The unit needs to be charged
Green: The unit is charging
Blue: The unit has fully charged
RCA Audio In
An RCA cable is included, to connect your chosen device to the unit’s
built-in speakers.
10

Headphone Out
Headphones can be connected using the Headphone jack.
Pitch Adjustment
When the Pitch knob is centered on the middle line, the record player
plays at normal speed. When the LP speed is slower than expected,
you can turn right to adjust the speed. When the LP speed is faster
than expected, you can turn left to adjust the speed.
Treble/Bass Adjustment
You can rotate the Treble and Bass knob to adjust the treble or bass at
your desired level.
11
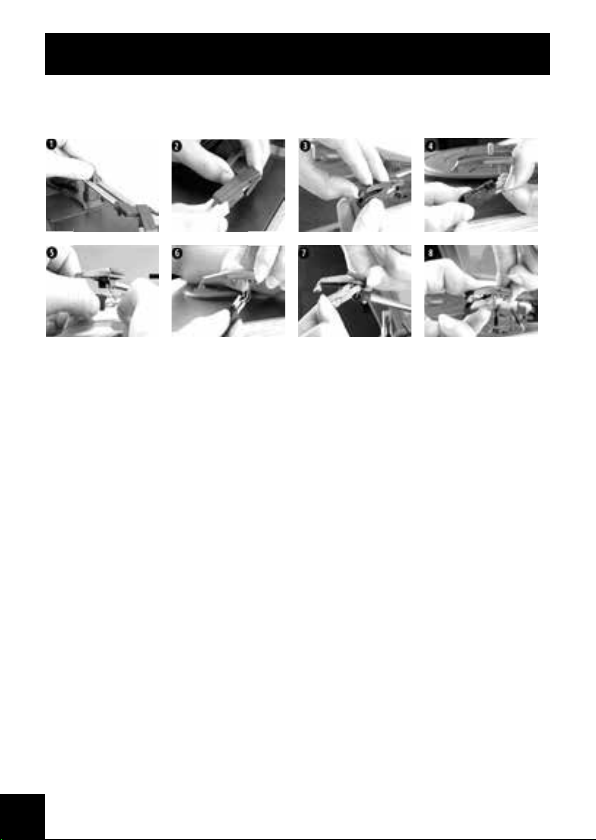
Replacing the Stylus
The unit’s stylus will need replacing regularly. To replace the stylus:
RCA Audio Out
1. Push the arm lock to release the tone arm
2. Remove the cap from the cartridge to expose the needle
3. Carefully remove the cartridge from the socket
4. Completely remove the stylus needle from the cartridge
5. Carefully place a new stylus needle into the cartridge
6. Place the cartridge back into the socket
7. Put the cartridge cap back in place
8. Re-engage the arm lock
The turntable’s stylus needs to be replaced every 3-4 months for best
performance. To buy a replacement stylus, go to www.gporetro.com or
visit one of our stockists.
12

Product Care
• Keep the unit clean, dry, and away from any potential sources of
splashing or dripping.
• Avoid areas with high levels of humidity – such as kitchens and
bathrooms, and those with extreme temperatures of 35°C or higher.
• Do not let any loose items fall into the unit.
• Always unplug the unit before cleaning.
• Take care when cleaning and wiping the unit’s plastic parts and
nish, and use only a dry dust cloth. The front panel can be cleaned
gently with a damp cloth and mild soap.
• Store the unit horizontally.
• Avoid condensation. If the unit is moved from a cold to a warmer
location, please wait 30 minutes before operation.
• Disconnect the power supply after use.
Product Support
For more advice or assistance, please visit www.gporetro.com.
Please note, for your personal safety you SHOULD NOT attempt to
open the unit’s casing. Opening the casing voids your warranty, and no
user serviceable parts are contained inside
13


GERMAN
Vielen Dank für Ihren Kauf des Flight-Schallplattenspielers von
GPO. Dieses Gerät im Retro-Stil verleiht jedem Raum einen
Hauch von klassischem Stil bei einer gleichzeitig hervorragenden
Klangleistung durch die integrierten Lautsprecher. Zur optimalen
Nutzung der Funktionen Ihres neuen Geräts sollten Sie diese Anweisungen vor Gebrauch sorgfältig lesen und für künftige Zwecke
sicher aufbewahren.
1515

ENTNAHME AUS DER VERPACKUNG
Packungsinhalt:
1x Flight-Plattenspieler
1x Plattenspielernadel (bereits montiert)
1x Antirutschmatte für Plattenspieler (auf Plattenteller liegend)
1x Gleichstromnetzkabel
1x RCA-Kabel
1x Benutzerhandbuch
Den gesamten Inhalt sorgfältig aus der Verpackung entnehmen. Dieses
Handbuch für künftige Zwecke sorgfältig aufbewahren.
Bei der Wahl eines Standorts für das Gerät schiefe Flächen, direkte
Sonneneinstrahlung oder Wärme- und Feuchtigkeitsquellen vermeiden.
Alle Lüftungslöcher freihalten und keine anderen Sachen oder
Ausrüstungen auf das Gerät stellen, da dies zu Beschädigungen führen
kann.
Die Kappe der Plattenspielernadel nur während des Gebrauchs
abnehmen. Die Kappe, während das Gerät nicht in Gebrauch ist,
wieder auf die Plattenspielernadel aufsetzen, damit die Nadel nicht
beschädigt wird.
16

MERKMALE UND FUNKTIONEN
1. 3 Geschwindigkeiten (33,45 oder 78 Umdrehungen)
2. Riemenantrieb und halbautomatischer Wiedergabetonarm
3. Keramik-Stereo-Steckmodul und Juwelnadel
4. Integrierter Adapter für 45 Umdr./Min
5. Audiogeräte-, RCA- und Kopfhöreranschlussbuchsen
6. Integrierte 2,1-Lautsprecher
7. Wiederauadbare Lithiumbatterie
8. Bluetooth-Funktion
9. USB-Wiedergabe, Aufnahme und Segmentierungsaufnahme
10. Kassettenwiedergabe
11. Tonhöhenregelung
12. Treble- und Bass-Einstellung
17

ANORDNUNG DER BEDIENUNGSTASTEN
1. Plattenspieler-Betriebsanzeige
2. Audiogeräte-Betriebsanzeige
3. USB-Betriebsanzeige
4. Kassetten-Betriebsanzeige
5. Stopp-Betriebsanzeige
6. Bluetooth-Betriebsanzeige
7. Batteriestandsanzeiger
8. Aufnahme-Betriebsanzeige
9. Kassettenschlitz
10. Tonhöhenregler
11. Treble-Regler
12. Bass-Regler
13. EIN-/AUS-Schalter und Lautstärke
14. Kopfhörer-Anschlussbuchse
15. Wiedergabe/Pause
16. Schnellvorlauf und Nächster
17. Stopp
18. Rücklauf und Vorheriger
19. Aufnahme
20. Moduswahl
21. Gleichstromnetzanschluss
22. RCA Audiogeräte- Anschluss
23. Audiogeräte-Anschluss
18
1
2
5
3
6
4
7
8
19
17
20
15
18
16
13
14
10
11
12
9
23 22 21
19
MODUSWAHL
Plattenspielermodus - Wiedergabe einer Vinyl-Schallplatte über
die integrierten Lautsprecher
USB-Modus - Wiedergabe von MP3-Dateien von einem externen
USB-Medium
USB-Aufnahmemodus - Aufnahme Ihrer Vinyl-Schallplatten und
Kassetten in MP3-Dateien auf einem externen USB-Medium
Audiogeräte-Modus - Wiedergabe von Musik von Ihrem MusikPlayer, Smartphone oder anderen Geräten über die integrierten
Lautsprecher des Geräts
Bluetooth-Modus - Anschluss des Geräts an externe BluetoothLautsprecher
Kassettenmodus - Wiedergabe einer Kassette über die
integrierten Lautsprecher
Stopp-Anzeige – Stopp der Musikwiedergabe im USB-Modus,
und Stopp der Vinyl-/Kassettenaufnahme im Aufnahmemodus
Batteriestandsanzeiger - Anzeige des aktuellen Ladestands der
wiederauadbaren Batterie
Zur Wahl des Plattenspieler-, USB-, Kassetten-, Audiogeräte-
M
oder Bluetooth-Modus die Moduswahltaste solange drücken, bis
die gewünschte Anzeige aueuchtet.
Drücken zum STOPP der Musikwiedergabe in USB-Modus
Drücken zum STOPP der Vinyl-/Kassettenaufnahme im
Aufnahmemodus.
WIEDERGABE oder PAUSE der Musik in USB-Modus.
Drücken zur Aufnahme von Vinyl-Schallplatten und Kassetten;
weitere Informationen im Abschnitt Aufnahme.
20

NÄCHSTEN Titel in USB-Modus abspielen Drei Sekunden lang
gedrückt halten für Schnellvorlauf in USB-Modus.
VORHERIGEN Titel in USB-Modus abspielen. Drei Sekunden
lang gedrückt halten für Rücklauf in USB-Modus.
BEDIENUNG DES GERÄTS
Plattenspielermodus
1. Das Gerät einschalten
2. Mit der Moduswahltaste Plattenspielermodus wählen
3. Die gewünschte Geschwindigkeitseinstellung wählen und die
Schallplatte auf den Plattenteller legen
4. Den Tonarm an der gewünschten Stelle auf der Schallplatte ablegen, um mit der Wiedergabe zu beginnen
5. Wenn die Schallplatte bis zu Ende abgespielt ist, hält der Plattenspieler automatisch an.
Audiogeräte-Wiedergabemodus
1. Das Gerät einschalten
2. Mit der Moduswahltaste den AUX IN-Modus wählen
3. Das gewünschte Gerät mit dem mitgelieferten Kabel an den AUX
IN-Anschluss anschließen
4. Die Wiedergabe-/Pause-Taste drücken, um mit der Wiedergabe zu
beginnen
USB-Wiedergabemodus
1. Das Gerät einschalten
2. Mit der Moduswahltaste den USB-Modus wählen
3. Das USB-Medium in den USB-Schlitz des Geräts einstecken
4. Die Wiedergabe-/Pause-Taste drücken, um mit der
Wiedergabe zu beginnen
21

Bluetooth-Modus
1. Das Gerät einschalten
2. Den Bluetooth-Modus wählen, indem Sie die Moduswahltaste drei
Sekunden lang gedrückt halten, während das Gerät in Plattenspieler-, USB-, Kassetten- oder AUX IN-Modus ist.
3. Dann beginnt die Bluetooth-Anzeige schnell zu blinken, während
das Gerät nach Bluetooth-fähigen Geräten in der Nähe sucht.
4. Wenn das Gerät synchronisiert ist, wird die blaue Anzeige mit
einem Drei-Sekunden-Intervall kurz aueuchten.
5. Falls die Synchronisierung scheitert, Schritte 1-4 noch einmal wiederholen.
6. Die Stopp-Taste drei Sekunden lang gedrückt halten, um den Bluetooth-Modus zu deaktivieren und direkt zum Plattenspielermodus
übergehen
Kassettenwiedergabemodus
1. Das Gerät einschalten
2. Mit der Moduswahltaste den Kassettenwiedergabemodus wählen
3. Kassette in den Kassettenschlitz einführen
4. Wenn die Kassette bis zu Ende abgespielt ist, hält der Plattenspieler automatisch an
Schallplattenaufnahmemodus
1. Einen leeren USB-Stick in den USB-Schlitz einstecken
2. Die gewünschte Schallplatte auf den Plattenteller legen oder die
gewünschte Kassette in den Kassettenschlitz einführen
3. Auf der Schaltäche die Aufnahmetaste drücken; dann beginnt die
rote Anzeige neben der Aufnahmetaste zu blinken. Die Aufnahmetaste einmal drücken, um die Schallplatte in einem Titel aufzunehmen; die Aufnahmetaste zweimal drücken, um die Musiktitel
getrennt aufzunehmen.
22

4. Die Stopp-Taste drücken, um die Aufnahme zu beenden.
Auaden der Batterie
Batteriestandsanzeiger zeigt den aktuellen Ladestand der wiederau-
adbaren Batterie des Geräts an.
Rot: Das Gerät muss aufgeladen werden
Grün: Das Gerät lädt auf
Blau: Das Gerät hat voll aufgeladen
RCA-Kabel für externe Lautsprecher
Ein RCA-Kabel für den Anschluss Ihres gewünschten Geräts an die
integrierten Lautsprecher des Plattenspielers ist im Packungsinhalt
inbegriffen.
Kopfhöreranschluss
Kopfhörer können an die Kopfhörerbuchse angeschlossen werden.
Tonhöhenregelung
Wenn der Tonhöhenregler auf der Mittellinie zentriert ist, läuft der
Plattenspieler bei normaler Geschwindigkeit. Wenn die LP-Geschwindigkeit langsamer ist als sie sein sollte, können Sie die Geschwindigkeit
durch Rechtsdrehen anpassen. Wenn die LP-Geschwindigkeit schneller ist als erwartet, können Sie die Geschwindigkeit durch Linksdrehen anpassen.
Treble-/Bass-Einstellung
Den Treble- und Bass-Knopf drehen, um das gewünschte Treble- oder
Bassniveau einzustellen.
23

AUSWECHSELN DER NADEL
Die Nadel des Geräts muss regelmäßig ausgewechselt werden. Zum
Auswechseln der Nadel:
RCA Audio Out
1. Die Armverriegelung drücken, um den Tonarm freizugeben
2. Die Kappe von dem Steckmodul abnehmen, um die Nadel zu
exponieren
3. Das Steckmodul vorsichtig aus dem Sockel nehmen
4. Die Nadel komplett aus dem Steckmodul herausnehmen
5. Sorgfältig eine neue Nadel in das Steckmodul einsetzen
6. Das Steckmodul wieder in den Sockel einsetzen
7. Die Kappe wieder aufsetzen
8. Tonarm wieder verriegeln
Für eine optimale Leistung sollte die Plattenspielernadel alle drei bis
vier Monate ausgewechselt werden. Für den Kauf von Ersatznadeln
siehe www.gporetro.com oder besuchen Sie einen unserer
Fachhändler.
24

HINWEISE ZUR PFLEGE DES GERÄTS
• Das Gerät trocken und sauber halten und von möglichen Quellen
des Tropfens oder Spritzens fernhalten.
• Bereiche mit hoher Feuchtigkeit (z. B. Küche oder Badezimmer)
und Räume mit extremen Temperaturen von 35°C oder höher
vermeiden.
• Keine losen Gegenstände in das Gerät fallen lassen.
• Das Gerät vor dem Reinigen stets abschalten und Netzstecker
ziehen.
• Die Kunststoffteile und -oberächen des Geräts mit Sorgfalt
reinigen und abwischen; nur ein trockenes Staubtuch verwenden.
Die Vorderseite kann sanft mit einem leicht feuchten Tuch und
mildem Reinigungsmittel gereinigt werden.
• Das Gerät horizontal aufstellen.
• Kondensation vermeiden. Falls das Gerät von einem kalten an
einen wärmeren Ort versetzt wird, dann bitte 30 Minuten vor
Gebrauch warten.
• Das Gerät nach Gebrauch abschalten und den Netzstecker ziehen.
PRODUKTSUPPORT
Für weitere Beratung oder Betreuung siehe www.gporetro.com.
Hinweis: Zur eigenen Sicherheit sollten Sie das Gerätegehäuse
NICHT selbstständig öffnen. Durch Öffnen des Gehäuses erlischt Ihre
Garantie. Zudem benden sich keine vom Benutzer zu wartenden Teile
innerhalb des Geräts.
25


FRENCH
Nous vous remercions d’avoir choisi la platine Flight de GPO. Cette
unité de style rétro ajoute une touche de style classique à toutes
les pièces, tout en offrant une qualité audio exceptionnelle grâce à
ses haut-parleurs intégrés. Pour proter au mieux de votre nouvelle
platine, veuillez lire ces instructions attentivement avant utilisation et
conservez cette notice dans un endroit sûr pour référence future.
2727

DÉBALLAGE
Cet ensemble comprend :
1x Platine Flight
1x aiguille de platine (installée)
1x couvre-plateau en caoutchouc pour platine (placé sur la platine)
1x Câble d’alimentation CC
1x Câble RCA
1x Manuel
Sortez avec précaution l’ensemble du contenu de l’emballage. Assurez-vous de conserver et de ranger ce manuel pour référence future.
Lors du choix de l’emplacement de l’unité, évitez les plans inclinés, la
lumière directe du soleil ou les sources de chaleur et l’humidité.
Gardez les trous de ventilation dégagés et ne placez aucun équipement sur l’unité, car ceci peut entraîner des dommages.
Retirez seulement la protection du stylet de l’ensemble du stylet lors de
l’utilisation. Laisser la protection en place lors du rangement permet de
protéger votre stylet de dommages.
28

CARACTÉRISTIQUES
1. Platine à 3 vitesses (33, 45 ou 78 tours)
2. Transmission par courroie et bras de lecture semi-automatique
3. Cartouche stéréo en céramique et stylet saphir
4. Adaptateur 45 tours intégré
5. Fonctions Aux-in (entrée auxiliaire), entrée audio RCA et sortie
casque
6. Haut-parleurs 2.1 intégrés
7. Batterie au lithium rechargeable
8. Fonctionnalité Bluetooth
9. Lecture USB, enregistrement et enregistrement de segmentations
10. Lecture de cassettes
11. Réglage de la tonalité
12. Réglage des aigus et des graves
29

EMPLACEMENT DES COMMANDES
1. Témoin lumineux platine
2. Témoin lumineux Aux-in
3. Témoin lumineux USB
4. Témoin lumineux cassette
5. Témoin lumineux arrêt
6. Témoin lumineux Bluetooth
7. Témoin lumineux batterie
8. Témoin lumineux enregistrement
9. Fente pour cassettes
10. Réglage de la tonalité
11. Réglage des aigus
12. Réglage des graves
13. Marche/Arrêt et volume
14. Prise casque
15. Lecture/Pause
16. Avance rapide et Suivant
17. Arrêt
18. Rembobinage et Précédent
19. Enregistrer
20. Sélection du mode
21. Prise d’alimentation CC
22. Prise d’entrée audio RCA
23. Prise d’entrée auxiliaire (Aux-in)
30

1
2
5
3
6
4
7
8
19
17
20
15
18
16
13
14
10
11
12
9
23 22 21
31

SÉLECTION DE MODE
Mode platine - lit un disque vinyle via les haut-parleurs intégrés
de l’unité
Mode USB - lit des chiers MP3 stockés sur une clé USB
externe
Mode enregistrement USB - enregistre votre vinyle ou votre
cassette sur des chiers MP3 sur une clé USB externe
Mode Aux-in - lit la musique à partir de votre lecteur de musique,
smartphone or autre appareil via les haut-parleurs intégrés
Mode Bluetooth - connecte l’unité à des haut-parleurs Bluetooth
externes
Mode cassette - lit une cassette via les haut-parleurs intégrés de
l’unité
Témoin d’arrêt – arrête la lecture de la musique en mode USB
et arrête l’enregistrement d’un vinyle ou d’une cassette en mode
enregistrement
Indicateur du niveau de la batterie - afche l’état de charge
actuel de la batterie rechargeable
M
Pour sélectionner le mode platine, USB, cassette, aux-in ou
Bluetooth, appuyez sur le bouton de sélection de mode jusqu’à
ce que le témoin lumineux correspondant s’allume.
Appuyez pour ARRÊTER la lecture de la musique en mode
USB. Appuyez pour arrêter l’enregistrement d’un vinyle ou d’une
cassette en mode enregistrement.
LIRE ou PAUSER la musique en mode USB.
Appuyez pour enregistrer vos vinyles et cassettes, plus
d’informations dans la section enregistrement.
32

Lire la chanson SUIVANTE en mode USB. Appuyez pendant
trois secondes pour avancer rapidement en mode USB.
Lire la chanson PRÉCÉDENTE en mode USB. Appuyez pendant
trois secondes pour revenir en arrière rapidement en mode USB.
FONCTIONNEMENT DE L’UNITÉ
Mode platine
1. Allumez l’unité.
2. Sélectionnez le mode platine à l’aide du bouton de sélection de
mode.
3. Choisissez le réglage de vitesse adapté et placez le disque vinyle
sur la platine.
4. Placez le bras dans la bonne position pour commencer la lecture.
5. La platine s’arrête automatiquement lorsque le disque est ni.
Lecture en mode Aux-in
1. Allumez l’unité.
2. Sélectionnez le mode Aux-in à l’aide du bouton de sélection de
mode.
3. Connectez l’appareil choisi à la prise d’entrée auxiliaire (Aux-in) de
l’unité à l’aide du câble fourni.
4. Appuyez sur le bouton lecture/pause pour commencer la lecture.
Lecture en mode USB
1. Allumez l’unité.
2. Sélectionnez le mode USB à l’aide du bouton de sélection de
mode.
3. Connectez le périphérique USB à l’unité en utilisant le port USB.
4. Appuyez sur le bouton lecture/pause pour commencer la lecture.
33

Mode Bluetooth
1. Allumez l’unité.
2. Sélectionnez le mode Bluetooth en appuyant sur le bouton de
sélection de mode pendant trois secondes tout en étant en mode
platine, USB, cassette ou Aux-in.
3. Le témoin lumineux Bluetooth clignote rapidement pendant que
l’unité cherche les appareils compatibles Bluetooth à proximité.
4. Après le couplage, la lumière bleue clignote brièvement avec un
intervalle de trois secondes.
5. Si l’appareil ne parvient pas à se synchroniser, répétez les étapes 1
à 4.
6. Appuyez sur le bouton d’arrêt pendant trois secondes pour
désactiver le mode Bluetooth et passer directement en mode
platine.
Lecture en mode cassette
1. Allumez l’unité.
2. Sélectionnez le mode cassette à l’aide du bouton de sélection de
mode.
3. Insérez votre cassette dans la fente pour cassettes.
4. La cassette s’arrête automatiquement lorsqu’elle est nie.
Mode disques vinyles
1. Insérez une clé USB vierge dans le port.
2. Placez le vinyle souhaité sur la platine ou la cassette dans la fente
pour cassettes.
3. Appuyez sur le bouton Enregistrer sur le panneau de commande,
la lumière rouge à côté du disque commence à clignoter. Appuyez
sur le bouton d’enregistrement pour enregistrer le vinyle en un seul
morceau, appuyez sur le bouton d’enregistrement deux fois pour
séparer les morceaux.
34

4. Appuyez sur le bouton d’arrêt pour arrêter l’enregistrement.
Charger la batterie
L’indicateur du niveau de la batterie afche l’état de charge actuel de la
batterie rechargeable de l’unité.
Rouge : L’unité doit être rechargée
Vert : L’unité est en cours de charge
Bleu : L’unité est complètement chargée
Entrée audio RCA
Un câble RCA est inclus et permet de connecter l’appareil de votre
choix aux haut-parleurs intégrés de l’unité.
Sortie casque
Un casque peut être connecté à l’aide de la prise casque.
Réglage de la tonalité
Lorsque le bouton de la tonalité est centré sur la ligne médiane, la
platine tourne à vitesse normale. Lorsque la vitesse du disque est plus
lente que prévu, vous pouvez le tourner vers la droite pour régler la
vitesse. Lorsque la vitesse du disque est plus rapide que prévu, vous
pouvez le tourner vers la gauche pour régler la vitesse.
Réglage des aigus et des graves
Vous pouvez faire tourner le bouton des aigus et des graves pour
régler les aigus ou les basses au niveau désiré.
35

REMPLACER LE STYLET
Le stylet de l’unité aura besoin d’être remplacé régulièrement. Pour
remplacer le stylet :
RCA Audio Out
1. Poussez sur le dispositif de verrouillage du bras pour libérer le bras
de lecture.
2. Retirez le capuchon de la cartouche pour exposer l’aiguille.
3. Retirez avec précaution la cartouche du support.
4. Retirez entièrement l’aiguille du stylet de la cartouche.
5. Placez soigneusement une nouvelle aiguille de stylet dans la
cartouche.
6. Remettez la cartouche en place dans le support.
7. Remettez le capuchon sur la cartouche.
8. Réengagez le dispositif de verrouillage du bras.
Le stylet de la platine doit être remplacé tous les 3 ou 4 mois pour
obtenir les meilleures performances. Pour acheter un stylet de
rechange, rendez-vous sur www.gporetro.com ou visitez l’un de nos
revendeurs.
36

ENTRETIEN
• Gardez l’unité propre, sèche, et éloignée de toute source potentielle
d’éclaboussures ou de gouttes d’eau.
• Évitez les zones où l’humidité est élevée, comme les cuisines et
salles de bains, et celles avec des températures extrêmes de 35 °C
ou plus.
• Ne laissez pas tomber d’éléments dans l’unité.
• Débranchez toujours l’appareil avant de le nettoyer.
• Faites attention lorsque vous nettoyez et essuyez les parties en
plastique et la nition de l’unité ; utilisez uniquement un chiffon à
poussière sec. Le panneau avant peut être nettoyé en douceur
avec un chiffon humide et du savon doux.
• Rangez l’unité à l’horizontale.
• Évitez la condensation. Si l’unité est déplacée d’un endroit froid à
un endroit plus chaud, attendez 30 minutes avant de l’utiliser.
• Débranchez l’alimentation après utilisation.
ASSISTANCE
Pour plus de conseils ou d’assistance, visitez www.gporetro.com.
Veuillez noter que pour votre propre sécurité, vous ne DEVRIEZ PAS
essayer d’ouvrir le boîtier de l’unité. Le produit ne contient aucune
pièce réparable par l’utilisateur, et si vous ouvrez son boîtier, la
garantie sera nulle.
37


DUTCH
Bedankt voor het aanschaffen van draaitafel Flight van GPO. Met
dit retro-apparaat geeft u iedere ruimte een klassieke uitstraling en
proteert u tegelijkertijd van een geweldige audiokwaliteit door de
ingebouwde luidsprekers. Lees deze handleiding goed door alvorens het apparaat te gebruiken, dan bent u verzekerd van optimaal
luistergenot. Bewaar de handleiding op een veilige plaats voor
toekomstig gebruik.
3939

Uitpakken
In deze verpakking:
1x draaitafel Flight
1x draaitafelnaald (reeds bevestigd)
1x anti-slipmat draaitafel (deze bevindt zich op de draaitafel)
1x DC-voedingskabel
1x RCA-kabel
1x handleiding
Verwijder voorzichtig alle materialen uit de verpakking. Bewaar deze
handleiding voor toekomstig gebruik.
Zet het apparaat op een geschikte plaats. Vermijd schuine
oppervlakken, plekken met direct zonlicht en houd het apparaat uit de
buurt van hittebronnen of vochtige plekken.
Houd alle ventilatiegaatjes vrij en plaats geen spullen bovenop het
apparaat, omdat dit het apparaat kan beschadigen.
Verwijder de naaldkap alleen van de naaldinrichting wanneer u de
draaitafel wil gaan gebruiken. Houd de naaldkap op de naald als u de
draaitafel niet gebruikt, om deze te beschermen tegen beschadigingen.
40

Eigenschappen
1. Draaitafel met 3 snelheden (33, 45 en 78 RPM)
2. Snaaraandrijving en half-automatische toonarm
3. Keramisch stereo-element en diamantnaald
4. Ingebouwde 45 RPM-adapter
5. Ingang Aux-in, ingang RCA Audio-in en uitgang koptelefoon
6. Ingebouwde 2.1-luidsprekers
7. Oplaadbare lithiumbatterij
8. Bluetooth-functionaliteit
9. Mogelijkheid tot afspelen, opnemen en gesegmenteerd opnemen
via USB
10. Cassettes afspelen
11. Snelheidsafstelling
12. Afstelling hoge en lage tonen
41

Locatie bedieningselementen
1. Indicatielampje draaitafel
2. Indicatielampje Aux-in
3. Indicatielampje USB
4. Indicatielampje Cassette
5. Indicatielampje Stop
6. Indicatielampje Bluetooth
7. Indicatielampje Batterijstatus
8. Indicatielampje Opnemen
9. Cassettesleuf
10. Afstelling Snelheid
11. Afstelling hoge tonen (treble)
12. Afstelling lage tonen (bass)
13. Aan/uitknop en Volumeknop
14. Hoofdtelefooningang
15. Afspelen/Pauzeren
16. Snel vooruit en Volgende
17. Stoppen
18. Snel achteruit en Vorige
19. Opnemen
20. Modus-selectie
21. DC-ingang
22. Ingang RCA Audio in
23. Ingang Aux-in
42

1
2
5
3
6
4
7
8
19
17
20
15
18
16
13
14
10
11
12
9
23 22 21
43

EEN MODUS SELECTEREN
Draaitafelmodus - speel een LP af over de ingebouwde
luidsprekers van het apparaat
USB-modus - speel MP3-bestanden af die u heeft opgeslagen
op een externe USB-drager
USB-opnamemodus - Zet muziek van uw LP of cassette om
naar MP3-bestanden die worden opgeslagen op een externe
USB-drager
Aux-in-modus - speel muziek af vanaf uw muziekspeler,
smartphone of ander apparaat over de ingebouwde luidsprekers
van het apparaat
Bluetooth-modus - sluit het apparaat aan op externe Bluetoothluidsprekers
Cassette-modus - speel een cassette af over de ingebouwde
luidsprekers van het apparaat
Stop-indicator – stop met het afspelen van muziek in USBmodus en stop het opnemen van LP’s en cassettebandjes in
Opname-modus
Indicatielampje batterij - toon de huidige status van de
oplaadbare batterij
Druk op de knop Mode select om de modi Draaitafel, USB,
M
Cassette, Aux-in of Bluetooth te selecteren. Houd de knop
ingedrukt tot het betreffende indicatielampje oplicht.
Druk op deze knop om te stoppen met het afspelen van muziek
in USB-modus. Druk op deze knop om te stoppen met het
opnemen van een LP/cassette in Opname-modus.
Druk op deze knop om de muziek in USB-modus af te spelen of
te pauzeren.
44

Druk op deze knop om uw LP en cassette op te nemen. Meer
informatie vindt u onder het kopje Opnemen.
Speel het volgende nummer af in USB-modus. Houd de knop
drie seconden ingedrukt om snel vooruit te gaan in USB-modus.
Speel het vorige nummer af in USB-modus. Houd de knop drie
seconden ingedrukt om snel terug te gaan in USB-modus.
HET APPARAAT BEDIENEN
Draaitafelmodus
1. Zet het apparaat aan
2. Selecteer de gewenste draaitafelmodus met de knop Modus-
selectie
3. Kies de juiste snelheidsinstelling en leg de LP op de draaitafel
4. Plaats de toonarm in de juiste positie om de plaat af te spelen
5. De draaitafel stopt automatisch als de plaat is afgelopen
Afspeelmodus Aux-in
1. Zet het apparaat aan
2. Druk op de knop Modus-selectie om de modus Aux-in te
selecteren
3. Sluit met de meegeleverde kabel een apparaat naar keuze aan op
de aux-ingang van de platenspeler
4. Druk op de knop Afspelen/Pauzeren om af te spelen
Afspeelmodus USB
1. Zet het apparaat aan
2. Druk op de knop Modus-selectie om de modus USB te selecteren
3. Sluit uw USB-apparaat aan op de platenspeler, d.m.v. de USB-
sleuf
45

4. Druk op de knop Afspelen/Pauzeren om af te spelen
Afspeelmodus Bluetooth
1. Zet het apparaat aan
2. Selecteer de afspeelmodus Bluetooth door de knop Modus-
selectie drie seconden ingedrukt te houden wanneer het apparaat
in de modus draaitafel, USB, cassette of aux-in staat.
3. Het Bluetooth-indicatielampje gaat snel knipperen; het apparaat
zoekt naar Bluetooth-apparaten in de buurt.
4. Wanneer een koppeling is gemaakt knippert het blauwe lampje
kortstondig met een interval van drie seconden.
5. Lukt het niet om de apparaten te koppelen, herhaal dan stap 1 t/m
6. Houd de knop drie seconden ingedrukt om de modus Bluetooth uit
te schakelen en direct over te schakelen naar de modus Draaitafel
Afspeelmodus Cassette
1. Zet het apparaat aan
2. Druk op de knop Modus-selectie om de modus Cassette te
selecteren
3. Steek een cassettebandje in de cassette-sleuf
4. De cassette stopt automatisch als deze is afgelopen
Opnamemodus LP
1. Plaats een lege USB-stick in de sleuf
2. Plaats de gewenste LP op de draaitafel of een cassette naar keuze
in de cassettesleuf.
3. Druk op de knop Opnemen op het bedieningspaneel; het rode
lampje naast Opnemen gaat knipperen. Druk eenmaal op de knop
Opnemen om de plaat als één track op te nemen, druk tweemaal op
de knop Opnemen om te knippen tussen de afzonderlijke nummers.
4. Druk op de knop Stop om het opnemen te staken.
46

De batterij opladen
Het batterij-indicatielampje toont de huidige status van de oplaadbare
batterij van het apparaat.
Rood: De batterij moet worden opgeladen
Groen: De batterij wordt opgeladen
Blauw: De batterij is volledig opgeladen
RCA Audio In
Een RCA-kabel wordt meegeleverd. Hiermee kunt u een apparaat naar
keuze aansluiten op de ingebouwde luidsprekers van het apparaat.
Uitgang hoofdtelefoon
U kunt een hoofdtelefoon aansluiten op de hoofdtelefoonaansluiting.
Snelheidsafstelling
Wanneer de knop voor snelheidsafstelling is gecentreerd op de
middelste lijn, speelt de platenspeler af op normale snelheid. Wanneer
de LP te langzaam wordt afgespeeld, kunt u de knop naar rechts
draaien om de snelheid aan te passen. Wanneer de LP te snel wordt
afgespeeld, kunt u de knop naar links draaien om de snelheid aan te
passen.
Afstellen hoge en lage tonen (treble/bass)
Draai aan deze knop om de hoge of lage tonen af te stellen op uw
gewenste niveau.
47

DE NAALD VERVANGEN
U dient de naald van het apparaat regelmatig te vervangen. Vervang
de naald als volgt:
RCA Audio Out
1. Druk tegen de klem van de toonarm om de toonarm te
ontgrendelen
2. Verwijder het kapje van het element om de naald bloot te leggen
3. Verwijder voorzichtig het element uit de houder
4. Verwijder de naald helemaal uit het element
5. Plaats voorzichtig een nieuwe naald in het element
6. Plaats het element terug in de houder
7. Plaats het elementkapje terug
8. Vergrendel de toonarm
Voor optimale prestaties dient u de naald van de draaitafel iedere 3
tot 4 maanden te vervangen. Een vervangende naald vindt u op www.
gporetro.com. U kunt ook terecht bij een van onze verkooppunten.
48

PRODUCTVERZORGING
• Houd het apparaat schoon, droog en uit de buurt van plekken waar
water kan spatten of druppen.
• Vermijd locaties met een hoge (lucht)vochtigheidsgraad - zoals
keukens, badkamers en ruimtes met extreme temperaturen van
35°C of hoger.
• Laat geen losse voorwerpen in het apparaat vallen.
• Haal altijd de stekker uit het stopcontact alvorens het apparaat te
reinigen.
• Wees voorzichtig als u het apparaat en/of de kunststof onderdelen
en afwerklaag reinigt of afstoft. Gebruik hiervoor alleen een droge
stofdoek. Het paneel aan de voorzijde kunt u voorzichtig reinigen
met een vochtige doek en milde zeep.
• Plaats het apparaat altijd horizontaal.
• Vermijd condensvorming. Wordt het apparaat verplaatst van een
koude naar een warmere locatie, wacht dan tenminste 30 minuten
alvorens het weer in te schakelen.
• Zet het apparaat uit na gebruik.
PRODUCTONDERSTEUNING
Bezoek voor meer hulp of advies www.gporetro.com.
Met het oog op uw persoonlijke veiligheid raden wij het ten zeerste
af de behuizing van het apparaat open te maken. Als u de behuizing
openmaakt, vervalt uw garantie. Bovendien bevat het apparaat geen
onderdelen waar de gebruiker onderhoud aan kan plegen.
49


SPANISH
Gracias por comprar el tocadiscos Flight de GPO. Este modelo de
carácter retro añade un toque de estilo clásico a cualquier habitación, y ofrece a su vez una calidad de audio asombrosa a través
de los altavoces incorporados. Para sacar el mayor rendimiento a
su nuevo tocadiscos, lea estas instrucciones detenidamente antes
de utilizar el aparato y guárdelas en un lugar seguro para poder
consultarlas en el futuro.
5151

Desembalaje
Este paquete contiene:
1 tocadiscos Flight
1 aguja para el tocadiscos (colocada)
1 alfombrilla (colocada sobre el plato giratorio)
1 cable de alimentación CC
1 cable RCA
1 manual
Extraiga el contenido del paquete con cuidado. Asegúrese de conservar y guardar este manual para poder consultarlo en el futuro.
A la hora de elegir la ubicación para la unidad, evite supercies inclinadas, la luz solar directa u otras fuentes de calor y humedad.
Mantenga despejados todos los oricios de ventilación y no coloque
ningún equipo sobre la unidad, ya que podría dañarse.
Retire solamente la protección de la cápsula durante su uso. Deje la
protección puesta mientras la unidad esté guardada para proteger la
cápsula de posibles daños.
52

Funciones
1. Tocadiscos de 3 velocidades (33, 45 o 78 RPM)
2. Transmisión por correa y brazo de accionamiento semiautomático
3. Cápsula y cartucho estéreo de cerámica
4. Adaptador de 45 RPM integrado
5. Entrada auxiliar, entrada para conector de audio RCA y salida
para auriculares
6. Altavoces 2.1 incorporados
7. Batería de litio recargable
8. Bluetooth
9. Reproducción con USB, grabación y grabación con segmentación
10. Reproducción de casetes
11. Ajuste no de la velocidad (pitch)
12. Ajuste de agudos y graves
53

Ubicación de los controles
1. Piloto del tocadiscos
2. Piloto de la entrada auxiliar
3. Piloto del USB
4. Piloto del casete
5. Piloto de parada
6. Piloto del Bluetooth
7. Piloto de alimentación con batería
8. Piloto de grabación
9. Ranura para el casete
10. Ajuste no de la velocidad (pitch)
11. Ajuste de agudos
12. Ajuste de graves
13. Encendido/apagado y volumen
14. Toma para auriculares
15. Reproducción/pausa
16. Avance rápido y siguiente
17. Detener
18. Rebobinar y anterior
19. Grabar
20. Selección de modo
21. Toma para alimentación CC
22. Toma para el conector de audio RCA
23. Toma de entrada auxiliar
54

1
2
5
3
6
4
7
8
19
17
20
15
18
16
13
14
10
11
12
9
23 22 21
55

SELECCIÓN DE MODO
Modo Tocadiscos - Reproduce un disco de vinilo a través de los
altavoces integrados.
Modo USB - Reproduce archivos MP3 guardados en un
dispositivo USB externo.
Modo Grabación USB - Graba los discos de vinilo y casetes en
archivos MP3 en un dispositivo USB externo.
Modo Entrada auxiliar - Reproduce música del reproductor,
smartphone u otro dispositivo a través de los altavoces
integrados.
Modo Bluetooth - Conecta la unidad a altavoces externos
compatibles con Bluetooth.
Modo Casete - Reproduce un casete a través de los altavoces
integrados.
Indicador de parada - Detiene la reproducción de la música
en el Modo USB y la grabación de vinilos/casetes en el Modo
grabación.
Indicador del nivel de batería - Muestra el estado de carga
actual de la batería recargable.
Para seleccionar el modo Tocadiscos, USB, casete, entrada
M
auxiliar o Bluetooth, pulse el botón de selección de modo hasta
que se ilumine la luz correspondiente.
Pulse para DETENER la reproducción de música en el modo
USB. Pulse para DETENER la grabación de vinilos/casetes en
el modo Grabación.
REPRODUCCIÓN o PAUSA de la música en el modo USB.
Pulse para grabar sus vinilos y casetes; encontrará más
información en la sección sobre grabación.
56

Pulse SIGUIENTE para pasar a la siguiente canción en modo
USB. Mantenga pulsado durante tres segundos para avanzar
rápido en el modo USB.
Pulse ANTERIOR para pasar a la canción anterior en modo
USB. Mantenga pulsado durante tres segundos para rebobinar
en el modo USB.
MANEJO DE LA UNIDAD
Modo Tocadiscos
1. Encienda la alimentación de la unidad.
2. Seleccione el modo Tocadiscos usando el botón de selección del
modo.
3. Elija la velocidad adecuada y coloque el disco de vinilo en el
giradiscos.
4. Coloque el brazo en la posición adecuada para comenzar la
reproducción.
5. El tocadiscos se detendrá automáticamente cuando el disco llegue
a su n.
Modo de reproducción con entrada auxiliar
1. Encienda la alimentación de la unidad.
2. Seleccione el modo Entrada auxiliar usando el botón de selección
del modo.
3. Conecte el dispositivo elegido a la toma de entrada auxiliar con el
cable que se suministra.
4. Pulse el botón de reproducción/pausa para comenzar la
reproducción.
57

Modo de reproducción USB
1. Encienda la alimentación de la unidad.
2. Seleccione el modo USB usando el botón de selección del modo.
3. Conecte el dispositivo USB a la unidad usando la toma de USB.
4. Pulse el botón de reproducción/pausa para comenzar la
reproducción.
Modo Bluetooth
1. Encienda la alimentación de la unidad.
2. Seleccione el modo Bluetooth manteniendo pulsado el botón de
modo durante tres segundos mientras esté en modo Tocadiscos,
USB, Casete o Entrada auxiliar.
3. El piloto del Bluetooth parpadeará rápidamente mientras la unidad
busca dispositivos cercanos compatibles con Bluetooth.
4. Cuando encuentre alguno, la luz azul parpadeará brevemente con
un intervalo de tres segundos.
5. Si los dispositivos no logran sincronizarse, repita los puntos 1-4.
6. Mantenga pulsado el botón Detener durante tres segundos para
desactivar el modo Bluetooh y pasar al modo Tocadiscos.
Modo de reproducción de casetes
1. Encienda la alimentación de la unidad.
2. Seleccione el modo Casete usando el botón de selección del
modo.
3. Introduzca el casete en la ranura para casetes.
4. El casete se detendrá automáticamente cuando llegue a su n.
Modo de grabación de vinilos
1. Inserte un dispositivo USB vacío en la ranura.
58

2. Coloque el vinilo elegido en el tocadiscos o el casete en la ranura
para casetes.
3. Pulse el botón de grabación en el panel de control; la luz roja junto a
Grabación comenzará a parpadear. Pulse el botón de grabación una
vez para grabar el vinilo en una sola pista; púlselo dos veces para
dividir las pistas.
4. Pulse el botón de parada para detener la grabación.
Carga de la batería
El indicador del nivel de batería muestra el estado de carga actual de
la batería recargable.
Rojo: debe cargarse la unidad.
Verde: se está cargando la unidad.
Azul: se ha cargado completamente la unidad.
Toma para el conector de audio RCA
Se incluye un cable RCA para conectar el dispositivo que desee a los
altavoces integrados de la unidad.
Toma de auriculares
Pueden conectarse auriculares en la toma de auriculares.
Ajuste no de la velocidad (pitch)
Cuando el mando del ajuste no de la velocidad está en el centro de la
línea, el reproductor funciona a velocidad normal. Cuando la velocidad
del LP es inferior a lo previsto, puede girar a la derecha para ajustar la
velocidad. Cuando la velocidad del LP es superior a lo previsto, puede
girar a la izquierda para ajustar la velocidad.
Ajuste de agudos y graves
Puede girar el mando de agudos y graves para ajustar los agudos y
los graves al nivel deseado.
59

SUSTITUCIÓN DE LA CÁPSULA
La cápsula de la unidad debe reemplazarse regularmente. Para
sustituir la cápsula:
RCA Audio Out
1. Presione sobre el bloqueo del brazo para liberarlo.
2. Retire el tapón del cartucho para dejar expuesta la aguja.
3. Retire con cuidado el cartucho de la toma.
4. Extraiga completamente la aguja de la cápsula del cartucho.
5. Coloque con cuidado la nueva aguja de la cápsula en el cartucho.
6. Vuelva a colocar el cartucho en la toma.
7. Coloque el tapón del cartucho en su posición.
8. Vuelva a enganchar el bloqueo del brazo.
La cápsula del tocadiscos debe reemplazarse cada 3-4 meses para
garantizar el mejor rendimiento. Para comprar una cápsula nueva,
visite www.gporetro.com o uno de nuestros distribuidores.
60

CUIDADO DEL PRODUCTO
• Mantenga la unidad limpia, seca y alejada de cualquier fuente
potencial de salpicaduras o goteos.
• Evite zonas con altos niveles de humedad, como cocinas y baños,
y con temperaturas extremas de 35 °C o más.
• No permita que ningún elemento suelto caiga sobre la unidad.
• Desenchufe siempre la unidad antes de limpiarla.
• Tenga cuidado al limpiar y frotar las piezas y supercies de plástico
y utilice únicamente un paño para el polvo seco. El panel frontal se
puede limpiar frotando suavemente con un paño húmedo y jabón
neutro.
• Guarde la unidad en posición horizontal.
• Evite la condensación. Si traslada la unidad desde un lugar frío a
otro más cálido, espere 30 minutos antes de utilizarlo.
• Desconecte la alimentación después de su uso.
SERVICIO TÉCNICO DEL PRODUCTO
Para obtener más información o recibir asistencia, visite
www.gporetro.com.
Recuerde que, por motivos de seguridad personal, NO DEBE tratar
de abrir la carcasa de la unidad. Abrir la carcasa anula la garantía y
dentro de ella no hay ninguna pieza que el usuario pueda arreglar
61

62

63

EN
Hereby ProtelX, declares that
this equipment (GPO Flight) is
in compliance with the essential
requirements and other relevant
provisions of Directive, you can
access a copy of this certicate on
www.gporetro.com/Certicate-of-
Conformity
NL
Hierbij verklaart ProtelX dat
dit apparaat (GPO Flight) voldoet
aan de essentiële eisen en andere
relevante bepalingen van de richtlijn, u
kunt een exemplaar
van dit certicaat downloaden op
www.gporetro.com/Certicate-of-
Conformity
DE
Hiermit erklärt ProtelX, dass
dieses Gerät (GPO Flight) den
grundlegenden Anforderungen und
anderen relevanten Bestimmungen
der Richtlinie entspricht, Sie können
eine Kopie dieses Zertikats
runterladen www.gporetro.com/
Certicate-of-Conformity
FR
Par ProtelX, déclare que cet
équipement (GPO Flight) est
conforme aux exigences essentielles
et aux autres dispositions pertinentes
de la Directive, vous pouvez accéder
à une copie de ce certicat sur www.
gporetro.com/Certicate-of-Conformity
ES
ProtelX, declara que este equipo
(GPO Flight) cumple con los
requisitos esenciales y otras
disposiciones pertinentes de la
Directiva, puede acceder a una copia
de este certicado en www.gporetro.
com/Certicate-of-Conformity
www.gporetro.com
IMPORTED AND DISTRIBUTED BY:
ProTelX Ltd, Unit 6, Park 17 Industrial Estate, Moss Lane,
Whiteeld, Manchester, M45 8FJ UK
 Loading...