

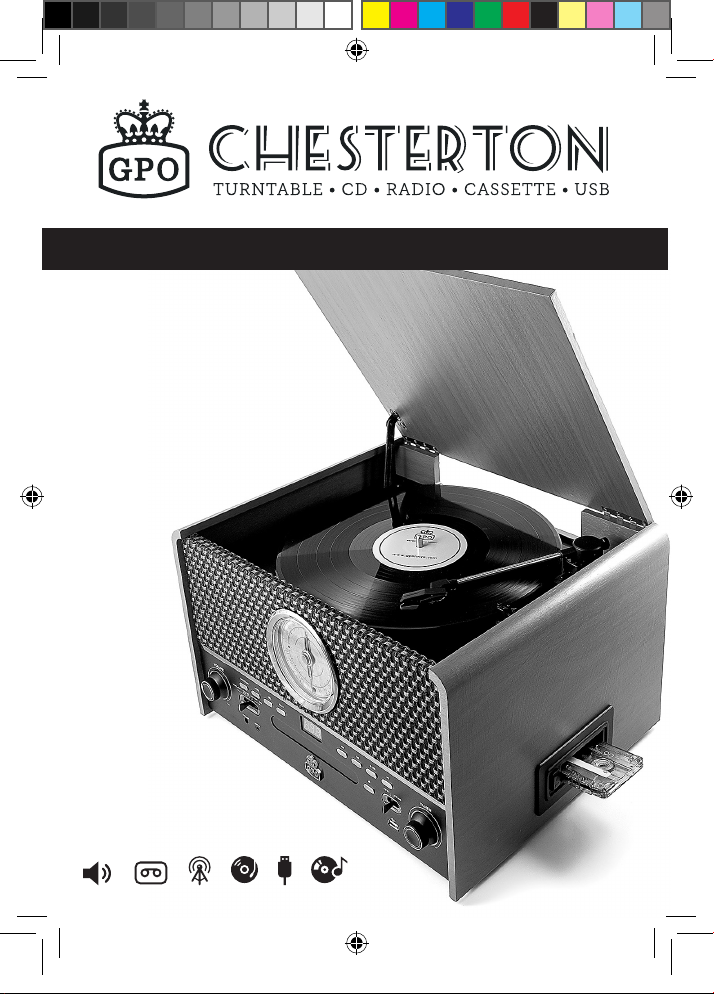
USER MANUAL
Chesterton_user_Manual EU - JAN 2018 V5.indd 1 18/01/2018 14:03
V5 | JAN 2018
EN
Specications
Operating temperature range 0°C
to 40°C
Frequency: FM 87.5-108 MHz,
voltage 230Va.c
DE
Spezizierung
Betriebstemperatur 0°C bis 40°C
Frequenz
UKW 87,5-108MHz
Spannung 230 V c
FR
Spécication
Plage de température de Plage de
température de fonctionnement 0°C
à 40°C
87,5- 108 MHz de fréquence FM,
tension 230Va.c
NL
Specicatie
Bedrijfstemperatuur 0 °C tot 40 °C
Frequentie: FM 87.5-108 MHz
Netspanning 230Va.c
ES
Especicación
Rango de temperatura de
funcionamiento 0 °C a 40 °C
FM 87.5-108 MHz de frecuencia
voltaje 230Va.c
IT
Specica
Intervallo di temperatura di
funzionamento da 0°C a 40°C
FM 87.5-108 MHz Frequenza
tensione Va.230c
Chesterton_user_Manual EU - JAN 2018 V5.indd 2 18/01/2018 14:03
2

Content
English 5
German 23
French 41
Dutch 59
Spanish 77
Italian 95
Chesterton_user_Manual EU - JAN 2018 V5.indd 3 18/01/2018 14:03
3

Chesterton_user_Manual EU - JAN 2018 V5.indd 4 18/01/2018 14:03
4

English
Chesterton_user_Manual EU - JAN 2018 V5.indd 5 18/01/2018 14:03
5
5
Introduction
Thanks for purchasing the GPO Chesterton Turntable. This all-in-one
music player will allow you to enjoy LPs, CDs, radio and MP3s in one
stylish, retro-styled entertainment unit. We hope you enjoy adding a
touch of retro style to your home.
Safety Information
Before using your GPO Chesterton, please read the following
safety information. Please make sure to retain this manual for future
reference:
• Cleaning: Unplug the unit from the wall socket before cleaning gently
with a damp cloth. Avoid liquid and aerosol cleaners.
• Attachments: Please do not use any attachments which have not
been recommended by GPO Retro, as they may cause damage to
your unit.
• Water and Moisture: Please keep the unit away from standing water
such as a bathtub or kitchen sink. This unit may be damaged by
humid or damp environments. Ensure that the unit remains dry, as
liquid can damage the unit.
• Heat: Please keep the unit away from heat sources such as radiators,
stoves or other products which produce excess heat.
• Placement: Please ensure that the unit is placed on a at, stable
surface before use.
• Transport: Take care when moving the unit to avoid any damage.
• Ventilation: Make sure that none of the openings or slots in the unit
cabinet is covered to ensure proper ventilation. Placing the unit on a
covered shelf can block these ventilation openings.
Chesterton_user_Manual EU - JAN 2018 V5.indd 6 18/01/2018 14:03
6
• Power: Please ensure that the unit is only plugged into an
appropriate wall socket or adaptor. Ensure that the cord is not trapped
or placed in a way which could cause fraying or damage. Do not
overload wall sockets or extension cords.
• For further troubleshooting or technical support advice, please refer to
the troubleshooting and product support sections of this manual.
Unpacking
This package contains:
• 1x T298-KD GPO Chesterton
• 1x Remote Control
• 1x DC Power Cable
• 1x Manual
Carefully remove all of the contents from the packaging. Make sure
you retain and store this manual for future reference.
When choosing a location for the unit, avoid inclines, direct sunlight or
sources of heat and moisture.
Keep all of the ventilation holes clear, and do not place any equipment
on top of the unit as this can lead to damage.
Only remove the stylus guard from the stylus assembly during use.
Leaving the guard in place during storage will protect your stylus from
damage.
Chesterton_user_Manual EU - JAN 2018 V5.indd 7 18/01/2018 14:03
7
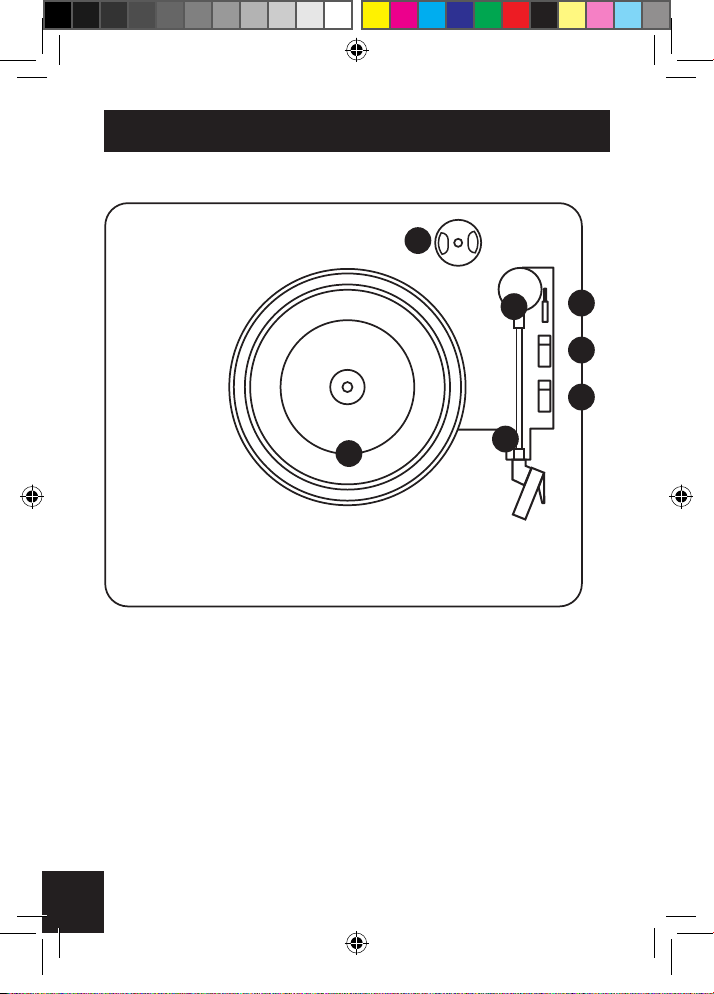
Location of Controls
Top Panel
1. Turntable
2. 45 RPM Adaptor Holder
3. Tone Arm
4. Arm Clip
2
3
1
5. Raise/Lower Tone Arm Lever
6. 33/45/78 RPM Speed Switch
7. Autostop Switch
4
5
6
7
Chesterton_user_Manual EU - JAN 2018 V5.indd 8 18/01/2018 14:03
8
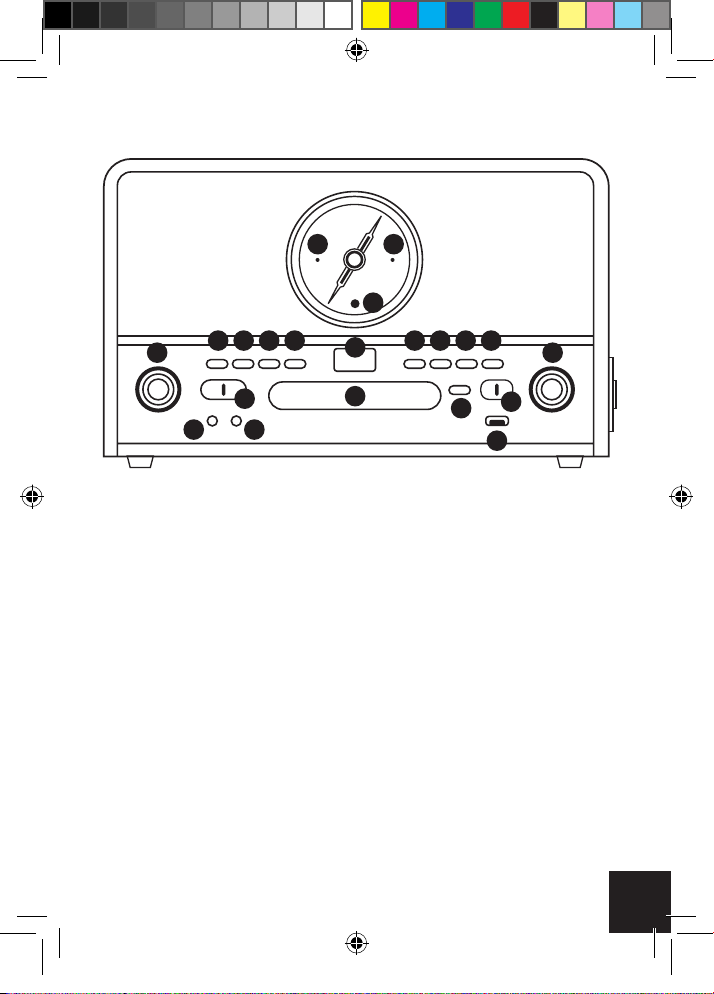
Front Panel
19 20
21
1 11
2 3 4 5 7
12
16 17
1. Volume Control
2. Program Button
3. Mode Select Button
4. Delete Button
5. USB Recording Button
6. Display
7. Skip Backwards
8. Skip Forwards
9. Stop/USB
10. Play/Pause
6
13
12. Function Selector
13. CD Tray
14. Open/Close CD Tray
15. FM mono/FM stereo Selector
16. Headphone Out Jack
17. Aux In Jack
18. USB Port
19. Power Indicator LED
20. Stereo Indicator LED
21. IR Receiver LED
8 9 10
11. Radio Frequency Selector
14
15
18
9
Chesterton_user_Manual EU - JAN 2018 V5.indd 9 18/01/2018 14:03

Side Panel
1 2
1. Cassette Eject/Fast Forward Button
2. Cassette Door
10
Chesterton_user_Manual EU - JAN 2018 V5.indd 10 18/01/2018 14:03

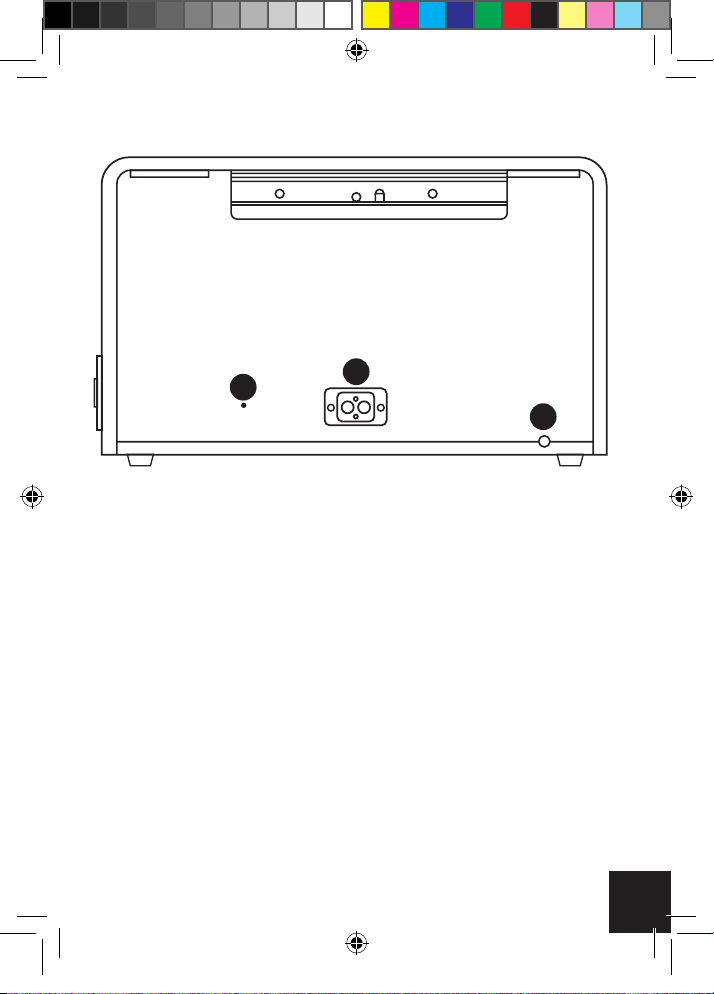
Rear Panel
1. Line Output
2. Power Input
3. FM Antenna
2
1
3
11
Chesterton_user_Manual EU - JAN 2018 V5.indd 11 18/01/2018 14:03

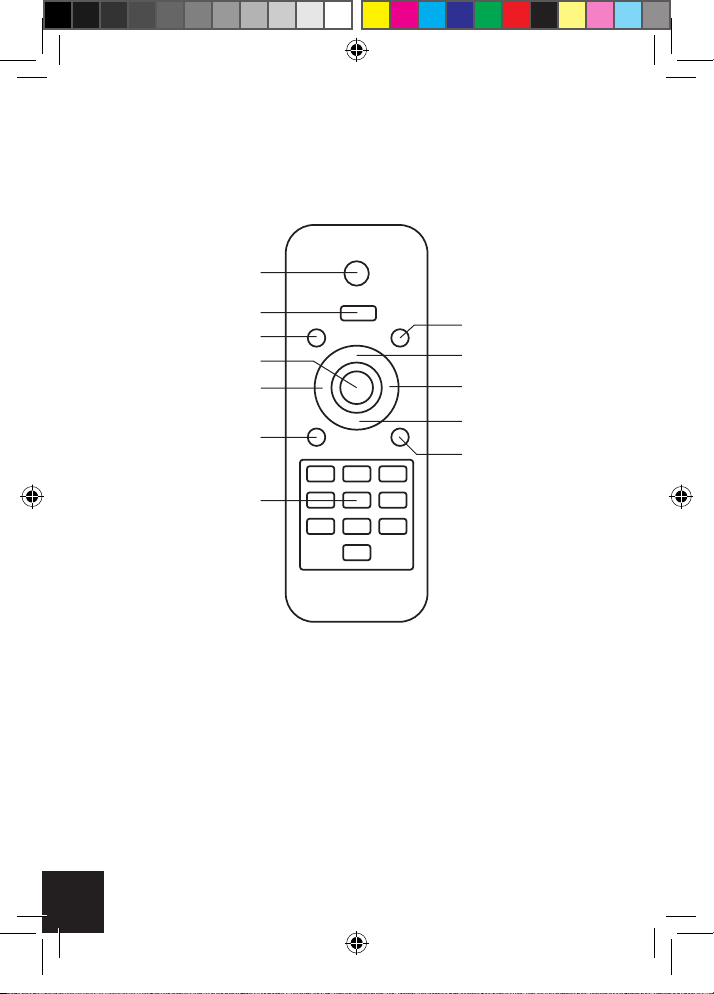
Remote Control
Please note: Please install two AAA batteries (not included) before use.
Power
Stop CD/USB
Play/Pause/Pair
Record
Back
Program
Number
Delete
Folder+
Next+
Folder-
Mode
To use the remote control, install two AAA batteries as instructed, point
the control at the sensor located on the front panel of the unit and press
the button rmly.
Please ensure that there are no obstacles between the control and the
sensor, and avoid the sensor being exposed to strong light.
12
Chesterton_user_Manual EU - JAN 2018 V5.indd 12 18/01/2018 14:03
Playback
You can use the GPO Chesterton to play music using the turntable,
CD player, cassette player or radio. You can also play music using the
unit’s internal speakers using the Aux In function.
Tape Playback
1. Set the Function selector to Tape/Off
2. Insert your cassette into the tape slot, with the thicker side of the
tape to the right
3. Playback will begin automatically
4. Push the Eject/Fast Forward button half way down to wind the tape
forward. Release the button to resume playback
5. Push the Eject/Fast Forward button down completely to eject the
tape
Turntable Playback
1. Lift the turntable dust cover, remove the stylus protector and unlock
the tone arm
2. Set the Function selector to Phono/Aux In
3. Place your chosen record on the turntable over the central spindle
4. Set the correct speed (33/45/78) using the Speed selector
5. Lift the tone arm using the Raise Lever and slowly move it over the
record. The turntable will begin to turn
6. Place the tone arm onto the record at your desired location. The
record will begin playing
7. The tonearm will automatically stop once the record has nished. To
manually stop the record, lift the tone arm manually. Once the record
has nished, return the tone arm to the rest.
13
Chesterton_user_Manual EU - JAN 2018 V5.indd 13 18/01/2018 14:03
Auto-Stop Switch Operation: Please note, some records have an auto-
stop area which causes the record to stop before the last track nishes.
If this happens, move the Auto-Stop switch to the off position and
manually stop the record once the track has nished.
Aux-In Playback
1. Set the Function selector to Phono/Aux In
2. Use a 3.5mm audio cable to connect your external device to the
unit’s AUX IN jack
3. Adjust the volume to your desired level
4. Begin playback using your external device
CD Playback
The GPO Chesterton can play standard audio CDs and data CDs
which contain MP3, WAV or WMA les. Please note that the Chesterton
can only correctly handle data CDs which have folders containing 999
music les or less.
1. Set the Function selector to CD/USB
2. Open the disc tray by pressing the CD tray Open/Close button
3. Place the disc carefully in the disc tray, label size up
4. Close the disc tray and the CD will begin to play automatically
5. To listen to the same track repeatedly, press the Mode button once.
The LED display will show “ONE”
6. To play the entire disc repeatedly, press the Mode button twice. The
LED display will show “ALL”
7. To cancel repeat play, press the Stop button
14
Chesterton_user_Manual EU - JAN 2018 V5.indd 14 18/01/2018 14:03

The GPO Chesterton allows you to program the playback order of
tracks on your CD:
1. Press Stop to stop CD playback
2. Press Program
3. Press the Backward/Forward button to select the location in which
the track should be stored (eg. 1, 2, 3)
4. Press Play/Pause to resume playback at the beginning of the rst
programmed track
5. To clear the programmed memory, press Stop twice while the disc is
playing
USB Flash Drive Playback
The GPO Chesterton can play the following le types from a USB ash
drive: AAC/M4A, AIFF/AIF, MP3, WAV, WMA. Please note that folders
on the USB drive must contain 999 les or less, and that the unit can
only read FAT32 format USB drives of 32GB or less.
1. Set the Function selector to CD/USB
2. Connect the USB ash drive to the USB port
3. Press and hold the Stop/USB button for two seconds to switch to
USB mode
4. The total number of tracks will be shown on the display and playback
will begin automatically
5. Press Stop to stop playback
Chesterton_user_Manual EU - JAN 2018 V5.indd 15 18/01/2018 14:03
15

FM mono/FM stereo Radio
1. If possible, uncoil and extend the unit’s built-in FM antenna
2. Set the Function selector to Radio
3. Select the desired frequency using the FM mono/FM stereo switch
4. Select the desired station using the Tuner knob
5. Set the Function selector to OFF to turn off the radio
Line Out
1. Connect the Line Out jack to the Aux In jack of your amplier, taking
care to match the socket and jack colours
2. Ensure your amplier is turned on and adjust the volume accordingly
Headphones
To listen to music on your headphones, simply connect them to the
earphone jack and play your chosen music as described above.
External Speakers
You can use the external speaker jack on the rear of the unit to connect
your chosen speakers to the GPO Chesterton.
If the unit does not receive an audio signal for around 10 minutes, it
will automatically enter standby mode. To reactivate the unit, turn the
power off and back on again.
16
Chesterton_user_Manual EU - JAN 2018 V5.indd 16 18/01/2018 14:03
Recording
You can use the GPO Chesterton to record to a USB ash drive from a
CD, MPS Disc, LP, FM radio, cassette or the unit’s Aux Input.
Recording from a CD
1. Ensure that your CD is not copy protected and insert into the CD slot
2. Set the Function selector to CD/USB
3. Insert the USB ash drive into the unit’s USB port
4. Press the Record button. REC will ash on the unit display for three
seconds, and will then be replaced by ONE
5. Press the Backwards/Forwards button to record a single track (ONE)
or all of the tracks on a CD (ALL)
6. Press the Record button to conrm. The unit will alternately display
REC and the track number to indicate that the track is being
recorded
7. Press the Stop button to stop recording
Recording from an MPS Disc
1. Insert your disc into the CD slot
2. Set the Function selector to CD/USB
3. Insert the USB ash drive into the unit’s USB port
4. Press the Record button. REC will ash on the unit display for three
seconds, and will then be replaced by ONE
5. Press the Backwards/Forwards button to record a single track
(ONE), a folder (FOL) or all of the tracks on a CD (ALL)
Chesterton_user_Manual EU - JAN 2018 V5.indd 17 18/01/2018 14:03
17

6. Press the Record button to conrm. The unit will alternately display
REC, the folder number and the number of total tracks to indicate
that the track is being recorded
7. Press the Stop button to stop recording
Recording from an LP
1. Place your LP onto the turntable
2. Set the Function selector to Phono/Aux In
3. Insert the USB ash drive into the unit’s USB port
4. Lower the Tone Arm to the desired location on the record
5. Press the Record button. REC will ash on the unit display for three
seconds
6. The unit will alternately display REC and PHO to indicate that the LP
is being recorded
7. Press the Stop button to stop recording
Recording from the Radio
1. Set the Function selector to Radio
2. Insert the USB ash drive into the unit’s USB port
3. Select your chosen FM station
4. Press the Record button. REC will ash on the unit display for three
seconds
5. Press the Stop button to stop recording
18
Chesterton_user_Manual EU - JAN 2018 V5.indd 18 18/01/2018 14:03
Recording from a Cassette
1. Insert your cassette into the tape slot, with the thicker side of the
tape to the right
2. Insert the USB ash drive into the unit’s USB port
3. Set the Function selector to Tape/Off – playback will begin
immediately
4. Press the Record button. REC will ash on the unit display for three
seconds
5. The unit will alternately display REC and TAP to indicate that the
cassette is being recorded
6. Press the Stop button to stop recording
Recording from the Aux Input
1. Connect your external device using the Aux In jack
2. Insert the USB ash drive into the unit’s USB port
3. Set the Function selector to Phono/Aux In
4. Begin playback using the external device
5. Press the Record button. REC will ash on the unit display for three
seconds
6. The unit will alternately display REC and AUX to indicate that it is
being recorded
7. Press the Stop button to stop recording
Chesterton_user_Manual EU - JAN 2018 V5.indd 19 18/01/2018 14:03
19

Troubleshooting
Q) The unit will not turn on
A) Ensure that the unit is correctly connected to the power supply
Q) No sound comes out of the unit’s speakers
A) Ensure that the volume has been set correctly and that the Function
selector has been set to the correct playback source
Q) The sound quality is poor
A) Ensure that the unit is not too close to a TV set or other appliance
Q) The unit is not responding
A) Remove the power supply to the unit and leave for 60 seconds. Plug
the unit back into the power supply and try again
Q) The sound quality is poor during LP playback
A) Ensure that your stylus is undamaged, and that it is placed in the
correct place on the record
20
Chesterton_user_Manual EU - JAN 2018 V5.indd 20 18/01/2018 14:03

Product Support
more advise or support please visit www.gporetro.com.
Please note, for your personal safety you SHOULD NOT attempt to
open the unit’s casing. Opening the casing voids your warranty, and no
user serviceable parts are contained inside
Chesterton_user_Manual EU - JAN 2018 V5.indd 21 18/01/2018 14:03
21
22
Chesterton_user_Manual EU - JAN 2018 V5.indd 22 18/01/2018 14:03

German
Chesterton_user_Manual EU - JAN 2018 V5.indd 23 18/01/2018 14:03
23
23

Einleitung
Vielen dank, dass Sie den Plattenspieler GPO Chesterton gekauft
haben. Mit diesem vielseitigen stilvollen Gerät im Retrodesign können
Sie sich LPs, CDs, Radioprogramme und MP3 anhören. Wir hoffen,
dass Sie viel Freude daran haben werden.
Sicherheitshinweise
Bevor Sie Ihren GPO Chesterton einschalten, lesen Sie bitte
die folgenden Sicherheitsinformationen. Bewahren Sie die
Bedienungsanleitung auf, um später etwas nachlesen zu können.
• Reinigung: Ziehen Sie den Netzstecker, bevor Sie das Gerät mit
einem feuchten Tuch abwischen. Benutzen Sie keine üssigen
Reiniger und Sprays.
• Befestigungen: Bitte benutzen Sie keine Befestigungen, die nicht von
GPO Retro empfohlen wurden, weil diese Ihr Gerät möglicherweise
beschädigen könnten.
• Wasser und Feuchtigkeit: Bitte halten Sie das Gerät von stehendem
Wasser, z. B. Badewannen oder Küchenspülen fern. Das Gerät
könnte in nasser oder feuchter Umgebung beschädigt werden.
Stellen Sie daher sicher, dass das Gerät trocken bleibt.
• Wärme: Halten Sie das Gerät von Wärmequellen wie Heizkörpern,
Heizlüftern oder anderen Geräten, die Wärme produzieren, fern.
• Standort: Stellen Sie das Gerät auf einer ebenen und stabilen
Oberäche auf, bevor Sie es benutzen.
• Transport: Bewegen Sie das Gerät mit Vorsicht, um Schäden zu
vermeiden.
• Belüftung: Stellen Sie sicher, dass die Öffnungen oder Schlitze
24
Chesterton_user_Manual EU - JAN 2018 V5.indd 24 18/01/2018 14:03
im Gerät nicht bedeckt sind, um für eine ausreichende Lüftung zu
sorgen. Durch das Aufstellen des Geräts in einem verschlossenen
Regal können die Lüftungsöffnungen bedeckt werden.
• Stromanschluss: Das Gerät darf nur an eine geeignete Steckdose/
Adapter angeschlossen werden und das Kabel darf nicht
eingeklemmt oder so gelegt werden, dass es durch Abrieb oder
anderweitig beschädigt werden kann. Überlasten Sie Steckdosen
oder Mehrfachstecker nicht.
• Weitere Informationen nden Sie in den Abschnitten „Fehlersuche“
und „Kundendienst“ in dieser Bedienungsanleitung.
Auspacken
Das Paket enthält:
• 1x T298-KD GPO Chesterton
• 1x Fernbedienung
• 1x Netzkabel
• 1x Bedienungsanleitung
Nehmen Sie den Inhalt vorsichtig aus der Verpackung. Bewahren Sie
die Bedienungsanleitung auf, damit Sie sie später noch einmal lesen
können.
Achten Sie bei der Auswahl des Standorts für das Gerät darauf, dass
es eben steht und keinem direkten Sonnenlicht, Wärmequellen oder
Feuchtigkeit ausgesetzt ist.
Decken Sie die Lüftungsöffnungen nicht ab und stellen Sie keine
Gegenstände auf das Gerät, da es sonst beschädigt werden könnte.
Entfernen Sie den Nadelschutz nur beim Betrieb des Geräts. Durch die
Verwendung des Nadelschutzes schützen Sie die Nadel vor Schäden,
wenn das Gerät nicht benutzt wird
25
Chesterton_user_Manual EU - JAN 2018 V5.indd 25 18/01/2018 14:03

Anordnung der Bedienelemente
Oberes Bedienfeld
1. Plattenspieler
2. Halterung für 45 UpM-Adapter
3. Tonarm
4. Armclip
2
3
1
5. Hebel zum Heben/Senken des
Tonarms
6. 33/45/78 UpM-Geschwindigkeitswahlschalter
7. Autostopp-Schalter
4
5
6
7
26
Chesterton_user_Manual EU - JAN 2018 V5.indd 26 18/01/2018 14:03

Vorderes Bedienfeld
19 20
21
1 11
2 3 4 5 7
12
16 17
1. Lautstärkeregler
2. Programmschalter
3. Moduswahlschalter
4. Löschtaste
5. USB-Aufnahmeschalter
6. Anzeige
7. Zurückspringen
8. Vorspringen
9. Stopp/USB
10. Wiedergabe/Pause
11. Frequenzwahl für Radio
6
13
12. Funktionswahlschalter
13. CD-Schublade
14. CD-Schublade öffnen/
15. UKW-Mono/UKW-Ste-
16. Kopfhöreranschluss
17. Aux-In-Anschluss
18. USB-Anschluss
19. Betriebsanzeige - LED
20. Stereoanzeige - LED
21. IR-Empfänger - LED
8 9 10
schließen
reo-Wahlschalter
14
15
18
27
Chesterton_user_Manual EU - JAN 2018 V5.indd 27 18/01/2018 14:03

Seitliches Bedienfeld
1 2
1. Kassette auswerfen/vorspulen
2. Kassettenfachdeckel
28
Chesterton_user_Manual EU - JAN 2018 V5.indd 28 18/01/2018 14:03
Rückseite
1. Line-Ausgang
2. Netzanschluss
3. UKW-Antenne
2
1
3
29
Chesterton_user_Manual EU - JAN 2018 V5.indd 29 18/01/2018 14:03
Fernbedienung
Legen Sie vor der Benutzung zwei AAA-Batterien (nicht enthalten) ein.
Ein-/Aus
CD/USB-Stopp
Aufnahme
Start/Pause/Verb
Zurück
Löschen
Ordner+
Nächste+
Ordner-
Programm
Modus
Ziffernfeld
Legen Sie zwei AAA-Batterien entsprechend der Anweisungen ein, um
die Fernbedienung zu benutzen. Richten Sie sie auf den Sensor an der
Vorderseite des Geräts und drücken Sie fest auf die Taste.
Stellen Sie sicher, dass keine Hindernisse zwischen der Fernbedienung
und dem Sensor vorhanden sind und verhindern Sie, dass der Sensor
von intensivem Licht angestrahlt wird.
30
Chesterton_user_Manual EU - JAN 2018 V5.indd 30 18/01/2018 14:03
 Loading...