

Page 1
GV 1214
5
Page 2
With each wash cycle.
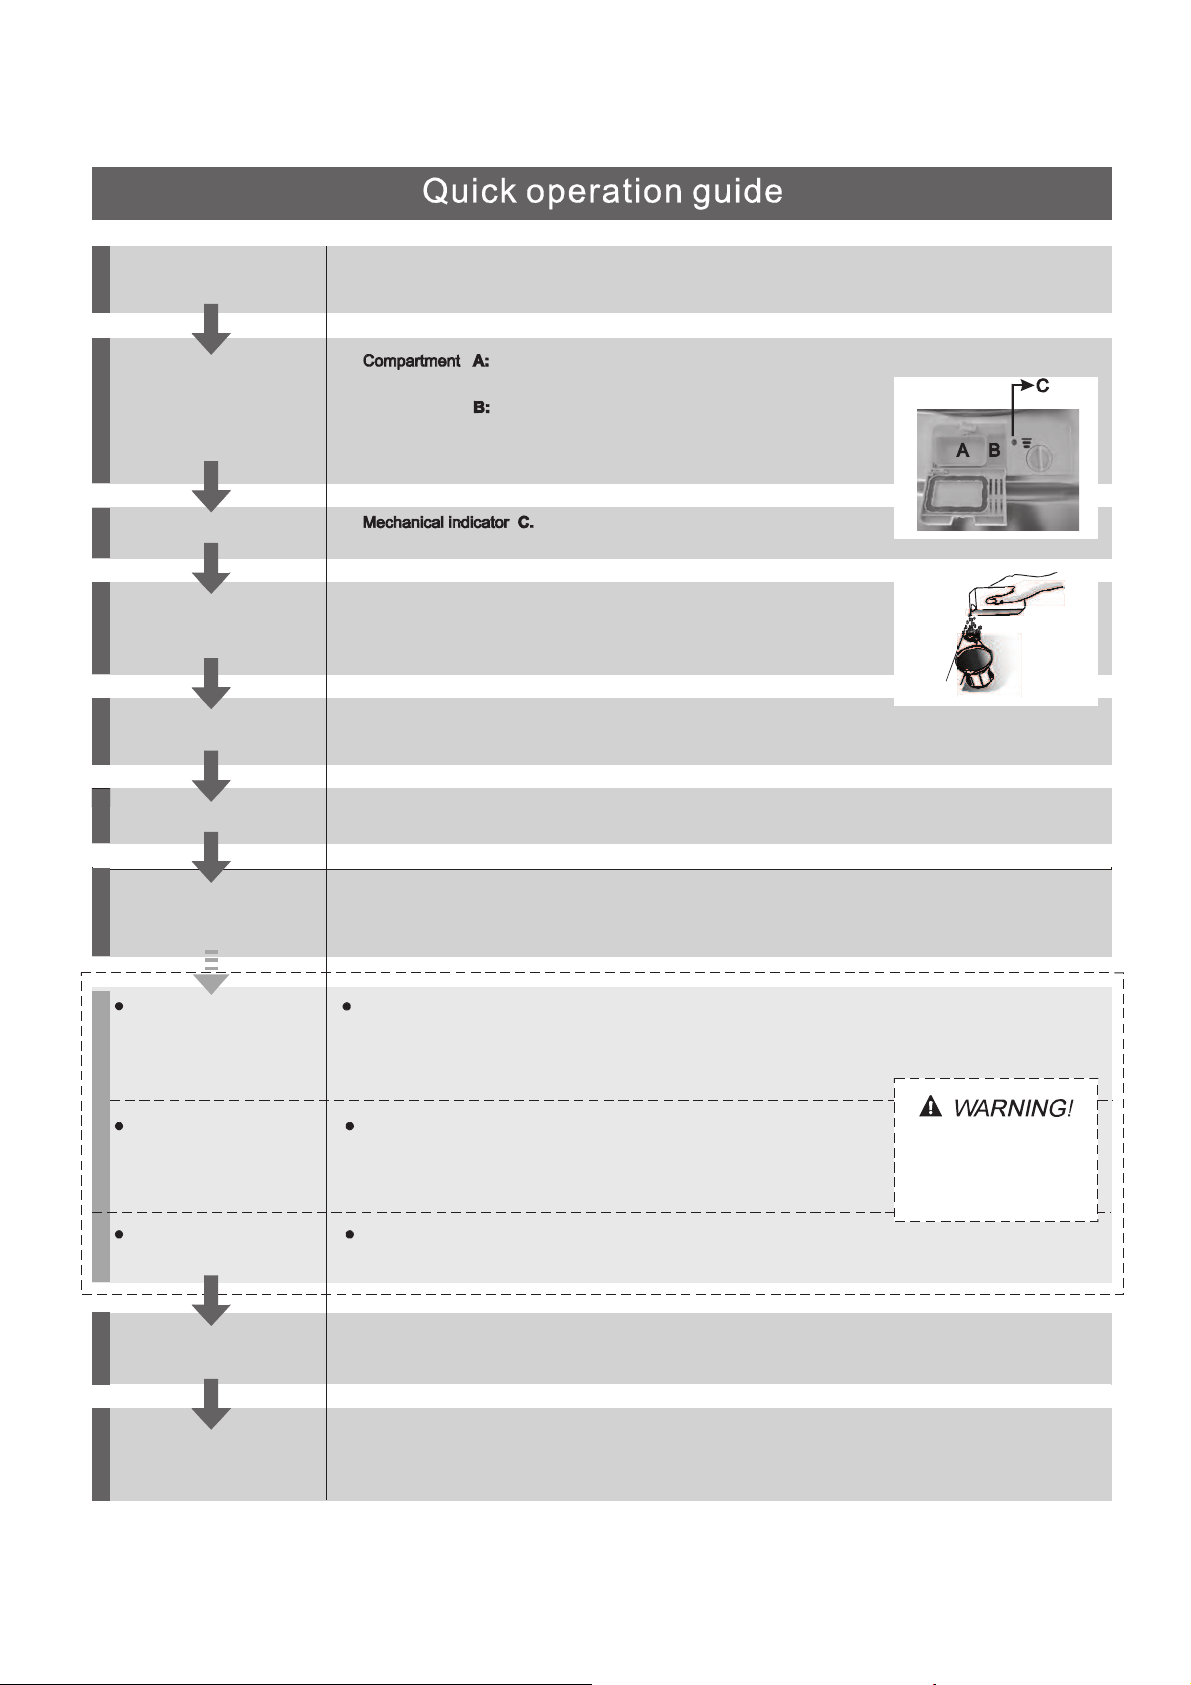
Compartment
For programmes with pre-wash only.
(Follow the user instructions!)
Electric indicator on control panel (if provided).
Check the rinse aid level
(On models with water softener system only.)
Electric indicator on control panel (if provided).
If there is no salt warning light in the control panel
(for some models), you can estimate when to fill the salt into
the softener by the number of cycles the dishwasher has run.
Check the regeneration
salt level
Load the baskets
Select a programme
Turn on the water tap ,close the door . The machine will start working after about 10 seconds.
Running the dishwasher
Switch off the appliance
Turn off the water tap,
unload the baskets
Fill the detergent dispenser
Warning: wait a few minutes (about 15 minutes) before unloading the dishwasher to avoid handling
the dishes and utensils while they are still hot and more susceptible to break.
They will also dry better.Unload the appliance, starting from the lower basket.
Changing the programme
Add forgotten dishes in the
dishwasher.
Scrape off any large amount of leftover food. Soften remnants of burnt food in pa ns,
then l oad the baskets. Refer to the dishwasher loading instructions.
Press the Programme Button until the s elected programme lights up.
( See the section entitled Operation instruction )Ā ā
When the working cycle has finished, the buzzer of the
dishwasher will sound 8 times, then stop.
Turn off the appliance using the On/Off Button.
If the appliance is switched
off during a wash cycle.
Op en the doo r car e ful ly.
Hot s t eam may escap e
when t he do o r is op ened!
If the appliance is switched off during a wash cycle, when switched
on again, please re-select the washing cycle and operate the dishwasher
according to the original Power-on state ).
Switch on the appliance Open the door,press the On/Off button to switch on the appliance .
1.Open the door a little to stop the dishwasher.
2.After the spray arms stop working, you can open the door completely.
3.Add the forgotten dishes.
4.Close the door, the dishwasher will start running again after 10 seconds.
For d etailed opera ting method read the co rresponding content on t h e instr uction manual.
1. A running cycle can only be modified if it has been running for a short time. Otherwise the detergent
may have already been released and the water already drained. If this is the case, the detergent
dispenser must be refilled.
2. Press the for more than 3 seconds to cancel the running programme.
3. Select a new programme.
4. Restart the dishwasher.
Programme Button
Page 3
To revie w the se ction on troubleshooting Ti p s
will h elp you to so l ve some co mmon pro ble m s
by yourse lf .
Dea r Customer,
Pl e as e care fu lly rea d this m anu al bef or e usin g the
dishw a sh er, it will help you t o use an d mainta in the
dishw a sh er pro pe rly.
Pa ss it on t o any subsequen t ow ner of the ap p liance.
This ma nua l contai ns se ctio ns on sa fet y Instructio ns,
Operating Ins tru c tions, Install at ion Instr uctions and
Troubl eshooting Tip s, et c.
Th e man ufa ctu rer, follo wing a policy of c onstant
developm ent a nd updat i ng of the pro duct, may
make mo difica tio ns witho ut giving pr ior notice.
Keep it as a re f er in the later days.
If you can not solv e the pr o bl ems by yourself ,
plea se ask for the hel p of pro fessio nal te chn i cians.
Th is appli ance i s in tend ed to be u sed in h ou s eho ld
an d simila r applica tions suc h as:
-s t aff kitch en areas in sh op s, off ices and othe r
working en vir onme nts;
-f arm hous es;
-b y cli e nt s in hotels , motels and othe r res idential
ty pe envir onm ent s;
-b ed and b rea kfa st type env ironments.
Dishwas her Fe atures.......... ......................... . . ..3
A Wa ter S oftener...... .... ......... .......... ... ...... ... ..4ǃ
Attention before or a fte r loading the Dishwasher
Baskets. ... ... ... ................................................9
Filt eri n g System.... ...... ... ...... ......... . ................13
Ca ring for the Di shwashe r......... ............ ... ... ... 14.
B L oad ing the Sal t into the So ften er. ...... . .........5ǃ
C Fill the Rinse Aid D ispenser.. . ................ ... ...5ǃ
D Function of De terg ent .... ... ... ...... ... ...... ... ... ..6
ǃ
Loadi n g th e upper . ... ...... ... . ................ .10Bask et
Loadi ng th e Low er .... ... ... ...... ... .... ... .. . ..10Bas k et
Wash Cyc l e Tabl e... .......... ...... .... ...... .. . ..... . .....11
Turnin g on th e Ap pliance... ......... .......... ..... .... .11
Change the Pr ogr am me.... . ......... ............ ... .12.. ..
At the End of the Wash Cycle.............. ... ... ... ... .12
Be for e c al lin g f or se rvi ce............ ... ............ .....22.
Error code s............. ... ... ... . ..... . ... ... . . ...... ... ... .23.
Tech nical informat i on. .. ... ....... ... ... ... ...... .. .... . 24..
Co ntrol Panel.... ... ... . ..... . ...... ... ... ... ...................3
.... ......... . ......... ....... ... . 15Install atio n p rep aration
...16Aesthetic pan el' s dime nsions and ins tal lati on
............. . 18Tension ad ju s tment of the doo r spring
.......... .......... ...... ... . 18Co nne ction of dr ain hoses
.......... .......... ..... 19Dishw ash er installation steps
About E le ctr i city Connecting... ... ....... .. . ..... ......20
Co ld Wat e r C onnec tion......... .......... ...... ......... 21
Page 4
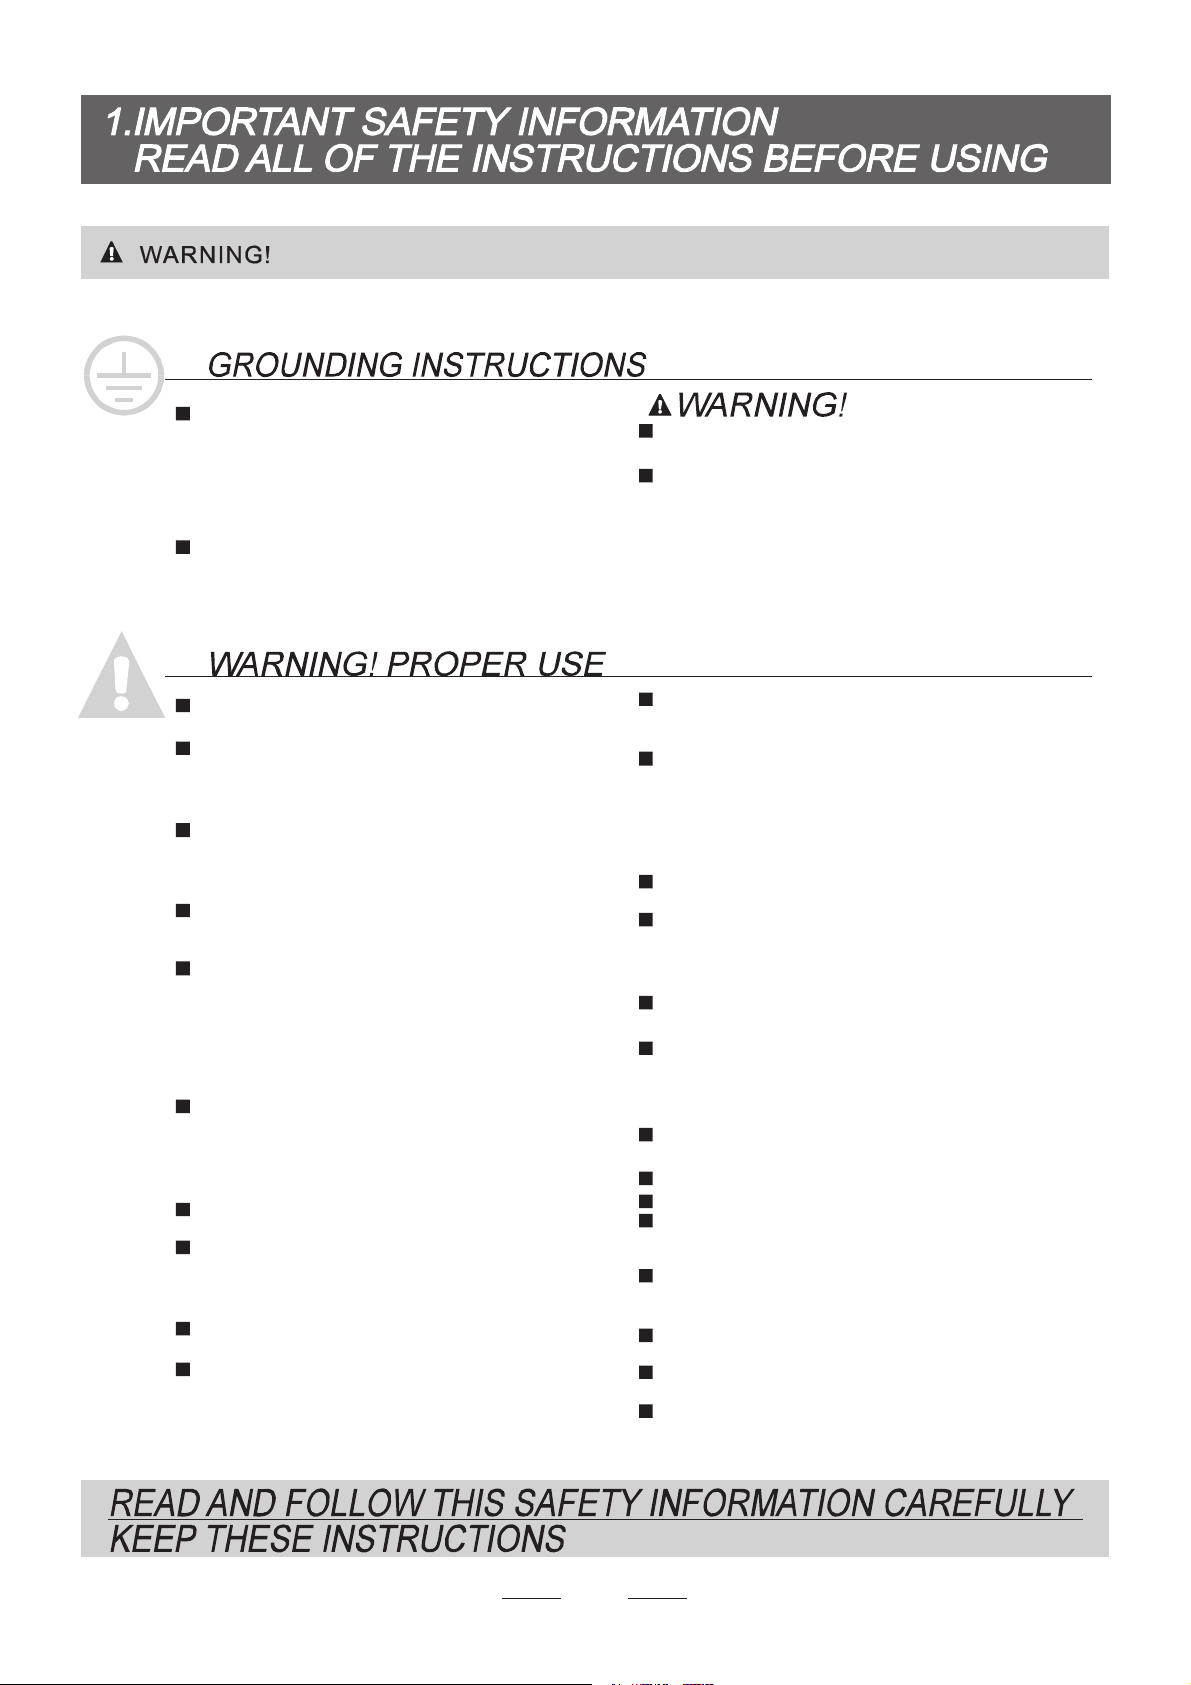
1
This appliance must be grounded. In the event of a
malfunction or breakdown, grounding will reduce
the risk of an electric shock by providing a path of
least resistance of electric current. This appliance
is equipped with a cord having an equipmentgrounding conductor and a grounding plug.
The plug must be plugged into an appropriate outlet
that is installed and grounded in accordance with
all local codes and ordinances.
Keep children away from detergent and rinse aid, keep
child away from the open door of the dishwasher,
there could still be some detergent left inside.
ren
Do not abuse, sit on, or stand on the door or dish
rack of the dishwasher.
Do not touch the heating element during or
immediately after use.
(This instruction is only applicable to machines
with a visual heating element.)
Do not wash plastic items u nless they are marked
dishwasher safe or the equivalent. For plastic items
n
ot so marked, check the manufacturer's
recommendations.
Us e only det erge nt and rin se additi ves
desi gned for an a utom atic dis hwa she r.
Neve r use so ap, laun dry de te rgen t, or hand
wash i ng deter gen t in you r dis hwa s her. Keep
thes e pro ducts out of the reach of chi l dren.
During ins tallat ion, t he power su ppl y mus t n ot
be exce s sively or dan gerously be nt or fl att ened.
Do not tamper with controls.
Do not place any heavy objects the
door when it is open. The appliance could tip
forward.
on or stand on
When loadi n g it e ms to be w ashed:
1) L ocate sharp it ems so tha t they a re not like ly
to dama ge the d oor seal ;
2 Warni ng: Kni ves and other utensils wi th
sh arp poin ts mus t be loaded in the ba sket
with th eir point s down or place d i n a
ho rizontal position.
)
When us i ng yo ur dishwash er, you sh ou l d
preve nt plast ic it e ms from com ing into co nt act
with the h e ating e l eme nt.(This instru ct ion is on l y
appli cable to machi ne s with a visua l heat in g
element. )
If the suppl y cord i s damaged, it must be repla ced
by the manufacturer or its se rv ice agent or a
simi larly quali fied per s on in or der to avoid a
hazar d.
Plea se dispose of pa cking materials prop erl y.
Use the dishwasher only for its intended function.
Remove the door to the washing compartment when
removing an old dishwasher from service or discarding it.
Dishwash er de ter gent s are stro ngl y alkalin e, th ey
can be ex tremely dang ero us if swall owed. Avoid
conta ct wi th sk in and e yes and kee p children aw ay
from the dis hwa s her w hen t he door is ope n.
Check that the de t erg ent comparm ent is e mpty
after c om p let ion of the wa sh cycle.
Th e app lia nce is to be connec ted to t he water
mains u s in g new hose se ts and that old hose-sets
should not be reused.
Th e maximum nu mb er of place set tings to be
washed i s 9.
Th e maximum pe rmiss ible inlet water pressure is
1Mpa.
Th e minimum perm issibl e inl et wat er pr ess ure is
0.04Mpa .
Children should be supervised to ensure that they do
not play with the appliance.
This appliance is not intended for use by persons
(including children with reduced physical, sensory or
mental capabilities, or lack of experience and
knowledge ,unless they have been given supervision
or instruction concerning use of the appliance by a
person responsible for their safety.
)
When using your dishwasher, follow the precautions listed below:
Th e door should not be left ope n,
si nce this coul d increas e the risk of trip ping.
Improper connection of the equipment-grounding
conductor can result in the risk of an electric shock.
Check with a qualified electrician or service
representative if you are in doubt whether the
appliance is properly grounded. Do not modify the
plug provided with the appliance; If it does not fit
the outlet. Have a proper outlet installed by a
qualified electrician.
Do not operate your dishwasher unless all
enclosure panels are properly in place. Open
the d oor very carefully if the dishwasher is
operating, there is a risk of water squirting out.
Page 5
2
Dispo se of the d is h wa s her packagi ng material correc tly.
All pa ckaging mate rials ca n be rec y cled.
Pl ast i c pa rts are marked with the s tandard international a bbreviations:
PE fo r polyet h ylene, e .g. shee t wrappin g m ateria l
PS fo r polysty rene, e. g. paddi n g m aterial
POM polyox yme thylene, e.g. pla stic c lips
PP po lypropylene, e.g. Sa lt fi ller
ABS Acrylonitr i le Butadiene Styrene , e.g. Control Pa nel .
Pa cka ging materia l coul d be da nge rou s f or ch il d ren !
Fo r dispos i ng of pa ckage an d the a ppliance ple ase go to a recycling centre. Ther e fore cu t
off the pow er s upply ca ble and mak e the door closing de vic e u nusab le.
Car db oard pac kag i ng is manufactured fro m r ec ycl e d pap er and s ho u ld be disposed in the
waste paper c ollecti on for recycling .
By en surin g this p r odu ct is disp o sed of corr ectly, you wil l hel p prevent po tential negat ive
co nse que nces for the e nvi ronment a nd human h eal th, w hic h could otherwise be c aused
by inappro p ri a te wast e handlin g of this prod uct.
Fo r m ore d e ta iled informatio n a bout re c ycling of t his product, please con tact you r loc a l
ci ty of fice and your ho usehold w ast e di s pos a l se r vi c e.
DISP OSAL : Do no t d isp ose th is pr oduct as unsorte d m uni cip al wa ste . C oll ect ion o f such
waste sepa rately for spe c ial treatment is necessa ry.
Page 6
3
before u s ing it fo r the first t ime.
To g et t he best perform ance from you r di shwasher, rea d all o p er ating ins tructions
9
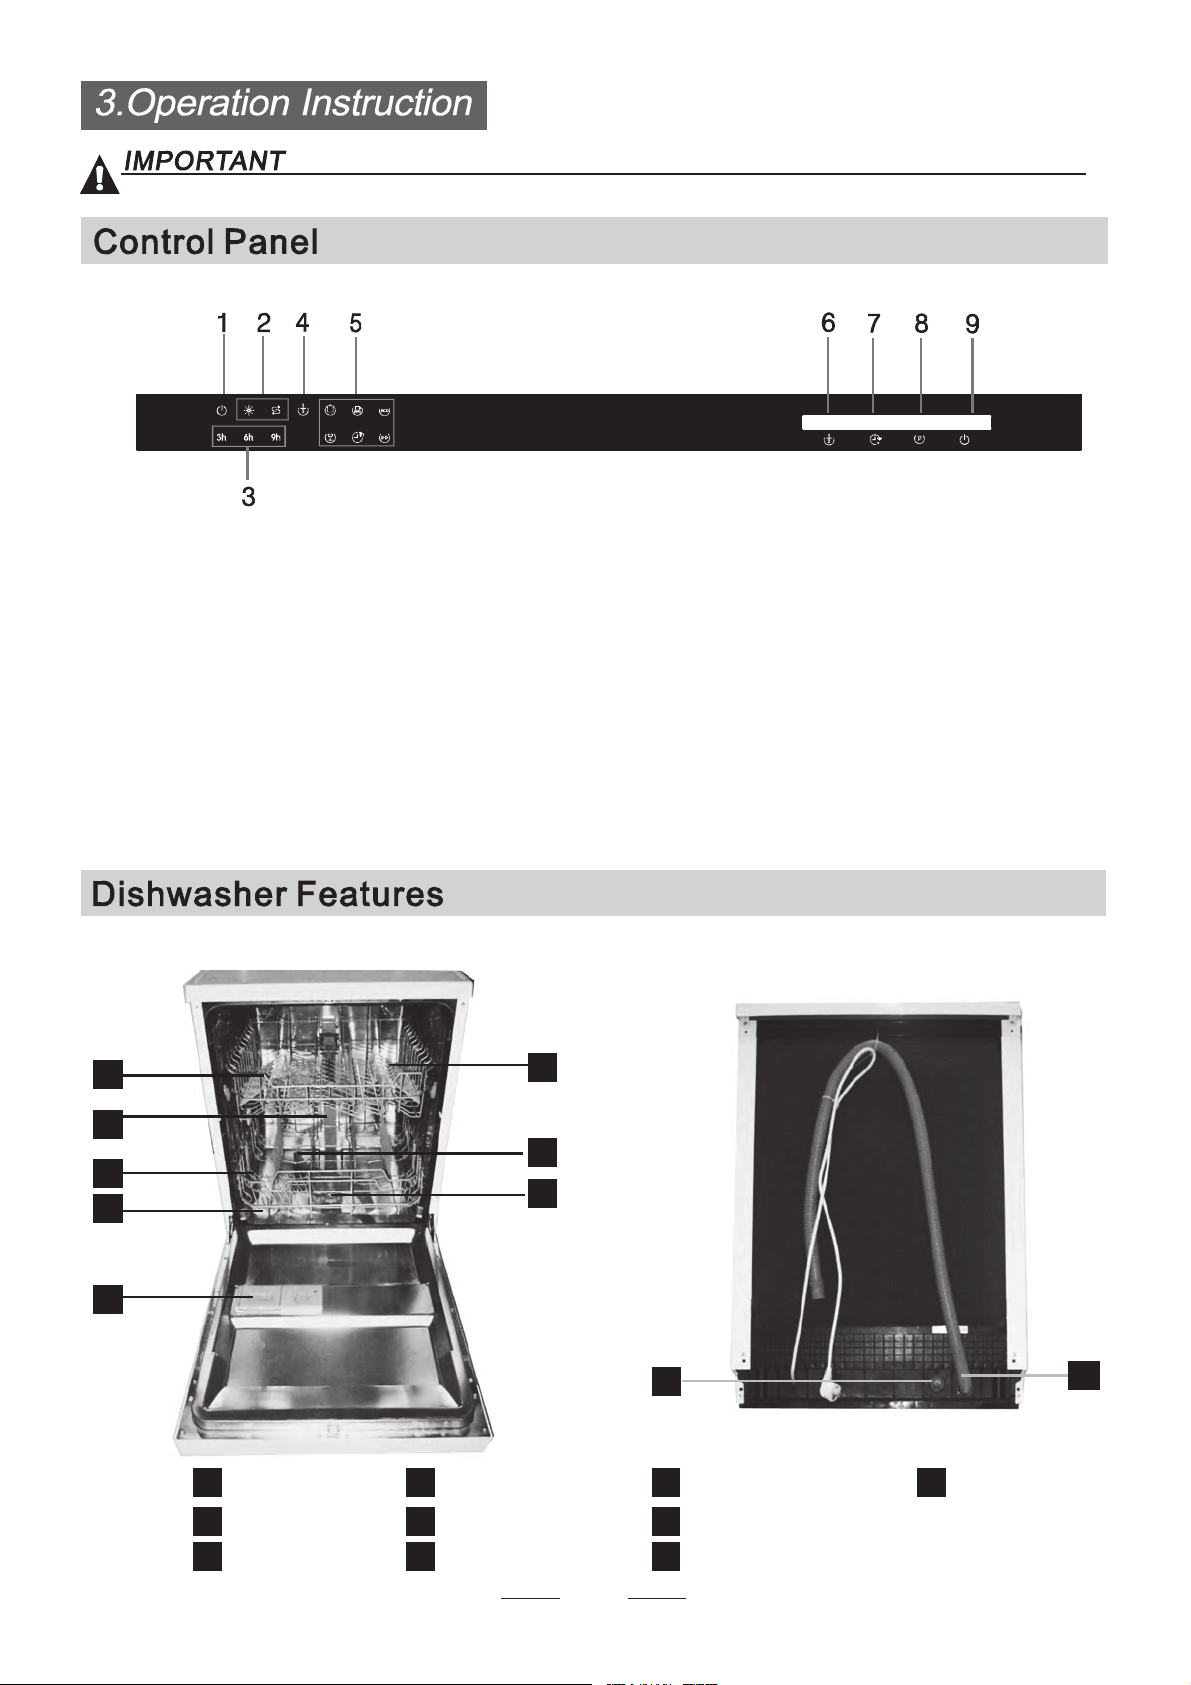
Ba ck View
1
2
3
4
5
6
7
8
Front v i ew
Dispe nser
Cup She lf
Sp ray arms
Filter ass emb l y
In let p ipe conn e cto r
Dra in pipe
Lower Ba ske t
Inner pipe
Upper Ba ske t
1
Salt Co nta ine r
5
6
7
8
9
10
3
2
4
10
2.Salt and r i nse aid warning lig hts : To sh ow
wh en the s alt container or di spenser need to be
refil led
5.Progra m indicators : to sh ow which program
you have cho se;
3.Del ay indica tors: to show the del ay t ime
(3h/6h/9h/ )
1.Power indic ato r : To show w h en the powe r on.
4. Ha ft loa d indicator : To s how w hen you sel ect t he
ha ft load functi on .
9. On/ Off B utto n: To tur n on/off the power su pply.
7. Dela y Button : To Pr e ss the button to dela y.
8. Program Bu tton : To Press the bu tton t o select a
wash Pr ogra m.
6. Half l oa d functions Butto n: To select Half load
functions. (W ith this Half loa d functio n yo u c a n
only use it when you have on ly ab out or less t h an
5 pl ace sett ing di sh wave , and yo u w ill se e le s s
water a nd energ y consumpti on , c an only be u sed
with Inte nsiv e, No rm al, Eco, Gla ss an d 1 Hour .)
Page 7
The wa t er soft ener m ust be s et manually, usin g the wa ter h ard nes s dial.
The wa t er so ft ener is des ign ed to remove minerals and sa lts f r om the wat er, which would ha ve
a detr imenta l o r advers e effect on the op e ra tion of the applian ce.
The higher t he co nte nt of the se mine r als a nd salts, the har der your w ater i s.
The so ftener should be adjusted accordin g t o the hard nes s of t he wate r in you r area. Your local Wat er A uthority
can ad vise y ou on th e hardne ss of th e wat er in your ar ea.
Adjusting Salt Consumption
The dishw asher is de sig ned to allow for adjus tme nt in the amo unt of sa lt co nsumed b ased o n the h a rd ness o f
the water us ed. Thi s is intended to op tim ise and cus tomise th e level o f salt consum ption.
1. O p en th e door , Sw i tch on t he ap pl i ance;
2. P ress the Program button for more t han 5 s econds to start the water sof tene r
set mode l wit h in 60seco nds afte r t he appl i ance was sw itc hed on ( Th e S alt a nd
Ri nse ai d war ninglights w ill be on per io d ica lly w hen it g et in th e set model ) ;
3. P ress the Program but ton to s elect the proper set acc ording to y our loca l envi r on men t,
th e s ets w ill chang e in th e f ollowi ng sequence: H 1-> H2- >H3 - >H4->H5-> H6;
4. P ress t he Pow er butto n t o end th e set u p model.
WATER SO FTENER
The har dne ss of t he water varie s f rom plac e t o plac e. If hard water i s used i n the dishw asher, de pos its w ill
form o n the dishes and utensils .
The appliance i s equipp ed with a special soft ener tha t u ses a salt conta iner s pecifically des ig ned to e lim inate
lime an d minera ls fr om the wate r.
Contact yo ur local wa ter board for in for mation on t he hardne ss of your w ater supply.
Plea se follo w the st eps below for adj ustment in sa l t consumptio n.
4
If your m odel does not have any water softener, you may skip this secti on.
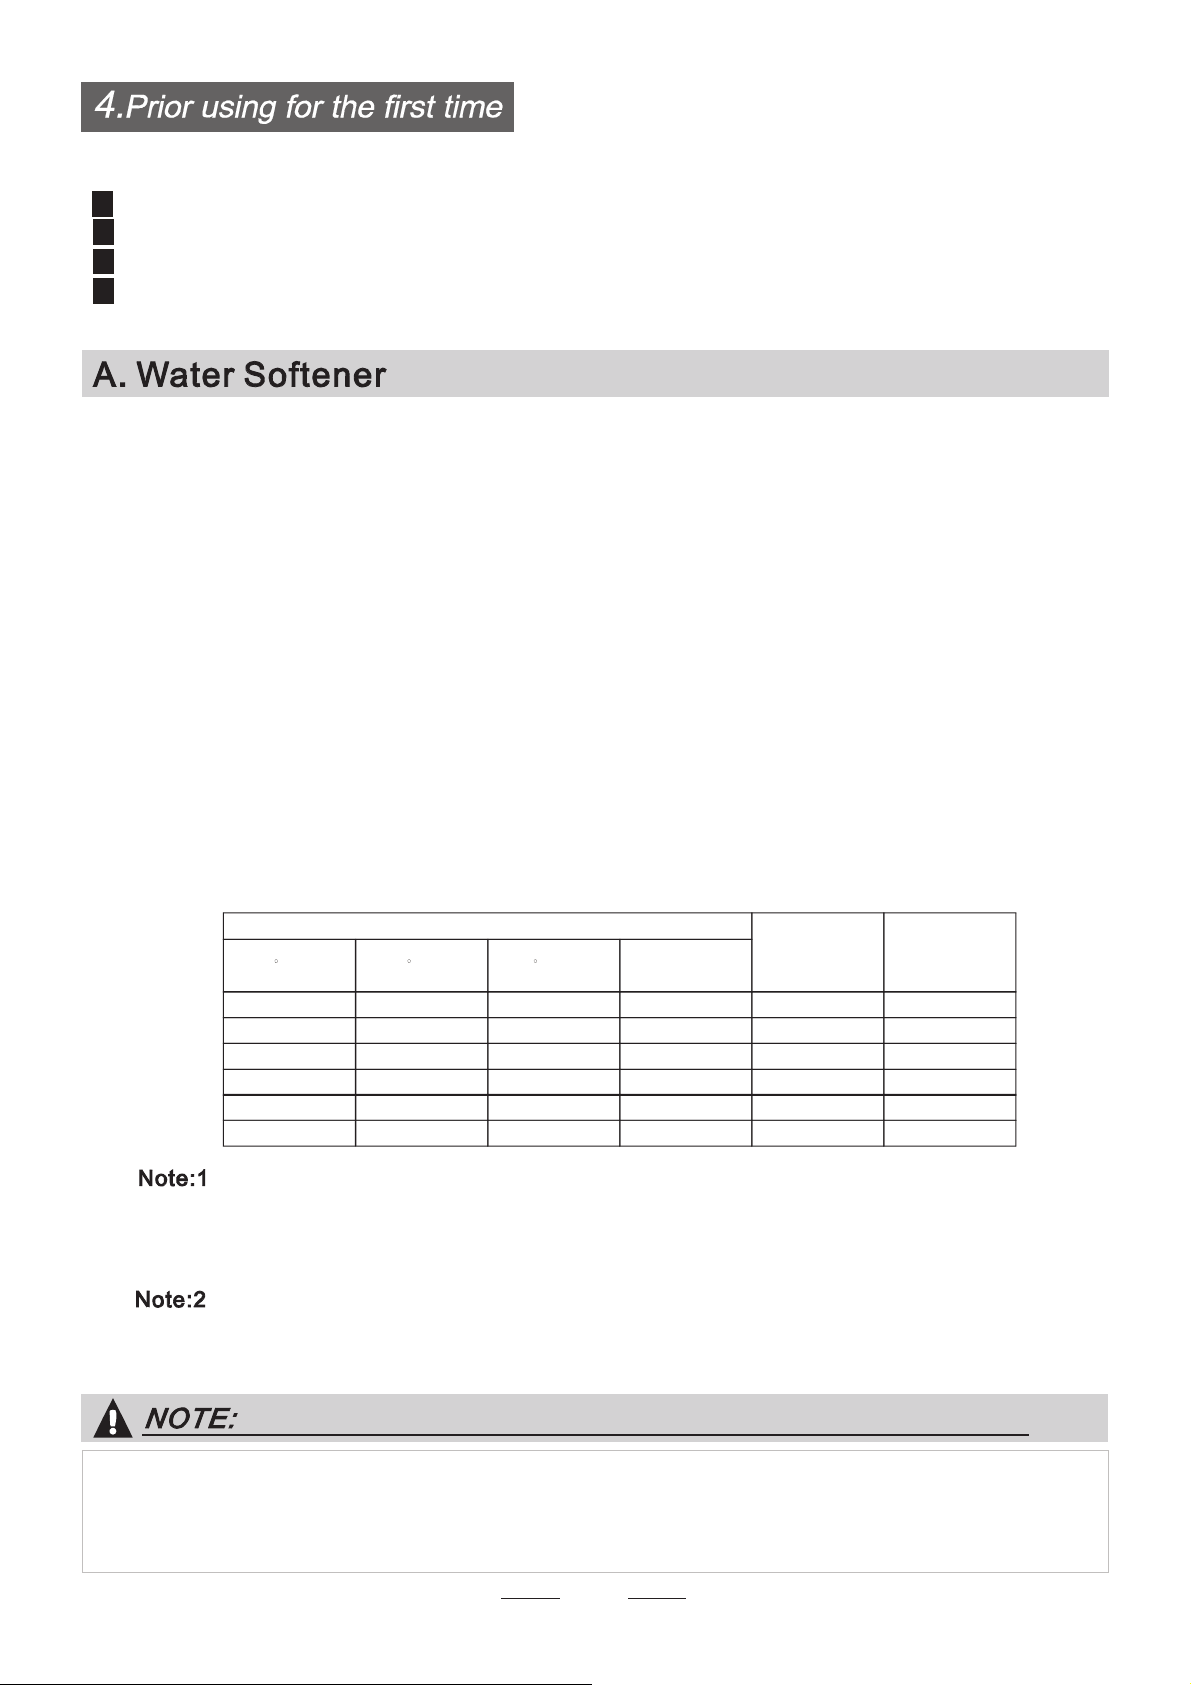
Clar k: Bri tis h degree
fH : Frenc h degree
DH: German degree
dH=1.25 Clark e=1 .78 fH=0.178mm ol/l
1
Th e m anufac tory settin g: H4 (EN 50242)
Befo re using your di shwasher for the first time :
A. Set the wat er softe ner
B. Add 1. 5Kg di shw ash er sa lt and t hen full fi ll th e salt c ontain er wit h w at er
C. Fill t he ri ns e aid dispense r
D. Fill i n deterg ent
dH
0~5
6-11
12-17
18- 22
23-34
35- 55
mmol /l
0~9 0~0 .94 0
10-2 0
1.0-2.0 9
21-3 0
2.1 -3.0 12
20
fH
0~6
7-14
15-21
Cla rke
WATER H A RD NE SS
Se le ctor P osi ti on
Salt co ns umption
(gram/ cy cle)
31- 40 22- 2 8 3.1-4.0
41-6 0
4.1 -6.0 30
60
29-42
61- 98 43- 6 9 6.1-9.8
H1( R ap id )
H2(1 Ho ur )
H3(1Ho ur Rap id )᱃
H4(G la ss )
H5(G la ss Rapid)᱃
H6(G la ss 1Hour)᱃
Page 8
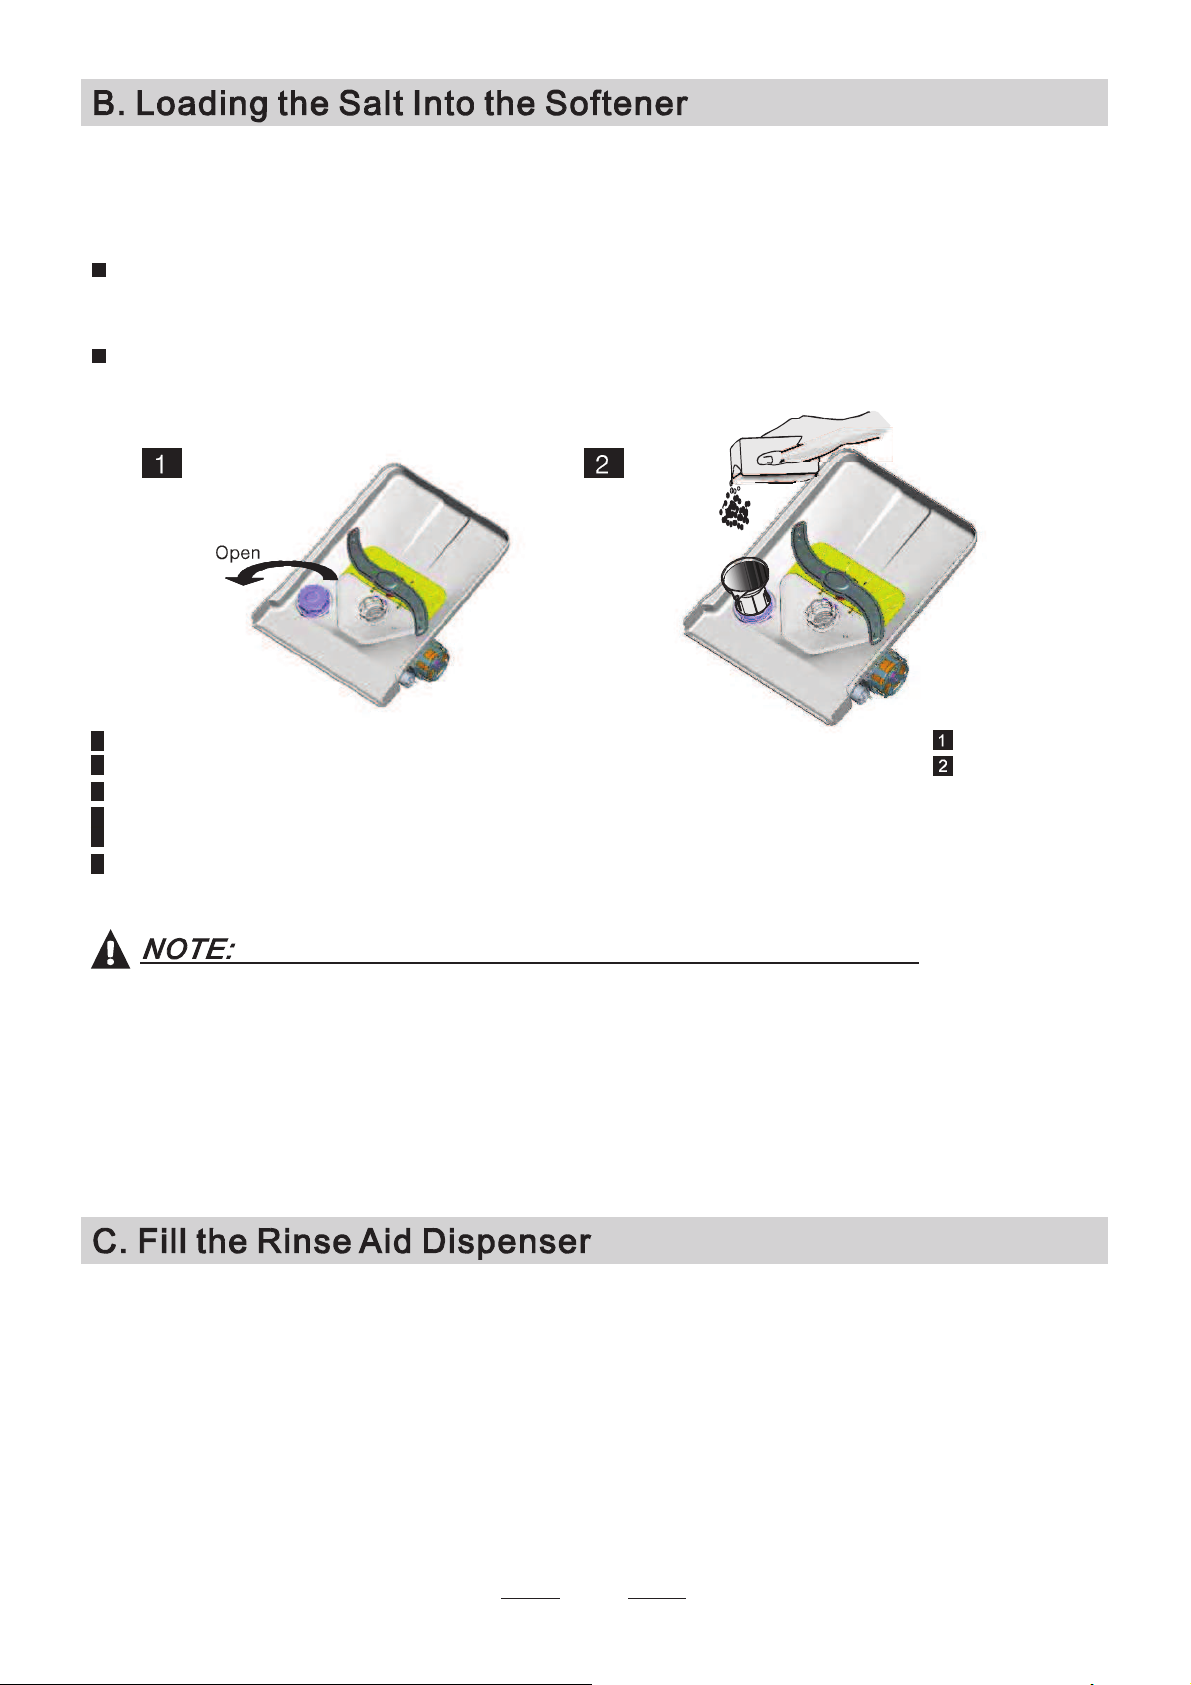
Always use the salt int end ed for u se with dishwasher.
The salt cont ain er is located beneath the l owe r bask et and should be fill ed as expla ine d
in t he foll owin g:
Attention!
Only use salt spe cif i ca lly desi gne d for the use in d i shwash ers ! Every other type of
salt n o t speci fically de sig ned for the u se in a d ishwasher, especially tab le salt, wi ll
damage the w ater s of t ene r. In cas e of damages caused by t he use of unsuit able
salt t he ma nuf act urer d oes not give any wa rra nty nor is li abl e for any damage s caus ed.
Only fill wi t h sal t jus t b efo re starting one of th e comp lete washing p rograms.
This wi ll preve nt any g rai ns of s a lt or salt y wate r, which ma y have b een spill ed,
remaining on th e bottom of t he machi ne for any period of time, which may cause
corrosi o n.
5
1. The salt c ontaine r mus t onl y be r efi l le d whe n t he salt wa r ning lig h t in the c ontrol p anel com es on. D e pe n di ng on
how wel l the salt disso lves , th e salt warn ing light may st ill be on e ven t hou gh th e salt c ontainer is fi lled.
If the r e is no salt warning light in the con trol panel (fo r some M ode ls) ,yo u c an estim ate when to f ill
the salt into the so ftener by the cycles that t he dishwashe r has ru n.
2. I f there are sp ills of th e salt , a s oa k or a rap id pro gram should be run to re move the exce ssiv e salt.
Th e rinse aid i s relea s ed during the fi nal rinse to prevent water fro m formin g drop lets o n your dis hes, w hic h can
leave spots and s t rea ks. I t als o imp rov e s dr y i ng by all owing wat e r to roll off the di shes. Your dishwasher i s
designe d to use l iquid rinse aids. The ri n se a id dis penser is l o cat ed insid e t he do o r next to the d etergen t di s pense r.
To fil l the di spenser, ope n the cap and pour the r inse aid into the d ispenser until t he level indicator t urn s comple tel y
black. The v olume of the ri n se aid cont ain er i s about 110m l .
Rinse Aid Dispenser
Function of Rinse Aid
Rinse aid is automatically a dded d uri ng the last r ins e, ensuring th orough rinsi ng, and spo t and st reak free drying.
Attention!
Only use br anded rinse ai d for dis hwasher. Nev er fi ll the rinse aid dis pe nse r with a n y other substanc es
(e.g. Dishwasher cleaning agen t, liquid d ete rg e nt) . This wou ld da mag e t he ap p li ance .
Fu ll f ill the s alt cont ainer with wa ter,It is normal f or a sma ll amount o f wa ter to come out of the salt c o nta ine r.
A After the l ow er basket ha s been removed, uns crew and remove the cap from the salt conta ine r.
B Place the en d of the funn el (supp lied) int o the ho le and introd u ce about 1.5kg o f dishwashe r salt.
C
D Af ter filli ng th e cont ain er , sc rew the cap t igh tly back clockwise.
E The salt wa rning light wi ll stop be ing after th e sa lt c o nta iner has be en fi lled with s a lt .
F Immediatel y aft er fil lin g t he salt in to the salt c o ntaine r, a washin g p rogram should be start ed
progr am Ot her wise the filt er sys tem , p ump or other impor t ant pa rts of the ma chine may be damage d
by salt y w a ter. This is out of warranty.
(W e su ggest to use a short
).
3. I f the machine nee ds to be dump ed fo r the re asons of transit, repa ir and so o n, pl ea s e u se the bi bulo us cloth or
analog to blot up the water in th e salt c on tain er, an d s crew the cap tightly, after w ard , t ransit or rep air the mac h ine .
Afte r t ransiting or r epa iri ng the m achine a nd con fir mi ng it in or der, load the salt into the so ft e ner acco rding to the
process of B. Lo ading the s al t into the Soften er . O ther wis e, it co uld be m ak e the big d am age to th e machine,
for ex a mp le, rustines s, conk an d so on. Such probl ems are ou t of t he gu ara nte e r an ge.
Ŷ ŷ
Page 9
6
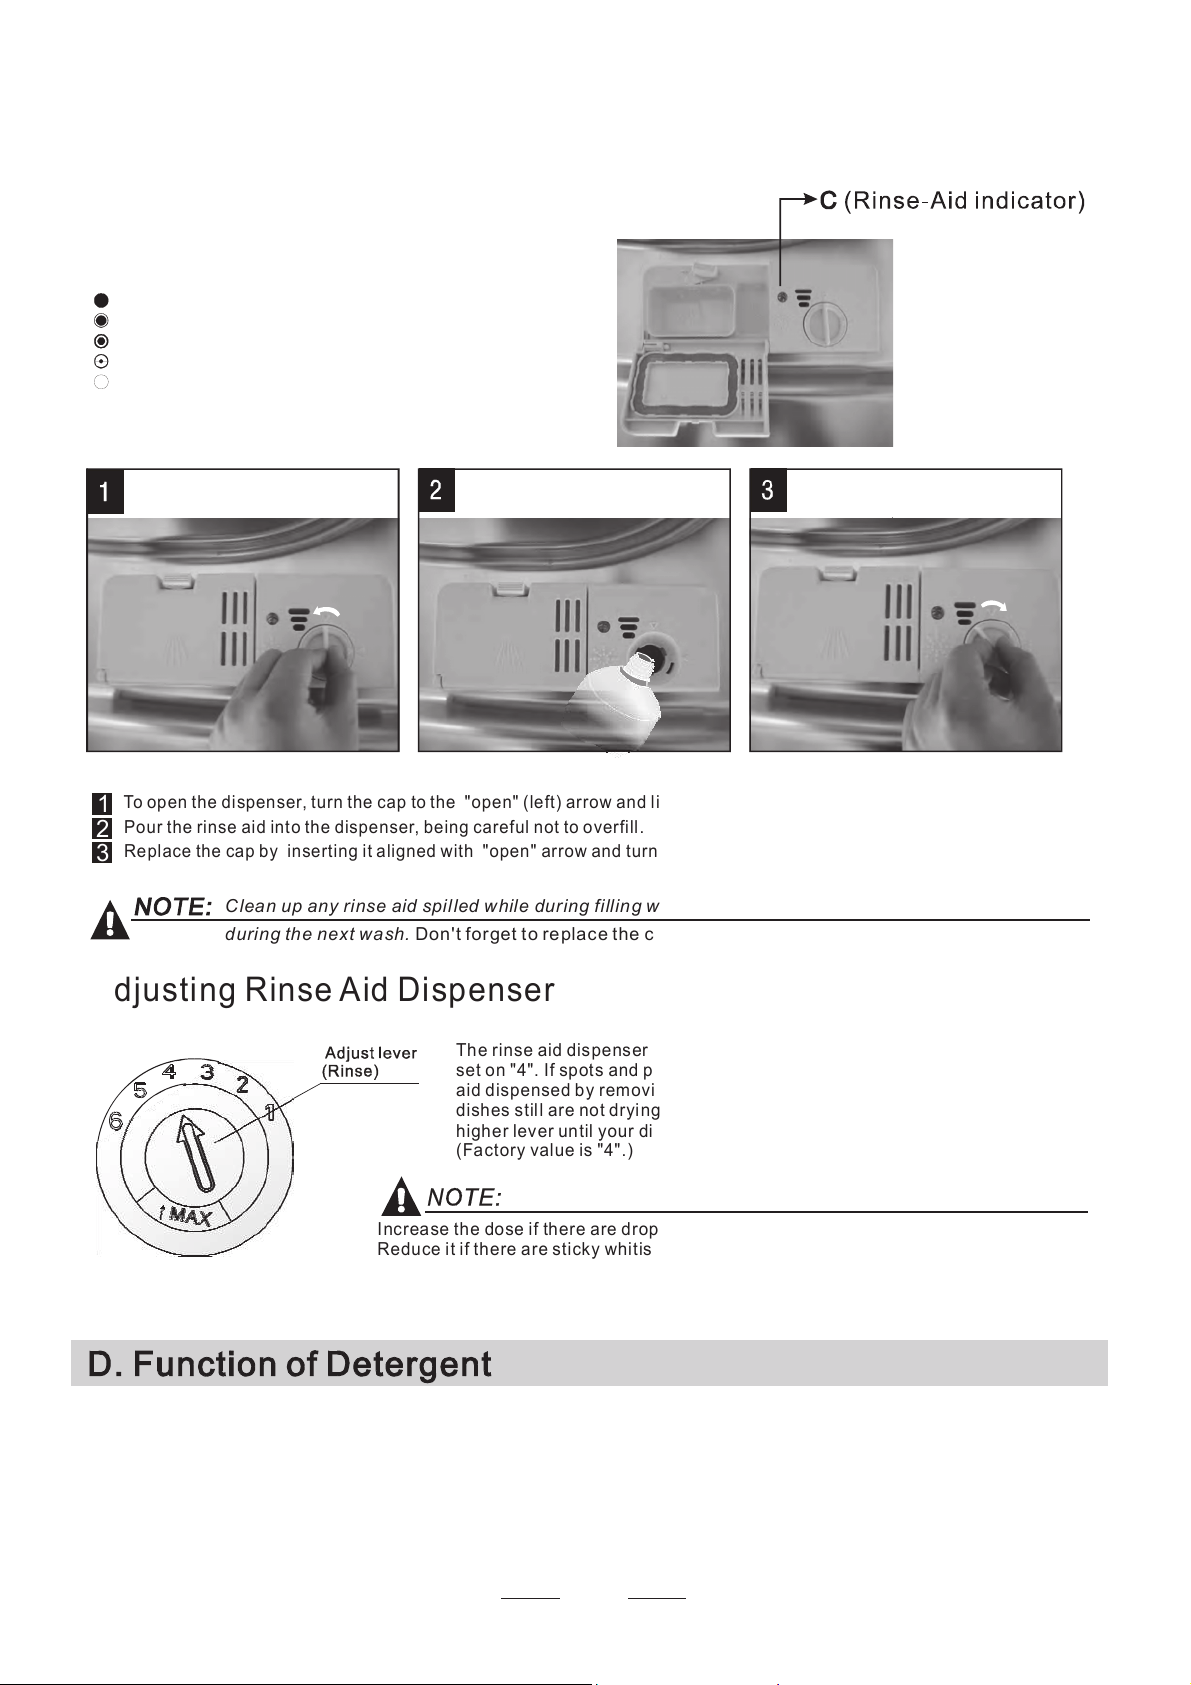
To open t he dispen ser, turn the cap to the "open" ( left) arr ow an d l ift i t o ut.
Po ur th e rinse aid into the dispen ser, b eing careful n ot to overfill .
Re place the cap by in serting i t ali gned wit h "open" arrow and turning it to t he closed ( right) arrow.
Adjusting Rinse Aid Dispenser
Th e rinse aid dis pens er ha s six or four s ett i ng s. Always st a rt with the d ispens er
set on "4". If sp ot s and poor drying are a p rob lem, i ncrease the amoun t of rin se
aid dis pensed b y r em o vin g the d i spe nser lid an d rot ating the d ial to "5". If t he
dish es still are not dr yi ng properly or are s how s pots, adj ust the dia l to the n ext
high e r lev er un til your di shes a re sp ot-free. Th e recommended setting is "4".
(Factory value is "4".)
Increase t h e dose if th ere are d rops of water or lime spot s o n t he di shes after wa shing.
Re duce i t if th ere a r e sti cky whitis h st ain s on your dish es or a bl uish fil m on glassware o r
kn ife blad es.
1
2
3
As the ri nse aid diminishe s, th e size o f the black dot
on the rinse a id level indic ato r cha nges, as illustra ted below.
Ful l
3 / 4 full
1 / 2 full
1 / 4 full - Sho ul d refi ll to elimi nate spo tti ng
Empty
When to Refill the Rinse Aid Dispenser
If ther e is no ri ns e-aid wa r nin g ligh t in the c ont rol p ane l, you can es t imate the amount from the col o ur
of the op tical lev el indicator C loc a te d next to t he cap. Whe n th e rinse-a i d contai ner is full, th e whole
indi cat or wil l be dark .As the rinse -aid diminishes , the si ze of the dar k dot de creases. You should n eve r l et
the rinse aid leve l fal l 1 / 4 ful l .
du ri n g the next wa sh.
Don't f orget to re pla c e th e cap be fore you close dishwasher do or.
Clea n up any rinse aid spilled w hile du r ing f i ll ing with an absorbent cloth to avoi d excessive foaming
Dete rge nts wi th its chemical ingred ients are nece ssa ry to r e move dir t, crush dirt an d transport it o u t of the dish was he r.
Most of th e co mme rci al qu ality detergents are su itable f or this p ur p os e.
Prop er Use o f Deterg ent
Use only de t er gent s peci fically made for the use in d is h was her s. Keep your detergent fr esh and dr y.
Don't put po wde re d d etergen t int o the d ispe nser u ntil you 're re ady to was h dish es .
Attention!
Page 10

7
Amount of Detergent to Use
Dishwash er de ter gen t i s corros ive! Take care to ke ep it out of reach of c h ildren.
Always add the deterg ent j ust befo re starting eac h wash cyc le.
Only use brande d deterg ent ai d for dishwash er.
If the lid i s clo sed: press release butt on. The li d will spri ng op en.
Based o n th e ir ch emical c ompo sit io n, det erge nts c an be split in two basic types :
Dete rge nt ta blet s of diffe ren t brands disso lve at differ e nt s peeds. For t his r ea s on some
dete rge n t tablets can not diss olve and de v el op the ir fu l l cl e aning po wer during sho rt
prog rams. There fore plea se use l ong program s when u sin g deterg ent t abl e ts, t o
ensu re the c omp lete rem oval of detergent residua ls.
The dispenser m us t b e refill e d before the start of each was h cycle follo wing the instructions
prov ided in the w ash cycl e table . Your dis hwa sher uses less de tergent and rins e aid than
Convent i ona l dis hwa she r. Generally, onl y one ta b lespoon of deterg ent is n ee ded fo r
a norma l was h load. More hea vily soi l ed it ems need mo re detergent. Al way s ad d t he
dete rge n t jus t before star tin g the dishwasher, ot herw ise it coul d get damp and w il l n ot
diss olve proper ly.
Concentrated Detergent
Detergent Tablets
Detergent Dispenser
co nve nti o nal, al kaline detergen ts with c aus tic c omp one nts
lo w alkalin e concentra t ed deter gen ts with natura l enzymes
Normall y new pu lverised de tergent is with ou t p hos ph a te. T hus the water so ftener fu nction o f
phos pha te is no t giv e n. I n this case we r ecommend to fill salt in the sal t con taine r ev en when
the hardness of wate r is onl y 6 d H. If de tergents without phosphate ar e use d in the case of h ard water
ofte n white spots ap p ear on d ishes an d glasse s. In this case pl ease add mo re deter gen t to reach
bett er re sult s. De ter g ent s wi t hou t chlori ne do only bl each a littl e. Stron g and co loured spots wil l not
be remo ve d com pletely. I n thi s case p lease ch oose a prog r am wi th a higher temperature .
Detergents
Ther e a re 3 sorts of d eter gents
1.With p hosphate an d with ch lorine
2.With pho sphate and wit hou t c hlorine
3.Withou t phosphate and wit h ou t chlo r ine
Page 11

Fill t he deter g ent disp ens e r wit h detergent.
The mar king indica tes the dosing le ve ls , as
illustrate d on the righ t:
The pla ce of main wash cyc le de terg ent plac ed.
The pla ce of pr e-wash cycle deterge nt placed.
Plea s e observ e the m anufact urer s do sing a nd storage
Recommenda tio ns as st a te d o n the detergent pac kagi ng.
Clos e the lid a nd pres s until it locks in pl ac e.
If the dishes a re he av ily soile d, pl a ce an a ddi tional
dete rge n t do se in the pre - was h deterg ent cham ber. T h is deter gen t wil l take effe ct durin g the pre-wash p has e.
A
B
Fill in Detergent
You find informati o n about the a mount of de tergen t for th e si ngle program me on the last page .
Pl eas e aware, tha t according t o the level soiling and the spec ific har dnes s of water differ ences ar e possib le.
Please observe th e ma nufa ctu r er 's rec ommend at ions on the de tergent pack aging.
8
A
B
Page 12

Cutlery wi th wooden, horn chi na or
mother-of-p ea r l han dle s
Plastic items that are not h eat resistant
Older c ut l ery with glued parts t hat a re not
temperature r esistant
Bo nded cut ler y ite m s or di shes
Pe wt er or cooper i tems
Crystal gl ass
Steel item s subj ec t t o rus ting
Wood en pl att e rs
Items m ade from synt hetic fib res
Some t y pes of glasses can become
dull after a larg e number of w ashes
Silv er an d a luminum part s have a
tendenc y to dis col our during was hing
Glaz ed patte rns may fade if machine
washed frequently
Are not suitable
Are of limited suitability
Dishe s and items of cutlery must no t li e inside one a n other, or co ver each other.
To avoi d damage to glas se s, th ey mus t not to uc h.
Load large ite ms whic h are most diffi cul t to clea n in t o the lo we r b ask et.
Th e upp e r bas ket i s designe d to ho ld more d elicate and ligh ter dishw are suc h as glasses , cof fee
and t ea cup s
Long bladed k nives st o red i n a n upr igh t positio n are a potential haza rd!
Long and /or s harp item s of cut lery suc h as carving k niv es must be po sitioned
horiz onta lly i n t he up per b aske t.
Pleas e do not overloa d your di shw asher. This is importan t f or good result s and fo r
reaso n ab le co n sumpti on of en ergy.
Load ho ll o w ite ms suc h as cup s, gl asses, p ans et c. With the o pe ning faci ng dow nwa rds s o t hat
water c an not co lle ct in the con tainer or a deep base.
Consi der buyi ng ute ns i ls wh ich are ide ntifie d a s dis hwa she r-proo f.
Us e a mil d detergent th at is de scribe d a s 'kind to dishes'. I f n ece ssa ry, se ek furth er
information from t h e deterg ent manufactur e rs.
Fo r par ticular items, se lec t a p rogram w ith as low a temperature as po ssib le.
To prev ent dama ge, do n ot take gla ss and c utl ery out of the dis hwashe r i mmediatel y
after t he programme h as ended.
(For be st performance of t he di shw ash er, fol low t hese load ing g uid e li nes .
Feat u res a nd ap pearance of baske ts and cutl ery ba skets may var y from your m odel.)
Sc ra p e off any la rge amounts of le ft over food. Sof ten r emnants of b urnt foo d i n pan s.
It i s not necess ar y to ri nse the d is hes un der runn ing water.
Pl ac e obje cts in the dishwasher in follo win g way:
1.I tem s such a s cups, glasses, po ts/pans, etc. a re f a ced downwards.
2.Curv ed it ems, or one s with r ecesses, sh ould b e loa ded as lant s o that water can run off.
3.All utens ils are sta cked securely and c an not ti p over.
4.All utens ils are pla ced in t he way t hat the sp ray arms can rot ate freel y d ur ing wa shing.
Very sm all it ems s hould not b e washed in the di shwasher as th ey cou ld ea s il y fall out of th e basket .
To preven t water drip pin g from the uppe r basket into the lowe r basket, w e recomme nd th a t you
empt y the lower ba sk e t fir st an d t hen the upp er ba sket.
9
Page 13

10
The u pper bas ket is design ed to hol d more del icate
and lighte r dishwa re such as glasses, coff e e a nd
te a cups a nd saucers, as w el l a s plates, small b owls
and shallo w p a ns (as long as th ey are n ot to o dirty).
Po siti on th e dishes an d co okw are so t hat th ey will
not get mo ve d by t he spray of w ate r.
We su g ges t tha t you pl a ce large ite m s and the most
difficult to clea n ite ms are to be pla ced into the lower
basket: su ch as po ts, pans , lids , se rvi n g d ishes and
bowl s, as show n i n the figure below. It is pre ferab le to
place s er v ing dishes an d lids on the side of the ra ck s
in ord e r to avo id bl ocking t he ro tat ion of the t op spray
arm.
Po ts, serving bo wls, etc, m ust always be place d top do wn .
Deep po t s shoul d be s lan ted to allow water to fl ow out.
Please be remin ded that:
The B ot tom Basket featur e s fo ldi n g spikes so t ha t l arg e r or mo re po t s and pans can be loade d.
Folding Spikes of Lower Basket
Fo r bet ter stacking of pots and pa ns,
the spi kes c an be folded down a s
show in the picture right.
Adjusting the Upper Basket
Th e h eight of the up per ba sket can b e adjusted in ord er to
create more s pace for larg e uten sil s both for th e upper
/l ow e r bas ket . The h eight of the up per bask et can b e
adjus ted by placing the wheels on di ffe re n t height of t he
rails. Lon g items, se rving cutlery, salad servers and kniv es
shoul d be pl aced on the sh elf s o that t hey do not obstruct
the rotati on of th e spr ay arms..
Folding back the cup shelives
Fo r bet ter s tacking of po ts and p ans ,
the spikes c an be fo lded dow n a s
show in the pict ure right.
Cu tlery shoul d b e placed in t he cutle ry basket with the han dle s at the b ott om. If the ra c k has side baske ts, the
spoons shoul d be load ed separate ly into the ap propria te sl ots, espe cia lly long utens ils s houl d be pl ace d in the
horiz ontal posit ion at t he front of the up per ba sket as shown in th e pic tur e.
Do n o t let any item exte nd th rou gh th e b o ttom.
Alway s loa d shar p uten sils with t he shar p p oin t down!
Page 14

*E N 5 024 2 : Th is pro gra mme i s the te st cy cle. T he infor mation for comparability t est
in acco rdance w ith EN 5 0242, as fo llows:
Capa city: 9 settin g
Position Uppe r ba sket : upper whe els o n rails
Rinse aid setti ng: 6
Pl:0.55w; Po: 0.45w.
Star t ing a cycl e was h
Dr aw ou t the lower an d upper basket, l oa d the dishe s and push the m back.
It is c ommend ed to lo ad the lower bas k et f i rst, then the upper one (see the se c ti o n entitl e d
Loading the Dishwashe r ).
Pour in th e det ergent (see the sec t ion e ntit led Sal t, Detergent and Ri nse Ai d ) .
Insert the plug in to the s ocket. T he power s u pply is 220-240 VAC /50 HZ, the spe cificatio n
of th e so cket is 10A 250VAC. Mak e sure t hat the water su p ply is turned on to full p re s sur e.
Open the door, press the ON/OF F But t on, a nd the O N/ O FF light will turn on.
Pr ess the pro gra m Button , the wa sh progr am wi ll be ch anged a s follows direction:
If a pro gra m is se lect ed , t he re sponse ligh t will ligh t. Th en clo se the doo r, the dis hwa she r
begins to sta r t.
Ā ā
Ā ā
Intensiv e->N ormal- > Eco-> Glass->1Hour ;->Rapid
1
2
3
4
5
Means : need to fill rins e into the Rinse -Ai d Dispen ser.
( )
11
Ec o.
Intensive
Norma l
(* EN 5024 2)
(or )3i n1
5/22 g
Pre-wa sh(50 )
Was h ( 65 )
Rinse
Rinse
Rinse (55 )
Dryin g
ć
ć
ć
Pre-wa sh( 45 )
Was h ( 55 )
Rinse
Rinse ( 6 0 )
Dryin g
ć
ć
ć
Was h ( 50 )
Dryin g
Pre-wa sh
Rinse (60 )ćć
155
165
130
1. 00
0. 78
1.15
15.5
12.5
9
1H ou r
Wash(6 2 )
Rinse ( 55 )
Drying
Pre-wash(50 )ć
ć
ć
60
8.5
0.85
5/22g
Glass
Rinse
Dryin g
Pre-wa sh
wash( 40 )
Rinse (60 )ćć
110
For n or mal ly soiled l oad s,
such as , plates,glasses
and lig h tly soi led pans.
pots
Fo r heavie st soile d crock er y,
an d nor mall y soiled po ts
pa ns d ish es etc w i th d rie d
on s oil ing.
ǃ
ǃ
Standard dail y c ycl e for
normally s oiled loads, such
as p ots plat es glasses.ǃ ǃ
Fo r lig htl y soil ed loads t hat
do not need excell ent d rying
efficiency.
Fo r lightl y soiled cr ock ery
and gla ss
(or )3in1
5/ 22 g
(or )3i n1
5/22 g
5/22g
0. 7
12.5
Rapid
Was h ( 40 )
Rinse
Rinse ( 4 5 )ćć
40 0. 45
9.5
20 g
A shorter was h f or lightly
soiled lo ads and quick wash.
Page 15

When the wo rking c ycle h as fi nish ed, the bu zzer of the dish was her will so und fo r 8 s ec onds, the n sto p . Turn off
the a ppliance usi ng the ON/OFF b utt o n, s hut off the wa te r s upp ly an d open the door of th e dishw asher.
Wait for a few minutes b efor e unlo ad ing th e dis hwa sher t o a voi d handlin g the dishes and u tensil s while they
are s ti ll hot a nd more suscep t ible to br eak age. The y will also dry bet ter.
Switch Off the Dishwasher
Th e pro gram l igh t is off, on ly in th is case the p rogramme has e nded.
1.Switch off the d ishwasher by p ressin g the ON/OF F b utton.
2.Turn off the water t ap!
Open the door carefully.
Hot dis hes are sensit ive to knocks. The dishes should ther efor e be allowe d to cool down around 15 minu tes
before removing from the appliance.
Open the dis hwas her 's do or, leave it aj ar and wait a f ew minute s before remov ing the dis hes. In th is way t hey
will be cool er an d t he drying w ill b e i mpr oved.
Unloading the dishwasher
It is nor mal th at th e dishwas her is wet in sid e.
Empt y the lower ba sket fir st and then t he upp er on e. This wil l avo id wat er dripp ing from the uppe r Bas ket onto
the dis hes in the lo wer one.
If you op en the door , the machine will pa use. The pr o gram ligh t w ill
stop blinking and the bu zzer will mooing every minut e u nless you cl o se the door . After
you c lose the doo r ,the m achine will keep o n wor king af ter 10 secon d s.
during a wash cyc le
Prem ise:
A cyc le tha t is underw ay ca n on ly b e modified if it ha s only bee n r unn ing for a short time. O therwis e, the
detergent m ay have alread y been released, and the ap pliance m ay have alr eady dr ained the wash water.
If t his is t he ca se, th e detergent disp enser must be refilled (see the sec tion entitled " Load ing t he
De ter gen t " ).
Open the door ,p re ss the P rog r am butto n , th e mach ine w ill be in standb y state,
th en yo u can ch a nge t he program to th e d esi red cycle set t ing ( see the sec tion entitl ed " S tarting a
wa sh cycle. . ." ).
more than 3 secon ds
1
2
A forgotten dish can be added any time before the detergent cup opens.
Add forgotten dishes.
Close the door
After the spray arms stop working, you can open the door
completely.
2
3
Open the door a little .
1
4
5
The dishwasher will run after 10 seconds.
Was h the arms in s oapy and warm wa t er and u se a soft brush t o
clea n the jets. R epl a ce th em after ri nsing them th o rou gh ly.
When following this procedure from step1 to step 3, the filter system will be removed;
when following it from Step 3 to Step 1, the filter system will be installed.
It is dan gerous to ope n the do or when w as hing, be c aus e th e hot water ma y s cal d you .
12
Page 16

The f ilter prevents l ar ger remn ant s of fo od or ot her objects from ge tting inside th e pum.
The r esidues may block the fi l ter, in this case t hey must be removed .
The fi lte r s yst em consists of a coar se filter, a flat (Ma in filte r )
And a microfilter(F i ne fi lter).
Fo od and soi l part icles trapped in this filter ar e pulveriz e d by a
sp ecia l jet on the lowe r spr ay arm an d washed down to d rai n.
La rger ite ms, such as p iece s of bon es or glass, that cou ld block
th e drain are trapp ed in the coarse filter. To remo ve the items
ca ugh t by the fi lter, ge n tly s que eze the tap o n the to p of this
filte r a nd lift ou t.
Th is fi lter holds soil and food re sid u es in the sum p are a a nd
pr ev e nts i t f rom be ing r ede pos it on the dis h es du ri ng wash c ycle.
Main filter
1
Co arse fil ter
2
Fin e filter
3
2
3
1
Filter assembly
The f ilter effi c ien tly
For b est p erf o rm anc e and results, the filter must be cleaned re gularly. th is reaso n, it is a goo d idea to
remove the la rge r food particl es tr app ed in the filter after e ach wash cy c le by rinsing the sem icircular filte r and
cup unde r runnin g water. To re mo ve th e f ilter device, p ull t he cup handle in the upward direction.
re mo ves f ood pa rticle s from the wa sh water, al lowing it to be rec y cle d durin g the cycle.
For
The d ishwasher m ust never b e used w ithout the fi l ters.
Impro per replacement of the filte r may re duce the perform ance level o f the appliance
and dama ge dishes a nd ut en sils.
When following this procedure from step1 to step 2, the filter system will be removed;
when following it from Step 2 to Step 1, the filter system will be installed.
13
1
2
St e p 1 Tur n t he fi lter i n ant i-c lockwi se dir ect ion ,˖
St ep 2 lift the filter assy up˖
Page 17

The co ntrol pane l can be clea ned by usi ng a lig htly dam pen ed cloth.
Afte r cle aning, make sure to dr y it tho r oug hly.
For t he ext erior, use a g o od appli a nc e polish wax.
Never use sharp objects, scouri ng pads o r har sh cleaners on a ny part of the dishwasher.
Protect Against Freezing
1.Cu t off t he electrical power to the dis hwa sher.
2.Turn off the wat er su ppl y and disco nnec t the water i nlet pipe from the water valve.
3.Drain the water fr om the inlet pipe an d water v alv e. (U se a p an to g ath e r th e w ater )
4.Re connec t the wate r i nl e t pipe t o the wa ter v alve.
5.Re mov e the filter at th e bottom of the tub a nd use a sponge to soak up wate r in the sump.
please t ake fros t p rot ect io n meas ures o n the di shw asher in winter. Ever y fter wa shing cyc les ,
please oper ate as f oll ows
time a
˖
Cleaning the Filter
Cleaning The Door
To cle an the c oar se fi lter a nd the f ine f ilter, us e a c lea n ing b rus h. Reass e mb le the f i lter p arts as shown in the figures
on the la st pa ge and r einsert t he entire ass embly in th e dis hwa she r, positio ning i t in its s eat and pressing dow nwa r ds .
When cle anin g the fi lters, don't knock on t hem. Otherwise, the filte rs could be
contorted an d the pe rform ance of th e dishwasher cou ld be decre ased.
To cle an the e dge ar ound t he door, you sho uld use o nly a soft wa rm, d amp cl oth.
To avoid penetr at ion of wa ter into th e door loc k and el ect ric a l co m po nents, do no t
use a spr ay cle aner of any k ind .
Never u se a spray c l ean er to clean t he door pan el as i t m ay da m age the door loc k
and el e ct ric al c om pon e nt s.
Abrasiv e agents or some pa pe r towels should not be used becau se of th e risk o f
scratch i ng or leaving spots on the s t ai nless ste el su r fac e.
Cleaning the Spray Arms
If your dishwa sher ca nnot w ork beca u se of the ice,
pl ease contact professi ona l service person s.
It is n ecessary to cl ean the spray arms re gul a rly for ha rd
wate r chemica l s wil l clo g the sp ray ar m jet s a nd bear ings.
- Inspect the filters for blo ck ing after e ver y time t he dis hwa she r has be en used.
- By unscrew ing the coarse filter, you c an remove t he filter system. Re mov e any f oo d re mna nts and
clean the fi lters under ru nni ng water.
Remarks:
The en tire filter assembly should be cleaned once a week.
To r emove th e l ower s pr ay arm , pull out the spr ay arm u pwa rd.
To r emove th e up per spra y arm, hold the n ut, r otat e the a rm
clock wise to remove it.
Wash the arms in soapy and warm wat er and u se a sof t bru sh to
clean t he jets. Re place th em aft er rinsin g the m thor oughly.
14
Page 18

It is recommend t hat y ou run a wash cy cle with the
dish washer empt y an d th e n remove th e plu g fro m the
sock et, turn o ff th e wate r supp ly and leave the d oor of
the appli anc e sli g ht l y open. This will help the door
seal s to last l onger an d preven t odours fr om for min g
withi n th e applian ce.
If the app liance m ust be move d, tr y to keep it in the
vertical posi tion. If ab sol ute ly ne c essar y, i t can b e
posit ion ed on its back.
One of th e factors that cause o do urs to form i n t he
dish washer is f ood th at re mai ns tr app e d in th e seals.
Peri odic cle a ning with a d amp sponge will prevent t hi s
from occurri n g.
Be fore cleani ng or perfo rming maintenance, always
remove the plug fr om the s ocket.
To cle an the e xte r ior a nd rubber p arts of the di shw asher,
do not use solvents or abr asive cle ani ng produ cts.
Only use a clo th w ith w ar m so apy water.
To remove sp ots o r s t ains from the surface of t he
in terior, use a clo th da mpened with wa ter a n a little
vineg a r, or a clean ing product mad e speci fically for
dishw ash e rs.
Remove the Plug
No Solvents or Abrasive Cleaning
Moving the Appliance
Seals
Af ter ever y wash, turn off t he water supply to the
ap pliance and leave t h e doo r s li ght l y op en so th a t
moist u re a n d odours ar e not trapped in side.
After Every Wash
When not in Use for a LongTime
15
Th e instal lat ion of t he pipes
an d electr ica l e quipments
sh ould be do ne by profe ssio nals .
Electrical Sh ock H azard
Disconn ect electri cal po wer befor e
inst alling dishwasher.
Fail ure t o do so can r esu lt in death or
elec trical sh oc k.
The i nstallat ion po sition of d ishwasher should be ne ar the existing in let a nd drain hoses a nd
power co rd.
One s id e of the ca binet si n k shoul d be c ho sen t o f acilit a te th e connectio n of d rain ho s es of
the d ishwasher.
Installation preparation
No te: please che ck the acc omp anying installati o n accessori e s(hook for aes th etic pan e l,screw)
ʎ
Page 19

Please carefully rea d the installation i nstruction.
Illus t ratio ns of ca bin et dimens ions and installa tion pos i tion of t he dishw ash er
Prep arat ion s shou ld be made befor e moving the dishwashe r to the install atio n pla ce.
Choose a plac e near the si nk to f acilitate th e ins t al l ation of i n let a nd drain hoses
(see figure 1).
If dishwas her is instal l ed at the cor ner o f the ca b in et, th e re shoul d be so me space
(illu strate d in fig ure 2 ) when th e door is ope ne d .
2
1
Minimu m sp ace whe n
the door is opened
ʧ ʨFigure2
Cabinet d imens ions
ʧ ʨF igure1
Cabinet
Dis hwas he r
Do or of
dis hw as he r
Minimum space of 50mm
1
The aesthetic wo od en panel could be p rocessed accor ding to the Figur e 3.
Th e ae sth etic panel sh oul d
be pr oces sed i n accordanc e
with the illus tra te d d imensions
ʧ ʨFig ure3
ʎ
Aesthetic panel's dimensions and installation
Less than 5mm
betw een the top
of dis hwa s her and
cabin et a nd the
outer door al igned
to ca bine t.
90
90
450 mm
820mm
100
580mm
80
Space between cabinet
bottom and floor
Electrical, drain and
water supply line
entrances
(Unit: mm)
16
dp8
439
416 0.2f
390 0.2f
287.5 0.2f
286
38
8- 2
dp8
4- 2
dp8
2- 2
20 MAX˄ ˅
5
Page 20

Inst allation of aesthetic panel
ʧ ʨFigure 4a
2 In st all th e h ook on the aesth et ic woo den panel a nd put the ho ok in t o th e slot of the ou ter door of
dishw ash er(see figur e 4a). Af ter p ositi o nin g of the p anel , fix th e panel ont o t he outer door b y
screw s and bolt s(See figure 4b) .
Inst allation of aesthetic
woode n panel
ʧ ʨFigure4b
. take away the four
short sc rews
. pin up the four long
screw s
1
2
17
Page 21

Tension adjustment
of the door spring
ʧ ʨFigure5
Tension adjustment of the door spring
ʎ
Connection of drain hoses
ʎ
The do or springs are set at the factory to the proper tension for the outer door.
If aesthetic wooden panel are installed, you will have to adjust the do or spring tension.
Rotate the adjusting screw to drive the adjustor to strain or relax the steel cable
(see figure 5).
Doo r spring tension is correct when
the doo r re mains horizontal in t he
ful ly o pened position yet rises
to a close with the slight lift of a
finger.
⩖
18
Inse rt the drain h ose int o a d r a in pi pe with a minimum diameter of 40mm, or let it run int o the sink, making sur e to
avoi d bendin g o r crim pin g it. The top o f the ho s e must be le s s than 1 00 0mm.
A
Counter
Front
Drain pipe
NOTE
The top of the hose
must be less than
1000mm.
Ĩ 40mm
B
Page 22

19
ʧ'JHVSF
ʨ
%JTIXBTIFS JOTUBMMBUJPO TUFQT
ʎ
*OTUBMM UIF GVSOJUVSF EPPS UP UIF PVUFS EPPS PG UIF EJTIXBTIFS VTJOH UIF CSBDLFUT QSPWJEFE 3FGFS
UP UIF UFNQMBUF GPS QPTJUJPOJOH PG UIF CSBDLFUT
"EKVTU UIF UFOTJPO PG UIF EPPS TQSJOHT CZ VTJOH BO "MMFO LFZ UVSOJOH JO B DMPDLXJTF NPUJPO UP
UJHIUFO UIF MFGU BOE SJHIU EPPS TQSJOHT 'BJMVSF UP EP UIJT DPVME DBVTF EBNBHF UP ZPVS EJTIXBTIFS
*MMVTUSBUJPO
$POOFDU UIF JOMFU IPTF UP UIF DPME XBUFS TVQQMZ
$POOFDU UIF ESBJO IPTF 3FGFS UP EJBHSBN 'JHVSF
$POOFDU UIF QPXFS DPSE
"GGJY UIF DPOEFOTBUJPO TUSJQ VOEFS UIF XPSL TVSGBDF PG DBCJOFU 1MFBTF FOTVSF UIF DPOEFOTBUJPO
TUSJQ JT GMVTI XJUI FEHF PG XPSL TVSGBDF
1MBDF UIF EJTIXBTIFS JOUP QPTJUJPO*MMVTUSBUJPO
-FWFM UIF EJTIXBTIFS 5IF SFBS GPPE DBO CF BEKVTUFE GSPN UIF GSPOU PG UIF EJTIXBTIFS CZ UVSOJOH
UIF "MMFO TDSFX JO UIF NJEEMF PG UIF CBTF PG EJTIXBTIFS VTF BO "MMFO LFZ *MMVTUSBUJPO " 5P BEKVTU
UIF GSPOU GFFU VTF B GMBU TDSFX ESJWFS BOE UVSO UIF GSPOU GFFU VOUJM UIF EJTIXBTIFS JT MFWFM *MMVTUSBUJPO #
5IF EJTIXBTIFS NVTU CF TFDVSFE JO QMBDF 5IFSF BSF UXP XBZT UP EP UIJT
" /PSNBM XPSL TVSGBDF1VU UIF JOTUBMMBUJPO IPPL JOUP UIF TMPU PG UIF TJEF QMBOF BOE TFDVSF JU UP UIF
XPSL TVSGBDF XJUI UIF XPPE TDSFXT *MMVTUSBUJPO
# .BSCMF PS HSBOJUF XPSL UPQ'JY UIF TJEF XJUI 4DSFX *MMVTUSBUJPO
Page 23

20
1VMM 5IF TBGFUZ TVQQMZ IPTFT DPNQMFUFMZ PVU GSPN TUPSBHF DPNQBSUNFOU MPDBUFE BU SFBS PG EJTIXBTIFS
5VSO XBUFS GVMMZ PO CFGPSF TUBSUJOH UIF EJTIXBTIFS
5JHIUFS UIF TDSFXT PG UIF TBGFUZ TVQQMZ IPTF UP UIF GBVDFU XJUI UISFBE JODI
5IF BQQMJBODF N VTU CF DPOOFDUFE UP UIF XBUFS NBJOT VTJOH OFX IPT F TFUT
5IF PME IPTFTF UT T IPVME OPU CF SFVTFE
8BUF S QSFTTVSF NV TU CF CFUXFFO .1B BOE .1B *G UIF QSFTTVSF JT CFMPX UIF NJOJNVN
DPOTVMU PVS 4FSWJDF %FQBSUN FOU GPS BE WJDF
Dishwasher must be level fo r prop er dish rack oper ation and wash perform ance.
Pla ce a spirit level on door and rack track inside the tub as sh own to check that the
dishwasher is level.
level the dishwasher by adjusting the three levelling legs individually.
When level the dishwa sher, p lease pay attention not to let the dishwasher tip over.
1
2
3
Illustration of feet adjustment
Ǐ ǐFigure 8
NOTE:
Th e maximum ad justment
height of the feet is 50 mm.
Th is ap pli a nce must be earth ed. In t he event
of a malfunction or b rea kdow n, earthi ng wil l
reduc e t he risk of electr ic sho ck by pr ovi din g a
pa th of least re sistance fo r t he e lectric curre nt.
Th is app li an ce is e q uip ped w ith a cord having an
eq uip men t-ea rth in g co ndu ctor a nd an ea rth ing
plug. T he plug must b e plugged i nto an ap propri ate
ou tlet t hat i s installed and earthe d in ac cord anc e
with al l local s tandards and requirem ents .
Improper con nec ti on o f th e equipment grounding conducto r can re s ul t i n the risk
of an elec tri c shock. Che ck wi th a qual ified
electrici an or se rvice repr ese ntat iv e i f you
are i n d oubt whet her the app li ance is properl y
grounded. Do n ot mo dify the plug p rovi ded w ith
the a ppl iance; If it is n ot f i t for th e outl et.
Have a proper ou tlet in stalled b y a qual ifi ed
electrici an.
Ensure the vo ltag e and fr equency of the power be ing cor resp ond s t o
th ose on the rating pl ate. Only insert t he plug into an electrical so cke t which i s earthe d
prope rly. If t he el ect r i cal sock et to wh ich th e a pp l ianc e mus t b e connect ed is no t
appro pri a te for t he pl ug , rep l ace the socket, rather than u sin g a a daptor s o r t he like as
th ey co ul d ca use ov e rh eating an d burns.
Please look at the ra ting lab e l to know th e rat ing volta ge and c onnect the d ishwas h er to the app ropriat e power s upp ly.
Us e the required fuse 10 am p , tim e d ela y fuse or c ircuit break e r rec omm ended and provide separa te ci rcuit s erv ing
on ly thi s appl ia nce.
For pe rsonal safety:
DO NOT USE AN EX T E NSION C ORD OR A N ADAPTE R PLUG W ITH THIS APPLIANC E.
DO NOT, UNDE R ANY C IRCUMSTANCES, CU T OR R EMOVE T HE EARTHIN G
CONNECTION FROM T HE POWER CORD.
Check le vel s ide to si de
Sp irit l ev el
Check level Front to Bac k
Page 24

21
Positioning the Appliance
How to Drain Excess Water From Hoses
If the sink is 1000 higher f rom the floor, the e xcess water in h oses c ann ot be dr ained directly
into the sin k. It wi ll be necessary t o dra in excess w ater from hoses into a bowl or s uitable
conta ine r that i s held outside and lo wer th an t he sink.
Water Outlet
Co nne ct th e w ate r d ra in hos e. Th e d ra in hose must b e correc tly fi tted to av oid wa ter leaks.
En sur e tha t the water i n l et h ose is n ot ki nked or s quash ed.
Th e follo wing things should be checked b efore sta rting the dishwasher.
Syphon Connection
Insert the d r ai n hose into a drain pipe with a minim um di a met e r of 40m m, or let it ru n into the sink, m akin g sure t o
avoid b end ing o r crimpi n g it. The to p of the h o se mus t be less than 10 0 0mm.
Th e content of this manual is very helpful to the users.
After installation, please make sure to keep this manual.
Extension Hose
If y ou n eed a dr ai n h ose extensio n, make sur e to use a similar d rain hose .
It m ust be no longer than 4 metr e s; other wis e t he cleaning eff ect o f the dis hwa sher could b e reduced.
1 Th e dish wa sher is level and fixed properly
2 Th e inle t valve is open
3 There is a leakage at the connections of the conducts
4 Th e wires are tightly connected
5 Th e power is switched on
6 Th e inlet and drain hoses are k notted
7 All packing materials and p rintings should be taken out from the dishwasher
Position the ap pli anc e i n the desi red l ocat ion . The back shou ld rest against the w all behind it, and the si des ,
alon g t he adjacent cabinets o r wall s. T h e dis hwa sher i s equ i ppe d wit h wat er supply and drain hoses t hat can
be positio ned eith er to th e r igh t or the left s ide s to fac il itat e pro per i nsta lla tio n.
Please c los e the hyd rant after us ing.
Turn off the water.
Release the water pressure by depressing the pressure release button. This relieves water pressure and protects you, and
the room, from severe splashing.
Unscrew The safety supply hose from the faucet..
Connect the cold water supply hose to a threaded 3/4(inch) connector and make sure that it is fastened tightly in place.
If the water pipes are new or have not been used for an extended period of time, let the water run to make sure that the
water is clear and free of impurities. If this precaution is not taken, there is a risk that the water inlet can get blocked and
damage the appliance.
A hose that attaches to a sink spray can burst if it is installed on the same water line as the dishwasher. If your sink has one, it
is recommended thet the hose be disconnected and the hole plugged.
The safety supply hose consists of the double walls. The hose's system guarantees its intervention by blocking the flow of water
in case of the supply hose breaking and when the air space between the supply hose itself and the outer corrugated hose is full
of water.
Page 25

22
Fuse blown, or the
circuit breaker acted
Replace fuse or reset circuit breaker. Remove any other
appliances sharing the same circuit with the dishwasher
Spilled rinse-aid
Always wipe up rinse-aid spills immediately.
Hard water minerals
The affected items are
not corrosion resistant.
The lid of the softer
is loose
A sp ay arm is
knocking against
an item in a basket
r
Items of crockery
are loose in the
wash cabinet
This may be caused
by on-site installation
or the cross-section of
the piping.
A programme was not
run after dishwasher
salt was added.
Traces of salt have
gotten into the wash cycle.
To clean the interior, use a damp sponge with
dishwasher detergent and wear rubber gloves.
Never use any other cleaner than dishwasher
detergent for the risk of foaming or suds.
Always run the quick wash programme .
without any crockery in the dishwasher and
without selecting the Turbo function (if present),
after adding dishwasher salt.
Check the lip .Ensure the fix is fine.
Interrupt the programme, and rearrange the items
which are obstructing the sp ay arm.r
Interrupt the programme,
and rearrange the items of crockery.
This has no influence on the dishwasher function.
if in doubt, contact a suitably qualified plumber.
Detergent with
colourant was used
Make sure that the detergent is the one without
colourant.
Improper detergent
Make sure the dishwasher is turned on and the door is
closed securely.
Check that the water supply is connected properly and
the water is turned on.
Make sure to close the door properly and latch it.
Make sure the power cord is properly plugged into the
wall socket.
Power supply is not
turned on
Water pressure is low
Door of dishwasher
not properly closed.
Kink in drain hose
Filter clogged
Kitchen sink clogged
Check drain hose.
Check coarse the filter
(see section titled )" Cleaning The Filter "
Check the kitchen sink to make sure it is draining well.
If the problem is the kitchen sink not draining ,you may
need a plumber rather than a serviceman for dishwashers.
Use only the special dishwasher detergent to avoid suds.
If this occurs, open the dishwasher and let suds evaporate.
Add 1 gallon of cold water to the tub. Close and latch the
dishwasher, then select any cycle. Dishwasher will drain
out the water at the first step.Open the door after draining
is stop and check if the suds is disappeared.
Repeat if necessary.
Page 26

Overflow.
When some malfunctions come on, the appliance will display error codes to warn you:
23
Longer inlet time.
Faucets is not opened, or water intake is
restricted,or water pressure is too low.
Some element of dishwasher leaks .
Th e Rapi d lig ht fl icke r fle et ly
Th e Glas s lig ht flicker fle et ly
The dishes were not
loaded correctly.
See notes in " Loading the Dishwasher Baskets ".
Select a more intensive programme.
See" Wash Cycle Table ."
Use more detergent, or change your detergent.
Rearrange the items so that the sp ay can rotate freely.r
Clean and/or fit the filter combination correctly.
Clean the sp ay arm jets. See "Cleaning the Spray
Arms".
r
Use less detergent if you have soft water and select
a shortest cycle to wash the glassware and to get
them clean.
Use a mild abrasive cleaner to eliminate those marks.
Re-loading the dishes properly.
Load the dishwasher as suggested in the directions.
Increase the amount of rinse-aid/refill the rinse-aid
dispenser.
Do not empty your dishwasher immediately after
washing. Open the door slightly so that the steam can
escape. Begin unloading the dishwasher only once t
he dishes are barely warm to the touch. Empty the low
basket first. This prevents water form dropping off
dishes in the upper basket.
In short program the washing temperature is lower.
This also lowers cleaning performance. Choose
a program with a long washing time.
Water drainage is more difficult with these items.
Cutlery or dishes of this type are not suitable for
washing in the dishwasher.
The programme was
not powerful enough.
Not enough detergent
was dispensed.
Items are blocking
the path of sp ay arms.r
The filter combination
in the base of wash
cabinet is not clean or
is not correctly fitted.
This may cause
the sp ay arm jets
to get blocked.
r
Combination of soft
water and too much
detergent.
Aluminum utensils
have rubbed against
dishes.
Dishes block
detergent cups.
Improper loading
Too little rinse-aid
Dishes are removed
too soon
Wrong program
has been selected
Use of cutlery with
a low-quality coating
Page 27

Height : 815mm
Width : 448 mm
Depth : 550mm
( )
with th e doo r cl osed
Pow er supply: see rating label
Capacity: 9 place settings
24
If overflow occurs, turn off the main water supply before calling a service.
If there is water in the base pan because of an overfill or small leak,
the water should be removed before restarting the dishwasher.
Page 28

Loading the baskets according to En50242:
6
Large serv ing b owl
Small serv ing b owl
4
5
Medium serving bowl
3
Glasses
Saucers
2
1
Cups
10
Oval p lat ter
8
Dinner pla tes
9
Soup plate s
Dessert dishe s
7
Teaspoons
4
Soup spoons
2
Forks
1
Serving for ks
8
Serving spo ons
6
Knives
5
3
Dessert spo ons
7
Gravy ladle s
1.Upper basket:
2.Low
er
b
a
sket:
3.Cutterly basket:
In
f
ormatio
n f
o
r co
mparability tests in accordanc
e
with E
N
5
0
2
42
Capacity: 9 place settings
P
osition of th
e upper
bask
et: lower pos
ition
P
rog
ramme:
E
c
o
Ri
n
se aid
s
e
tting:
6
So
f
tener
setting
: H
4
8
7
9
10
7
IN
1
3
5
2
6
3 3
1
3
1
4
8
8
7
7
7
9
10
25
Page 29

GV51214
GORE N JE
9
A+
222 kWh
0.78 kWh
0.45 W
0.55 W
2520 liter
A
165 m in
81.5 cm
44.8 cm
55 cm
1930 W
Sh eet o f hous ehold dishwasher acc ord ing to EU Dir ective 1059/2010:
Manufac turer
Type / Descr iption
Stan dar d pla ce settin gs
Energy effi ci ency cla ss
Annual energy consu mp tion
Energy consumption of t h e standard cle aning cycle
Power con sumption of of f-m o de
Power con sumption of lef t- on mode
Annual water co nsumpt ion
Dryi ng efficiency cl ass
Stan dar d cle anin g cycle
Prog ra m duration of t he stand ard cleaning c ycle
Nois e level
Mountin g
Heig ht
Widt h
Depth (with connec tors)
Power con sumption
Rate d voltag e / f r eq uency
A + + + (highest efficiency) to D (lo west effici enc y)
En erg y consu m ption 222 kW h per ye ar, based on 280 st and ard cl eaning c y cle s using cold wa t er fill and
the con su mpti on of the low power m ode s. A ctual energy co nsumption will dep en d o n how th e app liance is us ed.
Ā ā
Water con sum ption 2520 litres per year, b ased on 280 stand ard clea ning cycles. Actual w ate r con sumption
will de pend on how the applia nce is used .
Ā ā
A ( hig hest efficien c y) to G (lowest effic iency)
Th is pr ogr am is suitable fo r cleani ng soi led normall y soil ed ta ble ware and th at it is the
most effi cie nt programme in terms of its combined ener gy and wate r con sump tio n for
that ty pe of tablewar e.
Th e device meets the Eur opean st andards a nd the d irecti ve s in t he curre nt versio n at delivery:
- LVD 200 6/95/EC
- EMC2004/ 108 /EC
- EUP 2009/125/EC
Th e above val ues hav e be en m e a sur ed in acco rdance with standards u nder spec ifi ed operating cond iti on s .
Resul ts may v ary grea tly ac cor ding to quantity and polluti on of the dis hes, w ater hard ness,
amou nt of de terg ent , etc .
Th e man ual is based on th e E uropea n U nio n's stan d ards and rule s.
Technical Data Sheet
NOTE˖
ECO 50
ć
49 dB (A) r e 1 pW
Build unde r
220-240 V~ / 50 Hz
Water pr essu re (flow p ressur e) 0 . 4- 10 bar = 0.04 - 1 Mpa
Could be bu i lt-in
Yes
26
 Loading...