

Page 1
GMP31M2/GMP32M2/GMP35M2
INSTRUCTION MANUAL
Before operating this unit
Please read this Instruction Manual carefully
www.goodmans.co.uk
GOODMANS Product Information Helpline
08708730080
Page 2

Introduction
Thank you for purchasing this Goodmans product.
This product provides the following key functions, details of which are
described in the following pages.
z MP3/WMA WMA-DRM9 & DRM10 Format Files playback
z Voice recording - The unit can record voice through the internal
microphone encoding directly into WAV format.
z Universal storage - the unit can operate as a mass storage device and
can be used for file storage i.e. between work and home etc.
z Direct PC compatibility - operates without the need to install driver
software on Windows ME/2000/XP and comes complete with a driver for
use Windows 98SE
z Sound Enhancement Equaliser patterns - inbuilt equaliser for Natural,
Rock, Pop, Classic, Soft, Jazz and DBB effects.
To transfer purchased tracks (WMA DRM encoded) from most online music
download services to this device Windows Media Player 10 must be used.
Note: this is exclusively available with Windows XP alternatively use the
application recommended by the online music download service
NOTE: Services and applications must be Windows Media audio-compliant and
support Digital Rights Management. Windows XP required. Apple iTunes music
content is NOT supported.
This instruction manual is important. Please read it, in a short time it will show
how to connect, operate and adjust the unit for best performance.
It can also save money, it shows simple things to do and check before calling
us for assistance.
- 1 -
Page 3

Table of Contents
TABLE OF CONTENTS
Introduction…………………………………........…….
Table of Contents…….………………………….…….
System Requirements………….…..…………………
Important Notes…......................………………....….
Overview of General Controls……… ....……………
Setting Up Your Computer…….……………………..
Transferring Audio and Data…………………………
Disconnecting Your Player…….……………………..
What is DRM ? ……………..…………………………
DRM Operation………………………………………..
Getting Started…………………………………………
Music Playback Operation……………………………
Voice Recording Operation…………………………..
Voice Playback Operation…………………..…..……
Advanced Settings and Functions…………..………
Troubleshooting Guide…………………...…..…..…..
Product Specifications………………………………...
1
2
3
4
5
7
9
11
12
13
15
16
19
20
21
23
24
YOUR PACKAGE INCLUDES THE FOLLOWING COMPONENTS:
1 x Main Unit
1 x Earphone with strap
1 x USB Cable
1 x Instruction Manual
1 x AAA Battery
1 x Installation Driver CD
NOTE: Please retain all packaging materials for future transportation or in the
unlikely event the product should need to be returned for repair.
- 2 -
Page 4

System Requirements
HARDWARE AND SOFTWARE REQUIREMENTS
Computer IBM PC/AT-Compatible (not operable with Macintosh)
Operating System Microsoft® Windows® 98SE/ME/2000 Professional/
XP Home Edition standard install
CPU Windows® XP Professional/XP Home Edition
Pentium® II 300 MHz or higher
Windows ® Millennium Edition, 2000 Professional,
MMX® Pentium® 233 MHz or higher
Memory 64MB minimum
Hard disk space 10MB minimum required
Drive CD-ROM drive
Interface Available USB Port
Display 1024 x 768 pixels or better, higher colour (16-bit) or better
(128MB or more recommended for Windows XP)
SECURED MUSIC DOWNLOAD REQUIREMENT
O/S: Windows XP SP1* or higher (Note: SP = Service Pack)
Software: Windows Media Player 10.0 or higher
(Windows Media Player 10.0 is only available for Windows XP users)
NOTES:
z Operation is not guaranteed on all the compatible PCs.
z Operation is not guaranteed on computers running upgraded
OS or multiple OS with dual-boot. NTFS format can be used
for standard installation only.
z Depending on the Windows version, more free space maybe
necessary. Music data also requires more space.
- 3 -
Page 5

Your hearing is important to you and to us so please take care when
operating this equipment. It is strongly recommended that you follow the listed
guidelines in order to prevent possible damage or loss of hearing.
ESTABLISH A SAFE SOUND LEVEL
• Over time your hearing will adapt to continuous loud sounds and will give
the impression that the volume has in fact been reduced. What seems
normal to you may in fact be harmful. To guard against this BEFORE
YOUR HEARING ADAPTS set the volume at a low level.
• Slowly increase the level until you can hear comfortably and clearly and
without distortion.
• Damage to your hearing is accumulative and is irreversible.
• Any ringing or discomfort in the ears indicates that the volume is too loud.
Once you have established a comfortable listening level, DO NOT
INCREASE THE SOUND LEVEL FURTHER.
The following list of typical sound levels may assist you in recognising just
how loud you have set the volume level.
DECIBEL
Level dB Example
30dB Quiet library, soft whisper
40dB Living room, fridge freezer bedroom away from traffic
50dB Normal conversation, quiet office, light traffic
60dB Electric sewing machine
70dB Vacuum cleaner, hair dryer, noisy restaurant
THE FOLLOWING NOISE CAN BE HARMFUL UNDER CONSTANT
EXPOSURE
80dB Average city traffic, alarm clock buzzer at 2 feet, food mixer
90dB Motorcycle, heavy goods vehicle, petrol lawn mower
100dB Pneumatic drill, chain saw, garbage truck, discotec / night-club
120dB Rock bank concert, thunderclap
PERMANENT LOSS OF HEARING
140dB THRESHOLD OF PAIN Gunshot 2 feet way
180dB Rocket launching pad
Important Notes
- 4 -
Page 6
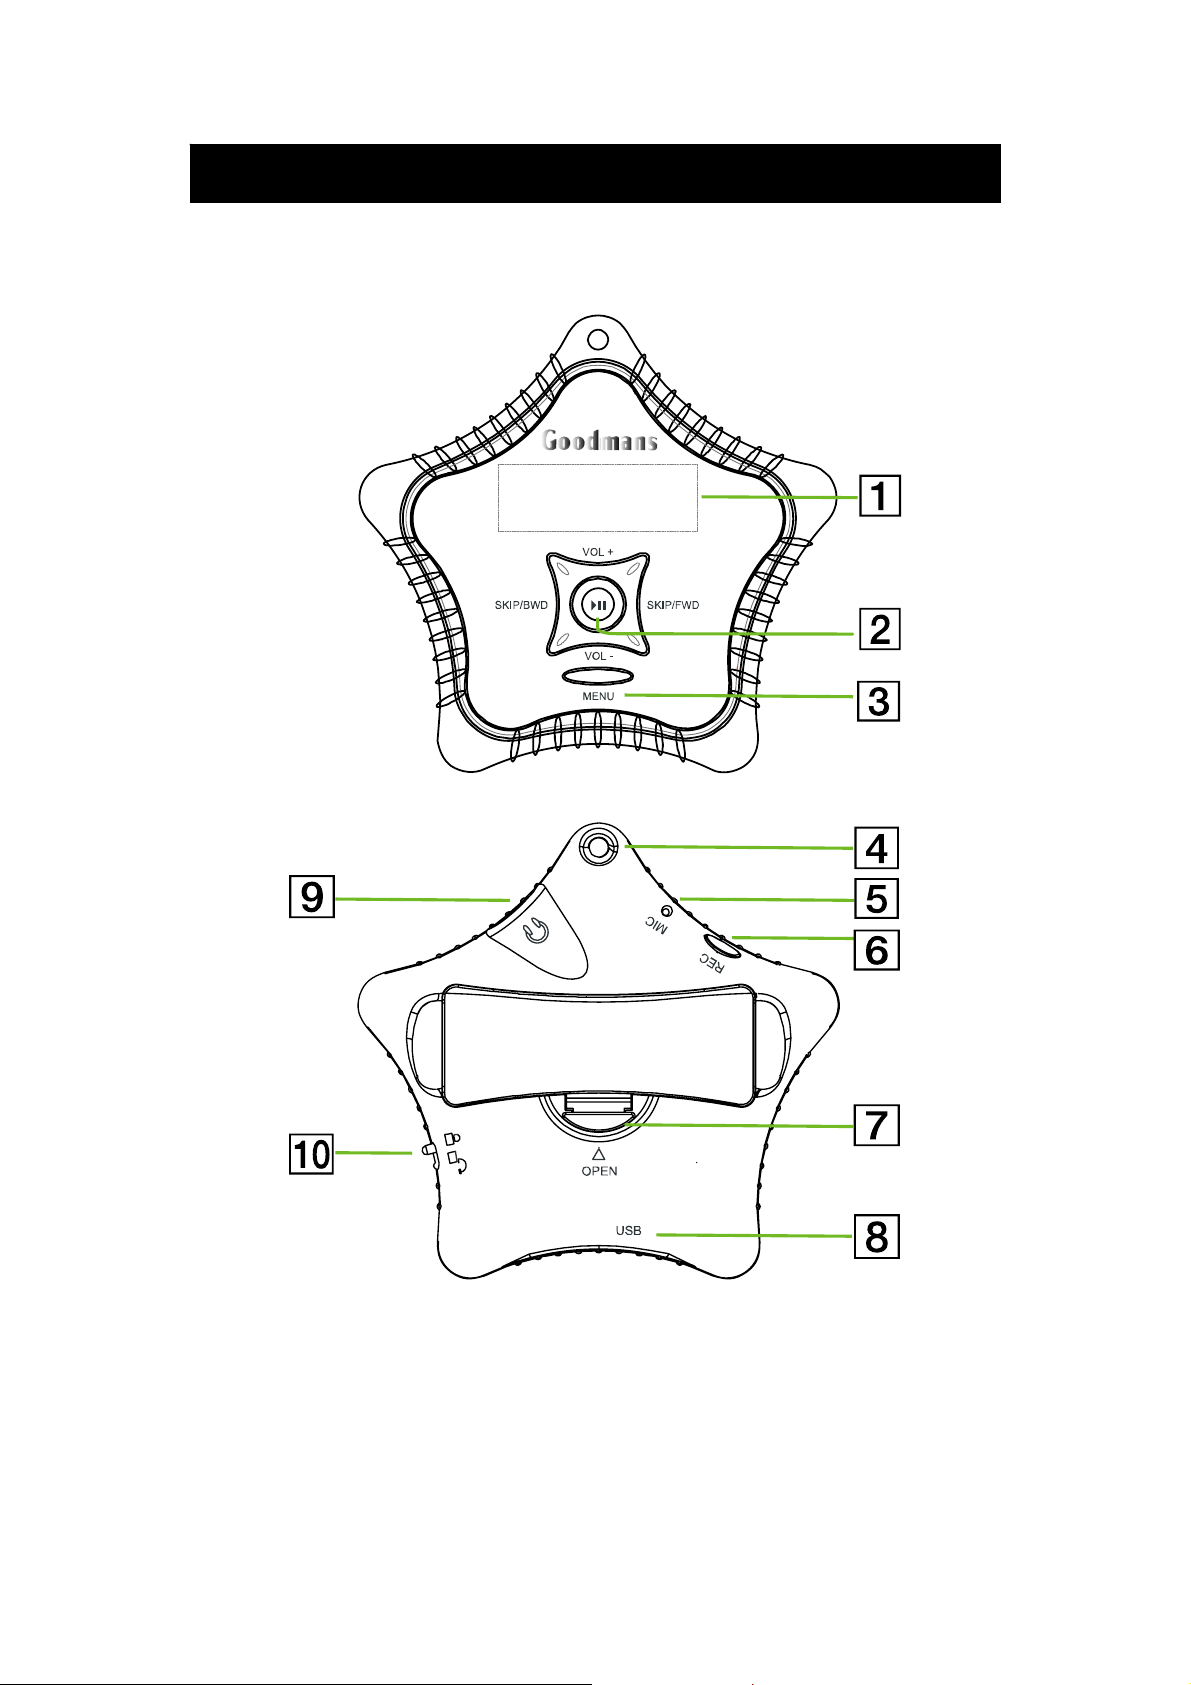
Overview of General Controls
LOCATION OF CONTROLS
LCD Display
1
Jog Switch (Play/Pause/Stop)
2
MENU Button
3
Strap Connecting Loop
4
Inbuilt Microphone
5
- 5 -
REC Button
6
Battery Compartment Cover
7
USB Socket
8
Earphone Socket
9
HOLD Switch
10
Page 7

A
Overview of General Controls (contd.)
DISPLAY ICONS DURING MUSIC PLAYBACK
Repeat Mode
EQ
rties / Title
DISPLAY ICONS DURING VOICE RECORDING
Recording Format
DISPLAY ICONS DURING VOICE PLAYBACK
Recording Format Elapsed Time
Current Track
Elapsed Time
Battery Indicator
Elapsed Time
Battery Indicator
Year / Month / Day Current Track
Battery Indicator
Year / Month / Day
- 6 -
Page 8
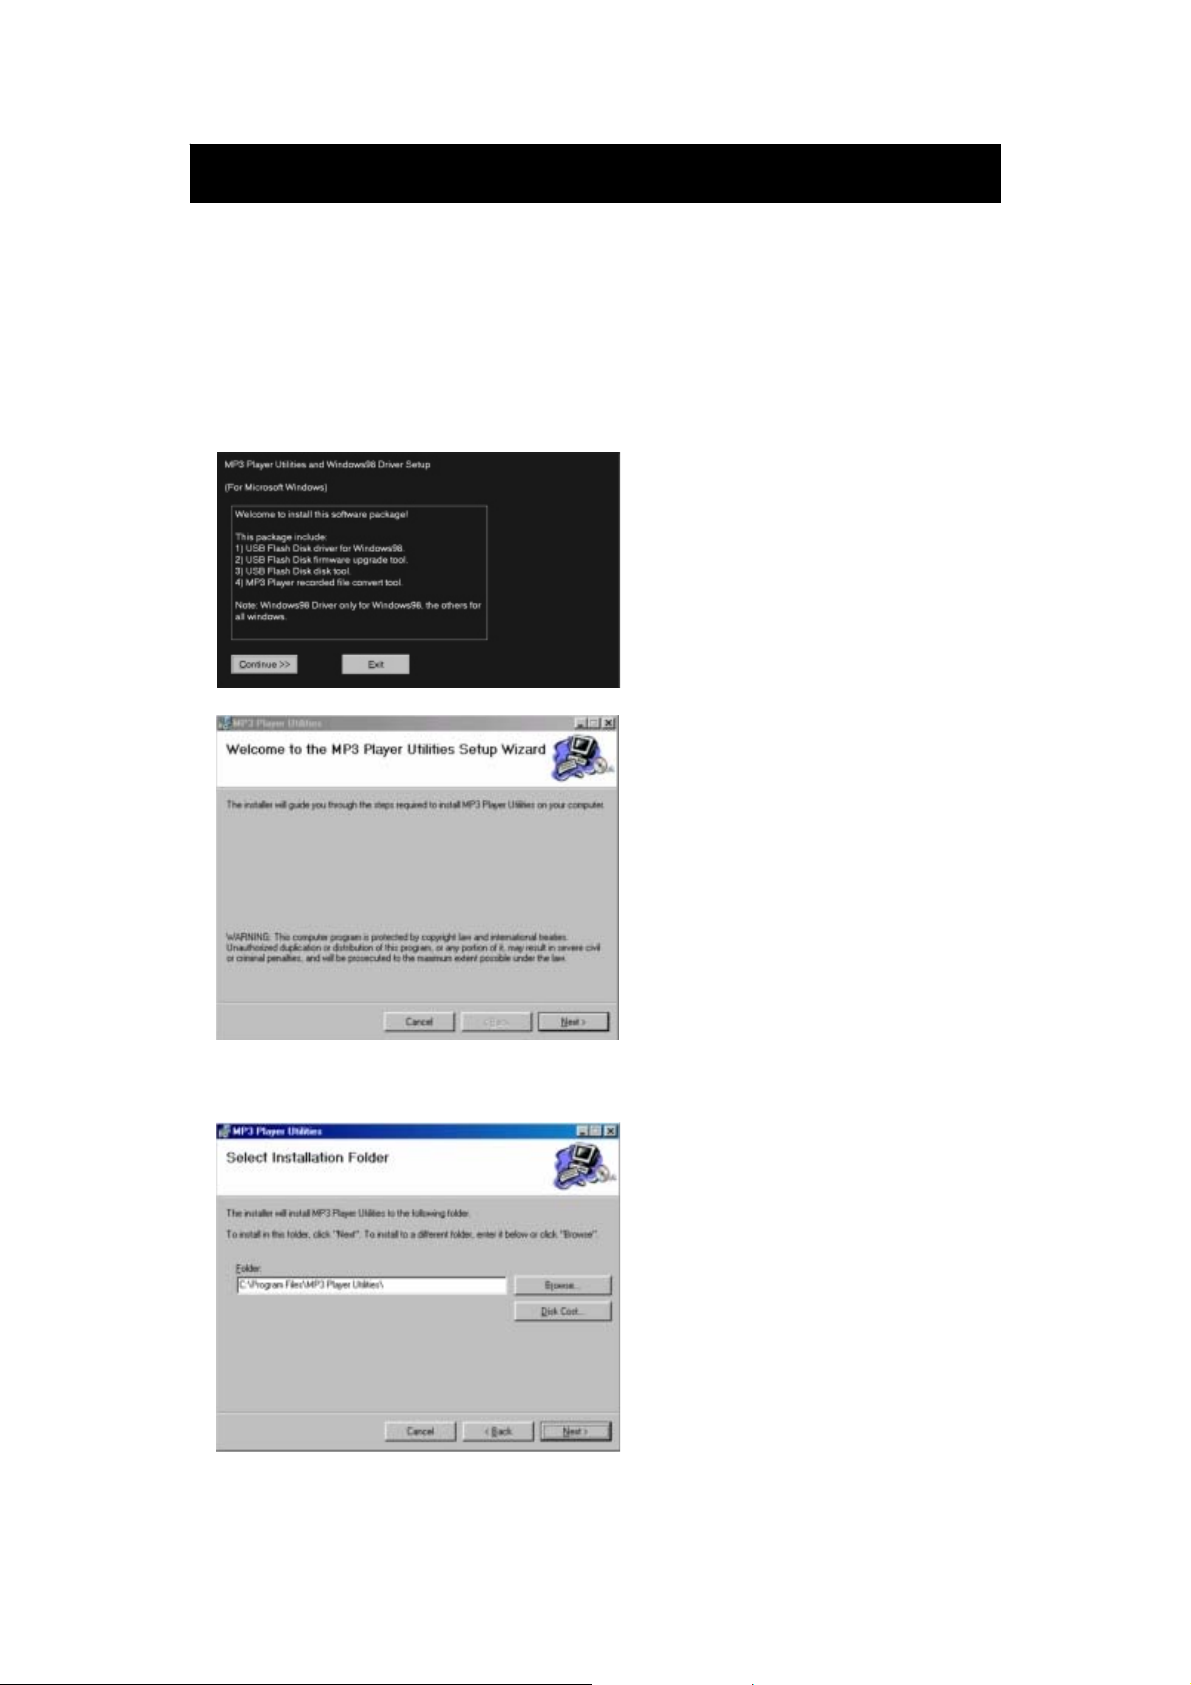
Setting Up Your Computer
FOR WINDOWS 98
1. Start up Windows and insert the CD (setup software driver for Windows 98)
into the drive.
2. Run the program setup.exe from the disk drive, the installation icon will
appear on the desktop. Press “NEXT” to start installation.
3. Press “NEXT” to accept the default install location for the driver.
- 7 -
Page 9

4. Connect the MP3 player to your PC, the “New Hardware Found” message
will pop up. You will find a removable driver under “My Computer”
5. To uninstall the software, click “START” and enter into “Control Panel” and
select “Add / Remove Program”, then select “MP3 Player Utilities” from the
menu and click on “Add / Remove”
Setting Up Your Computer (contd.)
FOR WINDOWS 2000/ ME/ XP
1. Windows 2000/ ME/ XP do not need driver installation. Just plug in the
MP3 Player to the computer, Windows will detect the driver automatically
and pop up with a message “New Hardware Found” and “USB Mass
Storage Device” will be installed.
2. A Removable Disk will show in “My Computer”, normally as the E: drive,
but the actual letter is dependant on how many drives are already installed.
- 8 -
Page 10

When you wish to download additional music tracks to your player, you can
either download music tracks from an Internet Music Site or rip them from
your audio CDs to create digital files on your computer and then transferred to
your player via your computer. Data files can also be transferred to and stored
in your player, for example, you can transfer a data file from one computer to
another.
Transferring Audio and Data
TO TRANSFER AUDIO AND DATA - for MP3, WMA (Non-DRM)
1. Please ensure that one AAA battery is inserted otherwise data corruption
may occur if the power fails during transfer.
2. Connect your player to the USB port of your computer using the supplied
USB cable.
3. Windows Device Manager will recognize the MP3 player.
4. Launch Windows Explorer.
5. “Removable Disk” will appear under “My Computer”.
6. To format the onboard memory before downloading songs to the MP3
player, go to “My Computer” and right click on the “Removable Disk”, then
click on “Format”.
- 9 -
Page 11

Transferring Audio and Data (contd.)
7. It will launch a format dialogue box, if there is a file system option please
ensure that FAT is selected (NOT FAT32), then click on START to format
your player.
WARNING
EVER USE OTHER SOFTWARE TO
FORMAT THE PLAYER. THIS WAY CAUSE
AN IRREVERSIBLE MALFUNCTION
NOTE: If you have selected a different file
system to FAT on “File System” option when
for formatting, it may cause a malfunction.
Please re-format it using the “FAT” option to
repair.
8. To load files onto your player double click on the Removable Device icon
under “My Computer” to open drive. Select the files that you wish to load
onto the player by highlighting them and then drag and drop them into this
removable drive window.
9. Before disconnecting your player from the computer follow the instructions
below “Disconnecting Your Player”.
NOTE: Always follow the instructions given in “Disconnecting Your Player” before
unplugging the player from the PC otherwise the data stored on the player may be
corrupted.
- 10 -
Page 12

Disconnecting Your Player
TO STOP YOUR PLAYER IN WINDOWS XP/ ME/ 2000
(for Mass Storage Mode only):
Double click on the Safely Remove Hardware icon on the taskbar, ensure
that the USB MASS STORAGE DEVICE is highlighted and click on the
“STOP” button, and then confirm by clicking on the “OK” button and
disconnect your player when you are prompted.
TO STOP YOUR PLAYER IN WINDOWS 98SE
In Windows Explore, right click the Removable Disk icon, click the Eject icon
and disconnect your player when you are prompted.
- 11 -
Page 13

What is DRM ?
DRM is Digital Rights Management, it is a way of protecting copyrighted
material in digital age. It has come about due to the easy of copying material
using digital methods. Basically the DRM encryption will limit usage of the file
to certain hardware that is compatible with DRM encryption. This does not
mean that a DRM encrypted file cannot be downloaded to Non-DRM
compatible hardware only that the file will not play.
DRM can also be used to set the number of times that file can be burned to
CD, how many different pieces of hardware/equipment it can be copied to etc.
In the most recent version of the DRM (DRM10) there is also an option to set
how long the file can be used for. This time restriction is a method that is
currently used by some Music Download websites.
NOTE: DRM10 files can only be used when your player is connected to a PC
running Windows XP and Windows Media Player 10
- 12 -
Page 14

DRM Operation
Your player is compatible with both DRM9 and DRM10 encrypted files. These
files are normally obtained from Music Download websites. The following
instructions are only given as a guide, please check with your content provider
for any specific procedure for use with their services.
NOTE: DRM files cannot be downloaded using mass storage drag and drop, if the
files are transferred using this method they will not play. Before downloading DRM10
encrypted files the DRM time must be set. Please follow the instructions “Setting
”
DRM10 files can only be downloaded to the player when then player connects
as “MEDIA DEVICE” this allows the player to be “Syncronised” with the the
computer to allow playback. This is the default mode that the unit is set to
when connecting to a computer with Windows XP. When in this mode files
cannot be “dragged and dropped” as they can in USB DISK. The mode can
be changed to USB DISK via the “USB MODE” SYSTEM menu (please see
“SYSTEM MENU” section below). When set to USB DISK mode DRM10
encrypted files will not play when transferred in the player.
NOTE: DRM files cannot be downloaded using mass storage drag and drop, if the
files are transferred using this method they will not play. Before downloading DRM10
encrypted files the DRM time must be set. Please follow the instructions “Setting
”
DOWNLOADING DRM10 ENCODED FILES
The following has been extracted from the Windows Media Player 10 Help file
© Microsoft.
When you connect your device to your computer for the first, Windows Media
Player starts the Device Setup Wizard, which helps you setup automatic or
manual synchronisation between the Player and your device.
When you connect your device to your computer after automatic
synchronisation has been established, the Player and the device begin
synchronising the content you selected, until all of the items are synchronised.
If the Player detects that your device does not have enough room to store all
of the automatically synchronised content, the Player and the device will
synchronise content in priority order, either by default priority order or by a
priority order that you select.
When you connect your device to your computer after manual synchronisation
has been established, you must select the content and specify the order in
which it is synchronised. If the Player detects that your device does not have
enough room to store all the manually synchronised content, it will display a
message next to the items that it cannot synchronise to your device.
- 13 -
Page 15

You can change the synchronisation order or delete items from the
synchronisation list, and then start synchronisation manually.
When synchronisation finished, the message “Synchronisation is complete” is
displayed above the Items to Sync pane (the left side of Sync) and two types
of categories are displayed in the Items to Sync pane:
The number of items that were synchronised successfully and the number of
items that were not synchronised due to errors, along with the error details.
There may be more than one error category displayed if different types of
erros occurred during synchronisation. You can expand these categories to
view the individual items that failed to synchronise due to erros and take the
appropriate steps. You can also view the synchronised files on the device by
expanding the category or playlist that contains the items in the Items on
Device pan (the right side of Sync).
After the desired files have been downloaded to the player, disconnect the
player from the computer and the following will be shown in the display:
DRM Operation (contd.)
This screen is shown when the player synchronise the licenses that allow the
DRM10 encoded files to be played. This process can take several minutes.
Once this screen is no longer shown you can now play your downloaded
tracks.
For full instructions on using Windows Media Player 10 to synchronise files to
your player please consult the help file that is supplied with Windows Media
Player 10.
- 14 -
Page 16

Getting Started
INSERTING THE BATTERY
Open the battery compartment cover and insert 1 x AAA
Alkaline battery observing the correct polarity as shown
in the battery compartment. Refit the battery
compartment cover.
Connect the supplied earphone to the earphone socket on the player and
attach the security strap to the strap connecting loop.
SWITCHING THE POWER ON/OFF
To switch the player ON first ensure the HOLD switch is in the Off position
then press and hold the PLAY/PAUSE/STOP button for more than 2
seconds. The start-up screen logo appears.
To switch the player OFF firstly ensure the HOLD switch is in the Off
position then press and hold the PLAY/PAUSE/STOP button for more
than 2 seconds.
VOLUME CONTROL
During playback use the VOL + or VOL - buttons (Jog Switch up/down) to
increase or decrease the volume level through the earpieces.
HOLD FUNCTION
This feature enables the locking of the buttons on the unit to prevent
accidental operation during use and transportation. To activate move the
HOLD switch on the side of the unit to the ON (UP) position the HOLD will
show in the display.
To unlock the buttons move the HOLD switch to the OFF (DOWN) position.
If the hold function is active “HOLD” will appear in the display if any button
is pressed.
- 15 -
Page 17

Music Playback Operation
MUSIC PLAYBACK OPERATIONS
Basic Operations Controls to Press
Playback start and pause
Pause playback
Stop playback
Go to the next track
Go to the previous track
Search forward
Search backwards
Increase the volume
Decrease the volume
Display the submenu during
music playback
Press the Jog Switch in the centre
Press the Jog Switch in the centre
Press the Jog Switch in the centre
Move the Jog Switch Right
Move the Jog Switch Left
Press and hold the Jog Switch Right
Press and hold the Jog Switch Left
Move the Jog Switch Up (VOL+)
Move the Jog Switch Down (VOL-)
Press the MENU button briefly during music
playback to display Music Playback submenu
briefly
To access the main menu, press and hold the MENU button, the following
icons will show in display.
The options are described as below:
MUSIC This is the default mode that is selected when
the player is switched ON and is used for
playback of MP3/WMA files
VOICE RE CORD To make a voice recording using the inbuilt
Microphone
VOICE RECORD PLAYBACK To playback any voice recordings already made
SYSTEM MENU To change the preference settings
For details please refer to the section of Advanced Settings and
Functions
- 16 -
Page 18

Music Playback Operation (contd.)
REPEAT FUNCTION
During music playback it is possible to select repeat play of one or all tracks.
1. Press the MENU button briefly during music playback to display the Music
Playback menu.
2. Move Jog Switch (Left/Right) to select the REPEAT mode and press
PLAY/PAUSE/STOP button to enter the REPEAT submenu. Select the
required repeat mode using
Submenu under “REPEAT” mode
Option Icon Repeat mode
PLAY/PAUSE/STOP button.
Normal
Repeat One
Folder
Repeat Folder
Repeat All
Random
Intro Scan
3. To exit the menu, select the “EXIT” option or press the MENU button briefly
until the normal playback is shown.
All tracks will be played ONCE
The current track will be played continuously
The current folder will be played continuously
All tracks in the current folder will be played continuously
All tracks will be played continuously
All tracks in the current folder will be played in a random
order
Playback first 10 sec. of each track in the directory will
be played until STOP button is pressed
- 17 -
Page 19

Music Playback Operation (contd.)
EQ SELECTION
1. To select a different EQ effect during music playback, press the MENU button
briefly to display the Music Playback menu.
2. Move Jog Switch (Left/Right) to select the EQUALIZER options and press
PLAY/PAUSE/STOP button to enter the EQ submenu. Select the required
repeat mode using
Submenu under “EQUALIZER” (EQ) mode
Option Icon EQ mode
PLAY/PAUSE/STOP button.
Natural
Rock
Pop
Classic
Soft
Jazz
DBB
No preset EQ effects added
All tracks will be played in Rock equalizer
All tracks will be played in Pop equalizer
All tracks will be played in Classic equalizer
All tracks will be played in Soft equalizer
All tracks will be played in Jazz equalizer
All tracks will be played in DBB equalizer
3. To exit the menu, select the “EXIT” option or press the MENU button briefly
until the normal playback is shown.
- 18 -
Page 20

Voice Recording Operation
Voice or music data can be recorded through the inbuilt microphone. The
recordings will be automatically stored in the VOICE folder which is inside the
RECORD folder in the Root directory.
VOICE RECORDING OPERATION
To start recording:
Switch the player ON.
Hold down the REC button for 2 seconds.
Recording starts.
To interrupt recording:
Press the REC button for 1 second.
To resume recording, press the REC button again.
To stop recording:
Press and hold the REC button for 2 seconds to stop recording.
RECORDING QUALITY
It is possible to change the recording quality as required, to change the recording
quality,
1. Press the MENU button briefly.
2. Move Jog Switch (Left/Right) to enter the REC TYPE submenu using
PLAY/PAUSE/STOP button.
3. Move Jog Switch (Left/Right) to select the required recording type and press
PLAY/PAUSE/STOP button to confirm.
Submenu under “REC TYPE” mode
Record Quality
Fine Rec 8.5 hours 17.5 hours 35 hours
Long Rec 35 hours 70 hours 140 hours
GMP31M2 (128MB) GMP32M2 (256MB) GMP35M2 (512MB)
Average storage time on
Fine Vor 8.5 hours 17.5 hours 35 hours
Long Vor 35 hours 70 hours 140 hours
4. To exit the menu, select the “EXIT” option or press the MENU button briefly
until the normal voice record screen is shown.
- 19 -
Page 21

Voice Playback Operation
PLAYING A RECORDED VOICE FILE
To start voice playback:
Switch the player ON.
Press the MENU button to enter the main menu and select the Voice
Record Playback icon, then scroll through the available recorded voice
tracks and select the required track for playback by using
PLAY/PAUSE/STOP
Move Jog Switch (Left/Right) to browse the available tracks. Select the
desired track and press PLAY/PAUSE/STOP
To interrupt playback:
Press PLAY/PAUSE/STOP
To resume playback, press PLAY/PAUSE/STOP again.
REPEAT FUNCTION
During voice playback it is possible to select repeat play of one or all tracks.
1. Press the MENU button briefly during music playback to display the Voice
Playback menu.
2. Move Jog Switch (Left/Right) to select the REPEAT mode and press
PLAY/PAUSE/STOP button to enter the REPEAT submenu. Select the
required repeat mode using
Submenu under “REPEAT” mode
PLAY/PAUSE/STOP button.
Option Icon Repeat mode
Normal
Repeat One
Folder
Repeat Folder
Repeat All
Random
Intro Scan
3. To exit the menu, select the “EXIT” option or press the MENU button briefly
until the normal playback is shown.
All tracks will be played ONCE
The current track will be played continuously
The current folder will be played continuously
All tracks in the current folder will be played continuously
All tracks will be played continuously
All tracks in the current folder will be played in a random
order
Playback first 10 sec. of each track in the directory will
be played until STOP button is pressed
- 20 -
Page 22

Customized Settings Advanced Settings and Functions
In the SYSTEM MENU the following functions can be accessed the bottom 7
functions are contained within the system menu.
Menu Item Functions
Backlight Settings Set the backlight timer
Power Off Auto power off if no music is playing or no
menu actions are taken
Contrast Adjust display contrast level
Sleep Time Automatically switch off after 120, 90, 60 or
30 minutes.
USB Mode MEDIA DEVICE mode is essential if you want
to transfer DRM10 encrypted music tracks to
the player & USB DISK is available for any
files transfers through Windows Explorer
Memory Info
Firmware Version Display the firmware version of this player
Display the total amount of memory available in
this player
BACKLIGHT
1. Press and hold the MENU button to access the MAIN MENU display.
2. Use Jog Switch (Left/Right) to browse the MAIN MENU and select SYSTEM
Menu, press
3. Use Jog Switch (Left/Right) to browse the SYSTEM submenus. Select the
BACKLIGHT option and then use Jog Switch (Left/Right) to select the
backlight options.
4. Press
PLAY/PAUSE/STOP button to confirm the selection.
Submenu under “BACKLIGHT”option
Options Description
OFF The backlight will not come on at all
5 Sec. The backlight will remain for 5 sec. after a button is pressed
10 Sec. The backlight will remain for 10 sec. after a button is pressed
15 Sec. The backlight will remain for 15 sec. after a button is pressed
PLAY/PAUSE/STOP button.
- 21 -
Page 23

Advanced Settings and Functions (contd.)
CONTRAST
1. Press and hold the MENU button to access the MAIN MENU display.
2. Use Jog Switch (Left/Right) to browse the MAIN MENU and select SYSTEM
Menu, press
3. Use Jog Switch (Left/Right) to browse the SYSTEM submenus. Select the
CONTRAST option and then use Jog Switch (Left/Right) to adjust the
contrast level. The unit is set to 9 (middle setting) when first used.
4. Press
PLAY/PAUSE/STOP button to confirm the selection.
PLAY/PAUSE/STOP button.
USB MODE (MEDIA DEVICE (for secure music) or USB Disk switching)
The USB MODE provides you the option to switch it to the USB Disk as an
external storage device which allows you to transfer any data or music files
through PC (using Windows 98SE, ME or 2000). It is essential to set it to MEDIA
DEVICE mode while transferring the DRM10 encrypted music contents files
through Windows Media Player 10 (available to Windows XP users only). We
strongly recommend that unless connecting to an online musical rental service this
unit is set in the USB Disk
1. Press and hold the MENU button to access the MAIN MENU display.
2. Use Jog Switch (Left/Right) to browse the MAIN MENU and select SYSTEM
Menu, press
3. Use Jog Switch (Left/Right) to browse the SYSTEM submenus. Select the
USB MODE option and then use Jog Switch (Left/Right) to select the option.
Press
PLAY/PAUSE/STOP button to confirm the selection.
PLAY/PAUSE/STOP button.
MEMORY INFO
1. Press and hold the MENU button to access the MAIN MENU display.
2. Use Jog Switch (Left/Right) to browse the MAIN MENU and select SYSTEM
Menu, press
3. Use Jog Switch (Left/Right) to browse the SYSTEM submenus. Select the
MEMORY INFO the display will show the total amount of memory available for
this player.
4. Press
MENU button briefly to exit and return to the SYSTEM menu.
PLAY/PAUSE/STOP button.
FIRMWARE VERSION
1. Press and hold the MENU button to access the MAIN MENU display.
2. Use Jog Switch (Left/Right) to browse the MAIN MENU and select SYSTEM
Menu, press
3. Use Jog Switch (Left/Right) to browse the SYSTEM submenus. Select the
FIRMWARE VERSION the display will show the version number of firmware
used on this player.
4. Press
MENU button briefly to exit and return to the SYSTEM menu.
PLAY/PAUSE/STOP button.
- 22 -
Page 24

Troubleshooting Guide
TROUBLESHOOTING GUIDE
Many potential problems can be resolved without calling a service technician.
If something seems to be wrong with this product, check the following before
calling us.
The player cannot be switched on
z Check if the battery is inserted properly.
z Check if the battery is exhausted.
z Check if the HOLD key is switched OFF.
No sound or the sound quality is poor
z Check if the volume is set too low.
z Check if the earphone is plugged in properly.
Sound skips during playback
z Check if the battery is exhausted.
z Check if the music file is bad encoded.
Voice recording is not possible
z Check if the HOLD key is switched OFF.
z Make sure if there’s enough storage memory for recording.
Display shows “NO LICENSE” and will not play track
z Check if the license file for the selected track is expired. You may contact the
content provider for instructions for updating license files.
- 23 -
Page 25

Product Specifications
As a part of our policy of continuous improvement. Goodmans reserves the
right to make design and specification changes for product improvement
without prior notice. The performance specification figures indicated are
nominal values. There may be some deviations from these values in individual
units.
General Specifications
GMP31M2 (128MB)
Model & Internal Memory
Battery Type 1 AAA Alkaline Battery
LCD 128x32 dot matrix display, with Backlight
Playback File Formats MP3, WMA
MP3 Decoding 8 Kbps ~ 320 Kbps
WMA Decoding 32 Kbps ~ 384 Kbps
S/N Ratio 85 dB
Headphone Output 5mW x 2 @ 32Ω
Sample Frequency of the Recording 8 KHz
GMP32M2 (256MB)
GMP35M2 (512MB)
* Specifications are subject to change without notice.
For further assistance please visit the Goodmans website:
www.goodmans.co.uk
or contact the Goodmans
Product Information Helpline:
0870 873 0080
- 24 -
 Loading...