

Page 1

GMP31G7DAB
Instruction Manual
Before operating this unit
Please read this Instruction Manual carefully
www.goodmans.co.uk
GOODMANS Product Information Helpline
0870 873 0080
Page 2

Page 3

Introduction
Thank you for buying this
GMP31G7DAB which is designed
to give you many years of troublefree service.
You may already be familiar with
using a similar unit, but please take
time to read these instructions.
They are designed to familiarise
you with the unit’s many features
and to ensure you get the very best
from your purchase.
Safety is important
Your safety and the safety of others
is important. Please therefore,
ensure you read the “Safety
Information” on page 6 before you
operate this unit. Keep this
information in a safe place for
future reference.
4
Copyright warning notice
Please be aware that copyright
laws may apply to the music/
material you are intending to
record. The copying and
distribution of music files without
the permission of the owner is
against copyright laws.
Infringement of these laws may
result in prosecution. If in doubt,
seek advice before making your
recording.
Page 4

Contents
Product Registration...................................... 3
Introduction.................................................... 4
Contents ........................................................ 5
Safety Information ......................................... 6
Quick Views................................................... 7
Getting Started .............................................. 8
DAB Mode ..................................................... 12
Transferring Files .......................................... 24
Playing MP3 Files.......................................... 25
Voice Rec and Playback ............................... 28
MP3 Menu System ........................................ 30
Troubleshooting............................................. 36
Technical Spec.............................................. 38
Guarantee ..................................................... 39
5
Page 5

Safety Information
Please read all the safety
information before use.
Safety Considerations
■
Do not use the Personal DAB/
MP3 Player in humid or damp
conditions.
■
Do not allow the Personal DAB/
MP3 Player to get wet.
Servicing
■
There are no user serviceable
parts in this Personal DAB/
MP3 Player.
■
When servicing, refer to
qualified service personnel.
■
Consult your dealer if you are
ever in doubt about the
installation, operation or safety
of this Personal DAB/MP3
Player.
6
Hearing
Damage to hearing can occur with
consistent exposure to high volume
when using headphones. Always
check the volume level before
inserting headphones into your
ears. Use of headphones while
operating a vehicle is not
recommended and is illegal in
some areas. Stop listening to your
Personal DAB/MP3 Player if you
find it distracting while operating
any type of vehicle or performing
any other activity that requires your
full attention.
Page 6
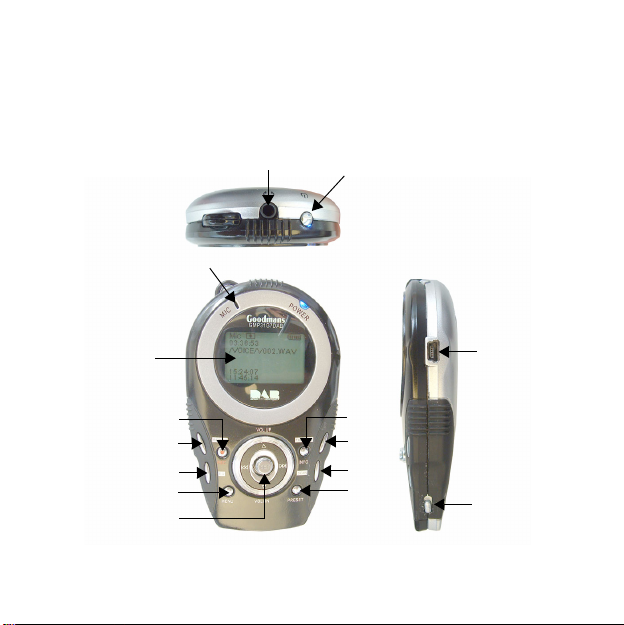
Quick Views
Display
Record
Repeat
EQ
Menu
Joystick / Set button
Microphone
Earphones Socket
Power On/Off
Info
Function
Scan
Preset
USB Connector
Hold Switch
7
Page 7

Getting Started
Read these instructions before
use.
Remove your Instruction Manual
carefully from the box. You may
wish to store the packaging for
future use.
In the Box
Inside the box you should have:
■
Instruction Manual
■
Built in rechargeable battery
■
Mains adapter
■
USB to mini USB cable (for
connection to PC)
■
Earphones
■
Instruction manual
If any items are missing call the
Helpline on 0870 873 0080.
8
Charging
The Instruction Manual uses a
rechargeable battery pack which
can be charged in 2 ways/
1. PC USB Lead. Whilst connected it cannot be used as a player.
2. Mains adaptor (supplied).
Whilst the unit is charging the
battery icon will cycle from one bar
displayed to all bars displayed.
Page 8
Getting Started
Powering on for the first time
■
Connect the earphones to the
Instruction Manual
■
When the Instruction Manual is
first powered on, a welcome
screen will appear for 2
seconds, this will be followed
by a brief message 'creating
new playlist'.
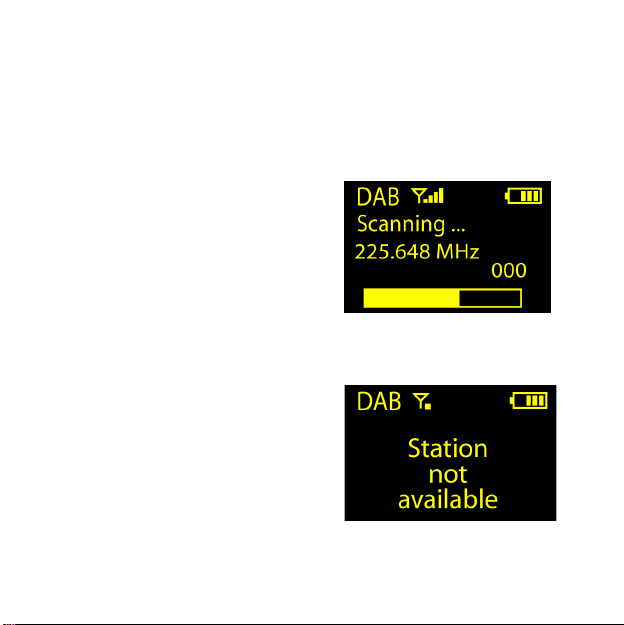
■
The Personal DAB/MP3 Player
will then go straight into DAB
mode where it will show 'now
tuning' and start scanning for
the stations available as shown
below.
If no stations are found the
Instruction Manual will display
'Station not available'.
If a station list can be found it will
tune to the first station in the list.
9
Page 9

Getting Started
General operation
The player operates in several
main modes which are selected via
menus or short cut keys. The units
main modes are:
■
DAB Radio
■
Music Player
■
Mic Recording
■
Voice Playback
Changing Modes
There are 2 ways of changing
modes.
FUNCTION SELECT Button
1. Press the FUNC SEL button
to cycle through the following
10
modes: DAB, Music and Voice
Playback.
Note. This does not include Mic
record.
Menu
1. Press the MENU button.
2. Move the JOYSTICK to the right to access the 'GoTo' menu and highlight the mode you want using the UP or DOWN buttons.
3. Press SET.
■
Whenever the unit is powered
on, it will return to the last mode
left in before it was powered off.
For example if the user turned
off the unit when listening to
DAB radio. The unit
automatically returns to DAB
mode when it is powered on
again.
Page 10

Getting Started
Vol ume
During playback, press the UP or
DOWN button to adjust the volume.
Hold Button
The HOLD button locks all of the
button to prevent accidental
presses.
11
Page 11

DAB Mode
Turning on and tuning
When you first enter DAB mode,
your Instruction Manual performs
an autotune to find all the DAB
stations available in your area.
The unit will then tune to the first
station found in the list.
12
Scan for DAB stations
1. Press the MENU button.
2. Select either the local scan or full scan option in the DAB menu.
3. Press the JOYSTICK to the right to start the search.
Alternatively, press the Scan
button to perform a Local scan
Page 12
DAB Mode
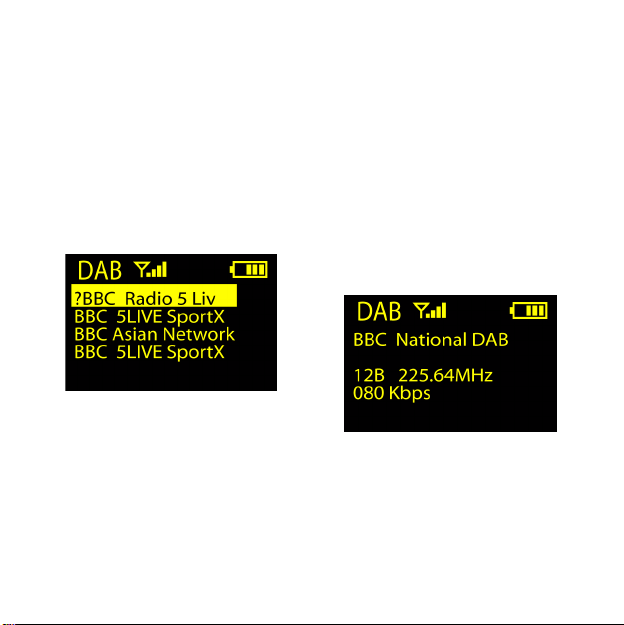
Selecting DAB Stations
1. To access the station list press the JOYSTICK to the right. The station list will be shown as below.
2. Push the JOYSTICK UP or DOWN to highlight the required station and press SET.
■
The unit will then tune to the
station selected.
■
If the station cannot be
acquired 'station not available'
will be displayed.
Additional information
Pressing INFO provides you with
additional information. There are 2
information screens.
13
Page 13

DAB Mode
The first shows the multiplex,
channel, frequency and data rate of
the audio being transmitted.
The second shows signal error and
time and date
More errors = Lower audio quality
14
DAB Preset
Preset save
1. Select a DAB station. See “Selecting DAB Stations” on page 13
2. Press the PRESET button once to enter preset save.
3. Press the JOYSTICK to the LEFT/RIGHT to change the preset number until the desired preset location is shown.
4. Press SET to save the current DAB service to the desired preset location.
■
A message will be shown to
indicate the DAB service is
saved successfully.
Page 14

DAB Mode
Preset Select
1. Press the PRESET key twice to enter preset select mode.
2. Press the JOYSTICK to the LEFT/RIGHT to navigate to the desired preset and press SET to tune to the station stored in that location.
Recording DAB
Start Recording
Press the REC button to start
recording.
■
A recording icon will be shown.
To Pause Recording
1. During recording, Press SET to pause the recording.
■
A pause icon will appear.
2. Press SET again to resume recording.
■
The pause icon will disappear.
To Stop Recording
1. Press REC or POWER ON/ OFF to stop recording.
■
A file named as D001.wav will
be created in the DAB directory
15
Page 15

DAB Mode
automatically, which contains
the recording.
■
For the next recordings, the
files will be named as
D002.wav, D003.wav…etc.
■
If the memory becomes full
during recording, the recording
will stop automatically and a
warning screen will be shown
to indicate memory full.
16
DAB Menu
1. Press MENU.
2. Move the JOYSTICK UP and DOWN to highlight the required item in the list and press the SET key.
DAB Menu
Go to...
Local Scan
Full Scan
Manual Tune
Settings
Delete files
Page 16

DAB Mode
DAB Menu
Info
DAB Version
Local Scan
A local search will search for all UK
stations.
Full Scan
If you are using your DAB radio
outside of the UK then a wider
search can be initiated by selecting
FULL SCAN.
Manual Tune
It is possible to manually tune to a
specific channel/frequency and
add this to the station list.
This function can be used to assist
the positioning the antenna to
obtain the optimum reception for a
specific station.
1. Press the MENU button.
2. Highlight manual tune and press SET.
3. Move the Joystick UP and DOWN to select the frequency and press SET to tune to that station/frequency.
17
Page 17

DAB Mode
Settings
Settings Menu
Station Order
DRC
Contrast
Power Savings
Record Settings
Backlight
Factory Reset
Station Order
This option adjusts the order the
18
stations are displayed in the station
list.
■
Active station Displays active
stations at the top of the station
list and inactive ones at the
bottom, in alphanumeric order.
Inactive stations are those on
your station list but not
currently available, marked
with a ’?’.
■
Alphanumeric Displays all
stations in alphanumeric order.
■
Favourite station Displays
your ten favourite stations at
the top of the station list and the
others below. Your favourite
stations are selected by how
long you listen to each station.
■
Prune Station: Remove all
inactive stations from the list.
Page 18

DAB Mode
DRC (Dynamic Range Control)
Dynamic range is defined as the
difference, in decibels (dB),
between the loudest and quietest
sounds in any particular piece of
audio. Classical music is a good
example, with ranges from piano
(soft) to forte to FFF (for extremely
loud). DRC limits the range from
the quietest and loudest sections of
the audio.
1. In the DRC menu, navigate until the desired DRC value is highlighted and press the SET button to confirm.
■
0: Content is played with the
full dynamic range without any
processing.
■
1/2: Content is played with a
medium difference between
loud and soft sounds. The peak
value of the audio signal is
limited to 12 dB above the
average level.
■
1: Content is played with very
little difference between the
loud and soft sounds. The peak
value of the audio signal is
limited to 6 dB above the
average level.
Contrast
To set the contrast of the display,
1. Push the JOYSTICK UP or DOWN to set the desired contrast level.
2. Press SET to save the setting.
Power Savings
In order to save the battery power,
your Instruction Manual can be set
19
Page 19

DAB Mode
to switch off automatically after a
period of inactivity.
The settings are:
■
Disable (remains on)
■
2 mins
■
5 mins
■
10 mins
1. Push the JOYSTICK UP or DOWN to set the desired Power Saving setting.
2. Press SELECT to save the setting.
Record Settings
The recording settings are listed as
follows:
Source
■
MIC
20
■
DAB
Encoder
■
IMADPCM
■
MSADPCM
■
PCM
Channels
■
STEREO
■
MONO
Rate
■
8KHZ
■
11K HZ
■
16KHZ
■
22kHZ
■
32KHZ
Page 20

DAB Mode
Mode
■
Song
■
Album
Backlight
This menu enables you to set the
length of time the display backlight
remains on after the last button
press.
The settings are:
■
5 seconds
■
10 seconds
■
20 seconds
■
30 seconds
■
40 seconds
■
50 seconds
■
Always ON
Factory Reset
This menu allows you to return all
setting back to the default settings.
Delete Files
This menu enables you to delete
tracks or recordings in the following
ways.
■
Music: Deletes one music file
at a time.
■
All Music: Deletes all music
files at once.
■
Voice/DAB: Deletes one
recorded file at a time.
■
All Voice/DAB: Deletes All
recorded files at once.
21
Page 21

DAB Mode
Info
Enter the Info Menu to show:
■
The software version
■
Total memory
■
How much memory is left
To remove screen press the
JOYSTICK to the left to return to
the menu.
If no action is taken, after 10
seconds the unit will return to the
last mode before Info was selected.
22
DAB Version
Displays the current software
version installed on your unit. You
may be asked to quote this if you
contact technical support.
Page 22

Transferring Files
To transfer files to the Personal
DAB/MP3 Player.
1. Connect the cable to the USB port on the PC and to the USB socket on the side of the Personal DAB/MP3 Player.
■
The PC should recognize the
unit as an additional drive for
you to drag and drop files to.
■
The unit will show the following
screen and the icons will
animate showing the transfer in
place.
24
■
When complete it will indicate
'ready'.
2. Remove the cable from your Personal DAB/MP3 Player.
■
The Personal DAB/MP3 Player
will power off briefly and then
show updating library. Once
complete it will return to the last
mode it was left in.
Page 23

Playing MP3 Files
The Playback Menu
1. On entering the MUSIC mode a playback menu will be shown.
2. It can be displayed at any time during playback by pressing SET.
■
This will pause the audio and
allow the selection of another
file. To continue to listen to the
current file highlight 'Resume'
and press SET the audio will
restart at the point it was
stopped.
Track selection
Music files can be selected in one
of 8 different ways.
The options are:
■
Play All: Plays the files
alphabetically according to
filename.
■
Artist: Plays the files
alphabetically according to the
artist names.
■
Album: Plays the files
alphabetically according to the
album titles.
■
Songs: Plays the files
alphabetically according to the
track titles.
■
Favourites: Plays the files
alphabetically according to
order of the user selections.
25
Page 24

Playing MP3 Files
■
DAB Record: Play any
recording of dab stations that
you have made in alphabetical
order.
■
New music:
■
Genre: Plays the files
alphabetically according to
genre.
■
Year: Sort the audio files
according to the order of years.
1. Move the JOYSTICK UP/ DOWN until the desired Playback option is highlighted.
2. Press SET to confirm.
26
The Play Screen
■
■
■
The unit will play the first song
in the list selected and display
the play screen as below.
The play screen shows the
time/total time, song title, artist
name, album name, and track
number/total track number.
If the ID3 tag within the file does
not contain the above
information "<NO
INFORMATION>" will be
Page 25

Playing MP3 Files
shown in that corresponding
position.
Selecting a track
1. Move the JOYSTICK LEFT/ RIGHT to select the next or previous track.
2. Hold the JOYSTICK to the LEFT or RIGHT to scan through the track.
27
Page 26

Voice Rec and Playback
Recording
1. Press the MENU button.
2. Move the JOYSTICK to the RIGHT to enter the GOTO menu.
3. Move the JOYSTICK UP and DOWN to highlight the “Mic record". Press SELECT and you will enter the voice recording files.
■
Voice recording will start
recording immediately.
■
Alternative to start a voice
recording press REC when in
Music, voice record or voice
playback mode.
4. During recording, press SET to pause. A pause icon will be shown on the top line. To resume, press SET again.
28
To Stop Recording,
1. Press POWER or REC to stop
the recording. For the first
recording, the audio will be
saved in a file named as
V001.WAV. For the next time,
the filename will be
V002.WAV…etc. Once the
recording has been saved the
voice playback screen will be
displayed.
Page 27

Voice Rec and Playback
Voice playback
1. Press the MENU button.
2. Move the JOYSTICK to the RIGHT to enter the GOTO menu.
3. Move the JOYSTICK UP and DOWN to highlight the “Voice Playback" and Press SELECT.
■
The voice recordings are
listed.
4. Move the JOYSTICK UP and DOWN to select to file to listen to and press SET to play the file.
5. During playback, move the JOYSTICK to the RIGHT and LEFT buttons to skip forward and back through the recordings.
6. Press SET to pause playback.
7. To continue to listen to the current file press SET again.
29
Page 28

MP3 Menu System
The MP3 MENU system allows you
to access the MP3 Player functions
and preferences.
1. Press MENU button to enter the menu system.
Go to
You can select the Current mode
using this menu. Select from the
following modes.
■
DAB
■
Music
■
Mic Record
■
Voice Playback
30
Equalization
Your MP3 player has seven preset
equalization settings and one
custom setting as listed below.
■
FLAT (no equalization)
■
CLUB
■
MONITOR
■
STUDIO
■
ARENA
■
BASS
■
CUSTOM
Equalization is used to enhance
certain frequency bands to suit the
type of audio output. The custom
setting enables you to set your
equalization levels.
Page 29

MP3 Menu System
Playmode
The MP3 Jukebox has a number of
repeat and shuffle playback
modes.
There are 5 playback modes.
These are listed below:
■
Normal - Albums, songs and
playlists are only played once.
■
Repeat One - The selected file
will repeatedly play until either
the play mode is changed or
the unit is switched off.
■
Repeat All - All files in the
library will play in order then
repeat until either the play
mode is changed or the unit is
switched off.
■
Shuffle - All files in the library
will play in a random order
once.
■
Shuf & Rep - All files in the
library will play in a random
order repeatedly.
31
Page 30

MP3 Menu System
Settings Menu
Contrast
To set the contrast of the display,
1. Move the JOYSTICK UP or DOWN to set the desired contrast level.
2. Press SET to save the setting.
Power Savings
In order to save the battery power,
your MP3 player can be set to
switch off automatically if it is
inactive.
The settings are:
■
Disable (remains on)
■
2 mins
■
5 mins
■
10 mins
32
1. Move the JOYSTICK UP or DOWN to set the desired Power Saving setting.
2. Press SET to save the setting.
Page 31

MP3 Menu System
Record Settings
The recording settings
Source
■
MIC
■
DAB
Encoder
■
IMADPCM
■
MSADPCM
■
PCM
Channel
■
Stereo
■
Mono
Rate
■
8KHZ
■
11K HZ
■
16KHZ
■
22kHZ
■
32KHZ
Mode
■
Song
■
Album
33
Page 32

MP3 Menu System
Backlight
This menu enables you to set the
length of time the display backlight
remains on after the last button
press.
The settings are:
■
5 seconds
■
10 seconds
■
20 seconds
■
30 seconds
■
40 seconds
■
50 seconds
■
Always ON
34
Factory Reset
Selecting factory reset will restore
the unit to its factory settings. .
Page 33

MP3 Menu System
Delete Files
This menu enables you to delete
tracks or recordings in the following
ways:
■
Music: Deletes one music file
at a time.
■
All Music: Deletes all music
files at once.
■
Voice/DAB: Deletes one
recorded file at a time.
■
All Voice/DAB: Deletes All
recorded files at once.
Info
Enter the Info Menu to show:
■
The software version
■
Total memory
■
How much memory is left
To remove screen press the
JOYSTICK to the left to return to
the menu.
If no action is taken, after 10
seconds the unit will return to the
last mode before Info was selected.
button.
35
Page 34

Troubleshooting
If you believe that something is wrong with your Instruction Manual, first
check the points listed below. If the trouble persists consult your dealer or
contact our customer support line:
I can’t get any
sound
I hear a ‘burbling’
sound on some
stations
Unable to play an
MP3 file
1. Make sure your Instruction Manual is fully charged and is switched on.
2. Check that the volume level is not set too low.
1. Although DAB is excellent at providing quality audio from very little signal, the quality can suffer if the signal strength is too low. If that happens, a ‘burbling’ sound can sometimes be heard.
1. Make sure that the memory contains MP3 files.
2. Check the player is in music mode.
36
Page 35

Troubleshooting
Unable to find the
mass storage
device after
connection to the
PC.
None of the
controls work.
The player is
switched on but
the screen is not
visible.
1. Make sure that the Instruction Manual is installed and connected correctly.
2. Restart the computer.
1. Check that the HOLD button is not in the lock position.
1. Check the contrast setting.
37
Page 36

Technical Spec
Power
Power Supply: USB mains adaptor 5V 1A
Battery: Built in rechargeable Lithium-ion 3.7V 1030mAh
Battery Life: 8 hours
Recharging Time: Mains adaptor 2 hours
General
Size: 117 mm x 67mm x 23mm
Weight: 91g
PC Interface: USB Version 2
Memory: 1GB
Digital music format: WMA, MP3
Built in microphone: Condensor type
Tuner: DAB: 174.92MHz-239.20MHz
Preset memory: DAB: 99 presets
38
Page 37

Guarantee
This unit is guaranteed for twelve months from the date of original
purchase. If any defect arises due to faulty materials or workmanship,
the unit will either be replaced, a refund given or repaired free of
charge where possible during this period by the dealer from whom you
purchased the unit.
The guarantee is subject to the following provisions:
■
The guarantee is only valid within the boundaries of the country of
purchase.
■
The product must be correctly installed and operated in accordance with
the instructions contained in this manual.
■
The unit must be used solely for domestic purposes.
■
The guarantee will be rendered invalid if the unit is re-sold or has been
damaged by inexpert repair
■
The manufacturer disclaims any liability for incidental or consequential
damages.
The guarantee is in addition to, and does not diminish, your statutory
or legal rights.
39
 Loading...