

Page 1
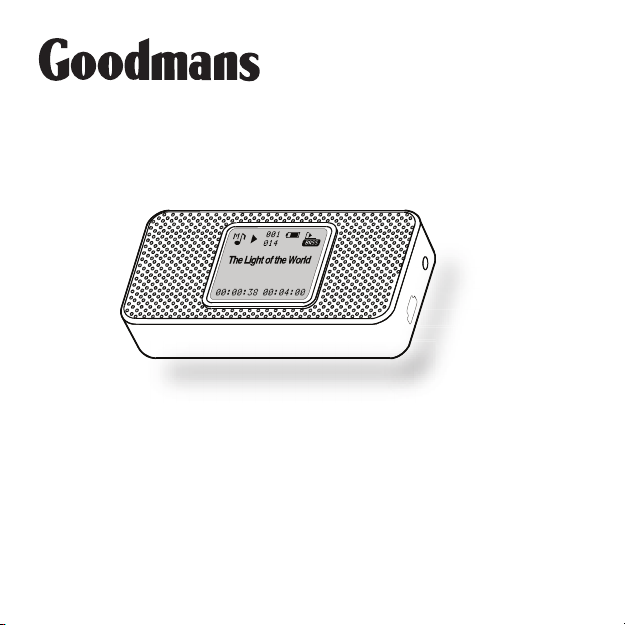
USER G UIDE
GMP31G3S
MP3 PLAYER WITH SPEAKERS
Please read t his in str ucti ons be fore us e and kee p for fu rth er ref erence.
Page 2
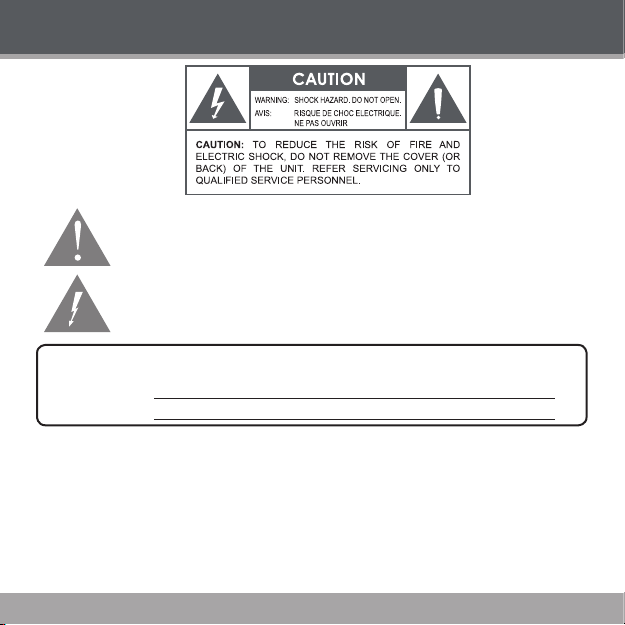
PRECAUTIONS
The lightnin g ash wi th arrowh ead symbol within a n equilater al triangl e is inten ded to alert the user
to the p resence of uninsulate d “dangerous vo ltage” within the product ’s enclosure t hat may be of suf cient magnitude to consti tute a risk of elec tric shock.
The exclamation point w ithin an equilater al triangle is intende d to a lert th e user to the presence of
impor tant operation and serv icing instruc tions in the literature ac companying the applianc e.
For Cus tomer Use:
Enter bel ow the serial numb er that is located on the bot tom of the unit. Retain this inf ormation for future refe rence.
Model N o. GMP31G3 S
Seria l No.
WARNI NG:
To prevent re or s hock hazard, do n ot expose this devi ce to rain or moistu re. Dangerous high voltage is present inside the
enclos ure. Do not open the c abinet.
Page 2
Page 3

PRECAUTIONS
PROTECT YOU R HEAR ING:
Hearing experts advise against the c onstant use of perso nal stere os played at hi gh volume. Constant
exposur e to high volumes can lead to hearing loss. If you shoul d experienc e ringing in the ears or
hearin g loss, dis contin ue use and se ek medic al advic e.
Notice:
This produ ct is protecte d by certain intellectual proper ty right s of Microsof t. Use or distr ibution of such
techno logy out side of this product i s prohibi ted with out a license from M icrosoft.
For recycling or disposa l informat ion about this prod uct, please co ntact your loca l au thorit ies or the Electroni cs Industries All iance: www.eiae.or g.
Page 3
Page 4

IMPORTANT SAFETY INSTRUCTIONS
Read Ins truc tions: Al l the safety and operatin g instruc tions shou ld be read befor e the produc t
1.
is operated.
Retai n Instr ucti ons: The sa fety and operating instruc tions sh ould be ret ained for future refer-
2.
ence.
Cleaning: Unp lug thi s product from the wal l outlet before cleaning. Do n ot use liquid cleaners
3.
or aeros ol cleaners. Use a damp cloth fo r cleaning.
Water and Moist ure: Do not use this product near wat er (e.g., near a bath tub, washbo wl,
4.
kitche n sink, laun dry tub, in wet baseme nts, or nea r a swimmin g pool and the like).
Power Sour ces: This pro duct shoul d be operated onl y from the type of power source ind icated
5.
on th e rati ng lab el. If you are not sure of th e ty pe of power supply to yo ur hom e, consult your
produc t dealer or local power comp any. For products int ended to operate from battery power or
other sources, re fer to the op erating i nstruc tions.
Power- Cord Pro tection: Power suppl y cords shou ld be routed so th at they are not likely to be
6.
walked on or pinched by items placed upon or against them, pay ing particular attention to cord s
at plugs, c onvenien ce rece ptacle s, and at the point which they exit fr om the pro duct.
Servicing: Do not attempt to ser vice this product your self as op ening or removing c overs may
7.
expose y ou to dangerous voltage o r other h azards . Refer al l serv icing to quali ed ser vice p ersonnel.
Heat: The pro duct shoul d be situated away from hea t sources such as radiators, heat registers ,
8.
stoves, or other prod ucts (including amplier s) that produ ce heat.
Page 4
Page 5

TABLE OF CONTENTS
PRECAUTIONS.... ........... ........... ........... ....................................................................... .......2
IMPORTANT SAFET Y INSTRUCTIONS.. ........... ........... ...........................................................4
TABLE OF CO NTEN TS.. ........... ........... ....................................................................... .......... 5
PACKAGE CONT ENTS.......................... ........... ........... ........... ........... ..................................7
FEATURES.................. ....................................... ............................ ............................ ..........8
GET TING STARTED............................................................................... ........... ........... .........9
GMP31G3S a t a Glance ...........................................................................................................................9
Front View ......................................................................................................................................9
Top View .........................................................................................................................................9
Left Vi ew ........................................................................................................................................9
Right Vi ew ......................................................................................................................................9
Connec tions ............................................................................................................................................10
Connec ting Hea dphones ............................................................................................................10
Connec ting Power .......................................................................................................................10
USB Char ge ......................................................................................................................10
Connec ting to a Co mputer...........................................................................................................11
Disco nnecting from a Co mputer .................................................................................................12
Microsoft Windows ......................................................................................................................12
Macintosh OS X ...........................................................................................................................12
GMP31G3S D isplay ................................................................................................................................14
Using the GMP31G3S C ontrols .............................................................................................................15
NAVIGATOR MODE ...................................................... ........... ........... ........... ...................17
Playing M usic ..........................................................................................................................................17
USB Dri ver Insta llation .....................................................................................................13
Play Mode ....................................................................................................................................14
Record M ode ...............................................................................................................................14
Power On/Off ...............................................................................................................................15
Hold Func tion ...............................................................................................................................15
Reset Function .............................................................................................................................15
Adjusti ng the Volume ...................................................................................................................15
Navigat ing the Me nu ....................................................................................................................15
Main Men u at a Glanc e .....................................................................................................16
Page 5
Page 6

TABLE OF CONTENTS
Navigat or Menu Co ntrols .............................................................................................................17
Music Playback Co ntrols .............................................................................................................17
Music Op tions ..............................................................................................................................18
Repeat A -B Mod e ........................................................................................................................18
RECOR D MODE ..... ....................................................................... ........... ........... ........... ..19
Record ing Voice .....................................................................................................................................19
Record ing Controls ......................................................................................................................19
Saved Rec ordings........................................................................................................................19
SET TINGS MODE.......................................................................................................................20
Setting Your Player’s Opt ions ............................................................................................................... 20
Settings Menu Controls .............................................................................................................. 20
Settings Optio ns ......................................................................................................................... 20
DEL FILES MODE.......................................................................................................................22
Deleting Files on Your Player ................................................................................................................ 22
Del Files Menu Cont rols ............................................................................................................. 22
File Brow ser Opti ons
ABOUT MODE...........................................................................................................................23
ABOUT WINDOWS MEDIA PLAYER..........................................................................................24
TROUB LESH OOTIN G.................................................................................................................25
SPECI FICATIONS......................................................................................................................27
Page 6
Page 7
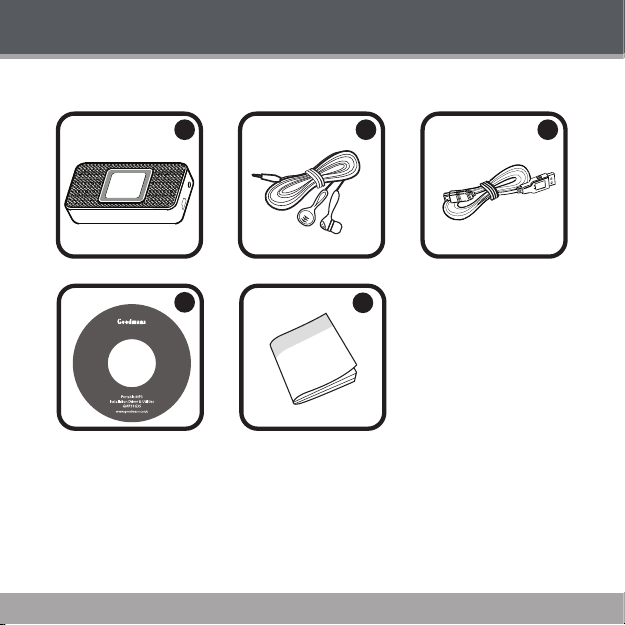
PACKAGE CONTENTS
1
4
2
5
3
Please ma ke sure that th e items list ed below are include d in the packa ge. Should an item be mis sing,
please c ontact t he local retailer from whic h you purchased thi s product.
GMP31G3S
1.
Stereo E arphones
2.
USB Ex tension C able
3.
Installation CD
4.
Instru ction Booklet
5.
Page 7
Page 8

FEATURES
1GB Integr ated Flash M emor y stores up to 240 Songs
High- Contr ast LCD Display with Backligh t
Integra ted Stere o Speaker s
Plays MP3 and WMA Di gital Music Files
Plays Digital Music from most online st ores and su bscrip tion ser vices
ID3 and LRC s uppor t for song and synchr onized ly ric infor mation d isplay
Integra ted Micr ophone fo r Digita l Voice Recording
Mobile D ata Stor age Functi on
USB 2.0 Ful l-Speed for Fast Fi le Transfers
Page 8
Page 9
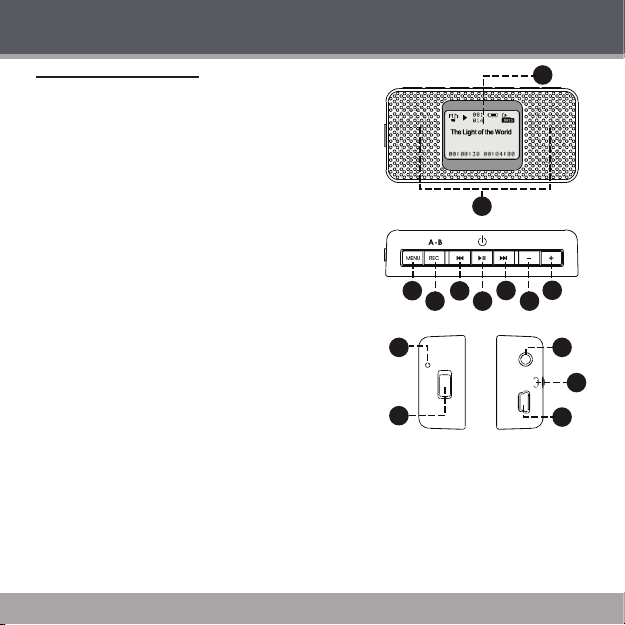
GMP31G3S a t a Glance
2
3
4
10
12
11
14
13
6
8
5
7
9
1
Front View
Display S creen
1.
Stereo S peakers
2.
Top View
Menu
3.
Record
4.
Repeat A -B (pre ss and hold)
Previou s
5.
Reverse (p ress and h old)
Play/Pause
6.
Power (pre ss and hol d)
Next
7.
Forward (press a nd hold)
Volume Dow n
8.
Volume Up
9.
Left View
Microphone
10.
Hold Sw itch
11.
Righ t View
Headphone Out
12.
Neckst rap Hook
13.
USB Por t
14.
GETTING STARTED
Page 9
Page 10
GETTING STARTED
USB Port
USB Port
(mini)
Computer
Connections
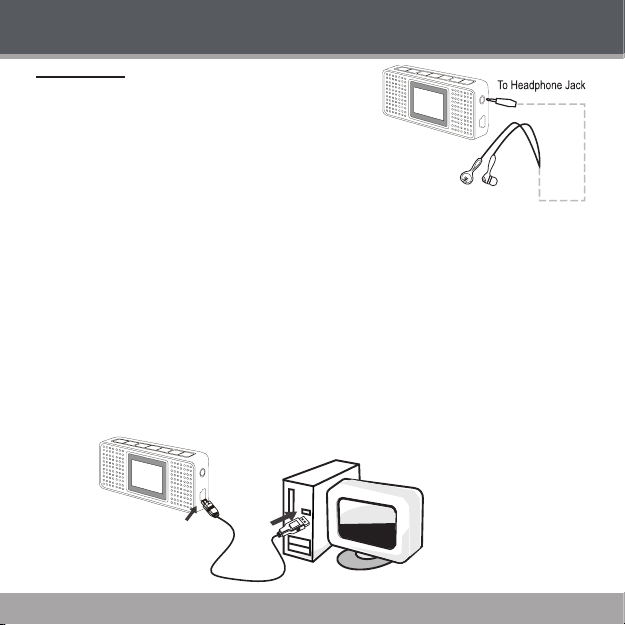
Conne cti ng Head phon es
Connec t headphones/ea rphone s to the H eadphon e Out jack
for private listening.
Lower the volume level before connecting headp hones, then
gradually increase the volume for comfortab le listening.
Hearing experts advise against the constant use of personal
stereos played at high volume.
Constant high- volume use can lead to hearing l oss. If you experie nce ringing in your e ars or hea r-
ing loss , discont inue use im mediately and seek m edical a dvice.
Conne cti ng Power
The GM P31G3S ope rates on an integr ated rec hargeab le lithium-io n batte ry. The b atte ry should be
charg ed full y befor e using your player f or the rst tim e.
USB Cha rge
Use the sup plied US B cable to c onnect your player to a c omputer. Your player w ill be charged whil e it
is conne cted to a powered- on comp uter.
Page 10
Page 11

GETTING STARTED
USB Port
USB Port
(mini)
Computer
Conne cti ng to a Com pute r
If you are using Wind ows 98 SE, you must inst all the USB driver contain ed on the supplie d Installation
CD. Please see the USB Driver In stallat ion section for mo re infor mation.
To c onnect to a computer:
Turn the player off.
1.
Connect the player to your computer using the supplied USB cable. I t may take Windows seve ral min-
2.
utes to recognize and set up t he devic e the rst tim e it is connec ted dep ending o n your h ardware
cong uration.
If your computer is running Windows XP and Windows Media Player 10 or newer, your player
will be detected as an “MTP Audio Device” when you open “My Computer”.
If your c omputer is running Windows 98 SE, NT, 2000, or ME, your player will be detected as
a “Removable Disk” when you open “My Computer”.
If you are using Windows Media Player 10 (WM P10), WMP10 can be set to synchronize
with your player automatically upon con nection.
For more infor mation and support regardin g music transfer and synchronizati on with
Windows M edia Player (WMP), please see th e h elp section include d w ith WMP (click
Help > Syn chroniz ing Conte nt to Devic es).
Page 11
Page 12
GETTING STARTED
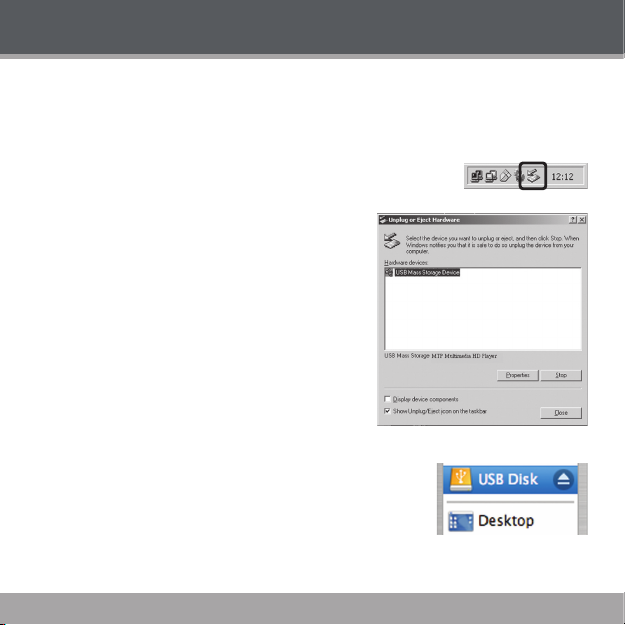
Disco nnec ting from a Computer
If your pl ayer is rec ognize d as an MT P device, you may sim ply unplu g the ca ble to dis connec t from a
comput er. If it is recognized as a USB Mas s Storage dev ice (i.e., a “Re movable Disk”), then follow the
steps bel ow to prevent d ata loss o r corruption.
Microsof t Wind ows
Double -cli ck the gre en arrow in t he taskb ar locat ed on the low er-righ t
1.
side of the c ompute r screen (Sa fely Remove Hardwar e).
Safel y Remove Hardware:
2.
Select “ USB Ma ss Storag e Device” from the li st that
appear s and then click on “S top”.
Stop a Ha rdwar e Device: S elect “ USB Mas s Storage
Device” from the li st that app ears and t hen click on “OK”.
Select “ USB Ma ss Storag e Device” from the li st that
appear s and then click on “O K”.
When the “Safe to Re move Hardwa re” window appears,
3.
click the O K button and di sconne ct the USB cable from
the player a nd your computer.
Maci ntosh O S X
On the left side of the Finder wind ow, identify the appropriat e Remov-
1.
able Dis k icon.
Click on the “Eject ” arrow on the right of the Removable Disk icon.
2.
Disco nnect the USB cabl e from the p layer and you r computer.
3.
Page 12
Page 13

GETTING STARTED
USB Dr iver I nstallation
It is no t neces sary to insta ll the U SB driver if you r compu ter is r unning M icrosoft Windows ME/20 00/
XP or newer, or Macintosh OS X. Com puters running these o peratin g systems will re cogniz e y our
player automatically when c onnected.
If your co mputer is r unning Wi ndows 98 S E:
Inser t the Installation CD into your compute r’s CD or DVD drive. Make sure to place the min i-CD in
1.
the cent er, recessed well of the d rive tray.
Navigat e to MY COM PUTER and d ouble-click on the CD/ DVD drive i con (usuall y “D:”).
2.
Double-click on the folder “Win98 USB Drivers”.
3.
Double -cli ck on the SE TUP icon (SETUP.EXE) to star t the USB dr iver inst allatio n program.
4.
Follow the on-screen instructions to comp lete the installation and then restart your computer.
5.
Mini- CDs should only be used in norm al tray- loadin g CD/DV D drives . Mini -CDs may be
used in slot-l oading drives with the proper adapter; please contact your comp uter or drive
manufac turer for m ore information .
Page 13
Page 14

GETTING STARTED
1
2
3
4
GMP31G3S D isplay
Play M ode
Playback Status
1.
(Play, Pause, Sto p)
Current Track Number /
2.
Total Number of Tracks
Batter y Level
3.
Equalizer Mode
4.
Song Tit le / Filenam e
5.
Elapsed Track Time /
6.
Total Track Time*
* A “ / ” symbol separating t he Elaps ed Track Time and Total Track T ime indicates th at the num ber of
tracks an d folder s loaded on t he player is less than 20 0 and 140, respectively.
A “ | ” symbo l indicates that th e number of tracks an d folder s loaded o n the player is greater than 20 0
and 140, resp ectively.
Record M ode
Record ing Statu s
1.
(Recor d, Pause, Stop)
Batter y Level
2.
Current R ecordin g File
3.
Elapsed Record Ti me /
4.
Total Record Time Available
1
2
3
4
5
6
Page 14
Page 15

GETTING STARTED
Using the GMP31G3S Control s
Power On/O ff
To turn your playe r on, press .
To turn your playe r off, pre ss until t he screen d isplays “ Bye Bye!”
Hold F unct ion
The Hold sw itch (loc ated on the lef t side of your playe r) locks/un locks the key co ntrols of
your player to prevent th em from being press ed accidentally.
To lo ck the key controls, slide the HOLD switch in th e direct ion of the ar row. The
screen w ill displ ay a “Lock ” icon.
To unlock the key c ontrols, slide the H OLD swi tch in the op posite di rectio n of the arrow.
Reset Funct ion
The Re set key (locate d on t he rear of your player) will power o ff an d reset your p layer. If your player
freezes or other wise beh aves abnor mally, use a pin to push this key to reset your player.
Adjus ting the Volu me
When yo ur player is in Play Mo de, pres s o r to adjust the volu me level down or up, res pectively.
Navi gati ng the Menu
To access th e Main menu at any time, pre ss . To exit the Ma in menu, pre ss again .
To move the selec tion lef t, pres s .
To move the selec tion ri ght, pres s .
To conrm (ente r) a selection, pres s .
To cancel or to r eturn to th e previou s menu scre en, press .
Page 15
Page 16

GETTING STARTED
Main M enu at a Gl ance
Menu Item Function
Navigat or Find and pl ay music fol ders or l es
Record Make digital voice recordings
Settings
Del Files Delete l es from yo ur player
About View info rmatio n about you r player
Exit Exit th e Menu
Page 16
Adjust th e player’s op tions:
Play Mode, EQ, Contr ast, Back light, Li ghtcol or, Power, Rec Set, or Lyr ic
Page 17
NAVIGATOR MODE
Playing Music
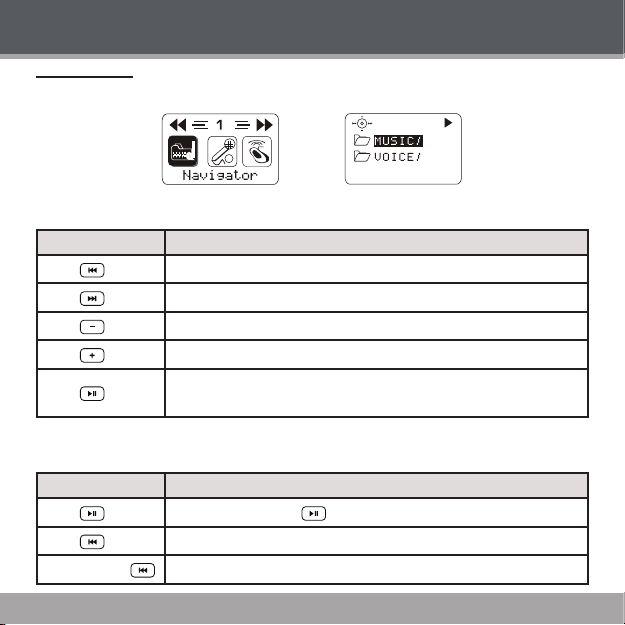
To play music and folders on your player, sel ect and co nrm NAVI GATOR from the Main menu.
Navi gato r Menu Controls
Use the following c ontrol s in Navigator mode me nu.
Key Function
Press
Press
Press
Press
Press
Musi c Playback Con trol s
Use the following c ontrol s during mu sic playback in Play Mo de.
Key Function
Press Pause play back. Press again to resume playback
Press
Press and hold
Move the se lectio n up
Move the se lectio n down
Return to t he previo us folder
Enter the selected f older
If a folder is selected, plays al l music in th e selecte d folder.
If a le is se lected, p lays the selected l e.
Play the previous track
Reverse through th e current track
Page 17
Page 18

NAVIGATOR MODE
Key Function
Press
Press and hold
Press or
Press
Press and hold
Musi c Opti ons
Music playback options may be set in t he SETT INGS menu. Please see the Settings sect ion for mor e
inform ation.
Repea t A-B Mode
Repeat A-B mode allows yo u c an dene a segmen t of an audi o t rack to be played repeatedly in a
loop.
During m usic playback, pre ss to set th e start point “A” of the loo p.
Press again to set the end poin t “B” of the loo p. The track se gment will no w play repeate dly in
a loop from point “A” to point “B”.
Press again to resu me norma l playbac k.
Page 18
Play the nex t track
Fast-for ward through the c urrent track
Adjust th e volume leve l down or up
Enter Repe at A-B m ode
Enter Rec ord mode and star t record ing
Page 19

RECORD MODE
Record ing Voice
To record voice les, select and c onrm R ECORD f rom the Main menu. Rec ording w ill star t immediate ly.
To quickly acc ess reco rd mode dur ing musi c playback , press and h old .
Speak into the integ rated mic rophone l ocated on t he left side of the playe r.
Record ing Co ntro ls
Use the following c ontrol s during re cordin g in Recor d Mode.
Key Function
Press Pause rec ording. P ress again to resum e record ing
Press
Saved Re cordi ngs
To sto p and save your re cording, press in Recor d mode. Your recordin g will be saved to the
VOICE folder as a le named “VXX X.WAV” where XXX corresponds to the numer ical sequence in
which th e recording was made (numberin g starts from 0 01).
You can play bac k your reco rdings from NAVIGATOR mode.
Stop and save recording. The pl ayer will exi t to the Main m enu.
Page 19
Page 20
SETTINGS MODE
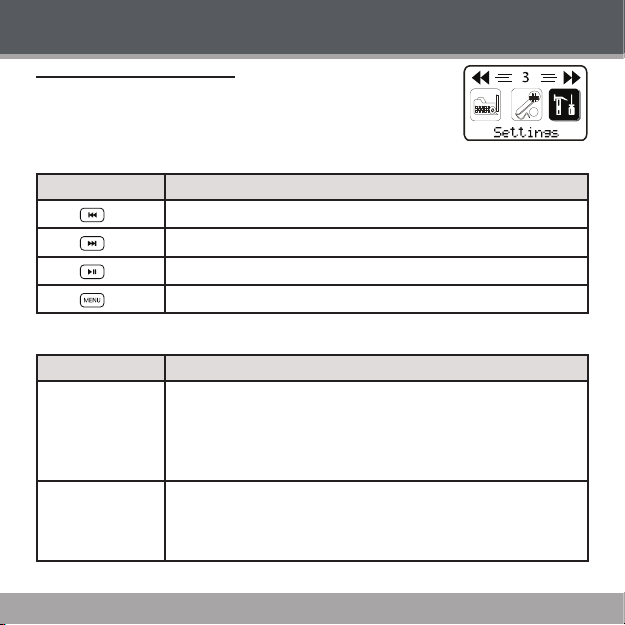
Sett ing Your Player’s Options
To set your player’s options, select and co nrm SETTINGS from the Main
menu. The fo llowing optio ns are available in the Settin gs men u: Play Mode,
EQ, Contrast, Bac klight, L ightcolor, Power, Rec Set, an d Lyric.
Sett ings Menu Co ntro ls
Use the following c ontrol s in the Set tings mo de menu.
Key Function
Press
Press
Press
Press
Sett ings Opti ons
Menu Item Function
Playmod e
Eq (Equaliz er)
Page 20
Move the se lectio n left
Move the se lectio n right
Enter a sele ction
Return to t he previo us screen
Adjust th e order in which trac ks are playe d.
Norma l: Play tracks in s equential order.
Repeat on e: Play the current tr ack repeatedly.
Repeat al l: Play all tracks repe atedly.
Shufe: Play tracks in r andom or der.
Preview: Play the r st 10 secon ds of each tr ack.
Adjust the equalizer mode settings to chang e the way mu sic sounds on
your player.
Set the option that best matches the music you are listening to: Norma l,
Rock, Ja zz, Clas sic, Pop, or B ass.
Page 21
Menu Item Function
Contra st
Backli ght
Lightcolor
Power
Rec Set
Lyric
Adjust the contr ast of the player’s display (01 = lowest contrast; 10 = highest
contrast).
Adjust t he durat ion of ti me the display backlight will rem ain on fo r after the
last key press.
A sett ing of “ ON” wi ll keep t he back light on; a setti ng of “O FF” will turn the
backli ght off.
Adjust th e color of t he backl ight. A set ting of “Auto” will change the col or of
the back light wit h each key pre ss.
Adjust th e duratio n of time the p layer will r emain on fo r when it is id le.
A settin g of “DIS ABLE” w ill keep the p layer on.
Adjust the qua lity of reco rdings made by your player. Higher-qu ality rec ordings will take up more m emory on your player.
Press or to selec t Rate.
1.
Press to change t he r ecordi ng quality option: Normal, Mi ddle, or
2.
High.
Select a nd enter Exit.
3.
Turn Lyric displ ay suppor t on or of f.
Lyric display supports “.LRC” l es which may be found on the intern et o r
may be c reated w ith a lyric l e edito r. LRC les may also contai n synchr o-
nized tim ing infor mation.
Page 21
SETTINGS MODE
Page 22
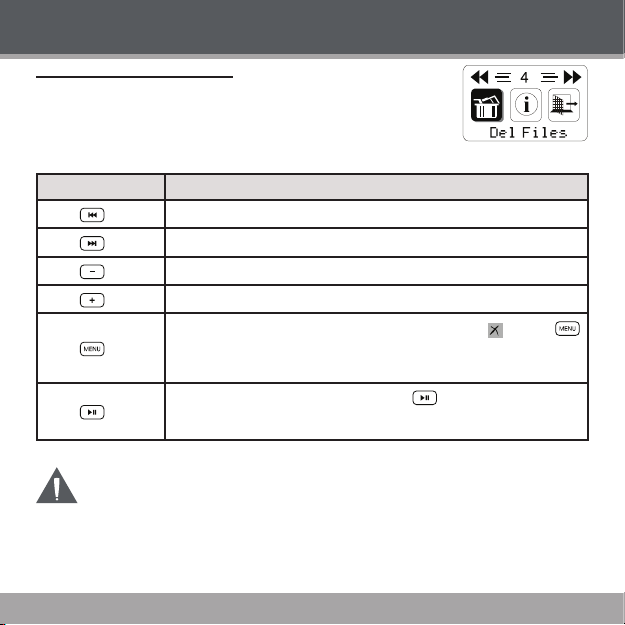
DEL FILES MODE
Deleting F iles on Your Player
To delete les f rom your player, select an d conr m DEL FILES f rom the
Main menu.
Del Fi les Me nu Control s
Use the following c ontrol s in the Del Fi les mode m enu.
Key Function
Press
Press
Press
Press
Press
Press
You may also connect your player to a computer to manage the les on you r player.
Please refer to the doc umentat ion that came with you r c omputer for mor e i nforma tion
about l e managem ent.
Page 22
Move the se lectio n up
Move the se lectio n down
Return to t he previo us folder
Enter the selected f older
If a le is select ed, the le will be marked for deleti on [ ] . P ress
again to unmark the le.
Multip le les may b e marked for deletio n.
If les have been mar ked for deletion, press to delete the marked les.
The player will prompt you for c onrma tion. Select and conrm “Yes” to
delete.
Page 23

ABOUT MODE
To view inform ation abo ut your player, select and c onrm A BOUT fr om the
Main menu. Firmwar e version, Free Memor y, and Total Memo ry may be
viewed in t his mode.
Page 23
Page 24

ABOUT WINDOWS MEDIA PLAYER
You can use W indows M edia Player 10 (WMP10) and a US B-M TP connection to manag e your mus ic
media lib rary with Micr osoft W indows XP or newer.
Window s Medi a Player can be downloaded from Microsof t free of charge at www.mi crosof t.com .
Please see the documentation that is i ncluded with Windows Media P layer for more information and
suppor t.
Notic e: This product is protected by certain intellectual proper ty rights of Micr osoft . Use or distribution
of such tec hnolog y outside of this pro duct is prohibited without a l icense f rom Micr osoft .
Content ow ners use Windows Media digita l rights management te chnolo gy (WM DRM) to prot ect their
intellectual prope rty, includi ng c opyrig hts. This device uses WMD RM soft ware to ac cess WMD RMprotected content. If the WMD RM softwar e fails to protect the content, conte nt owners may ask
Microsoft to revoke the softw are’s ability to use WMDRM to play or c opy protected content. Revocation
does not affec t unp rotecte d content. When you download li censes for protec ted content , you agree
that Microsof t may include a revocation list with the l icense s. Content owner s may require you to
upgrade WM DRM to access their conten t. If you decline an upgrade, you will not be able to access
content t hat requi res the upg rade.
Page 24
Page 25

TROUBLESHOOTING
If you have a pr oblem wit h this devi ce, please read the t roubleshooting guide bel ow.
The playe r does n ot turn on.
Ensure that the player i s charge d or is operating on AC po wer.
Ensure that the Lock s witch is di sengage d.
Try pressi ng the Rese t key on the back o f the player w ith a pin.
The but tons do not work.
Ensure that the player is charged or is operating on AC power
Ensure that the Lock s witch is di sengage d.
I cannot t ransf er les to the play er.
Ensure that your com puter is ru nning a supporte d operati ng system.
If you are runni ng Micros oft Windows 98 SE, ensure th at the USB driver has been prope rly in-
stalle d.
Ensure that the supplied USB cab le is securel y attached to t he player and the PC, or try us ing
another U SB cabl e.
If you have conn ected the player through a USB hub, try connecting the player direc tly to your
comput er.
Ensure that the player ’s memor y capac ity is not f ull.
There i s no sound du ring playback.
Check th e volume leve l.
Ensure that the headp hones are attach ed securely to the pl ayer.
Page 25
Page 26

TROUBLESHOOTING
The sound qualit y of the music is poor.
Try playing the le on your compu ter. If the sound quality is still po or, try downl oading the l e again
or re- encoding the le yo urself.
Ensure that th e bit rate of the l e is not too low. The higher the bi t rate of the le, th e better it will
sound. Th e minimum recomme nded bitr ate is 128kbps for MP3 s and 96k bps for WM As.
Try lowering the volum e of the playe r.
Ensure that the headp hones are attach ed securely to the pl ayer.
The playe r will not play my music le.
Ensure that the le is in a compatible format (MP3, WMA).
The le may be copy- protect ed and you no longer have auth orization to play this le. If you feel th is
is in erro r, please contact the s ervice from which you dow nloaded the le.
The LCD characte rs are c orrup ted or somethin g is wrong w ith the display.
Try pressi ng the Rese t key on the back o f the player w ith a pin.
The playe r has mal functi oned.
Try pressi ng the Rese t key on the back o f the player w ith a pin.
Page 26
Page 27

SPECIFICATIONS
Display Type 96 x 64 D ot Matri x LCD
Memor y 1GB Integr ated Flash Memor y
Audio For mat Suppo rt MP3, WMA
DRM Support WMDRM10 (require s Windows X P and Wind ows Medi a Player 10 or
Song Info Suppor t ID3, LRC
Record ing Forma t IM A-ADPCM enc oding
PC Inter face USB 2.0 Full-Spee d (MSC/M TP)
Plug and Play Suppor t Window s 98SE /200 0/ME /XP or n ewer
Audio Output 3.5mm S tereo (He adphone)
Audio Inp ut Integra ted Micr ophone
Power Supp ly Rechargeable Lithium- Ion
Unit Dim ensions 2.85” x 1.77 ” x 0.70” (W HD)
Speci cations and manual are subje ct to chang e without p rior not ice.
newer)
Mac OS X
Page 27
Page 28

© 2007
www.goodmans.co.uk
0871 230 1777
cecustomersevice@albaplc.co.uk
 Loading...