

Page 1

User Manual
Personal MP3 Player
GMP313/GMP315/GMP317
To operate this device correctly,please read this Manual carefully before using the
MP3 Player
Goodmans Product Information Helpline: 0870 876 0080
www.goodmans.co.uk
Page 2
Page 3

IMPORTANT NOTES
Your Hearing is very important to you and to us so please take care when operating this equipment. It
is strongly recommended that you follow the listed guidelines in order to prevent possible damage or
loss of hearing.
ESTABLISH A SAFE SOUND LEVEL
Over time your hearing will adapt to continuous loud sounds and will give the impression that the
volume has in fact been reduced. What seems normal to you may in fact be harmful. To guard
against this BEFORE YOUR HEARING ADAPTS set the volume at a low level
Slowly increase the level until you can hear comfortably and clearly and without distortion
Damage to your hearing is accumulative and is irreversible
Any ringing or discomfort in the ears indicates that the volume is too loud.
Once you have established a comfortable listening level, DO NOT INCREASE THE SOUND LEVEL
FURTHER.
The following list of typical sound levels may assist you in recognizing just how loud you have set the
volume level.
DECIBEL
Level dB Example
30dB Quiet Library, soft whispers
40
50 Normal conversation, quiet office, light traffic.
60 Electric sewing machine.
70 Vacuum cleaner, hair dryer, noisy restaurant.
Living room, fridge-freezer, bedroom away from traffic.
Page 4

THE FOLLOWING NOISES CAN BE HARMFUL UNDER CONSTANT EXPOSURE
80dB Average city traffic, alarm clock buzzer at 2 feet, food mixer.
90 Motorcycle, heavy goods vehicle, petrol lawn mower.
100 Pneumatic drill, chain saw, garbage truck, discoed / night club.
120 Rock band concert, thunderclap.
PERMANENT LOSS OF HEARING
140 THRESHOLD OF PAIN Gunshot 2 feet away.
180 Rocket launching pad.
Page 5

LOCATION OF CONTROLS
Display
ILLUSTRATION
Page 6
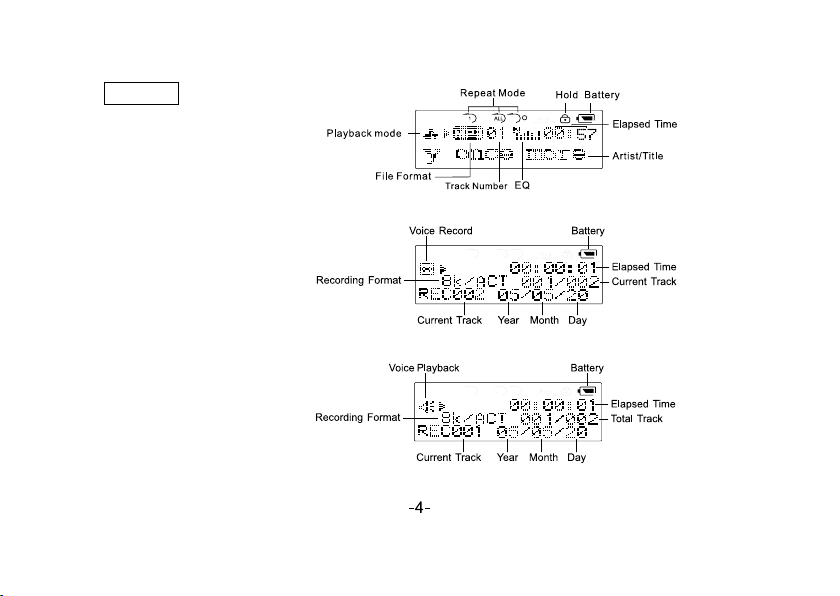
DISPLAY
Music Playback Mode:
Record Mode:
Voice Playback Mode:
Page 7
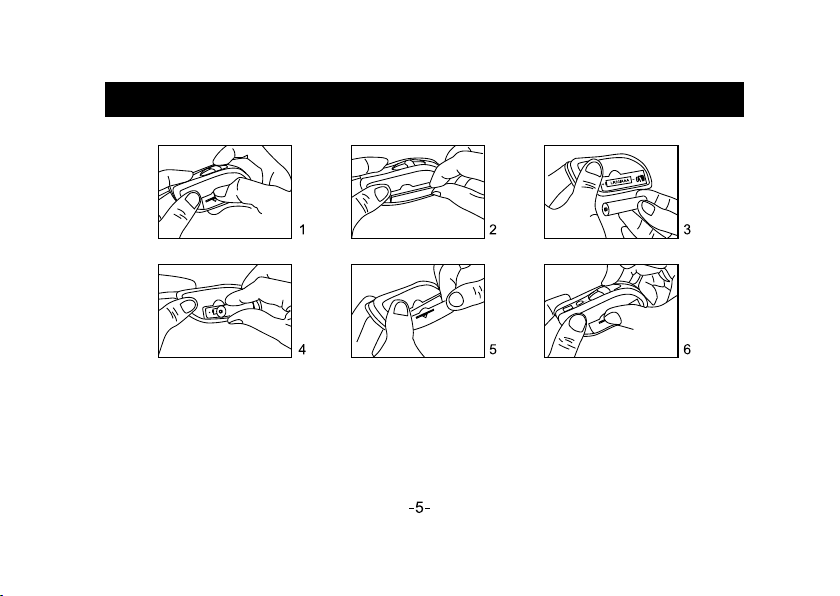
INSERTION OF BATTERY
1.and 2.Open and remove the as shown.battery compartment cover
3.Match correct polarities (+ & -) on the battery with the diagram.
4.Insert battery.
5.and 6. Reattach the as shown.battery compartment cover
Page 8

MINIMUM SYSTEM REQUIREMENT
Microsoft Windows XP, Windows Millennium Edition (Me),Windows 2000 or Windows 98
Second Edition (SE)
*For operating with DRM 10 protected WMA files, the minimum requirement is Windows XP. Also
Windows Media Play 10 must be installed as well.
Intel Ptentium 233 MHz, or AMD K6 -2 266 MHz
32 MB RAM
30 MB available hard disc space
CD-ROM/ DVD-ROM driver
USB Port
Page 9
SETTING UP YOUR COMPUTER
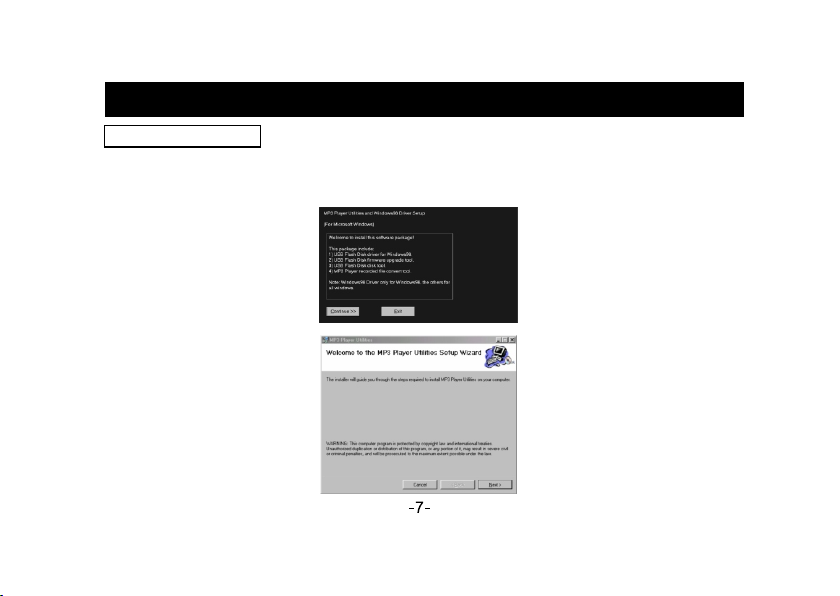
FOR WIN DOWS 98:
1. Start up Windows and insert the CD (Setup Software Driver for Windows 98) into the driver.
2. Run the program setup.exe from the disk driver, the installation icon will appear on the desktop.
Press “Next" to start installation.
Page 10
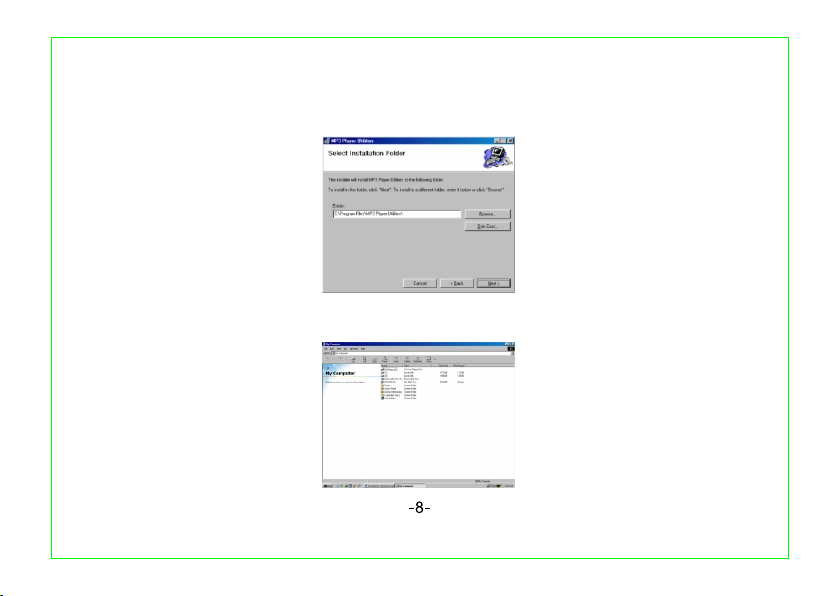
3. Press "Next" accept the default install location for the driver.to
4. Connect the MP3 Player to your PC; the "New Hardware Found" message will pop up. You
will find a removable driver appear under "My Computer" .
Page 11
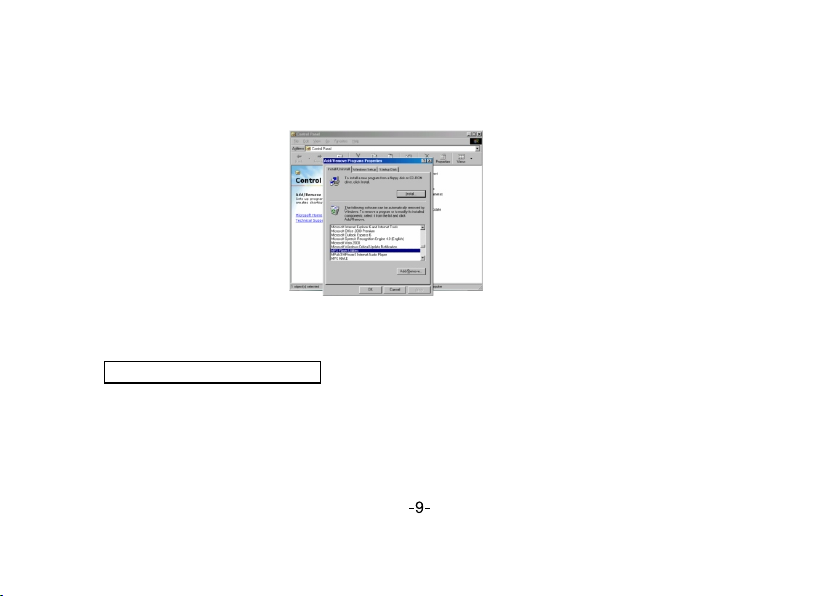
5. To uninstall the software, click "Start" , enter into "Control Panel" - "Add / Remove Program", then
select "MP3 Player utilities” from the menu and click on "Add/Remove".
FOR WINDOWS 2000/ ME/ XP
1. Windows 2000 / ME / XP does not need driver installation. Just plug in the MP3 player to the
computer, Windows will detect the driver automatically and pop up with a message " New
Hardware Found "and " USB Mass Storage Device" will be installed.
2. A Removable Disk will show in "My Computer" ,normally as the E: drive, but the actual letter is
dependant on how many drives are already installed.
Page 12

TRANSFERRING AUDIO AND DATA
When you wish to download additional music tracks to your player, you can either download music tracks
from an Internet music site or rip them from your audio CDs to create digital files on your computer
(software is not provided). Music files can be encoded into the supported formats ( or WMA ),
and then transferred to your player via your computer. Data files can also be transferred to and stored in
your player, for example, you can transfer a data file from one computer to another.
TO TRANSFER AUDIO AND DATA
For MP3, WMA (non-DRM )
1. ensure that on e AAA battery is inserted other wise data corruption may occur if the power
Please
fails during t ransfer.
2.Connect your player to the USB port of your computer using the supplier USB cables.
3.Windows Device Manager will recognize the MP3 player.
4.Launch Windows Explorer.
5."Removable Disk" will appear under "my computer".
MP3
Page 13

6. To format the onboard downloading songs to the MP3 player. Go to "My computer"
and right click on the "Removable Disk", then click on "Format".
7. It will launch a format dialogue box,if there is a file system option please ensure that FAT is selected
(NOT FAT32), then click on start to format your player.
memory before
Page 14

WARNING
NEVER USE OTHER SOFTWARE TO
AN IRREVERSIBLE MALFUNCTION.
** NOTE: If you have selected a different file systemto FAT
on "File System" option when for formatting,it may cause
a malfunction. Please re-format it using the "FAT" option
to repair.
8. To load files onto your player double click on the removable drive icon in My Computer to open the
drive. Select the files that you wish to load onto the player by highlighting them and then, drag and
drop them into this removable drive window.
9. Before disconnecting your player from the computer follow the instructions below "Disconnecting Your
Player".
** Note: ALWAYS FOLLOW THE INSTRUCTIONS GIVEN IN "DISCONNECTING YOUR PLAYER"
BEFORE UNPLUGGING THE PLAYER FROM THE PC OTHERWISE THE DATA STORED ON
THE PLAYER MAY BE CORRUPTED.
THIS MAY CAUSEFORMAT THE PLAYER.
Page 15

DISCONNECTION YOUR PLAYER
To stop your player in Windows XP, Windows Me or Windows 2000(MASS STORAGE MODE
ONLY):
Double click the Safely Remove Hardware icon on the Taskbar, ensure that the USB MASS STORAGE
DEVICE is highlighted and click on the "STOP" button, and then confirm by clicking on the "OK" button
and disconnect your player when you are prompted.
To stop your player in windows 98SE:
In windows explorer, right-click the Removable Disk icon, click the Eject option, and disconnect your
player when you are prompted.
Page 16

WHAT IS DRM?
DRM is Digital Rights Management, it is a way of protecting copyrighted material in the digital age. It
has come about due to the ease of copying material using digital methods. Basically the DRM encryption
will limit usage of the file to certain hardware that is compatible with DRM encryption. This does not
mean that a DRM encrypted file cannot be downloaded to non-DRM compatible hardware only that the
file will not play.
DRM can also be used to set the number of times that the file can be burned to CD, how many different
pieces of hardware/equipment it can be copied to etc. In the most recent version of the DRM (DRM 10)
there is also an option to set how long the file can be used for. This time restriction is a method that is
currently used by some Music Download websites.
NOTE: DRM 10 FILES CAN ONLY BE USED WHEN YOUR PLAYER IS CONNECTED TO A PC
RUNNING WINDOWS XP AND WINDOWS MEDIA PLAYER 10
DRM OPERATION
Your player is compatible with both DRM 9 and DRM 10 encrypted files. These files are normally
obtained from Music Download Websites. The following instructions are only given as a guide, please
check with your content provider for any specific procedure for use with their service.
NOTE: DRM FILES CANNOT BE DOWNLOADED USING MASS STORAGE DRAG AND DROP, IF
THE FILES ARE TRANSFERRED USING THIS METHOD THEY WILL NOT PLAY. BEFORE
DOWNLOADING DRM 10 ENCRYPTED FILES THE DRM TIME MUST BE SET. PLEASE FOLLOW
THE INSTRUCTIONS “SETTING DRM TIME” BELOW.
Page 17

DRM 10 files can only be downloaded to the player when the player connects as a “MEDIA DEVICE”,
this allows the player to be “Syncronised” with the computer to allow playback. This is the default mode
that the unit is set to when connecting to a computer with WINDOWS XP. When in this mode files
cannot be “dragged and dropped” as they can in MASS STORAGE MODE. The mode can be changed
to “MASS STORAGE” via the “ONLINE DEVICE” in the SYSTEM menu (Please see “SYSTEM MENU”
section below). When set to MASS STORAGE mode DRM 10 encrypted files will not play when
transferred th the player.
NOTE: THE PLAYER CAN ONLY CONNECT AS A MEDIA DEVICE WHEN USED WITH A COMPUTER
RUNNING WINDOWS XP WITH WINDOWS MEDIA PLAYER 10, IT IS NOT COMPATIBLE WITH ANY
OTHER OPERATING SYSTEMS. IF YOU TRY TO CONNECT TO ANY OTHER OPERATING SYSTEM
THE UNIT WILL AUTOMATICALLY CONNECT AS A MASS STORAGE DEVICE.
DOWNLOADING DRM 10 ENCODED FILES
The following has been extracted from the Windows Media Player 10 Help file © Microsoft
“When you connect your device to your computer for the first time, Windows Media Player starts the
Device Setup Wizard, which helps you set up automatic or manual synchronisation between the Player
and your device.
When you connect your device to your computer after automatic synchronisation has been established,
the Player and the device begin synchronising the content you selected, until all of the items are
synchronised. If the Player detects that your device does not have enough room to store all of the
automatically synchronised content, the Player and the device will synchronise content in priority order,
either by default priority order or by a priority order that you select.
When you connect your device to your computer after manual synchronisation has been established,
Page 18

you must select the content and specify the order in which it is synchronised. If the Player detects that
your device does not have enough room to store all of the manually synchronised content, it will display
a message next to the items that it cannot synchronise to your device.You can change the synchronisation
order or delete items from the synchronisation list, and then start synchronisation manually.
When synchronisation finishes, the message "Synchronisation is complete" is displayed above the Items
to Sync pane (the left side of Sync) and two types of categories are displayed in the Items to Sync pane:
the number of items that were synchronised successfully and the number of items that were not
synchronised due to errors, along with the error details. There may be more than one error category
displayed if different types of errors occurred during synchronisation. You can expand these categories
to view the individual items that failed to synchronise due to errors and take the appropriate steps. You
can also view the synchronised files on the device by expanding the category or playlist that contains
the items in the Items on Device pane (the right side of Sync).
After the desired files have been downloaded to the player, disconnect the player from the computer
and the following will be shown in the display:
This screen is shown when the player synchronises the licenses that allow the DRM 10 encoded files
to be played. This process can take several minutes. Once this screen is no longer shown you can now
play your downloaded tracks.
For full instructions on using Windows Media Player 10 to synchronise files to your player please
consult the help file that is supplied with Windows Media Player 10.
Page 19

DOWNL OADING DRM 9 E NCODED FIL ES
1.Please ensure the one AAA battery is inserted into the player before transferring files to your player.
2.Open Windows Media Player
3.Highlight the files to be downloaded in the Windows Media Player library, right click on the files and
from the pop menu select either “COPY TO CD OR DEVICE” (Windows Media Player 9) or “ADD
SYNC LIST” (Windows Media Player 10).
4.Depending on which version of Windows Media Player you have select “COPY TO CD OR DEVICE”
(Windows Media Player 9) or “SYNC” (Windows Media Player 10) tab.
5.Normally there will be two panes shown, on the left will be the files that you have selected to be
downloaded to the player. On the right will be the contents of the player.
6.Select “COPY” (in the top right corner Windows Media Player 9) or “START SYNC” (Windows Media
Player 10) to download the files.
7.Disconnect the player as described below.
For further information on downloading DRM 9 encoded files to your player using Windows Media player
please consult the help file supplied with Windows Media Player.
Page 20

GENERAL OPERATION
POWER O N/OFF
To turn on the player press and hold the PLAY/PAUSE/STOP button ( ), Music mode playback will
commence automatically.
To turn off the player press and hold the PLAY/PAUSE/STOP button ( ) when playback/recording
is stopped.
MAIN ME NU
To access the main menu, press and hold the MENU button. The following will be shown in the display.
The options are as follows:
Music: This is the default mode that will be selected when the player is turned on and is used for
playback of MP3/WMA files
Voice Record: Select this mode to make a voice recording using the internal microphone.
Voice Record Playback: Select this mode to playback any voice recordings already made.
System Menu: Select this option to change the preference settings.
Each of the above modes are explained below.
Page 21

VOLUM E UP/DOWN
To increase the volume press the volume up (+) button. The volume level will be shown in the display.
To decrease the volume press the volume down (-) button. The volume level will be shown in the display.
HOLD
To prevent the keys from being pressed accidentally (for example whilst in a pocket) move the hold switch
towards the “HOLD” mark. To release the key lock move the switch to the position away from the “HOLD”
mark. If any button is pressed whilst the keys are locked the following will be shown in the display:
Page 22

MUSIC PLAYBACK MODE
This is the default mode when turning on the player and is used for playback of MP3/WMA files.
The below display is shown when in playback mode.
PLAY/PAU SE/STOP
Press the PLAY/PAUSE/STOP button ( ) briefly to commence playback.
During playback press the PLAY/PAUSE/STOP button ( ) briefly to pause playback.
During playback press and hold the PLAY/PAUSE/STOP button ( ) for approximately two seconds
to stop playback.
Page 23

SKIP/ SEARCH UP/ DOWN
To skip to the next or previous track briefly press the SKIP/SEARCH UP ( ) or SKIP/SEARCH DOWN
( ) buttons.
To search at high speed for a particular section of a song press and hold the SKIP/SEARCH UP ( )
or SKIP/SEARCH DOWN ( ) buttons until the desired section is found. To resume normal playback
release the button.
REPEAT/RA NDOM
Briefly press the MENU button whilst in MUSIC PLAYBACK MODE to display the MUSIC PLAYBACK
MODE MENU. Repeatedly press the SKIP/SEARCH UP ( ) or SKIP/SEARCH DOWN ( ) buttons
until REPEAT is shown in the display. Press the PLAY/PAUSE/STOP ( ) button to enter the REPEAT
SUB-MENU.Select the repeat mode required using the SKIP/SEARCH UP ( ) or SKIP/SEARCH
DOWN ( ) buttons and then press the PLAY/PAUSE/STOP ( ) button. The options are as follows:
To exit the menu, select the “EXIT” option or repeatedly press the MENU button briefly until the normal
playback screen is shown.
Page 24

PRESE T EQ
The preset EQ can be used to add sound enhancements to the audio output. To select a preset EQ
briefly press the MENU button whilst in MUSIC PLAYBACK MODE to display the MUSIC PLAYBACK
MODE MENU. Repeatedly press the SKIP/SEARCH UP ( ) or SKIP/SEARCH DOWN ( ) buttons
until EQUALIZER is shown in the display. Press the PLAY/PAUSE/STOP ( ) button to enter the
EQUALIZER SUB-MENU. Select the PRESET EQ mode required using the SKIP/SEARCH UP ( ) or
SKIP/SEARCH DOWN ( ) buttons and then press the PLAY/PAUSE/STOP ( ) button.
The options are as follows:
To exit the menu, select the “EXIT” option or repeatedly press the MENU button briefly until the normal
playback screen is shown.
Note: Music tracks can only be deleted when connected to a computer.
Page 25

VOICE RECORD MODE
This mode is used for recording voice files using the internal microphone. These recordings will
automatically be stored in the VOICE folder that is inside the RECORD folder in the root directory.
NOTE: TO ACCESS THESE FILES ON A COMPUTER PLEASE ENSURE THAT MASS STORAGE
MODE IS THE SELECTED OPTION IN THE “ONLINE DEVICE” OPTION OF THE SYSTEM MENU.
START/STOP/PAUSE R ECORDING
To start recording press the PLAY/PAUSE/STOP ( ) button.
During recording press the PLAY/PAUSE/STOP ( ) button again to pause recording. To resume
recording press the PLAY/PAUSE/STOP ( ) button again.
To stop recording press and hold the PLAY/PAUSE/STOP ( ) until “SAVING…” is shown in the
display.
RECOR DING QUALI TY
The recording quality can be set to four values as shown below. The higher the quality the larger the
resulting file will be and therefore the less recording time will be available. The maximum recording
time for each mode are as follows (assuming no other files are stored on the unit):
Page 26

To change the recording quality briefly press the MENU button, repeatedly press the SKIP/SEARCH
UP/DOWN ( ) buttons to select the “REC TYPE” sub menu and press play to enter. Again using
the SKIP/SEARCH UP/DOWN ( ) buttons select the required recording type and press the play
button to confirm.
To exit the menu, select the “EXIT” option or repeatedly press the MENU button briefly until the normal
voice record screen is shown.
RECOR DING TIME
To view the remain time available for recording using the current RECORDING QUALITY setting briefly
press the MENU button, repeatedly press the SKIP/SEARCH UP/DOWN ( ) buttons to select the
“REC REMAIN TIME” sub menu and press play to enter. The remaining time will be shown in the display
as follows:
Page 27

VOICE PLAYBACK MODE
This mode is used for playback of voice files recorded in VOICE RECORD MODE.
PLAY/PAU SE/STOP
Press the PLAY/PAUSE/STOP button ( ) briefly to commence playback.
During playback press the PLAY/PAUSE/STOP button ( ) briefly to pause playback.
During playback press and hold the PLAY/PAUSE/STOP button ( ) for approximately two seconds.
SKIP/ SEARCH UP/ DOWN
To skip to the next or previous track briefly press the SKIP/SEARCH UP ( ) or SKIP/SEARCH DOWN
( ) buttons.
To search at high speed for a particular section of a song press and hold the SKIP/SEARCH UP( ) or
SKIP/SEARCH DOWN ( ) buttons until the desired section is found. To resume normal playback release
the button.
REPEAT/RA NDOM
Briefly press the MENU button whilst in VOICE PLAYBACK MODE to display the VOICE PLAYBACK
MODE MENU. Repeatedly press the SKIP/SEARCH UP( ) or SKIP/SEARCH DOWN( ) buttons until
REPEAT is shown in the display. Press the PLAY/PAUSE/STOP ( ) button to enter the REPEAT
SUB-MENU. Select the repeat mode required using the SKIP/SEARCH UP( ) or SKIP/SEARCH
DOWN( ) buttons and then press the PLAY/PAUSE/STOP ( ) button. The options are as follows:
Page 28

To exit the menu, select the “EXIT” option or repeatedly press the MENU button briefly until the normal
playback screen is shown.
Note: Voice files can only be deleted when connected to a computer.
Page 29
SYSTEM MENU
The system menu is used to set preferences for the player.
MENU OP ERATION
To scroll through the available options/menus, press the SKIP/SEARCH UP ( ) or SKIP/SEARCH
DOWN ( ) buttons repeatedly.
To enter a submenu, press the PLAY/PAUSE/STOP ( ) button.
To finalise an option, press the PLAY/PAUSE/STOP ( ) button.
To back up one level briefly press the MENU button.
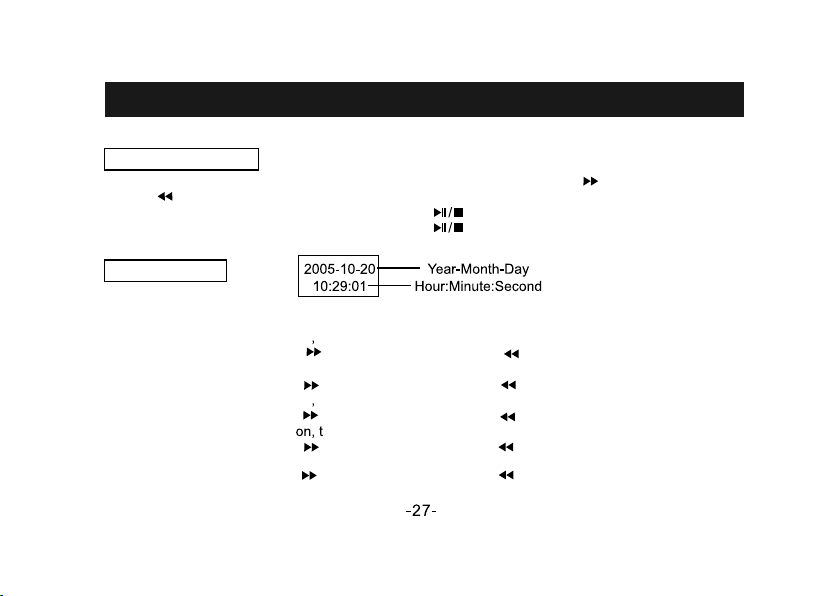
RECOR DTIME
This option sets the time/date that will be stored in the properties of the recorded voice file.
The time/date can be set by:
Press the VOUME UP (+) button, the year digits will flash.
Press the SKIP/SEARCH UP ( ) or SKIP/SEARCH DOWN ( ) buttons repeatedly to set the year.
Press the VOLUME UP (+) button, the month digits will flash.
Press the SKIP/SEARCH UP ( ) or SKIP/SEARCH DOWN ( ) buttons repeatedly to set the month.
Press the VOUME UP (+) button, the day digits will flash.
Press the SKIP/SEARCH UP ( ) or SKIP/SEARCH DOWN ( ) buttons repeatedly to set the day.
Press the VOUME UP (+) button, the hour digits will flash.
Press the SKIP/SEARCH UP ( ) or SKIP/SEARCH DOWN ( ) buttons repeatedly to set the hour.
Press the VOUME UP (+) button, the minute digits will flash.
Press the SKIP/SEARCH UP ( ) or SKIP/SEARCH DOWN ( ) buttons repeatedly to set the minute.
Press the VOUME UP (+) button, the seconds digits will flash.
Page 30

Press the SKIP/SEARCH UP ( ) or SKIP/SEARCH DOWN ( ) buttons repeatedly to set the seconds.
Press the VOUME UP (+) button, to store the set time/date in memory.
NOTE: AFTER REPLACING EXHAUSTED BATTERIES THE RECORD TIME WILL NEED TO BE
RESET
BACKL IGHT
Set the time that the backlight will remain on after pressing any button. Press the SKIP/SEARCH UP
( ) or SKIP/SEARCH DOWN ( ) buttons repeatedly to cycle through the following options:
Press the PLAY/PAUSE/STOP ( ) button to store the selected value and to return to the SYSTEM
MENU.
POWER O FF
Set the period after the last button press that the unit will turn off automatically (player will not turn off
during playback or recording, only when the unit is idle.)
Press the SKIP/SEARCH UP ( ) or SKIP/SEARCH DOWN ( ) buttons repeatedly to cycle through
the following options:
Page 31

Press the PLAY/PAUSE/STOP ( ) button to store the selected value and to return to the SYSTEM
MENU.
CONTRAST
This option allows the contrast of the display to be adjusted.
Press the SKIP/SEARCH UP ( ) or SKIP/SEARCH DOWN ( ) buttons repeatedly to cycle through
the available options.
To store the selected value to memory press the PLAY/PAUSE/STOP ( ) button
ONLINE DEVICE
This player can connect to a computer running Windows XP using two methods. Press the SKIP/SEARCH
UP ( ) or SKIP/SEARCH DOWN ( ) buttons repeatedly to cycle through the two options as follows:
Page 32

Press the PLAY/PAUSE/STOP ( ) button to store the selected option and to return to the SYSTEM
MENU.
This option will show the total amount of memory available (when empty) and will also show the amount
of memory used as a percentage. Press the MENU button briefly to exit and return to the SYSTEM menu.
NOTE: PLEASE NOTE SOME MEMORY IS RESERVED FOR USE BY THE OPERATING SYSTEM
FILES.
This option will show the version number for the firmware used on the player. Press the MENU button
briefly to exit and return to the SYSTEM menu.
Some DRM 10 encrypted music files are set so that they will expire after a certain period of time.
Therefore before downloaded DRM 10 encrypted files please ensure that the clock has been set to the
current time. Please note whenever the time is changed the unit will require confirmation that the time
should be changed, to confirm the change of time, highlight “YES” using SKIP/SEARCH UP ( ) or
SKIP/SEARCH DOWN ( ) buttons when prompted and press the MENU button to confirm.
Page 33

NOTE: IF THE CLOCK IS CHANGED BACKWARDS THEN THE LICENSE FOR THE ENCODED
FILES WILL BECOME INVALID AND “NO LICENSE” WILL BE SHOWN IN THE DISPLAY WHEN
ATTEMPTING TO PLAY THESE FILES. IF THE MESSAGE “REQUEST DRM TIME” IS SHOWN IN
THE DISPLAY THEN THE DRM CLOCK HAS NOT BEEN SET.
Press the VOUME UP (+) button, the year digits will flash.
Press the SKIP/SEARCH UP ( ) or SKIP/SEARCH DOWN ( ) buttons repeatedly to set the year.
Press the VOLUME UP (+) button, the month digits will flash.
Press the SKIP/SEARCH UP ( ) or SKIP/SEARCH DOWN ( ) buttons repeatedly to set the month.
Press the VOUME UP (+) button, the day digits will flash.
Press the SKIP/SEARCH UP ( ) or SKIP/SEARCH DOWN ( ) buttons repeatedly to set the day.
Press the VOUME UP (+) button, the hour digits will flash.
Press the SKIP/SEARCH UP ( ) or SKIP/SEARCH DOWN ( ) buttons repeatedly to set the hour.
Press the VOUME UP (+) button, the minute digits will flash.
Press the SKIP/SEARCH UP ( ) or SKIP/SEARCH DOWN ( ) buttons repeatedly to set the minute.
Press the VOUME UP (+) button, the seconds digits will flash.
Press the SKIP/SEARCH UP ( ) or SKIP/SEARCH DOWN ( ) buttons repeatedly to set the seconds.
Press the VOUME UP (+) button, to store the set time/date in memory.
NOTE: AFTER REPLACING EXHAUSTED BATTERIES THE DRM TIME WILL NEED TO BE RESET
Page 34

Page 35

Page 36

General Specifications
Memor y
Batte ry
LCD
Dimen sio n
S/N rad io
Headp hon e Output
Frequ enc y range
Sampl e Fre quency of th e Rec ording
File ty pe
Voice Re cor ding / Lengt h
WMA Bi t Rate
MP3 Bit R ate
128MB (GM P313)
256MB (GM P315)
512MB (GM P317)
1 AAA size Alk ali ne battery
128x3 2 dot w ith blue bac k lig ht
85x32 x21 mm
90dB
9mWx 2@ 32
20Hz- 20K Hz
8KHz
MP3 / WMA
AG8 / 36 hr s (12 8M)
32 Kbps - 3 84 Kb ps
8 Kbps - 44 8 Kbp s
-34-
 Loading...