

Goldmund T-5 Owners manual
GOLDMUND T5 TONE ARM
USER MANUAL
WARNING
This high quality tone arm possess new technical features which are
necessary for an accurate tracking of the today's records.
Only a careful use can provide all satisfactions you are expecting.
The mounting instructions must be SCRUPULOUSLY carried out.
All handling must be performed according to the following instructions to avoid
to deteriorate the tone arm.
Nevertheless, if the instructions are perfectly carried out, you will notice that
the use of the GOLDMUND T5 is quite simple and convenient.
IMPORTANT : PLEASE DO NOT CONNECT ANY HIRE OR MOVE ANY
PART BEFORE READING THE FOLLORING INSTRUCTIONS.
1. PRELIMINARIES

Please read very carefully the following instructions. This high-precision tone
arm will provide the best tracking conditions for any high-quality phono
cartridge.
For exacting technicians, musicians, and all those who demand the very best
in record transcription , we strongly recommend the use of our GOLDMUND
STUDIETTO turntable.
2. TECHNICAL DATA
DYNAMIC SPECIFICATIONS
- Effective mass high enough for the most recent moving coil cartridges.
- Dynamically constant tracking force.
- The pivot-to-stylus line is the tone arm inertia ellipsoid small axis.
- Fluid damping located on the tone arm vertical axis and adjustable.
- No elastic decoupling.
- Counterweight and tone arm tube attached in one single point.
GEOMETRICAL SPECIFICATIONS
- Overall dimensions Total tone arm length : 245 mm.
- Total rail length: 342 mm.
- Total height: between 60 and 70 mm.
- Effective dimensions Pivot to stylus length : 200 mm,
- Effective height: 28 to 38 mm with a 18 mm high cartridge.
- Tube axis to stylus: 13 mm.
GENERAL DATA
- Optimal theoritical balance of the tone arm.
- Headshell, tube and pivot machined from one single solid piece of
aluminum.

- Large diameter tube damped by special inner structure.
- Pivot type called "false unipivot" without lateral movement.
- New kind of headshell giving perfect coupling between the cartridge and the
tone arm tube.
- Counterweight machined in lead.
- Adjustable azimut.
- Tone arm lift adjustable in speed and height.
- Automatic lifting at the end of the record and if any trouble is detected during
play.
- Inner connections in Litz Wire
- Gold-plated, spring-loaded cartridge plugs.
- Carriage mounted on 3 ball bearing rolling on a V-shape rail.
- Pilot arm adjustable vertically.
- Very precise micrometric VTA adjustment with only two points to adjust and
a locking device.
- Easy set-up procedure on the turntable.
3. UNPACKING
You will find in the packing:
- the tone arm by itself,
- the power supply,
- the accessories box with one set of mounting screws, the belt, one special
small headshell, three sets of screws for cartridge mounting, two alien keys
for VTA adjustment and locking, two counterweights molded in lead, one
bottle of damping fluid., one syringe for the damping fluid.
To unpack these parts, please follow the procedure

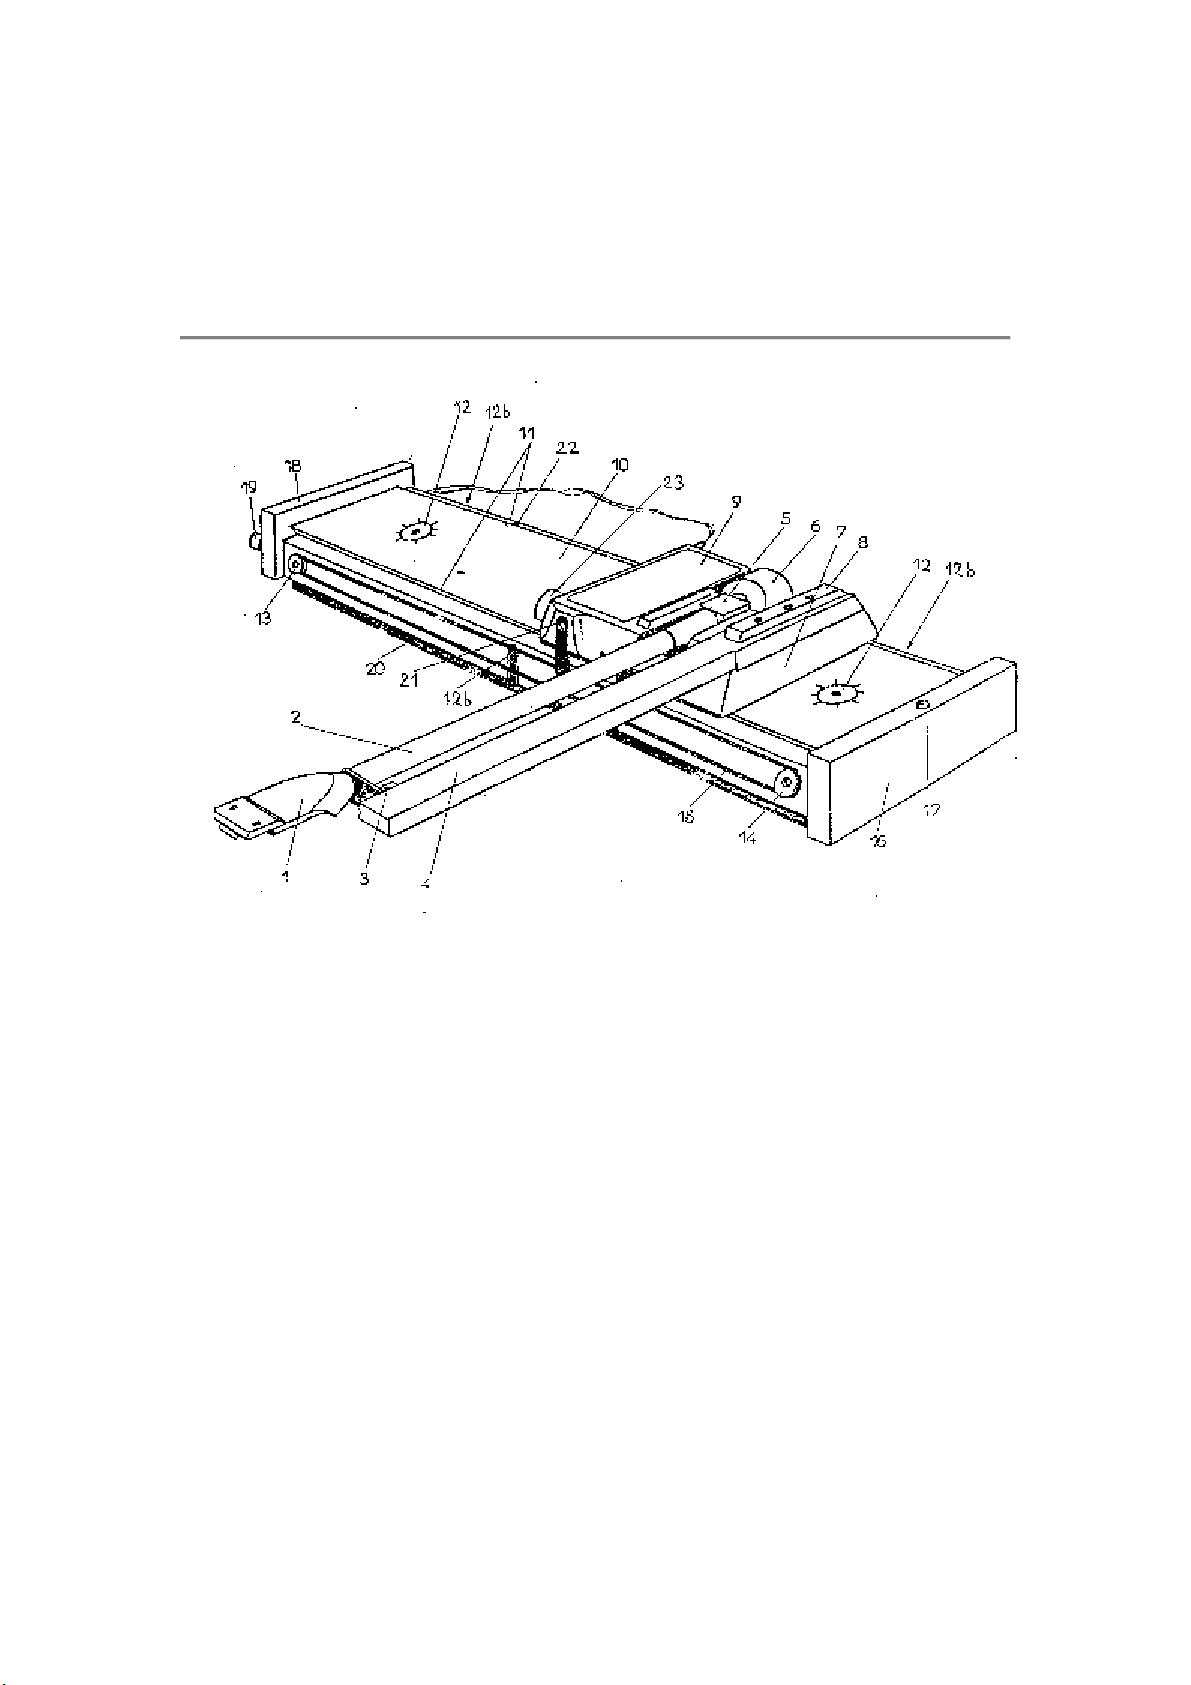
- Unpack the tone arm itself, without touching the carriage assembly (2, 4 & 7
on the schematic), handling it with the two sides (16 & 18). Take care of the
small wires.
- Don’t remove the parts holding the tone arm tube and the pilot arm (2 & 4)
together.
4. BELT SET-UP
- Open the cover (9) which is hold magnetically.
- Unscrew and keep in the accessories box the white nylon screw which locks
the carriage on the rail.
- Put the cover back.
NOTE: Avoid any brutal movement of the carriage. To move the carriage on
the rail, always handle it with the transparent bar called "manipulation bar" (8).
Never move the carriage by the pilot arm,
- Set the belt on the two pulleys (13 & 14). The belt tension is adjustable by
moving the outer pulley (14) screw and re-inserting it in a different hole.
- Insert the top string of the belt into the clutch (21), in between the black
plastic part and the steel wire.
- The clutch is adjustable by its front screw (21)
- If the clutch is not tight enough, the belt is slipping inside and even if the
correction motor turns, the carriage does not move.
- If the clutch is too tight, moving the carriage by hand becomes difficult and
the rest position, close to the front side (16) is imprecise.
- The right tightness is reached when by tightening it slowly, the point where
the belt does not slip anymore is reached, and then one turn is added.
ATTENTION: This adjustment will be checked later, when the tone arm will be
totally set-up. It is also a good verification you can make after some weeks of
good functionning.
5. SET-UP ON THE TURNTABLE
Unscrew with the allen key found in the accessories box the three locking
screws of the vertical adjustment (12b)
 Loading...