

Page 1
P/N. 920-0060611-02
QLabel-IV Operation Manual
Edition C
07.2009
Page 2

QLABEL-
Ҋ
......................................................................... 3
PART I: ABOUT QLABEL-Ҋ......................................................................3
1: INTRODUCTION ....................................................................................................... 3
NSTALLATION......................................................................................................... 3
2: I
PART II: STARTING ON QLABEL-IV........................................................... 6
3: START QLABEL-Ҋ ................................................................................................. 6
4: W
ORKING ENVIRONMENT....................................................................................... 6
5: QL
ABEL-IV TOOLBARS .......................................................................................... 7
PART III: WORKING WITH LABELS.............................................................8
6: OPENING,CREATING AND SAVING LABELS ........................................................... 8
NSERTING TEXT................................................................................................... 12
7: I
8: I
NSERTING A BARCODE ........................................................................................ 15
RAWING LINES AND SHAPES ............................................................................. 16
9: D
10: I
NSERTING MAXICODE.................................................................................... 18
NSERTING PDF417 .......................................................................................... 18
11: I
NSERTING DATAMATRIX CODE......................................................................... 19
12: I
NSERTING QR CODE ........................................................................................ 20
13: I
14: I
NSERTING GRAPHICS........................................................................................ 20
15: L
16: P
OCK OBJECTS .................................................................................................. 22
RINT PREVIOUS PRINTED LABEL...................................................................... 22
PART IV: ADVANCE MENU....................................................................... 23
17: COMMAND EDIT AREA ....................................................................................... 23
18: U
19: U
SING SERIAL AND VARIABLE NUMBER ............................................................ 23
SING REAL TIME CLOCK.................................................................................. 26
1
Page 3

20: DATABASE CONNECTION ................................................................................... 27
21. D
22. EAN -128 / GS1 D
A
OWNLOAD GRAPHIC,LABEL AND FONT .......................................................... 31
ATABAR AND APPLICATION IDENTIFIER .............................. 33
PPENDIX:ADVANCE MENU DESCRIPTION.............................................................. 37
2
Page 4
QLabel-
Ҋ
Ҋ
Part I: About QLabel-
1: Introduction
An applied program for Windows 95/98/NT/2000/ME/XP/Vista, QLabel-Ҋis designed for page mode printer of
EZ-1000/EZ-2000, EZ-Plus and EZ-DT series.
QLabel-Ҋhelps users not only design labels, but also change the label data into an executive text file with
optional extension (default .CMD extension). The executive file can be run by DOS commands such as COPY,
TYPE, and PRINT etc.
To master QLabel-Ҋ, an executive file producer, it is strongly recommended that programmers be familiar with
the Programming Language in advance.
2: Installation
1. Under Windows 95/98/NT/2000/ME/XP/Vista simply put your product CD into your computer’s CD Drive
then an Auto run manual will popup automatically. Select "Install QLabel" from manual to start the
installation or find the "Setup.exe" under the "QLabel" folder in product CD. If the AutoPlay feature has been
disabled on your computer and the Auto run manual does not work automatically, double click on the “My
Computer” icon, then right click on the CD drive and choose AutoPlay.
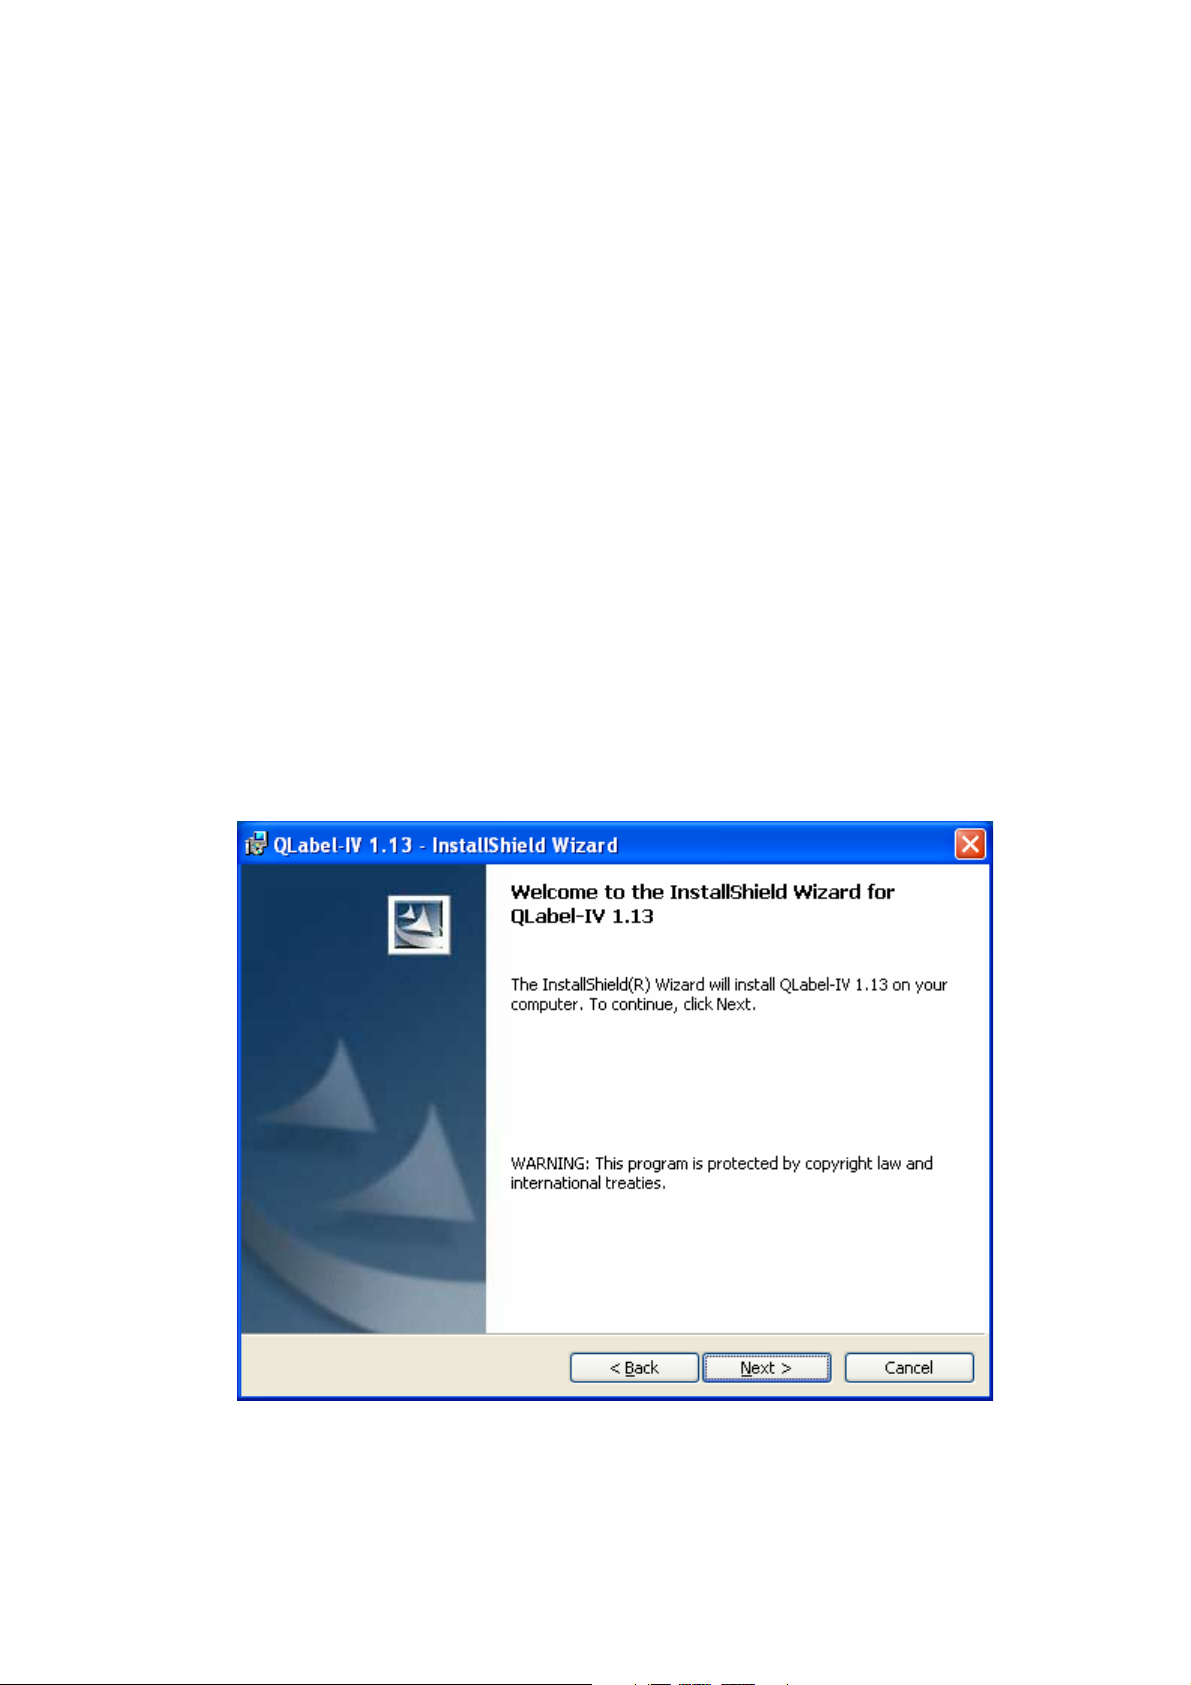
2. The first screen displayed is the WELCOME dialog box, press “Next”.
3
Page 5
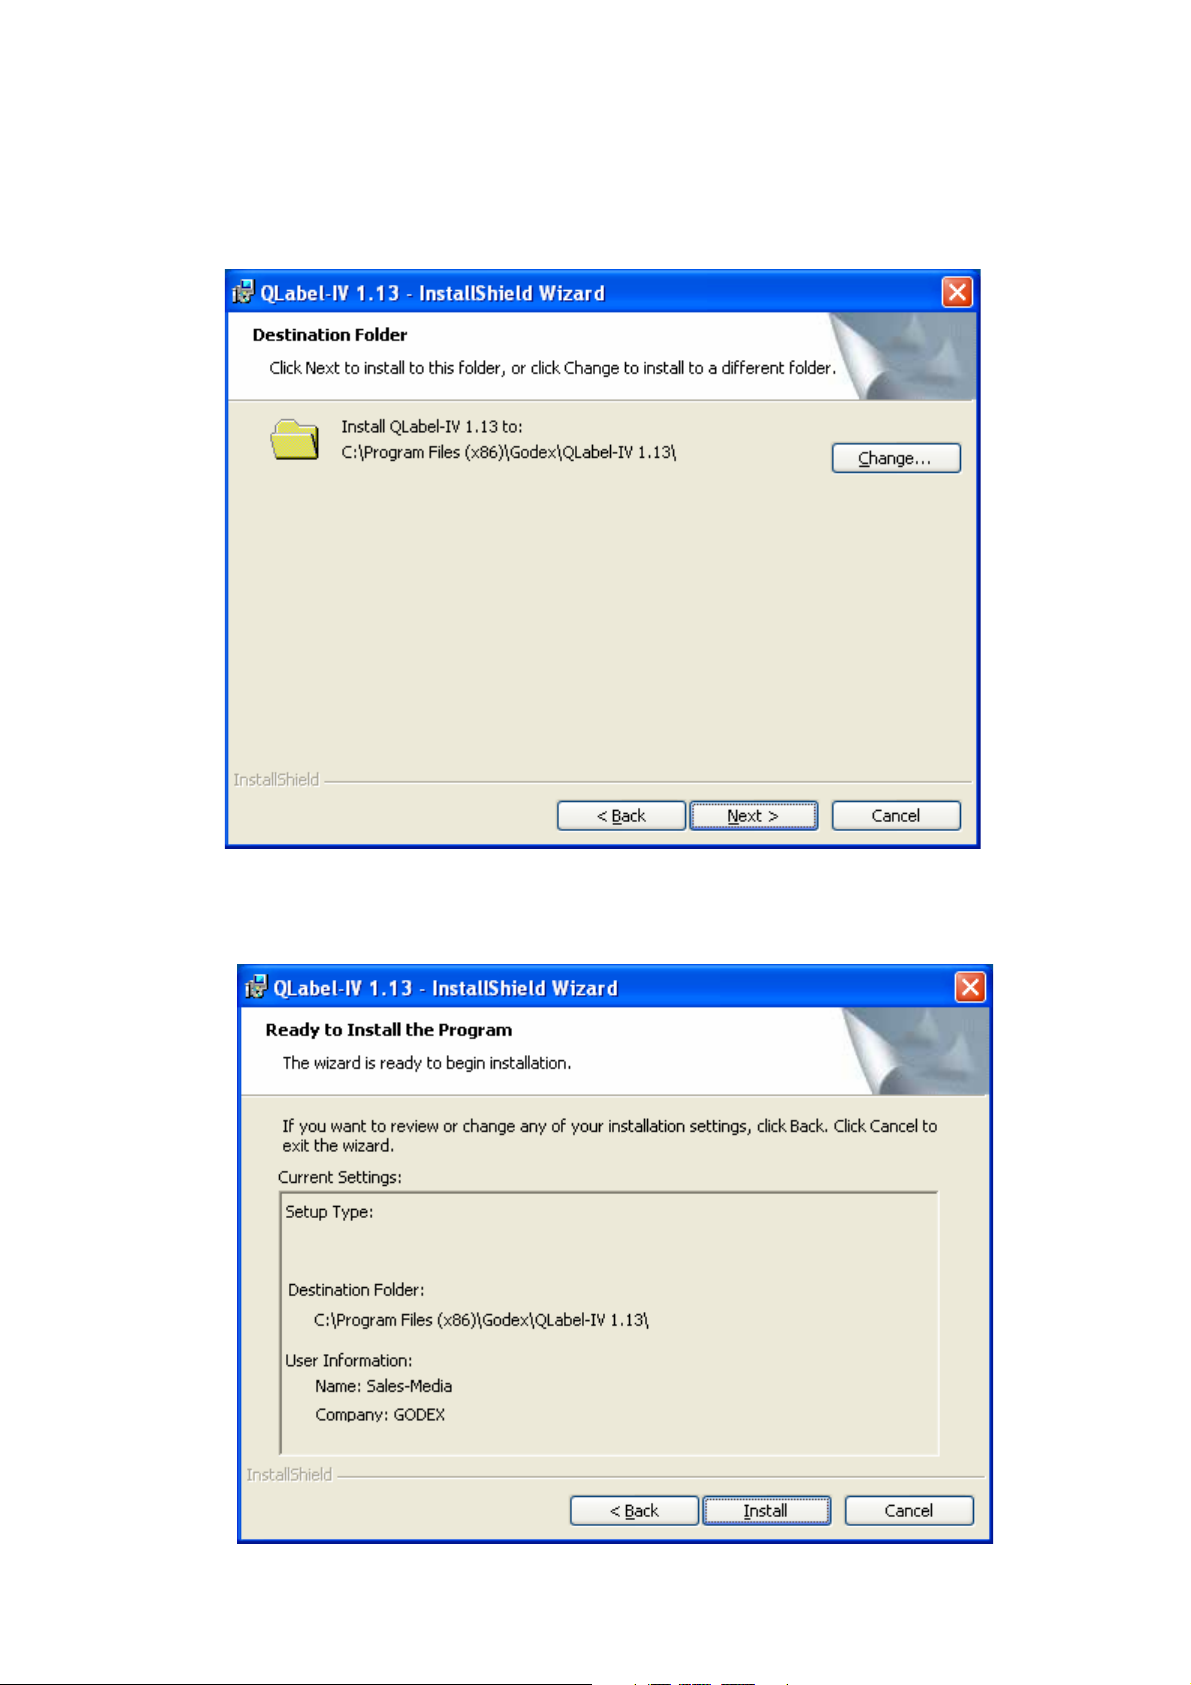
3. Select the directory that you would like to save for the QLabel-Ҋ program and related files. You can create a
new directory or choose one on your hard disk. If you use an established directory, specify the full path name
of the directory. Type the name of the directory, or accept the suggested default path then press “NEXT”.
4. The Start Copying Files dialog box shows your current setting. Please check these items correctly and then
click “NEXT”.
4
Page 6

5. QLabel-Ҋwill copy all the necessary files from the QLabel-Ҋ disks.
6. At once QLabel-Ҋ program installation completed, it will display the QLabel-Ҋ icon. Click the icon to start
the program.
5
Page 7
Part II: Starting on QLabel-IV
Ҋ
3: Start QLabel-
Click Start, point to Programs, point to the QLabel-Ҋ folder, and then click the QLabel-Ҋ program. Or click the
QLabel-Ҋ icon on desktop to start QLabel-Ҋ program directly.
4: Working Environment
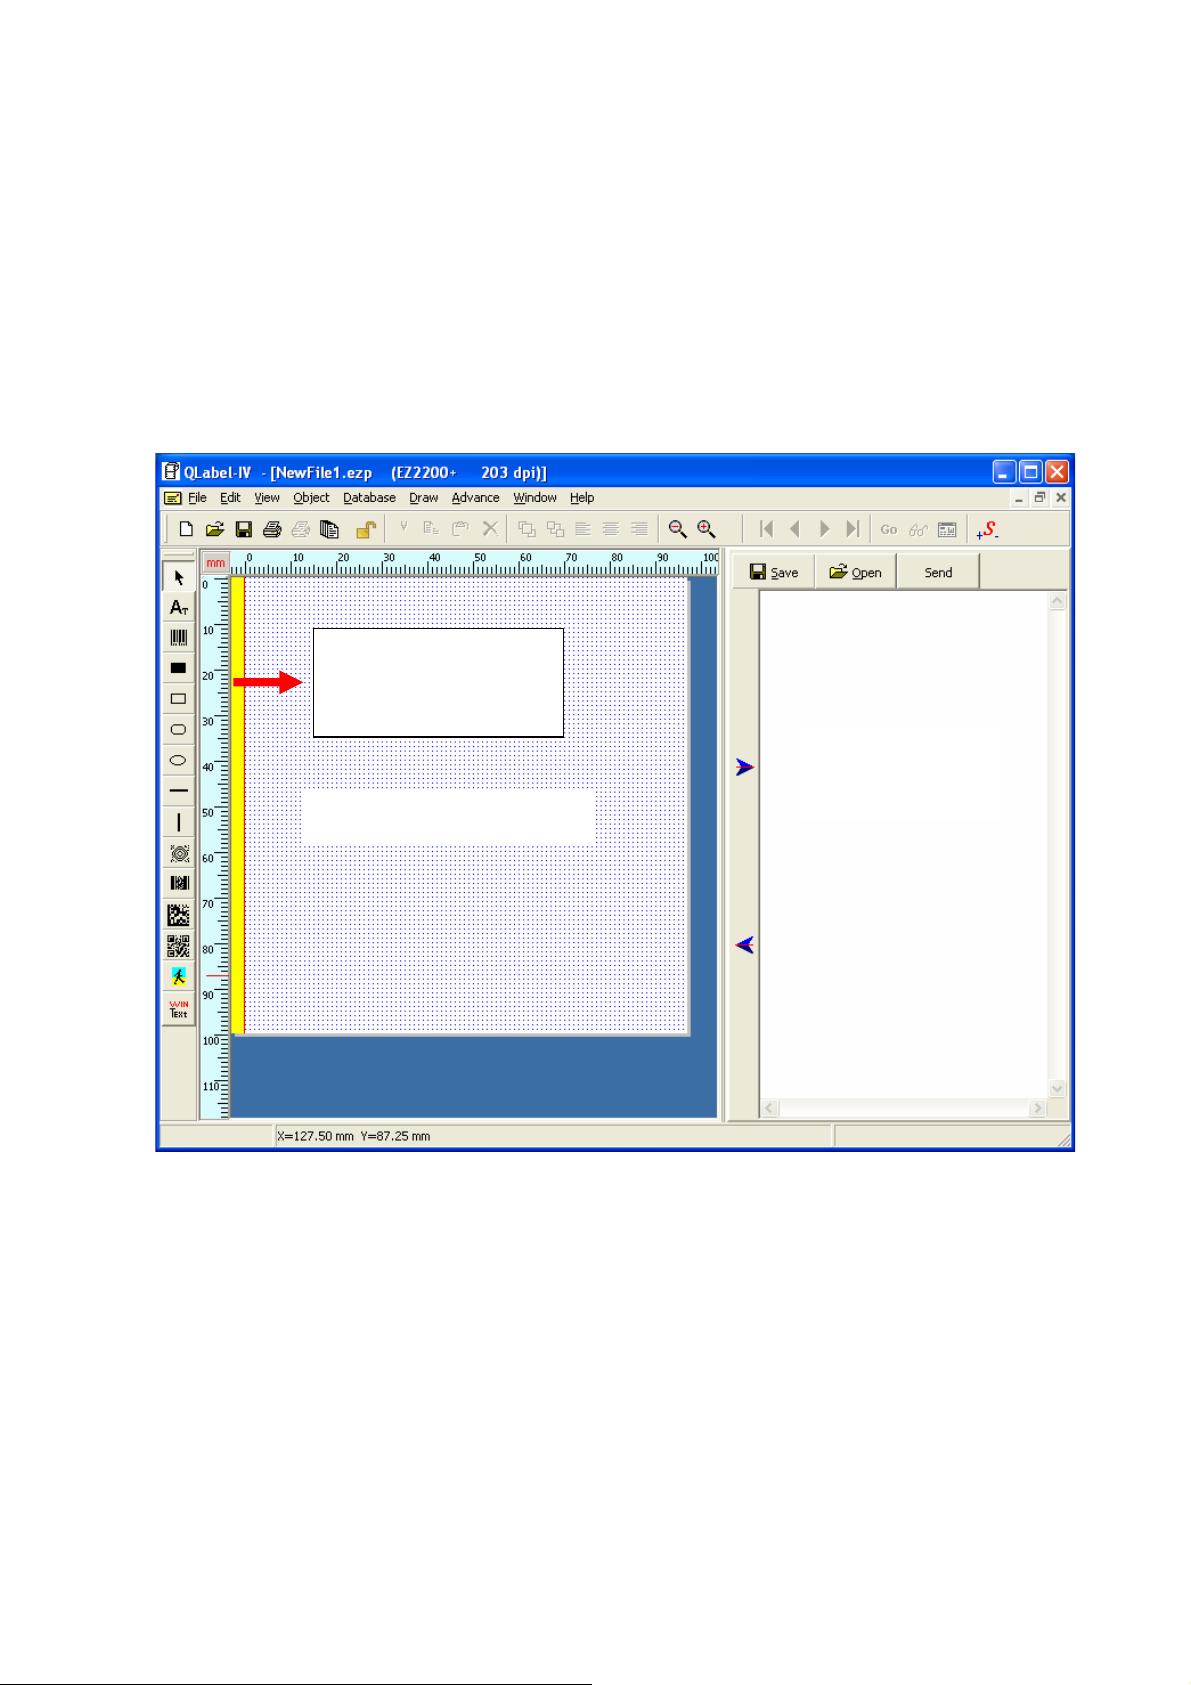
When you open a new label, there are two working areas on the screen. The left-hand side of the screen is the
Label Edit Area, and the right-hand side is the Command Edit Area.
*Unprintable
Area
Command
Edit
Area
Label Edit Area
*Unprintable Area: EZ-2000 / EZ-2000+ / EZ-6000+ series printers have an unprintable area of 3mm on the label
edit area.
6
Page 8
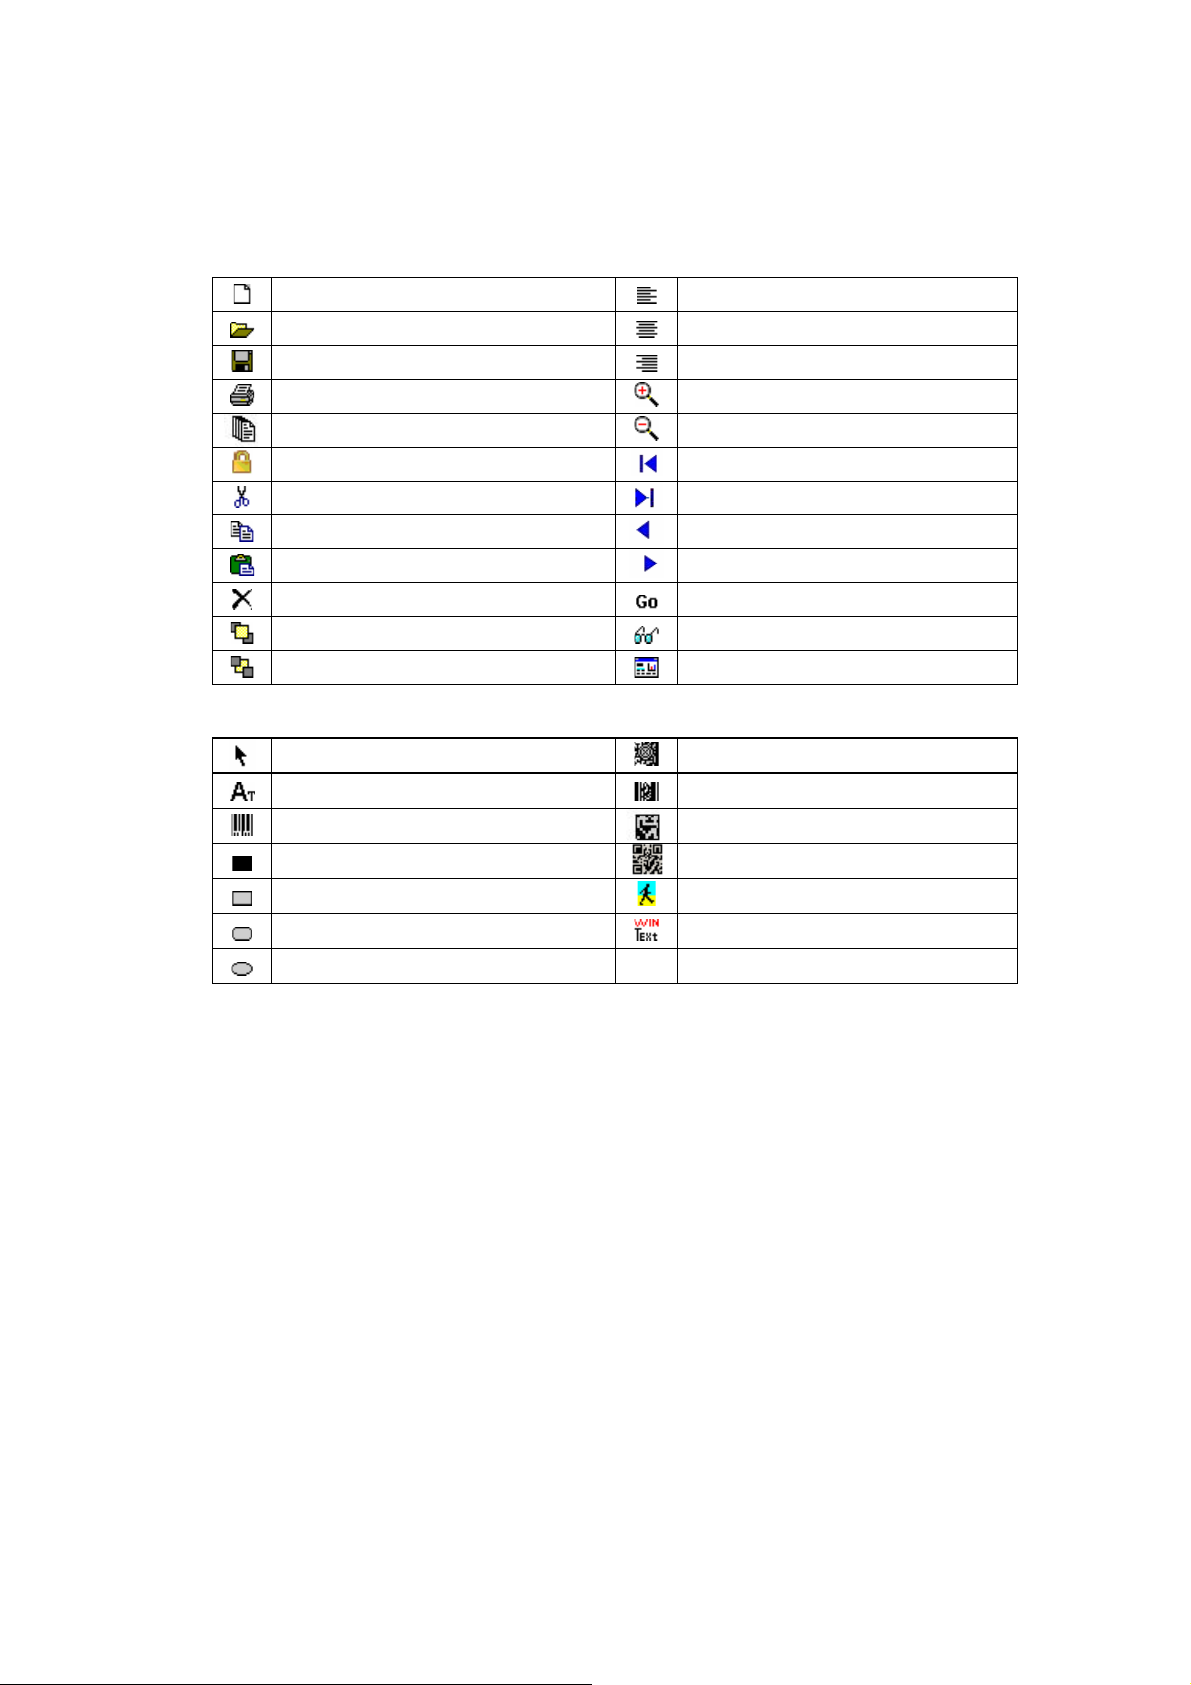
5: QLabel-IV Toolbars
Toolbars help you to use commands in QLabel-Ҋ quickly. Items of toolbar are detailed below:
Toolbars
Create a new label Align screen left
Open an existing label Align screen center
Save active document Align screen right
Print active label form
Print previous printed label Zoom In
Lock First record
Cut
Copy
Paste
Delete Go To…
Move to front Re-query
Move to back Database View/Edit
Draw Tools
Zoom Out
Last record
Previous record
Next record
Select an object
Create a text with printer’s font Insert PDF417
Insert Barcode
Draw a not hollow rectangle
Draw a square-corner rectangle
Draw a round-corner rectangle Create a text with window’s font
Draw an ellipse or circle
Insert MAXICODE
Insert Data Matrix Code
Insert QR Code
Insert a Picture
7
Page 9
Part III: Working with Labels
6: Opening, Creating and Saving Labels
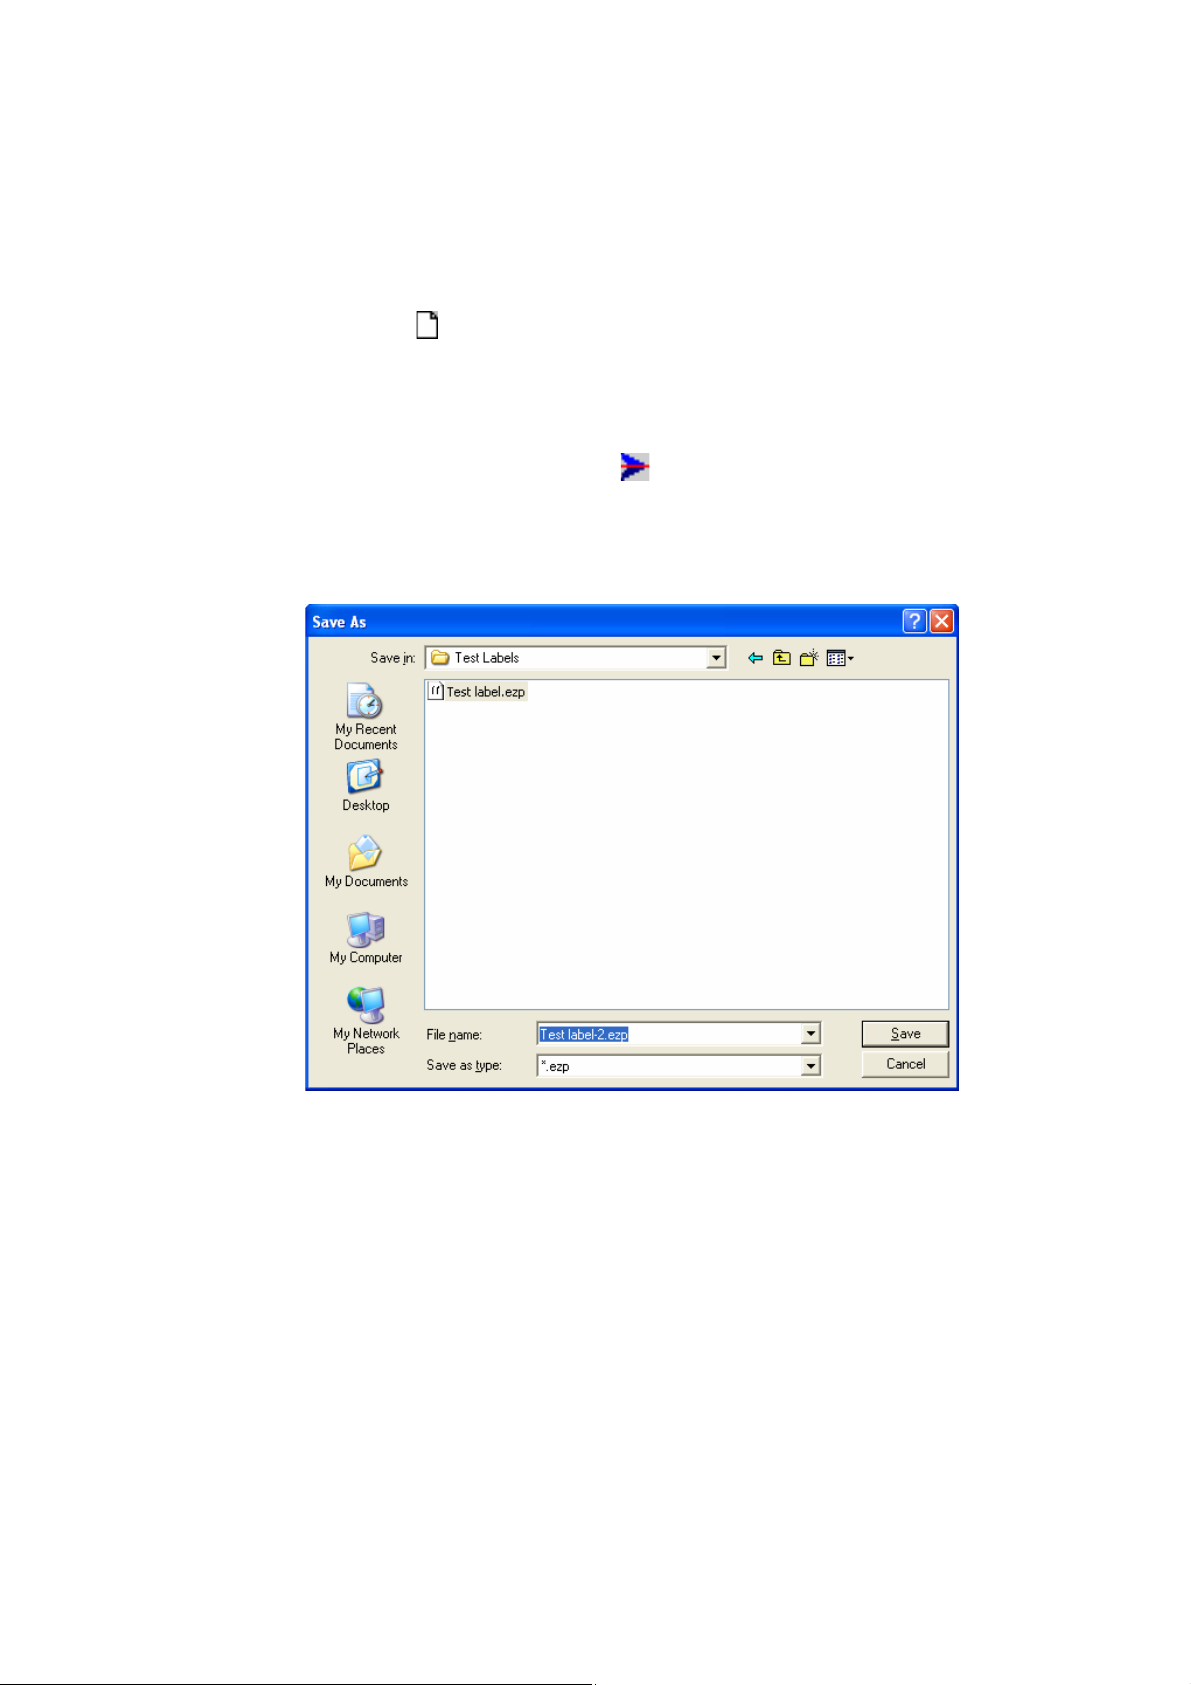
Create a new label
On the File menu, click “New” or on the toolbar to create a new label.
Save changes to a label
1. To save the new file, click the “File” menu, click “Save As”, and then type in a new file name.
2. To save the new file with the text type, click built-out
then type in a new File name. The program will highlight and require downloading unknown graphics,
window’s fonts, or other objects that were not created by printers.
z You can also save an existing label with a new file name by “Save As” and then typing a new name in File
name.
, click “Save” button in the Command Edit Area, and
Opening a label
1. On the File menu, click “Open”.
2. In the open dialog, go to “Look in”, select the file you would like to open.
3. Click the label name, and then click “Open”.
4. Alternatively, double-click the folder that contains the label you want to open.
8
Page 10
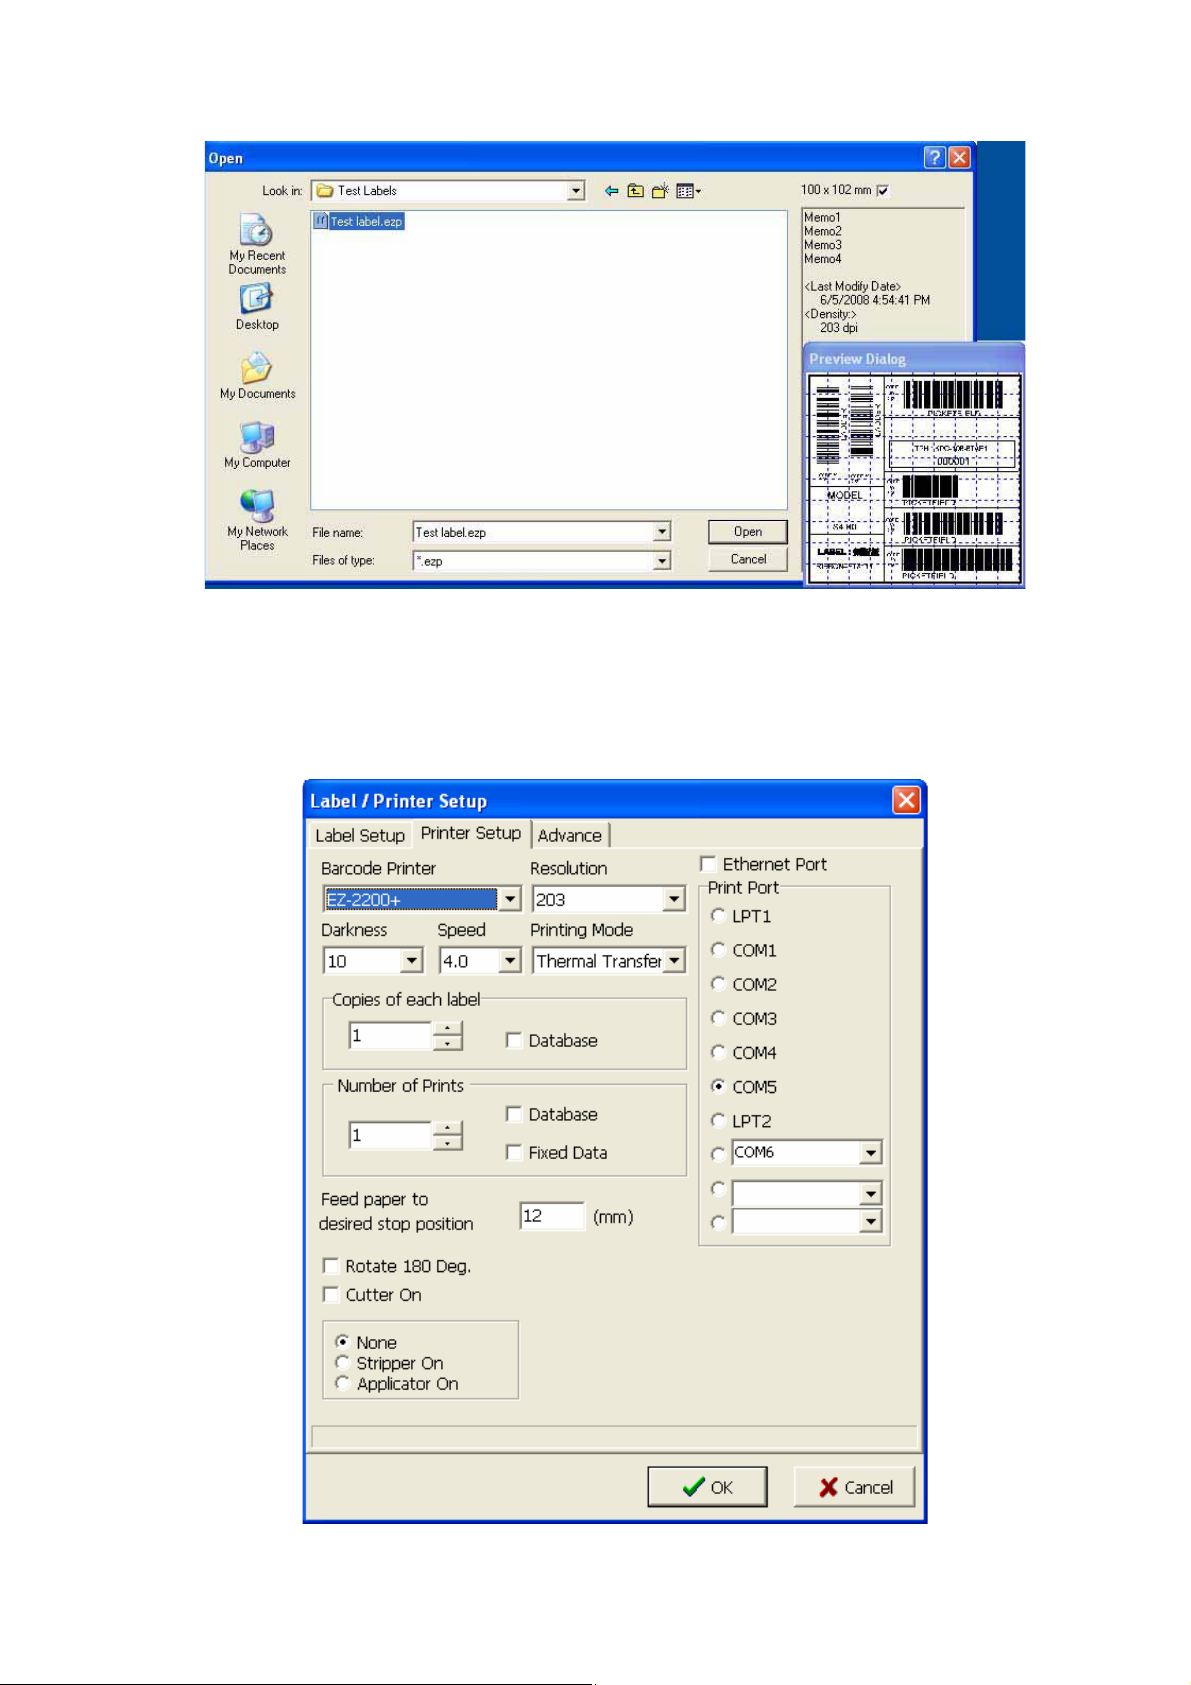
Setup printer
1. On the File menu, click “Printer Setup”.
2. Select the model of barcode printer.
3. Change settings in the Printer Setup dialog box.
9
Page 11
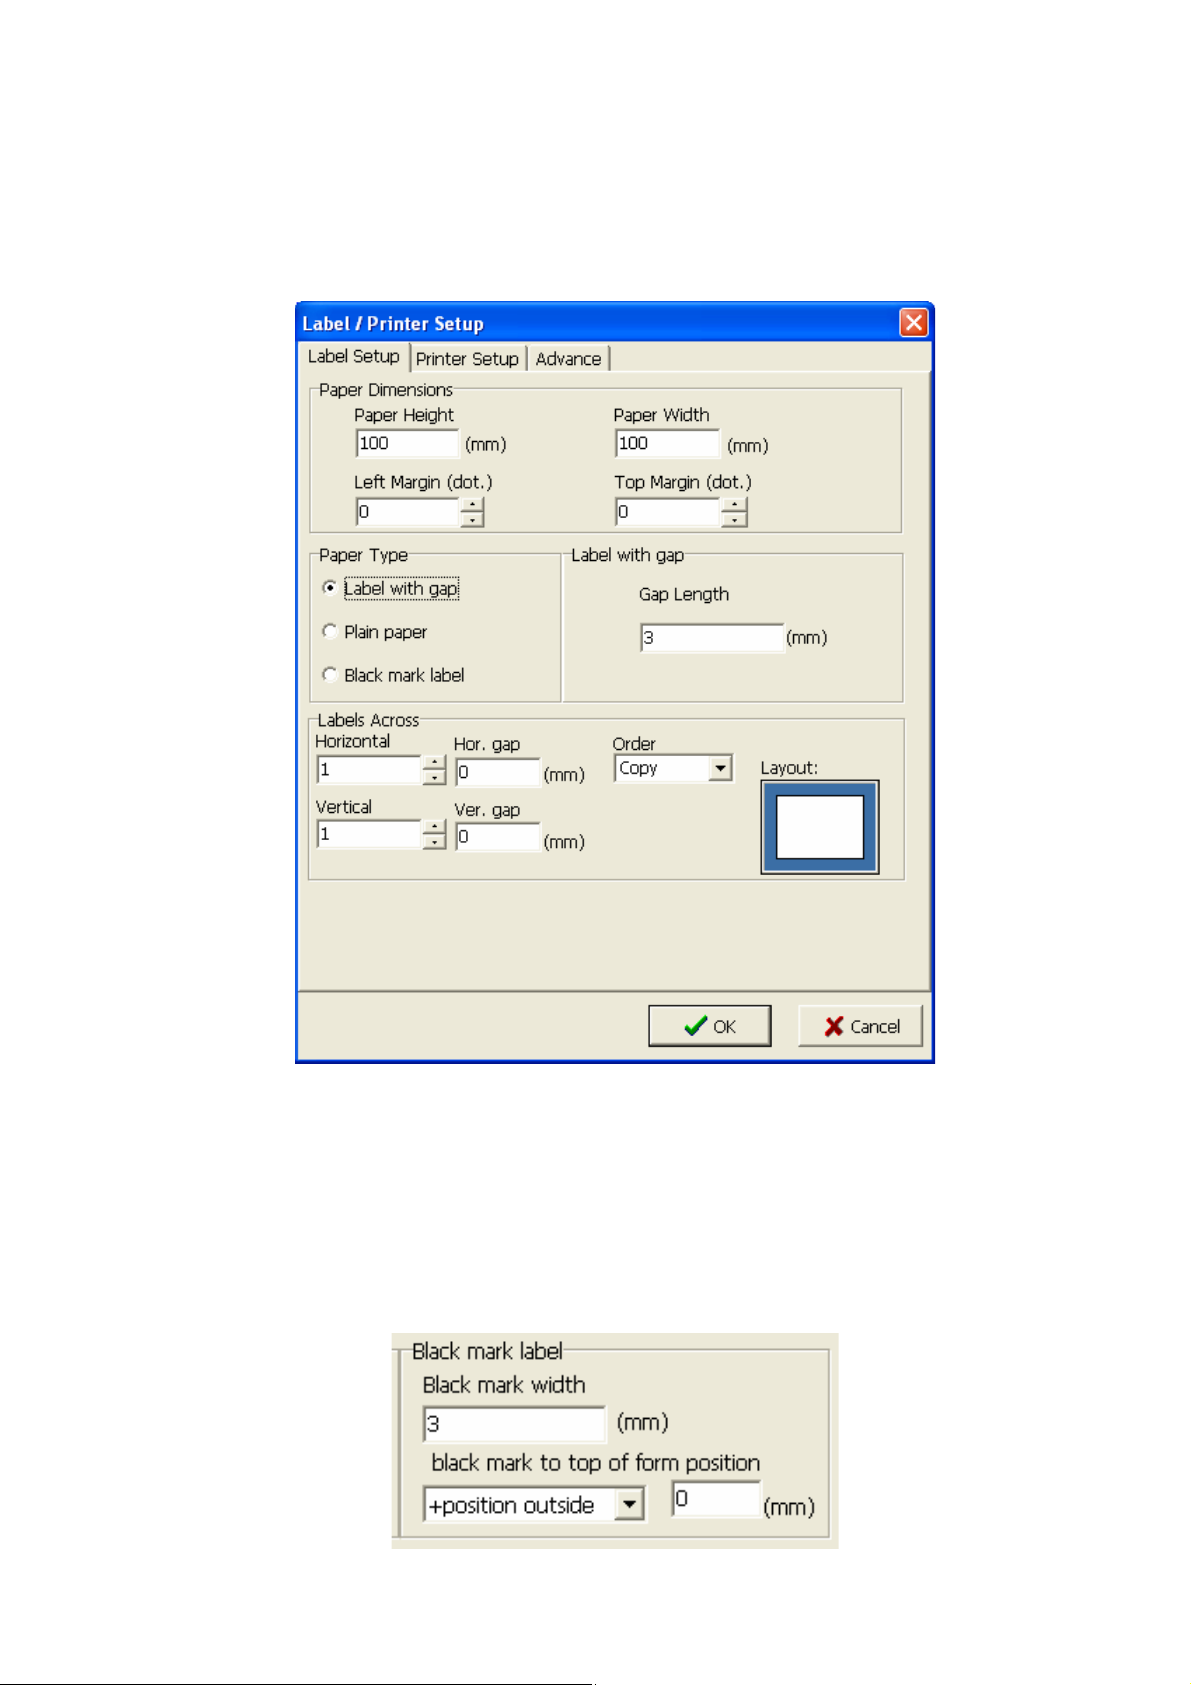
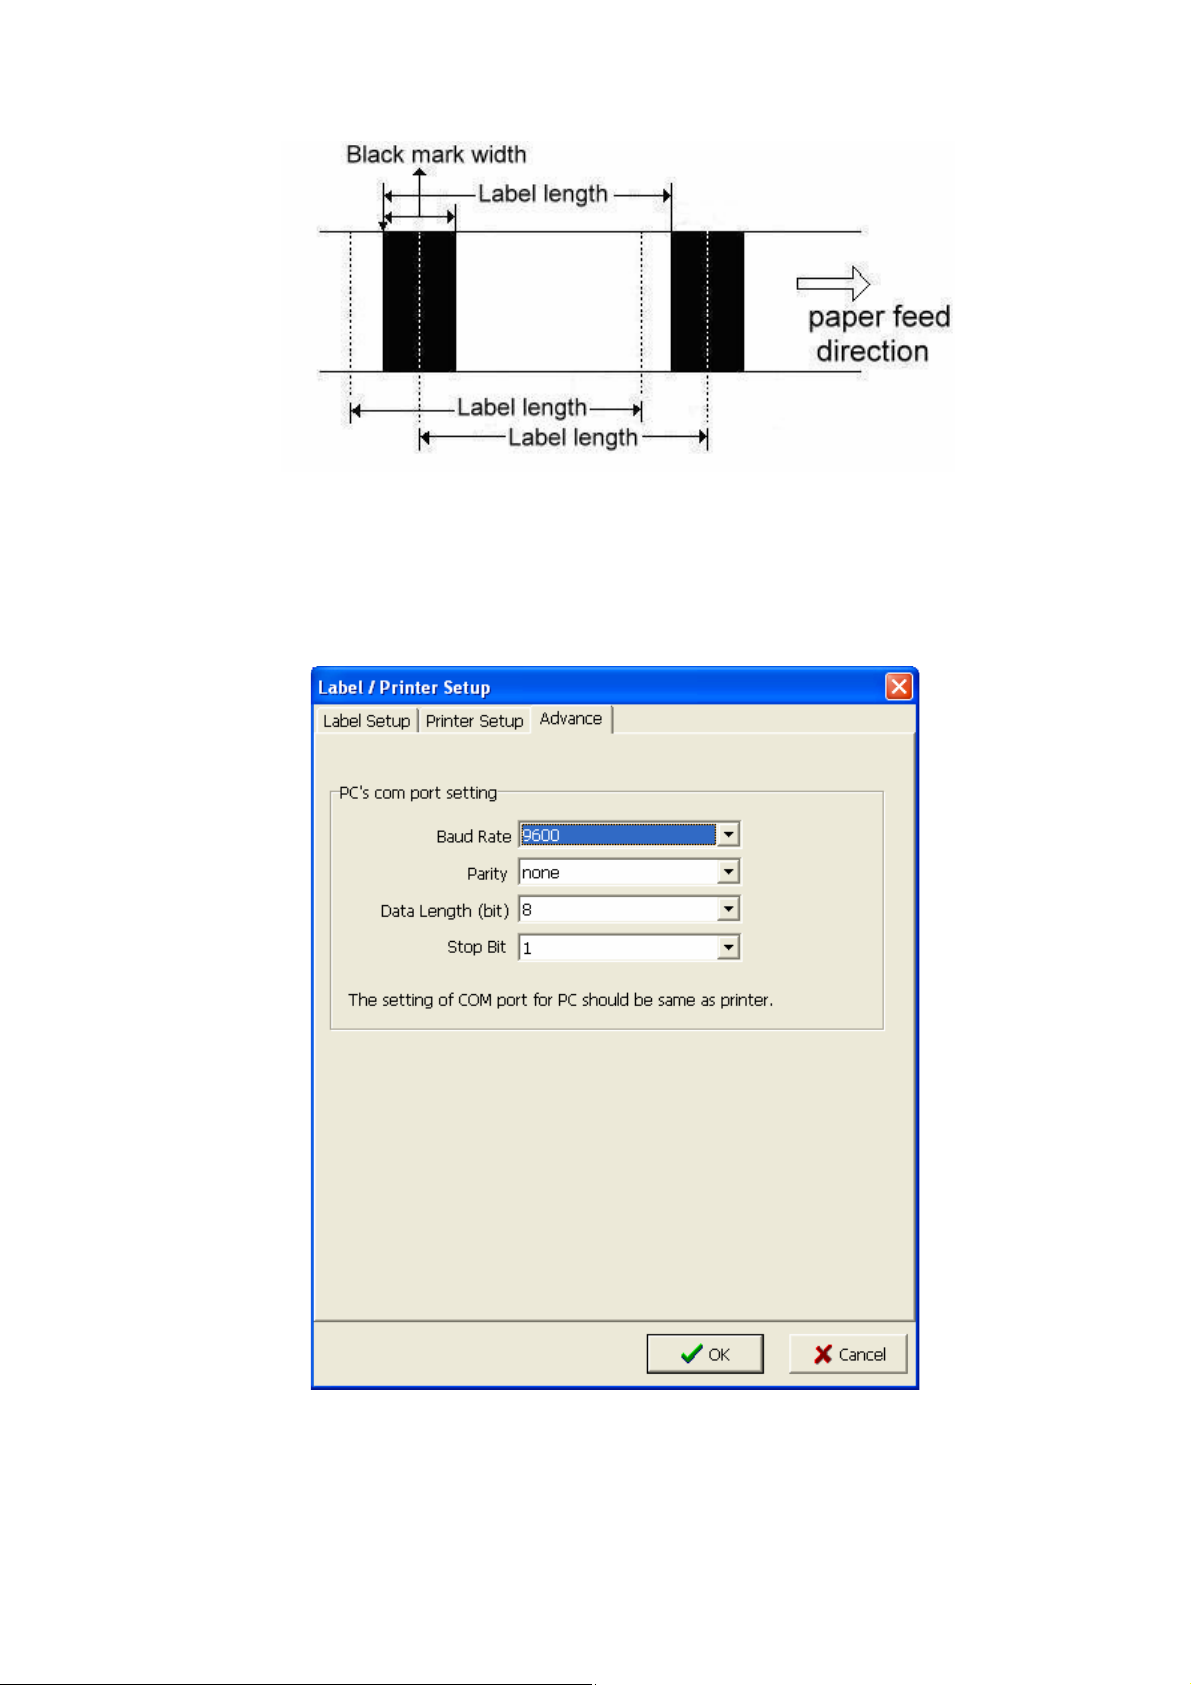
Label setup
1. On the File menu, click “Label Setup”.
2. Change settings in paper type, paper dimensions and label layout.
3. Click “OK” to complete label settings.
z Label paper: Check on paper with gap and set Gap Length.
z Plain paper: Check on Plain paper and set Feed paper length.
z Black mark paper: Check on Black mark label, and enter new values.
z Black mark width and Black line to top of form position.
z Horizontal: sets the number of columns of labels on a page.
z Vertical: sets the number of rows of labels on page.
z Horizontal gap: between the columns of labels.
z Vertical gap: between the rows of labels.
z Order: this method can collocate with serial number.
10
Page 12
Setting the Advance
These are default setting for 9600 baud rate, parity none, data length 18 bit, stop bit 1. The advance setting is for
the use of RS232 com port connection.
1. Click “Printer Setup” from the File menu.
2. Click the “Advance” table.
3. Click new setting.
11
Page 13

7: Inserting Text
Insert a text with printer’s font
1. Click .
2. On the Text Setup dialog box, select font type, size, and rotation angle, horizontal and vertical expansion
you would like to create on the label.
3. Input text in the Data column. Alternative select from the Load button to open the existent text file.
Note.
z Internal Font: Printer’s font.
z Asian Font: you can download the Asian Font to flash memory.
z Download Font: If you already used the Download New Font function to download window’s font to flash
memory, you can check on the item and select font you want.
12
Page 14

Download True Type Font
QLabel-IV supports True Type Font download function for EZ-PLUS / EZ-DT printers only.
1. Click
2. On the Text Setup dialog box, select font type.
3. Select a True Type Font, and then click OK to start download process.
.
13
Page 15

Insert a text with Window’s Font
1. Click .
2. On the Window Text Setup dialog box, click the font and rotation angle you would like to create on the label.
3. Input text in the Text String column.
4. If click “Change to Graphic” button, the text could be transforming into a graphic to enhance printer
performance. Transformed graphics are unable to modify any longer. Please refer to the chapter of graphics
for details information.
5. In data source function, you can connect text string with a database. Go to “Database” toolbar, and select
“Open DBF file” or “ODBC connect to open a database file.
14
Page 16

8: Inserting a Barcode
1. Click .
2. On the Barcode dialog box, select a barcode type, rotated angle, readable, barcode wide/narrow ratio and
height you would like to create on the label. Please acknowledge the barcode standard on each type as the
label ratio affection on CCD readability.
3. DataSource setting is the same as in the previous “Text Setup” chapter. Please refer to the “Advance Menu
Description” for the functionality of “Insert…” serial and variable numbers.
4. Input barcode data in the Data column on the below.
*Note: QLabel-IV supports Application Identifier (AI) in EAN-128 barcode. For more information about how to
use AI code in QLabel-IV, please refer to Chapter 22 "EAN -128 and Application Identifier".
15
Page 17

9: Drawing Lines and Shapes
Drawing a straight line or box
1. Click .
2. Drag the pointer diagonally in the direction and size you would like to create a label.
3. To change the thickness or brush style, double click the line or box, and then input width and height.
Drawing a square-corner rectangle or square
1. Click .
2. Drag the pointer diagonally in the direction and size you would like to create a label.
3. To change the border thickness, double click the rectangle, and than input width, height, and thickness in the
Rectangle Setup dialog box.
16
Page 18

Drawing a round-corner rectangle or square
1. Click .
2. Drag the pointer diagonally in the direction and size you would like to create a label.
3. To change the thickness, double click the rectangle, and than input width, height, line width, brush style and
color in the Ellipse/ Rounded Rectangle Setup dialog box.
Brush Color:
Drawing an ellipse or circle
1. Click .
2. Drag the pointer diagonally in the direction and size you would like to create.
3. To change the thickness, double click the rectangle, and than input thickness and color in the Ellipse/
Rounded Rectangle Setup dialog box.
17
Page 19

10: Inserting MAXICODE
1. Click .
2. In the MAXICODE dialog box, select a symbol number, numbers and mode you would like to create the
label.
3. Input country code, service class and postal code.
4. Input barcode data in the Message column (up to 84 characters).
11: Inserting PDF417
1. Click .
2. In the PDF 417 Setup dialog box, input width, height, error correction level, number of rows and column you
would like to have in a label.
3. Input data and select rotated angle of 0° or 90°.
18
Page 20

12: Inserting DataMatrix Code
1. Click .
2. Input data on the Number of encoded data box.
3. Select multiple numbers from 1 to 8.
4. To put a serial or variable numbers in the label, select “Inset…” button.
Please refer to the “Advance Menu Description” for the functionality of “Insert…” serial and variable
numbers.
19
Page 21

13: Inserting QR Code
1. Click .
2. Input data on the Number of encoded data box.
3. Select rotated angle for QRCode setup.
4. Select multiple numbers from 1 to 8.
5. Select error correction level, mask factor, original or enhanced type and data mode character set.
14: Inserting Graphics
Insert graphics from file
1. Click .
2. Select a halftoning of dithering you would like to create in a label.
3. Input width, height you would like to have a graphic.
4. On the Graphic dialog box, click Load.
5. In the open dialog, go to “Look in”; select the file you would like to open.
6. Click the label name, and then click “Open”.
7. Alternatively, double-click the folder that contains the label you want to open.
8. To insert graphics, click Graphic operate, click “Paste from clipboard”.
Notes.
z Select download graphics to internal or external memory to enhance printer performance. Graphics in the
internal memory will be clear while printer turns off.
To erase graphics, please go to “Advance” toolbar, select “Clear Memory”, and then “Delete Graphics”.
z Graphics would operate in rotate, flip, inverse color.
20
Page 22

21
Page 23

15: Lock Objects
1. Click .
2. All objects in the Label Edit Area will be locked, and not be able to move nor edit.
3. Click
Notes.
z In the Draw Bar setting dialog, the “Lock” function setup for each object.
again to unlock objects.
16: Print Previous printed Label
1. Click
2. Input quantity to print you would like to have.
Note:
z If label has serial number, you can use this method to keep on printing.
22
Page 24

Part IV: Advance Menu
17: Command Edit Area
When you create a label in the Label Edit Area, you can click to show the commands in the Command Edit
Area. In this area, you can save commands as a text file or send the commands to the printer. You also can open
an existing file by click “Open”.
Advance programmer could edit commends and send commends such as COPY, PRINT, TYPE etc to printers
in DOS mode.
18: Using Serial and Variable Number
Insert Serial Number
1. Insert a text or barcode.
2. Double click on the object.
3. In Data source, click Insert, select Serial to inset a new serial number.
4. In the New Serial dialog, input start value and increase or decrease value of serial numbers.
z For example: Start value = 1000, Increase value = 1, Prompt = S/N. The print out number will be from
0001, 0002, 0003, 0004 etc.
5. Input the max number of digits of serial numbers.
23
Page 25

Edit Existing Serial Number
1. Double click the object that you would like to edit.
2. In the Data source, select “Insert”, and click “Edit Serial Number” or click
3. In the Edit Serial dialog box, click the item you want to edit.
4. Click the item again, the data will be highlighted.
5. Input new values and then press “OK”.
toolbar.
24
Page 26

Insert Variable
1. Insert a text or a barcode.
2. Double click on the object.
3. In the Data source, click “Insert..”, and select “New Variable.
4. In the New Variable dialog box, input length and select justify value you would like to align variables.
Edit Existing Variable
1. Double click on the object that you would like to edit.
2. In the Data source, click Insert, and select “Edit Variable”.
3. In the Edit Variable dialog box, click an item you want to edit.
4. Click the item again, the data will be highlight.
5. Input new values or changes and then press “OK”.
25
Page 27

19: Using Real Time Clock
Setup Printer Date and Time
1. Go to Advance toolbar, select “Printer Date/Time Setup”.
2. In the Date/Time Setup dialog box, click Year and Month type.
3. Click Reset to clear original setting.
4. Input a new date and time.
5. Click Send Setup Command button to send new time settings to printer (before sending a new date and time
to printer, make sure printer is ready and “Ready LED” must in green light).
6. Click OK to close the Date/Time Setup dialog box.
Insert Date and Time in a Label
1. Double click on a text or a barcode object.
2. Click “Insert”, and select “Date or Time” to insert.
3. The command will show (^D) or (^T) parameter in data column.
26
Page 28

20: Database Connection
Database connectivity is to link up an existing database with a label format such as Excel, Access, and dBase
files. And we don’t need to do the duplicate work of keying all the data again. After connecting with a database,
the printing has to be operated through print icon
will print the single data only displayed on the screen.
. If click the “Send” button in command edit area, the printer
Use DBF file connection
1. Go to Database menu, click “Open DBF file”.
2. Select the Files of a database you would like to connect.
3. Alternatively, double-click the folder that contains the file you would like to open.
Note.
z If the connection is done, the screen will show Database connect OK.
z If you could not connect the database file, the file may be damaged. Please check DBF built.
27
Page 29

Use ODBC Connection
1. Go to Database menu, click ODBC Connect.
2. Select a Database Type and Table name you would like to connect.
3. Go to “ODBC Administrator” to replace a database directory.
Note.
z Before you use the ODBC Connect function, you should use Windows Control Panel to install the new
ODBC driver. The ODBC driver is the appended to application software that you use (such as FoxPro,
Access and more). When you install the ODBC driver, you must define one or multiple data source.
z Regarding the installation of ODBC driver and definition of data source, please refer to the ODBC Help from
your Windows.
z When the Database Login shows on the screen, you can enter your database file’s user name and password
or just click OK.
28
Page 30

Database operation
1. Double click a text or a barcode.
2. On the Data Source, click “Insert Field”.
3. Select a Field Name you would like and then click OK.
29
Page 31

Frame Boarder of Database
1. Go to Database menu, select Frame Boarder.
2. In the Label Edit Area shows the maximum data length of the connected database. This could help to design
a proper label within a label printable area.
3. Select a Field Name you would like and then click OK.
Database Viewer
1. Go to Database menu, select “Database Viewer”.
2. In the Database, you can sort a data by an alphabetical order or search data value on the database.
3. Click “Edit Mode” to edit the database.
30
Page 32

21. Download Graphic, Label and Font
Download Font
1. Go to Advance menu, select Download and click Font.
2. Select a Font, Style, Size and Effects you would like to create a label.
3. Click Font ID, and then click OK.
Delete Font
From Advance menu, go to “Clear Memory” and then select “Delete Font”.
31
Page 33

Download Labels
1. Go to Advance menu, select Download and click Label. If select “Quick Download to Printer”, system will
input label name automatically by selecting the graphic title.
2. Input a Label Name, and then click “OK”.
Note.
z Before you download labels, make sure printer is ready. If you would like to download from external
memory, please install memory before turn on the printer.
Delete Labels
1. From Advance menu, go to “Clear Memory” and then select “Delete Labels”.
2. Input the label name you would like to delete, and then click “OK’.
32
Page 34

22. EAN -128 / GS1 Databar and Application Identifier
Input the Application Identifier in EAN-128 Barcode
QLabel-IV supports Application Identifier (AI) in EAN-128 barcode. AI is a series of codes that can contain
pre-defined data type and actual data content in single data string. Each AI has 2 ~ 4 digits numeric Prefix in
front of the data to tell what the data means. For example, (11) represents the production date that should
conform to the format of "n2+n6". "n2" refers to the Application Identifier "11" and "n6" refers to the actual data
content in "YYMMDD" format. There are more than 100 Application Identifiers are defined in similar way. For
more details about Application Identifiers, please refer to the specification documentation of Application
Identifiers.
When inputting data with barcode type of EAN-128, QLabel-IV will check whether the input data conform to the
rule of AI. If the input data is following one of the AI definitions, QLabel-IV will then automatically bracket the
Application Identifier in human readable text (the actual barcode data remains the same). For example, input
"11090227" in data field, QLabel-IV will transfer it to "(11)090227" since it conform to the "n2+n6" rule of "(11)
production date".
If the input data is "1120090227", QLabel-IV will determine that it is not Application Identifier because it begins
with Application Identifier "11" but not in "n2+n6" format. Therefore, QLabel-IV will not transfer the input data to
the display type of AI.
33
Page 35

On the Barcode Setup page of EAN 128, GS1 Databar Expanded and GS1 Databar Expanded Stacked
barcodes, there is an "AI Wizard" to help user entering the data content of AI. To enter the "AI Wizard" setup
page, please click "W..." button on the Barcode Setup page.
On the left side of "AI Wizard" page, there is a list of AI codes to show the Identifier and description of each AI
code. Click one of AI codes from the list, and then a sample content to show the AI code format will be displayed
on the "Sample" box.
34
Page 36

Double click one of AI codes from the list, and then the Identifier of the AI code will be moved to the "AI" box on
the "ShowDataList" area. Input the data content on "DATA" box following the data format that displayed on
"Sample" box and then check the tick box on the right side of "DATA" box to complete the data input of AI code.
If the input data doesn't conform to the rule of the AI code and still check the tick box, then the "DATA" box will
turn to Red and cannot proceed to next set of AI code. In this case, please uncheck the tick box and then input
the data in correct format and check the tick box again to continue next AI data input.
35
Page 37

If you need input more than one AI code in a barcode, you can repeat above process to input data content in
multi columns. Make sure that all of AI code data are input correctly and then click the "Combine" button to
combine all AI codes in a barcode. The "Combine_Items" will show how many AI codes are combined and the
"Check Data" box will show the final result of barcode content. Check if the barcode content is correct and then
click "OK" button to complete the AI data input procedure.
36
Page 38

Appendix: Advance Menu Description
Control:
Display memory: Display external memory’s free spaces and name of the fonts, graphics and formats.
Print Head test: This command will print a pattern for the user to determine if the print head is damaged.
Print Version
message:
Reset Printer: Reset the printer. The LED will flash once.
Printer Clock Setup Setup printer real time clock of date and time.
Printer Serial Port
Setup
Paper Forward Setup label forward length
Paper Backward Setup label backward length
Buzzer Turn on or off setting
Unit of Measurement Set up unit of measurement in mm, cm or inch. ( Default : mm)
Undo/ Redo Enabled this function can back last step on label edits area. (Default: Disabled)
Clear Memory:
Print firmware version.
Setup printer com port of baud rate, parity and Stop Bits.
Printer external flash
memory:
Program memory: Clear the current program.
Delete Graphics: Clear graphics in internal or external memory.
Delete Font Clear font from memory.
Delete Labels Clear labels from memory.
Clearing external flash memory will clear all information in the external flash memeory.
Download:
Graphics: Download graphic files to external flash memory.
Label: Download label to flash memory.
Font: Download Window’s font to external flash memory.
Command
Files:
Download command file (text type) to flash memory.
Language: Switch languages.
37
Page 39

Printer Date/Time Setup: Setup the printer’s date and time.
Print Previous Printer Label: Repeatedly prints the indicated copies of last label
format.
38
Page 40

Label Information: To note the label information.
Printer Option List: To setup options of the printer.
39
 Loading...