

Page 1
MX20/MX30/MX30i MOBILE PRINTER
USER MANUAL
User Manual
Version
Issue Date
P/N
: MX20/MX30/MX30i series
: Rev. 1.1
: 2015.06
: 920-015211-00
Ver. 2.0
Page 2

MX20/MX30/MX30i
1
Mobile Printer
001
2
Printer Setup
004
Setting
5
Accessories
032
USER MANUAL
CONTENTS
1.1
1.2
2.1
2.2
2.3
2.4
2.5
2.6 Wizard CD Other Choice Installation 012
3
3.1
3.2
3.3
3.4
3.5
3.6
4 NetSetting for Ethernet 023
Box Content
Getting to Know Your Printer
Battery Installation
Paper Installation
Battery Charging
Belt Strap & Shoulder Strap Usage
Wizard CD Standard Installation
and Control for Operation Panel
Operation Panel
LCD Interface Introduction
LCD Setting
Label Calibration and Self Test
Active / Sleep / Shutdown / Charge Mode
Bluetooth Connection Terminal
Items In Setting Mode
001
002
004
005
007
008
009
015
015
017
019
020
021
022
4.1
4.2
5.1
5.2
5.3
6 Maintenance and Adjustment 035
6.1
6.2
Appendix
Product Specifications
Installing the NetSetting Software
The Interface of NetSetting
Charger
Car Charger and RS-232 Cable
Protective Case
Cleaning The Thermal Print Head
Troubleshooting
Interface
MX30/30i WiFi Setting
023
025
032
033
034
035
036
Page 3

MX20/MX30/MX30i
USER MANUAL
FCC COMPLIANCE STATEMENT
FOR AMERICAN USERS
Federal Communication Commission Interference Statement
This equipment has been tested and found to comply with the limits for a Class B digital device, pursuant to
Part 15 of the FCC Rules. These limits are designed to provide reasonable protection against harmful
interference in a residential installation. This equipment generates, uses and can radiate radio frequency
energy and, if not installed and used in accordance with the instructions, may cause harmful interference
to radio communications. However, there is no guarantee that interference will not occur in a particular
installation. If this equipment does cause harmful interference to radio or television reception, which can be
determined by turning the equipment off and on, the user is encouraged to try to correct the interference
by one of the following measures:
● Reorient or relocate the receiving antenna.
● Increase the separation between the equipment and receiver.
● Connect the equipment into an outlet on a circuit different from that to which the receiver is connected.
● Consult the dealer or an experienced radio/TV technician for help.
This device complies with Part 15 of the FCC Rules. Operation is subject to the following two conditions:
(1) This device may not cause harmful interference, and (2) this device must accept any interference received,
including interference that may cause undesired operation.
FCC Caution: Any changes or modifications not expressly approved by the party
responsible for compliance could void the user’s authority to operate this equipment.
EMS AND EMI COMPLIANCE STATEMENT
FOR EUROPEAN USERS
This equipment has been tested and passed with the requirements relating to electromagnetic compatibility
based on the standards EN55022:2010/AC2011 Class B, EN301 489-1,EN301 489-17,EN300 328, EN61000-3-2:2006/
A1:2009/A2:2009, EN 61000-3-3:2008 and IEC 61000-4-2:2008 series The equipment also tested and passed in
accordance with the European Standard EN55022 for the both Radiated and Conducted emissions limits.
MX SERIES
TO WHICH THIS DECLARATION RELATES
IS IN CONFORMITY WITH THE FOLLOWING STANDARDS
IEC 60950-1:2005(2nd Edition)+Am 1:2009, CB9254-2008 (Class B ) ; GB17625. 1-2003; GB4943.1-2011, EN55022:2010/
AC2011 Class B, EN301 489-1,EN301 489-17,EN300 328, EN61000-3-2:2006/A1:2009/A2:2009, EN 61000-3-3:2008 and
EN55024:2010, IEC 61000-4-2:2008 series, UL 60950-1, 2nd Edition, 2011-12-19, CSA C22.2 No. 60950-1-07, 2nd Edition,
2011-12, FCC part 15 subpartB, FCC part 15 subpartC, NCC LP002.z
Safety instructions
Page 4

MX20/MX30/MX30i
USER MANUAL
Battery Safety Precautions
Make sure to review the user manual carefully prior to product use.
Neglecting to heed the following instructions can result in battery overheating, combustion,
explosion, damage and/or decline in performance and product life.
1. Do not allow water, seawater or moisture to enter or leak into the battery. If the safety mechanism within
the battery becomes oxidized, oxidized the battery may overcharge with abnormal electrical current
and/or voltage so that it may overheat, ignite and/or explode.
2. Do not place the battery near open flames or heating devices, such as stoves.
Exposure to excessive heat may cause damage to the resin case and/or insulating materials, thus causing
a short circuit within the battery that may result in battery overheating, combustion, and/or explosion.
3. Charge the battery only with the exclusive charger specified (optionally provided) by GoDEX.
The use of an incorrect charger may result in overheating. Combustion and/or explosion of the battery.
4. Charging the battery with a modified charger may result in overheating, combustion and/or
explosion of the battery by abnormal chemical reaction caused by incorrect polarity.
5. Do not directly connect the battery to an electrical power outlet not specified by GoDEX or an automobile’s
cigarette lighter jack. Doing so may result in overheating, combustion and/or explosion of the battery by
over-current and/or over-voltage.
6. Do not heat the battery or place it near a fire. Doing so may melt insulation materials, damage the safety
mechanism/equipment, and/or ignite the electrolytic solution. There is a potential risk of battery overheating,
combustion, and/or explosion.
7. Do not reverse the connection of (+) and (-) electrodes of the battery. Charging the battery in reverse polarity
may produce an undesired chemical reaction inside the battery cell, causing unexpected behavior during
discharging such as overheating, explosion, or fire.
8. Do not allow the battery’s (+) or (-) pole to come into contact with any metal. In addition, do not carry or
store the battery with metallic items, such as necklaces and hairpins.
Doing so may cause a short circuit of the battery generating an over-current. There is the potential risk to
overheat, ignite and/or explode the battery or overheat the metallic items, such as necklaces, hair pins etc.
9. Do not throw the battery or subject it to strong shock. If the safety mechanism in the battery is damaged,
the battery may be overcharged and, consequently, an adverse chemical reaction may be generated
in the battery. There is a potential risk of battery overheating, combustion, and/or explosion.
10. Do not pierce the battery with a pointed object, such as nail or awl, or strike with a heavy object, such as a
hammer, and take care not to step on the battery. There is a potential risk of battery overheating, combustion,
and/or explosion caused by an internal short circuit.
11. Do not solder the battery directly. Doing so may melt the insulating materials and/or damage the safety
mechanism or safety equipment, resulting in battery overheating, combustion, and/or explosion.
12. Do not disassemble and/or modify the battery. The battery contains safety equipment and a safety mechanism
to prevent danger. There is a potential risk of overheating, combustion, and/or explosion caused by disassembly.
13. Do not charge the battery near open flames and/or under direct sunlight. Charging the ambient temperature at
0℃ ~ 40℃. Because exposure to high temperatures triggers the operation of the safety mechanism, the battery
may not charge or may overcharge due to destruction of the safety mechanism. There is a potential risk of
overheating, combustion, and/or explosion.
14. Do not expose the battery to high temperatures over 60℃, and do not use or store it in a hot or humid place.
15. Danger of explosion if battery is incorrectly replaced. Replace only with the equivalent type recommended by
the manufacturer.
16. Dispose of used batteries according to the manufacturer’s instructions.
17. Only use with designated power supply adapter model.
18. Changes or modifications not expressly approved by the party responsible for compliance could void the user's
authority to operate the equipment.
Battery Safety Precautions
Page 5
1 Mobile Printer
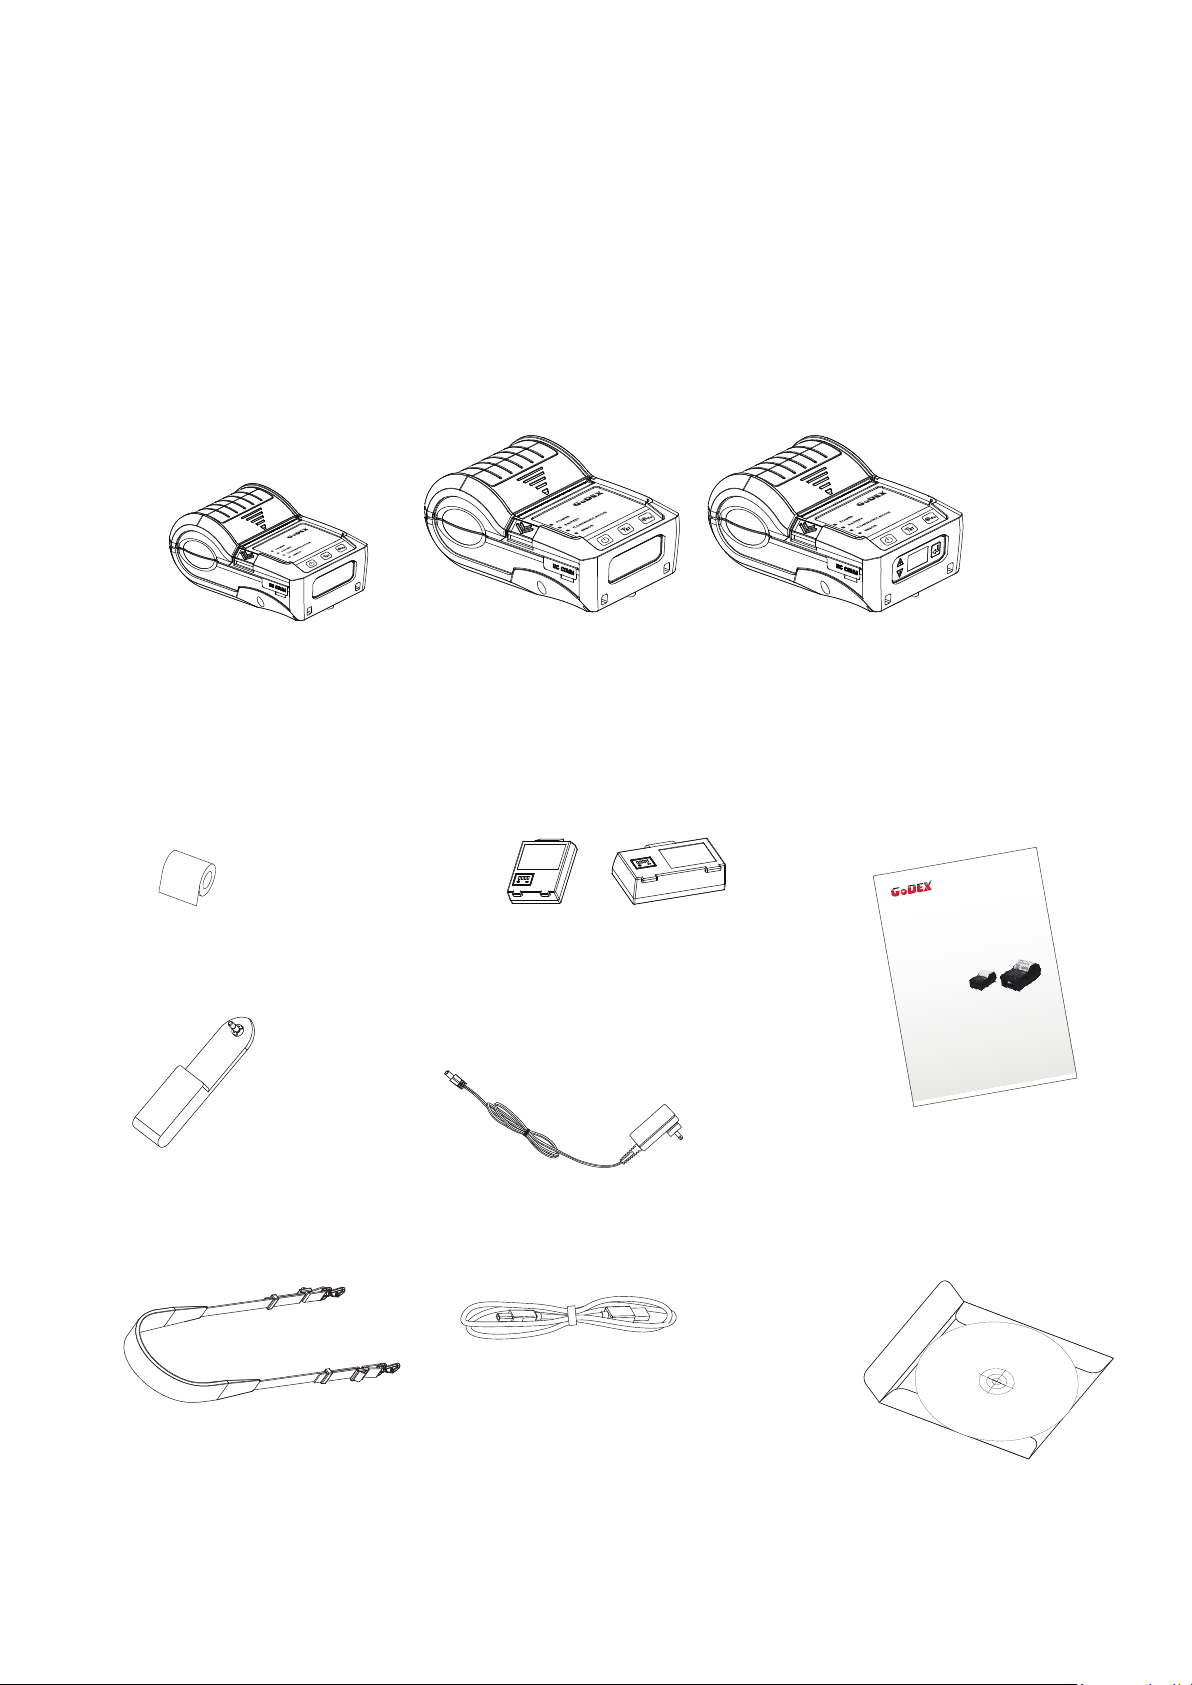
1.1 Box Content
Please check that all of the following items are included with your printer.
Charge the battery for at least 3 hours before use.
MX20 / MX30 / MX30i Mobile Printer
MX20 MX30 MX30i
Thermal Paper
Belt Strap(MX20 Series)
Shoulder Strap(MX30 Series)
Lithium Battery
MX20 Series MX30 Series
Power Supply
USB Cable
MX20 / MX30 / MX30i Series
Quick Guide
MX20/MX30/MX30i Series
CD
Including GoLabel software
and MX series user’s manual.
1
Page 6
1 Mobile Printer
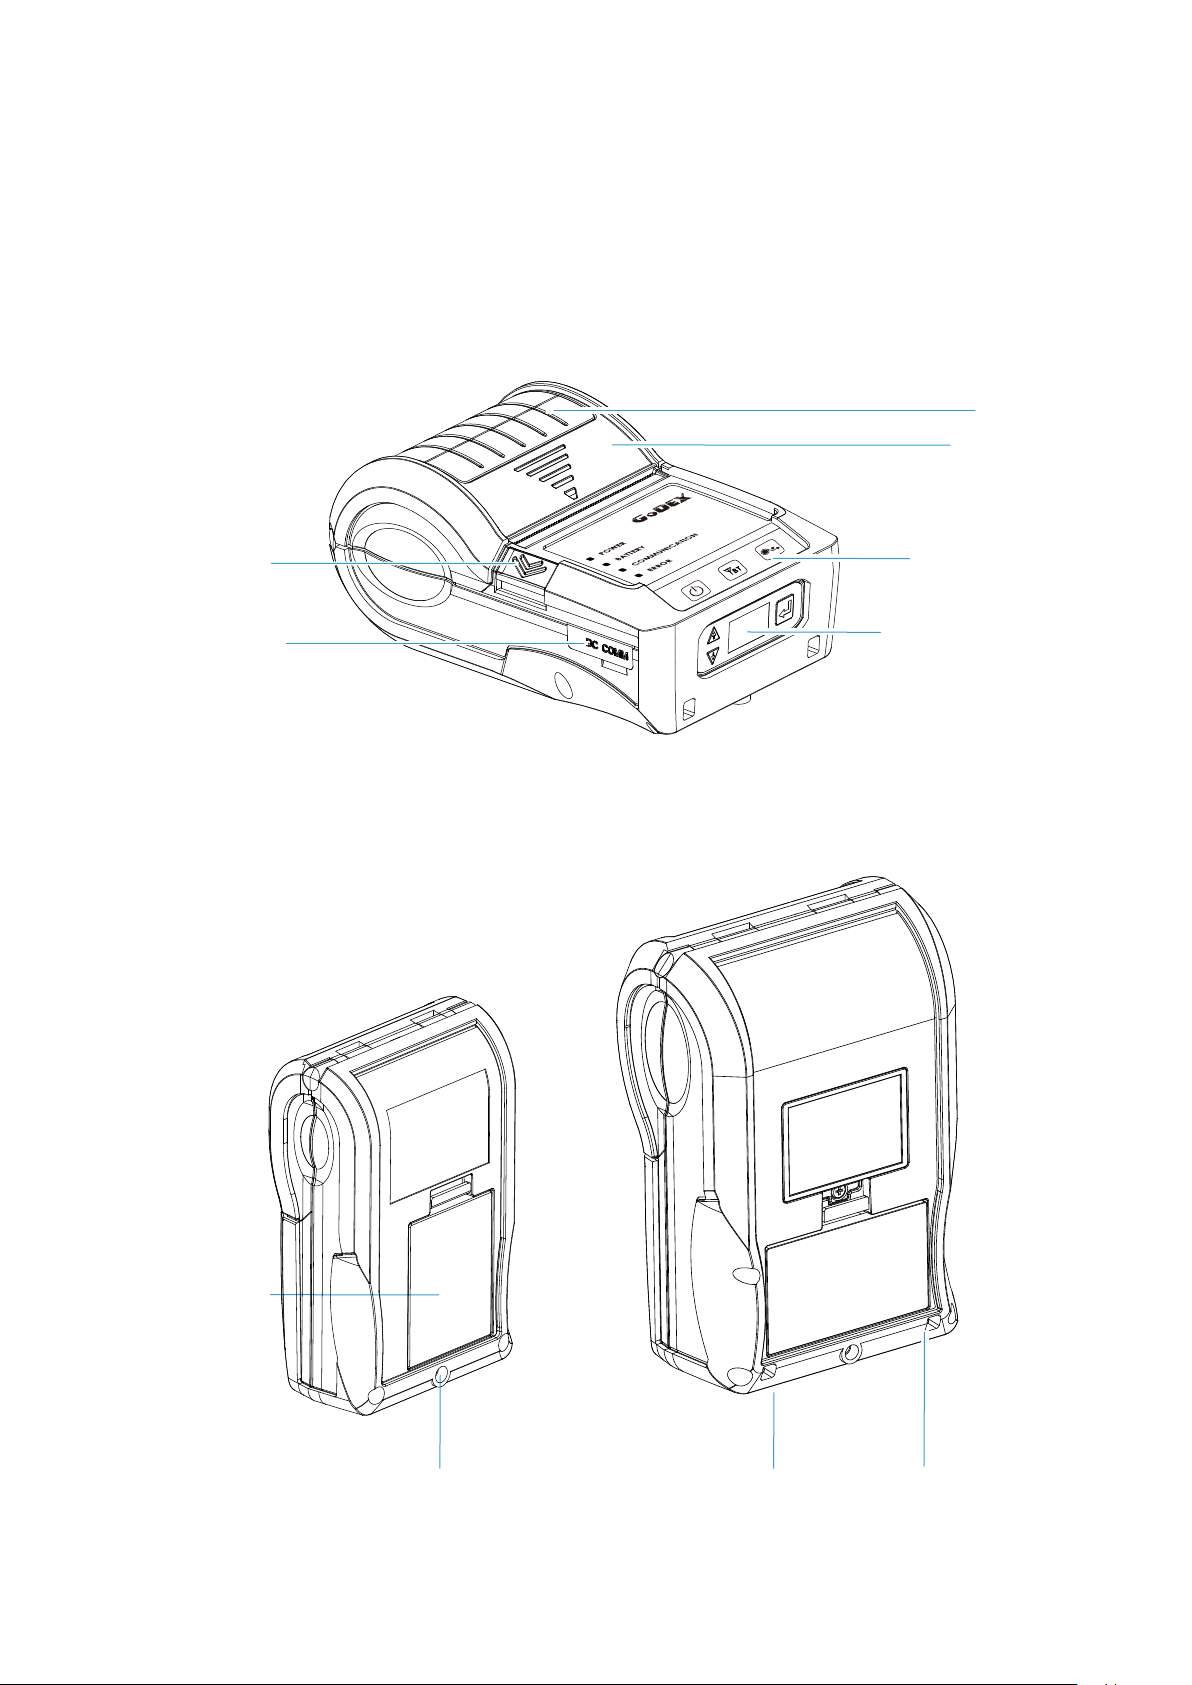
1.2 Getting to Know Your Printer
Device Overview
Front View (Take MX30i as an example)
Window
Top Cover
Open Button
Interface Cap
Rear View
Membrane Panel
LCD
Membrane Panel
Battery
Belt Strap Holes
Shoulder Strap Holes
MX20 Series MX30 Series
2
Page 7
RS232+USB
Port
Power Jack
1 Mobile Printer
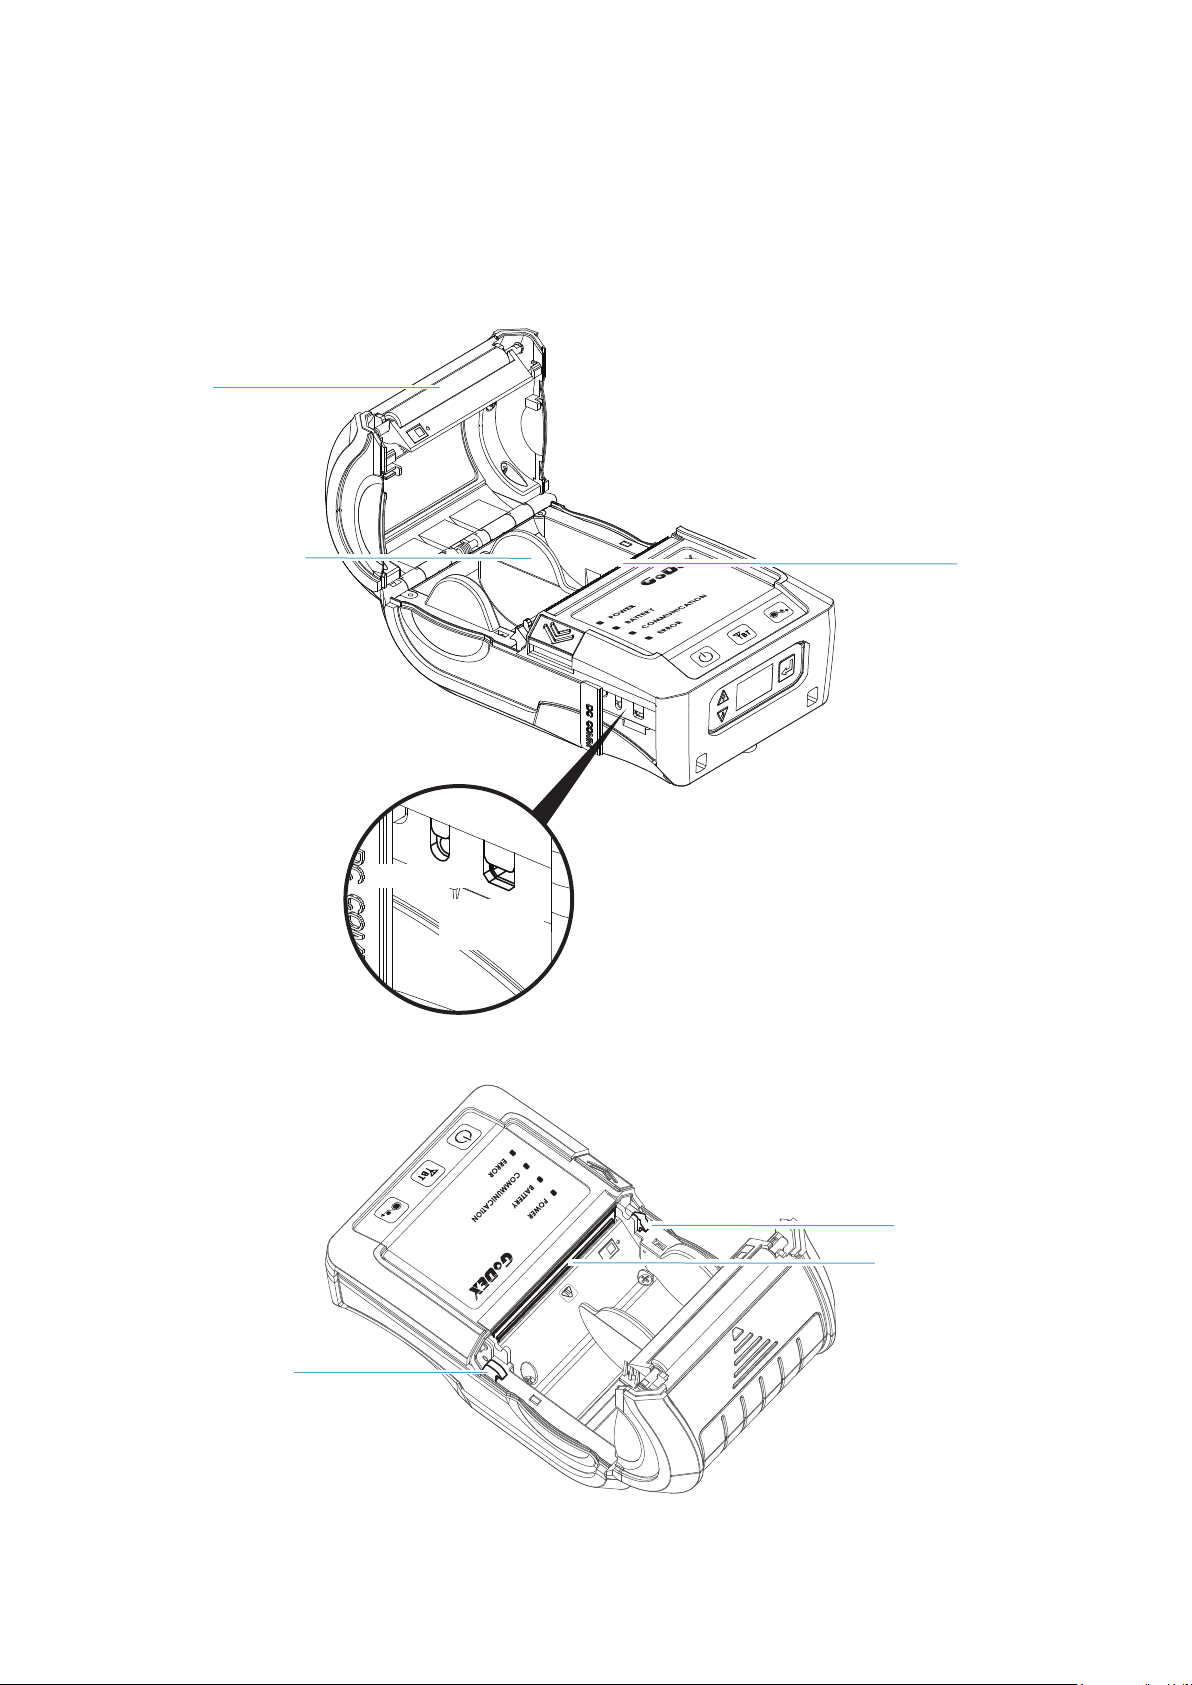
The Internal View of the Printer (Take MX30i as an example)
Platen Roller
Label roll guide
Tear BAR
This RS232 & USB Port
only support signal transmission,
no charge function.
Top Cover Hooks
Thermal Print Head
Top Cover Hooks
3
Page 8
2 Printer Setup
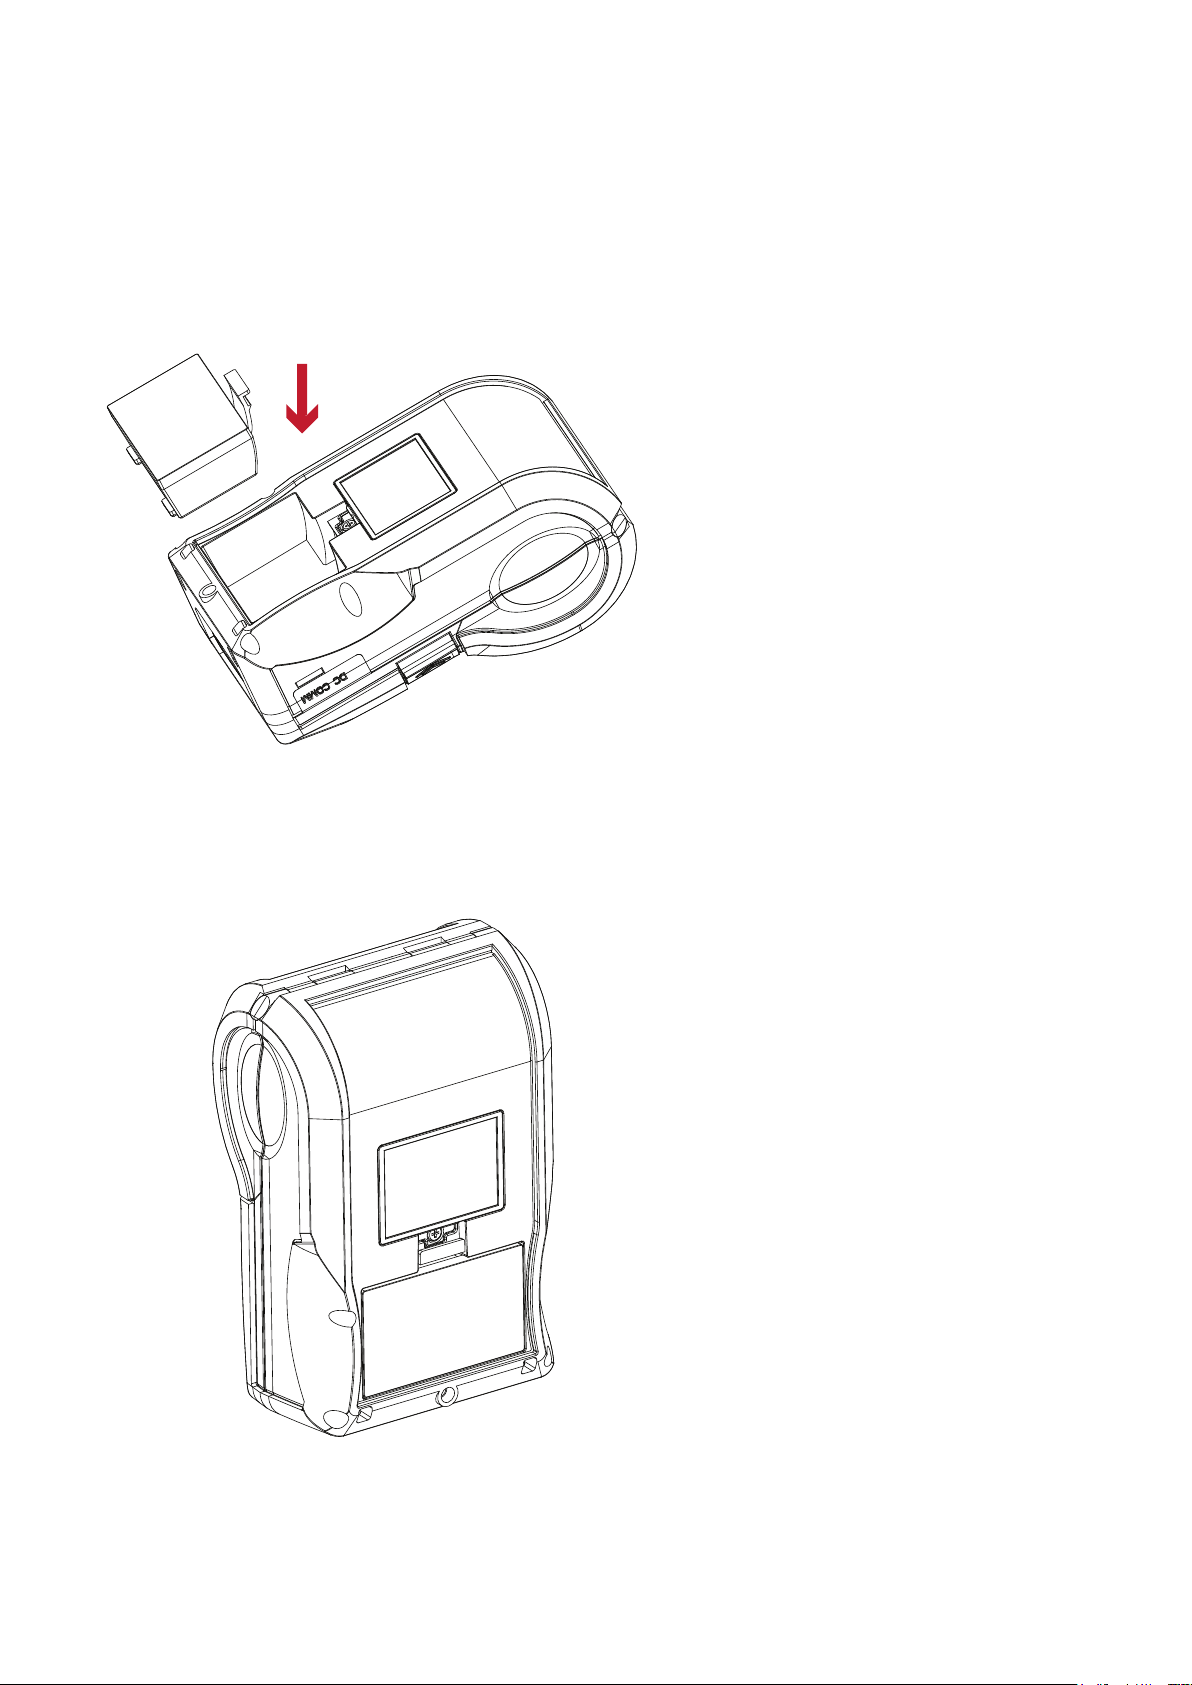
2.1 Battery Installation
Make sure to charge the battery for at least 3 hours prior to first use.
Insert the battery on the rear side of the printer,
aligning the battery hook properly.
Push the battery into the slot until
you hear a clicking sound.
Battery installation completed
4
Page 9
2 Printer Setup
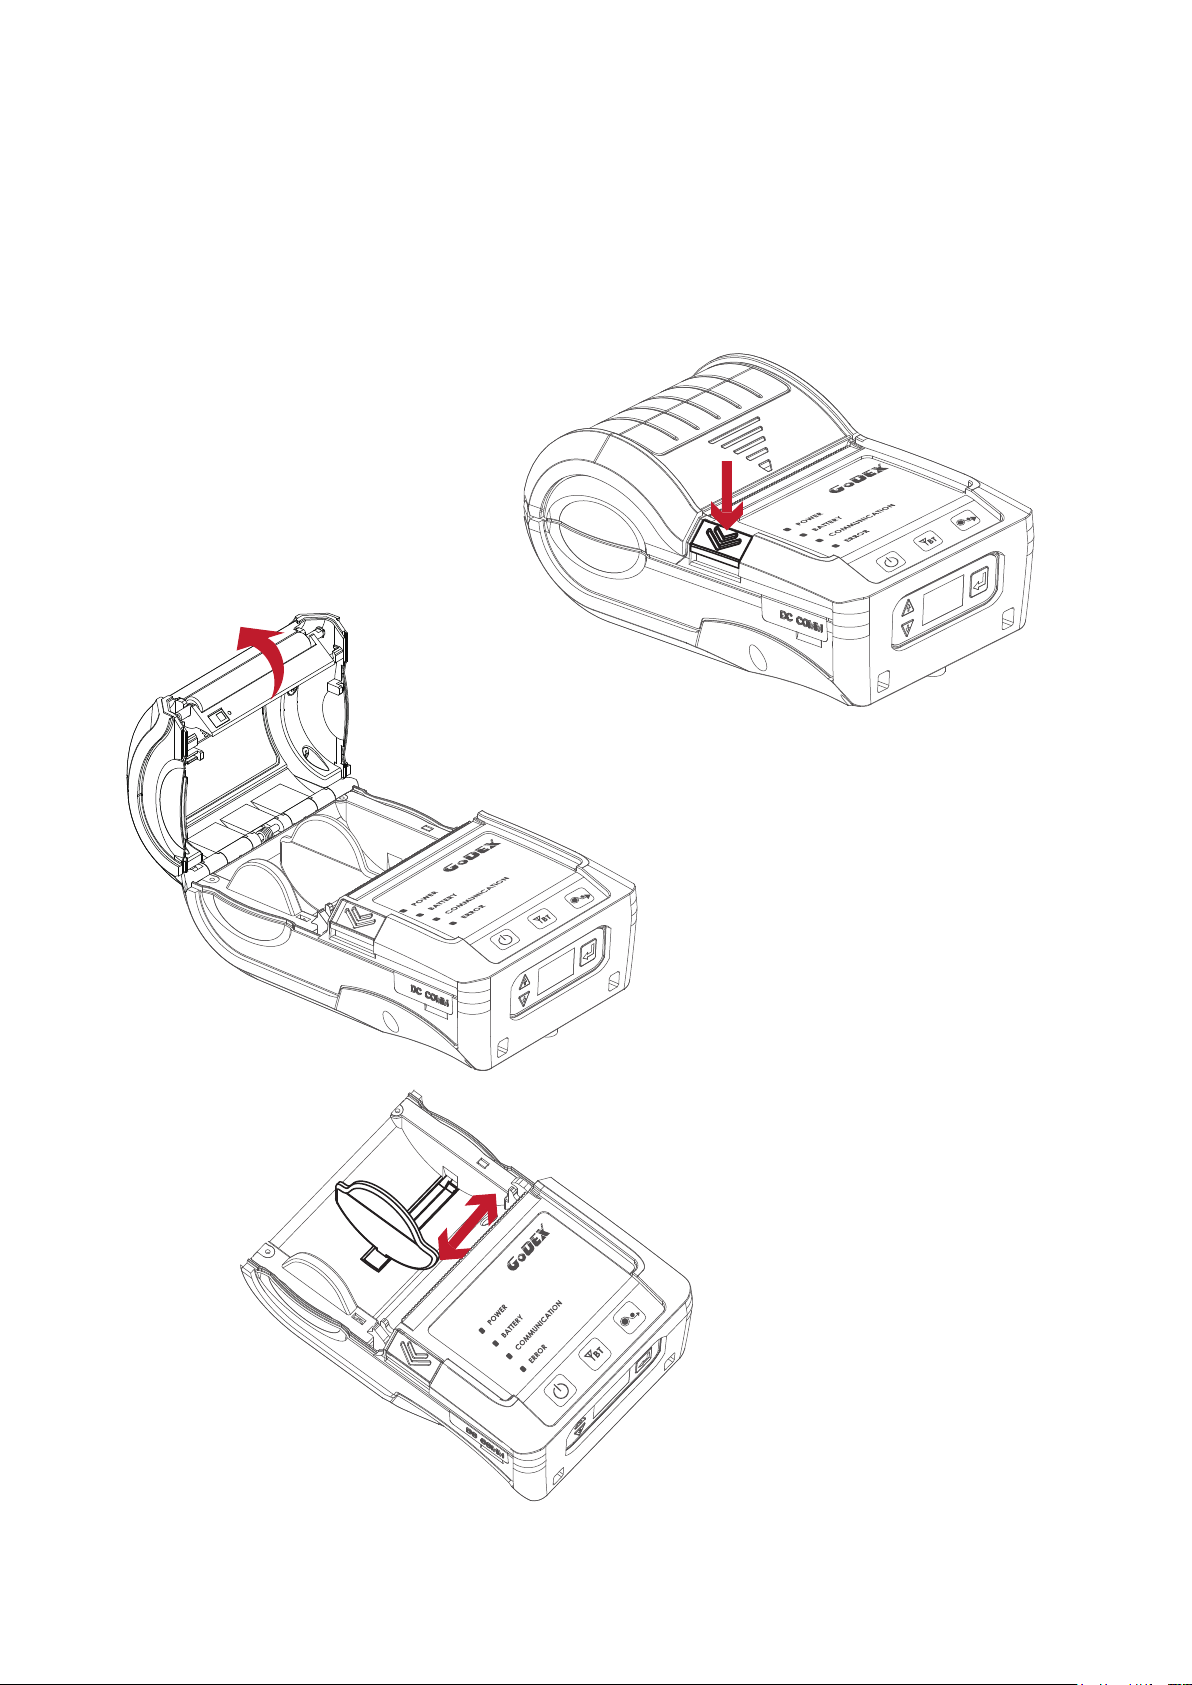
2.2 Paper Installation
The printer is set to Direct thermal transfer so no ribbon is required.
Place the printer on a flat surface
and press the button.
Top cover opened.
Label roll guide can be adjusted according to
label roll width.
5
Page 10
2 Printer Setup
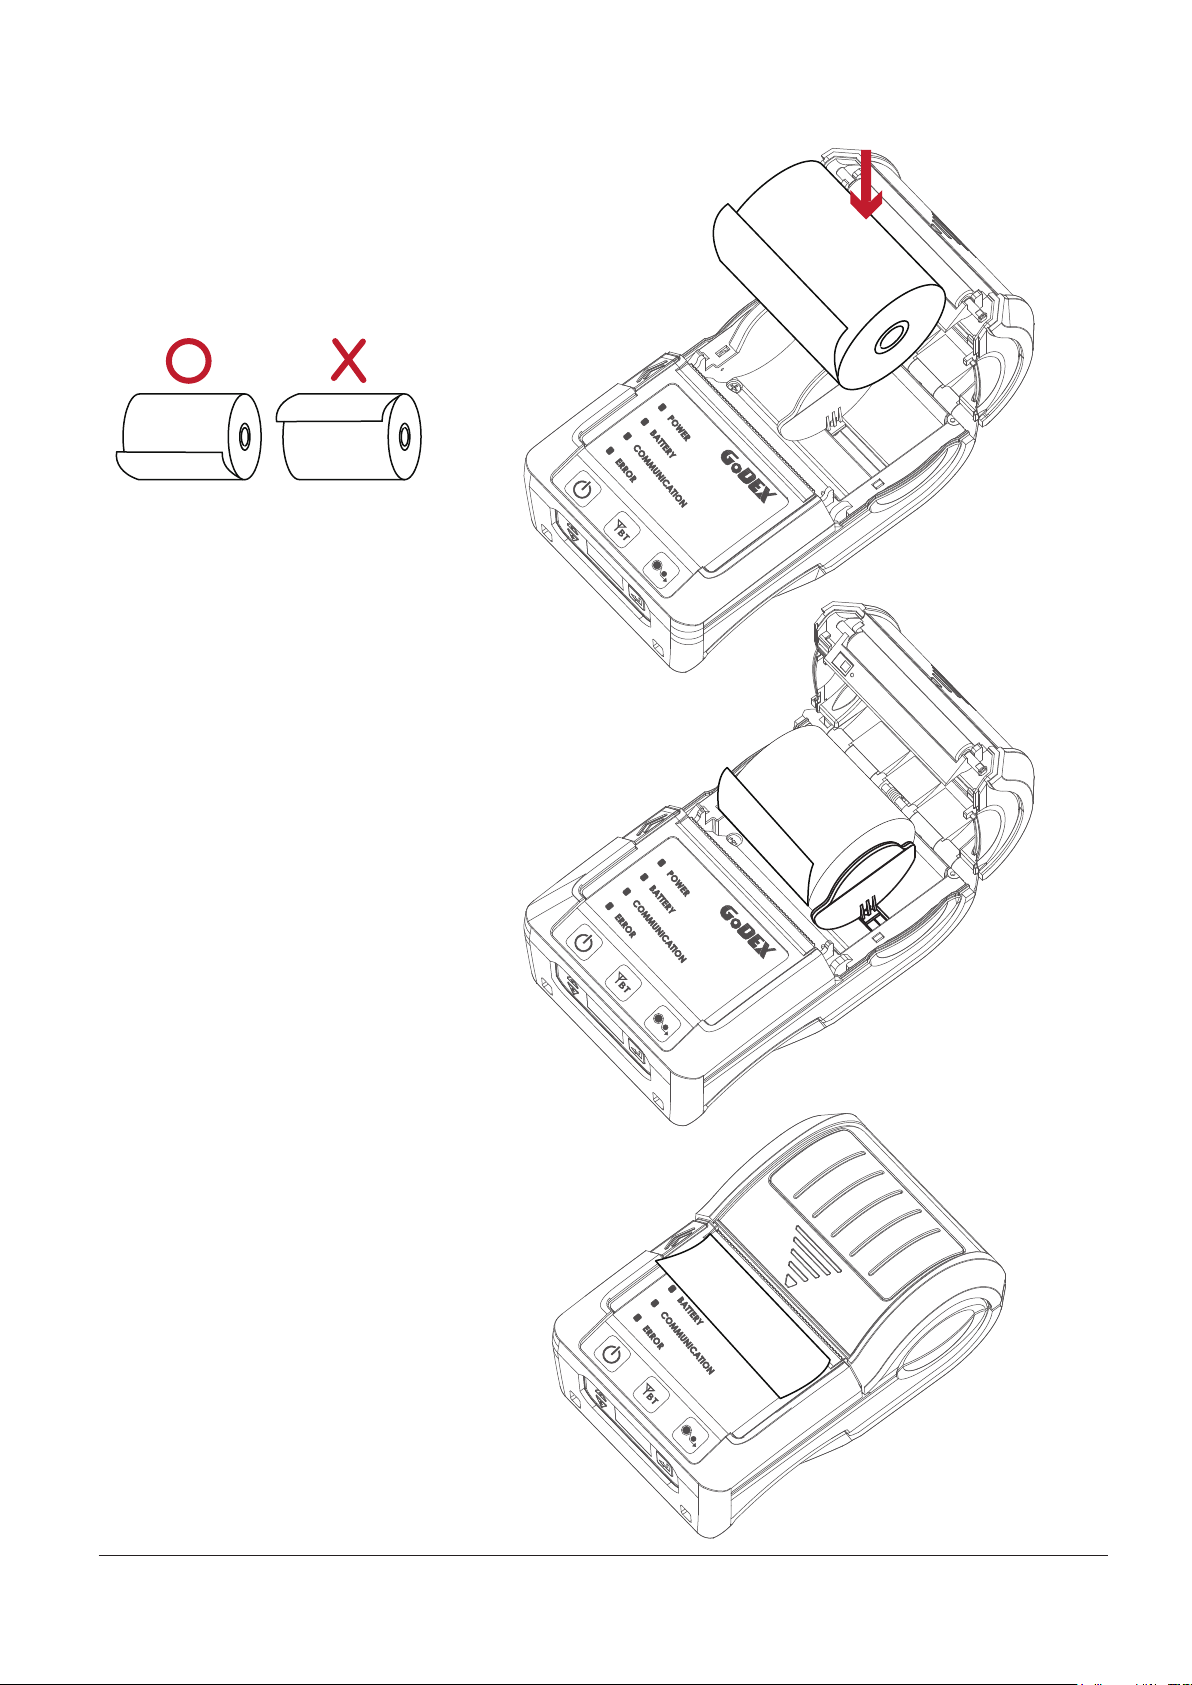
Insert the paper as shown in the image.
Pull the paper out and close the paper cover.
Tear off any excess paper in the direction
of the side of the printer.
Note
* When you move label roll guide, try to force near its bottom.
6
Page 11
2 Printer Setup
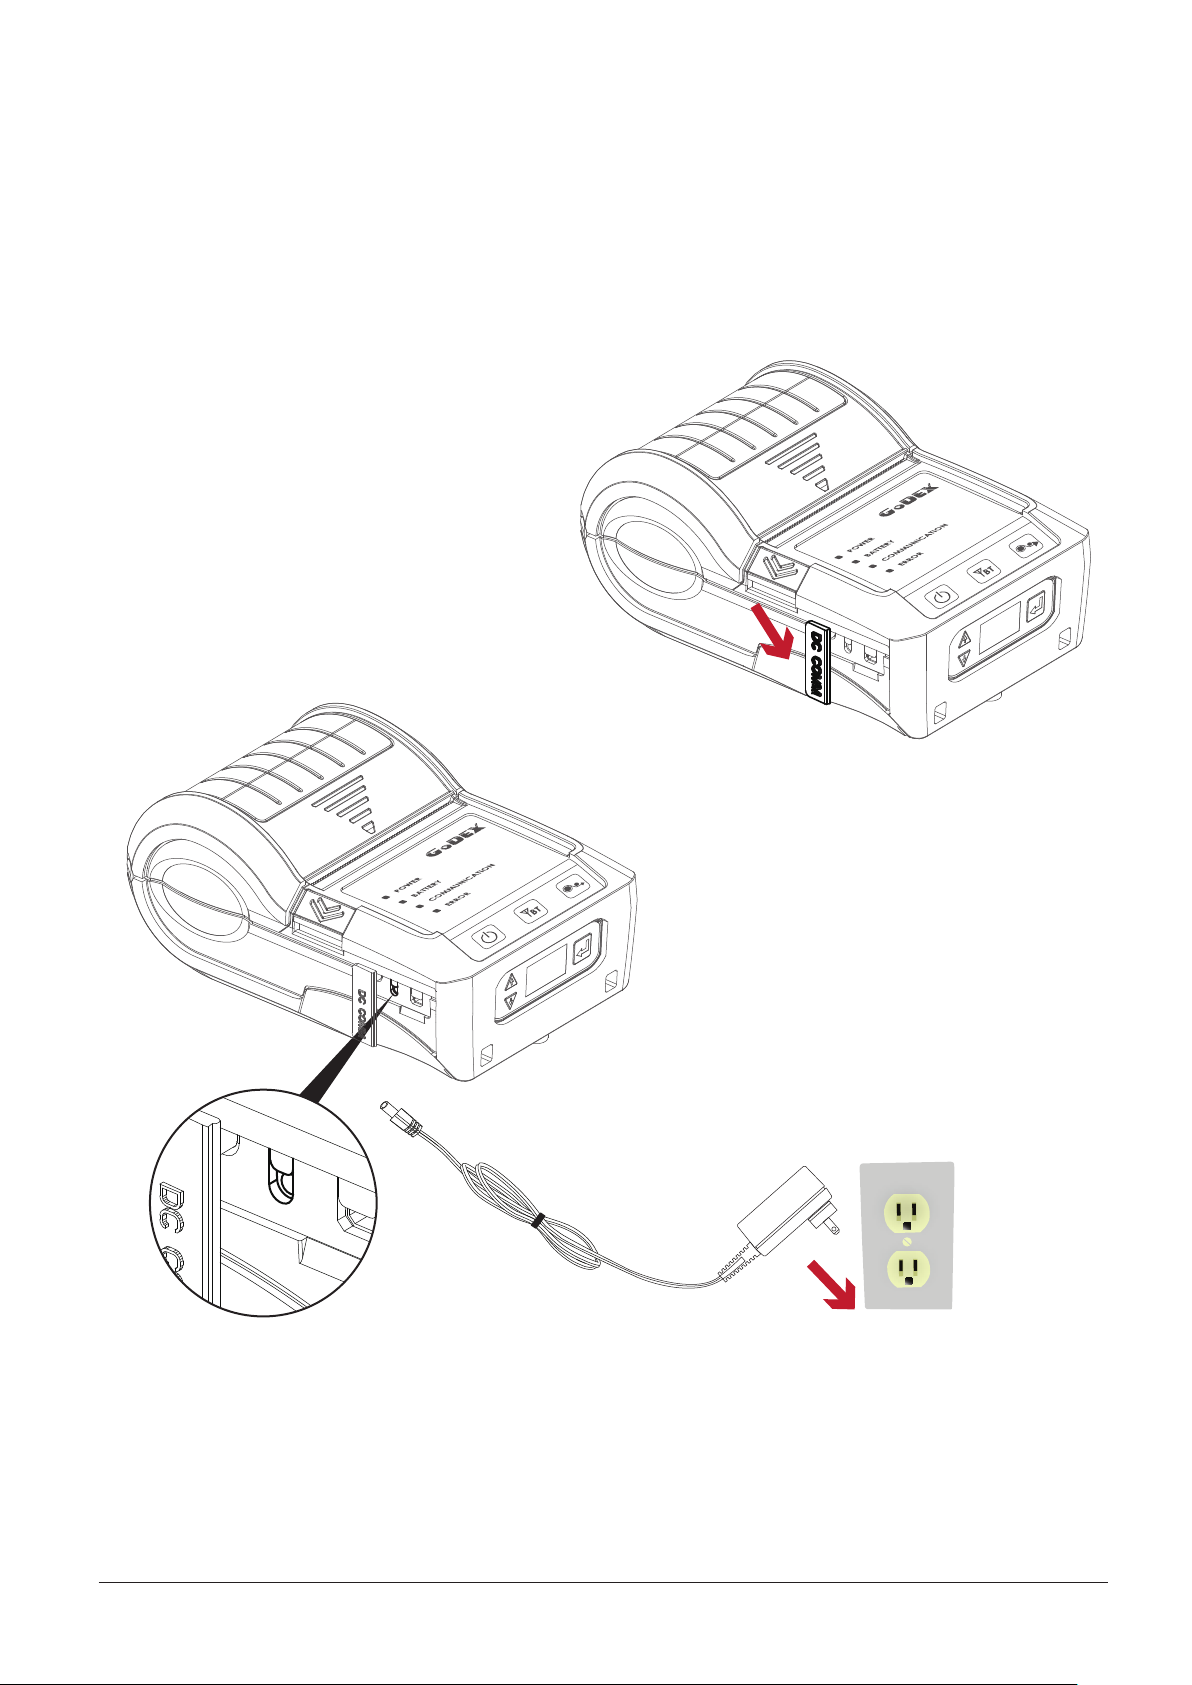
2.3 Battery Charging
1. Please make sure that the printer is switched off.
2. Connect the jack of the power adapter to the printer and connect the plug of the power adapter to the socket
of the wall.
3. Turn on the printer. The operator panel should now light up.
Open the external interface cap.
Note
* Charge the battery around 3 hours before use please. Charging the ambient temperature at 0℃ ~ 40℃.
** Closed the external interface cap when printer do not connect an adapter or cable for avoid dust away.
7
Page 12
2 Printer Setup
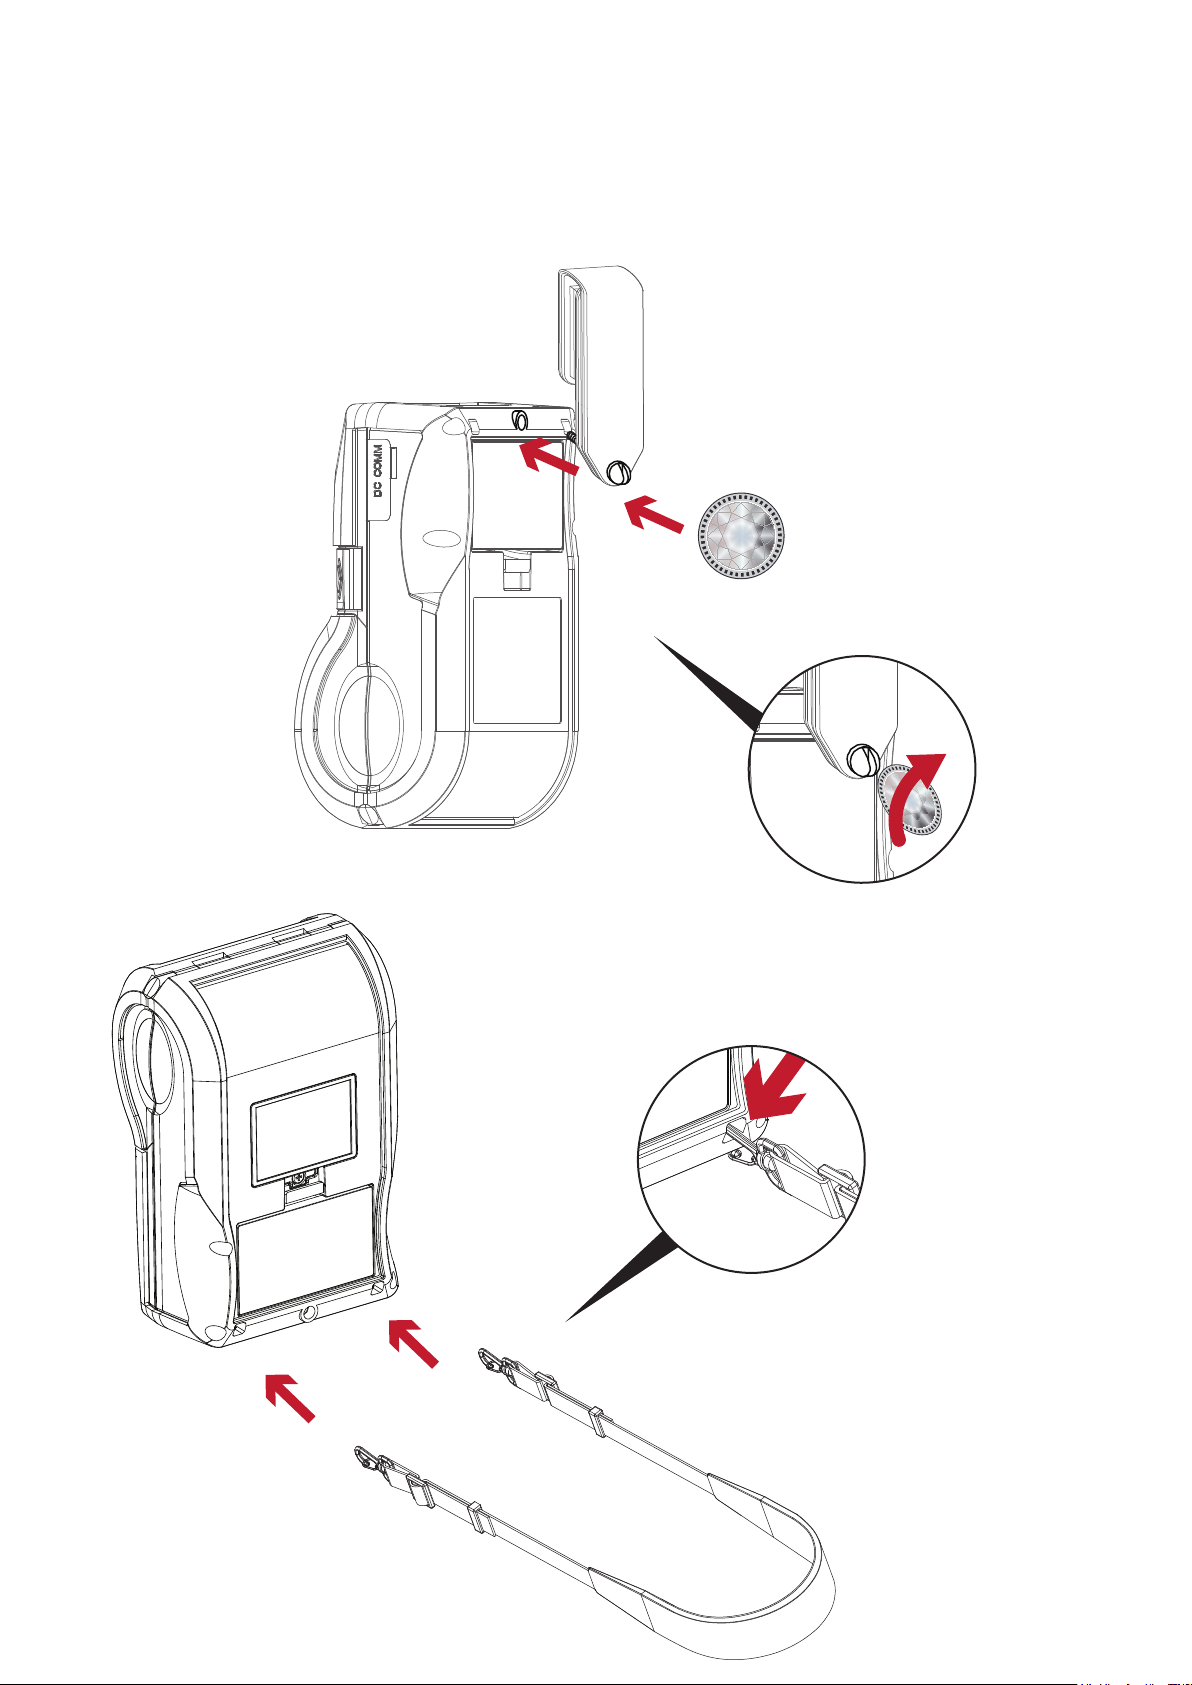
2.4 Belt Strap & Shoulder Strap Usage
MX20 Series
Use a coin to tighten the belt strap screw.
$
MX30 Series
Connect the clips of the shoulder strap to the printer.
8
Page 13
2 Printer Setup
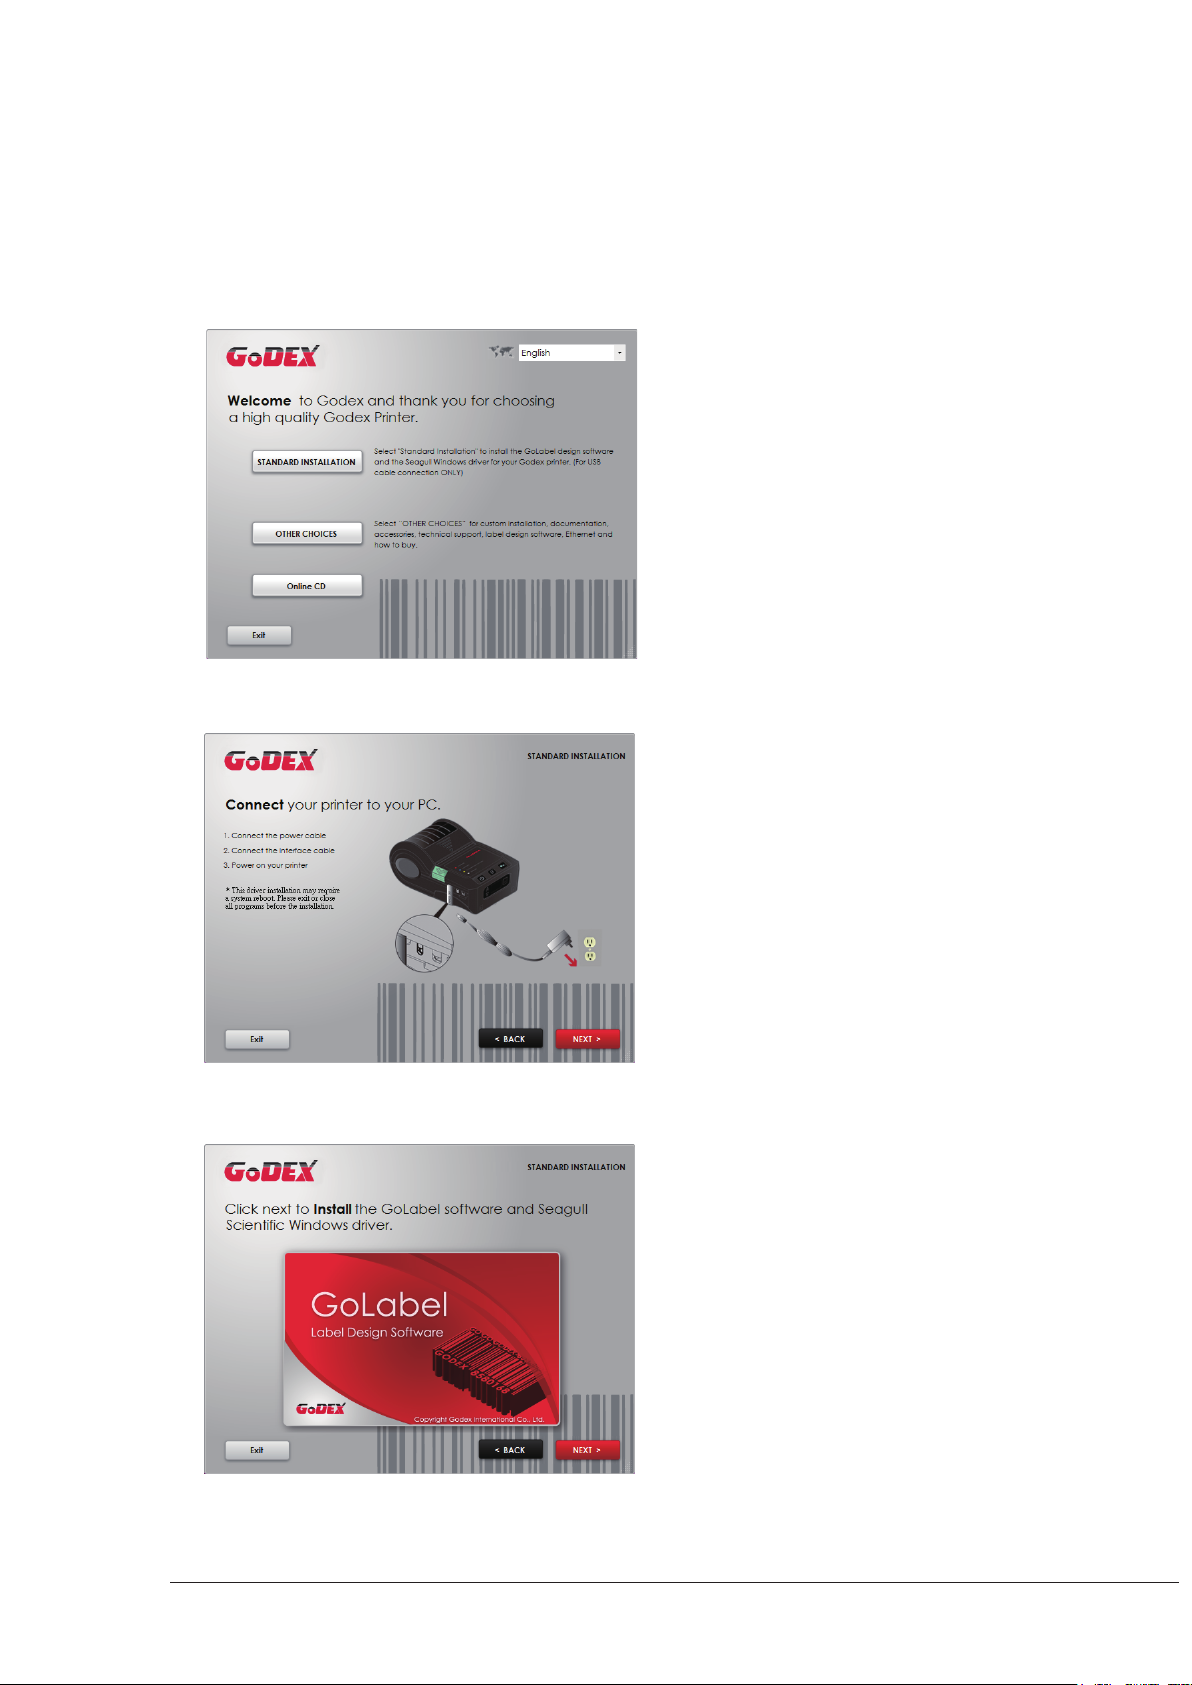
2.5
1. Insert the Super Wizard CD in the CD/DVD drive of the host computer and the installation program should pop up
automatically.
You will see the Welcome screen first. On the Welcome screen, choose “STANDARD INSTALLATION”.
2. The wizard will then ask you to make sure your USB and power cables are connected and that the power is
turned on. Then click “NEXT”.
Wizard CD Standard Installation
3. The next screen you will see is, “Install the GoLabel Software and Windows driver”. Click “NEXT” to continue.
Note
* If the Super Wizard program did not run automatically, you can either turn on the “Auto-run” setting for
your CD/DVD driver or double-click the icon of CD/DVD driver to run the program manually.
9
Page 14
2 Printer Setup
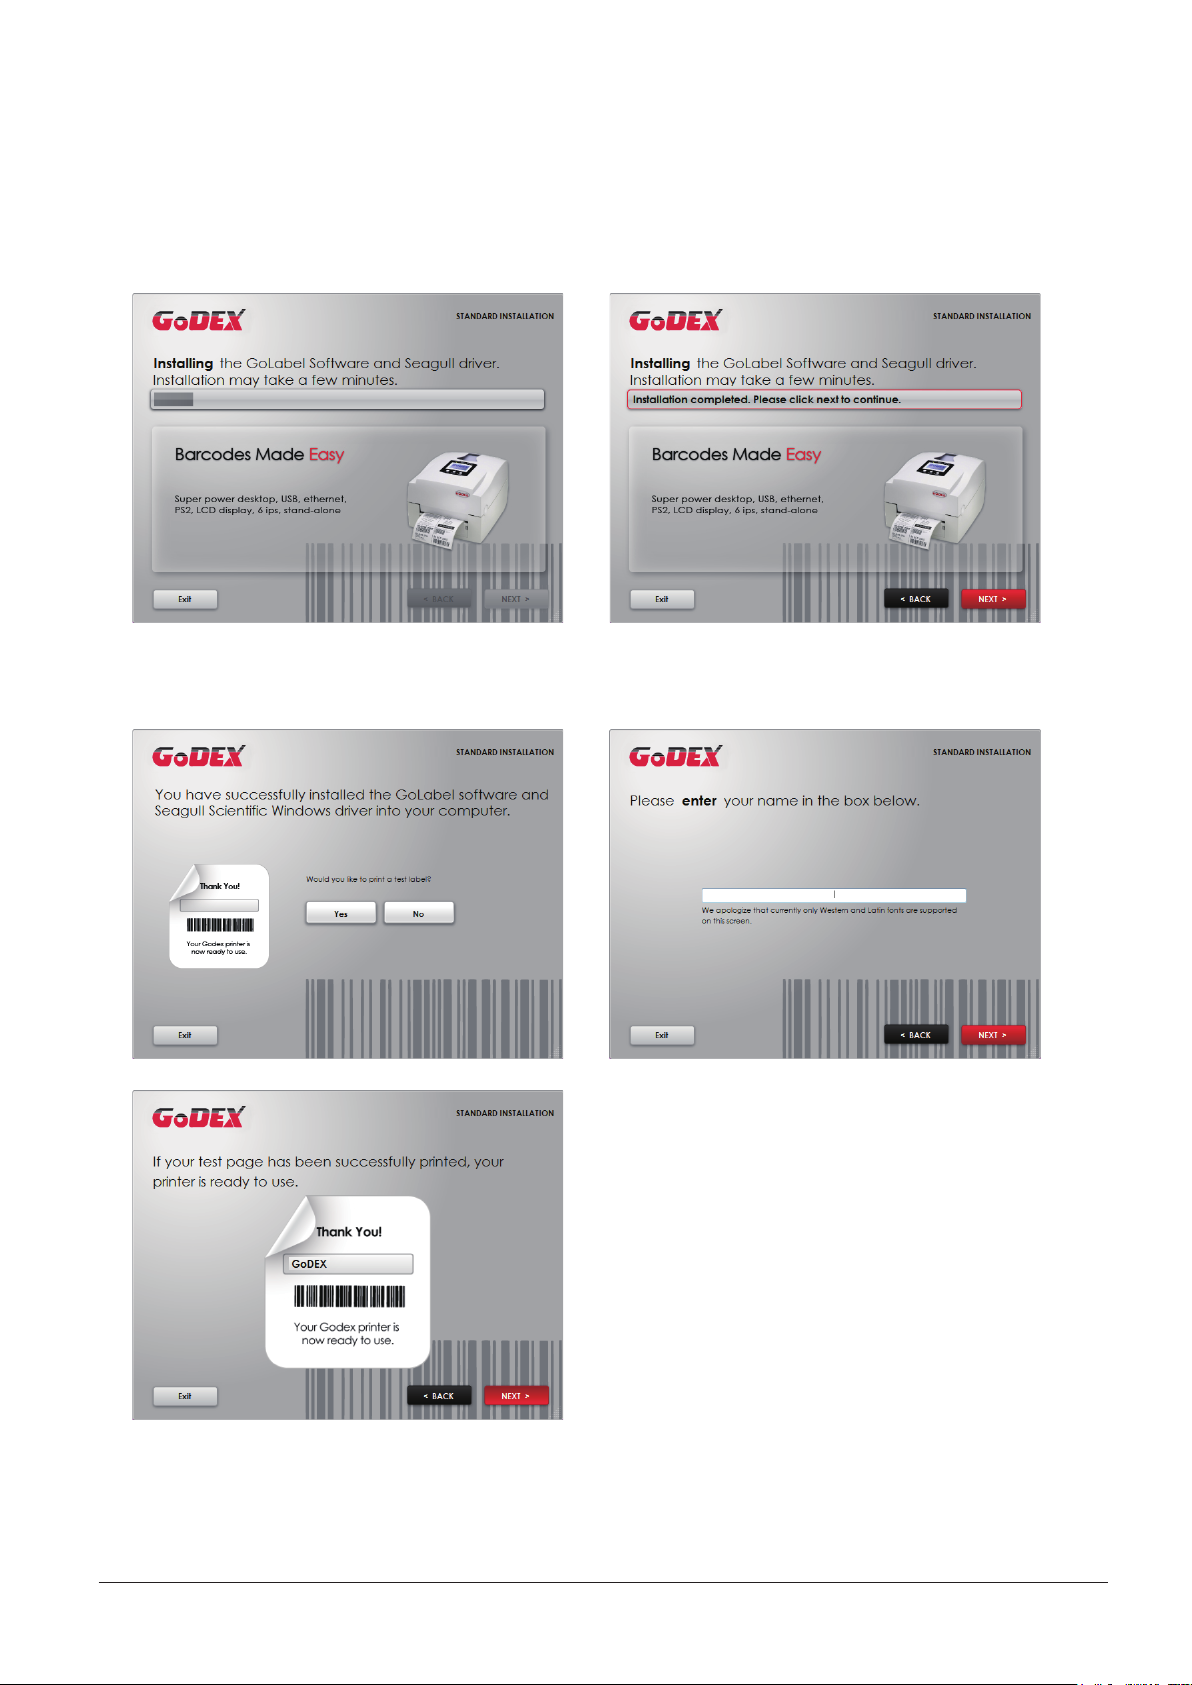
4. As the printer driver and GoLabel are installing, a screen will display a progress bar. While downloading
completed you will see Installation completed. Click “NEXT” to continue.
5. You can also print a test label. If don’t print a test label, the screen display as step 6.
Note
* If you need more resources, tools or reference documents, you can also find them on Super Wizard CD.
Just click “Other Choices” on the Welcome Screen to access the files.
10
Page 15
2 Printer Setup
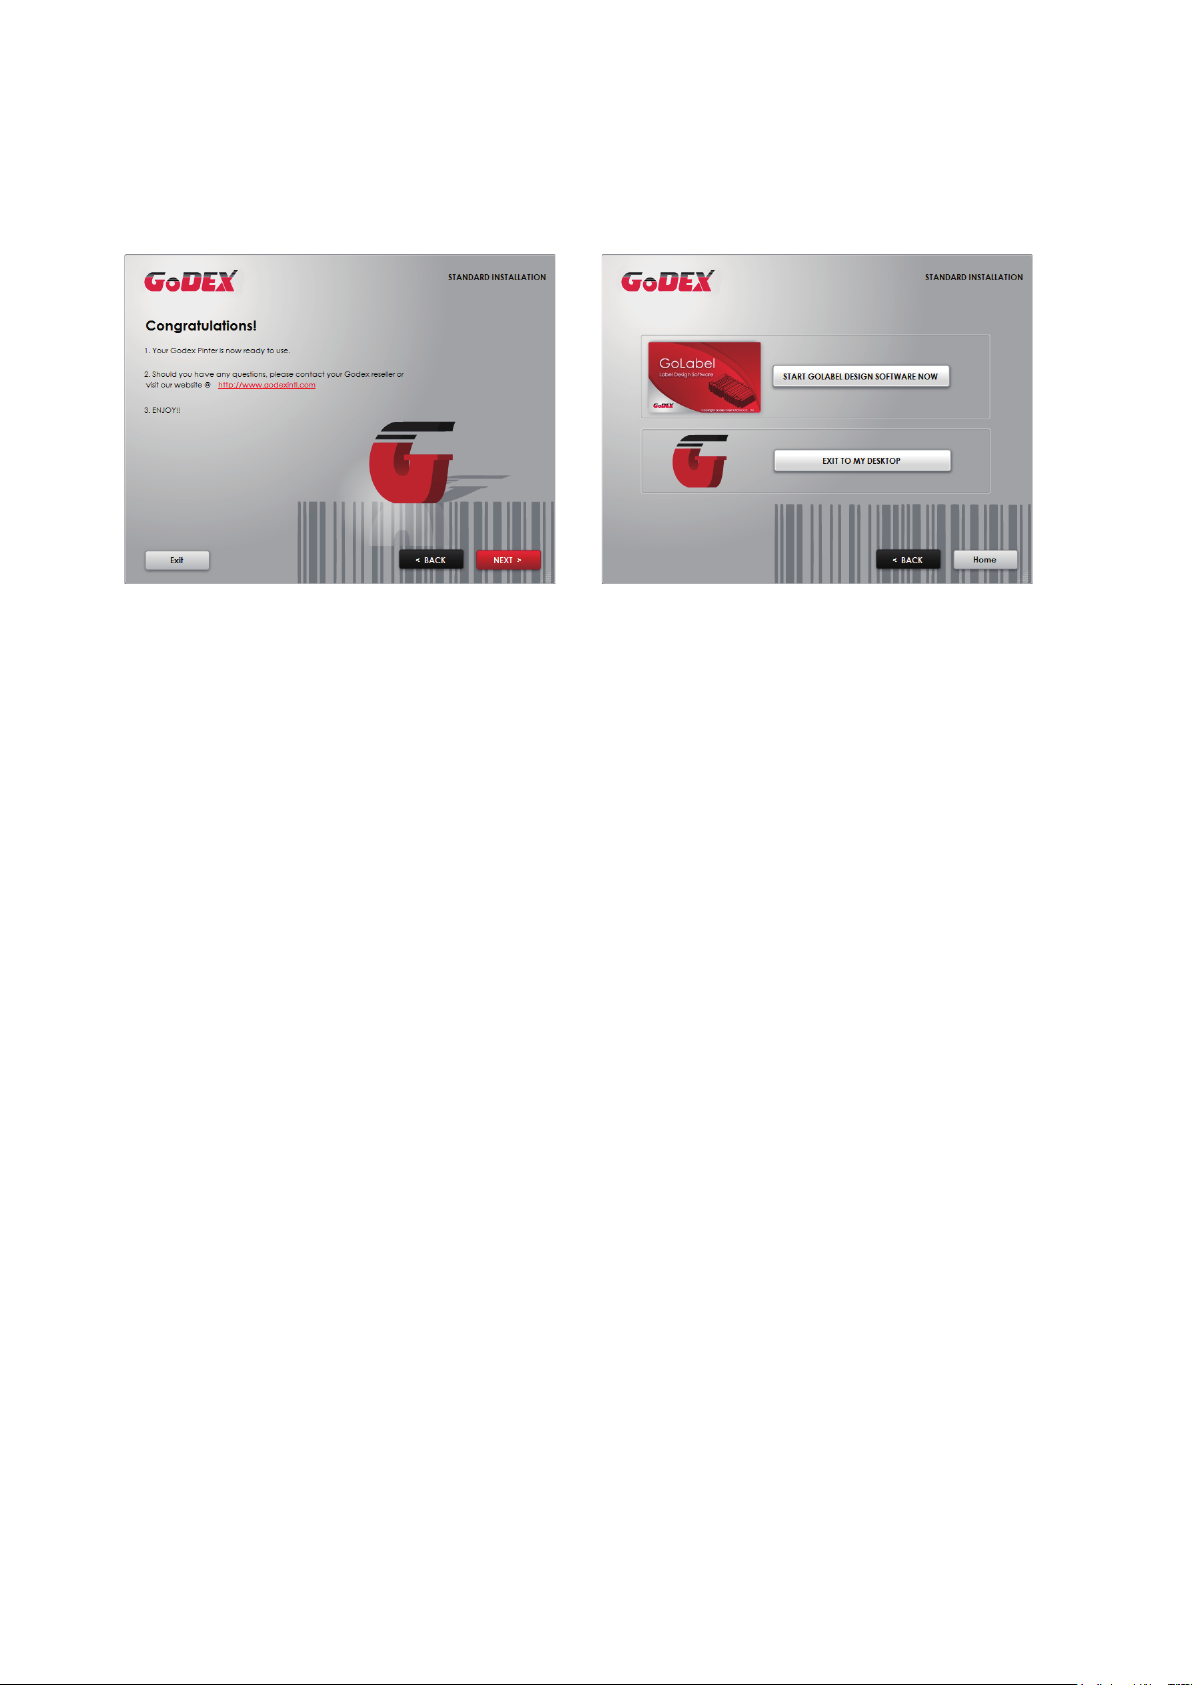
6. Once the installation is complete, you can start to make and print labels with GoLabel or through the printer driver.
11
Page 16

2 Printer Setup2 Printer Setup
2.6
1. Click “OTHER CHOICES” to next screen and select “PRINTER DRIVERS”.
2. Click “INSTALL SEAGULL SCIENTIFIC WINDOWS DRIVER” to next screen, and click “NEXT”.
Wizard CD Other Choice Installation
3. Select “I accept the terms in the license agreement”, and click ”Next”,then click ”Finish” to step 4.
12
Page 17

2 Printer Setup
4. The Driver Wizard will guide you through the installation procedure. Select "Install printer drivers" and click “Next”.
5. With a USB connection, search models such as the right diagram printer device. Specify your printer model
and click ”Next”.
6. Enter the printer name (you can use default), then click "Next" to display as right diagram.
Click "Finish" button to start installation.
13
Page 18

2 Printer Setup
7. Driver installation completed.
14
Page 19

3 Setting and Control for Operation Panel
3.1 Operation Panel
OPERATION PANEL
Power Button
Bluetooth Button
FEED Button
Up / Down Button
Enter Button
POWER Button
Press the POWER button to turn on the printer, and the POWER LED signal lights appears. While hear one “Beep sound”
, the LCD screen should display the message “GoDEX“ Logo on the screen.
When printer is turned on, hold and press down the POWER button for 3 second will turn the printer off.
FEED Button
Turn on the printer and press the FEED button.
When you press the FEED button, the printer will advance media until the FEED button is released.
If you are using continuous labels, pressing the FEED button will advance a length of media until the button is released.
If you are using media with gaps, pressing the FEED button once will advance only one label.
If the label does not stop at the correct position, you need to run the auto-detection function for your media,
please see Section 3.4 Label Calibration and Self-Test.
PAUSE PRINTING_FEED Button
Pressing the FEED button during printing will interrupt printing. While Error LED flash, the printer can’t receive commands.
When the FEED button is pressed again, the printer resumes printing. Example: While a 10-label print job is running, you
press the FEED button to pause the printer. Two of the labels have been printed. To resume printing and print the
remaining eight labels, you will need to press the FEED button again.
CANCEL PRINTING_FEED Button
Press and hold the FEED button for 3 seconds during printing cancels a print job. The current print job is cancelled.
Example: While a 10-label print job is running, you press the FEED button. Two of the labels have been printed.
The print job is cancelled and the remaining eight labels will not be printed.
15
Page 20

3 Setting and Control for Operation Panel
4 dual-color LED - Power On, Battery Capacity, Status Information (Wireless) , Status Information (Media):
POWER BATTERY COMMUNICATION ERROR
OFF Turn off
POWER
Turn on
BATTERY
COMMUNICATION
OFF
Standby Mode (5 sec flash one time)
Battery is recharging
Battery must be charged or replaced
OFF
Bluetooth ON
Transferring data
Automatic recovery after troubleshooting. Or push FEED button to clean up error status.
Without battery
Power off
Battery power supply as normal
Recharge finished
No connection
No data transmission
ERROR
OFF No
Paper out
Door open
Label sensing error
Printhead overheating
16
Page 21

3 Setting and Control for Operation Panel
3.2 LCD Interface Introduction
Getting Started
Press the POWER button to turn on the printer, and the START UP SCREEN appears.
Turn on the power
After the printer starts, GoDEX Logo will appear on the LCD screen, which means that the printer is ready
to print in the state. Use the printer's user interface can perform various operation, such action is set on
the main screen.
17
Page 22

3 Setting and Control for Operation Panel
Operations on Setting Page
On GoDEX page, press Enter Button, you will enter the SETTING PAGES for the function.
Enter Button
Press Enter Button to enter the
SETTING PAGES
On SETTING PAGES, press to select the setting items,you will enter the SETTING VALUE PAGES for the function.
Press back to previous page.
Darkness
19
18
Page 23

3 Setting and Control for Operation Panel
Darkness
0-19
ADJUST STOP POSITION
0-10
Reflective
See-Through
Auto
English
Deutsch
繁體中文
簡體中文
Français
Español
Italiano
T ürkçe
Off
On
Off
On
4800
9600
19200
38400
57600
115200
None
Odd
Even
7
8
1
2
3.3 Setting Items in Setting Mode
Self Test
SENSOR Media Type
Activate
LCD Language
日本語
850
852
437
860
863
865
857
861
862
Code Page
855
866
737
851
869
Windows 1250
Windows 1251
Windows 1252
Windows 1253
Windows 1254
Windows 1255
Windows 1257
BUZZER
TOP OF FORM
Baud Rate
COM PORT
Parity
Data Bits
Stop Bits
19
Page 24

3 Setting and Control for Operation Panel
3.4 Label Calibration and Self Test
Label Calibration
The printer can automatically detect and store label height.
That means the host computer does not need to transmit the label height to the printer.
Self Test
Self-test function lets you check whether the printer is functioning normally.
Here is how you run the label size calibration and self test.
1. Check that the label stock is loaded correctly.
2. Turn off the printer and pressing the FEED button.
3. Turn on the printer again, while pressing the FEED button. After waiting for the buzzer sounds twice,
the printer will now measure the label stock and store the label height.
4. Once the printer has successfully calibrated the label stock, it will print a self-test label.
The contents of a self-test printout are listed below.
Model & Version
USB ID setting
Serial port setting
Port status
(The default value is 1, which means that all ports open)
Number of forms
Number of graphics
Number of fonts
Number of Asian fonts
Number of Databases
Number of Scalable fonts
Free memory size
Speed, Density, Ref. Point, Print direction
Label width, Form length, Stop position
Cutter, Label Dispenser, Mode
Sensor Setting
Code Page
MX30i:VX.XXX
USB S/N:12345678
Serial port:96,N,8,1
PORT State L S E U B
1 1 1 1 1
#####################
0000 FORM(S) IN MEMORY
0000 GRAPHIC(S) IN MEMORY
000 FONT(S) IN MEMORY
000 ASIAN FONT(S) IN MEMORY
000 DATABASE(S) IN MEMORY
000 TTF(S) IN MEMORY
16616 KB FREE MEMORY
^S2 ^H19 ^R000 ~R200 ~Q+0
^W72 ^Q50,3 ^E10
Option:^D0 ^O0 ^AD
See:0.9 1.1 1.0[0.2_14]
Code Page:850
20
Page 25

3 Setting and Control for Operation Panel
3.5 Active / Sleep / Shutdown / Charge Mode
Sleep Mode = LED active. Power saving model.
Active Mode:
All functions active. On active mode, receiving a print job. Go to Sleep mode if no operation over 30~3600 seconds
in Active mode.
Sleep Mode:
Only FEED button functions active. Go to Shutdown mode if no operation and over 30~3600 seconds to forever in Sleep
mode.
Shutdown Mode:
All function off except Power button and battery charge. Wake up to Sleep mode by pressing the Power button.
Charge Mode:
Only charge function active when the battery is charging. When battery is fully charged, the battery LED will turn green.
21
Page 26

3 Setting and Control for Operation Panel
3.6 Bluetooth Connection Terminal
The printer can be connected to devices equipped with Bluetooth communication capability.
1. Press power button to turn on the printer.
2. Press Bluetooth button, bluetooth function is turned. So that the printer can be searched.
Terminal Equipment (Bluetooth function of the device must be turned on)
Pair with another Bluetooth device.
Note:
Do not press Bluetooth button while downloading and returning inforamtion through standard com port
or Bluetooth, otherwise the information may lose and malfunction of printer may occur.
22
Page 27

4 NetSetting for Ethernet
4.1 Installing the NetSetting software
The NetSetting software is used to manage the network configurations when connecting the printer via Ethernet port.
It is available on product CD or can be downloaded from official website. To install the NetSetting, please follow
below steps.
1. Insert the product CD in the CD/DVD drive, and click “OTHER CHOICES” buttom.
2. Select “ETHERNET”.
3. Click "Install Ethernet NetSetting Software", installation screen as right diagram, click "Next".
4. Specify the “Installation Folder", then click ”Next” to installing.
23
Page 28

4 NetSetting for Ethernet
5. Once the installation is completed, you will see the NetSetting icon on your desktop as right diagram.
NetSetting
24
Page 29

4 NetSetting for Ethernet
4.2 The Interface of NetSetting
GoDEX printer can also be used through a network connection (as a remote network printer), make sure the printer
connected to the Internet and the power cord, you can use the Interface of NetSetting to search connected
network printers.
1. Click the NetSetting icon to start the program, you will see the start page as left diagram. Click the magnifier icon
to search the Godex printers which are connected via Ethernet port in you network environment (as right diagram).
2. There are six tabs on the top of interface which can configure different types of network settings. But for the data
security reason, you need correct password to enter the configuration pages.
Note
* The default password is “1111”, you can change the password later from the “IP Setting” tab.
25
Page 30

4 NetSetting for Ethernet
IP Setting
The IP Setting tab can change the printer name, Port number, Gateway setting and the password for configuring
theprinter. You can also set the printer’s IP address ether by DHCP or by Static IP.
You can press “Set” button to apply the settings and “ReGet” button to refresh the setting values.
Note
* To fully benefit from the NetSetting software, you should be familiar with basic networking principles. Please
contact your network administrator for related network setting information.
* When enabling DHCP, if you find the IP Address as: IP = 169.254.229.88, Netmask = 255.255.0.0,
Gateway = invariable (last value), the IP Address is invalid.
26
Page 31

4 NetSetting for Ethernet
Alert Path Setting
NetSetting will send the alert messages to designated mail account when the error happened on printer.
The alertmessages are sent by SMTP (Simple Mail Transfer Protocol) or SNMP (Simple Network Management Protocol).
You can set or change the configurations of SMTP and SNMP on this “Alert Path Setting” tab.
You can press “Set” button to apply the settings and “ReGet” button to refresh the setting values.
27
Page 32

4 NetSetting for Ethernet
Alert Message Setting
For the alert message notification function, you can decide which error cases need to be sent out to the operator.
Moreover, the alert messages can be set to be sent by SMTP, SNMP or both.
You can press “Set” button to apply the settings and “ReGet” button to refresh the setting values.
28
Page 33

4 NetSetting for Ethernet
Printer Configuration
Set or change the configurations of connected printer. Most of key settings for the printer operation can be done by
this setting page.
You can press “Set” button to apply the settings and “ReGet” button to refresh the setting values.
29
Page 34

4 NetSetting for Ethernet
User Command
The “User Command” tab provides a communication interface for operator to control the printer. Input printer
commands in "Input Command" window and press “Send Command” button, the commands will be sent to the printer.
For some commands that will return response message, the message will be displayed in "Output Message" window.
You can press “Send Command” button to send printer commands via Ethernet port and control the printer remotely.
30
Page 35

4 NetSetting for Ethernet
Firmware Download
On “Firmware Download” tab, the current version of printer firmware will be showed on the screen. If you need
to update the printer firmware, just specify the file location of firmware file and press “Start Download Firmware”
button. The printer firmware then can be updated remotely.
In addition to the firmware update, you can press “Recover To Factory Settings” button to restore the printer
configurations back to factory default.
31
Page 36

5 Accessories
5.1 Charger
1. Connect the AC adpter to the Charger.
2. Insert the battery into the Charger as shown in the figure the below.
3. Gently slide the battery until it reaches the bottom of the charger.
4. Charging starts as soon as the battery is completely inserted.
MX20 SeriesMX30 Series
Red Light On
Green Light On
Red Light Blinking
Charge StatusLight
Charging
Fully Charged
Battery Defective
Charge Time
Within 3 hours
Note
* If the red light of the charger blinks, install the battery again.
** If the red light continues to blink despite several attempts(4~5 times) to install the battery, contact your local dealer.
*** The charging time may vary depending on the type of the charger or room temperature.
****This battery has a protection mechanism in the battery overcharge or over discharge.
32
Page 37

5 Accessories
5.2 Car Charger and RS-232 Cable
1. Please make sure that the printer is switched off.
(Connect the car charger to your car’s cigarette lighter jack.)
2. Open the external interface protection cap.
3. Connect the mini USB cable(battery charger) to the power connector.
1
Power Connector
2
This RS232 & USB Port
only support signal transmission,
no charge function.
33
3
Page 38

5 Accessories
5.3 Protective Case
Unzip to open up the protective case and insert your printer into the protective case
as shown in the figure on the below.
1
2
3
Open the paper discharger when using the printer.
34
4
Connect the clips of the leather case
with the shoulder strap.
Page 39

6 Maintenance and AdjustmentS
6.1 Cleaning the Thermal Print Head
Dirt on the print head, or glue residue from the label stock may result in inadequate print quality. The printer
cover must therefore always be closed during printing. Keeping dirt and dust away from the paper or labels ensures a
good print quality and a longer lifespan of the print head.
Cleaning Steps
Here is how to clean the print head.
1. Turn off the printer.
2. Open the printer cover.
3. To remove any label residue or other dirt from the print head, please use a soft lint-free cloth dipped with
some alcohol.
PRINT HEAD
Note
****Weekly to clean the print head one time. (Recommended)
*** When cleaning the print head, please note that if there is attached to metal or hard on soft cloth, if using a dirty
soft cloth made printer head damage is not covered under warranty conditions.
35
Page 40

6 Maintenance and Adjustment
6.2 Troubleshooting
Problem Solution
The printer is switched on but the LED
does not light up.
The LED lights up red and printing is
interrupted.
The paper roll passes through the printer
but no image is printed.
The label stock jams during printing.
There is no printed image on some parts
of the label.
There is no printed image on part of the
label or the image is blurred.
♦ Check if the battery is full charged.
♦ Check the software settings (driver settings) or command codes.
♦ Look for the error alert in the table in Section Error Alerts.
♦ Check whether the print mechanism is closed correctly.
♦ Please make sure that the paper roll is loaded the right side up
and that it is a suitable material.
♦ Choose the correct printer driver.
♦ Choose the correct paper roll and a suitable printing mode.
♦ Clear the paper jam. Remove any label material left on the
thermal print head and clean the print head using a soft lint-free
cloth dipped in alcohol.
Please see the Section 5.1
♦ Check whether any label material is stuck to the thermal
print head.
♦ Check for errors in the application software.
♦ Check whether the starting position has been set incorrectly.
♦♦ Check the paper for wrinkles.
Check the power supply is correct
♦ Check the thermal print head for dust or other dirt.
♦ Use the internal “~T” command to check whether the thermal print
head will carry out a complete print job.
♦ Check the quality of the print medium.
The printed image is positioned
incorrectly.
A label is missing during printing.
The printed image is blurred.
Note
♦ Check whether there is paper or dust covering the sensor.
♦ Check whether the label stock is suitable. Contact your supplier.
♦ Check the paper guide settings.
♦ Check the label height setting.
♦ Check whether there is dust covering the sensor.
♦ Run the auto-detection function.
♦ Check the darkness setting.
♦ Check the thermal print head for dust or dirt.
Please see the Section 5.1
**** If this does not resolve the problem, contact your dealer.
36
Page 41

MX20/MX30/MX30i
USER MANUAL
APPENDIX
PRODUCT SPECIFICATIONS
GPOS simulation or EZPL / GZPL / GEPL simulations
MX20
CE EMC, FCC part 15B class B, FCC Part 15C, CCC, SRRC, NCC, CB, UL, cUL
5.1” (129.55 mm)
2.0“ (51 mm)
3.3” (84 mm)
0.72 lbs (325g, with Battery, without protective case)
Options
Shoulder Strap, Li-ion battery, Battery charger station, Car charger adapter, RS-232 cable,
Protective case
Notice
Specifications are subject to change without notice. All company and/or product names are trademarks and/or registered
trademarks of their respective owners.
** Minimum print height and maximum print speed specification compliance can be dependent on non
variables such as label type, thickness, spacing, liner construction, etc. Godex is pleased to test non
minimum print height and maximum print speed capability.
01
Page 42

MX20/MX30/MX30i
USER MANUAL
APPENDIX
PRODUCT SPECIFICATIONS
MX30iMX30
N/A
WiFi (IEEE 802.11b/g/n)
RS-232 cable
Li-ion battery
Protective case
Battery charger station、Car charger adapter
Graphic OLED 128 x 64 dots with 3 buttons for Up,
Down and Enter functions
StandardN/A
1.47lbs (670g, with battery, without protective case)1.45lbs (660g, with battery, without protective case)
Notice
Specifications are subject to change without notice. All company and/or product names are trademarks and/or registered
trademarks of their respective owners.
** Minimum print height and maximum print speed specification compliance can be dependent on non
variables such as label type, thickness, spacing, liner construction, etc. Godex is pleased to test non
minimum print height and maximum print speed capability.
02
Page 43

MX20/MX30/MX30i
USER MANUAL
APPENDIX
Pinout Description
USB Port (mini-B Type)
INTERFACE
Pin No.
Function
1
GND
2
VBUS
D-
3
4
D+
5
TXD
6
CTS
7
RXD
8
RTS
03
Page 44

MX20/MX30/MX30i
USER MANUAL
Appendix
MX 30/30i WiFi Setting
Wireless
1.1
1.1
Checkt the
Checkt the
Connect MX30/30i Wireless Module to Wireless Access Point,
Connect MX30/30i Wireless Module to Wireless Access Point,
and then connect the Module to the Mobile phones or computers
and then connect the Module to the Mobile phones or computers
through network.
through network.
About the parameters of wireless access point, please refer to the figure below ( Example : D-Link AP)
Wireless
Access Point Setting Value
Access Point Setting Value
Security
SSID
04
PRE-SHARED KEY
Page 45

MX20/MX30/MX30i
USER MANUAL
Appendix
MX 30/30i WiFi Setting
1.2 Set up MX 30/30i Wireless Network through Godex WiFi tool
Step 1. Connect MX 30/30i and computer by USB cable
Step 2. Turn on MX 30/30i
Step 3. Start Golabel
Step 4. Select printer model to MX30/30i (see the screenshot below)
Step 5. Click “WiFi Setting” icon
(see the screenshot below)
05
Page 46

MX20/MX30/MX30i
USER MANUAL
Appendix
MX 30/30i WiFi Setting
wireless access point
Step 6. Input
Step 7. Click “Set Data”icon, and the printer will reboot
parameter
s of
(see the
screenshot
below)
Select
SSID
Security
PRE-SHARED KEY
PS : If printer doesn’t reboot after a few seconds and 3 beeps are not heard, please repeat the steps from chapter 1.2)
06
Page 47

MX20/MX30/MX30i
USER MANUAL
Appendix
MX 30/30i WiFi Setting
1.3 Activate DHCP function for MX30/30i
1. First of all, configure DHCP function through USB
Steps : Click “Generic” Click“Printer Setup” Select “USB port/GoDEX MX30/30i”
Click “Save ”
2. Obtain the printer IP address through WiFi Setting
(Please refer to the
screenshot below)
06
 Loading...