

Page 1

GoLabel On-line Help
Contents
1. Introduction.................................................................................................................................................................... 2
1.1 Startup ....................................................................................................................................................................................................... 2
1.2 Main Display Screen ................................................................................................................................................................................... 2
2. Working Environment ................................................................................................................................................... 3
2.1 General....................................................................................................................................................................................................... 3
2.2 Command Area .......................................................................................................................................................................................... 3
3. GoLabel Tool Sets ......................................................................................................................................................... 4
3.1 Generic Toll Set .......................................................................................................................................................................................... 4
3.2 Advance Tool Set ........................................................................................................................................................................................ 5
3.3 Object Tool Set ........................................................................................................................................................................................... 6
4. General Operation ....................................................................................................................................................... 7
4.1 Creating First Label..................................................................................................................................................................................... 7
4.2 Open an Existing File .................................................................................................................................................................................. 8
4.3 Change Printer Setting ............................................................................................................................................................................... 9
4.4 Setup Database Printing ........................................................................................................................................................................... 10
4.5 Select Label Size and Media Type ............................................................................................................................................................. 12
4.6 Printer Interface Setup ............................................................................................................................................................................. 15
4.7 Text Setup - Key in a Text into the Label ................................................................................................................................................... 16
4.8 Using the Fonts Provided by Windows ..................................................................................................................................................... 19
4.9 Create a Barcode ..................................................................................................................................................................................... 21
4.10 Drawing Line, Rectangle and Circle .......................................................................................................................................................... 35
4.11 Create Graphic ................................................................................................ ......................................................................................... 40
4.12 Lock Object .............................................................................................................................................................................................. 41
5. Advance Operation................................................................................................................................................... 42
5.1 Command Format ................................................................................................................................................................................... 42
5.2 Using Serial Number ................................................................................................................................................................................ 43
5.3 Using Variable .......................................................................................................................................................................................... 46
5.4 Date Time setting .................................................................................................................................................................................... 49
5.5 Database Linkage .................................................................................................................................................................................... 51
5.6 Printer with LAN Port .............................................................................................................................................................................. 54
5.7 Download Graphic/Font/Label/DBF/Cmd ............................................................................................................................................... 56
5.8 USB Disk Access Function ........................................................................................................................................................................ 62
6. Barcode Application ................................................................................................................................................. 68
6.1 EAN-128 / GS1 Databar with AI ............................................................................................................................................................... 68
7. Further Advance To ol Set .......................................................................................................................................... 71
7.1 Printer Control ......................................................................................................................................................................................... 71
7.2 Virtual Terminal ....................................................................................................................................................................................... 72
1 V1.002f
Page 2
GoLabel On-line Help
1. Introduction
1.1 Startup
Click [Begin] on Windows Desk and select “GoLabel” software program to run it. Or, just click the Icon on
the Windows desk, and start to execute GoLabel program.
1.2 Main Display Screen
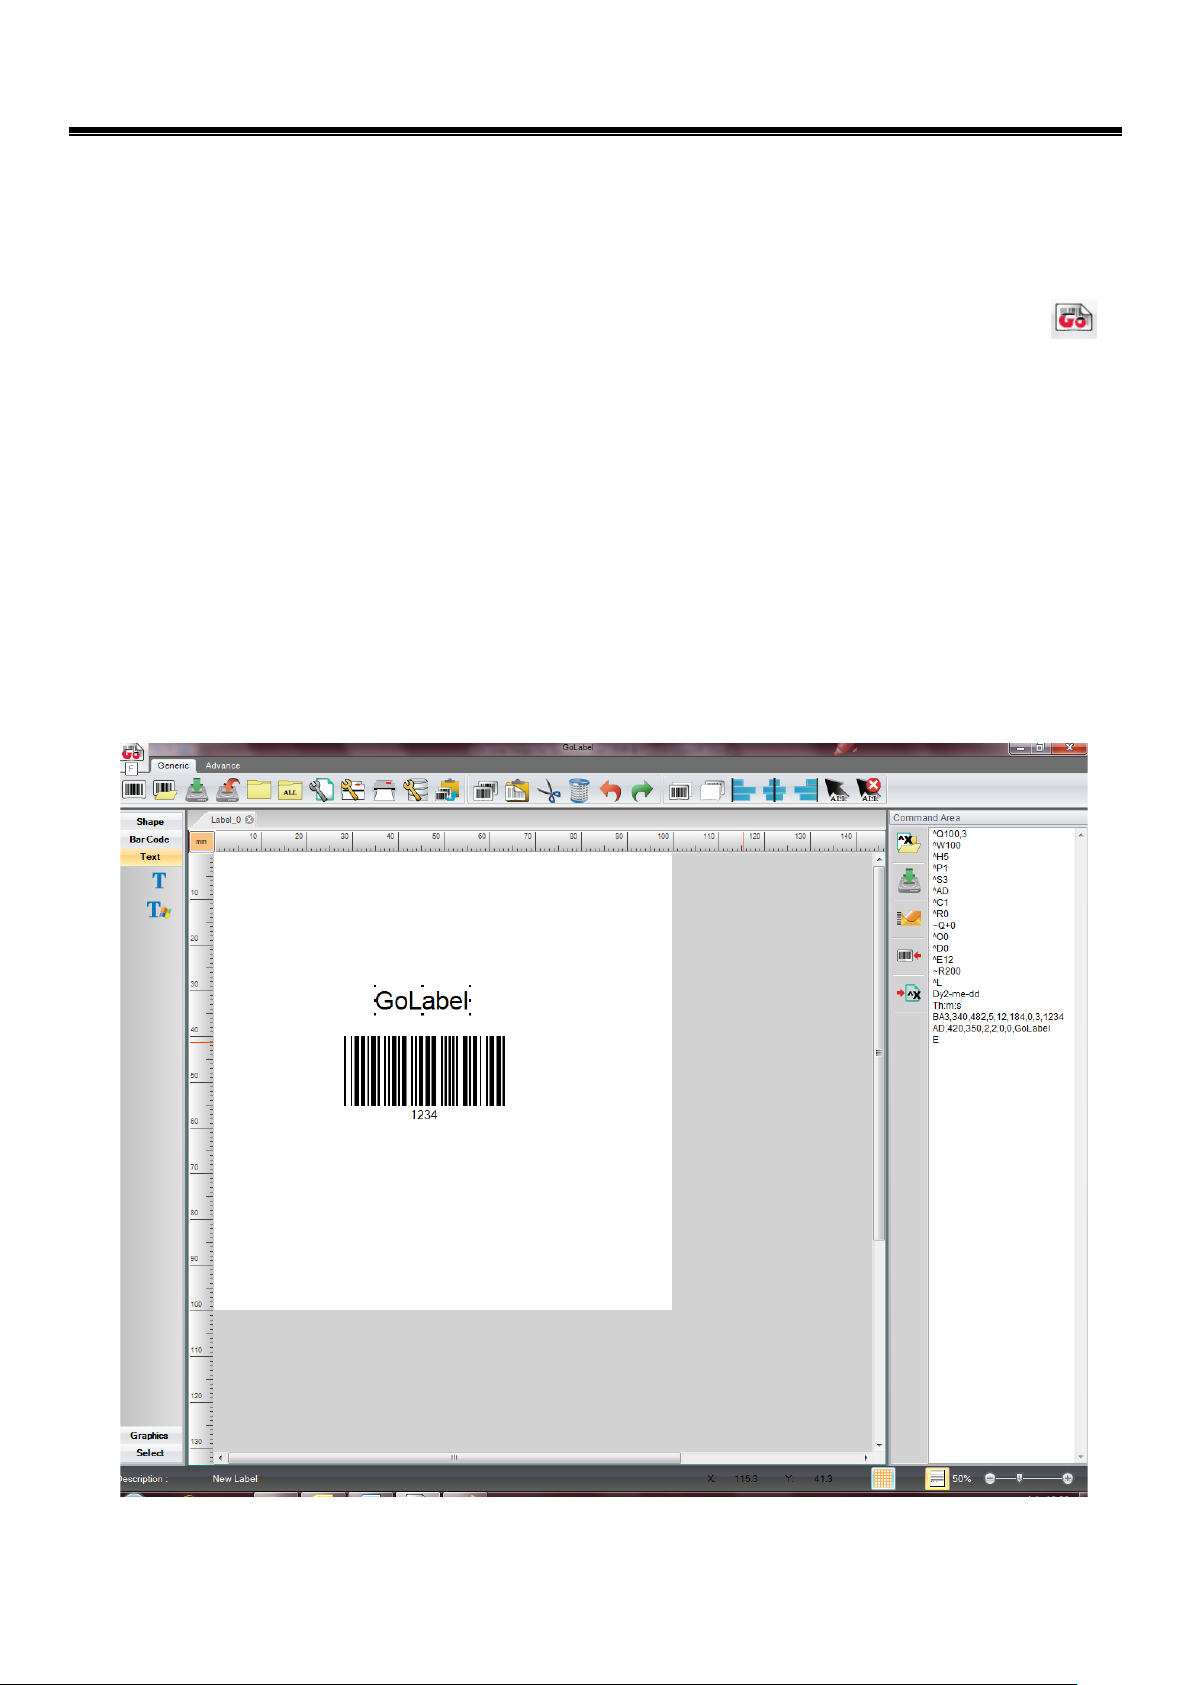
There are three tool sets and two working areas on GoLabel main display screen when it startup:
1) Tool Set :
Either on the top - Generic tool set and Advance tool set
Object tool set on the left side
2) Working Area:
Label Design area
Command area
2 V1.002f
Page 3
GoLabel On-line Help
2. Working Environment
2.1 General
With the friendly design, user clicks the icon to open a new file for label design and editing. There are two
working pads on the screen. The left pad is for label design area, right side of pad is for command area. In label
design area, user can design, edit, delete and then save label as a file name with “ezpx” file type (GoLabel always
save the file name with file type “ezpx”). In command area, user can export the label on the left working pad to the
command area with the printer’s command format (on the right working pad).
2.2 Command Area
The labels exported to the Command Area in “TEXT/ASCII” format and can be editing and saving as a “TEXT/ASCII” file
on PC. Thus, in DOS mode, user may work on this file with DOS commands - COPY, PRINT, TYPE, etc. to manipulate
this TEXT/ASCII file and then send/print it to the printer directly. Besides, the commands in the Command Area are
exported direct from the Label Design Area. For certain high level application, GoLabel provides these quickly and
convenient of operation tools for SI engineer and software designer.
3 V1.002f
Page 4
GoLabel On-line Help
3. GoLabel Tool Sets
3.1 Generic Toll Set
Being user-friendly software, GoLabel provides following graphic icons in the Tool Sets that displays on the top of screen. User
may click either icon of Tool Set to design labels and editing commands. The icons on Generic, Advance and Object Tool Set, and
its functional description are itemized and shown as below for user reference.
Generic Tool Set
New
Open
Save
SaveAs
Close
CloseAll
Page Setup
Printer Setup
Undo
Redo
Move To Front
Send To back
Align Left
Center
Align Right
Select All
Print
Database Select
Copy Label To Clipboard
Copy
Paste
Cut
Delete
4 V1.002f
Unselect All
Page 5
3.2 Advance Tool Set
GoLabel On-line Help
Advance Tool Set
IP Setting
Set Alarm Parameters
Set Alert Message
Search GoDEX Printer
Printer Control
Virtual Terminal
Calibration Sensor
Printer Date/Time Setting
Download Object To Printer
Delete Printer Object
Synchronize Printer And
GoLabel Object Record
Language
Style Settings
Enable/Disable Cross Hair
5 V1.002f
Page 6
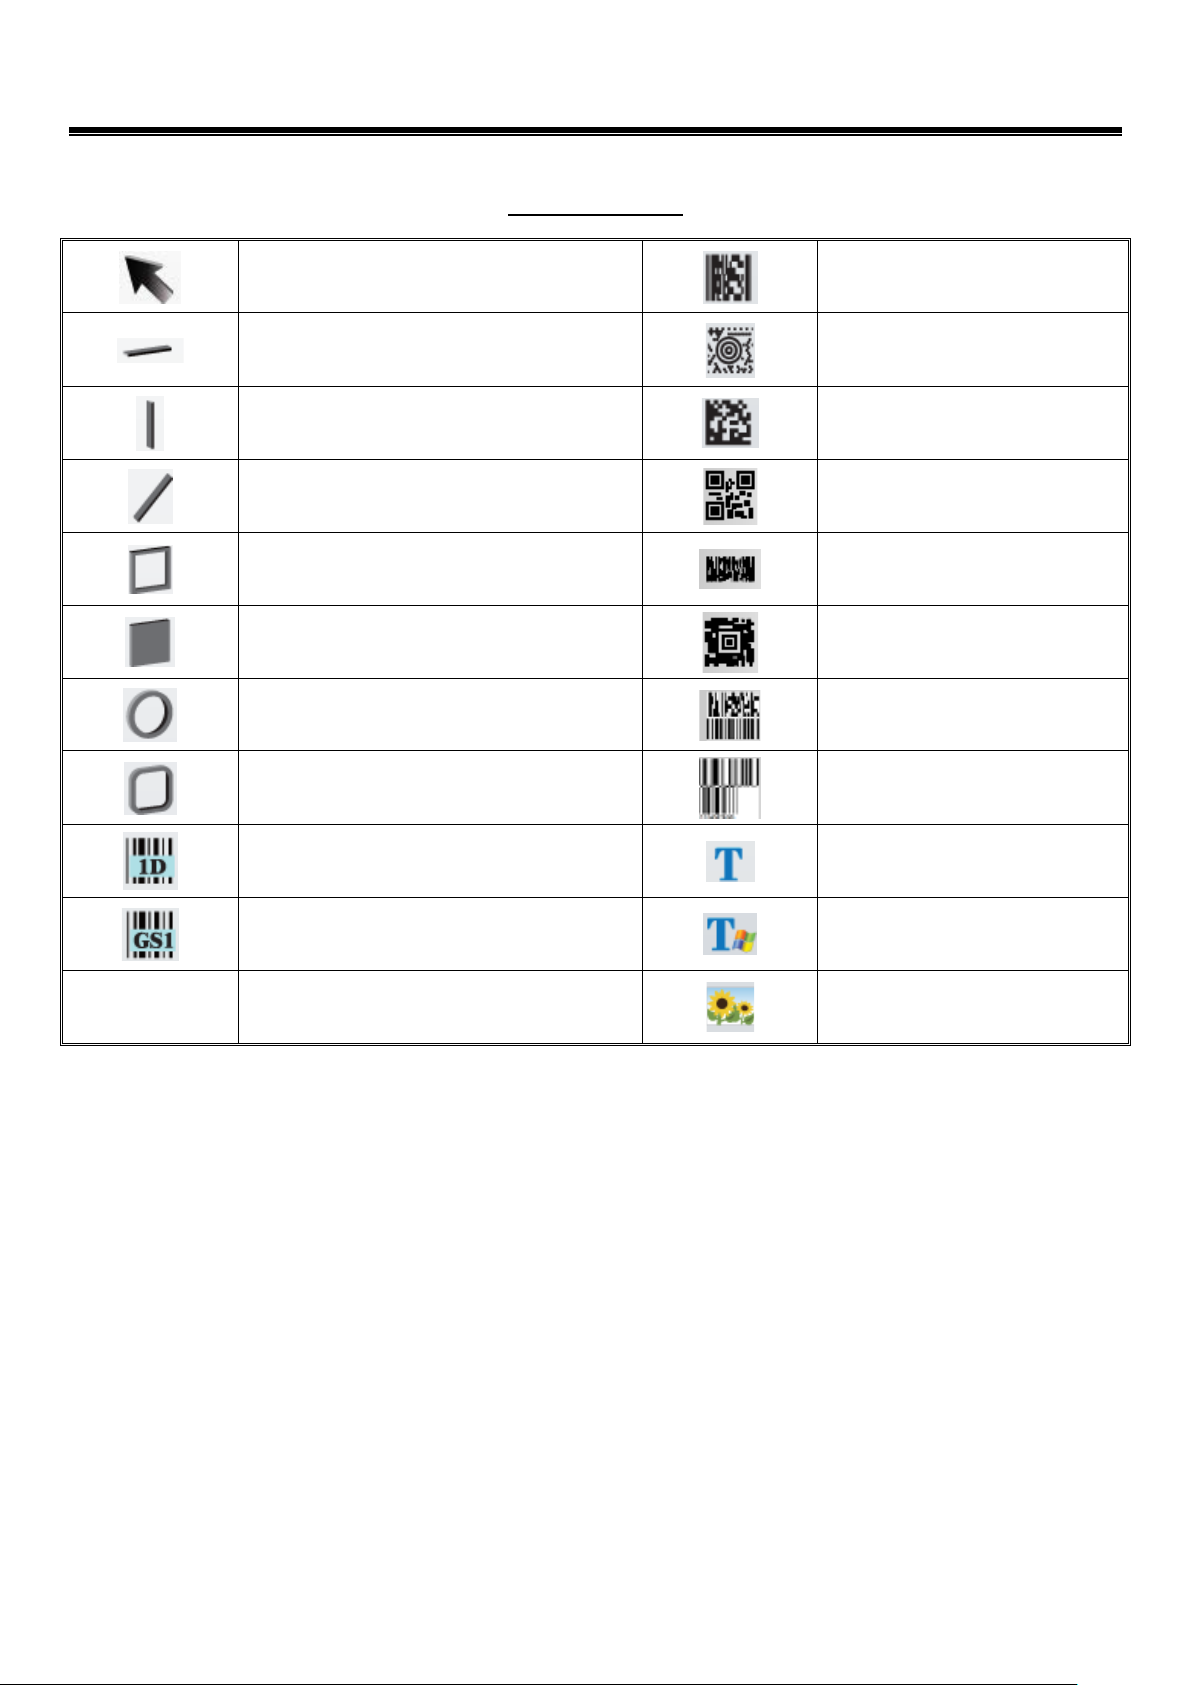
3.3 Object Tool Set
GoLabel On-line Help
Object Tool Set
Select
Horizontal Line
Vertical Line
Oblique Line
Box
Filled Rectangle
Ellipse
Rounded Rectangle
Pdf 417
Maxi Code
Data Matrix
QR Code
Micro PDF
Aztec
TCL39
Composite
Bar Code
GS1 Date Bar Code
Text
Window Text
Graphics
6 V1.002f
Page 7
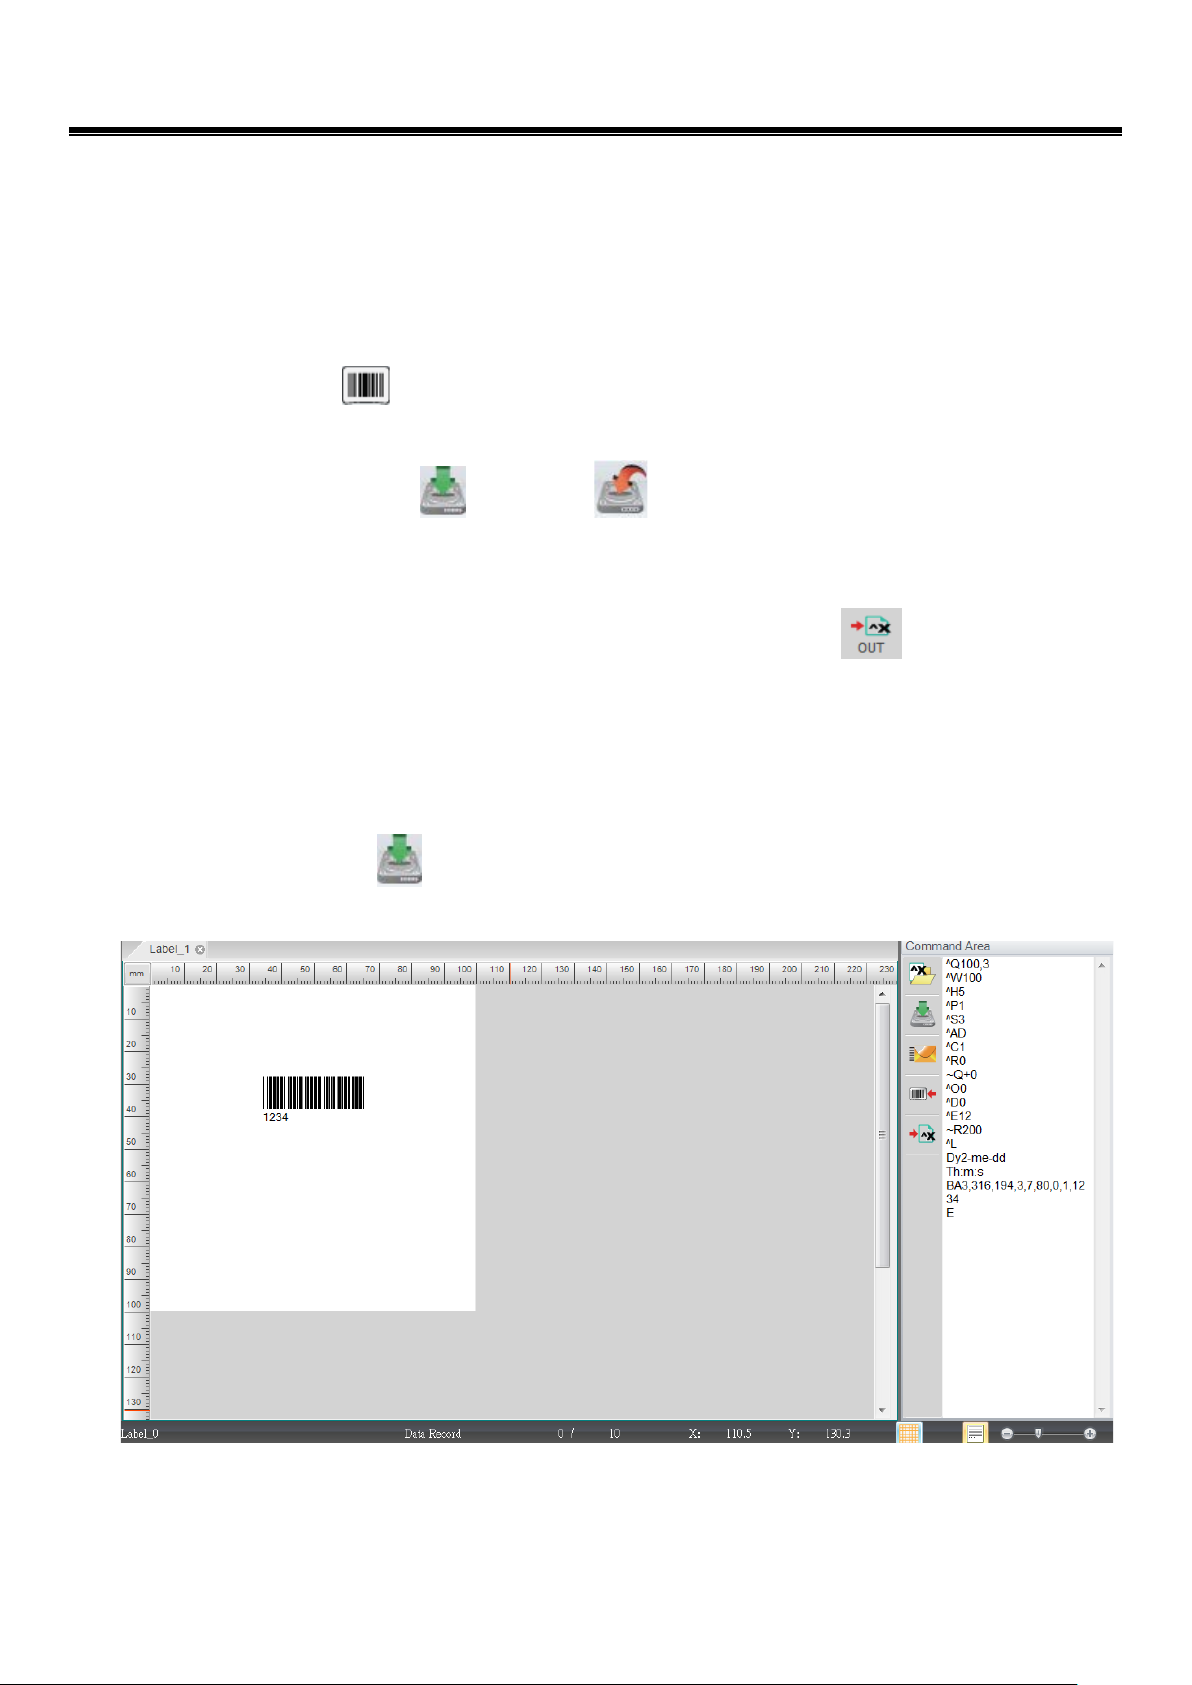
4.1 Creating First Label
Open and save a label file
Open a new label file
Click the icons in the Generic tool set
Save a Label file
Click either icons “SAVE” or “SAVE AS” to save the label files to disk. It’s required to key-in file
name when a dialog of SAVE AS is popping up (Don’t key-in, the file type “ezpx”, which is added by GoLabel itself
in automatically), after file name key-in, please click SAVE icon in the dialog to save the label file with the file
name you key-in.
GoLabel On-line Help
4. General Operation
In case, who want to save label with “TEXT/ASCII” format, please click icon
TEXT/ASCII format to the command area. The “TEXT/ASCII” format in command area is able to editing manually
by user.
If these labels have some unloaded objects, such as graphics, Fonts or non GoDEX EZPL printer’s commands
(such as sphercial or round coner, GoLabel will reminding the total amount of illegal object unloading yet,
marking white color on the fill-in columns and asking to user for key-in and download. Please follow instruction
to key-in the appropriate object names then. (the names must be alphabetical and numbers only).
Please clcik the icon
in command area that will save the label in “TEXT/ASCII” format to PC.
to transform the label as
7 V1.002f
Page 8
GoLabel On-line Help
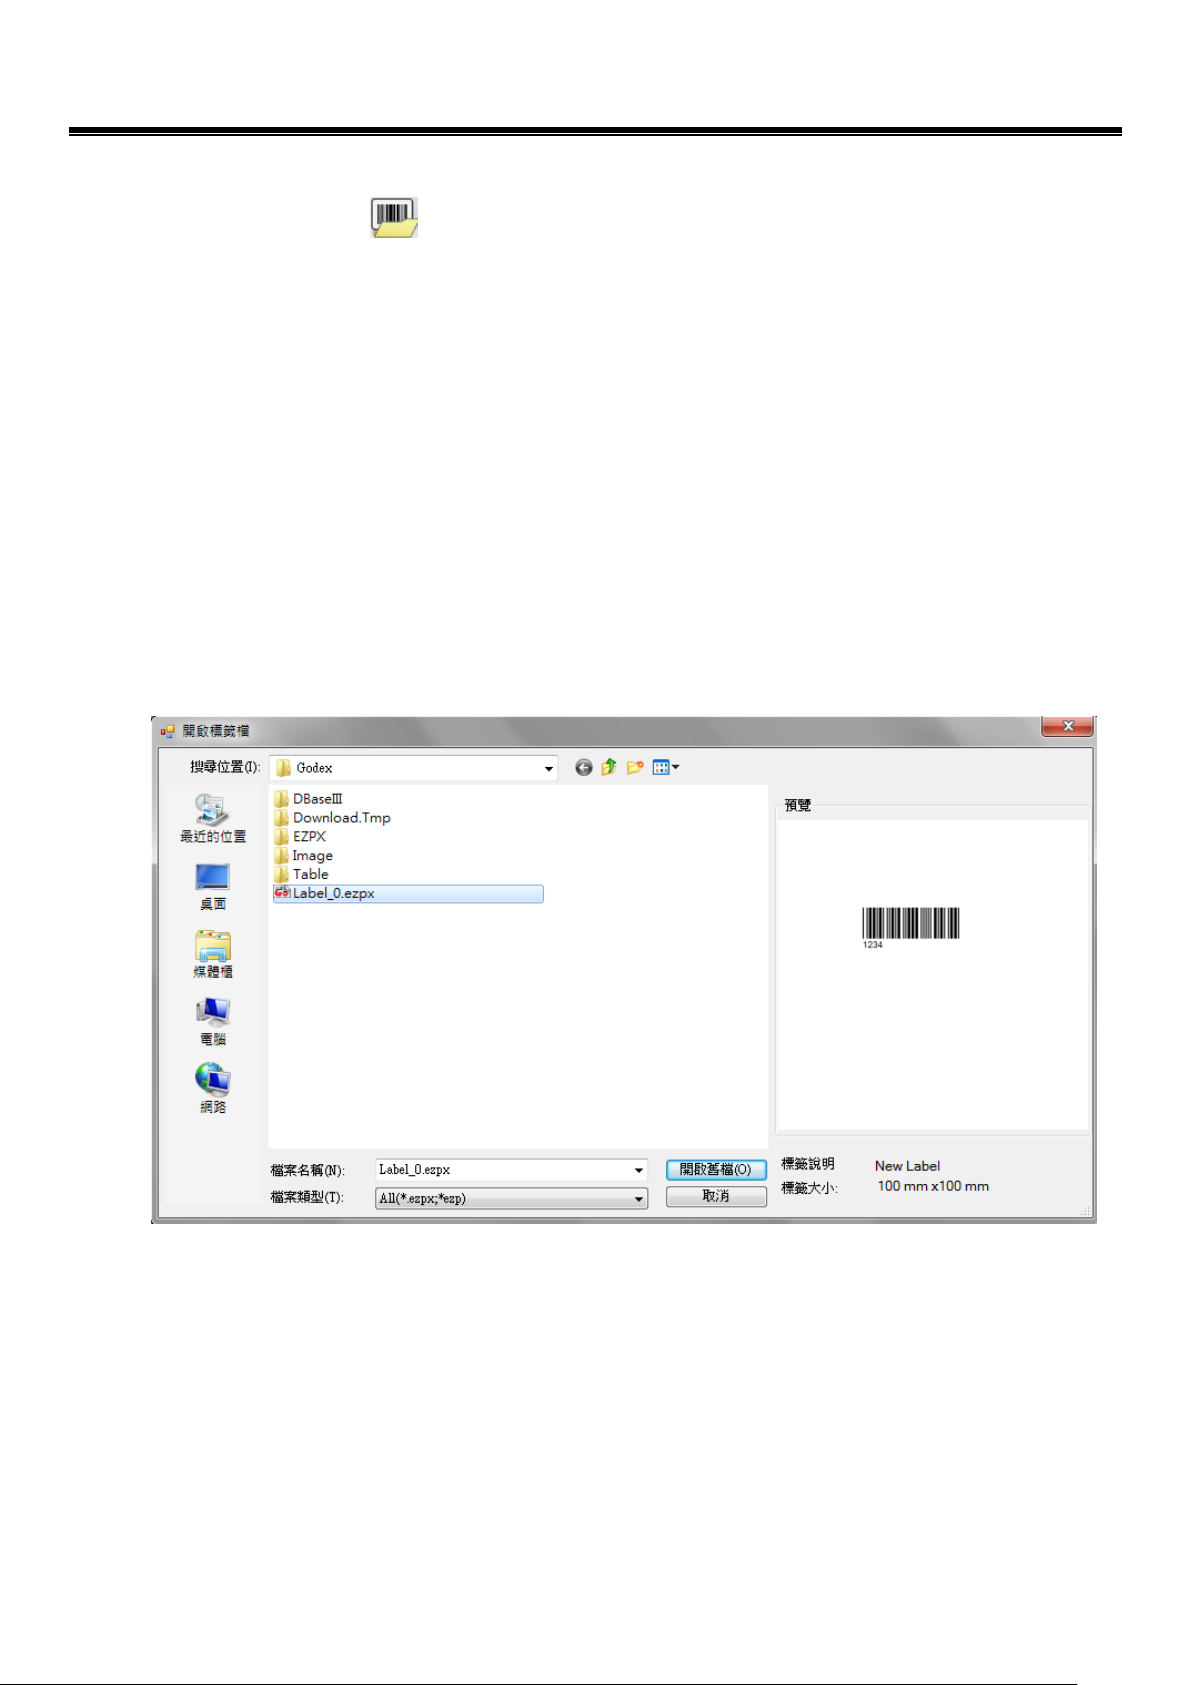
4.2 Open an Existing File
Click the icon “Open” on Generic Tool Set
To open an existing file is able be previewing when cursor select to it, and click “Open” icon in the dialog
to open it (or just double click the file name for instead). Only file type “ezpx” created by GoLabel is able
be opened properly.
Be noted 1: The file type “ezp” created by Qlabel is able be opened by GoLabel but may not 100%
workable unless the file created in Qlabel and save it in “Qlabel Command Area” as the file type of “cmd”
format, such as “Test.cmd”. Although, these files can be retrieved by GoLabel but if these files have any
graphic, photo, picture and curvature objects that created in Qlabel are still not be able to reproduce on
GoLabel properly.
Be noted 2: Only the “Text/ASCII” format of EZPL commands in the file type of “ezp” and “cmd” are
retrievable by GoLabel but the inside of download objects (graphic, photo, picture and curvature shape)
will be missed, that needs to recreate on GoLabel.
8 V1.002f
Page 9
GoLabel On-line Help
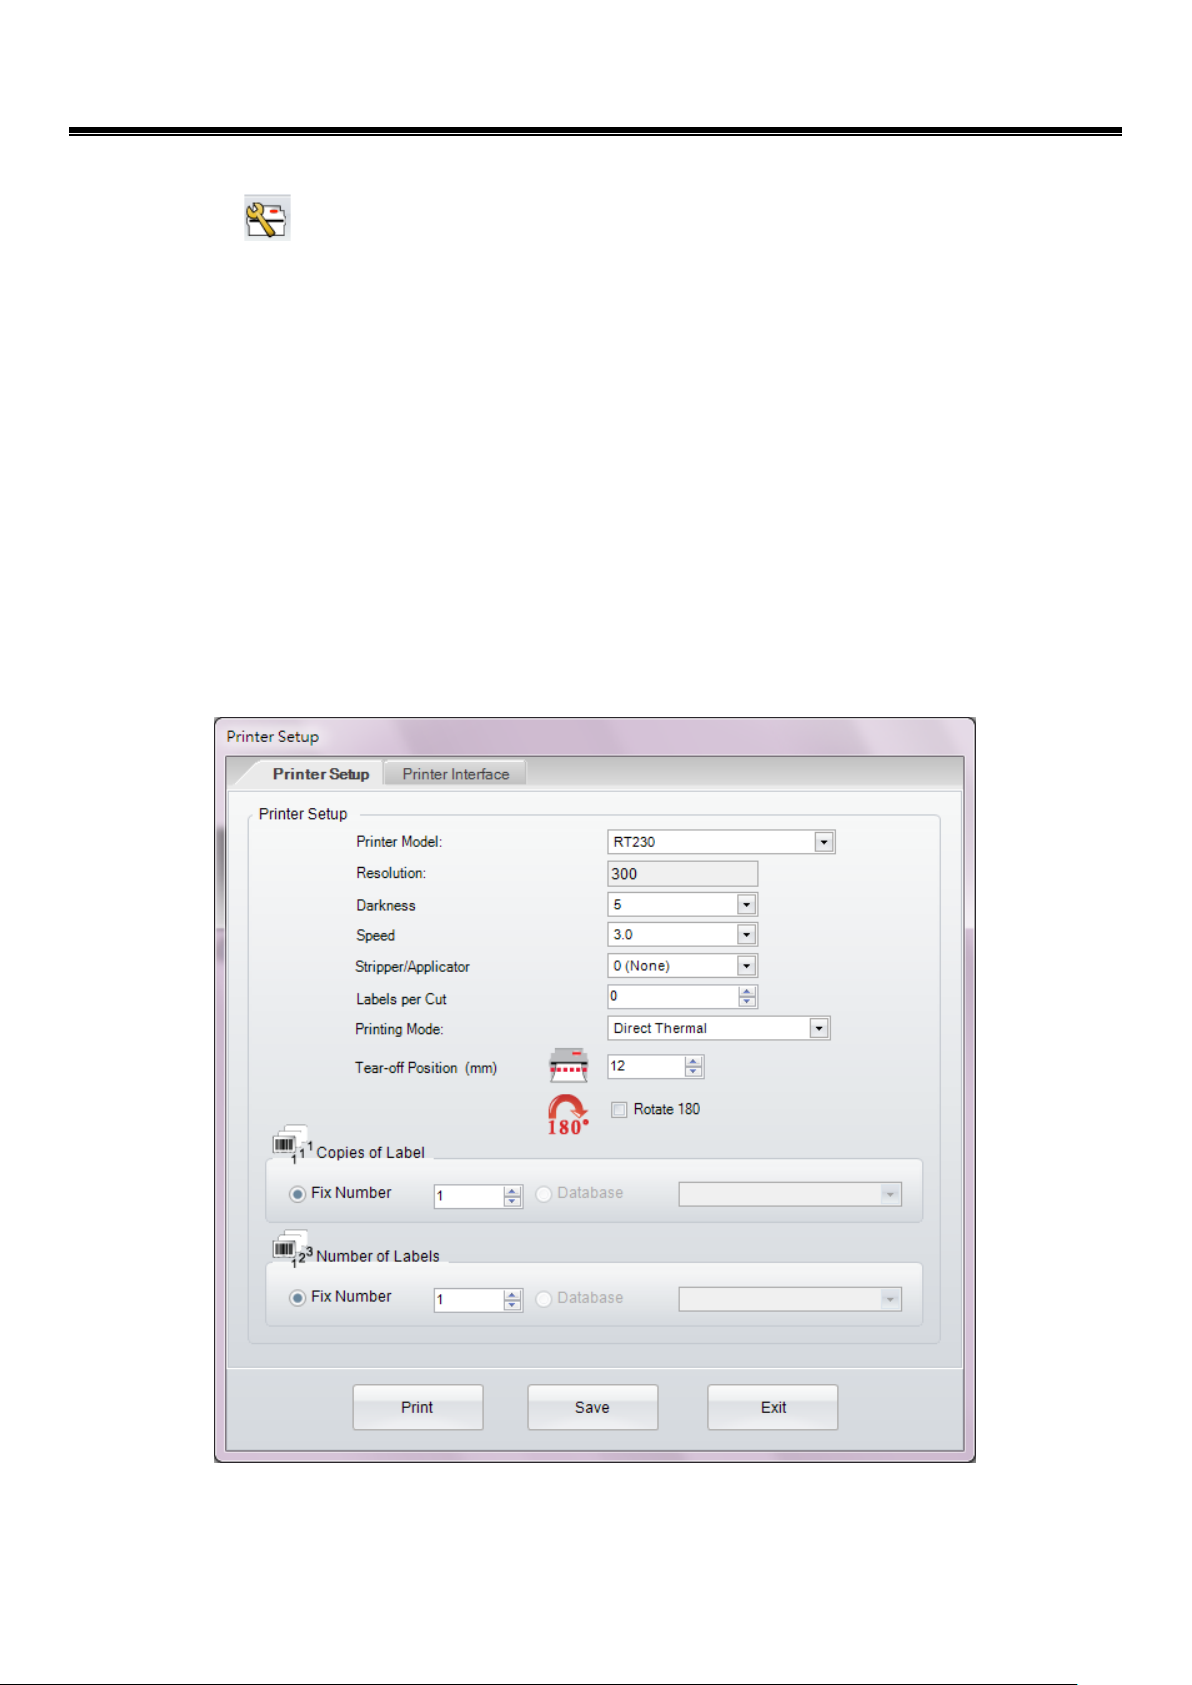
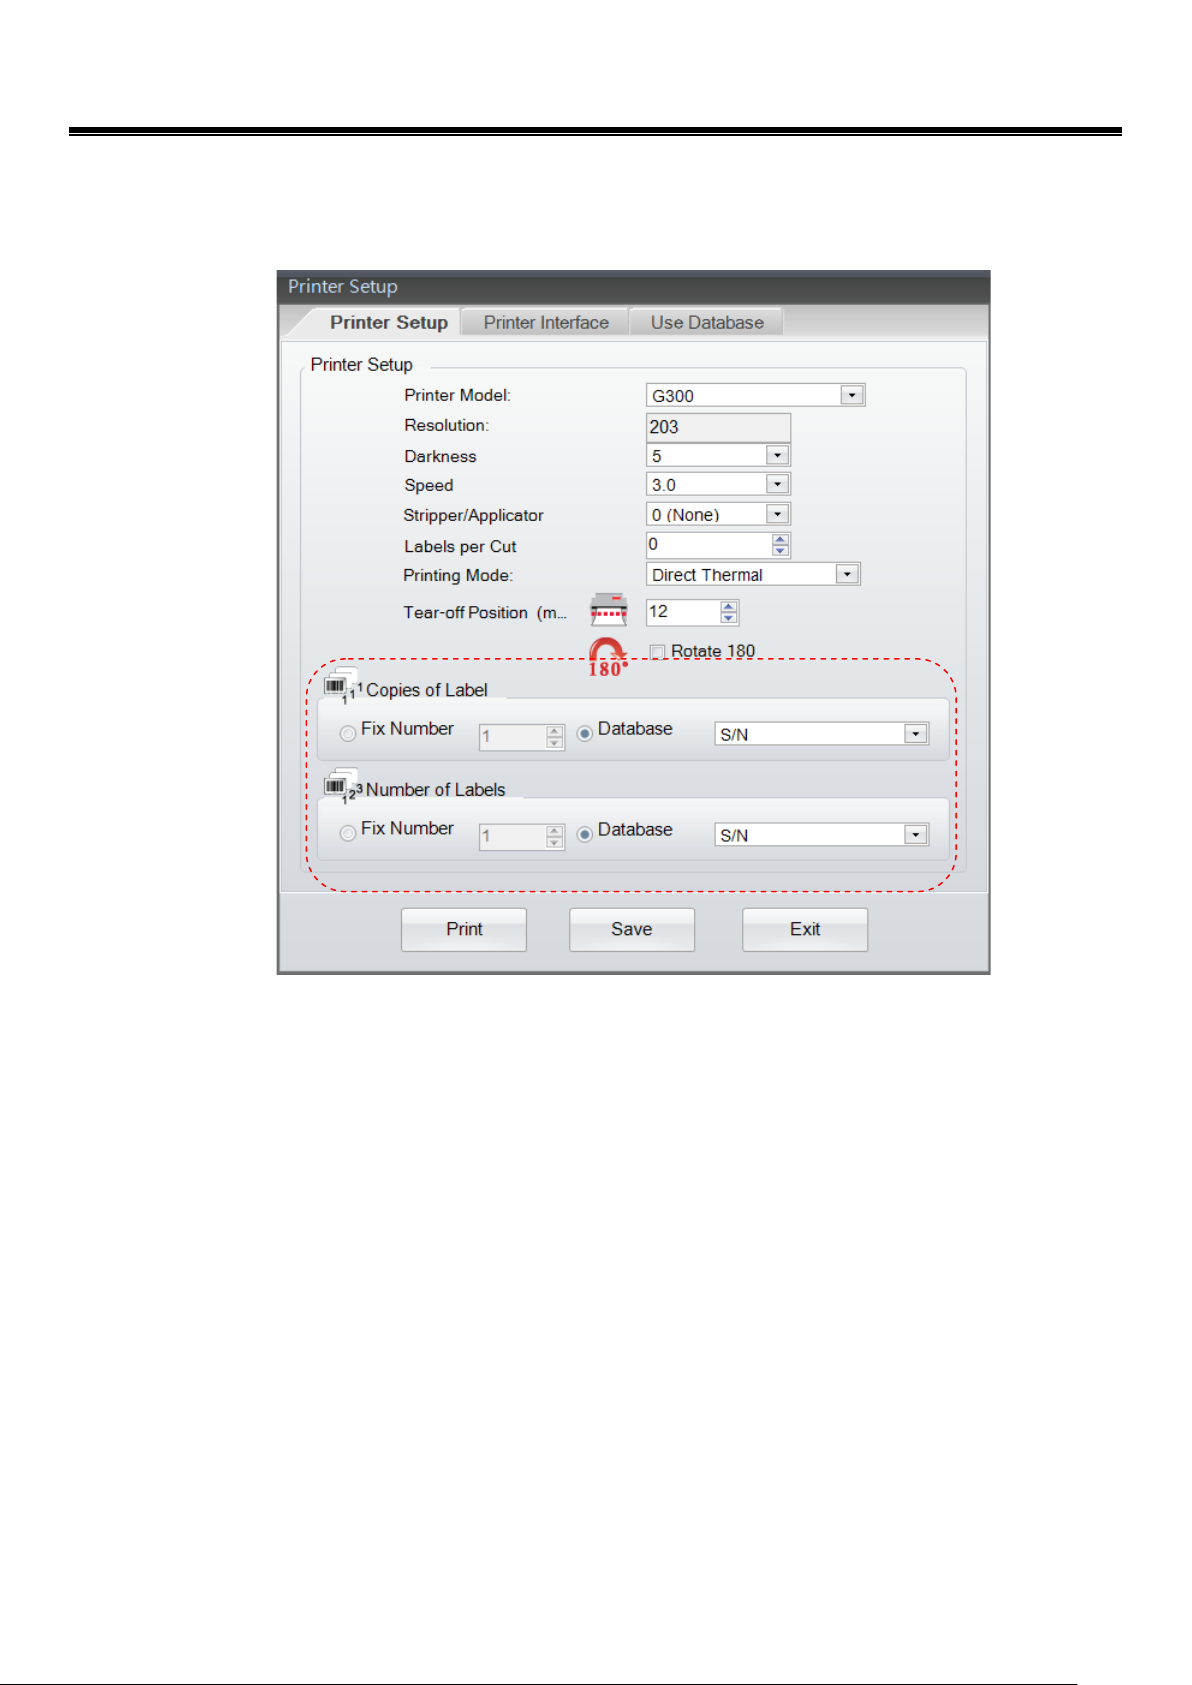
4.3 Change Printer Setting
Click the icon on the Generic Tool Set, or just click the right key of mouse on the “Label Design Area” and
select “Printer Setup”
Key-in the relevant parameters in the “Printer Setup” dialog
Please select the model name of GoDEX barcode printer in the dialog first. If you don’t know it clearly,
please check the model name to the printer’s bottom side that stuck a label with sufficient information.
All the items are able be setting unless these items are not supported by this model of barcode printer
Tear-off position: It’s a printer stop position (after a label print out) that can be adjusting forth and back
(+/- value, unit: mm). Key-in bigger adjusting value (number) in the dialog is meant that the next labels
will move forward or backward longer. The setting value should not large or equal to label high. Every
model of barcode has an own setting value and limitation of Tear-off position, please refer to the
description of the EZPL command (^E) that states in the user or programming manual.
9 V1.002f
Page 10
GoLabel On-line Help
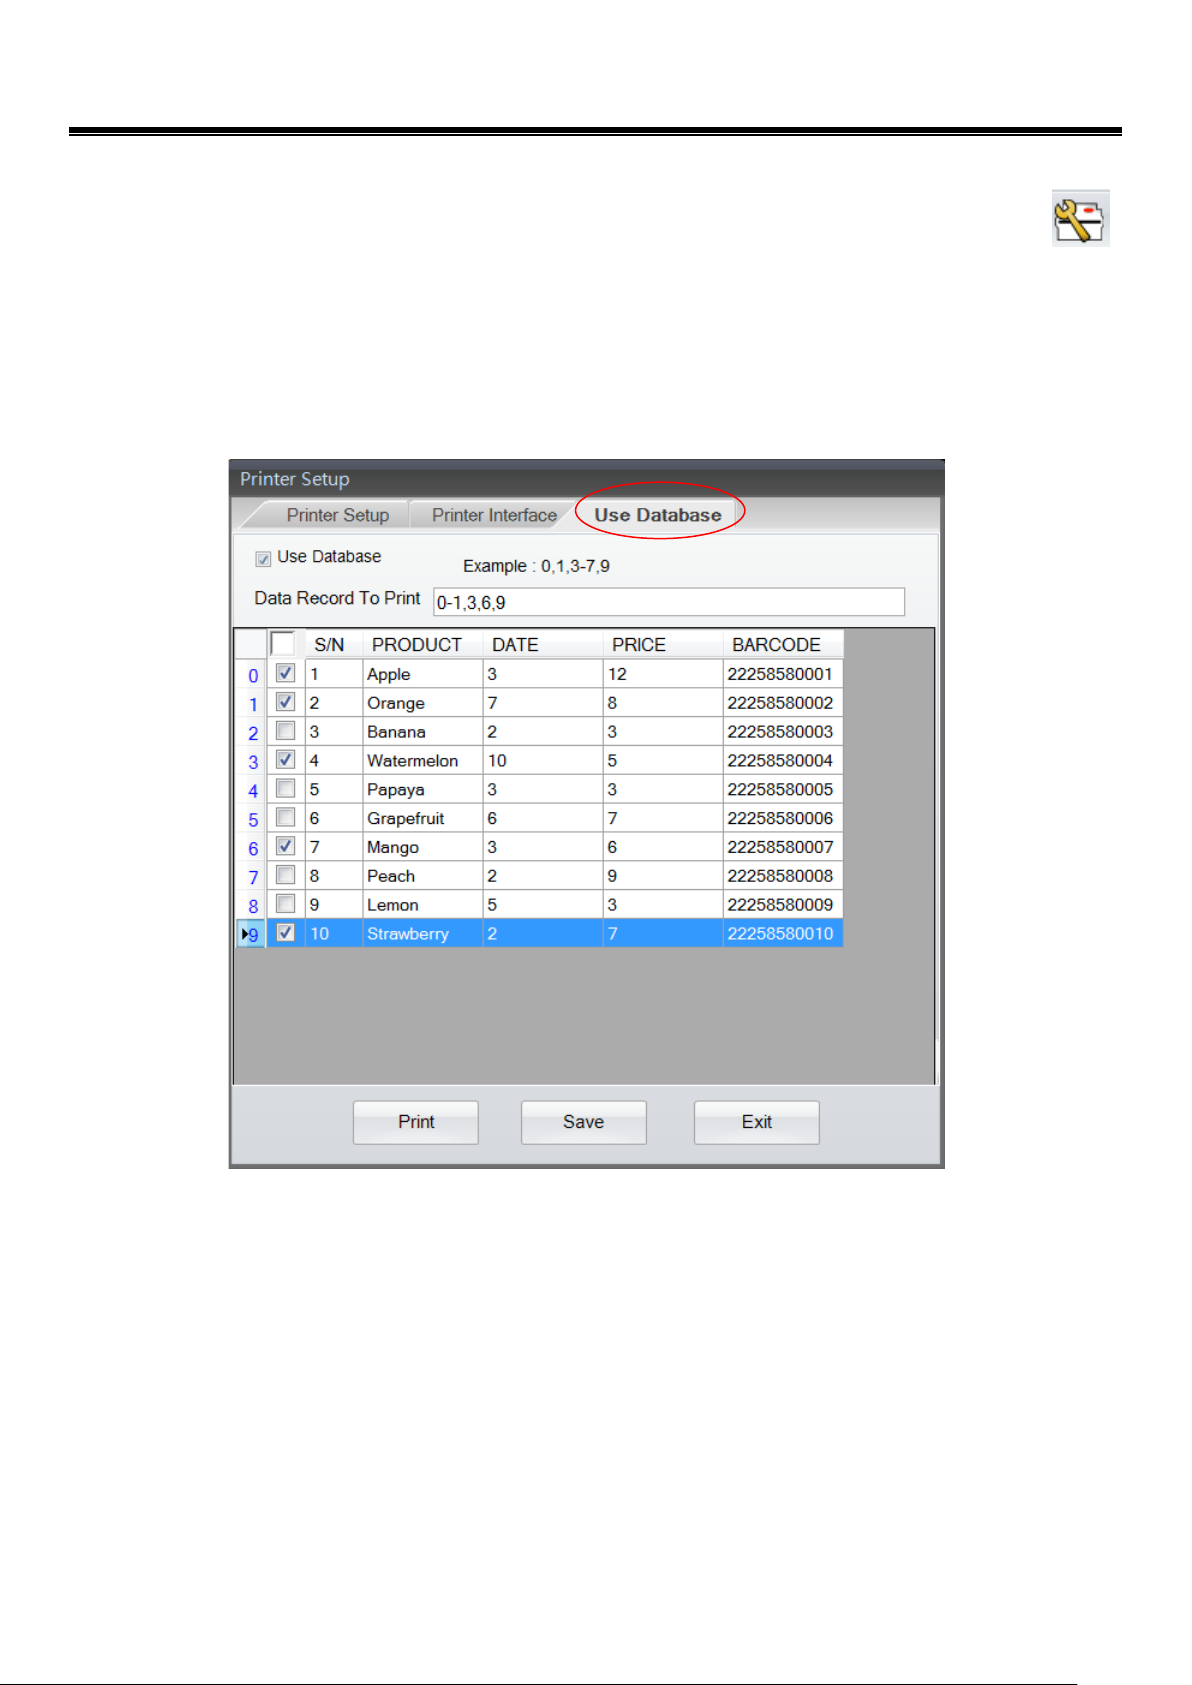
4.4 Setup Database Printing
If Database has been created and saved in the printer internal or external memory; it can be either: click icon
on the Generic Tool Set, or just click the right key of mouse on the “Label Design Area” and then select “Printer
Setup”.
Click the icon “USE DATABASE”, and then choose which row of database going to using; the selected database will
show up at the column field of “Data Record to Print” then.
10 V1.002f
Page 11
GoLabel On-line Help
The value in the fields of “Copies of Label” and “Number of Labels” are selectable to print more labels with copy or
counting number during “Use Database” function.
11 V1.002f
Page 12
GoLabel On-line Help
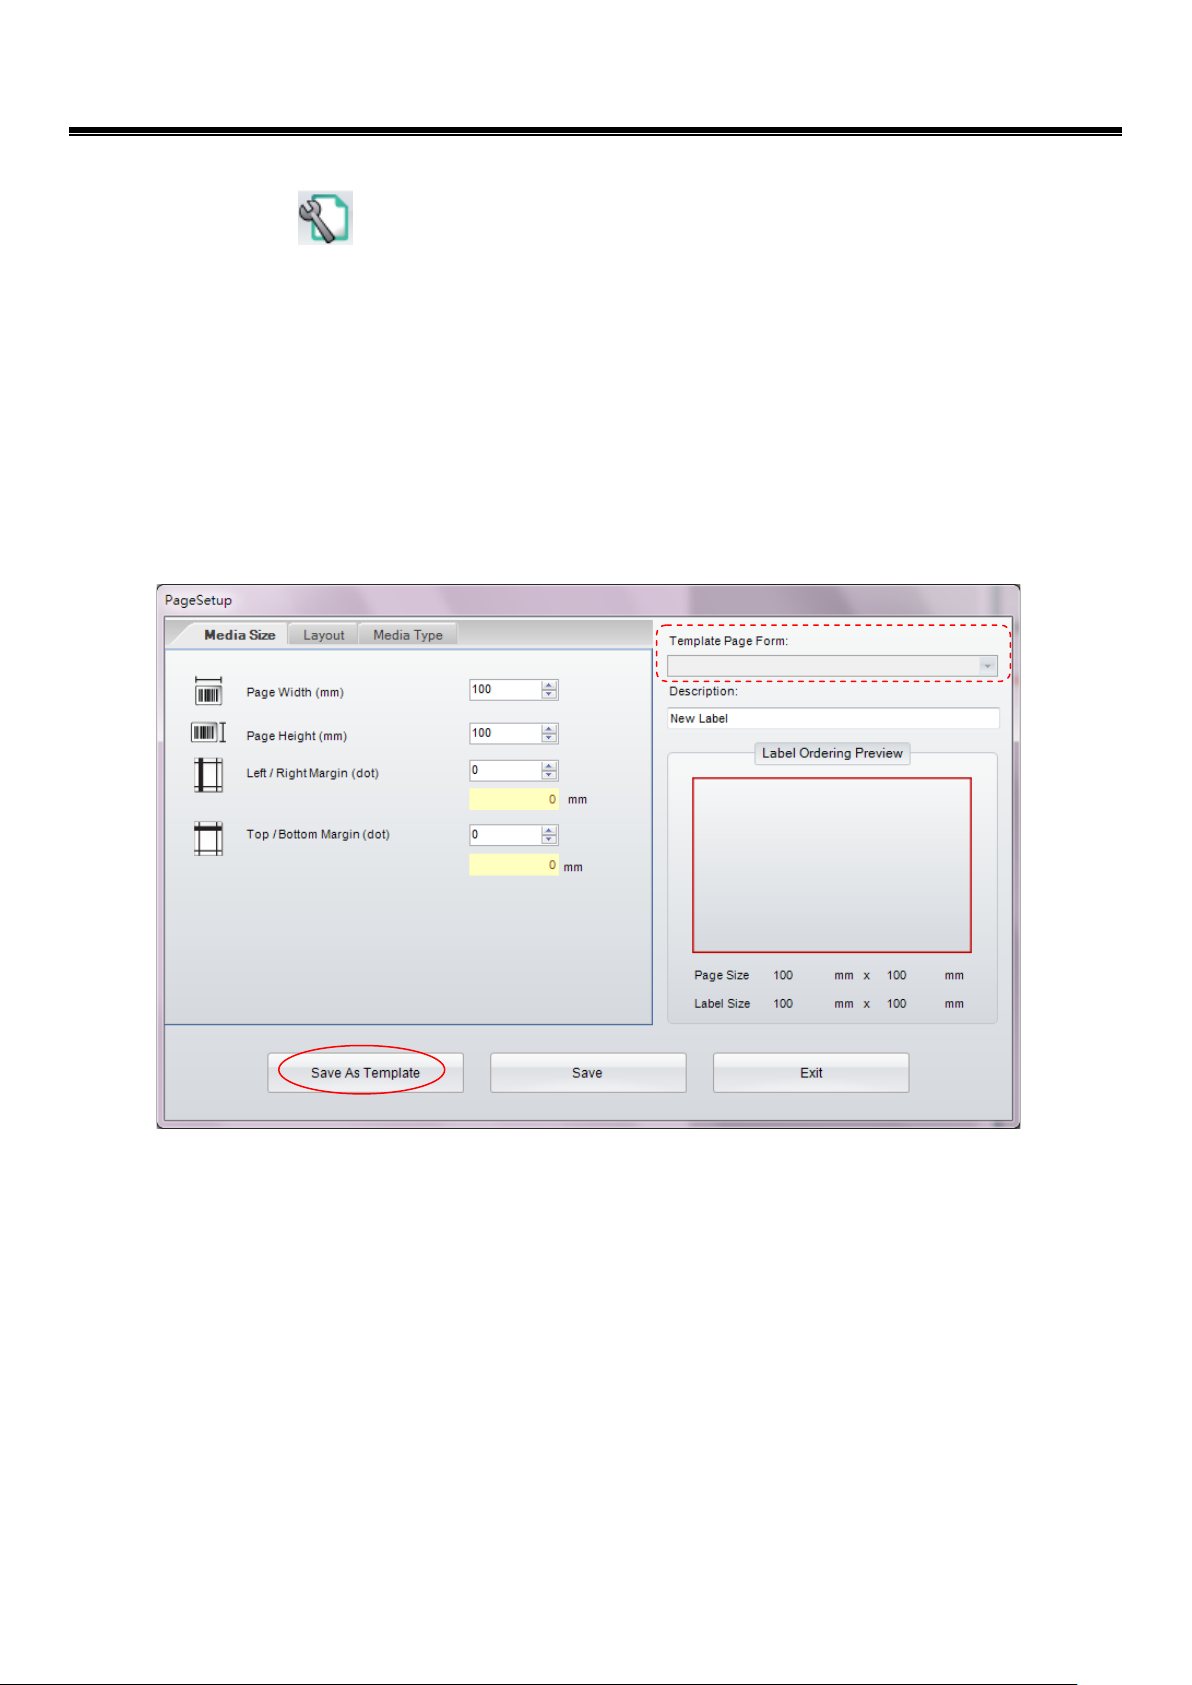
4.5 Select Label Size and Media Type
Click the icon on the Generic Tool Set
The label parameters are definable, included “page width”, “Page Height”, ”Left/Right Margin” and
“Top/Bottom Margin”
The label can be saved as a “self-defined label” by key-in the label name in the column field of
“Description” and click “Save as Template” then. In next times when GoLabel startup, user can
select the previous saved ““self-defined label” in the pull down column field of “Template Page
Form”
12 V1.002f
Page 13
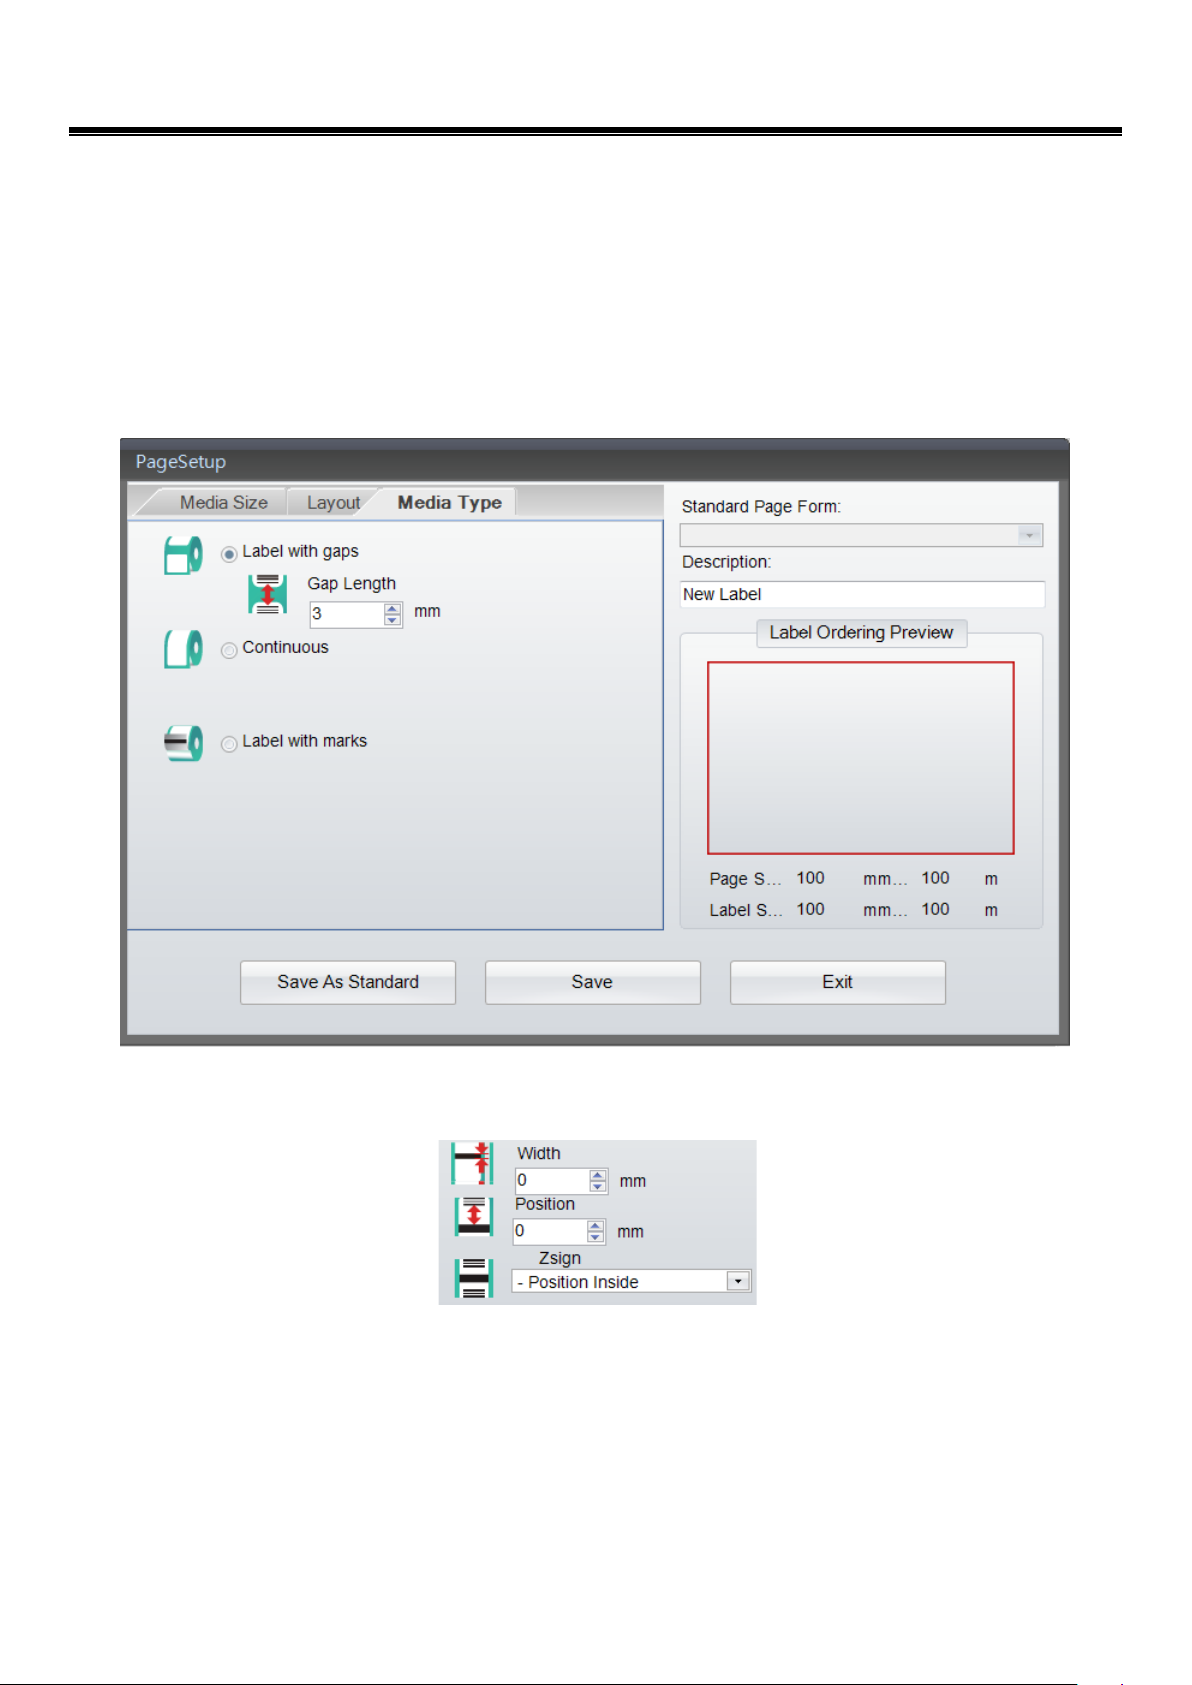
Select Media Type
Label with gaps, a sticking label with liner, every label has a gap in between, called gap length.
Continuous, like a fax using paper roll. Due to its continuous, it must set a “Feed Paper Length” if who want has
a printing gap in between label and label
Label with Mark: A label roller, it has a strip (or block) of black mark pre-printed on the back of liner. It needs
setting the black mark’s Width, Position and Zsign.
GoLabel On-line Help
13 V1.002f
Page 14
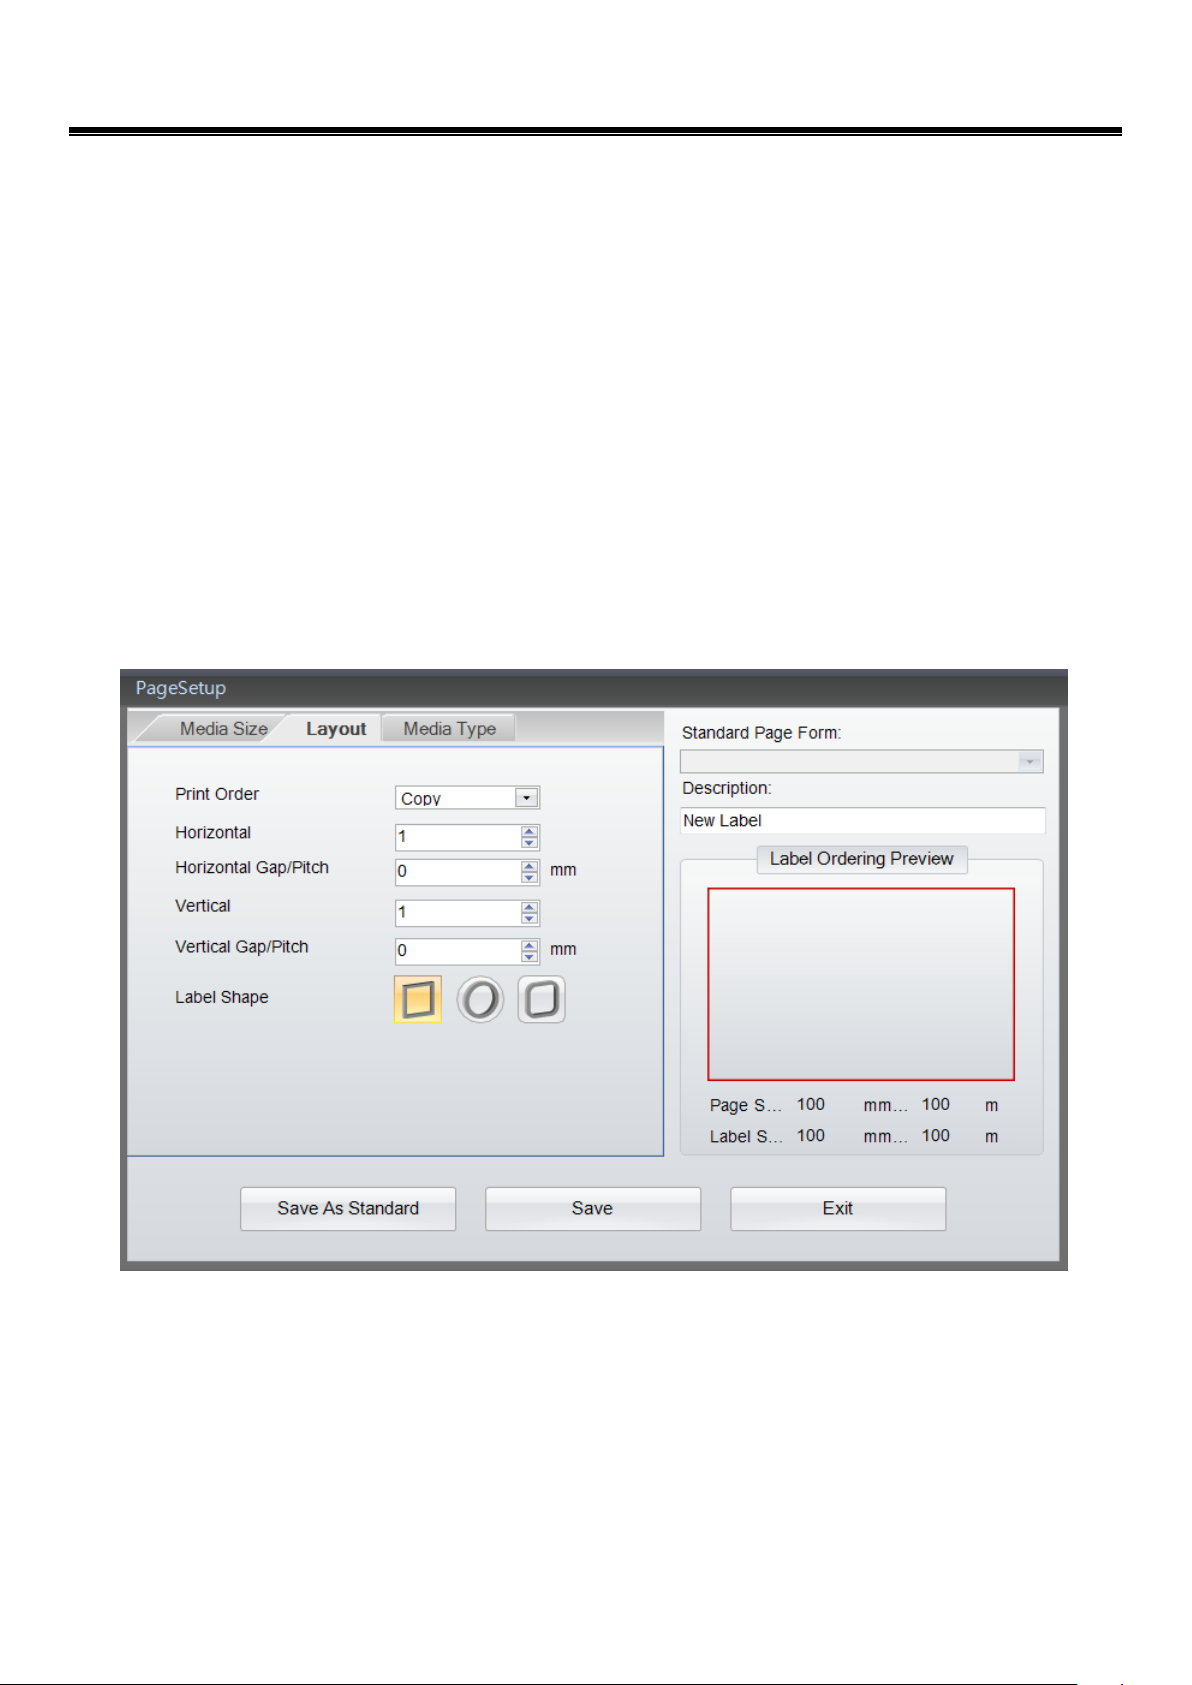
Choose Media Layout
Print Order: Label Printing Order is selectable by Copy, Left to Right or Top to Bottom
Horizontal: Label is divided and making them in horizontal layout
Vertical: Label is divided and making them in vertical layout
Horizontal Gap/Pitch: to define the horizontal gap width between the labels
Vertical Gap/Pitch: to define the vertical gap width between the labels
Label Shape: Three Label outer shape is selectable
Move cursor to inside of “Label Ordering Preview” area and click it, then the label shape and order can be
changed immediately for user preview one by one.
GoLabel On-line Help
14 V1.002f
Page 15
GoLabel On-line Help
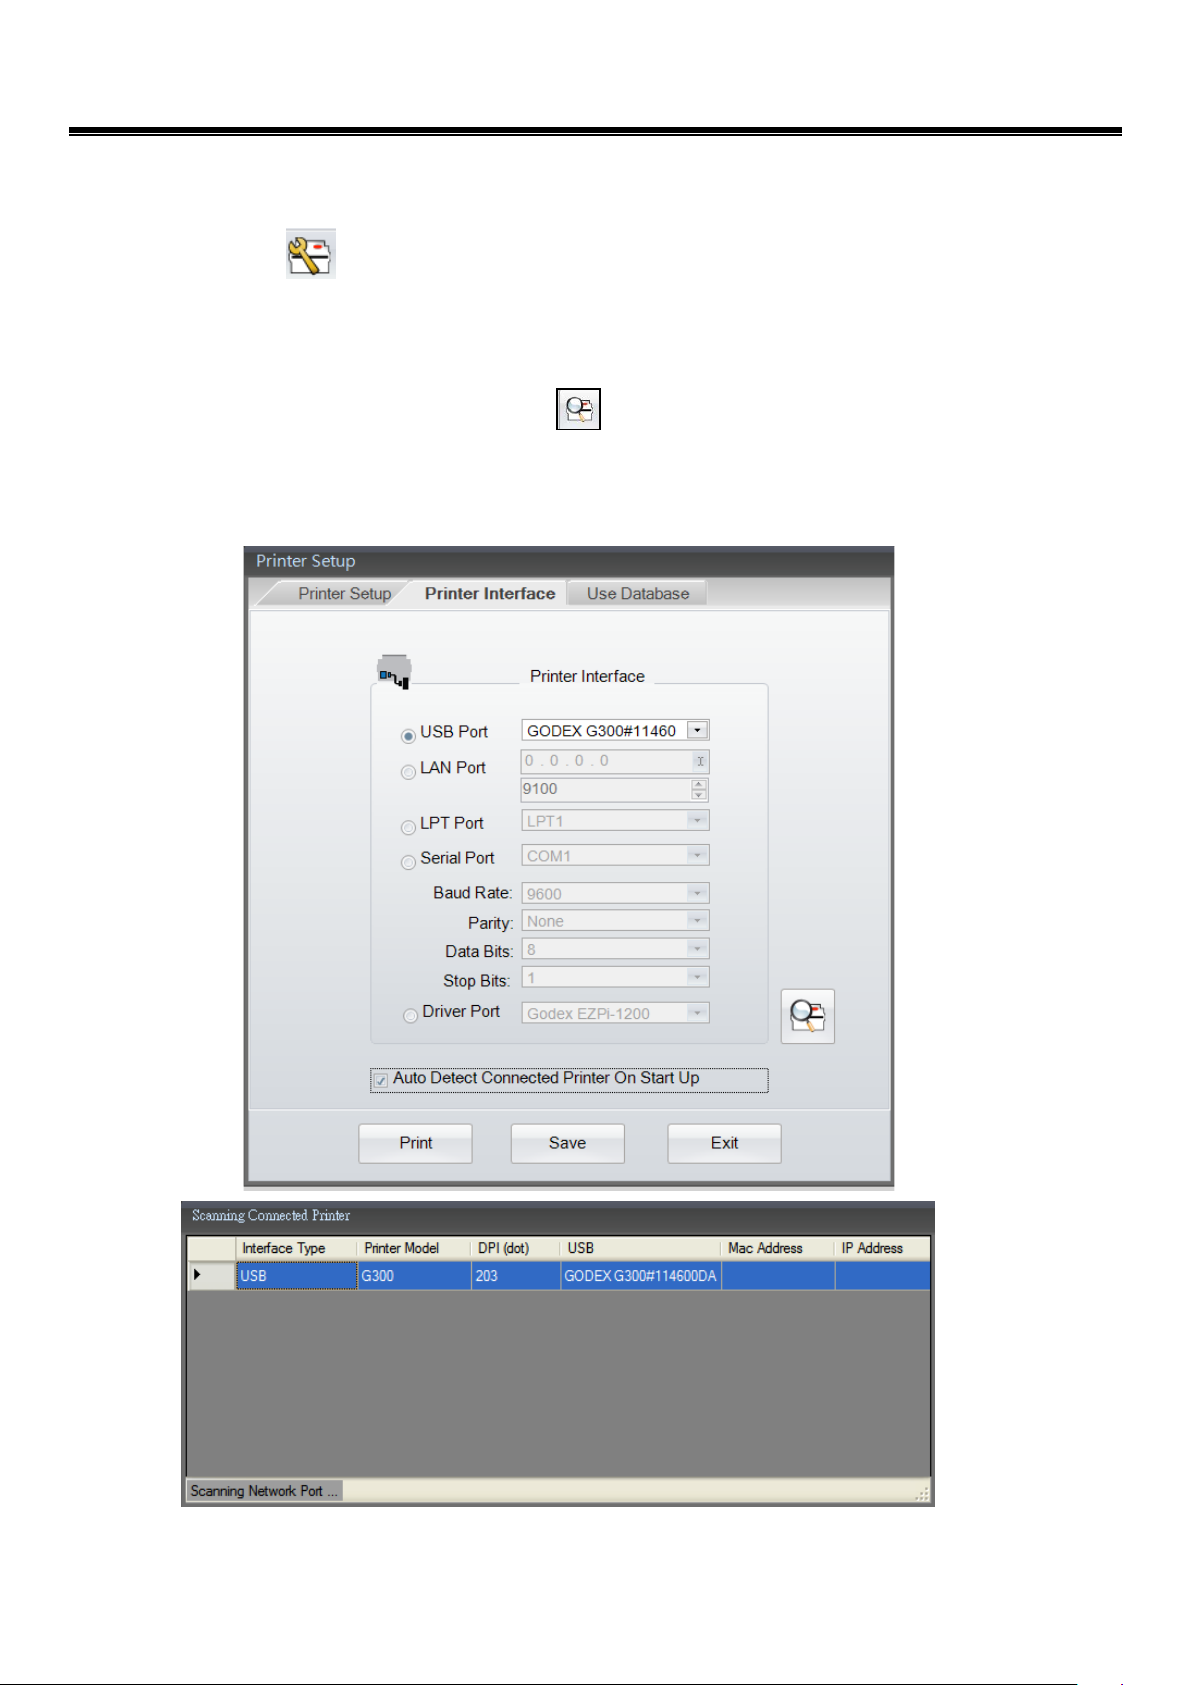
4.6 Printer Interface Setup
Printer interface: USB, LAN, LPT and Serial Ports are selectable as follow:
Click the icon
select “Printer Setup” and Choose “Printer Interface”
Please select the port and set the parameter where the printer connected, such as USB, LAN, LPT and Serial Port.
User can select “Driver Port” and click the icon
is connected to those ports. Or, user who choose “Auto Detect Connected Printer on Startup” in the dialog, then
GoLabel will always auto detect the connecting printer on next time when program re-startup.
on Generic Tool Set, or just click the right key of mouse on the “Label Design Area” and then
for instead, this will automatic detect which model of printer
15 V1.002f
Page 16
GoLabel On-line Help
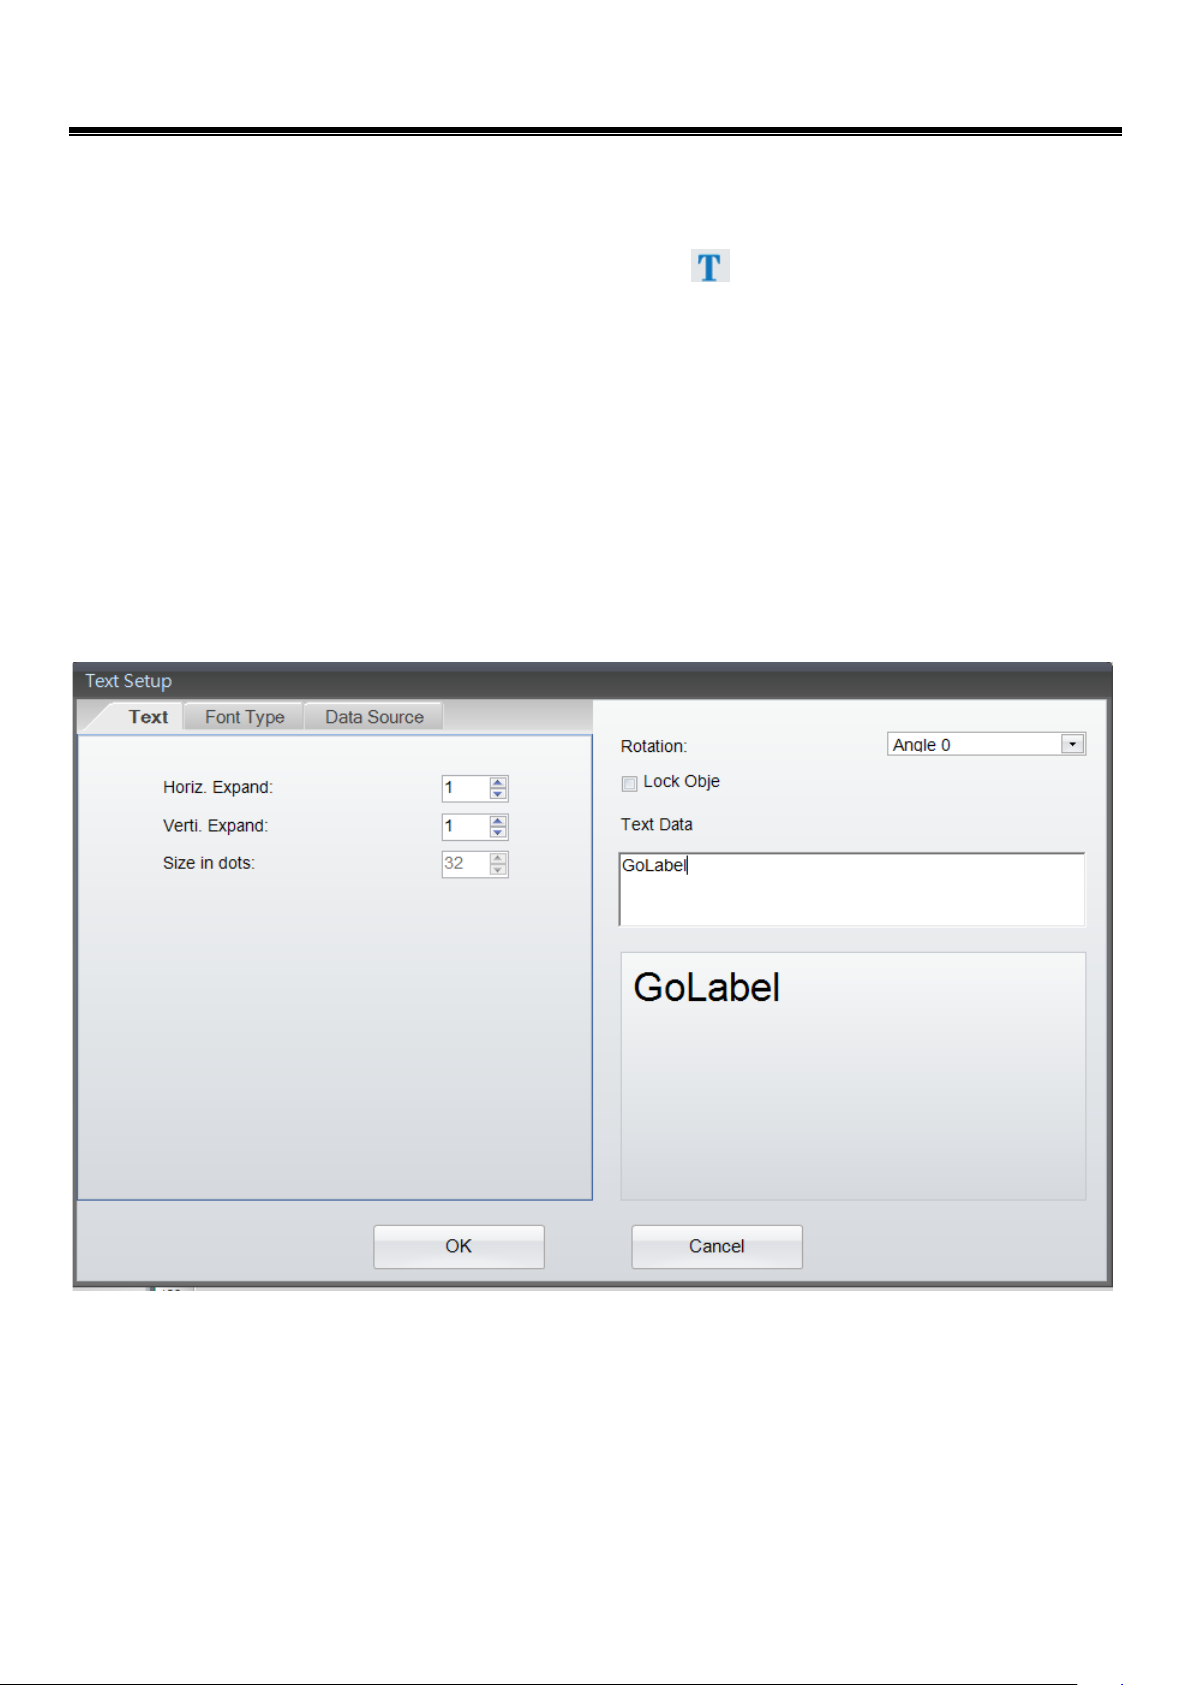
4.7 Text Setup - Key in a Text into the Label
The Fonts include internal font, download font, and external Font on CF card or USB Stick Memory
Select “Text” in left side of screen, and then click the icon
Move cursor to where the text will be located and click left key again.
There are three icons showing on the “Text Setup” dialog, “Text”, Font Type”, “Data Source”
1) In the sub-dialog “Text”, the “Horizontal Expand”, “Vertical Expand” and “Size in Dot” are definable by
user.
In the right part, it has “Rotation” for Text angle selection, “Text Data” for text key-in and a Preview
window.
.
16 V1.002f
Page 17
GoLabel On-line Help
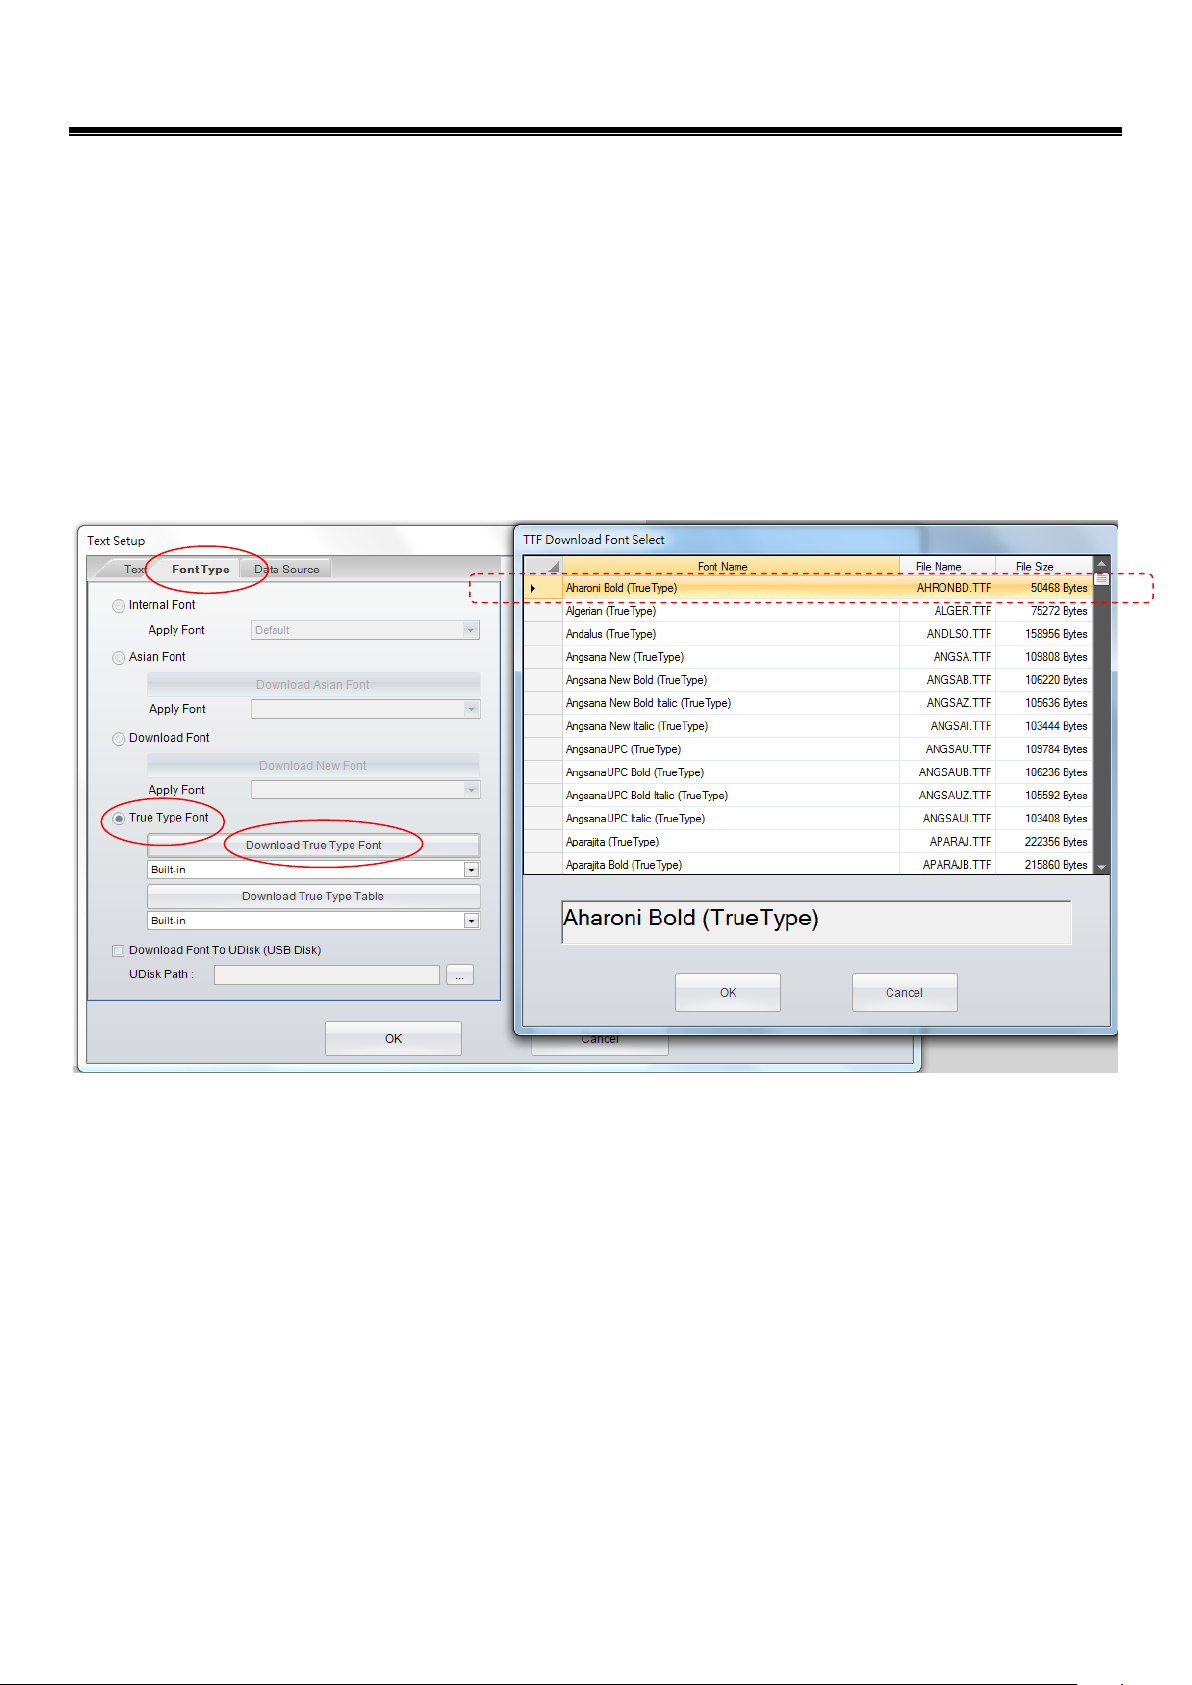
2) In the sub dialog “Font Type”, user may choose and define the parameters for the “Internal Font”, “Asian
Font”, “Download Font” and “True Type Fonts
Internal Fonts are built-in on the printer’s F/W, only alphabetical text and numbers are existed.
Asian Font, user can choose some Asian font and download it to the printer Flash or USB memory
True Type Font (TTF), this new feature provides for user to download TTF file and define its
parameters, which also supports to Multi-Language
Below dialogs will be popped up when select “True Type Font” and click “Download True Type
Font”; then choose either of TTF file and download it to printer.
17 V1.002f
Page 18
GoLabel On-line Help
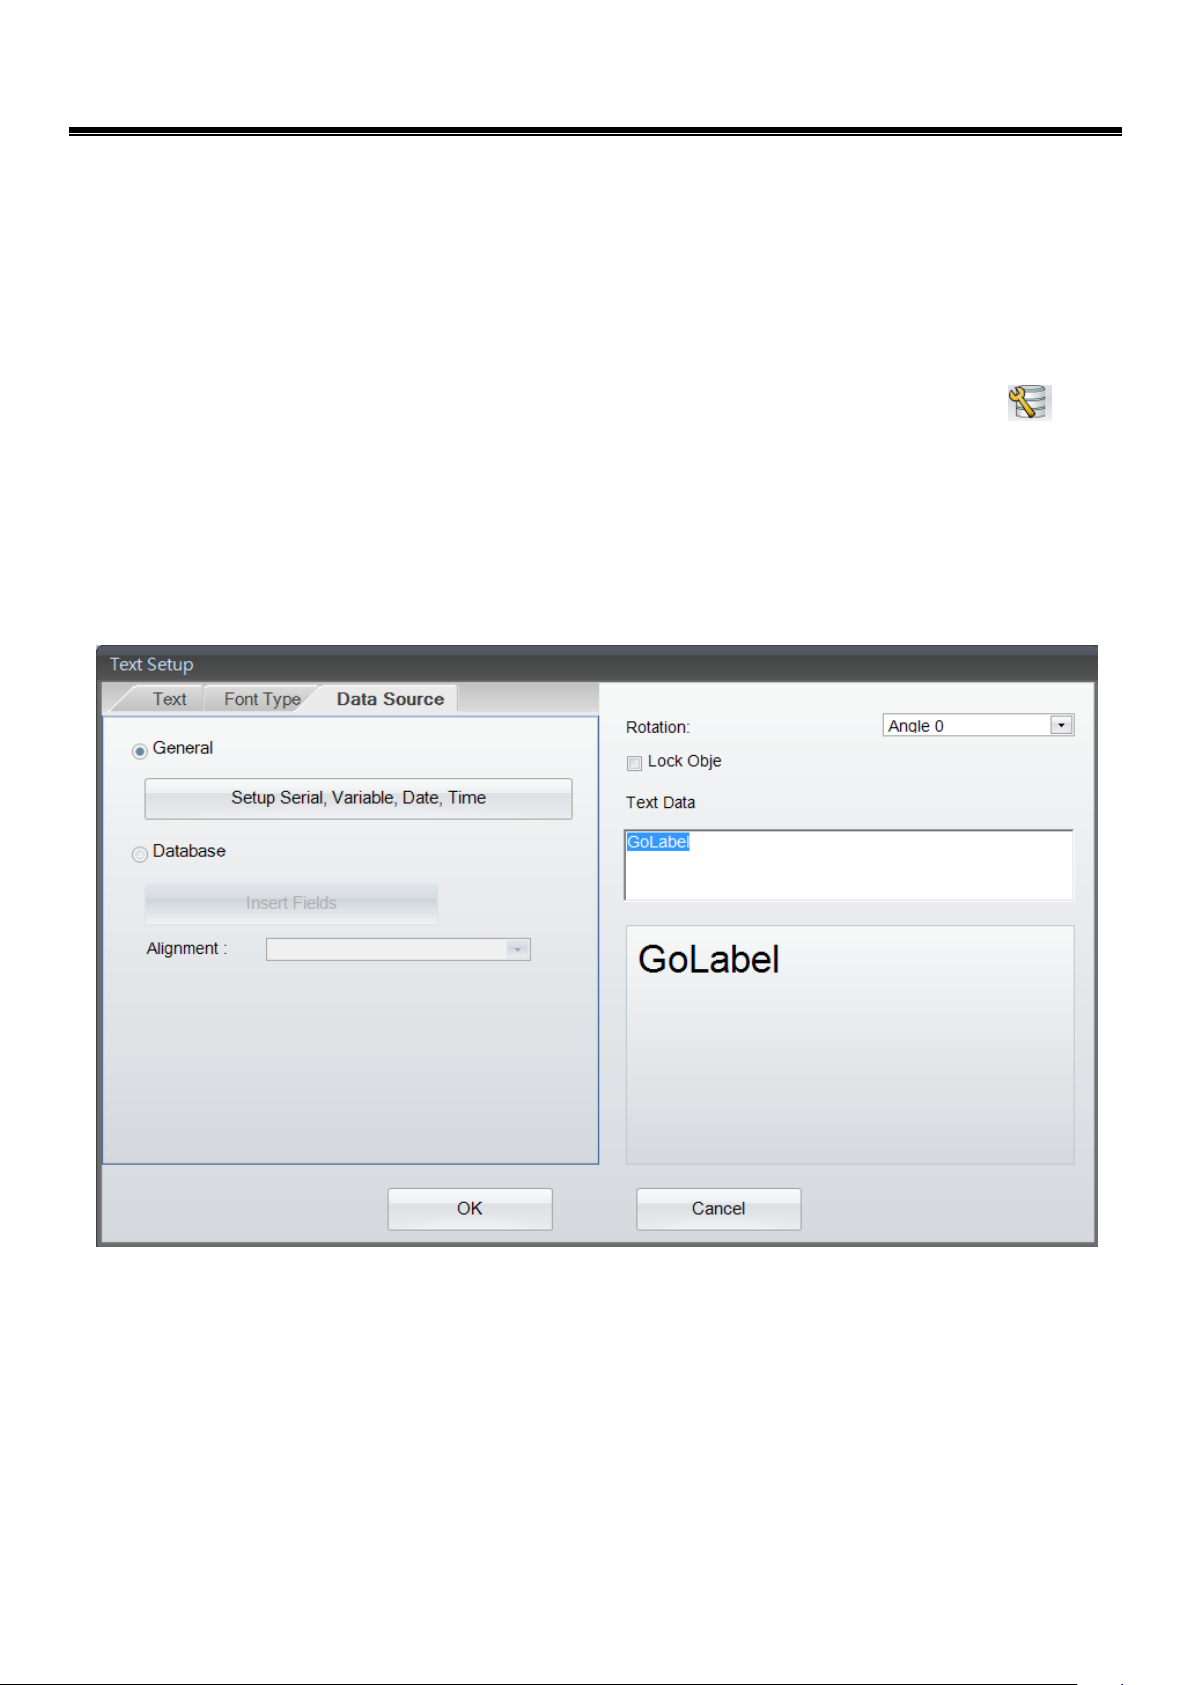
3) In the sub dialog “Data Source”, user can select where the text data going to come from - “General” or
“Database”
General: it select data source of text is coming from a pop up “self-defining table” that user can
setup the text stream with serial number, variable, data and time then.
Database: There are six databases (SQL, Access, Oracle, Excel, Txt, DBF) can be adopting when user
selected database in “Data Source” sub-dialog. In fact, it also can be created by the icon
“Database Query” in “Generic Tool Set”.
The detail of how to define serial number, variable and database, please refer to both paragraphs
“Variable and Serial Number” and “Database” in the chapters 5.2 to 5.5
18 V1.002f
Page 19

GoLabel On-line Help
4.8 Using the Fonts Provided by Windows
GoLabel supports Windows Fonts but has some limitations due to these fonts is created truly by dot-matrix not
like other fronts that built-in on printer. So, it may print slowly if selected too many Windows Fonts in the
labels. Besides, the text stream on the label with these Windows Fonts is not be able linking to database, serial
number for counting and variable for calculation, etc.
Select “Tex t ” in left side of screen, and then click icon
location that “Window Text” will be located and click left key again.
In the “Window Text Setup” dialog, click the “Font” it will pop up a sub-dialog for the font type and size
selection. It also can be rotated, and changed (converted) to graphic.
In case it “Changed to Graphic”, then the text will convert to “Graphic Object” and then download to
printer memory. This will helpful speed up the put-through-time, but it can’t be editing anymore when it
has been changed to Graphic.
in the “Object Too Set”, move cursor to the
19 V1.002f
Page 20
GoLabel On-line Help
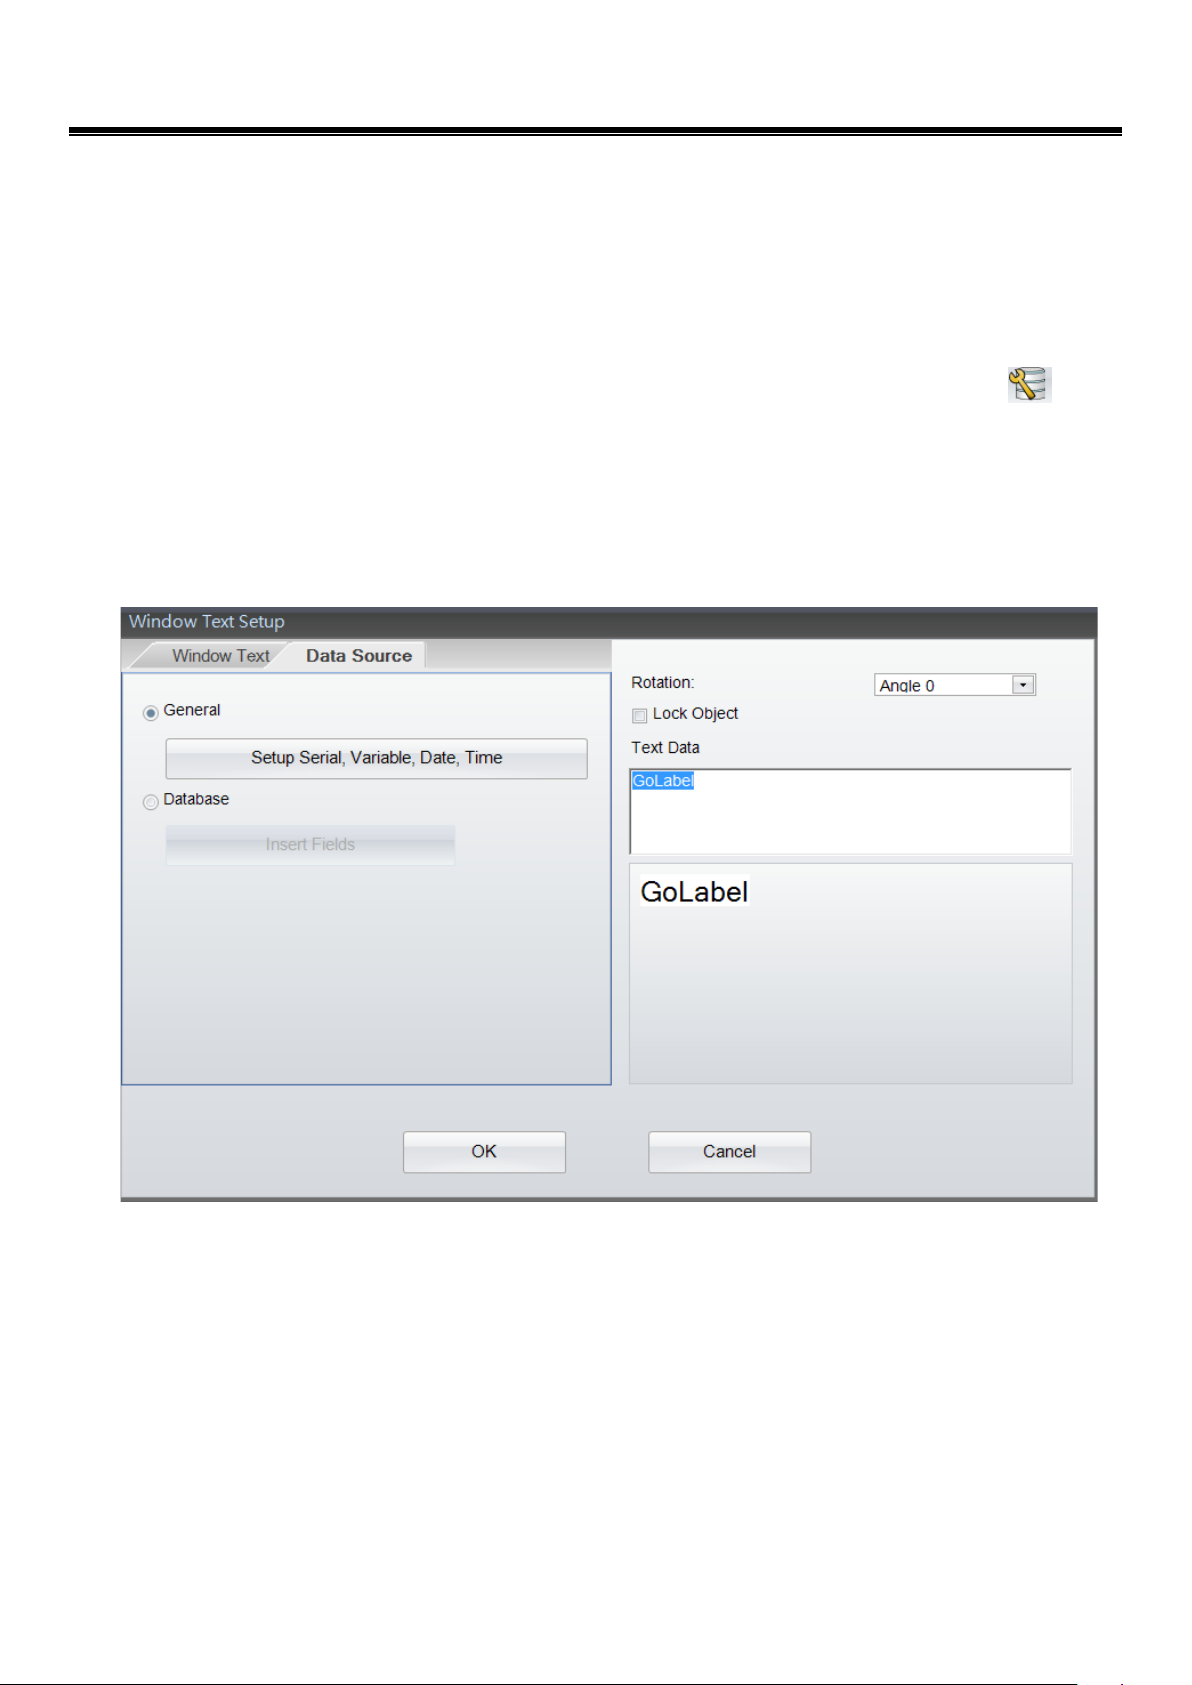
In the sub dialog “Data Source”, user can select where the text data going to come from - “General” or
“Database”
General: it select where the “Data Source” of text is coming from, which will pop up a “self-defining
table” that user can define the text stream with serial number, variable, data and time.
Database: There are six databases (SQL, Access, Oracle, Excel, Txt, DBF) can be adopting when user
selected database in “Data Source” sub-dialog. In fact, it also can be created by the icon
“Database Query” in “Generic Tool Set”.
The detail of how to define serial number, variable and database, please refer to both paragraphs
“Variable and Serial Number” and “Database” in the chapters 5.2 to 5.5
20 V1.002f
Page 21
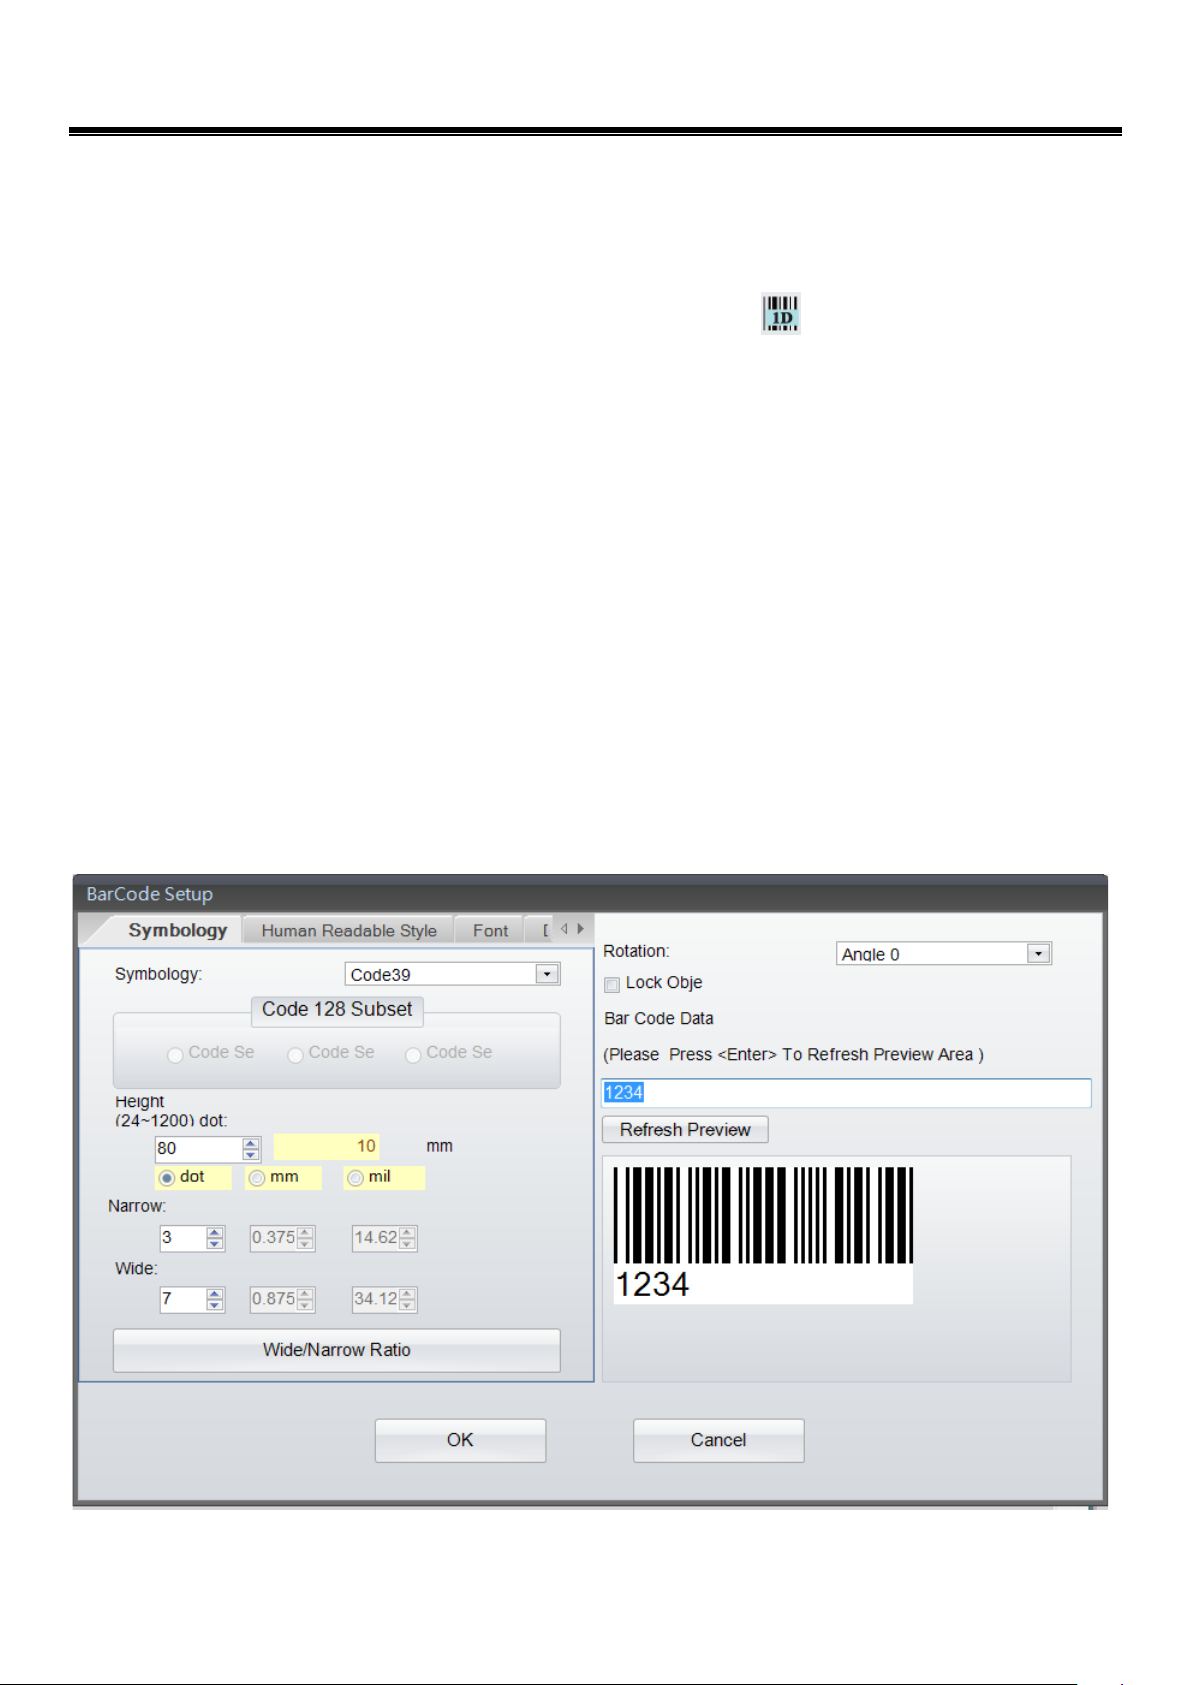
4.9 Create a Barcode
4.9.1 Create 1D Barcode
1) Symbology
GoLabel On-line Help
Select “Barcode” in the left side of screen, and then click the icon
cursor to the location that “1D Barcode” will be located and click left key again.
There are four sub-dialogs in the “Barcode Setup” – Symbology, Human Readable Style, Font and Data
Source
In the Symbology sub-dialog, choose barcode type first and then define its Height, Narrow, Width, and
Width/Narrow Ratio. Be sure to design a corrective barcode for scanner reading.
The barcode also can be rotated from 0, 90, 180- and 270 degree. A field of “Bar Code Data” may key-in
by users themselves.
After the completed of definition the Barcode, please click “Refresh Preview” to preview the designing
Barcode, or press “Enter Key” while you key-in the data to the field of “Bar Code Data”
There are many documents on the web or book story can be reference if someone is no idea how to
design the 1D barcode.
of the “Object Too Set”, and move
21 V1.002f
Page 22
GoLabel On-line Help
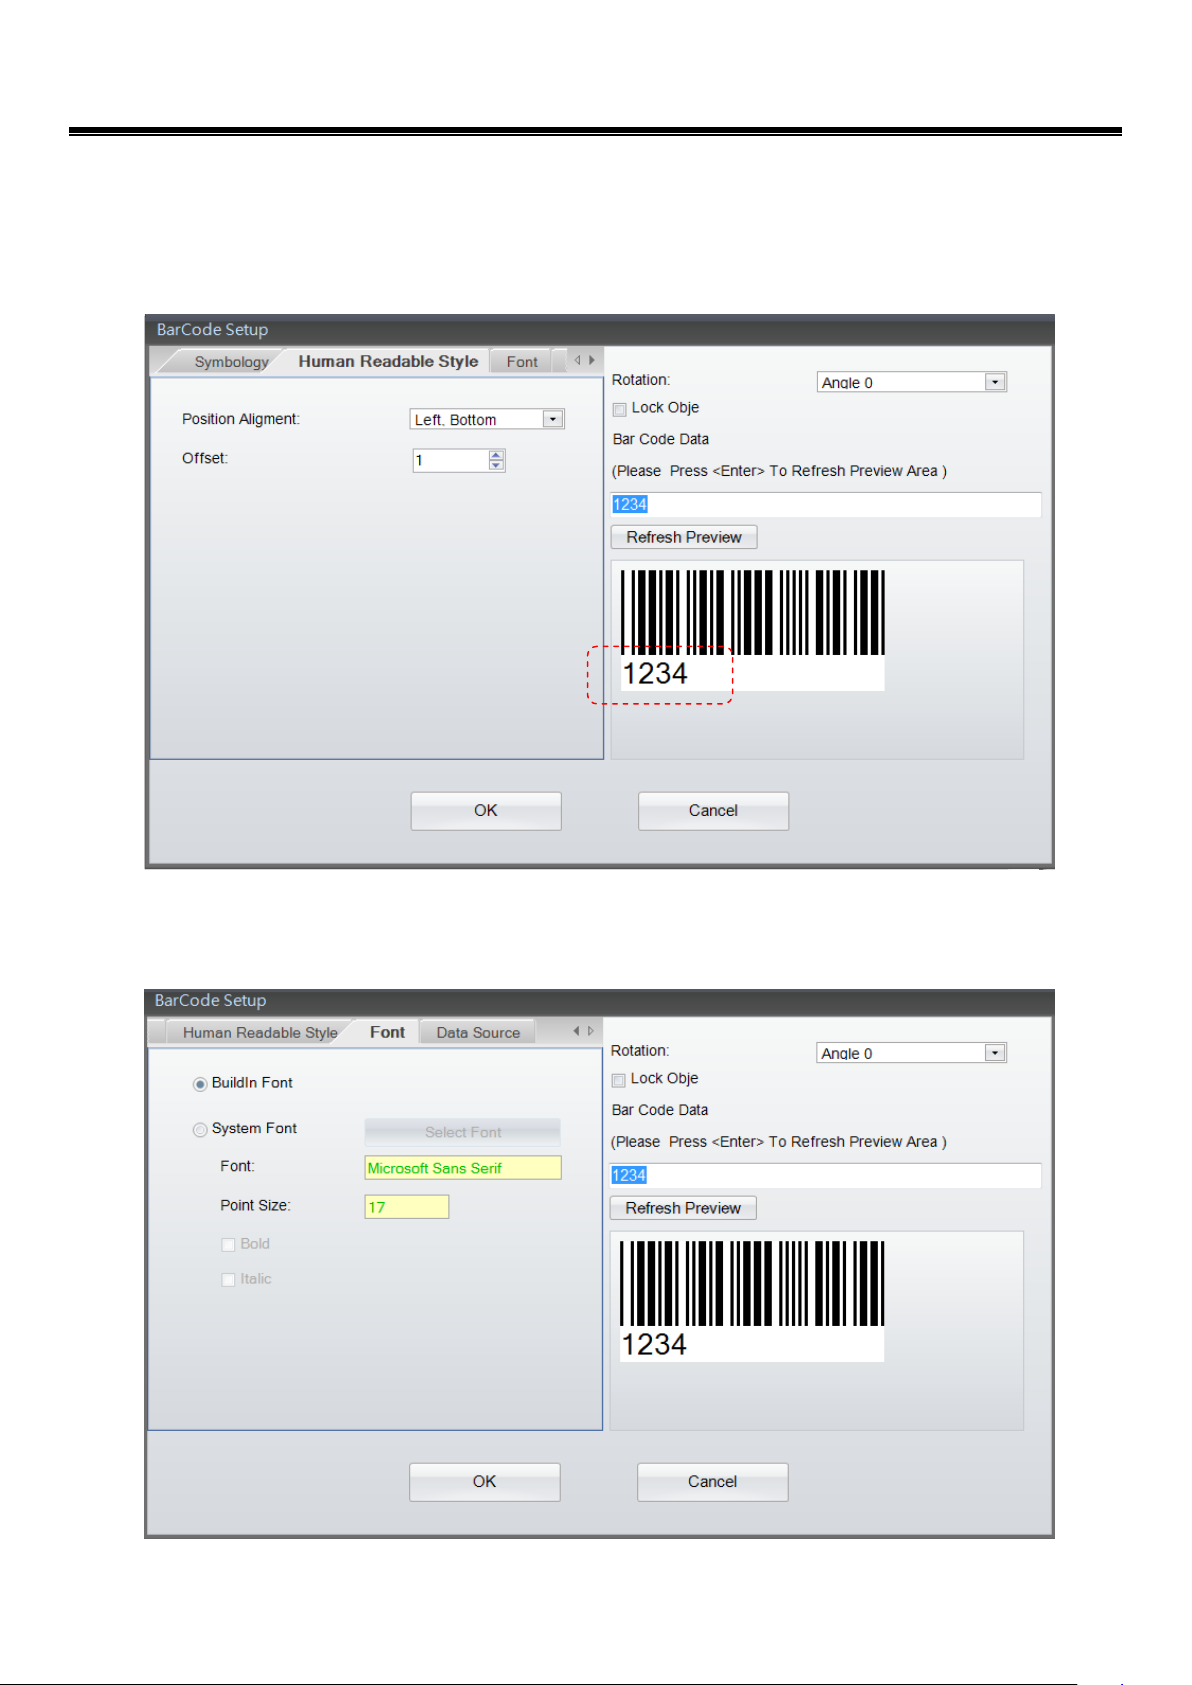
2) Human Readable Style
Click and enter to sub-dialog “Human Readable Style”, to select “Position Alignment” and “Offset” that
decides where the position of “TEXT” to be alignment, which also will update the display on “Preview”
window.
3) Font
Click and enter into sub-dialog “Font”, to define the font size, type and font, etc.
22 V1.002f
Page 23

GoLabel On-line Help
4) Data Source
In the sub dialog “Data Source”, user can select where the data source will be linked to Barcode - “General”
or “Database”
General: it select where the “Data Source” of Barcode is coming from, which will pop up a “self-defining
table” that user can define the text stream with serial number, variable, data and time.
Database: There are six databases (SQL, Access, Oracle, Excel, Txt, DBF) can be adopting when user
selected database in “Data Source” sub-dialog. In fact, it also can be created by the icon
Query” in “Generic Tool Set”.
The detail of how to define serial number, variable and database, please refer to both paragraphs
“Variable and Serial Number” and “Database” in the chapters 5.2 to 5.5
“Database
23 V1.002f
Page 24

4.9.2 Create GS1 DataBar
1) Symbology
GoLabel On-line Help
Select “Barcode” in left side of screen, then click the icon
to the location that “GS1 Databar” will be located and click left key again.
There three sub-dialogs in the “GS1 Databar Setup” – Symbology, Human Readable Style and Data Source
In the Symbology sub-dialog, choose the type of GS1 Databar first and then define its Height, Narrow and
Segs/Row then. Be sure to design a corrective GS1 Databar for scanner reading.
The GS1 Databar also can be rotated from 0, 90, 180- and 270 degree. A field of “Bar Code Data” may
key-in by users themselves.
After the completed of definition the GS1 Databar, please click “Refresh Preview” to preview the
designing GS1 Databar, or press “Enter Key” while the data is completed key-in to the field of “Bar Code
Data”
There are many documents on the web or book story can be reference if someone is no idea how to
design the GS1 Databar.
in the “Object Too Set”, and move cursor
24 V1.002f
Page 25

2) Human Readable Style
Click and enter to sub-dialog “Human Readable Style”, to select “Position Alignment” that decides where
the position of “TEXT” to be alignment, which also will update the display on “Preview” window.
GoLabel On-line Help
25 V1.002f
Page 26

GoLabel On-line Help
3) Data Source
In the sub dialog “Data Source”, user can select where the GS1 Databar going to come from - “General” or
“Database”
General: it select where the “Data Source” of GS1 Databar is coming from, which will pop up a
“self-defining table” that user can define the text stream with serial number, variable, data and time.
Database: There are six databases (SQL, Access, Oracle, Excel, Txt, DBF) can be adopting when user
selected database in “Data Source” sub-dialog. In fact, it also can be created by the icon
Query” in “Generic Tool Set”.
The detail of how to define serial number, variable and database, please refer to both paragraphs
“Variable and Serial Number” and “Database” in the chapters 5.2 to 5.5
“Database
26 V1.002f
Page 27

4.9.3 Create MaxiCode
Select “Barcode” in left side of screen, then click the icon for Maxicode creating
Move cursor to the location where the Maxicode will be creating, and press left key of mouse then
It will pop up a dialog below, please Key-in and select the parameters of Maxicode
GoLabel On-line Help
27 V1.002f
Page 28

GoLabel On-line Help
In the sub dialog “Data Source”, user can select where the Maxicode going to come from - “General” or
“Database”
General: it select where the “Data Source” of Maxicode is coming from, which will pop up a “self-defining
table” that user can define the text stream with serial number, variable, data and time.
Database: There are six databases (SQL, Access, Oracle, Excel, Txt, DBF) can be adopting when user
selected database in “Data Source” sub-dialog. In fact, it also can be created by the icon
Query” in “Generic Tool Set”.
The detail of how to define serial number, variable and database, please refer to both paragraphs
“Variable and Serial Number” and “Database” in the chapters 5.2 to 5.5
“Database
28 V1.002f
Page 29

4.9.4 Drawing PDF417
Select “Barcode” in left side of screen, then click the icon for PDF417 creating
Move cursor to the location where the PDF417 will be creating, and press left key of mouse then
It will pop up a dialog below, please Key-in and select the parameters of PDF417
GoLabel On-line Help
29 V1.002f
Page 30

GoLabel On-line Help
In the sub dialog “Data Source”, user can select where the PDF417 going to come from - “General” or
“Database”
General: it select where the “Data Source” of PDF417 is coming from, which will pop up a “self-defining
table” that user can define the text stream with serial number, variable, data and time.
Database: There are six databases (SQL, Access, Oracle, Excel, Txt, DBF) can be adopting when user
selected database in “Data Source” sub-dialog. In fact, it also can be created by the icon
Query” in “Generic Tool Set”.
The detail of how to define serial number, variable and database, please refer to both paragraphs
“Variable and Serial Number” and “Database” in the chapters 5.2 to 5.5
“Database
30 V1.002f
Page 31

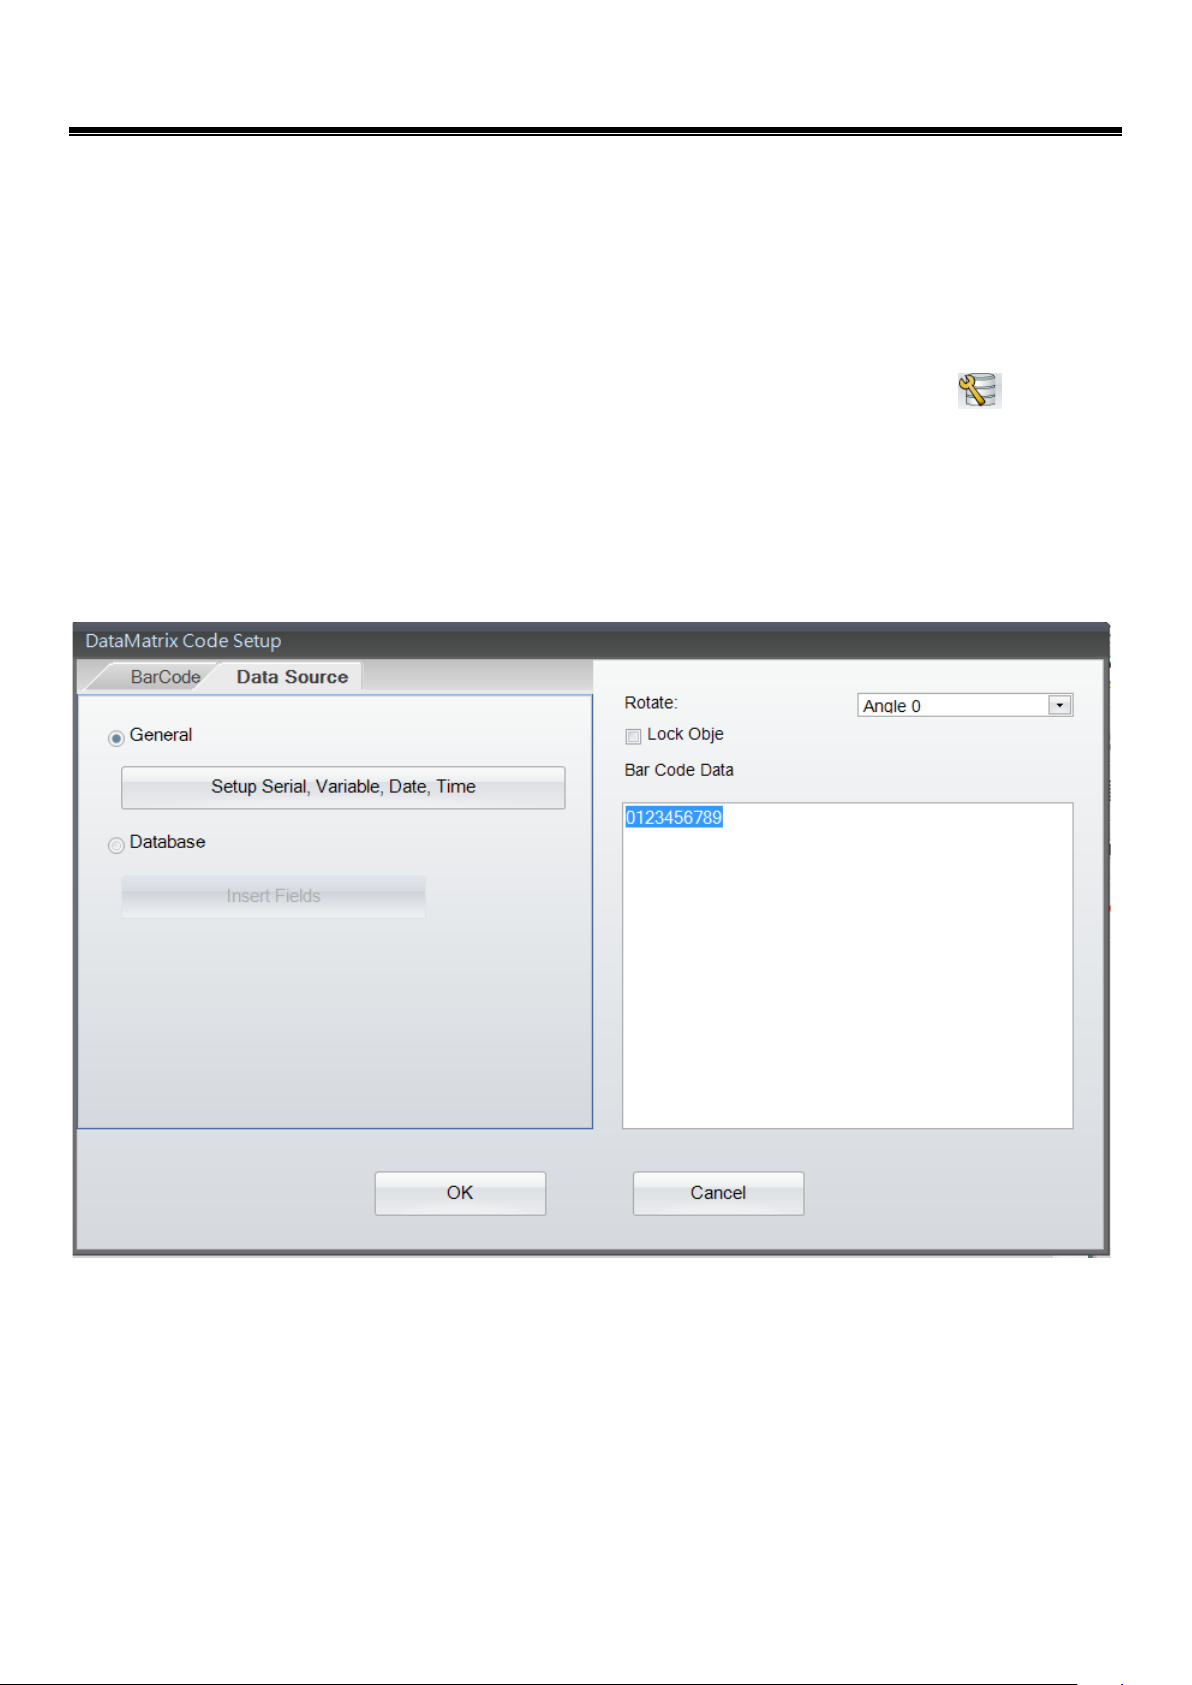
4.9.5 Create DataMatrix Code
Select “Barcode” in left side of screen, then click the icon for DataMatrix creating
Move cursor to the location where the DataMatrix will be creating, and press left key of mouse then
It will pop up a dialog below, please Key-in and select the parameters of DataMatrix
GoLabel On-line Help
31 V1.002f
Page 32
GoLabel On-line Help
In the sub dialog “Data Source”, user can select where the DataMatrix going to come from - “General” or
“Database”
General: it select where the “Data Source” of DataMatrix is coming from, which will pop up a
“self-defining table” that user can define the text stream with serial number, variable, data and time.
Database: There are six databases (SQL, Access, Oracle, Excel, Txt, DBF) can be adopting when user
selected database in “Data Source” sub-dialog. In fact, it also can be created by the icon
Query” in “Generic Tool Set”.
The detail of how to define serial number, variable and database, please refer to both paragraphs
“Variable and Serial Number” and “Database” in the chapters 5.2 to 5.5
“Database
32 V1.002f
Page 33

4.9.6 Create QRCode
Select “Barcode” in left side of screen, then click the icon for QRCodex creating
Move cursor to the location where the QRCodex will be creating, and press left key of mouse then
It will pop up a dialog below, please Key-in and select the parameters of QRCodex
GoLabel On-line Help
33 V1.002f
Page 34

GoLabel On-line Help
In the sub dialog “Data Source”, user can select where the QRCodex going to come from - “General” or
“Database”
General: it select where the “Data Source” of QRCodex is coming from, which will pop up a “self-defining
table” that user can define the text stream with serial number, variable, data and time.
Database: There are six databases (SQL, Access, Oracle, Excel, Txt, DBF) can be adopting when user
selected database in “Data Source” sub-dialog. In fact, it also can be created by the icon
Query” in “Generic Tool Set”.
The detail of how to define serial number, variable and database, please refer to both paragraphs
“Variable and Serial Number” and “Database” in the chapters 5.2 to 5.5
“Database
34 V1.002f
Page 35

GoLabel On-line Help
4.10 Drawing Line, Rectangle and Circle
4.10.1 Drawing Line (Horizontal Line, Vertical Line and Oblique Line)
Select “Shape” in left side of screen, and then click either icon of the drawing tool - Horizontal
Line
Move cursor to the location where the first point of line will be drawing, press left key of mouse and
drag it to end point and release it then.
The object’s location and length are movable and adjustable by mouse with left key dragging while
it’s being selected.
Double click to the line that will pop up a “Setup” dialog for the length and thickness editing
, Vertical Line or Oblique Line .
35 V1.002f
Page 36

4.10.2 Drawing Filled Rectangle
Select “Shape” in left side of screen, and then click the icon for filled rectangle drawing
Move cursor to the location where the first point of rectangle will be drawing, press left key of
mouse and drag it to end point and release it then.
The object’s location, width and height are movable and adjustable by mouse with left key dragging
while it’s being selected.
Double click to the rectangle that will pop up a “Setup” dialog for the width and height editing
GoLabel On-line Help
36 V1.002f
Page 37

4.10.3 Drawing Box or Rectangle
Select “Shape” in left side of screen, and then click the icon for box/rectangle drawing
Move cursor to the location where the first point of box/rectangle will be drawing, press left key of
mouse and drag it to end point and release it then.
The object’s location, width and height are movable and adjustable by mouse with left key dragging
while it’s being selected.
Double click to the box/rectangle that will pop up a “Setup” dialog for the width, height and
thickness editing
GoLabel On-line Help
37 V1.002f
Page 38

GoLabel On-line Help
4.10.4 Drawing Rounded Rectangle
Select “Shape” in left side of screen, and then click the icon for rounded rectangle drawing
Move cursor to the location where the first point of rounded rectangle will be drawing, press left key
of mouse and drag it to end point and release it then.
The object’s location, width and height are movable and adjustable by mouse with left key dragging
while it’s being selected.
Double click to the rounded rectangle that will pop up a “Setup” dialog for the width, height,
thickness, fill pattern and brush color editing
38 V1.002f
Page 39

4.10.5 Drawing Circle or Ellipse
Select “Shape” in left side of screen, and then click the icon for circle/ellipse drawing
Move cursor to the location where the first point of circle/ellipse will be drawing, press left key of
mouse and drag it to end point and release it then.
The object’s location, width and height are movable and adjustable by the dragging while user
presses the left key of mouse on the object when it’s being selected.
Double click to the circle/ellipse that will pop up a “Setup” dialog for the width, height, thickness, fill
pattern and brush color editing
GoLabel On-line Help
39 V1.002f
Page 40

GoLabel On-line Help
4.11 Create Graphic
Select “Graphic” in left side of screen, and then click the icon for Graphic creating
Move cursor to the location where the “Graphic” will be creating, and press left key of mouse then.
In the Graphic dialog, select “Graphic Source” will pop up a sub-dialog to load graphic/image from either -
file, clipboard or a downloaded graphic.
Select the downloaded graphic in printer, user can choose where the Graphic going to come from - “General” or
“Database”
General: it select “Graphic”, user can define the text stream of Graphic with serial number, variable, data
and time.
Database: There are six databases (SQL, Access, Oracle, Excel, Txt, DBF) can be adopting when user
selected database in the dialog. In fact, it also can be created by the icon
“Generic Tool Set”.
The detail of how to define serial number, variable and database, please refer to both paragraphs
“Variable and Serial Number” and “Database” in the chapters 5.2 to 5.5
To remove/delete the printer’s saved “Graphic”, please go on the “Advance Tool Set”, which has an icon
“Delete Printer Object”
“Database Query” in
40 V1.002f
Page 41

GoLabel On-line Help
In the sub-dialog “Graphic Operation”, the graphic can be defining and/or processing with width, height, rotation
angle and color.
4.12 Lock Object
In entire “Object” dialogs, it has a function called “Lock Object” that allowed user to lock the object not for move or
modify.
Select “Lock Object” in the dialog to lock object not be moving or modify.
If user wants removing a “Lock Object”, please double click “Object” itself, enter the dialog to deselect “Lock Object”
this function and choose “OK” to close, then the Object will be unlock.
41 V1.002f
Page 42

GoLabel On-line Help
5. Advance Operation
5.1 Command Format
A label has been well created or during the editing; user may click the icon “Export” in the Command Area,
to export/convert the entire parameters and contents in the “Label Design Area to become “Text/ASCII Commands
Format” on the Command Area. Then it can be saved as a pure “TEXT/ASCII” file by the icon
printer directly by the icon “Send”
To retrieve a saved “TEXT/ASCII” file back, please open it by the icon “Open”
Label Design Area by the icon “Import”
.
.
, and then import it back to the
, or send it to
The labels exported to the Command Area in “TEXT/ASCII” format and can be editing and saving as a
“TEXT/ASCII” file on PC. Thus, in DOS mode, user may work on this file with DOS commands - COPY,
PRINT, TYPE, etc. to manipulate this “TEXT/ASCII” file and then send/print it to the printer directly.
Besides, the commands in the Command Area are exported direct from the Label Design Area. For
certain high level application, GoLabel provides these quickly and convenient of operation tools for SI
engineer and software designer.
42 V1.002f
Page 43

5.2 Using Serial Number
5.2.1 Create Serial Number
In the Barcode, Text, Graphic of the Object Dialogs, It has a sub-dialog “Data Source” or “Graphic Source”, which can
choose “General” and then click “Setup Serial, Variable, Date, Time” to open a 3
GoLabel On-line Help
rd
level dialog respectively.
th
Click “Edit” in the dialog of “Setup Serial, Variable, Date, Time” to open a 4
After Editing, please select which one and click “Insert” to insert serial number to the Object.
level dialog “Serial Number Maintain”.
43 V1.002f
Page 44

GoLabel On-line Help
Select the editing column first and click “Add”, key-in its “Starting Value” and other parameters, then click
“Modified” to confirm. Repeat this editing to the rest columns and until all the columns of serial number are done.
“Prompt for value before print” is set, printer will stop and display a “Prompt” message on Printer (Standalone
Model only) and waiting for user to enter starting value
For Example (make three S/N in a text stream “GoLabel” :
In column 0: Click “Add” first, Set “Starting Value” to 1 and other parameters, then Click “Modified”
In column 1: Click “Add” first, Set “Starting Value” to 100 and other parameters, then Click “Modified”
In column 2: Click “Add” first, Set “Starting Value” to 1000 and other parameters, then Click “Modified” and “OK”
to close the dialog back to last dialog - “Setup Serial, Variable, Date, Time”
Hence, it has 3 serial numbers can be selected by the Object of this designing Label.
Select which on of Serial Number first and click “Insert”, repeat select C0, C1 and C2 then,
The result is “^C2 ^C1 ^C0 GoLabel”. (A space is manually inserted in between the S/N 0, 1 and2)
The Print Out is first label “1000 100 1 GoLabel”, second “1001 101 2 GoLabel”, third “1002 102 3 GoLabel”, etc.
44 V1.002f
Page 45

GoLabel On-line Help
5.2.2 Editing Serial Number
Double click the Object that the serial number will be modifying
The editing procedures are similar to the creating, just select the row that wants to modify and makes the
editing directly.
There are two more icons are reserved for editing. The icon “Clear” – it remove serial number one by one,
“Clear All” that deletes all the serial numbers in once.
45 V1.002f
Page 46

5.3 Using Variable
Be noted: Variable Create in GoLabel is for the printer that working in “Standalone” mode and operating with “Recall
Label” only.
5.3.1 Create Variable
In the Barcode, Text, Graphic of the Object Dialogs, It has a sub-dialog “Data Source” or “Graphic Source”, which can
choose “General” and then click “Setup Serial, Variable, Date, Time” to open a 3
GoLabel On-line Help
rd
level dialog respectively.
Click “Edit” in the dialog of “Setup Serial, Variable, Date, Time” to open a 4
Editing, please select which one and click “Insert” to insert “Variable” to the Object.
Select the editing column first and click “Add”, key-in its “Set Maximum Number of Character” and other
parameters, then click “Modified” to confirm. Repeat this editing to the rest columns and until all the columns of
Variable is done.
“Prompt for value before print” is set, printer will stop and display a “Prompt” message on Printer (Standalone
Mode only) and waiting for first starting value input and enter (Bug)
For Example (make two variables in a text stream “GoLabel”:
Select column 0: Click “Add” first, Set “Set Maximum Number of Character” to 3 and other parameters, then Click
“Modified”
Select column 1: Click “Add” first, Set “Set Maximum Number of Character” to 4 and other parameters, then Click
“Modified”
Hence, it has two variables can be selected by the Object of this designing Label.
th
level dialog - “Variable Maintain”. After
Select which one of Variable first and click “Insert”, repeat select V00 and V01 then,
The result is “^V01 ^V00 GoLabel”. (A space is manually inserted in between the variable 0 and 1)
The Print Out is depended on what variables are input when prompting, first label “VAR1 VAR GoLabel”, second
“var1 var GoLabel”, etc.
46 V1.002f
Page 47

GoLabel On-line Help
47 V1.002f
Page 48

GoLabel On-line Help
5.3.2 Editing Variable
Double click the Object that the “Variable” will be modifying
The editing procedures are similar to the creating, just select the row that wants to modify and makes the
editing directly.
There are two more icons are reserved for editing. The icon “Clear” – it removes the selected variable one
by one, “Clear All” that deletes all the variables in once.
48 V1.002f
Page 49

GoLabel On-line Help
5.4 Date Time setting
5.4.1 Setting Date/Time to the RTC of Printer
Click the Icon “Printer Date Time Setting” from Advance Tool Set
Set the date/time in the dialog - “RealTime Clock Setup” and then click “OK”
Or, Just click “OK” to load PC’s date/time to the Printer’s RTC
5.4.2 Add Date/Time in Label
In the Barcode, Text, Graphic of the Object Dialogs, It has a sub-dialog “Data Source” or “Graphic Source”, which can
choose “General” and then click “Setup Serial, Variable, Date, Time” to open a 3
Click the icon “Edit” in the dialog of “Setup Serial, Variable, Date, Time” to open a 4
Setup” After selection, please click either or both icons “Insert” to insert the RTC’s Date/Time to the Object.
rd
level dialog respectively.
th
level dialog “Date/Time Format
49 V1.002f
Page 50

GoLabel On-line Help
User selects preferring Date/Time format directly, or click icon “More” for comprehensive setup
After selection, click “OK” and then back to the previous dialog for Date/Time insertion. Select “Expiration
Date/Time and click the icon - “Insert” to insert date/time and expiration date/time if necessary
Please be sure the printer is “Ready” before that sends the commands to the printer
50 V1.002f
Page 51

5.5 Database Linkage
Database linkage provides the function for label to link with the database files, such as Excel, Access and dBase.
5.5.1 Connect Database
There are two ways for linkage; both will pop up two dialogs - “Database Query” and then “Connection” for Database
selection.
GoLabel On-line Help
Click the icon “Database Select”
Or, in the Barcode, Text, Graphic of the Object Dialogs, It has a sub-dialog “Data Source” or “Graphic Source”,
which can choose to click the icon “Database”.
of Generic Tool Set to make the database linkage.
51 V1.002f
Page 52

GoLabel On-line Help
GoLabel will pop up two overlay dialogs immediately; select which database going to link. For example, an
Excel file – “test-1.xlsx”, click “OK” to close the “Connection” dialog.
5.5.2 Select Database
In the dialog of “Database Query”, selecting “Data Table” will show the Excel file contents as below.
52 V1.002f
Page 53

GoLabel On-line Help
For example with “Text Setup” dialog:
When the database is connected successful, the object dialogs – Barcode, Text and Graphic may link to
“Database” by click “Insert Fields” and select which field will be insert to “TEXT”
53 V1.002f
Page 54

5.6 Printer with LAN Port
5.6.1 Search Printer
In case the printer is connected by Ethernet LAN port, please click the icon in “Generic Tool Set”; select
“LAN Port” in the dialog of Printer Interface and save then.
GoLabel On-line Help
Next step is to click the icon in “Advance Tool Set”, which will search to the Ethernet networking and
find out where the GoDEX printer is as following dialog.
54 V1.002f
Page 55

5.6.2 Setting IP Address
Click the icon in “Advance Tool Set”, the IP address will be get from DHCP Server
automatically, or select “Static IP” to key in it by user manually.
GoLabel On-line Help
55 V1.002f
Page 56

GoLabel On-line Help
5.7 Download Graphic/Font/Label/DBF/Cmd
5.7.1 Download Font
Click the icon in the “Advance Tool Set” and entering to the dialog “Object Download”. Click the icon
and then select “Font” to download.
Select Font, type, size and others in the Windows dialog, then click “OK” to download. The Font ID can be selected
from VA to VZ in the dialog of “Please Select a Font ID” or use the default ID name in the sub-dialog.
In some advance models (RT200i, RT700i, EZ2250i), they all have an USB Host port that can plug-in “USB Memory
Stick” for Graphic, Font, Label, DBF and Cmd download.
Click the icon “Printer Control”
“Extended Memory” (this function only for the model it has an “External USB Memory Stick”). While all the fonts are
selected, click “Start Download” to download fonts to either – “Flash Memory” in printer, or “USB Memory Stick” if it
plug-in.
When user plug-in “USB Memory Stick” to the advance “I” model printer. The printer will switch the “User Memory”
from internal “Flash” to external “Extended Memory” immediately unless remove the USB Memory Stick out or user
reselect back to “Flash” by the menu “Switches the Memory” at the icon of “Printer Control”.
Detail operation of the icon of “Printer Control”, please refer to chapter 7.1
in “Advance Tool Set” and select “Switch the Memory” to either “Flash”, or
56 V1.002f
Page 57

GoLabel On-line Help
57 V1.002f
Page 58
GoLabel On-line Help
5.7.2 Check Download files in Flash or Extended Memory
User can check the status of download file by click the icon “Synchronize Printer and GoLabel Object Record”
in “Advance Tool Set”
The dialog below shows that both (one Bitmap Font and one Label) are downloaded to the memory either - Flash or
Extended Memory which is selected by default or by GoLabel manually.
58 V1.002f
Page 59

GoLabel On-line Help
5.7.3 Download Label Format
Click the icon in the “Advance Tool Set” and entering to the dialog “Object Download”. Click the icon
“Label Formats”, it will select current “Editing Label” and asking the name in the sub-dialog, then click “Start
Download” to download “Label Format” to the User Flash of the pr i nt e r.
59 V1.002f
Page 60

GoLabel On-line Help
5.7.4 Other Object
The download procedures of other objects (Graphic, DBF and Cmd) are all similar to the Font and Label of above; they
are all downloaded to the available space of either “Flash” or “Extended Memory” that selects by printer default or by
user at GoLabel in manually.
5.7.5 Delete Printer Object
Click the icon “Delete Printer Object” and select which objects want to delete by right key of mouseand click
“Delete” to remove them.
Only Graphic and Label are able to preview in the Window of “Object Thumbnail” while cursor move to the object
which user wants to preview.
60 V1.002f
Page 61

GoLabel On-line Help
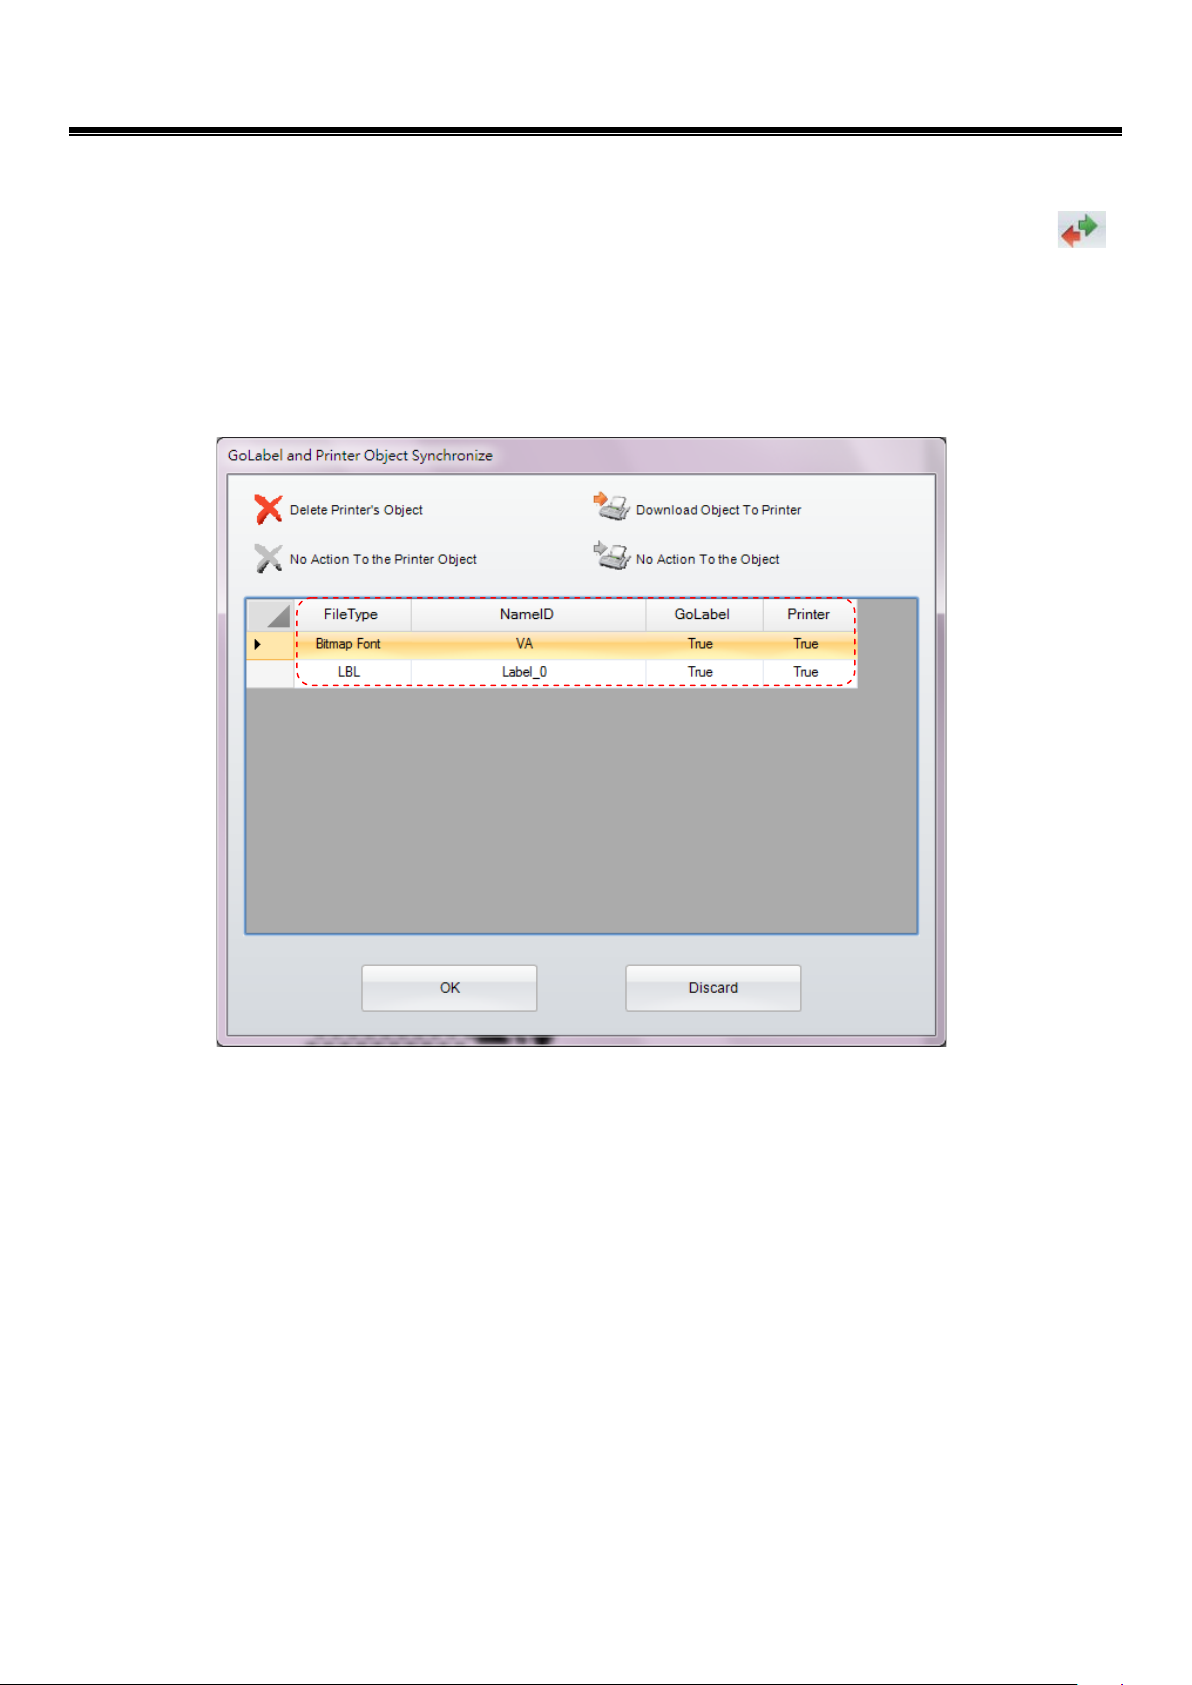
5.7.6 Synchronize GoLabel Objects with Printer
This Function will synchronize the downloaded objects in GoLabel to the connecting printer.
Click the icon “Synchronize Printer and GoLabel Object Record”
dialog “GoLabel and Printer Object Synchronize” which will display what object is existed in the connecting printer
and GoLabel itself.
Below dialog showing, Bitmap Font VA and label T001 are existed in GoLabel software but “False” in the printer;
then click “OK” if user wanted to synchronize all the GoLabel existed objects to the Printer, thus both status are
changed to “True” when synchronization (copy) completed.
in “Advance Tool Set”, entering into the
61 V1.002f
Page 62

GoLabel On-line Help
5.8 USB Disk Access Function
5.8.1 Main Display Screen
Click right button of mouse and select “USB Disk Access’’.
File type which can be downloaded are Labels, Graphics, Fonts, TTF, TTF Table and DBF. Setup “USB Disk Path”
where you are going to save the files. Select file type which would like to download.
62 V1.002f
Page 63

GoLabel On-line Help
Input relevant settings and click OK.
63 V1.002f
Page 64

GoLabel On-line Help
LABELDIR folder will be created automatically. Downloaded file will be saved in the subdirectory. (for example:
H:/LABELDIR/LBL)
Put the USB disk onto printer. Printer can recall label file and carry out standalone operation.
64 V1.002f
Page 65

GoLabel On-line Help
5.8.2 Text Setup
Click Printer Text of Object tool set on the left side and select “Font Type” tape. Check “Download Font To UDisk
(USB Disk)” and setup UDisk Path.
Select to font type you are doing to download.
65 V1.002f
Page 66

Font downloaded.
GoLabel On-line Help
LABELDIR folder will be created automatically. Downloaded file will be saved in the subdirectory. (for example:
H:/LABELDIR/ ASIAFONT)
66 V1.002f
Page 67

GoLabel On-line Help
5.8.3 Download Objects to Printer
Click on the Advance tool set. Check the box and setup the Download To UDisk Path. Select the objects you
are going to download then click “Start to Download” button.
Check the downloaded file in the USB disk. LABELDIR folder will be created automatically. Downloaded file will be saved in
the subdirectory. (for example: H:/LABELDIR/LBL)
67 V1.002f
Page 68

GoLabel On-line Help
6. Barcode Application
6.1 EAN-128 / GS1 Databar with AI
6.1.1 Application Identifiers
GoLabel supports the data format of Application Identifiers (AI) for EAN-128. The data format of AI is consisting by 2 to 4
digits of AI leading code that defines the significant and format of the following subsequence data. For instance, (11) in AI
definition is representing the production date; the format is n2+n6. The n2 is meant that AI code is consisted by two digits;
following n6 is comprised by 6 digits of the format (YYMMDD) of production date. The detail of how to define AI data
format, please refer to the relevant documents of AI definition standard.
In the field of “Bar Code Data” of EAN-128, the data being key-in, GoLabel will display it on the preview window. For
example, user key-in “11090227” in the field, it met to n2+n6 AI standard, (11) with production data “090227”, then it will
convert to “(11)090227” and display in the preview window below.
68 V1.002f
Page 69

6.1.2 AI Wizard
1) EAN-128
GoLabel provides a function “AI Wizard” for user to checking the AI rule of data. If necessary, user may click “AI
Wizard” to enter to the dialog that assists user defining the AI code and also helpful to check the corrective of
AI rule then.
In the left side of dialog, it has AI codes for selection and will display a sample format on the top of field for
user reference when selected it, such as (11)090423.
It can be either: input the data (110090227) to the field of “Check Data” by user himself; or, double click the AI
code (e.g., 11 Production Data (YY/MM/DD) in the left side of dialog, then it will auto fill-in AI code to the right
side of dialog, and input date (090207) to the “DATA” field also.
Click the “check 1”, AI Wizard will check the corrective of input data. If the data is corrected, the dialog will
allow user to input next data in following row.
Repeat the procedure 2
in second row; and click “Combine” that will integrate all the data together on the field of “Check Data”. Please
click “OK” that back to main screen and an EAN-128 barcode will be created as follow.
GoLabel On-line Help
nd
to 3rd for further data input until finish, i.e., (12) Due Date (YY/MM/DD) and 110526
69 V1.002f
Page 70

GoLabel On-line Help
2) GS1 Databar
Not just AI Wizard in EAN-128 of 1D barcode, the GS1 Databar Expanded and GS1 Databar Expanded Stacked also
provide AI Wizard in their dialog of GS1 DataBar Setup as below.
Select Symbology and click Expanded or Expanded Stacked. An icon of AI Wizard in the subdialog can be clicked to
assist user defining the AI code and also helpful to check the corrective of AI rule then.
The Detail, please referring “AI Wizard” in previous chapter.
70 V1.002f
Page 71

GoLabel On-line Help
:
7. Further Advance Tool Set
7.1 Printer Control
The icon “Printer Control” can be clicked to provides 10 functions for printer control and status display as
follow:
Display Memory
of the internal and external USB memory on label by selection
Print Head Test:Make a print head testing and print a net pattern on a label of the printer
Reset Printer:Warm start up the printer that clears and resets the DRAM memory
Print Version Message:it will print the model name, F/W version, system configuration and parameters out on the
labels。
Print Previous Printed Label: A last printed label will be reprinted again
Paper Forward:Directly move the printer forward by user selecting mm
Paper Backward:Directly move the printer backward by user selecting mm
Buzzer:Set the buzzer of printer to On or Off
Switch the Memory:Switch memory to either – internal Flash or Extended USB Memory stick
Auto Sensing:Auto sensing and detecting the specification of media
it will print the entire file name of either - Label Format, Graphic, Font, Asian Font and free space
71 V1.002f
Page 72

GoLabel On-line Help
7.2 Virtual Terminal
1) Click the icon “Virtual Terminal” will pop up a dialog to emulate the function of virtual terminal for user to
send EZPL command to control printer directly.
2) Click the icon “Language”
3) Click the icon “Style Settings”
Office 2010 or Windows 7。
to set the preferring language for user that up to 19.
to set the preferring color to GoLabel operation screen, such as Office 2007,
72 V1.002f
 Loading...