

Gigaset DE700 IP PRO User Manual

DE700 IP PRO
DE700
IP PRO

Gigaset DE700 IP PRO – More than just a telephone
Gigaset DE700 IP PRO – More than just a telephone
Your Gigaset DE700 IP PROis an IP phone designed for professional use.
u Easy to set up
Use automatic configuration or the default settings for approx. 200 preconfigured
VoIP providers.
u Web user interfaces for configuration
Operate and configure your telephone from your PC with ease.
u High Definition Sound Performance – HDSP
Make phone calls with brilliant sound quality.
u Phone functions for the professional user
Use the call divert, conference call, automatic ringback, call reject and Do Not Disturb
(DND) functions.
u Multiple directories
Manage your personal directory with up to 500 vCards (caller pictures are possible).
Use an LDAP directory or online directories on the Internet.
u Network connection
Connect your telephone to the local network via Ethernet. Connect a PC using your telephone as a gigabit Ethernet switch.
u Protect the environment
Reduce environmental pollution with the power-saving power adapter .
u Individual settings
Load your own pictures and ringers, subscribe to Internet services and choose how
you want the display to look.
Assign functions or frequently used numbers to the keys.
Further information about your phone can be found at
www.gigaset.com/pro
2
www.InternetVoipPhone.co.uk | sales@internetvoipphone.co.uk | 0800 088 4846

Phone overview
Understanding the keys
21 3 4 5
6 7 8 9
10 11 12 13 14 15
Phone overview
1 Mute key Activate/deactivate microphone (mute) £Page 36
2 Speaker key Activate/deactivate speaker
3 Headset key Make call via headset
4 Volume key Depending on the operating mode: Adjust the volume of the
5 Display keys Activate display functions
6 Information Centre Open the Information Centre
7 Do Not Disturb key Do Not Disturb (DND) function
8 Call records key Record a call
9 Message Centre Open call and message lists
10 End call/back key End/reject call; cancel function;
11 Navigation key Scroll through lists and entries. In idle status:
12 Consultation key Initiate/end consultation call
13 Conference key Initiate conference call
14 Transfer key Transfer call to another party
15 Function keys Programmable keys
speaker, receiver, headset or ringer
go back one menu level (press briefly);
return to idle status (press and hold)
È
‰
Z
Open redial list. £Page 43
Confirm or start action, select entry £Page 24
Open directory £Page 47
£Page 36
£Page 34
£Page 35
£Page 22
£Page 68
£Page 36
£Page 37
£Page 62
£Page 26
£Page 24
£Page 24
£Page 39
£Page 40
£Page 41
£Page 131
www.InternetVoipPhone.co.uk | sales@internetvoipphone.co.uk | 0800 088 4846
3
Phone overview
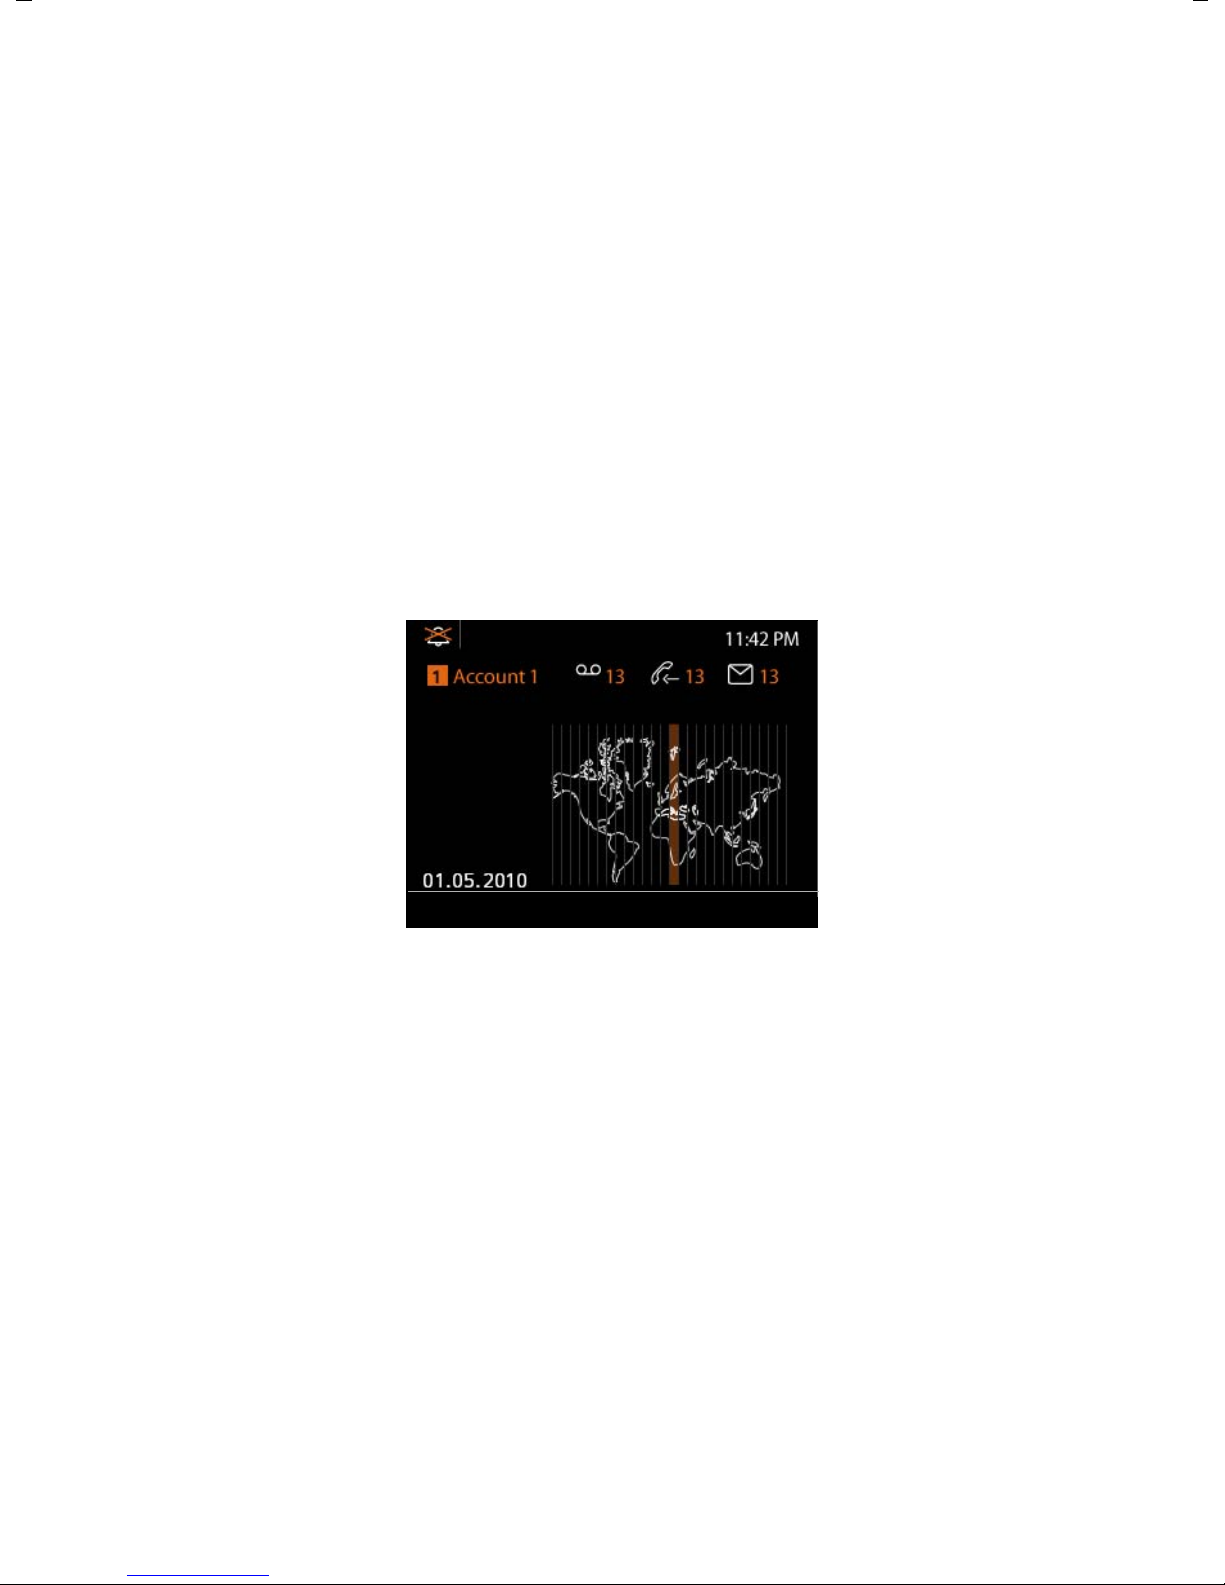
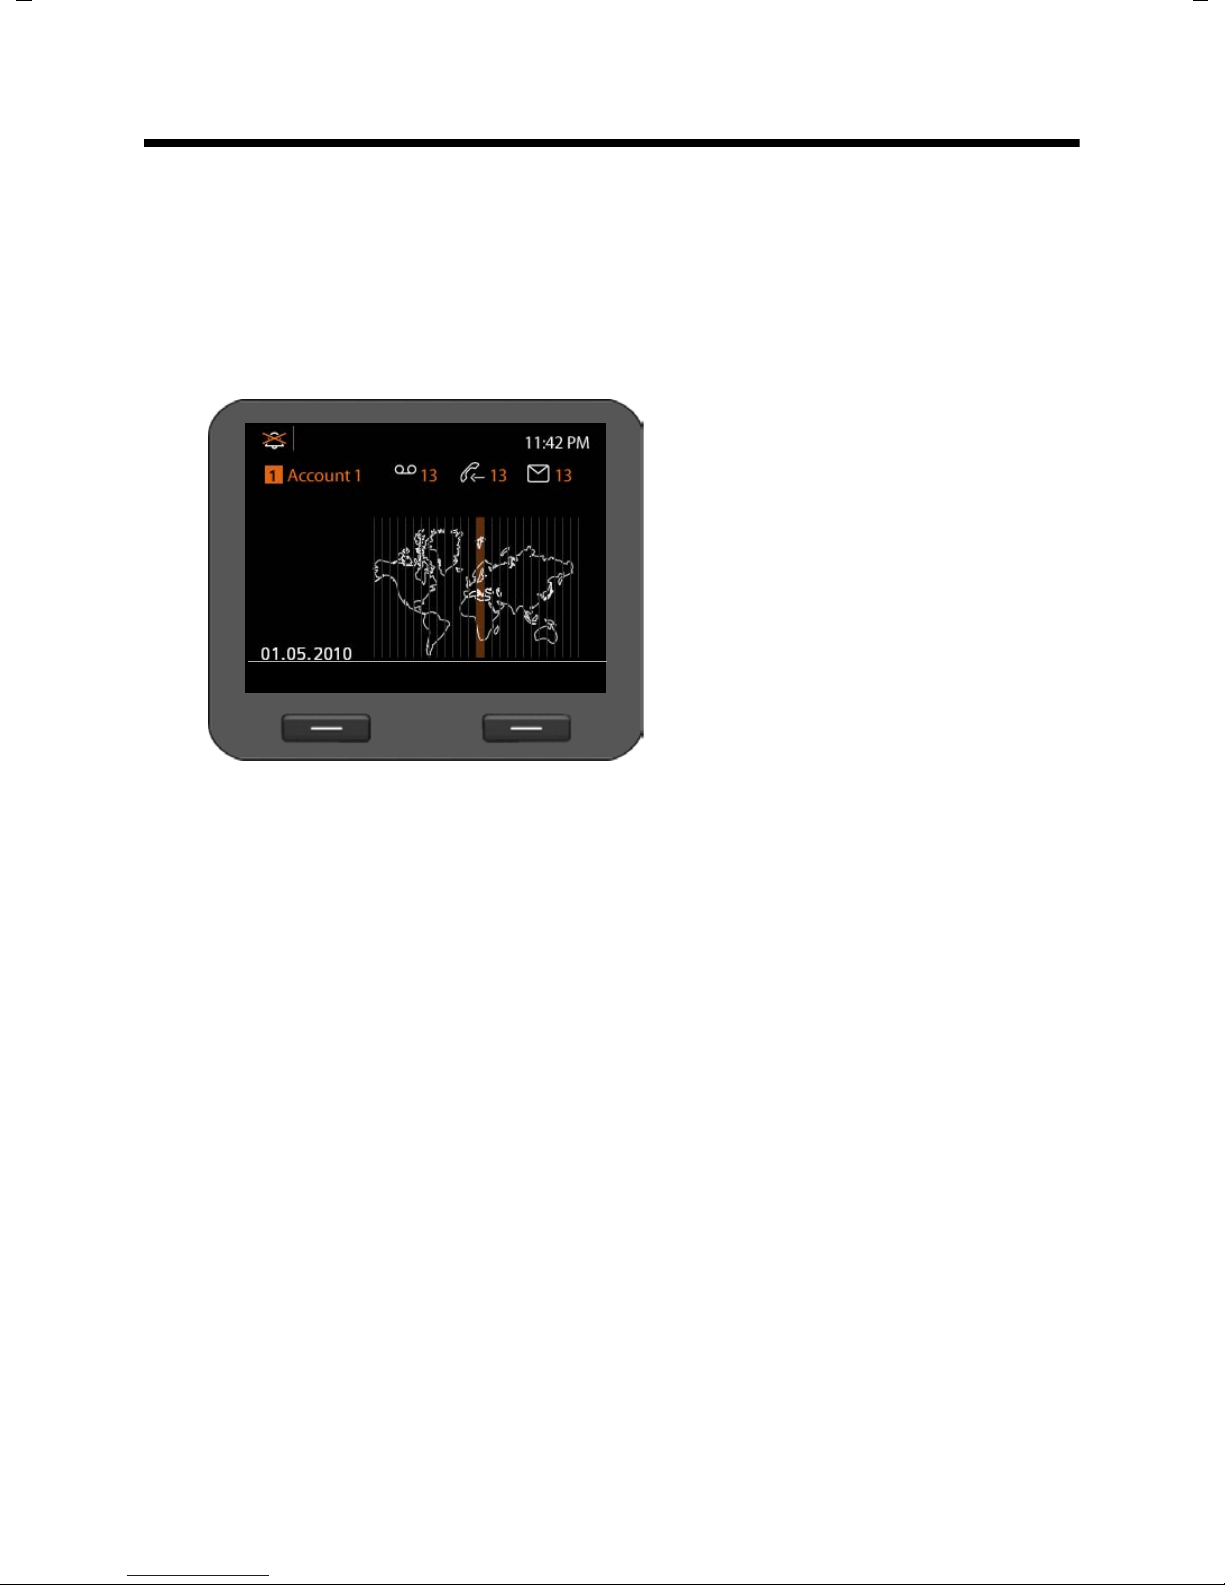
Call Select Line
Current time
Area of application
Adjustable display, e.g.,
time zone, time, calendar,
picture
£Page 75
Display functions
(Page 22)
T
T
T
Display icons
T
Display icons
Date and Time
U
U
You set the time and date
format using the Web
configurator
£Page 136.
Currently used
account
£ Page 30
U
Understanding Light Emitting Diodes (LEDs)
A
B
C
E
F
G
J
K
S
Flashes Incoming call. £Page 34
Lights up Call is being made via the speaker.
Flashes Incoming call (a headset must be connected). £Page 34
Lights up Call is being made via the headset.
Lights up The microphone is muted. £Page 36
Flashes New message in the Message Centre. £Page 62
Lights up Call is being recorded. £Page 37
Lights up "Do Not Disturb" function is activated. £Page 36
Lights up One or more callers on hold. £Page 39
Lights up Conference call is activated. £Page 40
Flashes Incoming call on the number programmed to this key. £Page 32
Lights up Call is being made on the number programmed to this key.
Understanding the display
£Page 36
£Page 34
Understanding the display symbols
Ringer deactivated. £Page 71
ó
New messages on the network mailbox. The number
Ã
Missed calls. £Page 43
™
New e-mails. £Page 59
Ë
Alarm clock function activated. The wake-up time is displayed to the right. £Page 65
·
Other icons may appear depending on the function. These are displayed alongside the corresponding
description.
4
www.InternetVoipPhone.co.uk | sales@internetvoipphone.co.uk | 0800 088 4846
is displayed to the
right.
£Page 57

Contents
Gigaset DE700 IP PRO – More than just a telephone . . . . . . . . . . . . . . . . . 2
Phone overview . . . . . . . . . . . . . . . . . . . . . . . . . . . . . . . . . . . . . . . . . . . . . . . . . . . 3
Understanding the keys . . . . . . . . . . . . . . . . . . . . . . . . . . . . . . . . . . . . . . . . . . . . . . . . . . . . . . . 3
Understanding Light Emitting Diodes (LEDs) . . . . . . . . . . . . . . . . . . . . . . . . . . . . . . . . . . . 4
Understanding the display . . . . . . . . . . . . . . . . . . . . . . . . . . . . . . . . . . . . . . . . . . . . . . . . . . . . 4
Following safety precautions . . . . . . . . . . . . . . . . . . . . . . . . . . . . . . . . . . . . . . . 8
Using the phone in different scenarios . . . . . . . . . . . . . . . . . . . . . . . . . . . . . . 9
First steps . . . . . . . . . . . . . . . . . . . . . . . . . . . . . . . . . . . . . . . . . . . . . . . . . . . . . . . 11
Check the package contents . . . . . . . . . . . . . . . . . . . . . . . . . . . . . . . . . . . . . . . . . . . . . . . . . 11
Setting up and connecting the device . . . . . . . . . . . . . . . . . . . . . . . . . . . . . . . . . . . . . . . . 12
Setting up the device (for the first time) . . . . . . . . . . . . . . . . . . . . . . . . . . . . . . . . . . . . . . 18
Proceeding . . . . . . . . . . . . . . . . . . . . . . . . . . . . . . . . . . . . . . . . . . . . . . . . . . . . . . . . . . . . . . . . . . 21
Using the phone . . . . . . . . . . . . . . . . . . . . . . . . . . . . . . . . . . . . . . . . . . . . . . . . . 22
Operating via the keypad and display menu . . . . . . . . . . . . . . . . . . . . . . . . . . . . . . . . . . 22
Menu tree . . . . . . . . . . . . . . . . . . . . . . . . . . . . . . . . . . . . . . . . . . . . . . . . . . . . . . . . . . . . . . . . . . . 28
Contents
Making calls . . . . . . . . . . . . . . . . . . . . . . . . . . . . . . . . . . . . . . . . . . . . . . . . . . . . . 30
Calling . . . . . . . . . . . . . . . . . . . . . . . . . . . . . . . . . . . . . . . . . . . . . . . . . . . . . . . . . . . . . . . . . . . . . . . 30
Receiving incoming calls . . . . . . . . . . . . . . . . . . . . . . . . . . . . . . . . . . . . . . . . . . . . . . . . . . . . . 34
Ending a call . . . . . . . . . . . . . . . . . . . . . . . . . . . . . . . . . . . . . . . . . . . . . . . . . . . . . . . . . . . . . . . . . 34
Using functions when making a telephone call . . . . . . . . . . . . . . . . . . . . . . . . . . . . . . . 35
Making a call to multiple participants . . . . . . . . . . . . . . . . . . . . . . . . . . . . . . . . . . . . . . . . . 38
Setting up call divert (CD) . . . . . . . . . . . . . . . . . . . . . . . . . . . . . . . . . . . . . . . . . . . . . . . . . . . . 42
Using the call lists . . . . . . . . . . . . . . . . . . . . . . . . . . . . . . . . . . . . . . . . . . . . . . . 43
Viewing entries . . . . . . . . . . . . . . . . . . . . . . . . . . . . . . . . . . . . . . . . . . . . . . . . . . . . . . . . . . . . . . 43
Dialling a number from a list . . . . . . . . . . . . . . . . . . . . . . . . . . . . . . . . . . . . . . . . . . . . . . . . . 44
Copying an entry from the call list to the directory. . . . . . . . . . . . . . . . . . . . . . . . . . . . . 45
Deleting an entry or list . . . . . . . . . . . . . . . . . . . . . . . . . . . . . . . . . . . . . . . . . . . . . . . . . . . . . . 46
Using directories . . . . . . . . . . . . . . . . . . . . . . . . . . . . . . . . . . . . . . . . . . . . . . . . 47
Using the local directory . . . . . . . . . . . . . . . . . . . . . . . . . . . . . . . . . . . . . . . . . . . . . . . . . . . . . 47
Using an LDAP directory . . . . . . . . . . . . . . . . . . . . . . . . . . . . . . . . . . . . . . . . . . . . . . . . . . . . . 52
Using online directories . . . . . . . . . . . . . . . . . . . . . . . . . . . . . . . . . . . . . . . . . . . . . . . . . . . . . . 53
Managing messages . . . . . . . . . . . . . . . . . . . . . . . . . . . . . . . . . . . . . . . . . . . . . 57
Managing voice mails on the network mailbox . . . . . . . . . . . . . . . . . . . . . . . . . . . . . . . . 57
Call records . . . . . . . . . . . . . . . . . . . . . . . . . . . . . . . . . . . . . . . . . . . . . . . . . . . . . . . . . . . . . . . . . . 58
Managing e-mail messages . . . . . . . . . . . . . . . . . . . . . . . . . . . . . . . . . . . . . . . . . . . . . . . . . . 59
Accessing messages via the Message Centre . . . . . . . . . . . . . . . . . . . . . . . . . . . . . . . . . . 62
www.InternetVoipPhone.co.uk | sales@internetvoipphone.co.uk | 0800 088 4846
5

Contents
Managing the calendar and alarms . . . . . . . . . . . . . . . . . . . . . . . . . . . . . . . 63
Managing the calendar . . . . . . . . . . . . . . . . . . . . . . . . . . . . . . . . . . . . . . . . . . . . . . . . . . . . . . 63
Displaying alarms . . . . . . . . . . . . . . . . . . . . . . . . . . . . . . . . . . . . . . . . . . . . . . . . . . . . . . . . . . . . 64
Displaying missed alarms . . . . . . . . . . . . . . . . . . . . . . . . . . . . . . . . . . . . . . . . . . . . . . . . . . . . 64
Alarm clock function . . . . . . . . . . . . . . . . . . . . . . . . . . . . . . . . . . . . . . . . . . . . . . . . . . . . . . . . . 65
Using Internet services . . . . . . . . . . . . . . . . . . . . . . . . . . . . . . . . . . . . . . . . . . . 67
Listening to Internet radio . . . . . . . . . . . . . . . . . . . . . . . . . . . . . . . . . . . . . . . . . . . . . . . . . . . . 67
Displaying Internet services in the Information Centre . . . . . . . . . . . . . . . . . . . . . . . . 68
Configuring basic settings . . . . . . . . . . . . . . . . . . . . . . . . . . . . . . . . . . . . . . . 70
Setting the date and time . . . . . . . . . . . . . . . . . . . . . . . . . . . . . . . . . . . . . . . . . . . . . . . . . . . . 70
Setting the ringer . . . . . . . . . . . . . . . . . . . . . . . . . . . . . . . . . . . . . . . . . . . . . . . . . . . . . . . . . . . . 71
Activating/deactivating advisory tones . . . . . . . . . . . . . . . . . . . . . . . . . . . . . . . . . . . . . . . 73
Setting the display . . . . . . . . . . . . . . . . . . . . . . . . . . . . . . . . . . . . . . . . . . . . . . . . . . . . . . . . . . . 74
Setting the language . . . . . . . . . . . . . . . . . . . . . . . . . . . . . . . . . . . . . . . . . . . . . . . . . . . . . . . . . 81
Resetting the device to the default settings . . . . . . . . . . . . . . . . . . . . . . . . . . . . . . . . . . . 81
Configuring settings for the local network . . . . . . . . . . . . . . . . . . . . . . . . 82
LAN settings . . . . . . . . . . . . . . . . . . . . . . . . . . . . . . . . . . . . . . . . . . . . . . . . . . . . . . . . . . . . . . . . . 83
Connecting a headset . . . . . . . . . . . . . . . . . . . . . . . . . . . . . . . . . . . . . . . . . . . 88
Using the resource directory . . . . . . . . . . . . . . . . . . . . . . . . . . . . . . . . . . . . . 89
Managing screensavers . . . . . . . . . . . . . . . . . . . . . . . . . . . . . . . . . . . . . . . . . . . . . . . . . . . . . . 90
Managing caller pictures . . . . . . . . . . . . . . . . . . . . . . . . . . . . . . . . . . . . . . . . . . . . . . . . . . . . . 91
Managing sounds . . . . . . . . . . . . . . . . . . . . . . . . . . . . . . . . . . . . . . . . . . . . . . . . . . . . . . . . . . . . 92
Checking the capacity of the Resource Directory . . . . . . . . . . . . . . . . . . . . . . . . . . . . . . 93
Web configurator – configuring the phone on a PC . . . . . . . . . . . . . . . . 94
Starting the Web configurator . . . . . . . . . . . . . . . . . . . . . . . . . . . . . . . . . . . . . . . . . . . . . . . . 94
Understanding the Web configurator menu tree . . . . . . . . . . . . . . . . . . . . . . . . . . . . . . 96
Running the setup assistant . . . . . . . . . . . . . . . . . . . . . . . . . . . . . . . . . . . . . . . . . . . . . . . . . . 97
Configuring phone settings via the Web configurator . . . . . . . . . . . . . 104
Network and connectors . . . . . . . . . . . . . . . . . . . . . . . . . . . . . . . . . . . . . . . . . . . . . . . . . . . . 104
Telephony . . . . . . . . . . . . . . . . . . . . . . . . . . . . . . . . . . . . . . . . . . . . . . . . . . . . . . . . . . . . . . . . . . 113
Messaging . . . . . . . . . . . . . . . . . . . . . . . . . . . . . . . . . . . . . . . . . . . . . . . . . . . . . . . . . . . . . . . . . . 122
Services . . . . . . . . . . . . . . . . . . . . . . . . . . . . . . . . . . . . . . . . . . . . . . . . . . . . . . . . . . . . . . . . . . . . 125
Function keys . . . . . . . . . . . . . . . . . . . . . . . . . . . . . . . . . . . . . . . . . . . . . . . . . . . . . . . . . . . . . . . 131
System settings . . . . . . . . . . . . . . . . . . . . . . . . . . . . . . . . . . . . . . . . . . . . . . . . . . . . . . . . . . . . . 133
Checking the status of the phone . . . . . . . . . . . . . . . . . . . . . . . . . . . . . . . . 141
6
www.InternetVoipPhone.co.uk | sales@internetvoipphone.co.uk | 0800 088 4846

Contents
Appendix . . . . . . . . . . . . . . . . . . . . . . . . . . . . . . . . . . . . . . . . . . . . . . . . . . . . . . 143
Caring for your telephone . . . . . . . . . . . . . . . . . . . . . . . . . . . . . . . . . . . . . . . . . . . . . . . . . . . 143
Using insert strips . . . . . . . . . . . . . . . . . . . . . . . . . . . . . . . . . . . . . . . . . . . . . . . . . . . . . . . . . . . 143
Using Gigaset QuickSync – additional functions for the PC interface . . . . . . . . . . 143
Specifications . . . . . . . . . . . . . . . . . . . . . . . . . . . . . . . . . . . . . . . . . . . . . . . . . . . . . . . . . . . . . . . 143
Service (Customer Care) . . . . . . . . . . . . . . . . . . . . . . . . . . . . . . . . . . . . . . . . . . . . . . . . . . . . . 144
Questions and answers . . . . . . . . . . . . . . . . . . . . . . . . . . . . . . . . . . . . . . . . . . . . . . . . . . . . . 144
Authorisation . . . . . . . . . . . . . . . . . . . . . . . . . . . . . . . . . . . . . . . . . . . . . . . . . . . . . . . . . . . . . . . 144
Protecting our environment . . . . . . . . . . . . . . . . . . . . . . . . . . . . . . . . . . . . . . . . . . . . . . . . . 144
Using free software . . . . . . . . . . . . . . . . . . . . . . . . . . . . . . . . . . . . . . . . . . . . . . . . . . . . . . . . . 146
Accessories . . . . . . . . . . . . . . . . . . . . . . . . . . . . . . . . . . . . . . . . . . . . . . . . . . . . . 153
Glossary . . . . . . . . . . . . . . . . . . . . . . . . . . . . . . . . . . . . . . . . . . . . . . . . . . . . . . . 154
Index . . . . . . . . . . . . . . . . . . . . . . . . . . . . . . . . . . . . . . . . . . . . . . . . . . . . . . . . . . 167
www.InternetVoipPhone.co.uk | sales@internetvoipphone.co.uk | 0800 088 4846
7

Following safety precautions
$
ƒ
Following safety precautions
Warning
Be sure to read this user guide and the safety precautions before using your telephone.
Use only the power adapter supplied, as indicated on the underside of
the telephone.
Using your telephone may affect nearby medical equipment. Be aware of
the technical conditions in your particular environment, e.g., doctor's surgery.
Do not install the phone in a bathroom or shower room. The phone is not
splashproof.
Do not use your phone in environments where there is a risk of explosion,
e.g., auto paint shops.
If you give your phone to a third party, make sure you also give them the
user guide.
Remove faulty telephones from use or have them repaired by our Service
team, as they could interfere with other wireless services.
8
www.InternetVoipPhone.co.uk | sales@internetvoipphone.co.uk | 0800 088 4846
Using the phone in different scenarios
DSL connection
1
2
3
4
5
6
7
ISDN, S2M
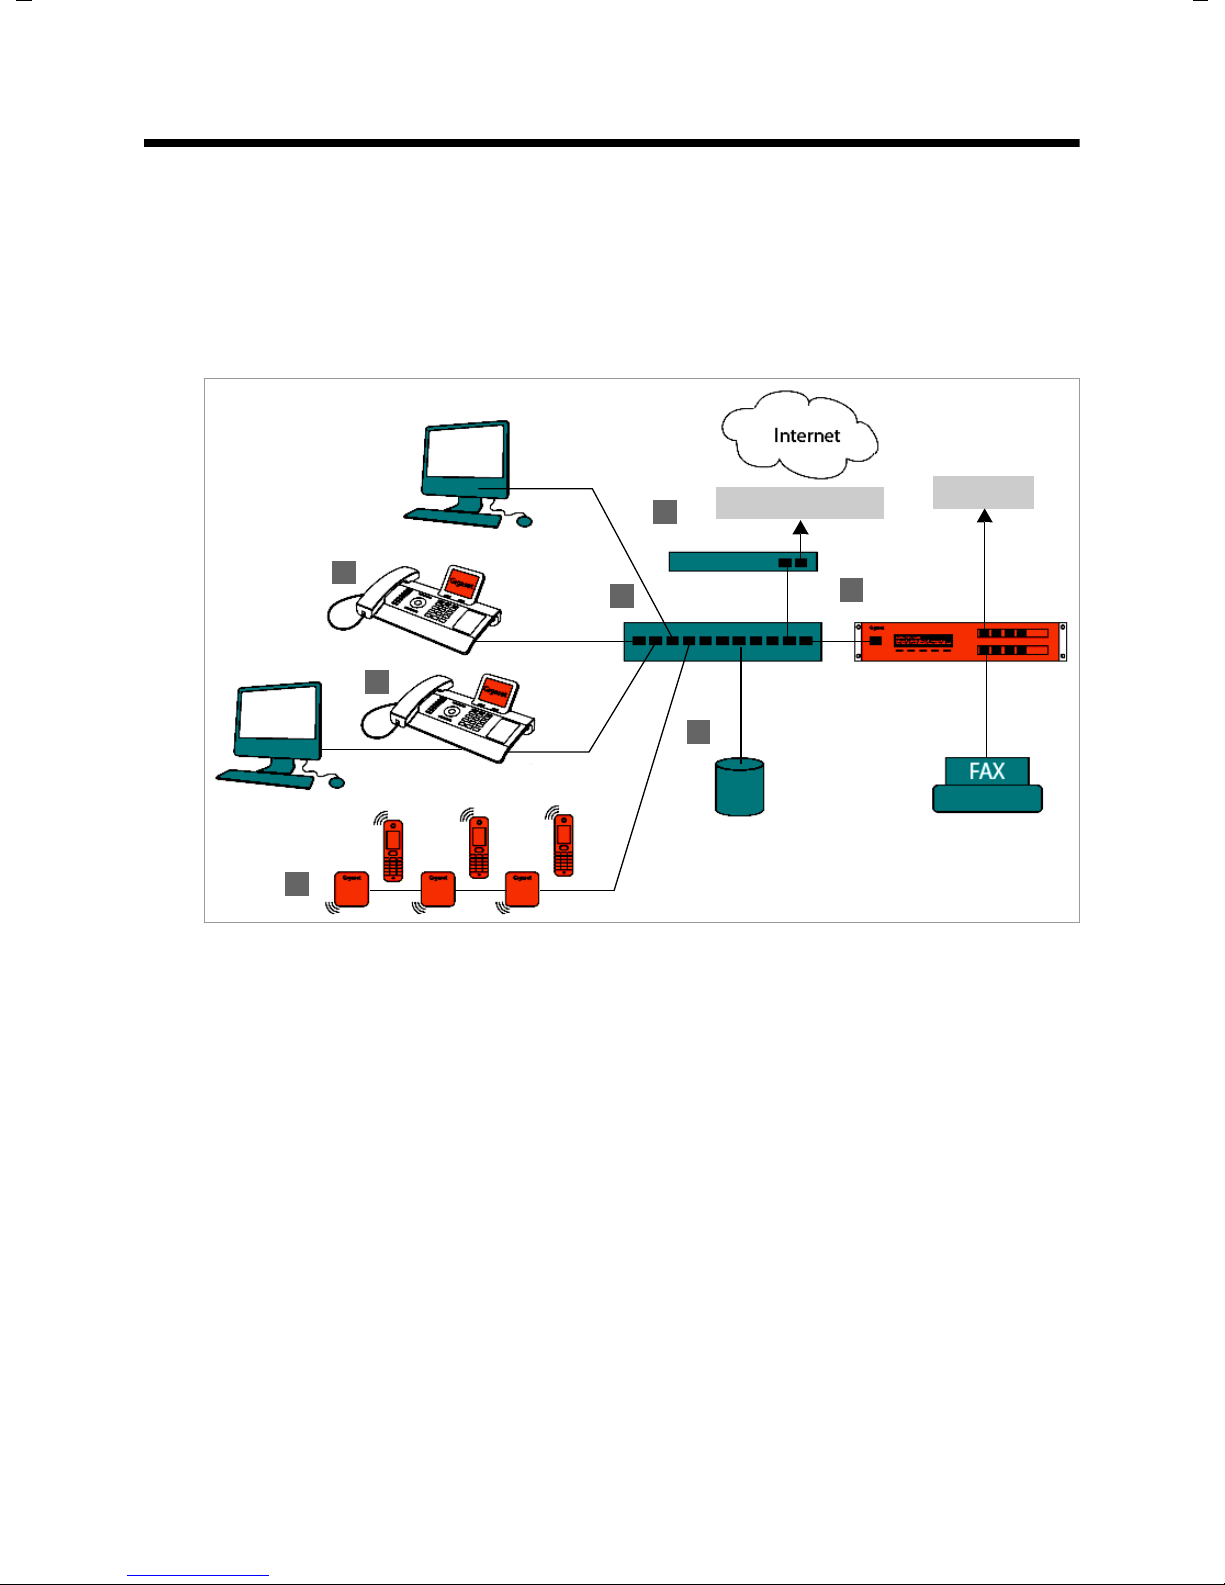
Using the phone in different scenarios
Using your phone in a professional environment with phone system and
server structure
If you use your Gigaset DE700 IP PRO in a corporate network with a telephone infrastructure, your phone incorporates functions and data from the phone system and servers.
In a corporate environment, the VoIP accounts and most of the settings are configured
centrally by the phone system.
§§1§§ Gigaset IP telephone
§§2§§ Gigaset IP telephone with integrated gigabit switch (Gigaset DE700 IP PRO).
Your PC is connected directly to the phone, providing you with an additional LAN connection in your network.
§§3§§ DECT base station for connection to DECT handsets
§§4§§ Ethernet switch
Supports Quality of Service (QoS), Gigabit Ethernet and PoE (Power over Ethernet).
§§5§§ Phone system (e.g., Gigaset T500 PRO)
Forms Internet telephony, ISDN or S2M connections. Analogue devices can be connected. A network connection is established using Ethernet.
§§6§§ Acts as a gateway to the Internet for the connected devices. Routes VoIP calls from the
phone system to the Internet.
§§7§§ File, e-mail and workgroup servers, or NAS systems, can be wirelessly integrated into
the phone system architecture. As a result:
– Invitations to conference calls can be organised via the phone system
– The phone system can be backed up to a server or the system can be started via the
network
– Online directories (LDAP) can be managed centrally
www.InternetVoipPhone.co.uk | sales@internetvoipphone.co.uk | 0800 088 4846
9
Using the phone in different scenarios
Internet
Connection
ISDN,
S2M
SIP provider
1
3
2
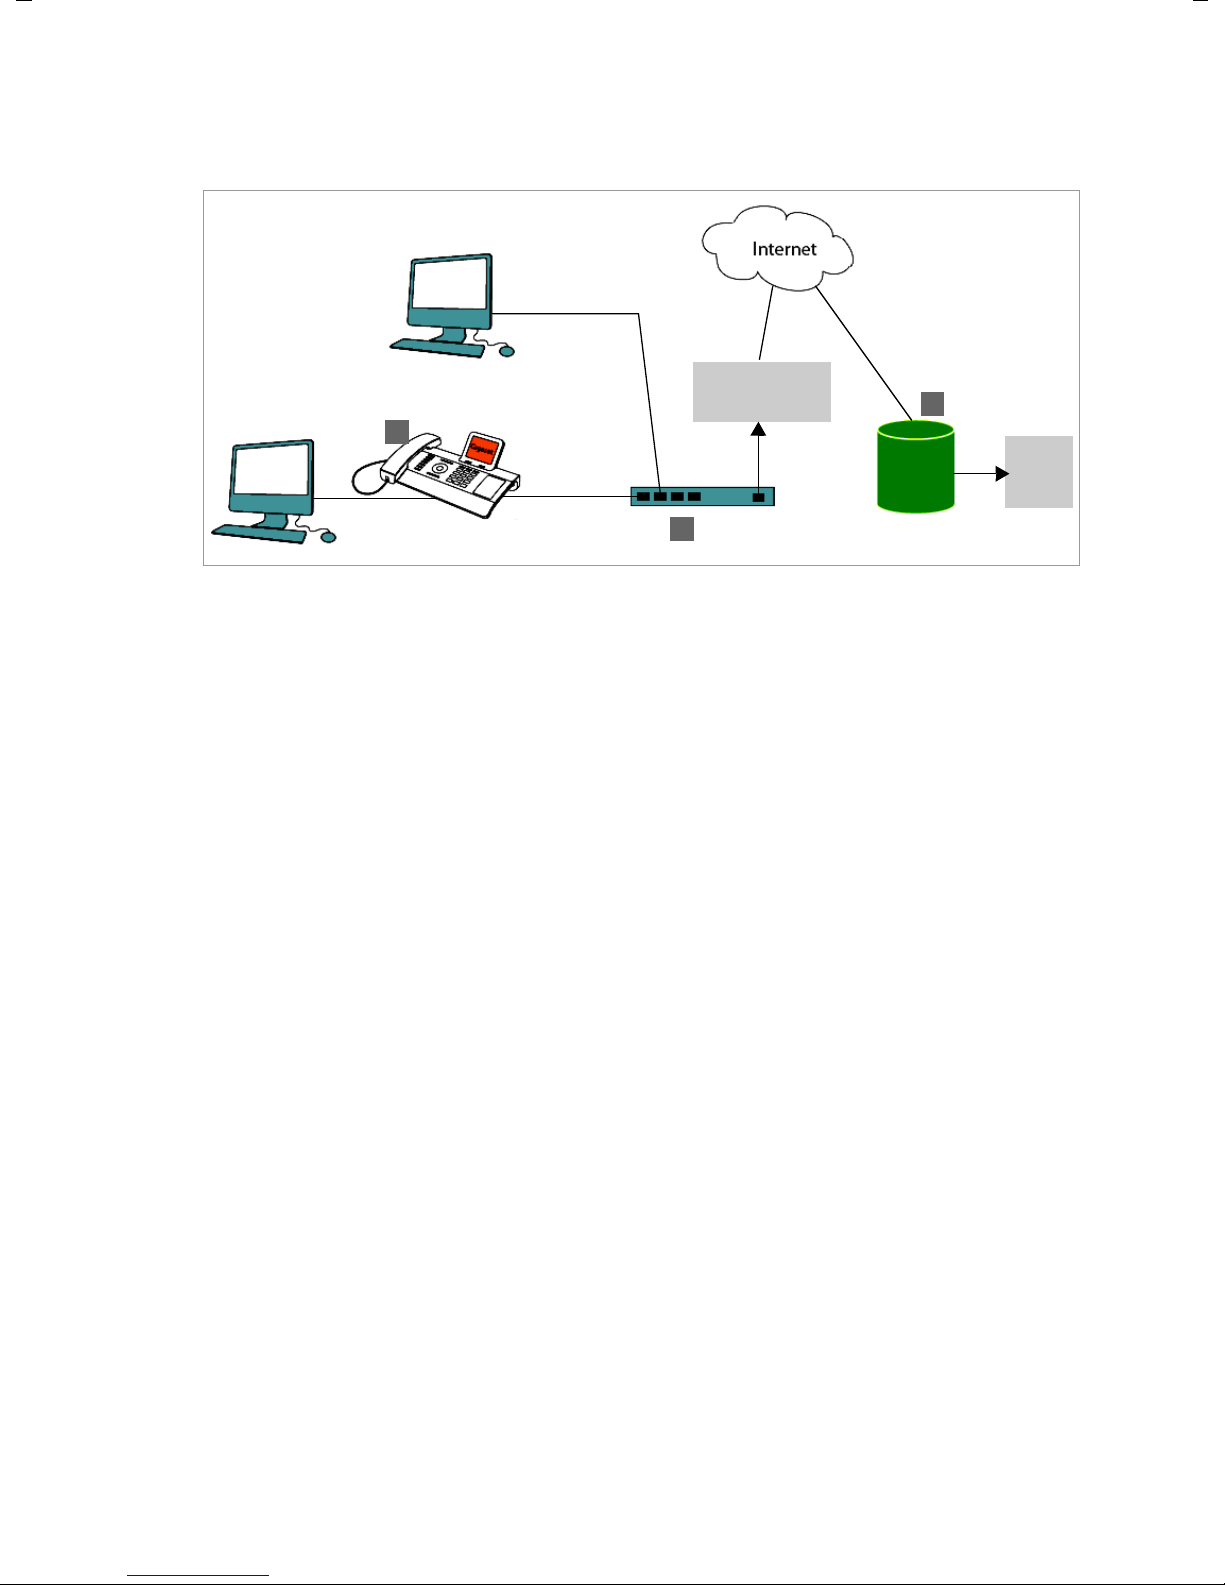
Using your phone in a simplified environment without a phone system
You can also use your Gigaset DE700 IP PRO without a phone system.
§§1§§ Gigaset IP telephone with integrated gigabit switch (Gigaset DE700 IP PRO).
Your PC is connected directly to the phone, providing you with an additional LAN connection in your network.
§§2§§ Acts as a gateway to the Internet for the connected devices. Routes VoIP calls from the
phone to the Internet.
§§3§§ The SIP provider transfers calls from the Internet and establishes a connection with the
standard telephone network.
In this scenario, you must manually configure the VoIP accounts for your phone. You can
create up to 12 VoIP accounts on your phone.
10
www.InternetVoipPhone.co.uk | sales@internetvoipphone.co.uk | 0800 088 4846

First steps
Check the package contents
First steps
Telephone: Gigaset DE700 IP PRO
Receiver with cable for connection to the
phone
Ethernet cable for connection to the local
network (switch/router/gateway)
Power adapter for connecting the phone to
the mains power supply (if required)
with three different plug-in modules
(Europe, Great Britain, USA)
The device is powered by PoE (Power over
Ethernet) if it is connected to a switch with
PoE-functionality (
CD containing Gigaset QuickSync™ PC software
and this user guide
Insert strips for labelling
the function keys (with protective film)
£ Page 15).
www.InternetVoipPhone.co.uk | sales@internetvoipphone.co.uk | 0800 088 4846
11

First steps
Firmware update
Whenever there are new or improved functions for your Gigaset, firmware updates are
made available for you to download to your phone (Page 139). If this results in operational changes to your phone, a new version of this user guide or the necessary amendments are published on the Internet at www.gigaset.com/pro
Select the product to open the relevant product page for your telephone, where you will
find a link to the user guide.
To find out what version of firmware is currently loaded on your phone, see Page 141.
Setting up and connecting the device
The phone is designed for use in dry rooms in a temperature range of ±0°C to +45°C.
¤ Set up the phone at a central point where a connection to the local network is availa-
ble.
Warning
u Never expose the Gigaset DE700 IP PRO to the following:
heat sources, direct sunlight or other electrical appliances.
u Protect your Gigaset from moisture, dust, corrosive liquids and fumes.
.
12
www.InternetVoipPhone.co.uk | sales@internetvoipphone.co.uk | 0800 088 4846

Connecting the receiver
1
2
3
First steps
§§1§§ Insert the connector, which can be found on the longer straight end of the connection
cable, into the connection port on the bottom of the phone.
§§2§§ Place the straight part of the cable in the cable recess provided.
3 Insert the other jack on the connection cable into the port on the receiver.
www.InternetVoipPhone.co.uk | sales@internetvoipphone.co.uk | 0800 088 4846
13
First steps
21
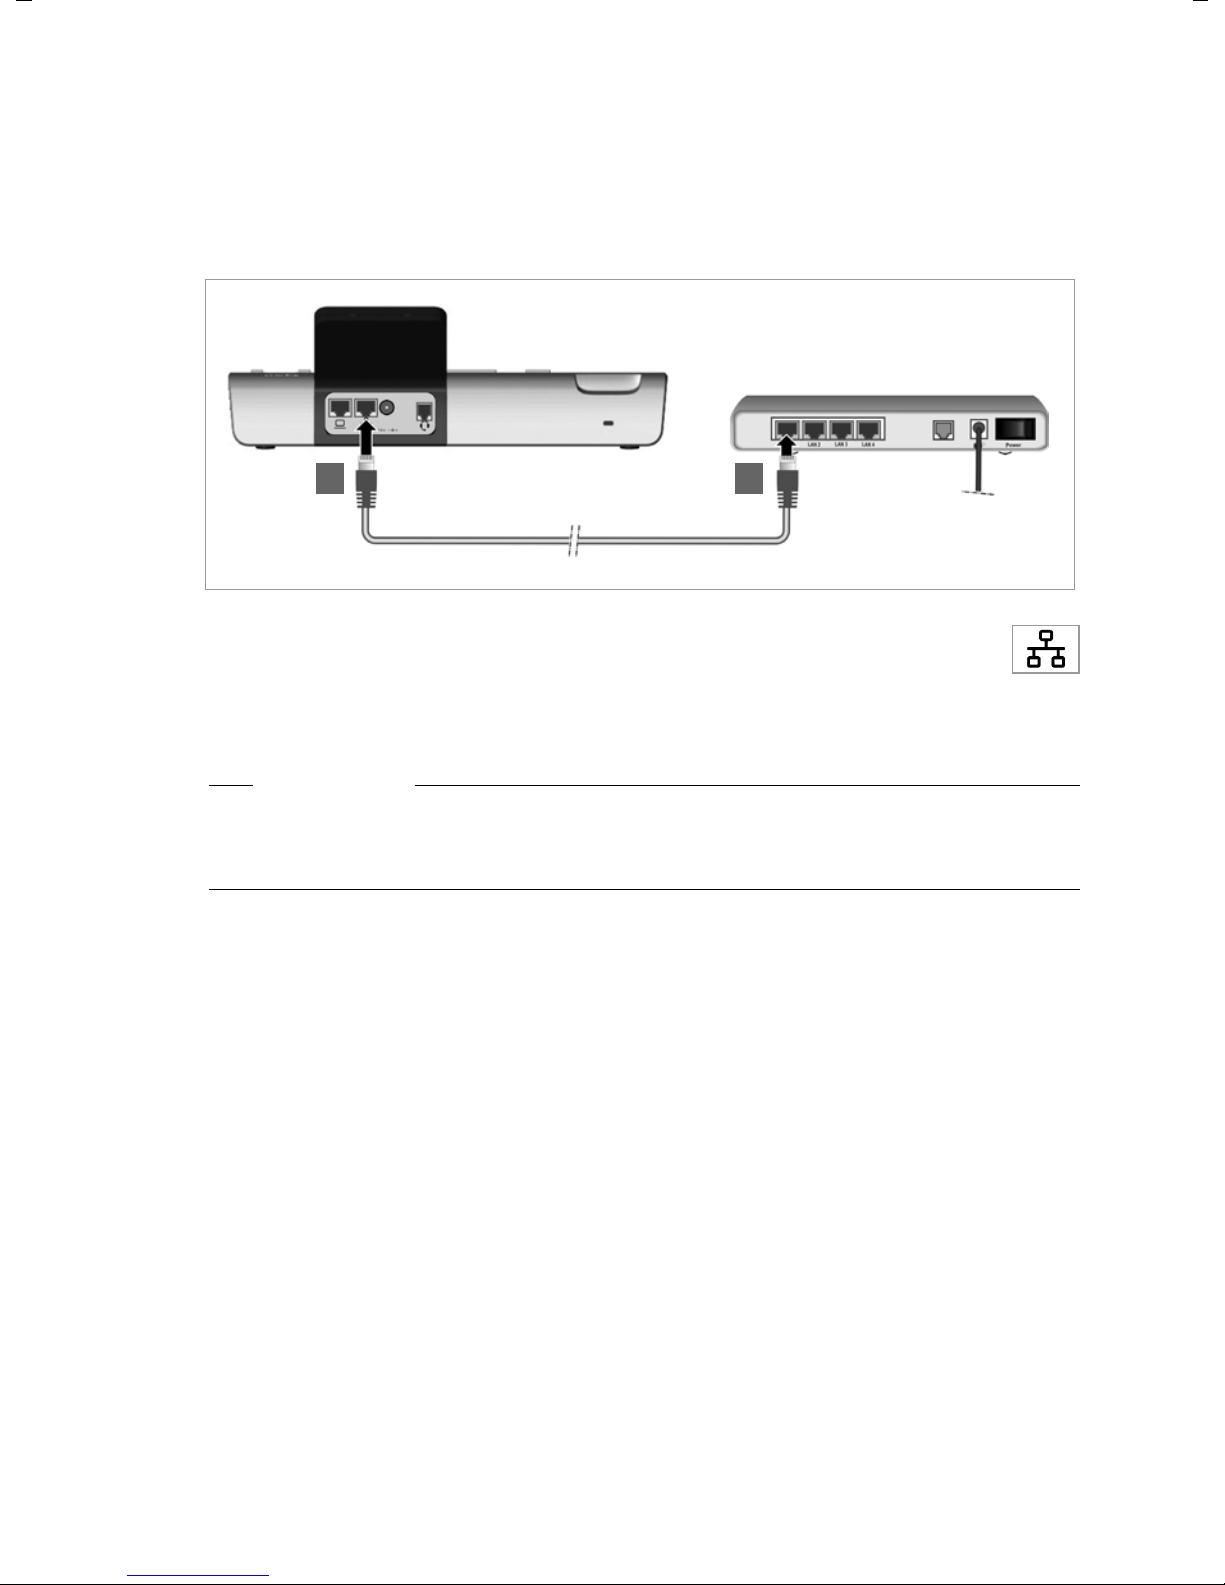
Connecting the network cable
To make calls via VoIP, your phone must have Internet access. This connection is established in the local network via a gateway.
You connect your phone to the same local network as the gateway. See the Using the
phone in different scenarios section on Page 9 for an overview of the different options.
§§1§§ Attach one end of the Ethernet cable supplied to the right-hand LAN port on
the rear of the phone.
§§2§§ Attach the other end of the Ethernet cable to a LAN port on your network Eth-
ernet switch or on the router itself.
Warning
If you connect your Gigaset DE700 IP PRO to a PoE-capable Ethernet switch (PoE class
IEEE802.3af), it will be supplied with power via PoE (Power over Ethernet). The PoE network must not exceed the premises boundaries.
14
www.InternetVoipPhone.co.uk | sales@internetvoipphone.co.uk | 0800 088 4846
First steps
2
1
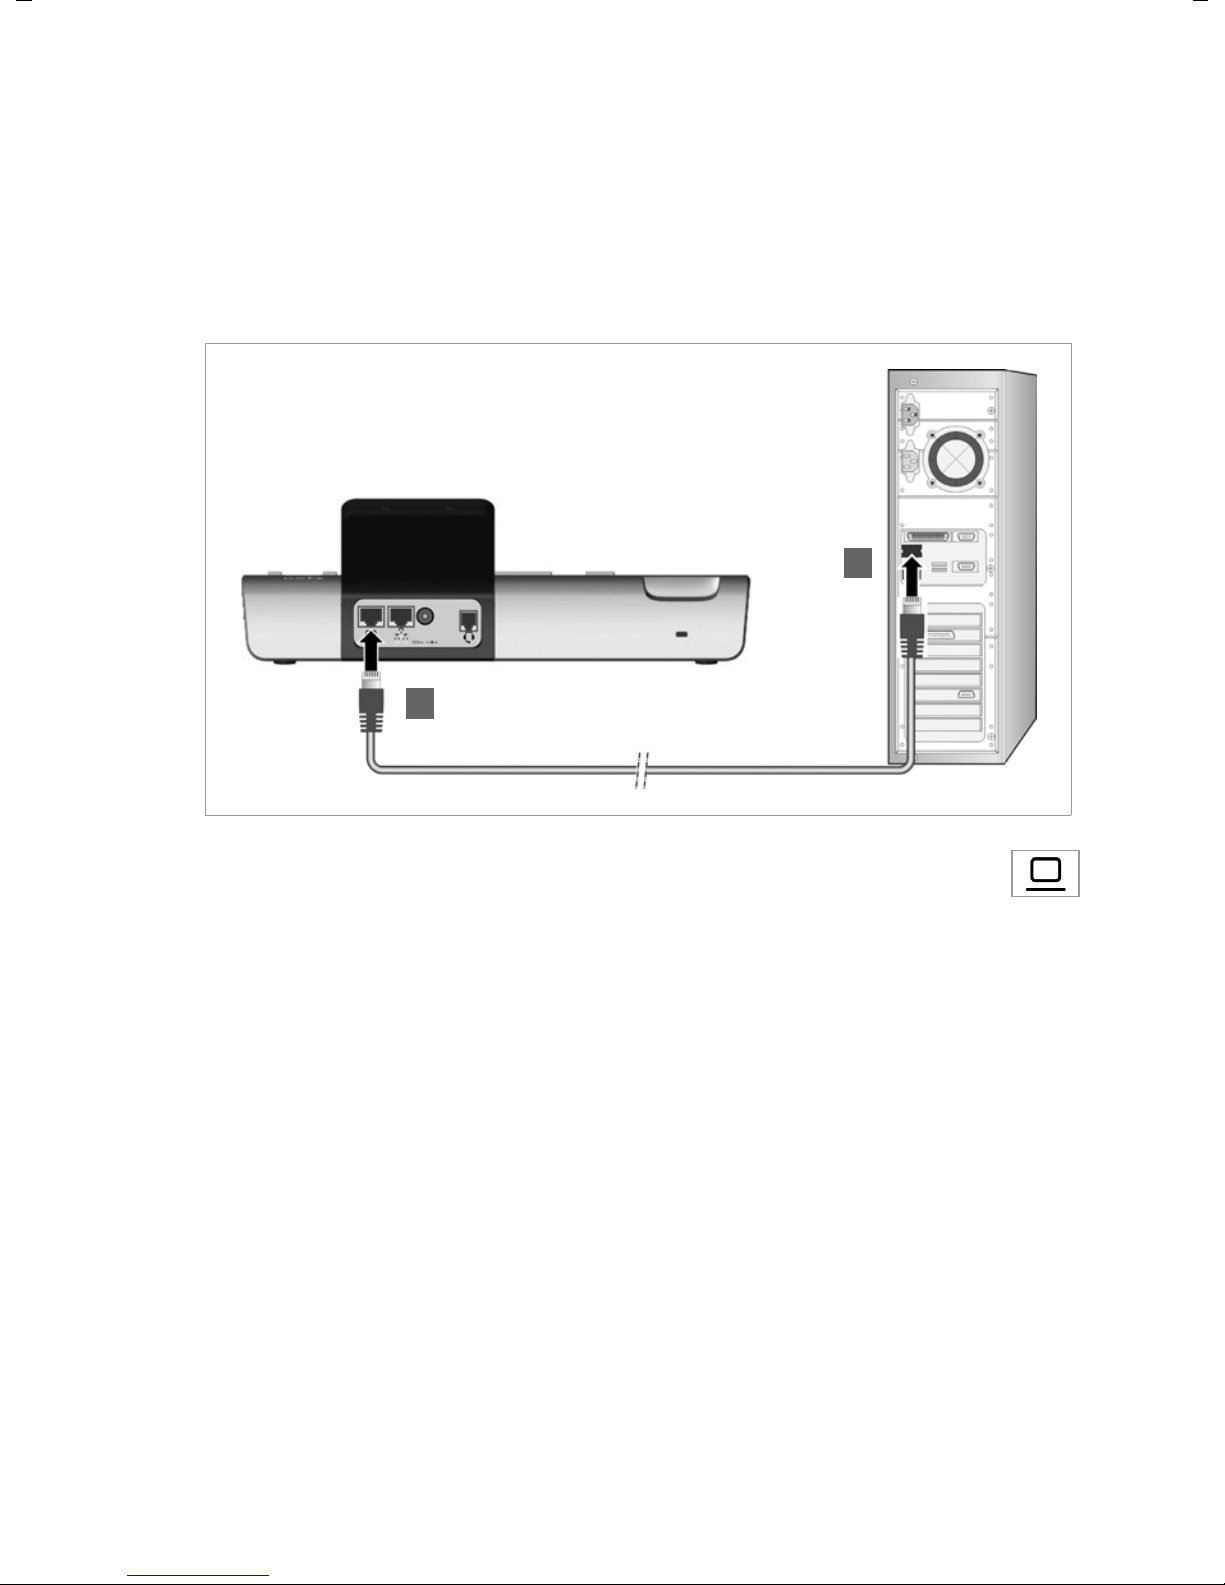
Connecting the PC
You must connect your Gigaset DE700 IP PRO to a PC to use the Web user interface or to
configure the phone using the Web configurator.
Your phone has an integrated two-port switch. This allows you to connect your PC to the
local network via the phone and avoid using additional connection ports on the switch or
router.
You need an additional Ethernet cable to connect a PC.
§§1§§ Connect an Ethernet cable to the left-hand LAN port on the rear of the phone.
§§2§§ Connect the other end of the Ethernet cable to a LAN port on the PC.
Connecting a device to the mains power supply (if required)
Your Gigaset DE700 IP PRO is supplied with sufficient power by PoE (Power over Ethernet)
and does not need to be connected to the mains power supply. Prerequisite: The device
is connected to an Ethernet switch with PoE functionality (PoE class IEEE802.3af)
£ Page 14).
(
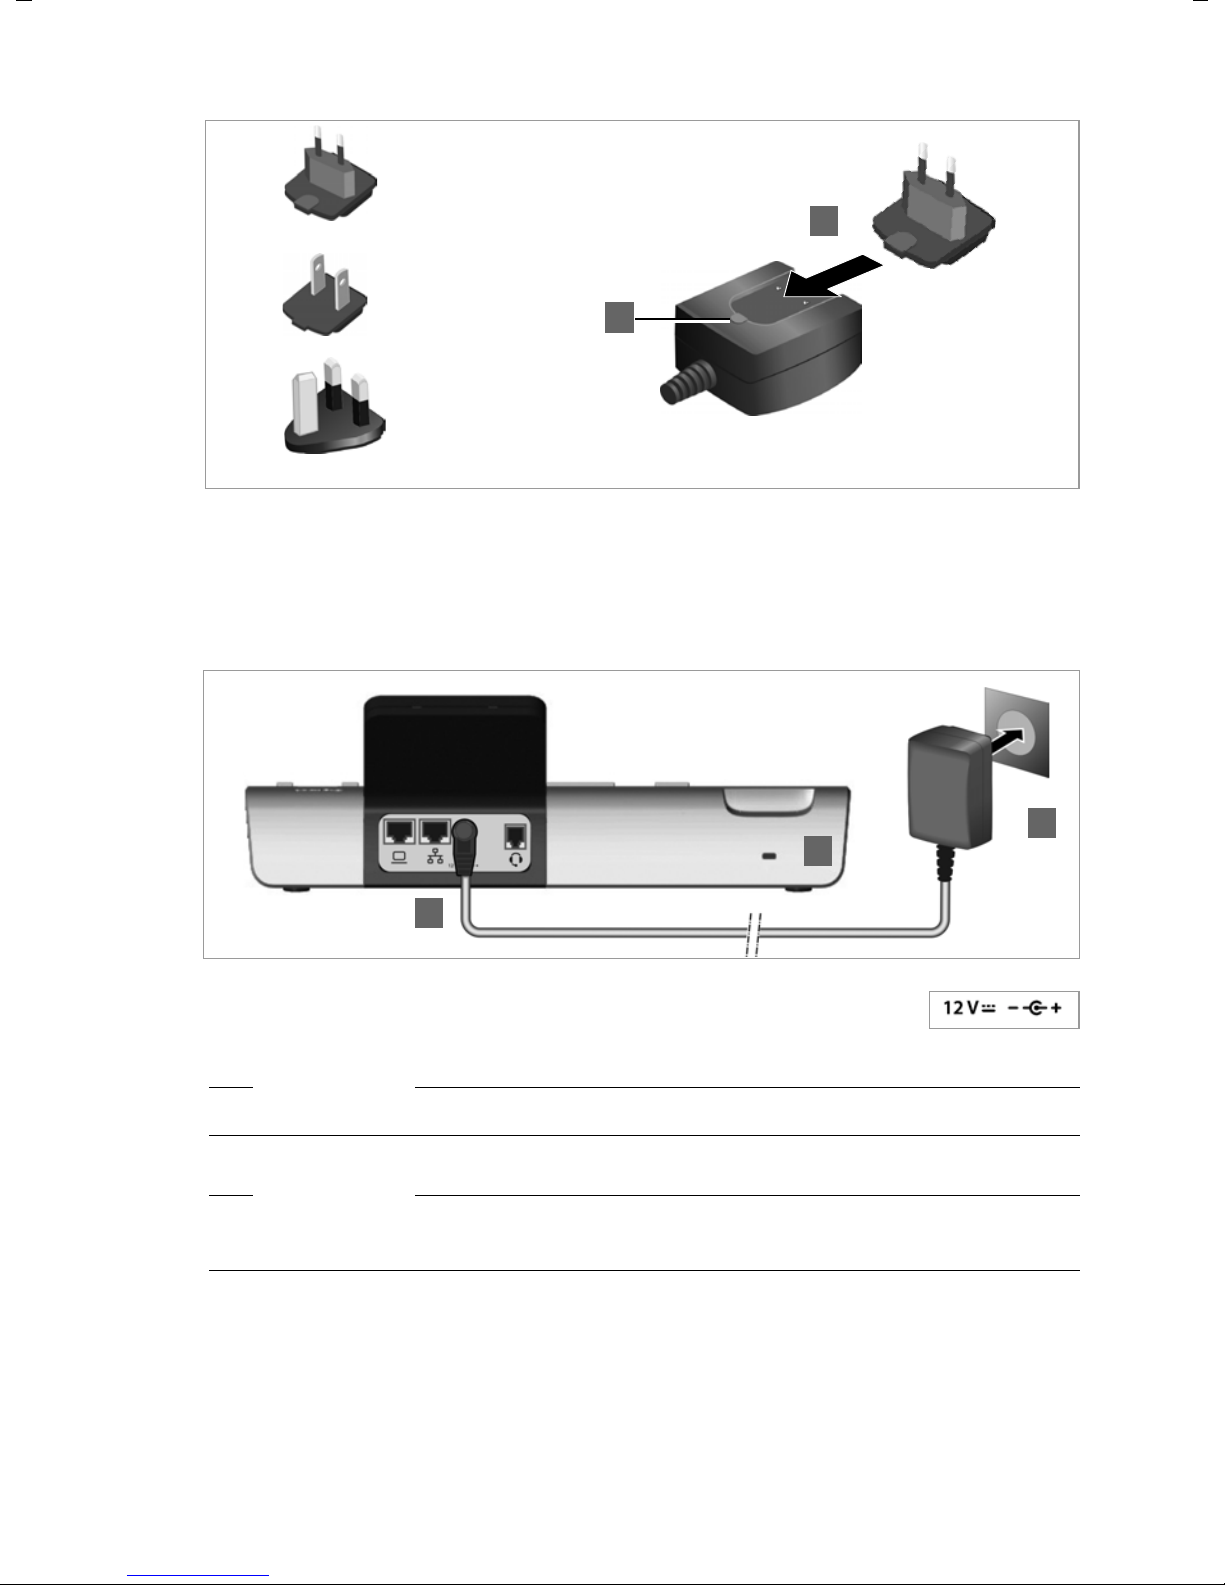
The power adapter is supplied with three different plug-in modules for Europe, Great Brit-
ain and the USA. First attach the appropriate plug-in module to the power supply unit.
www.InternetVoipPhone.co.uk | sales@internetvoipphone.co.uk | 0800 088 4846
15
First steps
Europe
Geat Britain
USA
1
2
2
1
3
§§1§§ Slide the required plug-in module into the recess on the underside of the power sup-
§§2§§ To remove the plug-in module again, press on the button marked Push and pull the
ply unit until it clicks into place.
plug-in module out of the power supply unit.
§§1§§ Connect the power adapter to the port on the rear of the phone.
§§2§§ Then insert the plug into the mains socket.
Warning
Use only the power adapter supplied.
Please note
You can safeguard your device against theft by fitting a Kensington lock. The corresponding hole can be found on the rear of the device (
16
www.InternetVoipPhone.co.uk | sales@internetvoipphone.co.uk | 0800 088 4846
§§3§§).
First steps
Extension module
1
3
Extension module Gigaset DE700 IP PRO
2
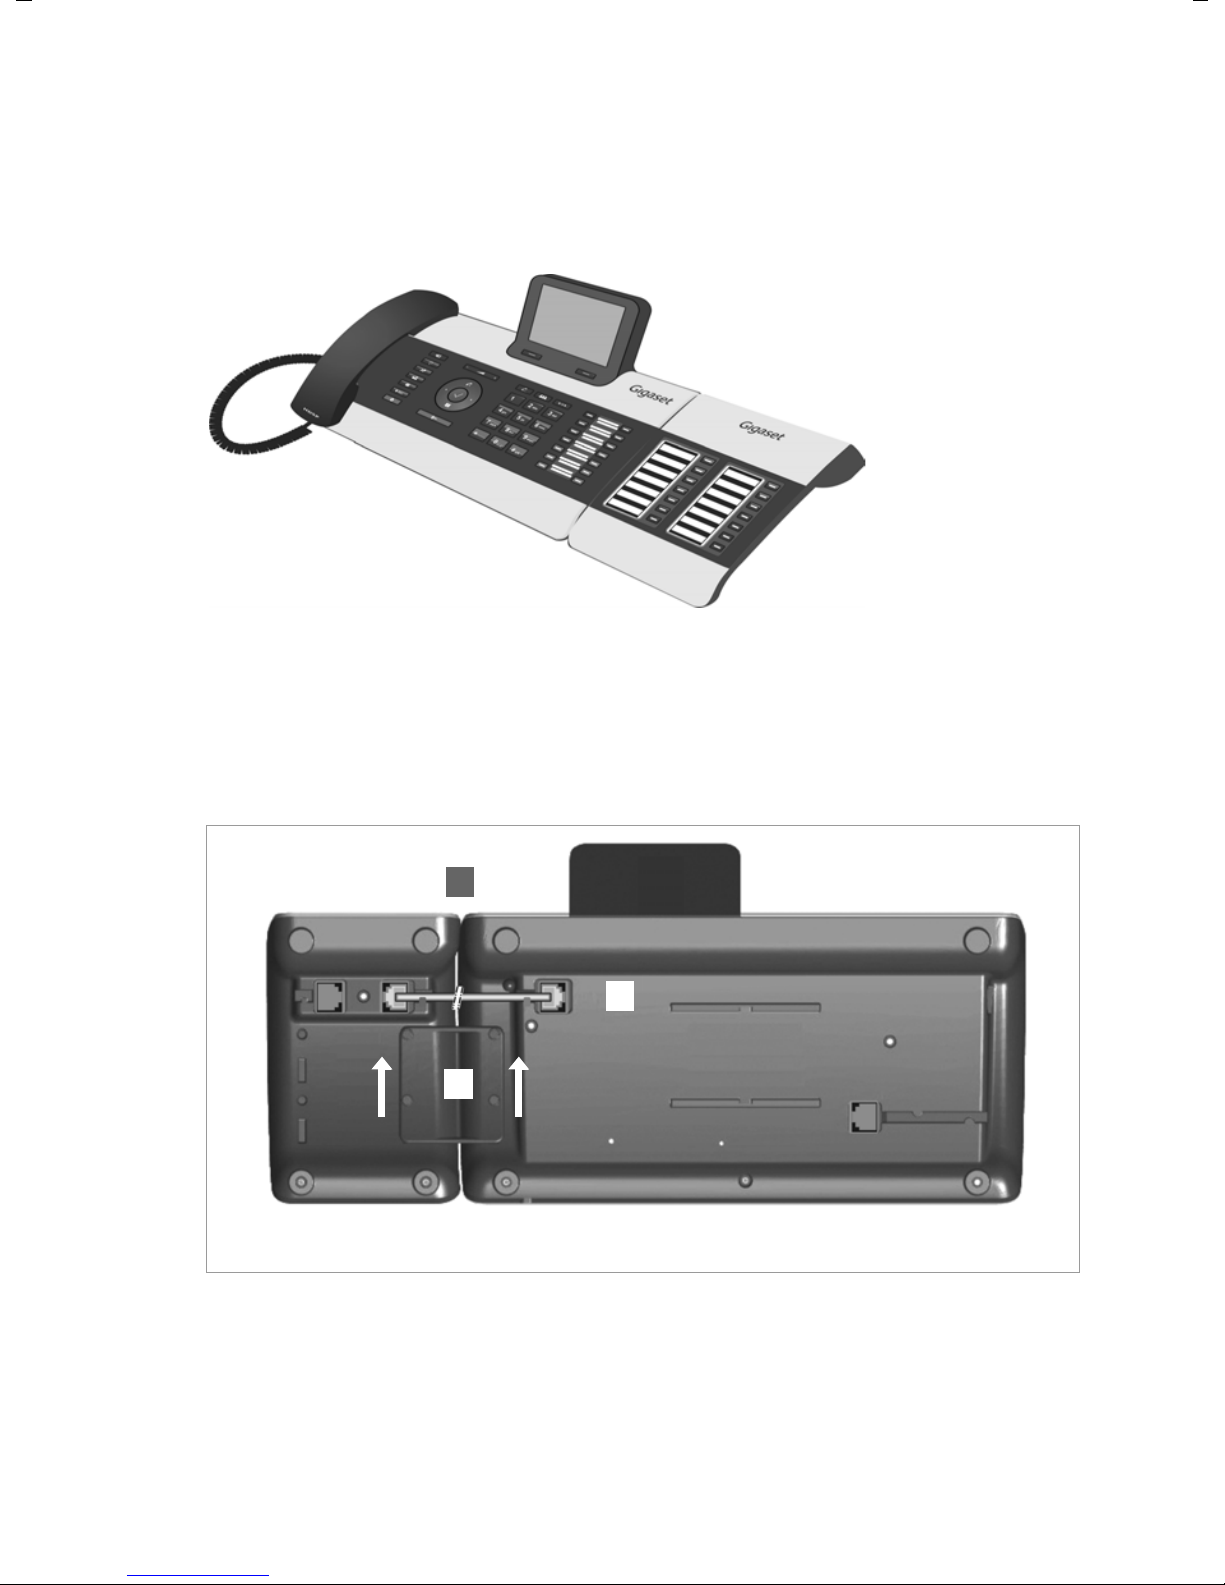
Connecting extension modules (optional)
You can increase the number of programmable keys using extension modules (max.
three; can be ordered as accessories
programmable keys. The function keys can be programmed using the Web configurator
£ Page 131).
(
£ Page 153). Each module includes 14 additional
The package contains:
u One extension module
u One connection frame with four fastening screws
u One connection cable
u Insert strips
§§1§§ Position the extension module to the right of the phone (on left when viewed from be-
low), so that the module and phone are the same height and meet in the centre.
§§2§§ Insert the clasps on the connection frame into the respective notches on the phone
and module and push the connection frame upwards until it clicks into place. Secure
the connection frame with the screws provided.
§§3§§ Establish the connections using the cable supplied.
www.InternetVoipPhone.co.uk | sales@internetvoipphone.co.uk | 0800 088 4846
17
First steps
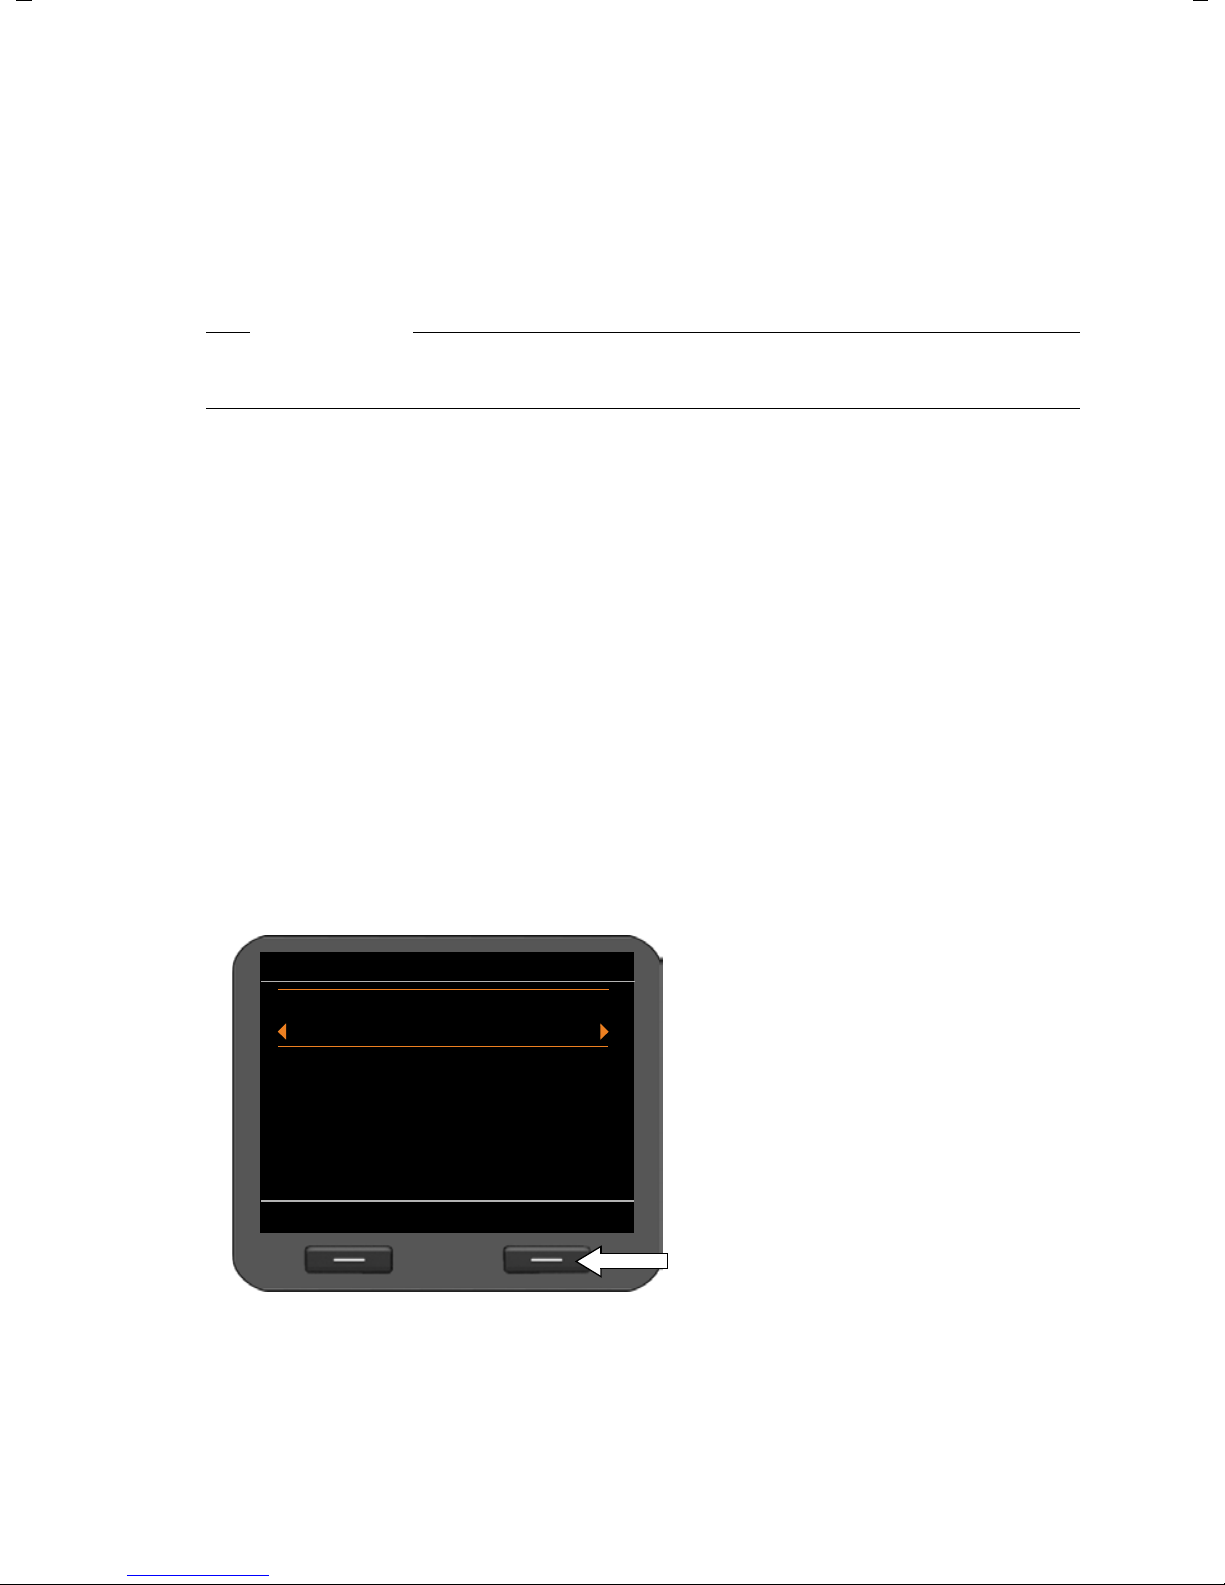
Select your Language
OK
English
Deutsch
Francais
Italiano
Espanol
Portugues
Nederlands
Select your Time Zone
OK
GMT: Dublin, London
GMT+1: Amsterdam, Berlin, ...
GMT+2: Athens, Cairo, Israel
GMT+3: Bagdahd, Kuweit ...
GMT+4: Abu Dhabi, Mucat
GMT+5: Islamabad, Karachi
GMT+6: Dhaka, Colombo
Setting up the device (for the first time)
Your device will start automatically as soon as it is connected to the mains power supply.
Please be aware that the device is powered by PoE (Power over Ethernet). This means that
it is supplied with power as soon as it is connected to an Ethernet switch with PoE-functionality.
The first time you use the device, an installation wizard will start automatically and guide
you through the necessary installation steps.
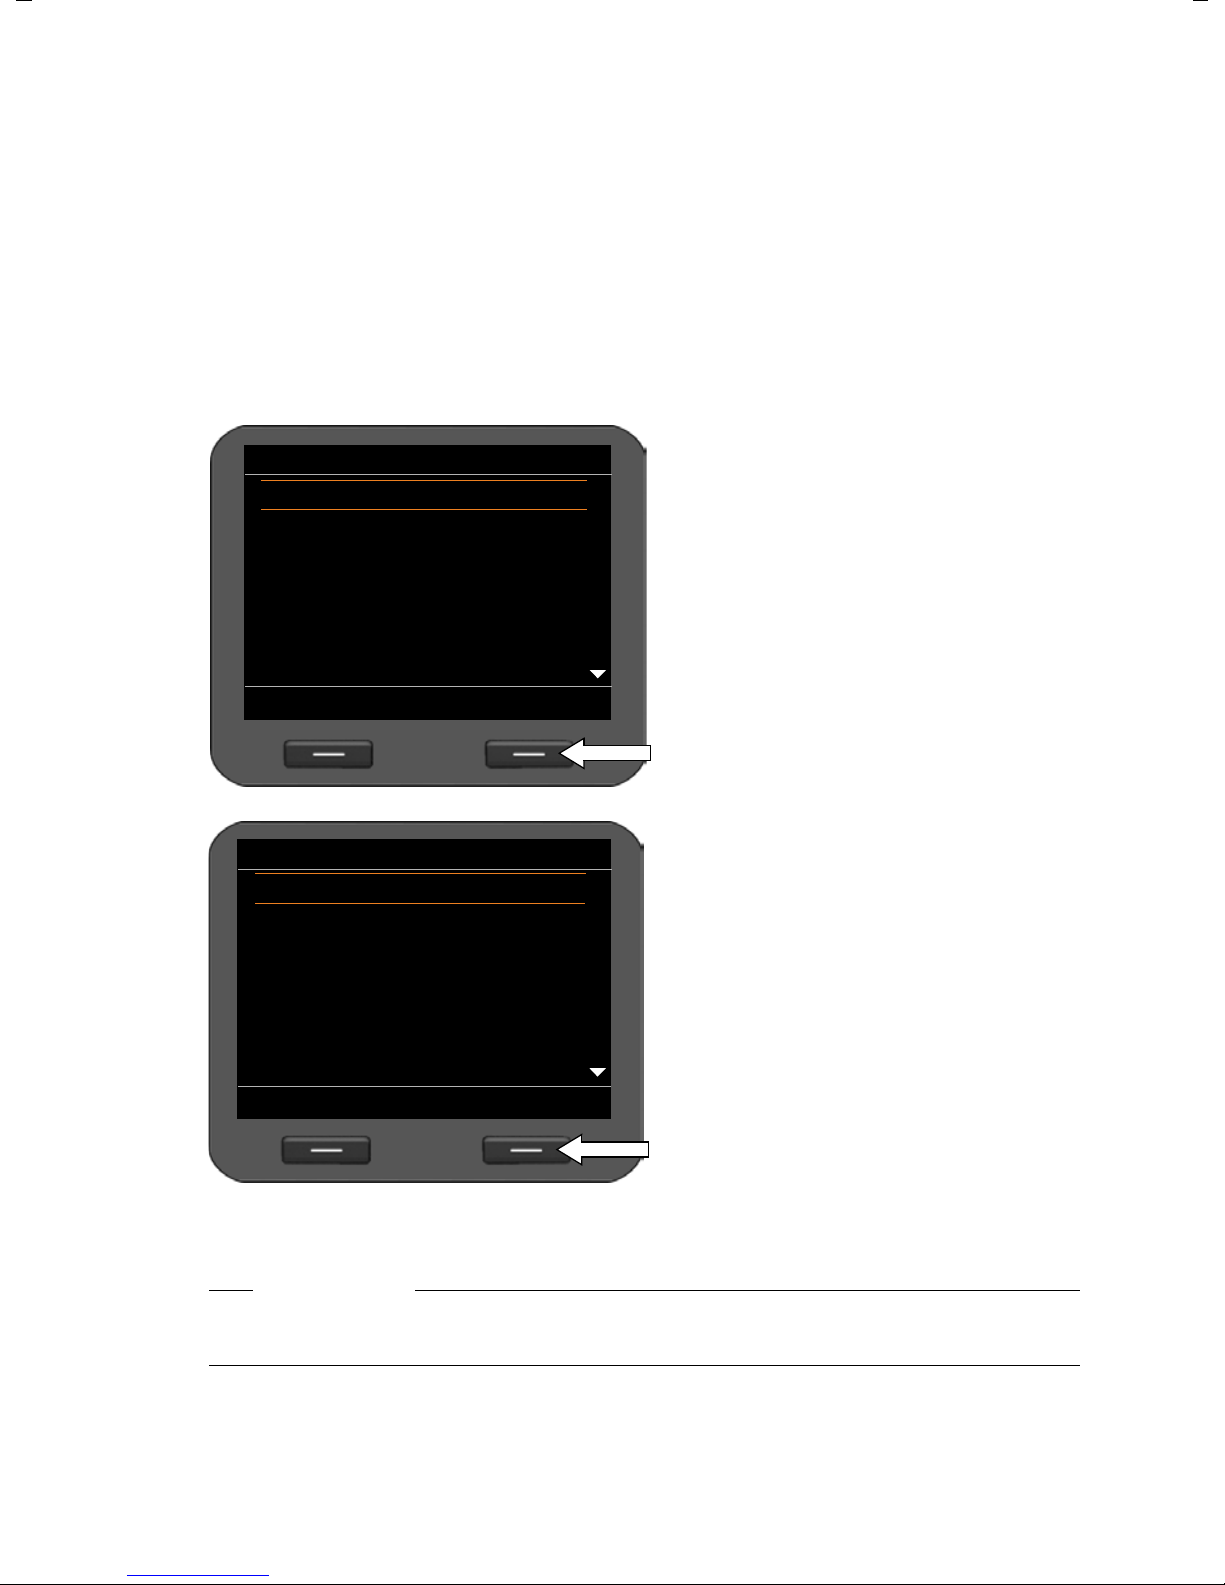
Configuring language and time zone settings
¤ Use the navigation key to select the
required language. To do this, press
up or down on the navigation key
Further information about the navigation key can be found on
£ Page 24.
¤ Press the display key under §OK§ to
confirm your selection.
You can also use the OK function on
the navigation key (by pressing
the centre of the key).
q.
‰in
When you have made your selection, press the end key I to return to the last entry
18
www.InternetVoipPhone.co.uk | sales@internetvoipphone.co.uk | 0800 088 4846
screen. You can correct your selection if necessary.
Please note
The date and time are automatically set by a time server. You can select a time server
using the Web configurator or deactivate this function (
¤ Use the navigation key to select the
required time zone.
¤ Press the display key under §OK§ to
confirm your selection.
£ Page 133).
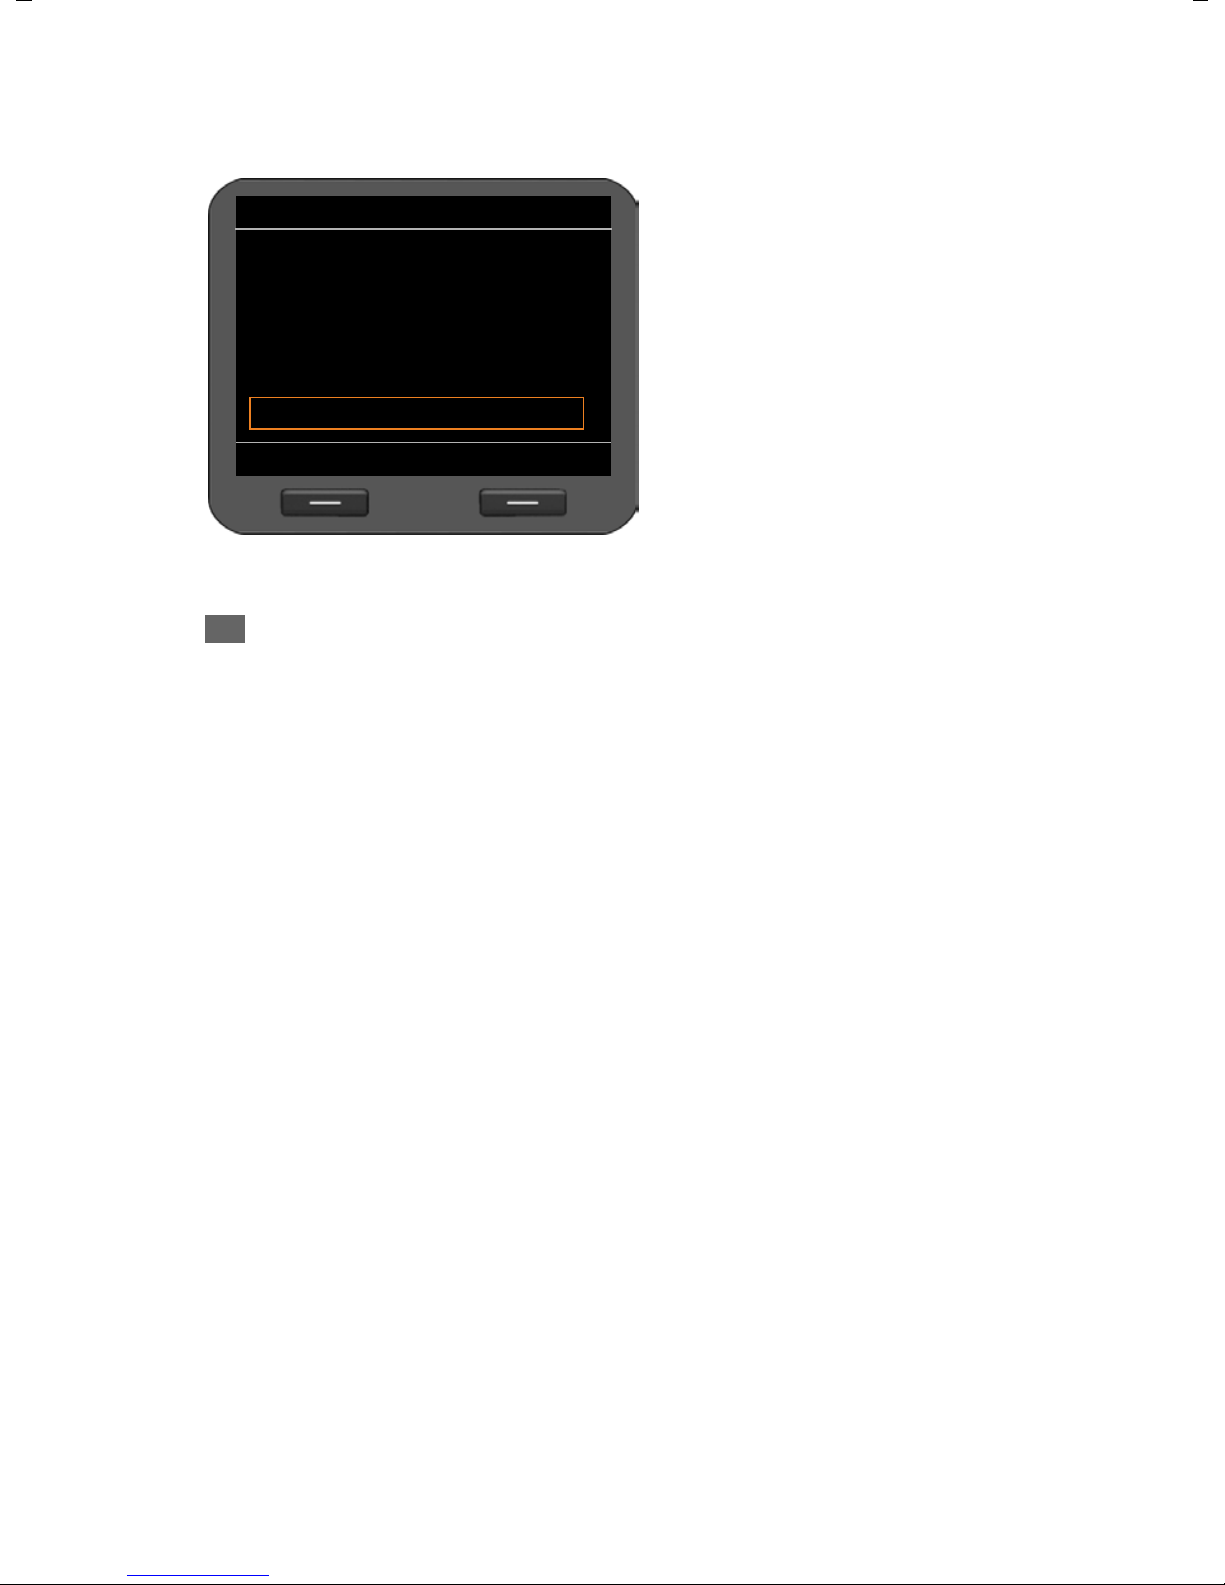
First steps
Local Network
Back Save
Network Type
IPv4
Activated Network:
LAN
IP Address Type:
Static
IP Address:
Establishing a connection to the local network
Your phone must be connected to the local network before it can connect to the Internet
and before you can operate it from a PC.
The device checks to see if a network connection already exists. The network connection
is automatically established if the phone has automatically been assigned an IP address
from a DHCP server in the network. If this is the case, the following screen will not appear
and you can skip to
Please note
The following network configuration is the default setting on your device: LAN with IP
protocol version 4 (IPv4) and DHCP.
If your phone has no network connection, you will need to configure the network manually. Depending on the type of network, you will need the following information about
the configuration:
u If the network uses IP protocol version 4 (IPv4) with a static IP address, you will need:
The device IP address, the network subnet mask, the IP addresses of the standard gateway and DNS server.
u If the network uses IP protocol version 6 (IPv6):
IP addresses automatically: select IPv6 as Network Type. The connection is then established automatically.
IP addresses statically: the device IP address, the address prefix length and the DNS
server IP address.
£ Page 20.
If there is still no network connection, you will then be asked whether you wish to configure the connection manually.
¤ Select §§Yes§§ if you have the required information.
¤ Select §§No§§ if you want to use the display menu to configure the network at a later date
£ Page 82).
(
Your device is now connected to the local network and can be configured for Internet
telephony.
If you selected
the network immediately.
Depending on your selection, additional
screens may be displayed so you can
enter the required information.
More detailed information on LANconfiguration can be found on
§§Yes§§§, you can configure
£ Page 82.
¤ Once you have configured the set-
tings, press the display key under
§§Save§§.
www.InternetVoipPhone.co.uk | sales@internetvoipphone.co.uk | 0800 088 4846
19

First steps
Configuring Internet telephony
Before you can use the Internet to phone anyone over the Internet, the fixed line network
or the mobile phone network, you need the services of a VoIP provider.
Prerequisite:
The device searches the network for a provisioning file and checks whether VoIP accounts
already exist. If the telephone has existing VoIP accounts, these accounts are configured
automatically. You can now make calls with your phone via the Internet.
If the telephone has no existing VoIP accounts, you must configure them manually. The
Web configurator's installation wizard will help you with this (
– You have a phone system in your network that provides VoIP accounts for your
device, or
– You have registered with a VoIP provider (e.g., via your PC) and set up a VoIP
account.
£ Page 97).
20
www.InternetVoipPhone.co.uk | sales@internetvoipphone.co.uk | 0800 088 4846

Proceeding
UUUUU
U
UUU
Now you have successfully set up your phone, you can adapt it to your personal requirements. Use the following guide to quickly locate the most important topics.
If you are unfamiliar with menu-driven devices such as other Gigaset telephones, you
should first read the section entitled Using the phone on Page 22.
Information on ... ... is located here.
Operating the phone via the keypad and display menu Page 22
Making calls Page 30
Setting up and using directories Page 47
Displaying Internet services Page 67
First steps
Setting ringers Page 71
Setting the idle display and screensavers Page 74
Connecting a headset Page 88
Loading your own pictures and sounds Page 89
Setting up VoIP accounts Page 97
If you have any questions about using your phone, please read the tips on
troubleshooting (Page 144) or contact our Customer Care team (
£ Page 144).
www.InternetVoipPhone.co.uk | sales@internetvoipphone.co.uk | 0800 088 4846
21

Using the phone
Back OK
Current display key functions
Display keys
Û
ß
Using the phone
You have a range of options for operating and configuring your Gigaset DE700 IP PRO in
a way that is convenient for you. For example, you can initiate a phone call or conference
call using the phone's keypad and display menu. You can change your configuration settings using the display menu or the Web configurator.
The option you choose will depend on the situation.
Operating via the keypad and display menu
Display and display keys
The display gives you quick access to all the functions on your phone, particularly the
menu functions.
In idle status, icons on the display indicate the status of your phone (
tively, you can select the information you wish to display, e.g., time, calendar or pictures
£ Page 74).
(
Use the display keys to activate the phone's functions and to navigate through the menu.
Different functions are available depending on the operating situation. These functions
are displayed at the bottom of the screen.
Example:
Some important display keys:
§§Options§§ Open a menu for further functions.
§§OK§§ Confirm selection.
£ Page 4). Alterna-
Delete key: Delete one character at a time from right to left.
§§Back§§ Skip back one menu level or cancel the operation.
§§Save§§ Save entry.
Copy the displayed entry to the directory.
22
www.InternetVoipPhone.co.uk | sales@internetvoipphone.co.uk | 0800 088 4846
Writing and editing text
Ûß
j §k§ l 5
abc
Prepare Dialling
11:45
peter.black@k|
Û
A text editor is provided for entering text via the keypad.
~ Enter the text.
Each key between Q and O is
assigned several letters and digits.
Press the relevant key a certain number
of times to enter a particular character.
Using the phone
For example k = 2 x the
The characters available are shown in
the editor field. The highlighted character is inserted to the left of the cursor.
Deleting/correcting characters
Press the display key. The character to the left of the cursor is deleted. Press
and hold to delete the word to the left of the cursor.
Entry mode
A range of entry modes are available depending on the operating situation. The current
mode is displayed on the right-hand side of the editor field.
Abc Letters, first letter upper case, others lower case, e.g., for entering names.
abc Lower case only, e.g., for entering e-mail addresses.
123 Digits only for entering numbers.
Switching entry mode
5 key.
# Press the hash key. The text entry mode will change.
Moving the cursor
r Press the navigation key briefly: moves the cursor one character at a time.
Press and hold the navigation key: moves the cursor word by word.
q Press the navigation key: moves the cursor line by line. The cursor stays in a
horizontal position.
www.InternetVoipPhone.co.uk | sales@internetvoipphone.co.uk | 0800 088 4846
23
Using the phone
Back Insert
Screensavers
;:,.-+*#
§%&@? ! ¡
{}()[]<>
¥£$ | ~^
_’ " =/ \
€
Open
redial list
Open
directory
Open
main menu
Entering special characters
* Press the star key. The table of special characters is displayed.
Navigation key
p Select the required charac-
ter.
§Insert§ Press the display key. The
selected character is
inserted at the cursor position.
The navigation key enables you to access important telephone functions quickly. You can use it to scroll through lists and directories with
ease.
In idle status
In menus and lists
Depending on the operating situation:
§§OK§§, §§Yes§§, §§Save§§, §§Select§§ or §§Change§§.
Copy a number that has been entered or is shown in the display into
the directory.
Press briefly:
Navigate to the line above/below.
Press and hold:
Scroll up/down the list one line at a time.
"Rotate" left or right (key is touch sensitive):
Quickly scroll through the list. Clockwise to scroll down. Anti-clockwise to scroll up.
24
www.InternetVoipPhone.co.uk | sales@internetvoipphone.co.uk | 0800 088 4846
In input fields
Back OK
Select Services
Additional Features
Organizer
Messages
Call Lists
Contacts
Settings
Move the cursor up/down
line by line
Press briefly:
Move the cursor to the left/right one character at a time.
Press and hold:
Move the cursor to the left/right quickly.
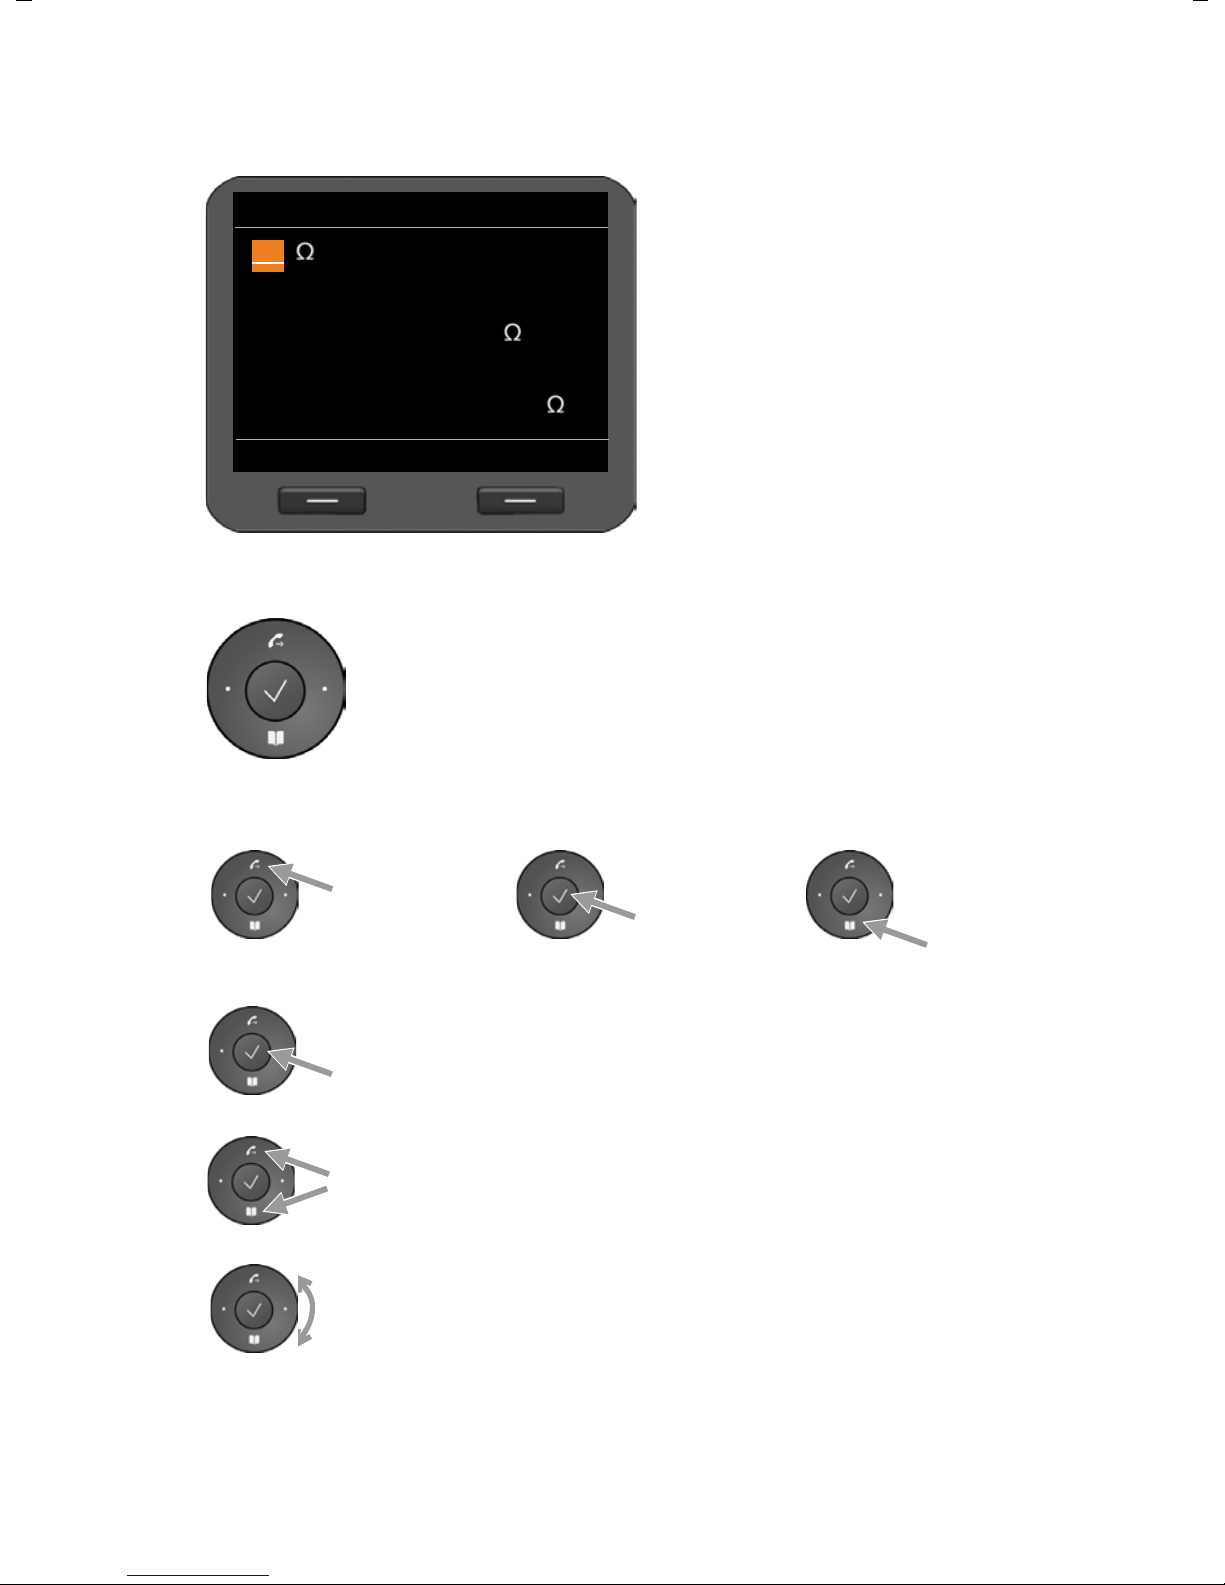
Understanding the navigation key
The following illustrations demonstrate how to use the navigation key:
Using the phone
‰
stuv
w
Press the centre of the navigation key.
Press down/up/left/right on the navigation key.
Rotate the navigation key to scroll quickly up/down a list.
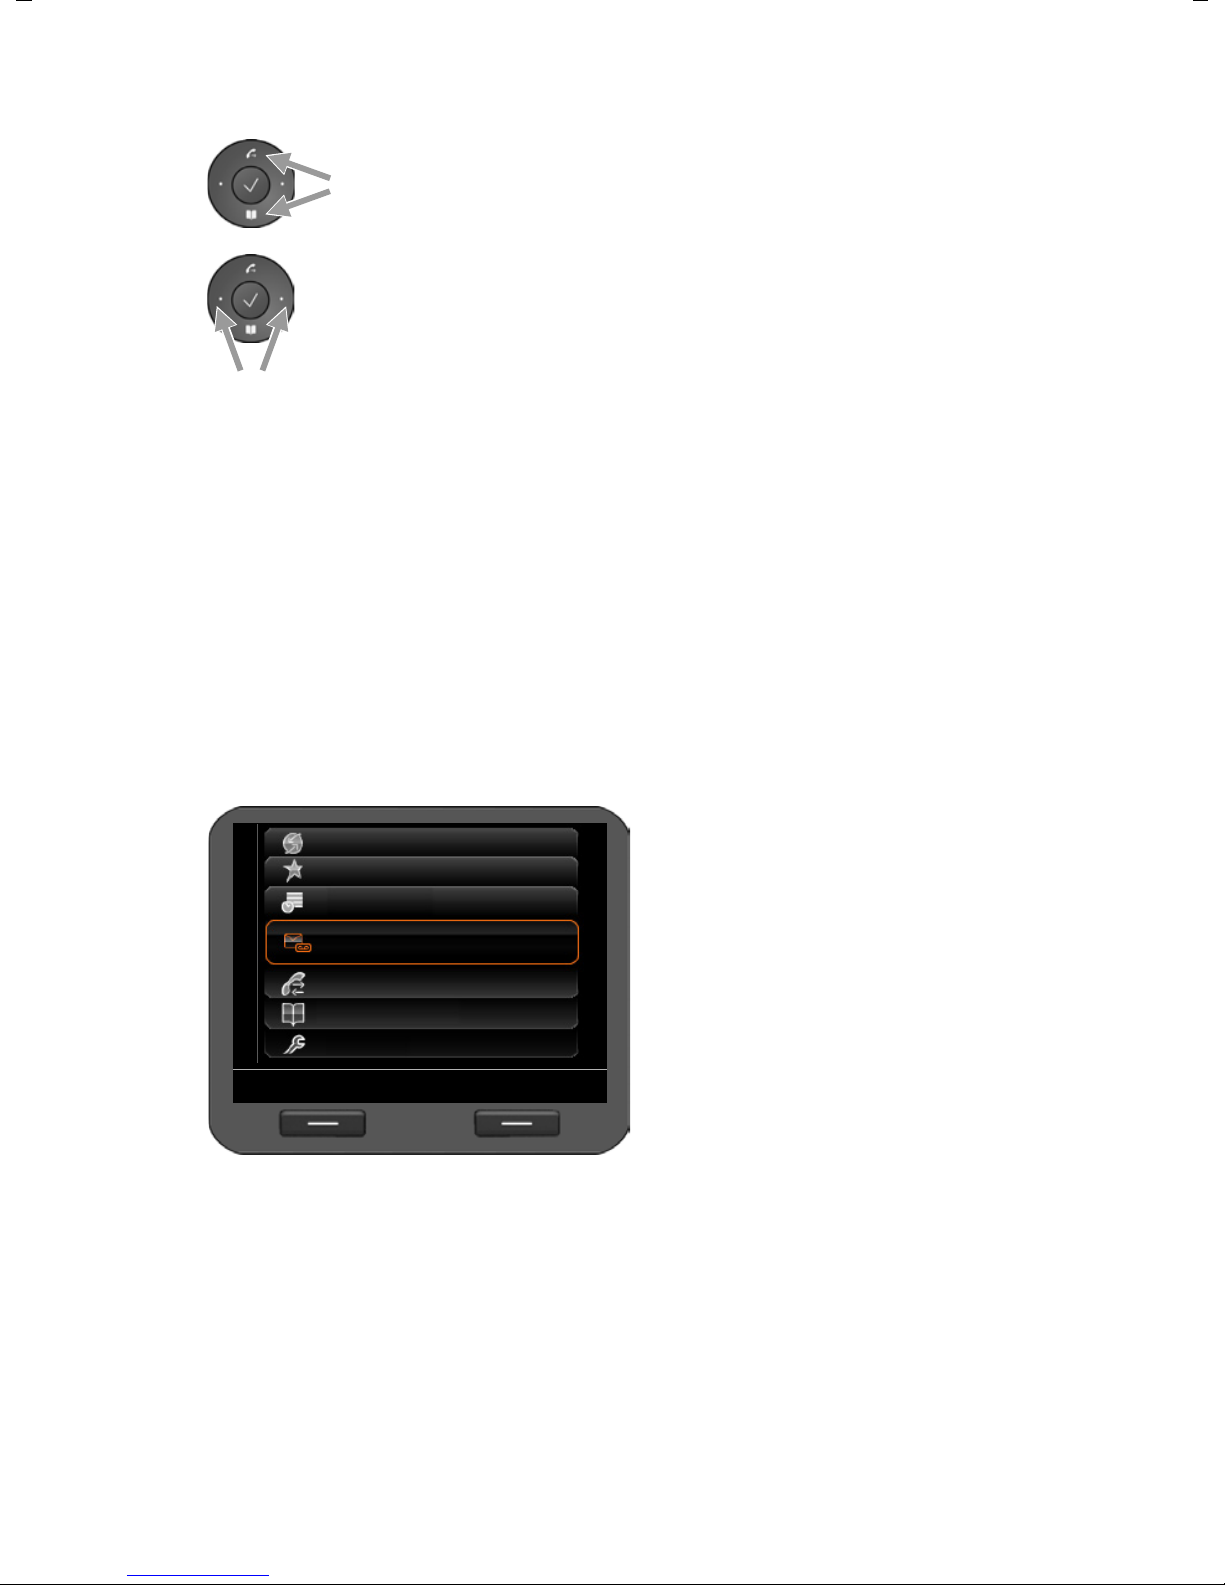
Using the menus
Your telephone's functions are accessed using a menu that has a number of levels.
Opening the main menu
¤ When the phone is in idle status, press the centre of the navigation key ‰.
The display menu functions are shown as
a list with the respective icons.
An orange box identifies the selected
function.
Accessing a function or opening the corresponding submenu
¤ Navigate to the required entry using the navigation key q and press the §OK§ display
key or the
Back to the previous level
‰ navigation key.
¤ Press the §Back§ display key or briefly press the end key I.
www.InternetVoipPhone.co.uk | sales@internetvoipphone.co.uk | 0800 088 4846
The current operation is cancelled and you will return to the previous menu level.
You can revert to idle status from the main menu.
25

Using the phone
Copy to Directory
Back
OK
Adam
Black, Susan
Brown, Tim
Forster, Fred
Judy
Miller, Peter
White, Phil
Reverting to idle status
You can revert to idle status from anywhere in the display menu as follows:
¤ Press and hold the end key I.
Or:
¤ Do not press any key: After 3 minutes the display will automatically revert to idle
status.
Settings that have not been saved by selecting the display keys
or the navigation key
‰ are lost.
Scrolling through lists
If it is not possible to view all of the functions/list entries at the same time (list is
too long), arrows appear on the righthand side. The arrows indicate the direction in which you need to scroll to view
the rest of the entries in the list.
§OK§, §Yes§, §Save§ or §Change§
26
www.InternetVoipPhone.co.uk | sales@internetvoipphone.co.uk | 0800 088 4846

Using the phone
Back OK
Select Services
Additional Features
Organizer
Messages
Call Lists
Contacts
Settings
¤ Continue to navigate through the menu
using the navigation and display key until
you reach the Volume submenu.
Settings
Back OK
Date / Time
Audio Settings
Display
Language
Connectivity
Reset
Audio Settings
Back
OK
Ringer Settings
Advisory Tones
Volume
Back Save
Calls:
Ringer Settings
Back OK
Volume
Melodies
Time Control
Anon. Call Silencing
Understanding the operating steps
The operating steps used to navigate through the display menu are shown in abbreviated
form.
For example, setting the ringer volume
‰ ¢ Settings ¢ Audio Settings ¢Ringer Settings ¢Volume
means:
¤ Press the centre of the navigation key
to open the main menu.
¤ Navigate up/down using the naviga-
tion key
menu is selected.
q until the Settings sub-
¤ Press the display key §OK§ to confirm
your selection.
www.InternetVoipPhone.co.uk | sales@internetvoipphone.co.uk | 0800 088 4846
27

Using the phone
Menu tree
The following menu tree shows all the components of the display menu.
Select Services Next Call anonymous £Page 37
Additional Features Internet Radio £Page 67
All Calls anonymous £Page 37
Call Divert £Page 42
Call Waiting £Page 38
Ringback off £Page 33
Resource Directory Screensavers £ Page 90
Caller Pictures £Page 91
Sounds £Page 92
Capacity £Page 93
Organizer Calendar £Page 63
Alarm Clock £ Page 65
Missed Alarms £Page 64
Messages Voice Mail £Page 57
Call Records £Page 58
E-mail £Page 59
Call Lists All Calls £Page 43
Outgoing Calls £ Page 43
Accepted Calls £Page 43
Missed Calls £Page 43
Contacts Directory £ Page 47
LDAP Directory £ Page 52
You can choose any name
Online directories £Page 53 The name of these menu entries
Settings ¢continues on the next page
28
www.InternetVoipPhone.co.uk | sales@internetvoipphone.co.uk | 0800 088 4846
depends on Web configurator
settings
£Page 127.

Settings Date / Time £ Page 70
Audio Settings Ringer Settings Volume £Page 71
Using the phone
Melodies £Page 71
Time Control £Page 72
Anon. Call Silencing
Advisory Tones £Page 73
Display Idle Display £ Page 74
Screensaver £Page 78
Backlight £Page 80
Language £ Page 81
Connectivity Local Network £ Page 83
Reset £Page 81
£Page 73
www.InternetVoipPhone.co.uk | sales@internetvoipphone.co.uk | 0800 088 4846
29
Making calls
Call Select Line
Making calls
Calling
You make your calls using the default account if you do not make another selection. The
first account that is created is used as the default account. You can change this using the
Web configurator (
Selecting VoIP account
£ Page 114).
If there are several VoIP accounts available on your device, you can select the
account you wish to use for the call.
§§Select Line§§ Press the display key.
q Select the required account.
§§OK§§ Press the display key to con-
firm the selection.
Entering a number using the keypad
You make a call using the phone's receiver, speaker kit or a connected headset
£ Page 88).
(
~ Enter the phone number.
c Lift the receiver.
Or
c Lift the receiver.
~ Enter the phone number.
§§Dial§§ Press the display key.
The number is dialled.
The duration of the call is shown while the call is in progress.
Instead of putting the receiver to your ear:
A Press the speaker key to make a call via the speaker.
B Press the headset key to make a call via the headset.
You can also switch at any time during the call. Throughout the whole of this section, the
c icon can always represent either Aor B.
30
www.InternetVoipPhone.co.uk | sales@internetvoipphone.co.uk | 0800 088 4846
 Loading...