

Gigaset DE410 IP Pro User Manual

PRO Version 3, 30.05.2012
Version 02.00.00

2
Gigaset DE410 IP PRO – More than just a telephone
PRO Version 3, 30.05.2012
Gigaset DE410 IP PRO – More than just a telephone
Your Gigaset DE410 IP PRO is an IP phone designed for professional use.
u
Easy to set up
Use the automatic configuration via the Gigaset phone system or the default settings for
approx. 200 preconfigured VoIP providers.
u
Web user interfaces for telephony and configuration
Operate and configure your telephone from your PC with ease.
u
High Definition Sound Performance – HDSP
Make phone calls with brilliant sound quality.
u
Phone functions for the professional user
Use the call divert, conference call, automatic ringback, call reject and Do Not Disturb
(DND) functions.
u
Multiple directories
Manage your personal directory with up to 200 entries. Use an LDAP directory or online
directories on the Internet.
u
Connection to a Gigaset T500 PRO or Gigaset T300 PRO Gigaset phone system
Connect your telephone to a Gigaset phone system and make use of a shared line with
colleagues and central management of your call lists or call switching, for example.
u
Network connection
Connect your telephone to the local network via Ethernet. Connect a PC using your telephone as a 100 MBit Ethernet switch.
u
Protect the environment
Reduce environmental pollution with the power-saving power adapter.
u
Individual settings
Load your own ring tones.
Assign functions or frequently used numbers to the keys.
Further information about your phone can be found at
www.gigaset.com/pro/gigasetDE410ippro
www.InternetVoipPhone.co.uk | sales@internetvoipphone.co.uk | 0800 088 48 46
PRO Version 3, 30.05.2012
3
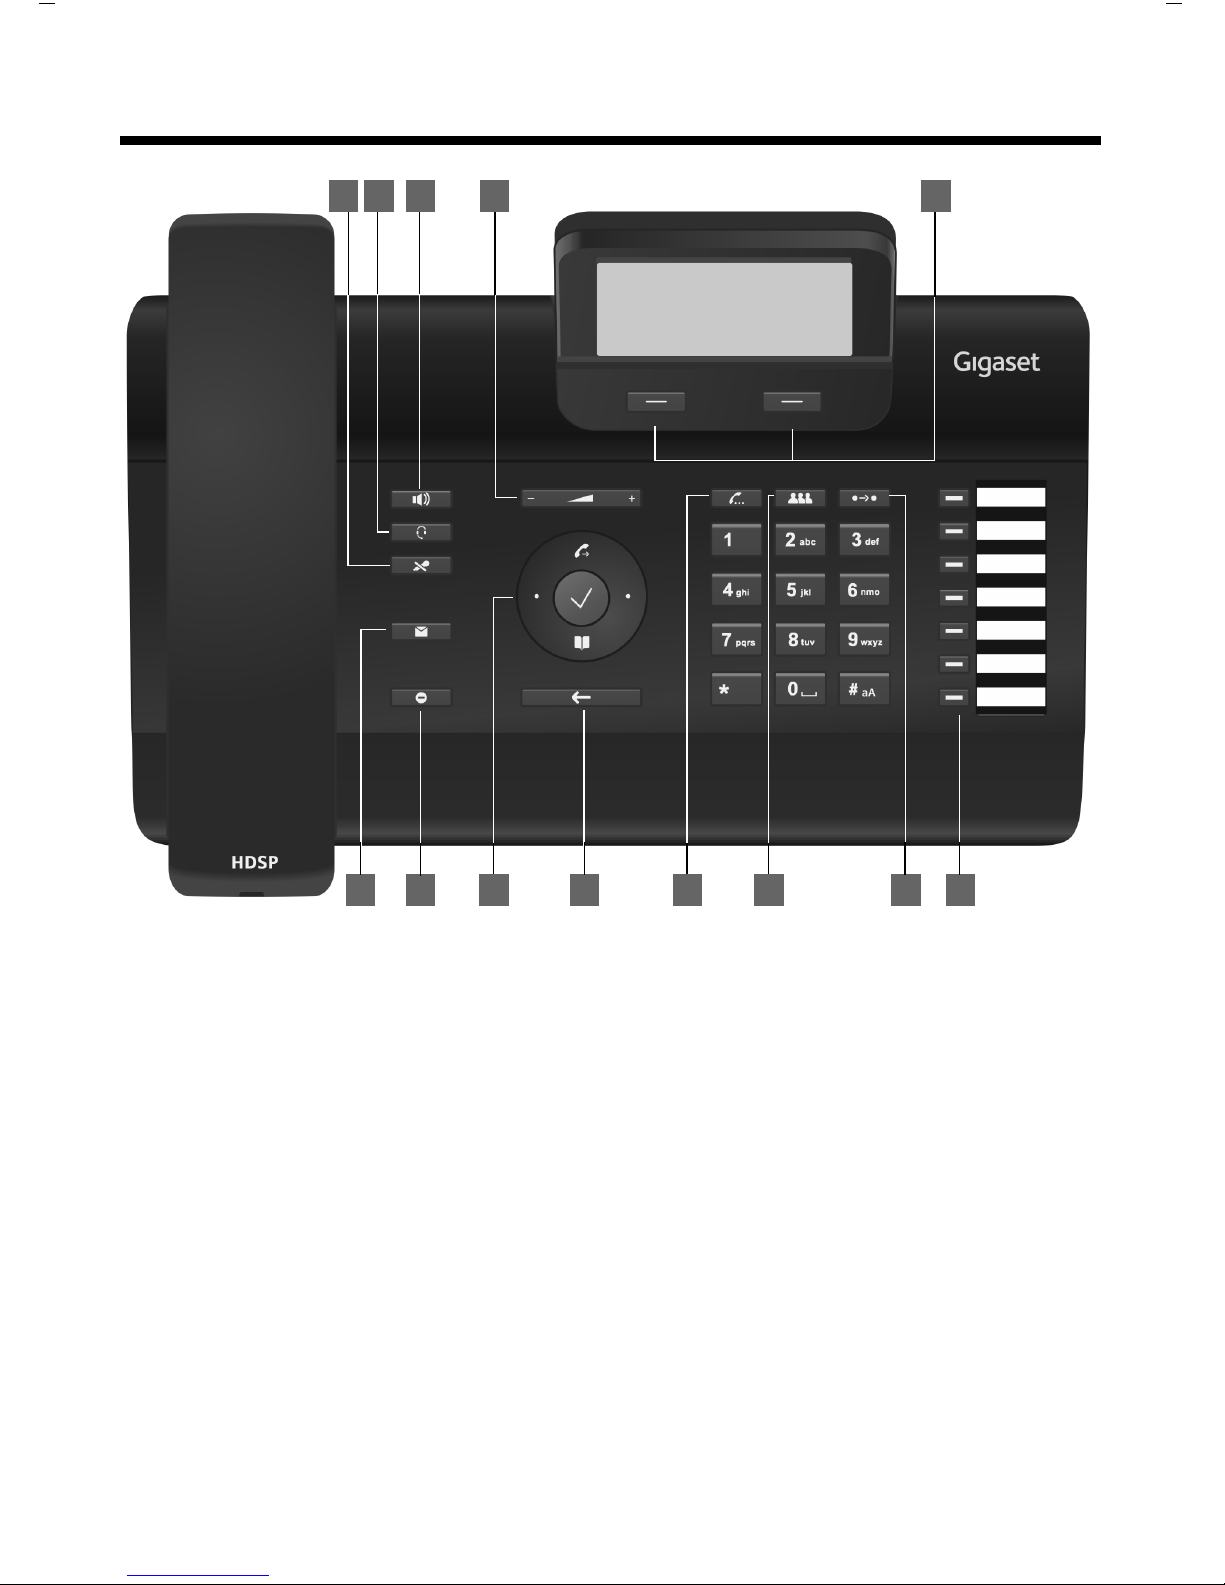
Phone overview
Phone overview
1 Mute key Activate/deactivate microphone (mute)
£
page 35
2 Headset key Make call via headset
£
page 33
3 Speaker key Activate/deactivate speaker
£
page 35
4 Volume key Depending on the operating mode: Adjust the volume of the
speaker, receiver, headset or ringer
£
page 34
5 Display keys Activate display functions
£
page 23
6 Message Centre Open call and message lists
£
page 56
7 Do Not Disturb key Do Not Disturb (DND) function
£
page 35
8 Navigation key Scroll through lists and entries. In idle status:
£
page 25
È
Open redial list.
£
page 43
‰
Confirm or start action, select entry
£
page 25
Z
Open directory
£
page 47
9 End call/back key End/reject call; cancel function;
go back one menu level (press briefly);
return to idle status (press and hold)
£
page 26
10 Consultation key Initiate/end consultation call, put participant on hold
£
page 38
11 Conference key Initiate conference call
£
page 38
Keys
6 7
9 12 1310 118
21 3 4 5
www.InternetVoipPhone.co.uk | sales@internetvoipphone.co.uk | 0800 088 48 46

4
Phone overview
PRO Version 3, 30.05.2012
Understanding Light Emitting Diodes (LEDs)
Understanding the display
Understanding the display symbols
12 Transfer key Transfer call to another party
£
page 39
13 Function keys Programmable keys
£
page 106
A
Flashes Incoming call.
£
page 33
Lights up Call is being made via the speaker.
£
page 35
B
Lights up Call is being made via the headset.
£
page 33
C
Lights up The microphone is muted.
£
page 35
E
Flashes New message in the Message Centre.
£
page 56
G
Lights up "Do Not Disturb" function is activated.
£
page 35
S
Flashes Incoming call on the number programmed to this key.
£
page 31
Lights up Call is being made on the number programmed to this key.
Ó
New message in the Message Centre.
£
page 56
^
The microphone is muted.
£
page 35
@
Call is being made via the speaker. Flashing: Incoming call.
£
page 30
ô
Headset connected
£
page 19
ó
Ringer deactivated.
£
page 59
Ñ
"Do Not Disturb" function is activated.
£
page 35
]
Telephone in conference call.
£
page 38
Õ
Secure connection.
£
page 34
Ô
HDSP quality connection.
£
page 34
Ã
New messages on the network mailbox. The number is displayed to the
right.
£
page 54
™
Missed calls.
£
page 43
Other icons may appear depending on the function. These are displayed alongside the corresponding
description.
Application area
Display functions (
£
page 23)
T
T
Display symbols (£below)
Date
You set the time and date format using the Web configurator (
£
page 110).
U
New Messages
(
£
page 56)
U
U
Missed calls (£page 43)
Calls Lines
18/02/2011
Ã
05
Ó^@ôó Ñ ]ÕÔ
™
11:45
18 MyName
Time
U
T
Own number / Name
U
www.InternetVoipPhone.co.uk | sales@internetvoipphone.co.uk | 0800 088 48 46

PRO Version 3, 30.05.2012
5
Contents
Contents
Gigaset DE410 IP PRO – More than just a telephone . . . . . . . . . . . . . . . . . . . . . . . . . 2
Phone overview . . . . . . . . . . . . . . . . . . . . . . . . . . . . . . . . . . . . . . . . . . . . . . . . . . . . . . . . . . . 3
Keys . . . . . . . . . . . . . . . . . . . . . . . . . . . . . . . . . . . . . . . . . . . . . . . . . . . . . . . . . . . . . . . . . . . . . . . . . . . . . . . . . . . 3
Understanding Light Emitting Diodes (LEDs) . . . . . . . . . . . . . . . . . . . . . . . . . . . . . . . . . . . . . . . . . . . . 4
Understanding the display . . . . . . . . . . . . . . . . . . . . . . . . . . . . . . . . . . . . . . . . . . . . . . . . . . . . . . . . . . . . . 4
Following safety precautions . . . . . . . . . . . . . . . . . . . . . . . . . . . . . . . . . . . . . . . . . . . . . . 8
Using the phone in different scenarios . . . . . . . . . . . . . . . . . . . . . . . . . . . . . . . . . . . . . 9
First steps . . . . . . . . . . . . . . . . . . . . . . . . . . . . . . . . . . . . . . . . . . . . . . . . . . . . . . . . . . . . . . . . 11
Check the package contents . . . . . . . . . . . . . . . . . . . . . . . . . . . . . . . . . . . . . . . . . . . . . . . . . . . . . . . . . . . 11
Setting up and connecting the device . . . . . . . . . . . . . . . . . . . . . . . . . . . . . . . . . . . . . . . . . . . . . . . . . 12
Wall mounting . . . . . . . . . . . . . . . . . . . . . . . . . . . . . . . . . . . . . . . . . . . . . . . . . . . . . . . . . . . . . . . . . . . . . . . . 18
Connecting a headset . . . . . . . . . . . . . . . . . . . . . . . . . . . . . . . . . . . . . . . . . . . . . . . . . . . . . . . . . . . . . . . . . 19
Setting up the device (for the first time) . . . . . . . . . . . . . . . . . . . . . . . . . . . . . . . . . . . . . . . . . . . . . . . . 19
Establishing a connection to the local network . . . . . . . . . . . . . . . . . . . . . . . . . . . . . . . . . . . . . . . . . 20
Proceeding . . . . . . . . . . . . . . . . . . . . . . . . . . . . . . . . . . . . . . . . . . . . . . . . . . . . . . . . . . . . . . . . . . . . . . . . . . . 22
Using the phone . . . . . . . . . . . . . . . . . . . . . . . . . . . . . . . . . . . . . . . . . . . . . . . . . . . . . . . . . 23
Operating via the keypad and display menu . . . . . . . . . . . . . . . . . . . . . . . . . . . . . . . . . . . . . . . . . . . 23
Menu tree . . . . . . . . . . . . . . . . . . . . . . . . . . . . . . . . . . . . . . . . . . . . . . . . . . . . . . . . . . . . . . . . . . . . . . . . . . . . 28
Operating via the PC . . . . . . . . . . . . . . . . . . . . . . . . . . . . . . . . . . . . . . . . . . . . . . . . . . . . . . . . . . . . . . . . . . 29
Making calls . . . . . . . . . . . . . . . . . . . . . . . . . . . . . . . . . . . . . . . . . . . . . . . . . . . . . . . . . . . . . 30
Calling . . . . . . . . . . . . . . . . . . . . . . . . . . . . . . . . . . . . . . . . . . . . . . . . . . . . . . . . . . . . . . . . . . . . . . . . . . . . . . . . 30
Receiving incoming calls . . . . . . . . . . . . . . . . . . . . . . . . . . . . . . . . . . . . . . . . . . . . . . . . . . . . . . . . . . . . . . 33
Ending a call . . . . . . . . . . . . . . . . . . . . . . . . . . . . . . . . . . . . . . . . . . . . . . . . . . . . . . . . . . . . . . . . . . . . . . . . . . 34
Using functions when making a telephone call . . . . . . . . . . . . . . . . . . . . . . . . . . . . . . . . . . . . . . . . . 34
Making a call to multiple participants . . . . . . . . . . . . . . . . . . . . . . . . . . . . . . . . . . . . . . . . . . . . . . . . . . 36
Setting up call divert (CD) . . . . . . . . . . . . . . . . . . . . . . . . . . . . . . . . . . . . . . . . . . . . . . . . . . . . . . . . . . . . . 40
Using the call lists . . . . . . . . . . . . . . . . . . . . . . . . . . . . . . . . . . . . . . . . . . . . . . . . . . . . . . . . 43
Viewing entries . . . . . . . . . . . . . . . . . . . . . . . . . . . . . . . . . . . . . . . . . . . . . . . . . . . . . . . . . . . . . . . . . . . . . . . 43
Dialling a number from a list . . . . . . . . . . . . . . . . . . . . . . . . . . . . . . . . . . . . . . . . . . . . . . . . . . . . . . . . . . . 45
Copying an entry from the call list to the directory . . . . . . . . . . . . . . . . . . . . . . . . . . . . . . . . . . . . . 45
Deleting an entry or list . . . . . . . . . . . . . . . . . . . . . . . . . . . . . . . . . . . . . . . . . . . . . . . . . . . . . . . . . . . . . . . 46
Using directories . . . . . . . . . . . . . . . . . . . . . . . . . . . . . . . . . . . . . . . . . . . . . . . . . . . . . . . . . 47
Using the local directory . . . . . . . . . . . . . . . . . . . . . . . . . . . . . . . . . . . . . . . . . . . . . . . . . . . . . . . . . . . . . . . 47
Using an LDAP directory . . . . . . . . . . . . . . . . . . . . . . . . . . . . . . . . . . . . . . . . . . . . . . . . . . . . . . . . . . . . . . . 50
Using online directories . . . . . . . . . . . . . . . . . . . . . . . . . . . . . . . . . . . . . . . . . . . . . . . . . . . . . . . . . . . . . . . 51
Managing messages . . . . . . . . . . . . . . . . . . . . . . . . . . . . . . . . . . . . . . . . . . . . . . . . . . . . . . 54
Managing voice mails on the network mailbox . . . . . . . . . . . . . . . . . . . . . . . . . . . . . . . . . . . . . . . . . 54
Accessing messages via the Message Centre . . . . . . . . . . . . . . . . . . . . . . . . . . . . . . . . . . . . . . . . . . . 56
www.InternetVoipPhone.co.uk | sales@internetvoipphone.co.uk | 0800 088 48 46

6
Contents
PRO Version 3, 30.05.2012
Operating door interphones . . . . . . . . . . . . . . . . . . . . . . . . . . . . . . . . . . . . . . . . . . . . . . 57
Configuring basic settings . . . . . . . . . . . . . . . . . . . . . . . . . . . . . . . . . . . . . . . . . . . . . . . . 58
Setting the date and time . . . . . . . . . . . . . . . . . . . . . . . . . . . . . . . . . . . . . . . . . . . . . . . . . . . . . . . . . . . . . 58
Setting the ringer . . . . . . . . . . . . . . . . . . . . . . . . . . . . . . . . . . . . . . . . . . . . . . . . . . . . . . . . . . . . . . . . . . . . . 59
Activating/deactivating advisory tones . . . . . . . . . . . . . . . . . . . . . . . . . . . . . . . . . . . . . . . . . . . . . . . . 61
Renaming or deleting ring tones . . . . . . . . . . . . . . . . . . . . . . . . . . . . . . . . . . . . . . . . . . . . . . . . . . . . . . . 61
Setting the display . . . . . . . . . . . . . . . . . . . . . . . . . . . . . . . . . . . . . . . . . . . . . . . . . . . . . . . . . . . . . . . . . . . . 62
Setting the language . . . . . . . . . . . . . . . . . . . . . . . . . . . . . . . . . . . . . . . . . . . . . . . . . . . . . . . . . . . . . . . . . . 63
Resetting the device to the default settings . . . . . . . . . . . . . . . . . . . . . . . . . . . . . . . . . . . . . . . . . . . . 64
Showing information on the device . . . . . . . . . . . . . . . . . . . . . . . . . . . . . . . . . . . . . . . . . . . . . . . . . . . . 64
Configuring settings for the local network . . . . . . . . . . . . . . . . . . . . . . . . . . . . . . . . . 65
LAN settings . . . . . . . . . . . . . . . . . . . . . . . . . . . . . . . . . . . . . . . . . . . . . . . . . . . . . . . . . . . . . . . . . . . . . . . . . . 66
Web configurator – configuring the phone on a PC . . . . . . . . . . . . . . . . . . . . . . . . . 72
Starting the Web configurator . . . . . . . . . . . . . . . . . . . . . . . . . . . . . . . . . . . . . . . . . . . . . . . . . . . . . . . . . 72
Understanding the Web configurator menu tree . . . . . . . . . . . . . . . . . . . . . . . . . . . . . . . . . . . . . . . 73
Running the setup assistant . . . . . . . . . . . . . . . . . . . . . . . . . . . . . . . . . . . . . . . . . . . . . . . . . . . . . . . . . . . 75
Configuring phone settings via the Web configurator . . . . . . . . . . . . . . . . . . . . . . 80
Network and connectors . . . . . . . . . . . . . . . . . . . . . . . . . . . . . . . . . . . . . . . . . . . . . . . . . . . . . . . . . . . . . . 80
Telephony . . . . . . . . . . . . . . . . . . . . . . . . . . . . . . . . . . . . . . . . . . . . . . . . . . . . . . . . . . . . . . . . . . . . . . . . . . . . 90
Messaging . . . . . . . . . . . . . . . . . . . . . . . . . . . . . . . . . . . . . . . . . . . . . . . . . . . . . . . . . . . . . . . . . . . . . . . . . . 100
Services . . . . . . . . . . . . . . . . . . . . . . . . . . . . . . . . . . . . . . . . . . . . . . . . . . . . . . . . . . . . . . . . . . . . . . . . . . . . . 101
Function keys . . . . . . . . . . . . . . . . . . . . . . . . . . . . . . . . . . . . . . . . . . . . . . . . . . . . . . . . . . . . . . . . . . . . . . . 106
System settings . . . . . . . . . . . . . . . . . . . . . . . . . . . . . . . . . . . . . . . . . . . . . . . . . . . . . . . . . . . . . . . . . . . . . 109
Checking the status of the phone . . . . . . . . . . . . . . . . . . . . . . . . . . . . . . . . . . . . . . . 119
Accessories . . . . . . . . . . . . . . . . . . . . . . . . . . . . . . . . . . . . . . . . . . . . . . . . . . . . . . . . . . . . 121
Service (Customer Care) . . . . . . . . . . . . . . . . . . . . . . . . . . . . . . . . . . . . . . . . . . . . . . . . 121
Questions and answers . . . . . . . . . . . . . . . . . . . . . . . . . . . . . . . . . . . . . . . . . . . . . . . . . . . . . . . . . . . . . . 121
Protecting our environment . . . . . . . . . . . . . . . . . . . . . . . . . . . . . . . . . . . . . . . . . . . . 122
Appendix . . . . . . . . . . . . . . . . . . . . . . . . . . . . . . . . . . . . . . . . . . . . . . . . . . . . . . . . . . . . . . 123
Caring for your telephone . . . . . . . . . . . . . . . . . . . . . . . . . . . . . . . . . . . . . . . . . . . . . . . . . . . . . . . . . . . 123
Contact with liquid . . . . . . . . . . . . . . . . . . . . . . . . . . . . . . . . . . . . . . . . . . . . . . . . . . . . . . . . . . . . . . . . . . 123
Authorisation . . . . . . . . . . . . . . . . . . . . . . . . . . . . . . . . . . . . . . . . . . . . . . . . . . . . . . . . . . . . . . . . . . . . . . . 123
Using insert strips . . . . . . . . . . . . . . . . . . . . . . . . . . . . . . . . . . . . . . . . . . . . . . . . . . . . . . . . . . . . . . . . . . . 124
Using Gigaset QuickSync – additional functions for the PC interface . . . . . . . . . . . . . . . . . . 124
Key combinations for phone system functions . . . . . . . . . . . . . . . . . . . . . . . . . . . . . . . . . . . . . . . 124
Specifications . . . . . . . . . . . . . . . . . . . . . . . . . . . . . . . . . . . . . . . . . . . . . . . . . . . . . . . . . . . . . . . . . . . . . . . 126
www.InternetVoipPhone.co.uk | sales@internetvoipphone.co.uk | 0800 088 48 46

PRO Version 3, 30.05.2012
7
Contents
Open Source Software . . . . . . . . . . . . . . . . . . . . . . . . . . . . . . . . . . . . . . . . . . . . . . . . . 127
General . . . . . . . . . . . . . . . . . . . . . . . . . . . . . . . . . . . . . . . . . . . . . . . . . . . . . . . . . . . . . . . . . . . . . . . . . . . . . 127
Information on license rights and copyright . . . . . . . . . . . . . . . . . . . . . . . . . . . . . . . . . . . . . . . . . . 127
License text . . . . . . . . . . . . . . . . . . . . . . . . . . . . . . . . . . . . . . . . . . . . . . . . . . . . . . . . . . . . . . . . . . . . . . . . . 127
Glossary . . . . . . . . . . . . . . . . . . . . . . . . . . . . . . . . . . . . . . . . . . . . . . . . . . . . . . . . . . . . . . . 133
Index . . . . . . . . . . . . . . . . . . . . . . . . . . . . . . . . . . . . . . . . . . . . . . . . . . . . . . . . . . . . . . . . . . 146
www.InternetVoipPhone.co.uk | sales@internetvoipphone.co.uk | 0800 088 48 46

8
Following safety precautions
PRO Version 3, 30.05.2012
Following safety precautions
Warning
Be sure to read this user guide and the safety precautions before using your telephone.
Use only the power adapter indicated on the device.
Using your telephone may affect nearby medical equipment. Be aware of the
technical conditions in your particular environment, e.g. doctor's surgery.
If you use a medical device (e.g. a pacemaker), please contact the device manufacturer. They will be able to advise you regarding the susceptibility of the device
to external sources of high frequency energy (for the specifications of your
Gigaset product see "Technical Data").
The devices are not splashproof. For this reason do not install them in a damp
environment such as bathrooms or shower rooms.
Do not use the devices in environments with a potential explosion hazard
(e.g. paint shops).
If you give your phone to a third party, make sure you also give them the user
guide.
Remove faulty devices from use or have them repaired by our Service team, as
these could interfere with other wireless services.
Please note
The Ethernet cable supplied is intended for connecting a PC. To connect the telephone to the
local network use shielded cables exclusively.
www.InternetVoipPhone.co.uk | sales@internetvoipphone.co.uk | 0800 088 48 46

PRO Version 3, 30.05.2012
9
Using the phone in different scenarios
Using the phone in different scenarios
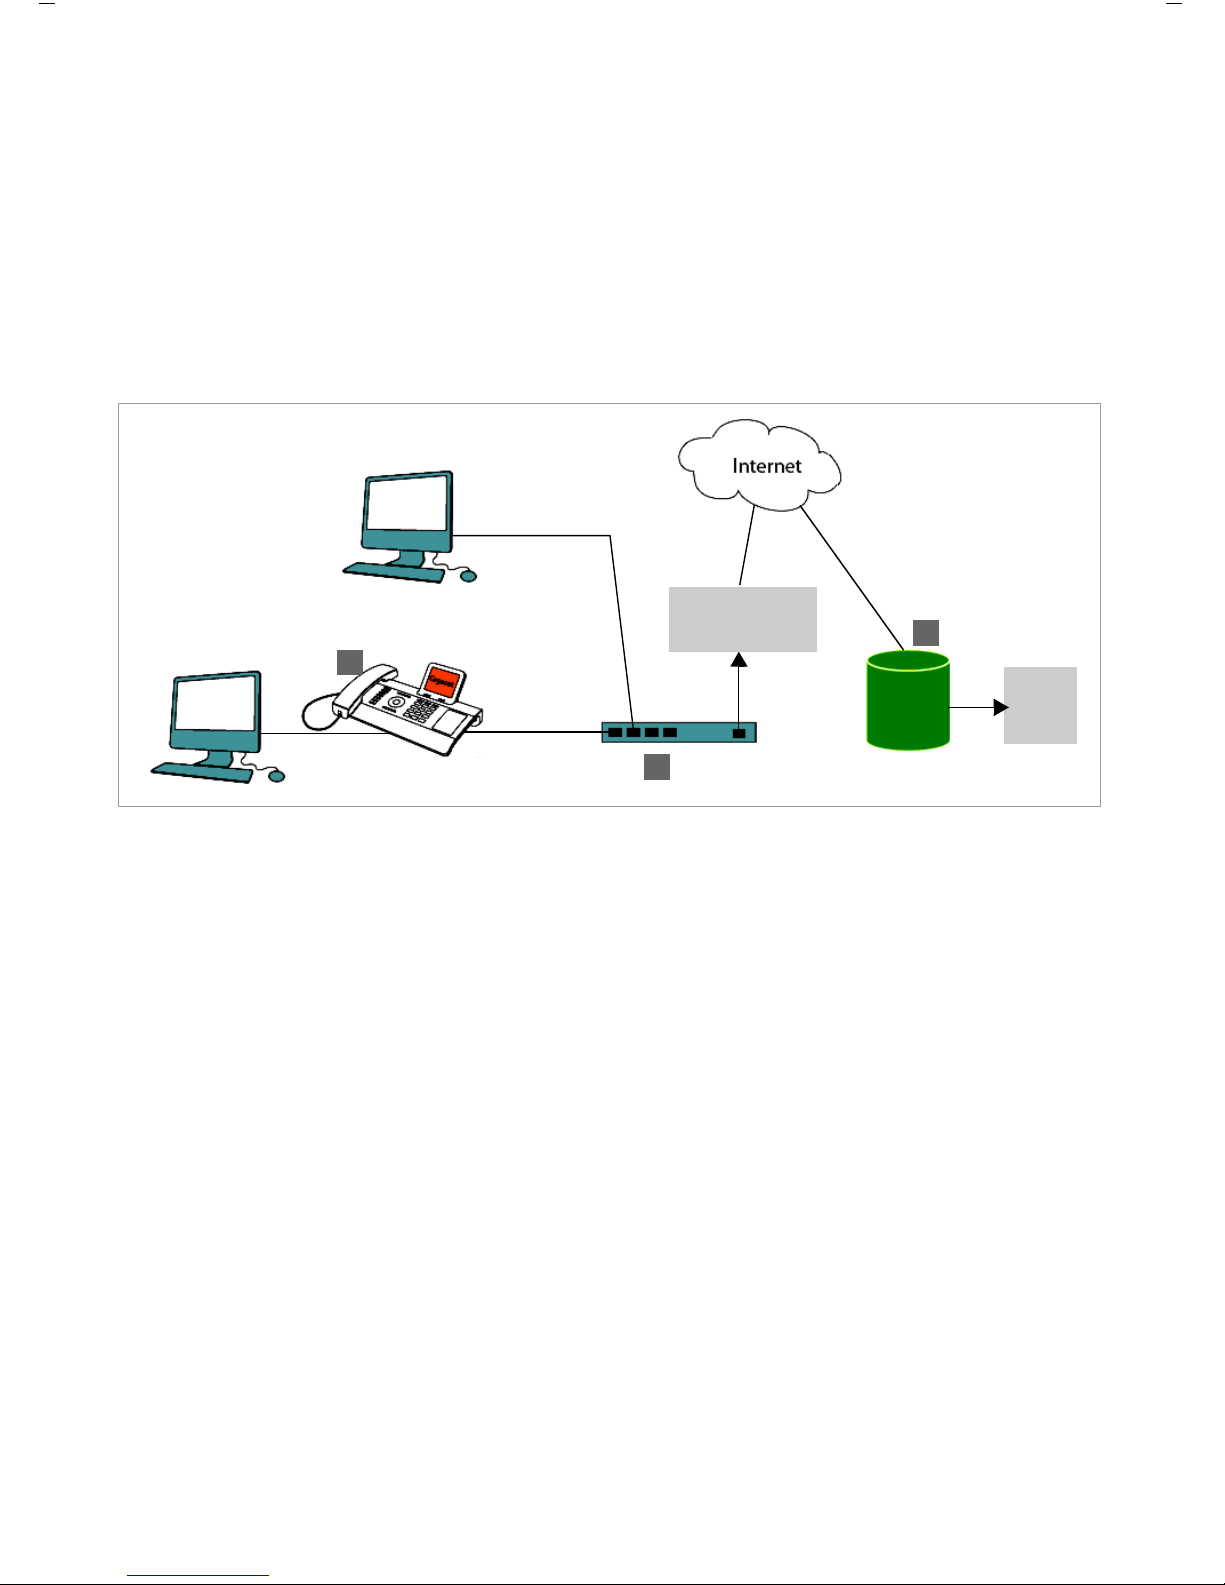
Using your phone in a professional environment with phone system and server
structure
If you use your Gigaset DE410 IP PRO in a corporate network with a telephone infrastructure,
your phone incorporates functions and data from the phone system and servers.
In a corporate environment, the VoIP accounts and most of the settings are configured centrally by the phone system.
§§1§§
Gigaset IP telephone
§§2§§
Gigaset IP telephone with integrated switch (Gigaset DE410 IP PRO).
Your PC is connected directly to the phone, providing you with an additional LAN connection in your network.
§§3§§
DECT IP bases for connection to DECT handsets
§§4§§
Ethernet switch
Supports Quality of Service (QoS), 100 Mbit or Gigabit Ethernet and PoE (Power over Ethernet).
§§5§§
Phone system (e.g., Gigaset T500 PRO)
Forms Internet telephony, ISDN or S2M connections. Analogue devices can be connected.
A network connection is established using Ethernet.
§§6§§
Acts as a gateway to the Internet for the connected devices. Routes VoIP calls from the
phone system to the Internet.
DSL connection
1
2
3
4
5
6
7
ISDN, S2M
www.InternetVoipPhone.co.uk | sales@internetvoipphone.co.uk | 0800 088 48 46
10
Using the phone in different scenarios
PRO Version 3, 30.05.2012
§§7§§
File, e-mail and workgroup servers, or NAS systems, can be seamlessly integrated into the
phone system architecture. As a result:
– Invitations to conference calls can be organised via the phone system
– The phone system can be backed up to a server or the system can be started via the net-
work
– Online directories (LDAP) can be managed centrally
Using your phone in a simplified environment without a phone system
You can also use your Gigaset DE410 IP PRO without a phone system.
§§1§§
Gigaset IP telephone with integrated switch (Gigaset DE410 IP PRO).
Your PC is connected directly to the phone, providing you with an additional LAN connection in your network.
§§2§§
Acts as a gateway to the Internet for the connected devices. Routes VoIP calls from the
phone to the Internet.
§§3§§
The SIP provider transfers calls from the Internet and establishes a connection with the
standard telephone network.
In this scenario, you must manually configure the VoIP accounts for your phone. You can create up to 6 VoIP accounts on your phone.
Internet
Connection
ISDN,
S2M
SIP provider
1
3
2
www.InternetVoipPhone.co.uk | sales@internetvoipphone.co.uk | 0800 088 48 46

PRO Version 3, 30.05.2012
11
First steps
First steps
Check the package contents
Telephone: Gigaset DE410 IP PRO
Receiver with cable for connection to the phone
Ethernet cable for connecting a PC
Wall bracket
and
Tool for fixing the handset retainer when
mounting the device on the wall.
Insert strips for labelling
the function keys (with protective film)
www.InternetVoipPhone.co.uk | sales@internetvoipphone.co.uk | 0800 088 48 46

12
First steps
PRO Version 3, 30.05.2012
Setting up and connecting the device
The phone is designed for use in dry rooms in a temperature range of ±0°C to +45°C.
¤
Set up the phone at a central point where a connection to the local network is available.
Optional:
Power adapter for connecting the phone to the
mains power supply (if required)
with three different plug-in modules
(Europe, Great Britain, USA)
The device is powered by PoE (Power over Ethernet) if it is connected to a switch with PoE-functionality (
£
page 16).
Firmware update
Whenever there are new or improved functions for your Gigaset, firmware updates are made
available for you to download to your phone (page 117). If this results in operational
changes to your phone, a new version of this user guide or the necessary amendments are
published on the Internet at www.gigaset.com/pro
.
Select the product to open the relevant product page for your telephone, where you will find
a link to the user guide.
To find out what version of firmware is currently loaded on your phone, see page 119.
Warning
u
Never expose the Gigaset DE410 IP PRO to the following:
heat sources, direct sunlight or other electrical appliances.
u
Protect your Gigaset from moisture, dust, corrosive liquids and fumes.
Please note
You can also mount your Gigaset DE410 IP PRO on the wall (£page 18).
www.InternetVoipPhone.co.uk | sales@internetvoipphone.co.uk | 0800 088 48 46

PRO Version 3, 30.05.2012
13
First steps
Connecting the receiver
§§1§§
Insert the connector, which can be found on the longer straight end of the connection cable, into the connection port on the bottom of the phone.
§§2§§
Place the straight part of the cable in the cable recess provided.
3 Insert the other jack on the connection cable into the port on the receiver.
1
2
3
www.InternetVoipPhone.co.uk | sales@internetvoipphone.co.uk | 0800 088 48 46

14
First steps
PRO Version 3, 30.05.2012
Connecting the network cable
To make calls via VoIP, your phone must have Internet access. This connection is established
in the local network via a gateway.
You connect your phone to the same local network as the gateway. See the Using the phone
in different scenarios section on page 9 for an overview of the different options.
§§1§§
Attach one end of the Ethernet cable to the right-hand LAN port on the rear of the
phone.
§§2§§
Attach the other end of the Ethernet cable to a LAN port on your network Ethernet switch or on the router itself.
Please exclusively use a shielded cable for the connection.
Warning
If you connect your Gigaset DE410 IP PRO to a PoE-capable Ethernet switch (PoE class
IEEE802.3af), it will be supplied with power via PoE (Power over Ethernet). The PoE network
must not exceed the premises boundaries.
21
www.InternetVoipPhone.co.uk | sales@internetvoipphone.co.uk | 0800 088 48 46

PRO Version 3, 30.05.2012
15
First steps
Connecting the PC
Your phone has an integrated two -port switch. This allows you to connect your PC to the local
network via the phone and avoid using additional connection ports on the switch or router.
The Ethernet cable supplied is intended for this connection. Do not use this cable to connect
the telephone to the local network (
£
page 14).
§§1§§
Connect an Ethernet cable to the left-hand LAN port on the rear of the phone.
§§2§§
Connect the other end of the Ethernet cable to a LAN port on the PC.
Please note
You can operate and configure your Gigaset DE410 IP PRO using this or any other PC within
the local network. For more information please see the chapter Web configurator – config-
uring the phone on a PC,
£
page 72.
2
1
www.InternetVoipPhone.co.uk | sales@internetvoipphone.co.uk | 0800 088 48 46
16
First steps
PRO Version 3, 30.05.2012
Connecting a device to the mains power supply (if required)
Your Gigaset DE410 IP PRO is supplied with sufficient power by PoE (Power over Ethernet) and
does not need to be connected to the mains power supply. Prerequisite: The device is con-
nected to an Ethernet switch with PoE functionality (PoE class IEEE802.3af) (
£
page 14).
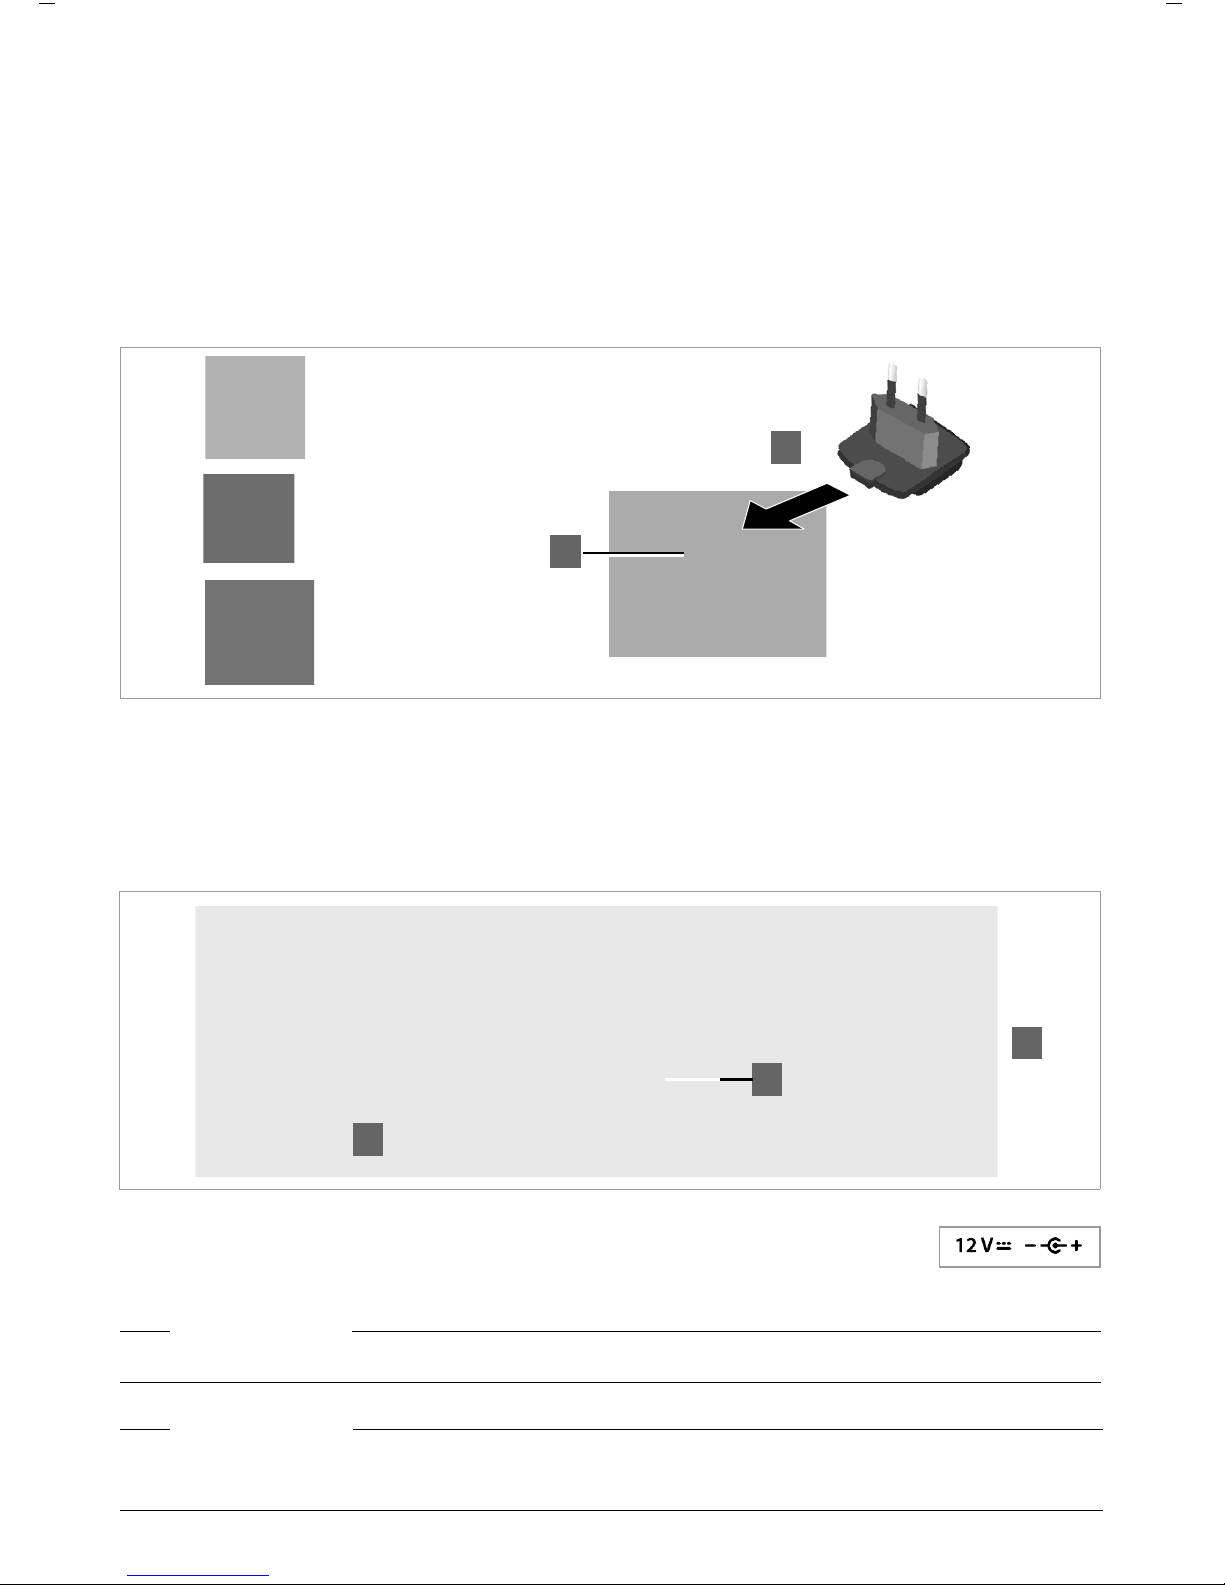
To connect your device to the mains power supply, if required, a power adapter is supplied
with three different plug-in modules for Europe, Great Britain and the USA. First attach the
appropriate plug-in module to the power supply unit.
§§1§§
Slide the required plug-in module into the recess on the underside of the power supply
unit until it clicks into place.
§§2§§
To remove the plug-in module again, press on the button marked Push and pull the plugin module out of the power supply unit.
§§1§§
Connect the power adapter to the port on the rear of the phone.
§§2§§
Then insert the plug into the mains socket.
Warning
Use only the power adapter supplied.
Please note
You can safeguard your device against theft by fitting a Kensington lock. The corresponding
hole can be found on the rear of the device (
§§3§§
).
Europe
Great Britain
USA
1
2
2
1
3
www.InternetVoipPhone.co.uk | sales@internetvoipphone.co.uk | 0800 088 48 46

PRO Version 3, 30.05.2012
17
First steps
Connecting extension modules (optional)
You can increase the number of programmable keys using extension modules (max. two; can
be ordered as accessories
£
page 121). Each module includes 14 additional programmable
keys. The function keys can be programmed using the Web configurator (
£
page 106).
The package contains:
u
One extension module
u
One connection frame with four fastening screws
u
One connection cable
u
Insert strips
§§1§§
Position the extension module to the right of the phone (on left when viewed from below),
so that the module and phone are the same height and meet in the centre.
§§2§§
Insert the clasps on the connection frame into the respective notches on the phone and
module and push the connection frame upwards until it clicks into place. Secure the connection frame with the screws provided.
§§3§§
Establish the connections using the cable supplied.
Extension module
1
3
Extension module Gigaset DE410 IP PRO
2
www.InternetVoipPhone.co.uk | sales@internetvoipphone.co.uk | 0800 088 48 46

18
First steps
PRO Version 3, 30.05.2012
Wall mounting
It is also possible to mount the Gigaset DE410 IP PRO on the wall using the supplied wall
bracket.
¤
Unplug the cables from the phone before you begin.
Please note
If the extension module does not work after installation, restart your device (disconnect it
from the mains power supply and reconnect it).
1 2
3 4
143 mm
5mm ø
¤
Drill two dowel holes and insert dowels. You can use the wall bracket as a
drilling template.
¤
Thread the cables through the cable
guides on the back of the bracket
and screw it to the wall.
¤
Remove the handset retainer from
the cradle using the tool provided,
and replace it with the ridge pointing upwards.
¤
Attach the phone to the wall bracket
by first hooking it onto the hooks at
the bottom and then tilting the top
back towards the wall and pushing it
downwards.
¤
Reconnect the cables.
www.InternetVoipPhone.co.uk | sales@internetvoipphone.co.uk | 0800 088 48 46

PRO Version 3, 30.05.2012
19
First steps
Connecting a headset
You can connect a headset via the RJ9 connector of your Gigaset DE410 IP PRO.
¤
Connect the cable for the headset to the RJ9 connector on the phone.
Setting up the device (for the first time)
Your device will start automatically as soon as it is connected to the mains power supply.
Please be aware that the device is powered by PoE (Power over Ethernet). This means that it
is supplied with power as soon as it is connected to an Ethernet switch with PoE-functionality.
The first time you use the device, an installation wizard will start automatically and guide you
through the necessary installation steps.
Configuring language and time zone settings
¤
Use the navigation key to select the
required language. To do this, press up or
down on the navigation key
q
.
Further information about the navigation
key can be found on
£
page 25.
¤
Press the display key under
§OK§
to confirm
your selection.
You can also use the OK function on the
navigation key (by pressing
‰
in the cen-
tre of the key).
Select your Language
OK
Deutsch
English
Francais
www.InternetVoipPhone.co.uk | sales@internetvoipphone.co.uk | 0800 088 48 46

20
First steps
PRO Version 3, 30.05.2012
When you have made your selection, press the end key
I
to return to the last entry screen.
You can correct your selection if necessary.
Establishing a connection to the local network
Your phone must be connected to the local network before it can connect to the Internet and
before you can operate it from a PC.
The device checks to see if a network connection already exists. The network connection is
automatically established if the phone has automatically been assigned an IP address from a
DHCP server in the network. If this is the case, the following screen will not appear and you
can skip to
£
page 21.
If your phone has no network connection, you will need to configure the network manually.
Depending on the type of network, you will need the following information about the configuration:
u
If the network uses IP protocol version 4 (IPv4) with a static IP address, you will need:
The device IP address, the network subnet mask, the IP addresses of the standard gateway
and DNS server.
u
If the network uses IP protocol version 6 (IPv6):
IP addresses automatically: select IPv6 as Network Type. The connection is then estab-
lished automatically.
IP addresses statically: the device IP address, the address prefix length and the DNS server
IP address.
If there is still no network connection, you will then be asked whether you wish to configure
the connection manually.
¤
Select
§§Yes§§
if you have the required information.
¤
Use the navigation key to select the
required time zone.
¤
Press the display key under
§OK§
to confirm
your selection.
¤
Please note
The date and time are automatically set by a time server. You can select a time server using
the Web configurator or deactivate this function (
£
page 110).
Please note
The following network configuration is the default setting on your device: LAN with IP protocol version 4 (IPv4) and DHCP.
Select Time Zone
OK
(GMT) GMT, Dublin, Lon-
(GMT+01:00) Amster-
(GMT+02:00) Athens,
www.InternetVoipPhone.co.uk | sales@internetvoipphone.co.uk | 0800 088 48 46

PRO Version 3, 30.05.2012
21
First steps
¤
Select
§§No§§
if you want to use the display menu to configure the network at a later date
(
£
page 65).
Your device is now connected to the local network and can be configured for Internet telephony.
Configuring Internet telephony
Before you can use the Internet to phone anyone over the Internet, the fixed line network or
the mobile phone network, you need the services of a VoIP provider.
Prerequisite:
– You have a phone system in your network that provides VoIP accounts for your device,
or
– You have registered with a VoIP provider (e.g., via your PC) and set up a VoIP account.
The device searches the network for a provisioning file and checks whether VoIP accounts
already exist. If the telephone has existing VoIP accounts, these accounts are configured automatically. You can now make calls with your phone via the Internet.
If the telephone has no existing VoIP accounts, you must configure them manually. The Web
configurator's installation wizard will help you with this (
£
page 75).
If you selected
§§Yes§§§
, you can configure the
network immediately.
Depending on your selection, additional
screens may be displayed so you can enter
the required information.
More detailed information on LAN configuration can be found on
£
page 65.
¤
Once you have configured all settings,
press the display key under
§§OK§§
. Your set-
tings are saved.
Local Network
OK
Network Type
IP Address Type
IP Address
Back
www.InternetVoipPhone.co.uk | sales@internetvoipphone.co.uk | 0800 088 48 46

22
First steps
PRO Version 3, 30.05.2012
Proceeding
Now you have successfully set up your phone, you can adapt it to your personal requirements.
Use the following guide to quickly locate the most important topics.
If you are unfamiliar with menu-driven devices such as other Gigaset telephones, you should
first read the section entitled Using the phone on page 23.
If you have any questions about using your phone, please contact our Customer
Care team (
£
page 121).
Operating the phone via the keypad and display menu £page 23
Operating the phone via the PC £page 29
Making calls £page 30
Setting up and using directories £page 47
Setting ring tones £page 59
Setting up VoIP accounts £page 75
Loading your own sounds £page 116
www.InternetVoipPhone.co.uk | sales@internetvoipphone.co.uk | 0800 088 48 46

PRO Version 3, 30.05.2012
23
Using the phone
Using the phone
You have a range of options for operating and configuring your Gigaset DE410 IP PRO in a
way that is convenient for you.
u
The keypad and display allow quick and clear access to your phone’s features.
u
The Web user interface provides access from a PC and helps you easily configure your
phone (
£
page 29).
u
If your phone is connected to a Gigaset T300 PRO or Gigaset T300 PRO phone system, you
can also use the capabilities of the phone system, such as Call Manager, centrally-stored
call lists, conference scheduling and function key assignment.
The option you choose will depend on the situation.
Operating via the keypad and display menu
Display and display keys
The display gives you quick access to all the functions on your phone, particularly the menu
functions.
In idle status, icons on the display indicate the status of your phone (
£
page 4). In addition,
the time is displayed.
Use the display keys to activate the phone's functions and to navigate through the menu. Dif-
ferent functions are available depending on the operating situation. These functions are displayed at the bottom of the screen.
Example
Some important display keys:
§§Options§§
Open a menu for further functions.
§§OK§§
Confirm selection.
Delete key: Delete one character at a time from right to left.
§§Back§§
Skip back one menu level or cancel the operation.
§§Save§§
Save entry.
Copy the displayed entry to the directory.
Back OK
Current display key functions
Display keys
Û
?
ß
www.InternetVoipPhone.co.uk | sales@internetvoipphone.co.uk | 0800 088 48 46

24
Using the phone
PRO Version 3, 30.05.2012
Writing and editing text
A text editor is provided for entering text via the keypad.
Deleting/correcting characters
Press the display key. The character to the left of the cursor is deleted. Press and
hold to delete the word to the left of the cursor.
Entry mode
A range of entry modes are available depending on the operating situation. The current
mode is displayed on the right-hand side of the editor field.
Abc Letters, first letter upper case, others lower case, e.g., for entering names.
abc Lower case only, e.g., for entering e-mail addresses.
123 Digits only for entering numbers.
Switching entry mode
#
Press the hash key. The text entry mode will change.
Moving the cursor
r
Press the navigation key briefly: moves the cursor one character at a time.
Press and hold the navigation key: moves the cursor word by word.
q
Press the navigation key: moves the cursor line by line. The cursor stays in a hor-
izontal position.
Entering special characters
*
Press the star key. The table of special characters is displayed.
~
Enter the text.
Each key between
Q
and
O
is assigned several letters and digits. Press the relevant key a
certain number of times to enter a particular
character.
For example k = 2 x the
5
key.
The characters available are shown in the editor
field. The highlighted character is inserted to
the left of the cursor.
p
Select the required character.
§Insert§
Press the display key. The selected
character is inserted at the cursor
position.
New Entry
Save
First Name:
Ke|
j k l
Û
abc
Û
?
Special Characters
Back
;:,.-+*#
§%&@? ! ¡
_’ " =/ \
Insert
www.InternetVoipPhone.co.uk | sales@internetvoipphone.co.uk | 0800 088 48 46

PRO Version 3, 30.05.2012
25
Using the phone
Navigation key
The navigation key enables you to access important telephone functions
quickly. You can use it to scroll through lists and directories with ease.
Understanding the navigation key
The following illustrations demonstrate how to use the navigation key:
In idle status
In menus and lists
Depending on the operating situation:
§§OK§§, §§Yes§§, §§Save§§, §§Select§§
or
§§Change§§
.
Copy a number that has been entered or is shown in the display into the
directory.
Press briefly:
Navigate to the line above/below.
Press and hold:
Scroll up/down the list one line at a time.
In input fields
Move the cursor up/down
line by line
Press briefly:
Move the cursor to the left/right one character at a time.
Press and hold:
Move the cursor to the left/right quickly.
‰
Press the centre of the navigation key.
stuv
Press down/up/left/right on the navigation key.
Open
redial list
Open
directory
Open
main menu
www.InternetVoipPhone.co.uk | sales@internetvoipphone.co.uk | 0800 088 48 46

26
Using the phone
PRO Version 3, 30.05.2012
Using the menus
Your telephone's functions are accessed using a menu that has a number of levels.
Opening the main menu
¤
When the phone is in idle status, press the centre of the navigation key ‰.
Accessing a function or opening the corresponding submenu
¤
Navigate to the required entry using the navigation key q and press the
§OK§
display key
or the
‰
navigation key.
Back to the previous level
¤
Press the
§Back§
display key or briefly press the end key
I
.
The current operation is cancelled and you will return to the previous menu level.
You can revert to idle status from the main menu.
Reverting to idle status
You can revert to idle status from anywhere in the display menu as follows:
¤
Press and hold the end key
I
.
Or:
¤
Do not press any key: After 3 minutes the display will automatically revert to idle status.
Settings that have not been saved by selecting the display keys
§OK§, §Yes§, §Save§
or
§Change§
or
the navigation key
‰
are lost.
Scrolling through lists
The display menu functions are shown as a list
with the respective icons.
The selected function is highlighted via inverse
display.
If it is not possible to view all of the functions/list
entries at the same time (list is too long), arrows
appear on the right-hand side. The arrows indicate the direction in which you need to scroll to
view the rest of the entries in the list.
Back OK
Voice Mail
Contacts
Settings
Ã
Z
Ÿ
Select Services
Ú
Directory
Back
OK
Adam
Black, Susan
Brown, Tim
www.InternetVoipPhone.co.uk | sales@internetvoipphone.co.uk | 0800 088 48 46

PRO Version 3, 30.05.2012
27
Using the phone
Understanding the operating steps
The operating steps used to navigate through the display menu are shown in abbreviated
form.
For example, setting the ringer volume
‰
¢Settings ¢Audio Settings ¢Ringer Settings ¢Volume
means:
¤
Press the centre of the navigation key to open
the main menu.
¤
Navigate up/down using the navigation key
q
until the Settings submenu is selected.
¤
Press the display key
§OK§
to confirm your
selection.
Back OK
Voice Mail
Contacts
Settings
Ã
Z
Ÿ
Select Services
Ú
Settings
Back OK
Date / Time
Audio Settings
Display
Volume
Back Save
Call Volume
Audio Settings
Back OK
Ringer Settings
Advisory Tones
Ringer Settings
Back OK
Volume
Melodies
Anon. Call Silencing
¤
Continue to navigate through the menu using
the navigation and display key until you reach the
Volume submenu.
Audio Resource
www.InternetVoipPhone.co.uk | sales@internetvoipphone.co.uk | 0800 088 48 46

28
Using the phone
PRO Version 3, 30.05.2012
Menu tree
The following menu tree shows all the components of the display menu.
Select Services Next Call anonymous
£
page 36
All Calls anonymous
£
page 36
Call Divert
£
page 40
Call Waiting
£
page 37
Active Ringbacks
£
page 33
Voice Mail
£
page 54
Contacts Directory
£
page 47
You can choose any name
LDAP Directory
£
page 50
Online directories
£
page 51 The name of these menu entries
depends on Web configurator settings
£
page 102.
Settings Date / Time
£
page 58
Audio Settings Ringer Settings Volume
£
page 59
Melodies
£
page 60
Anon. Call Silencing
£
page 60
Advisory Tones
£
page 61
Audio Resource
£
page 61
Display Backlight
£
page 62
Contrast
£
page 63
Language
£
page 63
Local Network
£
page 66
Reset
£
page 64
Info
£
page 64
www.InternetVoipPhone.co.uk | sales@internetvoipphone.co.uk | 0800 088 48 46

PRO Version 3, 30.05.2012
29
Using the phone
Operating via the PC
You can operate the main functions of your phone from your PC by using the Web configurator.
Starting the Web configurator
To start the Web configurator, you need the IP address of your phone. You will find this via
the display menu of the telephone in the LAN settings for the device:
‰
¢Settings ¢Local Network (£page 66).
Accessing the Web configurator:
¤
Open the Internet browser on your PC.
¤
Enter the IP address in the address field:
Example:
The login screen appears.
¤
Select the appropriate language.
¤
Select User as the user type and enter the corresponding password.
The default setting for the password is user, but this can be changed.
¤
Click on OK.
In User mode the following functions are available:
u
Manage your contacts in the local directory and dial numbers directly (£page 113)
u
View your call lists (£page 115)
u
Forward incoming calls to another phone number (£page 96)
u
Block individual phone numbers and/or all anonymous calls (£page 99)
u
Decide on the assignment of the directory key and programme the function keys
(
£
page 106)
u
Download ring tones from the PC to your phone (£page 116)
u
Select different ring tones for your VoIP connections (£page 95)
u
Change the password for the user login (£page 111)
u
Configure settings for your phone display (£page 112)
All Web configurator functions – user and administrator mode – are described in the chapter
Web configurator – configuring the phone on a PC on page 72.
Please note
The IP address for your device can sometimes change, depending on the settings of the
DHCP server in your network.
www.InternetVoipPhone.co.uk | sales@internetvoipphone.co.uk | 0800 088 48 46

30
Making calls
PRO Version 3, 30.05.2012
Making calls
Calling
You make your calls using the default account if you do not make another selection. The first
account that is created is used as the default account. You can change this using the Web configurator (
£
page 91).
Selecting the VoIP account
Entering a number using the keypad
You make a call using the phone's receiver, speaker kit or a connected headset (£page 69).
~
Enter the phone number.
c
Lift the receiver.
Or
c
Lift the receiver.
~
Enter the phone number.
§§Dial§§
Press the display key.
The number is dialled.
The duration of the call is shown while the call is in progress.
Instead of putting the receiver to your ear:
A
Press the speaker key to make a call via the speaker.
B
Press the headset key to make a call via the headset.
You can also switch at any time during the call. Throughout the whole of this section, the c
icon can always represent either
A
or
B
.
When entering the phone number:
Û
Press the display key to delete incorrectly entered figures to the left of the cursor.
ß
Press the display key to copy entered phone numbers to the local directory
(
£
page 47).
I
Press the end key to cancel dialling.
If there are several VoIP accounts available on
your device, you can select the account you wish
to use for the call.
§§Lines§§
Press the display key.
q
Select the required account.
§§OK§§
Press the display key to confirm the
selection.
18/02/2012
Calls Lines
11:45
18 MyName
www.InternetVoipPhone.co.uk | sales@internetvoipphone.co.uk | 0800 088 48 46
 Loading...