

Gigaset C810H Owner Manual
Gigaset C810H / CHN en/ A31008-M2357-Y101-1-7619 / overview.fm / 15.09.2011
ÐÃ U
Menu
07:15
Redial
2011-10-14
INT 1
§§2§§
§§3§§
§§4§§
§§5§§
§§6§§
§13§
§12§
§§7§§
§§1§§
§§8§§
§§9§§
§11§
§14§
§15§
§10§
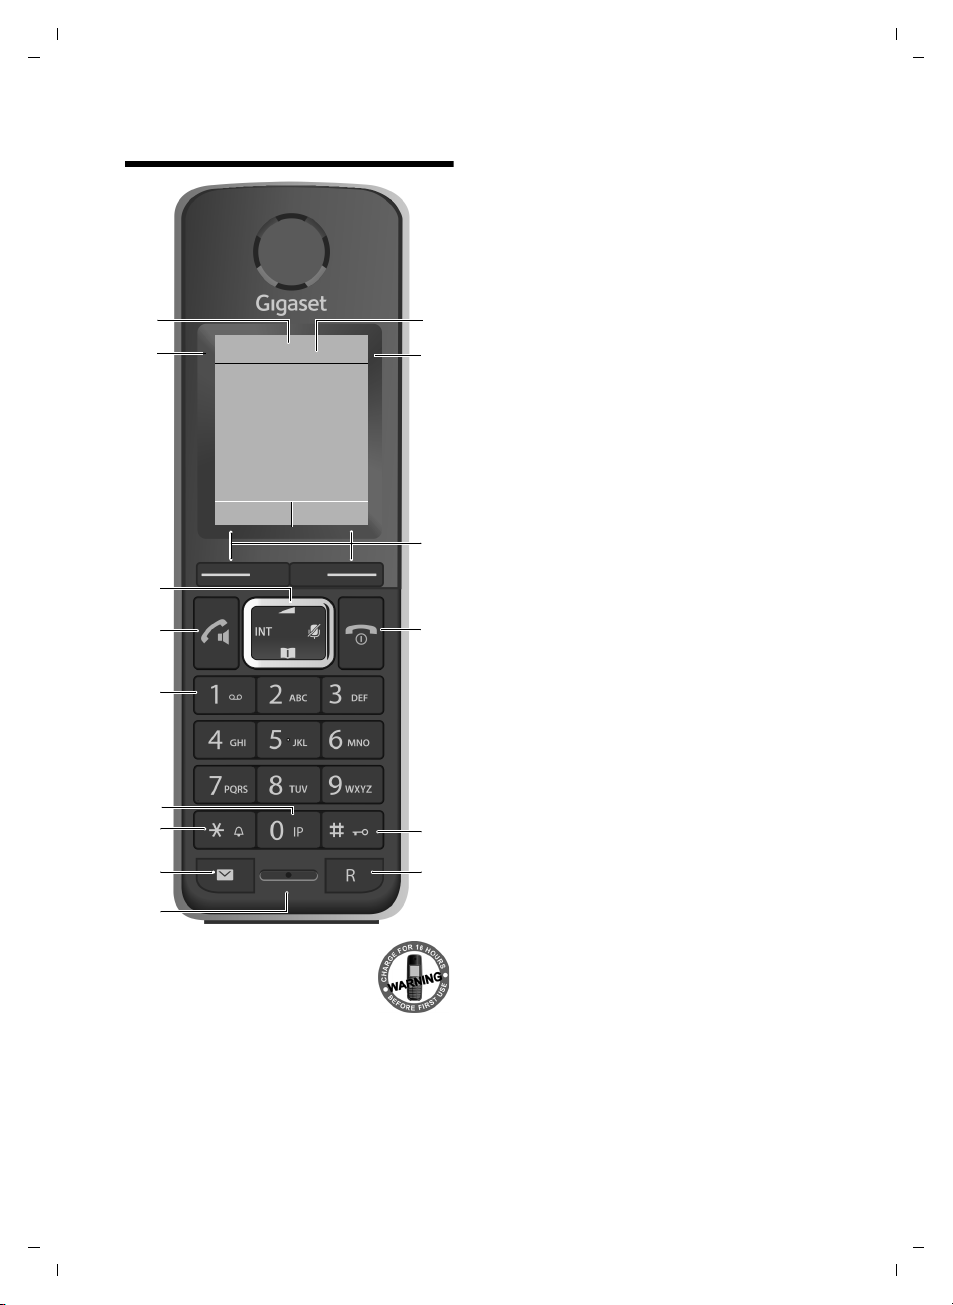
Telephone at a glance
Telephone at a glance
1 Display in idle status
2 Battery charge status
3 Display keys (
(
¢page 3)
¢page 11)
4 End call key, On/Off key
End call, cancel function, go back one menu
level (press briefly), back to idle status (press
and hold), activate/deactivate handset (press
and hold in idle status)
5 Hash key
Keypad lock on/off (press and hold in
idle status);
toggles between upper/lower case and digits
6 Recall key
– Consultation call (flash)
– Insert a dialling pause (press and hold)
7 Microphone
8 Message key (
Access to calls and message lists;
Flashes: new message or new call
9 Star key
Ringtone on/off (press and hold);
with an open connection: switch between dial
pulsing/tone dialling (press briefly);
Text input: Open table of special characters
10 Priority key (
Memory key for IP code (press and hold)
11 Key 1
Dial answering machine (press and hold)
if available on the base
12 Talk key
Flashes: incoming call;
Accept a call (press briefly);
13 Control key (
u initiate an internal call;
v mute the microphone during a call;
t open audio settings;
s open the directory;
14 Signal strength icon of the connection to the
base
15 Answering machine icon, if connected to a
base with answering machine
Answering machine switched on;
Flashes: Answering machine is recording a
message or is being operated by another internal party.
¢page 24)
¢page 19)
¢page 11)
Version 4, 16.09.2005
2
Gigaset C810H / CHN en/ A31008-M2357-Y101-1-7619 / overview.fm / 15.09.2011
Keypad locked
Ringtone switched off
Signal strength
Number of new messages
u
à on the answering
machine (depending on
base)
u ™ in the list of missed calls
Answering machine activated
Handset in talk mode
Battery charging state
Name of the handset
Ðó˝ Ã æU
Menu
07:15
Redial
2011-10-14
INT 1
™
3
Ã
1
¼ 08:00
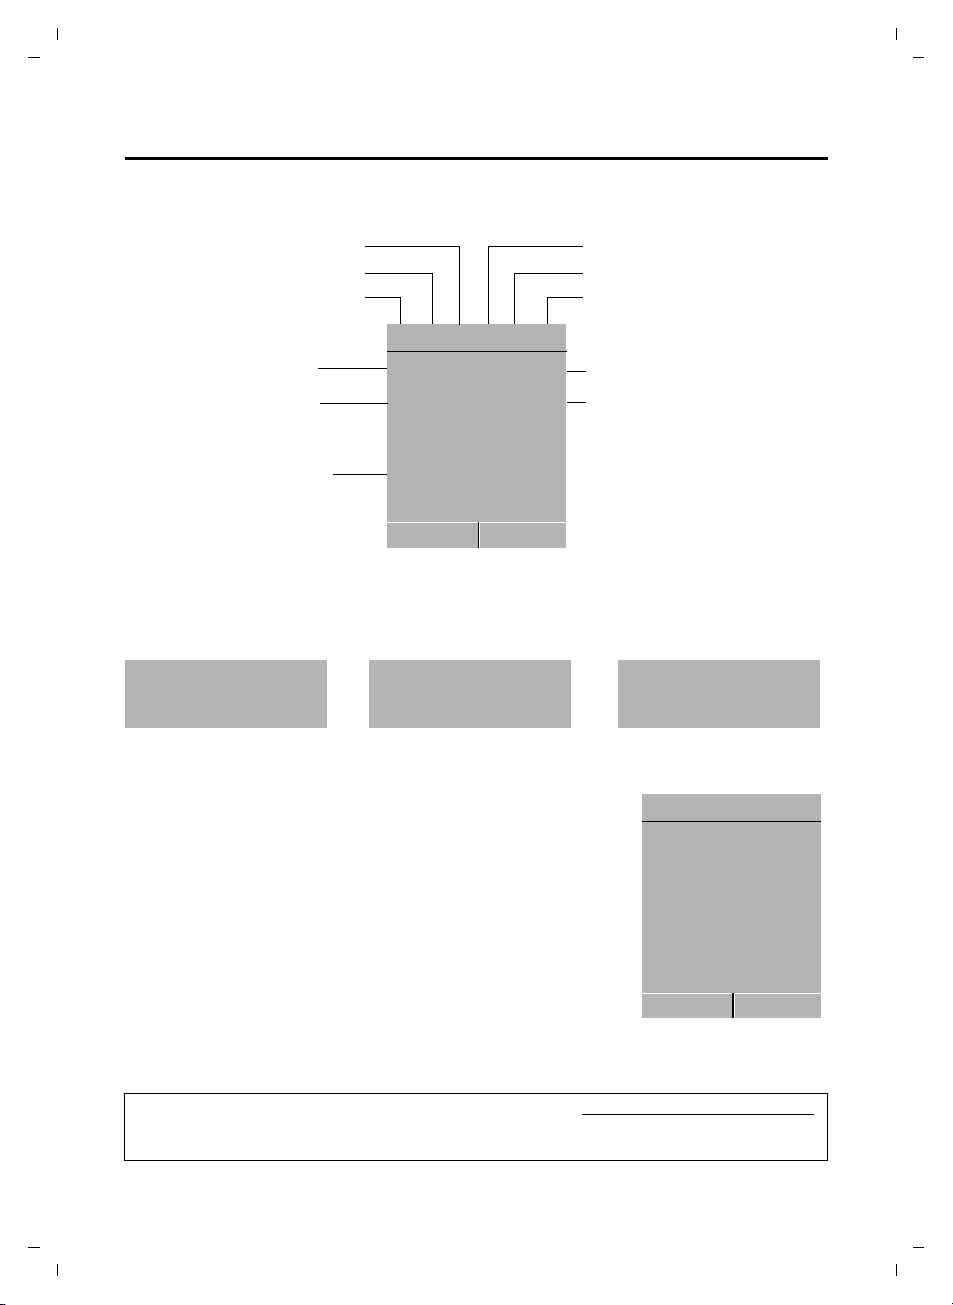
Current date
Current time
Alarm switched on and
wake-up time
Ð
Ã
U
Menu
07:15
Redial
2011-10-14
INT 1
Display symbols
The following symbols are displayed dependent on the settings and the operating status of
your telephone:
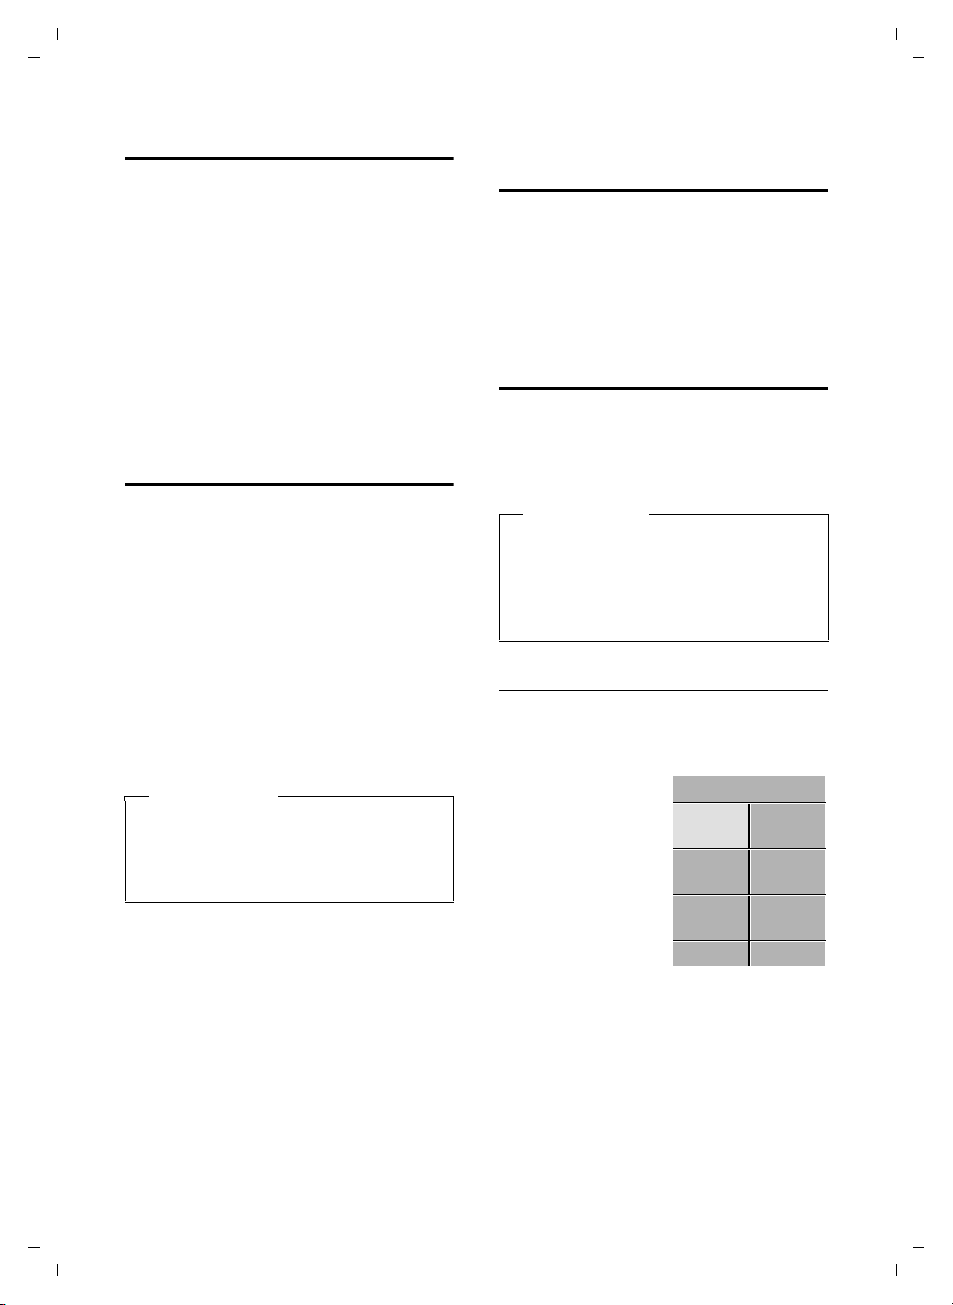
Telephone at a glance
Signalling
External call Internal call Alarm clock
Display in idle status
u Reception signal between the base and handset:
good to poor: ÐiÑÒ
If the handset goes out of range a warning tone will be heard.
u Battery charge status:
–
– = flashes red: batteries almost empty
–
u INT 1
Internal name of the handset (
If the answering machine on the base is activated, the à icon will
be displayed in the header
You can find additional information about your telephone at www.gigaset.com/gigasetc810
Have fun using your new phone!
Ø«Ú ØåÚ Ø¼Ú
=eVU (empty to full)
eVU during charging, the symbol is outlined red
while the charging state changes periodically
¢ page 30)
.
Version 4, 16.09.2005
3

Gigaset C810H / CHN en/ A31008-M2357-Y101-1-7619 / C810HIVZ.fm / 15.09.2011
Contents
Contents
Telephone at a glance . . . . . . . . . . . . . . . . . . . . . . . . . . . . . . . . . . . . . . . . . . . . . . . . . . . . . .2
Display symbols . . . . . . . . . . . . . . . . . . . . . . . . . . . . . . . . . . . . . . . . . . . . . . . . . . . . . . . . . . . . . . . . . . . . . . . 3
Safety precautions . . . . . . . . . . . . . . . . . . . . . . . . . . . . . . . . . . . . . . . . . . . . . . . . . . . . . . . . 6
First steps . . . . . . . . . . . . . . . . . . . . . . . . . . . . . . . . . . . . . . . . . . . . . . . . . . . . . . . . . . . . . . . . 7
Checking the pack contents . . . . . . . . . . . . . . . . . . . . . . . . . . . . . . . . . . . . . . . . . . . . . . . . . . . . . . . . . . . . 7
Setting up the handset for use . . . . . . . . . . . . . . . . . . . . . . . . . . . . . . . . . . . . . . . . . . . . . . . . . . . . . . . . . 8
Using the Gigaset C810H . . . . . . . . . . . . . . . . . . . . . . . . . . . . . . . . . . . . . . . . . . . . . . . . . 11
Control key . . . . . . . . . . . . . . . . . . . . . . . . . . . . . . . . . . . . . . . . . . . . . . . . . . . . . . . . . . . . . . . . . . . . . . . . . . . 11
Display keys . . . . . . . . . . . . . . . . . . . . . . . . . . . . . . . . . . . . . . . . . . . . . . . . . . . . . . . . . . . . . . . . . . . . . . . . . . 11
Keys on the keypad . . . . . . . . . . . . . . . . . . . . . . . . . . . . . . . . . . . . . . . . . . . . . . . . . . . . . . . . . . . . . . . . . . . 11
Correcting incorrect entries . . . . . . . . . . . . . . . . . . . . . . . . . . . . . . . . . . . . . . . . . . . . . . . . . . . . . . . . . . . 12
Activating/deactivating the keypad lock . . . . . . . . . . . . . . . . . . . . . . . . . . . . . . . . . . . . . . . . . . . . . . . 12
Activating/deactivating the handset . . . . . . . . . . . . . . . . . . . . . . . . . . . . . . . . . . . . . . . . . . . . . . . . . . . 12
Menu guidance . . . . . . . . . . . . . . . . . . . . . . . . . . . . . . . . . . . . . . . . . . . . . . . . . . . . . . . . . . . . . . . . . . . . . . . 12
Menu overview . . . . . . . . . . . . . . . . . . . . . . . . . . . . . . . . . . . . . . . . . . . . . . . . . . . . . . . . . . . . . . . . . . . . . . . 14
Registering handsets . . . . . . . . . . . . . . . . . . . . . . . . . . . . . . . . . . . . . . . . . . . . . . . . . . . . . . . . . . . . . . . . . . 16
De-registering handsets . . . . . . . . . . . . . . . . . . . . . . . . . . . . . . . . . . . . . . . . . . . . . . . . . . . . . . . . . . . . . . . 16
Locating a handset (paging) . . . . . . . . . . . . . . . . . . . . . . . . . . . . . . . . . . . . . . . . . . . . . . . . . . . . . . . . . . . 16
Making calls . . . . . . . . . . . . . . . . . . . . . . . . . . . . . . . . . . . . . . . . . . . . . . . . . . . . . . . . . . . . . 17
Making an external call . . . . . . . . . . . . . . . . . . . . . . . . . . . . . . . . . . . . . . . . . . . . . . . . . . . . . . . . . . . . . . . . 17
Quick dialling . . . . . . . . . . . . . . . . . . . . . . . . . . . . . . . . . . . . . . . . . . . . . . . . . . . . . . . . . . . . . . . . . . . . . . . . . 17
Ending a call . . . . . . . . . . . . . . . . . . . . . . . . . . . . . . . . . . . . . . . . . . . . . . . . . . . . . . . . . . . . . . . . . . . . . . . . . . 17
Accepting a call . . . . . . . . . . . . . . . . . . . . . . . . . . . . . . . . . . . . . . . . . . . . . . . . . . . . . . . . . . . . . . . . . . . . . . . 17
Calling Line Identification (CLI) . . . . . . . . . . . . . . . . . . . . . . . . . . . . . . . . . . . . . . . . . . . . . . . . . . . . . . . . 18
Speaker mode . . . . . . . . . . . . . . . . . . . . . . . . . . . . . . . . . . . . . . . . . . . . . . . . . . . . . . . . . . . . . . . . . . . . . . . . 18
Adjusting the earpiece/speaker volume during a call . . . . . . . . . . . . . . . . . . . . . . . . . . . . . . . . . . . 18
Switching to mute . . . . . . . . . . . . . . . . . . . . . . . . . . . . . . . . . . . . . . . . . . . . . . . . . . . . . . . . . . . . . . . . . . . . 18
Battery status control during a call . . . . . . . . . . . . . . . . . . . . . . . . . . . . . . . . . . . . . . . . . . . . . . . . . . . . . 19
IP dialling . . . . . . . . . . . . . . . . . . . . . . . . . . . . . . . . . . . . . . . . . . . . . . . . . . . . . . . . . . . . . . . . . . . . . . . . . . . . . 19
Making internal calls . . . . . . . . . . . . . . . . . . . . . . . . . . . . . . . . . . . . . . . . . . . . . . . . . . . . . 20
Transferring a call . . . . . . . . . . . . . . . . . . . . . . . . . . . . . . . . . . . . . . . . . . . . . . . . . . . . . . . . . . . . . . . . . . . . . 20
Internal consultation/conference calls . . . . . . . . . . . . . . . . . . . . . . . . . . . . . . . . . . . . . . . . . . . . . . . . . 20
Accepting/rejecting call waiting . . . . . . . . . . . . . . . . . . . . . . . . . . . . . . . . . . . . . . . . . . . . . . . . . . . . . . . 21
Barging in to an external call . . . . . . . . . . . . . . . . . . . . . . . . . . . . . . . . . . . . . . . . . . . . . . . . . . . . . . . . . . 21
Using the directory and lists . . . . . . . . . . . . . . . . . . . . . . . . . . . . . . . . . . . . . . . . . . . . . . 22
Directory . . . . . . . . . . . . . . . . . . . . . . . . . . . . . . . . . . . . . . . . . . . . . . . . . . . . . . . . . . . . . . . . . . . . . . . . . . . . . 22
Redial list . . . . . . . . . . . . . . . . . . . . . . . . . . . . . . . . . . . . . . . . . . . . . . . . . . . . . . . . . . . . . . . . . . . . . . . . . . . . . 23
Call lists . . . . . . . . . . . . . . . . . . . . . . . . . . . . . . . . . . . . . . . . . . . . . . . . . . . . . . . . . . . . . . . . . . . . . . . . . . . . . . 24
Version 4, 16.09.2005
4

Gigaset C810H / CHN en/ A31008-M2357-Y101-1-7619 / C810HIVZ.fm / 15.09.2011
Settings . . . . . . . . . . . . . . . . . . . . . . . . . . . . . . . . . . . . . . . . . . . . . . . . . . . . . . . . . . . . . . . . . 26
Changing the display language . . . . . . . . . . . . . . . . . . . . . . . . . . . . . . . . . . . . . . . . . . . . . . . . . . . . . . . 26
Quick access to numbers . . . . . . . . . . . . . . . . . . . . . . . . . . . . . . . . . . . . . . . . . . . . . . . . . . . . . . . . . . . . . . 26
Setting the date and time . . . . . . . . . . . . . . . . . . . . . . . . . . . . . . . . . . . . . . . . . . . . . . . . . . . . . . . . . . . . . 26
Setting the alarm clock . . . . . . . . . . . . . . . . . . . . . . . . . . . . . . . . . . . . . . . . . . . . . . . . . . . . . . . . . . . . . . . . 27
Audio settings . . . . . . . . . . . . . . . . . . . . . . . . . . . . . . . . . . . . . . . . . . . . . . . . . . . . . . . . . . . . . . . . . . . . . . . . 27
Setting the display . . . . . . . . . . . . . . . . . . . . . . . . . . . . . . . . . . . . . . . . . . . . . . . . . . . . . . . . . . . . . . . . . . . . 29
Activating/deactivating auto answer . . . . . . . . . . . . . . . . . . . . . . . . . . . . . . . . . . . . . . . . . . . . . . . . . . 29
Changing the name of the handset . . . . . . . . . . . . . . . . . . . . . . . . . . . . . . . . . . . . . . . . . . . . . . . . . . . . 30
Restoring the handset factory settings . . . . . . . . . . . . . . . . . . . . . . . . . . . . . . . . . . . . . . . . . . . . . . . . . 30
System settings . . . . . . . . . . . . . . . . . . . . . . . . . . . . . . . . . . . . . . . . . . . . . . . . . . . . . . . . . . . . . . . . . . . . . . . 30
Connecting the telephone to the PABX . . . . . . . . . . . . . . . . . . . . . . . . . . . . . . . . . . . . 32
Changing the dialling mode . . . . . . . . . . . . . . . . . . . . . . . . . . . . . . . . . . . . . . . . . . . . . . . . . . . . . . . . . . . 32
Setting recall . . . . . . . . . . . . . . . . . . . . . . . . . . . . . . . . . . . . . . . . . . . . . . . . . . . . . . . . . . . . . . . . . . . . . . . . . 32
Setting an automatic prefix . . . . . . . . . . . . . . . . . . . . . . . . . . . . . . . . . . . . . . . . . . . . . . . . . . . . . . . . . . . 32
Temporarily switching to tone dialling (DTMF) . . . . . . . . . . . . . . . . . . . . . . . . . . . . . . . . . . . . . . . . . 32
Operating the answering machine . . . . . . . . . . . . . . . . . . . . . . . . . . . . . . . . . . . . . . . . 33
Activating/deactivating the answering machine . . . . . . . . . . . . . . . . . . . . . . . . . . . . . . . . . . . 33
Playing back messages/memos . . . . . . . . . . . . . . . . . . . . . . . . . . . . . . . . . . . . . . . . . . . . . . . . . . . . . . . 33
Picking up a call from the answering machine . . . . . . . . . . . . . . . . . . . . . . . . . . . . . . . . . . . . . . . . . 34
Activating/deactivating call screening . . . . . . . . . . . . . . . . . . . . . . . . . . . . . . . . . . . . . . . . . . . . . . . . . 34
Recording an announcement . . . . . . . . . . . . . . . . . . . . . . . . . . . . . . . . . . . . . . . . . . . . . . . . . . . . . . . . . 34
Setting the answering machine mode . . . . . . . . . . . . . . . . . . . . . . . . . . . . . . . . . . . . . . . . . . . . . . . . . 35
Setting the recording parameters . . . . . . . . . . . . . . . . . . . . . . . . . . . . . . . . . . . . . . . . . . . . . . . . . . . . . 35
Customer Service & Assistance . . . . . . . . . . . . . . . . . . . . . . . . . . . . . . . . . . . . . . . . . . . 36
Questions and answers . . . . . . . . . . . . . . . . . . . . . . . . . . . . . . . . . . . . . . . . . . . . . . . . . . 36
Appendix . . . . . . . . . . . . . . . . . . . . . . . . . . . . . . . . . . . . . . . . . . . . . . . . . . . . . . . . . . . . . . . 37
Care . . . . . . . . . . . . . . . . . . . . . . . . . . . . . . . . . . . . . . . . . . . . . . . . . . . . . . . . . . . . . . . . . . . . . . . . . . . . . . . . . . 37
Contact with liquid . . . . . . . . . . . . . . . . . . . . . . . . . . . . . . . . . . . . . . . . . . . . . . . . . . . . . . . . . . . . . . . . . . . 37
Specifications . . . . . . . . . . . . . . . . . . . . . . . . . . . . . . . . . . . . . . . . . . . . . . . . . . . . . . . . . . . . . . . . . . . . . . . . . 37
General specifications . . . . . . . . . . . . . . . . . . . . . . . . . . . . . . . . . . . . . . . . . . . . . . . . . . . . . . . . . . . . . . . . . 38
Writing and editing text . . . . . . . . . . . . . . . . . . . . . . . . . . . . . . . . . . . . . . . . . . . . . . . . . . . . . . . . . . . . . . . 38
Index . . . . . . . . . . . . . . . . . . . . . . . . . . . . . . . . . . . . . . . . . . . . . . . . . . . . . . . . . . . . . . . . . . . 39
Contents
Version 4, 16.09.2005
5
Gigaset C810H / CHN en/ A31008-M2357-Y101-1-7619 / security.fm / 15.09.2011
ƒ
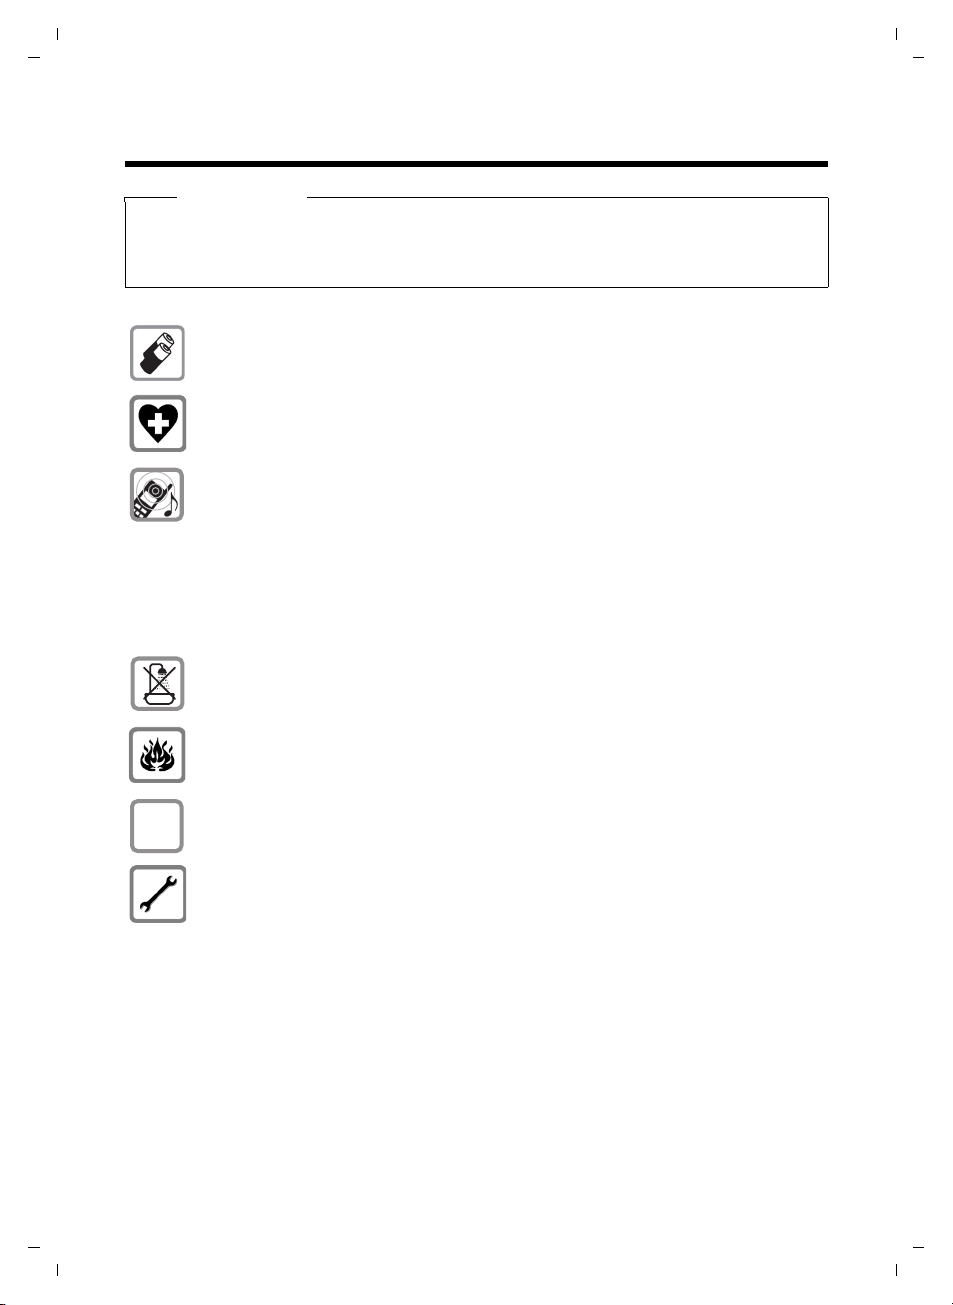
Safety precautions
Safety precautions
Warnin g
Read the safety precautions and the user guide before use.
Explain their content and the potential hazards associated with using the telephone to your
children.
Only use the recommended, rechargeable batteries (¢ page 37) as this could otherwise result in significant health risks and personal injury.
The operation of medical appliances may be affected. Be aware of the technical conditions in your particular environment, e.g. doctor's surgery.
Do not hold the rear of the handset to your ear when it is ringing or when speaker
mode is activated. Otherwise you risk serious and permanent damage to your hearing.
Your Gigaset is compatible with the majority of digital hearing aids on the market.
However, perfect function with all hearing aids cannot be guaranteed.
The handset may cause an unpleasant humming or whistling noise in hearing aids
or cause them to overload. If you require assistance, please contact the hearing aid
supplier.
Do not install the charging cradle in bathrooms or shower rooms.
Version 4, 16.09.2005
Do not use your phone in environments with a potential explosion hazard (e.g. paint
shops).
If you give your Gigaset to someone else, make sure you also give them the
user guide.
Please remove faulty bases from use or have them repaired by our Service department, as they could interfere with other wireless services.
6
Gigaset C810H / CHN en/ A31008-M2357-Y101-1-7619 / starting.fm / 15.09.2011
1 2
3
4
5
6
1
2
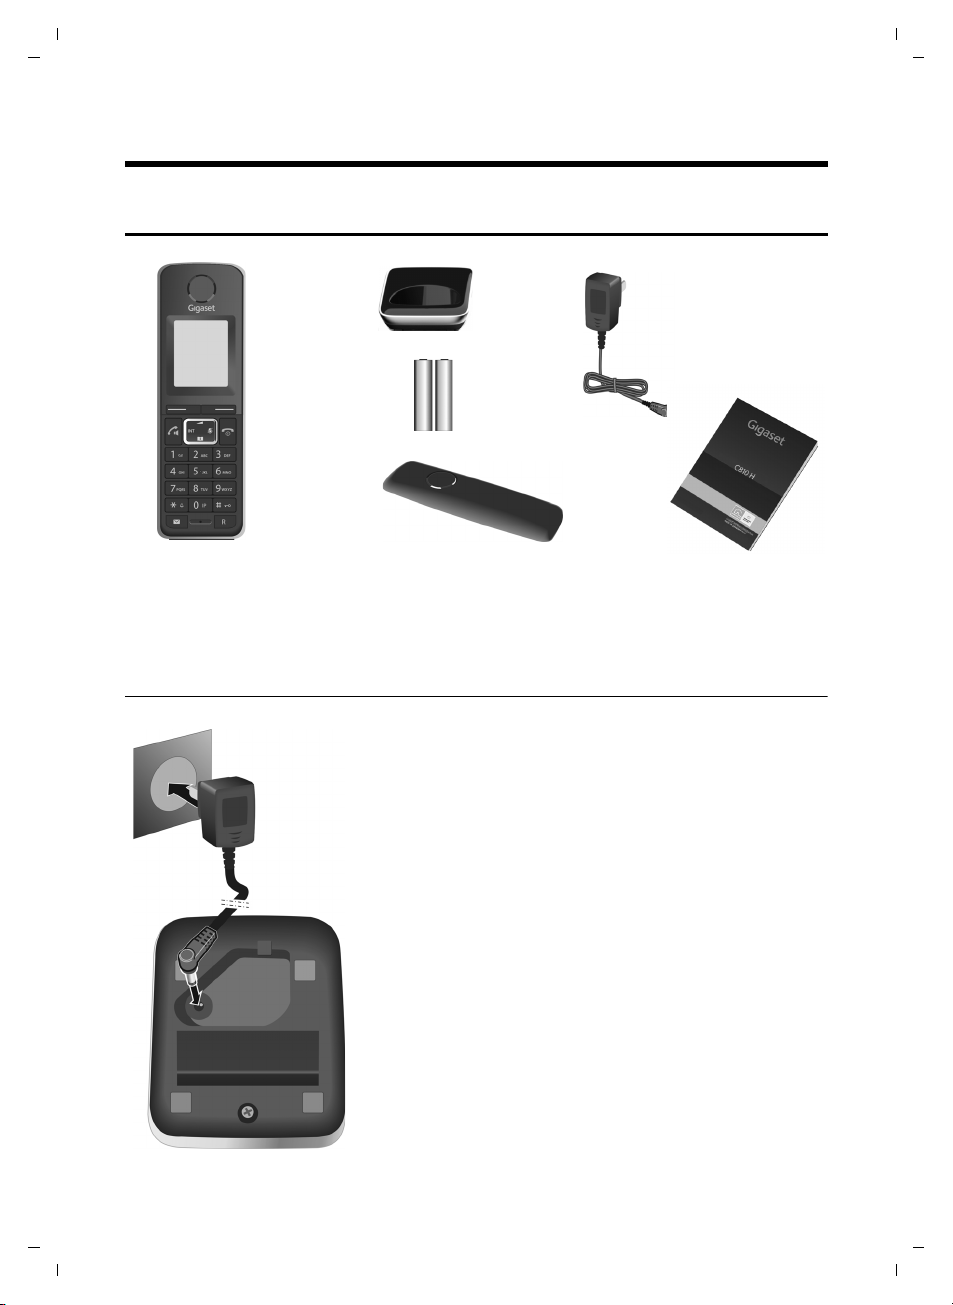
¤ Connect the mains adapter to the port on the underside
of the charger 1.
¤ Plug the mains adapter into the plug socket 2.
First steps
Checking the pack contents
First steps
1. one Gigaset C810H handset
2. one charger for Gigaset C810H
3. two batteries
Connecting the charging cradle
4. one battery cover
5. one mains adapter
6. one user guide C810H
Version 4, 16.09.2005
7
Gigaset C810H / CHN en/ A31008-M2357-Y101-1-7619 / starting.fm / 15.09.2011
First steps
Setting up the handset for use
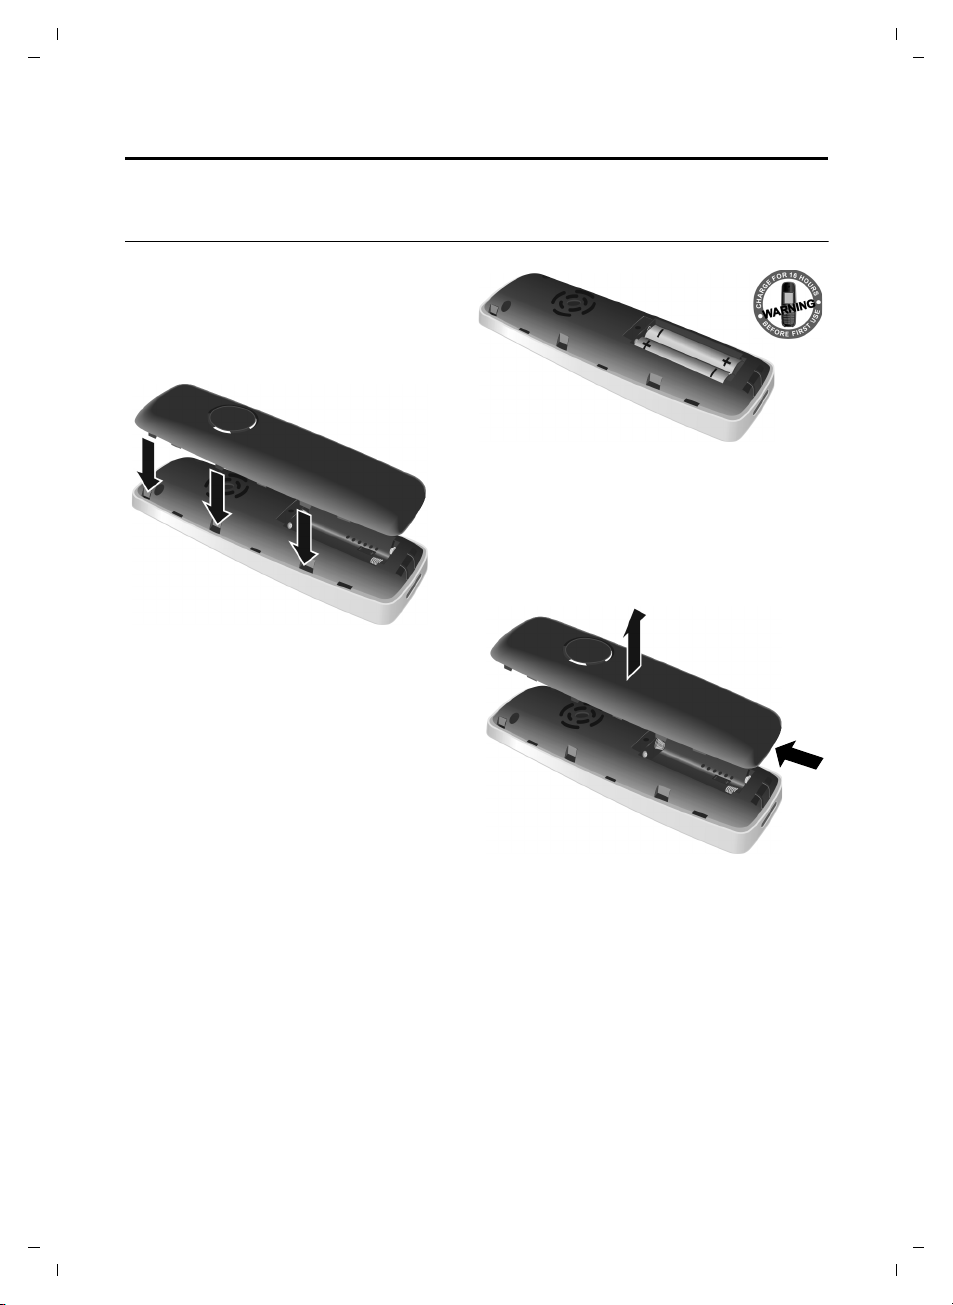
The display is protected by a plastic film. Please remove the protective film!
Inserting the batteries and closing the battery cover
¤ Insert the batteries the right way round.
The polarity is indicated in/on the battery
compartment.
¤ First insert the battery cover at the top.
Then press the cover until it clicks into
place.
If you need to open the battery cover, for
instance to replace the batteries, place your
fingertip in the cavity at the lower side of the
cover and pull the battery cover upwards.
8
Version 4, 16.09.2005
Gigaset C810H / CHN en/ A31008-M2357-Y101-1-7619 / starting.fm / 15.09.2011
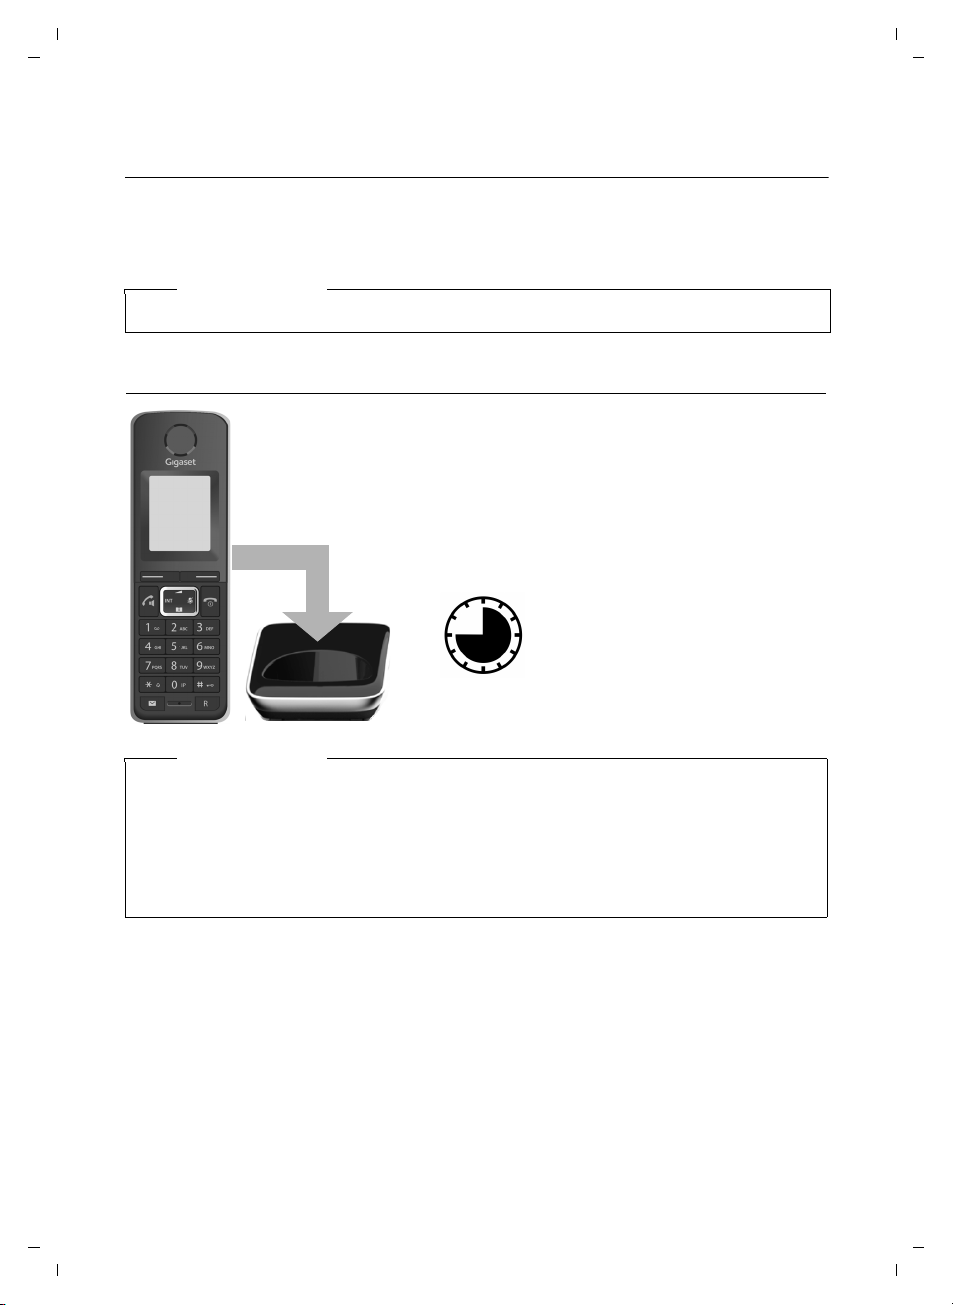
¤ Place the handset in the charging cradle for 10
hours.
¤ Then remove the handset
from the charging cradle
and do not replace it until
the batteries are fully discharged.
10 h
The correct charge level can only be displayed if the batteries are first fully
charged and discharged.
Initial charging and discharging of the batteries
Placing the handset in the charging cradle
¤ Place the handset in the charging cradle with its display facing forward.
For registration of the handset to a base, see the user guide of your base and ¢ page 16.
To charge the batteries, leave the handset in the charging cradle.
Please note
Only place the handset in the charging cradle that is intended for it.
First steps
Please note
u After the first battery charge and discharge you may replace your handset in the charg-
ing cradle after every call.
u Always repeat the charging and discharging procedure if you remove the batteries from
the handset and reinsert them.
u The batteries may warm up during charging. This is not dangerous.
u After a while, the charge capacity of the batteries will decrease for technical reasons.
Your telephone is now ready to use!
Version 4, 16.09.2005
9

Gigaset C810H / CHN en/ A31008-M2357-Y101-1-7619 / starting.fm / 15.09.2011
g
g
g
g
g
First steps
What would you like to do next?
Now you have successfully started your Gigaset, you will probably want to adapt it to your personal requirements. Use the following guide to quickly locate the most important subjects.
If you are unfamiliar with menu-driven devices such as other Gigaset telephones you should
first read the sections entitled "Using the Gigaset C810H" on page 11.
Information on ... ... is located here.
Setting the ringtone and volume page 27
Setting the earpiece volume page 27
Recording a personal announcement for the
answering machine
Operating the telephone on a PABX page 32
Registering new Gigaset handsets to a base page 16
If you have any questions about using your phone, please read the tips on
troubleshooting (
¢ page 36) or contact our Customer Care team (¢ page 36).
page 34
Version 4, 16.09.2005
10
Gigaset C810H / CHN en/ A31008-M2357-Y101-1-7619 / HS_using.fm / 15.09.2011
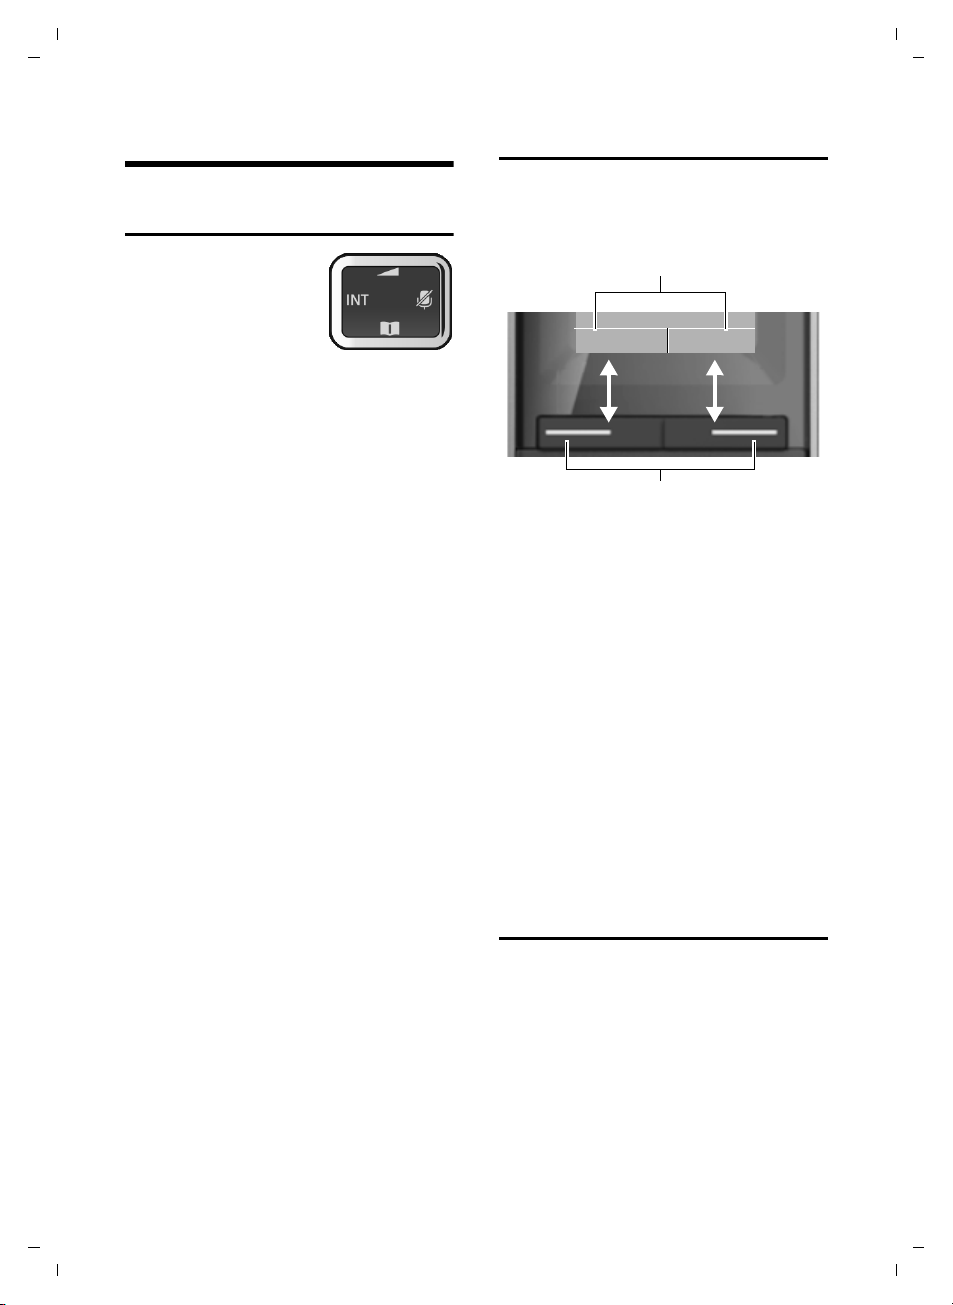
Display keys
MenuRedial
Display key functions
Using the Gigaset C810H
Using the Gigaset C810H
Control key
Below, the side of the control key that you must
press in the respective
operating situation is
marked in black
(top, bottom, right, left),
e.g. v for "press right on the control key" or
t for "press at the top of the control key".
The control key has a number of different
functions:
When the handset is in idle status
s Open the directory.
v Open the main menu.
u Open the list of internal phones
(base and handsets).
t Open the Audio Settings sub-
menu.
In the main menu
t, s, v or u
Navigate to the required function.
In submenus and lists
t / s Scroll up/down line by line.
In input fields
Use the control key to move the cursor up
t, down s, right v or left u. Press and
hold v or u to move the cursor word by
word.
During a call
s Open the directory.
t Adjust the loudspeaker volume
v Activates mute function.
for earpiece and speaker mode.
Display keys
The functions of the display keys change
depending on the particular operating situation. Example:
Some important display keys:
§§Menu§§ Open the menu.
§§Options§§ Open a submenu for further
functions.
§§Ok§§ Confirm selection.
§§< C§§ Delete key: delete one charac-
ter/word at a time from right to
left.
§§Back§§ Go back one menu level or can-
cel operation.
§§Save§§ Store entry.
In the following description the instruction
“press the display key
“press the display key below the display key
function labelled XXX“.
§XXX§“ means:
Keys on the keypad
c / Q / * etc.
Press the matching key on the
keypad.
~ Enter digits or letters.
Version 4, 16.09.2005
11
Gigaset C810H / CHN en/ A31008-M2357-Y101-1-7619 / HS_using.fm / 15.09.2011
Date/Time
SelectBack
É
Å
Ç
Ä
Ì
È
Using the Gigaset C810H
Correcting incorrect entries
You can correct incorrect characters in the
input fields by navigating to the incorrect
entry using the control key. You can then:
u Delete the character by briefly pressing
Ñ or press and hold to delete the word
to the left of the cursor.
u Insert characters next to the cursor.
u Overwrite the highlighted (flashing)
character, e.g. when entering time and
date.
Activating/deactivating the keypad lock
The keypad lock prevents any inadvertent
use of the phone.
# Press and hold the hash key in
idle status to activate or deactivate the keypad lock. You will
hear the confirmation tone.
If the keypad lock is activated, the
bol is displayed and a warning tone will be
emitted when you press a key.
The keypad lock deactivates automatically
when you receive a call. It is reactivated
when the call is ended.
˝ sym-
Please note
When the keypad lock is active, you cannot call emergency numbers using the
handset. In this case use the corded
receiver at the base for emergency calls.
Activating/deactivating the handset
a With the phone in idle status,
press and hold the end call key
(confirmation tone) to switch off
the handset.
Press and hold the end call key
again to switch the handset on.
Menu guidance
Your telephone's functions are accessible
using a menu that has a number of levels.
The full menu tree is shown in the next sec-
¢ page 14.
tion,
Please note
In these instructions, opening the main
menu is represented by pressing right on
the display key. However, if you prefer,
you can use the control key as described
¢ page 11).
above (
Main menu (first menu level)
¤ When the handset is in idle status press
the Menu display key to open the main
menu.
The main menu functions are shown in
the display with
icons. The icon for the
selected function is
marked in green and
the name of the associated function
appears in the display's header.
To access a function, i.e. to open the corresponding submenu (next menu level):
¤ Use the control key q to select the
required function and press the display
§Select§.
key
To return to the previous menu level or to
cancel the operation.
¤ Briefly press the display key §Back§.
Version 4, 16.09.2005
12

Gigaset C810H / CHN en/ A31008-M2357-Y101-1-7619 / HS_using.fm / 15.09.2011
Handset Settings
OkBack
Language
Auto Answer
Register Handset
De-Register Handset
Rename Handset
Using the Gigaset C810H
Submenus
The functions in the
submenus are displayed as lists (example on the right).
To access a function:
¤ Scroll to the func-
tion with the control key q and
§Ok§.
press
¤ Briefly press the
display key
return to the previous menu level/cancel
the operation.
Reverting to idle status
You can revert to idle status from anywhere
in the menu as follows:
§Back§ or the end call key a to
¤ Press and hold the end call key a.
Or:
¤ Do not press any key: after 2 minutes the
display will automatically revert to idle
status.
Settings that have not been saved by selecting the display key
An example of the display in idle status is
shown on page 3.
§Ok§ or §Save§ will be lost.
Illustration of menu operation in the user guide
Menu operations are shown in the user
guide in abbreviated form.
Example:
The illustration:
§§Menu§§ ¢Ç ¢ Ringer Settings
¢ Ringer Melody
means:
¤ Press the §§Menu§§ display key to open the
menu.
¤ Select the Ç symbol, press §Select§.
¤ Use the control key q to select Ringer
Settings, press
§Select§.
¤ Use the control key q to select Ringer
Melody, press
§Select§.
Version 4, 16.09.2005
13
 Loading...